Non-invasive/invasive ventilators. User Guide. English
|
|
|
- Crystal Lawrence
- 6 years ago
- Views:
Transcription

1 Non-invasive/invasive ventilators User Guide English
2 Contents Introduction Indications for use 1 Contraindications 1 Adverse effects 1 Stellar at a glance Patient interface 3 Humidification 3 Internal battery 3 ResMed USB stick 3 Use on an aircraft 4 Mobile use 4 Remote Alarm 4 Setting up for noninvasive use Attaching the H4i heated humidifier for noninvasive use 5 Setting up for invasive use Using the Stellar device for the first time Working with other optional accessories Attaching the pulse oximeter 8 Adding supplemental oxygen 8 Using the FiO2 monitoring sensor 10 Attaching an antibacterial filter 10 Stellar basics About the control panel 11 LCD screen 12 Starting therapy Performing a functional test 13 Starting therapy 14 Stopping therapy 14 Turning off the power 14 Working with alarms 15 Tailoring treatment setup options 15 Using mask-fit 16 Using the menus Setup menu Setup menu: Clinical Settings (Mask Type) 18 Setup menu: Alarm Settings (Alarm Volume) 18 Setup menu: Options 18 Setup menu: Configuration Menu 19 Info menu Event Summary 20 Used Hours 20 Device Information 20 Reminders 20 Data management i
3 ii Cleaning and maintenance Daily 21 Weekly 22 Monthly 22 Replacing the air filter 22 Disinfection 23 Multipatient use 23 Servicing 24 Troubleshooting Alarm troubleshooting 24 Other troubleshooting 27 Technical specifications Guidance and manufacturer s declaration electromagnetic emissions and immunity 32 Symbols 34 General warnings and cautions Limited warranty
4 Introduction Read the entire manual before using the device. This User Guide is for a non-clinician user, and does not contain all the information provided in the Clinical Guide. Indications for use The Stellar is intended to provide ventilation for non-dependent, spontaneously breathing adult and pediatric patients (30 lb/13 kg and above) with respiratory insufficiency, or respiratory failure, with or without obstructive sleep apnea. The device is for noninvasive use, or invasive use (with the use of the ResMed Leak Valve). Operation of the device includes both stationary, such as in hospital or home, or mobile, such as wheelchair usage. CAUTION (USA ONLY) Federal law restricts this device to sale by or on the order of a physician. Contraindications The Stellar is contraindicated in patients who are unable to endure more than brief interruptions in ventilation. The Stellar is not a life support ventilator. If you have any of the following conditions, tell your doctor before using this device: pneumothorax or pneumomediastinum pathologically low blood pressure, particularly if associated with intravascular volume depletion cerebrospinal fluid leak, recent cranial surgery or trauma severe bullous lung disease dehydration. The use of the Stellar or pulse oximetry (including XPOD) is contraindicated in an MRI environment. AutoEPAP 1 is contraindicated for invasive use. Adverse effects You should report unusual chest pain, severe headache or increased breathlessness to your prescribing physician. The following side effects may arise during the course of noninvasive ventilation with the device: drying of the nose, mouth or throat nosebleed bloating ear or sinus discomfort eye irritation skin rashes. English 1 This feature is not available in all countries. Introduction 1


 air tubing SlimLine air tubing")


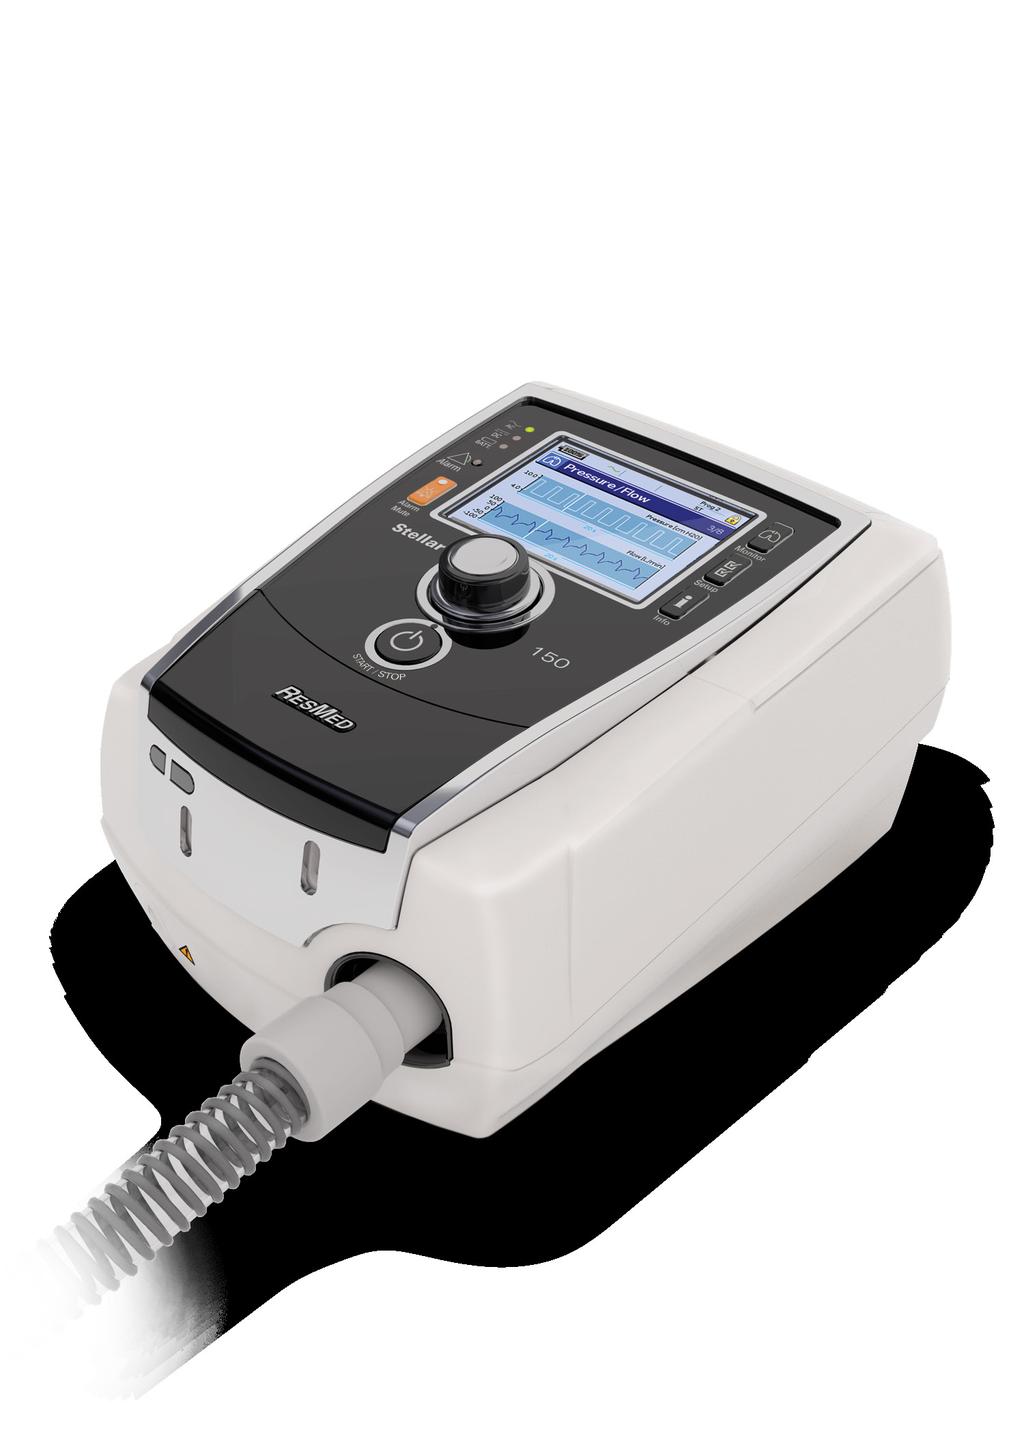
5 Stellar at a glance Handle H4i connector plug and AC connection Infrared connection for humidifier Air outlet Oxygen inlet Air filter cover ON/STAND-BY XPOD pulse oximeter connection FiO 2 sensor connection Data port for USB stick Remote alarm connection 1 Data port for direct PC connection DC power socket AC power socket Power on/standby switch The Stellar comprises: Stellar device Hypoallergenic air filter AC power cord Carry bag 6 6 (2 m) air tubing ResMed USB stick Low pressure oxygen connector. The following optional components are compatible with Stellar: 9 10 (3 m) air tubing SlimLine air tubing Clear air tubing (disposable) H4i heated humidifier Antibacterial filter Heat moisture exchanger filter (HMEF) ResMed XPOD oximeter Nonin pulse oximetry sensors FiO 2 monitoring kit (external cable, T-piece adapter) FiO 2 monitoring sensor Stellar Mobility bag ResMed Leak Valve Tubing wrap Stellar DC/DC converter. WARNING The Stellar should only be used with air tubing and accessories recommended by ResMed. Connection of other air tubing or accessories could result in injury or damage to the device. 2 1 Remote alarm connection is product model dependent.
6 ResMed regularly releases new products. Please check the catalogue of ventilation accessories on our website at Patient interface Both masks and tracheostomy tubes can be used with Stellar. To set the patient interface type go to the Setup menu, select Clinical Settings, then Advanced Settings. For information on using masks, see the mask manual. For a full list of compatible masks for this device, see the Mask/Device Compatibility List on on the Products page under Service & Support. If you do not have internet access, please contact your ResMed representative. Humidification A humidifier is recommended especially for patients experiencing dryness of the nose, throat or mouth. For information on using a humidifier as part of: noninvasive ventilation, see Setting up for noninvasive use on page 4. invasive ventilation, see Setting up for invasive use on page 5. Internal battery CAUTION Over time, the capacity of the internal battery will decrease. This depends on individual use and ambient conditions. As the battery degrades, the battery charge level indicator may lose accuracy. This will mean battery-related and system alarms may not activate as intended. ResMed recommends the battery be tested after two years to assess the remaining battery life. Testing and replacement of the internal battery should only be performed by an authorized service agent. Note: The battery duration depends on the state of charge, the environmental conditions, the condition and age of battery, the device settings and the patient circuit configuration. In case of a mains power disruption, the device will operate using the internal battery if there is no external battery connected to the device. The internal battery will operate for approximately two hours under normal conditions (see Technical specifications on page 30). The power status of the battery is displayed on top of the LCD screen. Check the battery status regularly while operating the device with the internal battery and connect the device in time to mains power or alternatively to the external battery. Additionally the Internal battery use alarm will be displayed. Press the Alarm mute button to clear the alarm. To recharge the internal battery, connect the device to mains power. It can take up to three hours to fully recharge the internal battery, however this can vary depending on environmental conditions and if the device is in use. Maintenance The internal battery has to be discharged and recharged every six months. 1 Remove the power cord while the Stellar is turned on (stand-by or in operation) and let the device operate with the internal battery to a charge level of 50%. 2 Reconnect the power cord to the mains power. The internal battery will be fully recharged. Storing If the device is stored for a longer period the internal battery should be at the charge level of approximately 50% to increase the durability. Note: Check the charge level every six months, if necessary recharge the internal battery to a charge level of 50%. ResMed USB stick A ResMed USB stick may be used with the device either to help the clinician to monitor your treatment or to provide you with updated device settings. For more information, see Data management on page 21. English Stellar at a glance 3


7 Use on an aircraft ResMed confirms that the Stellar can be used during all phases of air travel without further testing or approval by the airline operator. See Technical specifications on page 30. Mobile use The Stellar Mobility bag allows the Stellar to be used in mobile situations, eg, in a wheelchair. For setup and correct use, see the Stellar Mobility Bag User Guide. For extended mobile use, the ResMed Power Station II external power supply unit can be used as an additional power source. Limitations apply to the use of oxygen with the Stellar Mobility Bag. For more information, contact your local ResMed representative. Remote Alarm The Remote Alarm may be used to transfer audible and visual alarms by a direct cable connection. For more information on using the Remote Alarm, see the Remote Alarm user guide. Setting up for noninvasive use WARNING The air filter cover protects the device in the event of accidental liquid spillage onto the device. Ensure that the air filter and air filter cover are fitted at all times. Make sure that all the air inlets at the rear of the device and under the device and vents at the mask are unobstructed. If you put the device on the floor, make sure the area is free from dust and clear of bedding, clothes or other objects that could block the air inlets. Hoses or tubes must be nonconductive and antistatic. Do not leave long lengths of the air tubing or the cable for the finger pulse sensor around the top of your bed. It could twist around your head or neck while you are sleeping. CAUTION Be careful not to place the device where it can be bumped or where someone is likely to trip over the power cord. Make sure the area around the device is dry and clean. Notes: ResMed recommends using the AC power cord supplied with the unit. If a replacement power cord is required, contact your ResMed Service Center. Place the device on a flat surface near the head of the bed AC power cord AC locking clip 4 1 Connect the power cord. 2 Plug the free end of the power cord into a power outlet.
8 3 Attach the H4i heated humidifier to the front of the Stellar. If the H4i is not in use, and if applicable, connect the antibacterial filter firmly onto the air outlet of the device (see Attaching an antibacterial filter on page 10). Note: Other external humidifiers can be used for noninvasive setup. ResMed recommends using a breathing system (including antibacterial filter, air tubings, external humidifier) with an impedance of maximum 2 cm H 2 O at 30 L/min, 5 cm H 2 O at 60 L/min and 16 cm H 2 O at 120 L/min. 4 Connect one end of the air tubing firmly onto the air outlet of the H4i. 5 Connect the mask system to the free end of the air tubing. 6 Press the power switch on the back to turn on the device. 7 Select the mask type (select Setup menu, then Clinical Settings, then Advanced Settings). 8 Perform Learn Circuit (see Setup menu: Options on page 18). Attaching the H4i heated humidifier for noninvasive use Use of the H4i heated humidifier may be recommended by your clinician. For information on using the H4i, see the H4i user guide. English WARNING Always place the H4i on a level surface below the level of the patient to prevent the mask and tubing from filling with water. Make sure that the water chamber is empty and thoroughly dried before transporting the humidifier. The H4i heated humidifier is not intended for mobile use. Do not overfill the water chamber, as during use this will cause water to spill into the air circuit. Check the air circuit regularly for accumulated water. If you observe water has spilled into the air circuit, clear the water and check that the water chamber is not overfilled. When using the H4i at high pressures (above 25 cm H 2 O) the use of a water trap will avoid water spillage back into the air circuit. For optimal accuracy and synchrony, perform a Learn Circuit with a change of the circuit configuration, in particular when adding or removing high impedance components (eg, antibacterial filter, external humidifier, water trap, nasal pillow type mask or air tubing). See Setup menu: Options on page 18. CAUTION Check the air circuit for water condensation. Use a water trap or a tubing wrap if humidification is causing water condensation within the tube. Notes: A humidifier increases resistance in the air circuit and may affect triggering and cycling, and accuracy of display and delivered pressures. Therefore perform the Learn Circuit function (see Setup menu: Options on page 18). The device adjusts the airflow resistance. The heating feature of the H4i is disabled when the device is not mains powered. Setting up for invasive use The Stellar can be used invasively only with the ResMed Leak Valve, or using an uncuffed or deflated cuff tracheostomy tube with the ResMed Leak Port (24976). AutoEPAP is contraindicated for invasive use. WARNING Make sure that all the air inlets at the rear of the device and under the device and vents at the mask or at the ResMed Leak Valve are unobstructed. If you put the device on the floor, make sure the area is free from dust and clear of bedding, clothes or other objects that could block the air inlets. When using a Heated Moisture Exchange Filter (HMEF), replace the HMEF Setting up for invasive use 5

. Do not connect patient interfaces prior to performing the Learn Circuit.")


9 regularly as specified in the instructions provided with the HMEF. The H4i is contraindicated for invasive use. An external humidifier approved for invasive use is recommended according to EN ISO 8185 with an absolute humidity of > 33 mg/l. For optimal accuracy and synchrony, perform a Learn Circuit when a new circuit is used or with a change of the circuit configuration, in particular when adding or removing high impedance components (eg, antibacterial filter, external humidifier, water trap or different type of air tubing). Do not connect patient interfaces prior to performing the Learn Circuit. Patient interfaces include any components placed after the ResMed Leak Valve (eg, HMEF, catheter mount, tracheostomy tube). See Setup menu: Options on page 18. CAUTION When using a humidifier check the breathing system regularly for accumulated water. Notes: When the mask type is set to Trach, the Non-Vented Mask alarm will be automatically enabled to alert you when the ResMed Leak Valve has no vent holes or when the vent holes are blocked. When the Mask Type is set to Trach AutoEPAP has to be turned off. 2 Antibacterial filter 2 ResMed Leak Valve AC power cord AC locking clip External humidifier* Air tubing 1 Connect the power cord. 2 Plug the free end of the power cord into a power outlet. 3 Connect the antibacterial filter firmly onto the air outlet of the device. 4 Connect the external humidifier to the other side of the antibacterial filter. *If not using an external humidifier, the HMEF can be connected to the ResMed Leak Valve (at step 10). 5 Connect the air tubing to the external humidifier. 6 Connect the ResMed Leak Valve to the air tubing. Position the ResMed Leak Valve so that air from the vent holes does not blow directly onto the patient's chest. WARNING Always set up the ResMed Leak Valve in the breathing circuit with the arrows and the symbol pointing in the direction of air flow from the Stellar to the patient. 7 Press the power switch on the back to turn on the device.


10 8 Select the mask type Trach (select Setup menu, then Clinical Settings, then Advanced Settings). 9 Perform Learn Circuit (see Setup menu: Options on page 18) according to the following setup illustrations. With an external humidifier English Without an external humidifier 10 If an external humidifier is not being used, you can connect the HMEF to the patient side of the ResMed Leak Valve. 11 Connect the catheter mount. Catheter mount** 2 HMEF ** The ResMed Leak Valve or the HMEF can be connected to standardized tracheostomy interfaces including connector pieces like catheter mounts. The catheter mount and the external humidifier are not part of the ResMed component. Setting up for invasive use 7
. Alarms should also be checked by the physician when setting up a new patient (see Clinical Guide).")
11 Using the Stellar device for the first time When using the Stellar device for the first time, ensure that all components are in working condition and perform a functional test (see Performing a functional test on page 13). Alarms should also be checked by the physician when setting up a new patient (see Clinical Guide). Working with other optional accessories Attaching the pulse oximeter Use of a pulse oximeter may be recommended by your clinician. Contraindication The pulse oximeter does not meet defibrillation-proof requirement per IEC : 1990, clause 17.h. 1 Connect the plug of the finger pulse sensor to the plug of the pulse oximeter. 2 Connect the plug of the pulse oximeter at the rear of the device. To view the oximetry values, from the Monitoring menu, select Monitoring. Adding supplemental oxygen Oxygen may be prescribed by your clinician. Note: Up to 30 L/min can be added. WARNING Oxygen flow must be turned off when the device is not operating, so that unused oxygen does not accumulate within the device and create a risk of fire. Use only certified, clean oxygen sources. ResMed strongly recommends adding oxygen into Stellar s oxygen inlet at the rear of the device. Entraining oxygen elsewhere, ie into the breathing system via a side port or at the mask, has potential to impair triggering and accuracy of therapy/monitoring and alarms (eg, High Leak alarm, Non-vented mask alarm). If used in this way, therapy and alarm operation must be verified each time oxygen flow is adjusted. Oxygen supports combustion. Oxygen must not be used while smoking or in the presence of an open flame. Only use oxygen supply in well-ventilated rooms. The breathing system and the oxygen source must be kept at a minimum distance of 6 6 (2 m) away from any sources of ignition (eg, electrical devices). Oxygen must not be used while the device is being operated within the mobility bag.


12 To add supplemental oxygen 1 Unlock the low flow oxygen inlet on the back of the device by pushing up on the locking clip. 2 Insert one end of the oxygen supply tubing into the oxygen connector port. The tubing automatically locks into place. 3 Attach the other end of the oxygen supply tubing to the oxygen supply. 4 Start ventilation. 5 Turn on the oxygen source and adjust to the desired flow rate. English 1 2 To remove supplemental oxygen Before you remove supplemental oxygen from the device, ensure the oxygen supply has been turned off. 1 Unlock the low flow oxygen inlet on the back of the device by pushing up on the locking clip. 2 Remove the oxygen supply tubing from the oxygen connector port. 1 2 Working with other optional accessories 9
.")

. This should be repeated periodically at the recommendation of your clinician.")

13 Using the FiO 2 monitoring sensor Use of the FiO 2 monitoring sensor may be recommended by your clinician. CAUTION Do not use the FiO 2 monitoring sensor with the H4i humidifier. Preparing to use a new sensor 1 Before use, leave the FiO 2 monitoring sensor open to the air for 15 minutes. 2 Attach a new FiO 2 monitoring sensor (as shown below). 3 Perform the sensor calibration (see Setup menu on page 18). Note: The FiO 2 monitoring sensor must be replaced every 12 months Connecting a sensor 1 Connect the air tubing to the T-piece adapter. 2 Connect the FiO 2 monitoring sensor to the T-piece adapter. 3 Connect the adapter to the air outlet of the device. 4 Connect one end of the cable to the FiO 2 monitoring sensor. 5 Connect the other end of the cable to the rear of the device. 6 Start calibration (see Setup menu: Options on page 18). This should be repeated periodically at the recommendation of your clinician. Attaching an antibacterial filter The use of an antibacterial filter may be recommended by your clinician. One antibacterial filter product code can be purchased separately from ResMed. Regularly check the filter for entry of moisture or other contaminants. The filter must be replaced according to the manufacturer s specifications. Note: ResMed recommends using a filter with a low impedance (less than 2 cmh 2 O at 60 L/min, eg, PALL BB 50 filter). WARNING Do not use the antibacterial filter (product code 24966) with the H4i. 10


14 English Fit the antibacterial filter to the air outlet of the device. 2 Attach the air tubing to the other side of the filter. 3 Attach the mask system to the free end of the air tubing. 4 Perform the Learn Circuit function (see Setup menu: Options on page 18). From the Setup menu, select Options. This enables the device to compensate for the impedance introduced by the filters. Stellar basics About the control panel l Mains Power LED On when operating on mains power. LCD Screen External power supply LED On when external battery is connected. Internal battery LED On when internal battery is in use. Flashes when device is turned off and battery is charging. Monitoring menu Setup menu Alarm LED Red or yellow during an alarm or during alarm testing. Alarm mute button LED On when is pressed. Start/stop button Info menu Push dial (rotate/ click) Therapy LED On during treatment. Flashes during maskfitting operation. Stellar basics 11

 to enter and scroll through the relevant menu.")
15 Key Function Start/Stop Starts or stops treatment. Extended hold for at least three seconds starts the mask fitting feature. Alarm mute During therapy: Press once to mute an alarm. Press a second time to un-mute an alarm. If the problem is still present, the alarm will sound again after two minutes. See Working with alarms on page 15. In stand-by mode: Extended hold for at least three seconds starts the alarm LED and alarm buzzer test. Menu keys Press the appropriate menu button (Monitoring, Setup, Info) to enter and scroll through the relevant menu. Push dial Turning the dial allows you to scroll through the menu and change settings. Pushing the dial allows you to enter into a menu or confirm your choice. LCD screen The LCD screen displays the menus, monitoring screens and alarm status. Values on this LCD screen and other screens throughout the User Guide are examples only. Warm-up feature H4i ResMed USB stick Mains power External power supply Internal battery charge level Title bar Settings Ramp time Program Therapy mode Patient mode or Clinical mode Current screen/number of screens within the menu Scroll bar Therapy status bar 12
16 Starting therapy Performing a functional test Make sure your device is functioning properly each time before starting therapy. If any problems occur, see Troubleshooting on page 24. Please also check other provided User Instructions for troubleshooting information. 1 Turn off the device by pressing the power switch at the back of the device. 2 Check condition of device and accessories. Inspect the device and all the provided accessories. If there are any visible defects, the system should not be used. 3 Check the circuit configuration. Check the integrity of the circuit configuration (device and provided accessories) according to the setup descriptions in this User Guide and that all connections are secure. 4 Turn on the device and check alarms. Press the power switch at the back of the device once to turn on the device. Check that the alarm sounds a test beep and the LEDs (visual indicator) for the alarm signal and the Alarm mute button flash. The device is ready for use when the Treatment screen is displayed. If the display shows the Reminder page, follow the instructions, then press to display the Treatment screen. 5 Check batteries. Disconnect the device from the mains and external battery (if in use) so that the device is powered by the internal battery. Check that the Battery use alarm is displayed and the battery LED is on. Note: If the charge state of the internal battery is too low, or if the battery is empty, an alarm occurs. See the Alarm troubleshooting section on page 24 for further information. Reconnect the external battery (if in use) and check that the LED for the external power supply is lit. The External DC power use alarm will be displayed and the Alarm LED will light. Reconnect the device to the mains. 6 Check H4i heated humidifier (if in use). Check that the warm-up feature is displayed in the Treatment screen. Start the warm-up feature. Check that the humidifier warm-up symbol is displayed on top of the screen. Warm-up humidifier You can use the warm-up feature to pre-heat the water in the humidifier prior to starting treatment. The humidifier will be automatically detected when the device is turned on. The Treatment screen provides the option to start warming the humidifier. If the humidifier is heating, the related symbol is displayed at the top of the LCD screen. For more information, see the H4i User Guide. Note: The H4i in heating mode can only be used when the device is connected to mains supply. English 7 Check the FiO 2 monitoring sensor (if in use). Start the FiO 2 sensor calibration. Select Setup menu, then Options (see Setup menu: Options on page 18). Follow the instructions on the display. 8 Check pulse oximeter (if in use). Attach the accessories according to the setup descriptions (see Attaching the pulse oximeter on page 8). From the Monitoring menu, go to the Monitoring screen. Check that the values for SpO 2 and Heart rate are displayed. Starting therapy 13
17 9 Check oxygen connection (if in use). Attach the accessories according to the setup descriptions (see Adding supplemental oxygen on page 8). Starting therapy CAUTION The Clinical mode is only for clinicians. If the device is operating in clinical mode press the power switch at the back to re-start the device in patient mode. 1 Fit your patient interface (mask or catheter mount) as described in the user instructions. 2 Lie down and arrange the air tubing so that it is free to move if you turn in your sleep or arrange the tubing so it is comfortable in your wheelchair. 3 To start treatment, press or if the SmartStart/Stop function is enabled, simply breathe into your patient interface and treatment will begin. Stopping therapy You can stop therapy at any time, simply remove the patient interface and press to stop airflow or if SmartStart/Stop is enabled, simply remove the patient interface, and treatment will stop automatically. Notes: SmartStop may not work if Full face or Trach is selected as mask type; the High Leak alarm or the Low Min Vent alarm is enabled; Confirm Therapy Stop is enabled; or the mask-fitting feature is running. When the device is stopped and operating in standby mode with an integrated humidifier connected, it will continue to blow air gently to assist cooling of the humidifier s heater plate. Masks with high resistance (eg, pediatric masks) may cause the operation of the SmartStop feature to be restricted. When using with oxygen, turn off oxygen flow before stopping therapy. Turning off the power 1 Stop the therapy. 2 Press the power switch at the back of the device once and follow the instructions on the display. Note: To disconnect the device from the mains power pull out the power cord from the power socket. 14


18 Working with alarms WARNING This device is not intended to be used for vital signs monitoring. If vital signs monitoring is required, a dedicated device should be used for this purpose. When adjusting alarm volume, ensure that the alarm can be heard above the ambient noise levels that the patient may experience in a variety of settings, including use in noisy environments or inside mobility bags. This device is fitted with alarms to alert you to changes that will affect your treatment. English Alarm message Alarm LED Alarm mute key Alarm messages are displayed along the top of the screen. High priority alarms are displayed in red, medium priority alarms in yellow and low priority alarms in light blue. The Alarm LED lights red during high priority alarms and yellow during medium and low priority alarms. The alarm volume can be set Low, Medium or High. From the Setup menu, select Alarm Settings. After the set value has been confirmed, the alarm will sound and the alarm LED lights. Alarm settings, see Setup menu: Alarm Settings (Alarm Volume) on page 18. You can mute an alarm by pressing once. By pressing the Alarm mute key again, the alarm sounds again. When an alarm is muted, the Alarm mute key LED will light constantly. For a high or medium priority alarm, if after two minutes the problem is still present, the alarm will sound again. Any active low priority alarm will be permanently muted and the Internal Battery Use alarm will be cleared until the alarm condition is fulfilled again. Tailoring treatment setup options Setting Ramp Ramp time Ramp time is a feature that can be enabled by your clinician by setting a maximum ramp time. Designed to make the beginning of treatment more comfortable, ramp time is the period during which the pressure increases from a low start pressure to the treatment pressure. See Setup menu: Options on page 18. Starting therapy 15


19 Programs Program Programs can be configured by your clinician to provide you with multiple treatment options. For example, a clinician can set up programs for sleeping versus waking use or for use during exercise or physiotherapy. Programs save different patient circuit configurations (Learn Circuit result) and therapy and alarm settings. The Stellar comes with one active program. Your clinician can configure two programs. If your clinician has selected dual, you can choose the program to use on the Treatment screen after stopping treatment. If only a single program is selected, the option does not display. Note: Each program retains its own circuit configuration. When switching between programs, ensure you use the correct circuit (breathing system) as 'learned' for that program. If more than one program has been set up, follow the directions given by your clinician for when and how each program should be used. Ramp Down If you experience difficulties in taking off the ventilation, you can use the Ramp Down feature. This feature reduces the treatment pressure to Start EPAP/PEEP over five minutes. After five minutes the therapy stops. You can enable the Ramp Down feature when it is selected by the physician in the Options menu. Ramp Down Notes: Therapy can be stopped at any time by pressing the therapy start/stop button, including during the Ramp Down time. During the Ramp Down function some alarms are not active (eg, low minute ventilation alarm, low pressure alarm). This feature is not available in all countries. Using mask-fit You can use mask-fit to help you fit your mask properly. This feature delivers constant treatment pressure for a three-minute period, prior to starting treatment, during which you can check and adjust your mask-fit to minimize leaks. The mask-fit pressure is the set CPAP or EPAP pressure or 10 cm H 2 O, whichever is greater. 1 Put the mask on according to the mask user guide. 2 Hold down for at least three seconds until pressure delivery starts. 3 If necessary adjust the mask, mask cushion and headgear until you have a good mask fit. After three minutes treatment will begin. Mask-fit can be stopped at any time by pressing. 16
20 Notes: Press for at least three seconds during mask-fit to start the treatment immediately. The mask-fitting feature is disabled when the mask type Trach is selected. Using the menus The device has three menus (Monitoring, Setup, Info) accessed by the equivalent buttons on the right of the LCD screen. In each menu there are screens that display settings, device or therapy information. English MONITORING SETUP INFO Treatment Clinical Settings Event Summary Monitoring Leak Pressure / Flow Alarm Settings Minute Ventilation Min Vent/Resp Rate or MV/Va (ivaps Mode) Tidal Volume Leak Options Respiratory Rate Tidal Volume I:E Ratio Synchronisation Pressure Support Oximetry AHI SpO2 Used Hours Device Information Reminder Note: ivaps mode is only available in Stellar 150. Using the menus 17


21 Setup menu Setup menu: Clinical Settings (Mask Type) 1 Press to display the Clinical Settings screen. 2 Use the push dial to scroll through the menu and change the Mask Type in the Advanced Settings screen. Mask type options: Nasal, Ultra, Pillow, Full Face, Trach, Pediatric. Note: When Mask Type is set to Trach or Full Face the Non-Vented Mask alarm automatically turns on. For a full list of compatible masks for this device, see the Mask/Device Compatibility List on on the Products page under Service & Support. If you do not have internet access, please contact your ResMed representative. Setup menu: Alarm Settings (Alarm Volume) 1 Press to display the Alarm Settings screen. 2 Use the push dial to scroll through the menu and change the Alarm Volume to low, medium or high. Setup menu: Options 1 Press to display the Options screen. 2 Use the push dial to scroll through the menu and change parameters (see descriptions in the table below). 18
22 Parameter Description Learn Circuit FiO 2 Sensor Calibration Ramp Time Setup menu: Configuration Menu Parameter The device is calibrated according to your air tubing system. 1. Ensure that the therapy is turned off before performing a Learn Circuit. 2. If in use, turn off the oxygen flow. 3. Select the mask type. 4. Set up the air circuit including accessories and patient interface. Note: When performing a Learn circuit for invasive use, do not connect a catheter mount, tracheostomy tube or HMEF, see Setting up for invasive use on page 5). 5. Leave the air circuit unobstructed and open to the air. 6. Press to start the Learn Circuit. 7. Wait for the device to complete its automated tests (<30 sec). The results are displayed when complete. If the circuit configuration has been successfully learnt, displays. If unsuccessful, displays (see Troubleshooting on page 24). The device starts the calibration of the FiO 2 monitoring sensor to measure the oxygen concentration of the breathable air. 1. Press to start the FiO 2 sensor calibration. 2. Wait for the device to complete its calibration. The results are displayed when complete. Note: Turn off the oxygen flow. If Max Ramp Time has been set by the clinician, you may select any value up to this time. Options: 0 min-max Ramp Time (max 45 minutes, 5 minutes increments) Description English Language Brightness Sets the display language. Options: Depending on regional configuration Sets the LCD backlight brightness. Options: %, 10% increments Backlight Enables the LCD and keypad backlight. If the AUTO setting is selected the backlight turns dark after five minutes without any actions and turns on again if any button is pressed again or an alarm occurs. Options: On, Auto Time format Sets the time format. Options: 24 hrs,12 hrs Date format Sets the date format. Options: dd/mm/yyyy, mm/dd/yyyy To return to the Options screen press the Return button Setup menu 19
. There are up to 200 events of each type, displayed in chronological order, with the most recent event displayed at the top by default.")


. The reminder also displays when the device is powered on.")
23 Info menu Event Summary Event summary displays the summary of three types of events: changes in settings, alarms and system events (eg, connection of ResMed USB stick). There are up to 200 events of each type, displayed in chronological order, with the most recent event displayed at the top by default. Note: When the capacity of 200 logged events is reached, the oldest log record is overwritten. Used Hours Used Hours during the last seven days of treatment are displayed in a bar graph and can be compared to the data of the last 365 days. Device Information This screen shows the serial number (displayed as Device SN), device number, software version and other component versions. Data on this screen may be requested for servicing or as part of problem-solving by a technician. Reminders The Clinician uses the Reminders menu to alert you to specific events; for example, when to replace the mask, when to replace the filter and so on. The reminder appears in yellow as the date approaches (within 10% of the reminder period). The reminder also displays when the device is powered on. You can clear a reminder message by selecting Reset, which clears the current reminder date to OFF, or displays the next preset Reminder date. 20
24 Data management There are two data ports at the rear of the device for connecting a USB stick (see Stellar at a glance on page 2). Therapy and device data can be stored on it or read from it to be used with ResMed software applications. WARNING Do not connect any device to the data ports other than specially designed devices recommended by ResMed. Connection of other devices could result in injury, or damage to the Stellar (see General warnings and cautions on page 34). CAUTION Do not disconnect the ResMed USB stick while data transfer is in progress. Otherwise loss of data or incorrect data may result. The download time depends on the data volume. Notes: You cannot connect two ResMed USB sticks simultaneously for data communication. If data transfer is not possible or failed please read the troubleshooting section. Do not store files on the USB stick other than those created by the device or application. Unknown files may be lost during data transfer. 1 Plug the ResMed USB stick to one of the two USB connections on the rear side of the device. The first dialog for the USB data transfer is displayed automatically on the LCD. The device checks if there is enough memory capacity on the USB stick and if readable data is available. 2 Select one of the available options Read settings The settings will be transfered from the connected ResMed USB stick to the Stellar. Write settings Settings of the device will be stored on the ResMed USB stick. Write settings and loggings Settings and loggings of the device will be stored on the ResMed USB stick. Cancel 3 Confirm the data transfer. Cleaning and maintenance The cleaning and maintenance described in this section should be carried out regularly. This also helps to prevent the risk of cross contamination. Refer to the mask, humidifier and other accessories user guide for detailed instructions for care and maintenance. WARNING Beware of electric shock. Do not immerse the device, pulse oximeter or power cord in water. Turn off the device, unplug the power cord from the power socket and the device before cleaning and be sure that it is dry before reconnecting. The mask system and air tubing are subject to normal wear and tear. Inspect them regularly for damage. CAUTION The device cannot be sterilized. Daily Disconnect the air tubing from the device (and humidifier, if used) and hang it in a clean, dry place until next use. If the device is visibly soiled, wipe the exterior surfaces of the device and the pulse oximeter (if used) with a damp cloth and mild detergent. English Data management 21
25 CAUTION Do not hang the air tubing in direct sunlight as the tubing may harden over time and eventually crack. Do not use bleach, chlorine, alcohol or aromatic-based solutions (including all scented oils), moisturizing or antibacterial soaps to clean the air tubing or the device on a daily basis (other than the approved cleaning agents Mikrozid AF or CaviCide ). These solutions may cause hardening and reduce the life of the product. The use of cleaners and disinfecting solutions containing alcohol (other than the approved cleaning agents) is acceptable for periodic cleaning of the device, such as for cleaning between patients or especially for service periods, but not recommended for daily use. Weekly 1 Remove the air tubing from the device and the patient interface. 2 Wash the air tubing in warm water using mild detergent. 3 Rinse thoroughly, hang and allow to dry. 4 Reconnect the air tubing to the air outlet and patient interface. 5 If the device is visibly soiled, wipe the exterior surfaces of the device and the pulse oximeter (if used) with a damp cloth and mild detergent. Monthly 1 Wipe the exterior of the device and the pulse oximeter (if used) with a damp cloth and mild detergent. 2 Visually inspect the air filter to check if it is blocked by dirt or contains holes. Replacing the air filter Replace the air filter every six months (or more often if necessary). WARNING Do not wash the air filter. The air filter is not washable or reusable. 1 Remove the air filter cover from the back of the device. 2 Remove and discard the old air filter. 3 Insert a new air filter. 4 Refit the air filter cover. 22
.")


.")
26 . Air filter cover Air filter English Disinfection Disinfection of your device helps to prevent the risk of cross contamination. Disinfect the exterior of the device, and especially the air outlet, with a damp cloth and a disinfection solution (eg, Microzid). Multipatient use WARNING An antibacterial filter is mandatory if the device is used on multiple patients. In a mulitpatient use environment, you must perform the following before the device is provided to a new patient: Mask Reprocess; Cleaning, disinfection and sterilization instructions are available from the ResMed website, masks/sterilization/americas. If you do not have Internet access, please contact your ResMed representative. Air tubing Device Humidifier Replace the air tubing. Alternatively, consult the air tubing instructions for cleaning and disinfection information. Disinfect the Stellar as follows: Use an anti-bacterial cleaning/disinfectant solution such as Mikrozid AF or CaviCide with a clean non-dyed disposable cloth to clean and disinfect the exterior surfaces of the device. Wipe all accessible surfaces of the device, including the air outlet (avoid liquid entering any openings in the device). Follow the manufacturer s recommended cleaning instructions. As instructions for humidifiers vary, see the user guide for the humidifier in use. For multipatient use environment, use the H4i water chamber (disposable) in place of the H4i reusable water chamber. Cleaning and maintenance 23
27 Servicing CAUTION Inspection and repair should only be performed by an authorized agent. Under no circumstances should you attempt to open, service or repair the device yourself. This product should be inspected by an authorized ResMed service center five years from the date of manufacture, except for the internal battery which ResMed recommends be tested after two years to assess the battery life. Prior to this, the device is intended to provide safe and reliable operation provided that it is operated and maintained in accordance with the instructions provided by ResMed. Applicable ResMed warranty details are provided with the device at the time of original supply. Of course, as with all electrical devices, if any irregularity becomes apparent, you should exercise caution and have the device inspected by an authorized ResMed service center. Troubleshooting If there is a problem, try the following suggestions. If a problem cannot be solved, contact ResMed. Alarm troubleshooting The most common reason for an alarm to sound is because the system has not been properly assembled. Check that the air tubing has been properly attached to the device and patient interface (and humidifier if used). Notes: The alarm log and alarm settings are maintained when the device is powered down and in the event of a power loss. If multiple alarms are active simultaneously, the alarm with the highest priority will be displayed first. If an alarm activates repeatedly, discontinue use and return the device for servicing. Problem / possible cause LCD: Internal Battery Empty! The remaining battery charge is below 15%. The device can be powered by the internal battery for maximum 2 minutes. LCD: System Failure! Component failure. The device stops delivering air pressure (system failure 6, 7, 9, 22, 38). Therapy cannot be started (system failure 21). The device internal temperature is too low for the device to start/deliver therapy (system failure 21). Action Connect the device to mains power. Note: In case of a total power failure, the therapy settings will be stored and therapy will resume when the device is powered again. 1. Power off the device. 2. Power on the device again. 1. Ensure that ambient temperature is above 5 C. If the device has been stored below 5 C, allow sufficient time for it to acclimatize before use. 2. Power-off the device. 3. Power-on the device again. If the problem persists, return the device for servicing. 24
28 Problem / possible cause The self test of the device fails and therapy cannot be started (system failure 21). Component failure (system failure 8, 25). LCD: Over Pressure! The device generates a pressure that is greater than 59 cm H 2 O. Treatment will be stopped. LCD: Blocked Tube! Air path is blocked. LCD: High Temperature [10, 11, 12, 23]! The temperature inside the device is too high. Treatment may lead to stop. LCD: High Pressure! Therapy pressure exceeds pre-set alarm level. LCD: Low Pressure! The air tubing is not connected properly. LCD: Circuit disconnected! The air circuit is not connected properly. LCD: Low Minute Ventilation! Minute ventilation level has dropped below the alarm setting level. Action 1. Power-off the device. 2. Power-on the device again. If the problem persists, return the device for servicing. 1. Power off the device. 2. Power on the device again. 1. Power off the device. 2. Check that the air tubing is connected properly. 3. Power on the device again. 4. Start Learn Circuit function. Note: If the alarm activates repeatedly internal components may be defective. Discontinue use and return the device for servicing. 1. Check the air path for any blockages. 2. Remove the blockages. 3. If the alarm is not cleared, stop treatment. 4. Re-start treatment. Ensure the ambient temperature is within the specified operating range. If the problem persists within the specified operating conditions please return the device for servicing. Contact your clinician. 1. Stop treatment. 2. Re-start treatment. If the problem persists contact your clinician. 1. Check the air circuit integrity and reconnect. 2. If the alarm doesn t get cleared, stop treatment. 3. Re-start treatment. 1. Check the air circuit integrity and reconnect. 2. If the alarm is not cleared, stop treatment. 3. Re-start treatment. Contact your clinician. English Troubleshooting 25
29 Problem / possible cause LCD: Low Respiratory Rate!, High Respiratory Rate! The respiratory rate level has dropped Contact your clinician. below or has exceeded the alarm setting level. LCD: High Leak! High mask leak for more than 20 seconds. LCD: Non-Vented Mask! Connection of a non-vented mask. Mask vents may be blocked. ResMed Leak Valve is missing or vent is blocked. LCD: Apnea! The device detects an apnea that has exceeded the pre-set alarm level. LCD: Internal Battery Low! The internal battery capacity is below 30%. LCD: Low SpO 2! SpO 2 has dropped below pre-set alarm level. LCD: SpO 2 finger sensor failure! The finger sensor is not connected properly or delivers faulty values. LCD: Xpod oximeter disconnected! The pulse oximeter is disconnected. LCD: Low FiO 2 Level! FiO 2 has dropped below the pre-set alarm level. LCD: High FiO 2 Level! FiO 2 has exceeded the pre-set alarm level. Action Adjust the mask to minimize leak (see Using mask-fit on page 16). Check the air circuit integrity and reconnect. If the problem persists contact your clinician. Ensure the mask has vents. Ensure the mask vents are not blocked. Ensure the ResMed Leak Valve is installed and that the vent is not blocked. Ensure oxygen (if in use) has only been connected at the rear of the device. If the problem persists contact your clinician. Breathe normally to disable the alarm. If the problem persists contact your clinician. Connect the device to mains power. Check the attachment of the sensor. If the problem persists contact your clinician. Check if the finger sensor is attached properly to the finger and connection to the pulse oximeter. Check if the pulse oximeter is connected properly to the device. Perform FiO 2 sensor calibration. If the problem persists contact your clinician. Perform FiO 2 sensor calibration. If the problem persists contact your clinician. 26
30 Problem / possible cause LCD: FiO 2 sensor disconnected! The FiO 2 monitoring sensor is not connected. LCD: Keypad Failure! One of the keys was held down for more than 10 seconds or got stuck. LCD: Attention High Temp [42, 43, 44, 45]! The temperature inside the device is high. LCD: Internal Battery Use! The device is using the internal battery. LCD: External DC Power Use! The device is powered by an external battery. Action Connect the FiO 2 monitoring sensor or replace it with a new one. Remove any blockages from the keypad. Ensure the ambient temperature conditions are within the specified operating range. Check if the power cord is properly connected to the device if you want to run from mains power. Press the Alarm mute button to cancel the alarm. Check if the AC power cord is properly connected to the device if you want to run from mains power. Note: The alarm will be cleared automatically after one minute. English Other troubleshooting Problem / possible cause No display Power failure. The device stops delivering air pressure. Power not connected or device is not switched on. Treatment pressure seems low Ramp time is in use. Air filter is dirty. Solution Remove the mask or the catheter mount from the tracheostomy tube until power is restored. Check the power cable connection between the mains power or external battery and the device. As the internal battery ages, the available capacity decreases. When the remaining battery capacity is low, it can affect the battery charge level indication and lead to power failure without activating Low or Empty battery alarms. ResMed recommends the battery be tested after two years to assess the remaining battery life (see Internal battery on page 3). Ensure the power cord is connected and press the switch at the back of the device once. Wait for air pressure to build up. Replace air filter. Troubleshooting 27
Adult and paediatric ventilators. Quick Setup Guide. English
 Adult and paediatric ventilators Quick Setup Guide English Setup Noninvasive use AC Power cord Mask Stellar 2 Air tubing 3 4 5 1 AC Power cord AC locking clip H4i heated humidifier Invasive use 2 Antibacterial
VPAP COPD. H5i. Welcome Guide. Making quality of care easy. Respiratory Care Solutions. English NONINVASIVE VENTILATOR HEATED HUMIDIFIER
 VPAP COPD NONINVASIVE VENTILATOR H5i HEATED HUMIDIFIER Welcome Guide English Respiratory Care Solutions Making quality of care easy Respiratory Care Solutions Making quality of care easy Welcome Thank
VPAP ST with ivaps. Welcome Guide. Making quality of care easy. English. Respiratory Care Solutions NONINVASIVE VENTILATOR
 VPAP ST with ivaps NONINVASIVE VENTILATOR Welcome Guide English Respiratory Care Solutions Making quality of care easy Respiratory Care Solutions Making quality of care easy Welcome Thank you for choosing
VPAP Auto VPAP ST VPAP S. H5i. Welcome Guide. English POSITIVE AIRWAY PRESSURE DEVICE HEATED HUMIDIFIER
 VPAP Auto VPAP ST VPAP S POSITIVE AIRWAY PRESSURE DEVICE H5i HEATED HUMIDIFIER Welcome Guide English Welcome Thank you for choosing the S9 VPAP Series or H5i. Before operating these devices, please read
VPAP Adapt. H5i. Welcome Guide. English. adaptive servo-ventilator
 VPAP Adapt adaptive servo-ventilator H5i HEATED HUMIDIFIER Welcome Guide English Welcome Thank you for choosing the VPAP Adapt or H5i. Before operating the device, please read the entire Welcome and Information
S9 Escape. Welcome Guide. English POSITIVE AIRWAY PRESSURE DEVICE
 S9 Escape POSITIVE AIRWAY PRESSURE DEVICE Welcome Guide English Welcome Thank you for choosing the S9 Escape. Before operating this device, please read the entire Welcome and Information Guides. DC power
S9 Series AutoSet & Elite
 S9 Series AutoSet & Elite POSITIVE AIRWAY PRESSURE DEVICEs User Guide A 3 2 5 4 1 S9 AutoSet indications for use The S9 AutoSet self-adjusting system is indicated for the treatment of obstructive sleep
User guide User guide English
 User guide English Contents Introduction... 1 Indications for use... 1 Contraindications... 1 Adverse effects... 2 General warnings and cautions... 2 The Astral device... 4 The Astral device interface...
S9 AutoSet & S9 Elite
 S9 AutoSet & S9 Elite POSITIVE AIRWAY PRESSURE DEVICEs Welcome Guide English Welcome Thank you for choosing the S9 AutoSet or S9 Elite. Before operating these devices, please read the entire Welcome and
User guide User guide English
 User guide English Contents Introduction... 1 Indications for use... 1 Indications for use (USA only)... 1 Contraindications... 1 Adverse effects... 2 General warnings and cautions... 2 The Astral device...
Contraindications Positive airway pressure therapy may be contraindicated in some patients with the following preexisting
 S9 Escape Auto POSITIVE AIRWAY PRESSURE DEVICE Information Guide English English S9 Escape Auto indications for use The S9 Escape Auto self-adjusting system is indicated for the treatment of obstructive
AutoSet CS POSITIVE AIRWAY PRESSURE DEVICE. Welcome Guide. English
 AutoSet CS POSITIVE AIRWAY PRESSURE DEVICE Welcome Guide English Welcome Thank you for choosing the AutoSet CS. Before operating this device, please read the entire Welcome and Information Guides. Module/Adapter
AutoSet AutoSet for Her Elite Escape Auto Escape. H5i H5i for Her. Welcome Guide. English. POSITIVE AIRWAY PRESSURE DEVICEs HEATED HUMIDIFIER
 AutoSet AutoSet for Her Elite Escape Auto Escape POSITIVE AIRWAY PRESSURE DEVICEs H5i H5i for Her HEATED HUMIDIFIER Welcome Guide English Welcome Thank you for choosing the S9 Series or H5i. Before operating
VPAP ST VPAP S AutoSet CS S9 Auto 25
 VPAP ST VPAP S AutoSet CS S9 Auto 25 POSITIVE AIRWAY PRESSURE DEVICES User Guide A S9 VPAP ST indications for use The S9 VPAP ST is intended to provide non-invasive ventilation for patients weighing more
VPAP Adapt. H5i. Welcome Guide. English POSITIVE AIRWAY PRESSURE DEVICE HEATED HUMIDIFIER
 VPAP Adapt POSITIVE AIRWAY PRESSURE DEVICE H5i HEATED HUMIDIFIER Welcome Guide English Welcome Thank you for choosing the VPAP Adapt or H5i. Before operating this device, please read the entire Welcome
AutoSet & Elite. Welcome Guide / S9 Series. AutoSet & Elite WELCOME EUR2 / APAC. English Svenska Norsk Suomi Dansk Eesti 简体中文 繁體中文
 368893/2 2017-07 S9 Series AutoSet & Elite WELCOME EUR2 / APAC AutoSet & Elite POSITIVE AIRWAY PRESSURE DEVICES Manufacturer: ResMed Ltd 1 Elizabeth Macarthur Drive Bella Vista NSW 2153 Australia. See
English Please read the entire Information and Welcome Guides before using your device.
 VPAP COPD NONINVASIVE VENTILATOR H5i HEATED HUMIDIFIER ClimateLine / ClimateLine MAX / ClimateLine MAX Oxy / SlimLine / Standard AIR TUBING Information Guide English Please read the entire Information
H4i. User Guide HEATED HUMIDIFIER. English
 H4i HEATED HUMIDIFIER User Guide English English H4i HEATED HUMIDIFIER User Guide English Manufacturer: ResMed Ltd 1 Elizabeth Macarthur Drive Bella Vista NSW 2153 Australia. See www.resmed.com for other
VICTORIAN RESPIRATORY SUPPORT SERVICE AUSTIN HEALTH
 VICTORIAN RESPIRATORY SUPPORT SERVICE AUSTIN HEALTH GUIDELINES FOR THE OPERATION OF ASTRAL 100/150 SIZE: Width: 21.5cm Height: 9.3cm Depth: 28.5cm Weight:3.2kg The ResMed Astral is a portable positive
Cl inician Training Packet
 Cl inician Training Packet VOCSN Clinician Training Checklist Clinician Training Packet Photocopy and complete this checklist as a record. Provide a hands-on demonstration of each item, and ensure the
H4i HEATED HUMIDIFIER
 H4i HEATED HUMIDIFIER User Guide English English H4i HEATED HUMIDIFIER User Guide English Manufacturer: ResMed Ltd 1 Elizabeth Macarthur Drive Bella Vista NSW 2153 Australia. See www.resmed.com for other
Quick start guide. English
 Quick start guide English Read your entire Astral User Guide or Clinical Guide before use. The Astral device 1. Adapter port Can be fitted with single limb adapter, single limb leak adapter or double limb
System Contents Your REMstar Pro C-Flex+ system includes the following items: Reusable gray foam filter Disposable ultra-fine filter (optional)
") System Contents Your REMstar Pro C-Flex+ system includes the following items: Device Reusable gray foam filter User manual Disposable ultra-fine filter (optional) Carrying case Side cover panel Power cord
System Contents Your REMstar Pro C-Flex+ system includes the following items: Device Reusable gray foam filter User manual Disposable ultra-fine filter (optional) Carrying case Side cover panel Power cord
User guide User guide English
 User guide English ENGLISH Welcome The AirSense 10 AutoSet and AirSense 10 AutoSet for Her are ResMed's premium auto-adjusting pressure devices. The AirSense 10 Elite and AirSense 10 CPAP are ResMed's
Quick setup guide. English
 Quick setup guide English The Astral device 1. Adapter port Can be fitted with single limb adapter, single limb leak adapter or double limb adapter (Astral 150 only) 2. Handle 3. Inspiratory port (to
User guide User guide English
 User guide English ENGLISH Welcome HumidAir is a humidifier that provides heated humidification and is designed for use with your AirSense 10 or AirCurve 10 device. Read this guide together with your AirSense
Operating Manual. Model HC254
 A U T O S E R I E S Operating Manual Model HC254 English The SleepStyle 200 Auto Series is designed for use in the home or sleep laboratory, for the treatment of Obstructive Sleep Apnea. For further assistance,
User guide User guide English
 User guide English ENGLISH Welcome The AirSense 10 AutoSet and AirSense 10 AutoSet for Her are ResMed's premium auto-adjusting pressure devices. The AirSense 10 Elite and AirSense 10 CPAP are ResMed's
Table of Contents. isleep 20 users manual
 Table of Contents 1 Intended Use of the isleep 20... 3 1.1 What is the isleep 20?... 3 1.2 Indications for Use... 4 1.3 Contraindications... 4 1.4 About this Manual... 5 2 Safety Information... 7 2.1 General
SleepEasy. User Manual
 SleepEasy Would you like a free travel bag for your SleepEasy? If so, go to http://sleepeasy.respironics.com/register to register your product and receive your SleepEasy travel bag. A nominal charge for
A U T O S E R I E S Operating Manual
 A U T O S E R I E S Operating Manual English The SleepStyle 200 Auto Series is designed for use in the home or sleep laboratory, for the treatment of Obstructive Sleep Apnea. For further assistance, please
User guide. User guide. English
 User guide User guide English ENGLISH Welcome The AirCurve 10 VAuto, AirCurve 10 S and AirCurve 10 ST are bilevel positive airway pressure devices. WARNING Read this entire guide before using the device.
User guide User guide English
 User guide English ENGLISH Welcome The AirSense 10 AutoSet and AirSense 10 AutoSet for Her are ResMed's premium auto-adjusting pressure devices. The AirSense 10 Elite and AirSense 10 CPAP are ResMed's
USER Manual JR 10/02/06
 USER Manual 1038585 JR 10/02/06 Important! Fill in the information below when you receive the BiPAP Auto M Series system. Serial No.: (located on the bottom of the device) System Prescribed for: Date of
heated humidifier H5i Welcome Guide English
 H5i heated humidifier Welcome Guide English Welcome Thank you for choosing the H5i. Before operating this device, please read the entire Welcome and Information Guides. Flip lid seal Air outlet Flip lid
REMstar Auto A-Flex USER MANUAL
 REMstar Auto A-Flex USER MANUAL 2010 Koninklijke Philips Electronics N.V. All rights reserved. Table of Contents Intended Use... 2 Important... 2 Warnings... 2 Cautions... 3 Contraindications... 3 Symbol
Positive airway pressure therapy may be contraindicated in some patients with the following preexisting
 User guide English ENGLISH Welcome The AirSense 10 AutoSet and the AirSense 10 Elite are premium Automatic Positive Airway Pressure (APAP) and Continuous Positive Airway Pressure (CPAP) devices and come
INSTRUCTION MANUAL FOR THE NIPPY 3+ POSITIVE PRESSURE VENTILATOR This book must be kept with the machine
 DOC 0914 INSTRUCTION MANUAL FOR THE NIPPY 3+ POSITIVE PRESSURE VENTILATOR This book must be kept with the machine Breas Medical Ltd Unit A2, The Bridge Business Centre Timothy s Bridge Road Stratford Enterprise
Clinical guide. English
 Clinical guide English Contents Welcome... 1 Indications for use... 1 AirSense 10 AutoSet Plus... 1 AirSense 10 AutoSet for Her Plus... 1 AirSense 10 Elite Plus... 1 Contraindications... 1 Adverse effects...
REMstar Auto A-Flex USER MANUAL
 REMstar Auto A-Flex USER MANUAL 2012 Koninklijke Philips Electronics N.V. All rights reserved. Table of Contents Intended Use... 2 Important... 2 Warnings... 2 Cautions... 3 Contraindications... 3 Symbol
User guide User guide English
 User guide English ENGLISH Welcome The Lumis 100 VPAP S, Lumis 100 VPAP ST and Lumis 150 VPAP ST are bilevel positive airway pressure devices. WARNING Read this entire guide before using the device. Use
User guide User guide English
 User guide English ENGLISH Welcome The Lumis 100 VPAP S, Lumis 100 VPAP ST and Lumis 150 VPAP ST are bilevel positive airway pressure devices. WARNING Read this entire guide before using the device. Use
DreamStation. BiPAP Pro. Auto BiPAP. User manual
 DreamStation BiPAP Pro Auto BiPAP User manual Table of Contents Intended Use... 1 Important... 1 Warnings... 1 Cautions... 2 Contraindications... 2 Symbols Glossary... 3 System Contents... 4 How to Contact
VPAP III ST-A with QuickNav
 VPAP III ST-A with QuickNav User Guide English English VPAP III ST-A with QuickNav User Manual English Introduction............................................... 1 User/Owner Responsibility 1 Medical
VICTORIAN RESPIRATORY SUPPORT SERVICE AUSTIN HEALTH
 VICTORIAN RESPIRATORY SUPPORT SERVICE AUSTIN HEALTH GUIDELINES FOR THE OPERATION OF RESMED VS III VENTILATOR SIZE: Width: Height: Depth: Weight: 27.5cm 14.5cm 22.0cm 2.9kg The ResMed VSIII ventilator is
User guide User guide English r2 cover.indd 2 8/04/2016 4:17:25 PM
 User guide English ENGLISH Welcome The AirCurve 10 ST-A is a bilevel positive airway pressure device. WARNING Read this entire guide before using the device. CAUTION In the US, Federal law restricts this
User guide User guide English
 User guide English ENGLISH Welcome The AirCurve 10 ASV is a positive airway pressure device that belongs to the adaptive servo-ventilator category. WARNING Read this entire guide before using the device.
PAP Disinfecting Device User Guide. For all PAP Devices (Positive Airway Pressure) CPAP, APAP, Bi-PAP
 CPAP, APAP, Bi-PAP") PAP Disinfecting Device User Guide For all PAP Devices (Positive Airway Pressure) CPAP, APAP, Bi-PAP Thank You! Thank you for your purchase of the SoClean 2 PAP disinfecting system. Please familiarize
PAP Disinfecting Device User Guide For all PAP Devices (Positive Airway Pressure) CPAP, APAP, Bi-PAP Thank You! Thank you for your purchase of the SoClean 2 PAP disinfecting system. Please familiarize
micomme, Sepray,, are registered trademarks of Micomme Medical Technology Development Co., Ltd. All rights reserved. Modes: Sepray CPAP 25,Sepray CPAP
 Sepray CPAP 25/CPAP A25 User Manual MICOMME MEDICAL 0123 micomme, Sepray,, are registered trademarks of Micomme Medical Technology Development Co., Ltd. All rights reserved. Modes: Sepray CPAP 25,Sepray
RESmart CPAP System. User Manual
 RESmart CPAP System User Manual 0123 Table of Contents Symbols... 1 Intended Use... 2 Specifications... 3 Warning & Cautions... 4 Unpacking the System... 5 System Features... 6 First Time Setup... 7 Installing
bibag System User s Guide
 2008K@home bibag System User s Guide 2008K@home bibag System User s Guide For software version 4.30 and greater Copyright 2010-2014, Fresenius USA, Inc. All Rights Reserved This document contains proprietary
Achieva. Ve nt i l at or with Flow Acceleration Limit and Apnea Backup. User s Manual
 Achieva User s Manual Ve nt i l at or with Flow Acceleration Limit and Apnea Backup 840664790 Ventilator System Service Manual 4-070089-00 Rev. A (10/98) Achieva, Nellcor Puritan Bennett, and Puritan-Bennett
Quick start guide. CPAP Pro. Auto CPAP. Navigating in the menu. Caring for my. Setting up my therapy. DreamStation. Additional help and tips
 DreamStation CPAP Pro Auto CPAP Quick start guide Please refer to the device, humidifier and mask user manuals for full cleaning and user instructions. 2015 Koninklijke Philips N.V. All rights reserved.
BiPAP Pro Bi-Flex USER MANUAL
 BiPAP Pro Bi-Flex USER MANUAL 2010 Koninklijke Philips Electronics N.V. All rights reserved. Table of Contents Intended Use... 2 Important... 2 Warnings... 2 Cautions... 3 Contraindications... 3 Symbol
Patient Manual EcoStar
 EcoStar Patient Manual Table of Contents Before starting... 3 Safety instructions... 3 Intended use... 4 Adverse effects... 4 Contraindications... 4 Checking the components... 4 Description of the device...
User guide User guide English
 User guide English ENGLISH About your ClimateLineAir The ClimateLineAir is heated air tubing that delivers the desired temperature at your mask. ClimateLineAir Oxy is a variant of the ClimateLineAir that
User manual. DreamStation Heated Humidifier
 ! User manual DreamStation Heated Humidifier! Table of Contents Intended Use... 1 Warnings... 1 Cautions... 1 Contraindications... 2 Symbol Key... 2 System Overview... 2 System Features and Contents...
System One Heated Humidifier USER MANUAL
 System One Heated Humidifier USER MANUAL 2016 Koninklijke Philips N.V. All rights reserved. Table of Contents Intended Use... 2 Warnings... 2 Cautions... 2 Contraindications... 3 Symbol Key... 3 System
SimplyGo Mini. User Manual REF R05 JH 08/01/2016 EN-INTL
 SimplyGo Mini REF 1121830 1121829 R05 JH 08/01/2016 EN-INTL User Manual Table of Contents Introduction...1 Intended Use...1 Contraindications...1 Device and Accessories Description...1 SimplyGo Mini System...2
User guide User guide English
 User guide English ENGLISH Welcome The Lumis 100 VPAP S, Lumis 100 VPAP ST and Lumis 150 VPAP ST are bilevel positive airway pressure devices. WARNING Read this entire guide before using the device. Use
DreamStation Go. Heated Humidifier. User manual. Instructions for use
 DreamStation Go Heated Humidifier User manual Instructions for use Table of contents 1. Safety information... 1 2. System overview...3 3. Connecting and setting up the humidifier...5 Humidifier pop-up
Bipap A30/40 ventilator and System One humidifier
 The Lane Fox Respiratory Unit Bipap A30/40 ventilator and System One humidifier Patient start-up user guide Contents p.2 Contents p.3 What is bi-level ventilation? p.3 What s included in your bag? p.3
User guide User guide English
 User guide English ResMed.com/AirMiniApp ENGLISH Welcome The AirMini system combines ResMed s AirMini self-adjusting pressure machine, masks and the AirMini app. WARNING Read this entire guide before using
User guide User guide English
 User guide English ResMed.com/AirMiniApp ENGLISH Welcome The ResMed AirMini system combines ResMed s AirMini selfadjusting pressure machine, masks and the AirMini by ResMed App. WARNING Read this entire
REMstar SE USER MANUAL
 REMstar SE USER MANUAL 2012 Koninklijke Philips Electronics N.V. All rights reserved. Table of Contents Intended Use... 2 Important... 2 Warnings... 2 Cautions... 3 Contraindications... 3 Symbol Key...
Clinical guide. English
 Clinical guide English Contents Welcome... 1 AirCurve 10 CS PaceWave indications for use... 1 Contraindications... 1 Adverse effects... 1 At a glance... 2 About the control panel... 3 Therapy information...
DreamStation Service & Technical Reference Manual
 DreamStation Service & Technical Reference Manual CHAPTER 1: INTRODUCTION 1.0 CPAP/BIPAP SYSTEM OVERVIEW... 1-2 1.1 HUMIDIFIER SYSTEM OVERVIEW... 1-4 1.2 SERVICE NOTICE... 1-5 1.3 SERVICE TRAINING... 1-5
Clinical guide. English
 Clinical guide English Contents Welcome... 1 Legal notice... 1 Security... 2 Security features... 2 Software and firmware updates... 3 Indications for use... 3 AirMini... 3 AirMini app... 3 Contraindications...
4L & PRO PROVIDER MATERIALS
 & PRO PROVIDER MATERIALS 123-183 Rev B October 2015 In-Service Training Guide FOR USE WITH MODELS XYC100B-PRO & XYC100B-P Providers should use this document as a guide when providing an in-service to patients
User manual. DreamStation CPAP DreamStation CPAP Pro DreamStation Auto CPAP DRAFT
 User manual DreamStation CPAP DreamStation CPAP Pro DreamStation Auto CPAP Table of Contents Intended Use... 1 Important... 1 Warnings... 1 Cautions... 2 Contraindications... 2 Symbol Key... 3 System Contents...
CLINICAL MANUAL REF JH 6/7/10 CLINICAL MANUAL
 REF 1054728 1072919 JH 6/7/10 CLINICAL MANUAL CLINICAL MANUAL WARNING FOR CLINICIAN S USE ONLY Accessing Prescription Setting Screens The information on this page is ONLY for health care professionals.
DreamStation. BiPAP autosv REF R04 HM 01/30/2017 EN-DOM. User manual
 DreamStation BiPAP autosv REF 1128707 1128707 R04 HM 01/30/2017 EN-DOM User manual 2017 Koninklijke Philips N.V. All rights reserved. Provider guide DreamStation BiPAP autosv Warning! Remove this guide
Important! Fill in the information below when you receive the REMstar M Series system.
 1016452 AM 2/09/06 Important! Fill in the information below when you receive the REMstar M Series system. Serial No.: (located on the bottom of the device) System Prescribed for: Date of Purchase or Rental:
Instructions For Use. Hybernite ROC 2300 Rainout Control System
 Instructions For Use Hybernite ROC 2300 Rainout Control System The Hybernite Rainout Control System helps to prevent moisture condensation in the breathing tube of adult patients requiring continuous positive
U S E R M A N U A L. Portable Oxygen Concentrator SAVE THESE INSTRUCTIONS
 U S E R M A N U A L Model: PM4150 Series SAVE THESE INSTRUCTIONS CAUTION Federal (USA) law restricts this device to sale by or on the order of a physician. 300 Held Drive Tel: (+001) 610-262-6090 Northampton,
User guide User guide English
 User guide English ResMed.com/AirMiniApp ENGLISH Welcome The ResMed AirMini system combines ResMed s AirMini selfadjusting pressure machine, masks and the AirMini by ResMed App. WARNING Read this entire
GoodKnight H 2 O. User's Manual. Heated Humidifier. Ref. : M-146DFU00-20 Revision D
 GoodKnight H 2 O Heated Humidifier User's Manual Ref. : M-146DFU00-20 Revision D Revision D User's Manual Revisions: GoodKnight H 2 O Heated Humidifier The pages below are included in the American version
GoodKnight 425. Patient Manual. Ref. : M-145DFU00-40 Revision A
 GoodKnight 425 Patient Manual Ref. : M-145DFU00-40 Revision A List of Patient Manual Revisions GoodKnight 425 The pages below are included in the American version of the patient manual Ref. M-145DFU00-40,
LINE. Patient compass. Welcome Guide English. Your guide to the therapy device
 LINE Welcome Guide English Patient compass Your guide to the therapy device 2 Touchscreen Filter compartment Handle Unlocking button Voltage input Name of device On/off button SD card slot 3 Welcome to
Download the FREE application. on your Smartphone or on your tablet. and
 Download the FREE application on your Smartphone or on your tablet and With SEFAM ACCESS, you can: Easily adjust your S.Box, Easily monitor the evolution of the effectiveness of your treatment and other
Atlas Monitor Outline Train the Trainer
 Atlas Monitor Outline Train the Trainer A. ATLAS Monitor 1. Atlas Monitor is not designed for use on children younger than 3 years old. 2. Weight: 9.5lbs to 13.2 lbs, depending on configuration 3. Variable
product overview Adult Care Solutions
 product overview Adult Care Solutions Restore Natural Balance with the F&P 850 System Fisher & Paykel Healthcare is committed to advancing patient and clinician care with a comprehensive family of products
901-M / 901-ML. Pulse Oximetry System. Technical Information and Service Manual
 901-M / 901-ML Pulse Oximetry System Technical Information and Service Manual CONTENTS 1. PRELIMINARY REMARK...... 4 2. FUNCTION DESCRIPTION......... 5 2.1. INTENDED USE...5 2.2. CONTRAINDICATION...5 2.3.
NIPPY junior+ Quick Reference Guide
 DOC 0938c NIPPY junior+ Quick Reference Guide Nippy jnr+ may be used with:- Tracheotomy ET Tube Full Face Mask Nasal Mask / Nasal Pillows Modes CPAP Pressure Support Pressure Control IPPV (Continuous Positive
ACCESSORIES ISLEEP VIVO Z1
 ACCESSORIES ISLEEP VIVO Z1 How to Use this File This guide contains the most commonly used accessories for the isleep, Vivo and Z1 ranges. All accessories may not be available in all countries and some
1 Intended Use of the Breas HA 01 Humidifier
 User Manual for Breas HA 01 Humidifier 1 Intended Use of the Breas HA 01 Humidifier Read this manual thoroughly so that you completely understand how the humidifier is operated and maintained before taking
Med-Aire 8 Alternating Pressure Mattress Replacement System With Low Air Loss OPERATOR S MANUAL
 Med-Aire 8 Alternating Pressure Mattress Replacement System With Low Air Loss OPERATOR S MANUAL Item # 14027 TABLE OF CONTENTS IMPORTANT SAFEGUARDS... 3 STATEMENTS & SYMBOLS...4 INTRODUCTION...5 PACKAGE
Owner s Manual Super-Slim Four-Way Cassette
 CASSETTE- TYPE AIR CONDITIONER Owner s Manual Super-Slim Four-Way Cassette IMPORTANT NOTE: Read this manual carefully before installing or operating your new air conditioning unit. Make sure to save this
Operator s Manual. LifeSense LS1-9R. Vital Signs Monitor. Capnography/Pulse Oximeter
 Operator s Manual Vital Signs Monitor Capnography/Pulse Oximeter LifeSense LS1-9R CAUTION: Federal law (USA) restricts this device to sale by or on the order of a licensed practitioner. Consult Instructions
Enteral Pump Instructions for Use To Assemble When the low
 Enteral Pump Instructions for Use Before initial use on battery power and after extended storage periods, the pump must be plugged into an AC power source for a minimum of 12 hours (pump may be operated
R00 JH 1/23/2015 SimplyGo Mini
 1120880 1120879 R00 JH 1/23/2015 SimplyGo Mini Table of Contents English Introduction...1 Intended Use...1 Contraindications...1 Device and Accessories Description...1 SimplyGo Mini System...2 Warnings
PRODUCT OVERVIEW. Adult Care Solutions
 PRODUCT OVERVIEW Adult Care Solutions Restore Natural Balance with the F&P 850 System Fisher & Paykel Healthcare is committed to advancing our capabilities as a world leader in humidified therapy systems
A basic introduction about the principles of humidity
 Module 7: Humidity Disclaimer This material is intended for use by trained family members and caregivers of children with tracheostomies who are patients at the Alberta Children s Hospital. Although reasonable
BeneVision TM80 Telemetry Monitor
 Telemetry Monitor Note: The TM80 is not intended as a replacement to the Operating Instructions. Prior to operating equipment, the user must be familiar with the Operating Instructions Manual contents.
SPT & PRO PROVIDER MATERIALS
 SPT & PRO PROVIDER MATERIALS 122-031 Getting Started 1. Read the Quick Start Guide and Operator s Manual. 2. Review the accessories. AC & DC Power Supplies 4-way Carry Case with Adjustable Straps Accessory
AMBIENCE Low Air Loss Mattress Replacement System
 AMBIENCE Low Air Loss Mattress Replacement System User Manual Contents 1. Introduction... 1 1.1 General Information... 1 1.2 Intended Use... 1 2. Product Description... 1 3. Installation... 2 3.1 Unpacking...
Instruction Manual. Head & Eye Massager with Acupressure and Heat Compression.
 Instruction Manual Head & Eye Massager with Acupressure and Heat Compression www.pure-therapy.com 1 WARNING: To reduce the risk of burns, fire, electric shock or injury to persons: Read the entire manual
U S E R G U I D E. Home Respiratory Equipment Cleaning Guide. Health Information
 Health Information U S E R G U I D E Home Respiratory Equipment Cleaning Guide This document is intended for Patients and Families for use at home The goal of the cleaning guide is to properly handle,
Guide, Quick Start, Short, X-100 System
 Rev. CR/CO Date Orig. A 9950 2/15/16 DH Guide, Quick Start, Short, X-100 System P/N LANGUAGE NONIN ELECTRONIC FILE FINALSIZE 10885-001 ENGLISH 10885-001.01.INDD 5.5 X 8.5 NOTE 1: a. MATERIAL: 100lb cover