PowerGrower. 8-Pack. Assembly Guide
|
|
|
- Jocelin Woods
- 6 years ago
- Views:
Transcription
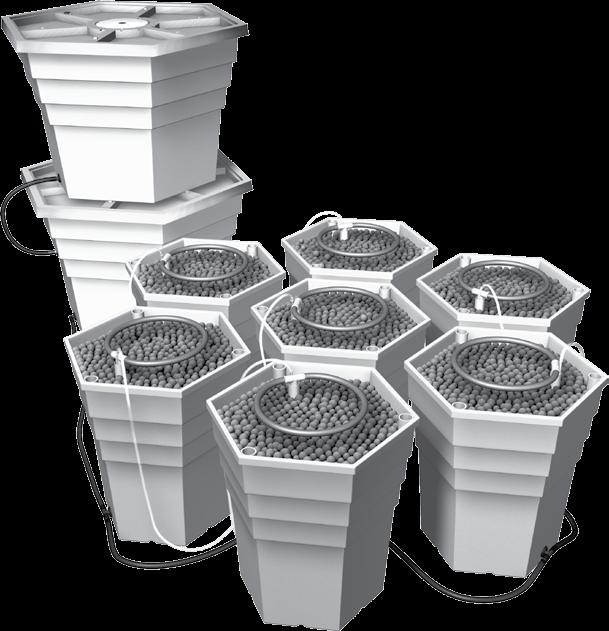


1 PowerGrower 8-Pack Assembly Guide

2 POWERGROWER 8-PACK PARTS POWERGROWER 8-PACK PARTS: 1: Reservoir & Controller (2) 2: Reservoir & Controller Lid (2) 3: Hatch Cover (2) 4: Reservoir & Controller Connecting Hose 5: Float Valve with pipe thread compound 6: Controller Drain Level Tube 7: Circulating Pump Column with Collar 8: Circulating Pump Connector with Split Tee 9: Drip Rings (8) 10: Clear Airline (8) 11: Pumping Columns with Support Tubes (8) 12: Individual Drain Level Tube with 1 grommet reducer 13: Blue Tubing (20 ft.) 14: Split Tees (8) 15: Single Output Air Pump 16: Individual Reservoir (8) 17: Growing Chamber (8) 18: Dual Diaphragm Air Pump
 and insert the threaded end with the")
, through the predrilled hole in")


3 STEP 1 Disassemble the Float Valve (part 5) and insert the threaded end with the washer on the inside of the Controller (part 1), through the predrilled hole in the Controller and secure from the outside with the nut. Coat the remaining threads with the Pipe Thread Compound and screw on the brass 1/2 barbed hose fitting. Pipe Thread Compound


 into the tabs on the bottom of the")

4 STEP 2 Insert the Drain Level Tube (part 6) into the 1/2 grommet on the side with the support tab. Insert Circulating Pump Connector with Split Tee (part 8) into the 1 grommet opposite the Drain Level Tube and support the grommet from the backside while securing the Split Tee into the grommet. STEP 3 Insert the Circulating Pump Column (part 7) into the tabs on the bottom of the Controller (part 1) and push the collar down over the tabs. Insert the Y-fitting from the Circulating Pump Column into the elbow from the Circulating Pump Connector (part 8)

 over the access hole in")

 into")

5 STEP 4 Make sure the black airline is securely inserted into the Y-fitting and thread the other end thru the cap in the Controller Lid (part 2). Place one of the Hatch Covers (part 3) over the access hole in the Controller Lid STEP 5 Place the Reservoir (part 1) on top of the assembled Controller. Connect the Reservoir to the Controller by inserting the 1/2 straight barbed fitting of the Connecting Hose (part 4) into the 1/2 grommet on the Reservoir and connect the other end of the blue tubing to the brass barbed fitting of the float valve. Place the Reservoir Lid (part 2) with the Hatch Cover (part 3) on the Reservoir.
.")

 on the remaining Individual Reservoirs.")
6 STEP 6 The individual growing units can be arranged in a compact honeycomb design or all 8 can be used in two rows (See Diagrams in Step 12). If you choose the compact honeycomb design, set one of the Individual Reservoirs (part 16) aside to be used in assembling a stand alone unit. Insert a Split Tee (part 14) into the 1 grommet for each of the remaining Individual Reservoirs. STEP 7 Place the Growing Chambers (part 17) on the remaining Individual Reservoirs. STEP 8 Push the beveled end of the Support Tubes (part 11) into the large hole in the bottom of the Growing Chambers. Push the PVC pipe down until it barely touches the bottom of the reservoir.
. Ensure that the holes in the ring itself are facing downwards.")


7 STEP 9 Attach a Drip Ring (part 9) to the end of each Pumping Column Assembly (part 11). Ensure that the holes in the ring itself are facing downwards. STEP 10 Push the entire drip ring assembly down into the pumping column support tubes. Being careful not to catch the tube clamps on the support tube. Push the assembly into the tubes until they barely touch the bottom of the reservoir. STEP 11 Move drip ring out of way and fill growing chamber with rinsed clay pellets or your favorite growing media.
 into eight 20 long pieces, and connect the individual units to each other and the controller assembly.")
8 STEP 12 To setup the individual growing units in a compact honeycomb pattern, arrange the controller assembly and the individual growing units according to the following diagram. Cut the Blue Tubing (part 13) into eight 20 long pieces, and connect the individual units to each other and the controller assembly. The individual units can also be arranged in two rows or any other custom configuration. Place the individual growing units according to the following diagram or your own custom configuration and cut the Blue Tubing (part 13) to custom lengths to connect the individual growing units to each other and the controller assembly. STEP 13 Securely attach the Clear Airlines (part 10) to the flexible tubing of the Pumping Column Assemblies.
 to the manifold.")


.")
9 STEP 14 Connect the manifold to the Dual Diaphragm Air Pump (part 18) and connect the airline tees (that are packaged with the Dual Diaphragm Air Pump) to the manifold. If you choose the compact honeycomb configuration, connect the Clear Airlines from the 7 growing units to the tees and connect a Clear Airline to the Black Airline from the circulating pump. Otherwise, connect the Air Lines from the 8 growing units and connect the circulating pump to the Single Output Air Pump (part 15). STEP 15 If you only used 7 of the growing units in the circulating system, remove the 1 Grommet Reducer that is connected to the Individual Drain Level Tube (part 12) and insert the 1 Grommet Reducer into the 1 grommet of the left over Individual Reservoir (part 16). Insert the Individual Drain Level Tube into the 1/2 opening of the 1 Grommet Reducer and complete the stand alone unit just as the other units used in the circulating system. After completed, connect the Single Output Air Pump (part 15) to the flexible tubing of the pumping column assembly.

10 HELPFUL GUIDELINES FILLING When filling the system with a nutrient solution it is best to mix the nutrients in a known volume of fresh water and pour into the controller until the system reaches the desired level. The controller and 7 individual growing units holds approximately 28 gallons. The controller and 8 individual growing units holds approximately 30 gallons. The float valve can be adjusted by bending the float valve arm so that the float valve is all the way up in the off position. Next, the reservoir can be placed on top of the controller and can be filled with an additional 15 gallons that will keep the system full for one to two weeks with small plants and may only last a few days to one week with larger plants. PLANTING To prepare a seedling or a plant for transplanting, remove all soil and/or organic material from around the roots. Plants must be sturdy with established roots before transplanting into the PowerGrower circulating 8-pack. Choose seedlings because it s more difficult to successfully transplant older plants. If your plant has been growing in soil or peat moss, gently remove the plant from its pot and carefully rinse as much soil as possible from the roots before transplanting. Although this method of transplanting from soil to hydroponics is somewhat risky, (soil may contain diseased organisms that proliferate in the rich hydroponic solution), we have been very successful in implementing, particularly with culinary herbs and encourage you to try it. Or, you can avoid these problems by starting plants from cuttings in one of our RainForest Systems. PLACEMENT Abundant light, proper temperature and adequate ventilation are crucial for fast growth, healthy plants and higher yields. Place the PowerGrower 8-pack in a warm, well-lit, well-ventilated location, such as an outdoor garden, sunlit window, patio or greenhouse. Keep your PowerGrower 8- pack away from areas where the inevitable dripping that occurs during filling, draining and ph adjustment could cause water damage. Reservoir Bend here to adjust Controller If you plan to grow several small plants in the PowerGrower 8-pack, place your plants just outside the drip ring, near the drip holes. If you prefer a single large plant, place it in the center of the drip ring. Gently add Hydroton around the plant roots until thoroughly covered.
11 HELPFUL GUIDELINES & TROUBLE SHOOTING OPERATION For moisture-loving plants, operate your PowerGrower 8-pack pump continuously. Plants preferring drier conditions grow best when the pump runs for 1/2 hour on and 1 hour off during daylight hours; off at night (a simple timer will turn the pump on and off for you automatically). Use mild to normal strength nutrient solution and avoid strong or aggressive nutrient. As your plants consume nutrient solution, the level in the reservoir will drop. Top off with half strength solution or plain water (the pump is more efficient when the reservoir is full). It is necessary to change the water and nutrients every one to two weeks depending upon the size of your plants and their rate of growth; with bigger plants change more often. Simply empty the reservoir by rotating the blue drain/level tube 90 degrees so water drains on the ground, or indoors in a pail. When changing or topping off solution, pour directly over the Hydroton (rather than into the reservoir itself) to flush out excess salts. PREPARATION FOR REPLANTING After harvesting and before replanting your PowerGrower 8-pack, dismantle the system and clean all parts with hot water. Rinse Hydroton in very hot water and soak overnight. It is a good idea to dis-assemble and wash the drip ring assembly and pumping tube from time to time in hot water. TROUBLE SHOOTING If white salt deposits form on the Hydroton: 1. Try using a milder nutrient solution and topping off with plain water only. 2. Occasionally drain your system, refill with plain water and run the pump overnight. After the overnight rinse, empty reservoir and refill with fresh nutrient. If Plants are not growing well and you suspect hard water: 1. Use FloraMicro Hardwater in place of FloraMicro. 2. Try distilled or purified water. You should see a significant improvement in plant health and growth within one week. 3. Collect rainwater for use in your PowerGrower. If nutrient solution stops flowing from the drip ring: 1. Check to ensure that pump is plugged in and reservoir is filled with nutrient solution. 2. Disconnect air line from the air inlet and check whether the air is coming through (put end under water and look for bubbles if you are not sure). No air flow could mean that the pump is broken and must be replaced or that the air line is loose or blocked. Try cutting an inch off each end of the line to provide a tighter fit. 3. Blow into the air inlet to check whether it is clogged, and rinse the pumping column in hot water. This type of clogging is usually an indication that you have hard water or too strong a nutrient solution. 4. Check whether emitter holes in the drip ring are clogged. To clear, dis-assemble drip ring by pulling it apart at the tee, rinse drip ring and tee in hot water and clear the holes with a toothpick.


12 FLORANOVA FloraNova represents a break-through in fertilizer technology. FloraNova gives users both the strength of a dry concentrate and the ease of a liquid. This unique formulation of highly purified minerals and natural additives combines the benefits of both organic and soil less gardening methods. Optimum nutrient absorption is aided by natural humic extracts for increased quality and superb yields. FloraNova is a one part formula that is ph stabilized outstanding for all plant types. RAPIDROOTER Rapid Rooter s advanced technology produces a unique matrix of composted organic materials bonded together with plant-derived polymers. Rapid Rooter plugs are manufactured using a scientifically controlled process that yields large populations of beneficial microbes in the media. These naturally-occurring microbes colonize young roots, helping plants resist disease while maximizing nutrient uptake. Rapid Rooter plugs are fortified with General Hydroponic micro nutrients for abundant root growth. The optimal air-to-water ratio within the plug matrix results in explosive early root growth. Rapid Rooter plugs are available in the following sizes: 50 plug tray 50 plug bag 98 cell mat RAINFOREST The Rainforest is perfect for propagation or growing plants to full maturity. Our patented Vortex Sprayer provides a superoxygenated mist for rapidly developing plants. With a compact design and small footprint, the Rainforest is available with 2, 3, and 6, site lid inserts to suit specific growing needs Monday through Friday 9am to 4pm PST P042307am 2007 GENERAL HYDROPONICS
WaterFarm. 8-Pack. Assembly Guide
 WaterFarm 8-Pack Assembly Guide WATERFARM 8-PACK PARTS 1 2 3 4 6 7 17 16 15 5 14 8 9 10 11 12 13 WATERFARM 8-PACK PARTS: 1) Controller and Lid 2) Reservoir and Lid 3) Growing Chambers (8) 4) Individual
EcoGrower. Assembly Guide
 EcoGrower Assembly Guide The EcoGrower incorporates an air driven spider drip system with revolutionary General Hydroponics hexagonal reservoir. Features removable six-inch inserts, each accomodating a
RainForest. Assembly Guide
 RainForest 36 Assembly Guide RAINFOREST 36 PARTS Congratulations on your new RainForest Model 36 aero-hydroponic system. This system enables you to rapidly and successfully root cuttings and germinate
AeroFlo. Assembly Guide
 AeroFlo 20 Assembly Guide AeroFlo 20 PARTS 13 1 4 16 14 15 5 6 3 2 12 17 10 11 9 8 7 AeroFlo 20 PARTS: assembled dimensions: 7 L X 1 6 W X 22 H Chambers Box: 1: Growing Chambers (2 ea) with Laser Spray
EuroGrower. Assembly Guide
 EuroGrower Assembly Guide EUROGROWER PARTS 7 4 15 8 1 2 BOX 1: BOX 2: 11 10 12 3 5 9 6 14 13 16 17 EUROGOWER PARTS: BOX 1: 1) Bato Buckets (8) 2) Drain Elbows (8) 3) Panda 40 Gallon Reservior (1) 4) Reservoir
AeroFlo 2 18 & 30. Assembly Guide
 AeroFlo 2 18 & 30 Assembly Guide AeroFlo2 18 & 30 PARTS 6 5 16 14 19 13 1 4 11 10 8 9 3 2 7 17 18 12 15 AeroFlo 2 18 & 30 PARTS: Parts Box: 1: WaterPower Pump 120 2: Pump line 3: Manifold 4: Drain Valve
MULTI FLOW HYDROPONIC SYSTEM
 MULTI FLOW HYDROPONIC SYSTEM Thank you for purchasing the Multi Flow Hydroponic System. The Multi Flow is an ebb and flow or fill and drain type hydroponic system. The operation is simple, the pots are
PIPE DREAMS 96. Aeroponic Garden IMPORTANT:
 1 WARNING: BEFORE PUTTING WATER PUMP INTO OPERATION FILL UP NUTRIENT TANK TO TOP OF PUMP. THE PUMP MUST NEVER RUN DRY OTHERWISE, WARRANTY WILL BE DECLINED. READ FILLING INSTRUCTIONS BEFORE USE. Welcome
APPLICATION DIRECTIONS SOIL BALANCE SOIL BALANCE
 PROFESSIONAL FORMULATION APPLICATION DIRECTIONS SOIL BALANCE SOIL BALANCE Professional Formulation is a wettable powder solution comprised of 62 proprietary, live microbe strains. TABLE OF CONTENTS TABLE
How to Build A State-of-the-Art, High Yielding Aeroponic Growing System
 How to Build A State-of-the-Art, High Yielding Aeroponic Growing System Table Of Contents: Page I. Introduction 3 a. What is Aeroponics? 3 b. Why is aeroponics used? 3 II. What You Will Need and Where
Assembly of an F12 Hydroponic Tower
 Assembly of an F12 Hydroponic Tower Congratulations on your purchase! Your Foody tower will provide years of fresh produce and healthy eating. But first it must be assembled:) Following these assembly
6-SITE SUPER-FLOW SYSTEM Instruction Manual
 6-SITE SUPER-FLOW SYSTEM Instruction Manual oxygenpotsystems.com 1-888-XL-YIELD Globally Sourced Components, Fabricated and Assembled in Southern California, U.S.A. Neither Oxygen Pot Systems, Inc. nor
TABLE OF CONTENTS. MANUAL Standalone soilless barrel.
 TABLE OF CONTENTS Prerequisites to run a standalone soilless vertical barrel... 2 Required...... 3 Recommended... 4 Height of the barrels and grow spaces... 4 Scope of delivery... 4 Assembly... 7 Step
HydroCycle Vertical Aeroponic Systems
 HydroCycle Vertical Aeroponic Systems 2018 Growers Supply All Rights Reserved. Reproduction is prohibited without permission. *Actual system may differ from system shown. 113593 8' Vertical System (44
NFT. basic steps to successful growing. nutriculture ltd. Do you want. Find out more. Hydroponic
 NFT Do you want Earlier Bigger Taste Hydroponic Crops Yields Explosion Excellence Find out more basic steps to successful growing BASIC STEPS TO GROWING SUCCESSFULLY USING NFT NFT (NUTRIENT FILM TECHNIQUE)
NFT. Instructions & Grow Guide
 NFT Instructions & Grow Guide WWW.NUTSYSTEMS.CO.UK 01695 554 080 01226 320 850 0121 289 3450 Raising seeds and cuttings RAISING TRANSPLANTS FROM SEED Ensure your growing environment is good enough for
Aloha Vertical Victory Garden
 Aloha Vertical Victory Garden User Guide Thank you for choosing our Aloha Vertical Victory Garden. Edible gardening is fun, healthy, it tastes great and it s very satisfying. We are pleased that you can
HydroCycle Vertical Aeroponic Systems
 HydroCycle Vertical Aeroponic Systems 2018 Growers Supply All Rights Reserved. Reproduction is prohibited without permission. 113700 4' Vertical System (24 Grow Sites) Revision date: 01.10.18 1 Important
PolyMax H2-24 Dutch Bucket System
 11234 PolyMax H2-24 Dutch Bucket System *Actual system may differ. PolyMax Dutch Buckets Versatile PolyMax Dutch Buckets are ideal for both small- and large-scale hydroponic growing. 2017 FarmTek All Rights
Introduction to HydroCulture
 Introduction to HydroCulture HydroCulture is the practice of growing plants without soil. When compared with self watering pots there are significant similarities and differences. Both systems eases the
1 Plant IWS Oxy-Pot - Instructions
 Plant IWS Oxy-Pot - Instructions page /8 Kit Information Growing indoors using a Plant IWS Oxy-Pot is incredibly productive and remarkably simple! Your plant grows from a net pot with its roots free to
Tsunami 6 Site Ebb & Flow Gro System Instruction Manual
 Notes: 1 Square = Foot / Feet Hydrogardening Bucket Systems Tsunami 6 Site Ebb & Flow Gro System Instruction Manual Featuring Titan Controls Oceanus 3 Controller VANCOUVER, WASHINGTON U.S.A. www.flo-n-gro.net
Like Us. Made in England. Assembly and Maintenance Instructions. Call:
 Assembly and Maintenance Instructions Any Questions? Contact us We are here to help you to get the best from your plants, so if you have any questions about your Greenhouse Sensation Vivigrow planter or
Safety. Rinse Kit for Multi-Pro 1200 and 1250 Turf Sprayers Model No Safety and Instructional Decals. Installation Instructions
 Rinse Kit for Multi-Pro 1200 and 1250 Turf Sprayers Model No. 106-4842 Form No. 3353-529 Rev B Installation Instructions Note: Determine the left and right sides of the machine from the normal operating
Growing Basil Indoors: Step by Step Instructions
 Growing Basil Indoors: Step by Step Instructions Please note, if you do not want to invest in a dome, you can start your basil in plastic egg cartons and use the top as a dome, or a plastic salad container.
Offering soil solutions for all your growing needs. and more...
 Offering soil solutions for all your growing needs and more... Ultimate Potting Mixes The most reliable mixes for all your growing needs All ferti-lome soilless mixes are designed according to every plants
Propagation System Manual
 Salve Regina University Digital Commons @ Salve Regina Hydroponic Center 9-1-2011 Propagation System Manual Margaret Kane Salve Regina University, margaret.kane@salve.edu Follow this and additional works
Potting soil soil mixture- substrates
 ...enjoy the difference! Potting soil soil mixture- substrates The Company Our Manufacturing Unit Licensed, Certified & Fully automated Patent-Formula Vitalia Mix At Vitalia, a Modern Hellenic Company,
NFT GROW GUIDE THE DEFINITIVE GUIDE TO IMPROVING YOUR YIELDS USING NFT
 NFT GROW GUIDE THE DEFINITIVE GUIDE TO IMPROVING YOUR YIELDS USING NFT RAISING SEEDS AND CUTTINGS IF YOU ARE GROWING FROM SEED OR CUTTINGS THIS INFORMATION WILL BE HANDY! X-STREAM AEROPONIC PROPAGATOR
IMPORTANT SAFETY INFORMATION
 IMPORTANT SAFETY INFORMATION 1. The Tower Garden is an aeroponic growing system. Do not stand on the Tower Garden and take care to keep children from playing on the Tower Garden. 2. Follow the safety instructions
Hydroponics Systems Q&A
 Hydroponics Systems Q&A What Hydroponic System do you guys like the BEST? We get asked this question ALOT. Of course we do...and we definitely have to say that we like Drip Systems the BEST. They are easy
Objective: Tips for raising your own vegetable transplants, choosing varieties, propagation materials needed, seeding methods, fertilization and
 Objective: Tips for raising your own vegetable transplants, choosing varieties, propagation materials needed, seeding methods, fertilization and problem solving. With the right supplies you can grow many
MODEL A5-2 SOLVENT & WATER RECOVERY SYSTEMS (EXPLOSION PROOF UNITS)
") MODEL A5-2 SOLVENT & WATER RECOVERY SYSTEMS (EXPLOSION PROOF UNITS) FOR PROPER AND SAFE USE OF THIS CHEMCHAMP EQUIPMENT, PLEASE FOLLOW THIS DOCUMENT AND LOCAL AUTHORITY. KEEP THIS DOCUMENT FOR FUTURE REFERENCE.
MODEL A5-2 SOLVENT & WATER RECOVERY SYSTEMS (EXPLOSION PROOF UNITS) FOR PROPER AND SAFE USE OF THIS CHEMCHAMP EQUIPMENT, PLEASE FOLLOW THIS DOCUMENT AND LOCAL AUTHORITY. KEEP THIS DOCUMENT FOR FUTURE REFERENCE.
Owner's Manual. WS Series. Water Softener
 Owner's Manual WS-165-150 Series Water Softener Table of Contents WHAT'S INCLUDED 3 OPERATING CONDITIONS 4 ASSEMBLY INSTRUCTIONS 6 FLUSHING THE WATER LINES 13 MASTERPROGRAMMING 14 PROGRAMMING KEYAND GENERAL
A few simple steps to ensure perfect water, every time.
 A few simple steps to ensure perfect water, every time. Use and Care Guide MODELS: A4BLWTRCLR Registration Please visit the website below to register your new water cooler within the first 30 days of purchase.
Agronomy Notes Vol 32 No Root growth and development of float tobacco transplants before and after. transplanting
 Agronomy Notes Vol 32 No 1 2000 Root growth and development of float tobacco transplants before and after transplanting L. V. Caruso, R. C. Pearce and L. P. Bush INTRODUCTION In the production of float
PolyMax H1-10 Dutch Bucket System
 112529 PolyMax H1-10 Dutch Bucket System *Actual system may differ. PolyMax Dutch Buckets Versatile PolyMax Dutch Buckets are ideal for both small- and large-scale hydroponic growing. STK# DIMENSIONS 112529
ADVANTAGE-100H-SC EXTRACTOR
 ADVANTAGE-100H-SC EXTRACTOR 120V INFORMATION & OPERATING INSTRUCTIONS CAUTION: DO NOT OPERATE MACHINE UNTIL YOU HAVE READ ALL SECTIONS OF THIS INSTRUCTION MANUAL IMPROPER USE OF THE MACHINE WILL VOID THE
 CropKing NFT 4-6 ( 10f t )1/2 Hose i t em HOS0500 Var i f l oval ve i t em EMI 1015 Gr eenbackval ve i t em EMI 1014 1. Punch a hole for each channel into 2. 3. the 1/2" hose using the punch tool
OPERATOR'S MANUAL. IMPORTANT: READ OPERATOR'S MANUAL CAREFULLY Please fill out & return your warranty card! DP80405
 CARBON SPOT 30 EXTRACTOR OPERATOR'S MANUAL IMPORTANT: READ OPERATOR'S MANUAL CAREFULLY Please fill out & return your warranty card! DP80405 Diamond Products www.diamondproductsus.com Printed in the U.S.A.
Age Old Organics. Product Catalog. Let s Get Growing Naturally! (800)
") Age Old Organics Let s Get Growing Naturally! Product Catalog www.ageoldorganics.com (800) 255-4906 1 Liquid Blends Age Old Organics liquid blends are high concentrate plant fertilizers. They are formulated
Age Old Organics Let s Get Growing Naturally! Product Catalog www.ageoldorganics.com (800) 255-4906 1 Liquid Blends Age Old Organics liquid blends are high concentrate plant fertilizers. They are formulated
Assembly- and Usermanual. Rainmaker. Code No GB. Edition: 09/2007
 Assembly- and Usermanual Rainmaker Code No. 99-97-1729 GB Edition: 09/2007 Table of contents Page I 1 Overview and system specifications.................................. 1 1.1 Purpose of Evaporative
CLEAN MIST ULTRASONIC HUMIDIFIER. Instruction Manual and Warranty Information READ AND SAVE THESE INSTRUCTIONS IM0036A
 CLEAN MIST ULTRASONIC HUMIDIFIER Instruction Manual and Warranty Information IM0036A READ AND SAVE THESE INSTRUCTIONS Contents Safety Instructions... 1 Unpacking / Specifications... 2 Parts & Contents...
CHECKLIST EFFECTS OF GROWING MEDIA CHARACTERISTICS ON WATER AND NUTRIENT MANAGEMENT
 CHECKLIST EFFECTS OF GROWING MEDIA CHARACTERISTICS ON WATER AND NUTRIENT MANAGEMENT Avoid compaction of growing media. Containers should be lightly filled and the excess brushed off the top. Do not stack
HYDROPONICS INDOOR GARDENING PRODUCTS
 HYDROPONICS INDOOR GARDENING PRODUCTS Danner Manufacturing is a nationally recognized supplier of pumps, filters and accessories currently used in hydroponics, water gardens, ponds, statuary and aquariums.
Jiffy-7C. Jiffy Sri Lanka (JSL) Young coconut tree in bag. Germinating Coconut. Maturing coconuts. Coconut flower with a pollinating bee
 Young coconut tree in bag. Germinating Coconut. Maturing coconuts. Coconut flower with a pollinating bee") Jiffy Sri Lanka (JSL) Germinating Coconut Young coconut tree in bag Coconut flower with a pollinating bee Maturing coconuts Mature Coconuts Man harvesting coconuts Coconuts stored after harvesting Coir
Jiffy Sri Lanka (JSL) Germinating Coconut Young coconut tree in bag Coconut flower with a pollinating bee Maturing coconuts Mature Coconuts Man harvesting coconuts Coconuts stored after harvesting Coir
MODEL A18 SOLVENT RECOVERY SYSTEMS (EXPLOSION PROOF UNITS)
") MODEL A18 SOLVENT RECOVERY SYSTEMS (EXPLOSION PROOF UNITS) FOR PROPER AND SAFE USE OF THIS CHEMCHAMP EQUIPMENT, PLEASE FOLLOW THIS DOCUMENT AND LOCAL AUTHORITY. KEEP THIS DOCUMENT FOR FUTURE REFERENCE.
MODEL A18 SOLVENT RECOVERY SYSTEMS (EXPLOSION PROOF UNITS) FOR PROPER AND SAFE USE OF THIS CHEMCHAMP EQUIPMENT, PLEASE FOLLOW THIS DOCUMENT AND LOCAL AUTHORITY. KEEP THIS DOCUMENT FOR FUTURE REFERENCE.
Biofertilizers. Discover
 Biofertilizers Discover BioWorks Inc. Mission Statement BioWorks proudly serves growers across North America and the throughout world. For more than 20 years BioWorks has been helping our customers in
Advanced Rooting Substrate Technology
 Advanced Rooting Substrate Technology Grow-Tech is a Leading Manufacturer of Advanced Rooting Substrates for Commercial Growers and Wholesalers www.grow-tech.com info@grow-tech.com + 1 207 353 5005 Product
GrowerFacts. Spreading Petunia Wave (Petunia X hybrida)
") GrowerFacts Spreading Petunia Wave (Petunia X hybrida) Germination Use a well-drained, disease-free seedling medium with a ph of 5.5 to 6.0 and EC about 0.75 ms/cm (1:2 Water thoroughly after sowing to
GrowerFacts Spreading Petunia Wave (Petunia X hybrida) Germination Use a well-drained, disease-free seedling medium with a ph of 5.5 to 6.0 and EC about 0.75 ms/cm (1:2 Water thoroughly after sowing to
READ THESE DIRECTIONS CAREFULLY before unpacking your Garden Tower!
 READ THESE DIRECTIONS CAREFULLY before unpacking your Garden Tower! *WARNING: CHILD CHOKING HAZARD - Product contains marble-like bearings or small balls UNBOXING (VERY IMPORTANT) Open top of box, remove
Germination Mixes. Mastering the Craft of Growing Media
 Mastering the Craft of Germination Mixes Predictable Results You Can Rely On Growers around the world rely on Berger s high-quality growing media for their valuable crops. Every mix is blended with superior
Growing Successful Fast Plants Dr. Paul H. Williams - September 23, 2001
 Growing Successful Fast Plants Dr. Paul H. Williams - September 23, 2001 I. Film Can Growing System (FCS) - 4 black plastic film canisters - 1 8 oz. clear plastic "deli" container - 1 16 oz. clear plastic
CLEAN MIST SMART HUMIDIFIER TABLETOP & FLOOR STANDING WITH REMOTE CONTROL. Instruction Manual and Warranty Information
 CLEAN MIST SMART HUMIDIFIER TABLETOP & FLOOR STANDING WITH REMOTE CONTROL Instruction Manual and Warranty Information IM0034A READ AND SAVE THESE INSTRUCTIONS Contents Safety Instructions... 1 Unpacking
Hydroponic Information
 Hydroponic Information Product Specifications Hydroponic production has become a popular alternative form of commercial food production. Even though the growing media is without organic matter and in an
Basic Hydroponics System
 Basic Hydroponics System by 'Buds' Parts List: 1 bucket with lid - 3 Gallon or larger 1 aquarium air pump - Elite 802 2 feet airline 1 air stone (4" or smaller) 1 3" or 4" plant pot 2 cups gro rock or
FILTRATION SYSTEM MODEL: FILTER - 5 MULTI-SHIFTER, INC. P.O. BOX CHARLOTTE, N.C TEL#: FAX#:
 FILTRATION SYSTEM MODEL: FILTER - 5 MULTI-SHIFTER, INC. P.O. BOX 411047 CHARLOTTE, N.C. 28241-1047 TEL#: 1-704-588-9611 FAX#: 1-704-588-4730 CONTENTS 1. System Overview 2. Air and Electrical Requirements
SAFETY PRECAUTIONS. 2) Before operating machine: - Make sure all safety devices are in place and operate properly.
 Before operating machine: - Make sure all safety devices are in place and operate properly.") TABLE OF CONTENTS Machine Components Safety Precautions Machine Set Up Machine Operation Machine Maintenance & Storage Troubleshooting Technical Specifications Parts Lists Wiring Diagram 1 2 3 3-4 5 6
TABLE OF CONTENTS Machine Components Safety Precautions Machine Set Up Machine Operation Machine Maintenance & Storage Troubleshooting Technical Specifications Parts Lists Wiring Diagram 1 2 3 3-4 5 6
CHECKLIST NUTRIENT MANAGEMENT
 CHECKLIST NUTRIENT MANAGEMENT Field Production Take soil samples at or near the same time each year, so results from year to year can be compared. Take soil samples during mid summer or fall each year.
Compost and Growing Media 2017
 Compost and Growing Media 2017 Prices include VAT @ 20%. Subject to availability. Prices may vary. Pictures and specifications are a guide only. West Street Somerton Somerset TA11 7PS Fax: 01458 274010
Organic Mixes. Mastering the Craft of Growing Media
 Mastering the Craft of Growing Media Organic Mixes Predictable Results You Can Rely On Growers around the world rely on Berger s high-quality growing media for their valuable crops. Every mix is composed
COBRA -H EXTRACTOR 120V
 COBRA -H EXTRACTOR 120V INFORMATION & OPERATING INSTRUCTIONS CAUTION: DO NOT OPERATE MACHINE UNTIL YOU HAVE READ ALL SECTIONS OF THIS INSTRUCTION MANUAL IMPROPER USE OF THE MACHINE WILL VOID THE WARRANTY
Unsurpassed Technology Real field data. Real results. Real restoration.
 For Citrus Trees Ultra-Grow Technologies, Inc. Unsurpassed Technology Real field data. Real results. Real restoration. RGA has proven test data restoring the root system Rebuilds the Immune system to control
Rain&Drain. Assembly and Maintenance. Instructions. Contents: Kit box. Instructions. Oxy tube inc valve. Oxy pump. Measuring beaker.
 Rain&Drain Contents: Kit box Instructions Oxy pump Oxy tube inc valve Ph Test Kit Measuring beaker Drip ring Emptying tube Delivery tube ph down Pipette Timer Overflow Drain Assembly and Maintenance Instructions
Absorber products have the property of absorbing up to 500 times their weight in distilled water and they become gels.
 Human activities require more and more resources among them water is certainly the most precious. Modern agriculture consumes almost two thirds of the waters pumped worldwide. For this reason, more and
Water Distillation System Instruction Manual Nutriteam TC-501
 Water Distillation System Instruction Manual Nutriteam TC-501 Thank you for purchasing the Nutriteam TC-501 Water Distillation System. It will provide your household with freshly made, ultra clean, great
 TM AUTOMATIC FERTILIZING SYSTEM GARDEN PRODUCTS INSTALLATION AND OPERATING GUIDE Model: EZ 2005-HB Low Pressure Garden & Drip Feeder 3/4 Gallon Liquid / 5 LB Dry Capacity CAUTION: Installing your system
2001 Smith Eastern Corporation
 Automatic Spray Equipment Cleaning System User s Manual UG-45V Smith Eastern Corporation 10630-S Riggs Hill Road Jessup, Maryland 20794-9425 USA 301.497.7600 800.937.HVLP (4857) Fax 301.497.7613 cleaner@airverter.com
model NO. LSS GALLON SKID MOUNTED HIGH PRESSURE SPRAYER ASSEMBLY / OPERATION INSTRUCTIONS / PARTS
 000 model NO. LSS- 00 GALLON SKID MOUNTED HIGH PRESSURE SPRAYER ASSEMBLY / OPERATION INSTRUCTIONS / PARTS Part number and descriptions can be obtained from the illustrated parts list section of this manual.
Floral Notes. By . In This Issue. A Publication of the UMass Extension Floriculture Program
 A Publication of the UMass Extension Floriculture Program Floral Notes By email Volume 19, No. 6 www.umass.edu/umext/floriculture May-June 2007 In This Issue Summer Educational Programs... 2 Organic Fertilization
RoomMate. Technical Manual
 RoomMate Technical Manual 1 Table Of Contents Packing List Assembly Vegetation Chamber Assembly T-5 Bulb Installation Internal Fan Mounting Instructions CO 2 System Assembly Machine Overview Contacts and
Seed Starting. Wendy Iles Hampton Grows, Inc.
 Seed Starting Wendy Iles Hampton Grows, Inc. Hamptongrows@yahoo.com Germination Needs Water: Adequate, continuous supply; don t drown your seedlings Light: Some need light to germinate, but all need light
As part of the V.I.P. family, you are entitled to the best protection by one of the most comprehensive warranties in the industry.
 CONGRATULATIONS on your purchase of a Viper product, and welcome to the V.I.P. family. We appreciate your business and will do everything in our power to keep you happy with your purchase for many years
- 1 - Updated on 18 March, 2010
 - 1 - Updated on 18 March, 2010 TABLE OF CONTENTS 1. SPECIFICATION & PARTS IDENTIFICATION...3 2. OPERATION & FUNCTION OF PARTS...4, 5 A. Cooling Operation B. Heating Operation C. Function of Parts 3. LOCATION
Clean Water Made Easy. CWS Time Clock Softener Installation & Start Up Guide. Questions?
 Clean Water Made Easy www.cleanwaterstore.com CWS Time Clock Softener Installation & Start Up Guide Thank you for purchasing a Clean Water System! With proper installation and a little routine maintenance
 TM AUTOMATIC FERTILIZING SYSTEM GARDEN PRODUCTS INSTALLATION AND OPERATING GUIDE Model: EZ 2005-HB Low Pressure Garden & Drip Feeder 3/4 Gallon Liquid / 5 LB Dry Capacity CAUTION: Installing your system
OF THE MOST AMAZING HYDROPONIC GARDENING SYSTEMS
 I was blown away. These books make learning hydroponic gardening really fun and super easy. -- Rob OF THE MOST AMAZING HYDROPONIC GARDENING SYSTEMS EASY TO UNDERSTAND HYDROPONIC GARDENING GUIDES HYDROPONICGARDENINGEBOOK.COM
PrimePour TM Operation Manual
 COT2000 SERIES PrimePour TM Operation Manual READ BEFORE USE. 840247001 7/14 For more Good Thinking visit www.commercial.hamiltonbeach.com 840247001_v18.indd 1 IMPORTANT SAFETY INSTRUCTIONS WARNING When
Geothermal Energy Nutrient Reservoir & Trench cooling System
 Geothermal Energy Nutrient Reservoir & Trench cooling System The Reservoir and Trench portions of this design can be used separately but work better when combined. Geothermal Energy is free energy. Meaning
WS1 Greensand Installation & Start Up Guide
 WS1 Greensand Installation & Start Up Guide Thank you for purchasing a WS1 Water System for the removal of iron, manganese and hydrogen sulphide gas. With proper installation and a little routine maintenance
Advanced Rooting Substrate Technology Grow-Tech manufactures rooting substrates and systems for the professional grower.
 Advanced Rooting Substrate Technology Grow-Tech manufactures rooting substrates and systems for the professional grower. www.grow-tech.com info@grow-tech.com + 1 207 353 5005 Product Overview Expertise
Producer. Technical Manual
 Producer Technical Manual 1 Table Of Contents Packing List Assembly, Unpacking, Electrical Flowering Chamber Assembly Bulb Installation T-5 Upgrade Installation Internal Fan Mounting Instructions CO 2
ALASKA GROW BUCKETS. Designed by Jim Lister. Publisher of. Wasilla Alaska Garden Adventures
 ALASKA GROW BUCKETS http://alaskagrowbuckets.com/ Designed by Jim Lister Publisher of Wasilla Alaska Garden Adventures This work is licensed under the Creative Commons Attribution-NonCommercial- ShareAlike
COBRA -300H EXTRACTOR
 COBRA -300H EXTRACTOR 120V INFORMATION & OPERATING INSTRUCTIONS DO NOT OPERATE MACHINE UNTIL YOU HAVE READ ALL SECTIONS OF THIS INSTRUCTIONS IMPROPER USE OF THE MACHINE WILL VOID THE WARRANTY 1. Always
Lecture # 11. Water Quality - Irrigation Practices
 Lecture # 11 Water Quality - Irrigation Practices Watering: No Simple Matter! Water source.! Water within the growing medium.! Water uptake and use by the plant.! Water stress.! Watering methods.! Water:
Low Volume Irrigation
 What you will learn today Low Volume Irrigation by Angela Chandler Growing a healthy garden with less water, less waste, less time Basics of the system Materials Design principles Maintenance & repair
CapraLite. Owner s Manual. Milking Machines. Built by: Apparatus Mfg., Inc. 13 Commerce St Poughkeepsie, NY 12603
 CapraLite Milking Machines Owner s Manual www.capralite.com Built by: Apparatus Mfg., Inc. 13 Commerce St Poughkeepsie, NY 12603 Page 2 Getting your Machine ready Your machine is almost ready to use. For
3/23/2011. Poor soil Soil pests Trees Limited space Deed restrictions Love the lawn! Epcot, April
 Alternative Vegetable Gardening Sydney Park Brown Epcot, April 2010 Edibles! UF Extension Specialist Consumer Horticulture Gulf Coast Research & Education Center Plant City http://tiny.cc/tm7sx Edibles!
TABLE OF CONTENTS FOR YOUR SAFETY
 TABLE OF CONTENTS 1. SPECIFICATION & PARTS IDENTIFICATION...2 2. OPERATION & FUNCTION OF PARTS...2, 3 A. Cooling Operation B. Heating Operation C. Function of Parts 3. LOCATION REQUIREMENTS...3, 4 4. INSTALLATION
Model NFF Iron, Manganese, Hydrogen Sulfide Reduction
 Super Filter Model NFF Iron, Manganese, Hydrogen Sulfide Reduction Operating and Maintenance Manual Page 1 of this manual contains operating conditions. 57055 9/07 Enjoy clean, stain-free laundry and dishes...
CLEAN MIST DUAL TANK SMART HUMIDIFIER. Instruction Manual and Warranty Information READ AND SAVE THESE INSTRUCTIONS IM0036A
 CLEAN MIST DUAL TANK SMART HUMIDIFIER Tabletop & Floor Standing Instruction Manual and Warranty Information IM0036A READ AND SAVE THESE INSTRUCTIONS Contents Safety Instructions... 1 Unpacking / Specifications...
DESIGN & SIZING GUIDE
 DESIGN & SIZING GUIDE GRAVITY BLUMAT DIAGRAMS These basic designs show grow rooms with a gravity reservoir. The bleed valve on the end is important for lerng out air and sediment that might build up. Making
California Substrate Coco
 Coco Hydroponics Coco coir (coir fibre, Coir, Coco, Coco fibre) is a product derived from the husks of coconuts. Visually it looks a lot like peat. Coco, when used properly, represents the best of soil
PRO 2000i LOW LEVEL DEPOSITOR
 DEPOSITORS AND AUTOMATED CAKE PRODUCTION SYSTEMS PRO 2000i LOW LEVEL DEPOSITOR OPERATION AND SPARE PARTS MANUAL Serial No. PR2L- (Please quote this number when ordering spares, and making service calls)
Offering Soil Solutions to All Your Growing Needs. Product Catalog
 Offering Soil Solutions to All Your Growing Needs Product Catalog ALL PURPOSE MIXES Organic Potting Mix ferti-lome Organic Potting Mix is a totally new formulation from fertilome and is an organic wonder.
Soil & Garden Preparation. Presented by Missouri Valley Master Gardeners
 Soil & Garden Preparation Presented by Missouri Valley Master Gardeners Healthy Yankton Community Gardens Located on City Limit Road Sites available March 14, 2016 Avera Pavilion Cost $20 Contact HealthyYankton@gmail.com
Instructions Apply For Model PHTT-6P-KFC. Panel Shelf Is Removed to install warming drawers
 Installation Tips and Procedure For OTR-KFC Table Assembly And Auto-Fill Connection Instructions Apply For Model PHTT-6P-KFC TO DETERMINE TABLE PLACEMENT: Faces Front: Control Side of the units. APPROVED
Rules for Safe Operation
 Rules for Safe Operation Important: Do not attempt to operate the CleanStation until you have read thoroughly and understand all instructions and safety rules contained in this manual. Failure to comply
OWNER S MANUAL IMPORTANT: READ OWNER S MANUAL CAREFULLY
 Shovelnose Wet & Dry Vac OWNER S MANUAL IMPORTANT: READ OWNER S MANUAL CAREFULLY Please fill out and return your warranty card MODEL 261750 082713 TABLE OF CONTENTS CONGRATULATIONS on your purchase of
) F
 F") Change reservoir every 7 days Keep ph between 5.6-6.1. (If using Soil make sure ph is between 6.2-6.5). Keep Water Temp at 66-68 F Only add Additives whenever you change out reservoir Add Nutrient up to
Change reservoir every 7 days Keep ph between 5.6-6.1. (If using Soil make sure ph is between 6.2-6.5). Keep Water Temp at 66-68 F Only add Additives whenever you change out reservoir Add Nutrient up to