TRW-17 READ PRIOR TO UNPACKAGING COMPONENTS
|
|
|
- Dwayne Gardner
- 6 years ago
- Views:
Transcription
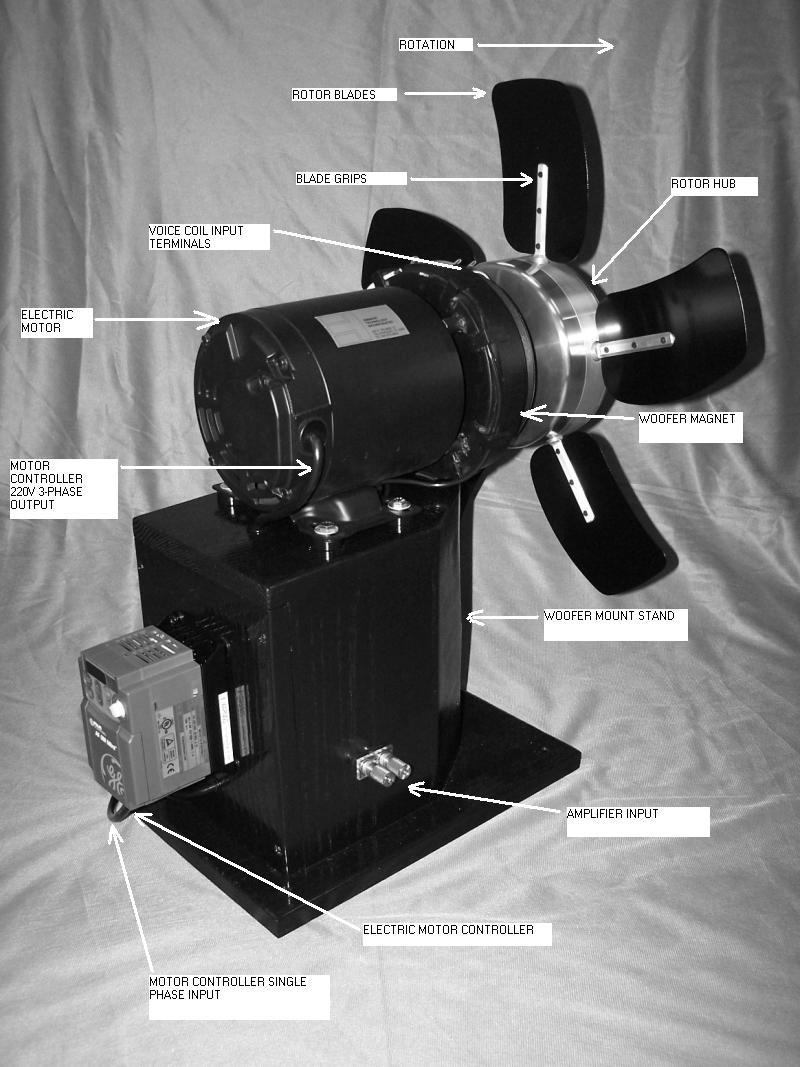
1 Rotary Woofer Setup & Installation Guide for the Eminent Technology Model TRW-17 READ PRIOR TO UNPACKAGING COMPONENTS
2 Contents: 1) Removing Rotary Woofer Stand (optional) from Shipping Crate 2) Removing Rotary Woofer from Shipping Crate 3) Assembling Rotary Woofer to optional Mounting Stand 4) Rotary Woofer Baffle Specification 5) Appendix: Rotary Woofer Components Illustration and Baffle Illustration Removing Rotary Woofer optional Stand from Shipping Crate A. Open Rotary Woofer Stand Crate from top side and set documentation, hardware, rotor blades, and tooling aside. B. Remove stand from crate and remove bagging. Use Care to avoid stress to wiring and motor controller mounting. C. Remove the four screws securing the rear panel of the woofer stand and swing panel aside, exposing the inside for mounting and hex nut tightening. D. Remove the four ¼-20 bolts from the top of the stand. E. Extend white and black woofer input wires as well as the motor controller output wire from top of mounting cabinet prior to placing woofer on stand. Removing Rotary Woofer from Shipping Crate A. Open Crate from top side B. Remove top slices of foam board and set aside C. Open plastic covering to expose woofer D. Remove woofer from crate by lifting electric motor and magnet structure. CAUTION: Care must be taken not to bend the blade grips or damage voice coil tensile leads and woofer input terminals. Assembling Rotary Woofer to Mounting Stand A. Carefully place Rotary Woofer centered on mounting stand with 1 x1 x1/16 square rubber pad beneath woofer magnet (installed on nose of stand at factory). B. Insert the four ¼-20 bolts, washers, and lock washers, and secure with supplied ¼-20 hex nuts C. Solder or attach white and black woofer input wires to voice coil barrier terminal on top of woofer D. Wire the Rotary Woofer electric motor for 220volt 3-phase AC from the output of the GE Fuji AF-300 Mini attached to rear of motor stand. Attach motor controller output wiring (using labeled wire nuts) to yellow numbered wiring in rear of motor as follows:
3 1. #3,#9,Green line lead from woofer stand motor controller output 2. #1,#7,Brown or Black line lead from woofer stand motor controller output (Line Lead) 3. #2,#8,White or Blue line lead from woofer stand motor controller output 4. #4,#5,#6 leads from rear of motor (wired together from the manufacturer). NOTE: To reverse rotation of motor, swap any two LINE LEADS (listed in steps 1-3 above) at rear of motor. Rotor rotation should be counterclockwise as viewed from the front. Rotor blade convex side should lead direction of rotation as illustrated in the Appendix of this guide. E. Supply 115volt Single Phase AC power to the GE Fuji AF-300 Mini input as instructed in AF-300 Startup Guide (the output wiring is supplied and connected to the controller). F. The AF-300 motor controller has been preset by Eminent Technology using an extended acceleration/deceleration time of 15 seconds instead of the default 6 seconds to prevent startup and shutdown damage to the shaft and the rotor mechanism. G. If the motor controller unit should arrive reset to the GE Fuji defaults (listed in the AF-300 manual), the items listed in section (F) above should be accomplished prior to operation to ensure longer service life of the Rotary Woofer components. Consult highlighted programming section of manual. H. Attach rotor blades to blade grips (convex side facing direction of rotation) using the included 3mm short, flush, socket head hardware. Install the hardware with the 2.5mm ball end hex wrench included with the blade kit. NOTE: Torque blade hardware lightly, with a small drop of blue thread locking compound. The blade grip material is aluminum and therefore threads will easily become damaged with excessive torque. All three screws must be installed into each Rotor Blade before torque is applied in order for proper blade tracking to occur and as well as ease of threading. Screws should freely thread into the blade grips without force such that threads are not damaged. If cross-threading (stripping) should occur, chase blade grip hole thread by inserting a 3mm screw from the opposite side (hub nose side). This should restore the threads. Rotary Woofer Baffle Specification A. The rotary woofer baffle can be constructed from ½ or ¾ thick Plywood, MDF, or Industrial Board using a router or Jigsaw to create the 20 hole for the rotor. The center of the hole can be measured from the center height of the rotor hub center. The woofer is designed to operate in an infinite baffle, meaning the desired sound on one side of the woofer is completely isolated from the sound on the other side of the woofer. The minimum backside volume for the woofer is about 600 cubic feet, ideally the backside volume should be much larger to achieve optimum efficiency.
4 Appendix
5
MODEL 6430T, 6460 & 6460T POTATO PEELER
 MODEL 6430T, 6460 & 6460T POTATO PEELER MODEL ML-137602 6430T ML-19630 6460 ML-137604 6460T ML-104562 6460C ML-137606 6460CT 701 S. RIDGE AVENUE TROY, OHIO 45374-0001 FORM 37005 (Apr. 2006) Installation,
INLET DAMPER WALL FAN UNIT
 FARM PRODUCTS DIVISION MEMBER OF AMCA AMERICAN COOLAIR CORPORATION P.O. BOX 2300 JACKSONVILLE, FLORIDA 32203 PHONE (904) 389-3646 FAX (904) 387-3449 E-MAIL - agfans@coolair.com INLET DAMPER WALL FAN UNIT
MNEFDD54 & MNBCDD54 GALVANIZED WALL FANS Installation, Operation, and Maintenance Instructions
 FARM PRODUCTS DIVISION MEMBER OF AMCA AMERICAN COOLAIR CORPORATION P.O. BOX 2300 JACKSONVILLE, FLORIDA 32203 PHONE (904) 389-3646 FAX (904) 387-3449 E-MAIL - fans@coolair.com MNEFDD54 & MNBCDD54 GALVANIZED
Marley X7 Fan USER MANUAL DESIGNED FOR INDUCED-DRAFT COOLING TOWER APPLICATIONS
 USER MANUAL Marley X7 Fan DESIGNED FOR INDUCED-DRAFT COOLING TOWER APPLICATIONS M2010-1234A ISSUED 3/2012 READ AND UNDERSTAND THIS MANUAL PRIOR TO OPERATING OR SERVICING THIS PRODUCT. Fan Components 1
Removal. CAUTION: Do not let tensioner arm snap back to the freearm position, sever damage may occur to the tensioner.
 Removal 3.7L/4.7L ENGINE CAUTION: Do not let tensioner arm snap back to the freearm position, sever damage may occur to the tensioner. 1. Disconnect negative battery cable from battery. 2. Rotate belt
Installation Instructions
 GE Consumer & Industrial Appliances Installation Instructions Junction Box Cover Within this user bag, you will find a junction box cover and a #10 hex head screw used to attach the junction box cover
propanel Series Installation Manual
 propanel Series Installation Manual propanel Series Installation Manual is published by Uponor Wirsbo 5925 148th Street West Apple Valley, MN 55124 (952) 891-2000 2003 Uponor Wirsbo All rights reserved
Platen Heater Pad Replacement
 Instruction Sheet P/N Platen Heater Pad Replacement WARNING: Allow only qualified personnel to perform the following tasks. Observe and follow the safety instructions in this document and all other related
HX Field Replacement Kit
 Quantity Kit Part Number Description PE 110 Natural Gas Stainless Steel Condensate Pan PT 110 Natural Gas Polypropylene Condensate Pan Model PE 110 LP Stainless Steel Condensate Pan PT 110 LP Polypropylene
KC22/32 SERIES Sealless Non-Metallic Centrifugal Pumps Installation and Maintenance Instructions
 KC22/32 SERIES Sealless Non-Metallic Centrifugal Pumps Installation and Maintenance Instructions ASSEMBLY Unpack pump from carton and check for shipping damage. WARNING: Magnetic field hazard. This pump
Owner s Guide and Installation Manual
 For Your Records and Warranty Assistance For reference, also attach your receipt or a copy of your receipt to the manual. Model Name Type 2 Models Owner s Guide and Installation Manual Model No. Catalog
Installation Instructions
 GE Consumer & Industrial Appliances Installation Instructions Junction Box Cover Within this user bag, you will find a junction box cover and a #10 hex head screw used to attach the junction box cover
Instruction Book for HD Punch Machines
 Instruction Book for HD Punch Machines HD7700, HD7000 & HD7500H Setup & Operator Manual Issue 5 February 2012 Performance Design LLC. These electric punches have been designed to punch most any job that
BUILT-IN DISHWASHER INSTALLATION INSTRUCTIONS
 BUILT-IN DISHWASHER INSTALLATION INSTRUCTIONS PLEASE READ COMPLETE INSTRUCTIONS BEFORE YOU BEGIN LEAVE INSTALLATION INSTRUCTIONS AND USER'S GUIDE WITH OWNER ALL ELECTRIC WIRING AND PLUMBING MUST BE DONE
Owner s Guide and Installation Manual
 For Your Records and Warranty Assistance For reference, also attach your receipt or a copy of your receipt to the manual. Model Name Type 2A Models Owner s Guide and Installation Manual Model No. Date
Owner s Guide and Installation Manual
 For Your Records and Warranty Assistance For reference, also attach your receipt or a copy of your receipt to the manual. Model Name Type 8 Models Owner s Guide and Installation Manual Model No. Catalog
KC22/32 SERIES Sealless Non-Metallic Centrifugal Pumps Installation and Maintenance Instructions
 KC22/32 SERIES Sealless Non-Metallic Centrifugal Pumps Installation and Maintenance Instructions ASSEMBLY Unpack pump from carton and check for shipping damage. WARNING: Magnetic field hazard. This pump
Water Distiller Service Manual
 Water Distiller Service Manual Water Distiller Service Manual L70478WT 2008 Regal Ware, Inc. Table of Contents RECOMMENDED TOOLS... 2 GENERAL INSPECTION...3 BOILING CHAMBER TROUBLESHOOTING & REPAIRS Description...
Electric Honey Extractor
 Electric Honey Extractor Instruction Manual SKU: BEE-V004E Scan the QR code with your mobile device or follow the link for helpful videos and specifications related to this product. https://vivo-us.com/products/bee-v004e
TS40 Product Assembly & Service Information Manual
 TS40 Product Assembly & Service Information Manual MODEL: SERIAL NUMBER(S): MANUFACTURE DATE: Please review all the information in this manual before attempting assembly and/or maintenance. ASSEMBLY FOR:
Model BX-903, BX-904 and BX-906 Environmental Enclosure For BAM-1020 Operation Manual
 Model BX-903, BX-904 and BX-906 Environmental Enclosure For BAM-1020 Operation Manual BX-903-9800 Rev C Met One Instruments, Inc. 1600 NW Washington Blvd. Grants Pass, Oregon 97526 Telephone: 541-471-7111
Instructions for Installing the MMD Rear Window Louvers
 Instructions for Installing the MMD Rear Window Louvers Time Required: Less than 1 hour of labor (5 hours total installation if the 4 hours of letting the brackets set are included). Required Tools: Socket
Owner s Guide and Installation Manual
 For Your Records and Warranty Assistance For reference, also attach your receipt or a copy of your receipt to the manual. Model Name Type 2A Models Owner s Guide and Installation Manual Model No. Date
CEILING FAN OWNER S MANUAL
 CEILING FAN OWNER S MANUAL VERA CRUZ 5/04 GENERAL INSTALLATION & OPERATION INSTRUCTIONS IMPORTANT SAFEGUARDS: 1. To ensure the success of the installation, be sure to read the instructions and review the
INSTALLATION GUIDELINES
 IMPORTANT: To ensure this product is installed properly, you must read and follow these guidelines. The owner/user of this product must keep this information for future reference. This product must be
INSTALLATION INSTRUCTIONS FOR 7330C740 FLUSH MOUNT CEILING ASSEMBLY
 INSTALLATION INSTRUCTIONS FOR 7330C740 FLUSH MOUNT CEILING ASSEMBLY TABLE OF CONTENTS Warnings...3 Package Contents...3 General Information...3 Supply Ducting And Registers...3 Routing 115 VAC Wiring...5
Installation Instructions Part No , Part No Part No
 Torsion-Flex Motor mount for PSC motors and Rigid-Mount for ECM motors Replacement Kit Cancels: New Installation Instructions Part No. 327752-401, Part No. 327753-401 Part No. 327754-401 IIK-310A-45-11
Owner s Guide and Installation Manual
 For Your Records and Warranty Assistance For reference, also attach your receipt or a copy of your receipt to the manual. Model Name Type 2 Models Owner s Guide and Installation Manual Model No. Date Purchased
INSTALLATION AND SERVICE MANUAL FOR THE SERIES 2000 & SERIES 3000 FAN SERIES GEN 2
 INSTALLATION AND SERVICE MANUAL FOR THE SERIES 2000 & SERIES 3000 FAN SERIES GEN 2 (PNEUMATIC CONTROL AND HYDRAULIC CONTROL) PUBLICATION No. 01900 Revision 2 Printed in Canada 1.1 INTRODUCTION Thank you
INSTALLATION AND SERVICE MANUAL FOR THE SERIES 2000 & SERIES 3000 FAN SERIES GEN 1
 INSTALLATION AND SERVICE MANUAL FOR THE SERIES 2000 & SERIES 3000 FAN SERIES GEN 1 (PNEUMATIC CONTROL AND HYDRAULIC CONTROL) PUBLICATION No. 01524 Revision 15 Printed in Canada 1.1 INTRODUCTION Thank
installation and operation manual for Hunter Ceiling Fans
 For Your Records and Warranty Assistance Model Name: Catalog/Model No.: Serial No.: Date Purchased: Where Purchased: For reference also attach your receipt or a copy of your receipt to the manual. installation
Orrin. Instruction Manual. Includes our new CoolTouch TM Control System Looks permanent, but goes wherever you go! U.S.
 Includes our new CoolTouch TM Control System Looks permanent, but goes wherever you go! U.S. Patent Pending Orrin A Kichler Select ceiling fan Kichler Lighting 7711 East Pleasant Valley Road P.O. Box 318010
HELIATOS Bottom Feed Connector Installation Instructions Introduction. Step 1
 Introduction The Bottom Feed solar water heater connector is meant to connect solar water heater panels directly to your existing standard water heater. It's main advantages are ease of installation, efficiency,
USSC LLC 4 ONE LLC FIELD MODIFICATION INSTRUCTIONS
 and Retrofit of G2E Quick Release Cushion Upholstery 1 OF 32 A 1.0 PURPOSE: To replace both Back and Cushion Upholstery on the G2E seats. 2.0 Tools Required: 2.1 1/2 Socket and Wrench 2.2 5/8 Socket 2.3
CROSS TRAINING MAGNETIC RECUMBENT BIKE
 CROSS TRAINING MAGNETIC RECUMBENT BIKE SF-RB4708 USER MANUAL IMPORTANT! Read all instructions carefully before using this product. Retain owner s manual for future reference. For customer service, please
GE Monogram. Installation. Instructions. Stainless Steel Bottom Mount Built-In Refrigerators. Models ZICS36N RH ZICS36N LH
 GE Monogram Installation Instructions Stainless Steel Bottom Mount Built-In Refrigerators Models ZICS36N RH ZICS36N LH Before you begin - Read these instructions completely and carefully. IMPORTANT - Save
54" Skye. Instruction Manual Customer Service :30 AM to 5:00 PM EST, Monday - Friday A Kichler Decor ceiling fan
 54" Skye TM 300167 A Kichler Decor ceiling fan Includes wall mount control system Kichler Lighting 7711 East Pleasant Valley Road P.O. Box 318010 Cleveland, Ohio 44131-8010 Instruction Manual Customer
Hatteras BayTM. Patio. Instruction Manual. Includes our new CoolTouch TM Control System Looks permanent, but goes wherever you go! U.S.
 Hatteras BayTM Patio A Kichler Décor ceiling fan Designed to coordinate with a popular Kichler Lighting collection. Includes our new CoolTouch TM Control System Looks permanent, but goes wherever you go!
Heat Exchanger Tube Change Procedure
 Heat Exchanger Tube Change Procedure Application: DATS II, DATS III, CorrDATS, CFM-500 and high temp, 120 or 240 VAC manufactured after 1 May 01 Last Update: 17 Dec 02 The DATS II and III systems use identical
CEILING FAN OWNER S MANUAL
 CEILING FAN OWNER S MANUAL LX SERIES 5/04 WARNING: Read and follow these instructions carefully and be mindful of all warnings shown throughout. GENERAL INSTALLATION & OPERATION INSTRUCTIONS IMPORTANT
Owner s Guide and Installation Manual Manual De Propietario
 Concert Breeze Owner s Guide and Installation Manual Manual De Propietario English Español Form# 45049-01 20090713 2009 Hunter Fan Co. For Your Records and Warranty Assistance For reference, also attach
Integrated Refrigeration
 INSTALLATION GUIDE Integrated Refrigeration Contents Integrated Refrigeration....................... 3 Model Specifications.......................... 4 Site Preparation.............................. 6
568X, 587X, 588X Series
 Please read and save this Repair Parts Manual. Read this manual and the General Operating Instructions carefully before attempting to assemble, install, operate or maintain the product described. Protect
TruTrainer. Premium Bicycle Rollers Assembly Instructions. Shaft Anti Rotation on Drive Side Rollers Purchased post 2008
 TruTrainer Premium Bicycle Rollers Assembly Instructions Shaft Anti Rotation on Drive Side Rollers Purchased post 2008 CAUTION: To prevent damage, familiarize yourself with the parts list and assembly
FitchTM. Instruction Manual. Includes our Basic Function CoolTouch TM Control System Looks permanent, but goes wherever you go!
 Includes our Basic Function CoolTouch TM Control System Looks permanent, but goes wherever you go! FitchTM A Kichler Décor ceiling fan U.S. Patent Pending Kichler Lighting 7711 East Pleasant Valley Road
rev3 INSTALLATION & OPERATION MANUAL OIL CIRCULATING HEATING SYSTEM MODEL OSM
 216279-000 rev3 INSTALLATION & OPERATION MANUAL OIL CIRCULATING HEATING SYSTEM MODEL OSM IDENTIFYING YOUR SYSTEM IOM216279-000 The HOTSTART heating system is designed to heat fluids for use in marine
ELSTON 52 CEILING FAN
 ELSTON 52 CEILING FAN MODEL #10290 Español p. 21 Questions, problems, missing parts? Before returning to your retailer, call our customer service department at 1-877-361-3883, Monday - Thursday, 8 am -
CEILING FAN OWNER'S MANUAL
 Style that revolves around you. CEILING FAN OWNER'S MANUAL VANTAGE with DC motor 12/14 WARNING: Read and follow these instructions carefully and be mindful of all warnings shown throughout. GENERAL INSTALLATION
Installation Instructions
 IMPORTANT Installation and final temperature adjustment are the responsibility of the installer. Installation Instructions Thermostatic Mixing Valve for Sinks/Faucets Inlet Outlet Model Connection Connection
Built-In Dishwasher. Installation Instructions. BEFORE YOU BEGIN Read these instructions completely and carefully. IMPORTANT The dishwasher MUST be
 Installation Instructions Built-In Dishwasher If you have questions, call 800.GE.CARES (800.432.2737) or visit our website at: www.ge.com BEFORE YOU BEGIN Read these instructions completely and carefully.
5COM52XXD Series Fan. Owner s Guide and Installation Manual. UL Model NO. : 5COM52XXD
 Owner s Guide and Installation Manual 5COM52XXD Series Fan UL Model NO. : 5COM52XXD Attach sales receipt to this card and retain as your proof of purchase DATE OF PURCHASE: MODEL NUMBER: RETAILER NAME:
Installation Instructions Built-In Dishwasher
 GE Consumer & Industrial Appliances Installation Instructions Built-In Dishwasher If you have questions, call 800.GE.CARES (800.432.2737) or visit our website at: www.ge.com BEFORE YOU BEGIN Read these
Select. Sutter PlaceTM. Instruction Manual. A Kichler Select ceiling fan
 Sutter PlaceTM A Kichler ceiling fan Kichler Lighting 7711 East Pleasant Valley Road P.O. Box 318010 Cleveland, Ohio 44131-8010 Customer Service 866.558.5706 8:30 AM to 5:00 PM EST, Monday - Friday Instruction
General System Layout Sketch
 General System Layout Sketch EZ-37 Solar Panels PV panel Glycol Fill Valve Expansion Tank ` 1 Introduction This document describes how to install a Heliatos GH type solar water heating system. These systems
CircoloTM A Kichler Décor ceiling fan Designed to coordinate with a popular Kichler Lighting collection.
 CircoloTM A Kichler Décor ceiling fan Designed to coordinate with a popular Kichler Lighting collection. Includes our new CoolTouch TM Control System Looks permanent, but goes wherever you go! U.S. Patent
INSTALLATION and OPERATION INSTRUCTIONS
 INSTALLATION and OPERATION INSTRUCTIONS Single Door cooler series MODEL NOS. CS32SB CS32SG CS32SS CS32ST IMPORTANT INFORMATION To register your product, visit our web site at (www.perlick.com). Click on
J SERIES. Technical Specifications. Centrifugal Pumps for J Series Condensate & Boiler Feed Pumps. Features
 Steam Traps Condensate Boiler Feed Valves Strainers Pumps J SERIES Centrifugal Pumps for J Series Condensate & Boiler Feed Pumps Technical Specifications The Sterlco J Series Centrifugal Pumps are designed
1. SAFETY RULES WARNING WARNING. 8. Avoid placing objects in the path of the blades.
 1 1. SAFETY RULES 1. To reduce the risk of electric shock, insure electricity has been turned off at the circuit breaker or fuse box before beginning. 2. All wiring must be in accordance with the National
Motor/Frame Assembly. Drain Cleaning Machine K Position Fan as Shown. Fan Mounting Detail
 Drain Cleaning Machine K-0 Motor/Frame Assembly 0 0. Position Fan as Shown. Fan Mounting Detail Frame Assembly 0 Screw #0 - () Rubber Foot () 0 Carriage Bolt /" - x /" Flange Bearing () 0 Bracket 0 /"
Installation Instructions
 Installation Instructions Built-In Dishwasher If you have questions, call 800-GECARES or visit our website at: www.geappliances.com BEFORE YOU BEGIN Read these instructions completely and carefully. IMPORTANT
CEILING FAN OWNER'S MANUAL
 Style that revolves around you. CEILING FAN OWNER'S MANUAL QUATRO 10/09 WARNING: Read and follow these instructions carefully and be mindful of all warnings shown throughout. GENERAL INSTALLATION & OPERATION
CEILING FAN OWNER'S MANUAL
 Style that revolves around you. CEILING FAN OWNER'S MANUAL GRANDER (GN) with DC motor 03/14 WARNING: Read and follow these instructions carefully and be mindful of all warnings shown throughout. GENERAL
CEILING FAN OWNER S MANUAL
 Style that revolves around you. CEILING FAN OWNER S MANUAL Total fan weight *53 lbs. WEXFORD 11/05 WARNING: Read and follow these instructions carefully and be mindful of all warnings shown throughout.
REF. NO Clamp Assembly 8 1 set Gasket (4 per set) S.S. Lock-washer 3/8 x 1/ Brass Impeller 3.
 S.S. Lock-washer 3/8 x 1/ Brass Impeller 3.") 4.4 SUPPLY PUMPAK ASSEMBLY NOTE: This section applies only to systems, which include a supply pumpak. Only the H6, XA, and XC series systems contain a supply pumpak. If your system is a single zone, H6
4.4 SUPPLY PUMPAK ASSEMBLY NOTE: This section applies only to systems, which include a supply pumpak. Only the H6, XA, and XC series systems contain a supply pumpak. If your system is a single zone, H6
Owner s Guide and Installation Manual
 Tribeca Owner s Guide and Installation Manual English Form# M6001-01 20120416 2012 Casablanca Fan Co. Welcome Your new Casablanca ceiling fan is an addition to your home or office that will provide comfort
CEILING FAN OWNER S MANUAL
 CEILING FAN OWNER S MANUAL 5/03 I/O THE INDOOR/OUTDOOR FAN WARNING: Read and follow these instructions carefully and be mindful of all warnings shown throughout. GENERAL INSTALLATION & OPERATION INSTRUCTIONS
INSTALLATION AND SERVICE MANUAL FOR THE TAC1000-P FAN SERIES (PNEUMATIC CONTROL) TAC1000-H FAN SERIES (HYDRAULIC CONTROL)
 TAC1000-H FAN SERIES (HYDRAULIC CONTROL)") INSTALLATION AND SERVICE MANUAL FOR THE TAC1000-P FAN SERIES (PNEUMATIC CONTROL) TAC1000-H FAN SERIES (HYDRAULIC CONTROL) Publication No. 01553 Revision 8 Printed in Canada 1.1 INTRODUCTION This manual
INSTALLATION AND SERVICE MANUAL FOR THE TAC1000-P FAN SERIES (PNEUMATIC CONTROL) TAC1000-H FAN SERIES (HYDRAULIC CONTROL) Publication No. 01553 Revision 8 Printed in Canada 1.1 INTRODUCTION This manual
52 DorsetTM. Instruction Manual. Basic Function Wall Control System Included. A Kichler Decor ceiling fan
 Basic Function Wall Control System Included 52 DorsetTM II A Kichler Decor ceiling fan Kichler Lighting 7711 East Pleasant Valley Road P.O. Box 318010 Cleveland, Ohio 44131-8010 Customer Service 866.558.5706
I N ST R UC T I ON. MODEL HAB500 AroMatic TM BREAD SLICERS MODEL FORM (4-99) AROMATIC BREAD SLICER 701 S. RIDGE AVENUE TROY, OHIO
 AROMATIC BREAD SLICER 701 S. RIDGE AVENUE TROY, OHIO") I N ST R UC AROMATIC BREAD SLICER T I ON S MODEL HAB500 AroMatic TM BREAD SLICERS MODEL HAB500 ML-104845 701 S. RIDGE AVENUE TROY, OHIO 45374-0001 FORM 34198 (4-99) TABLE OF CONTENTS GENERAL..........................................................
I N ST R UC AROMATIC BREAD SLICER T I ON S MODEL HAB500 AroMatic TM BREAD SLICERS MODEL HAB500 ML-104845 701 S. RIDGE AVENUE TROY, OHIO 45374-0001 FORM 34198 (4-99) TABLE OF CONTENTS GENERAL..........................................................
36 & 48 E-Z Cone Fan. Installation & Operator s Instruction Manual (Direct Drive)
") 36 & 48 E-Z Cone Fan Installation & Operator s Instruction Manual (Direct Drive) September 1997 MV1433C Chore-Time Warranty Chore-Time Equipment warrants each new product manufactured by it to be free
36 & 48 E-Z Cone Fan Installation & Operator s Instruction Manual (Direct Drive) September 1997 MV1433C Chore-Time Warranty Chore-Time Equipment warrants each new product manufactured by it to be free
INSTRUCTION MANUAL with Replacement Parts
 INSTRUCTION MANUAL with Replacement Parts MODEL FD500 FOOD WASTE DISPOSERS (INCLUDES MOTOR PARTS) ML-18978 A product of HOBART CORPORATION 701 S. RIDGE AVENUE TROY, OHIO 45374-0001 FORM 11394 Rev. G (10-98)
Installation Instructions Built-In Dishwasher
 RINSE CHINA CRYSTAL SPEED CYCLE NORMAL WASH COOK WARE SELECTIONS ANTI BACTERIA START RESET ENHANCEMENTS DELAY HOURS ADDED HEAT PRE WASH HEATED DRY TO LOCK CONTROLS PRESS HEATED DRY FOR 3 SECONDS GE Consumer
Installation Instructions. For the 18 Built-In Dishwasher and Front Color Panels
 Installation Instructions For the 18 Built-In Dishwasher and Front Color Panels Printed in USA 154232102 Before You Begin DO NOT INSTALL DISHWASHER UNTIL YOU HAVE READ ALL INSTRUCTIONS. FOR YOUR SAFETY,
60" Lyndon Patio. Instruction Manual Customer Service :30 AM to 5:00 PM EST, Monday - Friday A Kichler Decor ceiling fan
 60" Lyndon Patio TM 310140 A Kichler Decor ceiling fan Includes wall mount control system Kichler Lighting 7711 East Pleasant Valley Road P.O. Box 318010 Cleveland, Ohio 44131-8010 Instruction Manual Customer
1. SAFETY RULES. 8. Avoid placing objects in the path of the blades.
 1 1. SAFETY RULES 1. To reduce the risk of electric shock, insure electricity has been turned off at the circuit breaker or fuse box before beginning. 2. All wiring must be in accordance with the National
ALH SYSTEMS LTD ALH SYSTEM 1 SERVICE VALVE AND DRILLING MACHINE OPERATING MANUAL
 ALH SYSTEMS LTD ALH SYSTEM 1 SERVICE VALVE AND DRILLING MACHINE OPERATING MANUAL CONTENTS ALH SYSTEM 1 PRODUCT RANGE OPERATING AND SERVICE NOTES ALH SYSTEM 1 SERVICE VALVE EXPLODED DIAGRAM ALH SYSTEM 1
Model 5060/5070. Letter Opener Revision 3 Brush Transport
 Model 5060/5070 Letter Opener Revision 3 Brush Transport ON/OFF, Reset Envelope Guide Ramp / Envelope Model 5060, 5070 Letter Opener Introduction Variable Speed Track Cover Counter (Optional) Deflector
Marley Ultra Quiet Fan
 USER MANUAL Marley Ultra Quiet Fan DESIGNED FOR INDUCED-DRAFT COOLING TOWER APPLICATIONS M2012-1165 ISSUED 8/2012 READ AND UNDERSTAND THIS MANUAL PRIOR TO OPERATING OR SERVICING THIS PRODUCT. safety and
INTRODUCTION. NOTE: Read the entire instruction manual before starting the installation. FIRE, EXPLOSION, ELECTRICAL SHOCK HAZARD
 Installation Instructions NOTE: Read the entire instruction manual before starting the installation. SAFETY CONSIDERATIONS Improper installation, adjustment, alteration, service, maintenance, or use can
READ AND SAVE THESE INSTRUCTIONS
 READ AND SAVE THESE INSTRUCTIONS CEILING FAN INSTALLATION AND OPERATION INSTRUCTION FAN RATING AC 120V. 60Hz UL LISTED MODEL: AC-552OD WEIGHT OF FAN: 6.82 KGS 1. TOOLS AND MATERIALS REQUIRED Philips screw
ACRYLIC CLAWFOOT TUB
 ACRYLIC CLAWFOOT TUB INSTALLATION INSTRUCTIONS AND CARE GUIDE CONTENTS Tub Installation...2 Rough-In...2 Drain Installation...3 Drain without Overflow...3 Waste and Overflow Drain...3 Trimming Drain Pipes...4
KimberleyTM A Kichler Décor ceiling fan Designed to coordinate with a popular Kichler Lighting collection.
 KimberleyTM A Kichler Décor ceiling fan Designed to coordinate with a popular Kichler Lighting collection. Includes our new CoolTouch TM Control System Looks permanent, but goes wherever you go! U.S. Patent
installation and operation manual for Hunter Ceiling Fans
 For Your Records and Warranty Assistance Model Name: Catalog/Model No.: Serial No.: Date Purchased: Where Purchased: For reference also attach your receipt or a copy of your receipt to the manual. installation
Series PX. Installation & Maintenance. Models: PX-3 PX-5 PX-7 1/2-HF PX-10-HF PX-15-HF. Materials: A - CPVC
 Series PX Installation & Maintenance Models: PX-3 PX-5 PX-7 /2-HF PX-0-HF PX-5-HF Materials: A - CPVC Introduction Penguin Pumps are designed to handle a large range of chemicals without difficulty. Completely
KD-27A SERIES DISHWASHERS
 KD-27A SERIES DISHWASHERS INSTALLATION INSTRUCTIONS FORM 4171083 (153138) 3-86 THIS PAGE INTENTIONALLY LEFT BLANK BEFORE STARTING: Please read these installation instructions COMPLETELY AND CAREFULLY.
Installation Instructions
 Installation Instructions Over the Range Microwave Oven PVM88 Questions? Call -800-56-44 or Visit our Website at: GEAppliances.ca BEFORE YOU BEGIN Read these instructions completely and carefully. IMPORTANT
BUBBLE-Maker. Necessary tools and materials:
 106.326 BUBBLE-Maker Necessary tools and materials: Fretsaw and board Wood file, glasspaper Pillar drill Hole maker 2mm dia.+ 3.5mm Cross and normal screwdriver Allen key ( 7mm ) Wood glue, all purpose
60" Hatteras BayTM. Patio. Instruction Manual. Includes our new Wall Control System. A Kichler Décor ceiling fan
 Includes our new Wall Control System 60" Hatteras BayTM Patio A Kichler Décor ceiling fan Kichler Lighting 7711 East Pleasant Valley Road P.O. Box 318010 Cleveland, Ohio 44131-8010 Customer Service 866.558.5706
Gen II Entree Bath - All Models
 Gen II Entree Bath - All Models Installation Manual Important Safety Instructions Read & Follow All Instructions Thoroughly Important safety instructions. Read and follow all instructions thoroughly. CAUTION:
Eldex Column Heater. Operator s Manual
 Eldex Eldex Column Heater Operator s Manual Eldex Laboratories, Inc. 30 Executive Court Napa, CA 94558 Tel: (707) 224-8800 Fax: (707) 224-0688 www.eldex.com Rev. B: 081700 2000Eldex Laboratories, Inc.
CEILING FAN OWNER'S MANUAL
 CEILING FAN OWNER'S MANUAL READ AND SAVE THESE INSTRUCTIONS MODEL: 52-135-5WA-13 FAN RATING AC 120V. 60Hz CUL LISTED MODEL : AC-552OD 1. TOOLS AND MATERIALS REQUIRED Philips screw driver Blade screw driver
Hanson LED C e i l i n g F a n
 Hanson LED C e i l i n g F a n model no. 052-8398-2 Toll-free 1-866-827-4985 IMPORTANT: For your safety please read and understand this manual before installing or operating this product. OWNER S MANUAL
Home Stack Washer/Dryers
 Home Stack Washer/Dryers Refer to Page 3 for Model Numbers Parts SWD456C_806093 www.alliancelaundry.com Part No. 806093R1 December 2016 Table of Contents Title Page Parts Ordering Information... 2 Serial
SuperKlean Washdown Products
 DURAREEL DR8 & DR8S INSTALLATION AND MAINTENANCE INSTRUCTIONS **DO NOT THROW AWAY AFTER INSTALLATION** **SAVE AND DISPLAY PROMINENTLY WHERE THIS EQUIPMENT IS USED** GENERAL WARNINGS High pressure and hot
1. SAFETY RULES. 1. To reduce the risk of electric shock, insure electricity has been turned off at the circuit breaker or fuse box before beginning.
 Kichler Basics 403 1 1. SAFETY RULES 1. To reduce the risk of electric shock, insure electricity has been turned off at the circuit breaker or fuse box before beginning. 2. All wiring must be in accordance
60" Tulle PatioTM. Instruction Manual. A Kichler Select ceiling fan
 60" Tulle PatioTM A Kichler Select ceiling fan cul Certified for Wet Location Kichler Lighting 7711 East Pleasant Valley Road P.O. Box 318010 Cleveland, Ohio 44131-8010 Customer Service 866.558.5706 8:30
CEILING FAN OWNER'S MANUAL
 Style that revolves around you. CEILING FAN OWNER'S MANUAL Hover with DC motor 12/14 WARNING: Read and follow these instructions carefully and be mindful of all warnings shown throughout. GENERAL INSTALLATION
42 Kevlar. Instruction Manual. Kichler Lighting 7711 East Pleasant Valley Road P.O. Box Cleveland, Ohio
 42 Kevlar Kichler Lighting 7711 East Pleasant Valley Road P.O. Box 318010 Cleveland, Ohio 44131-8010 Customer Service 866.558.5706 8:30 AM to 5:00 PM EST, Monday - Friday Instruction Manual 1 1. SAFETY
Installation and Operation Manual For Hunter Ceiling Fans
 Installation and Operation Manual For Hunter Ceiling Fans 1 2 CONGRATULATIONS! Your new Hunter ceiling fan is an addition to your home or office that will provide comfort and performance for many years.
CEILING FAN OWNER'S MANUAL
 Style that revolves around you. CEILING FAN OWNER'S MANUAL Vail with DC motor 10/15 WARNING: Read and follow these instructions carefully and be mindful of all warnings shown throughout. GENERAL INSTALLATION