A301 SHOWER PANEL INSTALLATION GUIDE
|
|
|
- Louise Farmer
- 6 years ago
- Views:
Transcription


1 A301 SHOWER PANEL INSTALLATION GUIDE

2 Shower Panel Installation Read Before Using Your New Shower Panel Congratulations on purchasing an Ariel Shower Panel. Your new shower panel will be a great addition to your bathroom for years to come. This manual will be your reference for installation, instructions for care of the shower panel, operation of the shower panel and for the benefits of using an Ariel Shower Panel. Before using your new Ariel Shower Panel, please read this document carefully and thoroughly. The instructions and safety information in this document are essential to the safe operation of your new unit. Additionally, not adhering to the conditions regarding maintenance and installation in this document may affect your new product s warranty. An Ariel Shower Panel brings a spa experience into your life in the comfort of your personal bathroom. Adding the shower panel as a modification to your present shower will allow you to enjoy the pleasures of massaging body spray jets, an overhead rain shower and a shower wand. Furthermore, the shower panel will operate with your existing plumbing supply lines with standard line pressure and flow rates. IMPORTANT: This shower panel will replace your present mixing valve set up. A retrofit shower panel would be used if you plan to continue using your present setup. Owning an Ariel Shower Panel means you will not need to complete expensive upgrades to get a spa experience in your home. Our shower panels come with luxury features in the form of standard equipment. Features Included: -Body jets -Handheld shower wand -Overhead rain shower -Two Stainless Steel Hoses -Thermostatic valve -Multi-position diverter valve

3 Instructions for Installation Carefully read and follow the instructions in the following guidelines. If you fail to follow these recommended instructions and techniques for installation, you risk affecting the warranty claims for your product and causing damage to the unit and the surrounding area. IMPORTANT: In order to install this shower panel, simple understanding of plumbing techniques will be necessary. Please contact your dealer or a professional plumber if you are unfamiliar with plumbing techniques or have questions. While determining the installation location for your new unit, we recommend you take into account the guidelines below. All installations are unique and these guidelines are general: 1. This shower panel is designed for indoor use ONLY. It is not intended for outdoor use or other uses. 2. We have provided flexible supply hoses. It is recommended that you consider installing individual cut off valves for the cold and hot water supplies. Prior to installation, make sure to check your unit for the following: 1. Look over all of the unit s components. Check for damaged and broken components and sections. 2. Contact your dealer or the manufacturer if you find damaged sections. Vacuum Break The risk of backflow, which can contaminate the drinking water supply, is reduced by a vacuum break. A vacuum break, pictured here, is a backflow preventer. The vacuum break will emit a small amount of water when the shower is turned on (when the hand shower is above the level of the vacuum break) and/or when the shower control valves are opened and closed. The presence or absence of water pressure in the supply line causes the seating and unseating of the diaphragm.
 -Water pressure: 60 to 80 psi for both cold and hot supply lines You will have to speak with a plumber regarding the installation of a booster pump or enlarging your supply")

4 Plumbing Requirements: -Flow rate: 2.5 gallons per minute (gpm) -Water pressure: 60 to 80 psi for both cold and hot supply lines You will have to speak with a plumber regarding the installation of a booster pump or enlarging your supply lines if your water supply in unable to meet the requirements above. Tools You Will Need: -3 foot level -Drill, screwdriver attachments & masonry or tile drill bits -Teflon tape -Adjustable wrench -Bathroom rated silicone sealant -Caulk gun -Tape measure -Phillips head screwdriver -Pipe cutter Items You Will Need (Note, these are not provided): -The appropriate diameter drill bits for your wall surface, including ¼ and 5/16 -Standard male 3/8 compression threads supply line connection fittings -Optional supply line cut off valves with standard male 3/8 compression threads The installation guidelines assume that rough plumbing has already been finished and that shower walls are finished. IMPORTANT: These guidelines assume that you are performing a remodel on your bathroom. The only items needed to operate an Ariel Shower Panel are separate cold and hot water supply lines. The shower panel is a replacement of any mixing valve set up you are currently using. If you are thinking of using your current mixing valve set up, it is recommended that you use a retrofit unit, which is specifically designed for that use.
5 WARNING: You must turn off the cold and hot water supply to the location of installation before starting the installation. Connecting to the Supply Lines -Note, the connection to the cold and hot supply lines is not provided. Two flexible hoses, which are provided with the shower panel unit, make the connection between the supply lines and the shower panel. -Standard female 3/8 compression threads with appropriate washers for connections are used for the hoses. -Separating the cut off valves for the cold and hot water supply lines will assist in any future service performed to the unit. It is recommended that you do this, although it is not required. -Purchase the appropriate valves and fitting for your installation that will provide male 3/8 compression threads for attachment to the flexible hoses. -Before continuing your installation, the supply connections must be completed. Mounting Your Showerhead -Install the rubber washer onto the showerhead and install onto the shower arm. Mounting the Brackets of the Shower Panel While mounting the brackets of your new shower panel, the following will influence your decision on which height to mount the unit at: -It is recommended that the shower panel be mounted at a height that will make the unit accessible to people of varying heights. That way, various people in the home can enjoy the shower panel. -A comparison between the height of the overhead rain shower to the body jets and the height of all of the people who will be using the shower panel. -Whether or not the height you choose will allow the shower panel to completely cover up the connection points for the cold and hot water supplies.
6 In order to determine your installation location of the shower panel, you will require the use of a tape measure and pencil (or some type of marking tool). IMPORTANT: A second person may be needed to assist you in holding up the unit while another person makes the measurements used during the installation. Steps for Mounting the Shower Panel 1. First, locate the package including the wall anchors, mounting brackets and screws. These will be used in the following process. 2. Mark where the center of the shower panel will be placed with a center line. (This is usually at the center of the plumbing supply lines.) 3. Make marks on the bottom and center of the shower panel while holding it at your desired height and location on the center line. This will act as a reference point for the measurements of the bottom of the shower panel and the other measurements for placing the mounting brackets. 4. Lay the unit on the ground with its back facing up. Find the two built-in hanging straps of the unit. 5. The following guidelines will assist you in placing the mounting brackets: a. Four mounting brackets are used in units with two single bar straps. (Two will go on the top strap and two will go on the bottom strap.) b. Determine the distance between the top and bottom strap. This is measurement X. Measure from the top to top or bottom to bottom of the straps. c. Determine the distance between the most outside measurement from the bottom of the top strap to the bottom of the shower panel. Measure this and it will be measurement Y. d. Starting from the reference mark (which was made when the shower panel was on the wall), mea sure up the distance Y to the bottom outside of the shower panel and mark this. ( Y was the distance from the bottom of the top strap to the bottom outside of the shower panel.) Mark this. e. Place a second mark a few inches to one side of the mark you just made. This second mark should be at the same height. Make a horizontal line through these two marks with the use of a level. f. The two mounting brackets need to be equally spaced about the centerline (and two mounting brackets are required on each strap). (Tip: Dividing the width of the shower panel by two is a good rule of thumb for determining the distance between the two brackets.) Divide the distance between the two brackets to determine the distance between each bracket and the center line. -Example: If the width of the shower panel is 12 inches, the distance between the brackets is 6 inches (12/2=6). Thus, the distance between the center line and each bracket is 3 inches (6/2=3). Mark the distance for the two mounting brackets. g. Hold one mounting bracket flat against the wall with the mounting holes over the mark indicat ing the bracket s location from the center line. The mounting holes must point towards the bottom of the shower.
7 h. You will have to line up this mounting bracket so that the bend in the bracket is on the horizontal line you drew earlier. Meanwhile, make sure the mounting holes are still centered on the mark you made for the bracket s location. i. Mark both of the mounting holes in the mounting bracket. j. Repeat this process for the other mounting bracket and you will have successfully marked the loca tions for both the top brackets. k. Use the location of one of the top mounting brackets as a reference for the next measurement. Measure the distance X straight down from the top mounting hole and make a mark. ( X is the distance between the two mounting straps.) l. Repeat this process with the location of the other top mounting bracket. m. Use one of the last two marks you made to place the third mounting bracket. Center the top mounting hole of the bracket within the mark. Make sure the mounting bracket is vertical and mark both of the mounting holes. n. Repeat the last step with the fourth and last mounting bracket. o. Drill each hole location. Use a 5/16 diameter drill bit with the appropriate drill bit for your wall surface. TIP: Pilot drill with a smaller drill bit before stepping up to the final size if your wall surface is prone to chipping and cracking. p. Place the plastic wall anchors into the holes you have drilled. q. With a Phillips screwdriver, or a drill with a Phillips bit, attach the mounting brackets to the wall surface with the use of the provided screws. Connect Your Shower Panel to Your Water Supply After installing the mounting brackets for your shower panel, the final water connections will be made. 1. You will find the input cold and hot water connections on the back of the thermostatic valve on the shower panel unit. The cold connection is labeled with a blue sticker and the hot connection is labeled with a red sticker. 2. Connect each of the flexible hoses to the thermostatic valve. Then connect each hose to the corre sponding cold and hot water supplies. Secure both hoses. IMPORTANT: Use the rubber washer included in your purchase. 3. Turn on each of the valves if you installed cut off valves on your supply line. Check for leaks in both the cold and hot water supply. If there are no leaks, you may move on to the next process in the installation.
8 Hanging your Ariel Shower Panel You can hang your shower panel on the mounting brackets you installed when you are done checking for leaks. To hang the shower panel: 1. Put your shower panel on the wall surface with the mounting straps above the corresponding mounting brackets while making sure that the flexible supply lines are in the shower panel enclosure. 2. Slide the shower panel down. Stop when it rests on the mounting brackets you installed. 3. The shower panel must be seated onto the mounting brackets by pulling down on the shower panel. You will have seated the unit on the mounting brackets properly after you feel a slight movement down ward and the shower panel stops moving. 4. Seal the shower panel with a caulk gun using a bathroom rated caulk or sealant. Run sealant where the unit contacts the wall surface, using a bead of caulk. 5. Use excess caulk to fill in any cracks or spaces in the joint, and wipe away the excess caulk. The Shower Wand and Hose Installation 1. There are two tapered ends to the shower wand. One end has an O-ring around the outside. Install the end with the O-ring onto the shower wand. Before screwing the hose and the wand together, install the rubber gasket that came with your unit. 2. The other end of the hose (without the O-ring) will be installed onto the outlet spout for the shower wand. A rubber gasket must be placed between the outlet spout and the hose. 3. The shower wand goes into the wand holder with the O-ring holding it in place. Operating Your Ariel Shower Panel IMPORTANT: You must read and understand all of the safety statements and warnings in this document before operating your shower panel unit. Failure to do so may risk the warranty of your product. If you do not understand this document, we ask that you contact the manufacturer or your dealer for assistance. Diverter Valve The flow of water to the overhead shower, shower wand, body jets and the ON/OFF position is controlled by the diverter valve. The diverter valve is operated by rotating it to one of the devices above depending on which one you want to use. After rotating it to a device you will feel a click for each device. IMPORTANT: The diverter can only operate one device at one time. Only one device can be operated at one time because of current water conservation requirements and typical residential flow rates and water pressure. For example, the body jets and overhead shower will not work at the same time.
9 Thermostatic Faucet The thermostatic faucet sets the mixture between the cold and hot water in the unit. The unit will not change the water temperature beyond the temperature of the hot water heater in your home; the markings for temperature are only for reference. The unit will operate at the same temperature unless you change the setting of the thermostatic faucet. Set the thermostatic faucet to the temperature you prefer. Press the release button in order to operate the faucet and turn the faucet to your preferred temperature. Showerhead 1. Set the diverter valve to the showerhead setting and the water will start. 2. Designate the temperature you want with the thermostatic valve. 3. Turn the diverter valve to off when you are done. Body Jets 1. Set the diverter valve to the body spray jet setting and the water will start. 2. Designate the temperature you want with the thermostatic valve. 3. Turn the diverter valve to off when you are done. Shower Wand 4. Set the diverter valve to the shower wand setting and the water will start. 5. Designate the temperature you want with the thermostatic valve. 6. Turn the diverter valve to off when you are done.
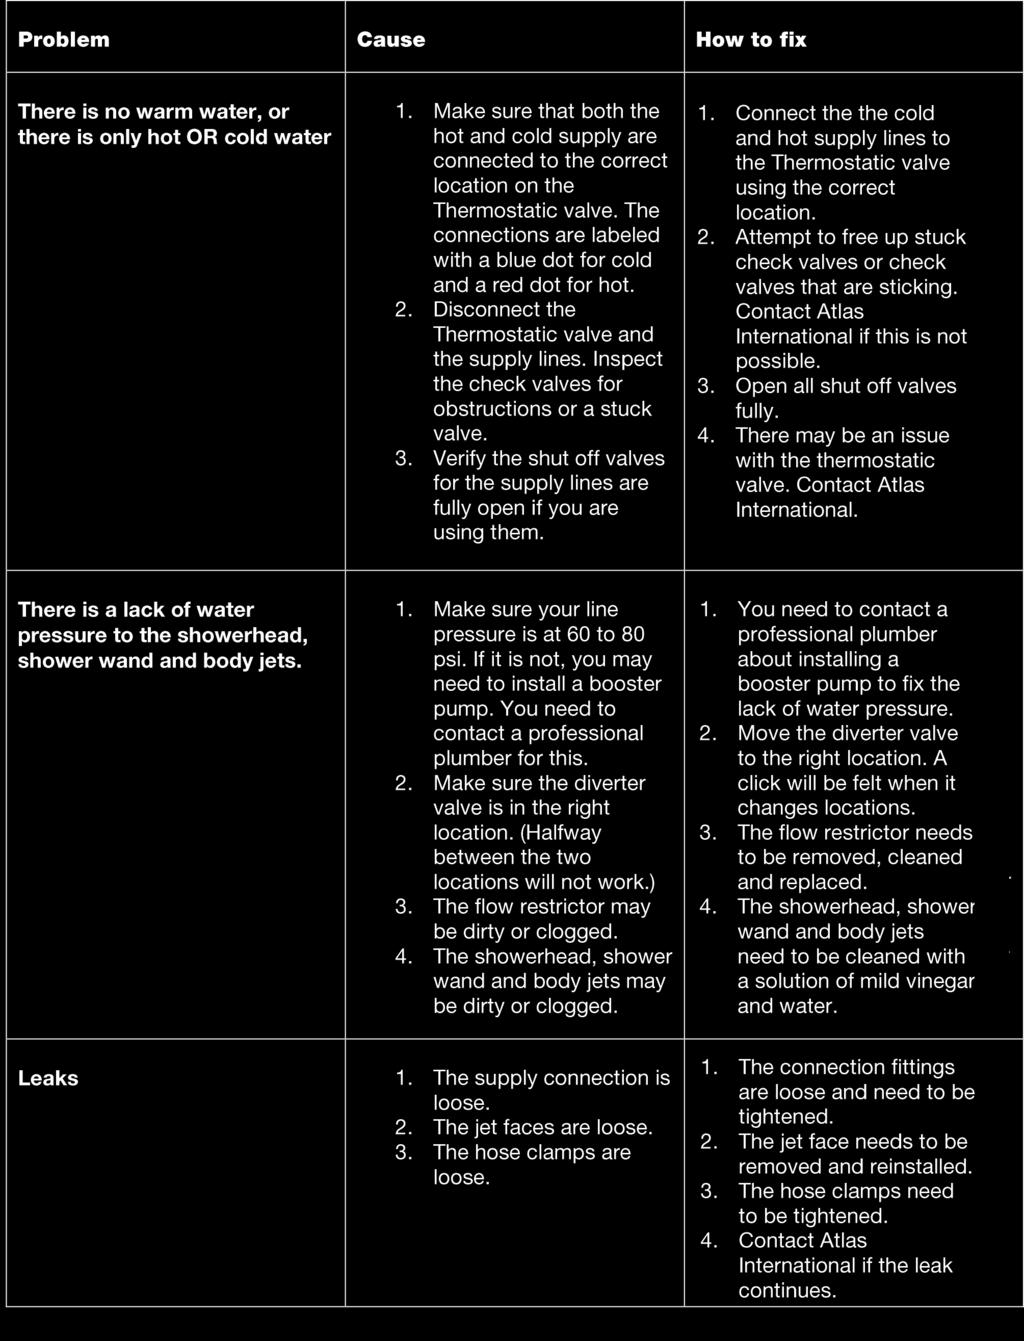
10 Troubleshooting
11 Care and Maintenance of Your Ariel Shower Panel Follow these guidelines to ensure that your luxury shower panel lasts a long time and to keep your warranty intact. The proper maintenance of the product is crucial. If you do not adhere to the following guidelines, the resulting damage will not be covered by the warranty from the manufacturer. It is important that you follow these guidelines so that your shower panel unit s life will last longer. If you follow the guidelines for care and maintenance, the finish and look of the shower panel will last. The shower panel is made of high quality acrylic that requires proper care. IMPORTANT: Abrasive cleaners should never be used on the shower panel unit. Do NOT use Ajax or Comet for cleaning the acrylic unit; it will result in dulling the finish on the unit and scratching the acrylic surface. Do NOT use MEK, acetone, mineral spirits or any solvent based cleaner for cleaning the shower panel. Mild, non-abrasive cleaners should be used to clean the shower panel unit. Appropriate cleaners include Soft Scrub or cleaning products that are specifically designed for use on an acrylic surface. The finish, luster and shine of your shower panel unit can be maintained by buffing and polishing the acrylic surface. This can be accomplished using appropriate products, such as Maguire s #10 Mirror glaze, automotive polishing paste, toothpaste or a good polishing compound. If you do find minor, small scratches on the acrylic surface of the shower panel, you can gently buff them using 600# grit wet sand paper. Also, the luster and shine of the surface can be restored using a surface polish. An acrylic repair kit can be purchased for fixing chips in the acrylic surface or scratches. Acrylic repair kits can be found at home centers and hardware stores. Follow the instructions and guidelines that come with the acrylic repair kit. Showerhead and Body Jets The showerhead and body jets may need to be cleaned because of hard water or the build-up of calcium, rust or lime, depending upon the chemistry of your water. To clean the showerhead and/or the body jets, you first need to remove the piece from the shower panel by screwing it off. It can be cleaned with a solution of water and mild vinegar (50/50). You can also soak the piece in the solution before cleaning it. Alternatively, you may use CLR or another hard water cleaner.

12 500 West Warner Ave, Santa Ana, CA arielbath.com atlasusa.net Phone:
NIAGARA. Niagara ShowerSpa Model #1048B-BN Owner s Manual
 NIAGARA Niagara ShowerSpa Model #1048B-BN Owner s Manual Niagara ShowerSpa Model 1048B-BN Please Read The Following Instructions COMPLETELY Before Beginning! Our goal is to ensure your installation goes
ACRYLIC PEDESTAL TUB
 BEFORE YOU BEGIN We recommend consulting a professional if you are unfamiliar with installing bathroom fixtures and plumbing. Signature Hardware accepts no liability for any damage to the floor, walls,
SANTA CRUZ. Santa Cruz ShowerSpa Model #1033 Owner's Manual
 SANTA CRUZ Santa Cruz ShowerSpa Model #1033 Owner's Manual Santa Cruz ShowerSpa Model #1033 Please Read The Following Instructions COMPLETELY Before Beginning! Our goal is to ensure your installation goes
Leilani ShowerSpa Model #1022-B Owner's Manual
 Leilani ShowerSpa Model #1022-B Owner's Manual Leilani ShowerSpa Model #1022-B Please Read The Following Instructions COMPLETELY Before Beginning! Our goal is to ensure your installation goes smoothly
Important Safety Instruction
 WARNING: To reduce the risk of drowning, electrical shock, or injury, read the following important precautions before using the unit. If you do not fully understand the meaning of any of the precautions
INSTALLATION AND OWNER'S MANUAL
 INSTALLATION AND OWNER'S MANUAL Steam Shower Model Number: ZA218 Please carefully read these instructions before you begin to install the products. 07/11 Rev A P/N: 100053-01 Thank you for purchasing your
RIO. Rio ShowerSpa Model #1049B-BN Owner s Manual
 RIO Rio ShowerSpa Model #1049B-BN Owner s Manual Rio ShowerSpa Model 1049B-BN Please Read The Following Instructions COMPLETELY Before Beginning! Our goal is to ensure your installation goes smoothly and
Ariel PlAtinum AnnA tb222m installation guide
 Ariel Platinum ANNA TB222M installation guide ARIEL PLATINUM TOILET MANUAL INVISIBLE L-MOUNT BRACKETS TABLE OF CONTENTS 1. Sizing and Details 2. Necessary Tools and Materials 3. Precautions Before Installation
Murano Shower Cabin Installation Instruction
 Murano Shower Cabin Installation Instruction IMPORTANT Please read carefully the following instructions before installing your shower cabin. If you have any questions on this shower cabin installation
MOJAVE. Mojave ShowerSpa Model #1016 Owner's Manual
 MOJAVE Mojave ShowerSpa Model #1016 Owner's Manual Mojave ShowerSpa Model #1016 Please Read The Following Instructions COMPLETELY Before Beginning! Our goal is to ensure your installation goes smoothly
STAINLESS STEEL TUB INSTALLATION
 BEFORE YOU BEGIN We recommend consulting a professional if you are unfamiliar with installing plumbing fixtures. Signature Hardware accepts no liability for any damage to the faucet, plumbing, sink, counter
Oahu Showerspa Model #1035 Owner's Manual
 O A H U Oahu Showerspa Model #1035 Owner's Manual Oahu ShowerSpa Model #1034 Please Read The Following Instructions COMPLETELY Before Beginning! Our goal is to ensure your installation goes smoothly and
WAIMEA. Waimea Showerspa Model #1034 Owner's Manual
 WAIMEA Waimea Showerspa Model #1034 Owner's Manual Waimea ShowerSpa Model #1034 Please Read The Following Instructions COMPLETELY Before Beginning! Our goal is to ensure your installation goes smoothly
Package Content. Decor Star 1 2. PL-011-GS Rev. A
 Thank you for purchasing Décor Star product from Modern Designer Shop. Please read the information below and keep it for future reference. If you require assistance, please contact us by email at moderndesignershop@gmail.com.
ACRYLIC CLAWFOOT TUB
 ACRYLIC CLAWFOOT TUB INSTALLATION INSTRUCTIONS AND CARE GUIDE CONTENTS Tub Installation...2 Rough-In...2 Drain Installation...3 Drain without Overflow...3 Waste and Overflow Drain...3 Trimming Drain Pipes...4
STOP RESIN TUB WITH INTEGRAL DRAIN PLANNING BEFORE YOU BEGIN TOOLS AND MATERIALS: GETTING STARTED INSTALLATION INSTRUCTIONS.
 BEFORE YOU BEGIN We recommend consulting a professional if you are unfamiliar with installing bathroom fixtures and plumbing. Signature Hardware accepts no liability for any damage to the floor, walls,
SHOWER COLUMN WITH RAIN HEAD
 SHOWER COLUMN WITH RAIN HEAD OWNER S MANUAL. INTRODUCTION This owner manual will help you to enjoy your new Dreamshower Shower column by HS-WorldLink as well as to show you how to install, clean and maintain
Waimea ShowerSpa MODEL #1034
 Start your day in a whole new way! GENERAL DESCRIPTION The Waimea ShowerSpa is sure to make waves with any décor. Wash away your worries with a unique cascading waterfall shower head, a 6" rain style shower
SEABREEZE. SeaBreeze Rain Shower System Model #1086-CH Owner's Manual
 SEABREEZE SeaBreeze Rain Shower System Model #1086-CH Owner's Manual SeaBreeze Model #1086 Please Read The Following Instructions COMPLETELY Before Beginning! Our goal is to ensure your installation goes
Decor Star 1. Decor Star PL-037-SS
 Decor Star PL-037-SS Features - Stunning stylish European inspired design - Durable stainless steel frame construction - Square stainless thin profile shower head - 3 swivel massage jets - 4 stage shower
CAST IRON PEDESTAL TUB
 BEFORE YOU BEGIN We recommend consulting a professional if you are unfamiliar with installing bathroom fixtures and plumbing. Signature Hardware accepts no liability for any damage to the floor, walls,
Features Decor Star PL-004-SS
 Decor Star PL-004-SS Features - Stunning stylish European inspired design - Elegant durable stainless steel frame construction - 4 stage shower functions (Rainfall, Waterfall, Massage Spray, Hand Shower)
NEPTUNE Steam Room Installation Instructions
 NEPTUNE Steam Room Installation Instructions IMPORTANT Please read carefully the following instructions before installing your shower cabin. If you have any questions on this shower cabin installation
Features Luxier SP21-SS
 Luxier SP21-SS Features - Stunning stylish European inspired design - Durable stainless steel frame construction - Square stainless thin profile shower head - 3 swivel massage jets - 3 stage shower functions
Features Luxier SP26-GS
 Luxier SP26-GS Features - Stunning stylish European inspired design - Elegant white safety tempered glass panel - Square stainless thin profile shower head - 8 swivel massage jets - 3 stage shower functions
Acrylic Claw Foot Tub
 Acrylic Claw Foot Tub Wrench or socket Drill & Bits Parts Recommended 2-2 x12 boards 4 Lag Bolts 4 Flat Washers Be sure to re-inforce the floor before securing tub. We recommend 2-2 x12 s securely fastened
WATTS WALL-MOUNT WIDESPREAD BATHROOM FAUCET INSTALLATION
 SKU(s): 940842 WATTS WALL-MOUNT WIDESPREAD BEFORE YOU BEGIN We recommend consulting a professional if you are unfamiliar with installing plumbing fixtures. Signature Hardware accepts no liability for any
Features Decor Star PL-004-SS
 Decor Star PL-004-SS Features - Stunning stylish European inspired design - Elegant durable stainless steel frame construction - 4 stage shower functions (Rainfall, Waterfall, Massage Spray, Hand Shower)
STOP ACRYLIC TUB WITH INTEGRAL DRAIN PLANNING BEFORE YOU BEGIN TOOLS AND MATERIALS: GETTING STARTED INSTALLATION INSTRUCTIONS.
 BEFORE YOU BEGIN We recommend consulting a professional if you are unfamiliar with installing bathroom fixtures and plumbing. Signature Hardware accepts no liability for any damage to the floor, walls,
Installation and Operation Manual MG-304. Please read this manual carefully before use.
 Installation and Operation Manual MG-304 Please read this manual carefully before use. 1 P a g e Important Safety Instructions: Warning! Use this unit only for its intended purposes or as described in
Features Luxier SP21-SS
 Luxier SP21-SS Features - Stunning stylish European inspired design - Durable stainless steel frame construction - Square stainless thin profile shower head - 3 swivel massage jets - 3 stage shower functions
L6D S OW6R PAN6L MANvlAL
 L6D SOW6R PAN6L MANvlAL OWNER S MANUAL. INTRODUCTION This owner manual will provide you with information regarding your NEZZA shower panel including installation instructions, cleaning recommendations,
Instructions. Certifications Brass w/built-in Stop Valve. Pressure Balance Shower Valve. Tools Required. Important Points.
 Instructions Tools Required Adjustable Wrench Groove Joint Pliers Pipe Wrench Phillips Screwdriver Pipe Tape or Pipe Thread Compound Safety Tips If you solder the joints during installation, the seats,
Acrylic Claw Foot Tub
 Acrylic Claw Foot Tub Wrench or socket Drill & Bits Parts Recommended 2-2 x12 boards 4 Lag Bolts 4 Flat Washers Be sure to re-inforce the floor before securing tub. We recommend 2-2 x12 s securely fastened
ARIN THERMOSTATIC SHOWER SYSTEM
 ARIN THERMOSTATIC SHOWER SYSTEM INSTALLATION INSTRUCTIONS Before installing, read entire shower system installation instructions. Observe all local building and safety codes. For the following installation
PL-004-SS. * Proper water pressure is required for simultaneous operations
 PL-004-SS Features - Stunning stylish European inspired design - Elegant durable stainless steel frame construction - 4 stage shower functions (Rainfall, Waterfall, Massage Spray, Hand Shower) - Simultaneous
CAST IRON CLAWFOOT TUB
 BEFORE YOU BEGIN We recommend consulting a professional if you are unfamiliar with installing bathroom fixtures and plumbing. Signature Hardware accepts no liability for any damage to the floor, walls,
TIMES SQUARE TWO-HANDLE THERMOSTAT
 TIMES SQUARE TWO-HANDLE THERMOSTAT MODEL NUMBER: TRIM KITS: T184.740 Two-Handle Thermostat Trim Kit With separate volume control. LESS Valve. ROUGH VALVES: TEMPERATURE & ON/OFF VOLUME CONTROL ONLY R50
Installation Instructions / Warranty
 Installation Instructions / Warranty IP C 04210000 04211000 04212000 IP S 04203000 04204000 04205000 IP E 04199000 04200000 04201000 IP Trim Sets Valve trim only IP C 04212000 IP E 04201000 IP S 04205000
RYLE WIDESPREAD FAUCET INSTALLATION
 SKU(s): 934429, 934421 RYLE WIDESPREAD FAUCET INSTALLATION BEFORE YOU BEGIN We recommend consulting a professional if you are unfamiliar with installing plumbing fixtures. Signature Hardware accepts no
DELEVINGNE WIDESPREAD FAUCET INSTALLATION
 SKU(s): 927254 BEFORE YOU BEGIN We recommend consulting a professional if you are unfamiliar with installing plumbing fixtures. Signature Hardware accepts no liability for any damage to the faucet, plumbing,
INSTALLATION INSTRUCTIONS
 INSTALLATION INSTRUCTIONS MODEL: BISTRO THERMO SHOWER KIT (RH-5344) 1 Restoration Hardware Thermo Shower Kit Specification Diagram 2 All Threaded Connections are 3/4 NPT Dimensions are in Inches and Approximation
TARVER SINGLE HOLE FAUCET INSTALLATION
 SKU(s): 931525, 934571 BEFORE YOU BEGIN We recommend consulting a professional if you are unfamiliar with installing plumbing fixtures. Signature Hardware accepts no liability for any damage to the faucet,
OWNER S MANUAL AND INSTALLATION GUIDE PLEASE READ THIS MANUAL CAREFULLY BEFORE ATTEMPTING INSTALLATION
 ClearChoice Economy Under Sink Drinking Water System OWNER S MANUAL AND INSTALLATION GUIDE PLEASE READ THIS MANUAL CAREFULLY BEFORE ATTEMPTING INSTALLATION Congratulations on the purchase of your ClearChoice
EDISON DUAL HANDLE VESSEL SINK FAUCET
 SKU(s): 929281 BEFORE YOU BEGIN We recommend consulting a professional if you are unfamiliar with installing plumbing fixtures. Signature Hardware accepts no liability for any damage to the faucet, plumbing,
Lavatory Faucet INSTALLATION INSTRUCTIONS P24490-CR, P24490-LV, P24491-CR, P24491-LV, P24492-CR, P24492-LV, P24700, P24705, P24706, P24736, P24800
 P24490-CR, P24490-LV, P24491-CR, P24491-LV, P24492-CR, P24492-LV, P24700, P24705, P24706, P24736, P24800 2018 1 of 7 KALLISTA THANK YOU FOR CHOOSING KALLISTA We appreciate your commitment to KALLISTA quality
America s Walk-In Tub. Installation & Instructions. Manufactured by. A Division of Spa World Corp NW 35th Avenue ANSI-Z124.1
 America s Walk-In Tub Installation & Operational Instructions REEF SOAKER ASME A112.19.7-2006 ANSI-Z124.1 Manufactured by ACCESS TUBS A Division of Spa World Corp. 5701 NW 35th Avenue Miami, Florida 33142
CAOL VESSEL SINK FAUCET INSTALLATION
 SKU(s): 926652 CAOL VESSEL SINK FAUCET INSTALLATION BEFORE YOU BEGIN We recommend consulting a professional if you are unfamiliar with installing plumbing fixtures. Signature Hardware accepts no liability
PAVIA INSTALLATION GUIDE
 FSP800 PAVIA INSTALLATION GUIDE Parts List Please unpack and inspect all packages and components carefully, make sure they are complete. Examine for shipping damage. If some parts are damaged or missing,
K4600 Assembly Directions
 K4600 Assembly Directions All parts are delivered inside one (1) shipping box. o The base, the bowl and the chair NOTE: A qualified Plumber should be employed to assemble this Shampoo Backwash Unit. Install
ENCLOSED UNIT TECHNICAL MANUAL Items # &
 R ENCLOSED UNIT TECHNICAL MANUAL Items #91163-00 & 91164-00 The Green Earth II Enclosed Unit is a modular, locking dispensing system that allows the user to dispense chemicals safely. It also has the flexibility
COPPER FREESTANDING TUB
 COPPER FREESTANDING TUB INSTALLATION INSTRUCTIONS AND CARE GUIDE CONTENTS Tub Installation...2 Rough-In...2 Drain Installation...3 Drain without Overflow...3 Waste and Overflow Drain...3 Trimming Drain
INSTALLATION INSTRUCTIONS
 INSTALLATION INSTRUCTIONS 67000 6700 MODEL: SPRITZ 67000 (RH-600) 6700 (RH-600X) REV.C Restoration Hardware Faucet Product Size Specification Diagram Recommended Deck Hole Size -/8 Diameter Dimensions
TRU-TEMP VALVE. Tru-Temp Pressure Balance 1/2" Rough-In Valve Owner's Manual 3001-RIV-PB-ORB 3001-RIV-PB-BN 3001-RIV-PB-CH 3003-RIV-PB-ORB
 TRU-TEMP VALVE 3001-RIV-PB-CH 3003-RIV-PB-CH Tru-Temp Pressure Balance 1/2" Rough-In Valve Owner's Manual 3001-RIV-PB-BN 3003-RIV-PB-BN 3001-RIV-PB-ORB 3003-RIV-PB-ORB Rough-In Valve Model #3001-RIV-PB
PD-811 PD-811 propriétaire Owner s manual Manuel du PD D P
 PD-811 Owner s manual PD-811 Swivel rain shower head with anti-scale jets Neck & shoulder massage waterfall 6 adjustable anti-scale recessed body jets Stainless steel handshower 4 volume controls Thermostatic
Handshower, Hose & Handshower Accessories
 P24443, P24445, P24446, P24452, P24453, P24456 1 of 6 INSTALLATION INSTRUCTIONS Thank You For Choosing KALLISTA We appreciate your commitment to KALLISTA quality products. Please take a moment to review
Installation Instructions Model: EB Single-Lever Lavatory Faucet
 by Dawn Kitchen & Bath Products, Inc. 877-Dawn-USA dp@dawnusa.net www.dawnusa.net Installation Instructions Model: EB1359150 Single-Lever Lavatory Faucet TABLE OF CONTENTS Preparation Parts Installation
ULTIMATE REVERSE OSMOSIS SYSTEM
 ULTIMATE REVERSE OSMOSIS SYSTEM INSTALLATION INSTRUCTION & OWNER S MANUAL Ver 3.1 All Rights Reserved APEC Water Systems Please keep this Owner s Manual for future reference. It contains useful information
BARRINGTON PRESSURE LITE VITREOUS CHINA SIPHON JET TOILET K-4327
 BARRINGTON PRESSURE LITE VITREOUS CHINA SIPHON JET TOILET K-4327 BEFORE YOU BEGIN INSTALLER HAZARD NOTIFICATION WARNING: Risk of injury or water damage. Contents of vessel under pressure can cause severe
Faucet Care and Maintenance Guide. Answers to frequently asked questions on how to keep your Delta faucets at their best
 Faucet Care and Maintenance Guide Answers to frequently asked questions on how to keep your Delta faucets at their best Congratulations. You ve made a smart choice. Your new Delta faucets are engineered
SAN RAPHAEL PRESSURE LITE VITREOUS CHINA SIPHON JET TOILET
 SAN RAPHAEL PRESSURE LITE VITREOUS CHINA SIPHON JET TOILET BEFORE YOU BEGIN HOW TO USE THESE INSTRUCTIONS Please read these instructions carefully to familiarize yourself with the required tools, materials,
TOULOUSE DOUBLE SINK CONSOLE
 TOULOUSE DOUBLE SINK CONSOLE Date: 2016 05 19 www. potterybarn.com Page 1 of 8 Important Safety Instructions: CAUTION: Keep natural stone materials in its packaging until installation and store on its
INSTALLATION INSTRUCTIONS
 INSTALLATION INSTRUCTIONS 5000 700069 50055 MODEL: Dillon 5000 (RH-600) 50055 (RH-600X) 700069 (TRRH-600) REV D Restoration Hardware Faucet Product Size Specification Diagram Recommended Deck Hole Size
GRANITE COMPOSITE SINK
 GRANITE COMPOSITE SINK CONTENTS Sink Installation Faucet Drilling Drop-In Sink Undermount Sink Drain Installation 2 3 4 5 Materal Care and Maintenance 6 1 FAUCET DRILLING The hole for the faucet can be
BROEG SINGLE HOLE FAUCET INSTALLATION
 SKU(s): 931283 BEFORE YOU BEGIN We recommend consulting a professional if you are unfamiliar with installing plumbing fixtures. Signature Hardware accepts no liability for any damage to the faucet, plumbing,sink,
owner s manual produitsneptune.com Do not discard. Save these instructions for further use.
 owner s manual AMAZE Installation OPERATION MAINTENANCE Bathtub REPAIR ONE-PIECE freestanding Bathtub INSTALLATION produitsneptune.com Do not discard. Save these instructions for further use. Table of
RESIN FREESTANDING TUB
 RESIN FREESTANDING TUB INSTALLATION INSTRUCTIONS AND CARE GUIDE CONTENTS Tub Installation...2 Rough-In...2 Drain Installation...3 Air Tub Installation...4 Electrical Installation...4 Remote Control Installation...5
Installation Guide. Pedicure Spa D K-163, K-1006, K-1011, K-1012
 Installation Guide Pedicure Spa K-163, K-1006, K-1011, K-1012 1063564-2-D Important Information WARNING: When using electrical products, basic precautions should always be followed, including the following:
24. Exhaust Fan. 2. ½ NPT Brass nut. 1. Brass Elbow. 4. Speaker. 6. Rain Shower head. 5. White LED Light. 16. Flex Drain Assembly
 1. Brass Elbow 2. ½ NPT Brass nut 4. Speaker 5. White LED Light 6. Rain Shower head 12. Steamer Cleaning Port 13. Massage Jet 14. Foldable Seat 16. Flex Drain Assembly 22. Door Handles 24. Exhaust Fan
AUBEREE CENTERSET FAUCET INSTALLATION
 SKU(s): 917558 BEFORE YOU BEGIN We recommend consulting a professional if you are unfamiliar with installing plumbing fixtures. Signature Hardware accepts no liability for any damage to the faucet, plumbing,
LUDGATE SINGLE HOLE FAUCET INSTALLATION
 SKU(s): 931522 BEFORE YOU BEGIN We recommend consulting a professional if you are unfamiliar with installing plumbing fixtures. Signature Hardware accepts no liability for any damage to the faucet, plumbing,sink,
Ligature Resistant Sensor Faucet Patent # US D635,386 #SAL-5011/SF370
 Ligature Resistant Sensor Faucet Patent # US D635,386 #SAL-5011/SF370 Installation, Maintenance & Operation Instructions SENSORFLO Battery or AC Powered This Ligature Resistant Sensor Faucet is designed
Aquapeutics GENERAL INSTALLATION GUIDE. Toll Free Customer Service line 1 (800)
") Aquapeutics GENERAL INSTALLATION GUIDE Toll Free Customer Service line 1 (800) 290-6812 Thank you for choosing an Aquapeutics product. Please read the following guide in its entirety before assembling
Aquapeutics GENERAL INSTALLATION GUIDE Toll Free Customer Service line 1 (800) 290-6812 Thank you for choosing an Aquapeutics product. Please read the following guide in its entirety before assembling
PAGOSA SINGLE HOLE FAUCET INSTALLATION
 SKU(s): 927330, 927331 BEFORE YOU BEGIN We recommend consulting a professional if you are unfamiliar with installing plumbing fixtures. Signature Hardware accepts no liability for any damage to the faucet,
AQUAPEUTICS MONACO INSTALLATION MANUAL
 AQUAPEUTICS MONACO INSTALLATION MANUAL Monaco schmatic diagram Cross sectional illustration of gaskets Recommended tools 4 5 5 5 5 Installation steps Steam generator hook-ups Troubleshooting n Steam dispenser
OWNER S MANUAL WISTERIA
 OWNER S MANUAL WISTERIA INSTALLATION OPERATION MAINTENANCE BATHTUB REPAIR ONE-PIECE FREESTANDING BATHTUB INSTALLATION alcove.ca Do not discard. Save these instructions for further use. Table of Content
LETA SINGLE HOLE FAUCET INSTALLATION
 SKU(s): 910802 LETA SINGLE HOLE FAUCET INSTALLATION BEFORE YOU BEGIN We recommend consulting a professional if you are unfamiliar with installing plumbing fixtures. Signature Hardware accepts no liability
INSTALLATION INSTRUCTIONS M SHOWER SLIDING RAIL
 INSTALLATION INSTRUCTIONS M1-4533 SHOWER SLIDING RAIL Dimensions in Inches (& Millimetres) M1-4533 Ø15/16" (Ø24mm) 2 11/16" (68mm) 1 3/8" (35.6mm) 2 11/16" (68.7mm) 2 13/16" (71mm) 2 3/8" (60mm) 2 11/16"
OVE ORDERING INFORMATION NOTES T01-A INSTALLATION INSTRUCTIONS ELONGATED TWO-PIECE TOILET K-17737T/K-17737T-S
 OVE INSTALLATION INSTRUCTIONS ELONGATED TWO-PIECE TOILET K-17737T/K-17737T-S Please read these instructions carefully to familiarize yourself with the required tools, materials, and installation sequences.
MENZA CENTERSET FAUCET INSTALLATION
 SKU(s): 929372 BEFORE YOU BEGIN We recommend consulting a professional if you are unfamiliar with installing plumbing fixtures. Signature Hardware accepts no liability for any damage to the faucet, plumbing,
BATHTUB INSTALLATION MANUAL
 BATHTUB INSTALLATION MANUAL Universal Installation Instructions and Use & Care Guide For questions about features, operation/performance parts, accessories or service, call: 1-626-453-0550 F-210 F-224
VERONA INSTALLATION GUIDE
 FSP800 VERONA INSTALLATION GUIDE Parts List Please unpack and inspect all packages and components carefully, make sure they are complete. Examine for shipping damage. If some parts are damaged or missing,
Product Description and Measurements. Thank You. Prior To Installation Steps. Waterfall Faucet Installation
 Product Description and Measurements Exclusive Kraus Collection Waterfall Faucet Glass Thickness: 12mm-19mm Diameter: 14 17 For Above Counter Installation Thank You Dear Valued Customer, Kraus would like
INSTALLATION INSTRUCTIONS
 INSTALLATION INSTRUCTIONS 3580079 3580006 MODEL: LUGARNO 3580006 (RH-5900) 3580079 (RH-5900L) REV C Restoration Hardware Faucet Product Size Specification Diagram Recommended Deck Hole Size -3/8 Diameter
SAN RAPHAEL GRANDE ORDERING INFORMATION NOTES T01-B INSTALLATION INSTRUCTIOINS 4.8L SKIRTED CLASS FIVE ONE-PIECE TOILET 4.
 SAN RAPHAEL GRANDE INSTALLATION INSTRUCTIOINS 4.8L SKIRTED CLASS FIVE ONE-PIECE TOILET 4.8 S-TRAP 305mm K-8688T-S S-TRAP 400mm K-18728T-S Please read these instructions carefully to familiarize yourself
Installation Manual for M-G014 & M-G015
 Installation Manual for M-G014 & M-G015 M-G014 M-G015 1 Contents 1. Electrical specifications 2. Plumbing 3. Installation of Water connections 4. Installation of Drain 5. Operation of Bathtub 6. Troubleshooting
O W N E R S MANUAL ROUGE
 O W N E R S MANUAL ROUGE INSTALLATION OPERATION MAINTENANCE BATHTUB REPAIR ONE-PIECE FREESTANDING BATHTUB INSTALLATION Do not discard. Save these instructions for further use. Table of Content INTRODUCTION
Installation Guide BUBBLEMASSAGE. English page T01-A
 Installation Guide BUBBLEMASSAGE BATH 368 201419 English page 1-9 10-17 Before You Begin Please read these instructions carefully to familiarize yourself with the required tools, materials, and installation
REVE ORDERING INFORMATION NOTES T01-A INSTALLATION INSTRUCTIONS 现代型分体座便器 CONTEMPORARY TWO-PIECE TOILET K-17178T-S/K-17178T-SP
 REVE INSTALLATION INSTRUCTIONS 现代型分体座便器 CONTEMPORARY TWO-PIECE TOILET K-17178T-S/K-17178T-SP Please read these instructions carefully to familiarize yourself with the required tools, materials, and installation
REACH ORDERING INFORMATION NOTES T01-B
 REACH INSTALLATION INSTRUCTIONS 3/4.8L SKIRTED VITREOUS CHINA TWO-PIECE TOILET 3/4.8 S-TRAP 305mm K-3991T/K-3991T-S S-TRAP 400mm K-4153T/K-4153T-S Please read these instructions carefully to familiarize
kk21 installation Kk21-WF21 Things you might need for the installation: vessel sink,
 Kk21-WF21 Things you might need for the installation: vessel sink, plumber's putty(home depot), liquid nails(home depot), Bucket silicone caulk(home depot), Putty knife Plumber's putty Pipe wrench Channel-lock
ROHL Modern Bath Lombardia/Architectural ROHL Transitional Bath Avanti COLORS/FINISHES. Polished Chrome Polished Nickel Satin Nickel
 MODERN SINGLE LEG FLOOR MOUNTED TUB FILLER ROHL Modern Bath Lombardia/Architectural ROHL Transitional Bath Avanti M1687 FEATURES Popular single leg, floor mounted tub filler Solid brass construction Side
Handshower, Hose & Handshower Accessories
 INSTALLATION INSTRUCTIONS P21650, P21660, P24452, P24453, P24454, P24456, P24743, P24745, P24746, P24761, P24843 1188577-2-F 2014 KALLISTA 1 of 5 THANK YOU FOR CHOOSING KALLISTA We appreciate your commitment
INSTALLATION INSTRUCTIONS
 INSTALLATION INSTRUCTIONS Siphonic Ultra-High Efficiency Two-Piece Toilets HOptimum Single Flush Models 88AA / 88CA / 88DA HOption Dual Flush Models 886 / 88 / 889 Thank you for selecting American Standard
ARLEY STEAM SHOWER ENCLOSURE
 ARLEY STEAM SHOWER ENCLOSURE INSTALLATION AND USER MANUAL CONTENTS Steam Shower Enclosure Installation...2 Technical Information...2 Plumbing Requirements...2 Assembly...3 Tools and Materials...3 Installation...3
Instructions. Certifications Chrome 2-handle Chrome 3-handle 10-B83-WCH-AD Chrome 3-handle 10-B82-WCH-AD Chrome 2-handle
 Instructions 623282 Chrome 2-handle *Image may vary slightly from actual product Tools Required Adjustable Wrench Groove Joint Pliers Pipe Wrench Phillips Screwdriver Pipe Tape or pipe thread compound
Thermostatic tub. Maxima SAMPLE INSTALLATION. S5333/2 (page 47) + S2262 (page 47) S2095 (page 58) S2150 (page 57) + S2172 (page 57)
 + S2262 (page 47) S2095 (page 58) S2150 (page 57) + S2172 (page 57)") Thermostatic tub SAMPLE INSTALLATION S5/ (page 47) + S6 (page 47) S095 (page 58) S50 (page 57) + S7 (page 57) S5/ (page 47) + S6 (page 47) S095 (page 58) S0 (page 57) + S (page 57) S5/ (page 47) + S6 (page
Thermostatic tub SAMPLE INSTALLATION S5/ (page 47) + S6 (page 47) S095 (page 58) S50 (page 57) + S7 (page 57) S5/ (page 47) + S6 (page 47) S095 (page 58) S0 (page 57) + S (page 57) S5/ (page 47) + S6 (page
1/7 INSTALLATION INSTRUCTIONS. Rough Installation
 Rev 06/2016 Installation Instruction 3/4 Thermostatic Control Please read the instructions completely before beginning the installation. 3/4" Thermostatic control Model Number: 7093..-TM INSTALLATION INSTRUCTIONS
FREESTANDING ACRYLIC TUB INSTRUCTION MANUAL
 FREESTANDING ACRYLIC TUB INSTRUCTION MANUAL HELIXBATH FREESTANDING ACRYLIC TUB GENERAL INSTALLATION INSTRUCTIONS & CARE GUIDE Before you begin installing your new Helixbath freestanding tub we recommend
1/7 SPOUT INSTALLATION
 Rev 06/06 Installation Instruction CHADWICK COLLECTION Widespread Lavatory Set Please read the instructions completely before beginning the installation. Chadwick Collection Model Number: 430GL Flush both