Set-up/Operating Manual for Model X5-CD
|
|
|
- Moris Watts
- 5 years ago
- Views:
Transcription


1 Set-up/Operating Manual for Model X5-CD Programmable Automatic Horse Feeder
2 - 2 - Table of Contents Pages 3 6 Pages 7 9 Page 10 Page 11 Page 12 Set-up Instructions Programming Timer Recharging Battery Maintenance Warranty
 3.")
3 - 3 - Automatic Feeder Set-up Instructions 1. Unpack Remove all components from packaging. 2. Handle Installation Remove Handles from bag, unscrew mounting hardware from sides of feeder, reinstall with Handles in place and tighten. (see illustration below) 3. Hanger Bracket Installation Remove Hanger Brackets from bag, unscrew mounting hardware from side of feeder, reinstall with Hanger Brackets in place and tighten. Use the lower set of mounting holes, move to upper only if final chute position is not favorable. 4. Feeder Mounting Determine where feeder will be used. If on fence or any type of tubular style structure you will be using the (2) hose clamps. If on a wall type structure the (4) Mounting Screws will be used.

 Simply open hose clamp fully, wrap around fence tube in approximate location of where feeder is to reside and screw clamp partially closed.")

4 - 4 - Note Due to so many potential applications the mounting may need to be improvised. If you are having trouble, feel free to contact the factory for advice or even special mounting hardware. 5. Fence Mounting When mounting to any tubular style fencing or containment the Hose Clamp method is idea. (see photo) Simply open hose clamp fully, wrap around fence tube in approximate location of where feeder is to reside and screw clamp partially closed. This should leave the clamp free to be moved along the mounting tube. Repeat this with second clamp. With some help from an assistant lift feeder into position, align with tube and slide clamps over mounting brackets. Move unit to desired place and tighten clamps until unit is secured. 6. Wall Mounting When mounting to any wooden surface the unit will be screwed on. This will require a drill. The screws supplied are self tapping and do not require a pre-drilled hole, but if you are using a hand screwdriver it is recommended to pre-drill the holes (drill bit provided) to help in the mounting process.
 mounting screws.")


5 - 5 - a. Find a suitable location for the unit. With the help from an assistant hold unit in the proper location and mark the (4) mounting holes. Remove feeder. Using the supplied drill bit, drill all the marked spots approx. 1 deep. Secure unit using all (4) mounting screws. See the following illustration for mounting height recommendations. Mounting height recommendations Wall opening dimensions Minimum Dimension to top of opening Minimum mounting height is 24, bottom of Feeder to Floor. The 6 x 12 Chute Opening is referenced from the bottom of the feeder. 7. Squaring the Unit The unit will need to be squared up to its mounting surface. This is achieved by adding spacers between the Back Wall and the Fence or Mounting Wall. Shims can be combined to reach the correct thickness, once correct stack is made remove tape liner and adhere Shims to backside of unit. (see photo) Spacers Spacers

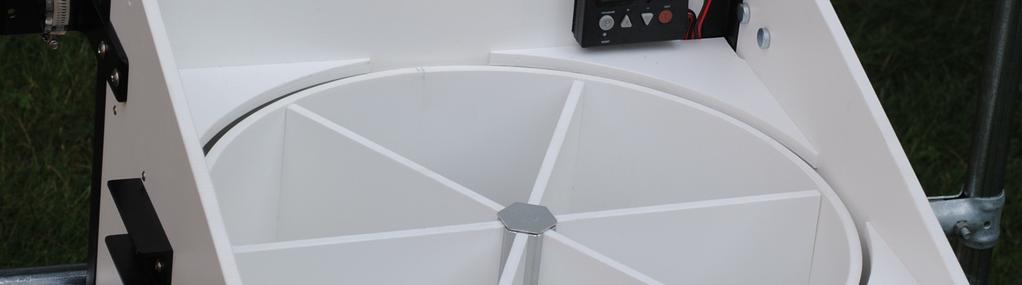
6 Chute Installation Remove Chute from bag. Remove the (2) mounting screws from the Gearbox located on the underside of the Feeder. Align the Chute over the Beaded Support Chain and through any opening in wall or fence. Reuse the screws to secure the Chute. Note-the screws will bottom out short of the Chute being fully secured. This is intentional and by design. If the chute does not rest on a wall face or a fence section the Beaded Support Chain must be adjusted to support the chute. (see illustration) 9. Connect Drive Motor For storage and shipping purposes the final Drive Motor has been disconnect. At this time simply plug the pair of three wire connectors, located on the underside of the unit, into each other. There is only one way they can be connected. Your unit is ready to be programmed.
7 - 7 - Programming Timer 1. Clock Setup If screen is blank press + button to activate. Press the button or P button once from the READY mode to enter the CLOCK mode. Press the P button again to enter clock settings. Use the + or buttons to adjust to the desired weekday, then press P button and use the + or buttons to adjust hour, then press P button and use the + or buttons to adjust minutes. After the time is set wait 10 seconds to go back to READY mode automatically. 2. Setting the Feed time, Run time, & RPM a. If screen is blank press + or button to activate screen b. Press + button once to see CLOCK screen c. Press + button again to see FEED 1 screen. Continue pressing the + button to scroll through all the FEEDS 1 through 8. NOTE Feed cycles 6,7& 8 are not used and must be turned off d. When reaching the desired screen press P button to begin programming.
8 - 8 - e. Repeatedly press P button to scroll through settings. The screen sequence will be; Day/Week setting (any one day, week or weekend) Hour setting (1-12, AM or PM) Minute setting (1-59) Duration setting (factory set to 7 seconds) RPM setting (factory set to HI ) The flashing feature on the screen will change with each press of the P button. Only when a feature is flashing can it be changed. To change that feature use the + or buttons to make changes. When satisfied, press P button to move on to next setting. When finished press P button until no flashing features appear. Now use the + button to scroll to next FEED CYCLE. f. Repeat Item e until Feeds 1-5 have been completed. 3. Programming Tips a. Write out your schedule on paper prior to programming. Timer will default out of programming mode if idle for more then 10 seconds and you will be forced to restart. b. Only use Feed Cycles 1 through 5. Timer has capacity for up to 8. Cycles 6-8 should not be used, reading OFF at all times. c. RPM/MOTOR SPEED need not be adjusted; factory setting is HI and is shipped this way. If changed for any reasons make necessary adjustments d. DURATION need not be adjusted. Factory setting is 7 seconds. If changed for any reasons make necessary adjustments. e. Extreme cold weather may cause the LCD (Liquid Crystal Display) screen to react slowly until the temperature warms up. Despite the lazy display of the LCD, the digital timer is working properly and will go off as per the program.
9 Testing Unit To test the unit, press and release the TEST button. The unit will turn on after a 10 second delay. The unit will index one feed position and stop. 5. Check Battery Charge If screen is blank press the + button to activate display. In the upper right corner of the screen is the 5-baricon meter. Normal operating range is 4-5 bars, recharge recommended at 2-3 bars, unreliable operation at 0-1 bars.
10 Recharging Battery 1. Your unit is in need of a recharge when the 5-baricon meter (located in the upper right corner of display screen) reaches 3 bars or lower. Typical battery life is 3-5 weeks. Variables affecting charge life are; extreme heat, extreme cold and age of battery. 2. Your feeder comes with a charger. The charger plugs into any standard 110 volt house outlet. The other connector on the charger plugs into the recharge port located inside the feeder several inches from the controller, in the wiring harness. (see photo) 3. To Charge plug two wire plug into charge port. Plug other end onto wall outlet. 4. Normal charge time is 6-8 hours. Unit cannot be overcharged, and will operate normally while being charged. The 5-baricon meter should read 4-5 bars when fully charged. NOTE It is not recommended to leave charger on for more then 24 hours.

 With the Drum removed a sweep and wipe down cleaning can be performed to the cabinet interior.")
11 Option offers a Solar Panel (for an additional fee) which would eliminate the need to ever recharge. This is an ideal solution if a 110 volt power source is difficult to attain. Visit website/call for more details Maintenance The Equine Automation Automatic Programmable Horse Feeder is a very low maintenance unit. From a performance standpoint there is no mandatory maintenance. Individual preference will dictate how often you choose to clean up the interior of the unit. The Feeder is designed with a lift out Distribution Drum. (See photo) With the Drum removed a sweep and wipe down cleaning can be performed to the cabinet interior. A wash down of the Cabinet interior is not recommended. The Distribution Drum on the other hand can be cleaned and washed down with a garden hose. When replacing Distribution Drum, first line up onto center hub and slide on. Then gently rotate Drum until a drop and engagement is felt. Gently push Drum down to fully seat.
12 Warranty will repair all material and workmanship defects free of charge for (1) year after the date of purchase. Battery is considered a wear item and has a (1) year replacement warranty. The warranty does not cover damage, losses, or injury caused by unauthorized repairs, alterations, improper connection, shipping, abuse, theft, neglect or collateral loss. In most cases a repair can be handled without returning the unit to the factory. The Feeder is designed to be modular, meaning that with basic hand tools, most repairs can be field serviceable. Only shipping expenses related to warranty issues are cover by. Please contact for authorization prior to shipping any components.
CRX Single Zone Wireless Controller. Installation and User Guide. 1. Getting to know your CRX2 wireless controller
 Please read this guide carefully and retain for future use and maintenance. CRX2-01 Single Zone Wireless Controller Installation and User Guide 1. Getting to know your CRX2 wireless controller An illustration
CT500 Electronic Thermostat
 CT500 Electronic Thermostat OWNER'S GUIDE MERCURY NOTICE If this control is replacing a control that contains mercury in a sealed tube, do not place your old control in the trash. Dispose of it properly.
Graber Lake Forest Faux Wood and Premium Faux Wood Blind
 2 3 5 6 8 7 1 2" (5.1cm) Blind shown 1. Blind (cord tilt shown) 2. Mounting Brackets 3. Center support bracket (if required). Mounting screws (2 per bracket) 5. Projection brackets (optional, one per mounting
DEMA SOLID PRODUCT LAUNDRY MASTER TM MODEL: 581L-1W and 581L-2W INSTALLATION INSTRUCTIONS
 Included Parts: A. 581.1 Solid Bowl B. 58.1LA Vacuum Breaker C. 58.6 Stainless Steel Supply Tube D. 58.29 90º Compression Fitting E. 58.24 Straight Compression Fitting F. 58.7 Vinyl Discharge Tube G. 66.123
USER MANUAL MODEL READ ALL INSTRUCTIONS BEFORE PROCEEDING. 5-2 Day Programmable Multi-Stage 2 Heat/1 Cool Heat Pump Digital Thermostat
 WARNING! Important Safety Information Builder MODEL 2200 Series 5-2 Day Programmable Multi-Stage 2 Heat/1 Cool Heat Pump Digital Thermostat USER MANUAL Compatible with low voltage multi stage heat/cool
CT2800 Programmable Thermostat
 CT2800 Programmable Thermostat INSTALLATION AND PROGRAMMING INSTRUCTIONS Welcome to the world of comfort and energy savings with your new Honeywell Programmable Thermostat. Your new thermostat will automatically
Wood. Blind owner's handbook
 Wood owner's handbook 2 WARNING Cords and bead chains can loop around a child s neck and strangle. Always keep cords and bead chains out of children s reach. Move furniture away from cords and bead chains.
Cat No. 099A. Digital Programmable Thermostat for Weekday/Weekend Setting. User Maunal
 Cat No. 099A Digital Programmable Thermostat for Weekday/Weekend Setting User Maunal TABLE OF CONTENT 1 INTRODUCTION. 2 2 INSTALLATION. 4 3 SETTING CLOCK. 11 4 SETTING PROGRAM...12 5 SLEEP OPERATION MODE
Operating Instructions for the BBO-1 and BBO-2 Basket Blasters
 Operating Instructions for the BBO-1 and BBO-2 Basket Blasters 2101 West Cabot Boulevard Langhorne, PA 19047-1893 www.empire-airblast.com Page 2 Model Number: Serial Number: Date of Purchase: Date of Installation:
INSTALLATION AND OPERATION INSTRUCTIONS
 MODEL: RCT-MLT III INSTALLATION AND OPERATION INSTRUCTIONS INTRODUCTION IF YOU CANNOT READ OR UNDERSTAND THESE INSTALLATION INSTRUCTIONS DO NOT ATTEMPT TO INSTALL OR OPERATE This remote control system
DEMA 813 PROBELESS DEMAMaster TM INSTALLATION INSTRUCTIONS
 DEMA 813 PROBELESS DEMAMaster TM INSTALLATION INSTRUCTIONS Models: DM-813-PLLL-1T DM-813-PDLL-1T DM-813-PLLL-2T DM-813-PDLL-2T I-729 Pg 1 of 15 System Overview The DEMA DEMAMaster probeless series is designed
Oahu Showerspa Model #1035 Owner's Manual
 O A H U Oahu Showerspa Model #1035 Owner's Manual Oahu ShowerSpa Model #1034 Please Read The Following Instructions COMPLETELY Before Beginning! Our goal is to ensure your installation goes smoothly and
WARNING Important Safety Information
 Builder Series Non-Programmable Thermostat MODEL 00NC Heat Only or Cool Only Thermostat Before Installing, Programming or Operating, PLEASE READ ALL INSTRUCTIONS Specifications Temperature Adjustment WARNING
Cordless CellularFabric Shade. owner's handbook
 Cordless CellularFabric Shade owner's handbook 2 WARNING Young children can STRANGLE in cord and bead chain loops. They can also wrap cords around their necks and STRANGLE. Always keep cords and bead chains
13500 BTU RV Air Conditioner Installation and Operating Instructions
 13500 BTU RV Air Conditioner Installation and Operating Instructions Model No.:HCB-R135-A-ID HCB-R135-A-OD 3092402 V140804 Thank you for choosing a Soleus Air RV Air Conditioner. This owner s manual will
USER MANUAL WARNING! CONTENTS MODEL 1 SPECIFICATIONS READ ALL INSTRUCTIONS BEFORE PROCEEDING 2 INSTALLATION. Premier Series
 Premier Series MODEL 5000 USER MANUAL 5-2 Day Programmable Single Stage Heat/Cool Digital Thermostat Compatible with low voltage single stage gas, oil or electric heating or cooling systems, including
USER MANUAL 2000NC MODEL READ ALL INSTRUCTIONS BEFORE PROCEEDING. Builder Series 5-2 Day Programmable Single Stage Heat/Cool Digital Thermostat
 MODEL 2000NC USER MANUAL Builder Series 5-2 Day Programmable Single Stage /Cool Digital Thermostat Compatible with low voltage single stage gas, oil or electric heating or cooling systems, including single
RIO. Rio ShowerSpa Model #1049B-BN Owner s Manual
 RIO Rio ShowerSpa Model #1049B-BN Owner s Manual Rio ShowerSpa Model 1049B-BN Please Read The Following Instructions COMPLETELY Before Beginning! Our goal is to ensure your installation goes smoothly and
MagicStat CT3300 Programmable Thermostat
 MagicStat CT3300 Programmable Thermostat Installation and Programming Instructions Weekday/Weekend (5-day/2-day) Programmable Heat and/or Cool Low Voltage (20 to 30 Vac) Thermostat and Mounting Plate Model
OWNERS MANUAL YEAR LIMITED WARRANTY READ ALL INSTRUCTIONS BEFORE PROCEEDING. Store this booklet for future reference
 3100 Premier Series Non-Programmable 2 Heat / 2Cool & Heat / Cool Digital Thermostat OWNERS MANUAL Compatible with low voltage multi-stage heat / cool systems with up to two stages of heating and two stages
Feed Whiz INSTRUCTION MANUAL
 Feed Whiz INSTRUCTION MANUAL IMPORTANT READ THIS BEFORE USING THE FEED WHIZ AUTOMATIC FEEDER Contents 1. Introduction... 2 1.1. Feed Whiz Introduction to the Horse or Animal... 2 1.2. Disclaimer... 2 1.3.
OWNERS MANUAL YEAR LIMITED WARRANTY READ ALL INSTRUCTIONS BEFORE PROCEEDING. Store this booklet for future reference
 5100 Premier Series 7-Day Programmable 2-Heat / 2-Cool Heat /Cool Digital Thermostat OWNERS MANUAL Compatible with low voltage multi-stage heat / cool systems with up to two stages of heating and two stages
AC6 & AC8 HORIZONTAL SERIES Sealed Metallic Centrifugal Pumps Installation and Maintenance Instructions
 AC6 & AC8 HORIZONTAL SERIES Sealed Metallic Centrifugal Pumps Installation and Maintenance Instructions ASSEMBLY PUMPS WITH MOTORS 1. No assembly required. Unpack the pump and motor and examine for any
NIAGARA. Niagara ShowerSpa Model #1048B-BN Owner s Manual
 NIAGARA Niagara ShowerSpa Model #1048B-BN Owner s Manual Niagara ShowerSpa Model 1048B-BN Please Read The Following Instructions COMPLETELY Before Beginning! Our goal is to ensure your installation goes
WINE AND BAR SERIES. Sink Installation Kit. For assistance, call ; for UK ; at
 WINE AND BAR SERIES Sink Installation Kit For assistance, call 1.877.306.8930; for UK 0800.031.4069; e-mail at info@newageproducts.com Unpacking Begin by placing the package on a protected flat surface.
Fillmore Small Pendant Assembly and Installation Instructions
 CAUTION: Fillmore Small Pendant Assembly and Installation Instructions BEFORE INSTALLING FIXTURE, MAKE SURE THE POWER TO THE CIRCUIT IS TURNED OFF AT THE MAIN FUSE BOX / CIRCUIT BREAKER UTILITY BOX. Important
Installation Instructions EFS Hand Washing Station
 Installation Instructions EFS Hand Washing Station Both water and soap are sequenced and dispensed from outlet. Override button allows for non potable, water-only dispensing. Lighted icons indicate the
INSTALLATION INSTRUCTIONS
 INSTALLATION INSTRUCTIONS Accessory ENGINE BLOCK P/N 08T44-SNA-101 Application 2011 ACCORD CROSSTOUR Publications No. AII 44661 Issue Date SEP 2010 PARTS LIST Engine Block Heater Kit Engine block heater
INSTALLATION INSTRUCTIONS TOOLS YOU WILL NEED GETTING STARTED
 INSTALLATION INSTRUCTIONS HONEYCOMB SHADES STANDARD RECTANGULAR Thank you for your purchase. This shade has been custom built for you from the highest quality materials. To avoid errors and save valuable
Unpacking Your Fan 2.
 Excel Lighting & Manufacturing Ltd. Lifetime Limited Warranty Excel Lighting & Manufacturing Ltd. Warrants the fan motor to be free from defects in workmanship and material present at time of shipment
SC Installation, Operation & Application Guide
 SC 3006 Auto Changeover 7-Day Programmable Hardwired Programmable Electronic Thermostat 7-Day Programmable Single Stage Heat Pump/Non-Heat Pump Systems Backlit Display Single Stage Heat/Cool Systems Field
Owner s Manual RD432-0 Chemical Controller
 Owner s Manual RD432-0 Chemical Controller Table of Contents I. Introduction page 2 A. Water Chemistry page 2 B. Safety page 3 C. System Components page 4 D. Specifications page 7 E. Controller Panel Descriptions
SC Installation, Operation & Application Guide
 SC 1800 Manual Changeover Non-Programmable Hardwired Non-Programmable Electronic Thermostat Controls Single Stage Heating Systems Millivolt and Hydronic (water or steam) System Compatible Compatible with
INSTALLATION INSTRUCTIONS. WOOD BLINDS 1-3/8, 2 and 2-3/8 SLAT SIZES. COMPOSITE FAUX WOOD BLINDS 2 and 2-1/2 SLAT SIZES
 INSTALLATION INSTRUCTIONS WOOD BLINDS 1-3/8, 2 and 2-3/8 SLAT SIZES COMPOSITE FAUX WOOD BLINDS 2 and 2-1/2 SLAT SIZES POLYMER FAUX WOOD BLINDS 2 and 2-1/2 SLAT SIZES STANDARD CORDLESS LIFT Thank you for
7-Day Electronic Timer Model CDN Operating Instructions
 7-Day Electronic Timer Model CDN- Operating Instructions INDEX. Description................................................................ Features of Timer.....................................................
User Manual for the. ACCS-1 Digital 7 Day Programmable Thermostat with Zone Control
 Suppliers of Air Conditioning & Refrigeration Control Equipment Unit 25/205-213 Port Hacking Rd Miranda 2228 Sydney Australia Phone: +61 2 9522 0334 Fax: +61 2 9522 0337 www.mjbcontrols.com.au sales@mjbcontrols.com.au
Digital Programmable
 www.geappliances.com Digital Programmable Thermostats Operating Instructions Auto Changeover..........10 Day/Time Setting Mode.....6 Default Mode...............4 Fan Control...............10 Hold and Temporary
Helpful Tip: NOTE:
 Grounded electrical supply required. Do not run drain lines, water lines or electrical wiring where they can interfere with or contact dishwasher motor or legs. The location where the dishwasher will be
Honeywell CT8602 PROGRAMMABLE THERMOSTAT
 Honeywell CT8602 PROGRAMMABLE THERMOSTAT Seven Day Programmable Heat and/or Cool Low Voltage (20 to 30 Vac) Thermostat and Wallplate Model CT8602 OWNER S GUIDE Para obtener un documento con las instrucciones
Installation Instructions
 Installation Instructions SELECTRONIC Hard-Wired AC Powered ICU Lavatory Proximity Faucet PRODUCT NUMBER 0. Certified to comply with ASME A..M 0 American Standard M 0. ICU Faucet shown Installed on American
INSTALLATION INSTRUCTIONS. WOOD BLINDS 1-3/8, 2 and 2-3/8 SLAT SIZES. FAUX WOOD BLINDS 2 and 2-1/2 SLAT SIZES
 INSTALLATION INSTRUCTIONS WOOD BLINDS 1-3/8, 2 and 2-3/8 SLAT SIZES FAUX WOOD BLINDS 2 and 2-1/2 SLAT SIZES STANDARD CORDLESS LIFT Thank you for your purchase. This blind has been custom built for you
52 CEILING FAN. Owner s Manual Models #50336, 50337
 52 CEILING FAN Owner s Manual Models #50336, 50337 If a problem cannot be remedied or you are experiencing difficulty in installation, please contact the Service Department: 1-877-706-3267, 9 a.m.- 5 p.m.
GETTING STARTED OPTIONAL HARDWARE A
 ROLLER SHADES Continuous Cord Loop and Link System without Cassette Double Roller GETTING STARTED OPTIONAL HARDWARE A few simple tools are required: Hold Down Brackets Spacer Block Spacers Steel Tape Measure
HONEYCOMB AND PLEATED SHADES
 HONEYCOMB AND PLEATED SHADES GETTING STARTED BRACkET INFORMATION A few simple tools are required: The brackets you received with your product are REQUIRED for proper installation. Brackets should be installed
WARNING Important Safety Information
 1 Specifications Premier Series Non-Programmable Thermostats MODEL 3000 MODEL 3200 1 2 3 4 5 Specifications Installation Testing Your New Thermostat Programming User Settings Temperature Adjustment WARNING
Secure the other corner. bracket using the remaining screw,
 Mount the E-FENCE1 directly to the fabric of the chain link or wire mesh, on the interior side of the protected area as shown in the illustrated examples, at a height of 4 5 feet and 1 foot from a post.
SEA FROST BD 12 OR 24-VOLT D.C. AIR-COOLED SYSTEM
 148 OLD CONCORD TURNPIKE BARRINGTON, NH 03825 USA TEL (603) 868-5720 FAX (603) 868-1040 1-800-435-6708 E-Mail:sales@seafrost.com www.seafrost.com SEA FROST BD 12 OR 24-VOLT D.C. AIR-COOLED SYSTEM CONDENSING
Mobile Evaporative Cooler. Use & Care Guide MC37 / MC61 INDEX
 INDEX Safety Rules... 1 Quick Start.... 2 Features...3 Maintenance......4 Cooler Parts......5 Warranty......6 Trouble Shooting...7 Mobile Evaporative Cooler Use & Care Guide MC37 / MC61 Safety Safety Rules
OWNERS MANUAL YEAR LIMITED WARRANTY READ ALL INSTRUCTIONS BEFORE PROCEEDING. Store this booklet for future reference
 3000 Premier Series Non-Programmable Single Stage /Cool Digital Thermostat OWNERS MANUAL Compatible with low voltage single stage gas, oil or electric heating or cooling systems, including single stage
WARNING Important Safety Information
 1 Specifications 1 2 3 4 5 Builder Series Programmable Thermostats 2000 2000NC 2200 2200NC Single Stage Heat / Cool Conventional and Heat Pump Multi-Stage 2 Heat / 1 Cool Conventional and Heat Pump Before
WARNING Important Safety Information
 Builder Series Non-Programmable Thermostats MODEL 1000 MODEL 0 1 2 3 4 Single Stage Heat / Cool Conventional and Heat Pump Multi-Stage 2 Heat / 1 Cool Conventional and Heat Pump Before Installing, Programming
Assembly Manual
 Assembly Manual Prepare & Position the Sauna Floor If you are assembling your sauna on a hard surface floor it is recommended that you apply the included adhesive felt to the bottom of the sauna floor.
TS40 Product Assembly & Service Information Manual
 TS40 Product Assembly & Service Information Manual MODEL: SERIAL NUMBER(S): MANUFACTURE DATE: Please review all the information in this manual before attempting assembly and/or maintenance. ASSEMBLY FOR:
15-Year Limited Warranty
 PROGRESS LIGHTING 15-Year Limited Warranty PROGRESS LIGHTING FAN MOTORS ARE WARRANTED TO THE END USER TO BE FREE OF ELECTRICAL AND/OR MECHANICAL DEFECTS FOR A PERIOD OF 15 YEARS FROM DATE OF SALE. PULL
Standard Downrod for ceilings 8-10 feet high. Longer Downrod for ceilings 10 feet or higher
 Table of Contents www.casablancafanco.com To register your fan, please visit: www.casablancafanco.com/register What to Expect with Your Installation Save your receipt for proof of purchase. Ceiling Bracket??
SFD. Suburban Filter Dryer. User Manual Installation Instructions
 SFD Suburban Filter Dryer User Manual Installation Instructions Take your air system into the future with patented, molecular sieve technology used in the SFD regenerative cycle compressed air drying system.
HEATING AND AIR CONDITIONING
 WJ HEATING AND AIR CONDITIONING 24-1 HEATING AND AIR CONDITIONING TABLE OF CONTENTS page SERVICE PROCEDURES REFRIGERANT OIL LEVEL...1 REFRIGERANT RECOVERY....1 REFRIGERANT SYSTEM CHARGE...1 REFRIGERANT
SC Installation, Operation & Application Guide
 SC 5211 2-Stage Heat Pump Auto Changeover Hardwire Programmable Electronic Thermostat 7-Day, 5-2-Day or 5-1-1-Day Programmable Configurable 2-Stage Heat Pump Systems Large Display With Backlight Selectable
2 - Wire Programmable Digital Thermostat
 OWNER'S MANUAL P/N P474-1020 2 - Wire Programmable Digital Thermostat TOTALINE I2:34 72 HEAT 72 Heat only, or Cool only 2 - Wire Operation No Batteries Required Simple, Single Setpoint 7 Day Programmable
CT2700 An Electronic Round Programmable Thermostat
 CT2700 An Electronic Round Programmable Thermostat USER S GUIDE MERCURY SWITCH TYPICAL LOCATION OF A MERCURY SWITCH IN A THERMOSTAT M064 RECYCLING THERMOSTAT If this thermostat is replacing a control that
WARNING Important Safety Information
 1 Specifications Premier Series Non-Programmable Thermostats MODEL 3000 MODEL 3200 1 2 3 4 Specifications Installation Testing Your New Thermostat Programming User Settings WARNING Important Safety Information
FLCH4R Garage and Utility Electric Heater
 FLCH4R Garage and Utility Electric Heater Installation, Operation & Maintenance Instructions Model No. Volts Amps Watts BTU/HR Phase High Low High Low High Low Min Fuse Size* FLCH4R 208 17.3 8.66 3600
52 STRATHMERE CEILING FAN
 52 STRATHMERE CEILING FAN Owner s Manual Models #20341 If a problem cannot be remedied or you are experiencing difficulty with installation, please contact the Service Department: 1-877-459-3267, 9 a.m.-
M770 ph Controller Owner s Manual
 M770 ph Controller Owner s Manual Table of Contents I. Introduction page 2 A. Water Chemistry page 2 B. Safety page 3 C. System Components page 4 D. Specifications page 7 E. Controller Panel Descriptions
Leilani ShowerSpa Model #1022-B Owner's Manual
 Leilani ShowerSpa Model #1022-B Owner's Manual Leilani ShowerSpa Model #1022-B Please Read The Following Instructions COMPLETELY Before Beginning! Our goal is to ensure your installation goes smoothly
JOHN DEERE GATOR HPX/XUV 2 PASSENGER HEATER INSTALLATION INSTRUCTIONS (p/n: 9PH20S30)
") P. 1 of 12 JOHN DEERE GATOR HPX/XUV 2 PASSENGER HEATER INSTALLATION INSTRUCTIONS (p/n: 9PH20S30) Item: Qty: Description: 1 2 1 x 1 x 5/8 Tee Fitting 2 2 Plastic Snap-in Hose Grommet 3 4 1-1/2" Hose Clamps
P. 1 of 12 JOHN DEERE GATOR HPX/XUV 2 PASSENGER HEATER INSTALLATION INSTRUCTIONS (p/n: 9PH20S30) Item: Qty: Description: 1 2 1 x 1 x 5/8 Tee Fitting 2 2 Plastic Snap-in Hose Grommet 3 4 1-1/2" Hose Clamps
WAIMEA. Waimea Showerspa Model #1034 Owner's Manual
 WAIMEA Waimea Showerspa Model #1034 Owner's Manual Waimea ShowerSpa Model #1034 Please Read The Following Instructions COMPLETELY Before Beginning! Our goal is to ensure your installation goes smoothly
MOJAVE. Mojave ShowerSpa Model #1016 Owner's Manual
 MOJAVE Mojave ShowerSpa Model #1016 Owner's Manual Mojave ShowerSpa Model #1016 Please Read The Following Instructions COMPLETELY Before Beginning! Our goal is to ensure your installation goes smoothly
Manual update 2016 MC37/MFC3600
 Manual update 2016 MC37/MFC3600 SETUP INSTRUCTIONS Evaporative cooling works on the principle of heat absorption by moisture evaporation. Simply put, heat is removed from the air as water evaporates. You
HONEYCOMB SHADES CORDLESS LIFT SYSTEM CONTINUOUS CORD LOOP SYSTEM REMOTELIFT 2.0 SYSTEM
 INSTALLATION INSTRUCTIONS HONEYCOMB SHADES CORDLESS LIFT SYSTEM CONTINUOUS CORD LOOP SYSTEM REMOTELIFT 2.0 SYSTEM Thank you for your purchase. This shade has been custom built for you from the highest
WALL MOUNTED ELECTRIC FIREPLACE HEATER. Model # : Onyx Ivory Mirror OWNER S MANUAL. AC V 60Hz 1500W
 WALL MOUNTED ELECTRIC FIREPLACE HEATER Model # : 80001 Onyx 80002 Ivory 80008 - Mirror OWNER S MANUAL AC 110-120V 60Hz 1500W WARNING Read and understand this entire owner s manual, including all safety
TITAN VI High Efficiency Water Conditioner Installation and Operation Manual
 TITAN VI High Efficiency Water Conditioner Installation and Operation Manual Manufacturer s Warranty Holts Water Conditioning 369 South Mountainway Drive Orem, UT 84058 801-426-9243 To the original purchaser,
USER MANUAL WARNING! CONTENTS MODEL SPECIFICATIONS READ ALL INSTRUCTIONS BEFORE PROCEEDING
 MODEL Premier Series 3000 USER MANUAL Non-Programmable Single Stage Heat/Cool Digital Thermostat Compatible with low voltage single stage gas, oil or electric heating or cooling systems, including single
Here is what comes in your box:
 Here is what comes in your box: We recommend that you pull everything out of the box and lay it out. We have grouped the drawn components below with the hardware you ll need for those parts. The screws
Manual for MC21A SETUP INSTRUCTIONS
 Manual for MC21A SETUP INSTRUCTIONS Evaporative cooling works on the principle of heat absorption by moisture evaporation. Simply put, heat is removed from the air as water evaporates. You feel this principle
48 TAYLOR CEILING FAN
 48 TAYLOR CEILING FAN Owner s Manual Models #20554 If a problem cannot be remedied or you are experiencing difficulty in installation, please contact the Service Department: 1-877-459-3267, 9 a.m.- 5 p.m.
SC Installation, Operation & Application Guide
 SC 3801 2 Heat/2 Cool 7-Day Programmable Hardwired Programmable Electronic Thermostat Programmable and Configurable Single/Dual Stage Heat Pump Systems Single/Dual Stage Heat/Cool Systems Backlit Display
Manual for MC37/MFC3600
 Manual for MC37/MFC3600 SETUP INSTRUCTIONS Evaporative cooling works on the principle of heat absorption by moisture evaporation. Simply put, heat is removed from the air as water evaporates. You feel
WIRING DIAGRAMS R410A MODELS PAC 2OAC/2OACH CAC OWC PWC
 WIRING DIAGRAMS R410A MODELS 2OAC/2OACH PAC CAC PWC OWC WIRING 02172017 TABLE OF CONTENTS PAGE 2OACH Deluxe Portable Air-cooled Heat Pump Electronic Controller... 2-3 Piping Schematic... 4 Single Phase
DAY/TIME Button: Selects hour, minute and day setting.
 CONTENTS MODEL 5400 USER MANUAL READ ALL INSTRUCTIONS BEFORE PROCEEDING For more information on energy savings, go to www.energystar.gov Premier Series Universal Auto Changeover Thermostat Up to 3 Heat
RTH8500 Series. Quick Installation Guide. Included in your box. Programmable Thermostat. Quick Install Guide Screws and anchors. RTH8500 Thermostat
 RTH8500 Series Programmable Thermostat Quick Installation Guide Included in your box Quick Install Guide Screws and anchors UWP Mounting System (UWP) RTH8500 Thermostat Tools you will need Tools you may
Solar Heater INSTRUCTIONS. Above-Ground Pool. Calentón Solar Para Alberca Sobre Tierra
 Above-Ground Pool Solar Heater Calentón Solar Para Alberca Sobre Tierra 59025 INSTRUCTIONS Read instructions BEFORE assembling! KEEP THESE INSTRUCTIONS for future reference. THANK YOU FOR YOUR PURCHASE!
USER MANUAL WARNING! CONTENTS MODEL 1 SPECIFICATIONS READ ALL INSTRUCTIONS BEFORE PROCEEDING 2 INSTALLATION
 MODEL 5100 USER MANUAL Compatible with low voltage multi-stage heat/cool systems with up to two stages of heating and two stages of cooling. READ ALL INSTRUCTIONS BEFORE PROCEEDING 1 2 3 4 5 6 7 CONTENTS
Installation Operation Care
 Installation Operation Care Provenance Woven Wood Shades Standard Cordlock and Clutch Operated Shades CONTENTS Getting Started: Product View... 1 Tools and Fasteners Needed... 2 Mounting Types and Window
Table of Contents What to Expect with Your Installation. Ceiling Plate. Tools Needed.
 Table of Contents Congratulations on purchasing your new Casablanca ceiling fan! It will provide comfort and performance in your home or office for many years. This installation and operation manual contains
PANEL HEATERS OPERATING INSTRUCTIONS
 PANEL HEATERS OPERATING INSTRUCTIONS GPH110 GPH210/220 GPH310/320 GPH410/420 WARNINGS AND SAFEGUARDS 1. Use only the voltage specified on the rating plate of the appliance. 2. Keep all objects at least
Model TG 1000 External Toilet Water Shut-Off Valve User Manual
 Toilet Guardian Protection Systems Model TG 1000 External Toilet Water Shut-Off Valve User Manual Modules Main Control Unit (MCU) - Shut-Off Valve, LCD Screen, Alarm Buzzer, Alarm Silence Button, Program
Heater for BRP Commander. Caution: Before using this product, read this manual and follow all safety instructions. Owner s Manual
 Owner s Manual Model: Can Am Commander Heater for BRP Commander Caution: Before using this product, read this manual and follow all safety instructions. Safety Instructions Kit Contents Tool Requirement
Select. Sutter PlaceTM. Instruction Manual. A Kichler Select ceiling fan
 Sutter PlaceTM A Kichler ceiling fan Kichler Lighting 7711 East Pleasant Valley Road P.O. Box 318010 Cleveland, Ohio 44131-8010 Customer Service 866.558.5706 8:30 AM to 5:00 PM EST, Monday - Friday Instruction
SHEER MAGIC Installation Instructions
 SHEER MAGIC Installation Instructions The Vertical Blind that Looks Like A Sheer Drapery! Congratulations on the purchase of your new window covering! Sheer Magic blinds are an attractive choice for your
Please read and save these instructions. Should you have any questions or difficulty installing your fan, call us first!
 IC/Air2 and IC/Air3 Installation Instructions and Owners Manual Please read and save these instructions. Should you have any questions or difficulty installing your fan, call us first! Customer Service
The Extraordinaire OWNER S MANUAL. Orbital Ceiling Fan. Model No. OF110** READ AND SAVE THESE INSTRUCTIONS. Net Weight 14.5 lbs. or 6.59 kg.
 The Extraordinaire Orbital Fan WARNING: Support Directly From Building Structure Net Weight 14.5 lbs. or 6.59 kg. Model No. OF110** OWNER S MANUAL READ AND SAVE THESE INSTRUCTIONS Important Safety Instructions
USER MANUAL STAY IN BED L I G H T C L O C K
 USER MANUAL STAY IN BED L I G H T C L O C K 1 SAFETY INSTRUCTIONS pg. 3 VISUAL GUIDE pg. 3 WHAT'S INCLUDED pg. 4 SETUP pg. 4 SETTING THE TIME FORMAT AND TIME pg. 5 NIGHT LIGHT SETTING pg. 6 AUTO OFF FUNCTION
HONEYCOMB AND PLEATED SHADES
 HONEYCOMB AND PLEATED SHADES GETTING STARTED BRACKET INFORMATION A few simple tools are required: The brackets you received with your product are required for proper installation. Brackets should be installed
TITAN Pro-Max High Efficiency Upflow Water Conditioner Installation and Operation Manual
 TITAN Pro-Max High Efficiency Upflow Water Conditioner Installation and Operation Manual TITAN VI Pro-Max Manufacturer s Warranty Holts Water Conditioning 369 South Mountainway Drive Orem, UT 84058 801-426-9243
Table of Contents. What to Expect with. Mounting Options. Tools Needed
 Table of Contents www.hunterfan.com What to Expect with Your Installation Congratulations on purchasing your new Hunter ceiling fan! It will provide comfort and performance in your home or office for many
Lifetime Limited Warranty
 Hampton Bay Lifetime Limited Warranty The retailer warrants the fan motor to be free from defects in workmanship and material present at time of shipment from the factory for a lifetime after the date
Daytime Fan-Aspirated Radiation Shield Kit Installation Manual
 Daytime Fan-Aspirated Radiation Shield Kit Installation Manual For Vantage Pro2 & Vantage Pro2 Plus Stations Introduction The instructions describe how to upgrade a non-aspirated Vantage Pro2 radiation
Table of Contents. What to Expect with. Mounting Options. Tools Needed. Preparation. Wiring. Downrod.
 Table of Contents www.casablancafanco.com What to Expect with Your Installation Congratulations on purchasing your new Casablanca ceiling fan! It will provide comfort and performance in your home or office
Set & $ave. Model Programmable Thermostat. installation and operation manual
 Set & $ave Programmable Thermostat installation and operation manual Model 44110 42707-01 8-21-06 2 Table of Contents Important Information... 5 Tools... 6 Uninstalling the Existing Unit... 7 Installing