Sauna & Steam. STEAM GENERATOR (Domestic & Light Commercial) Assembly and operating manual PRODUCT IMAGE
|
|
|
- Sabina Reed
- 5 years ago
- Views:
Transcription
1 STEAM GENERATOR (Domestic & Light Commercial) Assembly and operating manual PRODUCT IMAGE Oceanic Ltd, Pountney Street, Wolverhampton, WV2 4HX Phone:
2 Table of contents 1. Introduction Important Notes Safety Precautions Electrical connection Specification Steam Generator Unit Parameters Wiring multiple steam generators Steam Generator Frame Sizes Clearance distances Ventilation Steam Generator Parts Description Table 2. OC-A Controller Parameters Temperature Sensor Parameters OC-A Controller Description Installation Generator Size Steam Generator Location Water and Steam Connections Installation for controller and temperature probe Installations for power supply and control cable Installing a light Steam on Demand Function (Only supplied with commercial generators) Circuit Diagrams Testing and operation Setting time and temperature Steam on Demand Troubleshooting guide Maintenance Descaling procedure Guarantee Oceanic Saunas sales@oceanic-saunas.co.uk 2
3 1. Introduction Thank you for choosing to buy our Oceanic steam generator, please take the time to read these instructions before you begin as they contain important information about the installation and maintenance requirements. Oceanic steam generators are available in specifications from 3kw to 12kw and are equipped with our OC-A intelligent controller. With this not only can you control the temperature and time duration of your steam bath but also the light of the steam room, the automatic drain valve, key-lock, alter the temperature display between Centigrade and Fahrenheit; as well as displaying the steam generator s status by the 8 LED s on the panel, heating, water inlet, temperature, drain status etc. note also that one OC-A controller can control multiple Oceanic steam generators. Every Oceanic steam generator is thoroughly tested before leaving the factory so there may be the remains of water inside the boiler. 2. Important Notes Read the manual before installation and operation. This Equipment must be installed by competent person. This equipment must be connected to an all pole isolator Disconnect the power supply before exposing electrical connections. Confirm the right voltage to your steam generator 1 or 3 phase. For hard water areas please read our descaling section on page??? Water supply must have maximum of 1 bar pressure, recommend the use of a pressure reducing valve if necessary 3. Safety Precautions Elderly persons, pregnant women, or these suffering heart disease, high blood pressure, diabetes or not in good health are advised to seek medical opinion before using a steam room. Do not smoke in the steam room. Avoid using the steam room immediately after strenuous exercise. Do not use the steam room when under the influence of alcohol. Leave the steam room at once if you feel sleepy, sick or uncomfortable. Ensure there is good ventilation for the steam room. We do not recommend that children under 16 use this product. Commercial operators should post a notice of these precautions in a prominent position. Steam entering the steam room will be scalding hot; take care to position the inlet nozzle away from where users will sit and/or provide adequate guarding, post a notice to caution users. 4. Electrical connection A qualified electrician will have no problem installing this system with the provided wiring schematic and with the help of the circuit diagram mounted inside the respective control unit. According to the valid regulations, the electrical connection of the steam generator and the control box has to be carried out by an authorised electrician. In case of a warranty claim, you are kindly requested to present a copy of the invoice from the electrician. Oceanic Saunas sales@oceanic-saunas.co.uk 3
 Size (mm) Steam")


4 5. Specification 5.1. Steam Generator Unit Parameters Model Power Current (amps) Size (mm) Steam outlet Inlet Drain Nozzle Type Kw 1N~ 3N~ L W H inches inches inches Domestic OC A /2 1/2 1/2 White OC A 8.6A /2 1/2 1/2 White OC A 11.6A /4 1/2 1/2 Chrome Steam On Demand OC-60 S /2 1/2 Red OC-80 S /4 1/2 1/2 Red OC-90 S /4 1/2 1/2 Red OC-105 S /4 1/2 1/2 Red OC-120 S /4 1/2 1/2 Red Please note that all models may not be available from your dealer. Important note: Steam outlet should not be reduced Note: To use the steam generator in single phase the L1 L2 and L3 must be linked together with the copper bridges that are supplied. This is not possible with the 4kw machine. See circuit diagram on page 15. Domestic unit Steam On-Demand unit 1/2 Steam outlet 3/4 Steam outlet 3/4 Steam inlet White Steam nozzle Chrome steam nozzle Steam On Demand button Oceanic Saunas sales@oceanic-saunas.co.uk 4


5 5.8. Wiring multiple steam generators If greater power is required one OC-A controller may be used to control two or more steam generators, e.g. if you need a 24KW steam generator you can use one OC-A controller to control two 12kw steam generator or three 10kw steam generators. Multiple steam generators wiring schematic OC-A controller Temperature sensor Slave Slave Master To next slave Pressure release valve Steam Outlet To drain Multiple steam generators plumbing Water Inlet Pressure reducing valve Oceanic Saunas sales@oceanic-saunas.co.uk 5


6 5.2. Steam Generator Frame Sizes Model A B C D E F G H OC OC OC Clearance distances >300mm >200mm >400mm >500mm 5.4. Ventilation Ensure air flow into area where steam generator is housed. For commercial use ensure good ventilation from at least two ducts within the housing of the generator Oceanic Saunas sales@oceanic-saunas.co.uk 6
7 5.5. Steam Generator Parts Description No. Part Description 1 Water inlet valve Automatically controls the water flow (maximum pressure 1bar) 2 Drain valve Controller by controller. Turn on or turn off to drain water 3 Power entry The route of power wire 4 Control cable entry The route of control cable 5 Stainless steel tank Boiler 6 Insulation material Reduce the loss of the boiler heat 7 Water lever probe Detect the water level 8 Steam outlet Steam outlet 9 Pressure relief valve Operates if the pressure in the boiler exceeds 1.2kg/ c m2 10 Overheat switch Boil dry protector operates at 105 C 11 Main circuit board Control center 12 Accessory circuit board Connect and control the heat element 13 Terminal Connection for power supply 14 Earth wire plug Connection for earth wire 15 Water inlet Water inlet to the boiler 16 Elements Electrical heating elements Oceanic Saunas sales@oceanic-saunas.co.uk 7
 Temperature ( O C) Dimension L x W x H (mm) Remarks OC-A 15-240 30-60 o C 150 x 92 x 22 When the time window displays Long the generator will operate")
8 5.6. Table 2. OC-A Controller Parameters Model Working Time (m) Temperature ( O C) Dimension L x W x H (mm) Remarks OC-A o C 150 x 92 x 22 When the time window displays Long the generator will operate continuously until it is switched off Temperature Sensor Parameters MODEL Detected Scope Max Cut out Temperature Size (mm) o C o F o C o F L W H OC-S Minimum distances for temperature sensor installation Temperature sensor 1800mm >500mm Steam nozzle 300mm Oceanic Saunas sales@oceanic-saunas.co.uk 8
9 6. OC-A Controller Description L1 L2 L3 L4 L5 L L L8 7 C/F ENTER SET 4 6 DRAIN LIGHT ON OFF No Part Description 1 On/off Push to operate 2 Light Push to operate 3 Drain Control Push to operate / Keep pressed for SOD/ Keep pressed for normal 4 Set Preset time and temperature 5 /\ Increase button 6 \/ Decrease button 7 / ºC/F / ENTER Change from centigrade to Fahrenheit / Enter change in settings 8 Time display window Display the work time of the steam generator 9 Temp display window Display the detected temperature of steam room 10 L1 Indicator LED for the light in steam room 11 L2 Indicator LED for water level red, water is filling - green water level OK. Note if the LED remains red in excess of 5 minutes check water supply. 12 L3 Indicator LED for drain - red for draining - green for draining and filling at the same time 13 L4 Red means it is in SOD mode. Green means it is in normal mode 14 L5 Indicator LED for over heat, red means the steam generator was cut off as the heat element is too hot (lack of water, the heat elements may worked in air) 15 L6 Indicator LED for pressure - when the pressure in the boiler exceeds 1.2kg/c m2. It will switch on. 16 L7 Indicates the detected temperature is lower than the preset temperature and steam generator is heating. 17 L8 Indicates the detected temperature is higher than the preset temperature and the steam generator is idling. Oceanic Saunas sales@oceanic-saunas.co.uk 9
10 7. Installation Isolate the power supply before installation Confirm the model you have selected is suitable for your steam room, please refer to chart 5 Mount the steam inlet nozzle approximately 300mm up from the floor and it should be at least 200mm from person s body. If the steam generator is installed in an inaccessible place ensure that both the electrical power and water supply can be isolated in an emergency. To use the steam generator in single phase the L1 L2 and L3 must be linked together with the copper bridges that are supplied. This is not possible with the 4kw machine. See circuit diagram on page 15. The minimum water inlet pressure is 0.25 bar (2.5 Mpascals) and the maximum is 2 bar (20 Mpascals), for pressures in excess of this use a reducer before the valve. The steam pipe from steam generator to steam room should be kept to a minimum, pipes longer than 3 meters should be insulated to prevent heat loss. Steam pipes will be hot during use and must be protected against accidental contact. Steam entering the steam room will be scalding hot; take care to position the inlet nozzle away from where users will sit and/or provide adequate guarding, post a notice to caution users. Keep the number of right angle bends to a minimum and ensure that the run does not create a trap into which condensate would gather and cause a blockage I.e. the pipe must not go down and then up. There must be no valve or other blockage in the steam pipe The steam pipe should be metal of other material that can endure 150 C temperature, copper pipe is recommended. It is not recommended to install the Steam generator outdoors or where it might be affected by frost. Allow for a minimum space of 0.5 cubic meters to install the generator. Steam generator should be level side-to-side and front to back and should be installed so that the arrows on the case point up. Do not install the steam generator in close proximity to hazardous substances Generator Size The table opposite should be referred to for guidance only. Please note that the size of generator required to heat a particular size of steam room will vary according to a number of factors including the type of material used for construction, the height of the steam room and the ambient temperature. For lightweight materials such as plastics and laminates 1 KW will heat up to 1 cubic meter of air for dense materials such as stones and ceramics which will conduct the heat away more rapidly allow for up to 2KW per cubic meter of air. Hot air rises so restricting the height to around 2 meters will ensure the user is sitting in the steam for higher ceilings you may need to increase the power requirement. Generator Model OC OC OC OC OC OC OC Steam Room Volume (m 3 ) OC The following table is given as a guide; ambient air temperatures and frequency of use (number of door openings) can also affect the power requirements. Oceanic Saunas sales@oceanic-saunas.co.uk 10
11 7.2. Steam Generator Location The steam generator should be installed in dry well ventilated place in close proximity to the steam room. It can be placed on the floor or hung on wall. To hang the generator on a wall drill 3 holes 8mm in diameter in accordance with the table below. Fix the top 2 screws in place first then hang the generator by the 2 keyhole shaped holes in the back plate. Then with the front cover removed fix the 3rd screw to secure the unit in place. Model A B C OC-30 to OC OC-70 to OC OC-100 to OC The steam generator can be installed anywhere that is dry and has an airflow. Example locations: Boxed under bench within steam room Cupboard in an adjacent room In the loft Up to 1.5m beneath the unit in a basement Important notes: The steam pipe should be insulated and not travel further than 10 metres Do not reduce size of steam pipe at any point the steam pipe must not go down and then up, as this will create a trap and damage the steam generator. <10m Oceanic Saunas sales@oceanic-saunas.co.uk 11


12 7.3. Water and Steam Connections i. The water supply pipe and steam pipe should comply with local standards ii. Connect the water inlet valve of the generator to the mains water supply using a flexible hose with 1/2 inch fittings. iii. Steam outlet (1/2 inch or 3/4 inch) use the same dimension copper pipe to connect it, if the steam pipe is longer than 5 meter it should be insulated. During use the steam pipe will be very hot and must be protected against accidental contact. Note that according to the location it may be necessary to attach an additional length of pipe to the pressure relief valve in order to divert the steam flow to a safe direction should the valve operate. iv. Connect the drain outlet to a suitable drain via a copper pipe with the appropriate fittings. Pressure release valve Steam outlet nozzle 300mm Steam pipe 10m max insulated above 5m Pressure reducer valve To drain Water inlet Oceanic Saunas sales@oceanic-saunas.co.uk 12


13 7.4. Installation for controller and temperature probe. OC-A controller is waterproof and can be installed inside or outside the steam room according to customer preference. i. For a better connection and to eliminate any future connection problems spray connection fluid or aerosol oil spray on the pins of the PS/2 cable(5pin cable) before plugging into the circuit board. ii. Ideally the control panel should be installed at a height of approximately 1200mm for ease of use. iii. Installation method: Open the front cover of steam generator. Pin the control cable (6 cores) and temperature sensor cable (2 cores) to the relevant ports. iv. Control panel installation: pin one end to circuit board ports in steam generator connect the other end to the controller s cable. v. Temperature probe installation: the temperature probe is installed inside the steam room at approximately 1.2 to 1.5 meters high and away from the steam outlet. Use a 4mm screw fix it in place and then connect to the wire from the controller. vi. Fix protective cover (supplied) over the temperature Temperature Sensor 4mm Screw 7.5. Installations for power supply and control cable Confirm the correct voltage of power supply and wires. Cover to protect the temperature sensor Remove the knock out for the power cable entry and use a rubber grommet to protect the cable, connect to the conductors to the correct terminals for single phase power supply use the copper bridge connectors, for 3 phase supply remove them. (Extra bridges can be found it provided) Remove the knock out for the control cable entry and use a rubber grommet to protect the cable, connect the cable to the relevant port on circuit board. Ensure the power supply wire and control cable remain separated to prevent magnetic field of power supply wire from disturbing control cable signal Installing a light i. The steam generator keypad has a light button which switched a 230v connection on the main circuit board upto 100watts in power. ii. - Use the supplied grey connector with two blue wires to connect to the light empty output on the circuit board labelled LIGHT Oceanic Saunas sales@oceanic-saunas.co.uk 13

14 8. Steam on Demand Function (Only supplied with commercial generators) Commercial operators may wish to take advantage of the steam on demand function which will allow customers to press the steam on demand button located outside the steam room after which the generator will operate for 30 minutes then stop until activated again. To set STEAM ON DEMAND hold the drain button for 10 seconds until the screen says LONG and L4 goes red. 9. Circuit Diagrams Oceanic Saunas

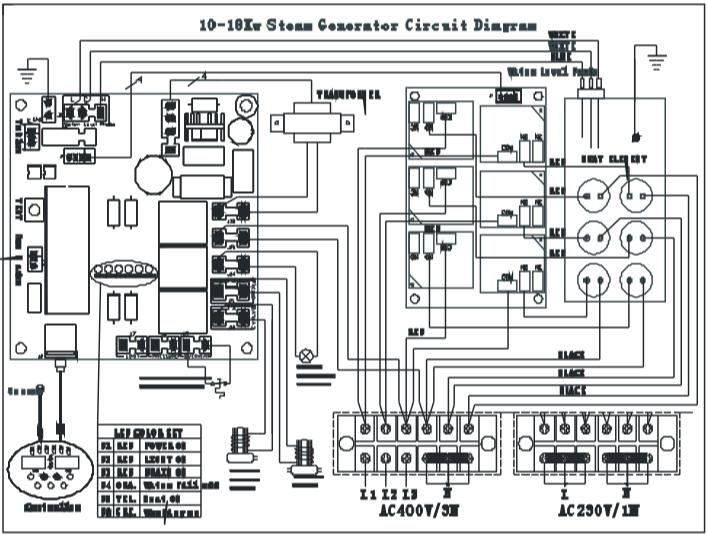
15 Oceanic Saunas
16 10. Testing and operation i. Check water, drain and steam connections are all safe and sealed. ii. Switch on main power to the machine. iii. If connected you can switch on the lights using the light button independently of the temperature and time settings for example if you wanted to use the room as a shower without steam. iv. Push the On/Off button The keypad will now illuminate v. Push SET Time will now flash Use Up and Down Arrows to change time Press ENTER to save settings. vi. Push SET Twice Temperature will now flash Use Up and Down Arrows to change temperature Press ENTER to save settings. vii. You can switch between Celsius and Fahrenheit by holding the ENTER button for 2 seconds. viii. Once the generator has surpassed the set temperature L8 will go red and the machine will cut out. Once it drops below the set temperature it should begin steaming again. ix. To set STEAM ON DEMAND hold the drain button for 10 seconds until the screen says LONG and L4 goes red. The temperature can still be adjusted in the same way as above. Now when someone pushes the red button the generator will steam for 30 minutes until the set temperature is reached Setting time and temperature. When the steam generator leaves the factory the default settings are 40 o and 1 hour of operation these can be adjusted as follows; i. Time setting: press set key the time display window will flash - press /\,\/ to adjust the time, every press, the time will increase or reduce 5 minutes, once the desired setting is reached press enter the window will stop flashing. You can adjust from the time from 15 to 240 minutes or no time limited. Note the controller has a memory function, if the power supply is not cut off the next time you turn on steam generator the time you selected will be the default time. ii. Temperature setting: if you press set once after you finish setting the time or otherwise twice the temperature window will flash, enter the required temperature by pressing /\, \/ to adjust - every press will increase or reduce 1 o.you can adjust from 30 o -60 o once the required temperature has been set press enter key the window will stop flashing Steam on Demand (Commercial Generators only 9, 10.5, 12KW) i. To set the generator to commercial mode ( steam on demand mode) you will need both the digital controller and the steam on demand button plugged into the circuit board. ii. Set the desired temperature using the method above. iii. Hold the drain button for 5 seconds, the word LONG will now appear on the screen and L4 will turn red (note this isn t the same as setting the time to long). iv. Your generator is now ready for steam on demand, push the button and it will steam for 30 minutes until pressed again when it will go for another 30 minutes. Oceanic Saunas sales@oceanic-saunas.co.uk 16
17 v. If the button is not pressed for five minutes after it shuts down it will automatically go into it drain cycle, it will take around 8 minutes for this to complete itself. The generator will take in more water when it is draining to flush out the boiler, this action is designed to minimize the build up of lime scale but not allow the elements to dry out while they are still hot. The process will only occur after the generator has operated for more than 10 minutes or more vi. To deactivate steam on demand hold drain for 5 seconds until L4 changes green. 11. Troubleshooting guide Please note that we recommend all repairs are carried out be a suitably qualified person. Trouble description When the generator is turned on there is no display on control panel. Control panel lit up but no steam. Cause Something is wrong with: Connection Power supply Transformer. Main circuit board controller Control cable or port Connection Fuse Water probe Control lead connection Water supply Solution 1. Check you have power to the main terminals. 2. Check fuse. 3. Disconnect control cable from main circuit board, spray multipurpose lubricant or electrical connection cleaner on the pins and in the socket, blow away excess, reconnect. 4. If there are no RED LEDs on the main circuit board the transformer has failed or has a loose connection. 1. If L2 is green, L7 is yellow remove the water level probe, clean off any scale, return probe. Test 2. Disconnect control cable from main circuit board, spray multipurpose lubricant or electrical connection cleaner on the pins and in the socket, blow away excess, reconnect. 3. If L2 is red, check water supply, if ok shut of water and take inlet valve apart, clean filter and return. If still red replace inlet valve. Circuit breaker tripping out. Temperature window displays LC Temperature window display HC Water runs through steam nozzle in room. Generator works when switched off on the control panel. Element failure Loose Earth Wire Faulty connection The temp sensor connection Temp sensor is short circuit. Water inlet valve. Level sensor. Relays 1. To check elements use a insulation tester, or fault find by disconnecting individual elements one by one. 2. Check earth connections are tight. 3. If above fails, return generator to supplier for repair, guarantee information below. 1. Check connection or change temp sensor. 2. If above fails replace sensor. 1. Check connection or change temp sensor. 2. If above fails replace sensor. 1. Turn machine off, if water continues clean inlet valve or replace. 2. If runs while machine is on try above if fails clean water probe and check connection to circuit board. 1. Replace relay PCB. Oceanic Saunas sales@oceanic-saunas.co.uk 17
18 12. Maintenance The single biggest problem with steam generation is the build up of scale resulting from dissolved solids within the water. Scaling can cause the elements to fail, the water level sensors not to function, premature failure of the O-rings resulting in leaks from around the elements. The extent of the problem will vary according to the degree of hardness in the local water supply. For all commercial operators we recommend the use of a water softener. Expect 2500 hours element life, this can be serious depleted by poor maintenance. All users commercial and domestic must ensure a regular maintenance routine to descale the generator the frequency of this will vary according to the degree of hardness in the local water supply and the amount of time the generator is used for. Check the water for hardness and arrange the descaling routine accordingly: - High levels of hardness descale once every 50 to 100 hours of operation. Medium levels of hardness descale once every 100 to 250 hours operation. Low levels of hardness descale once every 250 to 1000 hours of operation. To descale the generator use a solution of weak acid crystals (such as citric acid) mixed with water Citric acid can be purchased from: Descaling procedure i. Firstly push the drain button to empty the tank, check the valve is draining. Once the machine has finished draining isolate the mains power. ii. Unscrew the top plate of the machine which says water level probe, disconnect the probes wires with a flat screw driver and pull the probe out. iii. Fill the machine using a funnel with 5-6 litres of pre mixed citric acid. iv. Replace the probe and reconnect. v. Heat the machine for 2 minutes. vi. Leave the machine for 4 hours minimum vii. Drain 2-3 times. Follow the instruction supplied with the crystals and allow sufficient time for the solution to dissolve the scale before flushing out the generator. For best results add to water, steam for two minutes then leave overnight. Empty the next days and flush twice using drain cycle. Faults arising from a result of a failure to descale the generator are not covered by warranty. Because heating and cooling cause expansion and contraction it is important to inspect all the water and steam inlets and outlets as well as their pipes and connectors on a regular basis to ensure there are no leaks. Clean the filter net in the magnetic valve according to the water quality in the location. The condition of the wiring and electrical integrity of the generator should be checked regularly - for commercial operators this should be at least once a year. Oceanic Saunas sales@oceanic-saunas.co.uk 18
19 13. Guarantee All generators are guaranteed for 12 months for domestic and commercial use from the date of purchase. This guarantee excludes consumable items such as the electrical elements and failures resulting from misuse or abuse such as a failure to descale as explained previously. If you are using the generator for more than 20 hours a week in a hard water area without a water softener your guarantee will be invalidated. If you encounter any difficulty with this assembly procedure or think we could have explained anything more clearly we would welcome your comments, please call T: or T: technical help line. Oceanic Saunas sales@oceanic-saunas.co.uk 19
SK SERIES INSTALLATION INSTRUCTIONS 1
 Certified Products PO Box 636 Eagle Idaho USA. 83616 T: 877.467.2862 F: 208.286.0290 info@scandiamfg.com www.scandiamfg.com SK SERIES INSTALLATION INSTRUCTIONS 1 Table of Contents FOREWARD... 3 SAFETY...
Oceanic Sauna Heater Manual
 April 13 Oceanic Manual Thank you for choosing to buy our Oceanic Sauna heater; please take the time to read these instructions before you begin as they contain important information about the installation
Sauna & Steam. SAUNA HEATER with OCSB/LB CONTROLLER Assembly and operating manual PRODUCT IMAGE
 SAUNA HEATER with OCSB/LB CONTROLLER Assembly and operating manual 31.06.16 PRODUCT IMAGE Oceanic Ltd, Pountney Street, Wolverhampton, WV2 4HX Phone: 01902 450 550 sales@oceanic-saunas.co.uk www.oceanic-saunas.co.uk
Sauna & Steam BEHIND BENCH HEATER. Assembly and operating manual September 2018 PRODUCT IMAGE
 BEHIND BENCH HEATER Assembly and operating manual September 2018 PRODUCT IMAGE Oceanic Ltd, Pountney Street, Wolverhampton, WV2 4HX Phone: 01902 450 550 E-Mail: sales@oceanic-saunas.co.uk www.oceanic-saunas.co.uk
Sauna & Steam. Infrared Sauna Assembly Manual
 Infrared Sauna Assembly Manual Oceanic Ltd, Pountney Street, Wolverhampton, WV2 4HX Phone: 01902 450 550 sales@oceanic-saunas.co.uk www.oceanic-saunas.co.uk Table of contents.......... 1. Safety Precautions.........................................
Sauna & Steam. Infrared Sauna Assembly Manual
 Infrared Sauna Assembly Manual Oceanic Ltd, Pountney Street, Wolverhampton, WV2 4HX Phone: 01902 450 550 sales@oceanic-saunas.co.uk www.oceanic-saunas.co.uk Table of contents 1. Safety Precautions..........................................
DOMESTIC STEAM GENERATOR Installation Instructions
 DOMESTIC STEAM GENERATOR Installation Instructions Please read all of the instructions carefully before commencing installation or using the facility. Contents INTRODUCTION Page 2 TECHNICAL SPECIFICATION
CROWN WATER HEATERS CPU10 - CPU15 CPOS10 - CPOS15
 CROWN WATER HEATERS CPU10 - CPU15 CPOS10 - CPOS15 COMPACT PLUS 10 and 15 Litre Unvented Under and Over Sink Water Heater INSTALLATION AND USER GUIDE 1 DIMENSIONS 10L - 250mm 15L - 310mm 100mm 80mm 410mm
User and Installation Instructions. Wall Mounted Water Boiler WMB3F/B and WMB3F/W IS435 ECN3461
 User and Installation Instructions Wall Mounted Water Boiler WMB3F/B and WMB3F/W IS435 ECN3461 Dear Customer Thank you for purchasing this Lincat product. With correct use and careful maintenance as described
BOILING UNIT REDITAP. Installation and User Guide. IMPORTANT: This booklet should be left with the user after installation and demonstration
 in tap Boiling water to in tap sink Drain Valve (as high as possible) REDITAP CONNECTION SUMMARY Amp mains supply cold mains water into in tap optional filter cold water in hot water BOILING UNIT Installation
LEVENS STEAM SHOWER ENCLOSURE
 LEVENS STEAM SHOWER ENCLOSURE INSTALLATION AND USER MANUAL CONTENTS Steam Shower Enclosure Installation...2 Technical Information...2 Plumbing Requirements...2 Assembly...3 Tools and Materials...3 Installation...3
The Professional s Choice
 SureFlow compact range: 1000-C & 1000-M Auto-Fill Catering Water Boiler Installation And User Instructions The Professional s Choice CONTENTS CONTENTS & INTRODUCTION 2 SAFETY & ENVIRONMENTAL INFORMATION
User and Installation Instructions. Electric Auto-Fill Water Boilers EB3F, EB4F, EB6F, EB6TF IS339 ECN3539
 User and Installation Instructions Electric Auto-Fill Water Boilers EB3F, EB4F, EB6F, EB6TF IS339 ECN3539 Dear Customer Thank you for purchasing this Lincat product. With correct use and careful maintenance
Installation, Operating and Servicing Instructions
 Installation, Operating and Servicing Instructions Wall Mounted Water Boiler WMB3F/B,WMB3F/W Please make a note of your product details for future use: Date Purchased: Model Number: Serial Number: Dealer:
REDRING POWERSTREAM UNVENTED INSTANTANEOUS WATER HEATER. Installation and User Guide
 : GUARANTEE AND CONTACT DETAILS REDRING POWERSTREAM UNVENTED INSTANTANEOUS WATER HEATER Installation and User Guide APPLIED ENERGY PRODUCTS LIMITED MORLEY WAY, PETERBOROUGH PE2 JJ TEL: +44 (0) 844 372
The Professional s Choice
 CPF Series Models: CPF2100, CPF210, CPF310, CPF4100-3, CPF4100-6 & CPF6100 Auto-Fill Catering Water Boiler With Integrated Multi-Filter Installation And User Instructions The Professional s Choice INSTANTA
Autofill wall mounted water. boiler. Getting the best from your water. boiler. Please read and keep these instructions
 Autofill wall mounted water boiler Please read and keep these instructions For Burco wall mounted boilers 76700 (SKU 444448534), 76702 (SKU 444448546), & 76704 (SKU444448548) Getting the best from your
SERVICE MANUAL. Ecoboiler Model range: T20 ( ) T30 ( )
 T30 ( )") SERVICE MANUAL Ecoboiler Model range: T20 (1000662) T30 (1000663) Marco Beverage Systems Ltd. 63d Heather Road, Sandyford Industrial Estate, Dublin 18, Republic of Ireland Ireland Tel: (01) 295 2674 Ireland
SERVICE MANUAL Ecoboiler Model range: T20 (1000662) T30 (1000663) Marco Beverage Systems Ltd. 63d Heather Road, Sandyford Industrial Estate, Dublin 18, Republic of Ireland Ireland Tel: (01) 295 2674 Ireland
AQUARIUS 45 MARINE SERVICE MANUAL
 AQUARIUS 45 MARINE SERVICE MANUAL CONTENTS: PAGE 1. INTRODUCTION 3 2. SAFETY INSTRUCTIONS 4 3. BASIC INSTRUCTIONS 5 3.1. Installation Details 5 3.2. Operating the Boiler for the First Time 6 3.3. Troubleshooting
100 FLUEBOOST
 100 FLUEBOOST f l u e b o o s t 1 0 0 The flueboost is a box shaped centrifugal fan unit with in line spigots for the flue connection, a pressure switch to ensure safe operation, all within a compact package.
Minimalist Bottom Outlet Thermostatic Bar Shower. Telephone Product Specification
 Product Specification ~ Minimum Working Pressure 0.5 bar ~ Maximum Working Pressure 4.0 bar ~ Cold Water Supply Temp 4-20 c ~ Hot Water Supply Temp 55-85 c ~ Fixing Centres 150mm +/- 20mm ~ Outlet size
Autofill counter top water boiler
 Autofill counter top water boiler Please read and keep these instructions For Burco counter top water boilers 76500 (SKU 444448531) and 76502 (SKU 444448533) Getting the best from your water boiler Remove
Electrical Installation Instructions
 Steambath Generators Models: SM-2 and SM-5! Electrical Installation Instructions C US LISTED 995C WARNING: Elderly persons, pregnant women, or those suffering from heart disease, high blood pressure, diabetes,
SPA HEATER INSTALLATION, OPERATION AND MAINTENANCE
 SPA INSTALLATION, OPERATION AND MAINTENANCE MODELS: ST SERIES 5.5 & 11kW 240V SINGLE PHASE BEFORE YOU BEGIN CHECK ALL ELECTRICAL CONNECTIONS TO ALL COMPONENTS WITHIN THE FOR TIGHTNESS. CONNECTIONS CAN
4L Instant Water Boiler Instructions for Use
 Power Details: 220-240Va.c. 50Hz-60Hz 2200-2600W Capacity: 4.0L Accessories: 2 Water aid trays Water Filters are not included and can be purchased separately Item Code 10747 IMPORTANT NOTES FOR YOUR INSTANT
Ecoboiler T20 & T30 SERVICE MANUAL. Marco Beverage Systems Ltd. 63d Heather Road, Sandyford Industrial Estate, Dublin 18, Republic of Ireland
 Ecoboiler T20 & T30 SERVICE MANUAL Marco Beverage Systems Ltd. 63d Heather Road, Sandyford Industrial Estate, Dublin 18, Republic of Ireland Ireland Tel: (01) 295 2674 Ireland Fax: (01) 295 3715 UK Tel:
ARLEY STEAM SHOWER ENCLOSURE
 ARLEY STEAM SHOWER ENCLOSURE INSTALLATION AND USER MANUAL CONTENTS Steam Shower Enclosure Installation...2 Technical Information...2 Plumbing Requirements...2 Assembly...3 Tools and Materials...3 Installation...3
L A signature series TA T N E RE O, A L L A T S IN
 signature series COMMERCIAL STEAM GENERATORS INSTALLATION, OPERATION AND MAINTENANCE MANUAL INSTALLATION MANUAL COMMERCIAL STEAM GENERATOR SIGNATURE SERIES (SS) INTRODUCTION Steam Sauna manufactures steam
FLUEBOOST. flueboost 350 gas fire model
 350 FLUEBOOST flueboost 350 gas fire model The flueboost is a box shaped unit with in line spigots for the flue connection, a pressure switch to ensure safe operation and plug-in electrical fittings for
Unvented Calorifier Range. Operating and Maintenance Manual. For Models & 500
 Unvented Calorifier Range. Operating and Maintenance Manual. For Models 125 300 & 500 Telephone 08456 448802 Fax 08456 448803 Emial info@mhgheating.co.uk Web www.mhgheating.co.uk TABLE OF CONTENTS. Section
THE BOILING WATER DISPENSER INSTALLATION & OPERATING INSTRUCTIONS IMPORTANT: READ AND SAVE THESE INSTRUCTIONS FOR THE BENEFIT OF THE USER
 THE BOILING WATER DISPENSER INSTALLATION & OPERATING INSTRUCTIONS IMPORTANT: READ AND SAVE THESE INSTRUCTIONS FOR THE BENEFIT OF THE USER Thank you for choosing a quality Redring product manufactured by
AQUAPEUTICS MONACO INSTALLATION MANUAL
 AQUAPEUTICS MONACO INSTALLATION MANUAL Monaco schmatic diagram Cross sectional illustration of gaskets Recommended tools 4 5 5 5 5 Installation steps Steam generator hook-ups Troubleshooting n Steam dispenser
Mira Sport Max with Airboost
 Mira Sport Max with Airboost 9.0 & 10.8 kw These instructions must be left with the user Installation Guide 1 INTRODUCTION our instructions and recommendations. inside the shower. The Mira Sport Max with
SUBMERSIBLE WATER PUMPS
 OPERATING & MAINTENANCE INSTRUCTIONS SUBMERSIBLE WATER PUMPS Model Nos. HIPPO-3 and 3A 6/97 Thank you for purchasing this CLARKE, HIPPO Submersible Pump. These highly efficient pumps are designed for pumping
FREWIN STEAM SHOWER ENCLOSURE
 FREWIN STEAM SHOWER ENCLOSURE INSTALLATION AND USER MANUAL CONTENTS Steam Shower Enclosure Installation...2 Technical Information...2 Plumbing Requirements...2 Assembly...3 Tools and Materials...3 Installation...3
Steamist Installation Guidelines
 Steamist Installation Guidelines The Heavy Commercial steam generator (HC-9 thru HC-18) comes from the factory assembled, carefully wired, and tested. Please read all instructions before installing or
UNDERCOUNTER SERVICE MANUAL. Ecoboiler UC4L 2.4kW Ecoboiler UC10L 2.8kW Ecoboiler UC10L 5.6kW Ecosmart UC4L 2.
 UNDERCOUNTER SERVICE MANUAL Ecoboiler UC4L 2.4kW 1000740 Ecoboiler UC10L 2.8kW 1000741 Ecoboiler UC10L 5.6kW 1000742 Ecosmart UC4L 2.4kW 1000750 Ecosmart UC10L 2.8kW 1000751 Ecosmart UC10L 5.6kW 1000752
Stainless steel kettle
 Stainless steel kettle Please read and keep these instructions getting the best from your new kettle... Empty the water out of the kettle after the first boiling To clean away any deposits that are left
Autofill Wall Mount Boilers
 USER INSTRUCTION MANUAL Autofill Wall Mount Boilers HELPLINE 0844 372 7766 Redring Warranty 2 Year Parts 2 Year Labour 083329501-05/12/13 Contents 1.0 About your Product My Product (please complete this
INSTALLATION MANUAL GUTHD2. Universal Two Way Digital Thermostatic Valve for Shower Systems
 INSTALLATION MANUAL GUTHD2 Universal Two Way Digital Thermostatic Valve for Shower Systems IMPORTANT: To ensure this product is installed properly, you must read and follow these guidelines. The owner/
Use & Care Manual. Electric Tankless Water Heaters. With Installation Instructions for the Installer AP15447 (10/10)
") Use & Care Manual With Installation Instructions for the Installer Electric Tankless Water Heaters The purpose of this manual is twofold: one, to provide the installer with the basic directions and recommendations
Use & Care Manual With Installation Instructions for the Installer Electric Tankless Water Heaters The purpose of this manual is twofold: one, to provide the installer with the basic directions and recommendations
ELECTRIC WATER HEATER HT382E55
 ELECTRIC WATER HEATER HT382E55 Note: Before operating or installing this electric water heater read this manual and follow all safety rules and operating instructions. 220v 240v 60Hz 30~55 C 6.8 Kw 1.8
REDRING POWERSTREAM UNVENTED INSTANTANEOUS WATER HEATER. Installation and User Guide
 REDRING POWERSTREAM UNVENTED INSTANTANEOUS WATER HEATER Installation and User Guide IMPORTANT: This booklet should be left with the user after installation and demonstration. It should be kept in a safe
Control Series Operation Instructions Page 1. "Digi VII"
 Control Series Operation Instructions Page 1 Do not take a sauna if using alcohol, drugs or medications. "Digi VII" Control Models Digi VII 60 min or Digi VII 24 hr (Model # 1601-15, and 1601-15-1) Read
Installation and Operating Manual
 Installation and Operating Manual SR868C6 System Regulator for Solar Thermal Systems Display Panel Illustration Pos. Button on display panel Button description 1 Green lamp Power indication lamp 2 On/Off
USER MANUAL. Laboratory Refrigerator Range. Applicable models: LSR151 LSR288
 USER MANUAL Laboratory Refrigerator Range Applicable models: LSR151 LSR288 1 Contents Before first use 3 Positioning of refrigerator 3 Transportation and moving of refrigerator 3 Energy saving tips 4 Important
Zehnder ComfoInline Heater
 Zehnder ComfoInline Heater Specifications and Installation Guidelines This unit complies With CSA and UL SDHR5-1.5K120V1P-CIRO17-OTDD-OEMZ standards SDHR6-2.5K220V1P-CIRO17-OTDD-OEMZ SDHR7-3.5K220V1P-CIRO17-OTDD-OEMZ
Colorado SCR. Electric Towel Radiator Operating and Installation Instructions. (Read these instructions carefully and retain for future reference)
") Colorado SCR Electric Towel Radiator Operating and Installation Instructions (Read these instructions carefully and retain for future reference) Models SCR 300 300W SCR 450 450W SCR 750 750W NOTE A qualified
Colorado SCR Electric Towel Radiator Operating and Installation Instructions (Read these instructions carefully and retain for future reference) Models SCR 300 300W SCR 450 450W SCR 750 750W NOTE A qualified
Steam cleaner. Please read and keep these instructions
 Steam cleaner Please read and keep these instructions Quick start 1 Fill the tank up to a maximum of 0.75 litres of water (using warm water will reduce the heat-up time). Screw cap on and tighten fully.
USER MANUAL. Pharmacy Refrigerator Range. Applicable models: PSR353/PGR353 PSR273/PGR273 PSR151/PGR151
 USER MANUAL Pharmacy Refrigerator Range Applicable models: PSR353/PGR353 PSR273/PGR273 PSR151/PGR151 1 Contents Before first use 3 Positioning of refrigerator 3 Transportation and moving of refrigerator
MANUAL. OEM (Unit) OZONE GENERATOR (100VA, 200VA and 300VA) INDEX
 OZONE GENERATOR (100VA, 200VA and 300VA) INDEX") MANUAL OEM (Unit) OZONE GENERATOR (100VA, 200VA and 300VA) INDEX 1) Technical Specifications: (100VA, 200VA, 300VA) 2) Introduction 3) Construction 4) Operation and maintenance a) Operating Procedure b)
MANUAL OEM (Unit) OZONE GENERATOR (100VA, 200VA and 300VA) INDEX 1) Technical Specifications: (100VA, 200VA, 300VA) 2) Introduction 3) Construction 4) Operation and maintenance a) Operating Procedure b)
INSTALLATION MANUAL. RD SERIES Digital Electric Water Heater Wall-hung Unvented
 INSTALLATION MANUAL RD SERIES Digital Electric Water Heater Wall-hung Unvented WELCOME Dear Customer, Thank you for choosing the RD Series electric water heater, with an exclusive electronic temperature
Steam cleaner with attachments
 70530 Rev 4 2/6/04 2:53 PM Page 1 Steam cleaner with attachments Please read and keep these instructions getting the best from your new steam cleaner... Quick start 1 Fill the tank up to a maximum of 1.4
INSTANTANEOUS ELECTRIC SHOWER
 GUARANTEE / SERVICE POLICY INSTANTANEOUS ELECTRIC SHOWER GUARANTEE Designa guarantee this DS3000 product for a period of two years, from date of purchase, against mechanical and electrical defects arising
USER MANUAL KBU-21, KBU-52, KBU-68 SERIES
 USER MANUAL KBU-21, KBU-52, KBU-68 SERIES KBU-21 KBU-52 www.kingsbottle.com KBU-68 CONTENTS CONGRATULATIONS Congratulations and thank you for choosing our KingsBottle Beverage Coolers. We are sure you
User manual Whirlpool
 User manual Whirlpool Serial number: Foreword: This manual is general for all whirlpools in the BT-series. The user manual describes safety procedures, operating instructions and general maintenance. Please
Assembly instructions and instructions for use for electric sauna oven with evaporator. Bi-O-Mat W MADE IN GERMANY IPX en / -44.
 Assembly instructions and instructions for use for electric sauna oven with evaporator Bi-O-Mat W GB MADE IN GERMANY IPX4 29341224-en / -44.06 20009571 1 Important notice There is a fire risk if assembled
4-in-1 Mug Press Model No.: LMP-10C
 4-in-1 Mug Press Model No.: LMP-10C CONTENTS I. Assembly Drawing -----------------------------------------------------------------------------------2 II. Technical Parameters ------------------------------------------------------------------------------2
DSSLF2X04H 2 IN 1. Intelligent Lead Free Soldering Station. OPERATION and MAINTENANCE MANUAL
 401H000898 DSSLFX04H Intelligent Lead Free Soldering Station IN 1 OPERATION and MAINTENANCE MANUAL Thank you for purchasing a lead free soldering station. It is designed for lead free soldering. Please
USER MANUAL KBU-21, KBU-52, KBU-68 SERIES COMPRESSOR BEVERAGE COOLER
 USER MANUAL KBU-21, KBU-52, KBU-68 SERIES www.kingsbottle.com CONTENTS CONGRATULATIONS Congratulations and thank you for choosing our KingsBottle Beverage Coolers. We are sure you will find your new appliance
HEATRAE SADIA. Installation and User Instructions for the UTC Undersink Vented Water Heater
 HEATRAE SADIA The quality name in water heating Installation and User Instructions for the UTC Undersink Vented Water Heater UTC 15 Please read and understand these instructions before starting work. Please
Unvented Electric Water Heater 10/15 litre Undersink
 Unvented Electric Water Heater 10/15 litre Undersink Fitting Instructions and User Guide 1 CONTENTS SECTION PAGE 1.0 INTRODUCTION 2 2.0 TECHNICAL SPECIFICATION 3 3.0 INSTALLATION 4 4.0 COMMISSIONING 9
STEAMPRO. Steam Generator Troubleshooting and Service Guide
 STEAMPRO Steam Generator Troubleshooting and Service Guide TABLE OF CONTENTS Page PREFACE... 1 I. STEAMPRO STEAM GENERATOR SYSTEM...2 II. PLUMBING AND ELECTRICAL...3-4 III. SYSTEM OVERVIEW... 5-10 IV.
infrared essential lounge owner s manual
 infrared essential lounge owner s manual Please read the Owner s Manual before using the product. Keep this Owner s Manual in a safe place for future reference. healthmatesauna.com infrared essential lounge
Gallery Electric Fireplaces
 Gallery Electric Fireplaces Homeowner s Installation Instructions & Operating Manual Model: GBI-34, GBI-41 Only use this heater as described in this manual. Any other use is not recommended by the manufacturer,
SAFETY AND OPERATING MANUAL. Original instructions 2000W WALLPAPER STRIPPER
 24 SAFETY AND OPERATING MANUAL Original instructions This appliance can be used by children aged from 8 years and above and persons with reduced physical, sensory or mental capabilities or lack of experience
SHOWER HANDBOOK IMPORTANT
 SHOWER HANDBOOK IMPORTANT This booklet should be given to the customer after installation and demonstration. Thank you for choosing a quality Redring product manufactured in Peterborough, England. Contents
breeze easytm model # F100-1W
 DewStop breeze easytm model # F100-1W Installation Guide Read and Save These Instructions LISTED Questions, Problems, Missing Parts? Please Call 1-360-876-2974 or E-Mail info@dewstop.com please retain
Thermoelectric wine cooler. Model No: UBWC450. Operation Manual
 Thermoelectric wine cooler Model No: UBWC450 Operation Manual PLEASE READ AND FOLLOW ALL INSTRUCTIONS CAREFULLY BEFORE USE. FAILURE TO FOLLOW THESE INSTRUCTIONS COULD RESULT IN BODILY INJURY, AND/OR PROPERTY
AQUA PREMIER ELECTRONIC ELECTRIC SHOWER. Installation and User Guide
 AQUA PREMIER ELECTRONIC ELECTRIC SHOWER Installation and User Guide IMPORTANT: This booklet should be left with the user after installation and demonstration CONTENTS Section Page Section Page Introduction.......................
TRUE INDUCTION DOUBLE BURNER MINI DUO COOKTOP MANUAL
 TRUE INDUCTION DOUBLE BURNER MINI DUO COOKTOP MANUAL DOUBLE BURNER MINI DUO INDUCTION COOKTOP MANUAL 1 TABLE OF CONTENTS I. II. III. IV. V. VI. VII. VIII. Control Panel Overview Cooktop Installation Important
User Guide & Warranty Information
 User Guide & Warranty Information Product Model/Code: UDK_BW Manual v.1.0 PAGE CONTENTS Important Safety Instructions pg 5 Know Your Kettle pg 9 Operation pg 13 Care and Cleaning pg 14 Warranty pg 15
(3 plastic wire connectors,blade balancing kit, 2 extra mounting screws #10-32 for outlet box.)
") Excel Lighting & Manufacturing Ltd. Lifetime Limited Warranty Excel Lighting & Manufacturing Ltd. Warrants the fan motor to be free from defects in workmanship and material present at time of shipment
Excel Lighting & Manufacturing Ltd. Lifetime Limited Warranty Excel Lighting & Manufacturing Ltd. Warrants the fan motor to be free from defects in workmanship and material present at time of shipment
INDUSTRIAL VACUUM CLEANER WITH AUTO START/STOP
 INSTRUCTIONS FOR INDUSTRIAL VACUUM CLEANER WITH AUTO START/STOP MODEL NO: PC200SDAUTO.V3 Thank you for purchasing a Sealey product. Manufactured to a high standard, this product will, if used according
Inspect bath carefully and report any damage or faults before installation. No claims can be entered in to after installation.
 V4, 1, 2012 A3\4 Installation Instructions Inspect bath carefully and report any damage or faults before installation. No claims can be entered in to after installation. Protect the bath throughout installation
Elite Control Installation and Operation Instructions
 Elite Control Installation and Operation Instructions 5 L x 3 H x ¾ W DO NOT USE THIS PRODUCT UNLESS YOU HAVE CONSULTED YOUR DOCTOR AND RECEIVED WRITTEN PERMISSION TO DO SO. USE OF THIS PRODUCT MAY BE
Electronically controlled instantaneous water heater. CEX 9-U: C models. Installation instructions
 Electronically controlled instantaneous water heater CEX 9-U: 27910-50 C models Installation instructions For 50 ºC models, the appliance delivers water not exceeding 50 ºC in accordance with AS3498. 1.
Owner s Guide and Installation Manual
 For Your Records and Warranty Assistance For reference, also attach your receipt or a copy of your receipt to the manual. Model Name Type 8 Models Owner s Guide and Installation Manual Model No. Catalog
AVANT DGS. Thermal Electric Radiator. Operating and Installation Instructions. (Read these instructions carefully and retain for future reference)
") (v8 20180104) AVANT DGS Thermal Electric Radiator Operating and Installation Instructions (Read these instructions carefully and retain for future reference) Models: AVANT-DGS 350 AVANT-DGS 500 AVANT-DGS
(v8 20180104) AVANT DGS Thermal Electric Radiator Operating and Installation Instructions (Read these instructions carefully and retain for future reference) Models: AVANT-DGS 350 AVANT-DGS 500 AVANT-DGS
CONTROLS INSTRUCTIONS MANUAL ENGLISH
 CONTROLS INSTRUCTIONS MANUAL ENGLISH Table of Contents 1. Introduction of the Innova Controls 3 1.1 Precautions 3 2. Operating Instructions 2.1 Quick Start 4 2.2 Direction of Use 5 2.2.1 Heater on 5 2.2.2
Owner s Guide and Installation Manual
 For Your Records and Warranty Assistance For reference, also attach your receipt or a copy of your receipt to the manual. Model Name Type 2 Models Owner s Guide and Installation Manual Model No. Date Purchased
HINTS AND TIPS Cleaning and maintenance HELPLINE
 43675 Rev1 24/4/08 09:43 Page 1 DESCALING IMPORTANT: As this appliance is fitted with a concealed element, it must be descaled regularly. The frequency of descaling depends on usage and the hardness of
GMSG OWNER S MANUAL SPLIT-SYSTEM ROOM AIR CONDITIONER CONTENTS
 GMSG OWNER S MANUAL SPLIT-SYSTEM ROOM AIR CONDITIONER CONTENTS SAFETY PRECAUTIONS 3 PARTS NAMES 5 OPERATING TEMPERATURE 6 MANUAL OPERATION 7 ADJUSTING AIRFLOW DIRECTION 8 HOW THE AIR CONDITIONER WORKS
HINTS AND TIPS Cleaning and maintenance HELPLINE
 43690 rev1 6/3/07 12:49 Page 1 Descaling IMPORTANT: As this appliance is fitted with a concealed element it must be descaled regularly. The frequency of descaling depends on usage and the hardness of the
INSTALLATION MANUAL. Domestic hot water tank for air to water heat pump system EKHWE150A3V3 EKHWET150A3V3 EKHWE200A3V3 EKHWE300A3V3
 INSTALLATION MANUAL Domestic hot water tank for air to water heat pump system EKHWE50AV EKHWET50AV EKHWE00AV EKHWE00AV EKHWE00AZ EKHWE00AZ 4 5 6 7 x x x 4x x x x EKHWE50~00 EKHWET50 50 50 0 0 00 50 700
Instruction Manual for Bench-Top Cleaning Baths
 Precision Ultrasonic Cleaning Equipment Instruction Manual for Bench-Top Cleaning Baths 1 Oxford Street, Cardiff, CF24 3WY United Kingdom Telephone Sales: 0845 330 4236 Telephone Service: 0845 330 4238
HINTS AND TIPS Cleaning and maintenance HELPLINE
 43068 rev2 5/6/06 14:51 Page 1 DESCALING IMPORTANT: As this appliance is fitted with a concealed element it must be descaled regularly. The frequency of descaling depends on usage and the hardness of the
DOUBLE BURNER COUNTER INSET. User Guide
 DOUBLE BURNER COUNTER INSET User Guide Table of Contents I. Cooktop Installation 1-3 II. Important Safety Information 4 III. Product Specifications 5 IV. How to Use 5 Power Invariance Technology 5 Using
INFRARED IP55 HEATER INSTRUCTIONS FOR: MODEL:- QZWP45N 1. SAFETY INSTRUCTIONS
 INSTRUCTIONS FOR: INFRARED IP55 HEATER MODEL:- QZWP45N Thank you for purchasing a Consort Claudgen product. Manufactured to a high standard this product will, if used according to these instructions and
rev3 INSTALLATION & OPERATION MANUAL OIL CIRCULATING HEATING SYSTEM MODEL OSM
 216279-000 rev3 INSTALLATION & OPERATION MANUAL OIL CIRCULATING HEATING SYSTEM MODEL OSM IDENTIFYING YOUR SYSTEM IOM216279-000 The HOTSTART heating system is designed to heat fluids for use in marine
This appliance must be installed and serviced by a competent person as stipulated by the Gas Safety (Installation & Use) Regulations.
 Regulations.") G3512 and G3532 DOMINATORPLUS Grills INSTALLATION and SERVICING INSTRUCTIONS This appliance must be installed and serviced by a competent person as stipulated by the Gas Safety (Installation & Use) Regulations.
G3512 and G3532 DOMINATORPLUS Grills INSTALLATION and SERVICING INSTRUCTIONS This appliance must be installed and serviced by a competent person as stipulated by the Gas Safety (Installation & Use) Regulations.
User Instruction Manual
 User Instruction Manual Mulled Wine Heater Please read and keep these instructions You will need: -32 amp plug socket -Temperature thermometer These instructions cover the Mulled Wine Heater Mulled Wine
Tankless Electric Water Heater MS-C2PSU Series
 Tankless Electric Water Heater MS-C2PSU Series Installation and Instructions Manual Keep this Instructions Manual in a safe place once your unit is installed. You may need to refer to it for general instructions
TRUE INDUCTION DOUBLE BURNER TI-2B COUNTER INSET INDUCTION COOKTOP MANUAL
 TRUE INDUCTION DOUBLE BURNER TI-2B COUNTER INSET INDUCTION COOKTOP MANUAL DOUBLE BURNER TI-2B INDUCTION COOKTOP MANUAL 1 *Previous model# S2F3 TABLE OF CONTENTS I. II. III. IV. V. VI. VII. Cooktop Installation
INSTRUCTION MANUAL FOR ELECTRIC RADIANT INFRARED HEATERS
 www.colorato.net INSTRUCTION MANUAL FOR ELECTRIC RADIANT INFRARED HEATERS MODELS: CLHR-150A / CLHR-180A / CLHR-240A / CLHR-320A Read carefully this manual before using the appliance and keep them for future
Com-Pak Heater Benefits You Can Depend On Com-Pak Models Line Model w/o Model w/ Voltage Thermostat Thermostat Watts Amps (1) (2)
 (2)") Benefits You Can Depend On Dual safety features Primary: power reset thermal switch Secondary: over temperature thermal fuse Heating element style quickly warms your room, and quickly cools when heater
Benefits You Can Depend On Dual safety features Primary: power reset thermal switch Secondary: over temperature thermal fuse Heating element style quickly warms your room, and quickly cools when heater
INSTALLER AND OWNER GUIDE
 5110831/03 INSTALLER AND OWNER GUIDE Model 808 Electric Heater This guide is intended to help you install and care for your Baxi Fires Division electric heater. Please read carefully before installing
GeyserWise MAX. Thermostat instruction manual. SANS 181 compliant. All in one hot water management
 GeyserWise MAX Thermostat instruction manual SANS 181 compliant All in one hot water management Before operating and installation, carefully read all instructions. Do not discard this manual. Index Warranty
Installation Instructions PRO SERIES
 Installation Instructions PRO SERIES If you are a plumber installing this unit, please leave this owners manual & warranty card with the owner when you finish the installation. Thank You! DO NOT USE THIS
SMARTELEC 2 ENERGY SAVING CONTROL INSTALLATION AND OPERATING MANUAL
 Instruction Manual. SMARTELEC 2 SmartElec ENERGY SAVING CONTROL INSTALLATION AND OPERATING MANUAL 0 F1 INDEX Section General information ------------------------------------------------------------ 1 Dimensions