Table of Contents. Forward Quality Policy Design Parameters Section A Unit Operation Setting the Timer...
|
|
|
- Cordelia Gaines
- 5 years ago
- Views:
Transcription
1
2
3 Table of Contents Forward... 3 Quality Policy... 3 Design Parameters... 4 Section A Unit Operation... 5 Setting the Timer... 6 Typical Loading System... 8 Section B Unit Maintenance... 9 Trouble Shooting Guide... 9 Wiring Diagram Unit Installation 11 Unit Specifications Warranty Statement Australia Only Issue 11 Page 2 30 th January 2013
4
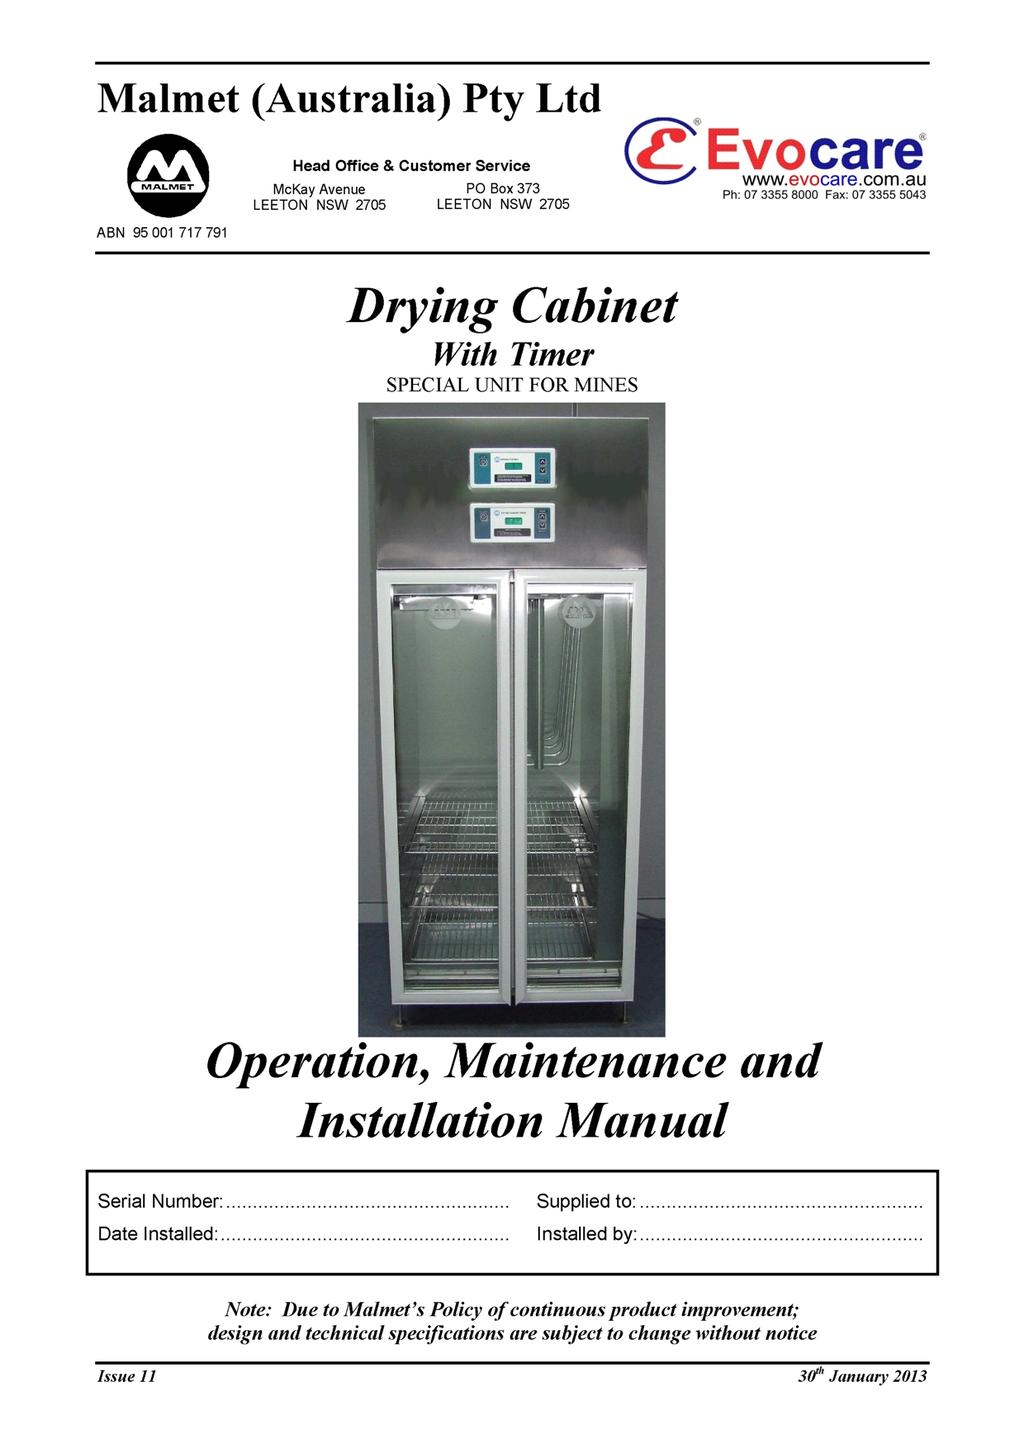
5 Design Parameters The cabinet is designed to dry surgical instruments and metalware, respiratory tubes or other tubing, face masks, anaesthetic bags and other ancillary equipment modified for Mines. A total of six (3) stainless steel shelves is provided (1 standard and 2 modified). The shelves are removable, with 3 positions including the base. The cabinet is insulated with 25mm approved type insulation. Magnetic door latches are fitted with toughened bi-parting glass doors and gasket to ensure effective seal when the doors are closed. All external panels are fabricated from satin finish stainless steel 0.9mm thick, 304/4 type. A centrifugal fan is provided to circulate air throughout the chamber with a filtered air inlet duct on the RH side of unit A solenoid operated damper is provided to allow damp air to be exhausted from the chamber. An inlet for make up air is provided. The heating bank (located in the air duct leading to the chamber) is controlled by a microprocessor, which is factory set to 50 C. The temperature of the air in the chamber is indicated on the controller mounted on the front panel. Heating element over temperature cut out protection Issue 11 Page 4 30 th January 2013

6 Section A Unit Operation NOTE The Drying Cabinet is factory set to 50 C Before starting the Unit The unit should be run initially on a power supply not protected by an earth leakage circuit breaker for approximately three hours. This will allow any moisture in the heaters to dry out. The unit can then be connected to an earth leakage circuit breaker protected circuit if required. Plug into standard 240V outlet. NOTE: The unit is recommended for use in a controlled temperature environment. Starting the Unit Power ON, the preset temperature of the cabinet appears for approximately five seconds. After five seconds the unit switches to display the actual cabinet temperature. Changing the set temperature (lock out feature) AUTHORISED PERSONNEL ONLY Authorised operators can change the temperature by holding the up and down temperature buttons at the same time for a total of 5 seconds. The temperature can then be adjusted. The setting will revert back to tamper proof 5 seconds after the temperature is adjusted or if the up and down temperature buttons are not pressed within 5 seconds. The unit has a built in electronic over temperature cut out which will switch off the elements if the selected temperature is exceeded by 5 C, and Ot w ill flash on the display panel. (See Fig 1) Note: This safety cut out is an automatic reset device. Fig 1 Place instruments and utensils upside down where applicable. Issue 11 Page 5 30 th January 2013
 2) Use Time Set to advance the hours (0-6 hours). 3) Press Time Select again. The second digit will flash (minutes x 10).")
7 Setting the Timer Load DC chamber with components (refer to Diagram A: Typical Loading System). Press Power On and Set Timer To Set Timer: 1) Press Time Select. The first digit will begin to flash (hour first) 2) Use Time Set to advance the hours (0-6 hours). 3) Press Time Select again. The second digit will flash (minutes x 10). 4) Use Time Set to advance minutes in tens. 5) Press Time Select again. The third digit will flash (minutes x 1) 6) Use Time Set to advance minutes. NOTE: Time may only be adjusted before Cycle Start key is pressed. Wait 5 seconds until all 3 digits are flashing in unison. Press Cycle Start. Once Cycle Start is pressed, Time Select is locked out. To reset Time Select turn off unit and repeat steps 1 to 6. Once Cycle Start is pressed, the timer will start counting back. When the unit reaches its set temperature (50 C) the display will stop flashing t o indicate count down. If a buzzer sounds when the unit reaches 50 C then Time Select was not pressed after setting the time. Press Time Select. At completion of cycle, timer panel will display END. (See Fig 2) NOTE: For next cycle, Time Select will resort to default setting unless reset to another time setting. Fig 2 Issue 11 Page 6 30 th January 2013
 Fig 3 The error could be one of the following: Problem Temperature Drops by 10 C during Cycle Door is opened during cycle and temperature Drops 10 C.")
8 Display Errors If there is an error a buzzer will sound and err will be displayed on timer board. (See Fig 3) Fig 3 The error could be one of the following: Problem Temperature Drops by 10 C during Cycle Door is opened during cycle and temperature Drops 10 C. Suggested Remedy Turn unit off and restart cycle. If problem reoccurs, switch off power supply at main and Call for Service. Turn unit off and restart. Press Cycle Start. Issue 11 Page 7 30 th January 2013


9 Typical Loading System 16 x Tube Hanger On specially designed rack 8 x Bag holder On specially designed rack 8 x Ice Boxes. On specially designed shelf 8 x Full Faced Respirators on standard shelf Free Space Standard Shelf Diagram A Issue 11 Page 8 30 th January 2013
10 Section B Unit Maintenance Preventative Maintenance Daily Weekly Half Yearly Wipe out inside doors and chamber with warm water and detergent. Wipe over outside panels with stainless steel cleaner. Remove filter on air intake (top right hand side panel) and wash in warm water and replace when dry. Check electrical connections.remove top panel and clean off accumulated dust and dirt. Note: Disconnect power before removing top panel. Yearly Check and if necessary replace rubber in tube holding trays. Trouble Shooting Guide Problem Probable Cause Suggested Remedy Display not on or won t turn on. Display turns on. (Runs for approximately ½ - 1 hour then turns off). Display is on but unit not heating. Display indicates Ot Display indicates O/C Display on but unit cooling down. No Mains power supply. Power point not turned on. Display will not turn on. Faulty display board. Interconnecting harness failure. Relay board fault. Fan failure. Heating element failure. Relay board failure Thermostat cut-out switch open circuit. Fan Failure. Heating element on. Continuously unable to switch off. (Relay Board Failure) Control Temperature Thermistor is broken or unplugged. Heating element failure. Thermostat cut-out switch open circuit. Relay board failure. Check power supply and lead plugged in. Check power switched on. Press Standby button. Issue 11 Page 9 30 th January 2013
11 Wiring Diagram Issue 11 Page th January 2013
12 Section C Unit Installation The cabinet must be installed level on adjustable legs. Service Connections Provide 98mm OD duct to atmosphere. Electrical Connection 240 Volt 15 Amp cycle. Plug into 15 Amp G.P.O. Wall Recessed Units Plug into a standard 240 Volt outlet. - Plug shall be accessible after installation. Cabinet clearance space dimension (eg at least 150mm per side and 500 mm on top) are to be provided for the appliance. All electrical service work must be accessible through the top of unit. Position the unit in the cavity, ensuring that the that doors can be open and shut with clearance for the doors at hinge point. NOTE: This appliance is not intended for use by persons (including children) with reduced physical, sensory, or mental capabilities, or lack of experience and knowledge, unless they have been given supervision or instruction concerning use of the appliance by a person responsible for their safety. Children should be supervised to ensure they do not play with the appliance. If the supply cord is damaged, it must be replaced by the manufacturer or its service agent or a similarly qualified person in order to avoid a hazard. Issue 11 Page th January 2013
13 Unit Specifications Volts 240V Electrical Rating Phase / Hz 1 ph / 50 Hz Amps 13.8 Amps Electrical Connection IEC Power Cord with 3 Pin Plug 15 Amp (into standard GPO 240 Volt) Elements Rated 1500 watt x 2 Over temp cut out protection Manual reset thermostat cut-out switch factory set 90 C Control PCB Microprocessor Control Relay PCB (SKCM325) Access via compatible RS232 Overtemp Protection Electronic 5 C above set point Temperature Control Incremental 1 C 70 C Factory set at 50 C Secondary Overtemp Protection Hight Limit 85 C Auto reset thermostat factory set 85 to 90 C Bi-parting, protruding 330mm out Doors when open. Materials Door Gasket Silicon Rubber Cabinet 304/4 stainless steel Air Vent Automatic Damper Control, to be vented to outside atmosphere. Air Circulation 150mm x 150mm x 15mm - Air Filter (mm) washable Air Bleed Off Automatic Damper Control Issue 11 Page th January 2013
14 Warranty Statement Australia Only Subject to the following conditions we provide, from the date of purchase, the following warranty: Functional components found within the unit to be defective in workmanship or material will be repaired or replaced free of charge subject to the periods of warranty specified. A decision regarding whether the defective components will be repaired or replaced will be determined at the sole discretion of Malmet (Australia) Pty Ltd ( Malmet ) or its authorized agents or representatives. The structural warranty covers any structural components within the unit, which fail to perform their intended function due to faulty manufacture or deterioration within the warranty period. This warranty only covers products manufactured by Malmet. This warranty is provided, and operates in addition to, the statutory warranties Malmet provides you as a consumer under the Australian Consumer Law or by virtue of any other applicable legislation. CONDITIONS AND EXCLUSIONS Equipment must be installed according to our instructions (outlined in our Operation, Maintenance and Installation Manual) and operated to the purpose it was designed. To the extent permitted by law, this warranty shall not cover damage, malfunction or failure resulting from accident, misuse or misapplication, improper or unauthorised repair, neglect or modification or use of unauthorised replacement parts or accessories, inclusive of detergent, or improper voltage. The warranty shall be void if the serial number is removed or altered. Parts damaged in transit back to Malmet Leeton, due to poor packaging, could result in the warranty claim being rejected. Any part tampered with or which has been altered by unauthorised repairs and or modifications, will be rejected under a warranty claim. Reasonable access must be allowed for maintenance. If any additional equipment is needed to provide access to the unit, this must be provided (and paid for) by the owner. It is the owner s responsibility to provide safe access to the unit. Malmet, or any of its authorised service outlets, may refuse to perform maintenance or warranty work if access is unsafe, as determined by Malmet or any of its authorized service outlets at their sole discretion (acting reasonably). Should a warranty claim be rejected you will be advised in writing with a full explanation of our reasons. It is our policy to have a Warranty Claim Procedure that is fair to our customers and provides an efficient system of replacement and/or repair of faulty parts. If at any time you believe we are not meeting our commitment to you please contact Malmet Head Office Leeton by telephone on (02) or in writing to PO Box 373, Leeton NSW Issue 11 Page th January 2013
15 To the extent permitted by law, no responsibility will be accepted for outside elements including, but not limited to storms, pest and vermin that may cause damage to the unit. To the extent permitted by law, no responsibility will be accepted for damage incurred as a result of, or incidental to, electrical surges or brown outs or for any other consequential damages. If there is no certificate of compliance for plumbing or electrical, Malmet reserves the right to refuse service on non-compliant installations. To the extent permitted by law, claims for damage to contents, carpet, ceilings, foundations or any other consequential loss either direct or indirect resulting from, power spikes, incorrect operation, incorrect installation, faulty product or any other cause, are excluded. This warranty, and to the extent permitted by law, any warranties owed by Malmet under the Australian Consumer Law or other applicable legislation, are not transferrable and cannot be sold, assigned or transferred in any other way from the purchaser to any other person. To the extent permitted by law, unauthorised use of any parts that were not supplied or approved for use in the applicable unit by Malmet will result in this warranty and any warranty claims applicable to that unit being void. Warranty labour (service work) shall not include units located outside of city metropolitan areas. Costs outside these areas shall be borne by the Customer. The Customer shall be notified of this prior to the warranty call out. To the extent permitted by law, a charge will be made for work done or a service call made where: There is no default apparent with the unit, as determined by Malmet or its authorized representative or agent at their sole discretion (acting reasonably). The defective operation of the unit is due to failure of electricity or water supply. Defects are caused by neglect, incorrect application, abuse or by accidental damage of the unit. An unauthorised person has attempted to repair the unit. Harsh environmental situations including, but not limited to, water quality that may cause the water tank damage can not be considered warranty. Issue 11 Page th January 2013
16 How to make a claim under this warranty: If you believe there is a defect in a unit you have purchased from Malmet, you must notify Malmet in writing of such defect, by sending a letter ( Notice of Defect ) to Malmet at PO Box 373, Leeton NSW 2705 prior to the expiration of the applicable warranty period set out in this warranty. For the avoidance of doubt, Malmet must receive your Notice of Defect prior to the expiration of the warranty period, and will be deemed to receive such Notice of Defect one business day (in the state of New South Wales) after you post the Notice of Defect. To the extent permitted by law, Malmet will not reimburse you for any expense you incur in claiming or attempting to make a claim for repair or replacement of a component under this warranty. Australian Consumer Law Disclaimer: Our goods come with guarantees that cannot be excluded under the Australian Consumer Law. You are entitled to a replacement or refund for a major failure and for compensation for any other reasonably foreseeable loss or damage. You are also entitled to have the goods repaired or replaced if the goods fail to be of acceptable quality and the failure does not amount to a major failure. Warranty on Replacement Parts Parts replaced under warranty are warranted for the balance of the original warranty period for that product. Unit Components Structural Guarantee All other components Parts & Labour 1 Year 1 Year Date Sold:... Warranty Expiry Date: Sold To: For Service Contact: Proof of Purchase It is important that the name of the distributor from whom you purchased your product and the name of the installer are recorded at the front page of this manual. The installer is responsible for the correct installation, start up and demonstrating the operation of this product. They are also responsible for issuing the relevant certificates of compliance (these may differ from state to state). Please attach your proof of purchase. Your receipt/invoice is your warranty and will be required to validate any warranty. E.&O.E. In the interest of continued product improvement, Malmet (Australia) Pty Ltd reserves the right to alter specifications without notice. Issue 11 Page th January 2013
17
Table of Contents. Forward Quality Policy Design Parameters Section A Unit Operation Section B Unit Maintenance...
 Table of Contents Forward... 3 Quality Policy... 3 Design Parameters... 4 Section A Unit Operation... 5 Section B Unit Maintenance... 6 Trouble Shooting Guide... 6 Wiring Diagram... 7 Section C Unit Installation...
Drying Cabinet With Timer
 Malmet (Australia) Pty Ltd Head Office & Customer Service 9-11 McKay Avenue PO Box 373 LEETON NSW 2705 Phone: (02) 6953 7677 Email: inquiries@malmet-aus.com.au ABN 95 001 717 791 Operation, Maintenance
Operation, Maintenance and Installation Manual
 Malmet (Australia) Pty Ltd Head Office & Customer Service 9-11 McKay Avenue PO Box 373 LEETON NSW 2705 Phone: +61 2 6953 7677 Email: info@malmet.com.au ABN 95 001 717 791 Drying Cabinet Operation, Maintenance
Table of Contents. Features Quality Policy Section A - Unit Operation Section B Unit Maintenance Trouble Shooting Guide...
 Table of Contents Features... 3 Quality Policy... 3 Section A - Unit Operation... 4 Section B Unit Maintenance... 6 Trouble Shooting Guide... 7 Wiring Diagram... 9 Section C Unit Installation... 9 Unit
Blanket Warming Cabinet For Models: BWM; BWS; BWFB; BWFC; BWTFB; BWTFC; BBWF; FBWF; BSWF; BBWFC; BSWFC
 Malmet (Australia) Pty Ltd Head Office & Customer Service 9-11 McKay Avenue PO Box 373 LEETON NSW 2705 LEETON NSW 2705 Phone: +61 2 6953 7677 Email: info@malmet.com.au ABN 95 001 717 791 Blanket Warming
MariGlo LED. Inspiring Excellence in Fish Keeping! 45 / 60 / 90 / 120.
 MariGlo LED 45 / 60 / 90 / 120 Inspiring Excellence in Fish Keeping! Instruction version: 01/10/2013 Important Safeguards To guard against injury, basic safety precautions should be observed, including
R A D I A N T O U T D O O R H E A T E R S OPERATION, INSTALLATION AND MAINTENANCE MANUAL. TT-MTM Wall Controller
 R A D I A N T O U T D O O R H E A T E R S OPERATION, INSTALLATION AND MAINTENANCE MANUAL TT-MTM Wall Controller TT-MTM Wall Controller Rev B JUL12 TT-MTM wall controller This controller is a custom designed
FAN HEATER FH118 User Manual
 FAN HEATER FH118 User Manual PLEASE READ AND SAVE THESE INSTRUCTIONS FOR FUTURE REFERENCE IMPORTANT SAFEGUARDS When using electrical appliances, basic safety precautions should always be followed to reduce
INSTRUCTION MANUAL / INSTALLATION MANUAL. 7kg Vented Dryer MODEL: KA7VENTDRYA
 INSTRUCTION MANUAL / INSTALLATION MANUAL 7kg Vented Dryer MODEL: KA7VENTDRYA THIS PAGE IS INTENTIONALLY LEFT BLANK 2 CONTENTS Safety Instructions 4 Your Kogan Vented Dryer 5 Before First Use 5 Accessory
Table of Contents. Forward Quality Policy Safety Instructions Design Parameters Section A Unit Operation...
 Table of Contents Forward... 4 Quality Policy... 4 Safety Instructions... 5 Design Parameters... 6 Section A Unit Operation... 7 Hands Free Operation... 7 Cycle of Operation... 12 Sequence of Operation...
2000 WATT CYCLONIC BAGLESS VACUUM CLEANER
 Instruction Manual 2000 WATT CYCLONIC BAGLESS VACUUM CLEANER Model Rated Voltage (V) Rated Frequency (Hz) Rated Power (W) V0409 220-240 V 50 Hz 2000 Watts Model: V0409 Please read this Instruction Manual
OWNER S MANUAL. CoolTower CTF07. (English) (CTF07)
 (CTF07)") OWNER S MANUAL CoolTower CTF07 (English) (CTF07) SAFETY General Safety Please read these instructions before using the fan and keep for future reference. This appliance is not intended for use by persons
OWNER S MANUAL CoolTower CTF07 (English) (CTF07) SAFETY General Safety Please read these instructions before using the fan and keep for future reference. This appliance is not intended for use by persons
WITH OMRON E5CC CONTROL
 LABORATORY OVENS, FAN FORCED & GRAVITY CONVECTION. MODELS: TO-152G & TOH-152G TO-152F, TOH-152F & TO-235F TO-330F & TO-500F WITH OMRON E5CC CONTROL Thermoline Scientific Equipment Pty. Ltd. T/A Thermoline
ETLW7. Product: 7kg Top Load Washing Machine. User Manual
 User Model Manual: Code/s: ETLW7 Product: 7kg Top Load Washing Machine Document: 1 User Manual Dear Customer, Congratulations on purchasing your washing machine. The Esatto brand is proudly distributed
PRODUCT MANUAL. TT-MTM2 Hard-Wired Controller with Remote
 PRODUCT MANUAL TT-MTM2 Hard-Wired Controller with Remote TT-MTM2 Hard-Wired Controller with Remote Rev D JUN16 TT-MTM2 Wall Controller This controller is a custom designed and manufactured controller for
OWNER S MANUAL. Convair Tower Heater CTH09. (English) (CTH09)
 (CTH09)") OWNER S MANUAL Convair Tower Heater CTH09 (English) (CTH09) SAFETY General Safety Please read these instructions before using the heater and keep for future reference. This appliance is not intended for
OWNER S MANUAL Convair Tower Heater CTH09 (English) (CTH09) SAFETY General Safety Please read these instructions before using the heater and keep for future reference. This appliance is not intended for
TRAVELMATE. Instruction Manual
 Nexberg Pty Ltd T/a Evakool 16 Enterprise St CALOUNDRA QLD 4551 Tel : 07 5492 7777 Fax : 07 5492 7733 Please read these instructions and the Safety Instructions carefully before using your refrigerator.
Noirot Spot Plus Digital Timer
 Noirot Spot Plus Digital Timer Electric Convection Panel Heater Operating & Installation Instructions In Order To Qualify For Your Lifetime Warranty Please Visit our Website and complete the Online Registration
Instruction Manual. By Evakool. Please read these instructions and the Safety section carefully before using your refrigerator.
 Nexberg Pty Ltd T/a Evakool 16 Enterprise St CALOUNDRA QLD 4551 Tel : 07 5492 7777 Fax : 07 5492 7733 Please read these instructions and the Safety section carefully before using your refrigerator. 1.Safety
Table of Contents. Operation, Maintenance and Installation Manual
 Table of Contents Foreward... 3 Quality Policy... 3 Certification... 3 Safety Instructions... 4 Design Parameters... 5 Section A Unit Operation... 6 Hands Free Operation... 6 Cycle of Operation... 11 Sequence
VC10LPH with HEPA Filter & Disposable Dust Bag
 Instruction Manual HOUSEMAID 10 Litre Plastic Dry Vacuum Cleaner Models: VC10LP with Cloth Filter only VC10LPH with HEPA Filter & Disposable Dust Bag Please read this Instruction Manual carefully and follow
Instruction Manual. Please read these instructions and the Safety section carefully before using your refrigerator.
 Nexberg Pty Ltd T/a Evakool 16 Enterprise St CALOUNDRA QLD 4551 Tel : 07 5492 7777 Fax : 07 5492 7733 Please read these instructions and the Safety section carefully before using your refrigerator. 1.Safety
OSCILLATING FAN HEATER INSTRUCTION MANUAL
 OSCILLATING FAN HEATER INSTRUCTION MANUAL MODEL: FH221B Read the instruction manual carefully before use and retain these instructions for reference GENERAL SAFEGUARDS When using electrical appliances,
Note: Verify that plastic bags are removed from filters, if equipped or installed, before first use (see page 8) CONTENTS
 CONTENTS") DEAR CUSTOMER Thank you for purchasing the Ionmax Breeze ION420 Air Purifier. The Ionmax Breeze can help to improve the indoor air quality in your home or office. Please read this manual carefully before
DEAR CUSTOMER Thank you for purchasing the Ionmax Breeze ION420 Air Purifier. The Ionmax Breeze can help to improve the indoor air quality in your home or office. Please read this manual carefully before
OPERATING INSTRUCTIONS FOR: MODEL: TGO-80W, 150W, 240W GLASSWARE DRYING OVEN
 OPERATING INSTRUCTIONS FOR: MODEL: TGO-80W, 150W, 240W GLASSWARE DRYING OVEN Thermoline Scientific Equipment Pty. Ltd. ABN 80 000 859 129 10-12 Ross Place Wetherill Park NSW 2164. P.O. Box 1851 Wetherill
TRAVELMATE FRIDGE FREEZER Instruction Manual
 Nexberg Pty Ltd T/a Evakool 16 Enterprise St CALOUNDRA QLD 4551 Tel : 07 5492 7777 Fax : 07 5492 7733 Please read these instructions and the Safety section carefully before using your refrigerator. 1.Safety
1.7L KETTLE INSTRUCTION MANUAL 220~240V 2200W
 1.7L KETTLE INSTRUCTION MANUAL 220~240V 2200W WHKE01 2200W CONTENTS SAFETY INFORMATION Important Safety Instructions......................... 1-2 Electrical Requirements................................
MODEL 620 ELECTRICAL DATA: FEATURES: DIMENSIONS: SHIPPING INFORMATION: AVAILABLE ACCESSORIES: CONVECTION OVEN 1/4 SIZE PAN
 CONVECTION OVEN 1/4 SIZE PAN MODEL 620 Convection is the ideal way to cook convenience foods and this compact oven can bake it all. Heated, circulating air throughout the oven penetrates food quickly.
PRODUCT MANUAL OPERATION, INSTALLATION AND MAINTENANCE MANUAL. Indoor Convective Panel Heater
 PRODUCT MANUAL OPERATION, INSTALLATION AND MAINTENANCE MANUAL Indoor Convective Panel Heater CONTENTS Rev A NOV14 1. Product Overview 2. Specification Data 3. Operations 4. Installation 5. Safety 6. Maintenance
LABORATORY ILLUMINATED FLOTATION BATH
 LABORATORY ILLUMINATED FLOTATION BATH MODELS INCLUDE: TFB-1 Thermoline Scientific Equipment Pty. Ltd. ABN 80 000 859 129 10-12 Ross Place Wetherill Park NSW 2164. P.O. Box 6862 Wetherill Park DC NSW 1851
PRODUCT MANUAL. The intelligent, energy saving solution
 PRODUCT MANUAL The envirotouch is a range of intelligent, timer based switches which allows easy, point-of-use control of lighting and electrical devices. It includes multiple pre-set, countdown timer
CUBE ICEMAKER MODELS SCU25, SCU35, SCU45, SCU75, SCU95, SCU120 INSTALLATION AND SERVICE MANUAL VERSION 2
 CUBE ICEMAKER MODELS SCU25, SCU35, SCU45, SCU75, SCU95, SCU120 INSTALLATION AND SERVICE MANUAL VERSION 2 STUART MANUFACTURING 1 Jayelem Crescent Padstow NSW 2211 Australia Telephone (02) 9773 3711 Fax
USER MANUAL. Adventure Kings 50L Refrigerator
 Adventure Kings 50L Refrigerator USER MANUAL Please read and understand these instructions and the safety information section before using your refrigerator. CONTENTS Safety Information 1 Notes on using
OPERATION, INSTALLATION AND MAINTENANCE MANUAL. THX Flush Mount Enclosure. Take heating to the Max!
 OPERATION, INSTALLATION AND MAINTENANCE MANUAL THX Flush Mount Enclosure Take heating to the Max! Mounting options Rev C MAR16 The installation of HEATSTRIP Max is simple and easy with the standard mounting
SILK CERAMIC STRAIGHTENER
 SILK CERAMIC STRAIGHTENER USE & CARE MANUAL PLEASE READ PRIOR TO USE To register your product go to www.remington-products.com.au SILK CERAMIC PLATES 240 C FAST HIGH HEAT 3 YEAR WARRANTY S9600AU 1 IMPORTANT
Levanté. Electric Panel Heater. Operating & Installation Instructions LPH15 LPH20.
 Levanté Electric Panel Heater Model: LPH10 LPH15 LPH20 Operating & Installation Instructions www.noirot.com.au RECOMMENDATION FOR WALL INSTALLATION This heater is sold ready for DIY installation, with
aquamanta the experts in aquatic technology CH 025/050/100/ 150/200/300 NEW PHOTO Instruction Manual
 aquamanta TM the experts in aquatic technology CH 025/050/100/ 150/200/300 NEW PHOTO Instruction Manual Technical Information Model Wattage Aquarium Volume CH 025 CH 050 CH 100 CH 150 CH 200 CH 300 25W
Thank you for purchasing the Ionmax Serene ION138 Ultrasonic Aroma Diffuser. The Ionmax Serene reintroduces moisture into the air to help you
 DEAR CUSTOMER Thank you for purchasing the Ionmax Serene ION138 Ultrasonic Aroma Diffuser. The Ionmax Serene reintroduces moisture into the air to help you maintain a comfortable humidity level in your
OWNER S MANUAL IMPORTANT - INSTALLER MUST COMPLETE FOR WARRANTY PURPOSES. Made in Western Australia by:
 OWNER S MANUAL QA AUTO CONTROLLER QM MANUAL CONTROLLER IMPORTANT - INSTALLER MUST COMPLETE FOR WARRANTY PURPOSES Model: Installation Date: Dealer: Serial Number: Installed by: Invoice No: Made in Western
CWR265SZ 26 Bottle Built-in Wine Cooler Owner s Manual
 CWR265SZ 26 Bottle Built-in Wine Cooler Owner s Manual This owner s manual provides instructions on safe installation use, and troubleshooting assistance. Please read it carefully and save it for reference
Convection Panel Heater
 Convection Panel Heater 2200 Watt Instruction Booklet HE4200 Please read these instructions carefully and retain for future reference. Contents Sunbeam s Safety Precautions 2 Safety precautions for your
Instruction Manual. Please read this manual and the Safety Instructions carefully before using your refrigerator.
 Nexberg Pty Ltd T/a Evakool 16 Enterprise St CALOUNDRA QLD 4551 Tel : 07 5492 7777 Fax : 07 5492 7733 Please read this manual and the Safety Instructions carefully before using your refrigerator. 1. Safety
6.5L SLOW COOKER INSTRUCTION MANUAL
 6.5L SLOW COOKER INSTRUCTION MANUAL 220~240V 320W WHSC01SS 320W CONTENTS SAFETY INFORMATION Important Safety Instructions......................... 1-2 Electrical Requirements................................
THERMOFILM CONVECTIVE PANEL HEATER INSTALLATION, OPERATION AND MAINTENANCE MANUAL. Models: CP 2400 CP 2000 CP 1500 CP 1000 TABLE OF CONTENTS
 THERMOFILM CONVECTIVE PANEL HEATER Rev C JUL13 INSTALLATION, OPERATION AND MAINTENANCE MANUAL Models: CP 2400 CP 2000 CP 1500 CP 1000 TABLE OF CONTENTS 1. Important Safety Instructions 2. Specification
USER MANUAL. Adventure Kings WiFi Refrigerator
 Adventure Kings WiFi Refrigerator USER MANUAL Please read and understand these instructions and the safety information section before using your refrigerator. CONTENTS Safety Information 1 Notes on using
Filter Coffee Maker with Timer and Glass Carafe Please read and keep these instructions
 Filter Coffee Maker with Timer and Glass Carafe Please read and keep these instructions o o Health and Safety The use of any electrical appliance requires the following common sense safety rules. Please
Using the Ducted Gas Central Heating Ducted Evaporative Air Conditioning. With your. Multi-appliance. Slimline Control.
 Using the Ducted Gas Central Heating Ducted Evaporative Air Conditioning With your Multi-appliance Slimline Control Owner s Manual Please keep this important manual in a safe place. It is the owner s responsibility
OWNERS INSTRUCTION MANUAL
 Congratulations on your purchase of a Kent Portable Electric Appliance. Please read the following instructions carefully before use and retain for future reference. BEFORE FIRST USE Read and follow all
IXL Eco Ventflo. User Guide. Model: (200mm) - Extraction Rate: 340m 3 /h Model: (250mm) - Extraction Rate: 490m 3 /h
 - Extraction Rate: 340m 3 /h Model: (250mm) - Extraction Rate: 490m 3 /h") User Guide Model: 10324 (200mm) - Extraction Rate: 340m 3 /h Model: 10326 (250mm) - Extraction Rate: 490m 3 /h Electrical Rating: 230~240 V. 50 Hz. Welcome Safety Thank you for buying this Fan. Even if
User Guide Model: 10324 (200mm) - Extraction Rate: 340m 3 /h Model: 10326 (250mm) - Extraction Rate: 490m 3 /h Electrical Rating: 230~240 V. 50 Hz. Welcome Safety Thank you for buying this Fan. Even if
GBC BLIZZARD A4 & A3 Laminators. Instruction Manual
 GBC BLIZZARD A4 & A3 Laminators Instruction Manual POWER / COLD READY 1 2 3 4 5 2 Technical specifications Electrical Machine Dimensions Machine Weight Maximum Pouch Width Maximum Pouch Thickness Maximum
Read installation manual prior to installation of this appliance! Read user manual before putting this unit in operation!
 6720808877-00.1V Gas continuous flow water heaters OptiFlow Professional GWH12 1 CTD E23/31 F3 OL Operating Manual 6 720 813 938 (2016/06) AU Read installation manual prior to installation of this appliance!
Parts Identification and Accessories Safety Information Installation Control Panel Layout Fully Automatic Washing...
 INDEX Parts Identification and Accessories.................................... 2 Safety Information................................................. 3 Installation.......................................................
Installation and Operating Instructions
 Installation and Operating Instructions Models: HO-4-77NF-CER-T For your convenience, we recommend to attach the serial number label HERE. As part of Parmco Appliances commitment to improving and updating
INSTALLER: LEAVE THIS MANUAL WITH THE APPLIANCE. CONSUMER: RETAIN THIS MANUAL FOR FUTURE REFERENCE.
 INSTALLATION AND OPERATION INSTRUCTIONS FOR VISTA-BI-12 UNITS VISTA-BI-50-12 VISTA-BI-60-12 VISTA-BI-72-12 SAFETY INFORMATION WARNING If the information in these instructions are not followed exactly,
all-rounder Mini Compact Bagless Vacuum Cleaner Cyclonic Bagless Technology Washable HEPA Filtration Compact, Lightweight & Stylish Design all-rounder
 all-rounder all-rounder Mini Compact Bagless Vacuum Cleaner Cyclonic Bagless Technology Washable HEPA Filtration Compact, Lightweight & Stylish Design 1 3 2 4 5 6 8 9 11 12 10 14 13 7 15 2. 5011 All-Rounder
Operation Manual Portable Room Air Conditioner Models: RPC26WA / RPC35WA / RPC41WA
 HIGH MID LOW DRY FAN COLL HEAT TIMER SLEEP SWING Operation Manual Portable Room Air Conditioner Models: RPC26WA / RPC35WA / RPC41WA F C This appliance shall be installed in accordance with: Manufacturer
MiniSkim. Inspiring Excellence in Fish Keeping! Instruction version: 17/08/2012.
 MiniSkim 80 Inspiring Excellence in Fish Keeping! www.aquaone.com.au Instruction version: 17/08/2012 Important Safeguards To guard against injury, basic safety precautions should be observed, including
SMOOTH FINISH CERAMIC 2 YEAR WARRANTY S3505AU USE & CARE MANUAL. To register your product go to
 SMOOTH FINISH CERAMIC USE & CARE MANUAL PLEASE READ PRIOR TO USE To register your product go to www.remington-products.com.au www.remington.co.nz 2 YEAR WARRANTY S3505AU 1 IMPORTANT SAFEGUARDS Warning:
OPERATION & MAINTENANCE INSTRUCTIONS FOR. 230/240 VAC, 1ø, 50Hz
 RV Products Division OPERATION & MAINTENANCE INSTRUCTIONS FOR 230/240 VAC, 1ø, 50Hz 47000 SERIES RV ROOF TOP AIR CONDITIONER/HEAT PUMP AND REMOTE CONTROLLER Service Contact: Coast to Coast RV Services
aquamanta the experts in aquatic technology
 HFX 70/100/150/200 TM aquamanta the experts in aquatic technology Coldwater Tropical Marine 2+1 year guarantee Instruction Manual Instruction version: 05/06/2012 Technical Information MODEL: HFX 70 HFX
Product & Assembly Manual
 Product & Assembly Manual HEATSTRIP Intense Portable Electric Heater Model THY2200P For HEATSTRIP Installation video go to: www.youtube.com, search HEATSTRIP www.heatstrip.com.au Contents Manual # Rev
OWNER'S GUIDE. Gas Continuous Flow Water Heaters. Owner's Information Warranty
 OWNER'S GUIDE Gas Continuous Flow Water Heaters Owner's Information Warranty Models 16NG50-6/16LP50-6 16NG60-6/16LP60-6 20NG50-6/20LP50-6 20NG60-6/20LP60-6 26NG50-6/26LP50-6 26NG60-6/26LP60-6 Thermann
EUF92W. Product: Bar Freezer. User Manual
 User Model Manual: Code/s: EUF92W Product: Bar Freezer Document: 1 User Manual Dear Customer, Congratulations on purchasing your new freezer. The Esatto brand is proudly distributed within Australia by
STACK & SHRED110X SHREDDERS. Start here AU_Rexel StackandShredManual_MZ.indd 1
 STACK & SHRED110X SHREDDERS Start here 2103110AU_Rexel StackandShredManual_MZ.indd 1 MAX 2min 1 2 2 2103110AU_Rexel StackandShredManual_MZ.indd 2 3 4 5 6 STACK & SHRED 110X SHREDDER 3 2103110AU_Rexel StackandShredManual_MZ.indd
CHELSEA 2 SLICE TOASTER
 RHT15_IB_FA_170914 CHELSEA 2 SLICE TOASTER 2 YEAR WARRANTY RHT15 SERIES INSTRUCTIONS & WARRANTY W0911 Spectrum Brands Australia Pty Ltd Locked Bag 3004 Braeside Victoria 3195 Australia Customer Service
Infrared quartz heater
 Infrared quartz heater User manual English...2 USA Introduction Infrared quartz heater Introduction Congratulations! You have made an excellent choice with the purchase of this quality Easy Home product.
CLASSIC 4 SLICE TOASTER 2 YEAR WARRANTY RHT14 SERIES RHT14_IB_FA_ Part No. T
 CLASSIC RHT14_IB_FA_151215 Part No. T22-5002863 4 SLICE TOASTER 2 YEAR WARRANTY RHT14 SERIES INSTRUCTIONS 1 & WARRANTY IMPORTANT SAFEGUARDS When using electrical appliances, basic safety precautions should
IMPORTANT SAFETY INSTRUCTIONS
 User s Manual Inside you will find many helpful hints on how to use and maintain your dehumidifier properly. Just a little preventative care can save you money and prolong the life of your unit. INDEX
BAR FRIDGE 118 & 228 LITRE
 118L Bar Fridge Double Glazed Glass Door Compressor refrigerator Adjustable shelves Interior light Adjustable thermostat for temperature control Magnetic door seal Height adjustable feet Powder coated
HOME OWNER S MANUAL DUCTED GAS HEATER. (with MagIQtouch Controller or Manual Thermostat)
") HOME OWNER S MANUAL DUCTED GAS HEATER (with MagIQtouch Controller or Manual Thermostat) This document is the Owner s Manual for your ducted gas heater. HEATER IDENTIFICATION AND INSTALLATION Model No Serial
HOME OWNER S MANUAL DUCTED GAS HEATER (with MagIQtouch Controller or Manual Thermostat) This document is the Owner s Manual for your ducted gas heater. HEATER IDENTIFICATION AND INSTALLATION Model No Serial
General Care and Safety Guide
 General Care and Safety Guide Thank you for choosing a Goldair Select Dehumidifier. This Goldair Select appliance has been designed and manufactured to high standards of engineering and with proper use
Rice Cooker User s Manual Model:MG-GP25B
 Rice Cooker User s Manual Model:MG-GP25B Please read this User s Manual carefully before using and keep it in a good place for future reference. Read all the instructions carefully before using this appliance
USE & CARE MANUAL PRO-TOUCH PLEASE READ PRIOR TO USE SENSOR 2 YEAR WARRANTY D6050AU
 USE & CARE MANUAL PLEASE READ PRIOR TO USE PRO-TOUCH SENSOR 2 YEAR WARRANTY D6050AU 1 IMPORTANT SAFEGUARDS Warning: Do not use this appliance near bath tubs, showers, basins or other vessels containing
OWNER S MANUAL Compact Portable Refrigerated Air Conditioner CP35CW1
 OWNER S MANUAL Compact Portable Refrigerated Air Conditioner (ENGLISH) () CONTENTS INTRODUCTION 1 SAFETY 2 COMPONENT LOCATION 3 INSTALLATION 4 CONTROL AND DISPLAY 5 REMOTE CONTROL 6 OPERATION 7 MAINTENANCE
MASTERCOOL (MIC, MICH)
") OWNER S MANUAL Portable Evaporative Cooler MASTERCOOL (MIC, MICH) ILL863-A ILL1222-A ILL863-A MEGACOOL (MIV, MIVH) MILLENIA (MI, MIH) (English) (MI MIH MIC MICH MIV MIVH) CONTENTS SAFETY... 1 General Safety
OWNER S MANUAL Portable Evaporative Cooler MASTERCOOL (MIC, MICH) ILL863-A ILL1222-A ILL863-A MEGACOOL (MIV, MIVH) MILLENIA (MI, MIH) (English) (MI MIH MIC MICH MIV MIVH) CONTENTS SAFETY... 1 General Safety
YORK KETTLE INSTRUCTIONS & WARRANTY 2 YEAR WARRANTY 20431AU 20431AU_IB_FA_190314
 20431AU_IB_FA_190314 YORK KETTLE 2 YEAR WARRANTY 20431AU INSTRUCTIONS & WARRANTY W0911 Spectrum Brands Australia Pty Ltd Locked Bag 3004 Braeside Victoria 3195 Australia Customer Service in Australia Toll
60cm Built-In Ceramic Cooktop
 20130304 issue 8 啊哈 60cm Built-In Ceramic Cooktop Installation and User manual Content Safety instructions-----------------------------------2 Features of your product---------------------------4 Installing
SILK CERAMIC HAIR DRYER 5 YEAR WARRANTY AC9096AU USE & CARE MANUAL 2400 WATTS SILK CERAMIC GRILLE PLEASE READ PRIOR TO USE
 USE & CARE MANUAL PLEASE READ PRIOR TO USE SILK CERAMIC HAIR DRYER 2400 WATTS SILK CERAMIC GRILLE 5 YEAR WARRANTY AC9096AU IMPORTANT SAFEGUARDS Warning: When the hair dryer is used in a bathroom, unplug
INSTALLATION AND USER INSTRUCTION GUIDE. Electric Fire With Remote Control. Model: WM-3522CF. Please read all instructions carefully and
 INSTALLATION AND USER INSTRUCTION GUIDE Electric Fire With Remote Control Model: WM-3522CF Please read all instructions carefully and retain for future reference IMPORTANT: THESE INSTRUCTIONS SHOULD BE
10cm Desk Fan User Manual
 10cm Desk Fan User Manual Model No.: HEG10 230 240Va.c. 50Hz 15W Rev 1 Note: The specifications and/or components of this appliance are subject to change without prior notice. Page 2 of 8 1 Safety Instructions...
VOLUME UP STRAIGHTENING BRUSH
 VOLUME UP STRAIGHTENING BRUSH Creates voluminous, smooth styles in minutes USE & CARE MANUAL PLEASE READ PRIOR TO USE To register your product go to www.remington-products.com.au www.remington.co.nz 2
2.9kW Portable Air Conditioner
 Operating Instructions 2.9kW Portable Air Conditioner Item: GCPAC210 General Care and Safety Guide Thank you for choosing this Goldair product. This Goldair appliance has been designed and manufactured
RHK52_IB_FA_ Part No. T HERITAGE VOGUE KETTLE 2 YEAR WARRANTY RHK52 SERIES
 RHK52_IB_FA_261115 Part No. T22-5002822 HERITAGE VOGUE KETTLE 2 YEAR WARRANTY RHK52 SERIES INSTRUCTIONS 1 & WARRANTY IMPORTANT SAFEGUARDS When using electrical appliances, basic safety precautions should
Mira Vision Wireless Controller
 Mira Vision Wireless Controller These instructions must be left with the user User Guide 1 128684-A2-A CONTENTS Introduction...3 Safety Information...3 Control Layout...4 Display Symbols...5 Using the
FRIDGE / FREEZER OPERATION MANUAL
 FRIDGE / FREEZER OPERATION MANUAL Please read all instructions and the safety section carefully before using your new KickAss refrigerator. TABLE OF CONTENTS FEATURES IMPORTANT SAFETY SYMBOLS IMPORTANT
8L DEHUMIDIFIER OPERATING INSTRUCTIONS
 8L DEHUMIDIFIER OPERATING INSTRUCTIONS Attention: This Dehumidifier is rated to extract 8L per day in an environment of 80% humidity and temperature of 30 C. This is the world-wide standard for rating
SEVILLE KETTLE INSTRUCTIONS & WARRANTY 2 YEAR WARRANTY 18152AU 18152AU_IB_FA_240712
 18152AU_IB_FA_240712 SEVILLE KETTLE 2 YEAR WARRANTY 18152AU INSTRUCTIONS & WARRANTY Spectrum Brands Australia Pty Ltd Locked Bag 3004 Braeside Victoria 3195 Australia Customer Service in Australia TollFree:
COMPACT PRO YEAR WARRANTY D2050AU USE & CARE MANUAL. To register your product go to
 COMPACT PRO 2100 USE & CARE MANUAL PLEASE READ PRIOR TO USE To register your product go to www.remington-products.com.au www.remington.co.nz 2 YEAR WARRANTY D2050AU IMPORTANT SAFEGUARDS Warning: When the
YEAR 2WARRANTY. 4 Slice Classic Toaster MODEL 9476 INSTRUCTIONS & WARRANTY 9476_IB3_111111
 2WARRANTY YEAR 4 Slice Classic Toaster MODEL 9476 INSTRUCTIONS & WARRANTY 9476_IB3_111111 Spectrum Brands Australia Pty Ltd Locked Bag 3004 Braeside Victoria 3195 Australia Customer Service in Australia
RHT420_IB_FA_ Part No. T KINGSTON 2 SLICE TOASTER 2 YEAR WARRANTY RHT420 SERIES
 RHT420_IB_FA_271117 Part No. T22-9000059 KINGSTON 2 SLICE TOASTER 2 YEAR WARRANTY RHT420 SERIES INSTRUCTIONS 1 & WARRANTY IMPORTANT SAFEGUARDS When using electrical appliances, basic safety precautions
Operating Manual HD01
 Operating Manual HD01 IMPORTANT SAFETY INSTRUCTIONS BEFORE USING THIS APPLIANCE READ ALL INSTRUCTIONS AND CAUTIONARY MARKINGS IN THIS MANUAL AND ON THE APPLIANCE When using an electrical appliance, basic
ERR627SA ERR927SA. Rangehood Installation manual
 ERR627SA ERR927SA Rangehood Installation manual 2 WELCOME TO ELECTROLUX Thank you for purchasing an Electrolux appliance. You ve chosen a product that brings with it decades of professional experience
INSTALLER: LEAVE THIS MANUAL WITH THE APPLIANCE. CONSUMER: RETAIN THIS MANUAL FOR FUTURE REFERENCE.
 INSTALLATION AND OPERATION INSTRUCTIONS FOR BI-SLIM UNITS BI-40-SLIM BI-50-SLIM BI-60-SLIM BI-72-SLIM BI-88-SLIM SAFETY INFORMATION WARNING If the information in these instructions are not followed exactly,
SHINE REVIVAL 3 YEAR WARRANTY AC4001AU USE & CARE MANUAL 2300 WATTS FOR ULTRA FAST DRYING SALON PROFESSIONAL AC MOTOR TRIPLE INFUSION TECHNOLOGY
 USE & CARE MANUAL PLEASE READ PRIOR TO USE SHINE REVIVAL To register your product go to www.remington-products.com.au 2300 WATTS FOR ULTRA FAST DRYING SALON PROFESSIONAL AC MOTOR TRIPLE INFUSION TECHNOLOGY
Oil-filled Radiator NY23EC-11L User Manual
 Oil-filled Radiator NY23EC-11L User Manual PLEASE READ AND SAVE THESE INSTRUCTIONS FOR FUTURE EFERENCE IMPORTANT INSTRUCTION When using any electrical appliance, basic precautions should always be followed
INSTALLATION & OPERATION INSTRUCTIONS PRO-AF1
 INSTALLATION & OPERATION INSTRUCTIONS PRO-AF1 WWW.PROAPPLIANCES.COM.AU Congratulations on your purchase of a Pro Appliances Air Fryer. Note: Please read through the instructions carefully before using
KERATIN & ARGAN OIL NOURISH HAIR DRYER
 KERATIN & ARGAN OIL NOURISH HAIR DRYER IONIC CONDITIONING TECHNOLOGY USE & CARE MANUAL PLEASE READ PRIOR TO USE To register your product go to www.remington-products.com.au www.remington.co.nz 3 YEAR WARRANTY
WARRANTY BOOKLET. EHPA Electric Heat Pump Water Heaters. Register online at
 WARRANTY BOOKLET EHPA Electric Heat Pump Water Heaters Register online at www.rinnai.com.au Rinnai EHPA Series Electric Heat Pump Water Heater Product Warranty Warranty Terms The warranty terms in this
PRO-AIR TURBO 2 YEAR WARRANTY D5220AU USE & CARE MANUAL. To register your product go to
 PRO-AIR TURBO USE & CARE MANUAL PLEASE READ PRIOR TO USE To register your product go to www.remington-products.com.au www.remington.co.nz 2 YEAR WARRANTY D5220AU IMPORTANT SAFEGUARDS Warning: When the