Glass Chimney Hood. Installation & User Instructions Please keep for future reference
|
|
|
- Hilary Washington
- 5 years ago
- Views:
Transcription
1 Glass Chimney Hood Installation & User Instructions Please keep for future reference Important Please read these instructions fully before installing or using These instructions contain important information which will help you get the best from your appliance and ensure safe and correct installation, use and maintenance. If you need help or have damaged or missing parts, call the Customer Helpline: Issue 1 16/09/2010
2 Contents Safety Information 2 Parts 3 Guide to Wall Mounting and fixings 4 Installation 5-9 Vent outside 5-7 Vent inside 8 Electrical Connection 9 User Instructions 10 Care and Maintenance 11 General 11 Light bulb replacement 11 Trouble Shooting 12 Technical Specifications 13 Disposal information 13 Guarantee 14 Product codes SY-3288B-P-C-600 SY-3288B-P-C-900 1
3 Safety Information Important Please read these instructions fully before installation Before use The installation of this appliance is best carried out by 2 people. Any installation work must be carried out by a qualified technician or competent person. Dispose of all packaging carefully and responsibly. The appliance is designed for indoor use only and must be protected from rain, moisture and extreme temperature variations. This appliance is designed for household use. Do not use the appliance for industrial and commercial use, or any other purpose. Do not modify the appliance as this could result in danger. When installing the hood, ensure that the following recommended distances are being observed between the cooker top and the bottom of the cooker hood: Electric cookers: 70 cm Gas cookers: 70 cm Coal/ oil cookers: 80 cm If the room where the cooker hood is to be used contains a fuel burning appliance such as a central heating boiler, the flue must be of a sealed or balanced flue type. The edges of the cooker hood are sharp take care when you handle your appliance, especially during installation and cleaning. DO NOT CLEAN IN BEHIND THE GREASE FILTERS! Always disconnect the cooker hood from the power supply before carrying out any work on the hood, including light bulbs replacement. Do not connect the ducting system of this appliance to any existing ventilation system which is being used for any other purpose. Do not install above a cooker with a high level grill. Carry out fumes discharging in accordance with the regulations in force by local laws for safety and technical restrictions. During use This appliance is not intended for use by persons (including children) with reduced physical, sensory or mental capabilities, or lack of experience and knowledge, unless they have been given supervision or instruction concerning use of the appliance by a person responsible for their safety. Children should be supervised to ensure that they do not play with the appliance. This appliance is not intended for use by young children or infirm persons unless they have been adequately supervised by a responsible person to ensure that they can use the appliance safely. Young children should be supervised to ensure that they do not play with the appliance. Adequate ventilation must be provided when the cooker hood and other non-electrical powered appliances are used at the same time. Ensure proper ventilation measures are being observed when hood is in extraction mode. Note that it removes odours from your room, not steam. Do not cook food over open flames or operate gas hobs without pots or pans under the hood as the flames may sucked into the hood causing damage. Always put lids on pots and pans when cooking on a gas cooker. Never leave frying pans or deep frying unattended during use as overheated fats and oils might catch fire. Dirty oil is an even greater fire risk. Never flambé cook under this cooker hood. Do not attempt to use the cooker hood if it is damaged in any way. Never attempt to use it without the grease filters fitted or if the filters are excessively greasy! The manufacturer refuses to accept any responsibility for damages arising to the hood or it s catching on fire from failure to observe safety advice in these instructions. Do not attempt to repair the appliance yourself. Contact the Customer Helpline:

4 Parts If you have damaged or missing parts, call the Customer Helpline: Please familiarize yourself with the parts and accessories listed below 1. Control panel 2. Light 3. Chimney 4. Glass 5. Filter Accessories included Instructions x 1 Glass x 1 (Fitted on SY-3288B-P-C-600) Chimney x 1 Exhaust Pipe x 1 One-way-valve x 1 Wall Bracket x 1 Plate I x 1 Plate II x 1 Screw x 7 Wall plug x 9 (4mm x 38mm) Screw x 8 (4mm x 8mm) Rubber cushion for glass x 4 (Fitted on SY- 3288B-P-C-600) Flat end Screw x 4 Screw x 2 (4mm x 22mm) (4mm x 30mm) (Fitted on SY-3288B-P-C-600) 3 Mat x 4 (Fitted on SY-3288B-P-C-600) Carbon filter (not included, purchase separately)
5 4

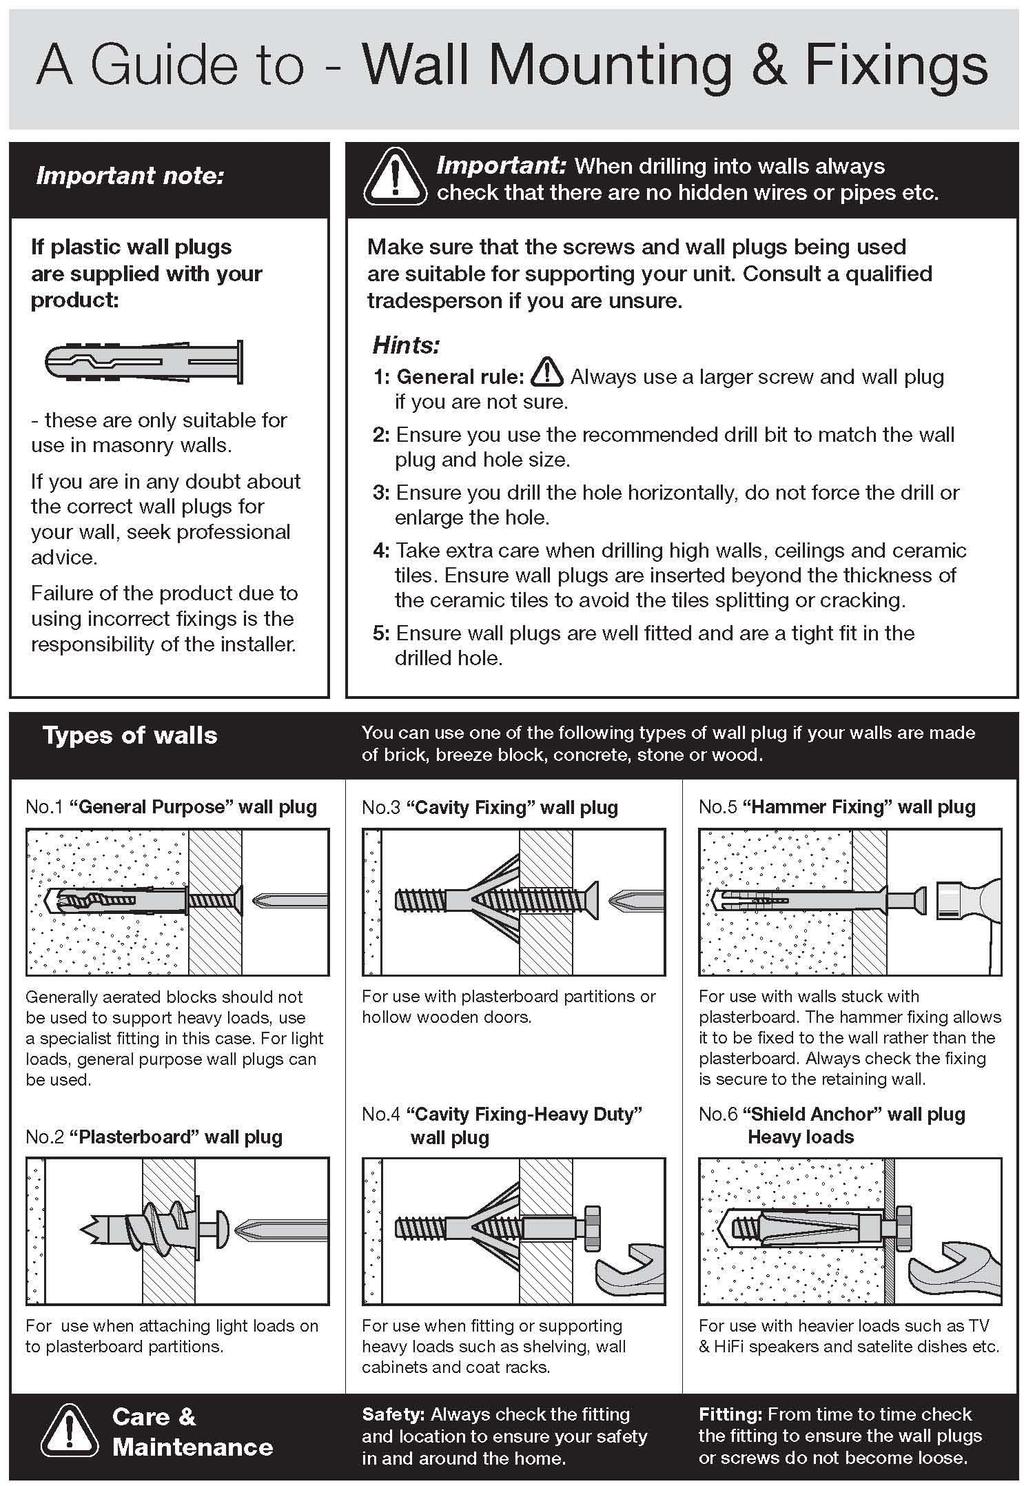
6 Installation Vent outside Caution: 2 people are required to unpack and handle the appliance, it is recommended that gloves are worn. Caution: The wall must be strong enough to take the weight of the hood. Wall plugs are provided to secure the hood to most types of walls. However, a qualified technician must verify the suitability of the materials in accordance with the type of wall. Do not tile, grout or silicone the appliance to the wall. Surface mount only. VENT OUTSIDE If you have an outlet to the outside, your cooker hood can be connected by means of a given exhaust pipe or any suitable extraction duct (enamel, aluminum, flexible pipe or inflammable material with an interior diameter of 150mm) Carefully remove all packaging materials including the foam base, dispose of correctly. Before installation, ensure that the unit is power off and unplug from the outlet. 1. The cooker hood should be placed at distance of 65~75cm above the cooking plane for the best effect. 2. Drill 3 holes to accommodate the wall bracket. Screw and tighten the wall bracket onto the wall with the screws (4mm x 38 mm) and wall plugs provided. 5
7 Installation Vent outside 3. Drill 2 holes to accommodate plate II. Screw and tighten the bracket onto the wall with the screws (4mm x 38 mm) and wall plugs provided. The distance between the wall bracket and plate II is suggested to be maximum 90cm. 3 Remark: Plate II is used to fix the chimney at the end of installation. Therefore, it is suggested that you refer to the whole installation procedure to locate the proper position of the plate II. The diagram at right is for illustration only. Fixing the chimney to wall plate is done at the end of installation. 4.Lift up the cooker hood and hang onto the wall bracket hook. 5. Fix the one-way-valve to the air outlet of the cooker hood by 4 screws (4mm x 8mm). Remark: Sponge tape sometimes covers the 4 holes. If the 4 holes are located below the sponge tape, simply insert the screw through the sponge tape. Then, attach the exhaust pipe onto the one-wayvalve as shown. 6. Place the rubber cushion into the holes of the glass. Place the glass in appropriate position on the top the cooker hood and fix with 4 flat end screws (4mm x 22mm). In order to avoid the glass cracking, please do not tighten the screws too strongly. (Not applicable to model SY-3288B- P-C-600) When the hood is being used in extractor function, ensure that the ducting is fire retardant and the bends is not greater than 90 degrees as this will reduce the efficiency of the hood. 6
8 Installation Vent outside 7. Adjust the height of the chimney approximately in according to your required height. Then, install plate I on the chimney with two screws (4mm x 8mm). The procedure is as below. a) Put the inner chimney into outer chimney. Then pulling out the inner chimney upwards. Adjust the chimney height as required approximately. Fine adjustment can be done later. b) Install plate I on the chimney with two screws provided (4mm x 8mm). NOTE: Remember not to fix the screw too tight, so that later height adjustment can be done easily. 8. Put the chimney to the cooker hood. Fine height adjustment can now be done. 9.Fix the chimney to plate II. Two screws (4mm x 8mm) are used Fix the body with safety screw. Two screws (4mm x 30mm) and two wall plugs are used. 7
 can be used to trap odors. Contact the helpline for details. Fix the one-way-valve to the air outlet of the cooker hood by 4 screws (4mm x 8mm).")

9 Installation Vent inside If you do not have an outlet to the outside, exhaust pipe is not required and the installation is similar to the one shown in section VENT OUTSIDE. Activated carbon filter (purchase separately) can be used to trap odors. Contact the helpline for details. Fix the one-way-valve to the air outlet of the cooker hood by 4 screws (4mm x 8mm). In order to install the activated carbon filter, the cartridge filter should be detached first. Press the lock and pull it downward. Put the activated carbon filter into the side of the motor and turn it in anti-clockwise direction. Repeat the same on the other side of motor. NOTE: Make sure the filter is securely locked. Otherwise, it would loose and cause danger. When activated carbon filter attached, the suction power will be lowered. Contact helpline to purchase the carbon filter. Carbon filters not included available separately 8
10 Installation Electrical connection Any electrical work that is required to install this appliance MUST be carried out by a qualified electrician. Warning: THIS APPLIANCE MUST BE EARTHED Before making any electrical connections, ensure that: Electrical safety is only guaranteed when the earth system of your house is in accordance with the related local regulations. Do not damage the refrigerant circuit. Do not bend, stretch or pull the supply cable to avoid electric shock. Do not use electrical appliances inside the food storage compartments of the appliance, unless they are of the type recommended by the manufacturer. Ensure the power socket is suitable for the maximum power of the machine (fuses in the power circuit must be 13 amp). The supply voltage should be the same as that indicated in the technical specifications and the appliance rating plate. The appliance should be earthed and in compliance with the applicable law. When installed, the power socket must be within easy reach. If the socket outlets in your home are not suitable for the plug supplied with this unit check with a qualified electrician for replacement. The use of adapters, multiple connectors or extension cables are not recommended. The appliance must be connected to a volt 50Hz AC supply by means of a three pin socket, suitably earthed and protected by a 13 amp fuse. Should the fuse need to be replaced, a 13 amp fuse approved to BS1363/A must be used. The plug contains a removable fuse cover that must be refitted when the fuse is replaced. If the fuse cover is lost or damaged, the plug must not be used until a replacement cover has been fitted or the plug is replaced. A damaged plug should be cut off as close to the plug body as possible, the fuse should be removed and the plug disposed of safely. Plug replacement (UK & Ireland only) Should you need to replace the plug; the wires in the power cable are coloured in the following way: Blue Neutral N Brown Live L Green & Yellow Earth E As the colours of the wires in the power cable may not correspond with the coloured markings identifying the terminals in your plug, and proceed as follows: The green & yellow wire must be connected to the terminal in the plug that is marked with the letter E or by the earth symbol. The blue wire must be connected to the terminal that is marked with the letter N. The brown wire must be connected to the terminal that is marked with the letter L. If power supply cord is damaged, it must replaced by the manufacturer or its service agent or a similar qualified person in order to avoid a hazard. 9

11 User Instructions Using your appliance Switch off button Press this button to stop the motor operation. Low Speed button Press this button to operate at low speed. Medium Speed button Press this button to operate at medium speed. High Speed button Press this button to operate at high speed. Light button Press once, two lighting lamps will illuminate. Press again will turn all lights off. It is recommended that the cooker hood is switched on for 5 minutes prior to cooking and to leave in operation during cooking. Leave for another 10 minutes after finish the cooking. 10
12 Care and Maintenance General Important: Always unplug the appliance from the power socket during cleaning and maintenance. Never use any sharp instruments or abrasive substances, soap, household cleaner, detergent or wax polish for cleaning. Regular Cleaning Use a soft cloth moistened with hand-warm mildly soapy water or household cleaning detergent. Never use metal pads, chemical, abrasive material or stiff brush to clean the unit. Monthly Cleaning for Cartridge Filter ESSENTIAL: Clean the filter every month can prevent any risk of fire. The filter collects grease, smoke and dust so the filter would directly affect the efficiency of the cooker hood. If not cleaned, the grease residue (potential flammable) will saturate on the filter. Clean it with household cleaning detergent. Annual Cleaning for Activated Carbon Filter Apply SOLELY to unit that installed as a recirculation unit (not vented to the outside). The filter traps odours and must be replaced at least once a year depending on how frequent the cooker hood used. Warning: Failure to carry out the basic standards of the cleaning of the appliance and replacement of the filters may cause fire risks. Light bulb replacement 1. Switch the unit off and pull out the plug first. 2. Wait until the light bulb is cooled down before replacement. 3. Remove the chrome rims by turning in anticlockwise direction. 4. Pull out the halogen light bulb carefully and replace by same type and same rated halogen light bulb (12V G4 base 20W MAX). 5. Assembly the chrome rims back to the unit. 11
13 Trouble Shooting In the unlikely event of difficulties with your appliance please follow the trouble shooting guide below. If the problem persists, contact the retailer if the machine is still under guarantee. If the machine is out of guarantee, contact an approved service agent on Problem Possible cause Solution The hood does not work Suction performance not good Power outage Speed not selected Too long distance between the unit and the cooking top Improper motor speed Dirty filter Check the power supply Press the speed button to activate Readjust the distance to 65-75cm Select the speed sufficient for the quantity of fumes presented Clean the filter under section Care and Maintenance No light Light bulb burnt Replace the bulb with correct rating 12

14 Technical Specifications Model SY-3288B-P-C-600 SY-3288B-P-C-900 Product width SY-3288B-P-C CM SY-3288B-P-C CM Fan speed level 3 Maximum extraction 700 m 3 /hr Lamps Halogen 20W X 2 Washable grease filters Adjustable chimney 5 layers We apologise for any inconvenience caused by any minor inconsistencies in these instructions, which may occur as a result of product improvements and development. Yes This appliance complies with the following EEC directives: 2006/95/EEC Low voltage directive 2004/108/EEC EMC directive Disposal information The symbol on the product or its packaging indicates that this product may not be treated as household waste. Instead it should be handed over to the applicable collection point for the recycling of electrical and electronic equipment. By ensuring this product is disposed of correctly, you will help prevent potential negative consequences for the environment and human health, which could otherwise be caused by inappropriate waste handling of this product. For more detailed information about recycling this product, please contact your local council office, your household waste disposal service or the shop where the product was purchased. 13


15 Guarantee PRODUCT GUARANTEE This product is guaranteed against manufacturing defects for a period of Year This product is guaranteed for twelve months from the date of original purchase. Any defect that arises due to faulty materials or workmanship will either be replaced, refunded or repaired free of charge where possible during this period by the dealer from whom you purchased the unit. The guarantee is subject to the following provisions: The guarantee does not cover accidental damage, misuse, cabinet parts, knobs or consumable items. The product must be correctly installed and operated in accordance with the instructions contained in this manual. It must be used solely for domestic purpose. The guarantee will be rendered invalided if the product is re-sold or has been damaged by inexpert repair. Specifications are subject to change without notice. The manufacturer disclaims any liability for the incidental or consequential damages. The guarantee is in addition to, and does not diminish your statutory or legal rights. In the event of a problem with the product within the guarantee period call the Customer Helpline on Guarantor: Home Retail Group Avebury Boulevard Central Milton Keynes MK9 2NW
A4 Laminator. Installation & User Instructions Please keep for future reference 908/6197
 A4 Laminator Installation & User Instructions Please keep for future reference 908/6197 Important Please read these instructions fully before installing or using These instructions contain important information
Paper Shredder. Installation & User Instructions Please keep for future reference 913/0153
 Paper Shredder Installation & User Instructions Please keep for future reference 913/0153 Important Please read these instructions fully before installing or using These instructions contain important
ProAction. Paper Shredder. Installation & User Instructions Please keep for future reference 903/1537
 ProAction Paper Shredder Installation & User Instructions Please keep for future reference 903/1537 Important Please read these instructions fully before installing or using These instructions contain
INSTALLATION AND USER S MANUAL COOKER HOOD RS-600/A-S
 INSTALLATION AND USER S MANUAL COOKER HOOD RS-600/A-S RS-600 (CHS60SS)-GB-05.indd 1 6/8/2010 9:30:59 AM TABLE OF CONTENTS 1. Introduction 2 2. Safety precaution 2 3. Intended use 3 4. Parts supplied 3
Argos Value Tabletop Fridge
 Argos Value Tabletop Fridge Installation & User Instructions Please keep for future reference 481/0423 Important Please read these instructions fully before installing or using These instructions contain
60cm Chimney Extractor
 60cm Chimney Extractor LAM2401 HJA2480 User & Installation Guide Contents Page Environmental note 3 IMPORTANT SAFETY INFORMATION 4 6 Specifications of your extractor 7 8 Dimensions 7 Specifications 7-8
BT16.4SS-HK BT19.4SS-HK Cooker Hood
 BT16.4SS-HK BT19.4SS-HK Cooker Hood User Manual for your Baumatic User Manual for your Baumatic BT16.4SS-HK 60 cm Chimney Hood BT19.4SS-HK 90 cm Chimney Hood NOTE: This User Instruction Manual contains
User and maintenance manual
 GB User and maintenance manual IMPORTANT SAFETY INSTRUCTIONS These instructions shall also be available on website: docs.whirlpool.eu. YOUR SAFETY AND THAT OF OTHERS IS HIGHLY IMPORTANT. This manual and
Built-in Gas Hob. Important - Please read these instructions fully before using. Operating Instructions -Please keep for future reference
 Built-in Gas Hob Operating Instructions -Please keep for future reference A70GCIS Important - Please read these instructions fully before using These instructions contain important information which will
BWT6.3GL Cooker Hood 60 cm Glass chimney hood
 User Manual for your BWT6.3GL Cooker Hood 60 cm Glass chimney hood NOTE: This User Instruction Manual contains important information, including safety & installation points, which will enable you to get
GUH90 90 cm Canopy Hood
 User Manual for your GUH90 90 cm Canopy Hood NOTE: This User Instruction Manual contains important information, including safety & installation points, which will enable you to get the most out of your
GUH52SD 52 cm GUH75 75 cm Canopy Hood
 User Manual for your GUH52SD 52 cm GUH75 75 cm Canopy Hood NOTE: This User Instruction Manual contains important information, including safety & installation points, which will enable you to get the most
ENGLISH INSTALLATION AND USER S MANUAL FRENCH NOTICE D INSTALLATION ET D UTILISATION ITALIAN MANUALE D ISTRUZIONE
 ENGLISH INSTALLATION AND USER S MANUAL FRENCH NOTICE D INSTALLATION ET D UTILISATION ITALIAN MANUALE D ISTRUZIONE 1 INSTALLATION AND USER S MANUAL CONTENT INTRODUCTION 03 SAFETY PRECAUTION 03 SPECIFICATION
BWTC6510GL Cooker Hood 60 cm Glass cooker hood in stainless steel. BWTC9510GL Cooker Hood 90 cm Glass cooker hood in stainless steel
 User Manual for your BWTC6510GL Cooker Hood 60 cm Glass cooker hood in stainless steel BWTC9510GL Cooker Hood 90 cm Glass cooker hood in stainless steel NOTE: This User Instruction Manual contains important
Argos Value Fridge Freezer
 Argos Value Fridge Freezer Installation & User Instructions Please keep for future reference 486/9285 486/9405 Important Please read these instructions fully before installing or using These instructions
Instructions for use
 Instructions for use These instructions are also available on the website: www.kitchenaid.eu Important instructions for safety 4 Installation 6 Safeguarding the environment 6 Troubleshooting guide 7 After-sales
Electric Cooker. Important Please read these instructions fully before installing or using
 Electric Cooker Installation & User Instructions - Please keep for future reference Cat no Model 2679556 BUSH BET50W WHITE 2441935 BUSH BET50B BLACK 3596669 BUSH BET50S SILVER Cooker serial number place
UPUTE ZA UGRADNJU I UPORABU
 CROATIAN CZECH ENGLISH FRENCH GERMAN GREEK ITALIAN POLISH PORTOGUESE ROMANIAN SLOVENIAN SPANISH DUTCH UPUTE ZA UGRADNJU I UPORABU NÁVOD K POUŽITÍ A INSTALACI INSTALLATION AND USER S MANUAL NOTICE D INSTALLATION
Electric Cooker. Important Please read these instructions fully before installing or using
 Electric Cooker Installation & User Instructions - Please keep for future reference Cat no Model 2455426 BUSH BEDC60W WHITE 2329150 BUSH BEDC60B BLACK 3318816 BUSH BEDC60S SILVER 2745105 BUSH BEDC50W WHITE
GEH9026G Cooker Hood
 User Manual for your GEH9026G Cooker Hood 90 cm Chimney Hood in Stainless Steel NOTE: This User Instruction Manual contains important information, including safety & installation points, which will enable
Electric Cooker. Important Please read these instructions fully before installing or using
 Electric Cooker Installation & User Instructions - Please keep for future reference Cat no Model 2147349 BUSH BFEDC60W WHITE 2139405 BUSH BFEDC60B BLACK 2145248 BUSH BFEDC50W WHITE 1983559 BUSH BFEDC50B
User Manual for your GEH6017 & GEH9017 Cooker Hood
 User Manual for your GEH6017 & GEH9017 Cooker Hood NOTE: This User Instruction Manual contains important information, including safety & installation points, which will enable you to get the most out of
IMPORTANT SAFETY INSTRUCTIONS DANGER: WARNING:
 IMPORTANT SAFETY INSTRUCTIONS YOUR SAFETY AND THAT OF OTHERS IS PARAMOUNT This manual and the appliance itself provide important safety warnings, to be read and observed at all times. This is the attention
JLBIHD624 60cm Cooker Hood
 JLBIHD624 60cm Cooker Hood User guide 2 Cooker hood user guide Contents Contents 3 Introduction 4 Safety is important 4 In the box 4 Safety information 5 Important safety information 5 Warnings 5 Cautions
Instructions for use
 Instructions for use These instructions are also available on the website: www.kitchenaid.eu Important instructions for safety 4 Installation 6 Safeguarding the environment 6 Troubleshooting guide 7 After-sales
GB User and maintenance manual
 GB User and maintenance manual IMPORTANT SAFETY INSTRUCTIONS These instructions shall also be available on website: docs.whirlpool.eu. YOUR SAFETY AND THAT OF OTHERS IS VERY IMPORTANT This manual and
Electrical Double Oven
 0 0 0 Electrical Double Oven Operating & Installation Instructions -Please keep for future reference AE66DCW AE66DCA AE66DCSS Important - Please read these instructions fully before using These instructions
Instructions for use
 Instructions for use These instruction shall be available on website docs.kitchenaid.eu Important instructions for safety 4 Installation 6 Safeguarding the environment 6 Troubleshooting guide 7 After-Sales
100cm Chimney Hood GB IE
 100cm Chimney Hood GB IE [01] x 1 [02] x 2 [03] x 2 [04] x 2 [05] x 3 [06] x 1 [07] x 1 1 : 1 [09] x 8 (3.9 x 32mm) [08] x 8 [10] x 4 (4 x 12mm) 100cm Chimney Hood GB IE Cooker Hood 04 FR Hotte Aspirante
Instructions Manual CTB CTB 9407
 Instructions Manual CTB 6407 - CTB 9407 INDEX EN RECOMMENDATIONS AND SUGGESTIONS... 3 CHARACTERISTICS... 4 INSTALLATION... 5 USE... 7 MAINTENANCE... 8 2 RECOMMENDATIONS AND SUGGESTIONS The Instructions
ART cm Island Curved Glass
 ART28101 90cm Island Curved Glass [01] x 1 [02] x 1 [03] x 1 [04] x 1 [05] x 4 [06] x 1 [07] x 1 [08] x 1 [09] x 4 [10] x 4 [11] x 1 [12] x 4 (6x70mm) [13] x 4 (6.3x17x2mm) [14] x 8 (4x12x1mm) [15] x 4
I n s t r u c t i o n m a n u a l f o r b u i l t - i n h o o d. Model code: BORA600
 I n s t r u c t i o n m a n u a l f o r b u i l t - i n h o o d Model code: BORA600 Contact Caple on 0844 8003830 or for spare parts www.4caple.co.uk 1 Y O U R A P P L I A N C E Thank you for buying your
CANOPY RANGEHOOD. instruction manual V3FC60SS & V3FC90SS 12 MONTH WARRANTY
 CANOPY RANGEHOOD instruction manual V3FC60SS & V3FC90SS 12 MONTH WARRANTY Contents Guide to the Appliance 2 Caring for the Environment 3 Safety Information and Warnings 4 Installation Instructions 6 Operation
Cooker Hood Instruction Manual
 Cooker Hood Instruction Manual Model number(s): RHSCH601SS/B & RHSCH901SS/B IMPORTANT: RETAIN FOR FUTURE REFERENCE Contents Safety Instructions. 3-6 Product Overview. 7 Positioning. 8 Operational modes.
Cooker Hood User Manual
 Cooker Hood User Manual HCB93042X EN 01M-8850803200-0116-02 Please read this manual first! Dear Customers! Thank you for preferring a Beko product. We hope that you get the best results from your product
BFR6 / BFR9 Rangehood
 BFR6 / BFR9 Rangehood User Manual for your Baumatic BFR6, 60 cm Rangehood BFR9, 90 cm Rangehood NOTE: This User Instruction Manual contains important information, including safety & installation points,
INDEX RECOMMENDATIONS AND SUGGESTIONS... 4 CHARACTERISTICS... 5 INSTALLATION... 6 USE... 9 MAINTENANCE... 11
 INDEX EN RECOMMENDATIONS AND SUGGESTIONS... 4 CHARACTERISTICS... 5 INSTALLATION... 6 USE... 9 MAINTENANCE... 11 2 RECOMMENDATIONS AND SUGGESTIONS The Instructions for Use apply to several versions of this
Belling Cooker Hood User Manual
 Belling Cooker Hood User Manual 1 Contents Introduction................................................ 3 Using the Hood.............................................. 4 Care and Maintenance.........................................
JLBIHD920 90cm Chimney Hood
 JLBIHD920 90cm Chimney Hood User guide 2 Cooker hood user guide Contents Contents 3 Introduction 4 Safety is important 4 In the box 4 Safety information 5 Important safety information 5 Warnings 5 Cautions
LEC L6014W/S User Manual
 LEC L6014W/S User Manual Safety Information Important Please read these instructions fully before installation Before use The installation of this appliance is best carried out by 2 people. Dispose of
Instruction Manual JLHDA cm Cooker hood
 Contents 3 Introduction 3 Safety is important 3 In the box 4 Safety information 4 Important safety information 4 Warnings 5 Cautions 5 Electrical information 6 Remote control 6 Programming the remote control
Instruction Manual JLCHDD601/JLCHDD901 60cm/90cm Cooker hood
 Contents 3 Introduction 3 Safety is important 3 In the box 4 Safety information 4 Important safety information 4 Warnings 5 Cautions 5 Electrical information 6 Operation 6 Automatic shut-down 7 Care and
USER MANUAL. ICON60H Version 00. Vertical Glass Hood
 USER MANUAL ICON60H Version 00 Vertical Glass Hood [02] x 1 [01] x 1 [03] x 1 [04] x 1 [07] x 1 [05] x 1 [08] x 9 [06] x 1 [09] x 9 (4 x 30mm) [10] x 2 (3 x 10mm) Cooker hood Let's get started... These
Instructions Manual SHC520X - SHC700X
 Instructions Manual SHC520X - SHC700X INDEX EN RECOMMENDATIONS AND SUGGESTIONS... 3 CHARACTERISTICS... 4 INSTALLATION... 5 USE... 7 MAINTENANCE... 8 2 RECOMMENDATIONS AND SUGGESTIONS The Instructions for
Stoves Cooker Hood User Manual
 Stoves Cooker Hood User Manual Contents Introduction................................................. 3 Using the Hood.............................................. 4 Care and Maintenance.........................................
Dual Fuel Range Cooker
 Dual Fuel Range Cooker Installation & User Instructions - Please keep for future reference Cat no Model 3436224 BCL100DFB BLACK 3325500 BCL100DFW WHITE 3434570 BCY100DFB BLACK 3390384 BCY100DFW WHITE Cooker
COOKWORKS TWIN PROFESSIONAL FRYER INSTRUCTION MANUAL
 COOKWORKS TWIN PROFESSIONAL FRYER INSTRUCTION MANUAL IMPORTANT SAFEGUARDS When using electrical appliances, basic safety precautions should always be followed, including the following: 1. Read all instructions.
Cooker Hood BAH61&BAH91 BAH60&BAH90 BAH93CG&BAH93CGIS BAH94FG&BAH94FGIS. User Manual for your
 User Manual for your BAH61&BAH91 BAH60&BAH90 BAH93CG&BAH93CGIS BAH94FG&BAH94FGIS Cooker Hood NOTE: This User Instruction Manual contains important information, including safety & installation points, which
Instruction Manual - Please keep for future reference VC-303 Compact Bagless Cylinder Vacuum Cleaner
 VC-303 Guide (amend Jan 2010).qxd:Value 22/1/10 11:39 Page 1 Instruction Manual - Please keep for future reference VC-303 Compact Bagless Cylinder Vacuum Cleaner For help, spares or assistance please call
RWC Issue: F. Description: ARISTON WALL CANOPY Model Numbers: ARCH90BIX. Model may vary slightly from images pictured. All measurements are in mm.
 RWC Issue: F Description: ARISTON WALL CANOPY Model Numbers: ARCH90BIX Model may vary slightly from images pictured. All measurements are in mm. 1 Overview Pre-installation Thank you for purchasing a quality
Cooker Hood Instruction Manual
 Cooker Hood Instruction Manual Model number(s): RHGCH702B IMPORTANT: RETAIN FOR FUTURE REFERENCE Contents Safety Instructions. 3-6 Product Overview. 7 Positioning. 8 Operating modes. 9 Installation. 10-15
LEIHDC70SC - LEIHDC70BB LEIHDC70BC. Instructions Manual.
 LEIHDC70SC - LEIHDC70BB LEIHDC70BC Instructions Manual www.rangemaster.co.uk INDEX EN RECOMMENDATIONS AND SUGGESTIONS...3 CHARACTERISTICS...4 INSTALLATION...5 USE...8 MAINTENANCE...9 2 RECOMMENDATIONS
60cm Integrated Turbo Extractor
 60cm Integrated Turbo Extractor LAM2201 User & Installation Guide Dear Customer, Congratulations on your choice of domestic appliance which has been designed to give you excellent service. The user manual
Chmney Hood - Model: H91PK H91PX H101PK H101PX. COOKER HOOD - User instructions
 Chmney Hood - Model: H91PK H91PX H101PK H101PX GB COOKER HOOD - User instructions A B C Fig.1 Fig.2 Fig.3 Fig.4 Fig.5-3 - Fig.6 Fig.7 Fig.8-4 - GENERAL ENGLISH GB Carefully read the following important
EN Instruction on mounting and use
 EN Instruction on mounting and use EN - Instruction on mounting and use Closely follow the instructions set out in this manual. All responsibility, for any eventual inconveniences, damages or fires
Dual Fuel Double Oven
 Dual Fuel Double Oven Installation & User Instructions - Please keep for future reference Cat no Model 2443940 BUSH BDFD60B BLACK 2455110 BUSH BDFD60W WHITE 3653959 BUSH BDFD60S SILVER Cooker serial number
INSTALLATION INSTRUCTIONS USER GUIDE
 INSTALLATION INSTRUCTIONS USER GUIDE Standard Rangehood HF60LX4 and HF60LW4 model NZ AU CONTENTS Safety and warnings 3 Installation instructions 5 Operating instructions 13 Cleaning and maintenance 14
Electric Cooker. Important Please read these instructions fully before installing or using
 Electric Cooker Installation & User Instructions - Please keep for future reference Cat no Model 2287041 BUSH BUEDC60W WHITE 2442374 BUSH BUEDC60B BLACK 2753812 BUSH BUEDC60SS S/STEEL Cooker serial number
Safety and Instruction Manual
 T14002 Safety and Instruction Manual PLEASE READ CAREFULLY 30cm Ceramic Coated Electric Sauté Pan T14002 30cm Ceramic Coated Electric Sauté Pan TECHNICAL DATA Description: Model: Rated Voltage: Input power:
CG60/ 70/ 80/ 90/ 100 SS/BK
 CG60/ 70/ 80/ 90/ 100 SS/BK GB IE [01] x 1 [02] x 1 [03] x 1 [04] x 2 [05] x 1 [06] x 1 [07] x 1 [08] x 4 [09] x 4 [10] x 1 [11] x 6 1 : 1 [12] x 4 [13] x 6 (3.9 x 32mm) [14] x 4 (3.4 x 10mm) CG60/ 70/
ISCG90SS _03 ISCG90SS
 ISCG90SS 60900355_03 ISCG90SS GB IE [01] x 1 [02] x 1 [03] x 1 [04] x 8 [05] x 1 [06] x 4 [07] x 1 [08] x 1 [09] x 1 [10] x 4 [11] x 4 [12] x 1 [13] x 4 (6x70mm) [14] x 8 (6.3x17x2mm) 1 : 1 [15] x 4 (3.9x18mm)
LI117A Ed. 01/03 Menhir by David Lewis
 Menhir by David Lewis LI11A Ed. 01/03 i 1 3 1 5 g g j h A g g 3 3 3 3 1,5 190 5 1 9 8 8 5 G F 13a 13b 13a 10F 13b 10A 13a 1a 1b 1a 1b 1 1 11 11 18-1 18-5 18-18- 1 1b 1b 18-3 18-18- 1 18-8 1a 1 1 3 5 8
60cm Canopy Extractor
 60cm Canopy Extractor LAM2300 User & Installation Guide Dear Customer, Congratulations on your choice of domestic appliance which has been designed to give you excellent service. The user manual will help
COOKER HOOD USER HANDBOOK FOR INSTALLATION AND OPERATION MODELS CRC95
 COOKER HOOD USER HANDBOOK FOR INSTALLATION AND OPERATION MODELS CRC95 Your new Cooker Hood Using your new Cooker Hood is very simple. Nevertheless, to get the best results it is important that you read
EXTRACTOR HOOD. Please read all the instructions carefully before starting the installation. 230 / 240V 50Hz
 abc EXTRACTOR HOOD Please read all the instructions carefully before starting the installation Model Stock Ref Napoli 120812 Napoli Plus (white) 436083 Napoli Plus (Silver) 436084 230 / 240V 50Hz PLEASE
W Steam Iron User Instructions SHIR01
 2000-2400W Steam Iron User Instructions SHIR01 CONTENTS Introduction... 2 Product Safety... 3 Electrical Safety... 4 Features... 5 Instructions for Use... 5-7 Cleaning... 7 Troubleshooting... 7 Guarantee...
Slider hood Grey metal/stainless steel panel JLHDA601
 60cm Slider hood Grey metal/stainless steel panel JLHDA601 User guide 2 Cooker hood user guide Contents Contents 3 Introduction 4 Safety is important 4 In the box 4 Safety information 5 Important safety
USER MANUAL EFC60001 EFC70001 EFC90001
 USER MANUAL EFC60001 EFC70001 EFC90001 We were thinking of you when we made this product electrolux 3 RECOMMDATIONS AND SUGGESTIONS 5 CHARACTERISTICS 6 INSTALLATION 8 USE 11 MAINTANCE 12 Welcome to the
INSTALLATION INSTRUCTIONS USER GUIDE
 INSTALLATION INSTRUCTIONS USER GUIDE Chimney Pyramid Rangehood HC60PLX4 and HC90PLX4 models NZ AU CONTENTS Safety and warnings 3 Installation instructions 5 Operating instructions 14 Cleaning and maintenance
Cooker hood Stainless steel/curved glass JLHDA623
 60cm Cooker hood Stainless steel/curved glass JLHDA623 User guide 2 Cooker hood user guide Contents Contents 3 Introduction 4 Safety is important 4 In the box 4 Safety information 5 Important safety information
Island Extractor. Instructions & Installation LAM
 Island Extractor LAM2850 Instructions & Installation www.howdens.com/appliance-registration See back page for product serial number Dear Customer, Congratulations on your choice of domestic appliance.
87cm. Cooker hood. Stainless steel JLCEILHD87. User guide
 87cm Cooker hood Stainless steel JLCEILHD87 User guide 2 Cooker hood user guide Contents Contents 3 Introduction 4 Safety is important 4 In the box 4 Safety information 5 Important safety information 5
EZT90BL Extractor. Installation, Use and Maintenance.
 EZT90BL Extractor Installation, Use and Maintenance Customer Care Department The Group Ltd. Harby Road Langar Nottinghamshire NG13 9HY T : 01949 862 012 F : 01949 862 003 E : customer.care@cda.eu W : www.cda.eu
Stainless Steel Chimney Extractor
 Stainless Steel Chimney Extractor HJA2450-2 User & Installation Guide LAMONA Appliances Dear Customer, Congratulations on your choice of a LAMONA domestic appliance which has been designed to give you
USER MANUAL. Cooker Hood ZHG51250GA
 EN USER MANUAL Cooker Hood 2 ZHG51250GA EN 2 Recommendations and Suggestions The Instructions for Use apply to several versions of this appliance. Accordingly, you may find descriptions of individual features
INSTALLATION INSTRUCTIONS USER GUIDE
 INSTALLATION INSTRUCTIONS USER GUIDE Tilted wall cooker hood HT90GHB2 model GB IE CONTENTS Introduction 3 Safety and warnings 4 Installation instructions 8 About your cooker hood Energy efficiency 18
waeady BT7.3GL/BT7.3BGL 70 cm Glass chimney hood
 waeady BT7.3GL/BT7.3BGL 70 cm Glass chimney hood User Manual for your Baumatic BT7.3GL/BT7.3BGL Cooker Hood 70 cm Glass chimney hood NOTE: This User Instruction Manual contains important information, including
STD6.2SS/STD6.2W Cooker Hoods
 STD6.2SS/STD6.2W Cooker Hoods User Manual for your Baumatic STD6.2SS/STD6.2W Cooker Hood NOTE: This User Instruction Manual contains important information, including safety & installation points, which
User Manual for your. GEH6009 Cooker Hood. 60 cm Chimney Hood in Stainless Steel
 User Manual for your GEH6009 Cooker Hood 60 cm Chimney Hood in Stainless Steel NOTE: This User Instruction Manual contains important information, including safety & installation points, which will enable
ELTSHDC110SG/ Users Guide & Installation Instructions
 ELTSHDC110SG/ Users Guide & Installation Instructions CONTENTS IMPORTANT SAFETY INFORMATION Installation Page 2 Child Safety 2 Maintenance and service 3 YOUR APPLIANCE OPERATING INSTRUCTIONS Cooker Hood
UNDERMOUNT RANGEHOOD. instruction manual VPP52S & VPP90S 12 MONTH WARRANTY
 UNDERMOUNT RANGEHOOD instruction manual VPP52S & VPP90S 12 MONTH WARRANTY Contents Guide to the Appliance 2 Caring for the Environment 3 Safety Information and Warnings 4 Installation Instructions 6 Operation
Owner s Manual STAINLESS CONICAL CHIMNEY HOOD CONTENTS
 Owner s Manual CONICAL CHIMNEY HOOD CONTENTS STAINLESS 2 Installation 3 Electrical Installation 3 The Controls 4 Operation 4 Maintenance 4 The controls 5 Cleaning and maintaining stainless steel 6 Problem
Cookworks Food Slicer
 Instruction Manual - Please keep for future reference Cookworks Food Slicer 9-06 1 IMPORTANT SAFETY INSTRUCTIONS IMPORTANT SAFETY INSTRUCTIONS Read all instructions before use and keep for future reference.
Instructions for the Use and Care and Installation of ORC97G ORC98G. Glass Canopy Rangehoods
 Instructions for the Use and Care and Installation of ORC97G ORC98G Glass Canopy Rangehoods CONTENTS 1 Notice 2 Features 3 Installation 4 Notice of installation 5 Safety Warning 6 Use Instructions 7 Maintenance
90cm Chimney Extractor
 90cm Chimney Extractor LAM2412 Stainless Steel LAM2413 Black Instructions and Installation www.howdens.com/appliance-registration See back page for product serial number LAMONA Appliances Dear Customer,
Stainless Steel and Glass Angled Extractor
 Stainless Steel and Glass Angled Extractor HJA2600 User & Installation Guide CONTENTS Environmental Note 3 Product information 4 4 Parts List 4 Method of Extraction 5 Installation 6 Hanging Your Extractor
"Let's provide you with a superior User Experience delivering Ease-of-Mind."
 "Let's provide you with a superior User Experience delivering Ease-of-Mind." contents 2 Safety warnings...3 For the installer...3 For the user...3 Installation...4 Unpacking...4 Location...4 Electrical
Cooker Hood CHIM60 CHIM70 CHIM90 CHIM101 CHIM110. Installation & User s instructions
 Cooker Hood CHIM60 CHIM70 CHIM90 CHIM101 CHIM110 Installation & User s instructions 2 250 20.5 167.5 A 590 : 960 260 330 Max 370 E F 304 278 42 206 167 Z B C D 230 230 Fig.1 Fig.3 G E A Z Z F B Y C D 490
VH60SS 60CM VISOR HOOD STAINLESS STEEL
 VH60SS 60CM VISOR HOOD STAINLESS STEEL INSTRUCTION MANUAL Thank you for purchasing our product. We hope you enjoy using the many features and benefits it provides. Before using this product please study
Challenge 5 Blade Ped Fan With Remote. Simple Assembly Instructions - Please keep for future reference FS40-9HRA
 Challenge 5 Blade Ped Fan With Remote Simple Assembly Instructions - Please keep for future reference FS40-9HRA IMPORTANT SAFETY INSTRUCTIONS Read all instructions before use and keep for future reference.
Instructions for the Use and Care and Installation of ORU52X ORU70X. Undermount Rangehoods CONTENTS
 Instructions for the Use and Care and Installation of ORU52X ORU70X Undermount Rangehoods CONTENTS CONTENTS 1) WARNING 2) INSTALLATION INSTRUCTIONS 3) OPERATION 4) LIGHT REPLACEMENT 5) CLEANING 6) ATTENTION
User manual. Fridge Freezer ZRT18100WA
 EN User manual Fridge Freezer ZRT18100WA Contents Safety instructions 2 Before first use 4 Daily use _ 4 Hints and tips _ 5 Safety instructions Before the installation and use of the appliance, carefully
EZA60BL & EZA90BL Extractors
 EZA60BL & EZA90BL Extractors Installation, Use and Maintenance Customer Care Department The Group Ltd. Harby Road Langar Nottinghamshire NG13 9HY T : 01949 862 012 F : 01949 862 003 E : customer.care@cda.eu
Instructions for use PHPC 6.4F AM X
 EN English, 7 Instructions for use PHPC 6.4F AM X 2 3 4 5 6 English GENERAL SAFETY Before any cleaning or maintenance operation, disconnect hood from the mains by removing the plug or disconnecting the
UBGHFF60W 60cm Gas on Glass Gas Hob
 UBGHFF60W 60cm Gas on Glass Gas Hob GB [02] x 1 [03] x 2 [04] x 1 [01] x 1 [08] x 4 [05] x 2 [09] x 1 [06] x 1 [07] x 4 [10] x 4 [11] x 1 TEMPLATE TEMPLATE UBGHFF60W GB Built-in 60cm Gas on Glass Gas Hob
USER INSTRUCTIONS PRE- PURCHASE INFORMATION INSTALLATION INSTRUCTIONS CHIMNEY HOOD MODELS: K240 90CM
 USER INSTRUCTIONS PRE- PURCHASE INFORMATION INSTALLATION INSTRUCTIONS CHIMNEY HOOD MODELS: K240 90CM and 100CM Britannia Living, Glen Dimplex Home Appliances, Eastern Rise, Trentham Lakes, Stoke-on-Trent
60cm Integrated Extractor
 60cm Integrated Extractor HJA2231 HJA2241 User & Installation Guide Dear Customer, Congratulations on your choice of domestic appliance which has been designed to give you excellent service. The user manual
Installation & Operating Instructions. Models: Desire, Ignite & Hereford Electric Stoves
 Installation & Operating Instructions Models: Desire, Ignite & Hereford Electric Stoves PLEASE NOTE THAT THIS APPLIANCE USES A MOTOR TO OPERATE THE FLAME EFFECT AND THAT IT MAY BE POSSIBLE TO HEAR IT WHERE
KKKKKKKCOOKER HOOD INSTRUCTION MANUAL
 KKKKKKKCOOKER HOOD INSTRUCTION MANUAL Read this manual carefully before operation Pictures in this manual are for reference only, the product in kind prevail. E60MEW2M19 Contents 01 02 03 04 05 06 07 08
User Manual for your Baumatic TEL06SS Cooker Hood
 TEL06SS Cooker Hood User Manual for your Baumatic TEL06SS Cooker Hood NOTE: This User Instruction Manual contains important information, including safety & installation points, which will enable you to