300KV Van de Graaff Generator Kit Builders Manual
|
|
|
- Lesley Hancock
- 5 years ago
- Views:
Transcription

1 300KV Van de Graaff Generator Kit Builders Manual

")
2 300KV Design Photos (Black)

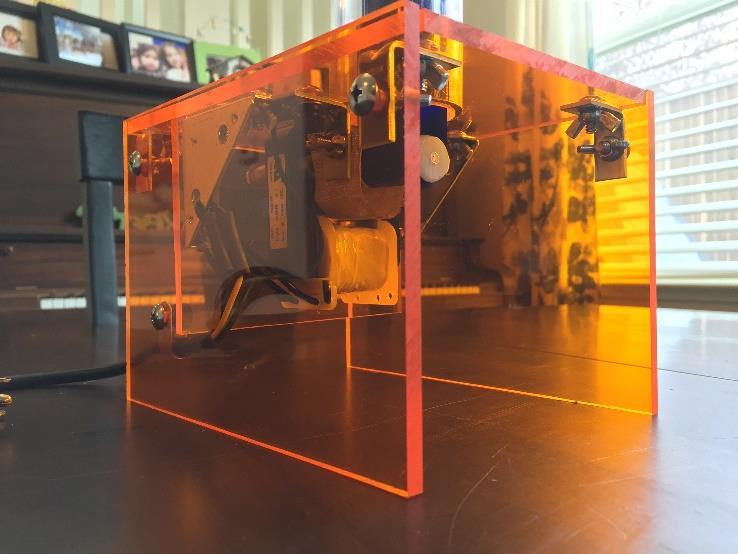
3 300KV Design (Orange)

4 Introduction: Welcome to perhaps what will be your first VDG kit. This manual is designed to give you a very straight forward and streamlined set of instructions so that you will be finished and shocking your friends in no time. To start the kit, you will only need a hand full of simple tools and materials as listed below. It is encourage that you take your time in order to ensure a kit that will operate at its maximum performance. During the process of constructing the VDG, there are a few items that are important to be mindful of. The first item is to never get oil on any of the parts, primarily the belts and rollers, because the oil will hinder the device from producing a significant charge. Secondly, never clean the VDG with acetone or other alcohols because it will react and crack the acrylic, furthermore, acrylic is fragile so please be cautious while handling it. Lastly, should any questions arise during the building process please write in through and your inquiry will be promptly answered. Thanks again and let s hope to see some sparks in about one hour! Tools and Materials Screw driver Very Sharp Scissors Two Part Epoxy (optional) 6 LB Fishing line White electrical tape
 The motor will arrive with two screws attached to the back of it. Take these screws off and then insert the motor on to the small acrylic motor plate.")
 Attach the motor assembly to the base using four 10-24x3/8 machine screws. 5) Place the clear rubber feet on the base.")
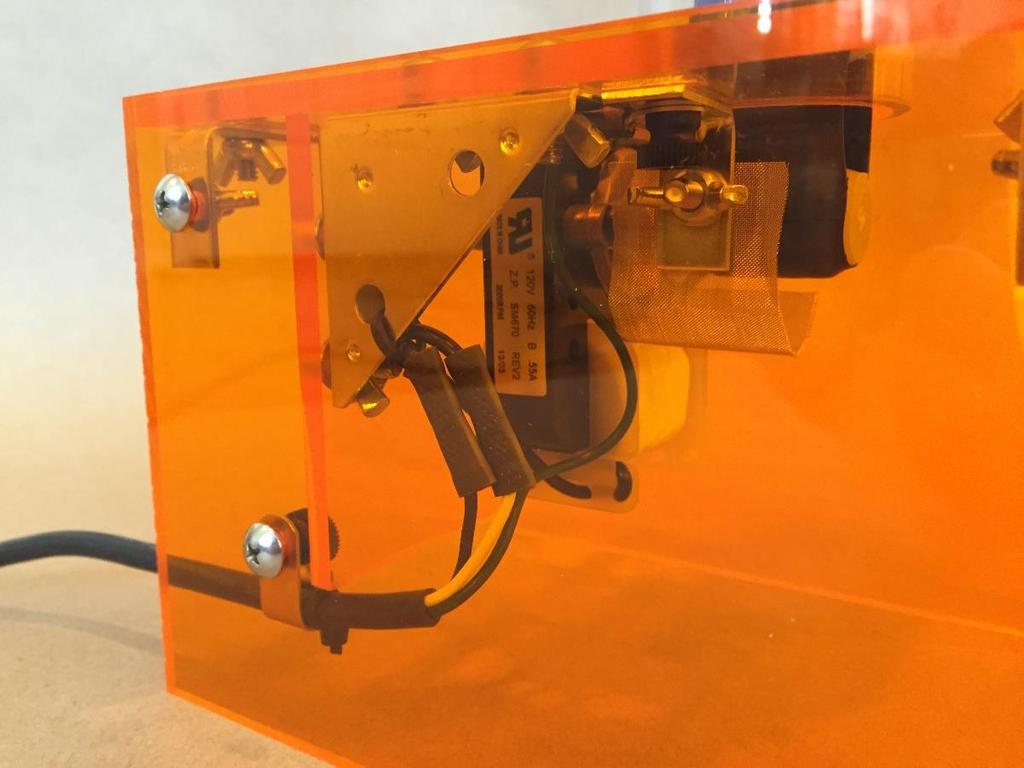
5 Motor Assembly: Base and Motor Construction Procedure: Warning: This section should only be prepared by an adult who is familiar with AC wiring and electronics 1) Take all of the wrapping off of the acrylic sheets. 2) The motor will arrive with two screws attached to the back of it. Take these screws off and then insert the motor on to the small acrylic motor plate. Next, place a small washer on the other side and then place then replace the screw to secure the motor. 3) Place the large 2 inch brackets on the motor. Attach using the four 10-24x ½ machine screws and acorn nuts. 4) Attach the motor assembly to the base using four 10-24x3/8 machine screws. 5) Place the clear rubber feet on the base. Motor Wiring: 6) Cut the end of the power cord off, opposite of the end that plugs into the wall. 7) Strip the black power cord so that the ground green wire is about 4 inches longer than the black and white wires, then pass through the motor brace 5/16 hole. 8) Connect the black and white motor wires to the black and white wires from the power cord using the blue wire connectors. Fasten wire to the near bracket

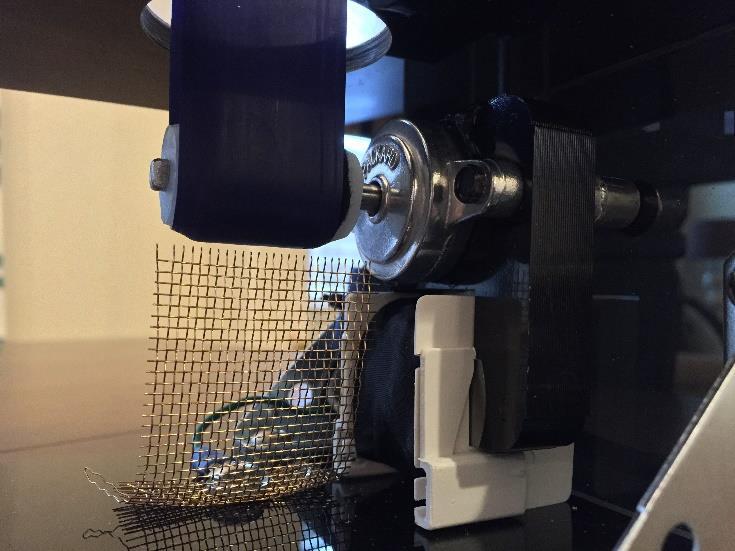
 Attach the green ground wire to the front of the motor and attach it to brass")
6 9) Cut out a piece of brass screen that is 1.5 x 3 inches. Insert a small hole at one end of the screen and attach it to the base using a small 10-24x3/8 machine screw, small washer, and blue ring terminal. 10) Attach the green ground wire to the front of the motor and attach it to brass discharge screen as seen in the illustration.
 Screw the long 10-24 x 4 inch machine screws through the bottom base as")
 Attach the motor to the acrylic base using the two metric screws.")

7 Base Assembly 1) Remove the lining from all of the all of acrylic plastic. 2) Screw the long x 4 inch machine screws through the bottom base as seen in the illustrations. 3) Attach the motor to the acrylic base using the two metric screws. The screws may need one or two washers so that the screws do not go too far into the motor and interfere with the internal parts. 4) Attach the rubber feet to the bottom of the base. Base Assemble Images for 300KV Kit (Orange)
8
9


10 Rollers and Static Belt: Prior to assembling the belt and rollers, it is crucial to have an extremely clean area free of dirt and oil. Oil will especially stop the VDG from efficiently operating. Once the belt and rollers are completed, they should be washed and then stored separately until installation and testing begins. Bottom White Nylon Roller: The white nylon roller is to be coated with black wool felt to increase its friction capabilities. First, clean the nylon roller with soap and water to remove any residual oil. Next, the felt should be cut to size and then attached using a very light amount super glue. Use a Q-tip to thinly spread the glue. Too much glue will prevent the VDG from working! The roller will press on to the motor axle. (Optional): To assure a sturdy adhesion, wrap 6 lb fishing string tightly around the felt. When wrapping with fishing string, the final passing loop may be glued using super glue or melted on with a lighter, which works very well. Next, wash the entire roller thoroughly with soap and water and then dry with a paper towel. Finally, apply a two part epoxy or Gorilla Super Glue (2 part epoxy is more efficient) to the roller s axle hole and completely press it on to the motor axle with about a 1/32 inch of clearance between the roller and the motor. Top Black Delrin Roller: This roller has been coated with a high friction application for creating greater charges. To begin, gently tap the axles into the flanged bearing as seen in the diagram and then press the axle assembly into the rollers. When pressing in the axles, constantly check the rollers with the top of the tubing roller insertion holes. It is best to have a slightly snug fit. If the axles are too loose, apply Gorilla Super Glue to the axles. Once finished, thoroughly clean the roller with soap and water and then store in a separate area.


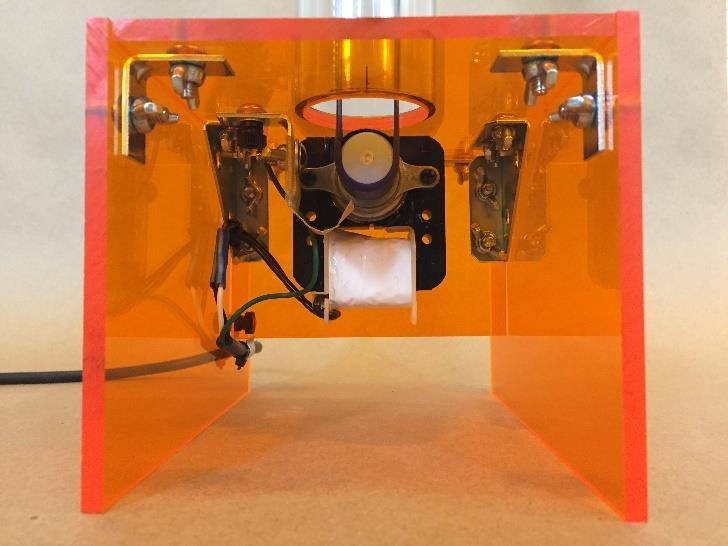
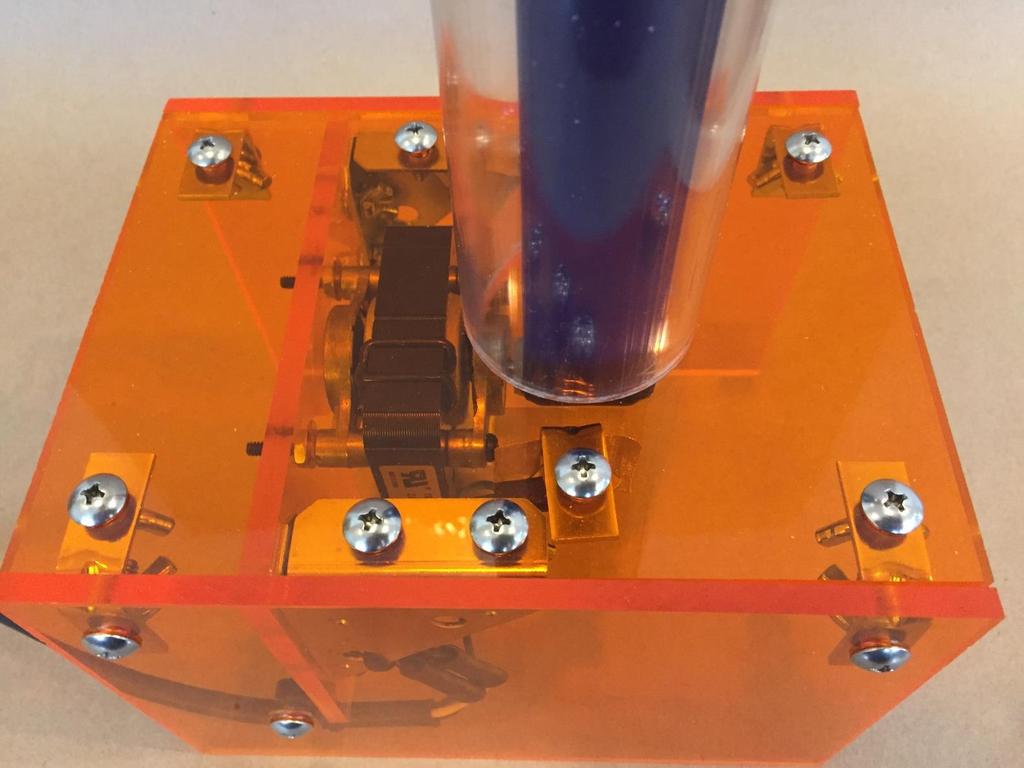
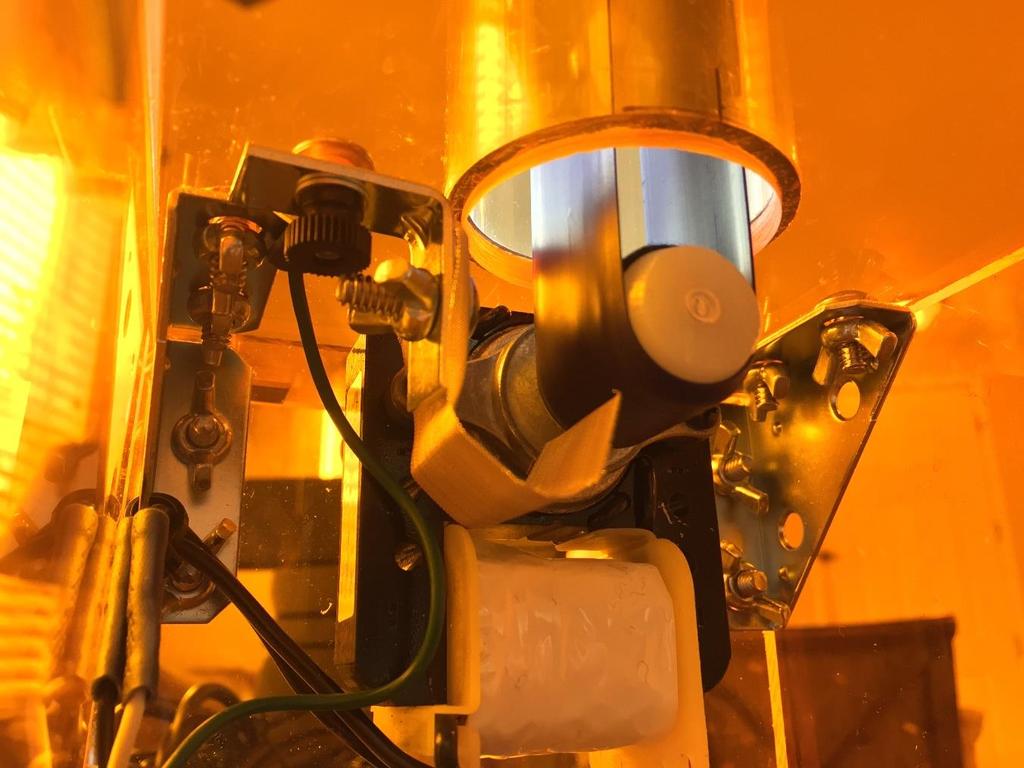
11 Belt Material Preparation: (300KV Belt Dimensions: 1.5 x 25 inches) The kit will come with material for two belts. Prepare each belt by cutting the ends at 45 degrees using a sharp pair of scissors and then creating a lap joint that overlays about1 1/4 to 3/8 of an inches. Mend the joint using a thin layer of Gorilla Super Glue. It is best to spread the glue with a Q-tip. Please note that other super glues will crack at the joint. Tubing, Aluminum Support System, and Dome Tubing Base Connection: The tubing will be glued to the bottom of the base. Place the top roller into position. Next place the tubing on top of the base and adjust the tubing until the top and bottom rollers are aligned. Make a small mark on the tubing and base for this location. Remove the tubing and place a thin film of super glue on the tubing and then place it on the base. You will have about 20 seconds to make adjustments. Wipe the area with a wet cloth to accelerate the drying process. Aluminum Support System: The aluminum support system has black end caps that slide over bottom to prevent electrical leakage during operation. The caps should be pressed on and then with a sharp tool, cut out the hole where the screw goes through. This may be done with a small 3/16 drill bit or with a razor blade or tool of choice. Alternatively, the support system end may also be covered with a single layer of electrical tape.
12 Support system Continue: The support system is fastened using 8-32x1/2 nylon screws and nuts as seen in the illustration. The top discharge screen is fastened using a 10-25x5/8 machine screw, wing nut (or thumb nut), and washer. Dome Insulation: The white/gray insulation seen wrapped around the tube near the top is used to prevent static electrical leakage at the bottom of the sphere and should be placed so that it presses firmly against the dome. To do so, check where the bottom of the dome rest and place the white insulation 1/8 th of an inch higher. Next, wrap it with a layer of white electrical tape which will further increase its insulative ability. You may also use a clear tape. The dome will be anchored using the10-24 x ¾ nylon thumb screw. See Operating Instructions and Safety before fully running.

13 Operating Instructions and Safety Quick Start: 1) Prior to use, wash the belt and rollers with soap and water and then dry with a paper towel. 2) Adjust the top and bottom combs to about.25 inches from the rollers. Connect the sphere and allow the VDG to run for about 10 minutes. Blow a hair dryer through the bottom to take out humidity if necessary. 3) When running, keep the speed control 6 feet away from the VDG. Arcs to the speed control can destroy it. Speed controls are not covered under the warranty. If needed to be replaced, these are fan or router speed controls. 4) This unit will come with a very powerful motor. Please note that the drive system may not allow it to run at full speed due to harmonics in the belt. 5) The sparks should average about 6-10 inches, with max sparks at 16 inches. If you are not getting 8 inch arcs, it could be due to a variety of reasons such as high humidity levels or sharp pointed grounded objects in the vicinity that create ion jets and pull the electrons from the dome, hindering the VDG from building a charge. Please refer to trouble shooting. Trouble Shooting: 1) Problem: Humid day. This will decrease the voltage by half. That is why they say we have good VDG weather and bad VDG weather. Solution: Blow a hair dryer through the bottom of the VDG roller entrance hole. 2) Problem: Dust particles on dome that cause leakage. Solution: Clean the dome after each hour of use. Even small dust particles will cause points of leakage. To see the points of leakage, run the VDG with the lights out and look for small blue ion jets. Brush the ion jet away and the VDG will produce rather large arcs. Be very careful while trying this technique 3) Problem: Oil on belt and rollers. This will shut the VDG off. Solution: Wash the top and bottom roller with soapy water. 4) Problem: Belt is not dry enough after washing. This will shut the VDG off. Solution: Blow hot air up through the bottom of the tower while running.
14 5) Problem: Pointed metal objects around the VDG will cause it leak. Solution: The VDG cannot be around pointed objects because they will prematurely pull charge from the dome and not allow it to build to its maximum potential. Keep the VDG located in open space. 6) Problem: Belt begins to rub on the combs at very high speeds. Solution: Once the belt develops a large amount of ware, it will loosen and possibly brush the combs during operation. This will indicate that it is time to change the belt. These belts are made from a latex material and will break down in UV light, therefore when finished using the VDG, take off the belt and place it in a dark location. These belts should last a very long time if stored correctly. VDG Maintenance: 1) Do not allow the belt to come in contact with the combs during operation in order to maximize the belt s life. 2) VERY IMPORTANT: Latex will oxidize when in the presence of ozone or UV light. The ozone is inevitable due to the voltage produced however the UV will inflict a significant amount of damage over time, therefore always store the belt in a dark place when not in use. 3) Never clean with alcohol or acetone due to sever cracking of the acrylic. 4) The VDG belt and rollers may be cleaned with dish soap and water only. Try to avoid water contact with the bearings. 5) All parts of the VDG charging system (dome, belt and rollers, and tower should be cleaned every 2 hours of run time. VDG Safety: 1) VDG s should not be used around people with heart condition or pacemakers. 2) Be careful not to make items that will act as high voltage capacitors. The current from the VDG s are fairly safe, however when the current is allowed to store at such high voltages they can become lethal.
15 3) Larger VDGs will produce welts from prolong exposure to arcs. 4) Keep away from all electronics. 5) Do not plug into outlets that are connect to other sensitive electronics. 6) Operate in well ventilated areas due to the ozone produced. 7) Avoid making human chains. 8) Never touch the speed control while handling the VDG during operation otherwise will ruin the control. The control must always be kept 6 feet from the VDG. Speed controls are not covered under warranty. Experimenter Ideas: 1) Insulate yourself and touch the VDG while pointing at various objects in the room to place a charge on. When done to a chandelier it will cause arcs within the chain. 2) Insulate and charge yourself with 700,000V and then step off of the insulated material and experience the feeling of your body just electrically shut off from the field. 3) Wrap the bottom roller with a metallic coating and force feed it with a 15,000V charge to induce higher currents. These VDG are designed to do so. (Dangerous) 4) Wrap a balloon in foil and then hang it from a string attached to the ceiling so that it can touch the dome. Turn on the VDG and watch the outcome. 5) Take two pie pans and attach a positive and negative lead from the VDG to each pan. Next place small foil leaves between the pans or string. Very cool to see! 6) Bring fluorescent tubes near the VDG. This makes a great visual for examining electric fields. The tube will begin to glow at 5 feet away. 7) Charging Lynden Jar and high voltage beer cup capacitors (Dangerous) 8) Place pie pans on the generator and watch them fly. 9) Static electricity motors and ion jets.
16 10) Just insulate yourself to feel your entire body light up from being immersed in the 320,000V electric field. ABSOLUTELY AWESOME!!! However, if someone touches you...ouch! This seems to be my students favorite thing to do especially with the x-large 700KV VDG where they will develop 8 inch arcs coming off of them when approached. Yes, this is a crowd pleaser!!! All of these demos are extremely fun and exciting to do, however as in every situation when experimenting, please consider all dimensions of safety. Please note that this item is not a toy. Use at your own risk Warranty: Physics Playground generators and high voltage equipment are covered under a one year warranty accept for static belts and speed controls (or AC to DC converter power supplies) Signs of rough use such as dropping, over tightening hardware, and exposure to caustic chemicals will dismiss the equipment from eligibility of the warranty. Prior to sending the replacement part, the buyer must a photo of the damaged part to frederickgraff@hotmail.com for verification. All replacement parts will be shipped within 4 business days.
400KV Van de Graaff Generator Kit Builders Manual
 400KV Van de Graaff Generator Kit Builders Manual 400KV Design Photos Introduction: Welcome to perhaps what will be your first VDG kit. This manual is designed to give you a very straight forward and streamlined
600KV Van de Graaff Generator High Current Model
 600KV Van de Graaff Generator High Current Model www.physicsplayground.com Frederick W. Graff 2012 Page 1 600KV Kit Model Frederick W. Graff 2012 Page 2 Table of Contents Introduction and Materials 4 How
700KV Van de Graaf Generator
 700KV Van de Graaf Generator By Frederick W. Graff www.physicsplayground.com Frederick W. Graff 2012 www.physicsplayground.com Page 1 700KV VDG KIT Frederick W. Graff 2012 www.physicsplayground.com Page
Physics Playground. Van de Graaff Generator Instructions. About Physics Playground. How a Van de Graaf Generator Works
 Van de Graaff Generator Instructions About Physics Playground HV Supplier for: 400KV DC or AC Powered VDG (built /kit) 450 KV High Current VDG (built / kit) 600 KV High Current VDG (built / kit) 700 KV
Static Electricity: Bending and Floating
 Static Electricity: Bending and Floating Week 3A Objectives: In this lesson students will learn: About the force of static electricity How electricity relates to our everyday life Intro to electrons Background:
Vari-Cyclone Ceiling Fans
 Installation Instructions For Vari-Cyclone Ceiling Fans Installation Instructions For Vari-Cyclone Ceiling Fans Vari-Cyclone Ceiling Fans DC powered fans designed to operate on 12 or 24 vdc only! Toll
2 Installation Instructions For Vari-Fan Ceiling Fans Installation Instructions For Vari-Fan Ceiling Fans 11
 Installation Instructions For Installation Instructions For Vari-Fan Ceiling Fans Vari-Fan Ceiling Fans Installation Instructions For Vari-Fan Ceiling Fans Vari-Fan Ceiling Fans DC powered fans designed
SCENE 2x2 INSTALLATION INSTRUCTIONS. Recessed T-Bar GENERAL SAFETY INSTRUCTIONS: NOTE:
 INSTALLATION INSTRUCTIONS SCENE 2x2 Recessed T-Bar NOTE: The following instructions provide general guidelines for product installation. For additional information consult the applicable electrical codes
ROTARY TUMBLER LORTONE INSTRUCTIONS AND PARTS LIST. Model 3-1.5B. Model 45C. Model 33B Cyrus Way Mukilteo, WA (425)
") ROTARY TUMBLER INSTRUCTIONS AND PARTS LIST Model 3-1.5B Model 45C Model 33B LORTONE 12130 Cyrus Way Mukilteo, WA 98275 (425) 493-1600 SETTING UP YOUR MACHINE For 45C Unit Only (33B & 3-1.5B already assembled)
ROTARY TUMBLER INSTRUCTIONS AND PARTS LIST Model 3-1.5B Model 45C Model 33B LORTONE 12130 Cyrus Way Mukilteo, WA 98275 (425) 493-1600 SETTING UP YOUR MACHINE For 45C Unit Only (33B & 3-1.5B already assembled)
ELECTRIC FLAT PANEL FIREPLACE HEATER
 ELECTRIC FLAT PANEL FIREPLACE HEATER Model Numbers: 80-2000A-42 OWNER S MANUAL AC 120V 60Hz 1500W WARNING Read and understand this entire owner s manual, including all safety information, before plugging
ELECTRIC FLAT PANEL FIREPLACE HEATER. Model# : BG-36B BG-45B BG-50B BG-60B BG-72B BG-100B OWNER S MANUAL
 ELECTRIC FLAT PANEL FIREPLACE HEATER Model# : BG-36B BG-45B BG-50B BG-60B BG-72B BG-100B OWNER S MANUAL 36"/45"/50"/60"/72"/100" LED Wall Mounted Or Built-in Electric Fireplace AC 110-120V 60Hz 1500W WARNING
MODEL: NSD10020 PACKING DIAGRAM \ _\ CARDBOARD (2) CORD COVERS AND PART--+- i----1 :ASTING POLYFOAM UMP. c=j-transformer AND L_J LIGHT
 CORD COVERS AND PART--+- i----1 :ASTING POLYFOAM UMP. c=j-transformer AND L_J LIGHT") MODEL: NSD10020 PACKING DIAGRAM \ _\ CARDBOARD I CJ (2) CORD COVERS AND PART--+- i----1 :ASTING POLYFOAM UMP c=j-transformer AND L_J LIGHT You should have received the following parts in the package. Please
MODEL: NSD10020 PACKING DIAGRAM \ _\ CARDBOARD I CJ (2) CORD COVERS AND PART--+- i----1 :ASTING POLYFOAM UMP c=j-transformer AND L_J LIGHT You should have received the following parts in the package. Please
Installation Instructions. For the 18 Built-In Dishwasher and Front Color Panels
 Installation Instructions For the 18 Built-In Dishwasher and Front Color Panels Printed in USA 154232102 Before You Begin DO NOT INSTALL DISHWASHER UNTIL YOU HAVE READ ALL INSTRUCTIONS. FOR YOUR SAFETY,
72 ONYX XL FLAT PANEL ELECTRIC FIREPLACE
 72 ONYX XL FLAT PANEL ELECTRIC FIREPLACE Model Numbers: 80005 OWNER S MANUAL WARNING Read and understand this entire owner s manual, including all safety information, before plugging in or using this product.
Installation Instructions
 GE Consumer & Industrial Appliances Installation Instructions Junction Box Cover Within this user bag, you will find a junction box cover and a #10 hex head screw used to attach the junction box cover
GETTING STARTED OPTIONAL HARDWARE A
 ROLLER SHADES Continuous Cord Loop and Link System without Cassette Double Roller GETTING STARTED OPTIONAL HARDWARE A few simple tools are required: Hold Down Brackets Spacer Block Spacers Steel Tape Measure
Vari-Fan Ceiling Fans
 Installation Instructions For Vari-Fan Ceiling Fans Installation Instructions For Vari-Fan Ceiling Fans Vari-Fan Ceiling Fans DC powered fans designed to operate on 12 or 24 vdc only! Toll free: 1 (877)
ANYWHERE. U.S. Patent(s) Pending INSTRUCTION MANUAL WARRANTY CERTIFICATE
 Pending INSTRUCTION MANUAL WARRANTY CERTIFICATE") TM ANYWHERE BY U.S. Patent(s) Pending INSTRUCTION MANUAL WARRANTY CERTIFICATE 2017 Minka Lighting Inc. Manual design and all elements of manual design are protected by United States Federal and/or State
TM ANYWHERE BY U.S. Patent(s) Pending INSTRUCTION MANUAL WARRANTY CERTIFICATE 2017 Minka Lighting Inc. Manual design and all elements of manual design are protected by United States Federal and/or State
Item # Modular Blast CaBinEt instructions
 Item #20464 Modular Blast CaBinEt instructions The Eastwood Modular Blast Cabinet is specifically designed with heavy-duty components and a quality powdercoated finish to provide years of trouble free
SUNSEEKER BY INSTRUCTION MANUAL WARRANTY CERTIFICATE
 SUNSEEKER BY INSTRUCTION MANUAL WARRANTY CERTIFICATE Manual design and all elements of manual design are protected by U.S. Federal and/or State Law, including Patent, Trademark and/or Copyright laws. The
ALUMA INSTRUCTION MANUAL WARRANTY CERTIFICATE
 ALUMA BY INSTRUCTION MANUAL WARRANTY CERTIFICATE Manual design and all elements of manual design are protected by U.S. Federal and/or State Law, including Patent, Trademark and/or Copyright laws. The Minka-Aire
In this activity, students will write secret messages that can only be revealed if you know how to read invisible ink!
 Invisible Ink Magic Science 15 20 minutes In this activity, students will write secret messages that can only be revealed if you know how to read invisible ink! Materials Needed Per Student: Half a lemon
INSTALLATION USE & CARE MANUAL ALL WEATHER SL-SERIES QUARTZ TUBE ELECTRIC INFRARED RADIANT HEATER
 INSTALLATION USE & CARE MANUAL ALL WEATHER SL-SERIES QUARTZ TUBE ELECTRIC INFRARED RADIANT HEATER TABLE OF CONTENTS IMPORTANT INFORMATION Warnings 2 Installation Instructions 3 Wiring Instructions 3 Outdoor
Table of Contents What to Expect with Your Installation. Top Housing. Ceiling Plate. Tools Needed.
 Table of Contents Congratulations on purchasing your new Hunter ceiling fan! It will provide comfort and performance in your home or office for many years. This installation and operation manual contains
Owner s Guide and Installation Manual
 Tribeca Owner s Guide and Installation Manual English Form# M6001-01 20120416 2012 Casablanca Fan Co. Welcome Your new Casablanca ceiling fan is an addition to your home or office that will provide comfort
569, 570, 571, 572 Series
 Please read and save this Repair Parts Manual. Read this manual and the General Operating Instructions carefully before attempting to assemble, install, operate or maintain the product described. Protect
Installation and Care Instructions
 Installation and Care Instructions 2" Horizontal Aluminum Blinds MagnaView Tilt Feature CONTENTS Getting Started................................................ 1 Mount the Installation s....................................
Wall Mount Electric Fireplace
 Wall Mount Electric Fireplace User Guide Thank you for purchasing the Ivation Wall Mount Electric Fireplace. This User Guide is intended to provide you with guidelines to ensure that operation of this
Table of Contents. What to Expect with. Mounting Options. Tools Needed. Preparation. Wiring. Downrod.
 Table of Contents www.casablancafanco.com What to Expect with Your Installation Congratulations on purchasing your new Casablanca ceiling fan! It will provide comfort and performance in your home or office
MNEFDD54 & MNBCDD54 GALVANIZED WALL FANS Installation, Operation, and Maintenance Instructions
 FARM PRODUCTS DIVISION MEMBER OF AMCA AMERICAN COOLAIR CORPORATION P.O. BOX 2300 JACKSONVILLE, FLORIDA 32203 PHONE (904) 389-3646 FAX (904) 387-3449 E-MAIL - fans@coolair.com MNEFDD54 & MNBCDD54 GALVANIZED
Installation Instructions
 Aluminum Blinds Installation Instructions Echelon, Traditions & Integra Aluminum Blinds 2 Metro Aluminum Blinds *Click on any page to return to the Table of Contents* Echelon, Traditions & Integra Aluminum
SUPRA 52. U.S. Patents: D450,830 INSTRUCTION MANUAL WARRANTY CERTIFICATE
 SUPRA 52 BY U.S. Patents: D450,830 INSTRUCTION MANUAL WARRANTY CERTIFICATE This product is protected by United States Federal and/or State Law, including Patent, Trademark and/or Copyright laws. Manual
WALL MOUNTED ELECTRIC FIREPLACE HEATER. Model # : Onyx Ivory Mirror OWNER S MANUAL. AC V 60Hz 1500W
 WALL MOUNTED ELECTRIC FIREPLACE HEATER Model # : 80001 Onyx 80002 Ivory 80008 - Mirror OWNER S MANUAL AC 110-120V 60Hz 1500W WARNING Read and understand this entire owner s manual, including all safety
Table of Contents What to Expect with Your Installation. Ceiling Plate. Tools Needed.
 Table of Contents Congratulations on purchasing your new Casablanca ceiling fan! It will provide comfort and performance in your home or office for many years. This installation and operation manual contains
Flat Wall Mounted / Free stand Electric Fireplace. Model Numbers: S OWNER S MANUAL. Wall Hanging Mode. Freestanding Mode AC 120V / 60HZ 1500W
 Flat Wall Mounted / Free stand Electric Fireplace Model Numbers: 80-421S OWNER S MANUAL Wall Hanging Mode Freestanding Mode AC 120V / 60HZ 1500W WARNING Read and understand this entire owner s manual,
READ AND SAVE THESE INSTRUCTIONS
 READ AND SAVE THESE INSTRUCTIONS CEILING FAN INSTALLATION AND OPERATION INSTRUCTION FAN RATING AC 120V. 60Hz UL LISTED MODEL: AC-552OD WEIGHT OF FAN: 6.82 KGS 1. TOOLS AND MATERIALS REQUIRED Philips screw
Instructions for Installing the MMD Rear Window Louvers
 Instructions for Installing the MMD Rear Window Louvers Time Required: Less than 1 hour of labor (5 hours total installation if the 4 hours of letting the brackets set are included). Required Tools: Socket
Fillmore Small Pendant Assembly and Installation Instructions
 CAUTION: Fillmore Small Pendant Assembly and Installation Instructions BEFORE INSTALLING FIXTURE, MAKE SURE THE POWER TO THE CIRCUIT IS TURNED OFF AT THE MAIN FUSE BOX / CIRCUIT BREAKER UTILITY BOX. Important
Rycroft Supapac Plate Heat Exchangers
 Rycroft Supapac Plate Heat Exchangers Installation Operation & Maintenance Manual Ormandy Rycroft Duncombe Road Bradford BD8 9TB England TEL +44 (0)1274 490911 FAX +44 (0)1274 498580 www.rycroft.com 1.
CEILING FAN OWNER'S MANUAL
 CEILING FAN OWNER'S MANUAL READ AND SAVE THESE INSTRUCTIONS MODELS: 52-ECM-5RV-13 52-ECM-5RV- 52-ECM-5RV-SN FAN RATING AC 120V. 60Hz CUL LISTED MODEL : AC-552 1. TOOLS AND MATERIALS REQUIRED Philips screwdriver
C-IV 60 CEILING FAN READ AND SAVE THESE INSTRUCTIONS. FAN RATING AC 120V. 60Hz
 C-IV 60 CEILING FAN READ AND SAVE THESE INSTRUCTIONS FAN RATING AC 120V. 60Hz Please do not use any electric or battery powered tools in the assembly and installation of this or any Matthews Fan Company
Installation and Care Instructions
 Installation and Care Instructions 2" Horizontal Aluminum Blinds MagnaView Tilt Feature Thank you for your purchase. Your new blinds have been custom built for you from the highest quality materials. Properly
Warnings 2. Installation Instructions 3. Wiring Instructions 3. Mounting Instructions 4-5. Replacement Element Installation 5. Replacement Parts 5-6
 TABLE OF CONTENTS Warnings 2 Installation Instructions 3 Wiring Instructions 3 Mounting Instructions 4-5 Replacement Element Installation 5 Replacement Parts 5-6 Heater Coverage Areas 6 General Notes 6
Yard Master Electric Series
 Yard Master Electric Series Outdoor Movie Electric/Motorized Projector Screen User s Guide Thank you for choosing the Yard Master Electric projection screen! Please read through this user guide before
OWNER S MANUAL ELECTRIC FLAT PANEL FIREPLACE. AC V 60Hz. Model# : /60 - Built-in & Wall Mounted Electric Fireplace WARNING CAUTION
 ELECTRIC FLAT PANEL FIREPLACE Model# :80017 OWNER S MANUAL 50/60 - Built-in & Wall Mounted Electric Fireplace AC 110-120V 60Hz WARNING Read and understand this entire owner s manual, including all safety
569, 570, 571, 572 Series
 Please read and save this Repair Parts Manual. Read this manual and the General Operating Instructions carefully before attempting to assemble, install, operate or maintain the product described. Protect
Figure 1. Explain how rubbing an acetate rod with a cloth causes the rod and cloth to become charged
 Q1.A student rubs an acetate rod with a cloth. Figure 1 shows the charges on the acetate rod and cloth before and after rubbing. Figure 1 (a) Explain how rubbing an acetate rod with a cloth causes the
5 SAFE EXPERIMENTS USING A VAN DE GRAAFF! INSPIRING TOMORROW S SCIENTISTS THROUGH PRACTICAL SCIENCE
 5 SAFE EXPERIMENTS USING A VAN DE GRAAFF! INSPIRING TOMORROW S SCIENTISTS THROUGH PRACTICAL SCIENCE INTRODUCTION THE VAN DE GRAAFF GENERATOR IS AMONGST THE MOST RECOGNISABLE PIECES OF APPARATUS IN THE
OWNER S MANUAL. Wall Hanging Mode. Pedestal Mode ELECTRIC FLAT PANEL FIREPLACE HEATER. Model Number: EFW-XB60B WARNING CAUTION
 ELECTRIC FLAT PANEL FIREPLACE HEATER Model Number: EFW-XB60B OWNER S MANUAL Wall Hanging Mode Pedestal Mode WARNING CAUTION Read and understand this entire owner s manual, including all safety information,
52 CEILING FAN READ AND SAVE THESE INSTRUCTIONS FAN RATING AC 120V.
 Irene 52 CEILING FAN READ AND SAVE THESE INSTRUCTIONS FAN RATING AC 120V. 60Hz TABLE OF CONTENTS Tools and Materials Required... 1 Package Contents... 1 Safety Rules... 2 Mounting Options... 3 Hanging
User s Manual and Operating Instructions
 User s Manual and Operating Instructions Model Numbers: PT-18W-DDF-A, PT-20F-DDF-A, PT-20S-DDF, PT-24O-DDF, PT-24-DDF, PT-24-DDF-F, PT-30-DDF, PT-30P-DDF-A, PT-30P-DDF-AF READ AND SAVE THESE INSTRUCTIONS
GRANITE COMPOSITE SINK
 GRANITE COMPOSITE SINK CONTENTS Sink Installation Faucet Drilling Drop-In Sink Undermount Sink Drain Installation 2 3 4 5 Materal Care and Maintenance 6 1 FAUCET DRILLING The hole for the faucet can be
OPERATING & SERVICE PARTS MANUAL HDS-215 COMBINATION SHRINK SYSTEM
 OPERATING & SERVICE PARTS MANUAL HDS-215 COMBINATION SHRINK SYSTEM FOR HOT KNIFE AND IMPULSE MACHINES READ ALL INSTRUCTIONS CAREFULLY BEFORE OPERATING EQUIPMENT TABLE OF CONTENTS Electrical Requirements
1. SAFETY RULES WARNING WARNING. 8. Avoid placing objects in the path of the blades.
 1 1. SAFETY RULES 1. To reduce the risk of electric shock, insure electricity has been turned off at the circuit breaker or fuse box before beginning. 2. All wiring must be in accordance with the National
TRUSTY PRODUCTS, INC.
 TRUSTY PRODUCTS, INC. 137 S. 8 th Avenue, #D, City of Industry, CA 91746 Tel: (626) 333-2221 Fax: (626) 333-2466 D.C. 12V CEILING FAN INSTALLATION INSTRUCTIONS V002-RC QUESTIONS OR CONCERNS CONTACT TRUSTY
DAVIS PACKAGING. TD-362 Dual Roll Console Reference Guide.
 DAVIS PACKAGING www.davispackaging.net E-mail: contact@davispackaging.net TD-362 Dual Roll Console Reference Guide SPECIFICATIONS Overall Dimensions: Working Height: Power Requirement: Wattage: Unit Weight:
The Multimax. OWNER S MANUAL READ AND SAVE THESE INSTRUCTIONS Be mindful of all warnings shown throughout. Ceiling Fan. Model No.
 The Multimax Ceiling Fan Net Weight 20.5 lbs (9.3 kgs) Model No. FP8008CH OWNER S MANUAL READ AND SAVE THESE INSTRUCTIONS Be mindful of all warnings shown throughout 1.Unpack and inspect fan carefully
Warnings 2. Installation Instructions 3. Wiring Instructions 3. Mounting Instructions 4. Replacement Element Installation 5. Replacement Parts 5
 TABLE OF CONTENTS Warnings 2 Installation Instructions 3 Wiring Instructions 3 Mounting Instructions 4 Replacement Element Installation 5 Replacement Parts 5 Heater Coverage Areas 6 General Notes 6 Maintenance
Standard Downrod for ceilings 8-10 feet high. Longer Downrod for ceilings 10 feet or higher
 Table of Contents www.casablancafanco.com To register your fan, please visit: www.casablancafanco.com/register What to Expect with Your Installation Save your receipt for proof of purchase. Ceiling Bracket??
Tough Stuff Products, Inc. Door Protectors. To ensure a successful installation, please read all of these instructions prior to starting.
 Tough Stuff Products, Inc. Door Protectors To ensure a successful installation, please read all of these instructions prior to starting. Note: Tough Stuff Door Protectors will Only Fit JEEP Vehicles with
OFF. 20 min. 60 min. 30 min. 60 min OFF. 100 min Start. 200 min 150 min
 Cool Warm HDY-M60 HDY-M60 HDY-M40 20 min 30 min 200 min 150 min 100 min Start Please read this manual carefully before operating your dryer. Retain this for future reference. Record the model and serial
60" Lyndon Patio. Instruction Manual Customer Service :30 AM to 5:00 PM EST, Monday - Friday A Kichler Decor ceiling fan
 60" Lyndon Patio TM 310140 A Kichler Decor ceiling fan Includes wall mount control system Kichler Lighting 7711 East Pleasant Valley Road P.O. Box 318010 Cleveland, Ohio 44131-8010 Instruction Manual Customer
42 Kevlar. Instruction Manual. Kichler Lighting 7711 East Pleasant Valley Road P.O. Box Cleveland, Ohio
 42 Kevlar Kichler Lighting 7711 East Pleasant Valley Road P.O. Box 318010 Cleveland, Ohio 44131-8010 Customer Service 866.558.5706 8:30 AM to 5:00 PM EST, Monday - Friday Instruction Manual 1 1. SAFETY
CEILING FAN OWNER S MANUAL
 CEILING FAN OWNER S MANUAL VERA CRUZ 5/04 GENERAL INSTALLATION & OPERATION INSTRUCTIONS IMPORTANT SAFEGUARDS: 1. To ensure the success of the installation, be sure to read the instructions and review the
INSTALLATION INSTRUCTIONS UNDERCOUNTER DISHWASHERS
 INSTALLATION INSTRUCTIONS UNDERCOUNTER DISHWASHERS VIKING 111 Front Street Greenwood, Mississippi 38930 USA (662) 455-1200 IMPORTANT - PLEASE READ AND FOLLOW Before beginning - please read these instructions
Table of Contents. What to Expect with. Mounting Options. Tools Needed
 Table of Contents www.hunterfan.com What to Expect with Your Installation Congratulations on purchasing your new Hunter ceiling fan! It will provide comfort and performance in your home or office for many
54" Skye. Instruction Manual Customer Service :30 AM to 5:00 PM EST, Monday - Friday A Kichler Decor ceiling fan
 54" Skye TM 300167 A Kichler Decor ceiling fan Includes wall mount control system Kichler Lighting 7711 East Pleasant Valley Road P.O. Box 318010 Cleveland, Ohio 44131-8010 Instruction Manual Customer
60" Tulle PatioTM. Instruction Manual. A Kichler Select ceiling fan
 60" Tulle PatioTM A Kichler Select ceiling fan cul Certified for Wet Location Kichler Lighting 7711 East Pleasant Valley Road P.O. Box 318010 Cleveland, Ohio 44131-8010 Customer Service 866.558.5706 8:30
Installation Instructions
 GE Consumer & Industrial Appliances Installation Instructions Junction Box Cover Within this user bag, you will find a junction box cover and a #10 hex head screw used to attach the junction box cover
NSS STANDARD-SPEED FLOOR MACHINES
 OPERATION MANUAL NSS STANDARD-SPEED FLOOR MACHINES IMPORTANT SAFETY INSTRUCTIONS Read all instructions before using or servicing machine. WARNING: Fire or explosion hazard. NEVER use with flammable or
INSTRUCTIONS AND PARTS LIST. Model 3A LORTONE Cyrus Way Mukilteo, WA (425)
") rotary tumbler INSTRUCTIONS AND PARTS LIST Model 3A LORTONE 12130 Cyrus Way Mukilteo, WA 98275 (425) 493-1600 GETTING STARTED I. Open the Barrel: Remove nut and washer, press down on bolt with thumb while
rotary tumbler INSTRUCTIONS AND PARTS LIST Model 3A LORTONE 12130 Cyrus Way Mukilteo, WA 98275 (425) 493-1600 GETTING STARTED I. Open the Barrel: Remove nut and washer, press down on bolt with thumb while
Patterson/AMT Inline Circulator Pump Refer to pump manual for General Operating and Safety Instructions.
 Please read and save this Repair Parts Manual. Read this manual and the General Operating Instructions carefully before attempting to assemble, install, operate or maintain the product described. Protect
Ceiling Fan Installation Instructions
 OWNER S MANUAL Ceiling Fan Installation Instructions For 5SH54XXD-L Series Fans READ AND SAVE THESE INSTRUCTIONS Total fan weight with light kit 1. 2. 3. 4. 5. 6. 7. 8. 9. 10. 11. 12. 13. 14. 15. 16. 17.
Product instruction manual Easymount Wide Format Laminators
 Product instruction manual Easymount Wide Format Laminators The Easymount has been designed to be user friendly, however we strongly recommend you take a few minutes to read through this manual to ensure
Thank you for buying this refrigerator-freezer. To ensure that you get the best
 Dear customer: Thank you for buying this refrigerator-freezer. To ensure that you get the best results from your new refrigerator-freezer, please take time to read through the simple instructions in this
IMPORTANT SAFETY INSTRUCTIONS:
 PRODUCT NAME: Beau Chandelier Small ITEM NUMBER: LC945 DIMENSIONS OF ITEM ASSEMBLED: 25 1/2 H x 23 DIA IMPORTANT SAFETY INSTRUCTIONS: -We strongly recommend that a professional electrician install all
IMPORTANT INFORMATION. Revised Dishwasher Installation Instructions
 IMPORTANT INFORMATION Revised Dishwasher Installation Instructions To obtain a revised copy of the entire Dishwasher User s Manual, go to www.eurotechappliances.com. SPECIAL EDITION 11-20-02 SAVE THESE
Patterson/AMT Inline Circulator Pump Refer to pump manual for General Operating and Safety Instructions.
 Please read and save this Repair Parts Manual. Read this manual and the General Operating Instructions carefully before attempting to assemble, install, operate or maintain the product described. Protect
SHRIMP CUTTER AND DEVEINER
 SHRIMP CUTTER AND DEVEINER 1 Prawnto Shrimp Machine of Texas Co., Inc. CONGRATULATIONS You have just purchased one of the most exciting and serviceable machines you have ever had in you operation. With
1. SAFETY RULES. 8. Avoid placing objects in the path of the blades.
 1 1. SAFETY RULES 1. To reduce the risk of electric shock, insure electricity has been turned off at the circuit breaker or fuse box before beginning. 2. All wiring must be in accordance with the National
52 DorsetTM. Instruction Manual. Basic Function Wall Control System Included. A Kichler Decor ceiling fan
 Basic Function Wall Control System Included 52 DorsetTM II A Kichler Decor ceiling fan Kichler Lighting 7711 East Pleasant Valley Road P.O. Box 318010 Cleveland, Ohio 44131-8010 Customer Service 866.558.5706
SPACESAVER INSTRUCTION MANUAL WARRANTY CERTIFICATE
 SPACESAVER BY INSTRUCTION MANUAL WARRANTY CERTIFICATE Manual design and all elements of manual design are protected by U.S. Federal and/or State Law, including Patent, Trademark and/or Copyright laws.
Quartzone. Infrared Quartz Tube & Metal Sheathed Electric Heaters. Owner s Manual. File E COMFORT HEATERS for INDOOR* and OUTDOOR** USE
 Quartzone Infrared Quartz Tube & Metal Sheathed Electric Heaters Owner s Manual File E97759 COMFORT S for INDOOR* and OUTDOOR** USE *Excluding Residences ** With Quartz Elements and when mounted Underneath
Table of Contents. What to Expect with. Tools Needed. Mounting Options. Blades
 www.hunterfan.com Table of Contents Ceiling Bracket 30 inches Downrod Ladder 3 Wiring Operation, Maintenance & Cleaning Light Kit 11 Troubleshooting??? 16 15 1 12 10 9 5 Blades Canopy 6 4 PÁGINA 2 7 feet
CEILING FAN OWNER'S MANUAL
 CEILING FAN OWNER'S MANUAL READ AND SAVE THESE INSTRUCTIONS MODEL: 52-854-5RV-234 52-854-5RV-CH 52-854-5RV- FAN RATING AC 120V. 60Hz CUL LISTED MODEL : AG-962MC 1. TOOLS AND MATERIALS REQUIRED Philips
Aquapeutics GENERAL INSTALLATION GUIDE. Toll Free Customer Service line 1 (800)
") Aquapeutics GENERAL INSTALLATION GUIDE Toll Free Customer Service line 1 (800) 290-6812 Thank you for choosing an Aquapeutics product. Please read the following guide in its entirety before assembling
Aquapeutics GENERAL INSTALLATION GUIDE Toll Free Customer Service line 1 (800) 290-6812 Thank you for choosing an Aquapeutics product. Please read the following guide in its entirety before assembling
Patterson/AMT Inline Circulator Pump Refer to pump manual for General Operating and Safety Instructions.
 Please read and save this Repair Parts Manual. Read this manual and the General Operating Instructions carefully before attempting to assemble, install, operate or maintain the product described. Protect
568X, 587X, 588X Series
 Please read and save this Repair Parts Manual. Read this manual and the General Operating Instructions carefully before attempting to assemble, install, operate or maintain the product described. Protect
SERVICE MANUAL TWIN TUB WASHING MACHINE PWM6010M PWM8010PM PWM1010PM PWM1210PM
 SERVICE MAUAL TWI TUB WASHIG MACHIE PWM6010M PWM8010PM PWM1010PM PWM1210PM + + TABLE OF COTEES 1.SAFET PRECAUTIO 1. Safety precaution 2. Introduction of product 2.1 ame of parts 3.Trouble shooting 3.1
966A AIR IONIZER. SUMITOMO 3M LIMITED Electronic Solutions Division
 966A AIR IONIZER Operation Manual Precautions...1 Safety precautions...1 Other precautions...1 Outline...2 Structure and kinds of the ionizer...2 Specifications...2 Characteristic...3 How to Install 966A
Table of Contents What to Expect with Your Installation. Tools Needed. Motor Housing.
 Table of Contents Congratulations on purchasing your new Casablanca ceiling fan! It will provide comfort and performance in your home or office for many years. This installation and operation manual contains
5LCM52XX Series Fan. Owner s Guide and Installation Manual. UL Model NO. : AC-552AL
 Owner s Guide and Installation Manual 5LCM52XX Series Fan UL Model NO. : AC-552AL Attach sales receipt to this card and retain as your proof of purchase DATE OF PURCHASE: MODEL NUMBER: RETAILER NAME: RETAILER
RECHARGEABLE CYCLONIC VACUUM CLEANER WITH POWER BRUSH
 RECHARGEABLE CYCLONIC VACUUM CLEANER WITH POWER BRUSH VC 44287 22.2 DC Li-Ion Batteries www.kalorik.com VC 42475-170120 1 PARTS DESCRIPTION 1. 3 in 1 accessory 2. Charging Station 3. Tube set 4. Motorized
The Bose 151 SE Environmental Speakers. Owner s Guide
 Owner s Guide Before you begin Thank you for purchasing Bose 151 SE speakers. Their advanced design and quality construction are intended to provide long-term listening enjoyment in or outside your home.
Graaf Generator. Making rollers: Assembly
 Graaff GENERATOR Contents Assembly... 2 Safety... 9 Operating the Generator... 9 Operation... 10 Experiments & Demonstrations... 11 Cleaning & Maintenance... 13 The Van de Graaff Machine Ancestors... 17
Table of Contents. What to Expect with. Tools Needed. Mounting Options. Blades
 Table of Contents 1.888.830.1326 Ceiling Bracket 30 inches Ladder Downrod 3 Wiring 10 Operation, Maintenance & Cleaning Light Kit 11 Troubleshooting??? 17 15 1 13 5 Blades 9 Switch Housing 12 Canopy 6
Select. Sutter PlaceTM. Instruction Manual. A Kichler Select ceiling fan
 Sutter PlaceTM A Kichler ceiling fan Kichler Lighting 7711 East Pleasant Valley Road P.O. Box 318010 Cleveland, Ohio 44131-8010 Customer Service 866.558.5706 8:30 AM to 5:00 PM EST, Monday - Friday Instruction
CEILING FAN OWNER S MANUAL
 CEILING FAN OWNER S MANUAL LX SERIES 5/04 WARNING: Read and follow these instructions carefully and be mindful of all warnings shown throughout. GENERAL INSTALLATION & OPERATION INSTRUCTIONS IMPORTANT
Graber Lake Forest Faux Wood and Premium Faux Wood Blind
 2 3 5 6 8 7 1 2" (5.1cm) Blind shown 1. Blind (cord tilt shown) 2. Mounting Brackets 3. Center support bracket (if required). Mounting screws (2 per bracket) 5. Projection brackets (optional, one per mounting
Installation Instructions
 Installation Instructions KFN 9855 ide en - CA Installation, repair and maintenance work should be performed by a Miele authorized service technician in accordance with national and local safety regulations