CONTENTS
|
|
|
- Cornelia French
- 5 years ago
- Views:
Transcription
1 GENERAL USER MANUAL
2 CONTENTS GENERAL USER MANUAL 1 INSTRUCTION OF USING A WOODEN HOT TUB 3 INSTRUCTION OF USING A FIBERGLASS HOT TUB 4 A GUIDE TO USING YOUR HEATER 5 HOT TUB ACCESSORIES 6 SAND FILTRATION SYSTEM 7 AQUAFINESSE HOT TUB WATER CARE BOX 12 LED LIGHT, CONTROLLER / TRANSFORMER 14 AIR BUBBLE SYSTEM 16 HYDRO MASSAGE SYSTEM 18 ELECTRIC HEATER 21
3 INSTRUCTION OF USING A WOODEN HOT TUB 1. To maintain the tightness of wooden hot tub there are usually two or three stainless steel rings around. During the transportation the rings might get loose therefore it is required to check and to screw them if needed. 2. When using the hot tub for the first time, it is essential to fill the wooden hot tub up to 90 cm of water. All the following times it is enough to fill the wooden hot tub up to 80 cm of water. 3. The 90 cm of water for the first time is necessary in order to force the full wood expansion due to moisture. Wood generates great expansion forces. 4. The following two or three hours are very important. During this time the wood reaches its biggest expansion therefore it is needed to control the process and to loosen the stainless steel rings according to the expansion. 5. If needed to loosen the stainless steel rings, please scroll the screw 180o counterclockwise one time. If the wood still expands, repeat this action again. In all the cases, two times of scrolling is enough. 6. When the wood stops the expansion or the rings are too loose, please tight them up to the default position. 7. Please note that wood leakage is expected for 1 to 5 days. If the wooden hot tub is made of spruce, the leakage usually stops in one day. If it is made of larch the leakage should stop in up to 5 days.
4 INSTRUCTION OF USING A FIBERGLASS- POLYPROPYLENE HOT TUB 1. The fiberglass hot tub is to be positioned on a flat, stable, solid base. 2. If the tub is not isolated, it is recommended to put the 5 cm thick Styrofoam plate at the bottom of the hot tub. 3. One should fill the fiberglass hot tub with 90 cm of water. 4. The heater must be started just after the water covered the lower part of the chimney, otherwise the fiberglass hot tub`s walls will be deformed (not the case for warranty). 5. When heating the water in the tub, one needs to stir the water occasionally. One can use into the tub when temperature of the water reaches degrees Celsius. 6. Before using the tub, it is recommended to use the shower. It is recommended to use the shower before using the hot tub (water keeps fresh longer). Water should be changed as needed. 7. Water is released by unscrewing the drain valve after the use. 8. The fiberglass tub should be washed. It is allowed to use of all disinfectants approved by the sanitary authorities. 9. The ashes from the heater are removed with the help of a shovel and rake. 10. The tub is covered by a lid.
5 A GUIDE TO USING YOUR HEATER Lighting the heater 1. The internal heater cannot be lit until it is at least half covered with water. External heater must be covered with water till the higher inlet before lighting it. Before lighting the heater do not forget to remove the protective film from metal parts. 2. Firewood must be placed in a heater vertically. Cardboard or flammable liquid is used to start a fire. Heater fuel type dry wood, fuel briquettes. 3. An average water heating rate (2000 liters) 8 degrees Celsius per hour. Depending on the outdoor temperature water reaches 38 degrees Celsius in 2-3 hours during the warm season and could take up to 4-6 hours during the cold season. 4. The water heats faster when the hot tub is covered. Water temperature is measured with the thermometer. Storage and Preservation 1. It is recommended to drain water from the hot tub for both internal and external heaters if the temperature goes below freezing point as it could cause damage to the metal. 2. The valve on the bottom of the hot tub is used for draining the water. Useful tips and common mistakes 1. Do not touch the chimney or metal parts when the heater is used it will cause serious injuries. 2. Use the heater lid to regulate water temperature. 3. Make sure the heater is covered with water (see step 2) before lighting it. 4. Heater stoke strictly prohibited any type of coal. Main warranty conditions 1. You have to preserve the hot tub and its parts, otherwise the warranty won t be eligible. 2. The internal heater cannot be lit until it is at least half covered with water. 3. External heater must be covered with water till the higher inlet before lighting it. 4. When not in use, during the cold season, water should be drained from the hot tubs external or internal heater to prevent any possible damages to the heater. 5. If there are any damages please contact the seller. Photos and videos would be necessary to evaluate the damage and further actions.
6 HOT TUB ACCESSORIES BELOW ARE THE USER MANUAL PAGES FOR ACCESSORIES

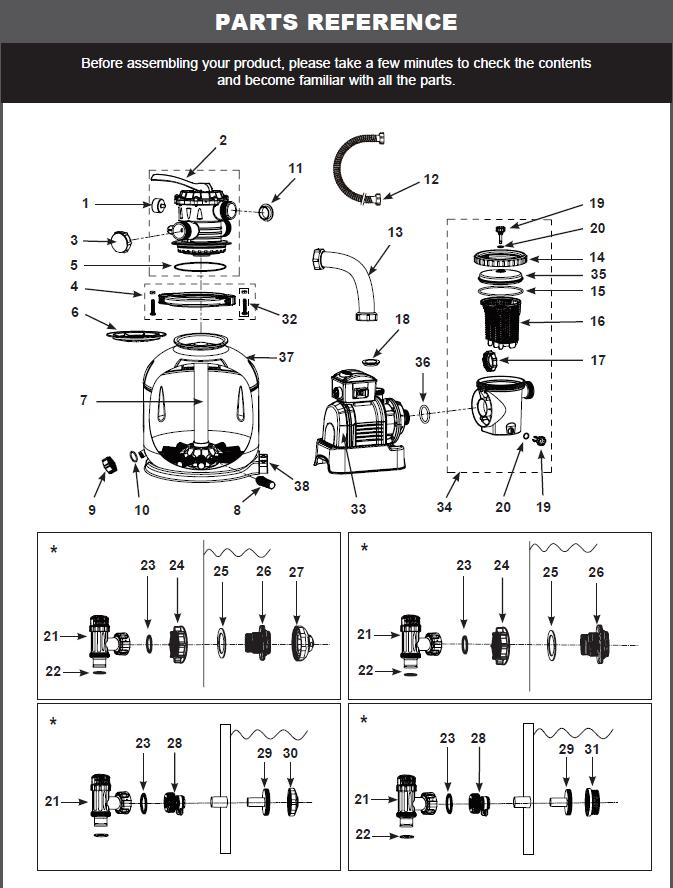
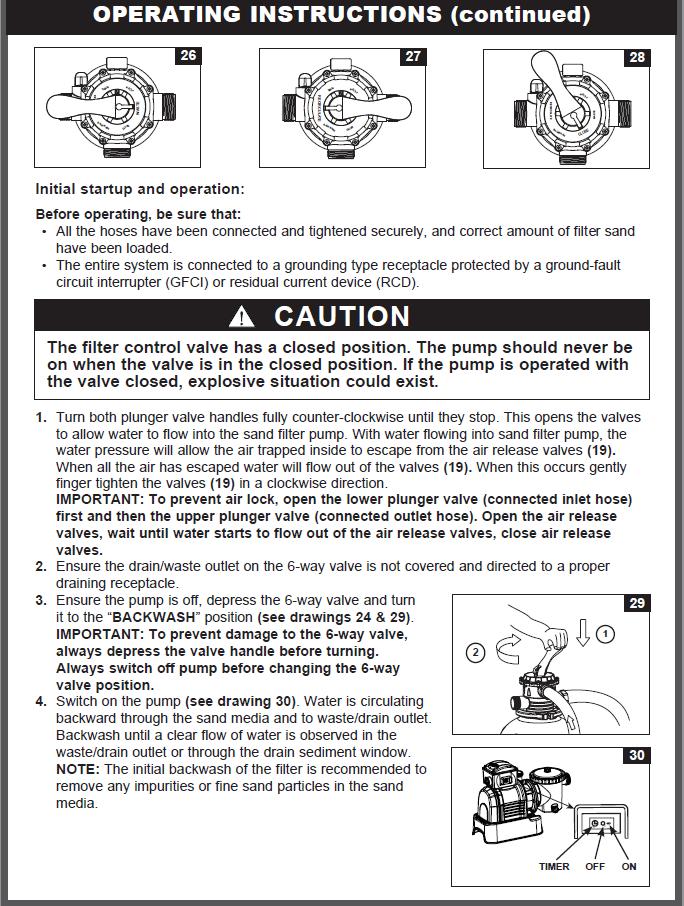
7 SAND FILTRATION SYSTEM
8

9
10

11
12 AQUAFINESSE HOT TUB WATER CARE BOX
13


14 LED LIGHT, CONTROLLER / TRANSFORMER LED light gives pleasant effect. The most popular choice is 2-3 units. Wall insulation is necessary to make a proper installation. USAGE OF THE LIGHT: 1. Connect all couplings and accessories, before connecting the equipment to the grid. 2. To shut down the light, after you ve finished using hot tub, hold the button to turn the light off, press it again to turn it back on. White gasket Black gasket 47 mm
15 ASSEMBLY INSTRUCTIONS Read all information before assembling/usage. 1. Drill a ø 47 mm hole for the light. Refinement might be needed, in that case use sandpaper or a file. 2. The light can be used with wall thicknesses up to 60 mm. 3. Thread the wires through the hole. Assemble with the white gasket under the crown of the lamp. Also use silicone on the surface that will lie against the wall in order to prevent any leaks due to possible irregularities. NOTE! Remove the crown from the light before beginning assembly, put it back after the silicone has dried. 4. The black gasket is put on from behind and then the nut is tightened over it. Attach the nut using hand force only and wipe away excess silicone from the inside. 5. The control panel is assembled outside the spa/bath/pool in the same way as the light, but without the use of silicone. Largest diameter is 35 mm, thus use a ø 35 mm hole saw. NOTE! Applies only if you have a control panel. Warning! The control panel is not be mounted inside the bath or in a place where it will be regularly exposed to water. 6. Connect the PCB output cable from the light to the control panel. 7. Put the transformer somewhere safe and connect the power cable from the control panel to the transformer. 8. Connect the transformer to the grid and test the light according to the manual.
16 AIR BUBBLE SYSTEM A powerful bubble system that also has a nice massage effect. A special pump blows streams of air into the water through 6 (HT150) special air vents. The system also includes: check valve, hose, connections, pressure switch for the air blower. BUBBLE SYSTEM PARTS: USING A HOT TUB WITH BUBBLE SYSTEM IN THE WINTER If you have a hot tub equipped with a bubble system and you intend to use it in the winter then the hose and air jets have to be protected from freezing. When the air blower isn t operating but there is still water in the hot tub then the hose will fill with water all the way up to the check valve. REMEMBER to start the air blower after 15 minutes maximum, so that the water in the hose does not have time to freeze. When the hot tub is drained of water the water in the hose can be removed by starting the air blower. Let the water drain from the hot tub and repeat the procedure at least three times. The base of the bubble system for the HT150 has 12 holes for air vents, which are screwed into a lower part (see picture). Note! Use Silicone or an equivalent material to seal the base of the jet from above as well as the threads. Tighten by hand. The picture below illustrates the connected hose system (Basic).

17 PICTURE SHOWS HOSE KIT ASSEMBLED AND WITH THE MIDDLE SUPPORT HAVING CUT-OUTS FOR VALVES FROST WARNING! If the Hot Tub is emptied and there is a risk for freezing, it is very important that there is no water remaining in the system. Start the blower in case there is a bubble system installed and let it run approx. for 5 seconds. Repeat this procedure three times. A cover shelf covers and protects the hose for the blower. WARNING! The blower must be placed at least 10 cm above the ground in order for the suction to work. It should be placed hoizontally or the valve connection on the air hose should face downwards preventing water getting into the pump. The blower is controlled by a pressure valve and a pressure switch via an air

18 HYDRO MASSAGE SYSTEM HYDRO MASSAGE SYSTEM PARTS

19
20

21 ELECTRIC HEATER
WARNING VILPRA WOOD WOOD HEATER MANUAL. Marketing: SpaDealers. Korsnäs FINLAND +358 (0)
") VILPRA WOOD WOOD HEATER MANUAL Marketing: SpaDealers Korsnäs FINLAND +358 (0)10 239 5600 info@spadealers.eu www.spadealers.eu Manufacturer UAB VILPROS PRAMONÉ, Lithuania WARNING Heater must be under supervision
VILPRA WOOD WOOD HEATER MANUAL Marketing: SpaDealers Korsnäs FINLAND +358 (0)10 239 5600 info@spadealers.eu www.spadealers.eu Manufacturer UAB VILPROS PRAMONÉ, Lithuania WARNING Heater must be under supervision
Vivatubs The Original Slovenian Hot Tub Company
 Vivatubs The Original Slovenian Hot Tub Company Mojca Bohak, s.p., Goriška cesta 23, 3320 Velenje, Slovenia, Vat no: SI44602049 tel: +386 (0)590 44 340 web: www.lesenekadi.si mail: info@lesenekadi.si Read
SAFIRE 1600D, 1800D and 2100D Diesel / fuel oil heaters USAGE, INSTALLATION AND MAINTENANCE
 SAFIRE 1600D, 1800D and 2100D Diesel / fuel oil heaters 1 Heater kit contains : Heater, mounting bracket Fuel hose (3 meters), pump, a fuel tank connection to standard tanks (15, 22, 30 litres) Power supply
External heater hot tub
 External heater hot tub User and maintenance manual Koriks-Fiiber OÜ 2018 Table of contents 1 General information... 3 1.1 Symbols... 3 1.2 Definitions... 4 1.3 Warnings... 4 1.4 Manufacturer s information...
Installation Manual for M-G014 & M-G015
 Installation Manual for M-G014 & M-G015 M-G014 M-G015 1 Contents 1. Electrical specifications 2. Plumbing 3. Installation of Water connections 4. Installation of Drain 5. Operation of Bathtub 6. Troubleshooting
BACK WASH INSIDE THE SPA
 BACK WASH INSIDE THE SPA Lower the temperature to 90 degrees and let the unit run approximately 10-15 minutes. This gives the heating element the chance to cool down. Now unplug the power pack Using a
Unity 180 Premium Whirlpool 180/80/62 cm
 Unity 180 Premium Whirlpool 180/80/62 cm Operating and installation instructions Is there a problem with your product or do you have any questions? Please feel free to contact our hotline: 020-8528 1729
Installation and Operation Manual MG-304. Please read this manual carefully before use.
 Installation and Operation Manual MG-304 Please read this manual carefully before use. 1 P a g e Important Safety Instructions: Warning! Use this unit only for its intended purposes or as described in
SERVICE INSTRUCTION. DYNAMIC COOLING with 0 zone REFRIGERATION. Fridge/freezer with. Publication number
 SERVICE INSTRUCTION REFRIGERATION DISTRIPARTS AB BOX 501 S-562 80 NORRAHAMMAR Phone 036-31 80 00 Telefax 036-31 81 10 Telefax 036-31 80 88 Publication number 599 51 96-71 Rev. 04-04-20 SV/SERVICE DT/MA/AN
Application Instructions
 Application Instructions Recommended Materials for LizardSkin Application LizardSkin Sound Control and/or Ceramic Insulation LizardSkin SuperPro Application Kit LizardSkin TopCoat Air compressor capable
WHISKEY BARREL HOT TUBS FLAT PACK CATALOGUE
 WHISKEY BARREL HOT TUBS FLAT PACK CATALOGUE WOODEN HOT TUBS SPRUCE Heater: Heater: Ø Size, cm Inside Outside 160 (2-4 persons) 1050 EUR 1300 EUR 180 (4-6 persons) 1150 EUR 1400 EUR 200 (6-8 persons) 1250
21 20 LITER GAS FRYER FFA3200 INSTALLATION AND SERVICING.
 21 20 LITER GAS FRYER FFA3200 INSTALLATION AND SERVICING www.anvilworld.com 20 ALL ANVIL EQUIPMENT COMES WITH A ONE YEAR WARRANTY ON COMPONENTS AND DEFECTIVE WORKMANSHIP. www.anvilworld.com 19 20 LITER
Installation and Operation Manual
 ! Please read this manual carefully before use. M-G301 Installation and Operation Manual! 1 Table of Contents 1. Important Notice------------------------------------------------------2 2. Technical parameters
COOKER HOOD INSTRUCTIONS MANUAL MODEL
 390 3300 COOKER HOOD INSTRUCTIONS MANUAL MODEL INTRODUCTION OF DEVICE 3 4 5 390 390 0 3 Min 80/Max 060 6 5 3300 ) Chimney ) Body 3) Control Panel 4)Aluminum Cassette Filter 5) Lighting 6) Split Extraction
SAFIRE 2000A FUEL OIL HEATER INSTALLATION, OPERATION AND MAINTENANCE
 SAFIRE 2000A FUEL OIL HEATER INSTALLATION, OPERATION AND MAINTENANCE You have selected the new generation SAFIRE oil heater as your heating solution. Although our goal is to take into account all problems
Aquapeutics GENERAL INSTALLATION GUIDE. Toll Free Customer Service line 1 (800)
") Aquapeutics GENERAL INSTALLATION GUIDE Toll Free Customer Service line 1 (800) 290-6812 Thank you for choosing an Aquapeutics product. Please read the following guide in its entirety before assembling
Aquapeutics GENERAL INSTALLATION GUIDE Toll Free Customer Service line 1 (800) 290-6812 Thank you for choosing an Aquapeutics product. Please read the following guide in its entirety before assembling
Installation and handlinginstructions for Mullis biological toilets.
 Installation and handlinginstructions for Mullis biological toilets. Please read the instruction before starting the installation and follow the handlinginstructions. The systems best functional temperature
1/2011 V1. Puzer AINO USER MANUAL. Read this instruction before using the vacuum cleaner! Keep the instructions near the vacuum cleaner for later use!
 Puzer AINO USER MANUAL Read this instruction before using the vacuum cleaner! Keep the instructions near the vacuum cleaner for later use! 1 Vacuum cleaner parts 1 Part numbers 1. Wall inlet 2. Display
Massage Bathtub Instructions of Installation. MODEL: TOCOA SIZE: 1380*1380*610mm
 Massage Bathtub Instructions of Installation MODEL: TOCOA SIZE: 1380*1380*610mm Dear Customer, Thank you for choosing our product. For your safe concern, please take a few minutes to read this manual before
Setup. Important. Texture Spraying (material supplied from unit)
") Setup Setup Important If you are going to stop spraying for more than 5 minutes, turn sprayer off to prevent shortened pump hose life. Do not allow material to dry inside pump, hoses, gun or spray system.
Setup Setup Important If you are going to stop spraying for more than 5 minutes, turn sprayer off to prevent shortened pump hose life. Do not allow material to dry inside pump, hoses, gun or spray system.
Massage Bathtub Instructions of Installation. MODEL:MT-NR1502(1504) SIZE:1500*1500*610mm
 SIZE:1500*1500*610mm") Massage Bathtub Instructions of Installation MODEL:MT-NR1502(1504) SIZE:1500*1500*610mm Preparations Dear Customer, Thank you for choosing our product. For your safe concern, please take a few minutes
Massage Bathtub Instructions of Installation MODEL:MT-NR1502(1504) SIZE:1500*1500*610mm Preparations Dear Customer, Thank you for choosing our product. For your safe concern, please take a few minutes
The Flush Kit: The perfect companion to Harvest Right home freeze dryers. The Flush Kit. User s Manual
 The Flush Kit: The perfect companion to Harvest Right home freeze dryers The Flush Kit User s Manual Freeze Dryer Accessories LLC 2608 W. 510 N. Hurricane, UT 84737 (435)215-5136 web: freezedryeraccessories.com
DRAFT INSTALLATION INSTRUCTIONS. Solid-State Series !! NOTE!! Covers the following models: Refer to INSERT for additional information
 INSTALLATION INSTRUCTIONS Solid-State Series!! NOTE!! Covers the following models: " CS6100 - CS7100 " CS6200 - CS9200 " CS6220 - CS9220 " CS6230 - CS9230 " CS6500 - CS7500 " CS6330 - CS9300 " CS9400 -
Installation Instructions
 Instructions for Topload Washers Original Instructions Keep These Instructions for Future Reference. CAUTION: Read the instructions before using the machine. (If this machine changes ownership, this manual
IMPORTANT SAFETY INSTRUCTIONS READ AND FOLLOW ALL INSTRUCTIONS SAVE THESE INSTRUCTIONS. Table of Contents WARNING.
 Eagle Pump Owners Manual IMPORTANT SAFETY INSTRUCTIONS READ AND FOLLOW ALL INSTRUCTIONS SAVE THESE INSTRUCTIONS Table of Contents SECTION I. INSTALLATION... 2 SECTION II. OPERATION & MAINTENANCE... 2 SECTION
USER MANUAL OF KL8300 SYSTEM
 Carefully read all of the instructions before enjoying the spa. WARNING: Operating the system without water will cause severe damage. WARNING: SHOCK HAZARD! No user serviceable parts. Do not attempt to
NEPTUNE Steam Room Installation Instructions
 NEPTUNE Steam Room Installation Instructions IMPORTANT Please read carefully the following instructions before installing your shower cabin. If you have any questions on this shower cabin installation
Remote Water Quality System Standard Equipment (supplied by EPI) Remote Water Quality System Optional Equipment (supplied by EPI)
 Remote Water Quality System Optional Equipment (supplied by EPI)") Page 1 of 11 Parts List Remote Water Quality System Standard Equipment (supplied by EPI) 20sq ft Skimmer-Filter Remote Water Quality Plumbing Kit Heater-Controller Keypad Control 220V 3/4HP Circulation
Page 1 of 11 Parts List Remote Water Quality System Standard Equipment (supplied by EPI) 20sq ft Skimmer-Filter Remote Water Quality Plumbing Kit Heater-Controller Keypad Control 220V 3/4HP Circulation
Maintenance 50 Serie CAUTION. Before resetting your electronic card that displays an error code. OVERHEAT MESSAGE
 29-10-2013 CAUTION Before resetting your electronic card that displays an error code. OVERHEAT MESSAGE Service the stove COMPLETELY as described in this manual. Check the chimney pipe. BLOCKED FLUE MESSAGE
INSTALLATION OF DURAVENT POLYPRO SINGLE WALL POLYPROPYLENE VENTING SYSTEMS
 SUPPLEMENT VENTING INSTRUCTIONS FOR INSTALLATION AND OPERATION INSTRUCTION MANUALS FOR THE FOLLOWING PRODUCT TYPES: HIGH EFFICIENCY CONDENSING COMMERCIAL, COMMERCIAL POWER DIRECT VENT, LIGHT DUTY COMMERCIAL
Laminating Machine User Manual
 Laminating Machine User Manual Cautions: 1. Please test your empty machine first after you received it. Plug in the power wire and turn on the machine, then test all the functions on the control panel.
Massage Bathtub Instructions of Installation. MODEL:MT-RT1708 SIZE:1700*800*620mm
 Massage Bathtub Instructions of Installation MODEL:MT-RT1708 SIZE:1700*800*620mm Preparations Dear Customer, Thank you for choosing our product. For your safe concern, please take a few minutes to read
MANUAL FOR USE AND INSTALATION STOVE MODELS: D11-D17
 MANUAL FOR USE AND INSTALATION STOVE MODELS: D11-D17 CE Tested by the DIN EN 13240 15a B-VG Austria Type 1 Color Emajl d.o.o. Alaginci 87 a 34000 Požega Croatia www.color.hr team@color.hr 1 Attention!
INSTRUCTIONS FOR USE FLOW TYPE LUXURY COOLERS LINDR
 ENGLISH INSTRUCTIONS FOR USE FLOW TYPE LUXURY COOLERS LINDR LINDR.CZ spol. s.r.o. Cooling and dispensing systems Sadová 132, CZ 503 15 Nechanice, Czech Republic Tel.: 495 447 239 l Fax: 495 425 085 l E-mail:
Beautifully Traditional
 TECHNICAL DETAILS For full technical details on all our products, please visit our website Arcade bath shower mixer - deck mounted with brass handle handset Arcade bath shower mixer - wall mounted with
INSTALLATION INSTRUCTIONS JOHN DEERE XUV 625I
 INSTALLATION INSTRUCTIONS JOHN DEERE. SAFETY INSTRUCTIONS Warning: Failure to heed all safety and operating instructions and warnings regarding use of this product can result in serious bodily injury.
Enzo Concealed Shower Mixing Valve
 Enzo Concealed Shower Mixing Valve EZ40010CP, EZ40013CP & EZ40014CP Installation and Maintenance Instructions In this procedure document we have endeavoured to make the information as accurate as possible.
INTEGRA PLUS ABC. 230V~ 50Hz. Stock Ref. N. Installation and Wiring Instructions IPX2
 INTEGRA PLUS Installation and Wiring Instructions Stock Ref. N INTEGRA PLUS 437666 230V~ 50Hz ABC PLEASE READ INSTRUCTIONS IN CONJUNCTION WITH ILLUSTRATIONS. PLEASE SAVE THESE INSTRUCTIONS. IPX2 VENT-AXIA
Enzo Safe Touch Thermostatic Shower EZ10010CP & EZ10014CP
 Enzo Safe Touch Thermostatic Shower EZ10010CP & EZ10014CP Installation and Maintenance Instructions In this procedure document we have endeavoured to make the information as accurate as possible. We cannot
HOT WATER BOTTLE BATH PART NUMBER
 If you need any assistance or if you have questions about this item, call our Tech Help Line at (254) 848-4300. Do not use this product without filling it with water or immediate damage can result. All
AQUARITE DELUXE Model: HW Installation Manual
 AQUARITE DELUXE Model: HW205930 Installation Manual Table of Contents Diagrams. 1 Tools Needed for Installation. 1 Notice to Installers. 2 Packing List. 2 Hinge Assembly. 2 Drain assembly Information.
Specifications. Vacuum motor power consumption(w/hp) 1200 / 1.6. Exhaust water pump power consumption(w/hp 800 / 1.1
 1200 / 1.6. Exhaust water pump power consumption(w/hp 800 / 1.1") Specifications Rated voltage (V) AC 110-120V or 220-240V / 50-60Hz Vacuum motor power consumption(w/hp) 1200 / 1.6 Exhaust water pump power consumption(w/hp 800 / 1.1 Exhaust water pump flow (GPH/LPH)
Specifications Rated voltage (V) AC 110-120V or 220-240V / 50-60Hz Vacuum motor power consumption(w/hp) 1200 / 1.6 Exhaust water pump power consumption(w/hp 800 / 1.1 Exhaust water pump flow (GPH/LPH)
Installation Instructions
 Installation Instructions for Topload Washers Original Instructions Keep These Instructions for Future Reference. (If this machine changes ownership, this manual must accompany machine.) www.speedqueen.com
Installation & Manual. Model T-25
 Installation & Manual TR Central Heating Stove With Solid Fuel Model T-25 Tested according to DIN EN 13240 For product efficiency and emission values, see the declaration of conformity! TABLE OF CONTENTS
Installation Instructions
 Instructions for Topload Washers Original Instructions Keep These Instructions for Future Reference. (If this machine changes ownership, this manual must accompany machine.) www.speedqueen.com Part No.
INSTALLATION OF CENTROTHERM INNOFLUE SINGLE WALL POLYPROPYLENE VENTING SYSTEMS
 SUPPLEMENT VENTING INSTRUCTIONS FOR INSTALLATION AND OPERATING INSTRUCTION MANUALS 238 48384 00, 238 44727 00, 238 44445 00, 238 48144 00, 238 47936 00, 238 45917 00, 238 45637 00, 238 47448 00, 238 48071
Click here for a labelled version of above
 Click here for a labelled version of above Download Of This Page: Click Here to download this whole page. (773 Kb Adobe Acrobat File) Biodiesel Processor Diagram: Click Here to download a detailed diagram
AirBath Hydro-Massage Tubs UL1795 Installation and Operating Instructions
 Tools you might need for proper installation Galvanized Nails or Screws - For Units with a Tiling Flange Four Foot Level Shims Caulking Gun Screw Gun Adhesive Thank you for purchasing the Praxis AirBath
PARTS & ACCESSORIES INSTALLATION AND SAFETY INSTRCUTIONS ITEM NO.:60010BZGTGLD SAFETY PRECAUTION. Canopy. Downrod. Housing. Transmitter CR2032/3V
 L I G H T I N G INSTALLATION AND SAFETY INSTRCUTIONS ITEM NO.:000BZGTGLD SAFETY PRECAUTION PARTS & ACCESSORIES Canopy Downrod Housing WARNING To make sure power is off before attempting installation. WARNING
SG User Manual
 SG 0004-5 User Manual The spa equipment requires a 44 amp outlet, preferably dedicated to the spa. Carefully read all of the instructions before enjoying the spa. WARNING: Operating the system without
RND Soldering Station. RND W Temperature Controlled Soldering Station Instruction Manual
 RND 560 00155 100W Temperature Controlled Soldering Station Instruction Manual 1 INTRODUCTION Thank you for purchasing this intelligent high power RND lab soldering station the best solution for your soldering
Instantaneous Oil-Fired Water Heater. Installation Manual OM-148. (Type D)
") Instantaneous Oil-Fired Water Heater Installation Manual MODEL OM-148 (Type D) IMPORTANT THIS APPLIANCE SHOULD BE INSTALLED BY A LICENSED, AUTHORIZED PERSON(S) DUE TO THE NECESSITY OF MAKING ELECTRICAL,
Instantaneous Oil-Fired Water Heater Installation Manual MODEL OM-148 (Type D) IMPORTANT THIS APPLIANCE SHOULD BE INSTALLED BY A LICENSED, AUTHORIZED PERSON(S) DUE TO THE NECESSITY OF MAKING ELECTRICAL,
AQVA ULTRA Faucet Purifier AQ003-1 User s Guide
 AQVA ULTRA Faucet Purifier AQ003-1 User s Guide Seller: AQVA Finland Oy Haukilahdenkatu 4 00550 Helsinki 010 321 5080 www.aqva.fi vesi@aqva.fi Read this manual carefully before installation. 1 Contents
Kallista Bath Flip Drain
 P21586 Page 1 of 7 THANK YOU FOR CHOOSING KALLISTA We appreciate your commitment to Kallista quality products. Please take a moment to review this manual before you install your Kallista product. If you
I N S T R U C T I O N S
 INSTRUCTIONS HIPPO Deluxe Room Steam Vaporiser Congratulations on your purchase of the HIPPO Deluxe Room Steam Vaporiser. Before using this appliance, read the following instructions carefully as they
Cable Drain & Cable Drain Trim Kit
 INSTALLATION INSTRUCTIONS Cable & Cable Trim Kit P21581 & P21582 1 of 6 INSTALLATION INSTRUCTIONS Cable & Cable Trim Kit THANK YOU FOR CHOOSING KALLISTA We appreciate your commitment to Kallista quality
Installation and User Manual. Model: IK35 (1151) TAPWARE RANGEHOODS COOKTOPS WASTE DISPOSALS
 TAPWARE RANGEHOODS COOKTOPS WASTE DISPOSALS") Installation and User Manual Model: IK35 (5) KITCHEN/LAUNDRY SINKS BATHROOM BASINS TAPWARE RANGEHOODS COOKTOPS WASTE DISPOSALS INTRODUCTION OF DEVICE Rocker switch product 3 4 ) Front panel ) Comand panel
Installation and User Manual Model: IK35 (5) KITCHEN/LAUNDRY SINKS BATHROOM BASINS TAPWARE RANGEHOODS COOKTOPS WASTE DISPOSALS INTRODUCTION OF DEVICE Rocker switch product 3 4 ) Front panel ) Comand panel
Factory Direct Walk-In Tubs WALK-IN TUB. Installation Manual. For Model Numbers VT2848, VT2853, VT3153 and VT3255
 Factory Direct Walk-In Tubs WALK-IN TUB Installation Manual For Model Numbers VT2848, VT2853, VT3153 and VT3255 FACTORY DIRECT WALK-IN TUBS Thank you for choosing an Vitality Tubs Walk-In Tub. Vitality
Installation & Operating Guide
 HOT WATER DISPENSER Installation & Operating Guide Read all instructions thoroughly. Keep this guide for future reference. Proof of purchase is required for Warranty. Staple receipt or proof of purchase
WATER FILTRATION SYSTEM (USF3) OWNER S MANUAL
 OWNER S MANUAL") WATER FILTRATION SYSTEM (USF3) OWNER S MANUAL 1 INTRODUCTION Congratulations on choosing Permatech to improve the quality of your water. You will immediately begin to notice the numerous benefits of having
WATER FILTRATION SYSTEM (USF3) OWNER S MANUAL 1 INTRODUCTION Congratulations on choosing Permatech to improve the quality of your water. You will immediately begin to notice the numerous benefits of having
hp Dust Collector With Vacuum Attachment
 Please dispose of packaging for the product in a responsible manner. It is suitable for recycling. Help to protect the environment, take the packaging to the local amenity tip and place into the appropriate
Double Door Over 70. Service Manual. Models: F NMTZH 821 F T F NMTZH 822 F T
 Double Door Over 70 Service Manual Models: F083975 NMTZH 821 F T F083973 NMTZH 822 F T Contents Parts Description...2 Circuit diagram...3 Cooling diagram...4 The guide for Disassembly Common parts of Refrigerator...5
Preparations MT-RT1806. Cleaning & Maintenance. Precautions
 Preparations Cleaning & Maintenance 1. Use general liquid detergent and soft cloth for daily cleaning. Don't use detergent that with acetone or ammonia. Disinfector with formic acid and formaldehyde is
Hydrotherapy Jets (Remote Water Quality System)
") Page 1 of 6 Parts List (_) - 50 Roll of Flex PVC pipe 1-3/4 HP Circulating Centrifugal Pump 1 25 Roll of Flex PVC pipe 4-1 1 / 2 " Tees 2-1 1 / 2 " Ball Valves 2 - Female slip couplers 4-1/2" 90 degree
Page 1 of 6 Parts List (_) - 50 Roll of Flex PVC pipe 1-3/4 HP Circulating Centrifugal Pump 1 25 Roll of Flex PVC pipe 4-1 1 / 2 " Tees 2-1 1 / 2 " Ball Valves 2 - Female slip couplers 4-1/2" 90 degree
Parenzo Range. Basin Mixer, Bath Filler & Bath Shower Mixer. Assembly instructions
 Parenzo Range Basin Mixer, Bath Filler & Bath Shower Mixer Assembly instructions We have designed these products with your enjoyment in mind. To ensure that they work to their full potential, they need
Little Helios. Use Instructions Portable Barrel Burner. Toll Free: Phone: (+1)
") Warranty GEI Works warrants these products against defects in material and workmanship under normal use and service for a period of six months. GEI Works obligation under this warranty is limited solely
Warranty GEI Works warrants these products against defects in material and workmanship under normal use and service for a period of six months. GEI Works obligation under this warranty is limited solely
Beautifully Traditional
 TECHNICAL DETAILS For full technical details on all our products, please visit our website G Please read these instructions carefully and keep in a safe place for further reference. DIMENSIONS General
PAVIA INSTALLATION GUIDE
 FSP800 PAVIA INSTALLATION GUIDE Parts List Please unpack and inspect all packages and components carefully, make sure they are complete. Examine for shipping damage. If some parts are damaged or missing,
RELAX. REVITALIZE. RESTORE. LUXURY SPA UNIT Installation Manual. English. For Model Numbers 2848, 2853, 3153 and 3255
 RELAX. REVITALIZE. RESTORE. LUXURY SPA UNIT Installation Manual For Model Numbers 2848, 2853, 3153 and 3255 English RELAX. REVITALIZE. RESTORE. Thank you for choosing a Secure Spa Luxury Spa Unit. Secure
Installation Instructions
 Installation Instructions for Frontload Washers Original Instructions Keep These Instructions for Future Reference. (If this machine changes ownership, this manual must accompany machine.) www.speedqueen.com
Murano Shower Cabin Installation Instruction
 Murano Shower Cabin Installation Instruction IMPORTANT Please read carefully the following instructions before installing your shower cabin. If you have any questions on this shower cabin installation
900mm Island Canopy Manual
 900mm Island Canopy Manual MODEL ICF9BLS Installation and Operation CANOPY INSTALLATION AND OPERATION MANUAL Dear Customer, We thank you for choosing this quality appliance and hope you enjoy many years
Mobile Milker. Filling the oil reservoir to HALF FULL
 1 2 Mobile Milker Upon receiving the unit check if there is any visible damage to pump, motor etc... If there is any damage do not attempt to run the unit! Call 800-245-8222 for assistance. Preparing to
Oceanic Sauna Heater Manual
 April 13 Oceanic Manual Thank you for choosing to buy our Oceanic Sauna heater; please take the time to read these instructions before you begin as they contain important information about the installation
ONE PIECE TOILET LT3. Model: MPN: B0940 INSTALLATION INSTRUCTIONS. Version: 1.0
 Model: MPN: B0940 INSTALLATION INSTRUCTIONS Version: 1.0 READ ALL INSTRUCTIONS BEFORE UNPACKING THE PRODUCT INSTRUCTIONS THAT, IF IGNORED COULD RESULT IN DEATH OR SERIOUS INJURY CAUSED BY INCORRECT HANDLING
INSTALLATION INSTRUCTIONS POLARIS RANGER 400 H.O.
 INSTALLATION INSTRUCTIONS POLARIS RANGER 400 H.O.. SAFETY INSTRUCTIONS Warning: Failure to heed all safety and operating instructions and warnings regarding use of this product can result in serious bodily
BUBBLE-Maker. Necessary tools and materials:
 106.326 BUBBLE-Maker Necessary tools and materials: Fretsaw and board Wood file, glasspaper Pillar drill Hole maker 2mm dia.+ 3.5mm Cross and normal screwdriver Allen key ( 7mm ) Wood glue, all purpose
INSTALLATION AND OPERATION MANUAL
 INSTALLATION AND OPERATION MANUAL Flow water heaters type PERFECT MIX 3,5-4,0-4,5-5,0-5,5 kw 1. Purpose and description Flow water heaters type PERFECT MIX 3.5-5.5 kw are intended for supplying hot water
HD 525 S 06/03 A ! 5.960
 HD 525 S 5 960 845 A2005225 06/03! Please read these operating instructions before starting and strictly observe the Safety Instructions for High Pressure Cleaners (5.951-949). WARNING DO NOT SPRAY ELECTRICAL
BLADE BATH SHOWER MIXER DECK MOUNTED CHR WITH KIT INSTALLATION INSTRUCTIONS P BS-E A/2
 BLADE BATH MIXER DECK MOUNTED CHR WITH KIT 20007014600 INSTRUCTIONS P5-65511339-1-BS-E A/2 20007014600 INTRODUCTION DIMENSIONS Please read these instructions carefully and keep in a safe place for future
Specifications 3. Bladder 5. Chimney 12. Air Supply 12. Anti-Rollout Device and Ash Auger Tube 14. Timer 15
 TABLE OF CONTENTS Page No. Specifications 3 Bladder 5 Fire Door 7 Chimney 12 Air Supply 12 Anti-Rollout Device and Ash Auger Tube 14 Timer 15 Supply Line and Return Line Threaded Connectors 15 Low Water
INSTRUCTIONS FOR USE PORTABLE VACUUM SYSTEM LEI Part # s / , , , IMPORTANT INFORMATION
 INSTRUCTIONS FOR USE PORTABLE VACUUM SYSTEM LEI Part # s / 27-009, 27-010, 27-015, 27-020 IMPORTANT INFORMATION UNATHORIZED CHANGES OR ALTERATIONS TO ANY LINCOLN PORTABLE VACUUM SYSTEM WILL AUTOMATICALLY
INSTALLATION INSTRUCTIONS
 BATH SHOWER MIXER WITH KIT UB422DC/L/U/B INSTRUCTIONS INTRODUCTION DIMENSIONS Please read these instructions carefully and keep in a safe place for future reference. General Installation Requirements.
PARTS & ACCESSORIES INSTALLATION AND SAFETY INSTRCUTIONS ITEM NO.:60006PC SAFETY PRECAUTION. Canopy. Downrod. Housing. Blade. Transmitter CR2032/3V
 L I G H T I N G INSTALLATION AND SAFETY INSTRCUTIONS ITEM NO.:000PC SAFETY PRECAUTION PARTS & ACCESSORIES Canopy Downrod Housing IMPORTANT : PLEASE READ BEFORE INSTALLATION.. Do not connect this remote
POOL WINTERIZING INSTRUCTIONS
 TASK CHECKLIST 1. Clean the Filter 2. Remove the Deck Equipment 3. Clean the Pool 4. Lower the Water Level 5. Apply Chemicals 6. Freeze Proof Equipment & Plumbing Lines 7. Put on the Winter Cover Note:
INSTALLATION AND USER S MANUAL COOKER HOOD RS-600/A-S
 INSTALLATION AND USER S MANUAL COOKER HOOD RS-600/A-S RS-600 (CHS60SS)-GB-05.indd 1 6/8/2010 9:30:59 AM TABLE OF CONTENTS 1. Introduction 2 2. Safety precaution 2 3. Intended use 3 4. Parts supplied 3
INSTALLATION MANUAL FOR MODELS: TERAZZA, TRACCIO, MILANO, CERRATO
 INSTALLATION MANUAL FOR MODELS: TERAZZA, TRACCIO, MILANO, CERRATO TABLE OF CONTENTS ROOM SPECIFICATIONS ELECTRICAL SPECIFICATIONS PLUMBING SPECIFICATIONS TECHNICAL SPECIFICATIONS INTRODUCTION ASSEMBLY
HOTTAP OUTING USER GUIDE MODEL: JCA11009 IMPORTANT!
 USER GUIDE HOTTAP OUTING MODEL: JCA11009 INFO. MONITOR IMPORTANT! It is important that you read these instructions carefully and understand the operation and safety features of this appliance. Familiarise
CONTENTS CONSIDERATIONS. General Plumbing Component Connection ILLUSTRATION. Control System CONFIGURATION. Voltage Verification CONNECTION
 AIR SERIES SYSTEM INSTALLATION MANUAL CONTENTS CONSIDERATIONS General Plumbing Component Connection 2 2 2 ILLUSTRATION Control System 3 CONFIGURATION Voltage Verification 4 CONNECTION Component Connection
METRO BATH FILLER MOUNTED CHR
 METRO BATH FILLER MOUNTED CHR 20004010050 For any further information please contact Bathstore on: 0845 873 8843 INSTRUCTIONS Or visit our web-site at www.bathstore.com P5-6P8P7-B-BS-E A/4 The manufacturer
MOJAVE. Mojave ShowerSpa Model #1016 Owner's Manual
 MOJAVE Mojave ShowerSpa Model #1016 Owner's Manual Mojave ShowerSpa Model #1016 Please Read The Following Instructions COMPLETELY Before Beginning! Our goal is to ensure your installation goes smoothly
abt W Lamp Paraffine Oil n. 0,125 l/h 12 V = (11-14,5 V) 220 x 285 x 115 mm
 220 x 285 x 115 mm") SPECIFICATIONS Heat output Fuel - consumption Supply voltage Current consumption - start, 2 minutes Dimensions abt. 1200 W Lamp Paraffine Oil n. 0,125 l/h 12 V = (11-14,5 V) abt. 0,4 A abt. 5 A 220 x 285
SPECIFICATIONS Heat output Fuel - consumption Supply voltage Current consumption - start, 2 minutes Dimensions abt. 1200 W Lamp Paraffine Oil n. 0,125 l/h 12 V = (11-14,5 V) abt. 0,4 A abt. 5 A 220 x 285
SERIES OWNER MANUAL DP1000(B) Please read this manual carefully prior to operating your Drinkpod. Retain for future reference.
 Please read this manual carefully prior to operating your Drinkpod. Retain for future reference.") 1000 SERIES DP1000(B) OWNER MANUAL Please read this manual carefully prior to operating your Drinkpod. Retain for future reference. Safety caution & usage Temperature Please use the product in a dry place
1000 SERIES DP1000(B) OWNER MANUAL Please read this manual carefully prior to operating your Drinkpod. Retain for future reference. Safety caution & usage Temperature Please use the product in a dry place
CHAMPION PUMP OWNER S MANUAL
 CHAMPION PUMP OWNER S MANUAL IMPORTANT SAFETY INSTRUCTIONS READ AND FOLLOW ALL INSTRUCTIONS SAVE THESE INSTRUCTIONS WARNING: Before installing this product, read and follow all warning notices and instructions
Inta City Shower Mixing Valve CT20010CP
 Inta City Shower Mixing Valve CT20010CP Installation and Maintenance Instructions In this procedure document we have endeavoured to make the information as accurate as possible. We cannot accept any responsibility
J-PRO-24 Soda Ash Injection Installation & Start-Up Guide
 J-PRO-24 Soda Ash Injection Installation & Start-Up Guide Thank you for purchasing a Clean Water System! With proper installation and a little routine maintenance, your system will be ph neutral water
BARRINGTON PRESSURE LITE VITREOUS CHINA SIPHON JET TOILET K-4327
 BARRINGTON PRESSURE LITE VITREOUS CHINA SIPHON JET TOILET K-4327 BEFORE YOU BEGIN INSTALLER HAZARD NOTIFICATION WARNING: Risk of injury or water damage. Contents of vessel under pressure can cause severe
Domestic Water Tank Cleaning Machine
 Domestic Water Tank Cleaning Machine Operational Manual Dear Customer, Thanks for purchasing this innovative product. The aim for this product development is for achieving followings. 1. Reduce water wastage
OPTIMUM 700 PASTA COOKER ELECTRIC BUILDER S SPECIFICATIONS. Part A: Technical characteristics Part B: Technical instructions for the installer
 OPTIMUM 700 PASTA COOKER ELECTRIC BUILDER S SPECIFICATIONS Part A: Technical characteristics Part B: Technical instructions for the installer WARNING Installation and repairs must be carried out by personnel
Wave. BATH SHOWER MIXER MONOBLOC With Kit Deck Mounted
 Wave BATH SHOWER MIXER MONOBLOC With Kit Deck Mounted WAVE MONO BATH SHOWER MIXER 20004011860 INSTRUCTIONS B For any further information please contact Bathstore on: 0845 873 8843 Or visit our web-site