Classic Mats Installation Manual
|
|
|
- Jean Lamb
- 6 years ago
- Views:
Transcription


1 Classic Mats Installation Manual 1


2 Classic Mats WarmTouch Classic Mats are the ideal Electric floor warming systems, designed by DomoTecK, for installation under tile, stone or marble. WarmTouch Classic Mats are easy and simple to install. The warming cable has a Twin-conductor which requires only one connection point to the electric systems; allowing you to start the mat near the control location and end it at any desirable point in the room. The warming cable is durable and screened from beginning to end to thoroughly protect the heating element and provide an optimal level of safety. The mats are only 1/8 thick to minimize any changes floor elevation,and they are feature an absorbent, textile mesh that simplifies the mat installation and perfectly integrates into the floor cross-section. The Mats are also produced with adhesive strips and are sprayed from edge to edge with a bonding agent to securely adhere the mat to the substrate. WarmTouch Classic Mats are perfectly suited for installation under tile, stone, and marble, but are versatile enough to warm other approved floor coverings such as floating wood, laminates, linoleum, and wall-to-wall carpeting as well. WarmTouch Classic Mats should be embedded in latex-modified thin-set mortar for tile and stone warming applications. When installing other floor coverings suitable for use with under floor warming systems (i.e. floating wood, laminates, linoleum, or wall-to wall carpeting) a 1/2 of self-leveling concrete should be used to cover the Classic Mats before laying the floor covering. This 1/2 of self-leveling concrete protects the warming elements, provides a smooth & level surface to lay the flooring, assures optimal heat distribution, and more efficient operation. WarmTouch Technical Data: Mat Output 15 W/Sqft Cable Output 3 W/Linear Ft Voltage 120V AC / 240V AC / 60Hz Wire Thickness 1/8 Protection Means GFCI in accordance to NEC One side connection-twin Conductor Base Material White textile mesh Cable Color Green Wire Spacing 2.5 Supply Lead Length 13Ft WarmTouch Classic Mats can be installed by a professional installer, and should be connected to the building wiring system by a licensed electrician. Our instruction manual will walk you through the complete process of installing WarmTouch Classic Mats. For any questions or needs during the installation process please call our Technical Support at WARM (9276) Copyright 2007 All Rights Reserved 2
3 TABLE OF CONTENT WarmTouch Classic Mats Features 2 General Instructions 4 Planning The Installation 5 Electrical Preparation 6-7 Temperature & Time Control 8 Resistance Testing & Warranty Documentation 9 Customizing the WarmTouch Heating Mat 10 Step by Step installation Procedures Troubleshooting 15 About DomoTecK 16 3
4 GENERAL INSTRUCTIONS The instructions in this manual must be followed when preparing and installing the WarmTouch Floor Warming System. This manual and the installation layout should be made available to all installers and the electrician working on the job. Both should then be turned over to the homeowner after the installation is complete..k. Heating Systems, Inc. 587 N. Edge959-WARM fa Maintenance WarmTouch Classic Mats have no moving parts and they are completely maintenance-free. To assure the highest level of safety and continued operation, it is imperative that the GFCI protecting the WarmTouch System be tested monthly. Some thermostat models incorporate GFCI protection into the thermostat. Other thermostat models do not. If the floor warming system is connected to a GFCI protected circuit, a thermostat WITHOUT a GFCI should be used. The use of two GFCIs can cause nuisance tripping of the GFCI breaker at the panel or the internal GFCI in the thermostat, which is usually indicated by a red light or display on the LCD screen. If either GFCI trips, it will prevent the floor warming system from operating. Sub-Floors and Floor Coverings WarmTouch Classic Mats may be installed directly over substrates such as concrete, backer boards, selfleveling cement, and plywood in accordance with all TCA guidelines. ALL materials in direct contact with the heating element MUST be rated to withstand 180 degrees Fahrenheit. Special consideration WarmTouch Classic Mats will be most effective and efficient if installed over a well-insulated substrate (i.e. plywood, polystyrene, insulated reflective foil, etc.). Insulation will minimize heat loss into the concrete slab allowing the heat to transfer to the surface more quickly. WarmTouch Classic Mats is specifically designed for use under tile and stone floor coverings. However, it can also effectively warm linoleum, laminates, wall-to-wall carpeting, and other floor coverings suitable for use with electric radiant floor-warming systems when covered by a ½ layer of self-leveling cement. If installing WarmTouch for use under one of these alternate flooring surfaces, we recommend setting the maximum floor surface temperature to no more than 82 F. Consult your DomoTecK Sales Representative to learn more about our Warmth4You Under Wood and Warmth4You Under Carpet floor-warming systems, specifically intended for use under floating laminate/ engineered wood floors and wall-to-wall carpeting. Call our Technical Support Hotline at WARM (9276) if you need answers to installation questions, need help solving a problem, or believe that the mat got damaged during installation. IMPORTANT! FAILURE TO FOLLOW THE INSTRUCTIONS IN THIS MANUAL MAY VOID THE HOMEOWNER S WARRANTY ON THE FLOOR-WARMING SYSTEM 4
5 PLANING THE INSTALLATION Before laying the WarmTouch floor-warming system, review the installation layout and verify that all dimensions match the field dimensions. If you are inexperienced with electric radiant heating systems, it may be helpful to chalk the mat installation layout on the sub-floor prior to customizing the mats. The installation plan should include the following: 1. Placement, direction, and dimensions of the WarmTouch Heating Mats 2. The starting and ending points of each mat 3. The location of the thermostat or other suitable control 4. The location of the floor sensor If you don t have an installation layout, call DomoTecK customer support and get a FREE installation layout for your project. IMPORTANT! The installation plan for each area should be attached to this manual and be provided to the homeowner when the installation is complete. The homeowner will need to reference this installation layout if system trouble-shooting is ever required or future renovations are going to take place in the room. DO IMPORTANT INSTALLATION CONSIDERATION 1. Clean the floor of all debris before placing the mat on the floor. Make sure there are no 2. protruding objects (nails, staples, etc.) on the sub-floor that could damage the heating element. 3. Measure and record mat resistance, and test for shorts as per instructions throughout the installation. 4. Use mats that have the same heat output. For example, ALL mats should be 15 watts/sqft. 5. Make sure all components of the system are rated for the same Voltage (120V OR 240V). 6. Have all electrical work completed by a professional electrician in accordance with all local and national codes. 7. Connect WarmTouch to a Dedicated Circuit. DON T 1. DON T use your floor warming system to dry or cure your flooring installation. Allow the installation to dry naturally and completely before allowing your floor warming system to operate. DON T 2. DON T shorten the heating mat and DON T cut the heating wire. 3. DON T drop or bang any tools on the heating wires with any sharp objects. 4. DON T install any fasteners such as nails, screws, through any area covered by the WarmTouch mat. 5. DON T install WarmTouch under cabinets, built-in appliances, etc. to avoid excessive heat from building up in those areas. 6. DON T install mats over expansion joints. 7. DON T install WarmTouch in walls. 8. DON T install WarmTouch in showers. 9. DON T overlap mats or allow any wires to cross or touch each other. 10. DON T crimp the heating wire while customizing the mat. 11. DON T place area or throw rugs thicker that ½ over the heated area to avoid excessive build-up of heat in these areas. 12. DON T attempt to repair the heating wire with out the proper instructions and repair kit (obtained from your distributor or DK Heating Systems). 13. DON T forget to install the floor-sensor if you are installing a thermostat. 14. DON T install WarmTouch in glues other than cement-based tile-setting mortars. 5

6 ELECTRICAL PREPARATION All Electrical Connections for the WarmTouch Floor-Warming System and Controls should be done by a Professional Electrician in accordance with all Local and National Electrical Codes. WarmTouch Floor-Warming System Typical Electrical Rough-In 1. A deep, 2 1/8 X 4 single-gang junction box OR a roomier 4 X 4 double-gang box should be provided by the electrician for the thermostat connections. Size and depth of the junction box should be determined by the electrician to accommodate the brand and model of the control provided with the floor warming system. Some brands/models may require the use of a mud plate to reduce the face of the junction box and accommodate the control properly. 2. Two conduits should be run down from the junction box. A. The first conduit, intended for the cold leads from the mat(s), should be ¾ and must be run from the junction box down to floor level. A plastic bushing should be used where the cold leads enter the conduit to protect the wires. The cold leads can be described as low resistance power supply to the heating elements with no heating capabilities. B. The second conduit, intended for the floor sensor, can be a ½ conduit. This ½ conduit should be run from the junction box down to floor level. THE SENSOR WIRE SHOULD NOT BE PLACED IN THE SAME CONDUIT AS THE COLD LEADS. Floor Sensor Placement The floor sensor should be installed after the heating mat has been secured to the underlayment, but BEFORE it is covered with any mortar. Make sure to place the sensor between the heating element wires without crossing or touching any of the element wires as described in the Step-By-Step Installation Procedures. If a sensor was not placed in between the heating elements BEFORE the tile or self-leveling cement was laid, THE SENSOR MAY BE PLACED IN THE GROUT JOINTS between the tiles. See the Trouble-Shooting Section of this Manual Entitled Placing a Sensor in a Grout Joint. If the grout joints are not large enough, please call DomoTecK s Representative at for further instructions. 6
7 Extending the Leads The cold leads extend approximately from the mat. Since the cold lead(s) cannot be spliced in the floor, the mat should be laid in a pattern that allows the cold lead(s) to run directly to the junction box without crossing or touching any element wires. However, if the cold lead(s) need to be extended, an additional accessible junction box may be installed in the lower portion of a nearby wall, an accessible crawl space, or an accessible basement ceiling. ALL electrical extensions and connections must be done in accordance with all NEC, State, and Local Electrical Codes. The Gage of the extension wire(s) used should be determined by the electrician to accommodate the amperage of the mat(s) being installed. IMPORTANT! Inaccessible extensions or splices are not permitted. Multiple Mat Installations If the project requires more than 1 WarmTouch mat to be connected to the same control, the cold leads from the mats should be connected IN PARALLEL (NEVER IN SERIES) through an additional junction box and extended through the conduit to the thermostat junction box. The Gage of the extension wires used should be determined by the electrician to accommodate the amperage of the mats being installed. (See Section below labeled Use of a Contactor and Separate GFCI for further details.) Use of a Contactor and Separate GFCI (For Multiple Mat Installations) IMPORTANT! Most floor warming thermostats are rated for Amps. Some thermostats are equipped with an internal GFCI, others are not. These specifications vary by brand and model. Please review the insert provided with your control to verify the control specifications and review the installation design/ electrical specifications of the floor warming system to determine the necessary electrical requirements prior to preparing the wiring accommodations. If you are missing the manufacturer's instruction/ wiring information, please call our technical support at If the total amperage of a multiple mat system exceeds 15 Amps: 1. The WarmTouch mats and controls should be connected through a definite purpose contactor (supplied by your electrical contractor) in accordance with all NEC and local electrical codes. If either GFCI trips, it will prevent the floor warming system from operating. Do not use two GFCI devices in the same circuit. Use a GFCI Breaker capable of handling the total load in accordance with NEC and local codes. OPTIONAL: To eliminate the need for a contactor, the installation layout may be designed to split the area into different zones. Each zone can be controlled by a separate thermostat or by links that are connected to one Master Thermostat as described in the Temperature and Time Control section of this manual. Call DomoTecK s customer support at WARM(9276) to discuss further details about your project. 2. The use of two GFCIs can cause nuisance tripping of the GFCI breaker at the panel or the internal GFCI in the thermostat, which is usually indicated by a red light or display on the LCD screen. 7

8 Temperature and Time Control OPTION 1 Programmable Thermostat models provide the most versatility and flexibility to adapt the floor temperature to meet all of the homeowners needs at any given time - AUTOMATICALLY. This model allows the homeowner to digitally set two desired floor temperature settings into the thermostat. Programs can be set to establish the desired times and temperature for each weekday individually or weekdays vs. weekends. Vacation mode can also be used to temporarily cease operation for extended periods of time. OPTION 2 Basic (Non-Programmable) Thermostat models allow the homeowner to manually adjust the desired floor temperature with a dial or a digital LCD screen. A floor sensor is connected to the thermostat and placed in the heated area under the flooring surface in between two of the heating element wires. The thermostat operates as necessary to maintain the desired floor temperature when set to the ON position. IMPORTANT! Programmable and Basic Thermostat models MAY or MAY NOT be equipped with an internal GFCI. Please verify the features of your thermostat prior to completing the electrical set-up. ALL systems MUST be GFCI protected by a local GFCI in the thermostat OR by a GFCI breaker at the panel of the home. OPTION 3 Master and Link Units are the most versatile and convenient control option to operate multiple floor warming systems throughout one home or within a very large living space. One Master Control incorporates a floor sensor that is connected to the back of the Master unit. This unit has all of the same Programmable Thermostat features described in Option 1 above except it actually allows the homeowner to operate up to 10 floor-warming systems at one time! Link units are placed in each room or area to provide a manual ON//OFF switch and GFCI protection. The links are then individually connected back to the Master Control. If the homeowner would like to temporarily exclude any given area from the program, it is as easy as switching the link to the OFF/Standby position. OPTION 4 Integration into Home Automation WarmTouch Classic can also be integrated into the home automation system for the highest level of comfort and energy-saving efficiency. Speak with your Home Automation Specialist to see if this is a feasible option for you. DomoTecK s new Thermostat Advantages DomoTecK s control units consist of LCD and an energy unit to which the line voltage and heating element are both connected. The electrical source to the energy unit should originate from a standard US type GFCI. The advantage of our system is that the LCD is a very low voltage only 5 V - while the high voltage unit is installed in a junction box and is positioned as close as possible to the heating element. The separation between the LCD and the energy unit allows the energy unit to be installed in a remote and hidden area. In as much as the energy unit is very quiet in operation when compared to line voltage thermostats, there is little chance of the home owner being disturbed by any noise created by the energy unit's relay when using this type of installation. This separation gives the highest level of safety even in wet rooms, sauna etc. In order to maximize efficiency DomoTecK has added to each heating element a tube for inserting the sensor as well as a 90 right angle bend. 8


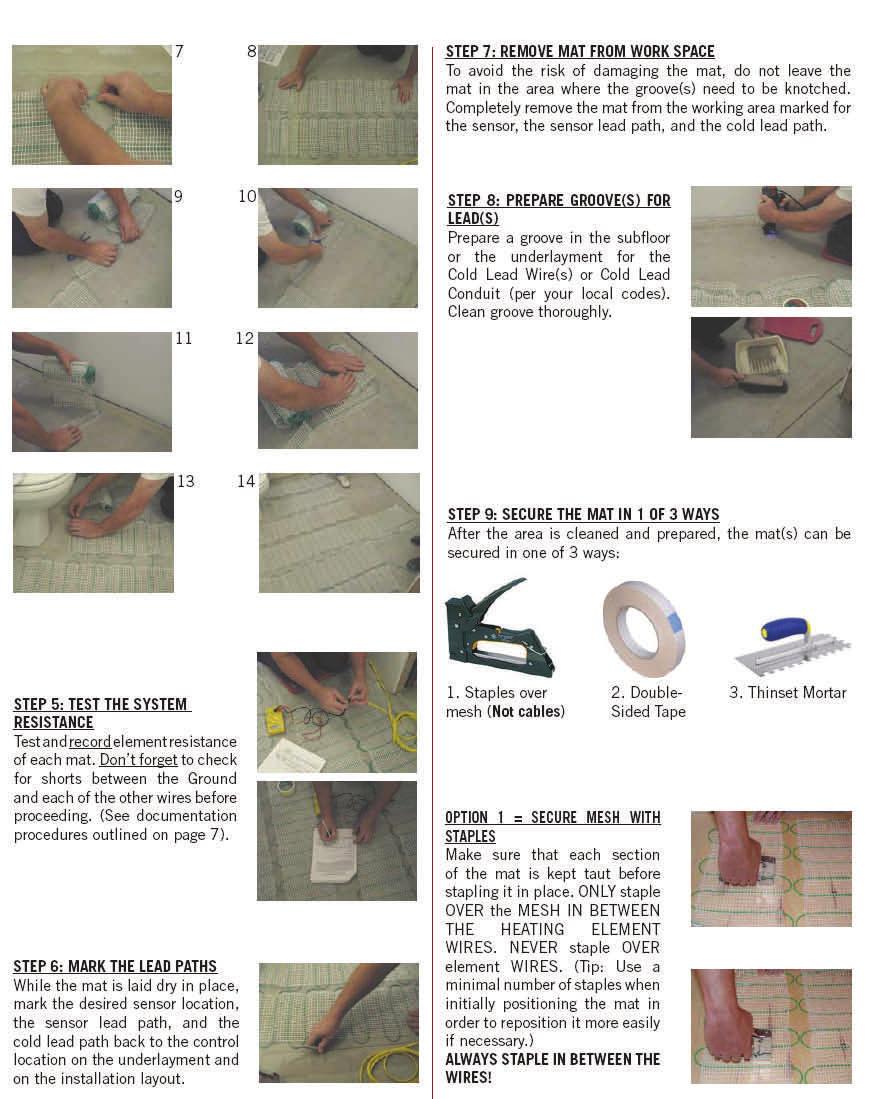
9 Resistance Testing and Warranty Documentation Follow the Resistance Documentation Procedures outlined below and record ALL Ohm Readings on the corresponding Installation Registration Form and the Installation Plan. IMPORTANT! IN ORDER FOR THE WARMTOUCH LIMITED WARRANTY TO BE VALIDATED, THE INSTALLATION REGISTRATION FORM MUST BE COMPLETED IN FULL AND RETURNED TO DOMOTECK INC. It is also essential that a copy of the final installation plan (marked with any changes made in the layout of the system or its electrical connections) be included with the Installation Registration Form. This information will be kept on file with our Technical Dept. so that we are better able to answer questions raised by the distributor who purchased the product(s), the installers, the electricians, and the homeowner. WarmTouch uses electrical resistance to generate heat. Resistance is measured in units known as Ohms. The Digital Ohmmeter or Multimeter used must have a setting of 200 Ohms (for the mats) and 20K (for the floor sensor). If your meter does not have these settings, please check with the manufacturer of the meter to determine THE appropriate setting. The process of checking resistance for all products is as follows: 120 Volt product: Test between the Hot (Yellow or Black) & Neutral (White) 240 Volt product: Test between Line 1(RED) and Line 2 (Black). To test for a short check for continuity between Hot and Ground and between Neutral and Ground. (step 6) 1. Verify that materials shipped match materials ordered BEFORE unwrapping mats. 2. Measure and record the initial resistance of each element. 3. Compare the reading(s) with the Theoretical Ohm Reading(s) chart provided in this manual. If there is more than a +/- 10% difference between the Actual Reading taken and the Theoretical Reading, STOP and CALL our Technical Dept. at BEFORE CONTINUING with the installation. 4. Compare each ohm reading taken in subsequent steps with the initial ohm readings taken in step Measure and record the resistance of each element (See Step 2) again after customizing the mat(s). 6. Verify that there is no short by checking the resistance between the Hot/Neutral and Ground (Green). There should be no continuity. If there is continuity, STOP and CALL our Tech. Dept. at BEFORE CONTINUING with the installation. 7. Measure the resistance of each element (See Step2) again after the heating mat has been secured in place. 8. Measure and record the resistance of each element (See Step 2) again after the mat(s) is embedded in the thin set mortar or self-leveling cement. 9. Repeat Step Attach the white and silver tags in their respective locations, at both the panel box and at the end of the cold leads. This will help identify both the breaker and the mat leads when multiple mats are installed. 9

 Mat should run directly in front of the base of the vanity to heat the toe kick area properly.")
10 Element Spacing & Coverage Recommendations Dimension A and B should be equal when possible. Dimension A should never be less than 60% of B. DO NOT ALLOW ANY HEATING ELE- MENT WIRES TO OVERLAP OR ANY COLD LEAD WIRES TO CROSS, TOUCH, OR OVERLAP THE ELEMENT WIRES AT ANY POINT DO NOT HEAT UNDER ITEMS THAT ARE FIXED TO OR FLUSH WITH THE FLOOR (i.e. toilet, cabinetry, etc.) Mat should run directly in front of the base of the vanity to heat the toe kick area properly. Mat can run slightly under the base of the toilet if need be. It should NEVER be placed any closer than 4-6 from the flange. 10

11 On page 9 see page 10 & following example steps numbered 1-14" 11
12 12

13 sensor wire must not touch or cross cold leads 9 13
 to T-stat line (red) for 240v applications.")
14 Power source Neutral (white) to T-stat line side neutral (white) - or - Power source line (red) to T-stat line (red) for 240v applications. 14
15 Troubleshooting Problem Possible cause Solution Cable resistance measurement is different than the nameplate label The control unit is not working at all Use an analog type meter (has a needle to indicate reading) If measurement is showing an open or short-circuit, cable has been damaged. If measurement is just a little low or high, room temperature affected this resistance No power is supplied Defective control unit Obtain a digital type meter with Ohms and re-measure Contact the manufacturer Make the room 75º-85º F, or check with the manufacturer Check circuit breaker, measure voltage at the control Return to dealer for replacement The floor continuously heats Sensor is loose or broken If your control unit has a floor sensor, pull the wires loose and re-insert them. If it still does not work measure resistance across the sensor wires, and compare to the values in the control unit instruction manual The floor is not getting warm Cable has been damaged Measure cable resistance. Check for both "open circuit" and "short circuit" (as detailed earlier in this manual). If damaged, contact the manufacturer. GFCI is tripped Reset the GFCI. If it trips again, check for short circuits in the cable (as detailed earlier in this manual). If damaged contact the manufacturer. If not, replace the GFCI control. Concrete slab floor Surface temperatures rise slowly on a concrete slabs. If after 5 to 8 hours of heating, it is not warmer to touch, check for cable damage (see "cable has been damaged" above). The thermostat is not working correctly Incorrect programming Incorrect voltage supplied Sensor is disconnected or broken Carefully read control unit instructions. Measure voltage at control, make sure it matches the control voltage rating. See "The floor continuously heats" above. 15
16 61
Electric Floor Warming Systems Installation and Operation Instructions. Mat Heating Systems and Cable Heating Systems. UL Listed for USA and Canada
 Electric Floor Warming Systems Installation and Operation Instructions Mat Heating Systems and Cable Heating Systems UL Listed for USA and Canada Thank you for your purchase of a Warming Systems electric
QuickNet System Installation Manual Manuel d installation du système QuickNet Manual de instalación del sistema QuickNet
 QuickNet System Manual Manuel d installation du système QuickNet Manual de instalación del sistema QuickNet Floor heating system Système de chauffage par le plancher Sistema de calefacción de pisos Table
ELEKTRA RadiantFloor Heating
 www.elektra.eu ELEKTRA RadiantFloor Heating single-side powered MD Heating Mats Installation manual ELEKTRA Heating Mats For the proper installation and operation of the ELEKTRA radiant floor heating system,
Installation Manual. Warmset. Warmset srl. Floor heating system
 Installation Manual Warmset Warmset srl Floor heating system General instructions before starting!! The device can be used by children elder than 8 years, by persons with reduced physical, mental and sensitive
IdealFILM. Do-It-Yourself Installation Manual
 IdealFILM Do-It-Yourself Installation Manual Comfortable Warm Floors Benefits of using RSG Idealfilm Heats from the floor up for better heat distribution throughout the room No dust or allergens blown
FloorHeat Installation Manual
 FloorHeat Installation Manual Transforming frosty floor surfaces into radiant warmth Transforming frosty floor surfaces into radiant warmth Contents Important Instructions!... 3 Safety Instructions:...
Warm Feet For Uncoupling Membrane Pour membrane de désolidarisation. Installation Guide Floor Heating Cable
 Warm Feet For Uncoupling Membrane Pour membrane de désolidarisation Installation Guide Floor Heating Cable 119A Sir Wilfrid Laurier Saint-Basile-le-Grand, (Québec), J3N 1M2 Tel: 1-450-482-1919 Toll Free:
Installation Guide For your AHT Underfloor Heating System
 Installation Guide For your AHT Underfloor Heating System Dear AHT Customer, Thank you for choosing the AHT underfloor heating system. It is designed to be simple to install and cost efficient to operate.
Underwood Heater Installation Manual
 Underwood Heater Installation Manual Contents Important Safeguards and Warnings... 3 1 General Information... 3 1.1 Use of the Manual... 3 1.2 Safety Guidelines... 3 1.3 Remember to measure resistance...
Intro. Intro. Table of Contents
 EN Intro Intro Dear AHT Customer, Thank you for choosing the AHT underfloor heating system. It is designed to be simple to install and cost efficient to operate. This guide provides the information you
radiant floor heating Floor Heating Mats Floor Heating Cables Thermostats
 radiant floor heating Floor Heating Mats Floor Heating Cables Thermostats Radiant floor heating: A modern comfort solution Floor heating s vertical temperature distribution is the closest form of heating
IMPORTANT NOTES. Electric Underfloor Heating Mats For use with Touchsceen underfloor heating Thermostat
 For any assistance or further information, go online at bathstore.com Electric Underfloor Heating Mats For use with Touchsceen underfloor heating Thermostat - 61000012339 Model Dimensions Area Covered
Installation Manual. Warmset. Warmset srl. Floor heating system
 Installation Manual Warmset Warmset srl Floor heating system General instructions before starting!! The device can be used by children elder than 8 years, by persons with reduced physical, mental and sensitive
amuheat Cable Mat floor heating systems Installation Manual CM02-12
 amuheat floor heating systems Cable Mat Installation Manual CM02-12 Table of Contents Introduction 1 2 Cable Mat Important Installation Guidelines Tools & Materials Needed for Installation Kit Contents
Underfloor Heating Cable Installation Manual
 Affordable Underfloor Heating Underfloor Heating Cable Installation Manual Technical Helpline 0845 034 8272 www.sunstone.co.uk SunStone Wire Manual V3.1.indd 1 09/01/2015 14:00:49 BEFORE YOU BEGIN INSTALLATION...
INSTALLATION. For more information on this product or to order samples call or visit our website at builddirect.com.
 Page 1 Page 2 Section 1. Introduction The Perfectly Warm Floating Floor Heat Heating System (PWF) is a unique heating system that is installed below floating flooring materials to create warm, comfortable
DOMOTHERM CLASSIC TWIN/S MAT
 Floor warming products 2013 V 10.12.2012 DOMOTHERM CLASSIC TWIN/S MAT An ideal solution for the whole house Ultra thin cable (2mm) Energy efficient Easy to install Domotherm Twin/s can be installed under:
Always make sure to check the heating film before, during, and after installation of the floor covering.
 Installation of floor heating film for ceramic tiles, granite and other stone or composite flooring Read through this entire manual before starting installation. All electrical connections must be made
Failure to comply with the instructions in this manual can void the manufacturer s warranty.
 The Perfectly Warm Peel & Stick Radiant Heat system works just like the sun. When the thermostat calls for power, the heating element warms the floor s surface by radiant heat, the same type of heat that
Toll Free:
 1 ProLine s electric radiant floor heating system is one of the most popular and durable floor heating solutions on the market. Available pre-spaced in mats with an adhesive backing or on the spool, the
LIFETIME. INSTALLATION MANUAL emat Pro 100w/150w/200w WARRANTY
 INSTALLATION MANUAL emat Pro 100w/150w/200w LIFETIME WARRANTY Before you begin installing, read through these instructions carefully and check that you have all the components required. 01473 276677 www.elementsunderfloorheating.co.uk
Underfloor Heating Mat Installation Manual
 Affordable Underfloor Heating Underfloor Heating Mat Installation Manual Technical Helpline 0845 034 8272 www.sunstone.co.uk 1 SunStone Mat Manual V3.1.indd 1 09/01/2015 13:58:26 DO S & DON TS ENSURE CORRECT
EasyWire Between Joists Installation Instructions
 EasyWire Between Joists Installation Instructions General Our product, EasyWire, is intended to bring up the floor temperature to a comfortable condition (no cold feet). Read instructions carefully I.
Installing Underfloor Heating Film. 1. Layout of electric underfloor heating systems
 Read through this entire manual before starting installation. May be installed under laminate, engineered wood or approved hardwood floors. See flooring manufacturer s specifications and instructions.
emat Pro 100/150/200 Installation Manual
 emat Pro 100/150/200 Installation Manual www.electricunderfloorheating.co.uk Before you begin installing read through these instructions carefully and check that you have all the components required. Introduction
Carbon Heating Film. Failure to follow these instructions may result in fire, electrical shock, property damage, personal injury, or death.
 Carbon Heating Film Easy to install. Does not circulate pollutants, dust, dirt, allergens or dry air. May be installed on wall, ceiling, under laminate, engineered wood floors or tile. Brings soothing
L J Visit to learn about the Danfoss Installer Certification program. Dual Self-Adhesive Mats. Installs in minutes!
 Dual SelfAdhesive Mats Danfoss LX Electric Floor Heating System (SelfAdhesive Mat & Thermostat) is an affordable luxury that brings warmth to life. It's a proven technology that is safe, reliable and energy
Peel & Stick Radiant Heat for Tile Floors. Cautions:
 Peel & Stick Radiant Heat for Tile Floors INSTALLATION ANd operation INSTRUCTIONS Cautions: THIS EQUIPMENT SHALL BE INSTALLED ONLY BY QUALIFIED PERSONNEL WHO ARE FAMILIAR WITH THE CONSTRUCTION AND OPERATION
Electric Warm-Stretch under floor heating
 Electric Warm-Stretch under floor heating bath store Installation Manual Please read these instructions before you start your installation. Any damage to the system due to incorrect installation will invalidate
Peel & Stick Radiant Heat for Tile Floors. Cautions:
 Peel & Stick Radiant Heat for Tile Floors INSTALLATION and operation INSTRUCTIONS Cautions: THIS EQUIPMENT SHALL BE INSTALLED ONLY BY QUALIFIED PERSONNEL WHO ARE FAMILIAR WITH THE CONSTRUCTION AND OPERATION
Model Dimensions Coverage 230v 230Vac. Pack Contents. Measuring Up
 Installation and Operating Instructions Electric tile-warming system Model Dimensions Coverage Wattage @ 230v Amps@ 230Vac RTS1M 2.0m x 0.5m 1.0m 2 160W 0.70A RTS1.5M 3.0m x 0.5m 1.5m 2 240W 1.04A RTS2M
Contact Details. Please note that some of the contact details on this PDF document may not be current.
 Contact Details Please note that some of the contact details on this PDF document may not be current. Please use the following details if you need to contact us: Telephone: 0844 879 3588 Email: customer.services@gdcgroup.co.uk
Installation Guide. Heating cables. Thin concrete (< 3 cm) Intelligent solutions with lasting effect. Visit DEVI.com
 Intelligent solutions with lasting effect. Visit DEVI.com") Installation Guide Heating cables Thin concrete (< 3 cm) Intelligent solutions with lasting effect Visit DEVI.com Table of contents 1 Introduction.................... 2 1.1 Safety Instructions...............2
Installation Guide Heating cables Thin concrete (< 3 cm) Intelligent solutions with lasting effect Visit DEVI.com Table of contents 1 Introduction.................... 2 1.1 Safety Instructions...............2
Installation Manual. Electric Underfloor Heating. heatingthroughinnovation.
 Installation Manual Electric Underfloor Heating heatingthroughinnovation. 02 Electric Underfloor Heating Contents 1.0 General Information 03 2.0 Preparation 04 3.0 Installation 05 4.0 Measuring Values
HEAT CABLE underfloor heating
 HEAT CABLE underfloor heating Installation Manual Thermosoft Heat Cable Installation Manual Page 1 INSTALLATION INSTRUCTIONS TM u n d e r f l o o r h e a t i n g c a b l e Please read these notes carefully
Foil Heaters. Installation Manual: TECHNICAL HELPLINE
 Installation Manual: Foil Heaters TECHNICAL HELPLINE 0345-345-2288 Complete and submit the warranty form online at www.warmup.co.uk IMPORTANT Read this manual before attempting to install your foil heater.
Installation Manual Loose cable underfloor heating. A large print version can be downloaded from our website. www. underfloorheatinghq.co.
 English Installation Manual Loose cable underfloor heating A large print version can be downloaded from our website www. underfloorheatinghq.co.uk Phone: 0800 328 4980 E-mail: enquiries@underfloorheatinghq.co.uk
Installation Instruction
 GB/DAS Installation Instruction Devimat DTIF 100/150 Heating cable mats for thin floors NB! Read page 3 before installing the product if you intend to connect 2 mats to the same thermostat 1 Devimat 100/150
Installation And User Instructions GB/IRE. Devimat Warm Floor System Installation Instructions User Guide Trouble Shooter
 GB/IRE Installation And User Instructions Devimat Warm Floor System Installation Instructions User Guide Trouble Shooter Please retain this booklet for homeowners future reference. For Devireg 55 setup
INSTRUCTION. Danfoss heating cable mats type 100/150 Danfoss heating cable mats for thin floors. Danfoss heating cable mat type 100/150
 INSTRUCTION GB Danfoss heating cable mats type 100/150 Danfoss heating cable mats for thin floors NB! Read page 2 before installing the product if you intend to connect 2 mats to the same thermostat Danfoss
Uponor Comfort E AL-Foil Mat
 Uponor Comfort E AL-Foil Mat Contents Important notes on the intended use, safety and warranty...3 Intended use...3 Uponor Declaration of Warranty...3 System description...4 Floor construction...4 Technical
Underlaminate Foil Heater
 Installation Manual: Underlaminate Foil Heater TECHNICAL HELPLINE 0845 345 2288 n online at warmup.co.uk IMPORTANT Read this manual before attempting to install your foil heater. Incorrect installation
Floor Heat INSTRUCTIONS
 Floor Heat INSTALLATION & operation INSTRUCTIONS PWFH-A-2016 Floor Heat Perfectly Warm TM Radiant Floor heat Installation and Operation manual PWFH-A2016 2380 Cranberry Hwy West Wareham, MA 02576 800-922-9276
LIFETIME. INSTALLATION MANUAL efoil WARRANTY
 INSTALLATION MANUAL efoil LIFETIME WARRANTY Before you begin installing, read through these instructions carefully and check that you have all the components required. 01473 276677 www.elementsunderfloorheating.co.uk
UNDERWOOD HEATING SYSTEM
 INSTALLATION MANUAL Suitable for most wooden/laminate fl oors (always check with fl oor manufacturer) Ideal for most wood/laminate fl oors Easy to install Fully compliant to latest regulations CE approved
Foil Heating System. Installation Manual. for Carpet and Laminate TECHNICAL HELPLINE 0800 WARMUP ( )
") Installation Manual Foil Heating System for Carpet and Laminate IMPORTANT Read this manual before attempting to install your heater. Incorrect installation could damage the heater and will invalidate your
Installation Manual Foil Heating System for Carpet and Laminate IMPORTANT Read this manual before attempting to install your heater. Incorrect installation could damage the heater and will invalidate your
ELECTRIC HEATING THERMOSYSTEM
 ELECTRIC RADIANT MAT 8200E INSTALLATION AND USE MANUAL heating passion ELECTRIC HEATING THERMOSYSTEM WARNING: For the guarantee to be valid, the product must be installed and handled as indicated in this
Underfloor Heating Inscreed Cable System
 The world s best-selling floor heating brand Installation Manual: Underfloor Heating Inscreed Cable System TECHNICAL HELPLINE 085 5 2288 IMPORTANT Read this manual before attempting to install your inscreed
amuheat Laminate Panel 14 floor heating systems Installation Manual LP12-V1
 amuheat floor heating systems Installation Manual LP12-V1 Table of Contents Installation Manual Introduction 1 2 Product Important Installation Guidelines Tools & Materials Needed for Installation Kit
Carbon Film Installation Instructions
 Contents Page 2 Page 3 Page 4 Page 5 Page 8 Product Overview Pre-Installation & Electrical Provision Depron Underlay Installation Carbon Film Installation - Under Wood/Laminate Flooring Notes & Trouble
HEATING USER GUIDE. Philex Support Line: Monday to Friday 9.00am to 5.00pm (Local rate - UK only)
") HEATING Underfloor Heating Kit USER GUIDE WARNING: Before installation make sure you have selected the right sized mat - you cannot cut the cable to make it shorter - slightly too small is better than
HEATING Underfloor Heating Kit USER GUIDE WARNING: Before installation make sure you have selected the right sized mat - you cannot cut the cable to make it shorter - slightly too small is better than
ELEKTRA HEATING MATS. Designed to be installed under laminate flooring and/or engineered wood UK PL RU. Installation manual
 www.elektra.eu ELEKTRA HEATING MATS Designed to be installed under laminate flooring and/or engineered wood Installation manual Instrukcja montażu Èíñòðóêöèÿ ïî ìîíòàæó UK PL RU Purpose The ELEKTRA WoodTec
Radiant Heat Film for Floating Floors
 Radiant Heat Film for Floating Floors INSTALLATION ANd operation INSTRUCTIONS For use under floating laminate, engineered wood, and floating tile flooring Cautions: THIS EQUIPMENT SHALL BE INSTALLED ONLY
I.D.L. Heaters Thermal Products Ltd. IdealMat Installation Manual
 I.D.L. Heaters Thermal Products Ltd. IdealMat Installation Manual 0 1 The Most Luxurious and Safe System For Underfloor Heating Table of Contents Important Instructions 3 Safety Instructions 4 Before Starting
Electric Floor Heating Cables
 Electric Floor Heating Cables Danfoss LX Electric Floor Heating Cable Systems combine the highest comfort levels with the maximum energy efficiency. Our Electric Floor Heating Cable Systems offer the following
Catalogue SPREAD THE WARMTH
 SPREAD THE WARMTH Catalogue Effective March 00 FLEXTHERM Catalogue TABLE OF CONTENTS SPREAD THE WARMTH.............. 3 Radiant systems Green Cable Surface.......... 4 Green Cable TM Mat.............. 8
CoziMat. 1. Introduction and Brief Description COZIMAT INSTALLATION INSTRUCTIONS & SAFETY REQUIREMENTS
 CoziMat 1. Introduction and Brief Description The CoziMat underfloor heating mat is designed for underfloor heating of rooms where the floor thickness needs to be kept to a minimum. CoziMat underfloor
Introduction. Please read the following instructions carefully before commencing installation.
 Introduction Please read the following instructions carefully before commencing installation. Installation involves simple processes. These are explained step by step in the following pages. Should you
Overview Frost Heave Prevention for Freezer floors on ground.
 PLEASE NOTE The floor sensor MUST be installed such that it may be REMOVED for service if required! The sensor probe should be installed into a conduit with no more than one wide-angle bend. This should
floor heating system
 floor heating system Installation manual Instrukcja montażu Инструкция по установке EN PL RU EN The package contains: Thin self-adhesive heating mat Thermostat and temperature sensor (option) Installation
WATCH OUT! UNDERNEATH THE WOODEN FLOORING IS A 230 VOLT HEATING FOIL SYSTEM! NEVER DRILL OR SCREW INTO THE FLOOR!
 WATCH OUT! UNDERNEATH THE WOODEN FLOORING IS A 230 VOLT HEATING FOIL SYSTEM! NEVER DRILL OR SCREW INTO THE FLOOR! SEE SCHEDULE/PICTURE FOR THE POSITION OF THE KLIMA FOIL. Control measurements: Type foil
Installation And User Instructions. Devimat Warm Floor System Installation Instructions User Guide Trouble Shooter
 GB Installation And User Instructions Devimat Warm Floor System Installation Instructions User Guide Trouble Shooter 1 Existing Floor Wooden Floors Concrete Floors Maximum load per m 2 100 W/m 2 150 W/m
STEP Warmfloor Installation Manual. Step Warmfloor Electric Radiant Floor Heating System
 STEP Warmfloor Installation Manual Step Warmfloor Electric Radiant Floor Heating System Contents INSTALLATION GUIDELINES... 3 IMPORTANT INSTALLATION GUIDLINES... 3 STEP WARMFLOOR HEATING SYSTEM... 3 BEFORE
CONTENTS CONSIDERATIONS. General Plumbing Component Connection ILLUSTRATION. Control System CONFIGURATION. Voltage Verification CONNECTION
 AIR SERIES SYSTEM INSTALLATION MANUAL CONTENTS CONSIDERATIONS General Plumbing Component Connection 2 2 2 ILLUSTRATION Control System 3 CONFIGURATION Voltage Verification 4 CONNECTION Component Connection
US: CA:
 Warmup DCM-PRO Installation Manual Technical Helpline US:1-888-927-6333 CA:1-888-592-7687 IMPORTANT! Please read this manual before attempting to install your Warmup product. Complete and submit your warranty
Comfortline Ceiling Heating Foils INSTALLATION INSTRUCTIONS. Rev Mar-2016
 s INSTALLATION INSTRUCTIONS Rev 3.1 3-Mar-2016 ACCESSORIES and SPECIFICATION 1. Connecting cold tail conductor 1.5mm² SDI (Single core Double Insulated) supplied by others 2. Crimping tool (CFCT) C1J081
Affiliations: Code Listings and Standards C O U N C I L
 P r o d u c t C a t a l o g T a p e M a t W a r m W i r e U n d e r F l o o r S l a b H e a t C a b l e P r o M e l t M a t P r o M e l t C a b l e s u n t o u c h. c o m SunTouch: more SunTouch products
Installation Manual for your ENVIRON II Floor Heating System
 Installation Manual for your ENVIRON II Floor Heating System INTRODUCTION: Thank you for purchasing the Environ II Electric Radiant Floor Heating Panel. This manual contains IMPORTANT information regarding
SECTION RADIANT-HEATING ELECTRIC CABLES / MATS
 SECTION 238313- RADIANT-HEATING ELECTRIC CABLES / MATS PART 1 - GENERAL 1.1 SECTION INCLUDES A. Electric radiant snow melting mats or cables embedded in concrete or asphalt slabs, or embedded under brick
Installation And User Instructions
 GB Installation And User Instructions Devimat Warm Floor System Installation Instructions User Guide Trouble Shooter 1 Existing Floor Maximum load per m 2 Wooden Floors 100 W/m 2 Concrete Floors 150 W/m
SUPPLEMENTARY INSTRUCTIONS
 www.burcam.com 2190 Dagenais Blvd.West TEL: 514.337.4415 LAVAL (QUEBEC) FAX: 514.337.4029 CANADA H7L 5X9 info@burcam.com SUPPLEMENTARY INSTRUCTIONS MODEL 450475 Dear consumer, We thank and congratulate
ComfortTile Floor Heating Systems
 ComfortTile Floor Heating Systems Luxurious Warmth for Your Floors The systems are easily installed under all types of floor surfaces to provide comfortable, even floor heat. ComfortTile radiant floor
Installation Guide BUBBLEMASSAGE. English page T01-A
 Installation Guide BUBBLEMASSAGE BATH 368 201419 English page 1-9 10-17 Before You Begin Please read these instructions carefully to familiarize yourself with the required tools, materials, and installation
electric floor heating Heating mats Heating cables Temperature controllers
 electric floor heating Heating mats Heating cables Temperature controllers Floor heating as the most favourable heating solution Of all heating systems, floor heating s vertical temperature distribution
Installation Guide - Heating Cables. Installation Guide. Heating cables. for In-Slab and In-Screed Applications BROCDEV135.1
 - Installation Guide Heating cables for In-Slab and In-Screed Applications BROCDEV135.1 Table of Contents SECTION TITLE PAGE 1. Introduction... 3 2. Cable and Application Overview... 4 3. Safety Instructions...
Undertile Heating Mat. Instructions. CORGI Underfloor Heating - Quality, Flexibility, Safety 1
 Undertile Heating Mat Instructions CORGI Underfloor Heating - Quality, Flexibility, Safety 1 It is vital that you read through these instructions fully before installing your CORGI undertile heating mat.
INSTALLATION INSTRUCTIONS & HOME OWNERS MANUAL ECO 18 ECO 24 ECO 27 IMPORTANT SAFETY INFORMATION
 INSTALLATION INSTRUCTIONS & HOME OWNERS MANUAL ECO 18 ECO 24 ECO 27 IMPORTANT SAFETY INFORMATION As when installing or using any high voltage electrical appliance, basic safety precautions should always
electric floor heating Heating mats Heating cables Temperature controllers
 electric floor heating Heating mats Heating cables Temperature controllers Floor heating as the most favourable heating solution Of all heating systems, floor heating s vertical temperature distribution
electric floor heating for everyone Heating mats Heating cables Temperature controllers
 electric floor heating Heating mats solutions for everyone Heating cables Temperature controllers Floor heating as the most favourable heating solution Of all heating systems, floor heating s vertical
Heating Mat and Mesh for indoors, modular or customized
 Heating Mat and Mesh for indoors, modular or customized Heating Mat - PVMI The Carbon Fiber electric floor heating is a patented system, only mm thickness, which can be produced in standard sizes or customized
Anti frost. Snow Melting USA 2012 USA 2014
 Anti frost USA 2014 USA 2012 1 Mat Resistance Wires Reinforced Braide PVC Jacketing Super strong aramid FEP Mat DomoTecK s Mat is the ideal heating element for outdoor de-icing. Our snow melting mat prevents
WARRANTY INSTALLATION MANUAL. Ideal for most wood/ laminate fl oors Easy to install. Fully compliant to latest regulations CE approved
 INSTALLATION MANUAL LIFETIME WARRANTY Ideal for most wood/ laminate fl oors Easy to install Fully compliant to latest regulations CE approved Suitable for most wooden/laminate fl oors (always check with
Under Carpet Heater Kit Installation Guide
 Under Carpet Heater Kit Installation Guide Please watch the under carpet heater installation video at www.coldbuster.com.au/learning-centre/videos/ WARNING: Failure to read this guide prior to installing
Installation Guide Heating Elements
 Page: 1 of 20 Table of Contents SECTION TITLE PAGE 1. Introduction... 3 2. Cable and Application Overview... 4 3. Safety Instructions... 5 4. Cable Requirements... 5 5. Important... 6 INSTALLATION SUMMARY...
DRAFT INSTALLATION INSTRUCTIONS. Solid-State Series !! NOTE!! Covers the following models: Refer to INSERT for additional information
 INSTALLATION INSTRUCTIONS Solid-State Series!! NOTE!! Covers the following models: " CS6100 - CS7100 " CS6200 - CS9200 " CS6220 - CS9220 " CS6230 - CS9230 " CS6500 - CS7500 " CS6330 - CS9300 " CS9400 -
Danfoss Self-limiting Heating Cables SLPG-10/26/33, SLPG-18, SLHW-55/70, SLPH-10
 MAKING MODERN LIVING POSSIBLE Installation Guide SLPG-10/26/33, SLPG-18, SLHW-55/70, SLPH-10 www.eh.danfoss.com Table of Contents 1 Introduction............................................. 3 1.1 Self-limiting
AWP 3260 CWH Installation Instructions Hydro-massage Bathtub - UL 1795
 Tools you might need for proper installation galvanized nails or screws large level hammer or screw gun shims adhesive Thank you for purchasing Praxis Bathware. For best results, please read and follow
DISHWASHER. Models DW2432 and DW2432SS. Installation Manual. Write Serial Number (on inner door of unit) here:
 here:") DISHWASHER Models DW2432 and DW2432SS Installation Manual Write Serial Number (on inner door of unit) here: Felix Storch, Inc. Summit Appliance Division 770 Garrison Avenue Bronx, New York 10474 www.summitappliance.com
DISHWASHER Models DW2432 and DW2432SS Installation Manual Write Serial Number (on inner door of unit) here: Felix Storch, Inc. Summit Appliance Division 770 Garrison Avenue Bronx, New York 10474 www.summitappliance.com
breeze easytm model # F100-1W
 DewStop breeze easytm model # F100-1W Installation Guide Read and Save These Instructions LISTED Questions, Problems, Missing Parts? Please Call 1-360-876-2974 or E-Mail info@dewstop.com please retain
Installation and User Guides
 Installation and User Guides Mats and Cable Trademat Plus+ Softmat Loose Cable Control Units Gloss Touch-Screen Stat Touch-Screen Stat Wireless Timerstat Manual Thermostat Contents Contents 3 Mats and
English. Dear Client,
 Installation manual Dear Client, This heating product is manufactured from high quality, durable materials. To guarantee that your product functions optimally there are a few points of attention which
PO Box 827 Hawley, MN (218) Fax (218)
 Fax (218)") Introduction Before proceeding with the installation or operation of the Oil Alert System, read all instructions thoroughly, as well as complying with all Federal, State and Local codes, Regulations and
Introduction Before proceeding with the installation or operation of the Oil Alert System, read all instructions thoroughly, as well as complying with all Federal, State and Local codes, Regulations and
SECTION ELECTRIC FLOOR HEATING AND SNOW MELTING EQUIPMENT
 SECTION 15770 ELECTRIC FLOOR HEATING AND SNOW MELTING EQUIPMENT PART 1 GENERAL 1.1 SECTION INCLUDES A. Floor Heating Systems for the following applications: 1. Under Concrete. 2. Within Concrete. 3. Over
WARRANTY INSTALLATION MANUAL. Ideal for most wood/ laminate fl oors Easy to install. Fully compliant to latest regulations CE approved
 INSTALLATION MANUAL LIFETIME WARRANTY Ideal for most wood/ laminate fl oors Easy to install Fully compliant to latest regulations CE approved Suitable for most wooden/laminate fl oors (always check with
Destination Collection Whirlpool Bath Installation Instructions
 Tools you might need for proper installation Galvanized Nails or Screws Large Level Hammer or Screw Gun Shims Adhesive Thank you for purchasing Praxis Bathware. For best results, please read and follow
Low Voltage System. STEP Warmfloor Installation Manual. Step Warmfloor Electric Radiant Floor Heating System
 Low Voltage System STEP Warmfloor Installation Manual Step Warmfloor Electric Radiant Floor Heating System Contents HEATING SYSTEM... 3 PRODUCT SPECIFICATIONS... 3 DESIGN AND CALCULATIONS... 3 SUPPLIED
INSTALLATION MANUAL. TOUCH Induction Cooktop
 INSTALLATION MANUAL TOUCH Induction Cooktop 701123 BlueStar TOUCH Induction Cooktop Installation Manual Model BSP36INDTOUCH Fitting and Installing WARNING Do not change or alter the appliance. Do not use
Steamist Sauna Heaters
 Steamist Sauna Heaters Installation Guide and Owner s Manual This manual contains installation and operation instructions, wiring specifications, maintenance and field repair information, and warranty
Installation GUIDE VDWU524SS VDWU524WSSS FDWU524WS FDWU524 VDWU324SS FDWU324
 Installation GUIDE VDWU524SS VDWU524WSSS FDWU524WS FDWU524 VDWU324SS FDWU324 To prevent accidents, which could cause serious injury or death, as well as machine damage read these instructions before installation
TB4000 Temperature Controller
 TB4000 Temperature Controller Instruction Manual Read and understand this material before operating or servicing these heating tapes. Failure to understand how to safely operate these heaters could result