Classic Media Operating Instructions
|
|
|
- Darlene Jordan
- 6 years ago
- Views:
Transcription

1 Classic Media Operating Instructions Model Numbers: & B
2 Contents P3 P4 P5 P6 P7 P8 P9 - Decals, displays and controls - Introduction - Key to Pictures & Operation - Continued Operation - Do s and Don t s - Troubleshooting - Technical Specification - Additional Information IMPORTANT OPERATING INFORMATION Caution! Before using or maintaining the Prestige Medical Classic Media autoclave ensure that you read and fully understand the operating instructions paying particular attention to information held within this page. This model is designed to operate at ºC for 22 minutes, for the sterilization of culture media. Please note that the Classic Media should not be used to sterilize wrapped instruments or porous loads. This cycle is not recommended for the sterilization of medical or dental instruments. TST Strips are not supplied with this model. When sterilizing media, to ensure the safe operation of the autoclave and to avoid damage to the media, DO NOT manually vent the pressure by operating the pressure release valve at the end of the cycle. As an added safety feature, the lid interlock has been set to release only when the temperature of the chamber contents has dropped to 80ºC or below


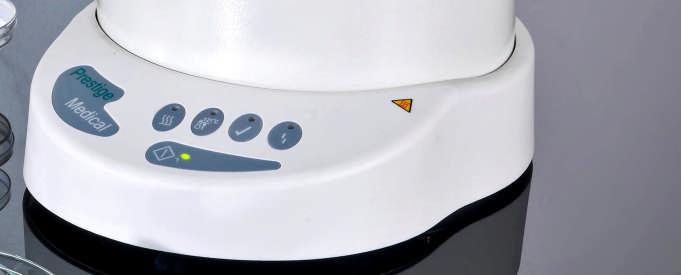
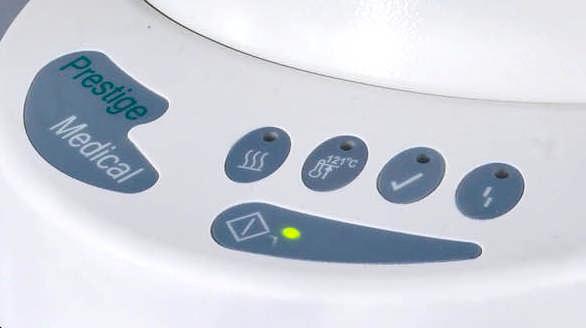
3 A E C W2 W3 W1 L2 L3 L4 L5 W1 B L1 D - 3 -
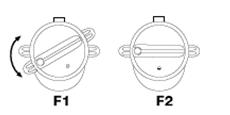
4 Introduction Thank you for choosing the Prestige Medical / Classic Media Autoclave, designed to sterilize culture media. After removing from the box, please check for any transit damage. If any damage to the unit is found, please contact your supplier immediately. Together with this unit and operating manual, you will find the following: Electrical mains cord Instrument furniture Spare fuses x2 (when fitted) Performance test certificate Certificate of Compliance (230v models only) Warranty registration card Key to Pictures, Diagrams and Sym bols The following descriptions refer to the pictures of the controls, display lights and operating symbols on Page 3 of this manual. Controls: A - Depressurisation valve B - Start cycle button C - Pressure rise indicator D - Display panel E Interlock mechanism Figures: F1 -Lid aligned with body, turn clockwise to close F2 -Lid in closed position Display Lights: L1 - Power on light - illuminates GREEN L2 - Heating light - illuminates ORANGE L3 - Sterilizing light illuminates YELLOW L4 - Sterilizing complete light illuminates GREEN L5 - Fault llght illuminates RED Warning Symbols: W1 Warning, caution, electric shock hazard. W2 Warning, read manual before using the autoclave. W3 - Warning, unit must be earthed/grounded. W4 Warning, heat hazard. WARNING! Do not touch body or lid as these parts become hot when the autoclave is in operation Before using the autoclave for the first time please take time to read the following pages to familiarise yourself with the operation of the unit. We strongly recommend that all users of the autoclave are trained in its operation. The autoclave is very easy to use. By following this simple operating sequence in conjunction with the pictures of the autoclave, its controls, display panel and operating symbols (page 3), you will be able to ensure your autoclave functions correctly every time. WARNING! Mains outlet MUST BE GROUNDED (EARTHED) The mains plug should always be easily accessible as it is to be relied upon as the means of disconnection 1. Connection. Attach the cable supplied to the rear of the unit (I) and plug into an EARTHED mains electrical socket of the CORRECT voltage. Operation 2. Water. Fill the unit to the water level line on the inside of the chamber with 0.75 litres of distilled or de-ionised water (S1). DO NOT USE TAP WATER OR OVERFILL
5 Operation 3. Loading (Media). Place media containers into the instrument basket, and place in the unit. When using the basket, always place the metal V support in the bottom of the unit so ensuring load is not in the water. 4. Closing. Always place the lid on the autoclave with the Depressurization Valve (A) in the open position. Align the arrows on the lid and body (F1) and with the interlock button (E) pressed down turn in a clockwise direction ensuring it is completely closed (F2). Release the interlock button. Close the Depressurization Valve (A). 5. Power on. Switch the unit on at the mains. Light: L1 illuminates GREEN 6. Temperature. The 121ºC temperature is automatically selected when the power is turned on. 7. Starting. Press the cycle start button (B) to start the sterilizing cycle. Light: L2 illuminates ORANGE and may flash. As the temperature rises, air will be displaced by steam through the Air Bleed Device located in the lid, until it closes with an audible click, sealing the unit. 9. Unlocking. Once the temperature has reached a safe level and is below 80ºC the interlock will release and the lid can be unlocked. Remove the lid by pressing down on the interlock button (E) and turning the lid in an anti-clockwise direction, aligning the arrows (F1 & F2). 10. Unloading. Lift off the lid, gently place upside down on a solid work surface and leave to cool. Ensure the Depressurization Valve (A) is in the closed position to avoid damaging it. The basket containing the sterilized media can now be lifted out of the unit with care. Allow 5 minutes for the lid to cool down before replacing as per Step 4. DO NOT USE THE MEDIA IF A COMPLETE STERILIZIATION CYCLE HAS NOT BEEN ACHIEVED. Sterilizing temperature is reached when: Light: L3 illuminates ORANGE L2 flashes ORANGE The sterilizing cycle is completed when: The internal buzzer sounds and Light: L4 is illuminated GREEN. 8. Depressurizing. Once sterilizing has finished the unit should be left to automatically cool down without opening the pressure release valve
6 D o s a n d D o n t s To ensure your autoclave gives you the years of service for which it was designed, it is important to remember a few do s and dont s with regards to the operation of the unit and to carry out the simple care weekly andbasis. maintenance Do ensure 1 you read these instructions and always follow the operating sequence. 2 the media will withstand the sterilizing temperatures selected, bottles are not sealed and screw tops are loose - do not overload the autoclave 3 the water level is maintained regularly with clean distilled or de-ionised water only. 4 the unit is in a draft free environment and is positioned not less than 250mm from adjacent walls. 5 you only use green sealing gasket (219500) and that it is changed at the end of its life, if visibly damaged, or when shrinkage has occurred. 6 the lid is securely closed when the unit is not in use, to avoid the risk of accidental damage. Never leave in position (F1). 7 you record the temperature and pressure readings for each cycle completed, to ensure they remain constant between cycles. Check readings against those quoted - see Technical data section. 8 you quote your model details, serial number and date of purchase when contacting Prestige Medical or your supplier. Do not... 1 lose this operating instruction manual. 2 add any chemicals whatsoever to the water. 3 attempt to sterilize volatile substances, toxic materials or inappropriate loads. 4 place the unit on heat sensitive surfaces ie polished wood or glass. 5 open the Depressurization Valve (A) during the sterilization cycle. 6 leave the Depressurization Valve (A) in the open position when placing the lid upside down on a work surface. 7 immerse the unit or electrical cord in water when cleaning. 8 use abrasive materials or lubricants when cleaning. 9 drop or abuse the unit. 10.use in areas of risk associated with flammable materials or gases. 11.attempt to change any fuses until the unit has been unplugged from the mains* reach over the unit when removing cover, to do so may cause burns from rising heat and steam. 13.cover lid or obstruct steam venting area when manually depressurizing. * These operations should only be undertaken by a qualified person. Care and Maintenance. Green Sealing Gasket. 1 Remove from inside the lid and clean with warm, soapy water. 2 Rinse thoroughly, shake dry, do not wipe. 3 Replace in the lid by tucking evenly under all lugs. It may appear slightly wrinkled until used. 4 Replace when it begins to show signs of leakage. Autoclave. 6 If a new gasket leaks, or a persistent leak develops, gently clean the sealing surface of both the lid and body of the unit with a Scotchbrite scrubbing pad making sure you do not remove any metal. Rinse both surfaces, but do not dry. 7 Clean both interior and exterior with warm soapy water ensuring electrical parts are kept dry. 8 Monitor the first cycle of the day to check the Air Bleed Device which is located inside the lid, audibly clicks shut. 9 Prestige Medical recommend that your unit is calibrated at six monthly intervals 10.Lubricate underside of body lugs with vaseline if the lid becomes stiff. DO NOT LUBRICATE GASKET
7 Troubleshooting In the event of a fault occurring during any stage of the unit s operation, identify the fault by referring to their descriptions below. The fault can be corrected by following a few easy steps. (Note: light L1 will be constantly illuminated GREEN whilst the unit is powered up). Fault Indication/Description/Remedy Fault 1: No power to unit Light: L1 fails to illuminate. Check for defective socket. Check for power to socket. Ensure lead is connected to electrical socket Fault 2: Low water or boil dry. Light: L5 flashes RED Allow unit to cool before refilling to the correct level. Disconnect from mains then reconnect and repeat cycle. If the fault repeats with sufficient water, arrange for a service engineer to visit. Fault 3: Sterilization failed to be achieved. Light: L4 fails to illuminate GREEN and there is no audible buzzer. Disconnect from mains then reconnect and repeat cycle. If the fault repeats arrange for a service engineer to visit. Fault 4: Steam or water leaks from under the lid. i) Worn or dirty gasket. Wash gasket and sealing surfaces on the body and lid as described under Care and Maintenance. If the fault persists, replace with a new gasket. ii) Incorrectly closed lid. Ensure the unit is fully depressurised by opening Depressurisation Valve (A). Remove lid and re-fit carefully. Disconnect from mains, reconnect and repeat cycle. Fault 6: Excessive steam or water leaking from Depressurisation Valve (A). Depressurisation Valve (A) in OPEN position. Close Depressurisation Valve (A). DURING THE COURSE OF OPERATION THE WATER LEVEL MUST BE MAINTAINED UP TO THE WATER LEVEL LINE
8 Specifications In the unlikely event that something should go wrong, we have incorporated a number of safety features to ensure that your autoclave remains safe at all times. Safety features. 1. Located to the rear of the lid, beneath the cover, is a spring called the Gasket Offset Device (GOD Spring), designed to prevent pressure building up if the lid has been incorrectly fitted. DO NOT TAMPER WITH THIS SAFETY DEVICE 2. If for any reason, the temperature falls below the minimum required sterilizing temperature, resulting in the Sterilizing light (L3) switching off, the cycle timer will re-start from zero once the correct temperature has been restored. 3. If there is an electrical or electronic failure resulting in a build up of pressure - in excess of normal operating pressure - one or all of the following safety features will be activated. i) Depressurisation Valve (A) will loudly and rapidly vent steam. ii) The gasket will extrude through the slot in the rear of the lid rapidly releasing excess pressure and steam. iii) A non - resettable thermal fuse located in the base of the unit will melt at a pre-determined temperature, disconnecting the power. Should any of the devices listed above activate, please observe the following steps: a) Do not touch the unit. b) Switch off at the wall socket and un-plug c) Allow temperature and pressure to drop before i) touching the unit ii) removing your instruments d) Do not attempt to re-start the unit e) Arrange for an immediate service. Technical Specifications - Standard Body Autoclaves - Model Height mm Width mm Capacity...9 litres Net Weight kgs Internal Dimensions (d/h)...210/230 mm Max Load Weight...3.0kgs Technical Specifications - Extended Body Autoclaves - Model Height mm Width mm Capacity...12 litres Net Weight kgs Internal Dimensions (d/h)...210/270 mm Max Load Weight...3.0kgs Fuses - Located under the control module, fuses F10A, 32 x 6.3mm, ceramic sand filled. Mains plug top fuse (user replaceable), F13A to BS1362. Rating - Models are rated continuously for intermittent use. Body - Deep drawn aluminium. Lid Aluminium. Heater - Externally surface mounted mechanically fixed electric element. Temperature Cut Out - Thermal fuse. Pressure calibrated pressure release valve. Max. Single Fault Temperature C Over Voltage Category - Group ll Pollution Degree - Group 2 Environment Conditions - indoor use - temperature 5 C to 40 C altitude up to 2000m - maximum relative humidity 80% for temperatures up to 31 C decreasing linearly to 50% relative humidity at 40 C. - mains supply voltage fluctuations not to exceed +10% of the nominal voltage Input Connections - Mains inlet socket hot format conforming to IEC 302. Safety Shut Down - See Temperature Cut Out. Packaging - All packaging materials are recyclable

9 Additional Information. Spares Only those spare parts supplied or specified by Prestige Medical should be used in the maintenance of the autoclave. Use of unauthorised parts will invalidate any warranty given and may adversely affect the performance and safety of the unit. Accessories. A range of accessories are available for your autoclave as described below. Contact your supplier for full details Lifting Device Cassette Rack General Instrument Tray Extended Basket ( Only) Standard Basket Green Silicone Sealing Gasket V Support Cord Set UK Warranty. Prestige Medical shall, in the first 12 months from the date of purchase, repair or replace free of charge any parts, which prove to be defective in workmanship and/or materials. The heating element (only) is covered by a lifetime guarantee. Prestige Medical shall not be so liable in the event that the purchaser has failed to adhere to the instructions contained herein or if the autoclave has been abused, interfered with, altered, repaired or serviced by any unauthorised party this may also result in the protection provided by the equipment being impaired. This warranty excludes the gasket, all internal furniture and consumables. Consumer s statutory rights are not affected. Product decontamination. Should the unit require repair, it must be decontaminated in accordance with a recognised procedure prior to return or on-site repair. A statement of equipment contamination status must be available with the product. (Details of a suitable procedure are available on request). Cleaning materials: Mild washing up liquid. Non-abrasive cream cleaner. Warm water Approvals. BS 3970 Part 4 Pressure vessel only. BS 550 Pressure vessel CE mark medical device derivative. IEC Product safety. Packaging. All Prestige Medical packaging materials used are recyclable - please dispose of accordingly. Disposal. WEEE Statement (Waste Electrical and Electronic Equipment) The WEEE Directive places an obligation on all EU-based manufacturers and importers to take back electronic products at the end of their useful life. Prestige Medical Limited accepts its responsibility to finance the cost of treatment of redundant WEEE in accordance with the specific recycling requirements. The symbol (shown opposite) is present on all Prestige Medical products, which indicates that the product must NOT be disposed of with other waste. Instead it is the user s responsibility to dispose of their waste electrical and electronic equipment by handing it over to an approved reprocessor, or by returning it to Prestige Medical for reprocessing

10 Quote your model details, serial number, and date of purchase when contacting Prestige Medical or your supplier. Model No. Serial No. Date of purchase. East House, Duttons Way, Shadsworth Business Park, Blackburn, BB1 2QR, Lancashire Tel: Fax: Web: Registered in England Reg No VAT No Registered office Unit 1 First Avenue Maybrook Industrial Estate Minworth, Sutton Coldfield West Midlands B76 1BA. BS EN ISO ISO Cert No. FM Cert No. FM
Operating Instructions
 Operating Instructions Clinical Autoclaves P3 - Decals, displays and controls P4 - Introduction - Key to Pictures P5 - Getting Started P6 - Continued Operation P7 - Troubleshooting P8 - Technical Specification
Advance Autoclave. Designed to give you more for your money with a high capacity for faster throughput: More features and benefits...
 Advance Advance Designed to give you more for your money with a high capacity for faster throughput: The Advance has a much bigger capacity than its main competitors and yet has one of the smallest footprints
Veterinary Autoclave
 Veterinary Autoclave Veterinary Autoclave The Anima autoclave sets high standards for speed, efficiency and performance for sterilizing. Highly efficient, yet compact, its capacity to process 6 full sized
Alpha User Manual 22 litre Non Vacuum (N) Autoclave
 Autoclave") Alpha User Manual 22 litre Non Vacuum (N) Autoclave 2 Instructions for use Please read these instructions before using the autoclave. Keep these Instructions for use in a safe place close by the unit for
Alpha User Manual 22 litre Non Vacuum (N) Autoclave 2 Instructions for use Please read these instructions before using the autoclave. Keep these Instructions for use in a safe place close by the unit for
Podiaclave+ The PodiaClave+ is specifically designed for the clinic based podiatrists and chiropodists.
 Classic PodiaClave Podiaclave+ The PodiaClave+ is specifically designed for the clinic based podiatrists and chiropodists. Easy to use, reliable and cost-effective, its outstanding performance comes from
User Manual Vacuum & Non-Vacuum Autoclave
 User Manual Vacuum & Non-Vacuum Autoclave 2 Instructions for use Please read these instructions before using the autoclave. Keep these Instructions for use in a safe place close by the unit for future
Introducing the latest model in Prestige Medical s first-class range of Advance autoclaves - Advance Pro.
 Introducing the latest model in Prestige Medical s first-class range of Advance autoclaves - Advance Pro. Advance Pro is a Class B sterilizer available in 16 or 22 litre capacity units, they offer superior
INSTRUCTIONS MODEL: MFBU WET WELL BAIN MARIE
 Page 1 of 12 INSTRUCTIONS MODEL: MFBU WET WELL BAIN MARIE SAFETY INSTRUCTIONS TECHNICAL DATA INSTALLATION INSTRUCTIONS OPERATION INSTRUCTIONS MAINTENANCE INSTRUCTIONS EXPLODED VIEW / PARTS LIST FAULT DIAGNOSTICS
Pasto Sous vide water bath
 Pasto Sous vide water bath User Manual enquiries@grancreativecuisine.com User guide Page 1 If you have any feedback on Grant Creative Cuisine s products or services, we would like to hear from you. Please
4L Instant Water Boiler Instructions for Use
 Power Details: 220-240Va.c. 50Hz-60Hz 2200-2600W Capacity: 4.0L Accessories: 2 Water aid trays Water Filters are not included and can be purchased separately Item Code 10747 IMPORTANT NOTES FOR YOUR INSTANT
Traditional Kettle CTK17U CPT445U
 Traditional Kettle CTK17U CPT445U Congratulations on your purchase of the Cuisinart Traditional Kettle. For over 30 years Cuisinart s aim has been to produce the very finest kitchen equipment. All Cuisinart
USER INSTRUCTION MANUAL. Autofill Water Boiler
 USER INSTRUCTION MANUAL Autofill Water Boiler GH187 GC719 (FILTERED PRODUCT) Buffalo Warranty 1 Year Parts 1 Year Labour 083347300-03/06/14 Introduction Thank you for purchasing this Buffalo appliance.
INSTALLATION INSTRUCTIONS SAFETY INSTRUCTIONS USER INSTRUCTIONS DRY BAIN MARIE
 Page 1 of 8 INSTALLATION INSTRUCTIONS SAFETY INSTRUCTIONS USER INSTRUCTIONS DRY BAIN MARIE MODEL: GBM2 MODEL: GBM4 MODEL: 1939 MODEL: 1940 MODEL: 1945 MODEL: PDB2 MODEL: PDB4 MODEL: PDB6 MODEL: PDDGB MODEL:
HINTS AND TIPS Cleaning and maintenance HELPLINE
 43840 Rev1 23/10/08 16:17 Page 1 Descaling IMPORTANT: As this appliance is fitted with a concealed element, it must be descaled regularly. The frequency of descaling depends on usage and the hardness of
INSTRUCTIONS. MODEL: CPC and CPC1 PIE CABINETS
 Page 1 of 14 INSTRUCTIONS MODEL: CPC and CPC1 PIE CABINETS SAFETY INSTRUCTIONS TECHNICAL DATA INSTALLATION INSTRUCTIONS OPERATION INSTRUCTIONS MAINTENANCE INSTRUCTIONS FAULT DIAGNOSTIC WIRING DIAGRAM EXPLODED
product safety Please read these instructions before operating the appliance and retain them for future use.
 product safety Please read these instructions before operating the appliance and retain them for future use.! This product is not suitable for use by children, and may not be suitable for persons requiring
INSTALLATION INSTRUCTIONS SAFETY INSTRUCTIONS USER INSTRUCTIONS PIE CABINET
 Page 1 of 11 INSTALLATION INSTRUCTIONS SAFETY INSTRUCTIONS USER INSTRUCTIONS PIE CABINET MODEL: SPC Page 2 of 11 PLEASE NOTE INSTALLATION OF PIE CABINET MUST BE CARRIED OUT BY A QUALIFIED ELECTRICIAN IMPORTANT
PARAGON FRYERS INSTALLATION INSTRUCTIONS SAFETY INSTRUCTIONS USER INSTRUCTIONS MODEL: PF9 MODEL: PSF3 MODEL: PSPF9 MODEL: PDPF6 MODEL: PDPF9
 INSTRUCTION REF: IN123 ISSUE No. 1 DATE 23.02.06 Page 1 of 10 TELEPHONE: SERVICE (44) 01332 875665 FAX: SERVICE (44) 01332 875536 INSTALLATION INSTRUCTIONS SAFETY INSTRUCTIONS USER INSTRUCTIONS PARAGON
FWC152 / FWC302 / FWC602 / FWC622 Wine Coolers
 FWC152 / FWC302 / FWC602 / FWC622 Wine Coolers Manual for Installation, Use and Maintenance Customer Care Department The Group Ltd. Harby Road Langar Nottinghamshire NG13 9HY T : 01949 862 012 F : 01949
Induction Fryer. Instruction manual. Model Modèle Modell Modello Modelo Malli: CP793
 Induction Fryer Instruction manual Model Modèle Modell Modello Modelo Malli: CP793 UK Safety Tips Position on a flat, stable surface. A service agent/qualified technician should carry out installation
Single Induction Hob
 Single Induction Hob Pour la version française veuillez consulter notre site de web www.andrewjamesworldwide.com Die deutsche Version finden Sie auf unsere Webseite www.andrewjamesworldwide.com Please
Multi-Temp Jug Kettle CPK17BPU
 Multi-Temp Jug Kettle CPK17BPU Congratulations on your purchase of the Cuisinart Multi-Temp Jug Kettle. For over 30 years Cuisinart s aim has been to produce the very finest kitchen equipment. All Cuisinart
INSTRUCTIONS MODEL: MWBT
 Page 1 of 15 INSTRUCTIONS MODEL: MWBT SAFETY INSTRUCTIONS INSTALLATION INSTRUCTIONS OPERATION INSTRUCTIONS MAINTENANCE INSTRUCTIONS WIRING DIAGRAM EXPLODED VIEW / PARTS LIST WARRANTY INFORMATION DISPOSAL
FWC860 Wine Cooler Installation, Use and Maintenance
 FWC860 Wine Cooler Installation, Use and Maintenance Customer Care Department The Group Ltd. Harby Road Langar Nottinghamshire NG13 9HY T : 01949 862 012 F : 01949 862 003 E : customer.care@cda.eu W :
BRITA Filter Jug Kettle
 KT10009 MUK Rev 1 BRITA Filter Jug Kettle Please read and keep these instructions for future use For competitions, product hints and tips and more join us at www.morphyrichards.co.uk/blog www.facebook.com/morphyrichardsuk
INSTRUCTIONS MODEL: BT1 MOBILE BANQUETING TROLLEY
 Page 1 of 13 INSTRUCTIONS MODEL: BT1 MOBILE BANQUETING TROLLEY SAFETY INSTRUCTIONS TECHNICAL DATA INSTALLATION INSTRUCTIONS OPERATION INSTRUCTIONS MAINTENANCE INSTRUCTIONS EXPLODED VIEW / PARTS LIST FAULT
Rapid Heat Sterilizers with 6, 8, and 12 Minute Sterilization Cycle Times
 Rapid Heat Sterilizers with 6, 8, and 12 Minute Sterilization Cycle Times USER MANUAL MODELS: COX 115V-N COX 220V-N COX 115V-R COX 220V-R 2364 Leicester Road, P.O. Box 175, Leicester, NY 14481 Phone (585)
Water Boiler. Instruction manual. Model: GL346-A/GL347-A/GL348-A/GL349-A
 Water Boiler Instruction manual Model: GL346-A/GL347-A/GL348-A/GL349-A AU Telephone Helpline: 1300225960 Safety Tips Position on a flat, stable surface. A service agent/qualified technician should carry
HINTS AND TIPS Cleaning and maintenance HELPLINE
 43068 rev2 5/6/06 14:51 Page 1 DESCALING IMPORTANT: As this appliance is fitted with a concealed element it must be descaled regularly. The frequency of descaling depends on usage and the hardness of the
HINTS AND TIPS Cleaning and maintenance HELPLINE
 43675 Rev1 24/4/08 09:43 Page 1 DESCALING IMPORTANT: As this appliance is fitted with a concealed element, it must be descaled regularly. The frequency of descaling depends on usage and the hardness of
Please read and keep these instructions for future use
 43922 rev7.qxp_layout 1 22/01/2015 10:12 Page 1 KT43922 MUK Rev 7 One Cup Please read and keep these instructions for future use For competitions, product hints and tips and more join us at www.morphyrichards.co.uk/blog
Bar Fridge USER MANUAL MB46W
 Bar Fridge USER MANUAL MB46W CONTENTS Safety information... 2-3 Identifying parts of the fridge... 4 Transporting... 5 Installation... 5 Reversing the door... 6 Operating instructions... 7 Cleaning &
VR60 GLASS FROSTERS INSTALLATION AND OPERATING MANUAL PLEASE LEAVE WITH OPERATOR. VR60 Glass Froster. Series 1
 VR60 GLASS FROSTERS INSTALLATION AND OPERATING MANUAL PLEASE LEAVE WITH OPERATOR VR60 Glass Froster Series 1 Imperial Machine Company Limited Unit 1, Abbey Road Wrexham Industrial Estate Wrexham LL13 9RF
One Cup. Please read and keep these instructions for future use
 43922 rev6_layout 1 10/10/2013 14:13 Page 1 KT43922 MUK Rev 6 2GUARANTEE YEAR One Cup Please read and keep these instructions for future use For competitions, product hints and tips and more join us at
INSTRUCTIONS NACHO WARMER MODELS: 1995 / 1995S
 Page 1 of 13 INSTRUCTIONS NACHO WARMER MODELS: 1995 / 1995S SAFETY INSTRUCTIONS TECHNICAL DATA INSTALLATION INSTRUCTIONS OPERATION INSTRUCTIONS MAINTENANCE INSTRUCTIONS EXPLODED VIEW / PARTS LIST FAULT
FWC153, FWC304, FWC604 & FWC624
 FWC153, FWC304, FWC604 & FWC624 Wine Coolers Installation, use and maintenance www.cda.eu Important The CDA Group Ltd cannot be held responsible for injuries or losses caused by incorrect use or installation
ULTRASONIC HUMIDIFIER
 To Buy: Visit www.sylvane.com or call (800) 934-9194 For Product Support: Contact Sunpentown at 1-800-330-0388 ULTRASONIC HUMIDIFIER [ADORABLE MONKEY] To prolong the life of this humidifier, using distilled
fwc152 / fwc303 / fwc603 / fwc623 Wine Coolers Manual for Installation, Use and Maintenance
 fwc152 / fwc303 / fwc603 / fwc623 Wine Coolers Manual for Installation, Use and Maintenance Customer Care Department The Group Ltd. Harby Road Langar Nottinghamshire NG13 9HY T : 01949 862 012 F : 01949
HINTS AND TIPS Cleaning and maintenance HELPLINE
 43690 rev1 6/3/07 12:49 Page 1 Descaling IMPORTANT: As this appliance is fitted with a concealed element it must be descaled regularly. The frequency of descaling depends on usage and the hardness of the
INSTRUCTIONS MODEL: MWB
 Page 1 of 8 INSTRUCTIONS MODEL: MWB SAFETY INSTRUCTIONS INSTALLATION INSTRUCTIONS OPERATION INSTRUCTIONS MAINTENANCE INSTRUCTIONS WARRANTY INFORMATION DISPOSAL INFORMATION Customer Information MODEL NUMBER:
Stainless steel kettle
 Stainless steel kettle Please read and keep these instructions getting the best from your new kettle... Empty the water out of the kettle after the first boiling To clean away any deposits that are left
Operator s Manual. Model G17-EU (International) Disinfection Soak Station for Hysteroscopes, Cystoscopes and ENT scopes
 Disinfection Soak Station for Hysteroscopes, Cystoscopes and ENT scopes") Model G17-EU (International) Disinfection Soak Station for Hysteroscopes, Cystoscopes and ENT scopes Operator s Manual CIVCO Medical Solutions 102 First Street South Kalona, IA 52247 USA Tel: 1-800-445-6741
Model G17-EU (International) Disinfection Soak Station for Hysteroscopes, Cystoscopes and ENT scopes Operator s Manual CIVCO Medical Solutions 102 First Street South Kalona, IA 52247 USA Tel: 1-800-445-6741
BLOW DRY & GO HAIR KIT
 BLOW DRY & GO HAIR KIT LSGS11P Instruction Manual My BLow DRy and go HAiR KiT is perfect with everything you need to style your hair the way you want - wherever you are. This kit includes accessories for
Advance Autoclave. Designed to give you more for your money with a high capacity for faster throughput: More features and benefits...
 Advance Advance Designed to give you more for your money with a high capacity for faster throughput: The Advance has a much bigger capacity than its main competitors and yet has one of the smallest footprints
INSTRUCTIONS AND WARRANTY
 INSTRUCTIONS AND WARRANTY MODEL NO: STS80 SALTON HOT TRAY WITH TEMPERATURE CONTROL Congratulations on purchasing our Salton Hot Tray with Temperature Control. Each unit is manufactured to ensure safety
SERVICE PROCEDURES. Mattress 2 Pipe Overlay or Replacement
 Mattress 2 Pipe Overlay or Replacement Contents 2 pipe Mattress Mattress 3 Air Leak Test 4 Air Cell Replacement 5 Air Pipe Connector Replacement 6 Troubleshooting 7 Safety 9 Care & Cleaning 10 Definition
WARNING: Do not place the appliance onto a metal tray or metal surface whilst in use. WARNING: The appliance must not be immersed for cleaning.
 108261 REV 2.qxp_Layout 1 01/03/2017 1:1 Page 1 Health and Safety The use of any electrical appliance requires the following common sense safety rules. Please read these instructions carefully before using
Thermo Pot. INSTRUCTION MANUAL Model Nos. TK-12-5L & TK-13-35L. Before operating this appliance, please read these instructions carefully.
 Thermo Pot INSTRUCTION MANUAL Model Nos. TK-12-5L & TK-13-35L Before operating this appliance, please read these instructions carefully. CONTENTS Parts Introduction Title Page Parts Introduction 1 Function
MODEL NO RUSSELL HOBBS APOLLO 1.8L DIGITAL FILTER COFFEE MAKER
 INSTRUCTIONS AND WARRANTY MODEL NO. 18593 RUSSELL HOBBS APOLLO 1.8L DIGITAL FILTER COFFEE MAKER Congratulations on purchasing our Russell Hobbs Apollo 1.8L Digital Filter Coffee Maker. Each unit is manufactured
Steam cleaner with attachments
 70530 Rev 4 2/6/04 2:53 PM Page 1 Steam cleaner with attachments Please read and keep these instructions getting the best from your new steam cleaner... Quick start 1 Fill the tank up to a maximum of 1.4
ASPIRE Laboratory Aspirator
 ASPIRE Laboratory Aspirator USER MANUAL Rev 2/14/18 Accuris Instruments / Benchmark Scientific Ph: (908) 769-5555 E-mail: info@accuris-usa.com (C) Benchmark Scientific, 2018 THE ACCURIS ASPIRE LABORATORY
I n s t r u c t i o n m a n u a l f o r b u i l t - i n h o o d. Model code: BORA600
 I n s t r u c t i o n m a n u a l f o r b u i l t - i n h o o d Model code: BORA600 Contact Caple on 0844 8003830 or for spare parts www.4caple.co.uk 1 Y O U R A P P L I A N C E Thank you for buying your
INSTRUCTIONS CertoClav EL
 High Pressure-LABORATORY AUTOCLAVE Autoclave using steam for the treatment of material and laboratory processes e.g. sterilization As an aid in research and development Thermometer Lid handle with locking
Instruction Manual. Model AccuPlate Hotplate AccuPlate Stirrers AccuPlate Hotplate Stirrer 12/10 CLS-EQ-LHP01REV
 Instruction Manual Model AccuPlate Hotplate AccuPlate Stirrers AccuPlate Hotplate Stirrer 12/10 CLS-EQ-LHP01REV2 9296050000 About This Manual This manual is designed to assist you in optimal usage of your
illuminated filter kettle
 illuminated filter kettle product safety IMPORTANT SAFETY INSTRUCTIONS. READ CAREFULLY AND KEEP FOR FUTURE REFERENCE This appliance can be used by children aged from 8 years and above and persons with
FWC152, FWC303, FWC603 & FWC623 Wine Coolers Installation, Use and Maintenance
 FWC152, FWC303, FWC603 & FWC623 Wine Coolers Installation, Use and Maintenance Customer Care Department The Group Ltd. Harby Road Langar Nottinghamshire NG13 9HY T : 01949 862 012 F : 01949 862 003 E :
INSTRUCTIONS MODEL: CBM / CMB2
 Page 1 of 13 INSTRUCTIONS MODEL: CBM / CMB2 SAFETY INSTRUCTIONS TECHNICAL DATA INSTALLATION INSTRUCTIONS OPERATION INSTRUCTIONS FAULT FINDING EXPLODED VIEW WIRING DIAGRAM WARRANTY INFORMATION DISPOSAL
Instruction Manual for the Revolutionary Science RS-IF-203 Incufridge
 Instruction Manual for the Revolutionary Science RS-IF-203 Incufridge REVOLUTIO NARY SCIENCE Manufacturer of Precision Laboratory Equipment Table of Contents Introduction 2 Recommended Safeguards 3 Operating
Multi-Temp Jug Kettle CPK17U
 Multi-Temp Jug Kettle CPK17U Important Safeguards When using electrical appliances, basic safety precautions should always be followed, including the following: 1. The appliance is not intended to be operated
Electric Digital Kettle
 Electric Digital Kettle OWNER S MANUAL Model EK119H 120V., 60Hz., 1800 Watts. EURO-PRO Operating LLC Boston, MA, 02465 1 (800) 798-7398 www.euro-pro.com COPYRIGHT 2008 EURO-PRO OPERATING LLC IMPORTANT
INSTRUCTIONS AND WARRANTY
 INSTRUCTIONS AND WARRANTY 20160-56 RUSSELL HOBBS ILLUMINA 360 STAINLESS STEEL KETTLE Congratulations on purchasing our Russell Hobbs Illumina 360 Stainless Steel kettle. Each unit is manufactured to ensure
Instruction Manual M6627 / Version 7.4. Slide Drying Bench MH6616 MH6616X1
 Instruction Manual M6627 / Version 7.4 Slide Drying Bench MH6616 MH6616X1 Please take your time to read this Instruction Manual in order to understand the safe and correct use of your new Electrothermal
Deluxe Ice Crusher. Pour la version française veuillez consulter notre site de web
 Deluxe Ice Crusher Pour la version française veuillez consulter notre site de web Die deutsche Version finden Sie auf unsere Webseite Please read the manual fully before using the appliance and keep the
USER INSTRUCTION MANUAL. Autofill Wall Mount Boilers /12/14
 USER INSTRUCTION MANUAL Autofill Wall Mount Boilers EN 083272701-11/12/14 Contents 1.0 About your Product My Product (please complete this section) page 3 Introduction page 4 Warranty page 4 Important
Installation, Operating and Servicing Instructions
 Installation, Operating and Servicing Instructions Opus 700 Electric Induction Hobs OE7013, OE7014 Please make a note of your product details for future use: Date Purchased: Model Number: Serial Number:
Exclusions. Disclaimer
 100002.qxp_Layout 1 15/10/2014 16:18 Page 1 Health and Safety The use of any electrical appliance requires the following common sense safety rules. Please read these instructions carefully before using
CAUTION: READ OPERATOR S MANUAL BEFORE USE Electric Kettle
 CAUTION: READ OPERATOR S MANUAL BEFORE USE Electric Kettle Visit www.hamiltonbeach-me.com for our complete line of products and Use and Care Guides as well as delicious recipes and tips! Hamilton Beach
the Compact Kettle Instruction Book - BKE320BSS
 the Compact Kettle Instruction Book - BKE320BSS Contents 2 Sage Recommends Safety First 6 Components 7 Functions 8 Care & Cleaning IMPORTANT SAFEGUARDS At Sage by Heston Blumenthal we are very safety conscious.
BRITA Filter Jug Kettle
 43960 rev1_layout 1 30/08/2012 16:21 Page 1 KT43960 MUK Rev 1 * BRITA Filter Jug Kettle Upon registration with Morphy Richards (UK & ROI only) Please read and keep these instructions for future use For
CERAMIC HEATER MODEL NO: DEVIL 350B 230V/110V OPERATING & MAINTENANCE INSTRUCTIONS PART NO: & ORIGINAL INSTRUCTIONS GC ISS 1
 CERAMIC HEATER MODEL NO: DEVIL 350B 230V/110V PART NO: 6920330 & 6920332 OPERATING & MAINTENANCE INSTRUCTIONS ORIGINAL INSTRUCTIONS GC1218 - ISS 1 INTRODUCTION Thank you for purchasing this CLARKE Ceramic
Manual Page 1 of 8. Manual. Laboratory autoclave
 Manual 17.11.2014 Page 1 of 8 Manual Laboratory autoclave Autoclave using steam for the treatment of material and laboratory processes e.g. sterilization, as an aid in research and development CertoClav
User Instruction Manual
 User Instruction Manual Counter Top Convection Oven Please read and keep these instructions These instructions cover the Burco counter top convection oven model CTCO01, SKU 444440542 CTCO01 SKU 444440542
Electrical Double Oven
 0 0 0 Electrical Double Oven Operating & Installation Instructions -Please keep for future reference AE66DCW AE66DCA AE66DCSS Important - Please read these instructions fully before using These instructions
Important Safeguards. Topic 2 SAVE THESE INSTRUCTIONS - FOR HOUSEHOLD USE ONLY SAVE THESE INSTRUCTIONS - FOR HOUSEHOLD USE ONLY 3
 User s Manual Index Topic Important safeguards 03 Safety features 05 Parts and accessories 05 Before first use 06 Operating instructions 06 Programme settings 08 Care and cleaning 09 Pressure canning guide
Autofill wall mounted water. boiler. Getting the best from your water. boiler. Please read and keep these instructions
 Autofill wall mounted water boiler Please read and keep these instructions For Burco wall mounted boilers 76700 (SKU 444448534), 76702 (SKU 444448546), & 76704 (SKU444448548) Getting the best from your
aquamanta the experts in aquatic technology
 HFX 70/100/150/200 TM aquamanta the experts in aquatic technology Coldwater Tropical Marine 2+1 year guarantee Instruction Manual Instruction version: 05/06/2012 Technical Information MODEL: HFX 70 HFX
Instruction Manual. For All Corning Hot Plates, Stirrers, Stirrer/Hot Plates with Digital Displays, and External Temperature Controller (6795PR)
") Instruction Manual For All Corning Hot Plates, Stirrers, Stirrer/Hot Plates with Digital Displays, and External Temperature Controller (6795PR) Corning Cat. No. 230V 230V Model No. Product Top Plate Size
Instruction Manual For All Corning Hot Plates, Stirrers, Stirrer/Hot Plates with Digital Displays, and External Temperature Controller (6795PR) Corning Cat. No. 230V 230V Model No. Product Top Plate Size
Diamond Cut 360 Cordless Jug Kettle Cool Touch Plastic
 Diamond Cut 360 Cordless Jug Kettle Cool Touch Plastic I/B Version 150217 230V~ 50Hz 3000W Front cover page (first page) Assembly page 1/8 Know Your Appliance 1. Two stage button operated flip-top lid
TTT Digital Incubator
 TTT Digital Incubator 135000 135000-2 Operating Instructions N2400342 Rev. 1 08/13 Table of Contents 1.0 Safety... 3 2.0 Intended Use of Product... 4 3.0 Installation... 4 3.1 Unpacking the Unit... 4 3.2
2 KW OIL FILLED RADIATOR
 This product is only suitable for well insulated spaces or occasional use. 2 KW OIL FILLED RADIATOR MODEL NO: OFR9/200 PART NO: 6934005 OPERATION & MAINTENANCE INSTRUCTIONS ORIGINAL INSTRUCTIONS LS0618
Actual product may differ from the one illustrated
 Actual product may differ from the one illustrated Important Safety Instructions READ CAREFULLY AND KEEP FOR FUTURE REFERENCE This product can be used by children aged 8 years and above, and persons who
User Guide & Warranty Information
 User Guide & Warranty Information Product Model/Code: UDK_BW Manual v.1.0 PAGE CONTENTS Important Safety Instructions pg 5 Know Your Kettle pg 9 Operation pg 13 Care and Cleaning pg 14 Warranty pg 15
Operator s Manual. Model G32-S Model G32-E Disinfection Soak Stations
 Model G32-S Model G32-E Disinfection Soak Stations Operator s Manual CIVCO Medical Solutions 102 First Street South Kalona, IA 52247 USA Tel: 1-800-445-6741 Fax: 1-877-329-2482 Website: WWW.CIVCO.COM Copyright
3 In 1 AIR CONDITIONER with REMOTE CONTROL MODEL NO: CA9000 PART No: OPERATION & MAINTENANCE INSTRUCTIONS
 3 In 1 AIR CONDITIONER with REMOTE CONTROL MODEL NO: CA9000 PART No: 32305600 OPERATION & MAINTENANCE INSTRUCTIONS 0304 Parts List Item Part No Description Qty 1 FT900001 Top Cover 1 2 FT900002 Filter
HOT CUPBOARD WITH BAIN MARIE
 Page 1 of 8 INSTALLATION INSTRUCTIONS SAFETY INSTRUCTIONS USER INSTRUCTIONS HOT CUPBOARD WITH BAIN MARIE MODEL: HOT12BM, HOT15BM, HOT18BM Page 2 of 8 OPERATING THE CABINET 1. Plug machine in to power supply.
User Instruction Manual
 User Instruction Manual 4 & 6 Slot Toasters This covers the Burco 4 & 6 slot toasters TSSL14 & TSSL16 444440355 & 444440356 Red End Cap 4 slot 444440606 Red End Cap 6 slot 444440608 Cream End Cap 4 slot
14 Bottle Wine Chiller with Digital Display CZ51186
 The product may differ from the one illustrated but the operation remains the same 14 Bottle Wine Chiller with Digital Display CZ51186 USER INSTRUCTIONS Please read these instructions carefully before
Conception Wall Fire. Instruction Manual THE SCIENCE BEHIND CLEAN.
 Conception Wall Fire Instruction Manual BEHIND CLEAN www.beldray.com Please read all of the instructions carefully and retain for future reference. Safety Instructions When using electrical appliances,
BOILING UNIT REDITAP. Installation and User Guide. IMPORTANT: This booklet should be left with the user after installation and demonstration
 in tap Boiling water to in tap sink Drain Valve (as high as possible) REDITAP CONNECTION SUMMARY Amp mains supply cold mains water into in tap optional filter cold water in hot water BOILING UNIT Installation
Autofill counter top water boiler
 Autofill counter top water boiler Please read and keep these instructions For Burco counter top water boilers 76500 (SKU 444448531) and 76502 (SKU 444448533) Getting the best from your water boiler Remove
Essentials Family and Pets+ permanent bagged cylinder vacuum cleaner
 70255 rev1 12/9/07 09:49 Page 1 Essentials Family and Pets+ permanent bagged cylinder vacuum cleaner Please read and keep these instructions Getting the best from your new cleaner... If your cleaner is
User Instruction Manual
 User Instruction Manual Export Electric Catering Urn Please read and keep these instructions These instructions cover the Burco 10, 20 and 30 litre electric catering urns for export SKU s 444441912, 444441913
Instruction Manual for the Revolutionary Science Saniclave
 Instruction Manual for the Revolutionary Science Saniclave Model RS-SC-102 and RS-SC-50 REVOLUTIONARY SCIENCE Making Science Simple Table of Contents Introduction 2 Display, Symbols, Control and Parts
3 Litre Fryer v2.0. Model: SD6040N. Helpline. SD6040N_IM.indd 1 28/10/ :44
 3 Litre Fryer Model: SD6040N Helpline 01733 404703 v2.0 SD6040N_IM.indd 1 28/10/2014 08:44 IMPORTANT INFORMATION - RETAIN FOR FUTURE USE When using any electrical appliance, basic safety precautions should
Package Contents. Dry Block Heater Power Cord Instruction manual Warranty Card. Serial Number: Date of Purchase: Supplier: Table of Contents
 - English... 1 Instruction Manual Analog, Dry Block Heater, 1 Block, HB1AL Analog, Dry Block Heater, 2 Block, HB2AL Analog, Dry Block Heater, 4 Block, HB4AL Analog, Dry Block Heater, 6 Block, HB6AL Digital,
Autofill Wall Mount Boilers
 USER INSTRUCTION MANUAL Autofill Wall Mount Boilers Burco Warranty 1 Year Parts 1 Year Labour 083262902-03/03/15 1.0 About your Product Contents My Product (please complete this section) page 3 Introduction
REPLACING THE BRITA MEMO
 43549 Rev2 29/4/08 16:29 Page 1 Change display G: Every week, one bar will disappear to show the remaining cartridge life. After four weeks, all four bars will disappear. This, and a flashing arrow, indicate
Oil Panel Heater Instructions for Use
 This product is only suitable for well insulated spaces or occasional use. Technical Data: Model Item No. Voltage Frequency Output (W) Protection Class OPA-60 10818 AC 230V 50/60Hz 600W I Accessories:
Health and Safety (cont)
") 43485 0x1rev3_Layout 1 08/1/011 13:57 Page 1 Health and Safety (cont) Do not touch hot surfaces, use handles or knobs. Always close the lid if applicable and always have the filter in place. Avoid contact
43485 0x1rev3_Layout 1 08/1/011 13:57 Page 1 Health and Safety (cont) Do not touch hot surfaces, use handles or knobs. Always close the lid if applicable and always have the filter in place. Avoid contact
PARAGON FRYERS INSTALLATION INSTRUCTIONS SAFETY INSTRUCTIONS USER INSTRUCTIONS MODEL: PSF3 MODEL: PDPF9 MODEL: PDPF6 MODEL: PF9
 Page 1 of 15 INSTALLATION INSTRUCTIONS SAFETY INSTRUCTIONS USER INSTRUCTIONS PARAGON FRYERS MODEL: 1860 MODEL: 1862 MODEL: 2000 MODEL: 2001 MODEL: CMF MODEL: CMF2 MODEL: CMFF2 MODEL: CMFF MODEL: PDF3 MODEL: