OPERATING INSTRUCTIONS MIGHTYLAM 2700 ROLL LAMINATOR
|
|
|
- Emmeline Crawford
- 6 years ago
- Views:
Transcription

1 OPERATING INSTRUCTIONS MIGHTYLAM 2700 ROLL LAMINATOR
2 TABLE OF CONTENTS Safety Messages and Electrical Safeguards Introduction... Laminator Features...5 Specifications...5 Intial Set-up...6 Operating Instructions 7-8 Operation... Loading Laminating Film...8 Threading Laminating Film Adjusting Mandrel/Film Tension...10 Heat Shoe Temperature...10 Laminating... Coating Mount Board...11 Mounting & Laminating...12 Troubleshooting...13 Maintenance... Cleaning Heat Shoes & Rollers...14 Removing Wrap-Arounds...14 Warranty & Return Policy...15 Parts List Parts Illustrations... Exploded View...18 Side Panels Wiring Diagram
3 IMPORTANT SAFETY MESSAGES AND ELECTRICAL SAFEGUARDS For your protection, do not connect the laminator to electrical power or attempt to operate it until you read these instructions completely. Keep these instructions in a convenient location for future reference. This instruction manual and labels affixed to the laminator are important safety messages. Read these messages carefully. For your safety... Save these Operating Instructions for later use. Keep hands, long hair, clothing, and other loose articles such as jewelry and ties, away from laminator s moving parts. Do not touch the heat shoes while the laminator power is turned on. Allow shoes to cool completely before touching. Do not use the laminator for other than its intended purpose. Place laminator on a sturdy cart, stand, or table. A laminator placed on an unstable surface may fall, causing serious bodily injury. Use caution when moving laminator on a rolling cart or stand. Never insert objects or spill liquids in or on the laminator. They may contact dangerous voltage points or short out components that could result in fire or electrical shock. The laminator should only be operated from the type of power source indicated in these Operating Instructions and on the data plate located on the rear panel of the laminator. The three-pronged grounding plug is a safety feature and will only fit into a grounding-type power outlet. If you are unable to insert the plug into an outlet contact a qualified electrician to have a suitable outlet installed. Do not leave the laminator power on overnight. Unplug the laminator at the end of the day. Unplug the laminator before moving it or when it is not in use for an extended period of time as a precaution against the possibility of an internal malfunction that could create a fire hazard. Do not operate the laminator with a damaged power supply cord or plug, or after it malfunctions or has been damaged in any manner. Keep the power cord away from hot or wet surfaces. Do not overload electrical outlets beyond their capacity as this can result in fire or electrical shock. Adjust only those controls that are specified in these Operating Instructions. 3
4 If the below conditions exist do not attempt to service or repair the laminator yourself. Unplug the laminator from the electrical outlet and contact an authorized service representative. When the power supply cord or plug is damaged or frayed. If liquid has been spilled into the laminator or it has been exposed to water. If the laminator has been subjected to excessive jarring through being dropped or bumped. If the laminator does not operate normally when following the operating instructions. KEEP THE LAMINATOR OUT OF THE REACH OF CHILDREN. 4
5 INTRODUCTION Congratulations on your purchase of the MightyLam 2700 Roll Laminator. This unit is designed to provide years of trouble-free service. The MightyLam 2700 will accept rolls of laminating film up to 27 wide in all film thicknesses. Paper and card stock up to 1/16 (1.6mm) thick may be laminated without adjusting the rollers. Your MightyLam 2700 is preset at the factory for most applications so any adjustments should be minor. Laminator Standard Features... Preset laminating roller pressure require no adjustment. Feed table with adjustable guide Dual digital heat controllers. Teflon coated Heat Shoes for easy cleaning. Laminating film widths up to 27 (68.6cm). Total material thickness up to 3/16 (4.8mm) with roller adjustment. SPECIFICATIONS Plastic Width Plastic Thickness Maximum Roll Length Speed Net weight Power Requirements Up to 27 (68.6cm) 1.5 mil up to 10 mil (37 to 250 micron) 1.5 mil - 1,000 feet (304.8 meters) 3 mil feet (152.4 meters) 5 mil feet (76.2 meters) 10 mil feet (30.5 meters) 0-10 feet per minute (3m/minute) 97.5 lbs (44 kg) 120VAC, 60Hz, 1800 watts 5
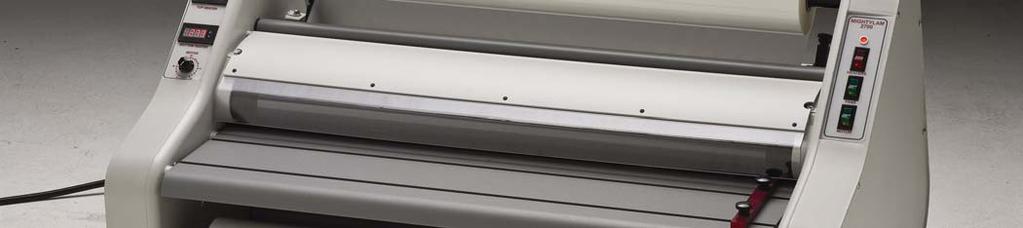
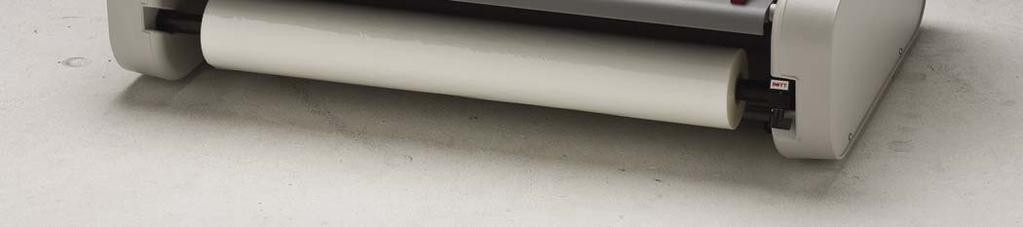
6 INITIAL SETUP Unpacking... Before unpacking the unit, inspect the shipping container for signs of damage. Notify the carrier and your dealer immediately if any damage is noted. Components... Figure 1 below shows the location of the major components and controls of the MightyLam You should become familiar with these before operating the laminator. Figure 1 6
7 OPERATING INSTRUCTIONS Heat Control Your new MightyLam 2700 has digital heat controllers for each heat shoe. Users can easily adjust the set temperature for each heat shoe individually to achieve the best quality lamination. Both controllers have been calibrated to accurately display the heat shoe temperature in the laminating range. The heater switch on the right side frame activates both controllers. When the switch is turned on both controllers will flash a two letter code and then display the heat shoe temperature. When cold, the temperature displayed on the controllers may be different than the actual ambient temperature to account for correction in the higher temperature range. When the heater switch is turned on the controller will send power to the heaters, provided the Set Temperature is higher than ambient temperature. (For safety reasons, this machine was shipped with the Set Temperature at 250). When power is being sent to the heaters the controllers will illuminate a small red indicator light in the lower right hand corner of the display. The light goes out when the Set Temperature is reached. Power to the heaters cycle on and off when the heat shoe temperature falls below the Set Temperature during lamination or while sitting idle. The heat indicator light above the heater switch is connected to the top heat shoe only and indicates when that heat shoe is heating. Determining and Adjusting the Set Temperature To determine the Set Temperature, with the heater switch activated and the current temperature displayed, press and hold down either the up or down arrow for 3-4 seconds. The display will change and flash the Set Temperature and SU alternately. After 10 seconds the display will return to the ambient/heat shoe temperature. To change the Set Temperature, depress and hold either arrow down for 3-4 seconds until the Set Temperature and SU flash. Depress and hold the appropriate arrow to raise or lower the setting. The digits will change slowly initially but will increase speed when held down longer for large changes. When the desired setting has been reached, depress both arrows simultaneously to save the Set Temperature. Each time the machine is turned on it will heat up to the last Set Temperature. It is advisable to verify the Set Temperature when starting to warm up the machine each day. Motor Switch: This switch controls power to the motor. After the switch is turned on, use the motor speed potentiometer to vary the speed of film through the rollers. Forward/Reverse Switch: This three position switch is found on the back of the machine. The switch must be in the down position for forward. When the switch is held in the up position, and the motor switch is on, the rollers move in the reverse direction. This is useful for clearing film from the rollers. When released from the up position the switch returns to a neutral position and must be pushed down for forward. Fan Switch: This switch turns the fans on and off. (Switch will be lighted when the fans are on). 7
8 OPERATION This section describes the operation of your MightyLam This laminator is designed for all widths of plastic up to 27. However, if narrower widths are used the Heat Shoes must be cleaned before using a wider roll. Refer to the MAINTENANCE section for cleaning instructions. Loading Laminating Film onto Mandrels... Slide the film onto the mandrel. Note that one mandrel is labeled TOP and the other BOTT (for bottom). They are not interchangeable. Threading Laminating Film... These instructions apply to poly-in film rolls (shiny side out, dull side in). 1. For the top supply roll place the mandrel ends into the slots in the top of the laminator. If you are facing the front of the laminator the film should unwind toward you from the bottom of the roll as in figure below. 2. Pull 6-12 of film from the top roll. Pass the film under the idler bar, heat shield and over the heat shoes. Make sure the shiny side of the film is against the shoes. See figure 5&6. 3. For the bottom supply roll, remove the feed table. Place the mandrel ends into position in the lower mandrel holder slots. If you are facing the front of the laminator the film should unwind away from you from the bottom of the rollers as shown in figure below. 8
9 4. Pull 6-12 of film from the bottom roll. Pass it under the lower idler bar. You can drop-down the lower idler bar to give you more clearance. After doing so, return the idler bar to its upper position for running the machine. Drape the film from the bottom roll over the film from the top roll. See figures 5&6. FIGURE 5 FIGURE 6 NOTE: The shiny side of the film must always go against the heat shoes. The heat shoes reach a temperature of up to 350 F. Do not touch the surface of the heat shoes. 5. Turn the Motor Switch on to start the Laminating and Pull Rollers. 6. Feed a piece of thin cardboard about 10 x 25 against the film so that it is centered between the two heat shoes. Push the cardboard and film into the laminating rollers. See figure 5. Watch cardboard pass through the back (pull) rollers to avoid a wrap-around. 7. When the feed card has completely exited the pull rollers at the rear of the laminator turn the motor switch off. 8. Replace the feed table. 9. If you are ready to laminate, the heat switch should be in the on position and the heat indicator should have gone off. 9
10 Adjusting Mandrel/Film Tension.. Each type of laminating film has different characteristics and may require laminator adjustment. The tension should be set so that the film moves over the heat shoes without wrinkles as the film enters the laminator. Best results are obtained if tension adjustments are made while the unit is at operating temperature. If any adjustments are required use the following procedure: 1. Switch the heaters on. Wait for the heat shoes to reach operating temperature. 2. Press the motor switch to on. 3. Locate the knob on the right side of the top supply mandrel. See Figure 1. Turn the knob to adjust the tension (clockwise to increase, counter clockwise to decrease) until the film passes over the top heat shoe without wrinkles and the web between the laminating and pull rollers is tight. Note: This adjustment requires only a few degrees of turn. If the knob is turned too far, you may stall the drive motor. 4. If necessary locate the knob on the right side of the bottom supply mandrel and adjust the tension as in step 3 above. 5. If you are not ready to laminate, turn the motor switch and heat switch off. Setting Heat Shoe Temperature... The laminator temperature should be adjusted according to the film thickness and the item being laminated. Contact film manufacturer for recommended temperature settings. Keep in mind that the temperatures listed are approximate and different brands of laminating film and heavy paper stocks may require different temperatures. Also keep in mind that when the machine is cold the warm-up time may be longer than the heat indicator light may suggest due to the rollers not yet having sufficient heat distribution. Use the heater controllers on the left side of the laminator to adjust the temperature of the heat shoes. Use the temperatures in the table below as a guide. Material Temperature Range 1.5 mil (.0015 ) 270 F F 3 mil (.003 ) 260 F F 5 mil (.005 ) 250 F F 10 mil (.010 ) 250 F F Adjusting Slitter Blades The slitter (figure 8) may be set to trim the web to the desired width as it exits the laminator. If an additional slitter blade is installed (optional), two pages (side-by-side) may be laminated and trimmed in a single operation. (As the web exits the unit, these pages may then be separated with the additional slitter blade). 10
11 Caution! If the blade release knobs are turned too far, the slitter blade may fall out of its guide and come in contact with the rubber rollers. If this happens, the rollers could be damaged. Never turn the blade release knobs more than one turn to position the blades. To Adjust the Slitter Blades: 1. Be sure the slitter blades are positioned above the laminating web. If they are lowered, loosen the release screws and lift the blades away from the web. Tighten the screws to lock the blades in place. 2. Loosen the positioning screws (counter clockwise) and slide the slitter blades left or right to the desired width of the edge seal. Lock the blades left or right to desired position by turning the positioning screws (clockwise). 3. Carefully, loosen each release screw and lower the blade in contact with the web. Tighten the release screw. 4. To prevent accidental damage to rollers, remove slitter blades when not in use. Figure 8 Laminating 1. Be sure the heaters have been turned on and are at the proper temperature. The fans should be turned on for laminating 3mil and heavier. Caution! Do not allow the temperature to exceed 350 F as this could cause the laminating film to melt on the heat shoes. 2. Adjust the Paper Guide on the Feed Table so that the right edge of the item will enter the laminator at the desired position. 3. Press the motor switch to the on position. The film will begin moving through the laminator. Please turn off fans when the motor is not running. 4. After clear laminating film exits the pull rollers at the rear of the machine you may feed the first item to be laminated into the laminator with the right side along the paper guide. 11
12 Note: You may want to run a test lamination first as any item that passes between the heat shoes will be laminated and cannot be recovered until it exits the rear of the laminator. 5. Additional items may be fed in sequence, keeping enough distance between sheets for trimming. 6. After the last item has exited the pull rollers, turn the motor switch off. 7. Use the zippy cutter to cut across the film to remove the laminated items from the unit. Coating Mount Board The MightyLam 2700 is capable of applying an adhesive coating on up to 3/16 uncoated mount board. 1. Load a roll of adhesive, with the liner wound to the outside, onto the top mandrel in the same manner as with laminating film. Thread the liner side of the adhesive over the top idler roller (so that the adhesive does not stick to the idler roller) and then through the laminator as with laminating film. 2. If the mount board is the same width as the roll of adhesive it is not necessary to load anything onto the bottom mandrel. If the mount board is narrower than the adhesive, load a roll of paper or film onto the bottom mandrel to keep the adhesive from accumulating on the rollers and heat shoes. Thread as for laminating film. 3. Using the supplied allen wrench back out the four pressure adjustment screws 1 full turn for each 1/16 thickness of the board. I.e. 3/16 3 full turns. (Be sure to count the number of turns so the screws can be returned to original position). 4. Turn heat switch to ON position if heat is needed for the application. 5. Set the temperature to the desired setting, depending upon the type of adhesive used. 6. Feed the uncoated mount board into the laminator behind a leader board of the same thickness. The leader board will prevent the compression of the leading edge of your mount board. 7. You may coat subsequent boards now, one directly behind the other, so that the board in front becomes the leader board. If at any time you have adhesive going through the machine without mount board, be sure to pull the adhesive on the exit side of the machine to prevent a wrap-around. Mounting & Laminating The MightyLam 2700 is capable of simultaneously mounting and laminating a print on up to 3/16 mount board. Preparing your print for mounting: 1. Peel back about 2 of release liner on your pre-coated mount board. 2. Align the top edge of your print with the top edge of the mount board (see figure 9). 12
13 Mounting your print: 1. Be sure all laminator parts (i.e. safety shield, feed table, etc.) are in their proper positions and the laminating film is loaded correctly on top and bottom mandrels. (See page 8-9 for film loading instructions). 2. Using the supplied allen wrench back out the four pressure adjustment screws 1 full turn for each 1/16 thickness of the board. Ie. 3/16 3 full turns. (Be sure to count the number of turns so the screws can be returned to original position). FIGURE 9 3. Turn the heat switch to the ON position. 4. Set the temperature using table 1 on page 10 as a guide. You may need higher temperatures than indicated for mounting and laminating mount board. 5. Turn the fans on. 6. Perform a test mount to ensure proper settings for successful mounting. If any adjustments are necessary make them now and run another test. Repeat this step until you obtain desired results. 7. Feed the print and mount board slowly and evenly into the laminator behind a leader board so that the leading edge of your mount board does not become compressed. Pull back the peeled back release liner before it enters the rollers. 8. You may mount subsequent prints now, one directly behind the other so that the board in front becomes the leader board. 9. Once your last print has completely exited the laminator, turn the MOTOR and FAN switches OFF and use the trimmer to remove the mounted and laminated prints. 13
14 TROUBLESHOOTING PROBLEM: ACTION: PROBLEM: ACTION: PROBLEM: ACTION: Laminator is inoperative. Motor does not run, indicator lights are out. Unit may be unplugged. Connect power supply. Ensure that your circuit breaker has not tripped. Fuse may have blown. Replace 15 amp power fuse. Laminating film and item being laminated move through laminator erratically. Check thickness of item to be laminated. Maximum thickness is 1/16 (1.6mm) if rollers have not been adjusted. Clean heat shoes of residual adhesive. Refer to MAINTENANCE section for cleaning instructions. Plastic is not bonding to the item or to itself at the edges. Make sure heat shoes and rollers are at proper operating temperature and have had time to warm up (Approximately 30 minutes). See table 1 for the suggested temperature ranges. PROBLEM: ACTION: PROBLEM: ACTION: PROBLEM: ACTION: Wrinkles appear on the laminated items running parallel with the outside edges. Increase film tension on top and/or bottom supply rolls. Reduce heat shoe temperature. Clean heat shoes of residual adhesive. See MAINTENANCE section for cleaning instructions. Blistering of the film appears over the item or along the edge. Reduce temperature on one or both heat shoes. If the indicator light remains on after the adjustment is made, disconnect the power supply and contact your dealer. Clean laminating rollers. See MAINTENANCE section for cleaning instructions. There may be moisture in the paper you are laminating. Store paper in a dry place and be sure that any ink is thoroughly dry before laminating. Laminated material curls after leaving pull rollers. Adjust tension. If laminated item curls upwards, reduce top roller film. If item curls downward, reduce bottom film tension. Clean heat shoes of residual adhesives as it may be causing drag on one side. Refer to MAINTENANCE section for cleaning instructions. 14
15 MAINTENANCE This section contains instructions for cleaning and maintaining your laminator. These procedures should be preformed at regular intervals to help ensure the trouble-free operation of your laminator. Cleaning the Heat Shoes and Laminating Rollers... The heat shoes and laminating rollers should be cleaned of any residual adhesive whenever the film does not pass smoothly over their surfaces. NOTE: The surface of the heat shoes is Teflon coated and must only be cleaned using a soft cloth. The heat shoes can easily be damaged by sharp or abrasive objects. 1. Allow the heat shoes to cool. 2. Remove the feed table. 3. Cut the plastic film at the top and bottom mandrels. 4. Turn the motor switch on and pull the film out of the back of the machine. 5. Turn the motor switch off. 6. Use a soft cloth moistened with denatured alcohol to remove any residue from the Teflon surface of the heat shoes and laminating rollers. 7. Allow the heat shoes and laminating rollers to dry before re-threading the film. Removing Wrap-Arounds... When laminating with thinner gauges of film, there is the possibility of the film wrapping around the pull rollers. Use the same procedure for cleaning the heat shoes and laminating rollers in order to remove a wrap-around. If the film cannot be pulled out of the back of the machine, leave the motor and switch on and use the forward/reverse switch on the back of the machine to reverse the rollers so the film can be pulled up and out of the machine. 15
16 WARRANTY AND RETURN POLICY Warranty Your laminator is warranted to be free of defects in material and workmanship for a period of 1 year from the original purchase date. In the event of a defect in material or workmanship, the manufacturer or its authorized dealer, will repair or replace (at their option) the laminator. This does not cover rollers that have been damaged due to improper usage. The manufacturer makes no other warranty stated or implied except as stated above. Return Policy If your laminator is not operating properly, first review the Operating Instructions and Troubleshooting Guide. If the malfunction cannot be corrected, contact your local dealer for instructions. Be sure to have your machine serial number and date of purchase handy. If the laminator must be returned to the dealer, proper packaging and freight charges are your responsibility. Shipping damages as a result of improper packaging is not covered under the terms of this warranty. 16
17 PARTS LIST AND ILLUSTRATIONS This section contains reference drawings and a partial parts list to assist you when ordering parts for your laminator. Some of the descriptions may have been changed for clarification. Item Part No. Description Qty BUSHING, SUPPLY MANDREL SUPPLY MANDREL, TOP CORE GRIPPER C-CLIP 15/15 DIA BRAKE, SUPPLY MANDREL KNOB, MANDREL BRAKE COVER, REAR FAN HOUSING FAN, COOLING, 120V, EZII SUPPLY MANDREL, BOTTOM SAFETY SHIELD GLASS, SAFETY SHIELD TIE BAR, REAR TIE BAR, FRONT HEAT SHOE HOLDER, GLASS, HEAT SHIELD COVER, ROLLER, REAR MOUNT, HEAT SHOE EZII BUSHING, IDLE ROLLER ROD, IDLER, TOP ROD, IDLER, BOTTOM TUBING, IDLER ROLLER SUPPORT, REAR, FEED TABLE SUPPORT, FRONT, FEED TABLE ROLLER, FRONT TOP ROLLER, FRONT BOTTOM ROLLER, REAR TOP ROLLER, REAR BOTTOM BLOCK, IDLER SPROCKET BOLT, IDLER SPROCKET BACKING,IDLER,BLOCK,EZII MOTOR, EZII, 80mm SPROCKET, IDLER,MIGHTYLAM SPROCKET, FRONT ROLLER, 22T SPROCKET, REAR ROLLER, 21T SPROCKET, MOTOR, MIGHTYLAM CHAIN, MIGHTYLAM HEAT SINK RELAY, SOLID STATE 25A DC TERMINAL BLOCK, 10 STA COVER, SIDE HEATER, TUBULAR 6 17
18 TABLE, FEED SUPPORT, RIGHT SIDE SUPPORT, LEFT SIDE SPACER WASHER LIGHT,INDICATOR,RED 120V SWITCH, RED (HEAT) SWITCH, GREEN (MOTOR & FANS) SCREW, ROLLER PRESSURE SPRING, ROLLER PRESSURE SPRING, MANDREL BRAKE ADJUSTMENT VARIABLE SPEED CONTROL TERMINAL BLOCK, 6 STATION BUSHING, ROLLER, TOP BUSHING, ROLLER BOTTOM KNOB, MOTOR SPEED CONTROLLER, HEAT FEED TABLE GUIDE ASSEMBLY CORD, POWER DVD, ROLL LAMINATOR FEET, RUBBER, LARGE FUSE HOLDER, MOTOR FUSE FUSE HOLDER, POWER FUSE, MAIN POWER 15AMP ABC FUSE, MOTOR, 3/4 AMP AGC3/ HEX KEY, ROLLER PRESSURE ADJUSTMENT LABEL, RIGHT MIGHTYLAM LABEL, LEFT MIGHTYLAM SENSOR, K TYPE SHAFT COLLAR, FR12, 1/2" SLITTER BLADE ASSEMBLY SWITCH,MOTOR FORWARD REVERSE 1 18
19 19
20 20
21 21
22 22
Easy-Lam School Budget Roll Laminator
 DO NOT DISCARD BOX! (If for any reason you need to ship your machine back and you discard your box you will be responsible for purchasing another one plus any freight charges to ship the box to you) Easy-Lam
OPERATING MANUAL Gfp 255C Please read this manual carefully before operating!
 OPERATING MANUAL Gfp 255C Please read this manual carefully before operating! Unpacking, assembly, and operating videos are available at www.gfpsmoothstart.com 1 Table of Contents Gfp 255C March 2015 Contents
OWNERS MANUAL. Minikote EZ
 OWNERS MANUAL Minikote EZ 652792 CONTENTS Section Index Speci cations...1 Important Safeguards...2 General Diagrams...3-4 I. Unpacking...5 II. Information About Laminating Film...5 III. Operating A. Control
OPERATING MANUAL Gfp 800 Series
 OPERATING MANUAL Gfp 800 Series Please read this manual carefully before operating! 1 Contents Table of Contents Page 1. Introduction 3 2. Important Safety Instructions.. 3 3. Installation Safeguards..
Gfp 400 Series August Gfp 463 TH. Please read this manual carefully before operating!
 OPERATING MANUAL Gfp 455 TH Gfp 463 TH Please read this manual carefully before operating! 1 Table of Contents Gfp 400 Series August 2015 Contents Page 1. Introduction 3 2. Important Safety Instructions..
OWNER'S MANUAL RSL MyBinding.com 5500 NE Moore Court Hillsboro, OR Toll Free: Local:
 OWNER'S MANUAL RSL-2701 Read all instructions carefully before use. For any Customer Support needs please choose the Customer Support tab on www.royalsovereign.com topic TABLE OF CONTENTS page 1. Introduction...
FD Heavy Duty Feeder for FD 280 Tabbing System
 FD 280-10 Heavy Duty Feeder for FD 280 Tabbing System Operator Manual 8/2011 First Edition TABLE OF CONTENTS 1. INTRODUCTION... 1 1.1 Feeder Description... 1 1.2 Items Included... 1 1.3 Operating Manual
45 Wide Format Hot and Cold Laminator
 45 Wide Format Hot and Cold Laminator 1 IMPORTANT SAFEGUARDS OPERATING INSTRUCTIONS TCC1200 When using electrical machines, basic precautions should always be followed to reduce the risk of electric shock
Product instruction manual Easymount Wide Format Laminators
 Product instruction manual Easymount Wide Format Laminators The Easymount has been designed to be user friendly, however we strongly recommend you take a few minutes to read through this manual to ensure
OWNERS MANUAL. D&K Minikote
 OWNERS MANUAL D&K Minikote CONTENTS Section Index Specs...1 Important Safeguards...2 General Diagrams...3-4 I. Unpacking...5 II. Information About Laminating Film...5 III. Operating A. Control Panel...5-6
TA-12. Tabbing System USER'S GUIDE
 TA-12 Tabbing System USER'S GUIDE SAFETY PRECAUTIONS THIS EQUIPMENT PRESENTS NO PROBLEM WHEN USED PROPERLY. HOWEVER, CERTAIN SAFETY RULES SHOULD BE OBSERVED WHEN OPERATING THE TA12 TABBER. BEFORE USING
ASTRO ENVELOPE FEEDER AMC FOR HEIDELBERG PRINTMASTER INSTALLATION AND OPERATING INSTRUCTIONS
 ASTRO ENVELOPE FEEDER AMC-2000-17 FOR HEIDELBERG PRINTMASTER INSTALLATION AND OPERATING INSTRUCTIONS INTRODUCTION Thank you for purchasing the Astro Envelope Feeder. It is fast, efficient, reliable, and
Product instruction manual Easymount Wide Format Laminators
 Product instruction manual Easymount Wide Format Laminators The Easymount has been designed to be user friendly, however we strongly recommend you take a few minutes to read through this manual to ensure
OWNER'S MANUAL. RSL-2701U (for CANADA MODEL) RSL-2701S (for USA MODEL ) Royal Sovereign International Inc.
 RSL-2701S (for USA MODEL ) Royal Sovereign International Inc.") OWNER'S MANUAL RSL-2701U (for CANADA MODEL) RSL-2701S (for USA MODEL ) Read all instructions carefully before use. For any Customer Support needs please choose the Customer Support tab on www.royalsovereign.com
OWNER'S MANUAL RSL-2701U (for CANADA MODEL) RSL-2701S (for USA MODEL ) Read all instructions carefully before use. For any Customer Support needs please choose the Customer Support tab on www.royalsovereign.com
Instruction Manual. Model: LPP4513 (18 ) For safe operation be sure to read through this instruction manual before operating your Laminator.
 For safe operation be sure to read through this instruction manual before operating your Laminator.") Instruction Manual Model: LPP4513 (18 ) For safe operation be sure to read through this instruction manual before operating your Laminator. ID Card System, Laminating Machines & Film FUJIPLA, Inc. TOKYO,
Instruction Manual Model: LPP4513 (18 ) For safe operation be sure to read through this instruction manual before operating your Laminator. ID Card System, Laminating Machines & Film FUJIPLA, Inc. TOKYO,
DryLam SL27 27" Laminator
 DryLam SL27 27" Laminator Instruction Manual Provided By http://www.mybinding.com http://www.mybindingblog.com 652792 OWNERS MANUAL SL27 CONTENTS Section Index Specifications...1 Important Safeguards...2
TACH-IT MODEL #3568 SEMI-AUTOMATIC TWIST TIE MACHINE OPERATION MANUAL AND PARTS LIST
 TACH-IT MODEL #3568 SEMI-AUTOMATIC TWIST TIE MACHINE OPERATION MANUAL AND PARTS LIST 1 TABLE OF CONTENTS: SECTION 1 CAUTION PAGE 3 SECTION 2 PARTS IDENTIFICATION PAGE 4 SECTION 3 MACHINE DIMENSIONS AND
ARCTIC TITAN 165 OPERATION & MAINTENANCE MANUAL
 ARCTIC TITAN 165 OPERATION & MAINTENANCE MANUAL October 2000 GBC Films Group Do not duplicate without written permission. GBC Pro - Tech 4151 Anderson Road DeForest, WI 53532 Revision : A Ph: ( 608 ) 246-8844
OWNER'S MANUAL SKYLAM 1120 / 720 / 380. * Read all instructions carefully before use.
 SKY OWNER'S MANUAL * Read all instructions carefully before use. * To aviod fire or eletric shock, do not expose the products to rain or moisture. 1 SKY 1. INTRODUCTION. 3 2. SAFETY PRECAUTIONS 3 3. INSTALLATION.
WIDE FORMAT LAMINATING OPERATION AND MAINTENANCE MANUAL MRL SERIES ROLL LAMINATORS/MOUNTERS. Inc. Since 1975
 USI Inc. Since 1975 WIDE FORMAT LAMINATING OPERATION AND MAINTENANCE MANUAL MRL SERIES ROLL LAMINATORS/MOUNTERS IMPORTANT INFORMATION PLEASE DO NOT DESTROY THE SHIPPING CARTON! USI urges you to store the
TCC-2700 LAMINATOR
 TCC-2700 LAMINATOR 028 001 011 046 041 013 058 014 045 027 016-1 016 059 009-1 033 032 031 028 016 030 047 044 012 007 008-1 009 015 039 028-1 023 002 003 046 017 035 049 010 029 036 036-2 050 057 022
ASG EZ-9000GR Tape Dispenser User Manual ASG #66136
 ASG EZ-9000GR Tape Dispenser ASG #66136 Revision Date: 03/27/18 1 Read Before Use Warnings and Cautions The safety guidelines in this instruction manual must be observed in order to prevent injury to the
Think & Tinker, Ltd. Dry Film Laminator Operation Manual
 Think & Tinker, Ltd. Dry Film Laminator Operation Manual Model 4200 5200 6200 Think & Tinker, Ltd. Palmer Lake, CO Table of Contents IMPORTANT SAFETY INSTRUCTIONS...4 IMPORTRANT SAFEGAURDS...4 General...4
Operating Manual Model BP500 and BP500 IJ Tape Dispenser
 Operating Manual Model BP500 and BP500 IJ Tape Dispenser Meets UL and CE Electrical and Safety Standards BETTER PACKAGES 4 Hershey Drive, Ansonia, CT 06401 Website: www.betterpackages.com BP P/N: MAN-500-OPR
EP-21F Manual Letter Folder Operation Manual
 EP-21F Manual Letter Folder Operation Manual EP Equipment Co.,Ltd. Introduction Thank you for selecting EP folder. This machine is designed for efficiently folding paper up to legal size (216 356mm). To
Product instruction manual Easymount Wide Format Laminators
 Product instruction manual Easymount Wide Format Laminators The Easymount has been designed to be user friendly, however we strongly recommend you take a few minutes to read through this manual to ensure
Owner's Manual RSL-2700 GRAPHIC LAMINATION PRODUCTS
 Owner's Manual RSL-2700 GRAPHIC LAMINATION PRODUCTS Royal Sovereign International Inc. Please read and retain these instructions. To register your product, please go to www.royalsovereign.com www.royalsovereign.com
INSTRUCTION MANUAL FOR DUTCHESS MODEL 260 BAGEL & BUN SLICER
 INSTRUCTION MANUAL FOR DUTCHESS MODEL 260 BAGEL & BUN SLICER Table of Contents Safety Information I thru VII Uncrating Instructions 1 Introduction 2 Adjustment Instructions 3 Operating Instructions, Cleaning,
OPERATING & SERVICE PARTS MANUAL 700ES ENERGY SMART WRAPPER SERIES C
 OPERATING & SERVICE PARTS MANUAL 700ES ENERGY SMART WRAPPER SERIES C READ ALL INSTRUCTIONS CAREFULLY BEFORE OPERATING EQUIPMENT TABLE OF CONTENTS Machine Components & Electrical Requirement... Preliminary
OWNER'S MANUAL. RSC-820CL/CLS Laminator
 OWNER'S MANUAL RSC-820CL/CLS Laminator Read all instructions carefully before use. For any Customer Support needs please choose the Customer Support tab on www.royalsovereign.com Royal Sovereign International
TA-12/HT12 Tabber. OPERATING GUIDE Revised:
 TA-12/HT12 Tabber OPERATING GUIDE Revised: 2-27-13 Neopost USA would like to Thank You for investing in our quality built products. Please record the following information for future reference: Model:
Owner's Manual Paramount 65X GRAPHIC LAMINATION PRODUCTS
 Owner's Manual Paramount 65X GRAPHIC LAMINATION PRODUCTS Royal Sovereign International Inc. Please read and retain these instructions. To register your product, please go to www.royalsovereign.com www.royalsovereign.com
HEDMAN DI-50. Endorser Instructions. Hedman DI-50 Operators Guide
 HEDMAN DI-50 Endorser Instructions Hedman DI-50 Operators Guide 25-0132-20 TABLE OF CONTENTS 1. INTRODUCTION...1 1.1 DI-50 Description...1 1.2 Items Included...1 1.3 Safety Terms...2 1.4 Safety Precautions...3
Cable Drum Machine. Operation Manual 40 SERIES. Cleans 2" to 4" lines up to 75' N O T F O R R O O T S
 Cable Drum Machine Operation Manual 40 SERIES Cleans 2" to 4" lines up to 75' Used For: Sinks, Showers & Floor Drains N O T F O R R O O T S WARNING - Read All Instructions, When Using Electric Tools, Basic
Laminator with Hot & Cold settings
 Laminator with Hot & Cold settings USER MANUAL LM990HC Please read these operating instructions before using the unit. Customer Service: 1-800-327-8508 WARNING / SAFETY INSTRUCTIONS Caution! Surface may
TCUT10UL 2.5 HP 10 Tile Saw Assembly & Operating Instructions
 TCUT10UL 2.5 HP 10 Tile Saw Assembly & Operating Instructions READ ALL INSTRUCTIONS AND WARNINGS BEFORE USING THIS PRODUCT. This manual provides important information on proper operation and maintenance.
Dry-Lam School & Office Laminators 27"(120V) Instruction Manual. Dry-Lam Rev. 3b 11/20/08
 Instruction Manual. Dry-Lam Rev. 3b 11/20/08") Dry-Lam School & Office Laminators 27"(120V) Instruction Manual Dry-Lam 652755 - Rev. 3b 11/20/08 Read all the safety and operating instructions before connecting or using this unit. Retain this notice
Dry-Lam School & Office Laminators 27"(120V) Instruction Manual Dry-Lam 652755 - Rev. 3b 11/20/08 Read all the safety and operating instructions before connecting or using this unit. Retain this notice
TCC 2700 Laminating Machine Operating Instructions
 TCC 2700 Laminating Machine Operating Instructions Remove machine from carton and place on a stable surface. Remove machine from plastic bag Remove bubble-wrap from mandrills TCC 2700 Laminating Machine
SEAL EP42 OWNER'S MANUAL
 SEAL EP4 OWNER'S MANUAL PLEASE READ AND SAVE INSTRUCTIONS TABLE OF CONTENTS About this manual...... Safety Precautions... Features... Specifications.... Names of Major Parts of Machine... Webbing Film..
OPERATING & SERVICE PARTS MANUAL HDS-215 COMBINATION SHRINK SYSTEM
 OPERATING & SERVICE PARTS MANUAL HDS-215 COMBINATION SHRINK SYSTEM FOR HOT KNIFE AND IMPULSE MACHINES READ ALL INSTRUCTIONS CAREFULLY BEFORE OPERATING EQUIPMENT TABLE OF CONTENTS Electrical Requirements
MODEL 1308-C & 1308-N
 Grand Rapids, Michigan, U.S.A. 49504-5298 USER S OPERATING AND INSTRUCTION MANUAL MODEL 1308-C & 1308-N HEAT SEALER 1308S20000CV1 INDEX Section Description Document No. Page No. DESCRIPTION/SPECIFICATIONS
OPERATING & SERVICE PARTS MANUAL 700ES ENERGY SMART WRAPPER SERIES B
 OPERATING & SERVICE PARTS MANUAL 700ES ENERGY SMART WRAPPER SERIES B READ ALL INSTRUCTIONS CAREFULLY BEFORE OPERATING EQUIPMENT TABLE OF CONTENTS Machine Components & Electrical Requirement... 3 Preliminary
MBM BC-10 Business Card Cutter
 MBM BC-10 Business Card Cutter Instruction Manual Provided By http://www.mybinding.com http://www.mybindingblog.com MBM BC-10 BUSINESS CARD CUTTER OPERATION MANUAL Tokyo, August 1, 2006 CONTENTS SPECIFICATIONS
MAYFIELD CEILING FAN LISTED E ITEM # MODEL #BTH44ABZC5C BTH44BNK5C Español p. 20 ATTACH YOUR RECEIPT HERE.
 Harbor Breeze is a registered trademark of LF, LLC. All Rights Reserved. ITEM #0331094 0331096 MAYFIELD CEILING FAN MODEL #BTH44ABZC5C BTH44BNK5C Español p. 20 ATTACH YOUR RECEIPT HERE Serial Number Purchase
Part Nos.: Laminators
 Part Nos.: 22-22813 -1 18 22-22812 -1 24 Laminators Mega Electronics Limited Mega House, Grip Industrial Estate, Linton, Cambridge. England. CB21 4XN Tel: +44 (0) 1223 893900 Fax: +44 (0) 1223 893894 Email:
52 BERKSHIRE CEILING FAN
 52 BERKSHIRE CEILING FAN Owner s Manual Models #20223, 20224 If a problem cannot be remedied or you are experiencing difficulty in installation, please contact the Service Department: 1-877-459-3267, 9
Product instruction manual Easymount Wide Format Laminators
 Product instruction manual Easymount Wide Format Laminators The Easymount has been designed to be user friendly, however we strongly recommend you take a few minutes to read through this manual to ensure
WAILEA OWNER S MANUAL
 WAILEA OWNER S MANUAL The blades in each pack are matched for equal weight to assure smooth fan operation. If more than one fan is being installed, be careful not to mix blades from different cartons.
User Guide Digital Bill Counter AB4000
 User Guide Digital Bill Counter AB4000 Warning Before turning the power on, please make sure there are no objects obstructing the operation of the rollers and wheels. Operate the machine only under normal
Owner's Manual RSC-5500H/6500H GRAPHIC LAMINATION PRODUCTS
 Owner's Manual RSC-5500H/6500H GRAPHIC LAMINATION PRODUCTS Royal Sovereign International Inc. Please read and retain these instructions. To register your product, please go to www.royalsovereign.com www.royalsovereign.com
Salad Assistant Instruction Manual
 BRAND Salad Assistant Instruction Manual MODEL: FP-7714 Ginnys.com 1.800.544.1590 IMPORTANT SAFEGUARDS Thank you for purchasing a Ginny s Brand Salad Assistant. Enjoy fast and easy prep time and maybe
SPACESAVER INSTRUCTION MANUAL WARRANTY CERTIFICATE
 SPACESAVER BY INSTRUCTION MANUAL WARRANTY CERTIFICATE Manual design and all elements of manual design are protected by U.S. Federal and/or State Law, including Patent, Trademark and/or Copyright laws.
52 SAN LUCAS CEILING FAN
 52 SAN LUCAS CEILING FAN Owner s Manual Models #20551 If a problem cannot be remedied or you are experiencing difficulty in installation, please contact the Service Department: 1-877-459-3267, 9 a.m.-
#8 STAINLESS STEEL ELECTRIC MEAT GRINDER OWNER S MANUAL
 #8 STAINLESS STEEL ELECTRIC MEAT GRINDER OWNER S MANUAL ITEM# 337989 Thank you very much for choosing a Kitchener product! For future reference, please complete the owner s record below: Model: Purchase
MODEL SF-420. Fabric Steamer. by Top Innovations, Inc. Please read all instructions before use. Mail in your warranty registration card.
 MODEL SF-420 Fabric Steamer by Top Innovations, Inc. Please read all instructions before use. Mail in your warranty registration card. LETTER FROM THE CEO Dear Valued Customer, Congratulations on purchasing
52 BARSTOW CEILING FAN
 52 BARSTOW CEILING FAN Owner s Manual Models #20519 If a problem cannot be remedied or you are experiencing difficulty with installation, please contact the Service Department: 1-877-459-3267, 9 a.m.-
TB-390 Conveyor Stacker
 TB-390 Conveyor Stacker OPERATIONS MANUAL Revised: 7-30-14 RENA Systems Inc. would like to Thank You for investing in our quality built products. Please record the following information for future reference:
Instruction Book for HD Punch Machines
 Instruction Book for HD Punch Machines HD7700, HD7000 & HD7500H Setup & Operator Manual Issue 5 February 2012 Performance Design LLC. These electric punches have been designed to punch most any job that
MAINTENANCE MANUAL TAIYO SEIKI CO., LTD.
 MAINTENANCE MANUAL TAIYO SEIKI CO., LTD. Introduction This Maintenance Manual explains how to replace and adjust the major components of the Automatic Taping Machine when required in daily operation.
Viking Installation Guide
 Viking Installation Guide Viking Range Corporation 111 Front Street Greenwood, Mississippi 38930 USA (662) 455-1200 For product information, call 1-888-VIKING1 (845-4641) or visit the Viking Web site at
Panel Fan Series Operators Manual (Galvanized and Polymer)
") Panel Fan Series Operators Manual (Galvanized and Polymer) 52" Belt Drive, Galvanized Panel Fan with Three Wing Blade IMPORTANT: READ AND SAVE THESE INSTRUCTIONS Read all instructions carefully before
Panel Fan Series Operators Manual (Galvanized and Polymer) 52" Belt Drive, Galvanized Panel Fan with Three Wing Blade IMPORTANT: READ AND SAVE THESE INSTRUCTIONS Read all instructions carefully before
Digital Roll Laminator (#8901) OWNER S MANUAL
 OWNER S MANUAL") ARL 4000 40" Digital Roll Laminator (#8901) OWNER S MANUAL CALL TOLL FREE: 1-800-282-9290 www.usi-laminate.com Free Lifetime Tech Support Customer Service M-F 8am to 6pm Eastern 1 IMPORTANT INFORMATION
ARL 4000 40" Digital Roll Laminator (#8901) OWNER S MANUAL CALL TOLL FREE: 1-800-282-9290 www.usi-laminate.com Free Lifetime Tech Support Customer Service M-F 8am to 6pm Eastern 1 IMPORTANT INFORMATION
 www.whitakerbrothers.com The Challenge Machinery Company provides owner's manuals on its products solely as a courtesy to its customers. See the information below before using this manual. These manuals
PANEL FAN SERIES OPERATORS MANUAL (Galvanized and Polymer)
") PANEL FAN SERIES OPERATORS MANUAL (Galvanized and Polymer) Galvanized Panel Fan IMPORTANT: READ AND SAVE THESE INSTRUCTIONS Read all instructions carefully before attempting to assemble, install, operate
PANEL FAN SERIES OPERATORS MANUAL (Galvanized and Polymer) Galvanized Panel Fan IMPORTANT: READ AND SAVE THESE INSTRUCTIONS Read all instructions carefully before attempting to assemble, install, operate
Laminator ZJY Series User Manual
 Laminator ZJY Series User Manual Eastsign International Limited Room 1818, 18/F., Shatin Galleria, 18-24 Shan Mei Street, Fotan, Shatin, N.T., Hong Kong TEL: + 852-2117 0098 FAX: + 852-2117 0099 Website:
Care and Use Guide #12. Features: POWERFUL
 Care and Use Guide #12 POWERFUL Features: - Reversible auger - 3/4 HP motor - All metal gear construction - Food pusher and sausage attachments included - Thermal reset button provides overload protection
Installation. Built-in Full Height Wine Cellar VCWB301
 Installation Built-in Full Height Wine Cellar VCWB301 Table of Contents Warnings & Important Information _ 3 Dimensions _ 5 Specifications _ 6 Cutout Dimensions 7 Cabinet Information _ 8 Cabinet Information
52 CEILING FAN. Owner s Manual Models #50336, 50337
 52 CEILING FAN Owner s Manual Models #50336, 50337 If a problem cannot be remedied or you are experiencing difficulty in installation, please contact the Service Department: 1-877-706-3267, 9 a.m.- 5 p.m.
CONTENTS INTRODUCTION... 2 SAFETY MESSAGES... 2 TRIMMER SAFETY... 3 IMPORTANT SAFETY INFORMATION... 3 SAFETY LABEL LOCATIONS... 4
 DRY OWNER'S MANUAL CONTENTS INTRODUCTION... 2 SAFETY MESSAGES... 2 TRIMMER SAFETY... 3 IMPORTANT SAFETY INFORMATION... 3 SAFETY LABEL LOCATIONS... 4 SETTING-UP YOUR NEW TRIMMER... 5 CONTROLS AND COMPONENTS...
The Extraordinaire OWNER S MANUAL. Orbital Ceiling Fan. Model No. OF110** READ AND SAVE THESE INSTRUCTIONS. Net Weight 14.5 lbs. or 6.59 kg.
 The Extraordinaire Orbital Fan WARNING: Support Directly From Building Structure Net Weight 14.5 lbs. or 6.59 kg. Model No. OF110** OWNER S MANUAL READ AND SAVE THESE INSTRUCTIONS Important Safety Instructions
12 VELOCITY OWNER S MANUAL OPERATING INSTRUCTIONS - MAINTENANCE - SAFETY - TROUBLESHOOTING
 12 VELOCITY OWNER S MANUAL OPERATING INSTRUCTIONS - MAINTENANCE - SAFETY - TROUBLESHOOTING This manual contains very important safety warnings and information. Read and save these instructions for future
OWNER'S MANUAL. RSC-LS/LSH/CW/HW SERIES Laminators
 OWNER'S MANUAL RSC-LS/LSH/CW/HW SERIES Laminators Read all instructions carefully before use. For any Customer Support needs please choose the Customer Support tab on www.royalsovereign.com Royal Sovereign
OWNER'S MANUAL. RSH-1151/1651 Laminator. material and workmanship for a period of One (1) year for Parts and Labor from the date
 year for Parts and Labor from the date") 8. WARRANTY Royal Sovereign International warrants the equipment sold is free from defects in material and workmanship for a period of One () year for Parts and Labor from the date of installation, excluding
8. WARRANTY Royal Sovereign International warrants the equipment sold is free from defects in material and workmanship for a period of One () year for Parts and Labor from the date of installation, excluding
IMPORTANT SAFEGUARDS SAVE THESE INSTRUCTIONS
 1 2 IMPORTANT SAFEGUARDS When using electrical appliances especially when children are present, basic safety precautions should always be followed to reduce the risk of fire, electric shock, and/or injury
52 BAYTOWNE CEILING FAN
 52 BAYTOWNE CEILING FAN Owner s Manual Models #20501 If a problem cannot be remedied or you are experiencing difficulty in installation, please contact the Service Department: 1-877-459-3267, 9 a.m.- 5
Installation and Operation Manual For Hunter Ceiling Fans
 Installation and Operation Manual For Hunter Ceiling Fans 1 2 CONGRATULATIONS! Your new Hunter ceiling fan is an addition to your home or office that will provide comfort and performance for many years.
18 INCHES, OSCILLATING STAND FAN
 To Buy: Contact Sylvane at 800-934-9194 or visit www.sylvane.com For Product Support: Contact Soleus Air at (888) 876-5387 18 INCHES, OSCILLATING STAND FAN OWNER S MANUAL Model # FSM-45 PLEASE READ AND
52 STRATHMERE CEILING FAN
 52 STRATHMERE CEILING FAN Owner s Manual Models #20341 If a problem cannot be remedied or you are experiencing difficulty with installation, please contact the Service Department: 1-877-459-3267, 9 a.m.-
ST. KITTS CEILING FAN
 ITEM #0845047 ST. KITTS CEILING FAN MODEL #40829 Questions, problems or missing parts? Before returning this item to your retailer, call our customer service department at 1-800-643-0067, Monday - Thursday,
A4 Laminator. Installation & User Instructions Please keep for future reference 908/6197
 A4 Laminator Installation & User Instructions Please keep for future reference 908/6197 Important Please read these instructions fully before installing or using These instructions contain important information
RINGMASTER 5-1/2 & 7 COTTON CANDY MACHINE
 3243 North California Avenue, Chicago, IL 60618 RINGMASTER 5-1/2 & 7 COTTON CANDY MACHINE 120 Volt, Single Phase, 50/60 Cycle 230 Volt, Single Phase, 50 Cycle READ and UNDERSTAND these operating, servicing,
Cable Drum Machine. Operation Manual 110ES SERIES. Cleans 1 1/4" to 3" lines up to 25'
 Cable Drum Machine Operation Manual 110ES SERIES Cleans 1 1/4" to 3" lines up to 25' Used For: Sinks, Showers &Tub Drains WARNING - Read All Instructions, When Using Electric Tools, Basic Safety Precautions
FerronTM. Instruction Manual A Kichler Decor ceiling fan
 Includes our new CoolTouch TM 6 Speed DC Control System Looks permanent, but goes wherever you go! U.S. Patent Pending 300160 A Kichler Decor ceiling fan HIGH EFFICIENCY DC MOTOR FerronTM Kichler Lighting
SUNSEEKER BY INSTRUCTION MANUAL WARRANTY CERTIFICATE
 SUNSEEKER BY INSTRUCTION MANUAL WARRANTY CERTIFICATE Manual design and all elements of manual design are protected by U.S. Federal and/or State Law, including Patent, Trademark and/or Copyright laws. The
Viking Installation Guide
 Viking Installation Guide Viking Range, LLC 111 Front Street Greenwood, Mississippi 38930 USA (662) 455-1200 For product information, call 1-888-(845-4641) or visit the Viking Web site at vikingrange.com
EHA Hoffmann International GmbH
 EHA Hoffmann International GmbH User manual EHA-TRANSPRINT HP 2020 Machine-No.: Year: EHA Hoffmann International GmbH Michelsbergstraße 24 D-57080 Siegen/Germany Telephone: +49 271 39 32-0 Telefax: +49
52 CEILING FAN READ AND SAVE THESE INSTRUCTIONS FAN RATING AC 120V.
 Irene 52 CEILING FAN READ AND SAVE THESE INSTRUCTIONS FAN RATING AC 120V. 60Hz TABLE OF CONTENTS Tools and Materials Required... 1 Package Contents... 1 Safety Rules... 2 Mounting Options... 3 Hanging
Ledco XL-44 Wide Format Pouch Laminator
 Ledco XL-44 Wide Format Pouch Laminator Instruction Manual Provided By http://www.mybinding.com http://www.mybindingblog.com READ ALL PRECAUTIONS & INSTRUCTIONS CAREFULLY BEFORE OPERATING LAMINATOR Setup
LIMITED LIFETIME WARRANTY
 LIMITED LIFETIME WARRANTY To obtain Service, please contact or call Turn of the Century Service Department: 1-800-887-6326, 9 a.m.- 5 p.m. central time. Model No.: # 355-6782 The limited lifetime warranty
IMPORTANT SAFETY INSTRUCTIONS TABLE OF CONTENTS SAVE THESE INSTRUCTIONS!
 TABLE OF CONTENTS IMPORTANT SAFETY INSTRUCTIONS Table of Contents Page 2 Important Safety Instructions Page 3 General Safety Instructions Page 4 List of Main Parts, Technical Specifications Page 6 Contents
OPERATING AND SETTING MANUAL
 COMPLETE SOLUTIONS FOR ON-DEMAND CD AND DVD PRODUCTION Speed Wrap Case Wrapper for CD or DVD Cases OPERATING AND SETTING MANUAL TP 000 156-1 - Thank you for purchasing a JMV Robotique Speed Wrap OPERATING
CUTMASTER Strip Cutting Machine
 EASTMAN THE EASTMAN CUTMASTER Strip Cutting Machine WARNING Safety glasses must be worn at all times when operating or servicing this equipment. Instruction Manual & Illustrated Parts List Please read
Torrena 42 Ceiling Fan
 Torrena 42 Ceiling Fan Owner s Manual Part # 269268, 269269 Model # 32096, 32097 Exclusively Distributed by: HD Supply Facilities Maintenance, Ltd. Atlanta, GA 30339 2017 Made in China If you are experiencing
Installation and Operation Manual For Hunter Ceiling Fans /16/2004
 Installation and Operation Manual For Hunter Ceiling Fans 1 2 CONGRATULATIONS! Your new Hunter ceiling fan is an addition to your home or office that will provide comfort and performance for many years.
LIMITED LIFETIME WARRANTY
 LIMITED LIFETIME WARRANTY Model No.: F0030 aireryder ORIGINAL CEILING FAN LIMITED LIFETIME WARRANTY The limited lifetime warranty covers this ceiling fan, for residential use by the original purchaser,
Camarillo 52 Ceiling Fan
 Owner s Manual Camarillo 52 Ceiling Fan Part # 269263, 269259, 269287 Model # 32091, 32092, 32087 Exclusively Distributed by: HD Supply Facilities Maintenance, Ltd. Atlanta, GA 30339 2017 Made in China
FD 90 / FD 95 Rotary Perforators
 FD 90 / FD 95 Rotary Perforators 11/2018 OPERATOR MANUAL SECOND EDITION TABLE OF CONTENTS SPECIFICATIONS 1 SAFETY PRECAUTIONS 1 DESCRIPTION 2 INSTALLATION AND OPERATION 3 INFEED TABLE ADJUSTMENT 3 OUTFEED
C-IV 60 CEILING FAN READ AND SAVE THESE INSTRUCTIONS. FAN RATING AC 120V. 60Hz
 C-IV 60 CEILING FAN READ AND SAVE THESE INSTRUCTIONS FAN RATING AC 120V. 60Hz Please do not use any electric or battery powered tools in the assembly and installation of this or any Matthews Fan Company
ValkyrieTM. Instruction Manual. Includes our new CoolTouch TM 6 Speed DC Control System Looks permanent, but goes wherever you go! U.S.
 ValkyrieTM A Kichler Décor ceiling fan Designed to coordinate with a popular Kichler Lighting collection. Includes our new CoolTouch TM 6 Speed DC Control System Looks permanent, but goes wherever you
20-GALLON MOBILE PARTS WASHER OWNER S MANUAL
 20-GALLON MOBILE PARTS WASHER OWNER S MANUAL WARNING: Read carefully and understand all INSTRUCTIONS before operating. Failure to follow the safety rules and other basic safety precautions may result in