VINOTEMP INTERNATIONAL SOUTH SUSANA ROAD RANCHO DOMINGUEZ,CA (800) FAX (310) WINEMATE COOLING SYSTEMS
|
|
|
- Steven Frank Perkins
- 6 years ago
- Views:
Transcription
1 DIGITAL DISPLAY INSTRUCTIONS WARNING: VINOTEMP INTERNATIONAL SOUTH SUSANA ROAD RANCHO DOMINGUEZ,CA (800) FAX (310) WINEMATE COOLING SYSTEMS PLEASE DO NOT PLAY WITH THE DIGITAL DISPLAY DO NOT PRESS ANY BUTTON FOR MORE THAN 60 SECONDS, IT WILL SHUT DOWN THE UNIT OR GO INTO SLEEP MODE. 1 The green LED indicates the compressor is on and running 2 Alarm signal: Indicates the alarm is on 3 Defrost in progress:led will light when unit is in defrost mode 4 Digital Display:LED will display the tempature. Codes will display on when pressed 5 LED button is to modify the tempatures or activates/deactivates continuous cycle Moves from one parameter to the next Increases the value of the parameter 6 Set Point: Silence the alarm You will access the menu (if pressed for more than five seconds) Blinking indicates that controller is waiting for a time delay to expired 7 LED button is to modify the tempatures Moves from one parameter to the next Decreases the value of the parameter DURING NORMAL WORKING CONDITIONS,THE DISPLAY SHOWS THE VALUE MEASURED BY THE AIR.IN CASEOF AN ACTIVE ALARM, THE TEMPERATURE FLASHES ALTERNATELY TO THE CODE. PAGE 1
2 DEACTIVATE THE ALARM Pressing the button silences the buzzer and de-energizes the relay, while the alarm code and the red LED go off only when the cause of the alarm no longer exist. The alarm codes are shown below: E0 E1 IA ALARMS AND SIGNALS ERROR- PLEASE CALL or VINOTEMP ERROR- PLEASE CALL or VINOTEMP ERROR- PLEASE CALL or VINOTEMP EE ERROR- PLEASE CALL or VINOTEMP d8 HI Alarm bypass time after defrost/door open FLASHING -HIGH TEMPERATURE ALARM -The unit has read high tempature which is higher than the set point. The alarm will automatically reset when the tempature returns within the set limit LO FLASHING- LOW TEMPERATURE ALARM- The unit has read a low tempature which is lower than the set point The alarm will automatically reset when the tempature returns within the set limit SETTING THE SET POINT 1 Press the button for one second to display the set-point value 2 After a few seconds, the set value blinks 3 Press up or down to increase or decrease the set point value 4 Press the once/ more to confirm the new value MAIN SINALS df - Defrost in progress This is not a alarm signal, but rather an indication that the unit is in defrost mode It will go into defrost mode every day for half an hour Manual Defrost Besides the automatic defrost, it is possible to activate a manual defrost by pressing button for more than 5 seconds. ps - Indicates the password PAGE 2
3 TROUBLE SHOOTING 1 WINEMATE COOLING SYSTEMS ARE SEALED SYSTEMS THAT REQUIREDS A MINIMUM OF SERVICE. WARNING: UNPLUG UNIT BEFORE CLEANING 2 CLEAN THE EXHAUST GRILL AT LEAST 3-4 TIMES A YEAR.(RECOMMENDED WITH VACUUM) 3 THE UNIT MAY RUN CONSTANTLY OR CYCLE ON AND OFF FOR SHORT PERIODS. 4 THE TIME REQUIRED TO REACH THE DESIRED TEMPERATURE WILL VARY, DEPENDING ON THE ENCLOSURE CONSTRUCTIONS AND CONTENTS. 5 WINEMATE COOLING SYSTEM ARE NOT FOR USE BELOW 50F. AND WORK BEST AT 55F TO 60F PROBLEM CHECK REMEDY NOT RUNING POWER TO OUTLET RESET CIRCUIT BREAKER IS WINE CELLAR PLUGGED IN PLUG IN IS UNIT PLUG IN PLUG IN INSIDE OF WINE CELLAR IS THERE DF DISPLAY ON DIGITAL UNIT IN DEFROST 30 MIN MAX CHECK FOR 15 MIN.& SEE IF UNIT ITS CYCLE WORKING NORMAL STILL DOES NOT START CALL SERVICE RUNNING WARM UNIT TURNS ON ON OFF ADJUST DIGITAL TO COLDER STTING RUNS ALL THE TIME IS CONDESOR DIRTY CLEAN CONDENSOR IS UNIT ICED UP DEFROST AND CHECK FOR AIR FLOW OR ITS SET TO COLD PROPER CLEARANCE FROM WALL EXHAUST 6" FROM WALL ALL AROUND CHECK WINE CELLAR FOR AIR LEAKS REPAIR AIR LEAKS STILL RUNS WARM CALL SERVICE RUNNING TO COLD UNIT TURNS ON AND OFF ADJUST DIGITAL TO WARMER SETTING STILL RUNS TO COLD CALL SERVICE EXCESS MOISTURE CHECK WINE CELLAR FOR AIR LEAKS AND REPAIR AIR LEAKS OR SEAL DOORS IN WINE CELLAR DOORS SEALS PAGE 3
4 WINEMATE VINO-CD MODEL COOLING UNITS INSTALLATION INSTRUCTIONS WINEMATE cooling units are designed to, when installed in a properly constructed cabinet or closet, provide a constant, selectable, temperature between 52-62F while maintaining 55-70% humidity. Products requiring these storage conditions include wine, furs, pastries, tobacco, chocolates and documents. WINEMATE cooling units are not intended to cool service cabinets which are maintained at lower temperatures and are opened frequently. Before installing the unit in the enclosure, place it on a table and plug it into a properly grounded outlet. The thermostat has no off position, therefor it will run as soon as it is plugged in. allow it to run for approximately 15 minutes. There should be a flow of cool air from the bottom opening and warm air from the back. If you have any problems contact your dealer. If your installation cannot be performed in accordance with these instructions contact your dealer. WINEMATE cooling units are not designed to have duct systems on ether the exhaust or cold sides. Do not drill any holes into the cooling unit, it may damage the unit and will void the warranty. INSTALLATION Select a place to mount the unit where the exhaust air flow is unobstructed for a minimum of 3 feet. The area into which the unit exhausts must be well ventilated. If it is not heat exhausted by the unit will build up and the unit will not operate properly. Additionally, cold air from the bottom opening must remain unobstructed. The unit must be mounted near the ceiling and as close to equal distance from each end of the wall as possible. Make a hole in the wall as illustrated in fig. 2. The dimensions of the hole should be 1/4 inch larger than the width and height of the unit. Construct a shelf as shown in fig. 3. This shelf must be capable of supporting the weight of the unit. Cut a 4 inch wide by 7 inch long hole for the cool air outlet. Place the unit on the shelf with the exhausted flush with the outside of the wall. Attach the exhaust grille to the wall with screws. Seal the opening with high quality weather stripping and cover with appropriate molding. Attach the molding to the wall not the unit. Plug the unit into a properly grounded outlet of adequate capacity. Because of potential safety hazards under a certain condition we strongly recommend against the use of an extension cord. However, if you still elect to use an extension cord, it is absolutely necessary that it is a UL LISTED 3-wire grounding type appliance extension cord having a 3-blade grounding plug and a 3-slot receptacle that will plug into the appliance. The marked rating of the extension cord should be 115v, 15a. Or equivalent. SPECIFICATIONS WINEMATE VINO-1500CD CAPACITY BTUH 1500 BUTH DIMENSIONS IN. 18 X 10.5 X 16.5 ELECTRICAL 115V 60HZ 1PH 4A WEIGHT 50 LBS. VINO-2500CD 2500 BTUH 18 X 10.5 X V 60HZ 1PH 5A 55 LBS. GRILL X 12.5 On initial start-up the unit will reduce the temperature of the enclosure slowly. The unit may run constantly or cycle on and off for short periods. The time required to reach the desired temperature will vary, depending on the enclosure construction and contents. The thermostat is set for approximately 55f. Unless the temperature falls below that which is desired, do not change the thermostat for at least 3 days. After initial cool down, the on-off cycle should be relatively constant. The percentage of off time will depend on enclosure construction, contents and surrounding temperature.
5 FIG 1 back left side front thermostat exhaust fresh air exhaust cool air cool air cool air in out in FIG 2 3 brackets here FIG 3 ceiling of cabinet thermostat outside grille bracket inside of cabinet 4-6" inside of cabinet clearance from the wall WINEMATE is extremely proud of the quality and reliability of its products. Experience has shown that of the small number of problems encountered, the large majority is due to improper unit selection or enclosure construction. Should the cooling system be suspected of malfunctioning, check the air being exhausted from the back of the unit. If it is warm then the unit is working. A further check may be done by comparing the temperature of the air entering the front of the unit with that leaving the bottom of the unit. If there is at least a 10 deg. difference, the unit is ok. In some cases, improper placement or installation may cause the units performance to be degraded. The exhaust side of the unit must have a constant supply of fresh air. If the unit is exhausted into a confined space with poor ventilation, the unit will not be able to reject the heat it is removing from the enclosure and a malfunctioning unit will be suspected. Similar symptoms may be caused by an obstruction to the free air flow into or out of the unit. Proper sealing of the enclosure cannot be over emphasized. The unit will not be able to maintain the proper conditions if fresh, moisture laden air is constantly being introduced in to the enclosure. Some symptoms of this condition are, the unit runs all the time with only a small reduction in temperature and or water over flows from the unit. Because of the temperature difference between the inside and outside very small cracks can allow large amounts of outside air into the enclosure. Often a newly constructed room contains fresh wood, paint, concrete and other building materials that contain large amounts of moisture. When placed into operation in this type of enviroment, the unit may not be able to reject this excess moisture and can over flow. When the enclosure dries out this problem will stop.
6 WINEMATE LIMITED WARRANTY C AND HZ MODEL UNITS WINEMATE warrants its products to be free from defects due to workmanship or materials under normal use and service, for twelve months after the initial sale. If the product is defective due to workmanship or materials, is removed within twelve (12) months of the initial sale and is returned to WINEMATE, in the original shipping carton, shipping prepaid, WINEMATE will at its option, repair or replace the product free of charge. Additionally WINEMATE warrants all parts to be free from defects for a period of sixty (60) months after initial sale. This warranty constitutes the entire warranty of the WINEMATE COMPANY with respect to its products and is in lieu of all other warranties, express or implied, including any of fitness for a particular purpose. In no event shall WINEMATE COMPANY be responsible for any consequential damages what so ever. Any modification or unauthorized repair of WINEMATE products shall void this warranty. SERVICE UNDER WARRANTY This service is provided to customers within the continental UNITED STATES only. WINEMATE cooling units are warranted to produce the stated number of BTUH. While every effort has been made to provide accurate guidelines, WINEMATE can not warranty its units to cool a particular enclosure. In case of failure, WINEMATE cooling units must be repaired by the factory or its authorized agent. Repairs or modifications made by anyone else will void the warranty. Should a WINEMATE cooling unit fail, contact the dealer for instructions. Do not return the unit to the factory without authorization from WINEMATE. If the unit requires repair, re-pack it in the original shipping carton and return it to the factory, shipping prepaid. WINEMATE will not accept COD shipments. If the unit is determined to be faulty and is within the twelve (12) month warranty period, WINEMATE will, at its discretion, repair or replace the unit and return it free of charge to the original retail customer. Additionally WINEMATE will, at standard shipping rates, reimburse the cost of returning the unit to the factory. If the unit is found to be in good working order, or beyond the initial twelve (12) month period, it will be returned freight collect. Purchaser understands and acknowledges that the goods sold here are wine cellars, cigar humidors, and/or other similar units which house wine or cigars. Purchaser assumes all risk of using these units, including risk of spoilage, humidity variations, temperature variations, leaks, fire, water damage, mold, mildew, dryness and similar and any other perils that might occur. LIMITATION OF IMPLIED WARRANTY WINEMATE'S SOLE LIABILITY FOR ANY DEFECTIVE PRODUCT IS LIMITED TO, AT OUR OPTION, THE REPAIR OR REPLACEMENT OF UNIT. WINEMATE SHALL NOT BE LIABLE FOR: DAMAGE TO OTHER PROPERTY CAUSED BY ANY DEFECTS IN THE UNIT, DAMAGES BASED UPON INCONVENIENCE, LOSS OF USE OF THE UNIT, LOSS OF TIME OR COMMERCIAL LOSS. ANY OUTER DAMAGES, WHETHER INCIDENTAL, CONSEQUENTIAL OR OTHERWISE. THIS WARRANTY IS EXCLUSIVE AND IS IN LIEU OF ALL OTHER WARRANTIES, EXPRESSED OR IMPLIED, INCLUDING BUT NOT LIMITED TO, IMPLIED WARRANTIES OF MERCHANTABILITY OR FITNESS FOR A PARTICULAR PURPOSE. While great effort has been made to provide accurate guidelines WINEMATE cannot warrant its units to properly cool a particular enclosure. Customers are cautioned that enclosure construction, unit location and many other factors can affect the operation and performance of the unit. There for suitability of the unit for a specific enclosure or application must be determined by the customer and cannot be warranted by WINEMATE.
7 VINOTEMP INSTRUCTIONS FOR WINE CELLAR INSTALLATION Check shipping carton for any exterior damage before acceptance. Note any damage on the shipping document before signing. The trucking company's insurance covers damage by them. Remove shipping carton and packing material (except pallet). Open the door and remove the plastic bag containing the casters/levelers. Tilt the cellar toward the back slightly and screw the front casters all the way in, then tilt the cellar toward the front and screw the back casters all the way in. Remove the wooden pallet used for shipping (we recommend this be done with two people). If needed, adjust cellar by screwing casters back out as necessary to align the doors. Move the cellar to the desired location. Leave at least 6" between the back of the cellar and the wall. 3" for top exhaust units. These wine cellars are free standing units and are not designed to be built in. The cellar is ready to plug into a 115v grounded outlet. We recommend a dedicated circuit but it is not essential. Extension cords are not recommended. After plugging cellar in, open door to make sure the cooling unit is working. The cooling unit may not start if the room is below 65F. The duration of on and off periods will vary by the temperature and conditions of your environment. If you have any problems see the TROUBLE SHOOTING CHART. IMPORTANT! do not attempt to open the cooling unit, any tampering with the cooling unit will void the warranty. The cooling unit is factory set for approximately 55F. The recommended aging temperature for both red and white wine is 53-57F. Close the door and allow the unit to run for 24 hours. If the temperature is too cold, turn the adjusting screw counter clock wise to make the unit warmer. If the temperature is too warm turn the screw clock wise to make it cooler. Make very small adjustments. Allow several hours for the unit to adapt after making a adjustment. DO NOT TURN UNIT ALL THE WAY TO THE COLDEST POSITION, AS THIS WILL CAUSE THE UNIT TO ICE UP AND STOP COOLING. WINEMATE cooling units use the latest technology, which provides the maximum efficiency of cooling unit operation. WINEMATE units also use ENVIRONMENTALLY SAFE R134A. LOADING; The wine cellar works most efficiently when loaded to capacity. The bottles act as a thermal mass, which stabilizes the temperature. To minimize handling and movement, we recommend you keep your most valuable wines in the double depth locations (close to the back wall). Begin loading your wines into the cellar starting from the bottom and moving up. The stacking space above the rack is for additional wine storage plus odd and large size bottles. do not place any bottles directly under the cold airflow from the cooling unit. As this could cause the unit to ice up. VINOTEMP INTERNATIONAL P.O. BOX 6107 COMPTON CA, PHONE; (310) FAX; (310)
8 WINEMATE VINO HZD MODEL COOLING UNITS INSTALLATION INSTRUCTIONS WINEMATE cooling units are designed to, when installed in a properly constructed enclosure or closet, provide a constant, selectable, temperature between 52-62F while maintaining 55-70% humidity. Products requiring these storage conditions include wine, furs, pastries, tobacco, chocolates and documents. WINEMATE cooling units are not intended to cool service cabinets which are maintained at lower temperatures and are opened frequently. Before installing the unit in the enclosure, place it on a table and plug it into a properly grounded outlet. The thermostat has no off position, therefor it will run as soon as it is plugged in. allow it to run for approximately 15 minutes. There should be a flow of cool air from the front opening and warm air from the back. any problems contact your dealer. If your installation cannot be performed in accordance with these instructions contact your dealer. WINEMATE cooling units are not designed to have duct systems on ether the exhaust or cold sides. Do not drill any holes into the cooling unit, it may damage the unit and will void the warranty. INSTALLATION Select a place to mount the unit where the exhaust air flow is unobstructed for a minimum of 3 feet. The area into which the unit exhausts must be well ventilated. If it is not heat exhausted by the unit it will build up and the unit will not operate properly. Additionally, cold air from the front opening must remain unobstructed. The unit should be mounted near the ceiling and as close to equal distance from each end of the wall as possible. Make a hole in the wall as illustrated in fig. 2. The dimensions of the hole should be 1/4 inch larger than the width and height of the unit. Construct a shelf as shown in fig. 3. The shelf must be capable of supporting the weight of the unit. Place the unit on the shelf with the back of unit flush with the outside of the wall. Attach the grille to the outside wall with screws. Seal the inside with a high quality weather stripping and cover with molding. Attach the molding to the wall not the unit. Plug the unit into a properly grounded outlet of adequate capacity. Because of potential safety hazards under a certain condition we strongly recommend against the use of an extension cord. However, if you still elect to use an extension cord, it is absolutely necessary that it is a UL LISTED 3-wire grounding type appliance extension cord having a 3-blade grounding plug and a 3-slot receptacle that will plug into the appliance. The marked rating of the extension cord should be 115v, 15a. Or equivalent. SPECIFICATIONS WINEMATE VINO-1500 HZD CAPACITY BTUH 1500 BTU DIMENSIONS IN X13.25 X 16 VINO-2500 HZD 2500 BTU X13.25 X 16 VINO-3500 HZD 3500 BTU X X VINO-4500HZD 4500 BTU X X GRILL HZ X GRILL HZ X ELECTRICAL 115V 60HZ 1PH 4A 115V 60HZ 1PH 5A 115V 60HZ 1PH 6A 115V 60HZ 1PH 8A OPERATION On initial start-up the unit will reduce the temperature of the enclosure slowly. The unit may run constantly or cycle on and off for short periods. The time required to reach the desired temperature will vary, depending on the enclosure construction and contents. The thermostat is set for approximately 55f. Unless the temperature falls below that which is desired, do not change the thermostat for at least 3 days. After initial cool down, the on-off cycle should be relatively constant. The percentage of off time will depend on enclosure construction, contents and surrounding temperature. WEIGHT 50 LBS. 55 LBS. 90 LBS. 90 LBS.
9 If it is necessary to adjust the temperature of the enclosure, adjust to a colder temperature wile the unit is running and to a warmer temperature while the unit is off. If the operation of the unit is stopped, ether by unplugging it or by turning the thermostat, do not restart unit for at least 10 minutes. FIG 1 cool warm air air A B air air intake intake A B front side back power cord thermostat FIG 2 FIG 3 ceiling ceiling studs outside studs inside hole in wall grille 3' unit clearance shelf wall shelf studs studs WINEMATE is extremely proud of the quality and reliability of its products. Experience has shown that of the small number of problems encountered, the large majority is due to improper unit selection or enclosure construction. Should the cooling system be suspected of malfunctioning, check the air being exhausted from the back of the unit. If it is warm then the unit is working. A further check may be done by comparing the temperature of the air entering the front of the unit with that leaving the front of the unit. If there is at least a 10 deg. difference, the unit is ok. In some cases, improper placement or installation may cause the units performance to be degraded. The exhaust side of the unit must have a constant supply of fresh air. If the unit is exhausted into a confined space with poor ventilation, the unit will not be able to reject the heat it is removing from the enclosure and a malfunctioning unit will be suspected. Similar symptoms may be caused by an obstruction to the free air flow into or out of the unit. Proper sealing of the enclosure cannot be over emphasized. The unit will not be able to maintain the proper conditions if fresh, moisture laden air is constantly being introduced in to the enclosure. Some symptoms of this condition are, the unit runs all the time with only a small reduction in temperature and or water over flows from the unit. Because of the temperature difference between the inside and outside very small cracks can allow large amounts of outside air into the enclosure. Often a newly constructed room contains fresh wood, paint, concrete and other building materials that contain large amounts of moisture. When placed into operation in this type of enviroment, the unit may not be able to reject this excess moisture and can over flow. When the enclosure dries out this problem will stop.
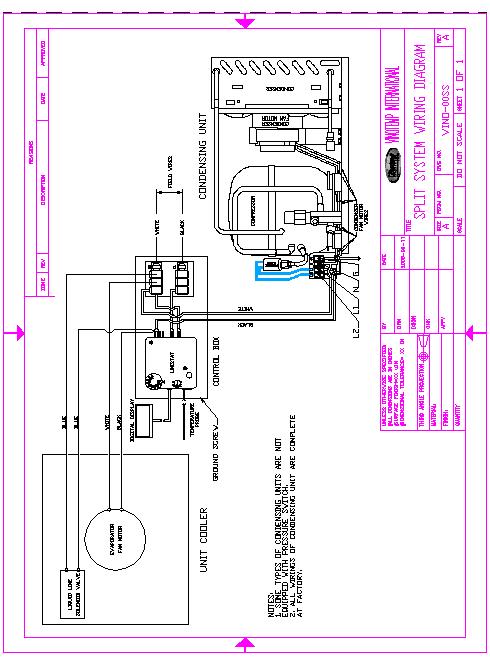
10 WINEMATE SPLIT SYSTEM VINO-2500SS- V8500SS INSTALLATION INSTRUCTIONS Thank you for choosing WINEMATE for your cooling needs. Our cooling systems are designed to give years of trouble-free service, When properly installed. All WINEMATE cooling systems use ENVIRONMENTALLY FRIENDLY R134A. WINEMATE cooling systems will provide a constant cooling temperature between 50f and 62f wile reducing excess moisture when installed in a properly constructed enclosure. The system does not add moisture, and the system does not include heating. Please take time to thoroughly read the instructions before installing the cooling system. WARNING Federal law requires that WINEMATE split cooling systems be installed by a EPA certified refrigeration technician. NOTE Before removing the cooling system from the box, inspect for damage which might have occurred during shipping. If any damage is found, notify the shipper immediately and file a claim. INSTALLATION WINEMATE split systems are shipped as components and are ready for use only after a certified refrigeration technician has properly installed and tested the system. Proper installation is critical. WINEMATE can only warrant the quality of the components. The installation and proper operation of the system must be warranted by the installer. Installation of the system must be done in accordance with all state and local building codes. If your installation cannot be performed in accordance with these instructions contact your dealer. WINEMATE cooling systems must be installed in the upright position and are not designed to have duct systems attached to them. Do not drill any holes into the unit. This may damage the unit, and WILL VOID THE WARRANTY. WINEMATE split cooling systems are shipped as components, and are ready for use only after being properly installed and tested by a certified refrigeration technician. The system consists of 2 parts, the FAN-COIL, and the CONDENSING UNIT. The FAN-COIL includes the evaporator coil, thermal expansion valve, thermostat, liquid line solenoid, mounting brackets, drain line fitting, and fans. The CONDENSING UNIT includes the condenser coil, compressor, low pressure control, service valves, and fans. The FAN-COIL and CONDENSING UNIT are connected by a liquid line and a insulated suction line. Supplied by the installer. These lines must be properly sized for the distance between the units. Because of the control system we use there is no need for wiring between the units. The FAN-COIL should be mounted against the ceiling of the enclosure using the bracket provided. The best location is centered in the enclosure. Be sure that the location is capable of supporting the weight of the unit. Air flow from the unit should be unobstructed for at least 1 foot. Provisions must be made for passing the line set threw the wall to the CONDENSING UNIT. The CONDENSING UNIT should be placed on a solid foundation with at least 1 foot clearance on all sides and 3 feet for exhaust air. Unit should be elevated to avoid possible flooding and shaded from direct sun. location should not be exposed to temperatures higher than 125f or lower than 20f. Unit must be wired in accordance with all state and local codes. After the units and the lines are installed. The system must be pressure tested. If no leaks are found, evacuate the system. We recommend that the system be triple evacuated. using proper charging methods, charge system with R134A. Amount will vary depending on the length of line set. MAINTENANCE WINEMATE split systems require very little maintenance. The FAN-COIL should be KEPT clean. The CONDENSING UNIT should be inspected 3 to 4 times a year and the condenser cleaned as needed. Clean condenser by using a vacuum cleaner with a brush attachment, or use compressed air to blow dirt out of the unit. If the condenser becomes blocked this will obstruct air flow, the unit will over heat causing a loss in cooling efficiency, and will result in compressor failure not covered by warranty.
11 OPERATION On initial start-up the system will slowly reduce the temperature of the enclosure. The system may run constantly or cycle on and off frequently until the enclosure reaches the desired temperature. The time needed will very depending on size, contents, and construction. The thermostat is preset for approximately 55f. Unless the temperature falls below what is desired, do not change the setting for at least 3 days. After initial cool down the on-off cycle should be relatively constant. SPECIFICATIONS VINO-2500SS FAN COIL 2500BTU R-134A 115V 60HZ 1A ETL & NSF LISTED 35LBS CONDENSING UNIT 115V 60HZ 5.7A UL LISTED 40LBS VINO-4500SS FAN COIL 4500BTU R134A 115V 60HZ 1A ETL & NSF LISTED 40LBS CONDENSING UNIT 115V 60HZ 6.9A UL LISTED 46LBS VINO-6500SS FAN COIL 6500BTU R134A 115V 60HZ 1.5A ETL & NSF LISTED 90LBS CONDENSING UNIT 115V 60HZ 12A UL LISTED 66LBS VINO-8500SS FAN COIL 8500BTU R134A 115V 60HZ 5.2A ETL & NSF LISTED 115 LBS. CONDENSING UNIT V 60HZ 1PH 7.3A UL LISTED 95LBS LINE SET 25' 50' 100' VINO-2500SS 2500BTU 500CUFT 900 BOTTLES 3/8 X 1/2 3/8 X 1/2 3/8 X 1/2 VINO-4500SS 4500BTU 1000CUFT 4500 BOTTLES 3/8 X 1/2 3/8 X 1/2 3/8 X 5/8 VINO-6500SS 6500BTU 1500CUFT 6000 BOTTLES 3/8 X 1/2 3/8 X 5/8 3/8 X 5/8 VINO-8500SS 8500BTU 2000CUFT BOTTLES 3/8 X 5/8 3/8 X 5/8 3/8 x 7/8 FAN COIL BOTTOM VIEW SIDE VIEW ELECTRICAL BOX C FAN D B A FAN COIL DIMENSIONS A B C D DRAIN VINO-2500SS /8 OD VINO-4500SS /8 OD VINO-6500SS /4 MPT VINO-8500SS /4 MPT CONDENSING UNIT DRAIN H D W W H D VINO-2500SS VINO-4500SS VINO-6500SS VINO-8500SS
12 OUT DOOR ENCLOSURE SS SS " 18 TYPICAL INSTALLATION LINE SET ELECTRICAL BOX FAN COIL AIR FLOW COND UNIT
13 WINEMATE VINO-1500 SS & 1900 SS SPLIT SYSTEMS INSTALLATION INSTRUCTIONS Thank you for choosing WINEMATE for your cooling needs. Our cooling systems are designed to give years of trouble-free service, When properly installed. All WINEMATE cooling systems use ENVIRONMENTALLY FRIENDLY R134A. WINEMATE cooling systems will provide a constant cooling temperature between 50f and 62f while reducing excess moisture when installed in a properly constructed enclosure. The system does not add moisture, and the system does not include heating. Please take time to thoroughly read the instructions before installing the cooling system. WARNING Federal law requires that WINEMATE split cooling systems be installed by a EPA certified refrigeration technician. NOTE Before removing the cooling system from the box, inspect for damage which might have occurred during shipping. If any damage is found, notify the shipper immediately and file a claim. INSTALLATION WINEMATE split systems are shipped as components and are ready for use only after a certified refrigeration technician has properly installed and tested the system. Proper installation is critical. WINEMATE can only warrant the quality of the components. The installation and proper operation of the system must be warranted by the installer. Installation of the system must be done in accordance with all state and local building codes. If your installation cannot be performed in accordance with these instructions contact your dealer. WINEMATE cooling systems must be installed in the upright position and are not designed to have duct systems attached to them. Do not drill any holes into the unit. This may damage the unit, and WILL VOID THE WARRANTY. WINEMATE split cooling systems are shipped as components, and are ready for use only after being properly installed and tested by a certified refrigeration technician. The system consists of 2 parts, the FAN-COIL, and the CONDENSING UNIT. The FAN-COIL includes the evaporator coil, thermal expansion valve, thermostat, liquid line solenoid, mounting brackets, drain line fitting, and fans. The CONDENSING UNIT includes the condenser coil, compressor, low pressure control, service valves, and fans. The FAN-COIL and CONDENSING UNIT are connected by a liquid line and a insulated suction line. Supplied by the installer. These lines must be properly sized for the distance between the units. Because of the control system we use there is no need for wiring between the units. The FAN-COIL should be mounted inside of the enclosure using the bracket provided. The best location is centered in the enclosure. Be sure that the location is capable of supporting the weight of the unit. Air flow from the unit should be unobstructed for at least 1 foot. Provisions must be made for passing the line set threw the wall to the CONDENSING UNIT. The CONDENSING UNIT should be placed on a solid foundation with at least 1 foot clearance on all sides and 3 feet for exhaust air. Unit should be elevated to avoid possible flooding and shaded from direct sun. location should not be exposed to temperatures higher than 125f or lower than 20f. Unit must be wired in accordance with all state and local codes. After the units and the lines are installed. The system must be pressure tested. If no leaks are found, evacuate the system. We recommend that the system be triple evacuated. using proper charging methods, charge system with R134A. Amount will vary depending on the length of line set. MAINTENANCE WINEMATE split systems require very little maintenance. The FAN-COIL should be KEPT clean. The CONDENSING UNIT should be inspected 3 to 4 times a year and the condenser cleaned as needed. Clean condenser by using a vacuum cleaner with a brush attachment, or use compressed air to blow dirt out of the unit. If the condenser becomes blocked this will obstruct air flow, the unit will over heat causing a loss in cooling efficiency, and will result in compressor failure not covered by warranty. OPERATION On initial start-up the system will slowly reduce the temperature of the enclosure. The system may run constantly or cycle on and off frequently until the enclosure reaches the desired temperature. The time needed will very depending on size, contents, and construction. The thermostat is preset for approximately 55f. Unless the temperature falls below what is desired, do not change the setting for at least 3 days. After initial cool down the on-off cycle should be relatively constant.
14 SPECIFICATIONS VINO-1500SS 150CUFT CELING MOUNTED FANCOIL 1500BTU R134A 115V 60HZ.73A ETL & NSF LISTED 15 LBS. COND UNIT 115V 60HZ 3.1A UL LISTED 30 LBS. VINO-1900 SS 150CUFT WALL MOUNTED FANCOIL 1900 BTU R-134A 115V 60HZ 2.2A ETL & NSF LISTED 20 LBS. COND UNIT 115V 60HZ 3.1A UL LISTED 30 LBS. LINE SET 25' 50' 100' VINO-1500 SS 3/8 X 1/2 3/8 X 1/2 3/8 X 1/2 VINO-1900SS 3/8 X 1/2 3/8 X 1/2 3/8 X 1/2 FAN COIL VINO-1500SS 16 3/4 4 3/4 15 AIR FLOW VINO-1900SS MOUNTING PLATE 20" 18" 7" 12.5" ELECTRICAL BOX THERMOSTAT DRAIN LINE 3/8 OD CONDENSING UNIT H D W W H D VINO-1900 SS OUT DOOR ENCLOSURE
15 TYPICAL INSTALLATION LINE SET AIR OUT AIR IN AIR OUT LINE SET COND UNIT AIR IN VINO-1900 SS VINO 1500SS COND UNIT
16 WINEMATE LIMITED WARRANTY VINO-SS COOLING SYSTEMS WINEMATE warrants this product to be free from defects in material and workmanship and agrees to replace any component found defective under these terms and conditions. This warranty may be enforced only by the original retail customer and is not transferable. All components used in this unit are warranted for ONE YEAR from the original retail purchase date. Alteration, repair or attempted repair of the components by anyone not authorized by WINEMATE will void this warranty. WINEMATE will cover the following: During the first 12 months WINEMATE will pay for materials to replace the unit/components. During the first 12 months WINEMATE will at the customers request, ship to the customer any replacement component with a deposit, charged at the value of the component, plus the freight. When the original component is returned in a condition that allows testing of the component and if that component is found to be defective, WINEMATE will refund the cost of the component and the freight. To obtain warranty parts, WINEMATE may require you to provide the original bill of sale or receipt as proof of purchase. Please retain any such proof of purchase. If a problem is suspected with a WINEMATE cooling unit contact your dealer. Do not return a unit/component without authorization from WINEMATE. Should it be necessary to return a unit/component for warranty parts, it must be packaged in the original packaging or similar packaging providing an equal degree of protection. Any freight charges must be prepaid, WINEMATE will not accept collect shipments. ITEMS NOT COVERED BY WARRANTY: Any unit on which the serial number has been removed, modified or defaced. Damage, deterioration or malfunction resulting from but not limited to: Any shipment of the unit, claims for shipping damage must be presented to the shipper. Installation or removal of the unit/component. Installation into an enclosure of inadequate design that does not follow the minimum guide lines of the installation instructions. Inadequate ventilation for the supply and exhausting condensers air that does not follow minimum guide lines of the installation instructions. Accident, misuse, abuse, neglect, fire, water, lightning or other acts of nature, improper storage, unauthorized modification, electrical power surges, or failure to follow instructions supplied with unit. Exposure to corrosive environments such as, but not limited to, marine air, pool chemicals, cleaning solvents, gasoline and petroleum products. Burial or coverage by, but not limited to, dirt, snow, mud, storage shelves, fabric products, plants, and children's toys. Any cause which does not relate to product defect. WINEMATE WILL NOT PAY FOR: Installation or removal of the unit/component. Handling or packaging of the unit/component. Component repairs performed by anyone outer than a WINEMATE Contents of enclosure Any other damages, weather incidental, consequential or otherwise.
17
18
19
20
21 DIMENSIONS OF COOLING UNITS VINO-1500CD VINO-2500CD VINO-2520CD VINO-1500HZD 18Wx10.5Hx16D 18Wx10.5Hx16D 18Wx10.5Hx16D 14.25Wx12.25Hx16D 115V 115V 220V 115V 60HZ 60HZ 50HZ 60HZ 4 AMPS 5 AMPS 4 AMPS 4 AMPS 1/6HP 1/5 HP 1/5 HP 1/6HP 1500BTU 2500BTU 1800BTU 1500BTU R134A R134A R134A R134A 150CUFT MAX 250 CUFT MAX 200CUFT MAX 150 CUFT MAX VINO-2500HZD VINO-2520HZD VINO-3500HZD VINO-4500HZD 14.25Wx13.25Hx16D 14.25Wx13.25Hx16D 14.25Wx19.75Hx Wx19.75Hx21.25D 115V 220V 115V 115V 60HZ 50HZ 60HZ 60HZ 5 AMPS 4 AMPS 8 AMPS 9 AMPS 1/5 HP 1/5 HP 1/4 HP 1/3 HP 2500BTU 1800BTU 3500BTU 4500 BTU R134A R134A R134A R134A 250 CUFT MAX 200CUFT MAX 650 CUFT MAX 1000 CUFT MAX VINO-4520HZD VINO-6500HZD VINO-8500HZD 14.25Wx19.75Hx21.25D17Wx22Hx28D 17Wx22Hx28D 220V 115V 115V 50HZ 60HZ 60HZ 5 AMPS 14.2 AMPS 16 AMPS 1/3 HP 1/2 HP 3/4HP 3800BTU 6500BTU 8500BTU R134A R134A R134A 850 CUFT MAX 1500 CUFT MAX 2000 CUFT MAX All CD and HZD cooling units use the Omni-Stat programmable controller features: Red light display Adjustable Tempature Adjustable Differantial High and Low Tempature alarms Adjust defrost Time delay on stat
22 SPLIT SYSTEMS VINO-1500SS FAN COIL 16.75Wx4.75Hx15D ETL AND NSF LISTED CELING MOUNTED 115V 60HZ 73 AMPS CONDENSING UNIT 14Wx12Hx18D UL LISTED 115V 60HZ 3.1 AMPS 1500BTU R134A 150 CUFT MAX VINO-1900SSD FAN COIL 18Wx12.5Hx4.5D ETL AND NSF LISTED WALL MOUNTED 115V 60HZ 2.2 AMPS CONDENSING UNIT 14Wx12Hx18D UL LISTED 115V 60HZ 3.1 AMPS 1500BTU R134A 150 CUFT MAX VINO-2500SSD FAN COIL 22Wx6Hx19.5D ETL AND NSF LISTED CEILING MOUNTED 115V 60HZ 1 AMP CONDENSING UNIT 14Wx12Hx18D UL LISTED 115V 60HZ 3.1 AMPS 2500BTU R134A 500CUFT MAX VINO-4500SSD FAN COIL 22Wx9Hx19.5D ETL AND NSF LISTED CEILING MOUNTED 115V 60HZ 1 AMPS CONDENSING UNIT 14Wx12Hx18D UL LISTED 115V 60HZ 6.9 AMPS 4500BTU R134A 1000 CUFT MAX VINO-6500SSD FAN COIL 30.75Wx11.75Hx23D ETL AND NSF LISTED CEILING MOUNTED 115V 60HZ 1.5 AMPS CONDENSING UNIT 18Wx14.5Hx24D UL LISTED 115V 60HZ 9.3 AMPS 6500BTU R134A
23 1500 CUFT MAX VINO-8500SSD FAN COIL 30.75Wx15.25Hx23D ETL AND NSF LISTED CEILING MOUNTED 115V 60HZ 5.2 AMPS CONDENSING UNIT 18Wx14.5Hx24D UL LISTED V 60HZ 1PH 7.3 AMPS 8500BTU R134A 2000 CUFT MAX All SSD unit use a mechanical thermostat adjustable from 45F TO 65F. All SSD cooling system use the uni-stat electronics thermostat and timer features: Green remote LED display Adjustable Tempature Adjustable differantial Adjustable defrost Time delay on start
24 The humidifier is designed to provide cool moist air for the humidor. By using a fan, a water reservoir and a humidistat. Install the humidifier in the bottom of the humidor. Connect the humidistat to the fan and mount it at the end of the wire above the humidifer. Fill the reservoir 3/4 full of water. Plug in humidistat. Cycle humidistat between highest and lowest setting at least 3 times to ensure proper function. Set control for desired humidity. CHECK RESERVOIR REGULARLY. ADD WATER AND CLEAN RESERVOIR AS NEEDED. OUTLET VT-HYDROMIST HUMIDIFIER INSTRUCTIONS HUMIDISTAT VT-HYDROMIST 1 RESERVOIR 16.5 X 6.5 X 5.5 CAPACITY 1 GALLON HUMIDIFIES 90 CUBIC FEET VT-HYDROMIST 2 RESERVOIR 12 X 6.5 X 5.5 CAPACITY 3/4 GALLON HUMIDIFIES 48 CUBIC FEET VT-HYDROMIST 3 RESERVOIR 6 X 6 X 5.5 CAPACITY 3/8 GALLON HUMIDIFIES 26 CUBIC FEET FAN RESERVOIR FAN RESERVOIR
WKS 4000 SERIES (USA only) --INSTALLATION INSTRUCTIONS--
 --INSTALLATION INSTRUCTIONS--") 8610 Production Avenue San Diego, California 92121 (858) 566-7465 Fax (858) 566-1943 WKS 4000 SERIES (USA only) --INSTALLATION INSTRUCTIONS-- Thank you for choosing a BREEZAIRE cooling unit. We believe
8610 Production Avenue San Diego, California 92121 (858) 566-7465 Fax (858) 566-1943 WKS 4000 SERIES (USA only) --INSTALLATION INSTRUCTIONS-- Thank you for choosing a BREEZAIRE cooling unit. We believe
WKS 2200 SERIES (USA only) --INSTALLATION INSTRUCTIONS--
 --INSTALLATION INSTRUCTIONS--") 8610 Production Avenue San Diego, California 92121 (858) 566-7465 Fax (858) 566-1943 WWW.BREEZAIRE.COM WKS 2200 SERIES (USA only) --INSTALLATION INSTRUCTIONS-- Thank you for choosing a BREEZAIRE cooling
8610 Production Avenue San Diego, California 92121 (858) 566-7465 Fax (858) 566-1943 WWW.BREEZAIRE.COM WKS 2200 SERIES (USA only) --INSTALLATION INSTRUCTIONS-- Thank you for choosing a BREEZAIRE cooling
Read and save these instructions
 www.winemate.com Wine Cooling System WM-1500HZD, WM-2500HZD WM-3500HZD, WM-4500HZD WM-6500HZD, WM-8500HZD Installation, Use & Care Manual www.vinotemp.com Read and save these instructions Important Safety
Split Floor-Mounted Cooling System Operation Care Installation Manual
 Split Floor-Mounted Cooling System Operation Care Installation Manual CT14TSA CT13TSA CT12TSA CT34TSA CT1TSA CT14TSA-LA CT13TSA-LA CT12TSA-LA CT34TSA-LA CT1TSA-LA www.apexwinecellars.com Apex 17631 S Susana
Read and save these instructions
 www.winemate.com Wine Cooling System WM-1500HZD, WM-2500HZD WM-3500HZD, WM-4500HZD WM-6500HZD, WM-8500HZD Installation, Use & Care Manual www.vinotemp.com Read and save these instructions Important Safety
Read and save these instructions
 Split Water-Cooled Central-Ducted Cooling System Operation Care Installation Manual CT14TSHWC CT13TSHWC CT12TSHWC CT34TSHWC CT1TSHWC www.apexwinecellars.com 17631 S Susana Road Rancho Dominguez, CA 90221
A PROUD HERITAGE OF EXPERIENCE & QUALITY. Beverage Cooler VT-SC-1
 A PROUD HERITAGE OF EXPERIENCE & QUALITY Beverage Cooler VT-SC-1 O W N E R S M A N U A L W W W. V I N O T E M P. C O M Your Beverage Cooler This unit can be used for Storage and/or Service. The cooler
Read and save these instructions
 Split Ceiling-Mounted Cooling System Operation Care Installation Manual WM-2500SSD WM-2500SSD-LA WM-4500SSD WM-4500SSD-LA WM-6500SSD WM-6500SSD-LA WM-8500SSD WM-8500SSD-LA WM-12000SSD WM-12000SSD-LA www.vinotemp.com
Split Wall-Recessed Cooling System Operation Care Installation Manual
 Split Wall-Recessed Cooling System Operation Care Installation Manual WM-2520SSW 2520SSW-LA WM-4520SSW 4520SSW-LA www.vinotemp.com Read and save these instructions Vinotemp International Corp 17631 S Susana
RPI Industries, Inc.
 RPI Industries, Inc. AIR SCREEN and SELF-SERVE OPERATION AND SERVICE MANUAL WARRANTY INFORMATION For Models Stratus SCRFC48R-SSI SCRFC60R-SSI SCRFC72R-SSI SCRFC48R-SSII SCRFC72R-SSII SCRFC48R-SSIII SCRFC72R-SSIII
Read and save these instructions
 Split Central-Ducted Cooling System Operation Care Installation Manual WM-12000SSH WM-12000SSH-LA www.vinotemp.com Read and save these instructions Vinotemp International Corp 17631 S Susana Road Rancho
Read and save these instructions
 Split Through-Ceiling Cooling System Operation Care Installation Manual WM-2500SSO WM-2500SSO-LA WM-4500SSO WM-4500SSO-LA www.vinotemp.com Read and save these instructions Vinotemp International Corp 17631
Blue Air. Commercial Refrigeration Inc. Installation & Operation Manual Ice Cream Freezers
 Blue Air Commercial Refrigeration Inc. Installation & Operation Manual Ice Cream Freezers Please read this manual completely before installing or operating this unit! BACF11 BACF15 BACRF14 Blue Air reserves
RPI Industries, Inc.
 IMPORTANT: THE FOLLOWING INFORMATION SHOULD BE RETAINED FOR FUTURE REFERENCE RPI Industries, Inc. building a better case for sales BAKERY and DELI USE AND SERVICE MANUAL WARRANTY INFORMATION SPECIFICATIONS
HMT-D30-A HMT-D45E-A HMT-D70E-A. Model Numbers: HMT-D30-A HMT-D45E-A HMT-D70E-A. Portable Dehumidifier Operating Instructions V.
 HMT-D30-A HMT-D45E-A HMT-D70E-A Model Numbers: HMT-D30-A HMT-D45E-A HMT-D70E-A Portable Dehumidifier Operating Instructions 3119233 V.141217 General Dehumidifier Information RECOMMENDED HUMIDITY LEVELS
Model Numbers: HCT-D30-A (TDA30) HCT-D45E-A (TDA45E) HCT-D70E-A (TDA70E) Portable Dehumidifier Operating Instructions V
 HCT-D45E-A (TDA45E) HCT-D70E-A (TDA70E) Portable Dehumidifier Operating Instructions V") Model Numbers: HCT-D30-A (TDA30) HCT-D45E-A (TDA45E) HCT-D70E-A (TDA70E) Portable Dehumidifier Operating Instructions 3119233 V.140529 General Dehumidifier Information RECOMMENDED HUMIDITY LEVELS Spring/Summer:
Model Numbers: HCT-D30-A (TDA30) HCT-D45E-A (TDA45E) HCT-D70E-A (TDA70E) Portable Dehumidifier Operating Instructions 3119233 V.140529 General Dehumidifier Information RECOMMENDED HUMIDITY LEVELS Spring/Summer:
Read and save these instructions
 www.winemate.com Customizable Wine Cooling System WM-4510HZD WM-6510HZD WM-8510HZD Installation, Use & Care Manual www.vinotemp.com Read and save these instructions Important Safety Information NOTES:
Air Cleaning Equipment, Inc. 303 N. Main St. Broadway, NC iers.com
 Read and Save These Instructions Horizon Galaxy - Installation and Operations Manual Air Cleaning Equipment, Inc. 303 N. Main St. Broadway, NC 27505 www.horizondehumidif iers.com 1 Safety Notes: The Horizon
INSTRUCTIONS! DO NOT DISCARD!
 INSTRUCTIONS! DO NOT DISCARD! CAUTION! Do NOT install where injury might occur due to Moving parts, Sharp corners, Hot surfaces or electrical components dn0521 Page 1 of 12 INSTALLATION INSTRUCTIONS CAUTION
Portable Dehumidifier
 Portable Dehumidifier OPERATING INSTRUCTIONS HMT-D30-A Model Numbers: HMT-D30-A HMT-D45E-A HMT-D70E-A HMT-D45E-A HMT-D70E-A 3058080 V.161115 PURCHASE INFORMATION Thank you for choosing a Soleus Air Portable
MANUAL 8/12/05. Model BKP TM 100 INSTALLATION, OPERATION & MAINTENANCE. Commercial High Efficiency Heat Pipe Dehumidifier
 MANUAL 8/12/05 INSTALLATION, OPERATION & MAINTENANCE Commercial High Efficiency Heat Pipe Dehumidifier Model BKP TM 100 Heat Pipe Technology, Inc. 6904 Parke East Blvd. Tampa FL 33610 Tel: (813) 470-4250
INSTRUCTIONS! DO NOT DISCARD!
 INSTRUCTIONS! DO NOT DISCARD! CAUTION! Do NOT install where injury might occur due to Moving parts, Sharp corners, Hot surfaces or electrical components dcn0620 Page 1 of 12 INSTALLATION INSTRUCTIONS CAUTION
Read and save these instructions
 Split Water-Cooled Through-Ceiling Cooling System Operation Care Installation Manual WM-2500SSOWC WM-4500SSOWC www.vinotemp.com Read and save these instructions Vinotemp International Corp 17631 S Susana
Read and save these instructions
 Split Water-Cooled Central-Ducted Cooling System Operation Care Installation Manual WM-2500SSHWC WM-4500SSHWC WM-6500SSHWC WM-8500SSHWC WM-12000SSHWC www.vinotemp.com Read and save these instructions Vinotemp
HMT-D30-A HMT-D45E-A HMT-D70E-A. Model Numbers: HMT-D30-A HMT-D45E-A HMT-D70E-A. Portable Dehumidifier Operating Instructions V.
 HMT-D30-A HMT-D45E-A HMT-D70E-A Model Numbers: HMT-D30-A HMT-D45E-A HMT-D70E-A Portable Dehumidifier Operating Instructions 3058080 V.151201 General Dehumidifier Information RECOMMENDED HUMIDITY LEVELS
Ceiling Split Cooling System Installation, Operation & Care Manual WM-2500SSD WM-4500SSD WM-6500SSD WM-8500SSD
 www.winemate.com Ceiling Split Cooling System Installation, Operation & Care Manual WM-2500SSD WM-4500SSD WM-6500SSD WM-8500SSD www.vinotemp.com Read and save these instructions Important Safety Information
POLAR TEMP FARM MORTALITY UNIT OPERATION MANUAL
 POLAR TEMP FARM MORTALITY UNIT OPERATION MANUAL www.polartemp.com TABLE OF CONTENT Disclaimer.......................................... Page 3 Inspection, unpacking and FMU setup.................. Page
Superdryer Dehumidifiers
 Superdryer Dehumidifiers Installation and Operations Manual Read and Save These Instructions Distributed Exclusively By: Air Cleaning Equipment, Inc. Broadway, NC 27505 Phone: 919-258-3330 www.aircleaningequipment.com
ref. com Owner s Manual for models: A Step Above the Standard Thank you for choosing EVEREST
 www.everest ref. com Owner s Manual for models: Back Bar Coolers " Deep Back Bar Coolers Glass Door Back Bar Coolers " Deep Galss Door Back Bar Coolers " Deep Galss Sliding Door Back Bar Coolers EBB3,
Installation & Operation Manual Ice Cream Freezers
 Installation & Operation Manual Ice Cream Freezers Please read this manual completely before installing or operating this unit! BACF11 BACF15 Blue Air reserves the right to make product modification at
EBAC MODEL CD30 INDUSTRIAL DEHUMIDIFIER OWNER S MANUAL
 EBAC MODEL CD30 INDUSTRIAL DEHUMIDIFIER OWNER S MANUAL Ebac Industrial Products, Inc. 700 Thimble Shoals Blvd, Suite 109 Newport News, VA. 23606-2575 Tel: (757) 873 6800 Fax: (757) 873 3632 Website www.ebacusa.com
REFRIGERATED DROP-INS (2-6)FT-DI Installation and Operating Manual
FT-DI Installation and Operating Manual") REFRIGERATED DROP-INS (2-6)FT-DI Installation and Operating Manual For service information call 800-544-3057 Please have the following information available before calling. Information can be found on
REFRIGERATED DROP-INS (2-6)FT-DI Installation and Operating Manual For service information call 800-544-3057 Please have the following information available before calling. Information can be found on
INSTRUCTIONS! DO NOT DISCARD!
 INSTRUCTIONS! DO NOT DISCARD! CAUTION! Do NOT install where injury might occur due to Moving parts, Sharp corners, Hot surfaces or electrical components d N0417 Page 1 of 10 INSTALLATION INSTRUCTIONS CAUTION
INSTRUCTION MANUAL. UNDERCOUNTER WINE & BEVERAGE COOLER (32 bottles capacity) MODEL:WC-30U
 MODEL:WC-30U") INSTRUCTION MANUAL UNDERCOUNTER WINE & BEVERAGE COOLER (32 bottles capacity) MODEL:WC-30U To ensure proper use of this appliance and your safety, please read the following instructions completely before
INSTRUCTION MANUAL UNDERCOUNTER WINE & BEVERAGE COOLER (32 bottles capacity) MODEL:WC-30U To ensure proper use of this appliance and your safety, please read the following instructions completely before
WCPT-3 and WCPT-4. Effective Date: 2017 IMPORTANT INFORMATION READ BEFORE USE. Drop-in Display Cases
 WCPT-3 and WCPT-4 Service and Installation Manual Please read this manual completely before attempting to install or operate this equipment! Notify carrier of damage! Inspect all components immediately.
240 ASSEMBLY & OPERATION MANUAL
 WineKoolRTM 240 Read the "USE and CARE" guide before you start! LOCATING YOUR WINE CELLAR Provide 2 1/2 Never locate your wine cellar outdoors or in an area with extremes of temperature and humidity. These
Portable Dehumidifier with Internal Pump
 Portable Dehumidifier with Internal Pump OPERATING INSTRUCTIONS 115 Pint Portable Dehumidifier With Internal Pump Model Number: DMC-115IP-210 3092402 V161220 PURCHASE INFORMATION Thank you for choosing
A PROUD HERITAGE OF EXPERIENCE & QUALITY. 8-Bottle Open Wine Cooler VT-8WC-OP
 A PROUD HERITAGE OF EXPERIENCE & QUALITY 8-Bottle Open Wine Cooler VT-8WC-OP O W N E R S M A N U A L W W W. V I N O T E M P. C O M General Operating Instructions Remove all external and internal packaging
InstructIon Manual KrEs EQuIPMEnt stands
 Instruction Manual Instruction Manual SELF-CONTAINED AND REMOTE Kairak KRES model refrigerated equipment stand units are available in many lengths from 36 to 120 inches long. These units are available
User Manual. Wine Cellar
 User Manual Wine Cellar MODEL: WWT060MB WWT080MB WWT100MB WWT120MB 1. READ these instructions carefully before installing and operating the Wine Cellar. Keep them for further reference. 2. Record in the
GL-DEH Series Portable Dehumidifier Operating Instructions
 GL-DEH Series Portable Dehumidifier Operating Instructions General Dehumidifier Information RECOMMENDED HUMIDITY LEVELS ACCORDING TO ENERGY STAR Spring/Summer: 30% - 50% Fall/Winter: 30% - 40% EMPTYING
Horizontal Bottle Cooler Installation and Operation Manual
 Speeds Up the Pace of Innovation Horizontal Bottle Cooler Installation and Operation Manual Please read this manual completely before attempting to install or operate this equipment! TBC-50SD, 50SB/ TBC-95SD,
AIR CONDITIONER ELECTRONIC CONTROL
 READ AND SAVE THESE INSTRUCTIONS AIR CONDITIONER ELECTRONIC CONTROL ROOM AIR CONDITIONER WARRANTY Your product is protected by this warranty Your appliance is warranted by Electrolux. Electrolux has authorized
Power Pack Service Manual
 Power Pack Service Manual MMPP4301-EP MMPP4301 MMPP4301-WC MMPP4301-PKG MMPP4301-PKG-WC MMPP4302 MMPP4302-WC MMPP4302-PKG MMPP4302-PKG-WC MMPP4303-PKG MMPP4303-PKG-WC MMPP4303-PKG-3 MMPP4305-PKG MMPP4305-PKG-WC
Zeus Extreme Owner's Manual
 Owner's Manual Read and Save These Instructions Seaira Global LLC 14021 NC Highway 50 Surf City, NC 28445 910-660-0962 sales@seairaglobal.com Safety Notes WARNING: Do not adjust or alter the unit in any
5) Do not start or stop the unit by inserting or pulling out the power plug.
 Do not start or stop the unit by inserting or pulling out the power plug.") 3058080 V170306 PURCHASE INFORMATION Thank you for choosing a Soleus Air Portable Air Conditioner. This Owner s Manual will provide you with valuable information necessary for the proper care and maintenance
3058080 V170306 PURCHASE INFORMATION Thank you for choosing a Soleus Air Portable Air Conditioner. This Owner s Manual will provide you with valuable information necessary for the proper care and maintenance
SLIDER CASEMENT AIR CONDITIONER
 OWNER S GUIDE READ AND SAVE THESE INSTRUCTIONS SLIDER CASEMENT AIR CONDITIONER ROTARY CONTROL P/N 309000854 (11/03) ROOM AIR CONDITIONER WARRANTY Your product is protected by this warranty Your appliance
RPI Industries, Inc.
 IMPORTANT: THE FOLLOWING INFORMATION SHOULD BE RETAINED FOR FUTURE REFERENCE RPI Industries, Inc. building a better case for sales CONFECTIONERY USE & SERVICE MANUAL WARRANTY INFORMATION For Models Bradford
Portable Air Conditioner 6,000 BTU 8,000 BTU 10,000 BTU
 Portable Air Conditioner 6,000 BTU 8,000 BTU 10,000 BTU OPERATING INSTRUCTIONS PCR-06-01 PCR-08-01 PCR-10-01 3058080 V170223 PURCHASE INFORMATION Thank you for choosing a Chigo Portable Air Conditioner.
4.5 CU.FT. REFRIGERATOR INSTRUCTION MANUAL
 4.5 CU.FT. REFRIGERATOR INSTRUCTION MANUAL Model No.: MCBR465S To ensure proper use of this appliance and your safety, please read the following instructions completely before operating this appliance.
Table of Contents Welcome and Thank You Note:
 TWR210EBL/TWR215ESS TWR320EBL/TWR325ESS Thermoelectric Wine Cooler Owner s Manual This owner s manual provides instructions on safe installation, use, and maintenance. Please read it carefully and save
INSTALLATION AND OPERATING MANUAL
 INSTALLATION AND OPERATING MANUAL Refrigerated Merchandisers with Air-Over Displays Refrigerated Low-Profile Mobile Merchandiser Refrigerated High-Profile Mobile Merchandiser Refrigerated Grab-N-Go Merchandiser
Glass Door Merchandisers GDC10, GDC12F, GDC15, GDC23, GDC24F, GDC40, GDC40F, GDS47, GDC69
 Commercial Refrigerator And Freezer User s Manual Glass Door Merchandisers GDC10, GDC12F, GDC15, GDC23, GDC24F, GDC40, GDC40F, GDS47, GDC69 12/2015 Please read the manual thoroughly prior to equipment
Power Pack Service Manual
 Power Pack Service Manual MMPP4301-EP MMPP4301 MMPP4301-PKG MMPP4302 MMPP4302-PKG MMPP4305-PKG MMPP4301-WC MMPP4302-WC MMPP4305-PKG-WC www.micromatic.com 1 TABLE OF CONTENTS Equipment Specifications...
1.7 CU.FT. REFRIGERATOR INSTRUCTION MANUAL MCBR170BMD
 1.7 CU.FT. REFRIGERATOR INSTRUCTION MANUAL Model No.: MCBR170WMD MCBR170BMD To ensure proper use of this appliance and your safety, please read the following instructions completely before operating this
Professional Warming Drawer and Warming Drawer Cabinet
 Professional Warming Drawer and Warming Drawer Cabinet Care & Use/Installation Instructions Models: (C)VQEWD5300SS (C)VQEWD5420SS IMPORTANT SAFETY INSTRUCTIONS WARNING: Read this manual carefully and completely
Quest Power Electric Heat EHS 62 Pro
 Quest DRY Power 150 Electric Heat EHS 62 Pro Read and Save These Instructions The Quest Power Electric Heat EHS 62 Pro portable, heavy duty electric heater features multiple power receptacles for connection
ASSEMBLY & OPERATION MANUAL
 WineKoolRTM 250 500 READ THE "USE AND CARE GUIDE" BEFORE YOU START LOCATING YOUR WINE CELLAR Provide 2 1/2 Never locate your wine cellar outdoors or in an area with extremes of temperature and humidity.
EBAC MODEL KOMPACT INDUSTRIAL DEHUMIDIFIER OWNER S MANUAL
 EBAC MODEL KOMPACT INDUSTRIAL DEHUMIDIFIER OWNER S MANUAL KOMPACT OWNERS MANUAL Page 1 of 9 INTRODUCTION Designed for a wide range of applications, the Kompact is a rugged, industrial unit, which utilizes
UNIT MODEL/ POWER SUPPLY VOLTAGE VARIATION AMBIENT AIR ON CONDENSER
 Room Air Conditioner Installation and Operation Manual UNIT MODEL/ POWER SUPPLY VOLTAGE VARIATION AMBIENT AIR ON CONDENSER (VOLTS) MIN. MAX. MIN. F ( C) MAX. F ( C) WAC060K7A 127-1-60 114.3 139.7 70(20.1)
 14,000 BTU Portable Air Conditioner 12,000 BTU Heat Pump LX-140 / LX-140BL Operating Instructions Model No. LX-140 2006 Soleus Air International Thank you for choosing a Soleus Air LX-140/LX-140BL Portable
POWER PACK SERVICE MANUAL
 POWER PACK SERVICE MANUAL MMPP4301-EP MMPP4301 MMPP4301-WC MMPP4301-PKG MMPP4301-PKG-WC MMPP4302 MMPP4302-WC MMPP4302-PKG MMPP4302-PKG-WC MMPP4303-PKG MMPP4303-PKG-WC MMPP4303-PKG-3 MMPP4305-PKG MMPP4305-PKG-WC
Model No. CZ2011O Oak Finish CZ2011C Cherry Finish CZ2011W Walnut Finish CZ2011B Black Finish DIGITAL QUARTZ INFRARED HEATER OWNER S MANUAL
 Model No. CZ2011O Oak Finish CZ2011C Cherry Finish CZ2011W Walnut Finish CZ2011B Black Finish DIGITAL QUARTZ INFRARED HEATER OWNER S MANUAL PLEASE SAVE THESE INSTRUCTIONS WARNING: READ THIS OWNER S MANUAL
POWER PACK SERVICE MANUAL
 POWER PACK SERVICE MANUAL MMPP4301-EP MMPP4301 MMPP4301-WC MMPP4301-PKG MMPP4301-PKG-WC MMPP4302 MMPP4302-WC MMPP4302-PKG MMPP4302-PKG-WC MMPP4303-PKG MMPP4303-PKG-WC MMPP4303-PKG-3 MMPP4305-PKG MMPP4305-PKG-WC
Operating Instructions
 PH5-13R-35D Portable Air Conditioner with Heat Pump Operating Instructions 3092402 Item Number: LX-130 Model Number: PH5-13R-35D 201 Soleus Air International Thank you for choosing a Soleus Air PH5 Series
INSTRUCTIONS! DO NOT DISCARD!
 INSTUCTIONS! DO NOT DISCAD! CAUTION! Do NOT install where injury might occur due to Moving parts, Sharp corners, Hot surfaces or electrical components dcn0812 Page 1 of 11 INSTALLATION INSTUCTIONS CAUTION
Glass Door Refrigerators
 To better help you obtain assistance or service should you ever need it, write down the following information about the product. This information is on the identification label located on the left hand
INSTALLATION AND OPERATING MANUAL
 INSTALLATION AND OPERATING MANUAL Refrigerated Island Merchandiser FOR PARTS & SERVICE Contact: Piper Products, Inc. Phone: (800) 544-3057 Ask for Service Department IMPORTANT! This manual contains important
Model No.: PS08-01 PS10-01 Ref: KY80 KY100
 8,000/10,000/12,000 BTU Portable Air Conditioner Operating Instructions Model No.: PS08-01 PS10-01 Ref: KY80 KY100 Model No.: PS12-03 Ref: KY120 3119233 V160310 Thank you for choosing a Soleus Air Portable
11,000 BTU Portable Air Conditioner with dehumidifier & Fan PE4-11R-03 Operating Instructions. Model No. PE4-11R Soleus Air International
 11,000 BTU Portable Air Conditioner with dehumidifier & Fan PE4-11R-03 Operating Instructions Model No. PE4-11R-03 2006 Soleus Air International Thank you for choosing a Soleus Air Portable Air Conditioner.
HGW-308R Wall Mountable Micathermic Heater w/ Remote. Model No. HGW-308R Soleus Air International
 HGW-308R Wall Mountable Micathermic Heater w/ Remote 3092402 Model No. HGW-308R 2007 Soleus Air International Thank you for choosing a Soleus Air Micathermic heater. This owner s manual will provide you
EBAC MODEL CD30 INDUSTRIAL DEHUMIDIFIER OWNER S MANUAL
 EBAC MODEL CD30 INDUSTRIAL DEHUMIDIFIER OWNER S MANUAL Ebac Industrial Products 704 Middle Ground Boulevard Newport News, VA 23606 Tel: 757 873 6800 Fax: 757 873 3632 Website: www.ebacusa.com UNPACKING
OPERATING INSTRUCTIONS
 OPERATING INSTRUCTIONS SPECIALTY REFRIGERATED TRANSPORT CABINETS FOR SATELLITE LOCATIONS RBQ-96 Caution: Read the instructions before using the machine. CONGRATULATIONS......and thank you for purchasing
PROAIR Air Conditioner. CR29 Model INSTRUCTION MANUAL nvent Rev. I P/N
 PROAIR Air Conditioner CR29 Model INSTRUCTION MANUAL Rev. I P/N 89104461 TABLE OF CONTENTS Warranty and Return Policy...2 RECEIVING THE AIR CONDITIONER...3 HANDLING AND TESTING THE AIR CONDITIONER...3
Model No. GB-PAC-08E4. 8,000 BTU Portable Air Conditioner Operating Instructions
 Model No. GB-PAC-08E4 8,000 BTU Portable Air Conditioner Operating Instructions Thank you for choosing a Soleus Air Powered by Gree Portable Air Conditioner. This owner s manual will provide you with valuable
PROAIR Air Conditioner. CR43 Model INSTRUCTION MANUAL nvent Rev. H P/N
 PROAIR Air Conditioner CR43 Model INSTRUCTION MANUAL Rev. H P/N 10-1008-130 TABLE OF CONTENTS Warranty and Return Policy...2 RECEIVING THE AIR CONDITIONER...3 HANDLING AND TESTING THE AIR CONDITIONER...3
FLCH4R Garage and Utility Electric Heater
 FLCH4R Garage and Utility Electric Heater Installation, Operation & Maintenance Instructions Model No. Volts Amps Watts BTU/HR Phase High Low High Low High Low Min Fuse Size* FLCH4R 208 17.3 8.66 3600
PROAIR Air Conditioner. CR23 Model INSTRUCTION MANUAL nvent Rev. D P/N
 PROAIR Air Conditioner CR23 Model INSTRUCTION MANUAL Rev. D P/N 89112522 TABLE OF CONTENTS Warranty and Return Policy...2 RECEIVING THE AIR CONDITIONER...3 HANDLING AND TESTING THE AIR CONDITIONER...3
Power Pack Service Manual
 Power Pack Service Manual MMPP4301-EP MMPP4301 MMPP4301-WC MMPP4301-PKG MMPP4301-PKG-WC MMPP4302 MMPP4302-WC MMPP4302-PKG MMPP4302-PKG-WC MMPP4303-PKG MMPP4303-PKG-WC MMPP4303-PKG-3 MMPP4305-PKG MMPP4305-PKG-WC
ROTARY CONTROL AIR CONDITIONER
 USE & CARE MANUAL NOTE: This USE & CARE MANUAL provides specific operating instructions for your model. Use the room air conditioner only as instructed in this USE & CARE MANUAL. These instructions are
CUBE ICEMAKER MODELS SCU25, SCU35, SCU45, SCU75, SCU95, SCU120 INSTALLATION AND SERVICE MANUAL VERSION 2
 CUBE ICEMAKER MODELS SCU25, SCU35, SCU45, SCU75, SCU95, SCU120 INSTALLATION AND SERVICE MANUAL VERSION 2 STUART MANUFACTURING 1 Jayelem Crescent Padstow NSW 2211 Australia Telephone (02) 9773 3711 Fax
EBAC MODEL CD60 INDUSTRIAL DEHUMIDIFIER OWNER S MANUAL
 EBAC MODEL CD60 INDUSTRIAL DEHUMIDIFIER OWNER S MANUAL CD60 OWNERS MANUAL Page 1 of 9 INTRODUCTION Designed for a wide range of applications, the CD60 dehumidifier is a rugged, industrial unit which utilizes
12,000 BTU Evaporative Portable Air Conditioner
 12,000 BTU Evaporative Portable Air Conditioner Owner s Manual Model # KY-32E Please read owner s manual carefully before operating the unit. TABLE OF CONTENTS PAGE Table of Contents. 2 Introduction....3
WatchDog NXT60. Installation and Operations Manual. Seaira Global, LLC NC Highway 50 Surf City, NC (910)
") WatchDog NXT60 Installation and Operations Manual Seaira Global, LLC 14021 NC Highway 50 Surf City, NC 28445 (910) 660-0962 Table of Contents Important Notes 2 Warranty Registration 2 Specifications 3
WatchDog NXT60 Installation and Operations Manual Seaira Global, LLC 14021 NC Highway 50 Surf City, NC 28445 (910) 660-0962 Table of Contents Important Notes 2 Warranty Registration 2 Specifications 3
2.4 Cu. Ft. Compact Refrigerator
 2.4 Cu. Ft. Compact Refrigerator User s Manual PLEASE READ THIS MANUAL CAREFULLY BEFORE USING YOUR REFRIGERATOR AND KEEP IT FOR FUTURE REFERENCE. Model MCBR240B Product Registration Thank you for purchasing
Portable Air Conditioner with Heat Pump Technology PH4-10R-01, PH4-12R-01, & PH4-14R-01 Operating Instructions
 Portable Air Conditioner with Heat Pump Technology PH4-10R-01, PH4-12R-01, & PH4-14R-01 Operating Instructions 3092402 2006 Soleus Air International Thank you for choosing a Soleus Air Portable Air Conditioner
BOTTOM MOUNT REFRIGERATORS AND FREEZERS Installation, Operation and Maintenance Instructions
 BOTTOM MOUNT REFRIGERATORS AND FREEZERS Installation, Operation and Maintenance Instructions INSPECTION When the equipment is received, all items should be carefully checked against the Bill of Lading
Instruction Manual Item No.: V~, 60Hz
 Energy- Saving Mode Portable AC 10,000 BTU Model: MW-L3-10C Montgomery Ward Customer Service 1112 7th Avenue, Monroe, WI 53566 8:00 am to Midnight, Monday through Friday 1 888 557 3848 Instruction Manual
RPI Industries, Inc.
 RPI Industries, Inc. AIR SCREEN and SELF-SERVE OPERATION AND SERVICE MANUAL WARRANTY INFORMATION For Models Olympus Bandit Bravo SCAS36R SCRFC3660R SCRFC3648R SCAS48R SCRFC4860R SCRFC4848R SCAS60R SCRFC6060R
Turbo Air Speed up the Pace of Innovation TBB-4SB CAUTION! PLEASE KEEP POWER SWITCH ON BEFORE OPERATING THIS EQUIPMENT
 Turbo Air Speed up the Pace of Innovation CAUTION! PLEASE KEEP POWER SWITCH ON BEFORE OPERATING THIS EQUIPMENT Underbar Equipment Back Bars Installation and Operation Manual Please read this manual completely
CWR265SZ 26 Bottle Built-in Wine Cooler Owner s Manual
 CWR265SZ 26 Bottle Built-in Wine Cooler Owner s Manual This owner s manual provides instructions on safe installation use, and troubleshooting assistance. Please read it carefully and save it for reference
OWNER S MANUAL STAINLESS STEEL REACH-IN SERIES. Model: ATF1 ATF2 ATF3 ATR1 ATR2 ATR3 ATF2 ATR2
 OWNER S MANUAL STAINLESS STEEL REACH-IN SERIES Model: ATF1 ATF2 ATF3 ATR1 ATR2 ATR3 ABF1 ABF2 ABF3 ABR1 ABR2 ABR3 ABF1 ABR1 ATF2 ATR2 ABF3 ABR3 Please read the manual carefully and follow all instructions.
Portable Dehumidifier with Internal Pump Portable Dehumidifier with Internal Pump OPERATING INSTRUCTIONS OPERATING INSTRUCTIONS
 Portable Dehumidifier with Internal Pump Portable Dehumidifier with Internal Pump OPERATING INSTRUCTIONS OPERATING INSTRUCTIONS DS1-70EIP-101 Model Number: DS1-70EIP-101 3058080 V.170209 PURCHASE INFORMATION
14,000 BTU Portable Air Conditioner 14,200 BTU Heat Pump Model Number: LX-140 Operating Instructions. Model No. LX Soleus Air International
 14,000 BTU Portable Air Conditioner 14,200 BTU Heat Pump Model Number: LX-140 Operating Instructions 3092402 Model No. LX-140 2012 Soleus Air International Thank you for choosing a Soleus Air LX-140 Portable
T-SERIES Air Conditioner. T20 Model INSTRUCTION MANUAL nvent Rev. C P/N
 T-SERIES Air Conditioner T20 Model INSTRUCTION MANUAL Rev. C P/N 89114993 TABLE OF CONTENTS Warranty and Return Policy... 2 IMPORTANT NOTICE... 2 RECEIVING THE AIR CONDITIONER... 3 HANDLING AND TESTING
T-Series Air Conditioner T15 Model
 INSTRUCTION MANUAL T-Series Air Conditioner T15 Model Protecting Electronics. Exceeding Expectations. McLean Cooling Technology 11611 Business Park Blvd N Champlin, MN 55316 USA Tel 763-323-8200 Fax 763-576-3200
Instruction Manual Item No.: V~, 60Hz
 Energy- Saving Mode Portable AC 8,000 BTU Model: MW-O-08C Montgomery Ward Customer Service 1112 7th Avenue, Monroe, WI 53566 8:00 am to Midnight, Monday through Friday Wards.com 1 888 557 3848 Instruction
PERFECT CHILL WINE CHILLER. USE AND CARE MANUAL MODEL Bottle
 PERFECT CHILL WINE CHILLER USE AND CARE MANUAL MODEL 88013 35 Bottle SAFETY INFORMATION------------------------------------------------------------ 2 WELCOME------------------------------------------------------------------------------------
Milk Coolers Installation and Operation Manual Please read this manual completely before attempting to install or operate this equipment!
 Turbo Air Speed up the Pace of Innovation CAUTION! PLEASE KEEP POWER SWITCH ON BEFORE OPERATING THIS EQUIPMENT Milk Coolers Installation and Operation Manual Please read this manual completely before attempting
Portable Air Conditioner with Heat Pump Technology Operating Instructions. Model No.: HCB-P13HP-D. Reference No.: BPD13HP V140217
 Portable Air Conditioner with Heat Pump Technology Operating Instructions 3092402 Model No.: HCB-P13HP-D Reference No.: BPD13HP V140217 Thank you for choosing a Soleus Air Portable Air Conditioner with