Double Pumping Things to Remember Tips for Expressing Breast Milk Functions & Controls Massage Mode & Expression Mode...
|
|
|
- Abner Reed
- 6 years ago
- Views:
Transcription


1 Spectra S2 1
2 Contents Welcome to your Spectra Breast Pump... 4 Features... 4 Important Safeguards... 5 Hygiene... 5 Pain or Discomfort... 5 General Safety Guidelines... 6 Package Contents... 7 Pump Kit... 8 Cleaning & Care Washing Breast Pump Parts Cleaning & Care Tips Cleaning & Care Quick Reference Chart Sterilising Breast Pump Parts Boiling Steam Steriliser Breastshield Sizing Measuring Your Nipple Signs Your Breastshield Is Too Small Signs Your Breastshield is Too Large For Your Information Assembling the Spectra S Backflow Protector Assembly Adaptor Assembly Preparing to Pump Pumping Instructions Single Pumping
3 Double Pumping Things to Remember Tips for Expressing Breast Milk Functions & Controls Massage Mode & Expression Mode Vacuum Intensity Cycle Speed Night Light Milk Storage Important Safeguards Thawing Frozen Breast Milk Feeding Breastmilk Warming Milk Safely Bottle-Feed Bottle Assembly Troubleshooting Warranty Disposal Flying with the Spectra S For More Information Instructional Videos Technical Specifications Environmental Conditions Performance Characteristics Electromagnetic Compatibility

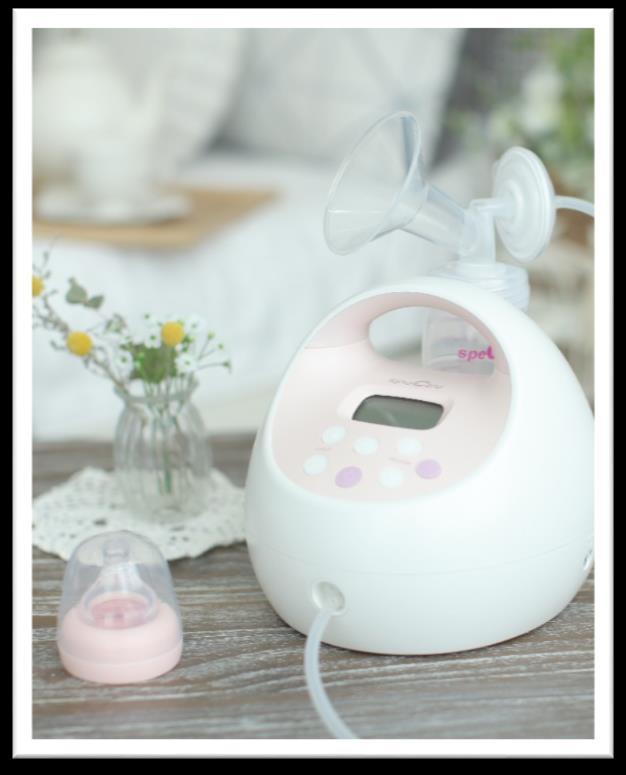
4 Welcome to your Spectra Breast Pump Congratulations on becoming the owner of a Spectra S2 hospital grade double electric breast pump. Your Spectra S2 is designed to make life easier for you, with a host of features to ensure effective expressing. If you have any questions about using your Spectra S2, please check our website for more information or get in touch with our customer service team at any time. Spectra Baby Australia Features Double-Sided Pumping: Your Spectra S2 comes with everything you need for double pumping. Expressing from both breasts at the same time saves you time and better supports milk supply. Letdown Mode: Switch with a touch to the letdown mode, which is a light, quick fluttering mode designed to speed the start of milkflow, just the way your baby does. 4
5 Fully Adjustable Cycle and Vacuum Settings: Touch button controls allow you to easily adjust the cycle and vacuum levels until you find what works best for your body. Night Light: Choose from two different light levels on the Spectra S2 s integrated nightlight, a feature you will love when pumping at night. Stylish, Portable Design: Spectra has endeavored to make the most portable and convenient hospital grade pump ever, with an integrated handle and integrated bottle stand to make life a little easier. Important Safeguards Carefully read all the instructions prior to using the Spectra S2. Follow the safety guidelines below when using your pump. Failure to follow the below guidelines may result in damage to the machine and/or serious injury to yourself. Hygiene The pump kits that come with this pump are for single use only and are not intended for multiple users. If this pump is shared by multiple users, every mum must have her own shield kit. Use by multiple users risks the spread of transmissible diseases. This breast pump is a closed system with the use of the backflow protector, preventing milk from entering the system tubing. Always follow the directions in this manual for cleaning and storage of your breast pump and parts. Failure to follow the guidelines provided or use of the Spectra S2 with attachments not recommended by the manufacturer may pose a health risk and will void the warranty. Pain or Discomfort You should not experience pain or discomfort when using your breast pump. Do not turn the suction level above your comfort level. Ensure that the breast shields are fitted correctly (see the Breastshield Sizing portion of this 5
6 manual on page 14 for more information). If you experience pain or discomfort, stop using the breast pump and seek help from your care provider, a certified lactation consultant, or the Spectra customer service team, as appropriate. General Safety Guidelines Close supervision is necessary when used near children. Use the product only for its intended use and with attachments recommended by the manufacturer. Handle the power cord, adapter and plug with care; do not leave on a heated surface, do not pull on or twist the power cord, do not wrap the cord around the adapter body. Do not use near water. Do not use in the presence of concentrated oxygen or pressurised gases. Unplug and store out of reach of children when not in use. 6
. Replacement parts and additional breastshield sizes are available to purchase on the Spectra website. Spectra Baby Australia www.spectra-baby.")
7 Package Contents The Spectra S2 comes complete with a power adaptor, 2 milk collection kits, and 2 feeding kits (bottle caps, soft flow teats, bottle necks, and bottle sealing discs). Replacement parts and additional breastshield sizes are available to purchase on the Spectra website. Spectra Baby Australia 7
, backflow protector, collection bottle, duck valve, and tubing.")
8 Pump Kit The Spectra S2 comes with 2 milk collection kits. Included in each kit is a breastshield (size 24mm), backflow protector, collection bottle, duck valve, and tubing. Replacement parts and additional breastshield sizes are available to purchase on the Spectra website. Spectra Baby Australia 8
9 9
10 Cleaning & Care Note: These guidelines are for use with a healthy, full-term baby and assume that you have access to potable water. If your baby is premature or has health challenges your care provider may supply alternative advice. If you live in an area without potable water, you should always sterilise parts before use. Always follow the advice of your care provider. Sterilise all parts (except the pump motor and tubing) before first use. You do not need to sterilise parts used with breastmilk after every use. Thorough washing with warm soapy water and air drying after each use is sufficient. You may wish to sterilise on occasion to ensure fat residue is removed. You do need to sterilise breast milk storage containers that will be used to store and freeze breast milk, such as bottles, before first use. Most milk storage bags come pre-sterilised; verify with the manufacturer prior to use. Washing Breast Pump Parts 1. Wash your hands with warm soapy water. 2. Disassemble all parts and wash in warm, soapy water and then rinse thoroughly in hot water. The top rack of the dishwasher is fine for all parts except the duck valve and backflow protector membrane (i.e. the silicone parts). Do not place silicone parts including valves and backflow protector diaphragms in the dishwasher. You may wish to soak the parts in warm soapy water for several minutes prior to washing, as well. 3. Use a bottle brush to ensure that there is no milk residue anywhere in the parts. Try to be careful with the membranes and valves, as they are the most fragile part of the kit. 4. Do not wash the valves or membranes in the dishwasher. Flush the valve with hot soapy water and carefully remove any milk residue with a bottle brush. 5. Place parts on a clean dish drying rack or clean paper towel to air dry after washing. Do not use cloth to dry your breast pump parts as it 10
. 7. Never immerse your pump motor in water. Wipe clean with a damp cloth as needed. 8. Never wash or sterilise the tubing.")
11 may harbour bacteria that can contaminate breast milk. Try not to touch the inside of any parts that will come into contact with breast milk. 6. Once dry, store parts in a clean, closed container (i.e. snaplock bag or clean plastic tub with a lid). 7. Never immerse your pump motor in water. Wipe clean with a damp cloth as needed. 8. Never wash or sterilise the tubing. When used correctly, the backflow protector stops milk from entering the tubing. If milk should somehow enter the tubing, we recommend replacing the tubing. If tubing should become wet, make sure it is completely dry before pumping as not to damage the motor. 9. The backflow protector does not need to be washed after each use. If you notice moisture in the backflow protector, disassemble and wash each of the three parts separately. Allow to air dry completely before reassembly. Cleaning & Care Tips Valves that are difficult to remove from the shield to wash, or slip off the shield during pumping, may need replacing, or may have a residue of fatty milk build-up. This can be helped by cleaning the shield and valves thoroughly, and washing them in a mix of 1 part vinegar 3 parts hot water to release the fatty residue. (This can be the case with bottles coming loose from shields too, and same solution). 11
12 Cleaning & Care Quick Reference Chart Sterilise Before First Use? Wash After Each Use? Dishwasher Safe? Special Instructions Pump Motor No No No Wipe down with a damp cloth as needed. Tubing No No No Replace if dirt or moisture gets in. Backflow Protector Yes No No: do not place silicone diaphragm in dishwasher. Yes: plastic outer pieces only. Wash only if moisture enter the component. Do not wash silicone diaphragm in dishwasher. Breastshield Yes Yes Yes Duck Valve Yes Yes No Do not wash in dishwasher Collection Bottle Yes Yes Yes Bottle Cap Yes Yes Yes Sealing Disc Yes Yes Yes Teat Yes Yes No Do not wash in dishwasher Bottle Cap Yes Yes Yes 12

13 Sterilising Breast Pump Parts You can use any method you like to sterilise the parts of your Spectra pump. Please remember that you must never sterilise the tubing or pump motor. In most cases, you do not need to sterilise after every use of your breast pump; over-sterilising will cause your pump parts to wear and require replacement more quickly. Your care provider may have given you alternative sterilisation instructions if your baby was born prematurely or has an illness: always adhere to your care provider s instructions. You do need to sterilise all parts (except tubing and pump motor) before first use. All parts must be disassembled prior to sterilising. Disassemble the backflow protectors and remove the duck valves from the breastshields prior to sterilising. Choose from any of the following instructions to sterilise pump parts: Boiling 1. Place all the equipment in a large sauce pan and cover with tap water. 2. Check that there are no air bubbles inside bottles or other parts. 3. Place the lid on the saucepan and bring to a boil. 4. Boil for 5 minutes, making sure that the pot doesn t boil dry and melt the equipment. 5. Turn off the heat and allow to cool. 6. Remove parts with tongs and air dry on a clean dish rack or clean paper towel. Steam Steriliser Follow the manufacturer's directions. Tip: Frequent microwave sterilising of breast pump parts and bottles may cause discoloration. This does not affect usability or safety of the parts. 13

 will expand while milk is being expressed so it s important to measure after it has swollen to ensure the size you select will provide adequate room.")
14 Breastshield Sizing Measuring Your Nipple The Spectra S2 comes with size 24mm breastshields. This is the most commonly fitted shield size; however, many women will fit better in other sizes. A properly sized breastshield is important to ensure the best performance of your pump. An improperly fitted breastshield can hinder milk output, cause discomfort, and in extreme cases cause injury. To determine the shield size you need, pump for 5 minutes using the provided shield(s). Your nipple(s) will expand while milk is being expressed so it s important to measure after it has swollen to ensure the size you select will provide adequate room. After you pump, measure the diameter of the nipple(s) at the base as illustrated in the image to the right. Select a shield size that is 2-3mm larger than this measurement. See below for fitting examples: Shield is Too Small Ideal Fit Shield is Too Large Nipple is not moving freely within the flange: there should be 2-3mm of space. 2-3mm of space around nipple; a small amount of areola may enter the flange. Excess areola is drawn into the flange, there is excess space around the nipple, and the nipple is being pulled toward the end of flange. 14
15 Note: The images presented in this section are a guide, not a rule, therefore fitting may appear differently for all women. Signs Your Breastshield Is Too Small Painful rubbing of nipple in flange. Nipple not moving freely inside of flange. Redness of the nipple. Whiteness of the nipple and/or a white ring around the base of the nipple. Little milk is being expressed. General discomfort while pumping. Signs Your Breastshield is Too Large Excess areola is drawn into the flange (a small amount of areola may enter the flange for some women; however, it should never be uncomfortable or painful). Sensation of pulling and/or pulling pain. Nipple is pulled to the end of the flange. Shield falls from the breast while pumping. Little milk is being expressed. General discomfort while pumping. For Your Information Although the above instructions provide a good indication of the size of breastshield you will need, there are few things to consider: Every woman s body responds differently to pumping. It is possible your measurements before pumping might change during pumping, therefore we suggest taking measurements of the swollen nipple 5 minutes after pumping. Your measurements might be different throughout the day. For example, you might be fuller in the morning after going a few hours without pumping and/or feeding at night, warranting a larger size. You might also be smaller in the evening after consistent pumping or feeding throughout the day. 15
16 You might be larger at the beginning of a pumping session, and smaller after some milk has been expressed. Your measurements might change after your milk supply is wellestablished (about 10 weeks postpartum). One breast may perform better with a different sized breastshield than the other. If you are experiencing friction, pain, or discomfort while pumping, contact us for help. Additional breastshield sizes are available on our website. If you need assistance selecting a shield size, please do not hesitate to contact our expert customer support team! Spectra Baby Australia 16
. For more information on sterilising and washing the parts that come with your pump, please refer to the Cleaning & Care section of this manual (page 10). 17")
17 Assembling the Spectra S2 Before using your Spectra S2 for the first time, you will need to sterilise all parts, except for the pump motor and tubing (sterilising the pump motor and tubing will cause irreparable damage and void the warranty). For more information on sterilising and washing the parts that come with your pump, please refer to the Cleaning & Care section of this manual (page 10). 17

18 1. Attach the silicone duck valve to the underside of the breastshield. 2. Screw the milk collection bottle into the underside of the breastshield. 3. Assemble the backflow protector as illustrated below by inserting the membrane into the base, then inserting the top into the base and turning clockwise to secure. 4. Fit the backflow protector into the top of the breastshield. Use a screwing motion to attach and remove this part to avoid damaging it. 5. Connect the tubing to the backflow protector. 6. Connect the tubing to the Spectra S2. For double-pumping, remove the cap on the airport. For single-pumping, make sure this cap remains in place (see below, right). 7. Insert power adaptor, if necessary. Backflow Protector Assembly Ensure that the backflow protector has been sterilized and allowed to completely dry on a clean paper towel prior to assembly. The backflow protector does not need to be cleaned or sterilized prior to each use - only if moisture should enter the component. Always inspect the backflow protector for moisture and damage prior to pumping. Membranes should be replaced regularly; see Preparing to Pump (Page 20) for more information. 1. Insert the membrane into the bottom piece (the piece that connects to the breastshield) as illustrated to the right. Ensure that it fits snugly into and curl the membrane lip around the rim of the bottom piece. 2. Fit the top piece (the piece that connects to the tubing) over the bottom piece and membrane by pressing the bottom snugly into the rim of the top piece. 18

 and require a")
19 Adaptor Assembly 1. Connect the power charger and the Australian adaptor by pushing the two components together. 2. You will hear a loud click once they are fully assembled. When fullyassembled, the Australian adaptor will be locked in place (not move freely) and require a significant amount of force to remove it. Note: When assembled properly, the Australian adaptor will not be visible from the back side (see image below). 19
20 Preparing to Pump Prior to pumping, make sure your pumping kit has been sterilised. Refer to the Sterilising Breast Pump Parts section of this manual (page 13) for information on proper sterilization of parts. Wash your hands thoroughly in warm soapy water prior to handling parts that come in contact with the breast or breast milk. Inspect parts for damage. Do not use parts if they are damaged. Do not use silicone parts such as membranes or duck valves if they are torn. To maintain suction and overall functionality of the pump, silicone parts need to be replaced regularly. Replacement parts are available on Baby.com.au; contact us if you need assistance. Replacement Frequency: Pump Once Daily Duck Valve 2-3 Months Backflow Protector 6 months Pump Twice or More Daily 4 weeks 3 months 20

21 Pumping Instructions 1. Relax and stimulate your letdown reflex. Some women find that breast massage, looking at photos of their baby, listening to recordings of their baby, or smelling their baby s clothing items assists with letdown. Some women have success using just the massage mode of the Spectra pump to stimulate letdown as well. 2. Centre the breastshield on your breast so that the nipple is centred in the flange (see right). 3. Press the button. The screen will light up and the pump will initiate. 4. Press the button to enter Massage Mode, to stimulate letdown. Massage Mode is a fast method of pumping designed to initiate your letdown, the start of milk flow. 5. Once your milk starts flowing, press the button again to enter Expression Mode. Expression mode mimics the slow, deep suckling of your baby once the milk has begun flowing. 6. Adjust the vacuum to comfort level. Start with the vacuum on low, and then gradually increase the vacuum setting to your comfort level. Never set the vacuum level higher than your comfort level. 7. Express milk until the breast is empty (this can take 15 minutes or longer). To maintain supply for an exclusively breastfed baby, we recommend pumping every 2-3 hours, or 7-8 times per day for long enough to completely drain the breast; then, an additional 5 minutes to signal the demand for the body to make more milk. 8. When you wish to stop expressing, press the power button then remove the milk collection kits from your breasts. Do not attempt to remove the collection kits without first breaking suction. Turning off the pump will break suction. Note: When powered back on, the Spectra S2 will automatically start off at the most recently used settings in expression mode. We recommend taking caution, 21
.")
22 and especially if you prefer to gradually increase vacuum intensity over a pumping session, to turn the pump down low prior to turning it off. Single Pumping 1. Connect the tubing to the air nozzle on the front of the pump motor. 2. Ensure that the cap is secured over the unused air nozzle (see right). Tip: Make sure the cap is secured firmly enough over the unused air nozzle that no air can escape, but not so firmly that it is difficult to remove. Double Pumping 1. Remove the cap from the second air nozzle. 2. Connect the tubing from each milk collection kit into an air nozzle (see below, right). Tip: Double pumping is more effective for most women at building milk supply, and is a great way to save time. It is normal to notice that suction reduces when double pumping - just turn the vacuum settings higher to compensate. Tip: Hold one breast shield to your breast with your forearm and the other with the hand of the same arm to keep one arm free while double pumping. If you are expressing frequently, you may consider investing in a hands free pumping bra. 22
23 Things to Remember Some women achieve success by swapping between Massage Mode and Expression Mode throughout a pumping session. For example, start in Massage Mode, and switch to Expression Mode when milk is flowing, and then when the milk flow slows, switch back into Massage Mode; and so on. After 30 minutes of operation, the Spectra S2 will automatically turn off. The Spectra S2 automatically starts back up where you left off, therefore we recommend slowly decreasing vacuum intensity at the end of your pumping session (this eliminates any surprises when you go to pump the next time). You may experience greater vacuum intensity when single pumping at the same level as while double pumping, so keep this in mind when starting your pumping session. Tips for Expressing Breast Milk Relax and stay hydrated: Set yourself up with a glass of water and snacks, and minimise interruptions for the next minutes as much as possible. Set the stage: Have a regular pumping location. Choose a seat that is comfortable and provides back support so you can relax while still sitting up straight. Keeping a small towel nearby will help you clean as needed. Routine and ritual: You can condition your body to express easily by pumping with the same setup each time. For example, try always using the bathroom first, then fix your favorite drink, grab your clean milk collection kits, sit down in your regular spot, have your drink, and then start pumping. Try always expressing after brushing your teeth, or playing the same game on your phone while you express. Your body will start to recognise what s going on. Visualise success! Just as ritual can help contribute to effective pumping, some creative visualisation can also help. Think of a gushing faucet, a flowing river, or simply visualise your milk coming out. Remember who you are pumping for: Some women find a picture of their baby, a baby item or item of clothing that smells like their baby 23
24 can help trigger letdown. Some find that a recording of their baby s cry is a powerful letdown trigger. Massage to start: Stimulated your breasts before pumping can ease letdown. Rub in small circles all around the breast (don t forget in the armpit area) on both sides before you turn your pump on. Massage to continue: When you notice your milkflow starting to slow, massaging your breast while focussing on any areas that seem to still contain milk can sometimes restart milkflow or encourage another letdown. Pump more often: Increasing the frequency of your pumping sessions rather than the amount of time you pump is generally more effective at increasing the volume you can express. Pump on schedule: Pumping at the same time each day can help teach your breasts to be ready to let the milk flow. Some women find pumping in the morning brings about the biggest payoff while other pump after their baby s bedtime, a much more relaxed time of day. Free a hand: With practice, you may be able to use a cushion or the crook of your arm to support one milk collection kit while you hold the other. This gives you a free hand to turn pages, scroll down screens, or use the remote. If you are serious about getting things done while pumping, a hands-free pumping bra will free up both your hands. Pain should not be pushed through : If you are experiencing discomfort or pain while pumping, turn the suction down, try a little bit of lubricant such as coconut oil on the shield, and contact your care provider or Spectra Customer Support ASAP if the pain continues. Note: When you express and how often will depend on your specific situation. We have provided some basic instructions here, but you may wish to ask your care provider for additional help. More information is also provided on our website and through customer support. Contact us if you need assistance. Spectra Baby Australia 24
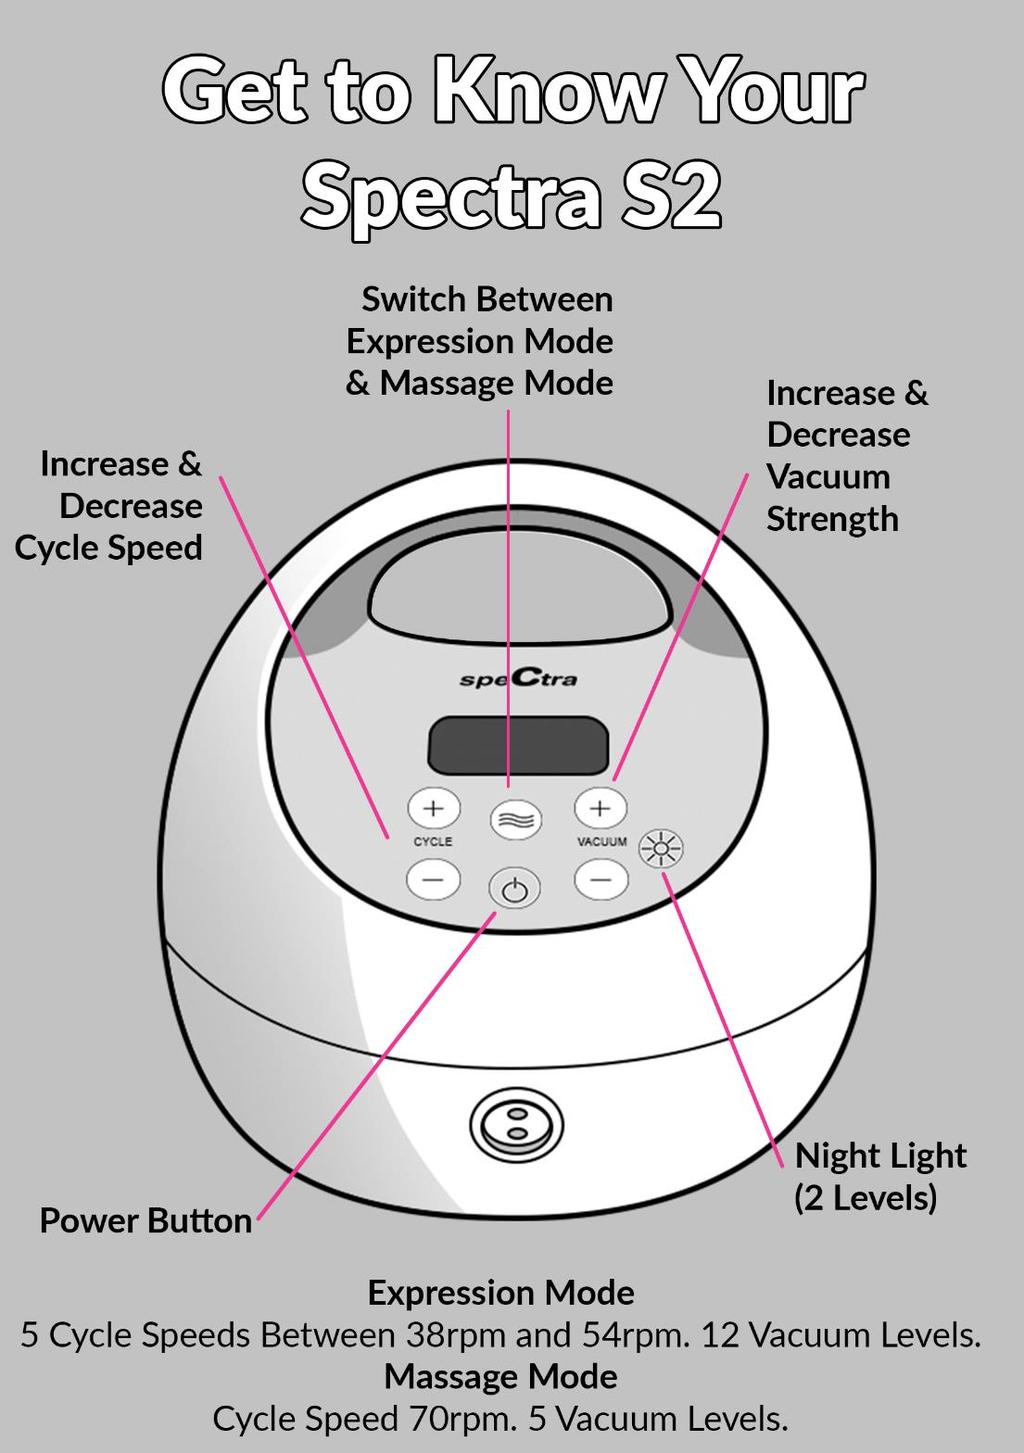
25 Functions & Controls Massage Mode & Expression Mode The Spectra S2 comes equipped with Massage Mode and Expression Mode to best mimic the patterns of your baby s suckling. The Massage Mode is a fast method of pumping designed to initiate your letdown, the start of milk flow. Expression Mode mimics the slow, deep suckling of your baby once the milk has begun flowing. To use these modes, follow the instructions below: 1. Press the button to turn on your Spectra S2. 2. Press the button to switch to Massage Mode. The screen will display the icon. 3. Once your milk is flowing, press the button again to enter the Expression Mode. 4. You may find good results switching between Massage Mode and Expression Mode multiple times throughout the pumping session. 25

26 Vacuum Intensity The vacuum level on your breast pump refers to the suction strength, or how strongly the pump will suck. This is measured in mmhg. When you are using your Spectra S2, you will usually find that expressing is most effective on the highest vacuum level that you are comfortable with. However, it s important not to set vacuum level so high that it makes you uncomfortable, as the resulting pain will hinder your milk flow. Adjust the vacuum intensity by pressing the and buttons between levels 1 and 12. Start off with the vacuum on low, and then gradually increase the vacuum setting to your comfort level. To achieve best results, we recommend trying to pump with the vacuum set to your maximum comfort level. You may try switching between your maximum comfort level and a lower intensity to stimulate more milk let down as well. Be sure not to pump above your comfort level as that may hinder milk flow or cause injury. Since the Spectra S2 automatically starts back up where you left off, we recommend slowly decreasing vacuum intensity at the end of your pumping session (this eliminates any surprises when you go to pump the next time). 26

27 Cycle Speed The cycle speed on your Spectra S2 refers to the how many times the pump sucks and releases per minute; this is measured in cpm (cycles per minute). Your Spectra S2 has been designed with variable cycle settings so that you can find the setting that suits your body best. Changing the cycle speed can make a dramatic difference to successful expressing for some women. Every woman is different, so experiment to find what speed works best for you. In Expression Mode, adjust the vacuum intensity by pressing the and buttons between levels 38 and 54. In Massage Mode, the cpm is locked at

28 Night Light The Spectra S2 comes with a nightlight to make pumping at night and on dark days easier. The night light has two settings of brightness - simply press the button to turn on the night light, and again to increase brightness. To turn off the light, press the button again. 28
29 Milk Storage The following chart describes how and where to safely store your expressed breast milk, based on current international recommendations. If your care provider has provided alternative instructions, always adhere to those. Preferred Storage Duration Acceptable Storage Duration Fresh Breast Milk At room temperature (up to 26 C / 78 F) In the cooler bag with an ice pack (up to 15 C / 59 F) In the back of the refrigerator (up to 4 C / 78 F) 4 hours 8 hours 12 hours 24 hours 3 days 8 days Frozen Breast Milk Prior to Feeding At room temperature (up to 26 C / 78 F) In the cooler bag with an ice pack (up to 15 C / 59 F) None - Should be thawed in the refrigerator Until Thawed None - Should be thawed in the refrigerator Until Thawed In the back of the refrigerator (up to 4 C / 78 F) 24 hours 48 hours Fresh Breastmilk after Feeding At room temperature (up to 26 C / 78 F) 1 hour 2 hours 29
30 In the cooler bag with an ice pack (up to 15 C / 59 F) In the back of the refrigerator (up to 4 C / 78 F) In the freezer ( C / -4-0 F) Up to 4 hours Up to 24 hours None - Should not be frozen Up to 4 hours Up to 24 hours None - Should not be frozen Previously Refrigerated or Frozen Breastmilk after Feeding At room temperature (up to 26 C / 78 F) In the cooler bag with an ice pack (up to 15 C / 59 F) In the back of the refrigerator (up to 4 C / 78 F) 1 hour 1 hour 1 hour 2 hours 1 hour 2 hours In the freezer ( C / 0-4 F) In the Freezer None - Do not refreeze None - Do not Refreeze In the Freezer Compartment of a Refrigerator (-15 C / 5 F) Conventional freeze ( C / -4-0 F) Deep Freeze (-20 C / - 4 F or lower) 1 week 2 weeks 3 months 6 months 6 months 1 year Note: The bottles, sealing discs, and bottlenecks that come with your milk collection kit are safe for storage use in the refrigerator or freezer; they need 30
31 to be sterilised before first use. Spectra milk storage bags which come presterilised are available to purchase on the Spectra Baby Australia website. Important Safeguards Do not refreeze previously frozen breast milk once thawed. Do not overheat or microwave breast milk as much of its nutritive value will be lost and hot spots can occur and result in serious burns. Do not use bottle warmers to heat breast milk. Thawing Frozen Breast Milk There are three ways to thaw frozen breast milk safely. If your caregiver has given you alternative instructions, always adhere to those. Choose one the following methods: Move it to the back of the refrigerator 24 hours prior to feeding. Hold the bottle or bag under warm running water until the milk is thawed and reaches room temperature. Place in a bowl of very warm water and gently move around in the bowl until thawed, refreshing the warm water as it cools. Note: Breast milk is still considered frozen as long as it contains any amount of ice particulates. 31
32 Feeding Breastmilk We recommend waiting until breastfeeding is well established prior to feeding your baby expressed breastmilk. Always follow the advice of your care provider. Warming Milk Some babies prefer warm milk. To warm the milk, set bottle in a mug of hot tap water for several minutes. Gently shake the bottle periodically. Test the temperature on the inside of your wrist prior to feeding it to your baby. Do not heat milk in a microwave. Microwaving can cause severe burns from hot spots that develop in the milk during the heating process. Do not heat in boiling water or water that is too hot to touch. Do not reheat milk above body temperature as it can negatively impact the nutritional components of the milk. Do not reheat milk in a bottle warmer as it can negatively impact the nutritional components of the milk. Bottle warmers are typically designed for formula, which is not as susceptible to heat damage. Safely Bottle-Feed To ensure safe use of the bottles, adhere to the following guidelines: Always inspect the bottle, nipple and other feeding accessories for defects prior to feeding your baby. If the nipple appears cracked or torn, discontinue use and discard immediately. Always supervise infants when bottle feeding. Periodically test the nipple by tugging on it to prevent potential choking hazards. Do not modify the nipple or bottle components. Do not use nipple or bottle components for anything other than their intended purpose, i.e. as for pacifiers, teething surfaces, or toys. 32
. 3. Screw the neck firmly onto the collection bottle. 4.")
33 Bottle Assembly The following instructions describe how to prepare the Spectra bottles for feeding: 1. First wash your hands in warm soapy water before touching parts that come in contact with milk. 2. Then, insert the teat by firmly pressing it from the underside and up into the bottle neck (where the sealing disc would go). 3. Screw the neck firmly onto the collection bottle. 4. When not in use, place the bottle cap over the teat to keep it clean. Tip: To avoid leaking, always transport and store the bottle in the upright position, and when possible store with the sealing disc in place instead of the teat. 33
34 Troubleshooting The following section contains common issues and resolutions. Should your issue not be resolved by following the contents of the following section, please contact our customer support team. POSSIBLE PROBLEM SOLUTION Pump will Not Turn On Not plugged in. Interchangeable parts on power adapter not connected properly. Inspect that adaptor is properly seated into mains and pump motor. Assemble adapter as per instructions on page 19. Pump Will Not Turn on And a Loose Rattling Sound is Heard Internal circuit board has come loose. Contact customer service. No Suction Tubing has been disconnected. Backflow protectors are not assembled correctly. Silicone valve is not attached correctly. Firmly attach tubing to both the backflow protector and the pump nozzle. Reassemble and reattach the backflow protectors. Reposition the valve and then reassemble. Low Suction Vacuum setting has been accidentally changed. Adjust vacuum settings. 34
35 POSSIBLE PROBLEM SOLUTION Low Suction (cont.) Silicone valve is not attached correctly. Backflow protectors are not assembled correctly. Tubing is not fully attached. If single pumping, nozzle cover is loose. Air is leaking out between breast and the breast shield. Valves and backflow protector may need replacing. Reposition the valve and then reassemble. Reassemble and reattach the backflow protectors. Firmly attach tubing to both the backflow protector and the pump nozzle. Ensure the second pump nozzle is fully covered by the rubber cap. Adjust breast. If persists, breast shield may be the wrong size. Over time the elasticity of these parts degrade which impacts suction. Replace regularly. 35
36 Warranty This product is warrantied by the manufacturer and its authorised representatives to be free from defects in material and workmanship for a period of two years from date of purchase. This warranty does not cover damage caused by accident, misuse, abuse, improper maintenance, unauthorised modification, or connection to an improper power supply. If you need assistance with correct usage, care or warranty when using this product please contact: Disposal Spectra Baby Australia Spectra Baby Australia encourages used pumps, including broken pumps, to be returned to us so we can prepare them for donation or repair them for use again. Please contact us for more information on this program. The Spectra S2 must not be disposed of with your regular household waste. It must be taken to a designated electronics recycling location. For more information about where you can dispose of electronic waste, please contact your local authority. Breastshields and the clear plastic pieces of the backflow protectors can be recycled in your normal household recycling service after proper sterilisation. In order to comply with EU Directive 2002/96/EC on Waste Electrical and Electronic Equipment (WEEE) please adhere to the following: This product may contain material which could be hazardous to human health and the environment. DO NOT DISPOSE of this product as unsorted municipal waste. This product needs to be RECYCLED in accordance with local regulations, contact your local authorities for more information. 36
37 Flying with the Spectra S2 The Spectra S2 is safe for use while travelling on commercial airlines. You do not need to declare the S2 prior to flying. When travelling by air, bring the S2 in your carry-on luggage to avoid damage. If you have more questions, contact your airline. For More Information If you need assistance with correct usage, care or warranty when using this product, please contact: Instructional Videos Spectra Baby Australia Spectra Baby Australia has produced a series of videos to assist with using your Spectra breast pump. Topics include assembly, cleaning & sterilising, warranty information and more. You can subscribe to our YouTube Channel and browse our range of videos here: 37
38 Technical Specifications Vacuum Strength: 320mmHg (12 steps in Expression Mode, 5 steps in Massage Mode) Grade: Hospital Grade Massage Mode: Yes Cycle Speed (Expression Mode): 5 Speed Settings Between 38 and 54 rpm Cycle Speed (Massage Mode): 70 rpm Power: Mains Time to Charge: 4 hours Double Pump: Yes Weight: 2kg Warranty: 2 Years Motor Life: 1500 Hours Country of Origin: South Korea Certifications: CE, FDA, ISO13485, ISO9001 Environmental Conditions Operating Temperature: 5 C - 40 C Operating Humidity: 15% - 93% non-condensing Storage Temperature: 20 C - 60 C Storage Humidity: 15% - 93% non-condensing Performance Characteristics Vacuum Strength Massage Mode Expression Mode
39 Cycle Speed (cycles per minute) Massage Mode 70 Expression Mode Electromagnetic Compatibility Portable and mobile RF communications such (i.e. mobile phones, walkie talkies, wireless devices) can impact the functionality of the Spectra S2. We recommend keeping these devices 1 meter away from the Spectra S2 while in operation. Do not use adjacent or stacked with any other electronic equipment. IEC :2007 This Spectra S2 has been tested and found to comply with the limits for medical devices in IEC :2007. These limits are designed to provide reasonable protection against harmful interference in a typical medical installation. This equipment generates, uses and can radiate radio frequency energy and may cause interference to other devices in the vicinity. Interference can be determined by turning the equipment on and back off again. Interference can be remedied by ensuring the Spectra S2 is at least 1 meter away from other radio emitting devices, by reorienting the pump, or by connecting the pump to an electrical outlet not shared by other devices. 39
40 Copyright 2017 Spectra Baby Australia 40
Single Pumping Double Pumping Things to Remember Tips for Expressing Breast Milk Functions & Controls...
 Spectra M1 1 Contents Welcome to your Spectra Breast Pump... 4 Features... 4 Important Safeguards... 5 Hygiene... 5 Pain or Discomfort... 5 General Safety Guidelines... 6 Package Contents... 7 Pump Kit...
SPECTRA S2. User Manual
 SPECTRA S2 User Manual WELCOME TO YOUR SPECTRA S2 BREAST PUMP Congratulations on becoming the owner of a Spectra S2 hospital grade double electric breast pump. Your Spectra S2 is designed to make life
Cleaning & Care. Washing Breast Pump Parts
 Cleaning & Care Cleaning & Care Note: These guidelines are for use with a healthy, full-term baby and assume that you have access to potable water. If your baby is premature or has health challenges your
MILK GENIE PLUS USER MANUAL & QUICK START GUIDE
 MILK GENIE PLUS USER MANUAL & QUICK START GUIDE CONTENTS YOUR NEW BREAST PUMP... 4 FEATURES... 4 PACKAGE CONTENTS... 6 QUICK START GUIDE... 7 ASSEMBLY... 8 MEMORY MODE... 10 BREASTSHIELD SIZING... 11 IMPORTANT
Thank you for choosing the Motif Duo Double Electric Breast Pump. Motif Duo Operation Manual
 Thank you for choosing the Motif Duo Double Electric Breast Pump. Motif Duo Operation Manual Motif Medical 8 The Green Suite #5601 Dover, DE 19901 Phone: (844) 7-8390 Email: info@motifmedical.com Web:
Apre 2 in 1 Electric Breast Pump
 Apre 2 in 1 Electric Breast Pump User Manual ü Memory function memorizes your personal suction cycle ü Automatic massage function ü Mains power or battery operated ü 9 levels of suction pressure and pace
ISIS UNO. Handheld Electronic Breast Pump. Guide to Your Pump. Warnings and Cautions
 ISIS UNO TM Handheld Electronic Breast Pump Guide to Your Pump Warnings and Cautions When using electrical products, especially when children are present, basic safety precautions should always be followed,
Single Breast Pump with collection combo kit
 Single Breast Pump with collection combo kit User Manual Model: ROS-SGEL Congratulations Congratulations on your new Viverity TrúEase Electric Breast Pump! The Viverity TrúEase Electric Breast Pump is
Instructions For Use
 Instructions For Use Spectra S1 Plus / S2 Plus PLEASE READ ALL INSTRUCTIONS BEFORE USING THIS PRODUCT MODEL #: SERIAL #: Single Pumping Dual Pumping DO NOT THROW AWAY THIS MANUAL. PLEASE KEEP IT FOR FUTURE
Always here to help you
 Always here to help you Register your product and get support at www.philips.com/welcome SCF334 SCF332 1 SCF334, SCF332 ENGLISH 6 6 ENGLISH Introduction Congratulations on your purchase and welcome to
how does the warmer work? are the contents of the warmer safe? can yoomi overheat my baby's feed?
 how does the warmer work? The warmer works in the same way as the gel hand-warming packs that warm up when you click a metal disc inside when you press the orange button on the yoomi warmer, you re effectively
Instructions for set-up, use and cleaning
 Nice job reading the instruction manual cover-to-cover! Here are a few extra tips to keep you & your Formula Pro Advanced happy. Push the drip tray firmly against the base to make sure it fits securely.
Instructions for set-up, use and cleaning. babybrezza.com 2017 Baby Brezza Enterprises LLC
 Customer Service If you are experiencing problems with your BabyBrezza Formula Pro, please contact your reseller, or Customer Service at babybrezza@gamin-tout-terrain.com so that we can offer you our best
CLOSED SYSTEM COLLECTION CUPS
 CLOSED SYSTEM COLLECTION CUPS User Manual for Freemie Closed System Collection Cups IMPORTANT - Read this manual prior to use. Please save this manual. Review the most current manual at www.freemie.com
 www.facebook.com/motifmedical www.instagram.com/motifmedical www.youtube.com/motifmedical www.pinterest.com/motifmedical Motif Duo Quick Guide Motif Medical 8 The Green Suite #5601 Dover, DE 19901 Phone:
MODEL 7000 SUCTION UNIT
 MODEL 7000 SUCTION UNIT OPERATOR S MANUAL Caution Federal law restricts this device to sale by or on order of a physician, or any other practitioner licensed by the law of the State in which he practices
Owner's Manual Read all instructions before assembly and use of this product
 Cover1-36_PJ's hospital garade breast pump manual 12/12/17 7:05 PM Page 1 hospital grade breast pumps Owner's Manual Read all instructions before assembly and use of this product For video instructions,
PORTABLE DOG BATH TOOL
 TM PORTABLE DOG BATH TOOL USER GUIDE 1842 SERIES More of a video person? Look for this icon and go online for an instructional how-to video at BISSELL.com/videos IMPORTANT SAFETY INSTRUCTIONS READ ALL
BREASTPUMP. Instructions
 BREASTPUMP Instructions II Congratulations! Soon you ll know why Freestyle is the perfect pump for you. Designed for busy moms, Freestyle is everything you could ask for in a breastpump: n Double electric
Ice Cream Maker USER CARE AND INSTRUCTION MANUAL
 Ice Cream Maker USER CARE AND INSTRUCTION MANUAL Thank you for purchasing the RICARDO ice cream maker. Before using this product, please read the user care and instruction manual carefully. INSTRUCTION
User s Manual. Electric Kettle Model MJ-EK5AEU (UK) Household Use
 Household Use") Electric Kettle Model MJ-EK5AEU (UK) Household Use User s Manual Thank you for your purchase. Please read this User s Manual before using this product. Retain this User s Manual for future reference. Contents
Electric Kettle Model MJ-EK5AEU (UK) Household Use User s Manual Thank you for your purchase. Please read this User s Manual before using this product. Retain this User s Manual for future reference. Contents
IMPORTANT SAFETY INSTRUCTIONS WARNING: When using electric appliances, basic
 INSTRUCTIONS PERTAINING TO; RISK OF FIRE, ELECTRIC SHOCK OR HARM TO PERSONS IMPORTANT SAFETY INSTRUCTIONS WARNING: When using electric appliances, basic precautions should always be followed, including
INSTRUCTION MANUAL USJ-101
 USJ-101 Thank you for purchasing the Reflex Roller. Please read this manual carefully to ensure optimum performance and safety. SAVE THESE INSTRUCTIONS INSTRUCTION MANUAL THE FIRST STEP TO A HEALTHY LIFE
One-Touch Dispense. Multi-temp selections. 208 F For tea, coffee, instant noodle. 194 F Keep warm around 194 F. 176 F Keep warm around 176 F.
 Instruction Manual Automatic Dispensing Hot Water Pot with Multi-temperature Function Automatic Dispensing One-Touch Dispense FEATURES Reboil Function 5 Temperature Settings Image Of SP-5016 208 F For
mini kettle Model # Operating Instructions Warranty 650 Watts / 120 V / 60 Hz
 mini kettle Model #280.01 Operating Instructions Warranty 650 Watts / 120 V / 60 Hz Read this manual thoroughly before using and save it for future reference IMPORTANT SAFEGUARDS When using electrical
IMPORTANT SAFEGUARDS SAVE THESE INSTRUCTIONS
 1 2 IMPORTANT SAFEGUARDS When using electrical appliances especially when children are present, basic safety precautions should always be followed to reduce the risk of fire, electric shock, and/or injury
5KHB3583 W A_01_EN_Final4.indd 1 12/11/12 1:34 PM
 5KHB3583 Cordless Hand Blender INSTRUCTIONS Table of Contents Hand blender SAFETY Important safeguards... 6 Electrical requirements... 7 Electrical equipment waste disposal... 7 Disposing of KitchenAid
5L STAINLESS STEEL SLOW COOKER
 5L STAINLESS STEEL SLOW COOKER PL390 Instruction Manual IMPORTANT SAFETY INSTRUCTIONS READ CAREFULLY AND KEEP FOR FUTURE REFERENCE Carefully read this manual before using this appliance. Ensure that you
yoomi warmers how does the warmer work? are the contents of the warmer safe? can yoomi overheat my baby's feed?
 yoomi FAQ s yoomi warmers how does the warmer work? The warmer works in the same way as the gel hand-warming packs that warm up when you click a metal disc inside when you press the orange button on the
Attention. Please handle this product with care and inspect it regularly to ensure it is in good working order.
 Attention Please handle this product with care and inspect it regularly to ensure it is in good working order. If the product, power supply cord or plug shows any signs of damage: stop use, unplug and
RJ11-17-TI CORDLESS GLASS ELECTRIC KETTLE. CUSTOMER SERVICE:
 RJ11-17-TI CORDLESS GLASS ELECTRIC KETTLE CUSTOMER SERVICE: 888.315.6553 customerservice@chefman.com 1 READ ALL INSTRUCTIONS BEFORE USE For your safety and continued enjoyment of this product, always read
משאבת חלב ידנית. Manual breast pump User manual
 7290015483339 משאבת חלב ידנית Manual breast pump User manual 3 2 1 עברית 4 العربية 10 20 ENGLISH 2 3 4 5 6 משאבת חלב ידנית 5 4 עברית 2 ( ) 3 ( ) (4 ) 5 ( ) 6 ( ) 6 עברית 7 8 עברית 9 יצרן: פיליפס אלקטרוניקס
I N S T R U C T I O N S
 INSTRUCTIONS HIPPO Deluxe Room Steam Vaporiser Congratulations on your purchase of the HIPPO Deluxe Room Steam Vaporiser. Before using this appliance, read the following instructions carefully as they
Important Safeguards. Topic 2 SAVE THESE INSTRUCTIONS - FOR HOUSEHOLD USE ONLY SAVE THESE INSTRUCTIONS - FOR HOUSEHOLD USE ONLY 3
 User s Manual Index Topic Important safeguards 03 Safety features 05 Parts and accessories 05 Before first use 06 Operating instructions 06 Programme settings 08 Care and cleaning 09 Pressure canning guide
the Quick Cook Instruction Book - LIC400
 the Quick Cook Instruction Book - LIC400 LIC400_ANZ_IB_B17.indd 1 BREVILLE RECOMMENDS SAFETY FIRST At Breville we are very safety conscious. We design and manufacture consumer products with the safety
WCD-210BK. Water Dispenser OWNERS MANUAL. Read and save these instructions.
 WCD-210BK Water Dispenser OWNERS MANUAL Read and save these instructions. 2 Trust has to be earned and we will earn yours. Customer happiness is the focus of our business. From the factory to the warehouse,
6L PRESSURE COOKER. Instruction Manual. Model: PLA1424
 6L PRESSURE COOKER Instruction Manual Model: PLA1424 Due to ongoing product improvements, specifications and accessories may change without notice. Actual product may differ slightly to that depicted.
1. Soother & Soother Accessories
 Online Shop English Content 1. Soother & Soother Accessories... 3 2. Bottle & Bottle Accessories... 6 3. Breastfeeding... 17 4. Cups & Cup Accessories... 20 5. Feeding... 23 6. Oral Care... 25 7. Developmental
COVER MODEL# GVS415 VACUUM SEALER FOOD PRESERVER. PHOTO OF PRODUCT
 COVER MODEL# GVS415 VACUUM SEALER FOOD PRESERVER www.gourmia.com PHOTO OF PRODUCT 2016 Gourmia www.gourmia.com The Steelstone Group Brooklyn, NY Welcome to Benefits of Food Storage from Gourmia! All rights
CLEAN MIST ULTRASONIC HUMIDIFIER. Instruction Manual and Warranty Information READ AND SAVE THESE INSTRUCTIONS IM0040A
 CLEAN MIST ULTRASONIC HUMIDIFIER Instruction Manual and Warranty Information IM0040A READ AND SAVE THESE INSTRUCTIONS Contents Safety Instructions... 1 Unpacking / Specifications... 2 Parts & Contents...
Electric steam steriliser
 Table of Contents Introduction... 2 Safety instructions and important notes.... 3 Description.... 6 Preparing for sterilisation.... 7 Operation.... 7 Cleaning the appliance and removal of limescale deposits...
CORDLESS GLASS ELECTRIC KETTLE WITH BONUS TEA INFUSER
 CORDLESS GLASS ELECTRIC KETTLE WITH BONUS TEA INFUSER USER GUIDE Now that you have purchased a Chefman product you can rest assured in the knowledge that as well as your 1-year parts and labor warranty
Instructions for Use
 Instructions for Use ENVIRONMENT PROTECTION The packaging of your product is recyclable. Do not dispose of it with the rest of your waste but rather recycle the packaging or bring it to your nearest recycling
Step1: Base and Large Bowl 1 Step 2: Fountain Bowl Installation 4 Step 3: Battery Installation 7 Step 4: Setting Up Your Fountain 10
 Owner s Manual Contents Step1: Base and Large Bowl 1 Step 2: Fountain Bowl Installation 4 Step 3: Battery Installation 7 Connecting The Battery 8 Inserting Battery Compartment Door 9 Step 4: Setting Up
INSTRUCTION MANUAL OF COMMERCIAL BLENDER
 www.colorato.net INSTRUCTION MANUAL OF COMMERCIAL BLENDER MODEL: CLB-1500N Read carefully these instructions before using the appliance and save them for future reference Contents COLORATO recommends safety
The Importance of Food Safety
 Safe Food Handling Table of Contents 1. Importance of Food Safety 2. Food-borne Illness 3. Food Safety a) Purchasing Food b) Storing Food c) Preparing Food d) Cooking Food 4. Safe Internal Cooking Temperatures
5KHB1231 W A_01_EN.indd 1 3/7/17 9:45 AM
 5KHB1231 TABLE OF CONTENTS ENGLISH PARTS AND FEATURES Parts and accessories...6 Immersion Blender features...7 IMMERSION BLENDER SAFETY Important safeguards...8 Electrical requirements...11 Electrical
INSTRUCTION BOOKLET. Electric Steam Sterilizer
 INSTRUCTION BOOKLET Electric Steam Sterilizer CS-6 SERIES For your safety and continued enjoyment of this product, always read the instruction book carefully before using. IMPORTANT SAFEGUARDS When using
INSTRUCTIONS AND WARRANTY
 INSTRUCTIONS AND WARRANTY MODEL: SB400E SALTON 450W STAINLESS STEEL GLASS JUG BLENDER Congratulations on purchasing our Salton 450W Stainless Steel Glass Jug Blender. Each unit is manufactured to ensure
OWNER S MANUAL LG CORDLESS VACUUM CLEANER
 OWNER S MANUAL LG CORDLESS VACUUM CLEANER This information contains important instructions for the safe use and maintenance of the vacuum cleaner. More importantly, please read all of the information on
Installation & Operating Instructions
 PREMIUM Installation & Operating Instructions AQP-20SIL Signature Filtered Water Cooler Premium Selection Congratulations on your purchase of a Aquaport Signature Filtered Water Cooler This unit is easy
Whynter Portable Ice Maker 33 lb capacity - White
 Whynter Portable Ice Maker 33 lb capacity - White Model # : IMC-330WS INSTRUCTION MANUAL Congratulations on your new Whynter product. To ensure proper operation, please read this Instruction Manual carefully
GAS STAINLESS COOKTOPS
 GAS STAINLESS COOKTOPS CG604D & CG905D models CG604DCG905D USER GUIDE HK SG Contents 1 EN Safety and warnings 2 Introduction 5 Using your cooktop 6 Cooking guidelines and cookware 8 Care and cleaning
Iconic. aroma diffuser. user manual. Iconic-Aroma-Diffuser Handleiding.indd :11
 Iconic aroma diffuser user manual 1 Iconic-Aroma-Diffuser Handleiding.indd 1 12-01-17 15:11 Thank you for choosing Duux. We re so glad you decided to read the instructions to your new Duux air purifier!
QUICK GROOM 2 YEAR WARRANTY BHT6450AU USE & CARE MANUAL. To register your product go to remington-products.com.au remington.co.nz
 QUICK GROOM USE & CARE MANUAL PLEASE READ PRIOR TO USE To register your product go to remington-products.com.au remington.co.nz 2 YEAR WARRANTY BHT6450AU IMPORTANT SAFETY INSTRUCTIONS When using electrical
WCD-200W Water Dispenser
 WCD-200W Water Dispenser OWNERS MANUAL Read and save these instructions. A Name You Can Trust Trust has to be earned and we will earn yours. Customer happiness is the focus of our business. 2 From the
WA A Aqua Sub Bottom-load Water Cooler
 WA1-02-21A Aqua Sub Bottom-load Water Cooler 4002638 Thank you for choosing a Soleus Air Water Cooler. This owner s manual will provide you with valuable information necessary for the proper care and maintenance
Pro Blender. BL450UK series OWNER S GUIDE
 Pro Blender BL450UK series OWNER S GUIDE 0800 862 0453 IMPORTANT SAFETY INSTRUCTIONS For Household Use Only WHEN USING ELECTRICAL APPLIANCES, BASIC SAFETY PRECAUTIONS SHOULD ALWAYS BE FOLLOWED, INCLUDING
Series HD9720-HD9727
 Series HD9720-HD9727 2 ENGLISH TABLE OF CONTENTS Important 3 Electromagnetic fields (EMF) 5 Introduction 6 General description 6 Before first use 8 Preparing for use 8 Placing the removable mesh bottom
OWNER S GUIDE
 QB3000SS series OWNER S GUIDE www.ninjakitchen.com IMPORTANT SAFETY INSTRUCTIONS For Household Use Only WHEN USING ELECTRICAL APPLIANCES, BASIC SAFETY PRECAUTIONS SHOULD ALWAYS BE FOLLOWED, INCLUDING THE
User Manual. Compact Bagged Vacuum Cleaner. Dog & Cat W2000
 User Manual Compact Bagged Vacuum Cleaner 3 Features 1 2 On/off button Flexible hose 4 7 3 4 Telescopic wand Wand length adjustment 2 8 5 Cord rewind button 6 7 Variable speed control Combination floor
Ultrasonic Cool Mist Humidifier
 Model No.: LV450CH Ultrasonic Cool Mist Humidifier Questions or or Concerns? Please contact us Monday Mon-Fri 9:00AM-5:00PM - Friday am - PST 5:00 pm PST at support@levoit.com (888) 726-8520 email or at
AirFloss Ultra. 5_020_4312_1_DFU-Luxury_A6_v5.indd 1 01/12/15 14:17
 AirFloss Ultra 5_020_4312_1_DFU-Luxury_A6_v5.indd 1 01/12/15 14:17 5_020_4312_1_DFU-Luxury_A6_v5.indd 2 01/12/15 14:17 1 1 ENGLISH 4 Philips Sonicare AirFloss Ultra 5_020_4312_1_DFU-Luxury_A6_v5.indd 3
OWNER S GUIDE
 BL480UK OWNER S GUIDE 0800 862 0453 IMPORTANT SAFETY INSTRUCTIONS For Household Use Only WHEN USING ELECTRICAL APPLIANCES, BASIC SAFETY PRECAUTIONS SHOULD ALWAYS BE FOLLOWED, INCLUDING THE FOLLOWING: READ
Installation & Operating Instructions
 PREMIUM Installation & Operating Instructions m AQP-3TAP-SS Platinum Water Dispenser Hot/Cold & Room Premium Selection Congratulations on your purchase of an Aquaport Platinum Water Dispenser Thank you
USE AND CARE GUIDE FOR MODEL MEK1, MEK15. Express Cordless Kettle
 USE AND CARE GUIDE FOR MODEL MEK1, MEK15 Express Cordless Kettle IMPORTANT SAFEGUARDS When using electrical appliances, basic safety precautions should always be followed, including the following: 1. Read
INSTRUCTIONS MANUAL. 1.8L Electric Kettle with Multi-Temp Feature SK-1800R (Red) SK-1800SS (Stainless Steel)
 SK-1800SS (Stainless Steel)") INSTRUCTIONS MANUAL 1.8L Electric Kettle with Multi-Temp Feature SK-1800R (Red) SK-1800SS (Stainless Steel) NAME OF COMPONENTS CONTROL PANEL Temperature selection indicators Display panel Boil button Temperature
INSTRUCTIONS MANUAL 1.8L Electric Kettle with Multi-Temp Feature SK-1800R (Red) SK-1800SS (Stainless Steel) NAME OF COMPONENTS CONTROL PANEL Temperature selection indicators Display panel Boil button Temperature
Questions or Concerns? Please contact us Mon - Fri 9:00 AM - 5:00 PM PST at (888) or by at Model No.
 or by at Model No.") Questions or Concerns? Please contact us Mon - Fri 9:00 AM - 5:00 PM PST at (888) 402-1684 or by email at support@cosori.com Model No.: C361-VS THANK YOU. Thank you for purchasing the C361-VS Slim Vacuum
Questions or Concerns? Please contact us Mon - Fri 9:00 AM - 5:00 PM PST at (888) 402-1684 or by email at support@cosori.com Model No.: C361-VS THANK YOU. Thank you for purchasing the C361-VS Slim Vacuum
CLEAN MIST SMART HUMIDIFIER Instruction Manual and Warranty Information IM0031B READ AND SAVE THESE INSTRUCTIONS
 CLEAN MIST SMART HUMIDIFIER Instruction Manual and Warranty Information IM0031B READ AND SAVE THESE INSTRUCTIONS Contents Safety Instructions... 1 Unpacking / Specifications... 2 Parts & Contents... 3
FS_IM_G.indd 1 14/02/ :44
 Cancel Seal Only Vaccum/Seal FS_IM_G.indd 1 14/02/2017 09:44 Cancel Thank you for purchasing this Food Sealer from JML. To get the most out of this product please make sure you read, and follow these instructions
RZ LITRE HALOGEN OVEN INSTRUCTIONS
 RZ102 12 LITRE HALOGEN OVEN INSTRUCTIONS Please ensure these instructions carefully before assembling or operating this product. Ensure you are familiar with all of the safety and operating instructions.
Liberty /independence
 Liberty /independence Double Electric Breast Pump User Manual for Freemie Liberty and Independence Mobile Pumps IMPORTANT - Read this manual prior to use. Please save this manual. Review the most current
5.3 QT. Owner s Manual. Air Fryer Model: CM1708 FOR HOUSEHOLD USE ONLY
 5.3 QT G Owner s Manual Air Fryer Model: CM1708 FOR HOUSEHOLD USE ONLY Index Topic Page Important Safeguards...1-2 Parts & Accessories...3 Using The Digital Panel...4-5 General Operating Instructions...6-8
Complete Pedicure Foot Spa
 IB-HL150MYGB-0111-01:Layout 1 18/01/2011 17:57 Page 1 Complete Pedicure Foot Spa Instruction Manual HL-150-MY-GB IB-HL150MYGB-0111-01:Layout 1 18/01/2011 17:57 Page 2 READ ALL INSTRUCTIONS BEFORE USE.
Traditional Kettle CTK17U CPT445U
 Traditional Kettle CTK17U CPT445U Congratulations on your purchase of the Cuisinart Traditional Kettle. For over 30 years Cuisinart s aim has been to produce the very finest kitchen equipment. All Cuisinart
HD9216 HD9217. User manual
 HD9216 HD9217 User manual 120 160 1 80 2 3 4 5 6 7 8 9 10 11 12 13 14 Contents Introduction 5 General description (Fig. 1) 5 Important 5 Before first use 8 Preparing for use 8 Using the appliance 8 Hot
Operator s Manual. Frozen Beverage Granita Machines
 Thank you for purchasing this Vollrath equipment. Before operating the equipment, read and familiarize yourself with the following operating and safety instructions. SAVE THESE INSTRUCTIONS FOR FUTURE
SKY Stainless Steel Compact Dishwasher. Instructions
 SKY4313 - Stainless Steel Compact Dishwasher Instructions Please retain these instructions for future reference. Notice: Do not allow children to operate this appliance. Keep appliance out of reach of
CLEAN MIST SMART HUMIDIFIER Instruction Manual and Warranty Information IM0002E READ AND SAVE THESE INSTRUCTIONS
 CLEAN MIST SMART HUMIDIFIER Instruction Manual and Warranty Information IM0002E READ AND SAVE THESE INSTRUCTIONS Contents Safety Instructions... 1 Unpacking / Specifications... 2 Parts & Contents... 3
OWNER S MANUAL ELECTRIC FIREPLACE INSERT. Model No.: WESTERN (EF42D-45D) WARNING CAUTION
 WARNING CAUTION") ELECTRIC FIREPLACE INSERT Model No.: WESTERN (EF42D-45D) OWNER S MANUAL WARNING Read and understand this entire owner s manual, including all safety information, before plugging in or using this product.
ELECTRIC FIREPLACE INSERT Model No.: WESTERN (EF42D-45D) OWNER S MANUAL WARNING Read and understand this entire owner s manual, including all safety information, before plugging in or using this product.
AIR FRYER. Instruction Manual. item no. 048-GM (949)
") AIR FRYER Instruction Manual item no. 048-GM-48212 www.dellaproductsusa.com (949)344-2588 Manual_929TS_48212.indd 1 Manual_929TS_48212.indd 2 TABLE OF CONTENTS Product Introduction... 4 Important Safeguards...
AIR FRYER Instruction Manual item no. 048-GM-48212 www.dellaproductsusa.com (949)344-2588 Manual_929TS_48212.indd 1 Manual_929TS_48212.indd 2 TABLE OF CONTENTS Product Introduction... 4 Important Safeguards...
INSTRUCTIONS AND WARRANTY
 INSTRUCTIONS AND WARRANTY MODEL NO: STS80 SALTON HOT TRAY WITH TEMPERATURE CONTROL Congratulations on purchasing our Salton Hot Tray with Temperature Control. Each unit is manufactured to ensure safety
Slow Cooker XJ-13220B User Manual
 Slow Cooker XJ-13220B User Manual PLEASE READ AND SAVE THESE INSTRUCTIONS FOR FUTURE REFERENCE IMPORTANT SAFEGUARDS When using electrical appliances, basic safety precautions should always be followed,
Stay or Go Slow Cooker
 Stay or Go Slow Cooker READ BEFORE USE English... 2 This product is intended for household use only. This product is only intended for the preparation, cooking, and serving of foods. This product is not
PORTABLE DOG BATH TOOL
 TM PORTABLE DOG BATH TOOL USER GUIDE 1842 SERIES More of a video person? Look for this icon and go online for an instructional how-to video at BISSELL.com/videos IMPORTANT SAFETY INSTRUCTIONS READ ALL
Health & Safety Kit. Digital Bath and Room Thermometer FlexiSafe Fever Alarm Thermometer Nasal Decongester
 Health & Safety Kit Your Vital Baby Health & Safety kit includes: Digital Bath and Room Thermometer FlexiSafe Fever Alarm Thermometer Nasal Decongester IMPORTANT CARE & USE INFORMATION. READ THIS INFORMATION
Turbo Stick Vac. OWNER S MANUAL Model EP V., 60Hz., 7.5 Amps.
 OWNER S MANUAL Model EP600 120V., 60Hz., 7.5 Amps. Turbo Stick Vac For information or assistance: EURO-PRO Operating LLC 94 Main Mill Street, Door 16 Plattsburgh, NY 12901 Tel.: 1 866 98SHARK (74275) www.sharkvac.com
1. Pan 2. Basket 3. Basket release button 4. Basket handle 5. Safety lock 6. Timer (0-60min)/Power on knob 7. Temperature control knob (80-200C )
/Power on knob 7. Temperature control knob (80-200C )") Introduction Your new Kogan air-fryer allows you to prepare your favourite ingredients and snacks in a healthier way. The air-fryer uses hot air in combination with high-speed air circulation (Rapid Air)
Introduction Your new Kogan air-fryer allows you to prepare your favourite ingredients and snacks in a healthier way. The air-fryer uses hot air in combination with high-speed air circulation (Rapid Air)
Get Cleaning... What s your Vax s model number? User Guide. Carpet Washer Vax Careline: AU: NZ:
 User Guide Vax Careline: AU: 1300 361 505 NZ: 0800 800 900 Carpet Washer Get Cleaning... What s your Vax s model number? W8 W8 W0 W0 W0 W W W W W What s your serial number? (Located on the base of the
A few simple steps to ensure perfect water, every time.
 A few simple steps to ensure perfect water, every time. Use and Care Guide MODELS: A7BOTTLELESS A7BOTTLELESSBLK Registration Please visit the website below to register your new water cooler within the
26/06/2018 USER MANUAL HOBBY 100 GPH REVERSE OSMOSIS. All Rights reserved Les Équipements d Érablière CDL inc.
 26/06/2018 USER MANUAL HOBBY 100 GPH REVERSE OSMOSIS All Rights reserved Les Équipements d Érablière CDL inc. Thank you for purchasing a CDL Hobby reverse osmosis system. This document will help you make
EVAPORATIVE COOL MIST HUMIDIFIER Instruction Manual
 EVAPORATIVE COOL MIST HUMIDIFIER Instruction Manual FOR MODEL: EE-7002 If you have any questions about the operation of your humidifier, please contact Crane Customer Care. Toll Free: 888-599-0992 Email:
WARNING: Read all instructions before use to avoid injury. Improper use of product can result in serious injury or death.
 USER GUIDE WARNING: Read all instructions before use to avoid injury. Improper use of product can result in serious injury or death. Follow the safety information in this user guide. Keep this user guide
BL250. Pulse Blender OWNER S GUIDE
 BL250 OWNER S GUIDE Pulse Blender 1-877-646-5288 IMPORTANT SAFETY INSTRUCTIONS For Household Use Only WHEN USING ELECTRICAL APPLIANCES, BASIC SAFETY PRECAUTIONS SHOULD ALWAYS BE FOLLOWED, INCLUDING THE
Built-in Microwave Oven
 Built-in Microwave Oven Instructions and Installation /appliance-registration HJA7030 See back page for product serial number CONTENTS Environmental note 4 Installation 5 Important safety information 6-10
Quick Start Guide. PWW Platinum Pet Fountain
 Quick Start Guide PWW00-13703 Platinum Pet Fountain Please read this entire guide before beginning. For troubleshooting and detailed cleaning instructions, visit www.petsafe.net/support for the full Operating
all-rounder Mini Compact Bagless Vacuum Cleaner Cyclonic Bagless Technology Washable HEPA Filtration Compact, Lightweight & Stylish Design all-rounder
 all-rounder all-rounder Mini Compact Bagless Vacuum Cleaner Cyclonic Bagless Technology Washable HEPA Filtration Compact, Lightweight & Stylish Design 1 3 2 4 5 6 8 9 11 12 10 14 13 7 15 2. 5011 All-Rounder
2 000W CYCLONIC BAGLESS VACUUM
 2 000W CYCLONIC BAGLESS VACUUM /GVAVK08 Instruction Manual Contents Guide to the Appliance Caring for the Environment Safety Information and Warnings Basic Set Up Care and Maintenance Troubleshooting 2
RECHARGEABLE CYCLONIC VACUUM CLEANER WITH POWER BRUSH
 RECHARGEABLE CYCLONIC VACUUM CLEANER WITH POWER BRUSH VC 44287 22.2 DC Li-Ion Batteries www.kalorik.com VC 42475-170120 1 PARTS DESCRIPTION 1. 3 in 1 accessory 2. Charging Station 3. Tube set 4. Motorized
CHEST FREEZER INSTRUCTION MANUAL. Model No.: EWCF5WBX EWCF7WBX
 CHEST FREEZER INSTRUCTION MANUAL Model No.: EWCF5WBX EWCF7WBX To ensure proper use of this appliance and your safety, please read the following instructions completely before operating this appliance.