1501 Westpark Drive, Suite 5 Little Rock, Arkansas International
|
|
|
- Anastasia Bryant
- 5 years ago
- Views:
Transcription

 for each")
 rated capacity).")


 for closure. Travel Stop 6.")

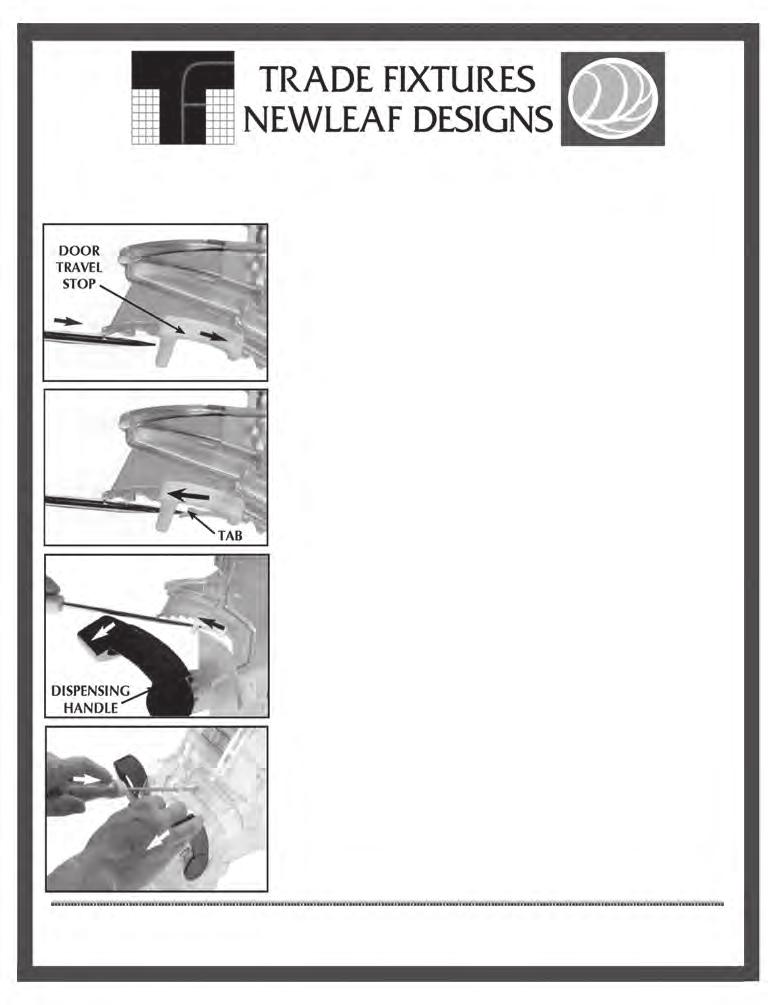
1 Retail Merchandising Installation Instructions Trade Fixtures Gravity Feed Bin 1501 Westpark Drive, Suite 5 Little Rock, Arkansas International PLEASE START HERE: Thank you for purchasing the Trade Fixtures Gravity Feed Bin. If you use your own shelving, each shelf span must support, without sagging, 25 lbs (11kg) for each 3 gallon bin, 45 lbs (20kg) for each 5 gallon bin, and 150 lbs (68kg) for the 12 gallon bin (90# (40kg) rated capacity). A 48 by 12 deep metal grocery gondola shelf is typically rated to hold 500 lbs, but check with the manufacturer. If you wall mount a shelf, heavy duty brackets every 16 on center screwed to the shelf is required. If you design your own ALWAYS INSPECT GRAVITY BINS DAILY TO ENSURE THE BINS ARE SECURE ON THE SHELF. Before you begin...we recommend pre-cleaning. Do not use any chemicals or alcohol based products, these will damage the bin. PLEASE NOTE: Certain spices may discolor and/or stain your Bin such as: Cardamon, Chili Powders, Cayenne, Mace, Nutmeg, Tumeric, and Paprika. We recommend not dispensing Ground Clove. Place right half of bin on side as shown. 2.Insert Travel Stop Slide travel stop onto track 3.Insert Locking Clip Clip should slide onto track. Slide to the rear to prepare for locking when the two halves come together in Step 8. Seal 4.Insert Rubber Seal Insert T-shaped edge of rubber seal into slot on right half of bin. Latch Fig 1 Fig 2 5.Two Halves Make a Whole on the right half (Fig 1). Tabs and slots should should rotate together smoothly (Fig 2) for closure. Travel Stop 6.Alignment alignment with slot, as you bring the two halves together. Drain Door Slot 7.Snap in Place Click together the latches on front of bin halves. Check for alignment prior to forcing the two halves together thus Snapping the two latches on the front of the bin. 8.Lockdown Slide the clip to the to lock. Slide to rear to unlock. The travel stop controls how much the pivot door opens adjust (increase or decrease) see other side of this sheet. 10.False Front/Drain Snap false front drain door tabs into slots on bin front. Once the tabs are aligned with the bin to Snap the door into place.


2 Knobs 11.Closing Drain Door Push drain door from behind to latch. Leave drain door false front to give an always full appearance. Hub Arms Attach With the pivot door in your hand, slide the eyelet opening of the pivot door. Align bin front and pivot door as shown. Pinch hub arms on door together and slide into bin front. Snap door hubs through large holes on bin front. Slip hanging 13.Install Handle Pull Insert one end of handle through bin front and into door hub. Flex other handle end into alignment and push through front into other door hub. Make sure handle Snaps into place. Insert Into Latch 14.Bin Front closures, your bin front should look like this. 18.Install Base Stand To disengage the bin from the base stand, press latch downward, and slide base stand to the rear to remove. 15.Install Bin Front Overlap Bin Front with lip on pivot together. Read Instructions Thoroughly Protruding Sleeve Washer Body 16.Install Bin Front Insert tabs on bin body with slots on bin front and click together. Improperly Right Wrong Tools needed: Flat head Screwdriver, 1/2 wrench/socket, or pliers. Secured To Shelf metal sleeve, and a 5/16 nut. This nut is used to secure the bolt to shelves that do not employ a threaded insert. If not already done, insert the metal sleeve POSITION THE PROTRUDING SLEEVE THROUGH THE WASHER. INSERT THE BOLT AS SHOWN AND TIGHTEN ONTO THE SHELF. PLEASE NOTE: FAILURE TO INSTALL, OR KEEP THE AREA AROUND THE RETAINER BUTTON FREE OF DEBRIS COULD CAUSE THE BIN TO FALL OFF THE SHELF DURING NORMAL USE CAUSING INJURY TO YOUR CUSTOMER. ALL PARTS ARE NEEDED FOR A PROPER INSTALLATION!!! YOU SHOULD FEEL AND HEAR A SNAP WHEN BASE STAND SNAPS ONTO THE RETAINER BUTTON PROPERLY. 17.Install Base Stand align tabs on the bin with the slots in the base stand and slide latch engages. 20.Fill with Product properly secured to your shelving and push the bin straight back, level with the shelf, and SNAP remove bin, pull straight out towards you. Door Travel Stop Decreasing Food Flow Push against the door travel Note: There are 6 possible Tab Dispensing Handle Increasing the Food Flow Disengage travel stop tab with a screwdriver and simultaneously drive the travel stop toward you by pulling down on the dispensing handle.


3


 rated capacity).")


4 NEWLEAF DESIGNS Installation Instructions Trade Fixtures Gravity Bin Retainer Buttons 1501 Westpark Drive, Suite 5 Little Rock, Arkansas International PLEASE START HERE: Thank you for purchasing the Trade Fixtures Gravity Feed Bin. If you use your own shelving, each shelf span must support, without sagging, 25 lbs (11kg) for each 3 gallon bin, 45 lbs (20kg) for each 5 gallon bin, and 150 lbs (68kg) for the 12 gallon bin (90# (40kg) rated capacity). A 48 by 12 deep metal grocery gondola shelf is typically rated to hold 500 lbs, but check with the manufacturer. If you wall mount a shelf, heavy duty brackets every 16 on center screwed to the shelf is required. If you design your own ALWAYS INSPECT GRAVITY BINS DAILY TO ENSURE THE BINS ARE SECURE ON SHELF. Old Design New Design Fig 1 Loose Button same, but we prefer you replace verify it is clear of food debris, or other items. Also check to 3.Check Bin Base develop wear, or even crack. Ensure the bin base is free of Align with Button Back of Bin Correct Push Straight Back Fig 2 Fig 3 5.Push and Snap Lock bin in place by pushing it straight back, snapping onto the 6.Safe and Secure In the previous step, you should feel the bin SNAP into place. Fig. 3 shows how the bin base is correctly secured. REPLACE THIS WITH THIS Read Instructions Thoroughly Protruding Sleeve Washer Body Improperly Right Wrong Secured To Shelf Remember in step 1, we talked about us preferring you to replace Your Trade Fixtures salesperson can send part #06205A to you upon your order. Tools needed: Flat head Screwdriver, 1/2 wrench/socket, or pliers. metal sleeve, and a 5/16 nut. This nut is used to secure the bolt to shelves that do not employ a threaded insert. If not already done, insert the metal sleeve POSITION THE PROTRUDING SLEEVE THROUGH THE WASHER. INSERT THE BOLT AS SHOWN AND TIGHTEN ONTO THE SHELF. PLEASE NOTE: FAILURE TO INSTALL, OR KEEP THE AREA AROUND THE RETAINER BUTTON FREE OF DEBRIS COULD CAUSE THE BIN TO FALL OFF THE SHELF DURING NORMAL USE CAUSING INJURY TO YOUR CUSTOMER. ALL PARTS ARE NEEDED FOR A PROPER INSTALLATION!!! YOU SHOULD FEEL AND HEAR A SNAP WHEN BASE STAND SNAPS ONTO THE RETAINER BUTTON PROPERLY.

5 Retail Merchandising Care and Maintenance of Your Bulk Department 1501 Westpark Drive, Suite 5 Little Rock, Arkansas International NATURAL FOODS COME FROM NATURE. Before these foods are sold at your checkout, they have been and travelled many miles to storerooms before being placed in a Trade Fixtures / New Leaf Designs bin for sale. Maintaining a clean bulk department will create a professionally merchandising goals. Proper care, cleaning and monitoring of your Bulk department BIN CLEANING Food Bins for use: If the bin is new, examine it out of the box and clean bin before use. These are normal case non-alcohol, non-chlorinated, ph near 7 as possible-not exceeding 9) in lukewarm water, using a 3. Never clean in direct sunlight or at high temperature as this can lead to staining. 4. Never scrub with brushes, steel wool or other abrasive materials. This includes paper towels. 5. Rinse with clean cool or lukewarm water to remove any residue and wipe with the surface dry 6. Do not soak parts and do not wash or rinse at temperatures greater than 122 º F (50 º C) as this submerged in it. 8. Do not use alcohols or glass cleaners to clean polycarbonate (unless the glass cleaner states it ALWAYS INSPECT GRAVITY BINS DAILY TO ENSURE THE BINS ARE SECURE ON THE SHELF.
π H-2268 SANITAIRE UPRIGHT VACUUM SAFETY uline.com
 π H-2268 SANITAIRE UPRIGHT VACUUM 1-800-295-5510 uline.com SAFETY PAGE 1 OF 7 NOTE: When using an electrical appliance, basic precautions should always be followed, including the following: READ ALL INSTRUCTIONS
INSTALLATION INSTRUCTIONS. Aluminum Blinds - Standard - - Lift & Lock -
 1 INSTALLATION INSTRUCTIONS Aluminum Blinds - Standard - - Lift & Lock - 1 Deluxe 1 Traditional 1 Value & 1 Basic 2 Macro Thank you for your purchase. This blind has been custom built for you from the
High-Density Industrial
 Installation Instructions 1 High-Density Industrial Drawers in Shelving BORROUGHS CORPORATION 3002 N. BURDICK STREET * KALAMAZOO, MI 49004-3483 800-748-0227 * FAX: 269-342-4161 Industrial Drawer Installation
Pet. Easy Guide. VAX Ltd., Kingswood Road, Hampton Lovett, Droitwich, Worcestershire, WR9 OQH, UK - website:
 V-027P Rapide Pet User Guide 10/7/07 10:05 Page 14 EEC STATEMENT OF COMPLIANCE Manufacturer/EEC importer: VAX Limited, hereby on our own responsibility declare that the products V-027/V-027PT/V-027P/CCW-701
PARTS LIST. 1 x POST. 1 x BOOM. 1 x ELBOW. 1 x CANOPY CLIP BRACKET. 1 x CRANK HANDLE. 1 x BASE SLEEVE. 1 x RUBBER COVER. 6 x WASHERS LOCKING PIN
 COMPONENTS PARTS LIST x POST (SEE OVERLEAF FOR ASSEMBLY DIAGRAM.) x BOOM x ELBOW 0 x CANOPY CLIP BRACKET x CRANK HANDLE x BASE SLEEVE SPIGOT (INSIDE BASE SLEEVE) x RUBBER COVER LOCKING PIN x WASHERS 7
52 CEILING FAN READ AND SAVE THESE INSTRUCTIONS FAN RATING AC 120V.
 Irene 52 CEILING FAN READ AND SAVE THESE INSTRUCTIONS FAN RATING AC 120V. 60Hz TABLE OF CONTENTS Tools and Materials Required... 1 Package Contents... 1 Safety Rules... 2 Mounting Options... 3 Hanging
Sanitise Syrup Lines & Valves. Taylor PH61 Cleaning every 14 days
 Taylor PH61 Cleaning every 14 days Drain the Syrup Lines Remove each syrup feed tube from syrup bottle and let excess syrup drain from the feed tube back into the syrup bottle. When flow of syrup from
INSTALLATION INSTRUCTIONS. Vertical Blinds
 1 INSTALLATION INSTRUCTIONS Vertical Blinds Vinyl & Fabric Thank you for your purchase. This blind has been custom built for you from the highest quality materials. To avoid errors and save valuable time,
18 INCHES, OSCILLATING STAND FAN
 To Buy: Contact Sylvane at 800-934-9194 or visit www.sylvane.com For Product Support: Contact Soleus Air at (888) 876-5387 18 INCHES, OSCILLATING STAND FAN OWNER S MANUAL Model # FSM-45 PLEASE READ AND
C-IV 60 CEILING FAN READ AND SAVE THESE INSTRUCTIONS. FAN RATING AC 120V. 60Hz
 C-IV 60 CEILING FAN READ AND SAVE THESE INSTRUCTIONS FAN RATING AC 120V. 60Hz Please do not use any electric or battery powered tools in the assembly and installation of this or any Matthews Fan Company
1. SAFETY RULES. 8. Avoid placing objects in the path of the blades.
 1 1. SAFETY RULES 1. To reduce the risk of electric shock, insure electricity has been turned off at the circuit breaker or fuse box before beginning. 2. All wiring must be in accordance with the National
ST. KITTS CEILING FAN
 ITEM #0845047 ST. KITTS CEILING FAN MODEL #40829 Questions, problems or missing parts? Before returning this item to your retailer, call our customer service department at 1-800-643-0067, Monday - Thursday,
ONE PIECE TOILET LT3. Model: MPN: B0940 INSTALLATION INSTRUCTIONS. Version: 1.0
 Model: MPN: B0940 INSTALLATION INSTRUCTIONS Version: 1.0 READ ALL INSTRUCTIONS BEFORE UNPACKING THE PRODUCT INSTRUCTIONS THAT, IF IGNORED COULD RESULT IN DEATH OR SERIOUS INJURY CAUSED BY INCORRECT HANDLING
CBT LW MAINTENANCE GUIDE
 CBT LW MAINTENANCE GUIDE PICTOGRAMS Each Signifier displayed here is specific to this User Manual. Menu Previous Advance Note Tip Example Powder Feeder Mixing Bowl Weigh Scale CBP Tanks Control Panel PSD
Installation and Care Instructions
 Installation and Care Instructions 2" Horizontal Aluminum Blinds MagnaView Tilt Feature CONTENTS Getting Started................................................ 1 Mount the Installation s....................................
Stainless Steel Kitchen Sink
 Stainless Steel Kitchen Sink Model AS3320 ----------------------------------------------------------------------------------------------------------------------------------------------------- FEATURES
OPERATING and MAINTENANCE INSTRUCTIONS Models: H138NPSCLCMCQRL Merchandising Hot Cabinets
 Rev. (/) Page of 0 OPERATING and MAINTENANCE INSTRUCTIONS Models: H8NPSCLCMCQRL Merchandising Hot Cabinets Cabinet model number: Cabinet serial number: Authorized Service Agency: Ph: Fax: Keep this manual
EDGEMERE DUAL CONTROL WIDESPREAD LAVATORY FAUCET INSTALLATION INSTRUCTIONS
 EDGEMERE DUAL CONTROL WIDESPREAD LAVATORY FAUCET INSTALLATION INSTRUCTIONS 0.0 Thank you for selecting American Standard... the benchmark of fine quality for over 00 years. To ensure that your installation
Model SD2318. Stainless Steel Kitchen Sink INSTALLATION INSTRUCTIONS DIMENSIONS FEATURES
 Stainless Steel Kitchen Sink INSTALLATION INSTRUCTIONS Model SD2318 DIMENSIONS Outside Dimensions 23 X 18 Depth 10" Inside Dimensions 21 X 16 Depth 10" Standard 3 1/2-Inch drain replacement FEATURES 16
WIRE GUIDE BLIND OUTDOOR DELUXE ROLLER. 5YR Warranty ASSEMBLY GUIDE
 WIRE GUIDE BLIND OUTDOOR DELUXE ROLLER 5YR Warranty 5 YEAR FABRIC WARRANTY AGAINST UV DEGRADATION ASSEMBLY GUIDE 2 You will need: Pelmet cap Pelmet Pelmet cap Idle end plug Aluminium tube Clutch plug Clutch
CEILING FAN OWNER S MANUAL
 CEILING FAN OWNER S MANUAL LX SERIES 5/04 WARNING: Read and follow these instructions carefully and be mindful of all warnings shown throughout. GENERAL INSTALLATION & OPERATION INSTRUCTIONS IMPORTANT
CBT Bowl & wrap replacement
 CBT bowl & wrap replacement 2 CBT BOWL & WRAP REPLACEMENT Revision History rev. level 01_03.14.2012 rev. level 02_03.19.2012 rev. level 03_03.23.2012 rev. level 04_05.30.2013 NOTE: due to the fact that
I N ST R UC T I ON MODEL 2612 & 2712 SLICERS MODELS 2612 ML ML FORM (12-98) 2612 SLICER
 2612 SLICER") I N ST R UC 2612 SLICER T I ON S MODEL 2612 & 2712 SLICERS MODELS 2612 ML-104829 2712 ML-104822 701 S. RIDGE AVENUE TROY, OHIO 45374-0001 FORM 34141 (12-98) Installation, Operation, and Care of MODEL 2612
I N ST R UC 2612 SLICER T I ON S MODEL 2612 & 2712 SLICERS MODELS 2612 ML-104829 2712 ML-104822 701 S. RIDGE AVENUE TROY, OHIO 45374-0001 FORM 34141 (12-98) Installation, Operation, and Care of MODEL 2612
600 Floor Stripper Applicator
 600 Floor Stripper Applicator Operator and Parts Manual Model Part No.: 60763 www.tennantco.com 607624 Rev. 0 (08-2007) *607624* OPERATION This manual is furnished with each new model. It provides necessary
FAUX WOOD BLINDS 2 & 2-1/2 SLAT SIZES
 INSTALLATION INSTRUCTIONS FAUX WOOD BLINDS 2 & 2-1/2 SLAT SIZES STANDARD RECTANGULAR Thank you for your purchase. This blind has been custom built for you from the highest quality materials. To avoid errors
INSTALLATION. Glass Panel Doors (select models) CAUTION
 CAUTION") Location Do not install refrigerator near oven, radiator or other heat source. If not possible, shield refrigerator with cabinet material. Do not install where temperature falls below 55 F (13 C) or rises
Location Do not install refrigerator near oven, radiator or other heat source. If not possible, shield refrigerator with cabinet material. Do not install where temperature falls below 55 F (13 C) or rises
Explorer CleaningPartsDirect.com Carpet Extractor. Operator and Parts Manual. Home Find... Go To.. Model No.: Can.
 Explorer 1500 Carpet Extractor Model No.: 608808 609231 Can. Operator and Parts Manual CleaningPartsDirect.com 662-393-3045 NOBLES 12875 RANSOM STREET HOLLAND MI 49424 U.S.A. CUSTOMER SERVICE: 1-800-365-6625
Damp Locations Wall & Ceiling Mount BEFORE YOU BEGIN
 INSTALLATION AND ASSEMBLY INSTRUCTIONS LXLW LED SERIES Damp Locations Wall & Ceiling Mount SAVE THESE INSTRUCTIONS AND DELIVER TO OWNER AFTER INSTALLATION BEFORE YOU BEGIN Read these instructions completely
Installation and Care Instructions
 Installation and Care Instructions 2" Horizontal Aluminum Blinds MagnaView Tilt Feature Thank you for your purchase. Your new blinds have been custom built for you from the highest quality materials. Properly
MAYFIELD CEILING FAN LISTED E ITEM # MODEL #BTH44ABZC5C BTH44BNK5C Español p. 20 ATTACH YOUR RECEIPT HERE.
 Harbor Breeze is a registered trademark of LF, LLC. All Rights Reserved. ITEM #0331094 0331096 MAYFIELD CEILING FAN MODEL #BTH44ABZC5C BTH44BNK5C Español p. 20 ATTACH YOUR RECEIPT HERE Serial Number Purchase
INLET DAMPER WALL FAN UNIT
 FARM PRODUCTS DIVISION MEMBER OF AMCA AMERICAN COOLAIR CORPORATION P.O. BOX 2300 JACKSONVILLE, FLORIDA 32203 PHONE (904) 389-3646 FAX (904) 387-3449 E-MAIL - agfans@coolair.com INLET DAMPER WALL FAN UNIT
CEILING FAN OWNER'S MANUAL
 CEILING FAN OWNER'S MANUAL READ AND SAVE THESE INSTRUCTIONS MODELS: 52-ECM-5RV-13 52-ECM-5RV- 52-ECM-5RV-SN FAN RATING AC 120V. 60Hz CUL LISTED MODEL : AC-552 1. TOOLS AND MATERIALS REQUIRED Philips screwdriver
Aluminum Horizontal Blinds BOX BRACKET INSTALLATION
 Aluminum Horizontal Blinds BOX BRACKET INSTALLATION MOUNT THE INSTALLATION BRACKETS Mounting Options The installation brackets may be inside mounted, outside mounted or ceiling mounted. In all cases, level
SUPRA 52. U.S. Patents: D450,830 INSTRUCTION MANUAL WARRANTY CERTIFICATE
 SUPRA 52 BY U.S. Patents: D450,830 INSTRUCTION MANUAL WARRANTY CERTIFICATE This product is protected by United States Federal and/or State Law, including Patent, Trademark and/or Copyright laws. Manual
CEILING FAN OWNER S MANUAL
 CEILING FAN OWNER S MANUAL VERA CRUZ 5/04 GENERAL INSTALLATION & OPERATION INSTRUCTIONS IMPORTANT SAFEGUARDS: 1. To ensure the success of the installation, be sure to read the instructions and review the
INSTALLATION INSTRUCTIONS
 INSTALLATION INSTRUCTIONS MODEL: BISTRO THERMO SHOWER KIT (RH-5344) 1 Restoration Hardware Thermo Shower Kit Specification Diagram 2 All Threaded Connections are 3/4 NPT Dimensions are in Inches and Approximation
CEILING FAN OWNER'S MANUAL
 Style that revolves around you. CEILING FAN OWNER'S MANUAL CIARA 12/14 WARNING: Read and follow these instructions carefully and be mindful of all warnings shown throughout. GENERAL INSTALLATION & OPERATION
HANDLING INSTRUCTIONS for DISPENSA VVS-x
 02/2012 Top runner (with stop point) Top damper Stop point Support frame Trays or baskets Pull-out components: Top runner Support frame Trays or baskets Front panel connector Bottom runner Top damper (optional)
CEILING FAN OWNER S MANUAL
 Style that revolves around you. CEILING FAN OWNER S MANUAL Total fan weight *53 lbs. WEXFORD 11/05 WARNING: Read and follow these instructions carefully and be mindful of all warnings shown throughout.
READ AND SAVE THESE INSTRUCTIONS
 READ AND SAVE THESE INSTRUCTIONS CEILING FAN INSTALLATION AND OPERATION INSTRUCTION FAN RATING AC 120V. 60Hz UL LISTED MODEL: AC-552OD WEIGHT OF FAN: 6.82 KGS 1. TOOLS AND MATERIALS REQUIRED Philips screw
IMPORTANT PLEASE RETAIN FOR YOUR RECORDS
 Beverage Air IMPORTANT INFORMATION FOR H SERIES HR/HF/HPR/HPF This cooler has passed the QUALITY CONTROL INSPECTION And meets the high standards at Beverage-Air This inspection includes complete refrigeration
Warnings 2. Installation Instructions 3. Wiring Instructions 3. Mounting Instructions 4-5. Replacement Element Installation 5. Replacement Parts 5-6
 TABLE OF CONTENTS Warnings 2 Installation Instructions 3 Wiring Instructions 3 Mounting Instructions 4-5 Replacement Element Installation 5 Replacement Parts 5-6 Heater Coverage Areas 6 General Notes 6
CapraLite. Owner s Manual. Milking Machines. Built by: Apparatus Mfg., Inc. 13 Commerce St Poughkeepsie, NY 12603
 CapraLite Milking Machines Owner s Manual www.capralite.com Built by: Apparatus Mfg., Inc. 13 Commerce St Poughkeepsie, NY 12603 Page 2 Getting your Machine ready Your machine is almost ready to use. For
MKTF CRO-Series 5-Stage Reverse Osmosis System Installation and Maintenance Manual
 MKTF - 215 CRO-Series 5-Stage Reverse Osmosis System Installation and Maintenance Manual Please fill out the following information at the time of installation. Save for future reference. Model: Date Code:
Syrup Server. Thank You MODEL: SY MODEL: SY for purchasing this Syrup Server to heat and neatly dispense sticky syrups and sauces.
 Syrup Server MODEL: SY.5 8580 UNIT ½ GALLON SERVER MODEL: SY 890 UNIT GALLON SERVER Thank You...for purchasing this Syrup Server to heat and neatly dispense sticky syrups and sauces. WARM & SERVE SYRUP
ESS-2200 Double Station Scrub Sink. with Two Sensor Operated Gooseneck Spout. ESS-3200 Deluxe Double Station Scrub Sink
 ESS-2000/3000 Series I.I. Rev. 2 (02/03) Code No. 016162 INSTALLATION INSTRUCTIONS SINGLE, DOUBLE AND TRIPLE STATION SENSOR OPERATED SYSTEMS ESS-2000 SERIES ESS-2100 Single Station Scrub Sink with One
ICE DISPENSER. Installation/Service Manual
 Installation/Service Manual ICE DISPENSER DPP 230-Push-Button Operated DPK 230-Key Operated (Optional) DPC 230-Card Operated (Optional) DPT 230-Token Operated (Optional) Part No. 16195201INS Release Date:
ACRYLIC CLAWFOOT TUB
 ACRYLIC CLAWFOOT TUB INSTALLATION INSTRUCTIONS AND CARE GUIDE CONTENTS Tub Installation...2 Rough-In...2 Drain Installation...3 Drain without Overflow...3 Waste and Overflow Drain...3 Trimming Drain Pipes...4
Installation Instructions
 Wood Blinds Installation Instructions Heartland Woods Heartland Woods w/ Continuum *Click on any page to return to the Table of Contents* Heartland Woods Wood Blinds Mounting Inside or Outside Window Frame
MNEFDD54 & MNBCDD54 GALVANIZED WALL FANS Installation, Operation, and Maintenance Instructions
 FARM PRODUCTS DIVISION MEMBER OF AMCA AMERICAN COOLAIR CORPORATION P.O. BOX 2300 JACKSONVILLE, FLORIDA 32203 PHONE (904) 389-3646 FAX (904) 387-3449 E-MAIL - fans@coolair.com MNEFDD54 & MNBCDD54 GALVANIZED
Remote Dispensing System
 Remote Dispensing System Remote Pump with 36" Hose SINGLE POUCH SYSTEM 85783 Remote Pump with 36" Hose TWIN POUCH SYSTEM 85784 Use with pouches up to 3 gallons with either 16mm fitment or 38mm connector.
HT650 TM FAN DRIVE SERVICE INSTRUCTIONS
 HT650 TM FAN DRIVE SERVICE INSTRUCTIONS When unpacking your product, remove all components and inspect them to ensure that no damage occurred during shipping. If any components are missing or damaged,
THE MONTICELLO CEILING FAN INSTALLATION INSTRUCTIONS
 THE MONTICELLO CEILING FAN INSTALLATION INSTRUCTIONS Please read and save these instructions These instructions are to be used in the installation of the following QUORUM INTERNATIONAL fans... The Monticello
K 2.97 M. Specifications Operating pressure, max PSI Water volume GPM Voltage V Amp draw AMPS
 K 2.97 M High Pressure Washer Operator Manual Overview... 2 Important Precautions... 3-4 Assembly Instructions... 4 Operating Instructions... 5 GFCI Instructions... 6 Using the Accessories... 6 Working
INSTALLATION INSTRUCTIONS. WOOD BLINDS 1-3/8, 2 and 2-3/8 SLAT SIZES. FAUX WOOD BLINDS 2 and 2-1/2 SLAT SIZES
 INSTALLATION INSTRUCTIONS WOOD BLINDS 1-3/8, 2 and 2-3/8 SLAT SIZES FAUX WOOD BLINDS 2 and 2-1/2 SLAT SIZES STANDARD CORDLESS LIFT Thank you for your purchase. This blind has been custom built for you
ELSTON 52 CEILING FAN
 ELSTON 52 CEILING FAN MODEL #10290 Español p. 21 Questions, problems, missing parts? Before returning to your retailer, call our customer service department at 1-877-361-3883, Monday - Thursday, 8 am -
fi-4530c & fi-5530c CONSUMABLE REPLACEMENT
 fi-4530c & fi-5530c CONSUMABLE REPLACEMENT AND CLEANING INSTRUCTIONS CG00000-718301 Revision C1 KIT CONTENTS Pick Roller Qty 2 Pad Assembly Qty 5 F1 Cleaner Isopropyl Alcohol Qty 1 Cotton Swabs Qty 1 100/pack
Before you begin the installation process, gather the following tools and keep them handy:
 Vertical Blind Installation Instructions ucontact@udoblinds.com 1-855-205-8442 Congratulations on purchasing vertical blinds from Follow these instructions to properly install your blinds. Tools You Need
NR17/NR20 OWNERS MANUAL
 NR17/NR20 OWNERS MANUAL ATTENTION! DO NOT USE THE MACHINE WITHOUT HAVING READ THE INSTRUCTIONS NaceCare Solutions 1205 Britannia rd E. Mississauga, ON, Canada L4W 1C7 Tel: 1 800 387 3210 Fax: 1 800 709
Ceiling Sweep Fan Assembly Instructions
 Ceiling Sweep Fan Assembly Instructions CSF Series Installation Note: This fan must be installed by a licenced electrical contractor Improperly installed ceiling sweep fans can be dangerous and expensive
TOUCHDOWN 48 CEILING FAN
 TOUCHDOWN 48 CEILING FAN MODEL #50205 Español p. 20 Questions, problems, missing parts? Before returning to your retailer, call our customer service department at 1-877-361-3883, Monday - Thursday, 8 am
How to Fix a Leaky Toilet:
 How to Fix a Leaky Toilet: First, determine the type of toilet you have. Pressurized Toilet: Inside this toilet is a sealed tank. When water is fed from the water line, the air inside the tank is compressed.
INSTALLATION INSTRUCTIONS. WOOD BLINDS 1-3/8, 2 and 2-3/8 SLAT SIZES. COMPOSITE FAUX WOOD BLINDS 2 and 2-1/2 SLAT SIZES
 INSTALLATION INSTRUCTIONS WOOD BLINDS 1-3/8, 2 and 2-3/8 SLAT SIZES COMPOSITE FAUX WOOD BLINDS 2 and 2-1/2 SLAT SIZES POLYMER FAUX WOOD BLINDS 2 and 2-1/2 SLAT SIZES STANDARD CORDLESS LIFT Thank you for
TILGHMAN CEILING FAN. LISTED For Damp Location E ITEM # MODEL #WCK52LMW5N WCK52NWZ5N. Español p. 20 ATTACH YOUR RECEIPT HERE
 ITEM #0294980 0294981 TILGHMAN CEILING FAN Harbor Breeze is a registered trademark of LF, LLC. All Rights Reserved. MODEL #WCK52LMW5N WCK52NWZ5N Español p. 20 ATTACH YOUR RECEIPT HERE Serial Number Purchase
Select. Sutter PlaceTM. Instruction Manual. A Kichler Select ceiling fan
 Sutter PlaceTM A Kichler ceiling fan Kichler Lighting 7711 East Pleasant Valley Road P.O. Box 318010 Cleveland, Ohio 44131-8010 Customer Service 866.558.5706 8:30 AM to 5:00 PM EST, Monday - Friday Instruction
RCM-77. Instruction Manual. G-Series Cooler. U.S. Patent No. 8,215,125 RECHARGE COLD MERCHANDISER
 G-Series Cooler RECHARGE COLD MERCHANDISER U.S. Patent No. 8,215,125 Instruction Manual FOR YOUR FUTURE REFERENCE This easy-to-use manual will guide you in getting the best use of your cooler. Remember
Safety. Rinse Kit for Multi-Pro 1200 and 1250 Turf Sprayers Model No Safety and Instructional Decals. Installation Instructions
 Rinse Kit for Multi-Pro 1200 and 1250 Turf Sprayers Model No. 106-4842 Form No. 3353-529 Rev B Installation Instructions Note: Determine the left and right sides of the machine from the normal operating
ALUMA INSTRUCTION MANUAL WARRANTY CERTIFICATE
 ALUMA BY INSTRUCTION MANUAL WARRANTY CERTIFICATE Manual design and all elements of manual design are protected by U.S. Federal and/or State Law, including Patent, Trademark and/or Copyright laws. The Minka-Aire
Soft Sheer Vertical. Installation and Care Guide
 Soft Sheer Vertical Installation and Care Guide Soft Sheer Vertical Blinds represent a design breakthrough in style, efficiency and function. The unique fabric structure and hardware system are designed
60" Tulle PatioTM. Instruction Manual. A Kichler Select ceiling fan
 60" Tulle PatioTM A Kichler Select ceiling fan cul Certified for Wet Location Kichler Lighting 7711 East Pleasant Valley Road P.O. Box 318010 Cleveland, Ohio 44131-8010 Customer Service 866.558.5706 8:30
1. SAFETY RULES WARNING WARNING. 8. Avoid placing objects in the path of the blades.
 1 1. SAFETY RULES 1. To reduce the risk of electric shock, insure electricity has been turned off at the circuit breaker or fuse box before beginning. 2. All wiring must be in accordance with the National
Installation Instructions
 Aluminum Blinds Installation Instructions Echelon, Traditions & Integra Aluminum Blinds 2 Metro Aluminum Blinds *Click on any page to return to the Table of Contents* Echelon, Traditions & Integra Aluminum
ICED CAPPUCCINO MACHINE Taylor MODEL: 390
 4.8.6.3 ICED CAPPUCCINO MACHINE Taylor MODEL: 390 LOCATION: Front of House WHEN CLEANED: Daily, Weekly, Monthly, Seasonal TOOLS/SUPPLIES REQUIRED: Salmon Cloth 2 or 3-Compartment Sink Sink Detergent Sanitizer
SUNSEEKER BY INSTRUCTION MANUAL WARRANTY CERTIFICATE
 SUNSEEKER BY INSTRUCTION MANUAL WARRANTY CERTIFICATE Manual design and all elements of manual design are protected by U.S. Federal and/or State Law, including Patent, Trademark and/or Copyright laws. The
aquaphyll TM QUAD Wall Mounted Chemical Dispensing System
 aquaphyll TM QUAD Wall Mounted Chemical Dispensing System w w w. p i o n e e r e c l i p s e. c o m aquaphyll tm QUAD wall mounted chemical dispensing system AquapHyll is the professional s choice in wall
Model K 5800 G Part No
 K5800G Manual 11/30/01 5:02 PM Page 1 Model K 5800 G Part No. 1.194-103.0 High Pressure Washer Operator Manual Overview..................................1 Precautions...............................1-2
INSTALLATION INSTRUCTIONS
 Model: MPN: AN5534 INSTALLATION INSTRUCTIONS Version: 1.0 READ ALL INSTRUCTIONS BEFORE UNPACKING THE PRODUCT INSTRUCTIONS THAT, IF IGNORED COULD RESULT IN DEATH OR SERIOUS INJURY CAUSED BY INCORRECT HANDLING
GRANITE COMPOSITE SINK
 GRANITE COMPOSITE SINK CONTENTS Sink Installation Faucet Drilling Drop-In Sink Undermount Sink Drain Installation 2 3 4 5 Materal Care and Maintenance 6 1 FAUCET DRILLING The hole for the faucet can be
INSTALLATION MANUAL. Touchless Paper Towel Dispenser Questions/Accessories/Parts (USA/Canada)
") Touchless Paper Towel Dispenser INSTALLATION MANUAL Questions/Accessories/Parts (USA/Canada) REGISTER ONLINE AT 1-866-599-7066 www.cleancutdispenser.com 1 IMPORTANT SAFEGUARDS SAVE THESE INSTRUCTIONS When
Touchless Paper Towel Dispenser INSTALLATION MANUAL Questions/Accessories/Parts (USA/Canada) REGISTER ONLINE AT 1-866-599-7066 www.cleancutdispenser.com 1 IMPORTANT SAFEGUARDS SAVE THESE INSTRUCTIONS When
CEILING FAN OWNER'S MANUAL
 Style that revolves around you. CEILING FAN OWNER'S MANUAL QUATRO 10/09 WARNING: Read and follow these instructions carefully and be mindful of all warnings shown throughout. GENERAL INSTALLATION & OPERATION
EXPOSED BATH SHOWER MIXER INSTRUCTION MANUAL W INST 300. Please note: Tap heads shown is for illustration purposes only.
 EXPOSED BATH SHOWER MIXER INSTRUCTION MANUAL W INST 300 Please note: Tap heads shown is for illustration purposes only. CONTENTS GUARANTEE GENERAL SAFETY INSTRUCTIONS PARTS SUPPLIED HOW TO INSTALL AFTER
5AZR56XX Series Fan. Owner s Guide and Installation Manual. UL Model NO. : 5AZR56XX
 Owner s Guide and Installation Manual 5AZR56XX Series Fan UL Model NO. : 5AZR56XX Attach sales receipt to this card and retain as your proof of purchase DATE OF PURCHASE: MODEL NUMBER: RETAILER NAME: RETAILER
VPMmini. Operator's Manual
 VPMmini Operator's Manual Whip Mix Corporation 361 Farmington Ave. P.O. Box 17183 Louisville, KY 40217-0183 USA 502-637-1451 800-626-5651 Fax 502-634-4512 www.whipmix.com Features The Whip Mix VPMmini
SUTTON 52 CEILING FAN
 SUTTON 52 CEILING FAN MODELS #50188, 50189, 50190 Español p. 19 Questions, problems, missing parts? Before returning to your retailer, call our customer service department at 1-877-361-3883, Monday - Thursday,
Step 1: Identify the parts of your shade (parts shown are not to scale)
") Motor Operated Solar Shade with Valance Installation and Care Instructions Read carefully and retain for future use. Installation video is available online. Tools required: Philips head screwdriver (not
Motor Operated Solar Shade with Valance Installation and Care Instructions Read carefully and retain for future use. Installation video is available online. Tools required: Philips head screwdriver (not
Installation and Operation Manual For Hunter Ceiling Fans
 Installation and Operation Manual For Hunter Ceiling Fans 1 2 CONGRATULATIONS! Your new Hunter ceiling fan is an addition to your home or office that will provide comfort and performance for many years.
600 SERIES LATERAL AND SHELF FILE LABEL HOLDER
 600 SERIES LATERAL AND SHELF FILE LABEL HOLDER Illustration Illustration 2 Grooves Drawer front Drawer pull Drawer front Drawer pull Label Read all instructions and review illustrations before installing.
CEILING FAN OWNER'S MANUAL
 CEILING FAN OWNER'S MANUAL READ AND SAVE THESE INSTRUCTIONS MODEL: 52-854-5RV-234 52-854-5RV-CH 52-854-5RV- FAN RATING AC 120V. 60Hz CUL LISTED MODEL : AG-962MC 1. TOOLS AND MATERIALS REQUIRED Philips
CEILING FAN OWNER'S MANUAL
 Style that revolves around you. CEILING FAN OWNER'S MANUAL Hover with DC motor 12/14 WARNING: Read and follow these instructions carefully and be mindful of all warnings shown throughout. GENERAL INSTALLATION
Model K 280 M Part No
 Model K 280 M Part No. 1.189-205.0 High Pressure Washer Operator Manual Overview...................................1 Precautions................................1-3 Assembly Instructions.........................3
Toolblox Storage System
 RBC36X26E RBC36X26E ORIGINAL INSTRUCTIONS Toolblox Storage System Important! It is essential that you read the instructions in this manual before assembling, using and maintaining these units. Subject
User information. Cleaning/descaling and sanitizing
 User information How the dispenser works Follett s 110 series automatic-load ice and water dispensers are equipped with Follett s 425 lb (193 kg)/day ice machine. In the continuous icemaking process, water
G-10f/GCG-10f UPRIGHT COOLER
 G-Series Cooler G-10f/GCG-10f UPRIGHT COOLER Manual is for the following models: G-10F, G-10-F33EB GCG-10F, GCG-10-F33EB GCG-10F2, GCG-10-F233EB G-10-F33EB-HC, GCG-10-F33EB-HC GCG-10-F233EB-HC Instruction
HD-26, HD-36, HD-48 Heated Displays
 HD-26, HD-36, HD-48 Heated Displays This manual contains important information regarding your Admiral Craft unit. Please read this manual thoroughly prior to equipment set-up, operation and maintenance.
Vari-Cyclone Ceiling Fans
 Installation Instructions For Vari-Cyclone Ceiling Fans Installation Instructions For Vari-Cyclone Ceiling Fans Vari-Cyclone Ceiling Fans DC powered fans designed to operate on 12 or 24 vdc only! Toll
Owner s Guide and Installation Manual
 For Your Records and Warranty Assistance For reference, also attach your receipt or a copy of your receipt to the manual. Model Name Type 8 Models Owner s Guide and Installation Manual Model No. Catalog
MODEL SK2750. COMPRESSOR SERVICE KIT For use on 2750 Series Compressors
 MODEL SK2750 COMPRESSOR SERVICE KIT For use on 2750 Series Compressors WARNING: Unplug the compressor before beginning disassembly. CAUTION: Improper assembly or use of damaged parts may lead to premature
Drink Mixer Operation Manual
 Drink Mixer Operation Manual Page 3 READ BEFORE USE. 840177410 10/14 Mixer Safety IMPORTANT SAFETY INSTRUCTIONS Your safety and the safety of oth ers is very important. We have provided many important
Operator s Manual. Wet/Dry Vacuum with Detachable Blower 12 Gallon Model No. VBV1210 FOR YOUR SAFETY
 Wet/Dry Vacuums Operator s Manual Wet/Dry Vacuum with Detachable Blower 12 Gallon Model No. VBV1210 FOR YOUR SAFETY Read and understand this manual before use Keep this manual for future reference www.vacmaster.com
5COM52XXD Series Fan. Owner s Guide and Installation Manual. UL Model NO. : 5COM52XXD
 Owner s Guide and Installation Manual 5COM52XXD Series Fan UL Model NO. : 5COM52XXD Attach sales receipt to this card and retain as your proof of purchase DATE OF PURCHASE: MODEL NUMBER: RETAILER NAME: