Silent TS. Nr / Content Introduction...1 Symbology...1 Information for Operators...2. Introduction.
|
|
|
- Alison Webb
- 5 years ago
- Views:
Transcription
1 Silent TS Nr / ENGLISH Content Introduction...1 Symbology...1 Information for Operators...2 Operating Instructions 1. Setup and Commissioning Setup Connection to the Extraction Point Electrical Connection Connecting electrical equipment Operation Operating Elements Switching the Unit ON / OFF Adjusting and Displaying the Extraction Force Continuous Operation Automatic Mode Adjusting the Automatic Start Feature "Change Filter" - Indicator Adjust the sensitivity of the Replace filter indicator Activating / deactivating the Replace filter indicator tone Cleaning / Maintenance Seals Replacing the Dust Bag Filters Replacing the Fine Particle Filter Replacing the Exhaust Filter Replacing the Electronics Filter Fuses Self-diagnosis Replacing the Suction Turbine Replacing the Exhaust Air Labyrinth Spare Parts Standard Delivery Delivery Versions Accessories Error List...7 Information for Operators A. Application Area...9 A.1 Proper Use... 9 A.2 Ambient Conditions (in accordance with DIN EN )... 9 B. Hazard and Warning Information...9 C. Authorised Individuals...10 D. Preparations Prior to Starting...10 D.1 Connecting the Dust Extractor D.2 Connecting a Dust-Generating Device E. Repairs...11 F. Disposal Information...11 F.1 Disposing of Consumables F.2 Disposing of the Unit F.3 Disposal instructions for countries in the EU 11 G. Technical Specifications...11 H. Liability Exclusion...11 I. Warranty...12 Introduction We are pleased with your decision to purchase Silent TS laboratory dust extractor. This device sets a new standard with regard to functionality, performance, and ergonomics. Please read the following operating instructions carefully and observe the information they contain in order to ensure a long and trouble-free service life. Symbology The following symbols are employed in these instructions and on the unit itself: Danger This indicates a direct risk of injury. Electrical current This indicates a hazard due to electrical current. Attention Failure to observe the associated information can result in damage to the unit. Note This provides the operator with useful information to make working with the unit easier. Only intended for indoor use. Before opening the unit, disconnect it from the mains power supply by unplugging the power cord from the wall outlet. Burn hazard Hot surface or objects. Observe the operating instructions. Other symbols are explained as they occur EN
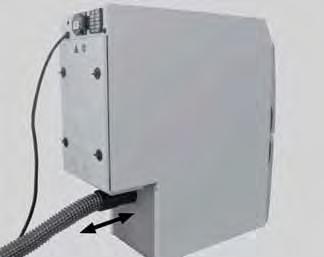
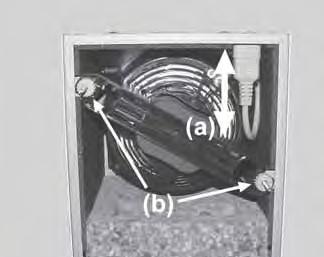
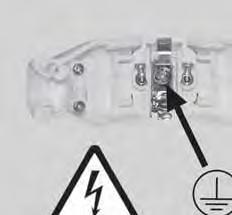
2 Information for Operators Using these operating instructions as a starting point, instruct all operators of the unit with regard to the area of application, the possible hazards during operation, and the proper operation of the dust extractor. Please have these operating instructions readily available for the operators. Additional information can be found in the Section, Information for Operators, at the end of these instructions. Operating Instructions 1. Setup and Commissioning 1.1 Setup Remove the unit and all accessories from the shipping package. Inspect the delivery for completeness (refer to the Standard Delivery Section). The unit is fully operational upon delivery. Select a setup location for the Silent TS where the exhaust air vent is not blocked. Where the unit is to be installed in a cabinet, an opening with the following minimum dimensions must be provided: Circular opening: Diameter at least 120 mm Rectangular opening: At least 170 x 65 mm. The Silent TS is a free-standing unit intended to be set up on the floor (e.g., under a workbench). Particularly after installation of the roller set (refer to the accessories list), the dust extractor may only be operated if it is standing on the floor. 1.2 Connection to the Extraction Point Use the included suction hose to connect the unit to the extraction point. Push the suction hose onto the extractor connection fitting on the dust extractor (fig. 1). Connect the suction hose to the desired extraction point (e.g., Dustex master plus, extractor clamp, etc.). With the aid of an extractor switch or a Y-junction it is possible to connect up to two suction points, or if necessary, use a universal adapter for connector tubes (see accessories). Never operate the Silent TS without a suction hose. Avoid steep pitches or hanging points along the hose path. Never kink the hose and make sure it is never stretched or under tension when connected. 1.3 Electrical Connection Before connecting the unit to the wall outlet, make sure the voltage information on the nameplate corresponds to your local power supply. Arrange conducting parts (mains outlets, plugs and couplings) and install extension cord such that the protection class (IP) is retained. Unroll the power cord. Press the OFF switch (fig. 2A). Plug the power cord into the wall outlet (fig. 3). The Silent TS is now ready for continuous operation. 1.4 Connecting electrical equipment Electronic equipment (electrical dust-generating equipment) can be connected to the Silent TS at the coupler socket at the back of the machine (N, fig. 4). In the automatic mode, extraction starts automatically when a connected electric device is switched on. Section D.2 at the end of these instructions offers information concerning electrical systems employing different power plug designs. When connecting electrically operated equipment to the dust extractor, please observe the operating instructions and safety information provided with the equipment. The unit power outlet is to be used only for connecting electric, dust-generating devices to be operated in conjunction with the dust extractor. The unit power outlet is live once the Silent TS has been connected to the power supply even when the Silent TS is switched off. This allows connected devices to be operated without extraction for brief periods. Power consumption of all devices connected to the unit power outlet may not exceed the rated value printed next to the unit power outlet. EN - 2 -
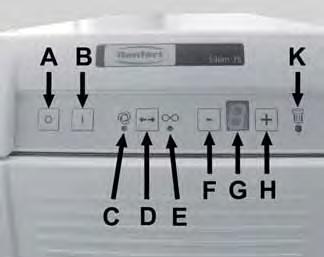
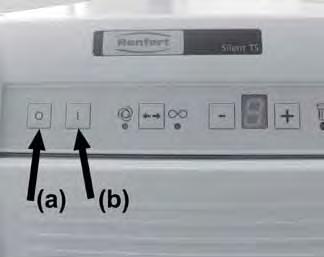
3 2. Operation 2.1 Operating Elements Refer also to fig. 4, 5 8 (A) OFF switch (B) ON switch (C) Automatic mode LED indicator (D) Continuous / automatic operating mode selector switch (E) Continuous mode LED indicator (F) Extraction force / activation sensitivity adjustment switch (G) Extraction power / activation sensitivity display (H) Extraction force / activation sensitivity adjustment switch (K) "Change Filter" LED indicator (L) Mains fuse (fig 4) (M) Motor protection switch (fig. 4) (N) Unit plug socket (fig. 4) 2.2 Switching the Unit ON / OFF The Silent TS is switched on at the ON switch (B) (fig. 2b), and off at the OFF switch (A) (fig. 2a). Extraction starts and stops in conjunction with the selected operating mode (continuous operation or automatic operation). The equipment s operating state is saved once the suction unit has been operating for longer than approx. 5 sec. 2.3 Adjusting and Displaying the Extraction Force The suction performance of the Silent TS can be adjusted in 4 stages by the buttons (F) and (H). This permits the unit s performance to be precisely matched to different types of materials being extracted. The extraction force setting is shown on the display (G). Increase the extraction force. 2.4 Continuous Operation Continuous operation LED (E) In the continuous operation mode, the extractor will begin running as soon as it is switched on, regardless of other electrical equipment which may or may not be connected. The operating mode selector switch (D) is used to switch between the continuous and automatic operating modes. The selected operating mode is indicated by LED (C) or LED (E). Continuous operating mode selection: Switch the Silent TS on - LED comes on - Continuous operation has now been selected or - LED comes on - The automatic mode has been selected. - Press the D key - LED comes on - Continuous operation has now been selected. The extractor will switch on The extractor is started and stopped with the ON (B) and OFF (A) switches. 2.5 Automatic Mode Automatic Mode, LED (C). In automatic operation suction only starts when the electric device connected is switched on responsible is operated. Selecting the automatic mode: Switch the Silent TS on (fig. 2b) - LED comes on - The automatic mode has been selected. or - LED comes on - Continuous operation has now been selected and the extractor starts. - Press the D key - LED comes on - The automatic mode has been selected. The extractor starts as soon as you begin operating the dust-generating device. After the dust-generating device is switched off, the Silent TS continues to run for approx. 5 sec., then stops automatically. Decrease the extraction force EN
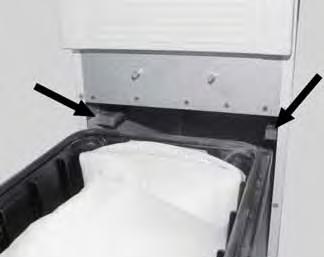
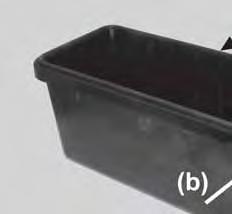
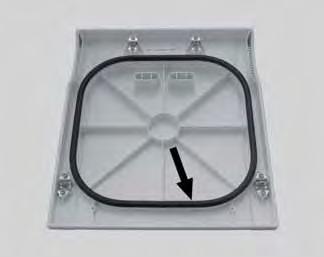
4 2.6 Adjusting the Automatic Start Feature In the automatic mode, the Silent TS is switched on and off by an automatic start system. This automatic start feature reacts to the current consumed by an electronic equipment plugged into the unit power outlet (N, fig. 4). If the current exceeds the activation threshold set at the Silent TS, extraction starts. If the current drops below this activation threshold, extraction stops. The factory set parameter for the start-up threshold enables the Silent TS to react correctly for most electrical dental equiment. Should this not be the case for a particular piece of equipment (eg. a handpiece), then the start-up threshold can be adjusted accordingly. To change the activation threshold: 1. Switch Silent TS on. 2. Press and hold for 3 sec.; - LED and flash. - A 0 flashes on the display. 3. Switch electronic equipment off. For units equipped with a standby mode, switch them to this mode (e.g., for units equipped with handpieces, only switch the controller on without activating the handpiece). 4. Press the key. - A 1 flashes on the display. 5. Switch the electrical appliance on, i.e. activate the hand piece at the speed at which the Silent TS is required to start up. 6. Press the key - An audible signal confirms that the adjustment has been successfully performed. The Silent TS returns to the operating mode (continuous or automatic operation) which was set for the automatic start function prior to the adjustment. 2.7 "Change Filter" - Indicator LED (K) coming on indicates that either the dust bag or the fine particle filter needs to be replaced. An acoustic signal will also sound three times in this case. In this case, follow the instructions given in the Cleaning/Maintenance section to replace the dust bag or the fine particle filter. If the dust extractor continues to be used after the Change Filter indicator goes on, it will automatically stop once the airflow drops below a predefined minimum value. The LED display blinks (K). The indicator can be turned off by switching the Silent TS OFF and ON, thus restarting extraction. Operating the unit with a blocked filtration system can result in hazards and damage to the extractor. Filters must be replaced if the extractor stops due to a full filter ADJUST THE SENSITIVITY OF THE REPLACE FILTER INDICATOR. It may be necessary to reduce responsivity if the suction support of the connected appliance has a smaller diameter than the Silent TS. (<< 32.5mm). The Replace filter sensitivity can be adjusted within limits. To do this: Switch the Silent TS off; Switch the Silent TS on, and in doing so keep the button firmly pressed until the display begins to blink. (5=factory set parameter) Press button, - Reduce level of sensitivity, - Change filter signal will appear later. - ==> Dust bag will get very full Press button, - Increase level of sensitivity, - Change filter signal appears more quickly. - ==> Dust bag will get less full Press button, - Accoustic signal confirms successful adjustment ACTIVATING / DEACTIVATING THE REPLACE FILTER INDICATOR TONE The Replace filter indicator tone can be activated or deactivated. To do this: Switch the Silent off; While holding down the and keys, switch the Silent back on and wait for the indicator tone - Brief indicator tone: acoustic signal deactivated. - Longer indicator tone: acoustic signal active 3. Cleaning / Maintenance Always unplug the unit from the wall outlet before beginning any cleaning or maintenance tasks. Examine the power cord regularly, but at least annually, for damage or signs of aging. Immediately replace damaged power cords. 3.1 Seals To ensure the proper function of the dust extractor, it is vital that the following three seals: Profile seal on the dust drawer (fig. 12a); V-ring seal on the dust drawer (fig. 12b); Seal on the upper front panel (fig. 20); are not damaged. Inspect these seals when replacing the associated filters and replace them if they are found to be damaged (refer to the spare parts list). EN - 4 -
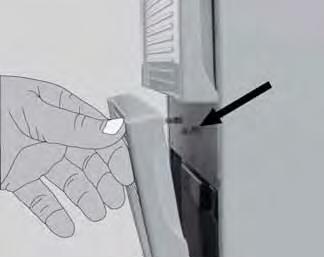
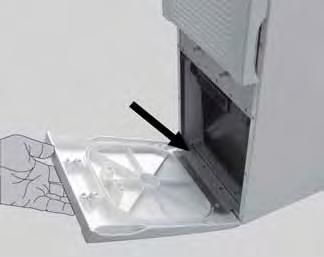
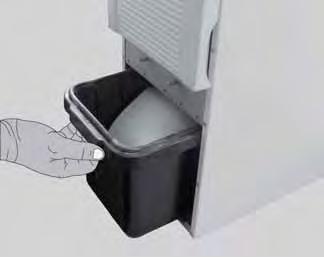
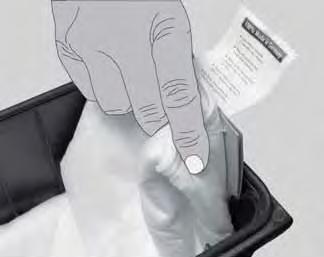
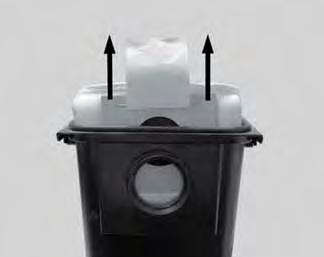
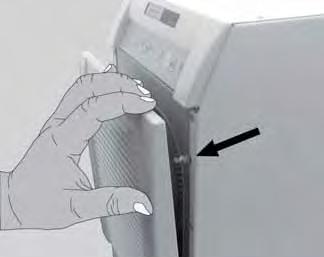
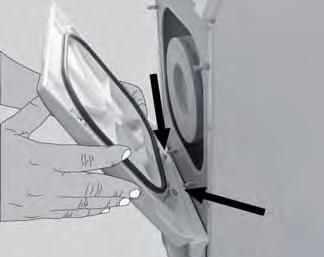
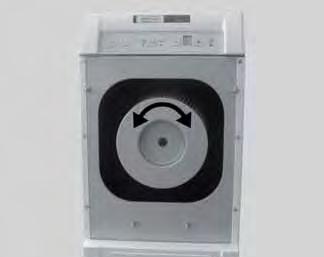
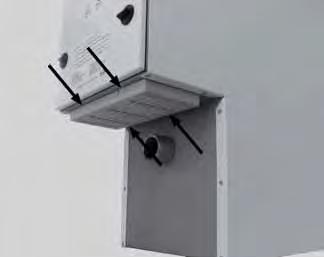
5 3.2 Replacing the Dust Bag The dust extractor may only be operated with a complete filtration system. The dust bag must be immediately replaced with a new one as soon as the Change Filter indicator goes on. Failure to replace the dust bag may result in it s rupturing. Depending on the material in the bag, this may lead to hazards for the operator. In addition, the dust extractor may be damaged. Pull the front panel forward and off (fig. 8). Pull the dust drawer out towards the front (fig. 9). Leave the dust bag in the dust drawer and take it to the disposal location. Remove the dust bag from the drawer. Take off protection film, cover filter opening (fig. 10). Dispose the dust bag accordingly. Always comply with all local ordinances governing proper disposal and accident prevention! Depending on the filter contents, protective clothing may be required. Insert the new dust bag into the dust drawer, being careful to ensure that the dust bag is properly aligned in the guide grooves and the glue lap faces up (fig. 11). Use only original Renfert dust bags (refer to the spare parts list). Inspect the dust drawer seal for damage and replace it, as required (fig. 12a, b). Insert the dust drawer, making sure it is straight, and push it fully against its stops. Make sure the dust drawer is seated correctly on the guide (fig. 13). Install the front panel on the bottom hooks first (fig. 14), then push it into the upper lock bolts, pressing firmly until it locks in place (fig. 15). 3.3 Filters NEVER operate the dust extractor without the complete filtration system REPLACING THE FINE PARTICLE FILTER Examine the fine particle filter regularly, but at least annually, and replace it. It must always be replaced if the Change Filter indicator (K) continues to go on, despite the dust bag having been replaced. Pull the front panel forward and off (fig. 16). Turn the fine particle filter anticlockwise to release it (fig. 17). Pull the fine particle filter straight forwards and out of the unit (fig. 18) and dispose of it properly. Always comply with all local ordinances governing proper disposal and accident prevention! Depending on the filter contents, protective clothing may be required. Install a new fine filter and fully insert it over the holder bar (fig. 19). Use only original Renfert fine particle filters (refer to the spare parts list). Turn the fine particle filter clockwise and hand-tighten it in place (fig. 17). Inspect the seal on the front panel for damage and replace it, as required (fig. 20). Snap the front panel in place (fig. 21, 22) REPLACING THE EXHAUST FILTER The exhaust filter primarily traps particles rubbed off the suction turbine graphite brushes. The filter should be replaced annually: Press on the four lock tabs on the filter cassette and pull the cassette down and off the unit (fig. 23). Properly dispose of the filter and the filter cassette. Always comply with all local ordinances governing proper disposal and accident prevention! Depending on the filter contents, protective clothing may be required. Insert a new filter mat in the filter cassette so that the smooth, compressed side of the filter mat faces down or outwards when the filter is installed. Install the new filter cassette on the exhaust air vent. Make sure the filter cassette is properly seated and locked in place on all four tabs. Use only original Renfert exhaust filters (refer to the spare parts list) REPLACING THE ELECTRONICS FILTER Cooling air for the unit s electronics passes through the electronics filter. The type of material trapped by the filter and the degree of contamination depend on the ambient laboratory conditions. The filter should be examined annually and replaced, as necessary: Press on the two lock tabs on the filter cassette and pull the cassette off towards the rear of the unit (fig. 24). Properly dispose of the filter and the filter cassette. Always comply with all local ordinances governing proper disposal and accident prevention! Depending on the filter contents, protective clothing may be required. Install a new filter cassette and filter on the opening. Make sure the filter cassette is properly seated and locked in place on both tabs. Use only original Renfert electronics filters (refer to the spare parts list). 3.4 Fuses Instead, two device overload switches, (L, fig. 4) are provided to protect these units. Press the button to reset a switch which has tripped EN
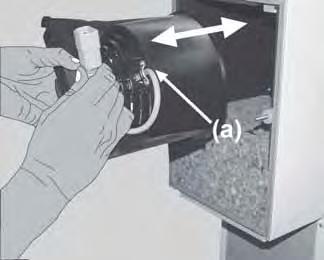
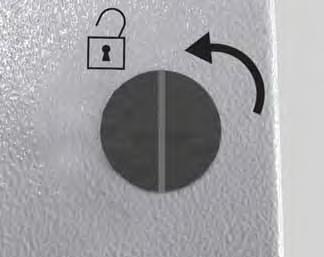
6 3.5 Self-diagnosis The dust extractor is equipped with a self-diagnosis, which checks various functions and displays errors on the display (G). Before the diagnosis takes place, insert a new dust bag and ensure that the fine filter is clean and the suction pipe is not blocked. Activate the self-diagnosis: Switch Silent TS off; Press and hold the operating mode selector switch (D) and switch Silent TS on (fig. 7a). For approx. 3 sec.: - all LED displays are illuminated, - An 8 is indicated in the display - The signalling device gives an acoustic signal. A d appears on the display during the unit s selftest (fig. 7b). During this time, the unit s electronics check various internal elements and functions. The suction turbines will briefly run at Level 1 during this test phase. If no errors are detected, the Silent TS automatically goes into the previously selected operating mode at the end of the self-test (after approx. 10 sec.). If an error is detected during the self-test, a flashing E will appear on the display, together with a number (1 to 3). These indicate: E1: Airflow sensor fault; have the unit repaired. E2: Plug on grey motor wire out of its socket (fig. 26a) or suction turbine fault. Replace suction turbine if necessary (refer to the spare parts list). E3: Error in the electronics; have the unit repaired. In this case, the Silent TS remains in the self-diagnosis mode until it is switched off at the OFF switch (A). 3.6 Replacing the Suction Turbine The suction turbine is encased in an encapsulating housing to form a single unit, thus allowing it to be easily replaced without the need for any tools. Before opening the unit, disconnect it from the mains power supply by unplugging the power cord from the wall outlet. The motor may be hot. Allow the motor to cool off before proceeding. The suction turbine may only be operated when it is installed in the unit. Only an authorized electrician may perform a functional inspection of or repair the unit. Turn the lock knob 90 anticlockwise (fig. 25). Remove the motor compartment cover. Pull the plug on the grey motor wire out of its socket (fig. 26a). Loosen the two internal, grey knurled nuts (fig. 26b) and unscrew them approx. 1 cm. These knurled nuts do not need to be completely removed. Release the suction turbine by turning it anticlockwise, then pull it straight out towards the back (fig. 27). Install the new suction turbine (fig. 27) by pushing it in straight and turning it clockwise to lock it in place (fig. 28). The connecting wire should be on top (fig. 27a). Tighten the internal knurled nuts (fig. 26b). Plug the motor wire into the socket (fig. 26a). Check that the lock knob is in the open position (vertical). Place the motor compartment cover on the motor compartment. Two guide pins have been provided on the cover to assist in positioning it correctly. Turn the lock knob 90 clockwise (fig. 30). Always comply with all local ordinances governing proper disposal and accident prevention! 3.7 Replacing the Exhaust Air Labyrinth Dust from the suction turbine graphite brushes also settles on the walls of the exhaust air labyrinth. Over time, the labyrinth will become discoloured. Before opening the unit, disconnect it from the mains power supply by unplugging the power cord from the wall outlet. Replacing the exhaust air labyrinth: Turn the lock knob 90 anticlockwise (fig. 25). Remove the motor compartment cover. Pull the exhaust air labyrinth out towards the back. Install the new exhaust air labyrinth by pushing it in straight, making sure it is properly seated. The openings in the exhaust air labyrinth must face towards the rear (fig. 29). Check that the lock knob is in the open position (vertical). Place the motor compartment cover on the motor compartment. Two guide pins have been provided on the cover to assist in positioning it correctly. Turn the lock knob 90 clockwise (fig. 30). Always comply with all local ordinances governing proper disposal and accident prevention! 4. Spare Parts For the order numbers of consumables and spare parts please refer to the spare parts list at the end of this manual. 5. Standard Delivery 1 Silent TS laboratory dust extractor 1 Operating instructions 1 Suction hose 1 Dust bag (properly installed in the dust drawer) 1 Fine particle filter (properly installed) 1 Hose fitting adapter 1 Y-junction 1 Grounded wall plug (No only) EN - 6 -
7 6. Delivery Versions Silent TS, 230 V, 50/60 Hz Silent TS, V, 50/60 Hz 7. Accessories Dust bag set (5 bags) Roller set Extractor clamp (w./o. glass pane) Glass pane, w. mounting (for the extractor clamp) Suction switch, incl. 4 mufflers (w./o. hose) Muffler set, 2 mufflers Suction hose (by the metre) Hose fitting adapter Suction hose (3m), cpl Y-junction 8. Error List Error Possible cause Corrective action Dust extractor stops suddenly, for no apparent reason. Dust extractor continued to be used, despite Change Filter indicator. Unit fuse blown. Motor protection switch (M, fig. 4) has been activated due to overload (temperature, electricity). Check and replace the dust bag and fine particle filter (Chapter 3.2 and 3.3) Check and reinstall the fuse Check the motor protection switch, if necessary reset. Change the motor if repeatedly activated. Motor over-temperature protector switch activated. Plug on grey motor wire out of its socket or loose. Suction turbine fault Check dust bag and filter, replace as required. (Sec. 3.2 and 3.3) Check exhaust air filter, replace as required. (Sec ). Check whether suction hose is blocked. Remove obstruction as required. Dust extractor can be restarted after being allowed to cool off for approx. 1 hour. Check plug (fig. 26a). Carry out self-diagnosis (chapt. 3.5), at fault E2 exchange suction turbine (see spare parts list). Dust extractor stops suddenly, for no apparent reason. E4 is indicated on the display. In-house fuse blown. The electronics may be overheated due to excessively high ambient temperature, e.g., if the unit is installed in a cabinet. Replace the in-house fuse. Check the total power consumption of the dust extractor plus dust-generating devices. Allow the extractor to cool down. Attempt to improve the ventilation conditions. Refer also to Sec. 1.1 After switching on the unit, the display immediately indicates E4. Temperature sensor fault Have the device repaired The self-test returns a suction turbine error, even though the turbine is running. Filter full. Suction hose blocked. Suction turbine fault Check dust bag and fine particle filter, replace as required. (Sec. 3.2 and 3.3.1) Remove obstruction from the suction hose. Replace the suction turbine (Sec.3.6) EN
8 Error Possible cause Corrective action Insufficient extraction force. Change Filter indicator goes on shortly after filters were replaced. Dust bag ruptures. Dust extractor fails to start when a dustgenerating device is being used. Dust extractor starts, although a connected device is not being used. Dust extractor fails to stop when a connected device is switched off. No satisfactory setting of the automatic start feature can be adjusted. Extraction force level too low Filter blocked. Suction hose blocked. Dust drawer seal not tight. Upper front panel fails to close properly. Suction hose damaged. Fine particle filter blocked. Suction hose blocked. Cross-section of the dustgenerating device s hose fitting is too small. Dust is too fine. Flow sensor defect The Change Filter indicator s sensitivity has not been adjusted for the material being extracted. Dust extractor not switched on. Dust-generating device not plugged into the unit power outlet on the Silent TS. Wrong operating mode selected. Automatic start feature s threshold value too high. Device fuse has blown. Automatic start feature fails to detect the attached device s operation. Automatic start feature s threshold value too low. Dust-generating device not plugged into the unit power outlet on the Silent TS. Wrong operating mode selected. Activation threshold too low. Some older handheld instruments do not generate a sufficiently strong signal for the automatic start feature. Increase the extraction level (Sec. 2.3). Check dust bag and fine particle filter, replace as required.(sec. 3.2 and 3.3.1) Remove obstruction from the suction hose. Check the proper seat of the dust drawer (Sec. 3.2). Check the dust drawer seal for damage and replace as required (Sec. 3.1). Check the proper seat of the upper front panel (Sec ). Check the upper front panel seal for damage and replace as required (Sec. 3.1). Inspect the suction hose and replace as required. Replace the fine particle filter (Sec ). Remove obstruction from the suction hose. Adjust the sensitivity of the Replace filter indicator(chapter ) Adjust the sensitivity of the Replace filter indicator (Chapter ) Carry out self-diagnosis (chapt. 3.5), at fault E1 equipment requires professional repair Reduce the sensitivity of the Replace filter indicator (Chapter ) Switch the dust extractor on (Sec. 2.2). Connect the dust-generating device to the Silent TS (Sec. 1.4). Select the automatic mode (Sec. 2.5). Adjust the automatic start feature (Sec. 2.6). Check and reinstall the fuse.(sec. 3.4) Some older handheld instruments do not generate a sufficiently strong signal for the automatic start feature. Switch the dust extractor to the continuous mode. Adjust the automatic start feature (Sec. 2.6). Connect the dust-generating device to the Silent TS (Sec. 1.4). Select the automatic mode (Sec. 2.5). Adjust the automatic start feature (Sec. 2.6). Switch the dust extractor to the continuous mode. EN - 8 -
9 Error Possible cause Corrective action Extraction briefly starts up when the unit is switched on. Activation sensitivity too low. Adjust the automatic start feature (Sec. 2.6). Panels covering the fine particle filter and the dust drawer are difficult to open. Lock bolts dirty. Clean the lock bolts and lubricate them slightly, if required. Information for Operators The following information is intended to assist you, the operator, in safely working with the Silent TS in your laboratory. Using these operating instructions as a starting point, instruct all operators of the unit with regard to the area of application, the possible hazards during operation, and the proper operation of the dust extractor. Please have these operating instructions readily available for the operators. A. Application Area The Silent TS is a workbench extractor used to extract dusts such as occur in laboratories, e.g., dental labs. It is solely intended for commercial use in laboratories and not for private, household use. The Silent TS can be operated both manually as well as in conjunction with connected, electric, dust-generating equipment. It is possible to connect one or two suction points to the extractor. The second suction point can be connected with a Y-adapter which is available as an accessory (see chapter accessories ). In order to protect the health of persons working in a dental laboratory, the law requires that specialised dust extractors must be used. National regulations state the MAK value - maximum concentration of suspended particles in the air. Find out about the legal national threshold value and the type of dust generated in your laboratory. A.1 Proper Use Proper use implies the extraction of dry, non-explosive dusts. Fire-promoting, easily flammable, flammable, or explosive materials may not be extracted with the Silent TS. The extraction of liquids, smouldering, or burning materials is prohibited. Any other use is not as intended. The manufacturer shall not be liable for any damages resulting from any such other use The use as intended includes compliance with the operating, servicing and preventive maintenance conditions defined by the manufacturer. A.2 Ambient Conditions (in accordance with DIN EN ) The unit may only be operated: Indoors; Up to an altitude of 2,000 m above sea level; At an ambient temperature range between 5-40ºC [41-104ºF] *); At a maximum relative humidity of 80% at 31ºC [87.8ºF], dropping in a linear manner to 50% relative humidity at 40ºC [104ºF] *); With mains power where the voltage fluctuations do not exceed 10% of the nominal value; Under contamination level 2 conditions; Under over-voltage category II conditions; *) Between 5 30 C [41 86 F], the unit can be operated at a relative humidity of up to 80%. At temperatures between C [ F], the humidity must decrease proportionally in order to ensure operational readiness (e.g., at 35 C [95 F] = 65% humidity; at 40 C [104 F] = 50% humidity). The unit may not be operated at temperatures above 40 C [104 F]. B. Hazard and Warning Information Only intended for indoor use. The unit is only designed for dry applications and may not be operated or stored outdoors or under wet conditions. The Silent TS laboratory dust extractor is an electric device and, as such, carries with it a certain inherent potential hazard. The unit may not be taken into service until any required alterations to comply with regionally specific power plug configurations have been made. Such alterations may only be performed by a qualified electrician. The unit may only be operated if the information on the nameplate conforms with the specifications of your local mains power supply. EN
10 The mains socket on the unit is only designed for the purposes specified in the Operating Instructions. Connecting other devices may cause material damage. Before connecting another device, turn off both the dust extractor and the other device. Read the operating instructions of the other device and comply with the safety instructions contained in the document. Please observe the national regulations and permitted exposure to dust in a working environment. Please note EN , Appendix AA, or initiate appropriate enquiries with your trade association or the responsible authorities. When extracting hazardous materials, always refer to the relevant safety data sheets. Always wear protective gear when extracting hazardous materials. It is necessary to wear suitable, personal protective equipment when emptying the dust bag or cleaning, depending on the type of extracted material. Regularly inspect connecting lines and hoses (e.g., the power cord) for damage (e.g., kinks, cracks, porosity) or signs of aging. Units exhibiting damaged connecting lines, hoses, or other defects must be taken out of service immediately. Always unplug the unit from the wall outlet before beginning any work on the unit s electrical components. Never operate the unit without the complete filtration system (dust bag, fine particle filter, exhaust air filter, electronics filter). Make sure the dust drawer is fully closed during extraction. Never operate the unit without the suction hose. Never extract flammable or explosive gases, vapours, dusts. Never extract liquids. Never extract hot materials. The unit may not be operated without supervision. If the dust extractor is employed to extract hazardous materials, appropriate personal protective gear must be worn and steps must be taken to ensure that the exhaust air is properly ventilated. Please refer to the associated safety data sheets for specific requirements. Spare parts and accessories. The use of other than OEM spare parts and accessories may be an impediment to the safety of the unit. Use OEM spare parts and accessories supplied by Renfert GmbH only. Environmentally hazardous extraction substances. Extracted substances may be a risk to the environment. Dispose of extracted material according to local statutory regulations. C. Authorised Individuals Only properly trained individuals may operate and service the Silent TS. Minors or pregnant women may only operate and service the Silent TS if they are wearing appropriate protective gear, particularly if the unit is being used to extract hazardous materials. Any repairs not specifically described in these operating instructions, in particular the inspection of the suction turbine outside the unit, may only be performed by a qualified electrician. D. Preparations Prior to Starting D.1 Connecting the Dust Extractor The unit is supplied with a power cord and two-contact plug with a ground contact (either DIN or NEMA, depending on the particular model in question). The unit may not be taken into service until any required alterations to comply with regionally specific power plug configurations have been made. Such alterations may only be performed by a qualified electrician. The unit may only be connected to wall outlets connected to a ground circuit system. Before operating the unit, make sure the voltage information on the nameplate corresponds to your local power supply. All required tools must be appropriately cleaned prior to use when the unit is employed for medical purposes or in conjunction with medicinal materials. EN
11 D.2 Connecting a Dust- Generating Device The unit is equipped with a power outlet on the back, designed for a two-contact plug with a ground contact (either in accordance with DIN or NEMA), to which dust-generating equipment can be connected (N, fig. 4). A suitable plug is supplied for units with a nominal voltage of 230V and plug socket according to DIN (Fig. 31). This connector can be used to make an adapter for your local plug configuration. This adapter may only be made by a qualified electrician! The adapter must not interrupt the ground circuit system! E. Repairs Repairs may only be performed by qualified electricians or authorized dealers. Depending on the material trapped by the filters, protective gear may need to be worn during repairs. F. Disposal Information F.1 Disposing of Consumables Full dust bags and filters including motor and electronics filters must be disposed of under compliance with locally applicable regulations. Depending on the material trapped by the filters, protective gear may need to be worn during disposal. F.2 Disposing of the Unit The unit must be disposed of by an authorized recycling operation. The selected firm must be informed of all possibly health-hazardous residues in the unit. F.3 Disposal instructions for countries in the EU To conserve and protect the environment, prevent environmental pollution and improve the recycling of raw materials, the European Commission adopted a directive that requires the manufacturer to accept the return of electrical and electronic units for proper disposal or recycling. Within the European Union units with this symbol should not therefore be disposed of in unsorted domestic waste: G. Technical Specifications Mains voltage: 230 V, 50/60 Hz V, 50/60 Hz Dust extractor power consumption: 1400 W (230 V) 1400 W (120 V ) 1000 W (100 V) Unit power outlet maximum connecting value: 2000 W (230 V) 360 W (120 V) 500 W (100 V) Total connected power: 3400 W (230 V) 1800 W (120 V) 1500 W (100V) Mains input fuse (fig. 4, L): 2x 15 A (T) Sound pressure level in accord. with DIN at maximum airflow: 63 db(a) Airflow, max: 3300 l/min (120 V / 230 V) 2900 l/min (100 V) Vacuum pressure, max: 20 kpa [2.9 psi] Filter surface area, fine particle filter: approx. 0.8 m² Fill volume, dust bag: approx. 7.5 l Power cord length: approx. 2 m [78.74 inches] Dimensions (height x width x depth): Weight (empty): Ø suction fittings: Internal: External: H. Liability Exclusion 595 x 225 x 565 mm [23.4 x 8.8 x 22.2 inches] approx. 26 kg 32.5 mm [1.28 inches] 40 mm [1.57 inches] Renfert GmbH shall be absolved from all claims for damages or warranty if: The product is employed for any purposes other than those cited in the operating instructions; The product is altered in any way other than those alterations described in the operating instructions; The product is repaired by other than an authorized facility or if any but Renfert OEM parts are employed; The product continues to be employed, despite obvious safety faults or damage; The product is subjected to mechanical impacts or is dropped. For more information regarding proper disposal please apply at your local authorities EN


12 Silent TS Nr / A Made in Germany Ideas for dental technology
13


14

15


16


17
18 I. Warranty A Guarantee on the Silent TS motor for 800 working hours (Motor running time). Depending on the selected suction level, a considerably longer service life can be expected. Provided the unit is properly used, Renfert warrants the all components of the Silent TS laboratory dust extractor for a period of 3 years. Warranty claims may only be made upon presentation of the original sales receipt from the authorized dealer. Components subject to natural wear as well as consumable (e.g., filters, the motor, etc....) are excluded from this warranty. The warranty is voided in case of improper use; failure to observe the operating, cleaning, maintenance, and connection instructions; in case of independent repairs or repairs by unauthorized personnel; if spare parts from other manufacturers are employed, or; in case of unusual influences or influences not in compliance with the utilization instructions. Warranty service shall not extend the original warranty. EN We reserve the right to make technical changes.
Silent TS. Nr / Ideas for dental technology / A. Made in Germany
 Silent TS Nr. 2921-0050 / 2921-1050 21-9191 30102012 / A Made in Germany Ideas for dental technology 1 2 3 4 5 6 7 8 9 10 11 12 13 14 15 16 17 18 19 20 21 22 23 24 25 26 27 28 29 30 31 Silent TS Nr. 2921-0050
SILENT compact /
 SILT compact 2934 0000 / 2934 1000 TRANSLATION OF THE ORIGINAL INSTRUCTIONS FOR USE Made in Germany Ideas for dental technology 21-2245 21052015 / A Contents 1. Introduction...3 1.1 Symbols...3 2. Safety...3
Silent V4 Nr
 Silent V4 Nr. 2933 0000 DE FR IT ES 21-6669 12052014 / A Made in Germany Ideas for dental technology Silent V4 Nr. 2933 0000 GLISH 1. Introduction... 2 1.1 Symbols... 2 2. Safety... 3 2.1 Intended Use...
Silent TS2 Nr /
 Silent TS2 Nr. 2930 0050 / 2930 1050 21-6670 18032013 / Made in Germany Ideas for dental technology Silent TS2 Nr. 2930 0050 / 2930 1050 Content 1. Introduction...2 1.1 Symbols...2 2. Safety...3 2.1 Intended
SILENT V4 TRANSLATION OF THE ORIGINAL INSTRUCTIONS FOR USE. Made in Germany
 SILT V4 TRANSLATI OF THE ORIGINAL INSTRUCTIS FOR USE Made in Germany 21-6669 26092016 1. Introduction... 2 1.1 Symbols... 2 2. Safety... 3 2.1 Intended Use... 3 2.2 Improper Use... 3 2.3 Ambient Conditions
Millo / Millo pro. Nr x000 / 1805-x000. Ideen für die Dentaltechnik A
 Millo / Millo pro Nr. 1804-x000 / 1805-x000 0609 21-6543 A Ideen für die Dentaltechnik 1 2 3 4 5 6 7 8 9 10 11 12 Millo / Millo pro No. 1804-x000 / 1805-x000 ENGLISH Content Introduction... 15 Symbols...
Bedienungsanleitung. Ideas for dental technology. Made in Germany C
 Bedienungsanleitung 216604 C 01022013 Made in Germany Ideas for dental technology GLISH Instruction manual 1. Introduction...1 1.1 Employed Symbols...1 2. Safety...2 2.1 Intended use...2 2.2 Improper use...2
Twister / Twister venturi
 Twister / Twister venturi Nr. 1826 / 1827 2010-09/A 21-6603 Ideas for dental technology 1 2 3 4 10 mm 0,4 Inch 5 6 7 8 9 10 11 12 13 14 15 16 C B A 17 H I K G D F E 18 E B C A D 19 20 21 22 23 24 25 26
Millo / Millo pro. Nr x000 / 1805-x000
 Millo / Millo pro Nr. 1804-x000 / 1805-x000 Renfert GmbH Industriegebiet 78247 Hilzingen / Germany Tel. +49 7731 8208-0 Fax +49 7731 8208-70 info@renfert.com www.renfert.com Made in Germany 0208 21-6543
Millo / Millo pro. Nr x000 / 1805-x000
 Millo / Millo pro Nr. 1804-x000 / 1805-x000 Bedienungsanleitung Instruction manual Mode d emploi Istruzioni d uso Instrucciones de servicio Инструкция по эксплуатации 操作说明书 取扱説明書 사용설명서 21-6543 05012016
Vortex compact 3L Nr / -6000
 Vortex compact 3L Nr. 2924-5000 / -6000 Bedienungsanleitung Instruction manual Mode d emploi Istruzioni per l uso Instrucciones de servicio Инструкция по эксплуатации 操作说明书 取扱説明書 사용설명서 21-6583 30102017
Vacu-Mixer. Operating Instructions
 Vacu-Mixer Operating Instructions Table of Content 1. Safety Instructions 2. Introduction 3. Installation 4. Charging 4.1 LED display in charging 5. Operation 5.1 Operating Elements 5.2 Inserting the Cartridge
Specifications. Vacuum motor power consumption(w/hp) 1200 / 1.6. Exhaust water pump power consumption(w/hp 800 / 1.1
 1200 / 1.6. Exhaust water pump power consumption(w/hp 800 / 1.1") Specifications Rated voltage (V) AC 110-120V or 220-240V / 50-60Hz Vacuum motor power consumption(w/hp) 1200 / 1.6 Exhaust water pump power consumption(w/hp 800 / 1.1 Exhaust water pump flow (GPH/LPH)
Specifications Rated voltage (V) AC 110-120V or 220-240V / 50-60Hz Vacuum motor power consumption(w/hp) 1200 / 1.6 Exhaust water pump power consumption(w/hp 800 / 1.1 Exhaust water pump flow (GPH/LPH)
User Manual GV25 GV35 GV702. Company information: Original instructions GV12066 (1)
") User Manual Original instructions GV25 GV35 GV702 Company information: www.vipercleaning.eu info-eu@vipercleaning.com GV12066 (1) 2012-04-10 USER MANUAL ENGLISH TABLE OF CONTENTS Introduction... 4 Manual
User Manual Original instructions GV25 GV35 GV702 Company information: www.vipercleaning.eu info-eu@vipercleaning.com GV12066 (1) 2012-04-10 USER MANUAL ENGLISH TABLE OF CONTENTS Introduction... 4 Manual
Owner's Manual. Please read this document carefully before installing and/or using your vacuum cleaning system.
 Owner's Manual for household use only Please read this document carefully before installing and/or using your vacuum cleaning system. Model : Serial No : Important Safety Instructions When using an electrical
ASPIRE Laboratory Aspirator
 ASPIRE Laboratory Aspirator USER MANUAL Rev 2/14/18 Accuris Instruments / Benchmark Scientific Ph: (908) 769-5555 E-mail: info@accuris-usa.com (C) Benchmark Scientific, 2018 THE ACCURIS ASPIRE LABORATORY
MV 4 MV 4 Premium. Operating Instructions. Before first use of the unit read these operating instructions and act in accordance with them.
 MV 4 MV 4 Premium Operating Instructions Before first use of the unit read these operating instructions and act in accordance with them. www.kaercher.com/register-and-win 59651790 10/13 3 4 2 5 6 7 1 8
Operating Instructions
 Operating Instructions TEKA Cartmaster Type PF-W 1, PF-W 2 TEKA Absaug- und Entsorgungstechnologie GmbH Industriestraße 13 D-46342 Velen Postfach 1137 D-46334 Velen Tel.: +49 (0) 2863 9282-0 Fax: +49 (0)
51AKS I S O OWNER S MANUAL
 LLOYD'S REGISTER QUALITY ASSURANCE 51AKS I S O 9 00 1 OWNER S MANUAL This manual applies to the following models Stand-alone Split 51AKS 085--- 51AKS 010--- 51AKS 185--- 51AKS 013--- 51AKS 113--- 51AKS
Vacuum cleaner Instruction manual
 CSR Tools & Consumables Triniti 3, Level 5 39 Delhi Road North Ryde NSW 23 Australia http://www.csr.com.au Vacuum cleaner Instruction manual IMPORTANT: Read and understand all instructions before using.
Moisture inside the drum is due to final testing.
 Safety instructions Scope of delivery depending on model Moisture inside the drum is due to final testing. Removing the transport safety devices Water connection depending on model The washing machine
VACUUM EXTRACTOR MODEL NO: CWVE1 OPERATING & MAINTENANCE INSTRUCTIONS PART NO: GC0916
 VACUUM EXTRACTOR MODEL NO: CWVE1 PART NO: 6471168 OPERATING & MAINTENANCE INSTRUCTIONS GC0916 INTRODUCTION Thank you for purchasing this CLARKE Workshop Vacuum Extractor. Before attempting to use this
PORTABLE AIR CONDITIONER OWNER S MANUAL
 PORTABLE AIR CONDITIONER OWNER S MANUAL ASSEMBLY AND OPERATING INSTRUCTIONS MODELS: JHS-A018-10KR SKU#: 130004 JHS-A018-12KRH SKU#: 130005 WARNING: Read and follow all warnings and instructions in this
(The chances are you re never going to read me) Owner s Manual HEAVY DUTY SHD-1T.
 Owner s Manual HEAVY DUTY SHD-1T.") (The chances are you re never going to read me) Owner s Manual HEAVY DUTY SHD-1T www.simplicityvac.com Index Important Safety Instructions............................................................ 2
(The chances are you re never going to read me) Owner s Manual HEAVY DUTY SHD-1T www.simplicityvac.com Index Important Safety Instructions............................................................ 2
Operating Instructions
 WD 3 Premium Operating Instructions Before first use of the unit read these operating instructions and act in accordance with them. English 5 59658050 (08/15) 10 11 12 13 14 15 16 2 3 4 Contents General
PJ130S High Pressure Cleaner
 PJ130S High Pressure Cleaner Operator Manual Original instructions WARNING: Do not use the machine without reading the instruction sheet. Item Description OVERVIEW 1. High pressure washer 2. On/off switch
Laboport Chemically-resistant Laboratory Pumps and Systems
 Operating Instructions Read and observe these Operating Instructions! Laboport Chemically-resistant Laboratory Pumps and Systems N 810 FT.18 N 820 FT.18 N 840 FT.18 N 840.1.2 FT.18 N 810.3 FT.18 N 820.3
Mobile Air Conditioner Instruction Manual Model TC-N9KM
 Mobile Air Conditioner Instruction Manual Model TC-N9KM Please read and retain these instructions for future reference SPECIFICATION Model no. Cooling capacity Power/Ampere consumption for cooling* Air
HOT WASHER MODEL NO: KING150
 WARNING: Do not use the hot washer without reading this manual HOT WASHER MODEL NO: KING150 PART NO: 7320175 OPERATION & MAINTENANCE INSTRUCTIONS LS1215 INTRODUCTION Thank you for purchasing this CLARKE
SOUND-INSULATED FAN. Iso-K OPERATION MANUAL. Iso-K_v.1(2)-EN.indd :20:59
-EN.indd :20:59") SOUND-INSULATED FAN OPERATION MANUAL _v.1(2)-en.indd 1 10.08.2015 15:20:59 CONTENT Introduction 3 General 3 Safety rules 3 Transport and storage requirements 3 Manufacturer's warranty 3 Fan design 4 Delivery
SOUND-INSULATED FAN OPERATION MANUAL _v.1(2)-en.indd 1 10.08.2015 15:20:59 CONTENT Introduction 3 General 3 Safety rules 3 Transport and storage requirements 3 Manufacturer's warranty 3 Fan design 4 Delivery
Glass Chimney Hood. Installation & User Instructions Please keep for future reference
 Glass Chimney Hood Installation & User Instructions Please keep for future reference 4897549 4897556 Important Please read these instructions fully before installing or using These instructions contain
SINGLE MOTOR UPRIGHT VACUUM CLEANER MODEL C
 SINGLE MOTOR UPRIGHT VACUUM CLEANER MODEL C375-3 OPERATION SERVICE PARTS CARE CONTENT MPV3 VACUUM CLEANER Instruction Manual Important safety instructions....2 Technical specification..2 How to assemble..
WET & DRY GARAGE VAC 20L CAPACITY WATT 1.5M MOTOR TANK STEEL HOSE KP702 ON BOARD ACCESSORY STORAGE SUCTION STAINLESS
 WET & DRY GARAGE VAC 20L CAPACITY 1.5M SUCTION HOSE STAINLESS STEEL TANK ON BOARD ACCESSORY STORAGE 1250 WATT MOTOR KP702 Table of Contents 20L WET & DRY GARAGE VAC Know Your Product...1 Vacuum Safety
Owner s Guide. Powerhead Canister Vacuum Cleaner
 Owner s Guide Powerhead Canister Vacuum Cleaner INDEX 1. Important Safety Instructions 2. Components & Accessories 3. Assembly 4. How to Operate a. On/Off Switch b. Check bag indicator c. Variable suction
AIRGOCLEAN 10 E OPERATING MANUAL AIR CLEANER TRT-BA-AIRGOCLEAN10E-TC-001-EN
 AIRGOCLEAN 10 E EN OPERATING MANUAL AIR CLEANER TRT-BA-AIRGOCLEAN10E-TC-001-EN Table of contents Notes regarding the operating manual... 1 You can download the current version of the operating manual and
1. CONDITIONS FOR USE 2. SAFETY
 1. CONDITIONS FOR USE This micro abrasive blaster may only be operated: Indoors; Below 6500 ft above sea level altitude; Ambient air temperature between 40-105 F (5-40 C); Maximum relative humidity of
TTV 4500 / TTV 4500 HP / TTV 7000
 TTV 4500 / TTV 4500 HP / TTV 7000 EN OPERATING MANUAL AXIAL FAN TRT-BA-TTV4500-4500HP-7000-TC-003-EN Table of contents The current version of the operating manual can be found at: Notes regarding the operating
Suits all KPF849 models
 Kambrook - Australia Ground Floor, Suite 2, 170-180 Bourke Rd Alexandria NSW 2015, Australia Locked Bag 2000 Botany NSW 1455 Customer Service Line 1300 139 798 Customer Service Fax 1800 621 337 www.kambrook.com.au
High-Pressure Washer BY02-VBP-WTR BY02-VBP-WTH. CAUTION : Do not use this device before reading the instructions.
 High-Pressure Washer BY02-VBP-WTH BY02-VBP-WTR CAUTION : Do not use this device before reading the instructions. 1 1. Safety Instructions The appliance has been designed solely for private use outdoors
PORTABLE AIR CONDITIONER OWNER S MANUAL
 PORTABLE AIR CONDITIONER OWNER S MANUAL ASSEMBLY AND OPERATING INSTRUCTIONS MODELS: JHS-A018-10KR SKU#: 130004 JHS-A018-12KRH SKU#: 130005 JHS-A018-14KRH SKU#: 130009 WARNING: Read and follow all warnings
User instructions. VA20HD, VA55HD, VA55IND and VA75IND. Commercial wet/dry vacuum cleaners CAUTION - READ THESE INSTRUCTIONS BEFORE USING THE MACHINE
 User instructions VA20HD, VA55HD, VA55IND and VA75IND Commercial wet/dry vacuum cleaners CAUTION - READ THESE INSTRUCTIONS BEFORE USING THE MACHINE 03-8112-0000 Iss.3 07/08 http://www.truvox.com/products/vacuums/valet_aqua
TTV 1500 / TTV 3000 OPERATING MANUAL CONVEYING FAN TRT-BA-TTV TC EN
 TTV 1500 / TTV 3000 EN OPERATING MANUAL CONVEYING FAN TRT-BA-TTV1500-3000-TC2016-26-004-EN Table of contents Notes regarding the operating manual... 2 You can download the current version of the operating
User Manual. Juice Extractor MODEL: WJE2BSLA
 User Manual Juice Extractor MODEL: WJE2BSLA 1. READ these instructions carefully before installing and operating the appliance. Keep them for further reference. 2. Record in the space below the SERIAL/MODEL
Owner s Manual CPU-1QD CPU-1 CPU-1T CPU-2 CPU-2T HEAVY DUTY UPRIGHT VACUUMS. Save These Instructions
 Owner s Manual HEAVY DUTY UPRIGHT VACUUMS CPU-1QD CPU-1 CPU-1T CPU-2 CPU-2T Save These Instructions Index Important Safety Instructions.... 2 Polarization Instructions....3 Grounding Instructions.....
Glass and Dishwashers 402/452/502. (original instructions) (incl. Australian /502) Starting from Serial No.:
 (incl. Australian /502) Starting from Serial No.:") Glass and Dishwashers ECOMAX 402/452/502 (incl. Australian 452-90/502) INSTALLATION AND OPERATION INSTRUCTIONS (original instructions) Starting from Serial No.: 8663 4000 REV. 05.10.2015 EN IMPORTANT NOTES
Glass and Dishwashers ECOMAX 402/452/502 (incl. Australian 452-90/502) INSTALLATION AND OPERATION INSTRUCTIONS (original instructions) Starting from Serial No.: 8663 4000 REV. 05.10.2015 EN IMPORTANT NOTES
DUST EXTRACTOR MODEL No: CDE1000
 DUST EXTRACTOR MODEL No: CDE000 Part No:64765 OPERATING & MAINTENANCE INSTRUCTIONS GC054 INTRODUCTION Thank you for purchasing this CLARKE Dust Extractor which is intended to keep work areas free from
Ireland. Australia. New Zealand
 UK Ireland Australia New Zealand 2 3 4 5 Intended use Your Black & Decker vacuum cleaner has been designed to vacuum dry substances. This product is intended for household use only. Safety instructions
K Operating Instructions. Before first use of the unit read these operating instructions and act in accordance with them.
 K 1.100 Operating Instructions Before first use of the unit read these operating instructions and act in accordance with them. www.kaercher.com/register-and-win 59651430 (10/13) Contents General information..............
Commercial backpack vacuum cleaner
 ORIGINAL INSTRUCTIONS CAUTION READ THESE INSTRUCTIONS BEFORE USING THE MACHINE User instructions Valet BackPack Commercial backpack vacuum cleaner 03-8113-0000 Issue 6 10/10 1 2 Contents 1. General information...
- 1- IMPORTANT SAFETY REMINDERS
 USER MANUAL IMPORTANT SAFETY REMINDERS This appliance should only be used for domestic cleaning, as described in this user guide. Please ensure that this guide is fully understood before operating the
51AKB / 51 AKC OWNER S MANUAL
 51AKB / 51 AKC OWNER S MANUAL This manual applies to the following models 51AKB 009 51AKB 012 51AKC 009 51AKC 012 Read this instruction manual thoroughly before using the air conditioner. Control panel
FINO JETSTEAM PRO 52072
 Original FINO Germany FINO JETSTEAM PRO 52072 Dampfstrahlgerät Steam Cleaner Appareil à jet de vapeur Vaporizadora Vaporizzatrice Stoomstraalapparaat Parní čistička Ångstråleapparat Parownica Gőzsugár
HW-17 Record Cleaning Machine Setup and Instruction Manual
 HW-17 Record Cleaning Machine Setup and Instruction Manual VPI Industries, Inc., 77 Cliffwood Ave. #3B, Cliffwood, NJ 07721 Phone: 732-583-6895, Email: Sales@vpiindustries.com http://www.vpiindustries.com
Instruction Manual. Pressure Washer. Get ready to deep clean! Wards.com Wards.com ITEM:
 Get ready to deep clean! Pressure Washer Montgomery Ward Customer Service 3650 Milwaukee Street, Madison, WI 53714 8:00 am to Midnight, Monday through Friday Wards.com Instruction Manual ITEM: 751821 Wards.com
hp Dust Collector With Vacuum Attachment
 Please dispose of packaging for the product in a responsible manner. It is suitable for recycling. Help to protect the environment, take the packaging to the local amenity tip and place into the appropriate
Register your new Bosch now:
 Register your new Bosch now: www.bosch-home.com/welcome ww.bos com/welcome BSGL5... en Operating instructions Table of content Safety information..................................4 Intended use.......................................4
Combivac Operating Instructions Combivac
 Combivac 17-36 Operating Instructions Combivac General Table of contents General...2 Table of contents...2 Information about the operating instructions...3 Liability...3 Notices in the operating instructions...3
Instruction Manual Item No.: V~, 60Hz
 Energy- Saving Mode Portable AC 8,000 BTU Model: MW-O-08C Montgomery Ward Customer Service 1112 7th Avenue, Monroe, WI 53566 8:00 am to Midnight, Monday through Friday Wards.com 1 888 557 3848 Instruction
Instruction manual ASPIMAX 16
 Manufacturer: deconta GmbH Im Geer 20, 46419 Isselburg Type-No.: 530 ( / 400) 540 ( / 230) Serial-No.: Table of contents on page 1 Basic safety advice 3 2 Technical description 4 2.1 Functionality Filter
Instructions manual DEHUMID HP50
 Instructions manual DEHUMID HP50 Table of contents 1. Unpacking 3 2. Intended use 3 3. Disposal 3 4. Safety instructions 3 5. Functional principle 4 6. Automatic defrosting system 4 7. Set up and transportation
Model Numbers: HCT-D30-A (TDA30) HCT-D45E-A (TDA45E) HCT-D70E-A (TDA70E) Portable Dehumidifier Operating Instructions V
 HCT-D45E-A (TDA45E) HCT-D70E-A (TDA70E) Portable Dehumidifier Operating Instructions V") Model Numbers: HCT-D30-A (TDA30) HCT-D45E-A (TDA45E) HCT-D70E-A (TDA70E) Portable Dehumidifier Operating Instructions 3119233 V.140529 General Dehumidifier Information RECOMMENDED HUMIDITY LEVELS Spring/Summer:
Model Numbers: HCT-D30-A (TDA30) HCT-D45E-A (TDA45E) HCT-D70E-A (TDA70E) Portable Dehumidifier Operating Instructions 3119233 V.140529 General Dehumidifier Information RECOMMENDED HUMIDITY LEVELS Spring/Summer:
HMT-D30-A HMT-D45E-A HMT-D70E-A. Model Numbers: HMT-D30-A HMT-D45E-A HMT-D70E-A. Portable Dehumidifier Operating Instructions V.
 HMT-D30-A HMT-D45E-A HMT-D70E-A Model Numbers: HMT-D30-A HMT-D45E-A HMT-D70E-A Portable Dehumidifier Operating Instructions 3119233 V.141217 General Dehumidifier Information RECOMMENDED HUMIDITY LEVELS
OWNER S MANUAL. Models SCU-H11, SCU-H9, SCU-H7, SCU-H5, SCU-H3
 Warranty Information Maintenance Troubleshooting Operating Instructions Installation OWNER S MANUAL Models SCU-H11, SCU-H9, SCU-H7, SCU-H5, SCU-H3 DOMESTIC USE ONLY Please read this document carefully
DUST EXTRACTOR INSTRUCTION MANUAL. 550W (3/4 HP) INDUCTION MOTOR 1850W AUTOMATIC POWER OUTLET 65L COLLECTION BAG ø100mm X 2.
 INDUCTION MOTOR 1850W AUTOMATIC POWER OUTLET 65L COLLECTION BAG ø100mm X 2.") KNOW YOUR PRODUCT DUST EXTRACTOR 550W (3/4 HP) INDUCTION MOTOR 1850W AUTOMATIC POWER OUTLET 65L COLLECTION BAG ø100mm X 2.5M SUCTION HOSE INSTRUCTION MANUAL WARNING: Read all safety warnings and all instructions.
KNOW YOUR PRODUCT DUST EXTRACTOR 550W (3/4 HP) INDUCTION MOTOR 1850W AUTOMATIC POWER OUTLET 65L COLLECTION BAG ø100mm X 2.5M SUCTION HOSE INSTRUCTION MANUAL WARNING: Read all safety warnings and all instructions.
FastGene Plate Centrifuge. Instruction Manual. Catalog No. NG
 FastGene Plate Centrifuge Instruction Manual Catalog No. NG040 www.nippongenetics.eu info@nippongenetics.eu Version 01 20.01.2015 Content -1x Plate Centrifuge -2x Adapter for 96 well plates -1x Power Cord
TFV 900 OPERATING MANUAL RADIAL FAN TRT-BA-TFV900-TC-001-EN
 TFV 900 EN OPERATING MANUAL RADIAL FAN TRT-BA-TFV900-TC-001-EN Table of contents Notes regarding the operating manual... 1 Safety... 2 Information about the device... 3 Transport and storage... 4 Start-up...
Ireland. Australia. New Zealand
 UK Ireland Australia New Zealand 2 3 4 5 Intended use Your Black & Decker vacuum cleaner has been designed to vacuum dry substances. This product is intended for household use only. Safety instructions
Instruction Manual Item No.: V~, 60Hz
 Energy- Saving Mode Portable AC 10,000 BTU Model: MW-L3-10C Montgomery Ward Customer Service 1112 7th Avenue, Monroe, WI 53566 8:00 am to Midnight, Monday through Friday 1 888 557 3848 Instruction Manual
V 120 SG - V 160 SG. Instructions for use
 V 120 SG - V 160 SG Instructions for use Warning As the appliance contains a flammable refrigerant, it is essential to ensure that the refrigerant pipes are not damaged. The quantity and type of the refrigerant
Drying Cabinet Installation and Operating Manual
 Drying Cabinet Installation and Operating Manual Model:- ECO Dryer 2.0 HP Heat Pump Technology CONTENTS THIS USER MANUAL 3 DATA PLATE DETAILS 3 ADVICE ON SAFE OPERATION 3 DESCRIPTION OF THE CABINET 4 AIR
READ MANUAL BEFORE OPERATING SYSTEM Read the owner s manual thoroughly before operating to ensure the most efficient use of the system.
 READ MANUAL BEFORE OPERATING SYSTEM Read the owner s manual thoroughly before operating to ensure the most efficient use of the system. Attention Installer: Please be sure this manual and warranty information
User Instruction Manual
 User Instruction Manual 4 & 6 Slot Toasters This covers the Burco 4 & 6 slot toasters TSSL14 & TSSL16 444440355 & 444440356 Red End Cap 4 slot 444440606 Red End Cap 6 slot 444440608 Cream End Cap 4 slot
- 1- IMPORTANT SAFETY REMINDERS
 USER MANUAL IMPORTANT SAFETY REMINDERS This appliance should only be used for domestic cleaning, as described in this user guide. Please ensure that this guide is fully understood before operating the
User and maintenance manual
 GB User and maintenance manual IMPORTANT SAFETY INSTRUCTIONS These instructions shall also be available on website: docs.whirlpool.eu. YOUR SAFETY AND THAT OF OTHERS IS HIGHLY IMPORTANT. This manual and
WET/DRY VACUUM. QUEST for Continuous Improvement Windsor s Quality Management System is Certified ISO MODEL: T1. Operating Instructions (ENG)
") WET/DRY VACUUM Operating Instructions (ENG) MODEL: T1 y QUEST for Continuous Improvement Windsor s Quality Management System is Certified ISO 9001. Read these instructions before operating the machine.
WET/DRY VACUUM Operating Instructions (ENG) MODEL: T1 y QUEST for Continuous Improvement Windsor s Quality Management System is Certified ISO 9001. Read these instructions before operating the machine.
TTK 75 ECO OPERATING MANUAL DEHUMIDIFIER TRT-BA-TTK75ECO-TC-002-EN
 TTK 75 ECO EN OPERATING MANUAL DEHUMIDIFIER TRT-BA-TTK75ECO-TC-002-EN Table of contents Notes regarding the operating manual... 01 Information about the device... 02 Safety... 04 Transport...05 Start-up...05
IMPORTANT SAFETY REMINDERS
 USER Manual IMPORTANT SAFETY REMINDERS This appliance should only be used for domestic cleaning, as described in this user guide. Please ensure that this guide is fully understood before operating the
Hot Air Station Ref. JT-B
 www.jbctools.com Hot Air Station Ref. JT-B www.jbctools.com Packing List Control Unit Ref. JTE-1B JTE-2B JTE-9B Stand Ref. JT-SB Heater hose set Ref. JT-T1A (100V - 120V) JT-T2A (230V) Extractor stand*
INSTRUCTIONS FOR INSTALLATION AND MAINTENANCE (GB)
") INSTRUCTIONS FOR INSTALLATION AND MAINTENANCE (GB) Pag. 1 Fig - Fig. - Abb.- Fig.- Fig.- Фиг.- Obr.- Fig.- Εικ. - Joonis - Kuva - Sl. -.ábra - Fig. -.att. - Afbeelding - Fig. - Rys.- Fig.- Fig. - Схема
INSTRUCTIONS FOR INSTALLATION AND MAINTENANCE (GB) Pag. 1 Fig - Fig. - Abb.- Fig.- Fig.- Фиг.- Obr.- Fig.- Εικ. - Joonis - Kuva - Sl. -.ábra - Fig. -.att. - Afbeelding - Fig. - Rys.- Fig.- Fig. - Схема
INSTALLATION. and INSTRUCTION MANUAL. for QUALITY AIR BREATHING SYSTEMS. Model ABM - 715
 INSTALLATION and INSTRUCTION MANUAL for QUALITY AIR BREATHING SYSTEMS Model ABM - 715 M A R T E C H S E R V I C E S C O M P A N Y P.O. Box 7079 OFFICE: 800-831-1525 Mazeppa, MN 55956 Fax : (507)843-4953
DIRTY WATER SUBMERSIBLE PUMP
 WHAT S IN THE BOX DIRTY WATER SUBMERSIBLE PUMP 780W INSTRUCTION MANUAL SPECIFICATIONS Motor: 780W Max. Flow Rate: 15,700l/h Max. Head 8m Max. Immersion: 7m Min. Suction Depth 50mm Max Particle Size: Ø35mm
MULTI - CYCLONIC VACUUM CLEANER VCC 7070
 MULTI - CYCLONIC VACUUM CLEANER VCC 7070 EN I J K A B C D E O P Q F G H L R S M N 3 ENGLISH 16-25 4 SAFETY Please read this instruction manual thoroughly prior to using this appliance! Follow all safety
Operating instructions
 Operating instructions (Translation of the original operating instructions) Type TEKA FILTERCUBE-MV TEKA Absaug- und Entsorgungstechnologie GmbH Industriestraße 13 D-46342 Velen Postfach 1137 D-46334 Velen
Chemical resistant Vacuum Pumps
 Chemical resistant Vacuum Pumps C300 / C400 / C410 / C510 / C600 / C610 English Operating Manual WIGGENS labortechnik GmbH Mühsamstrasse 3610249 Berlin Germany Fon:+49 30 42105470 Fax:+49 30 42105971 E-Mail:
Chmney Hood - Model: H91PK H91PX H101PK H101PX. COOKER HOOD - User instructions
 Chmney Hood - Model: H91PK H91PX H101PK H101PX GB COOKER HOOD - User instructions A B C Fig.1 Fig.2 Fig.3 Fig.4 Fig.5-3 - Fig.6 Fig.7 Fig.8-4 - GENERAL ENGLISH GB Carefully read the following important
DESIGNED FOR HEAVY DUTY, OUTDOOR CLEANING
 DESIGNED FOR HEAVY DUTY, OUTDOOR CLEANING LET S GET STARTED. VPW2BC Let s talk safety PLEASE KEEP THESE ORIGINAL INSTRUCTIONS. Basic safety precautions This pressure washer is intended for household use
TDS 20 R / TDS 30 R / TDS 50 R
 TDS 20 R / TDS 30 R / TDS 50 R EN OPERATING MANUAL ELECTRICAL FAN HEATER TRT-BA-TDS20R-30R-50R-TC-001-EN Table of contents Notes regarding the operating manual... 1 Safety... 1 Information about the device...
Moisture inside the drum is due to final testing.
 Safety instructions Scope of delivery depending on model Moisture inside the drum is due to final testing. Removing the transport braces Water connection depending on model The washing machine is heavy
14 Upright Vacuum with HEPA Filter & Dual Power
 E29990-00 14 Upright Vacuum with HEPA Filter & Dual Power Operator and Parts Manual 1001 Brown Avenue Toledo, Ohio 43607-0127 Customer Service: 888-GO-BETCO Fax: 800-445-5056 Technical Service: 877-856-5954
IVB 3-M/5-M/7-M. Operating Instructions Betriebsanleitung Notice d utilisation Gebruiksaanwijzing Istruzioni sull uso Driftsinstruks Bruksanvisning
 auto auto auto auto auto IVB -M/-M/7-M Operating Instructions Betriebsanleitung Notice d utilisation Gebruiksaanwijzing Istruzioni sull uso Driftsinstruks Bruksanvisning Driftsvejledning Käyttöohje Navodilo
AUTOMATIC MODULAR ICE FLAKER
 AUTOMATIC MODULAR ICE FLAKER INSTRUCTIONS AND WARNINGS 24479 rev. 08 It is strictly forbidden to reproduce this instruction manual or any part thereof. 1 5 3 4 Mod. N. V. W 2 2 M8 18 8 18 M8 M8 3 ~ 200
Propane Heater REMKO PGM 30 REMKO PGM 60
 Propane Heater REMKO PGM 30 REMKO PGM 60 Operation Technology Spare Parts Edition GB L07 REMKO strong as a bear. Operating instructions Make sure to read these instructions carefully before starting/using
TIH 300 S / TIH 400 S / TIH 500 S / TIH 700 S / TIH 900 S / TIH 1100 S
 TIH 300 S / TIH 400 S / TIH 500 S / TIH 700 S / TIH 900 S / TIH 1100 S EN OPERATING MANUAL INFRARED HEATING PANEL TRT-BA-TIH300S-TIH400S-TIH500S-TIH700S-TIH900S-TIH1100S-TC-002-EN Table of contents Notes
OWNER'S MANUAL RSL MyBinding.com 5500 NE Moore Court Hillsboro, OR Toll Free: Local:
 OWNER'S MANUAL RSL-2701 Read all instructions carefully before use. For any Customer Support needs please choose the Customer Support tab on www.royalsovereign.com topic TABLE OF CONTENTS page 1. Introduction...
IMPORTANT SAFETY REMINDERS
 USER MANUAL IMPORTANT SAFETY REMINDERS This appliance should only be used for domestic cleaning, as described in this user guide. Please ensure that this guide is fully understood before operating the
Glass and Dishwashers. BarAid 500/800. Installation and. Starting from Serial No.:
 Glass and Dishwashers BarAid 500/800 Installation and operation Instructions Starting from Serial No.: 8652 0001 REV. 19.01.2009 1617-A-01-09 Content Page 1 Important Notes... 4 2 Installation... 5 2.1
2CKA001473B System Manual Busch-Infoline. Handicapped toilet signal set 1510 UC
 2CKA001473B9007 19.05.2017 System Manual Busch-Infoline Handicapped toilet signal set 1510 UC-... -101 Table of contents Table of contents 1 Notes on the instruction manual... 3 2 Safety... 4 2.1 Information
Essentials Family and Pets+ permanent bagged cylinder vacuum cleaner
 70255 rev1 12/9/07 09:49 Page 1 Essentials Family and Pets+ permanent bagged cylinder vacuum cleaner Please read and keep these instructions Getting the best from your new cleaner... If your cleaner is
INFRARED IP55 HEATER INSTRUCTIONS FOR: MODEL:- QZWP45N 1. SAFETY INSTRUCTIONS
 INSTRUCTIONS FOR: INFRARED IP55 HEATER MODEL:- QZWP45N Thank you for purchasing a Consort Claudgen product. Manufactured to a high standard this product will, if used according to these instructions and
IDE 20 / IDE 30 / IDE 50 IDE 60 / IDE 80
 IDE 20 / IDE 30 / IDE 50 IDE 60 / IDE 80 EN OPERATING MANUAL OIL HEATER TRT-BA-IDE20-30-50-60-80-TC-001-EN Table of contents Information on the use of this manual... 1 Scope of delivery... 1 General safety...