INSTALLATION & OPERATING INSTRUCTIONS
|
|
|
- Alan Shepherd
- 5 years ago
- Views:
Transcription
1 RA/R-D RA/R-2D INSTALLATION & OPERATING INSTRUCTIONS AES III FOR YOUR SAFETY If you smell gas:. Open windows and door. 2. Don t touch electrical switches.. Extinguish any open flame. 4. Immediately call your gas supplier. R255 FOR YOUR SAFETY Do not store or use gasoline or other flammable vapors and liquids in the vicinity of this or any other appliance. R2455 R2555 6! warning Improper installation, adjustment, alteration, service or maintenance can cause injury or property damage. Refer to this manual. For assistance or additional information consult a qualified installer, service agency or the gas supplier. R4605 R O- 09
2
3 INTRODUCTION We are pleased that you have chosen this refrigerator and hope you will derive much satisfaction from using it. The refrigerator is designed for installation in motorhomes and intended for storage of foods, frozen foods and making ice. It comes with Automatic Energy Selector (AES) which controls operation and energy supply. To put the refrigerator in operation, just trip the main switch - AES manages the rest. Read this manual very carefully before using the refrigerator. ake sure to retain it for future reference. In this manual you will find information on how to install, operate and maintain your new appliance. To ensure good refrigeration and economical operation, the refrigerator has to be installed and used as described in these instructions. The installation must be performed by an authorised person and in accordance with the manufacturers installation instructions, local gas fitting regulations, municipal building codes, electrical wiring regulations, AS560 Installations and any other statutory regulations. TRANSIT DAAGE Before you install your refrigerator, ensure to remove all protective packaging. Check for any damage or marks. Transit damage must be reported to whoever is responsible for delivery not later than seven days after the refrigerator was delivered. DATA PLATE Check the data plate, inside the refrigerator, to ensure that you have received the right model. Below you can make a note of the details stated on the data plate. It is a good idea to this since this information is needed if you have to contact service personnel. The data plate contains e. g. the following details: odel designation R Product number... Serial number... contents OPERATING INSTRUCTIONS 4 CONTROL panel AES... 4 STARTING THE REFRIGERATOR LP operation V operation V operation SWITCHING BETWEEN ENERGY SOURCES REGULATING THE TEPERATURE... 5 TRAVEL CATCH using the refrigerator Defrosting CLEANING THE REFRIGERATOR Airing position card Replacing the bulb... 7 HEATING CABLE (R4605 & R4805) TURNING OFF THE REFRIGERATOR Product care - some useful hints... 7 Troubleshooting AINTENANCE SERVICE AND SPARE PARTS INSTALLATION INSTRUCTIONS 8 General information... 8 VENTILATION OF THE UNIT Voltage pressure volts 2,70 kpa TECHNICAL DATA connecting s BUILDING-IN Securing the refrigerator Drain water hose CONNECTIONS.... mounting instructions appendix A - rearview equipment appendix B - Wiring diagram appendix C - Working instructions for the gas safety system.... 9
4 OPERATING INSTRUCTIONS CONTROL panel ON OFF D A F 2 C LP gas-only operation can be selected by pressing the AES/ GAS button (2) until LED (B) comes on; the AES function is then turned off and LED (A) goes out. The Temperature selector button () is used to set the electronic thermostat. The LEDs (E) show the value set on the thermostat. LP operation AES will select LP gas operation under the following conditions: No AC (20-240V) available Engine not running (no high current at 2V DC available). 2.. C B ON/OFF button (main power button) AES/GAS mode selector button Temperature selector button AES The refrigerator is equipped with an Automatic Energy Selector (AES) controlling the operation and energy supply. Note! 2V must always be available to supply the electronics. The system selects the available energy source in the order: V 2. 2V. LP gas Turn off the AES function if you want the refrigerator to run on LP gas only. STARTING THE REFRIGERATOR 6! Fig.. Press the ON/OFF button ( ). The refrigerator starts in the mode it was in when it was turned off. 2. Press the AES/GAS button ( 2) and LED (A) or (B) comes on. Select AES or LP gas only by pressing the AES/GAS button (2) once if necessary.. If a 20V-240V mains supply is available: AES selects this as the energy source and LEDs (A) and (C) come on. When the vehicle s engine is running, AES selects 2V operation and LEDs (A) and (D) are illuminated unless LP gas only operation has been selected manually. If neither mains nor a 2V battery supply are available: AES selects LP gas operation and LEDs ( A) and (B) come on. E A. AES mode indicator lamp B. GAS mode indicator lamp C. AC mode indicator lamp D. DC mode indicator lamp E. Temperature indicator lamp F. Warning indicator lamp (gas failure) warning Whilst mobile: Do not operate the refrigerator on LP gas. Turn off the gas bottle. When the system chooses LP gas operation, the flame failure device is automatically opened, allowing the gas to flow to the burner. At the same time, the electronic igniter is energized. After initial installation, servicing, or changing gas cylinders etc., the gas pipes may contain some air that should be allowed to escape by briefly turning on the refrigerator or other appliances. This will ensure that the flame lights immediately. If the flame goes out (by gust of wind etc.), the reigniter will automatically relight the flame. The control electronics and the igniter must have 2V DC (battery) supply to operate! troubleshooting If the Warning indicator lamp (F) is lit, there has been a failure of gas operation. To troubleshoot, follow these steps:. Turn off the refrigerator. (Press the ON/OFF ( ) to OFF.) 2. Check that there is enough gas in the gas bottle, that its valve is open and that any valves in the gas line to the refrigerator are open.. Turn on the refrigerator again. (Press the ON/ OFF button () to ON.) After 0 sec. AES will repeat the ignition sequence. 4. Should the warning lamp come on again after approx. 6 minutes, the failure is still present. Repeat the procedure once more. If this does not help, contact an authorised service provider in your area. Abnormal operation Any of the following are considered to be abnormal operation and may require servicing: Yellow tipping of the burner flame. Sooting up area surrounding burner. Burner not igniting properly. Burner failing to remain alight. In case the appliance fails to operate correctly, contact an authorised Dometic Service Centre V operation When a mains is available, AES will select this. Please note, that even being in AC mode, 2V DC is necessary for the internal supply of the electronics. 4
5 2V operation AES will select the 2V mode of operation as soon as the vehicle engine is running (detected by the alternator of the fridge D+). If the 2V DC goes down below 9V DC, the system will shut down completely. SWITCHING BETWEEN ENERGY SOURCES When switching from one energy source to another, there are some delays implemented in the AES system. The 5 min. delay between switching off the engine and starting gas mode is intended to delay the starting of gas mode e.g. when stopping at a filling station. 6! warning It is not allowed to have a naked flame at a gas filling station. If you are not sure, that your stop is shorter than 5 min., you are advised to set the ON/OFF switch () to OFF, when stopping at a filling station. Defrosting Frost will gradually accumulate on the refrigerating surfaces. Each time the door is opened some of the cold air in the refrigerator spills out and is replaced by warm moist room air. As this air is cooled, the moisture is deposited onto the evaporator coils or other cold surfaces inside the refrigerator and can cause frost build-up. It is important that you do not leave the unit s door open any longer than necessary. This will reduce frost formation and increase the efficiency of your refrigerator. The frost must not be allowed to grow too thick as it acts as an insulator and adversely affects refrigerator performance. Check the formation of frost regularly every week and when it gets about mm thick, defrost the refrigerator. Do not try to accelerate defrosting by using any kind of heating appliance, as this might damage the plastic surfaces of the refrigerator. Neither should any sharp objects be used to scrape off the ice. z P REGULATING THE TEPERATURE The position number refers to Fig.. It will take a few hours for the refrigerator to reach normal operating temperature. So we suggest you start it well in advance of a trip and if possible store it with precooled foodstuffs. The temperature of the refrigerator main compartment is set for all three sources of energy, by means of the Temperature selector button (). After turning on the refrigerator the system automatically chooses the mid-position. With some experience you will soon find a suitable setting, bigger circles indicate lower temperatures. This normally does not need resetting because the same thermostat controls the main compartment temperature for any of the three sources of energy. TRAVEL CATCH ake sure that the travel catch is engaged when the motorhome is on the move. using the refrigerator 6! warning DO NOT store explosive substances in the refrigerator, such as cigarette lighter gas, gasoline, ether or the like. Food storage Always keep food in closed containers. Never put hot food in the refrigerator; allow it to cool first. The frozen food compartment is intended for the storage of frozen food and for making ice. ost kinds of frozen food can be stored in the frozen food compartment for about a month. This period of time may vary, however, and it is important to follow the instructions on the individual packages. Ice making Fill the ice tray to just below the brim with drinking water and place them on the bottom of the freezer compartment. Ice will be made more rapidly if the thermostat is set at its highest position (biggest circle), but be sure to move the thermostat back to normal setting when the ice is formed; the refrigerator might otherwise become too cold. To defrost the refrigerator, follow these steps:. Turn off the refrigerator. (Press the ON/OFF button () to OFF.) 2. Empty the refrigerator.. Leave the drip tray under the finned evaporator. 4. Leave the cabinet and freezer door open. Defrost water runs from the drip tray through a plastic drain water hose to the outside of the vehicle. 5. When all the frost has melted - dry the interior of the refrigerator with a clean cloth and replace the ice trays. 6. Turn on the refrigerator. Set the thermostat to the coldest position for a few hours and then, reset to the desired setting. 7. Place the food items back inside. CLEANING THE REFRIGERATOR Clean the inside of the refrigerator regularly to keep it fresh and hygienic. Never use detergents, scouring powder, strongly scented products or wax polish to clean the interior of the refrigerator as they may damage the surfaces Km and leave a strong odour. Soak a cloth in a solution consisting of a teaspoon of bicarbonate of soda to half a litre of warm water. Wring out the cloth and use it to clean the interior of the refrigerator and its fittings. The exterior of the refrigerator should be wiped clean now and then, using a damp cloth and a small quantity of detergent. But not the door gasket, which should only be cleaned with soap and water and then thoroughly dried. The cooling unit behind the refrigerator should be cleaned with a brush from time to time. ake sure that the refrigerator is switched off when doing this! 5

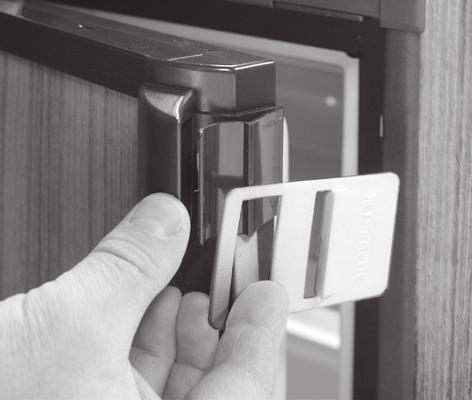
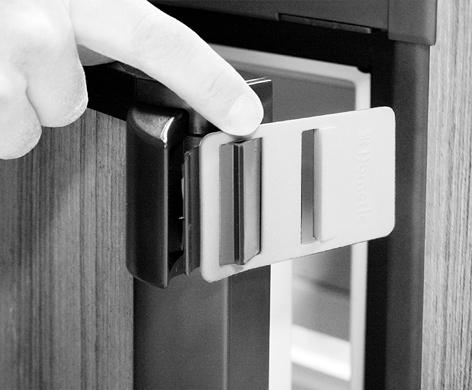
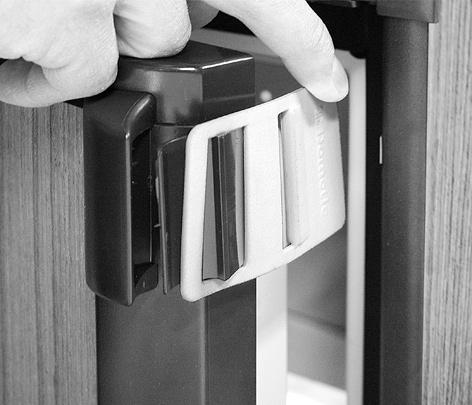
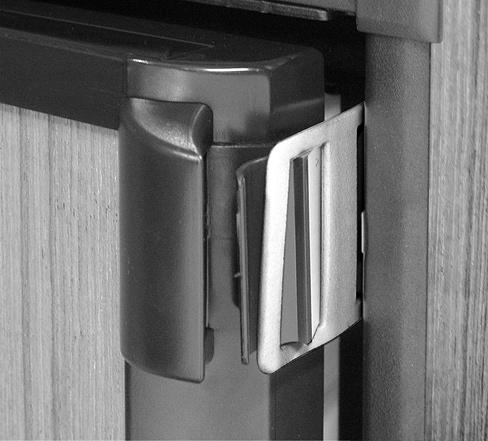
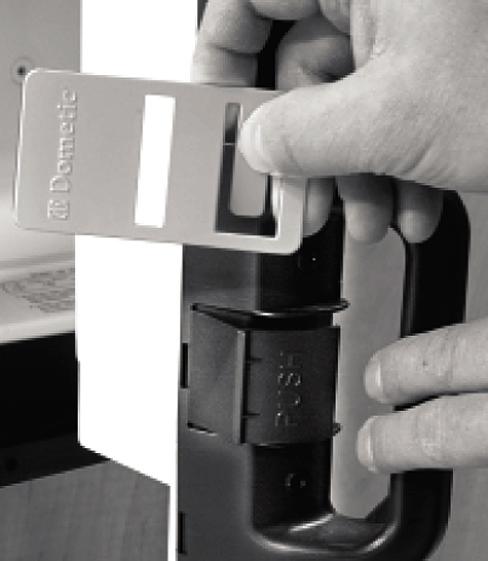


6 Airing position card R4605/R4805 Use the Airing Position Card to keep the doors ajar if the refrigerator will not be in use for an extended period of time or put in storage. R2455/R
7 Replacing the bulb To replace the bulb, follow these steps:. 2.. Remove the lamp cover. R4605/R4805: Push the lamp cover backwards. Replace the old bulb with an appliance bulb of the same wattage (2V, max 0W). Replace the cover. HEATING CABLE (R4605 & R4805) During the summer months of high temperatures and humidity, the metal frame between the freezer and fresh food compartments may have water droplets forming. This refrigerator comes standard with a 2V DC heating cable that will evaporate the water droplets when they form. To have the heating cable on, you position the switch located beneath the control panel to I, see Fig. 2. The heating cable can be left on continuously or only used when temperatures require it. The heating cable will draw 2V DC power continuously when in the ON (I) position. It should be turned off when a charging source is not available. TURNING OFF THE REFRIGERATOR If the refrigerator is not to be used for some time:. Turn off the refrigerator. (Press the ON/OFF button () to OFF.) 2. Shut off any on-board valve in the gas line to the refrigerator.. Pull out the plug from the wall socket. 4. Empty the refrigerator. Defrost and clean it as described earlier. Leave the doors of the refrigerator and frozen food compartment ajar. Product care - some useful hints ake sure that: Defrosting is carried out periodically. The refrigerator is clean and dry with the door left open when it is not to be used for some time. Liquids or items with a strong odour are well packed. The ventilation openings are unobstructed. The doors are secured by means of the travel catch when the motorhome is on the move. OFF CLIATE- CONTROL SWITCH ON Fig. 2 Troubleshooting If the refrigerator fails to work Before calling an authorised service technician: Ensure that the instructions in this manual have been followed. Check to make sure that the refrigerator is not tilted excessively. Verify that the LEDs on the control panel are lit when the ON/OFF button () is turned on. (2V must be available.) Check the fuses on the circuit board which is located under the cover on the back of the refrigerator. If the mains voltage are connected but the refrigerator stays in gas operation -> is the refrigerator correctly connected and is the fuse (20-240V) intact? If the refrigerator does not operate in DC mode when the engine is running -> is the alternator (D+) made correctly? If the Warning indicator lamp ( F) lights up -> see troubleshooting for further information. The refrigerator is not cold enough If the refrigerator is not cold enough it may be because: The ventilation is inadequate owing to reduced area of the ventilation passages (partial blockage of grilles from wire mesh etc.). The evaporator is frosted up. The temperature control setting is incorrect. The gas pressure is incorrect - check the pressure regulator at the gas container. The ambient temperature is too high. Too much food is loaded at one time. The door is not properly closed or the magnetic sealing strip is defective. If the refrigerator still does not work properly, call an authorised service technician. 6! AINTENANCE warning The sealed cooling system must not be opened, since it contains corroding chemicals under high pressure. This appliance must be serviced by an authorised person. We recommend that an authorised service technician checks the refrigerator once a year. The Installation and operating instructions manual should always be available. Ensure that the gas safety shut-off valve is working properly. ake sure that the ventilation openings are unobstructed. See to it that the burner is clean and free from combustible material. All s in the LP gas system should be checked for gas leaks. Connections can be tested for leaks using a soap solution. Do not use a naked flame! If there is any suspicion of damage, call for an authorised service technician. SERVICE AND SPARE PARTS Service and spare parts are obtainable from your dealer or Dometic - consult the telephone directory. 7
8 INSTALLATION INSTRUCTIONS General information The refrigerator is intended for installation in a motorhome, and the information relates to this application. A correct installation is important for correct operation of the appliance. The refrigerator must be installed on a solid floor and must be level. With the vehicle carefully levelled, the refrigerator should be level both ways in the freezer compartment. Free air circulation over the fins of the cooling unit is essential. VENTILATION OF THE UNIT Ventilation grilles We recommend fitting the Dometic ventilation system, which is specially developed by Dometic for this purpose. The Dometic ventilation grilles permit inspection and small repairs to be carried out without the necessity of removing the refrigerator from the recess. If there is no outer grille at floor level where leaking gas can escape, a 40 mm hole to the outside should be made in the floor of the recess to drain any unburned gas to the outside. Fit the hole with wire mesh and an angled plate to protect it from stones, mud etc. Ventilation heights R255 (Fig. ) R2455 (Fig. 4) R2555 (Fig. 4) R4605 (Fig. 4) R4805 (Fig. 4) inimum ventilation heights (mm) Installation with upper and lower side vent Installation with roof vent and lower side vent At extreme ambient temperatures the refrigeration unit will only perform adequately when properly ventilated. Side ventilation The refrigerator unit is ventilated via two openings in the wall of the motorhome. Fresh air enters through the lower opening and warm air is discharged through the upper one. The lower opening should be located at floor level to allow any leaking gas to escape to the outside. The upper ventilation opening should be located above the condenser, as high as possible, to ensure good ventilation. inimum ventilation height inimum ventilation height Roof ventilation The ventilation of the cooling unit can also be done via one opening in the wall of the motorhome and one on the roof for the roof vent. Fresh air enters through the lower opening and warm air is discharged through the roof vent. The lower opening should be located at floor level to allow any leaking gas to escape to the outside. Fig. R255 Removal of flue gases The ventilation passage at the rear of the recess, between the outer wall of the vehicle and the refrigerator must be sealed off against the living space, so cold draughts are excluded (winter camping) and no flue gases can penetrate into the motorhome. The flue gases are dispersed from the ventilation passage using the Dometic flueing system. The top, bottom and sides of the ventilation passage should be insulated to prevent condensation and cold draughts. The ventilation passage walls must be constructed of a non combustible material. inimum ventilation height inimum ventilation height Fig. 4 R2455 R2555 R4605 R4805 8
9 CLEARANCES inimum clearances (mm) to combustible materials R255 (Fig. 5 & Fig. 6) R2455, R2555, R4605 & R4805 (Fig. 5 & Fig. 7) G Top 0 0 k Side 0 0 L Bottom 0 0 Rear 25 0 The distance between the rearmost part of the refrigerator and the wall behind the refrigerator. G K K L Fig. 5 Fig. 6 R255 Fig. 7 R2455, R2555, R4605 & R4805 TEChNICAL DATA overall DIENSIoNS R255 R2455 R2555 R4605 R4805 height (mm) Width (mm) Depth incl. cooling unit (mm) RECESS DIENSIoNS height (mm) Width (mm) Depth (mm) CAPACITy Gross (litres) WEIGhT without packaging (kg) ,5 56,5 58 ELECTRICAL DATA (watt) Input 240V V LP GAS DATA Input, max (J/h)
10 connecting s Dimensions to connecting s (mm). R255 Flue outlet Electrical pressure test Electrical R Electrical Flue outlet pressure test Electrical 0
11 2V DC R Electrical Flue outlet pressure test Electrical R4605/R Electrical Flue outlet pressure test Electrical
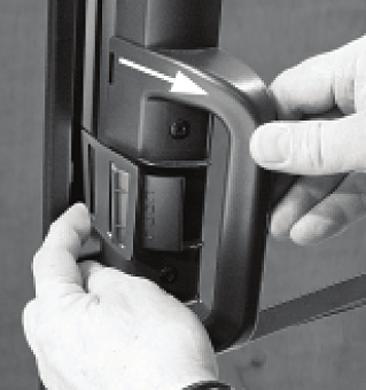
12 BUILDING-IN The refrigerator must not be exposed to radiated heat from hot objects. Excessive heat irradiation impairs performance and leads to increased energy consumption. For this reason the refrigerator should be installed if possible not at the entrance side of the vehicle - normally orientated south and often with an awning which would impair the dispersion of heat and combustion gases from the ventilation openings. It is not a good practice to install the refrigerator so that the vent openings are covered by the vehicle s entrance door when this is set open. This would reduce the ventilation airflow to the cooling unit and reduce refrigeration performance. The refrigerator has to be installed in a substantial enclosure and must be level. For information about dimensions, see Technical data. The bottom of the enclosure must be horizontal and even so that the refrigerator can be easily pushed into place. It must be sturdy enough to carry the weight of the refrigerator. A length of sealing strip is applied to the rear surface of the front frame for this purpose, see Fig. 8 / Fig. 9. Securing the refrigerator For the best cooling performance, when installing refrigerator model: R255: The installer must block the space between the storage cabinet and the top of the refrigerator. R2455/R2555/R4605 & R4805: The installer must block any space between the counter, storage area or ceiling and top of the refrigerator greater than 40 mm. Otherwise the heat will become trapped in this space, making the top of the refrigerator hot, thus reducing the efficiency of the unit. After the refrigerator is put in place, insuring a combustion seal at the front frame, the refrigerator is to be secured in the enclosure with screws. (These screws are not included.) Failure to follow the sequence in securing the refrigerator in enclosure can cause leakage between the frame and cabinet. R255 The five screws should be installed in the following order:. 2. Four screws installed through the front frame. One screw installed in rear base. Fig. 8 R255 ake sure that there is a complete seal between the front frame of the refrigerator and top, sides and bottom of the enclosure. 2 Push the refrigerator into the recess until the sealing strip on the flange seals against the front of the recess, so that the cooling unit is completely sealed off against the interior of the motorhome. Note! Be careful not to damage the sealing strip when the refrigerator is put in place. Fig. 9 R2455 R2555 R4605 R4805 R2455, R2555, R4605 & R4805 A wood strip must be in place across the upper opening of the enclosure. The top frame of the refrigerator will be anchored to the wood strip with screws. R2455, R2555, R4605 & R4805 The six screws have to be installed in the following order:. Fig. Install two screws through the front base. The refrigerator is provided with a lower front strip (shipped as a loose part) which is to be attached after the refrigerator is set into the cutout opening. a) Install the lower front strip by sliding it under the bottom hinge plate and swing it into place. Wood strip Fig. 2 Fig. 0 (The hinge plate can be on the right or left side depending on the door swing.) 2
13 b) Secure the refrigerator and the lower front strip with two screws: One screw through the hinge, and on the opposite side and then, one screw through the lower front strip, see Fig.. Drain water hose A hole must be drilled through flooring, see Fig. 6 / 7. The installer has to make sure that the hose does not kink when run through the floor. Seal around the hose that goes through the drilled hole. If a longer hose than supplied is required to get the water to drain outside of the vehicle, the installer will have to supply the extra length of hose. Fig. 2. Install two screws in the top frame. a) Remove the top decoration panel. Open the door and gently push the tabs out of the hole in the hinge with a flat blade screwdriver, (both sides), see Fig. 4. Hole for drain water hose Fig. 6 R Fig. 4 b) Carefully tilt the top decoration panel and lift up to remove from top frame. Be careful not to damage the circuit board and wires. c) Install the two screws in the top frame. (The holes are accessible from underneath.) d) Seal the opening for the screws with aluminium tape. e) Replace the top decoration panel. Be careful not to pinch the wires behind the panel. ake sure the tabs snap back into the holes in the hinge plate. Install two screws in the rear base, see Fig. 5. Hole for drain water hose CONNECTIONS LP gas The refrigerator is designed for operation on Propane (Propane only Australia) and LP gas (LP gas New Zealand). Alternative gas types must not be used to operate this appliance! The gas supply system must incorporate an approved gas pressure regulator to maintain a supply pressure of 2.75 kpa. The test pressure must be 2.70 kpa. Check that this is stated on the data plate. 6! caution Fig. 7 R2455 R2555 R4605 Check that the gas supplied to the refrigerator is at the correct pressure. Fig. 5 The gas installation and servicing must be carried out by an authorised person and conform to gas fitting regulations. The appliance shall be installed in accordance with AS 560- Installations. The gas supply pipe should be connected to the gas inlet at the rear of the refrigerator by means of a suitable threaded coupling. The nipple is furnished with an ISO 7/ - Rp /8 internal pipe thread.
14 In making the to the refrigerator, a union gas cock of an approved type bottled gas must be incorporated in the supply line in a position that is readily accessible to the user. For eventual servicing purposes, the union should be on the outlet side of the cock and the pipe work should be positioned so as not to prevent the refrigerator from being readily withdrawn. Before leaving, the installer should: Check all s for gas leaks with soap and water. DO NOT use a naked flame for detecting leaks! Ignite the burner to ensure correct operation of gas valve, burner and ignition. Instruct the user on the correct method of operation. In case the appliance fails to operate correctly after all checks have been carried out, contact the authorised service provider in your area. Electrical The electrical installation must be carried out by authorised personnel. For mains voltage operation, it is important that the circuit to and in the motorhome is effectively earthed. The refrigerator is equipped with a three-prong (grounding) plug for your protection against shock hazards and should be plugged directly into a properly grounded three prong receptacle. DO NOT cut off or remove the grounding prong from this plug! If the supply cord is damaged, it must be replaced by the manufacturer, its service agent or similarly qualified persons in order to avoid a hazard V supplies Check that the voltage stated on the data plate is the same as the main voltage in use (20-240V). Electrical leads must be routed and secured so that they cannot come into contact with hot or sharp parts of the refrigerator. The free length of the cord is m. It is recommended that the receptacle is located on the left side of the refrigerator (viewed from the rear) and approximately 50 mm from the floor. This allows easy access through the vent door. The cord should be routed to avoid direct contact with the burner cover, flue cover or any other components that could damage the cord insulation V AC receptacle 00-50mm Fig. 8 2V and D+ Connection The refrigerator is equipped with two terminals intended for to 2 volt. R255, R2455 and R2555: One terminal is marked Connect to permanent 2 Volt DC house battery and the other Connect to Vehicle 2 Volt DC battery, see Fig. 9. D+D+ Connect to permanent 2 Volt DC house battery D+ signal from either a 2V or a 24V DC alternator. Only 2V DC to the PC board. Under no circumstances can 24V DC be connected to the PC board. Connect to vehicle s 2 Volt DC battery Fig. 9 R4605 and R4805: One terminal is marked 2V DC House and the other 2V DC Vehicle, see Fig. 20. D+ signal from either a 2V or a 24V DC alternator. D + D + Connect to permanent 2 Volt DC house battery Connect to vehicle s 2 Volt DC battery Only 2V DC to the PC board. Under no circumstances can 24V DC be connected to the PC board. Fig. 20 For a otor Home the house battery and the vehicle battery may be the same battery. For a caravan the 2 volt s can only be made to separate batteries. marked Connect to Vehicle 2 Volt DC Battery (R255/R2455/R2555) - or - 2V DC vehicle (R4605/R4805) This supplies the 2V DC heating element. The (+2V) and (-) poles have to be connected directly to the vehicle battery. Via a suitable to the tow vehicle when fitted to a caravan. The (+2V) supply wire, connected to the terminal block (S) on the wiring diagrams, has to be fused according to the table below. Do not use the chassis for the return lead. odel Fuse size (A) R255/R2455/R R4605/R

 - or - 2V DC House (R4605/R4805) This supplies the AES refrigerator control system and must not be interrupted at any time")


15 Cross-sections The wires connected to this terminal must have the following minimum cross section area: R255/R2455/R2555 aximum length of 8 metres from refrigerator to the battery. 6 mm 2 cross-section low voltage multi strand cable. R4605/R4805 aximum length of 8 meters from refrigerator to the battery. 0 mm 2 cross-section low voltage multi strand cable. Cable lengths > 8 meters will require a larger cross-sectional cable. marked Connect to permanent 2 volt DC House Battery (R255/R2455/R2555) - or - 2V DC House (R4605/R4805) This supplies the AES refrigerator control system and must not be interrupted at any time whilst using the refrigerator on 240 volt, gas, and 2 volt. This is a permanent 2 volt. The (+2V) and (-) poles have to be connected directly to the permanent 2V DC house battery. Do not use the chassis for the return lead. The 2V supply must not be connected to a voltage controller or similar device as the AES control system itself monitors the DC voltage. The +2V must be permanently attached and must not be cut out when the ignition key is turned off. All s should be screwed or soldered to keep voltage drop to a minimum. Cross-sections The wires connected to this terminal must have a minimum cross-section area of.5 mm 2. Check that the panel dimensions are in compliance with those given in the following table: Height Dimensions (mm) (Thickness max 4 mm) Width 666± 497± We recommend that the panel is mounted before the refrigerator is installed in the enclosure. The lower decoration strip and parts bag are taped inside the door. To mount the door panel, follow these steps:. Slide the panel from the bottom of the door into the grooves on the vertical edges of the door. 2. Push the panel upwards. Take the two plastic panel stops from the parts bag and put them in the two holes at the lower door frame.. Put the decoration strip across the door and fasten with the screws from the parts bag. removing and replacing the shelves. Remove the shelf locks by inserting the tip of a flat bladed screwdriver into the slot of the locks. Turn the screwdriver counterclockwise and then remove the shelf locks from the wire shelf. D+ The D+ (alternator) has to be connected to the corresponding outlet of the vehicles electrical system - either a 2V or a 24V DC alternator. The D+ accepts 24V. Please note that the refrigerator accepts 2V only. Do not connect the refrigerator to 24V! This provides a signal to the refrigerators AES control system informing the control system when the vehicle engine is running. The AES refrigerator can not select 2V as the energy source unless the vehicle engine is running. Cross-sections The D+ (alternator) is a signal cable and therefore -.5 mm 2 is sufficient. mounting instructions REPOSITIONING THE HINGES The refrigerator is equipped with reversible doors. A special door reversing kit must be used to reverse the doors. For further information, please contact your dealer. ounting the door panel (R255) Door panels for R255 must be supplied by the manufacturer. This enables the manufacturer to match the door panel with the rest of the cabinetry inside the motor home or caravan. Before starting the mounting work, read the instructions thoroughly Tilt the shelf to one side at an angle while pulling forward. Reposition the shelf in the desired location. Insert the ends of the wire shelf on the left-hand side and slide the shelf into the holes on the right-hand side. Slide the plastic plugs into the holes of the wall. Snap the shelf locks onto the wire shelf. 5
16 D + D + appendix A - rearview equipment R255 Heaters Reigniter Flue baffle Relay Drain water hose Power module cover (PC board) Protection cover Flexible cord D+ Inlet fitting Vehicle battery 2V DC only Screw for protection cover Burner jet anual gas shutoff valve D+ 2 or 24V DC House battery 2V DC only R2455/R2555 Relay Heaters Reigniter Flue baffle Power module cover (PC board) Protection cover Flexible cord D+ 2 or 24V DC D+ Vehicle battery 2V DC only House battery 2V DC only Inlet fitting Drain water hose Screw for protection cover Burner jet anual gas shutoff valve R4605/R4805 Reigniter Heaters Relay Flue baffle Power module (PC board) Scew for protection cover Protection cover 2V DC Flexible cord D+ 2 or 24V DC Inlet fitting Vehicle battery 2V DC only House battery 2V DC only anual gas shutoff valve Drain water hose Burner jet 6
17 D + + appendix B - Wiring diagram R T U H C 7 P 2 P P P 4 P 2 P 5 P 6 P F BATT D + HEATER + 4 LAP FLAE 8 GROUND D GROUND AINS HEATER AC HEATER AC AINS F P 4 7 P 7 P 2 4 P 9 6 J I 4 N P + 8 V E A 9 X 2V DC 7 2 L N 6 O + D S 2V DC B A C E H J B D F I BURNER HOUSING CHASSIS GROUND CIRCUIT BOARD DISPLAY CIRCUIT BOARD POWER ELECTRODE FUSE A RELAY HEATER 2V DC HEATER 20,240V AC PROTECTIVE EARTH O S U X N P T V REIGNITER TERINAL BLOCK SOLENOID VALVE TERINAL BLOCK TEST POINT THERISTOR THEROCOUPLE TERINAL BLOCK BLACK 2 BROWN RED 4 YELLOW 5 GREEN 6 GREEN/YELLOW 7 BLUE 8 GREY 9 WHITE 0 ORANGE R2455/R T U H C 7 P 2 P P P 4 P 2 P 5 P 6 P F BATT HEATER LAP FLAE 8 GROUND D GROUND AINS HEATER AC HEATER AC AINS F P 4 7 P 7 P 2 4 P 9 6 J I 4 N P + 8 K L V E A 9 X 2V DC 7 2 L N 6 O + D S 2V DC B A C E H J L B D F I K BURNER HOUSING CHASSIS GROUND CIRCUIT BOARD DISPLAY CIRCUIT BOARD POWER ELECTRODE FUSE A RELAY HEATER 2V DC HEATER 20,240V AC SWITCH LAP LAP O S U X N P T V PROTECTIVE EARTH REIGNITER TERINAL BLOCK SOLENOID VALVE TERINAL BLOCK TEST POINT THERISTOR THEROCOUPLE TERINAL BLOCK BLACK 2 BROWN RED 4 YELLOW 5 GREEN 6 GREEN/YELLOW 7 BLUE 8 GREY 9 WHITE 0 ORANGE 7
18 D + + appendix B - Wiring diagram R4605/R T U H C 7 P 2 P G Z R P P 4 P 2 P 5 P 6 P X F BATT HEATER LAP FLAE 8 GROUND D GROUND AINS HEATER AC HEATER AC AINS F P 4 7 P 7 P 2 4 P 9 6 J I 4 N P + 8 L K V E 9 O + D 7 2 L N 6 S 2V DC 2V DC B A A C E G I K B D F H J L BURNER HOUSING CHASSIS GROUND CIRCUIT BOARD DISPLAY CIRCUIT BOARD POWER ELECTRODE FUSE A HEATING CABLE RELAY HEATER 2V DC HEATER 20,240V AC SWITCH LIGHT LIGHT O R T V Z N P S U X PROTECTIVE EARTH REIGNITER TERINAL BLOCK SOLENOID VALVE THEROFUSE TERINAL BLOCK TEST POINT THERISTOR THEROCOUPLE THERAL FUSE SWITCH H.C BLACK 2 BROWN RED 4 YELLOW 5 GREEN 6 GREEN/YELLOW 7 BLUE 8 GREY 9 WHITE 0 ORANGE 8
19 appendix C - Working instructions for the gas safety system Working diagram Thermostat Spark valve Flame detector device Lock out indication TW TS TS TWI TS TWI TS Technical specifications Classification codes according to EN298 Class of protection according to Low Voltage Directive Waiting time / TW Safety time / TS Inter-waiting time / TWI Working temperature Nominal working voltage* Resistance to vibration according to A--R-V-X-K IP-20 8 s 45 s 20 s 20 C to +45 C 2 -,8V DC EN :995 *Functional approved at a voltage variation of +20% through 25% 9
20
AES III RM2355 RM2455 RM Contact a qualified person. RM4605 RM4805 FOR YOUR SAFETY FOR YOUR SAFETY
 RA/RM-D RA/RM-2D AES III FOR YOUR SAFETY If you smell gas:. Open windows and door. 2. Don t touch electrical switches.. Extinguish any open flame. 4. Turn off the gas supply at the source. 5. Contact a
installation & operating instructions
 installation & operating instructions RGE 410 RA/RM-2D 822706106 MO-M 0740 INTRODUCTION We are pleased that you have chosen this refrigerator and hope you will derive much satisfaction from using it.
Model: Dometic RM2453
 Model: Dometic RM2453 Part Number: RM2453 Index Wide metal mounting flanges for built-in application - no exterior skin Door reversing kit available, part number 2932750-02 Gross Capacity: 20 litres approx.
2245 Wyecroft Road #5, Oakville, Ontario Canada L6L 5L7 Ph: Toll Free: Fax:
 2245 Wyecroft Road #5, Oakville, Ontario Canada L6L 5L7 Ph: 905-827-6157 Toll Free: 1-877-427-2266 Fax: 905-827-2027 Instructions for Installation, Operation & Service Manufacturer: Zero Appliances, Chloorkop
2245 Wyecroft Road #5, Oakville, Ontario Canada L6L 5L7 Ph: Toll Free: Fax:
 2245 Wyecroft Road #5, Oakville, Ontario Canada L6L 5L7 Ph: 905-827-6157 Toll Free: 1-877-427-2266 Fax: 905-827-2027 Instructions for Installation, Operation & Service Manufacturer: Zero Appliances, Chloorkop
DES/TB 07/97 Typ C 40/ 110
 MANUAL CARAVAN RM 4212 RM 4213 Deutsch Seite 1 English page 7 Français page 14 Italiano pagina 20 Español pagina 26 Svenska sida 32 Dansk side 38 Norsk side 44 Nederlands pag. 50 Suomi sivu 56 821 2649-01
Owner s Manual. For Australian refrigerator models: N304.3 (93 liter 3-way operation with LP gas, 240 volts AC, or 12 volts DC )
") Owner s Manual For Australian refrigerator models: N304.3 (93 liter 3-way operation with LP gas, 240 volts AC, or 12 volts DC ) N404.3 (128 liter 3-way operation with LP gas, 240 volts AC, or 12 volts
Owner s Manual For Australian refrigerator models: N304.3 (93 liter 3-way operation with LP gas, 240 volts AC, or 12 volts DC ) N404.3 (128 liter 3-way operation with LP gas, 240 volts AC, or 12 volts
For Models FF2310APS, FF2310APW, FF2310APB 55cm FREESTANDING FRIDGE FREEZER. Instruction Manual
 For Models FF2310APS, FF2310APW, FF2310APB 55cm FREESTANDING FRIDGE FREEZER Instruction Manual Please read these instructions carefully before use and retain for future reference. Before switching on your
Installation Manual. For Australian refrigerator models: N304M.3 (93 liter 3-way operation with LP gas, 240 volts AC, or 12 volts DC )
") Installation Manual For Australian refrigerator models: N304M.3 (93 liter 3-way operation with LP gas, 240 volts AC, or 12 volts DC ) N404M.3 (128 liter 3-way operation with LP gas, 240 volts AC, or 12
Installation Manual For Australian refrigerator models: N304M.3 (93 liter 3-way operation with LP gas, 240 volts AC, or 12 volts DC ) N404M.3 (128 liter 3-way operation with LP gas, 240 volts AC, or 12
installation manual DM3862 RM2554 DM2663 RM2551 Refrigerator for LP-gas & electric operation DM2852 ! AVERTISSEMENT ! WARNING FOR YOUR SAFETY
 RM25 RM254 RM245 RM2454 RM255 RM2554 DM2652 DM2662 DM266 DM2852 DM2862 DM862 NDM062 NDR292 installation manual Refrigerator for LP-gas & electric operation FOR YOUR SAFETY If you smell gas:. Open windows.
Bar Fridge USER MANUAL MB46W
 Bar Fridge USER MANUAL MB46W CONTENTS Safety information... 2-3 Identifying parts of the fridge... 4 Transporting... 5 Installation... 5 Reversing the door... 6 Operating instructions... 7 Cleaning &
REFRIGERATOR FOR LP-GAS AND ELECTRIC OPERATION RA1302. quality leisure line products Corporate Office 2320 Industrial Parkway Elkhart, IN 46515
 REFRIGERATOR FOR LP-GAS AND ELECTRIC OPERATION RA1302 FOR YOUR SAFETY If you smell gas: 1. Open windows. 2. Don t touch electrical switches. 3. Extinguish any open flame. 4. Immediately call your gas supplier.
SLIDER CASEMENT AIR CONDITIONER
 OWNER S GUIDE READ AND SAVE THESE INSTRUCTIONS SLIDER CASEMENT AIR CONDITIONER ROTARY CONTROL P/N 309000854 (11/03) ROOM AIR CONDITIONER WARRANTY Your product is protected by this warranty Your appliance
AIR CONDITIONER ELECTRONIC CONTROL
 READ AND SAVE THESE INSTRUCTIONS AIR CONDITIONER ELECTRONIC CONTROL ROOM AIR CONDITIONER WARRANTY Your product is protected by this warranty Your appliance is warranted by Electrolux. Electrolux has authorized
Dometic Manual Refrigerators
 This section addresses the most common system problems associated with supplied by The Dometic Corporation. Our intent is to provide you with a guideline of checks to make, should you encounter one of
FTM419A01W USER S MANUAL FROST FREE REFRIGERATOR
 FROST FREE REFRIGERATOR USER S MANUAL FTM419A01W Please read the manual carefully before operation and keep it for reference. This manual is only for reference, please comply with actual appliance you
UNIT MODEL/ POWER SUPPLY VOLTAGE VARIATION AMBIENT AIR ON CONDENSER
 Room Air Conditioner Installation and Operation Manual UNIT MODEL/ POWER SUPPLY VOLTAGE VARIATION AMBIENT AIR ON CONDENSER (VOLTS) MIN. MAX. MIN. F ( C) MAX. F ( C) WAC060K7A 127-1-60 114.3 139.7 70(20.1)
STRUCTURE ILLUSTRATION...3 IMPORTANT SAFETY INSTRUCTIONS 4 INSTALLATION INSTRUCTION..4 OPERATING YOUR REFRIGERATOR...5-6
 TABLE OF CONTENTS STRUCTURE ILLUSTRATION....3 IMPORTANT SAFETY INSTRUCTIONS 4 INSTALLATION INSTRUCTION..4 OPERATING YOUR REFRIGERATOR...5-6 FREEZER COMPARTMENT OPERATION 6 CARE & MAINTENANCE..7 CHANGING
Service Manual Model 3163
 Service Manual Model 3163 Contents Important Safety Information.......... 1 Specifications.................. 2 General Information.............. 2 Direct Vent Requirements........... 2 Propane System................
RM2612 RM2812 REFRIGERATOR MODEL INSTALLATION & OPERATING INSTRUCTIONS REFRIGERATOR FOR LP/GAS AND ELECTRIC OPERATION
 RECORD THIS INFORMATION FOR FUTURE REFERENCE BEFORE INSTALLING THE UNIT: Model No. Serial No. Date Purchased Place of Purchase USA SERVICE OFFICE The Dometic Corp. 509 So. Poplar St. LaGrange, IN 46761
Thank you for buying this refrigerator-freezer. To ensure that you get the best
 Dear customer: Thank you for buying this refrigerator-freezer. To ensure that you get the best results from your new refrigerator-freezer, please take time to read through the simple instructions in this
ROTARY CONTROL AIR CONDITIONER
 USE & CARE MANUAL NOTE: This USE & CARE MANUAL provides specific operating instructions for your model. Use the room air conditioner only as instructed in this USE & CARE MANUAL. These instructions are
USER'S MANUAL PGE Single Package Rooftop
 USER'S MANUAL PGE Single Package Rooftop Gas Heating/Electric Cooling Units Sizes 036-150 3 to 12-1/2 Tons NOTE TO INSTALLER: This manual should be left with the equipment owner. WARNING: If the information
BEVERAGE COOLER WITH DUAL TEMPERATURE ZONES INSTRUCTION MANUAL
 BEVERAGE COOLER WITH DUAL TEMPERATURE ZONES INSTRUCTION MANUAL Model No.: 155D Quality check Sydney warehouse Pass Fail Package opened and appliance checked for damage Handle location correctly marked
NOTE: All the illustrations in this manual are for explanation purposes only. Your air conditioner may be slightly different.
 RADS-51J RADS-61J Owner s Manual Room Air Conditioner with R-410A Heat Controller, Inc. 15 16 Contact an authorized service technician for repair or maintenance of this unit. Contact an authorized installer
LEC L6014W/S User Manual
 LEC L6014W/S User Manual Safety Information Important Please read these instructions fully before installation Before use The installation of this appliance is best carried out by 2 people. Dispose of
WINDOW/WALL-TYPE ROOM AIR CONDITIONER
 Before using your air conditioner, please read this manual carefully and keep it for future reference. WINDOW/WALL-TYPE ROOM AIR CONDITIONER Prior to installation this air-conditioning unit must be submitted
1. SAFETY WARNINGS INSTALLTION Location Reversing the Door Swing Levelling the Unit... 3
 Contents 1. SAFETY WARNINGS... 1 2. INSTALLTION... 2 2.1 Location... 2 2.2 Reversing the Door Swing... 2 2.3 Levelling the Unit... 3 2.4 Cleaning Before Use... 3 2.5 Before Using Your Unit... CE BC108
DOMETIC PTY. LTD. Camping Boxes-Refrigerator. Models: RC 1600 EGP Type: JCB - 1. Operating Instructions AUS
 DOMETIC PTY. LTD. Camping Boxes-Refrigerator Models: RC 1600 EGP Type: JCB - 1 Operating Instructions AUS 207.5911.15 Please read these operating instructions carefully before putting the refrigeration
USER MANUAL. Pharmacy Refrigerator Range. Applicable models: PSR353/PGR353 PSR273/PGR273 PSR151/PGR151
 USER MANUAL Pharmacy Refrigerator Range Applicable models: PSR353/PGR353 PSR273/PGR273 PSR151/PGR151 1 Contents Before first use 3 Positioning of refrigerator 3 Transportation and moving of refrigerator
RV REFRIGERATOR LP-GAS & ELECTRIC
 LITERATURE NUMBER MPD 4003333 RV REFRIGERATOR LP-GAS & ELECTRIC HE-0601, HE-0801 PROTECTED BY US PATENTS PENDING avoid possible injury or death SAFETY ALERT SYMBOLS Safety Symbols alerting you to potential
RCB53724MW RCB53724MX RCB53724VW RCB53724VX. User Manual Fridge Freezer USER MANUAL
 RCB53724MW RCB53724MX RCB53724VW RCB53724VX EN User Manual Fridge Freezer USER MANUAL 2 www.aeg.com CONTENTS 1. SAFETY INFORMATION... 2 2. SAFETY INSTRUCTIONS...4 3. CONTROL PANEL... 6 4. DAILY USE...
INSTRUCTION MANUAL (UNIT APPEARANCE MAY VARY FROM IMAGE) BEFORE USE, PLEASE READ AND FOLLOW ALL SAFETY RULES AND OPERATING INSTRUCTIONS.
 BEFORE USE, PLEASE READ AND FOLLOW ALL SAFETY RULES AND OPERATING INSTRUCTIONS.") INSTRUCTION MANUAL Model Number: FR551 REFRIGERATOR-FREEZER (UNIT APPEARANCE MAY VARY FROM IMAGE) BEFORE USE, PLEASE READ AND FOLLOW ALL SAFETY RULES AND OPERATING INSTRUCTIONS. Igloo has a policy of continuous
INSTRUCTION MANUAL Model Number: FR551 REFRIGERATOR-FREEZER (UNIT APPEARANCE MAY VARY FROM IMAGE) BEFORE USE, PLEASE READ AND FOLLOW ALL SAFETY RULES AND OPERATING INSTRUCTIONS. Igloo has a policy of continuous
REFRIGERATOR SAFETY. Your safety and the safety of others are very important.
 REFRIGERATOR SAFETY Your safety and the safety of others are very important. We have provided many important safety messages in this manual for your appliance. Always read and obey all safety messages.
Combi Box 3 Way Fridge & Freezer
 ELECTROLUX LEISURE PTY. LTD. Combi Box 3 Way Fridge & Freezer RC 1180 207.5098.01 Operating Instructions Please read these operating instructions carefully before putting the refrigeration unit into operation.
USER MANUAL. Laboratory Refrigerator Range. Applicable models: LSR151 LSR288
 USER MANUAL Laboratory Refrigerator Range Applicable models: LSR151 LSR288 1 Contents Before first use 3 Positioning of refrigerator 3 Transportation and moving of refrigerator 3 Energy saving tips 4 Important
RM7030 Product No REFRIGERATOR MODEL INSTALLATION & OPERATING INSTRUCTIONS MODEL RM7030
 RECORD THIS INFORMATION FOR FUTURE REFERENCE BEFORE INSTALLING THE UNIT: Model No. Serial No. Date Purchased Place of Purchase USA SERVICE OFFICE The Dometic Corp. 509 So. Poplar St. LaGrange, IN 4676
Foreword OS /94. Diagnostic Service Manuals
 Foreword This service manual is the result of the dedication of The Dometic Corporation and its engineers in giving service people the necessary instruction for making accurate analyses of certain conditions.
HOUSEHOLD FREEZER 048-GM-48303/048-GM-48304/048-GM-48305
 HOUSEHOLD FREEZER 048-GM-48303/048-GM-48304/048-GM-48305 TABLE OF CONTENTS NAMES OF THE PARTS 2 IMPORTANT SAFETY INSTRUCTIONS 3 INSTALLATION INSTRUCTIONS BEFORE USING YOUR FREEZER. 3 INSTALLING YOUR FREEZER
Installation Requirements for Models:
 900 & 9100 Series Refrigerators Installation Requirements for Models: 9162 9163 9182 9183 962 963 982 983 WARNING Improper installation, adjustment, alteration, service, or maintenance can cause injury
Model No. NR-BU303 Series
 RBD / PGF / GULF Operating Instructions Refrigerator For Household Use Model No. NR-BU303 Series NR-BU343 Series Contents Safety precautions...2 Installation...4 Parts identification...5 Specification...5
User s Information Manual
 48N2,N3,N4,N5,N6,N7,N8,N9 75-150 Ton Gas Heating/Electric Cooling Units with ComfortLink Controls User s Information Manual NOTE TO INSTALLER: This manual should be left with the equipment owner. : If
User Instruction &)+ 4: CFH110QB
+ 4: CFH110QB") User Instruction &)+ 4: CFH110QB 10 Safety Information In the interest of your safety and to ensure the correct use, before installing and first using the appliance, read this user manual carefully, including
User Instruction &)+ 4: CFH110QB 10 Safety Information In the interest of your safety and to ensure the correct use, before installing and first using the appliance, read this user manual carefully, including
User Manual. Refrigerator ZRG16605WA
 EN User Manual Refrigerator ZRG16605WA Contents Safety information 2 Safety instructions 3 Operation 4 First use 5 Daily use 5 Hints and tips 5 Care and cleaning 6 Troubleshooting 7 Installation 9 Technical
User Manual. Chest Freezer ZFC26500WA
 EN User Manual Chest Freezer ZFC26500WA Contents Safety information 2 Safety instructions 3 Operation 5 Before first use 5 Daily use 5 Hints and tips 6 Care and cleaning 7 Troubleshooting 8 Installation
INSTALLATION AND OPERATING INSTRUCTIONS
 INSTALLATION AND OPERATING INSTRUCTIONS REFRIGERATOR FOR LP-GAS AND ELECTRIC OPERATION RM2652 RM2852 Contents: Page Installation 4 Operating Instructions 8 Maintenance & Service 12 If you smell gas: FOR
IMPORTANT: RETAIN FOR FUTURE REFERENCE
 FREESTANDING TABLE TOP LARDER FRIDGE USER S GUIDE Model number: RHTTLF1/RHTTLF1B For Customer Services & Spare Parts please call 0845 208 8750 Opening times: Monday - Friday 8am IMPORTANT: RETAIN FOR FUTURE
Wine Cellar. Instruction Booklet. Model: WC-2038
 Wine Cellar Instruction Booklet Model: WC-2038 IMPORTANT SAFEGUARDS Before the appliance is used, it must be properly positioned and installed as per the instruction in the Installation section. To reduce
CHEST FREEZER INSTRUCTION MANUAL. Model No.: EWCF5WBX EWCF7WBX
 CHEST FREEZER INSTRUCTION MANUAL Model No.: EWCF5WBX EWCF7WBX To ensure proper use of this appliance and your safety, please read the following instructions completely before operating this appliance.
INSTRUCTION MANUAL. Model Number: DX K Wine Cooler BEFORE USE, PLEASE READ AND FOLLOW ALL SAFETY RULES AND OPERATING INSTRUCTIONS.
 INSTRUCTION MANUAL Model Number: DX-48.130K Wine Cooler CAUTION: BEFORE USE, PLEASE READ AND FOLLOW ALL SAFETY RULES AND OPERATING INSTRUCTIONS. TABLE OF CONTENTS 1. WINE COOLER SAFETY...114 2. IMPORTANT
ST NF60188W ST NF60188STA
 ST NF60188W ST NF60188STA Contents Safety Warnings... 4 Unpacking... 6 Installation... 7 Location... 7 Levelling the Unit... 7 Free Space Requirements... 7 Reversing the Door Swing... 8 Cleaning Before
Service Manual For model N260 - a 2.4 cu. ft., 2-way refrigerator. For model N a 2.4 cu. ft., 3-way refrigerator.
 Service Manual For model N260 - a 2.4 cu. ft., 2-way refrigerator. For model N260.3 - a 2.4 cu. ft., 3-way refrigerator. NORCOLD, Inc. P.O. Box 4248 Sidney, OH 45365-4248 Part No. 619260A (4-98) Table
Owner s Manual 33-bottle Under-Counter Wine Cooler Model: WC-3302US
 Owner s Manual 33-bottle Under-Counter Wine Cooler Model: WC-3302US Please read this manual carefully before use and keep in a safe place for future reference. IMPORTANT SAFETY INSTRUCTIONS WARNING To
REG-183J REG-253J RADS-151J RADS-183J RADS-253J RAD-283J
 REG-183J REG-253J RADS-151J RADS-183J RADS-253J RAD-283J Owner s Manual Room Air Conditioner with R-410A Heat Controller, Inc. NOTE 1 Heat Controller, Inc. Room Air Conditioner with R-410A Owner s Manual
KF Fridge / Freezer User Guide
 KF3135-90 Fridge / Freezer User Guide Please read this manual first! Dear Customer, Your product has been produced in modern plants and checked under the most meticulous quality control and we hope that
DUAL VOLTAGE REFRIGERATORS 220/240 VOLTS AC AND 12/24 VOLTS DC INSTALLATION AND OWNER S MANUAL
 DUAL VOLTAGE REFRIGERATORS 220/240 VOLTS AC AND 12/24 VOLTS DC INSTALLATION AND OWNER S MANUAL Service Information If service or parts are required, contact the nearest Norcold Service Center. To find
User s Information Manual
 48AJ,AK,AW,AY020-060 Single-Package Rooftop Gas Heating Units with COMFORTLINK Controls and Scroll Compressors User s Information Manual NOTE TO INSTALLER This manual should be left with the equipment
Packaged Gas/Electric Units. Owner s Guide to Operating and Maintaining Your Gas/Electric Unit
 Packaged Gas/Electric Units Owner s Guide to Operating and Maintaining Your Gas/Electric Unit ELECTRICAL SHOCK HAZARD. FIRE OR EXPLOSION HAZARD Disconnect power at fuse box or service panel before performing
ER MANUAL FOR YOUR BAUMATIC
 BW18BL 50 litre thermoelectric beverage centre BW28BL 70 litre thermoelectric beverage centre ER MANUAL FOR YOUR BAUMATIC BW18BL 50 litre thermoelectric beverage centre BW28BL 70 litre thermoelectric beverage
User Manual / Installation Instructions
 User Manual / Installation Instructions Outdoor Refrigerator MODEL: L24REF Lynx Professional Grills 5895 Rickenbacker Rd., Commerce, CA 90040 Service: (888) 289-5969 Tel: (323) 838-1770 Fax: (323) 838-1778
MEDICAL FREEZER. Model FS24L INSTRUCTION MANUAL. Write Serial Number (on back of unit) here:
 here:") MEDICAL FREEZER Model FS24L INSTRUCTION MANUAL - Write Serial Number (on back of unit) here: FELIX STORCH, INC. 770 Garrison Avenue Bronx, New York 10474 www.medicalrefrigerators.com TABLE OF CONTENTS
MEDICAL FREEZER Model FS24L INSTRUCTION MANUAL - Write Serial Number (on back of unit) here: FELIX STORCH, INC. 770 Garrison Avenue Bronx, New York 10474 www.medicalrefrigerators.com TABLE OF CONTENTS
Northwest RV Supply Manual Compliments of Printed From Foreword
 Foreword This service manual is the result of the dedication of The Dometic Corporation and its engineers in giving service people the necessary instruction for making accurate analyses of certain conditions.
GCG-10. Instruction Manual. G-Series Cooler. Manual is for the following models: GCG-10-N33EB G-10-N33EB UPRIGHT COOLER
 G-Series Cooler GCG-10 UPRIGHT COOLER Manual is for the following models: GCG-10-N33EB G-10-N33EB Instruction Manual Manual is for the following models: GCG-10-N33EB G-10-N33EB Instruction Manual GCG-10
UPRIGHT FREEZER FSA14921
 UPRIGHT FREEZER FSA14921 GB Index Safety first /1 Electrical requirements /2 Transportation instructions /2 Installation instructions /2 Temperature control and adjustment /3 Before operating /3 Freezer
9.9 CU.FT. TOP MOUNT REFRIGERATOR INSTRUCTION MANUAL. Model No.: HVDR1040W HVDR1040B HVDR1040S
 9.9 CU.FT. TOP MOUNT REFRIGERATOR INSTRUCTION MANUAL Model No.: HVDR1040W HVDR1040B HVDR1040S To ensure proper use of this appliance and your safety, please read the following instructions completely before
Contents. For your safety About your product Installing your appliance Using your appliance Care & cleaning...
 USER GUIDE TF5517S Contents For your safety..................................................... 1 About your product.................................................. 3 Installing your appliance...............................................
Commercial Countertop Beverage Center
 Commercial Countertop Beverage Center Model SCR114L INSTRUCTION MANUAL To ensure safe operation, please read this instruction manual thoroughly before use. Write Serial No. here: FELIX STORCH, INC. Summit
Instruction / Installation Manual. Fridge Freezer LFC60W13
 Instruction / Installation Manual Fridge Freezer LFC60W13 Contents Safety Warnings... 3 Unpacking... 5 Installation... 6 Location...6 Levelling the Unit...6 Installing the Spacers...6 Free Space Requirements...6
INSTALLATION GUIDE NZ AU D
 GAS COOKTOP CG905DW models INSTALLATION GUIDE NZ AU 590684D 08.17 1 SAFETY AND WARNINGS! WARNING! Electrical Shock Hazard Before carrying out any work on the electrical section of the appliance, it must
Refrigerator Freezer HD-368RWEW
 Refrigerator Freezer HD-368RWEW Contents 1. SAFETY WARNINGS... 1 2. INSTALLTION... 2 2.1 Location... 2 2.2 Reversing the Door Swing... 2-3 2.3 Door Space Requirements... 4 2.4 Levelling the Unit... 4 2.5
UPRIGHT FREEZER WHS-502FWEW1(E) WHS-502FWEB1(E) WHS-502FWESS1(E)
 WHS-502FWEB1(E) WHS-502FWESS1(E)") UPRIGHT FREEZER WHS-502FWEW1(E) WHS-502FWEB1(E) WHS-502FWESS1(E) TABLE OF CONTENTS NAMES OF THE PARTS.2 IMPORTANT SAFETY INSTRUCTIONS..3 INSTALLATION INSTRUCTION BEFORE USING YOUR FREEZER...3 INSTALLING
UPRIGHT FREEZER WHS-502FWEW1(E) WHS-502FWEB1(E) WHS-502FWESS1(E) TABLE OF CONTENTS NAMES OF THE PARTS.2 IMPORTANT SAFETY INSTRUCTIONS..3 INSTALLATION INSTRUCTION BEFORE USING YOUR FREEZER...3 INSTALLING
USING THE REFRIGERATOR COMPARTMENT
 USING THE REFRIGERATOR COMPARTMENT Switching the appliance on Starting the appliance Insert the plug. The light, located under the control panel or inside the product (depending on model) comes on when
TWO-ZONE WINE COOLERS
 TWO-ZONE WINE COOLERS Models SWC902D SWC1380D Owner s Manual BEFORE USE, PLEASE READ AND FOLLOW ALL SAFETY RULES AND OPERATING INSTRUCTIONS Write Model and Serial Numbers here: Felix Storch, Inc. Summit
BEFORE USE, PLEASE READ AND FOLLOW ALL SAFETY RULES AND OPERATING INSTRUCTIONS
 WINE CELLAR Model SWC1840 Owner s Manual BEFORE USE, PLEASE READ AND FOLLOW ALL SAFETY RULES AND OPERATING INSTRUCTIONS Write the Serial Number here Felix Storch, Inc. Summit Appliance Division An ISO
4.5 CU.FT. REFRIGERATOR INSTRUCTION MANUAL
 4.5 CU.FT. REFRIGERATOR INSTRUCTION MANUAL Model No.: MCBR465S To ensure proper use of this appliance and your safety, please read the following instructions completely before operating this appliance.
Ice Maker. Model BIM25. Instruction Manual. Write Serial Number of unit here:
 Ice Maker Model BIM25 Instruction Manual Write Serial Number of unit here: Felix Storch, Inc. Summit Appliance Division An ISO 9001:2008 registered company 770 Garrison Avenue Bronx, New York 10474 www.summitappliance.com
Model:WHS-109FB1/WHS-109FW1/WHS-109FSS1
 Model:WHS-109FB1/WHS-109FW1/WHS-109FSS1 WHS-109FB1/WHS-109FW1 WHS-109FSS1 R600a,1.59Oz 21.26 When using, please use scissors to cut out the plastic cable ties in the picture from top to bottom, a total
User manual. Fridge Freezer ZRT18100WA
 EN User manual Fridge Freezer ZRT18100WA Contents Safety instructions 2 Before first use 4 Daily use _ 4 Hints and tips _ 5 Safety instructions Before the installation and use of the appliance, carefully
INSTALLATION AND OPERATING INSTRUCTIONS
 INSTALLATION AND OPERATING INSTRUCTIONS REFRIGERATOR FOR LP-GAS AND ELECTRIC OPERATION RM2451 Contents: Page Installation 4 Operating Instructions 8 Maintenance & Service 12 If you smell gas: FOR YOUR
FR-1020ARW FR-1020ARS
 FR-1020ARW FR-1020ARS Dear customer: Thank you for buying this refrigerator-freezer. To ensure that you get the best results from your new refrigerator-freezer, please take time to read through the simple
INSTALLATION INSTRUCTIONS
 INSTALLATION INSTRUCTIONS Gas Cooktop CG905DW models NZ AU www.fisherpaykel.com 590684B 11.14 1 Safety and warnings! WARNING! Electrical Shock Hazard Before carrying out any work on the electrical section
User's Infomation Manual
 User's Infomation Manual 574A GAS HEATING/ELECTRIC COOLING Cancels: OM01-69 OM10-28 02-07 NOTE: Read the entire instruction manual before starting the installation. SAFETY CONSIDERATIONS Note to Installer:
Installation and Owner s Manual
 Installation and Owner s Manual For Australian refrigerator models: N301 (93 liter 2-way operation with propane gas or 240 volts AC) N301.3 (93 liter 3-way operation with propane gas, 240 volts AC, or
PROF. RANGE COOKER MODEL: EPRC-A6456GE(SS) Owner s Manual Please read this manual carefully before operating your set. Retain it for future reference.
 Owner s Manual Please read this manual carefully before operating your set. Retain it for future reference.") PROF. RANGE COOKER MODEL: EPRC-A6456GE(SS) Owner s Manual Please read this manual carefully before operating your set. Retain it for future reference. Record model number and serial number of the set.
PROF. RANGE COOKER MODEL: EPRC-A6456GE(SS) Owner s Manual Please read this manual carefully before operating your set. Retain it for future reference. Record model number and serial number of the set.
User Manual. 110 Cup (55 Cup Raw) Gas Rice Cooker. Model: 177GRCLP, 177GRCNAT 12/2018. Please read and keep these instructions. Indoor use only.
 Gas Rice Cooker. Model: 177GRCLP, 177GRCNAT 12/2018. Please read and keep these instructions. Indoor use only.") 110 Cup (55 Cup Raw) Gas Rice Cooker Intertek 5010781 Conforms to ANSI STD Z83.11-2016 Model: 177GRCLP, 177GRCNAT 12/2018 FOR YOUR SAFETY Do not store or use gasoline or other flammable vapors or liquids
110 Cup (55 Cup Raw) Gas Rice Cooker Intertek 5010781 Conforms to ANSI STD Z83.11-2016 Model: 177GRCLP, 177GRCNAT 12/2018 FOR YOUR SAFETY Do not store or use gasoline or other flammable vapors or liquids
Owner s Guide Installation & Operation
 Owner s Guide Installation & Operation Hot Top HHT Series Hestan Commercial Corporation 3375 E. La Palma Ave Anaheim, CA 92806 (888) 905-7463 RETAIN THIS MANUAL FOR FUTURE REFERENCE P/N 002130 REV 1 IMPORTANT
INSTALLATION AND OPERATING INSTRUCTIONS
 INSTALLATION AND OPERATING INSTRUCTIONS REFRIGERATOR FOR LP-GAS AND ELECTRIC OPERATION NDR1062 Contents: Page Installation 4 Operating Instructions 8 Maintenance & Service 12 If you smell gas: FOR YOUR
Packaged Gas/Electric
 Packaged Gas/Electric Units Owner's Guide to Operating and Maintaining Your Gas/Electric Unit ELECTRICAL SHOCK HAZARD. FIRE OR EXPLOSION HAZARD Failure to follow this warning can result in Disconnect power
BULL INSTRUCTION MANUAL. Model Number: BC-130 REFRIGERATOR BEFORE USE, PLEASE READ AND FOLLOW ALL SAFETY RULES AND OPERATING INSTRUCTIONS.
 BULL INSTRUCTION MANUAL Model Number: BC-130 REFRIGERATOR BEFORE USE, PLEASE READ AND FOLLOW ALL SAFETY RULES AND OPERATING INSTRUCTIONS. 1 REFRIGERATOR SAFETY Your safety and the safety of others are
FW422. Integrated In Column Larder Fridge. Installation, use and maintenance.
 FW422 Integrated In Column Larder Fridge Installation, use and maintenance www.cda.eu Contents: 3 Important information 5 Important safety warnings 6 Before first use 7 Setting the temperature 7 Guidance
User s Information Manual
 62DA,DB,DC,DD07-38 Vertical or Horizontal Dedicated 100% Outdoor Air Unit with Optional Gas Heat User s Information Manual NOTE TO INSTALLER This manual should be left with the equipment owner. : If the
Contents Safety Warnings... 3 Unpacking... 5 Installation... 6 Product Overview Operation Cleaning Maintenance...
 L5017W/S/B Contents Safety Warnings... 3 Unpacking... 5 Installation... 6 Location...6 Levelling the Unit...6 Free Space Requirements...6 Reversing the Door Swing...7 Cleaning Before Use... 10 Before Using
Table of Contents. Specifications... page 2. Installation... page 3. Customizing... page 4. Reversing door swing... page 5
 Introduction The Scotsman Compact Refrigerator is a unique product, capable of being built into a cabinet because of its front vented, forced-air cooling system. It s also designed to be a companion to
Dual Zone Wine Cellar
 Dual Zone Wine Cellar Instruction Booklet Model: WC-2012 IMPORTANT SAFEGUARDS Before the appliance is used, it must be properly positioned and installed as described in this manual. To reduce the risk
Fig. 1 - Unit PGD4, PGS4, WPG4
 OWNER S MANUAL 14 SEER Single -Package Air Conditioner and Gas Furnace System with R -410A Refrigerant Single Phase 2 to 5 Nominal Tons Three Phase 3 to 5 Nominal Tons PGD4andPGS4SeriesE,WPG4SeriesB Fig.
Before Putting Into Use. Important. Tips for Energy Savings
 Before Putting Into Use Before connecting the appliance to the power supply, let it stand for about 2 hours, which will reduce a possibility of malfunctions in the cooling system due to transport handling.
REFRIGERATOR USER S MANUAL MODEL: HS-306LN
 REFRIGERATOR USER S MANUAL MODEL: HS-306LN Contents 1. SAFETY WARNINGS... 1 2. INSTALLTION... 2 2.1 Location... 2 2.2 Reversing the Door Swing... 2 2.3 Door Space Requirements... 6 2.4 Levelling the Unit...
GAS COOKTOP INSTALLATION INSTRUCTIONS BEFORE YOU BEGIN. IMPORTANT Save these instructions for local electrical inspector s use.
 GAS COOKTOP INSTALLATION INSTRUCTIONS Please read this guide thoroughly before installation. To contact LG Electronics, 24 hours a day, 7 days a week: 1-800-243-0000 (U.S.A.) 1-888-542-2623 (Canada) Or
GAS COOKTOP MODELS: CTG365D, CTG305D, CTG304D TO REDUCE THE RISK OF FIRE, ELECTRIC SHOCK, OR INJURY TO PERSONS, OBSERVE THE FOLLOWING
 By CNP INDUSTRIES, INC. P.O. Box 18645 Anaheim, Ca 92817 (877) 387-6721 INSTALLATION INSTRUCTIONS GAS COOKTOP MODELS: CTG365D, CTG305D, CTG304D IMPORTANT: Before beginning installation please read these
Pizza Oven with Stand
 Pizza Oven with Stand Cooks up to 3 pizzas at a time Use to cook a variety of food Easy clean vitreous enamel interior Model No. P0104 Powerful 22MJ/h stainless steel burner Viewing window and temperature