Fig.1A Fig.1B Fig.1C. Fig.3. Fig.6. Fig.8. Fig.10 Fig.11 Fig.12
|
|
|
- Nancy Boone
- 5 years ago
- Views:
Transcription


1 Fig.1A Fig.1B Fig.1C Fig.1D Fig.2 Fig.3 Fig.4 Fig.5 Fig.6 Fig.7 Fig. Fig.9 Fig.10 Fig.11 Fig.12


2 - M0S0172 Edizione 1P a 11 10a A B C D E F G H I J K L M N O P Q R S T T U V Z Y1 Y2
 Power cord B) Main switch C) Detergent switch D) Steam control dial E) Steam ready light F) No water/container-full indicating light G) Detergent indicating light H) Pressure gauge")
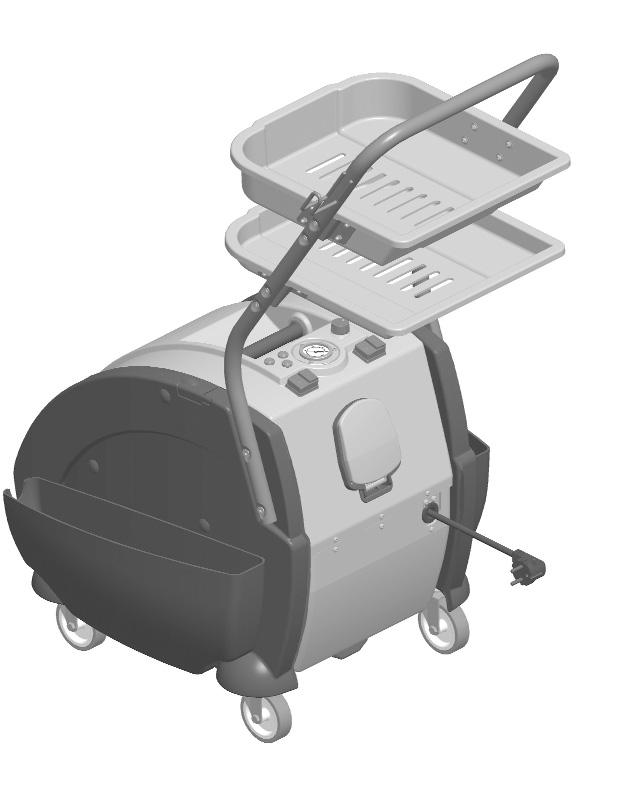
3 Read these instructions carefully before using the appliance. ENGLISH LEGEND A) Power cord B) Main switch C) Detergent switch D) Steam control dial E) Steam ready light F) No water/container-full indicating light G) Detergent indicating light H) Pressure gauge I) Water tank J) Detergent tank K) Cover for unit socket L) Locking lever for dirt container M) Dirt container unit N) Dirt container O) Cover for dirt container P) Float Q) Float closing grill R) HEPA Filter S) U shaped tube for dirt container filter T) Side basket U) Carrying handle V) Handle for lower basket Z) Handle for upper basket Y1) Handle fastening screws Y2) Screws for fastening the handle of the upper and lower baskets ACCESSORIES 1) Flexible hose 2) Handle 3) Steam button 4) Safety button 5) Vacuum button 6) Unit plug 7) Button for locking unit plug ) Accessory locking switch 9) Extension tubes 10) Multi-purpose brush 10a) Attachment locking slides 11) Brush attachment 12) Liquid vacuuming attachment 13) Carpet attachment 14) Cotton cloths 15) 120 accessory 16) Coloured 120 vacuum-steam brushes 17) Steam nozzle 1) 120 tool nozzle 19) Vacuum-steam squeegee tools 20) Small vacuum-steam nozzle 21) Squeegee attachment for small vacuum-steam nozzle 22) Brush attachment for small vacuum-steam nozzle 23) Funnel 24) Spare gaskets 25) Fabric brush with sprayer 26) Floor brush with sprayer 27) Floor brush attachment with sprayer 2) Anti-foam 29) Pressure nozzle 30) Tool for cleaning toilet bowl 31) Spray gun 32) Tool for freshening-up curtains 33) Filling can 42

4 PRECAUTIONS KEEP THIS INSTRUCTION BOOKLET Indoor use only Read these instructions carefully before using the appliance. Any use outside of the intended use will void the warranty. The wiring system to which the appliance is connected must comply with the laws in force. Before connecting the appliance, make sure the mains voltage corresponds to the voltage indicated on the rating label of the appliance and that the power outlet is connected to an earthing system. Always turn off the appliance from the main switch before disconnecting it from the mains power. When not in use, always unplug the appliance from the mains power. Never leave the appliance unattended when connected to the mains power. Before performing any maintenance, always turn off the appliance and unplug it from the mains power. Do not unplug the power cord by pulling at it, but extract the plug to avoid damaging the outlet. Do not twist, squash or stretch the power cord and make sure it does not come into contact with pointy or hot surfaces. Do not use the appliance if the power cord or other important parts of the appliance are damaged. Do not use electric extension leads that are not authorised by the manufacturer, as they may cause damage or fire. If it should become necessary to replace the power cord, please contact an authorised service centre because a special tool is required. Never touch the appliance with wet hands or feet when the plug is connected to the mains power. Do not use the appliance with bare feet. Do not use the appliance near sinks, bathtubs, showers or recipients full of water. Never immerse the appliance, power cord or plugs in water or other liquids. It is prohibited to use the appliance in places were there is a danger of explosions. Do not use the product in the presence of toxic substances. Do not rest the hot appliance on heat-sensitive surfaces. Do not leave the appliance exposed to atmospheric agents (wind, rain etc.). No not place the appliance near hot cookers, electric heaters, or however, near heat sources. Do not expose the appliance to extreme temperatures. Keep out of reach of children or people who do not know how to operate the appliance. Do not press the buttons too hard and avoid using pointy objects such as a pen or other objects. Always rest the appliance on a stable surface. If the appliance accidentally falls, it is necessary to have it checked by an authorised service centre because the internal safety features of the product may have been damaged. In case of failure or malfunctioning, turn off the appliance and never attempt to disassemble it but contact an authorised service centre. In case of repairs or replacement of accessories, only use original spare parts and accessories so as not to compromise the safety of the appliance. Do not wind the power cord around the appliance, especially when the appliance is still hot. Do not vacuum acids and solvents since they may cause serious damage to the appliance and, above all, do not vacuum explosive dust or liquids since they may cause explosions when they come into contact with the internal parts of the appliance. ENGLISH This unit conforms with EC-directives 9/336 as amended by 93/6 (EMC) and 73/23 as amended by 93/6 (low voltage). Polti S.p.A. reserves the right to change equipment or accessory specification without prior notice. 43


5 ENGLISH Do not vacuum toxic substances. Do not vacuum lit or smouldering objects, such as embers, hot ashes, and other burning materials. Normal tap water can be used to fill the water tank. Do not vacuum materials such as chalk, cement etc. which solidify on coming into contact with water, and therefore cause problems to the functioning of the appliance. When filling the tank with water, switch off the appliance and disconnect it from the power outlet. When in operation the appliance must be kept in a horizontal position. Do not direct the steam jet onto electric and/or electronic appliances. Before cleaning the appliance, make sure it has cooled down. Before storing the appliance away, make sure it has cooled down completely. This appliance is equipped with safety devices that can only be replaced by an authorised technician. Never direct the steam jet towards people, animals and debris. Never touch the steam jet with hands. ATTENTION: Danger of burns! Do not put any detergent or chemical substances in the boiler. This appliance cannot be used by physically, visually or mentally impaired people (including children) or by inexperienced or unqualified people, unless they are supervised or have received instructions on how to use the appliance by a person responsible for their safety. Children should be supervised to ensure that they do not play with the appliance. Never leave the appliance unattended when in operation. The crossed-out wastebasket symbol on the appliance means that at the end of its useful lifespan, the product must be disposed of separately from ordinary household wastes. The user is responsible for delivering the appliance to an appropriate collection facility at the end of its useful lifespan. Appropriate separate collection to permit recycling, treatment and environmentally compatible disposal helps to prevent negative impact on the environment and human health and promotes recycling of the materials making up the product. For more information on available collection facilities, contact your local waste collection service. CORRECT USE OF THE PRODUCT This appliance is intended for professional use as a steam generator and liquid/damp vacuum cleaner in accordance with the descriptions and instructions provided in this manual. Please read these instructions carefully and keep them for future reference. Polti declines liability for any damage or accident derived from any use of Mondial Vap which is not in conformity with the instructions contained in this booklet. PREPARATION FOR USE ASSEMBLING THE HANDLE (U) AND BA- SKETS (V AND Z) Using the hexagonal wrench supplied, fasten the lower (V) and upper (Z) baskets on the carrying handle (U) with the screws (Y2) (fig.1a). Position the carrying handle (U) next to the seats for the handle on the tanks (I and J). Fasten the carrying handle (U) with the 4 screws (Y1) by screwing them with the hexagonal wrench supplied (fig. 1B). ATTENTION Directive 2002/96/EC (Waste Electrical and Electronic Equipment - WEEE): information for users This product complies with EU Directive 2002/96/EC. ASSEMBLING THE SIDE BASKETS (T) Loosen the screws with the fastening knob located on the side tanks. Align the holes present on the side baskets to the screws with the knob and insert the baskets (fig. 1C). Fasten the screws with the knob to prevent 44
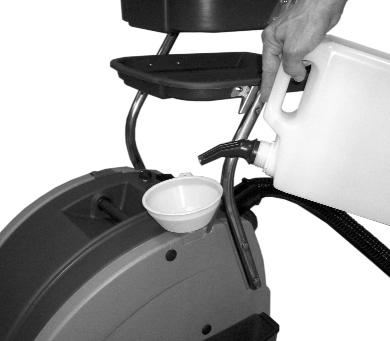
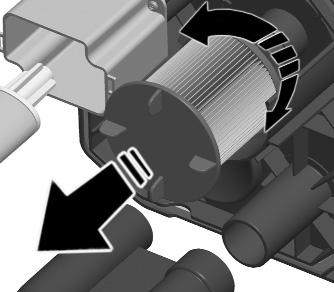
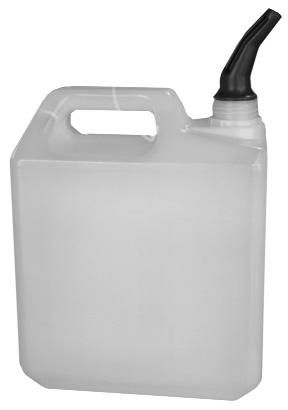
6 the baskets from accidentally coming loose. N.B.: the basket (T) that has the opening for lodging the extension tubes must be positioned on the water tank (I) (fig. 1D). If inverted, the baskets will not be in a perfect horizontal position. FILLING THE WATER (I) AND DETERGENT (J) TANK Open the cap and fill the water tank (I) with normal tap water using the funnel (fig. 2). Use water with a hardness of less than 5 F. If the water from the mains supply is particularly hard, we recommend using a mixture of 50% tap water and 50% demineralised water. Replace the cap on the tank. Use the funnel (23) to fill the tank (J) with the suitably diluted detergent. Replace the cap on the tank. ATTENTION: never swap the contents of the two tanks. It is important that the tank (I) is always filled with water and not detergent. Placing detergent in the water tank could cause serious damage to the product. Once the funnel has been used to fill the detergent tank, rinse it under running water before reusing it to fill the water tank. DETERGENT: It is recommended to only use detergents from the Polti HP007 PROFESSIONAL line because they are specifically developed and tested for using with Mondial Vap steam appliances. Refer to the instructions on the product labels for information on the correct dilutions and on how to use the Polti HP007 PROFESSIONAL products. ATTENTION: Never use foaming or acid-based detergents because they could damage the internal components of the appliance. Never use detergents containing muriatic acid, ammonia or products classified as irritants because their volatility increases when used with steam and, therefore, could be harmful if inhaled. Any problems caused by the use of detergents not conforming to those mentioned above will not be covered by the warranty PREPARATION OF DIRT CONTAINER Release the locking lever of the dirt container (L) and slide the container unit (M) towards the outside of the appliance (fig. 3). Lift the cover of the dirt container (O). Fill the container (N) with one litre of ordinary tap water. Add a dose (one cap) of antifoam (2) to the water already in the container (N). Put the container unit back inside the appliance. OPERATION Open the door of the unit socket (K); insert the unit plug (6) all the way in without pressing the button until the mechanism clicks into place; then check that it is secure (fig. 4). To disconnect the unit plug (6) from the appliance, press the button (7) and pull the unit so that it separates from the appliance. Connect the plug to a compatible power outlet. STEAM FUNCTION Press the main switch (B). The steam-ready indicating light (E) will start flashing; after about 5-10 minutes it will become fixed indicating that the appliance is ready to generate steam. ATTENTION: do not dispense steam when the indicating light (E) is flashing, wait for it to become fixed so that the system has stabilised and the most effective results can be obtained. Press the steam/detergent request button (3) on the handle to dispense steam. Note: The handle (2) comes with a safety button (4) which prevents the accidental dispensing of steam by children or other people who do not know how to use the appliance. If the flexible hose is temporarily left unattended while the appliance is on, lock the safety button (4). To start dispensing steam again, put the safety button in its original position. On first use, a few drops of water may leak out because the thermal stabilisation inside the hose is not perfect yet. Therefore, it is advisable to direct the first jet of steam onto a rag until the jet is even. ENGLISH 45
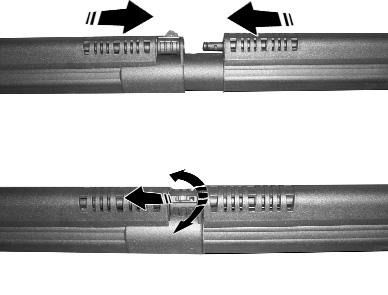
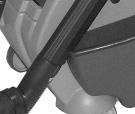
7 ENGLISH VACUUM FUNCTION Press the main switch (B). Hold the button (5) on the handle (2) down for a few seconds and the appliance will start vacuuming. To stop the vacuuming action, hold the button (5) on the handle (2) down for another few seconds. DETERGENT FUNCTION Press the main switch (B). The steam-ready indicating light (E) will start flashing; after about 5-10 minutes it will become fixed indicating that the appliance is ready to generate steam. Press the detergent switch (C). The detergent indicating light (G) turns on. Press the steam/detergent request button (3) on the handle to dispense detergent. Note: The handle (2) comes with a safety button (4) which prevents the accidental dispensing of steam by children or other people who do not know how to use the appliance. If the flexible hose is temporarily left unattended while the appliance is on, lock the safety button (4). To start dispensing steam again, put the safety button in its original position. To turn off the detergent function, press the switch (C). The indicating light (G) turns off. COMBINED FUNCTIONS The functions can be combined: STEAM VACUUM STEAM DETERGENT DETERGENT VACUUM STEAM DETERGENT VACUUM To combine the various functions, simply select those you wish to use according to the instructions described above. ADJUSTING THE STEAM FLOW This appliance allows optimising the steam flow on three levels by using the steam dial (D). Turn the dial in a clockwise direction to increase the steam flow. Turn the dial in an anticlockwise direction to reduce the steam flow. Gentle steam: to spray plants, clean delicate fabrics, upholstery, sofas, etc. Normal steam: for carpets, rugs, glass and floors; Strong steam: to remove grime, stains, oil and to disinfect; CONNECTING THE ACCESSORIES All the Mondial Vap accessories can be used with each other. Connect them to the sprayer handle by following these instructions (fig. 5): Place the accessory locking switch () (present on every accessory) in the OPEN position (a). Attach the desired accessory to the handle. Place the switch () in the CLOSED position (b). Make sure the connection is secure. Another fastening button is present on the steam+vacuuming extension tubes (9). Proceed as indicated above for the other accessories and release the tubes by sliding the button until it is in the locked position. EMPTYING AND CLEANING OF THE DIRT CONTAINER (N) When the dirt in the container (N) reaches the maximum level permitted, the safety float (P) automatically stops the vacuuming function. At the same time, the container-full indicating light (F) starts to flash on and off. ATTENTION: turn off the appliance and do not restart it until the water level in the container has been restored as descried in the chapter PREPARATION OF DIRT CONTAINER. Damage may be caused to the HEPA filter (R) if the appliance is restarted immediately. To resume cleaning, proceed as illustrated below, and then fill the container with water. If the water in the dirt container (N) is very dirty, replace it. To empty the container, proceed as follows: Turn off the appliance from the main switch (B) and disconnect the power cord from the mains power. Release the locking lever of the dirt container (L) and slide the container unit (M) towards the outside of the appliance (fig. 3). Lift the cover of the dirt container (O). Clean the dirt container (N). If you want to continue working, restore the water level as indicated in the chapter PRE- PARATION OF DIRT CONTAINER. Put the dirt container unit (M) back inside the appliance. Note: empty the dirt container (N) before putting away your Mondial Vap. 46
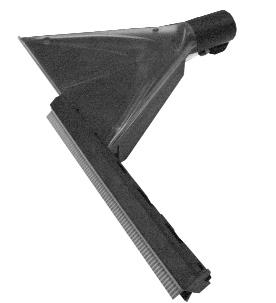
8 PRESSURE GAUGE Mondial Vap is equipped with a convenient and accurate gauge (H) for immediately displaying the operating pressure. NO WATER The no water indicating light (F) will turn on and an acoustic signal will sound when there is no water in the water tank. Before continuing to work, fill the water tank as described in the chapter FILLING THE WATER (I) AND DE- TERGENT (J) TANK. NO DETERGENT The no detergent indicating light will start to flash and an acoustic signal will sound when there is no detergent. To restore the detergent level, proceed as described in the chapter FILLING OF WATER (I) AND DETERGENT (J) TANK. NO WATER IN BOILER The boiler may run out of water if the refilling system is not working properly. This type of fault is signalled by the flashing of the indicating light (F) and an acoustic signal. If the problem persists, contact the technical service centre. STORING ACCESSORIES The Mondial Vap accessories can be stored in the side baskets (T) or in the handle baskets (V and Z). The cord can be stored in a side basket while the handle with the two extension tubes and brush attached can be placed in the appropriate lodging, resting the handle on the furrow present on the carrying handle (U) and lodging the tube in the special seat located inside the side basket (T) (fig. 6). TIPS ON USING THE ACCESSORIES Before treating leather, special fabrics and wooden surfaces with steam, consult the manufacturer s instructions and always carry out a test on a hidden part or sample. Allow the treated area to dry in order to check for any changes in colour or deformations. Be careful when cleaning wooden surfaces (furniture, doors, etc.) and terracotta floors because excessive use of steam may damage the wax, polish or colour of the surfaces to be cleaned. It is recommended to steam these surfaces only for short periods at a time or to clean them with a cloth that has already been steamed. Use the lowest steam setting on particularly delicate surfaces such as synthetic materials, lacquered surfaces, etc. If cleaning glass surfaces in particularly cold weather, preheat the glass by starting to spray at a distance of about 50 centimetres from the surface. To care for your plants, it is recommended to spray at a minimum distance of 50 cm. MULTI-PURPOSE BRUSH (10) This brush is recommended for large surfaces, ceramic floors, marble floors, parquet floors and carpets, etc. Brush attachment (11) for vacuuming only. Liquid-vacuuming attachment (12) for retrieving liquids on smooth surfaces. Carpet attachment (13) for carpets and rugs. The multi-purpose brush can be connected to the flexible hose via the extension tubes (9) or can be attached directly to the handle. Assembling the multi-purpose brush: To apply the different attachments to the multipurpose brush, shift the two slides (10a) located on the back of the brush outwards and apply the attachment suitable for the type of surface to be cleaned. To lock the attachment in place, shift the two slides (10a) inwards. ATTENTION: refer to the chapter Tips on using the accessories. VACUUM-STEAM SQUEEGEE TOOL (19) This accessory is recommended for using on large glass surfaces, large mirrors, and all kinds of smooth surfaces. The squeegee tools (19) can be connected to the flexible hose via the extension tubes (9) or can be attached directly to the handle (2). Follow these instructions for the correct use of the squeegee tools: Apply steam evenly on the surface to be cleaned in order to dissolve the dirt. Press the rubber wiper on the surface to be cleaned, move vertically from the top to the bottom with the vacuuming function activated. Attention: in particularly cold weather, preheat ENGLISH 47
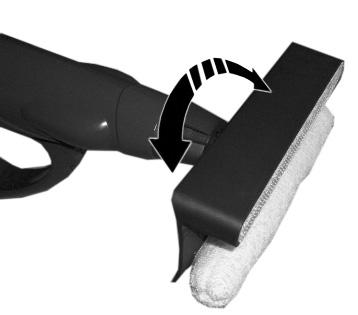
9 ENGLISH the glass by starting to spray at a distance of about 50 cm from the surface to be treated. 120 ACCESSORY (15) This accessory is recommended for hidden areas with are hard to reach with other accessories such as: treating stains on carpets or rugs before passing the brush; cleaning stainless steel, glass, mirrors, coated and enamelled surfaces; cleaning angles such as stairs, window frames, door jambs, aluminium profiles; cleaning the base of taps; cleaning shutters, radiators, car interiors; spraying house plants from a distance; eliminating odours and creases from clothing. The 120 accessory can be attached directly on the handle (2) or can be connected to the flexible hose via the extension tubes (9). It can also be used in combination with the following accessories: coloured 120 brushes (16) suitable for removing grime from very narrow surfaces such as gas rings, shutters, gaps between tiles, toilet bowls, etc. The different colours allow using the same brush on the same surface. The steam nozzle (17) is for reaching even the most hidden corners and is suitable for cleaning radiators, door and window frames, bathroom fixtures and shutters. To connect the nozzle to the 120 accessory, simply screw it on like the coloured brushes, which in turn can be screwed onto the nozzle. 120 tool nozzle (1) suitable for vacuuming dirt that has been removed from narrow surfaces such as gaps between tiles, door jambs, shutter slits, etc. SMALL VACUUM-STEAM NOZZLE (20) This accessory is recommended for various types of medium sized surfaces or for washing fabric surfaces such as sofas, mattresses, etc. using the following attachments supplied with the appliance: the squeegee attachment (21) is recommended for small mirrors, small windows, glass and cement walls, etc. the brush attachment (22) is recommended for carpets, stairs, car interiors, all kinds of fabric surfaces and is also useful for removing animal hairs from these types of surfaces. FABRIC BRUSH WITH SPRAYER (25) This accessory is suitable for treating fabrics such as sofas and armchairs, etc. using the combined action of water spray and vacuum power. FLOOR BRUSH WITH SPRAYER (26) NOTE: use this accessory with the detergent function on, do not use with steam. This brush is recommended for large surfaces, ceramic floors, marble floors, parquet floors and carpets, etc. with the combined action of water spray and vacuum power. The attachment (27) can be separated from the brush by sliding it off as shown in figure 7, so that it glides more easily over carpets and rugs. PRESSURE NOZZLE (29) This accessory can reach even the most hard to reach corners and is suitable for cleaning shutters, radiators, etc. ACCESSORY FOR CLEANING TOILET BOWL (30) This special accessory was specifically designed to clean under toilet bowl seats, in fact, its shape allows easily cleaning the area hidden under the seat that would otherwise be difficult to reach. The coloured brushes can also be connected to this accessory (16). ATTENTION: Use the toilet bowl cleaning accessory only for this purpose because, due to its special shape, any steam or detergent dispensed may be directed towards the user, with the risk of burns. Be very careful and when not in use, insert the steam lock on the FLEXIBLE hose via the safety button (4). 4
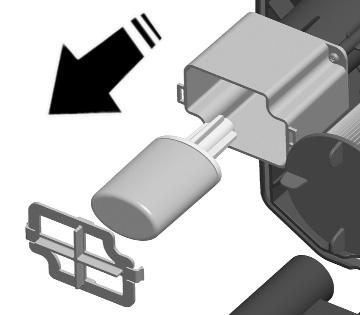
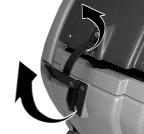
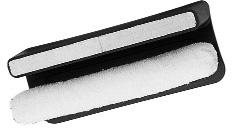
10 SPRAY GUN (31) / CURTAIN FRESHENING-UP ACCESSORY (32) Open the door of the unit socket (K); insert the unit plug of the spray gun (6) all the way in without pressing the button until the mechanism clicks into place; then check that it is secure (fig.4). To disconnect the unit plug (6) from the appliance, press the button (7) and pull the unit so that it separates from the appliance. Insert the catch located at the base of the curtain freshening-up accessory (32) in the special seat present on the end of the spray gun (31), then turn until it is completely blocked (fig. ). ATTENTION! The curtain freshening-up accessory (32) gets very hot during use, therefore be very careful when removing it. Use an oven mitt, or wait for it to cool down. This accessory is suitable for ironing and freshening-up curtains without having to remove them. HOW TO USE THIS ACCESSORY: pass the accessory from the top to the bottom of the curtain in order to spray and iron the curtains, removing any creases and unpleasant odours from the fabrics. The practical sponge present on the accessory collects any drops of steam. To clean the sponge, simply remove it and wash. Once dry, put it back on the accessory using the Velcro. GENERAL MAINTENANCE Before any type of maintenance, make sure the power cord is not connected to the mains power. After using the brushes, leave the bristles to cool down in their natural position in order to prevent any deformations. Periodically check the condition of the gaskets located in the unit plug (6). If necessary, replace them with an approved spare part. Also check the connection gaskets of the extension tubes (9) and handle (2). Use a damp cloth to clean the outside. Do not use solvents or detergents because they could damage the plastic surfaces. CLEANING THE DIRT CONTAINER UNIT (M) Turn off the appliance from the main switch (B) and disconnect the power cord (A) from the mains power. Release the locking lever of the dirt container (L) and slide the container unit (M) towards the outside of the appliance (fig. 3). Lift the cover of the dirt container (O). CLEANING THE HEPA FILTER (r) Turn the HEPA filter (r) in an anti-clockwise direction and pull it so that it detaches from the filter cover (O) (fig. 9). Rinse the HEPA filter under running water to remove any dirt. Allow the filter to dry before reconnecting it to the cover (O). ATTENTION: Do not clean the filter with brushes, rags or any object which may exert an abrasive action, because rubbing or buffering may damage it and consequently reduce its filtering performance. Do not use detergents, do not rub the filter and do not wash it in a dishwasher. To continue working, reassemble the filter by following the above operations in reverse. The filter has a lifecycle of about 100 hours. CLEANING U-SHAPED TUBE (S) Separate the U-shaped tube (S) from the cover and rinse under running water. Make sure that the small tube positioned on the bottom of the U-shaped tube is not obstructed. If so, separate it from the U-shaped tube and wash under running water to remove any obstructions. When replacing the U-shaped tube on the cover of the dirt container, make sure to position it by aligning the indent on the tube with the indent on the cover (fig. 10). ENGLISH 49
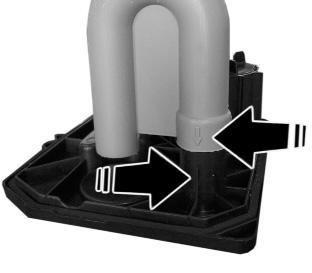
11 CLEANING THE FLOAT (P) When cleaning the dirt container unit (M), make sure there are no obstructions or dirt inside the float compartment. If the float and its cage require cleaning, proceed as follows: Open the cage of the float by working on the two tabs and remove the cover of the float (Q) (fig. 11). Remove the float. Clean the float compartment, the float and the cover and remove any dirt. Repeat these operations in reverse to close everything. ENGLISH EMPTYING OF TANKS (I and J) The water tank (I) and detergent tank (J) can be emptied easily. To empty the tanks proceed as follows: Release the locking lever of the dirt container (L) and slide the container unit (M) towards the outside of the appliance (fig. 3). As shown in figure 12, once the container unit (M) has been removed, there are two small tubes on the bottom of the appliance for emptying the tanks (I) and (J). Remove the tube from the fastening clip and leave it free. Remove the cap that closes the tube and allow the tank to empty. NOTE: It is recommended to place a large recipient under the tank that needs to be emptied. Once the tank has been emptied, replace the cap to close the tube and reattach the tube to the clip. ATTENTION: make sure the caps closing the tubes are repositioned correctly in order to prevent water from accidentally leaking out of the tanks. Make sure the two tubes are repositioned underneath the tie-rod that supports them (as shown in figure 12) to prevent these from breaking or compromising the correct position of the container unit (M) when repositioned. 50
12 NOTE
Fig.1 Fig.2 Fig.3. Fig.4 Fig.5 (8a)
") Fig.1 Fig.2 Fig.3 Fig.4 Fig.5 (8a) Fig.6 (8b) Fig.7 5 2 4 9 8 20 24 1 3 8 7 21 22 6 14 25 8 19 23 8 15 17 27 26 16 T S B F E H D A C G I O N J O K M Q K L P 10a 8 10 10a R 11 12 13 28 18 - M0S08412 Edizione
Fig.1 Fig.2 Fig.3 Fig.4 Fig.5 (8a) Fig.6 (8b) Fig.7 5 2 4 9 8 20 24 1 3 8 7 21 22 6 14 25 8 19 23 8 15 17 27 26 16 T S B F E H D A C G I O N J O K M Q K L P 10a 8 10 10a R 11 12 13 28 18 - M0S08412 Edizione
VAPORETTINO LUX A B C E. Fig.1 Fig.2 Fig.3 Fig.4. Fig.5 Fig.6 Fig.7 Fig.8. Fig.9 Fig.10 Fig.11. Vaporettino Lux 1R02
 H A B 4 1 G D 8 6 5 7 10 2 C E F 9 3 Fig.1 Fig.2 Fig.3 Fig.4 Fig.5 Fig.6 Fig.7 Fig.8 Fig.9 Fig.10 Fig.11 Vaporettino Lux 1R02 Read these instructions carefully before using the appliance. KEY GENERATOR
Stira e Aspira M0S O08
 Stira e Aspira M0S05484 1O08 Read these instructions carefully before using the appliance. KEY 1) Ironing surface 2) Opening handle 3) Vaporella supporting-grill 4) On/off switch 5) Suction switch 6) Supply
Fig. 1 Fig. 2 Fig. 3 Fig. 4 Fig. 5. Fig. 6 Fig. 7 Fig. 8 Fig. 9 Fig. 10. Fig. 11 Fig. 12 Fig. 13. VL Super Pro - M0S Edizione 1L08
 9 1 15 13 12 8 6 5 4 2 3 10 14 7 11 16 Fig. 1 Fig. 2 Fig. 3 Fig. 4 Fig. 5 Fig. 6 Fig. 7 Fig. 8 Fig. 9 Fig. 10 Fig. 11 Fig. 12 Fig. 13 VL Super Pro - M0S06995 - Edizione 1L08 VAPORELLA Dear Customer, Thank
VL FOREVER 600 INOX - VL FOREVER VL FOREVER 600 PRO
 VL FOREVER 600 INOX 7 10 VL FOREVER 600 11 8 3a 10 11 7 9 3 VL FOREVER 600 PRO 6 4 5 2 1 10a 11 6a 7 10 Fig.1 Fig.2 Fig.3 Fig.4 Fig.5 Fig.6 VL FOREVER 600 / INOX /PRO - M0S09515 1Q09 Read these instructions
INSTRUCTIONS FOR USE... 2
 5095109600 Rev. 1 19-03-2012 825440 INSTRUCTIONS FOR USE... 2 De Longhi Australia Pty Ltd ABN 49 104 012 857 Po Box 4540 Casula Mall NSW 2170 Australia Phone: 1800 126 659 Fax: 1800 007 289 www.kenwood-australia.com
VL FOREVER 600 INOX - VL FOREVER 600
 7 10 8 3a 11 9 3 7 11 6 4 5 2 1 10 8 6a 3a 9 3 Fig.1 2 Fig.2 1 Fig.3 Fig.4 Fig.5 VL FOREVER 600 /600 INOX M0S08218 1O07 Read these instructions carefully before using the appliance. KEY 1) Cable winder
Fig. 2. Fig. 1. Fig. 3. Fig. 4. Fig. 5. Fig. 7 Fig. 6. Fig. 9. Fig. 8. Fig. 10 MAX H2O
 R 1 2 23 3 5 6 7 10 9 8 4 13 19 23 18 12 17 21 16 11 22 14 15 20 Fig. 1 Fig. 2 2 1 Fig. 3 Fig. 4 MAX H2O 1 Fig. 5 2 Fig. 7 Fig. 6 Fig. 9 Fig. 8 Fig. 10 E N G L I S H KEY 1) Carrying handle 2) Mains ON/OFF
Polti S.p.A. reserves the right to change equipment or accessory specification without prior notice.
 Daisy R 1) Iron temperature adjustment knob 2) Boiler ON/OFF switch 3) Steam button 3a) Iron heating indicator light 3b) Pressure indicator light 3c) Continuous steam jet button 4) Iron on/off switch 5)
VAPORELLA. Fig. 1 Fig. 2. Fig. 3 Fig. 4
 3b 3 1 6 3a 4 2 7 8 9 5 Fig. 1 Fig. 2 Fig. 3 Fig. 4 1) Iron temperature adjustment knob 2) Boiler ON/OFF switch 3) Steam button 3a) Iron heating indicator light 3b) Continuous steam jet button 4) Iron
a V E1 B1 A5 E3 E4 P E5 W1 X 25-A T Z. Vtt LECOASPIRA Cod. M0S Edizione 2H01
 aspira 910 18 16 21 20 22 24a 22 19 34 17 24 23 29 13 11 13 30 31 14 15 6 5 1 15 14 4 10 12 11 28 26 33 32 27 7 3 2 9 8 25 C N V E1 C E E1 E2 U A3 A4 A2 A1 O P E5 E3 E4 B3 B1 A5 G F D C C 25-A L Q C J
Vaporetto Lecoaspira Intelligent - M0S07972 Edizione 1N11
 X1 F X Y Y1 R W1 W2 W4 W3 W Q G S B3 Q T Z W5 B2 M E7 Vaporetto Lecoaspira Intelligent - M0S07972 Edizione 1N11 C D C B3 B1 B2 A5 A1 A3 A4 A2 U P E5 24 25 26 23 17 27 13 14 15 16 18 19 22 20 20-A O O1
7a Fig.1. Fig.3. Fig.2. Fig.4 M0S U01
 7a 7 5 4 2 8 3 1 10 6 9 11 Fig.1 1 2 3 Fig.2 1 2 Fig.3 Fig.4 M0S10908 1U01 @ESPRESSO PRECAUTIONS KEEP THESE INSTRUCTIONS Read these instructions for use carefully before using the appliance. Any use which
Pulitore a vapore Steam cleaner Nettoyeuse à vapeur Dampfreiniger Limpiador de vapor limpador a vapor stoomreiniger ατμοκαθαριστής Пароочиститель
 Pulitore a vapore Steam cleaner Nettoyeuse à vapeur Dampfreiniger Limpiador de vapor limpador a vapor stoomreiniger ατμοκαθαριστής Пароочиститель очищувач паром البخار االنظف 4145 A L I B C D E F G H 1
V.lla Pro 5200 R - Cod. M0S Edizione 1H04
 Pro 5200 R 3 12 10 7 8 1 11 2 6 9 5 4 13 V.lla Pro 5200 R - Cod. M0S05387 - Edizione 1H04 ENGLISH Vaporella Pro 5200 R R Pro 5200 R 1) Patented safety cap 2) 3-Position switch 3) Iron heating indicator
ITALIANO KUBOX ESPAÑOL FRANÇAIS DEUTSCH ENGLISH ROMÂNĂ
 PORTUGUÊS Nederlands DEUTSCH ITALIANO FRANÇAIS ESPAÑOL 1 ROMÂNĂ 1 2 9 3 8 5c 4 7 5a 5 6 5b Fig. 1 Fig. 2 Fig. 3 Fig. 4 Fig. 5 Fig. 6 Fig. 7 Fig. 8 Fig. 9 KUBOX 2-1S01 Read these instructions carefully
24 2A A4 A2 E2 B1 E3 E4 A1 A5 F O1 N G O L K T W1 X X1 PQ S 20-A. Polti S.p.A Bulgarograsso (CO) - Italy - Via Ferloni, 83
 - Italy - Via Ferloni, 83") COP- - M0S09417-1Q07:V_tto_1300cop.qxd 09/07/2010 16.29 Pagina 2 24 2A 4 6 7 3 5 8 10 25 23 2 26 9 1 11 12 17 18 27 16 22 15 14 20 19 13 B3 B2 A3 E1 E5 E E1 E6 A4 A2 E2 B1 E3 E4 A1 A5 F O1 N G D C P K1
COP- - M0S09417-1Q07:V_tto_1300cop.qxd 09/07/2010 16.29 Pagina 2 24 2A 4 6 7 3 5 8 10 25 23 2 26 9 1 11 12 17 18 27 16 22 15 14 20 19 13 B3 B2 A3 E1 E5 E E1 E6 A4 A2 E2 B1 E3 E4 A1 A5 F O1 N G D C P K1
Polti S.p.A Bulgarograsso (CO) - Italy - Via Ferloni, 83 MAX. Fig. 10. Fig. 6. Fig. 6a. Fig. 14. Fig. E. Fig. 9. Fig.
 - Italy - Via Ferloni, 83 MAX. Fig. 10. Fig. 6. Fig. 6a. Fig. 14. Fig. E. Fig. 9. Fig.") COP - - M0S09128 1Q01:V_tto_1300cop.qxd 18/01/2010 16.43 Pagina 2 Fig. 1 Fig. 5 Fig. 2 Fig. 3 Fig. 4 Fig. 6 Fig. 6a Fig. 7 Fig. 9 Fig. 10 Fig. 12 Fig. 14 MAX Fig. 8 Fig. 11a Fig. 11b Fig. 13 Fig. C Fig.
COP - - M0S09128 1Q01:V_tto_1300cop.qxd 18/01/2010 16.43 Pagina 2 Fig. 1 Fig. 5 Fig. 2 Fig. 3 Fig. 4 Fig. 6 Fig. 6a Fig. 7 Fig. 9 Fig. 10 Fig. 12 Fig. 14 MAX Fig. 8 Fig. 11a Fig. 11b Fig. 13 Fig. C Fig.
(A) V.lla NEW CONCEPT 450 PATENT - M0S Edizione 1H09
 V.lla NEW CONCEPT 450 PATENT - M0S Edizione 1H09") (A) 8 12 7 10 10a 11 3a 1 9 2 5 4 6 3a 3 V.lla NEW CONCEPT 450 PATENT - M0S05855 - Edizione 1H09 ENGLISH Vaporella New Concept 450 1) Boiler cap 2) Illuminated ON/OFF switch 3) Removable tank 3a) Tank
(A) 8 12 7 10 10a 11 3a 1 9 2 5 4 6 3a 3 V.lla NEW CONCEPT 450 PATENT - M0S05855 - Edizione 1H09 ENGLISH Vaporella New Concept 450 1) Boiler cap 2) Illuminated ON/OFF switch 3) Removable tank 3a) Tank
Fig. 1 Fig. 2 Fig. 3 Fig. 4. Fig. 5 Fig. 6 Fig. 7 Fig. 8. Fig. 9 Fig. 10 Fig. 11 Fig. 12. Fig. 12a Fig. 12b Fig. 13 Fig. 13a Fig.
 Fig. 1 Fig. 2 Fig. 3 Fig. 4 Fig. 5 Fig. 6 Fig. 7 Fig. 8 Fig. 9 Fig. 10 Fig. 11 Fig. 12 Fig. 12a Fig. 12b Fig. 13 Fig. 13a Fig. 14 Fig. 15 Fig. 16 Fig. 17 Fig. 18 Fig. 19 Fig. 20 Fig. 21 Fig. 22 Fig. 23
Utility Master. Steam cleaner. User Guide. Performance is everything. S10 Series. vax.co.uk
 Utility Master Steam cleaner User Guide S10 Series vax.co.uk Performance is everything. Contents Contents 1 Machine Overview 2 General Safety Information 3 Getting Started 4 How To Use 5 Looking After
c o m p a c t AS 801 c o m p a c t AS 801
 compact AS 801 9 2 8 27 7 19a 17 18 21 20 18b 22 3 16 19 18 18a 23 4 N 24 25 26 10 11 6 M 12 5 1 4 A 13 14 15 L I H F A1 J B 5-A G B1 C E D L ECOLOGICO AS801- Cod. - Cod. M0S05631 M0S05407 - Edizione -
Eco Pro Forever 450. Forever 980. Forever 980 Inox. Forever 900. Forever Forever Clean Pratica. 2H Professional.
 COP-LECOASPIRA 715 - M0S07830-1N02.qxp 08/02/2007 15.50 Pagina 2 Eco Pro 3000 Aspirovapor 715 Forever Clean Pratica Forever 440 Super Pro Forever 1000 2H Professional Forever 980 Easy Professional Forever
VaporMax PC800 Steam Cleaner
 GB VaporMax PC800 Steam Cleaner Thank you for purchasing a Simac steam cleaner. It is the result of expert research and development to produce a quality functional product. Rigorous quality control ensures
Power System. Sprint. Easy Steam. Super Pro. Forever 450. Forever 900 Pratica. Forever Forever Clean. Vaporettino Power.
 P06959_VL POWER_syCOPE 19-01-2006 16:30 Pagina 2 PowerSystem Eco Pro 3000 Forever Clean Forever 450 Forever 1000 2300 Sprint 1300 2085 900 Easy Steam Super Pro Forever 900 Pratica 2H Professional Easy
M D. 17b B1 6-A. 17a. 17c. L ECOLOGICO AS810 - Cod. M0S Edizione 2G09. L ECOLOGICO AS810 - Cod. M0S Edizione 1F04
 AS 810 15 1 14 3 5 6 4 8 12 A 24 N 9 11 10 13 20 2 21 14 20 23 22 E 19 22 21 C M M D L C1 B F I O H G B1 6-A L ECOLOGICO AS810 - Cod. M0S04076 - Edizione 1F04 16 W 17b 17a 17c L ECOLOGICO AS810 - Cod.
Vaporetto Lecoaspira Parquet - M0S10067 Edizione 1S01
 PARQUET Fig. 1 Fig. 2 Fig. 3 Fig. 4 Fig. 5 Fig. 6 Fig. 6a Fig. 7 Fig. 8 Fig. 9 Fig. 10 Fig. 11a Fig. 11b Fig. 11c Fig. 12 Fig. A1 Fig. B Fig. C 1c Fig. D Fig. A2 Fig. A3 2c Vaporetto Lecoaspira Parquet
2 A C 3 1 D U R S E T. Vtt 1500 No-Volt - M0S Edizione 1H05
 R B I 2 A C 3 M G 5 2a 1 D 6 4 U R S Q F H E T 5 6 7 4 21 9 9 12 15 22 9 8 10 23 13 17 16 16 14 18 19 20 24 Vtt 1500 No-Volt - M0S05365 - Edizione 1H05 ENGLISH Vaporetto 1500 GENERATOR A) Patented Safety
EN Bagged Vacuum Cleaner
 SVC 8500TI EN Bagged Vacuum Cleaner - 1 - EN Bagged Vacuum Cleaner Important safety instructions READ CAREFULLY AND STORE FOR FUTURE USE. This vacuum cleaner may be used by children 8 years of age and
Vaporettino Extra AS705 AS300 AS570 AS530. Polti S.p.A Bulgarograsso (CO) - Italy - Via Ferloni, 83
 - Italy - Via Ferloni, 83") COP - VT 2600-2600 KIT M0S07612 1O03:V_tto_1300cop.qxd 02/04/2008 9.51 Pagina 2 Aspirovapor Eco Pro 3000 2600 Vaporettino Extra 1600 Sprint 2085 AS910 AS710 Kit AS810 AS710 AS807 Easy Pocket AS715 AS705
COP - VT 2600-2600 KIT M0S07612 1O03:V_tto_1300cop.qxd 02/04/2008 9.51 Pagina 2 Aspirovapor Eco Pro 3000 2600 Vaporettino Extra 1600 Sprint 2085 AS910 AS710 Kit AS810 AS710 AS807 Easy Pocket AS715 AS705
Hot Chocolate Dispenser
 Hot Chocolate Dispenser Instruction manual Model: CN219-A AU Telephone Helpline: 1300225960 Safety Tips Position on a flat, stable surface. A service agent/qualified technician should carry out installation
Pro6 Duo. Stampa Novaprint - Tel cod USER MANUAL
 Pro6 Duo Stampa Novaprint - Tel.0424-539449 - www.novaprint.it cod.10161031310 USER MANUAL 9. Troubleshooting PROBLEM CAUSE SOLUTION Boiler fails to heat up. Device not plugged in. Button 3 and/or 4 not
I K. V.lla ADVANCED SYSTEM - M0S Edizione 1H10
 Advanced System O M N E G H J J1 F C P W Q D A I K B L R X V.lla ADVANCED SYSTEM - M0S06060 - Edizione 1H10 ENGLISH Vaporella Advanced System Advanced System A) Tank cap B) Main switch C) Board main switch
Index. page 8. 1 Description of appliance. Description of accessories. page 4. 3 Precautions for use. page 5. 4 Getting started
 Index 1 Description of appliance page 2 2 Description of accessories page 3 3 Precautions for use 4 Getting started page 4 page 5 5 Practical use of the accessories page 5 6 Continuous refilling page 6
P.O.D. Pressure On Demand
 P.O.D. Pressure On Demand OWNERS MANUAL & INSTRUCTIONS Please! Read all these instruction carefully before use and save these instructions for future reference. SAFETY INSTRUCTIONS NEVER open the Pressure
Grime Pro+ Detergent + Steam Handheld Let s get started
 Grime Pro+ Detergent + Steam Handheld Let s get started S4S-A+ vax.co.uk Let s talk safety This steam cleaner is intended for household use only and NOT for commercial or industrial use. Only use the steam
U V S R2 W INSTRUCTION MANUAL ENGLISH G H PRINTED IN P.R.C /01
 T C U V B A INSTRUCTION MANUAL ENGLISH F E S R W D GB R M G H PRINTED IN P.R.C. 48007909/0 I J K L Q N O P P P3 P4 P5 3 4 5 4 5 6 7 6 7 8 9 8 9 0 0 3 3 4 5 IMPORTANT Safety reminders This cleaner should
IMPORTANT Read this manual thoroughly before using the appliance. This will ensure optimum results and maximum safety.
 GB IMPORTANT Read this manual thoroughly before using the appliance. This will ensure optimum results and maximum safety. Save these instructions for future reference. IMPORTANT SAFEGUARDS Read the following
- cod
 Diamant www.novaprint.it - cod.10161026300 User Instructions Read carefully these instructions before using the machine. User instructions DIAMANT Steam pressure cleaner with Iron NOTE Dear Client, congratulations
SUS-12 Steam Cleaner User Manual
 SUS-12 Steam Cleaner User Manual Steam Cleaner SUS-12 User Manual IMPORTANT SAFETY INSTRUCTIONS Read all instructions before using your Steam Cleaner. When using an electrical appliance, basic precautions
2 000W CYCLONIC BAGLESS VACUUM
 2 000W CYCLONIC BAGLESS VACUUM /GVAVK08 Instruction Manual Contents Guide to the Appliance Caring for the Environment Safety Information and Warnings Basic Set Up Care and Maintenance Troubleshooting 2
SC300 BEFORE USE PLEASE READ THE MANUAL AND SAFETY INSTRUCTIONS.
 TM Model SC300 BEFORE USE PLEASE READ THE MANUAL AND SAFETY INSTRUCTIONS. Please retain for future reference. Thank you for purchasing your Earlex SteamStation SC300, we hope you enjoy using it. Please
Vax Ltd., Kingswood Road, Hampton Lovett, Droitwich, Worcestershire, WR9 OQH, UK - website: vax.co.uk. Version 1.
 --- Vax Ltd., Kingswood Road, Hampton Lovett, Droitwich, Worcestershire, WR9 OQH, UK email: info@vax.co.uk - website: vax.co.uk Version 1.2 User Guide Vax Careline: (UK) 0844 412 8455 Steam cleaner Get
Steam Fresh Let s get started
 Steam Fresh Let s get started VX22 vax.com.au Let s talk safety This steam mop is intended for household use only and NOT for commercial or industrial use. WARNING: Danger of scalding WARNING: The stick
Care and Use Instructions
 EB0029 0114.qxp_Layout 1 16/01/2014 14:07 Page 1 Model SC1000 Care and Use Instructions For service and further information, please contact: Ewbank LLC, 8261 Highway 73, Suite F, Stanley, NC 28164, USA
USER S GUIDE IMPORTANT SAFETY INFORMATION READ ALL INSTRUCTIONS BEFORE USING VACUUM CLEANER USE ONLY AS DIRECTED. WATER FILTRATION VACUUM CLEANER
 WATER FILTRATION VACUUM CLEANER USER S GUIDE WATER FILTRATION VACUUM CLEANER MODEL: SA861-80 USER S GUIDE U.S. Distributed by: Thane International, Inc. La Quinta, CA 92253 U.S.A. www.thane.com IMPORTANT
PSTMH20 2-in-1 Multi-Purpose & Multi-Surface Steam Floor Mop with Detachable Handheld Steamer
 PSTMH20 2-in-1 Multi-Purpose & Multi-Surface Steam Floor Mop with Detachable Handheld Steamer INTRODUCTION Thank you for choosing Pyle for your household cleaning needs. Our steamer products use the active
Fig. 1 Fig. 2 Fig. 3 Fig. 4. Fig. 5 Fig. 6 Fig. 7 Fig. 8. Fig. 9 Fig. 10 Fig. 11 Fig. 12. Fig. 13 Fig. 14 Fig. 15 Fig. 16
 Special Allergy Fig. 1 Fig. 2 Fig. 3 Fig. 4 Fig. 5 Fig. 6 Fig. 7 Fig. 8 Fig. 9 Fig. 10 Fig. 11 Fig. 12 Fig. 13 Fig. 14 Fig. 15 Fig. 16 Fig. 17 Fig. 18 Fig. 19 Fig. 19a Fig. 20a Fig. 20b Fig. 20c Fig. 20d
Ireland. Australia. New Zealand
 UK Ireland Australia New Zealand 2 3 4 5 Intended use Your Black & Decker vacuum cleaner has been designed to vacuum dry substances. This product is intended for household use only. Safety instructions
FSMH1621 English 5 12
 www.blackanddecker.com FSMH1621 English 5 12 A B C D E 2 F G H I J K 3 L M 4 (Original instructions) ENGLISH FSMH1621 STEAM MOP Technical data Steam Mop FSMH1621 Voltage V ac 220-240 Power W 1600 Tank
Vacuum Cleaner User's manual
 Vacuum Cleaner User's manual EN Before first use, please read all instructions contained in this user's manual carefully, even if you are already familiar with using similar products. Only use this appliance
MOD COD REV. 0 del 30/07/2013
 MOD. 6431 COD. 2105100200 REV. 0 del 30/07/2013 De Longhi Appliances Srl Divisione Commerciale Ariete Via San Quirico, 300 50013 Campi Bisenzio (FI) - Italy E-Mail: info@ariete.net Internet: www.ariete.net
* depending on model.
 EN EASY PRESSING * * depending on model www.tefal.com 1 2 3 4 5 7* 8 9 10 11 6 12 14* 13* 15 * * depending on model Click!! Click!! fig. 1 fig. 2 fig. 3 fig. 4 fig. 5 fig. 6 fig. 7 fig. 8 fig. 9 ¾ fig.
Ireland. Australia. New Zealand
 UK Ireland Australia New Zealand 2 3 4 5 Intended use Your Black & Decker vacuum cleaner has been designed to vacuum dry substances. This product is intended for household use only. Safety instructions
Professional SLIM STEAM POCKET MOP S3455UKL OWNER S GUIDE
 Professional SLIM STEAM POCKET MOP S3455UKL OWNER S GUIDE IMPORTANT SAFETY INSTRUCTIONS For Household Use Only WHEN USING YOUR SHARK STEAM MOP, BASIC SAFETY PRECAUTIONS SHOULD ALWAYS BE FOLLOWED, INCLUDING
W Steam Iron User Instructions SHIR01
 2000-2400W Steam Iron User Instructions SHIR01 CONTENTS Introduction... 2 Product Safety... 3 Electrical Safety... 4 Features... 5 Instructions for Use... 5-7 Cleaning... 7 Troubleshooting... 7 Guarantee...
OWNER S MANUAL LG CORDLESS VACUUM CLEANER
 OWNER S MANUAL LG CORDLESS VACUUM CLEANER This information contains important instructions for the safe use and maintenance of the vacuum cleaner. More importantly, please read all of the information on
CONTENTS QUICK REFERENCE GUIDE PROGRAMME CHART
 1 CONTENTS Please read instruction for use QUICK REFERENCE GUIDE PREPARING THE LAUNDRY SELECTING A PROGRAMME AND OPTIONS STARTING AND COMPLETING A PROGRAMME CHANGING A PROGRAMME PROGRAMME CHART INTERRUPTING
Designed in the UK. Rapide Ultimate. User Guide Vax Rapide Ultimate
 Designed in the UK Rapide Ultimate User Guide Vax Rapide Ultimate VCWRU Contents Contents 1 Machine Overview 2 General Safety Information 3 Getting Started 5 How To Use 6 Looking After Your Machine 9 FAQs
VAC-THEN-STEAM MV2010UKL OWNER S GUIDE
 VAC-THEN-STEAM MV00UKL OWNER S GUIDE MV00UKL_IB_ENG_00.indd IMPORTANT SAFETY INSTRUCTIONS SAVE THESE INSTRUCTIONS For Household Use Only WHEN USING YOUR SHARK VAC- THEN-STEAM, BASIC SAFETY PRECAUTIONS
 brio 250cc MULTIPURPOSE STEAM CLEANER SYSTEME D ASPIRATEUR LIMPIADOR A VAPOR INSTRUCTION MANUAL GUIDE D UTILISATION MANUAL DE INSTRUCCIONES 9 11 10 8 13 5 14 7 15 6 16 2 4 1 12 3 02 03 04 CONGRATULATIONS
Register your new Bosch now:
 Register your new Bosch now: www.bosch-home.com/welcome ww.bos com/welcome BSGL5... en Operating instructions Table of content Safety information..................................4 Intended use.......................................4
PARQUET. Polti S.p.A Bulgarograsso (CO) - Italy - Via Ferloni, 83 Vaporetto Lecoaspira Parquet - M0S T10
 - Italy - Via Ferloni, 83 Vaporetto Lecoaspira Parquet - M0S T10") COP - LECOASPIRA PARQUET NUOVA IMPOSTAZIONE 1T10:V_tto_1300cop.qxd 23/10/2013 9.18 Pagina 2 PARQUET Polti S.p.A. - 22070 Bulgarograsso (CO) - Italy - Via Ferloni, 83 www.polti.com Vaporetto Lecoaspira
COP - LECOASPIRA PARQUET NUOVA IMPOSTAZIONE 1T10:V_tto_1300cop.qxd 23/10/2013 9.18 Pagina 2 PARQUET Polti S.p.A. - 22070 Bulgarograsso (CO) - Italy - Via Ferloni, 83 www.polti.com Vaporetto Lecoaspira
English. Important Read this user manual carefully before you use the appliance and save it for future reference.
 FC849-FC840 3 3 4 5 6 7 8 9 0 34 3 4 5 3 30 6 33 7 9 8 3 8 7 6 5 4 9 3 0 6 English Introduction Congratulations on your purchase and welcome to Philips! To fully benefit from the support that Philips offers,
AA Z** V2** W** U1* V** U2** USER MANUAL U* E D L U3* M N S ** T* O Q P P3 P2 P1 R** AD* PRINTED IN P.R.C /01
 AA Z** V2** H F Y* G AB X* I J AC W** U1* C B A K V** U2** USER MANUAL U* E D L U3* M N S ** T* O PRINTED IN P.R.C. 48022156/01 Q P P3 P2 P1 R** AD* *Certain models only **May vary according to the model
- 2 - IMPORTANT SAFETY REMINDERS IT IS IMPORTANT THAT YOU:
 USER MANUAL IMPORTANT SAFETY REMINDERS This cleaner should only be used for domestic cleaning, as described in this user guide. Please ensure that this guide is fully understood before operating the appliance.
SAFETY INFORMATION WHEN USING THE STEAM CLEANER, BASIC SAFETY PRECAUTIONS SHOULD ALWAYS BE OBSERVED INCLUDING THE FOLLOWING. around water.
 SAFETY INFORMATION WHEN USING THE STEAM CLEANER, BASIC SAFETY PRECAUTIONS SHOULD ALWAYS BE OBSERVED INCLUDING THE FOLLOWING around water. use only with a grounded outlet. Only use distilled water. Using
SAFEGUARDING THE ENVIRONMENT IMPORTANT NOTES BEFORE USING THE OVEN OVEN ACCESSORIES CARE AND MAINTENANCE TROUBLESHOOTING GUIDE AFTER SALES SERVICE
 INSTRUCTIONS FOR USE SAFEGUARDING THE ENVIRONMENT IMPORTANT NOTES BEFORE USING THE OVEN OVEN ACCESSORIES CARE AND MAINTENANCE TROUBLESHOOTING GUIDE AFTER SALES SERVICE To make the most of your new oven,
CONTENTS QUICK REFERENCE GUIDE INSTRUCTIONS FOR USE PROGRAMME CHART BOOKLET
 CONTENTS QUICK REFERENCE GUIDE PROGRAMME CHART PREPARING THE LAUNDRY SELECTING A PROGRAMME AND OPTIONS STARTING AND COMPLETING A PROGRAMME CHANGING A PROGRAMME INTERRUPTING A PROGRAMME DAILY MAINTENANCE
Read through the instructions carefully before using the appliance for the first time. Safeguard them for future reference.
 Table of Contents Important Safeguards... 2 Additional Caution for Blower... 2 Parts... 3 Installing Charger Base... 4 Charging the Battery... 4 Important Note for Charging... 5 Indication Lights... 5
C E B D N USER MANUAL H I P J K L /07 PRINTED IN P.R.C.
 C E B D N F USER MANUAL M O G P H I A P J PRINTED IN P.R.C. 1 48005775/07 K L Q 2 3 4 5 14 15 16 17 2 1 6 7 8 9 18 19 20 10 11 12 13 21 INSTRUCTIONS FOR SAFE USE Danger of Scalding. GB This appliance should
Steam cleaner with attachments
 70530 Rev 4 2/6/04 2:53 PM Page 1 Steam cleaner with attachments Please read and keep these instructions getting the best from your new steam cleaner... Quick start 1 Fill the tank up to a maximum of 1.4
Tornado Operations & Maintenance Manual
 Tornado Industries, LLC 333 Charles Court West Chicago, IL 60185 www.tornadovac.com Tornado Operations & Maintenance Manual MODEL NO. 99414 Form No. L9740AB Tornado Industries, LLC. All rights reserved
JUNEAU JUN. 08/51193/0 Issue 0
 JUNEAU JUN 08/51193/0 Issue 0 The product complies with the European Safety Standards EN60335-2-30 and the European Standard Electromagnetic Compatibility (EMC) EN55014, EN60555-2 and EN60555-3 These cover
- 1- IMPORTANT SAFETY REMINDERS
 USER MANUAL IMPORTANT SAFETY REMINDERS This appliance should only be used for domestic cleaning, as described in this user guide. Please ensure that this guide is fully understood before operating the
B W E F K J N T PRINTED IN P.R.C
 A B W C V U D L E F G I K J M N O P T PRINTED IN P.R.C. 48014372 H Q Q R S 1 2 3 4 13 14 5 6 7 8 15 16 + + 9 10 11 12 17 18 19 INSTRUCTIONS FOR SAFE USE This appliance should only be used for domestic
Steam MULTIFUNCTION STEAMER LET S GET STARTED. S85-CM SCSMV1SG
 Steam MULTIFUNCTION STEAMER LET S GET STARTED. S85-CM SCSMV1SG Let s talk safety Basic safety precautions Don ts Do s This STEAMER is intended for household use only and NOT for commercial or industrial
User and maintenance manual
 GB User and maintenance manual IMPORTANT SAFETY INSTRUCTIONS These instructions shall also be available on website: docs.whirlpool.eu. YOUR SAFETY AND THAT OF OTHERS IS HIGHLY IMPORTANT. This manual and
ANTIBACTERIAL HAND VAC
 Gebruiksaanwijzing User manual Gebrauchsanweisung Mode d emploi Navodila za uporabo ANTIBACTERIAL HAND VAC WITH UV LIGHT CVH5743M 09/09 HOME APPLIANCES 1 SAFETY REGULATIONS 1. Before using the device,
Operating Instructions
 Operating Instructions Before first use of the unit read these operating instructions and act in accordance with them. 5.962-066.0 02/07 Dear Customer, Please read and comply with these instructions prior
Due to continual improvement in design or otherwise, the product you purchase may differ slightly from the illustration in this book.
 Kambrook - Australia Building 2, Port Air Industrial Estate 1A Hale Street Botany NSW 2019 Australia Customer Service Line 1300 139 798 Customer Service Fax 1800 621 337 www.kambrook.com.au Kambrook -
Get Cleaning... What s your Vax s model number? User Guide. Steam Cleaner. Vax Careline: AU: NZ: VSTHM1600
 User Guide Vax Careline: AU: 1300 361 505 NZ: 0800 800 900 Steam Cleaner Get Cleaning... What s your Vax s model number? WV S T H M 1 6 0 0 What s your serial number? (Located on the base of the machine)
CONTENTS QUICK REFERENCE GUIDE INSTRUCTIONS FOR USE BOOKLET PROGRAMME CHART
 CONTENTS QUICK REFERENCE GUIDE PROGRAMME CHART PREPARING THE LAUNDRY SELECTING A PROGRAMME AND OPTIONS STARTING AND COMPLETING A PROGRAMME CHANGING A PROGRAMME INTERRUPTING A PROGRAMME DAILY MAINTENANCE
COMMERCIAL GRADE, ULTRA EFFICIENT VACUUMING SYSTEM USER GUIDE
 COMMERCIAL GRADE, ULTRA EFFICIENT VACUUMING SYSTEM USER GUIDE Congratulations on purchasing a Bennett Read Stealth vacuum cleaner. This product is packed with the power and technology to provide fast,
Professional HEPA Air Cleaner
 IB-AR20-1212-01_Layout 1 11/12/2012 17:06 Page 1 Professional HEPA Air Cleaner Instruction Manual AR-20-1 IB-AR20-1212-01_Layout 1 11/12/2012 17:06 Page 2 IB-AR20-1212-01_Layout 1 11/12/2012 17:06 Page
Vacuum Cleaner User's manual
 Vacuum Cleaner User's manual EN Before first use, please read all instructions contained in this user's manual carefully, even if you are already familiar with using similar products. Only use this product
Steam Fresh Combi Classic
 Steam Fresh Combi Classic Let s get started S86-SF-CC vax.co.uk Let s talk safety Thank you for buying this Steam Fresh Combi Classic This steamer is intended for household use only and NOT for commercial
SAFEGUARDING THE ENVIRONMENT IMPORTANT NOTES BEFORE USING THE OVEN OVEN ACCESSORIES CARE AND MAINTENANCE TROUBLESHOOTING GUIDE AFTER SALES SERVICE
 31002018GB.fm Page 11 Tuesday, December 2, 2008 10:29 PM INSTRUCTIONS FOR USE SAFEGUARDING THE ENVIRONMENT IMPORTANT NOTES BEFORE USING THE OVEN OVEN ACCESSORIES CARE AND MAINTENANCE TROUBLESHOOTING GUIDE
INSTRUCTIONS FOR SAFE USE INSTRUCTIONS FOR SAFE USE
 USER MANUAL INSTRUCTIONS FOR SAFE USE This appliance should only be used for domestic cleaning, as described in this user guide. Please ensure that this guide is fully understood before operating the appliance.
- 2 - IMPORTANT SAFETY REMINDERS
 USER MANUAL IMPORTANT SAFETY REMINDERS This appliance should only be used for domestic cleaning, as described in this user guide. Please ensure that this guide is fully understood before operating the
BX3. Instructions for use
 BX3 Instructions for use 1 Your vacuum cleaner............................................3 Intended use..................................................4 Safety information..............................................4
Steam Fresh Let s get started
 Steam Fresh Let s get started S86-SF-A vax.co.uk Let s talk safety This steam mop is intended for household use only and NOT for commercial or industrial use. WARNING: Danger of scalding Only use the steam
IMPORTANT SAFETY REMINDERS
 USER MANUAL IMPORTANT SAFETY REMINDERS This appliance should only be used for domestic cleaning, as described in this user guide. Please ensure that this guide is fully understood before operating the
Instruction Manual 1800W CYCLONIC BAGLESS U3510
 Instruction Manual U3510 IMPORTANT SAFETY INSTRUCTIONS READ ALL INSTRUCTIONS BEFORE USING (THIS APPLIANCE) When using an electrical appliance basic precautions should always be followed, including the
Commercial use of this product voids the manufacturer warranty. SAVE A COPY OF THESE INSTRUCTIONS FOR FUTURE REFERENCE.
 Table of Contents Warnings...2 Safeguards...2 Product Layout...4 Accessories...4 Assembly...5 Using the Steam Mop...6 For Best Results...8 Hand Held Steamer...9 Assembling the Hand Held Steamer...9 Accessory
USERS MANUAL. Desiccant Dehumidifier. Model: ECO DD322FW SIMPLE. Read This Manual
 keeping your home safe and clean USERS MANUAL Desiccant Dehumidifier Model: ECO DD322FW SIMPLE Read This Manual Inside you will find many helpful hints on how to use and maintain your dehumidifier properly.
OptiClean. U S E R S G U I D E 6 0 A 4 S E R I E S v. Product View. Assembly. Operations. Maintenance and Care.
 OptiClean U S E R S G U I D E 6 0 A 4 S E R I E S 2 2 0-2 4 0 v 3 Safety Instructions 4 Product View 5 Assembly 6-8 Operations 9-12 Maintenance and Care 13 Troubleshooting 14 Consumer Services 15 Replacement
Vacuum Cleaner User Manual
 Vacuum Cleaner User Manual VCM 7180 P EN 01M-8837713200-0217-02 Please read this manual first! Dear Valued Customer, Thank you for selecting this Beko appliance. We hope that you get the best results from
Easy Guide Luna 1300 Luna 1400 PARTS CHECKLIST - LUNA 1300 AND LUNA ONLY. Telescopic extension tube. Carpet washer. Hose and hand grip
 R Easy Guide Luna 1300 Luna 1400 PARTS CHECKLIST - LUNA 1300 AND LUNA 1400 1400 ONLY Telescopic extension tube Hose and hand grip Carpet washer Quick Clip tube (for washing) Hard floor washer Luna Washing
Contents. 1. Instructions for safety and use 20
 Contents 1. Instructions for safety and use 20 2. Positioning in the counter top 21 2.1 Fixing to the supporting structure 21 2.2 Positioning the adhesive sponge 22 2.3 Positioning the fastening clips