Washing Machine OWNER S MANUAL TW-6KG. Before using your washing machine, please read this manual carefully and keep it for future reference.
|
|
|
- Mervyn Wilcox
- 5 years ago
- Views:
Transcription
1 Before using your washing machine, please read this manual carefully and keep it for future reference. Washing Machine OWNER S MANUAL TW-6KG Read This Manual Inside you will find many helpful hints on how to use and maintain your washing machine properly. Just a little preventative care on your part can save you a great deal of time and money over the life of your washing machine. You'll find many answers to common problems in the chart of troubleshooting tips. If you review the chart of Troubleshooting Tips first, you may not need to call for service.
2 小天鹅 小天鹅 Notes Contents Safety and precautions... 2 Installation of the washer... 5 Preparation before washing... 7 Parts identification of the washer... 8 Instruction of the washer operation pan el... 9 Quick start The main wash Special features About the procedure of full automatic wash program Safety and precautions Observe the following items in order to prevent from injuring yourself, others and the damage of property: Warning This indicates serious injury or death to human being may be caused. This will remind you that injury to people and Caution damage to property may occur. Please observe following contents of graphics. This graphics represents(cause attention),and detailed cautions will be displayed inside the graphics. This graphics represents (operation prohibited), and detailed prohibitive items will be displayed inside the graphics. This graphic represents (forcible execution), and detailed forcible execution items will be displayed inside the graphics. This appliance is not intended for use by persons (including children) with reduced physical, sensory or mental capabilities, or lack of experience and knowledge, unless they have been given supervision or instruction concerning use of the appliance by a person responsible for their safety. Children should be supervised to ensure that they do not play with the appliance. Cleaning and Maintenance of the washing machine Identify usual trouble of washer Malfunction display and solutions Technical specifications Please do not disassembly and assembly the machine without authorization. Warning Please do not insert your hand and take out clothes inside the spin barrel before it is fully stopped. No dismantling No touching Please do not install the machine in damp and raining environment to avoid electric shocking, catching fire, faults and distortion accidents. Please do not directly rinse the machine with water when cleaning. No dampness No rinsing 1 2
3 小天鹅 小天鹅 小天鹅 Please do not let children climb the machine or peer into the rotating spin barrel to avoid accidents. Warning It is prohibited to wash the clothes touching with kerosene, gasoline, alcohol and other flammable materials. Please use correct power source. Caution Please do not pull out or insert the plug with wet hands to avoid electric shocking. Wet hands are prohibited Please do not damage power flexible cord and power plug to avoid electric shocking, short circuit and catching fire. Regularly clean the power plug to remove dust and dirt to avoid contact failure. Please ensure that the water inlet pipe is connected and the tap is opened before washing clothes. The water temperature shall not exceed 50 when washing with warm water. >50 C Please pull out plug from the socket if the machine is not in use. Please well connect the earth line of socket to avoid electric shocking by accidental leakage. (earthing) Customers are not allowed to change the power line without permission. It is strictly prohibited to place children or lay weights on the washer. Pull out the plug Earthing Please insert the power plug tightly. Please do not place on the washer burning candle, mosquito-repellent incense, cigarette and other flammable things, as well as electric stove, air heating fan and other heating sources. Smoke and fire prohibited Please do not pull the electric cord when pulling out the plug. Please do not wash down jacket, raincoat, fishing coat and similar clothes in the washer. 3 4
4 Installation of the washer Remove package Remove package and take out the bottom board of the cabinet on the foam cover. Open the lid of washer's door and take out accessories. A trial operation or washing on the foamed cushion is strictly forbidden. Installation of drain hose Placement of water drain hose Under3m If the water drain hose shall be extended, its length shall not exceed 3 meters, otherwise it will affect the water discharging time. The placed height of water drain hose shall not exceed 15cm. Placement of upper water drain hose Completely sleeve the drain hose over the sewer. Fix and tighten it with a hoop. ( As shown in the figure ) Under 15cm FOR LOWER DRAIN SYSTEM ONLY The height of drain hose ( a )should between cm. Diameter of b shuld not less than 3 cm, and flow capacity not less than 40 L/Min. Before washing machine starts, user should hang up the drain pipe cm height from the floor. FOR UPPER DRAIN SYSTEM ONLY Do not bend the water drain hose and place it under the washer. Base foamed cushion 86~100 cm Installation of the washer Installation of water inlet pipe A B 1 5mm Junk ring The connection socket consists of A and B two parts. Before installation, A and B two parts must be unscrewed about 5mm, or directly disconnected. If the bore of water tap is larger, remove the plastic junk ring of Connect part A. Tightly screw another end of water inlet hose on water inlet valve. (with rubber seal ring inside). Note: When tightening the clamping nut, evenly apply the force and do not twist the water inlet valve to avoid breaking of water inlet valve joint Small ball Push down the slide jacket to expose the small balls and enable separation of connector socket from speedy connector. 5 screw on part B. Connect: Push down the slide jacket of speedy connector (4 small balls must be exposed ),insert it into the connection socket and then push upward Release the connection of water tap with speedy connector completely. If it is required to feed 7 water, simply open the water tap. Separate: Close the water tap, push Separate down the slide jacket of speedy connector and pull out the speedy connector. Clamping nut Unscrew four screws of part A and sleeve part A horizontally over the mouth at the end of water tap (the mouth at the end of water tap must be flat and smooth. Flatten it by filing if it is not flat) and push it upward with force making the rubber washer firmly press the plane center of water tap mouth. Then tighten the screw sequentially. After that, tightly 3 Water inlet hose Installation of water inlet pipe Put the water inlet pipe(which has metallic filtering bag) screw on to the tap. Tightly screw another end of water inlet hose on water inlet valve. (with rubber seal ring inside). Note: When tightening the clamping nut, evenly apply the force and do not twist the water inlet valve to avoid breaking of water inlet valve joint. Clamping nut Water inlet hose Only for model with double screw thread water inlet pipe Only for model with single screw thread water inlet pipe If the supply cord is damaged, it must be replaced by the manufacturer, its service agent or similarly qualified persons in order to avoid a hazard. The instructions for appliances connected to the water mains by detachable hose-sets shall state that the new hose-sets supplied with the appliance are to be used and that old hose-sets should not be reused.the openings must not be obstructed by a carpet.this appliance is for indoor use only. 5 6
5 Preparation before washing Adjust the adjustable foot to make 1 the washer be placed stable. 2 Install the water inlet hose. For one inlet hose Parts identification of the washer Upper drain hose (For upper drain only) Top lid Adjustable foot (extend when clockwise rotating and shorten when counterclockwise rotating) (Slightly incline the washer first and loosen the adjustable foot knob. Adjust the adjustable foot so as to ensure four corners of washer be steadily contacted with the ground. Then tighten the adjustable foot knob and lock it. If the ground is obviously not flat, correction should be made on the ground surface, otherwise the washer barrel will incline and knock the cabinet) For two inlet hoses Control panel frame Cabinet Drain hose (For lower drain only) Adjustable leg 3 Connect with to power source. 5 Put down the drain house. Gravity drain 6 Put in clothes and suitable amount of washing powder. Adjustable foot knob 4 Turn on the water supply. Upper drain Note: The water will overflow when the height of the drain hose under 860mm. >860mm Fixing ring (1) is used for the fixing in time of the installation of the lower drain hose. Accessories Universal connector Self-tapping screw NOTICE Before washing, please do take out coins, keys and other hard goods, and zip up clothes tightly to prevent them and barrel from damage. Only for lower drain hose Water inlet hose assembly Only for model with single screw thread water inlet pipe Water inlet hose assembly Only for model with double screw thread water inlet pipe Please refer to the real material as the attachment Base cover Only for models including base cover 7 8

6
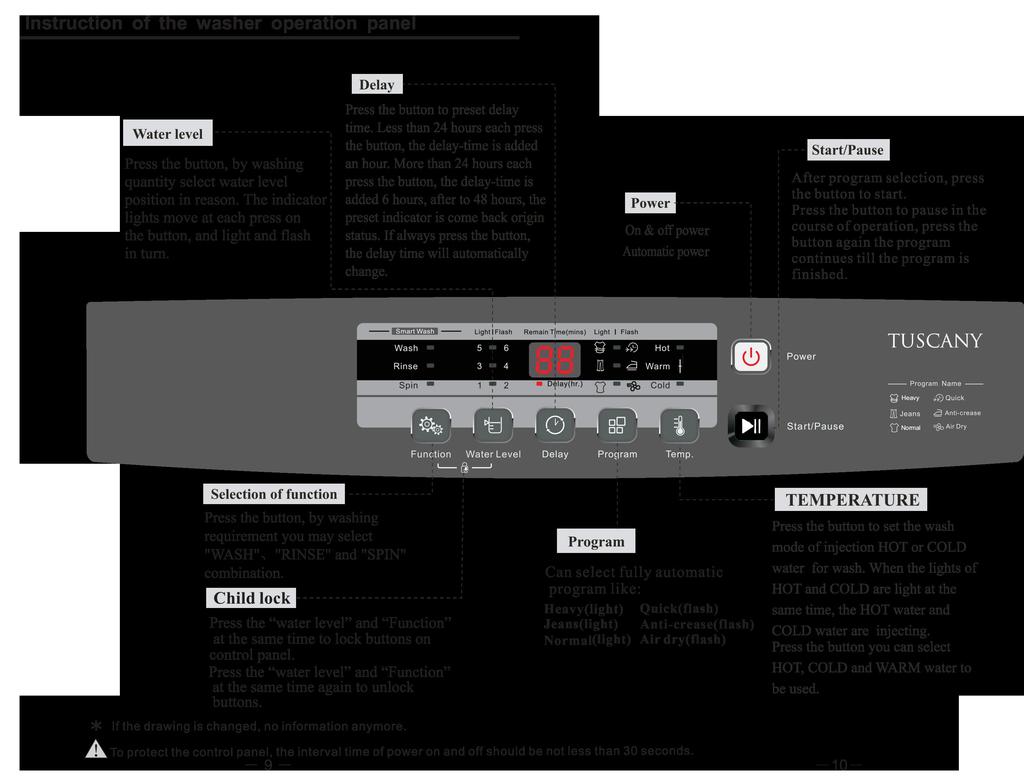
7 Quick start The main wash 1 Install the washing machine 9 Press the [start/pause] key Instruction of the Heavy program 1.[Heavy] wash program is the easiest, most convenient and most common washing program. When the user press the power switch and then press [Start/Pause] button, the heavy washing program will start to work. 2.When the washer start to work, the digital tube show the remain time. 2 Load the laundry 3 measure out the detergent 8 Select the desired programme 7 Plug the power supply Steps in details 1.Press the power switch. 2.According to the washing amount choose the proper water level. 3.Press START/PAUSE button. Instruction to single wash procedure 1.User may freely select any single procedure, or any combination of procedures among WASH, RINSE and SPIN according to the actual requirements. It is only required to turn off any one or two of these three indicators that not needed by the user. And keep the indicator be on showing the process needed by the user. 2.Single wash -- after switching on the power, turn off RINSE and SPIN two indicators by pressing these two keys. The operation for single rinse and single spin is similar. 3.Single wash-spin after switching on the power, turn off RINSE indicator by pressing that key. The operation for single rinse-spin and single wash-rinse is similar. 4 Close the machine door 5 Put down (hang up) the drain pipe Programme selection 1 Press the POWER button. 2 Select the proper water level and other attached functions. 3 press the start/pause key. 6 Turn on water supply The wash stops When the wash stops, the buzzer will buzz continuously for 6 times and then the power will be automatically cut off. Turn off the water tap. Although the power can be cut off automatically, the power plug must be pull out for the safety. Use the cleaning solution for twice 1. Put the laundry in the first batch and wash powder and press Function button to set single wash to run. 2. Take out the laundry in the first batch after hearing the buzzing sound. 3. put in the laundry in the second batch, and run Wash, Rinse, Spin. 4. Take out the laundry in the second batch after hearing the buzzing sound. 5. Put in the laundry in the first batch and press Function button to run Rinse and Spin. NOTICE.Close the lid of the door when machine is running, otherwise, it will automatically stop working during spin process and send out abnormal warning..the washer will not work when the filled water does not reach the set water level
8 Special features Delay time program Delay time means the preset beginning time of washing. 1.Switch on the power. 2.Open the tap and lay the drain hose. 3.Put in the laundry and detergent. 4.Select the propre water level according to the quantity of clothes. 5.Select the functions and programs. 6.Press DELAY button to select the beginning time of washing. 7.close the lid and press START/PAUSE button Confirmation of the delay and inspection 1. After the delay function is started, the corresponding delay light will flash, and other lights are turned off. 2. After the delay function is started, press Delay button continuously, you may inspect the preset program and function. Loose the button, the program return to delay status. Cancel the delay time, or alternate the delay time 1. Press Power button to cancel the delay time. 2. To change the delay time, cancel the delay time first, and then press Delay button to reset. Press t he DELAY b utton e ach t ime, the n umber o n the digital i ndication adds b y 1 ; After the n umber reaches 24,press t he DELAY button each t ime, t he number a dds b y 6 ; After t he number reaches 4 8, the light of delay t ime i s turned o ff, and the delay p rogram return to original status. Quick Wash time is short. Suitable to wash light stained clothes and clothes in summer. Heavy Delicate wash, especially for heavy fabrics. Jeans High wash ability, suitable to wash heavy or serious stained clothes. Special features Child lock Press the Function and water level at the same time to lock buttons on control panel.press the Function and water level at the same time again to unlock buttons. Function of automatic power shut off 1. If the machine do not start to work within 10 minutes after powered on, it will power off automatically. 2. After end of operation and the buzzer sounding 6 times, it will power off automatically. Function of adjusting for imbalance 1. If the laundry is placed uneven before spinning, it is likely to cause vibration during spinning. The washing machine has a function of adjusting imbalance. When working,the washing machine always inspects operation state automatically. If the spinning vibration is too great, the washing machine automatically starts the adjusting program to balance. 2. When the machine adjusts imbalance, rinse light will flash, and the machine will start to inject water to set water level. The machine adjusts imbalance automatically for about 1 minute, then drains water, returns to original spinning state. If the washing machine can adjust the imbalance twice. If the adjustment has no function, it will alarm. Fuzzy control function Standard procedures default implementation fuzzy control function. After startup, such as water level before starting the keys will be cancelled automatically according to the fuzzy control functions; In addition, the fuzzy measure before, if there is no water, tub fuzzy measurement, the water level directly as the default file namely 6 gear levels. Fuzzy control function is at boot automatically after the determination of cloth is measured, decide the water level. In fuzzy testing process, water circulation flashing lights display, digital pipe display "--". Power failure memory function If the power supply becomes off suddenly during operation, the machine remembers the current operation state.when power is on,the machine returns to former operation state automatically. Air dry As for not easily fading,deforming, and non-waterproof clothes, can use the function to dry clothes without heating, and to reach the result of being dried in a room. Anti-crease The wash time is short,rinses many time with high water level,thoroughly wash away the garment
9 About the procedure of full automatic wash program Cleaning and Maintenance of the washing machine End of program Maintenance Heavy 44 minutes The washing machine will send off the sound of " dou-dou " at the end of any program operation to remind you to take out the laundry or operate it again. After the sound,the washing machine returns to its power-off state with no display and all lights off. Please shut off the tap, pull out the plug when not in use to avoid water leakage or the fire accidents. Use gentle clothing to wipe off the water and dirt on the surface each time after using the washing machine. Detergent, propellant and other chemicals are not allowed to use so as to avoid any damage to the plastic accessories. Anti-crease 48 minutes one time 14 minutes 87 minutes Clean the water inlet Clean Of the filter After using the washing machine for a period please clean After long time use the water inlet mesh bag may be blocked with smudginess and should be cleaned it according to the following steps according to the following steps 1 Take out the lint filter 1 Switch on the power followed by shutting off the tap 2 Open the filter and wash it clean in the water 2 Let the washer works for 5 seconds so that water 3 Restore it and fix it flows into the tub through the water inlet hose then turn off the power 3 Unload the water inlet hose and clean the mesh bag then restore the water inlet assembly (only for magic filter) After using the washing machine for a period, clean it according to the following steps: 1. Take off the lint filter. 2. Turn over the mesh bag and wash it clean in the water. 3. Restore and fix it. (only for normal filter) Clean the lint filter in the drain pump (only for having drain filter) 1. Drain the water out of the pump,under which use a container to collect. 2. Loosen the pump cover anticlockwise. 3. Take out the lint filter. 4. Clean the filter. 5. Restore it and adjust the convex place to align at the pump hole. 6. Tighten the pump cover clockwise. Notes: If the drain filter is not cleaned at proper time (every 10 times of use),drain problem could be caused
10 Identify usual trouble of washer Malfunction display and solutions When the washer is in trouble, please contact local service office or the sales service department of our company and the customer should not dismantle the machine without permission. If the washer can not work normally, or appear abnormity or alarms, please check and correct as follows. List of faults and inspection When the washer is in trouble, please contact local service office or the sales service department of our company and the customer should not dismantle the machine without permission. If the washer can not work normally, and the abnormal indication is shown in the nixie tube window or the machine alarms, please check and correct them as follows. Faults Inspection Items No water flows in If the power is off or the fuse is burned out. If the water supply is cut off or the water pressure is too low. If the inlet hose is properly connected and the water tap is opened. If the filtering screen of inlet valve is blocked by dirt. If the coil of inlet valve is damaged. (The slight electromagnetic sound is normal phenomenon when the inlet valve is switched on) If the "Start / Pause" button is pressed after the power switch is pressed. No washing If the power is off or the fuse is burned out. If the power supply voltage is too low. If the water amount reaches to the required water level. (The washer will not work if the water amount does not reach the required water level) If it is set to "Delay" washing mode. (It will only start to work until the reservation time reached) Alarm for water drain time out. Technical specifications Abnormal draining If the water drain hose is placed very high. If the end of water drain hose is sealed in pond. If the internal rubber ring of drain valve is blocked by dirt. Size 545x560x940(mm) Weight of the product 36Kg Abnormal spin If the door lid is closed. If all clothing piled largely at one side of barrel or the clothing is excessively placed. If the washer is not placed in stable condition or it is placed in inclination state. (The ground is not flat). If the motor belt is loosened. Rated input power Rated voltage Rated frequency 560W Maximum water 240V~ pressure permitted 0.6Mpa in the water inlet 50Hz Rated capacity of wash and spinning Minimum water pressure permitted in the water inlet 6.0kg (dry clothes) 0.1Mpa Note: During the de spin process, if washing are piled at one side of the spin barrel, it will cause unbalance of spin barrel resulting in striking. At this moment, the computer inside the washer will feel this unbalance phenomenon and will automatically correct it ( fill in water Washing ). However, if unbalance situation is not removed after continuous three corrections, which means the computer auto-correction can not resolve the problem. Then the user has to manually and evenly place the clothing inside the barrel to solve the problem

11 European Kitchen Appliance & Accessories Terms and Conditions of Guarantee for standard 2 Year Warranty Please note that these terms and conditions apply within New Zealand only. The guarantee applies for a period of 24 months commencing from the date of purchase. Evidence of the date of purchase must be shown to the engineer when he calls to obtain benefit under this guarantee. This guarantee applies only to the original purchaser of the appliance and cannot be assigned or transferred. Callout labour and all main functional parts are covered, such as motors pumps, heating elements, timers, compressors, and thermostats. The warranty does not cover the costs of transport, mileage or travelling time if the product is located beyond 20km of a recognised service agent. Callouts, labour and parts excluded on the following: Excludes serviceable items such as filters, fuses, lightbulbs, door seals, drive belts, external hoses, etc. Damage to bodywork, paintwork, glass items (such as windows, covers, baskets and trays etc). Corrosion Damage The guarantee will not apply where: a. Incorrect voltage has been used b. There is evidence of negligence, willful or malicious damage c. There has been a failure to comply with the manufacturer instructions. d. Service or repair has been carried out by anybody other than an approved Eurotech Design Service Engineer. e. Incorrect detergents have been used f. Appliance has been used/installed anywhere other than a private dwelling or where it has been used other than for domestic use. g. The appliance is subject to rental agreement. h. If the product is not installed to comply with the electrical, gas, plumbing and other regulations and codes of practice in New Zealand. i. If any serial number has been removed or defaced j. If proof of purchase is not supplied. Liability under the guarantee will not be accepted for: a. Wear and tear from normal domestic use. b. Freight/Transport damage c. Damage caused to the product by negligence or misuse d. Any defect caused by accident, misuse, neglect or tampering with the appliance. e. Service calls related to the instruction on how to use the product f. Any damage to ceramic cooktops caused by spills when cooking g. Any damage or breakage of glass product h. Any damaged caused by the use of incorrect cleaning products i. Any installation faults j. Any third party (including reseller) or consequential loss or damage (direct or indirect) however arising. Any defective part that has been replaced becomes the property of Eurotech Design Ltd A charge may be levied at the discretion of Eurotech Design if the call is deemed unnecessary or if the cause of failure is traced to external sources such as, but not limited to, blown fuses, power failure, faulty installation etc. Service is offered during normal working hours only (Monday-Friday 9am-5pm), and is subject to the availability of authorised service agents. Losses caused by Act of God, civil war, failure to obtain spare parts, strikes or lockouts are not covered. This guarantee does not affect your statutory rights. For further assistance please contact: Eurotech Design Ltd Po Box , Pt Chevalier, Auckland 1246, New Zealand 604 Rosebank Road, Avondale, Auckland 1026, New Zealand PH: (64) Fax: (64) info@eurotechdesign.co.nz
Washing Machine OWNER S MANUAL. Before using your washing machine, please read this manual carefully and keep it for future reference.
 Before using your washing machine, please read this manual carefully and keep it for future reference. Washing Machine OWNER S MANUAL MODEL:TL6Kg Read This Manual Inside you will find many helpful hints
Washing Machine OWNER S MANUAL MODEL:TRWTL-80. Before using your washing machine, please read this manual carefully and keep it for future reference.
 Before using your washing machine, please read this manual carefully and keep it for future reference. Washing Machine OWNER S MANUAL MODEL:TRWTL-80 Should your washing machine require servicing under
Washing Machine OWNER S MANUAL MODEL:MFW-1050MV2
 Before using your washing machine, please read this manual carefully and keep it for future reference. Washing Machine OWNER S MANUAL MODEL:MFW-1050MV2 Read This Manual Inside you will find many helpful
tl10t Full Automatic Washer Made in China INSTRUCTION MANUAL :
 tl10t Full Automatic Washer Made in China INSTRUCTION MANUAL : WWW.CAMPOMATIC.COM Notes Contents Safety and precautions... 2 Installation of the washer... 5 Preparation before washing... 7 Parts identification
Washing Machine OWNER S MANUAL MFW-801S. Before using your washing machine, please read this manual carefully and keep it for future reference.
 Before using your washing machine, please read this manual carefully and keep it for future reference. Washing Machine OWNER S MANUAL MFW-801S Read This Manual Inside you will find many helpful hints on
Washing Machine OWNER S MANUAL TRWTL-70. Before using your washing machine, please read this manual carefully and keep it for future reference.
 Before using your washing machine, please read this manual carefully and keep it for future reference. Washing Machine OWNER S MANUAL TRWTL-70 Read This Manual Inside you will find many helpful hints on
Washing Machine OWNER S MANUAL. MODEL:MFW-V1100DDi
 Before using your washing machine, please read this manual carefully and keep it for future reference. Washing Machine OWNER S MANUAL MODEL:MFW-V1100DDi Read This Manual Inside you will find many helpful
Safety and precautions. Notes. Observe the following items in order to prevent from injuring yourself, others and the damage of property:
 WTAU12AW Notes Contents Safety and precautions... 2 Installation of the washer... 6 Preparation before washing... 7 Parts identification of the washer... 8 Instruction of the washer operation panel...
Washing Machine OWNER S MANUAL MODEL:MB45T. Before using your washing machine, please read this manual carefully and keep it for future reference.
 Befe using your washing machine, please read this manual carefully and keep it f future reference. Washing Machine OWNER S MANUAL MODEL:MB45T Read This Manual Inside you will find many helpful hints on
ETLW55. Product: 5.5kg Top Load Washing Machine. User Manual
 User Model Manual: Code/s: ETLW55 Product: 5.5kg Top Load Washing Machine Document: 1 User Manual Dear Customer, Congratulations on purchasing your washing machine. The Esatto brand is proudly distributed
OWNER S MANUAL BWM55. Full Automatic Electric Washing Machine
 Before using your washing machine, please read this manual carefully and keep it for future reference. Full Automatic Electric Washing Machine OWNER S MANUAL BWM55 Read This Manual Inside you will find
TUSCANY USER'S MANUAL MODEL:T320LRF
 TUSCANY USER'S MANUAL MODEL:T320LRF Contents 1. SAFETY WARNINGS... 1 2. INSTALLTION... 2 2.1 Location... 2 2.2 Reversing the Door Swing... 2-3 2.3 Door Space Requirements... 4 2.4 Levelling the Unit...
Semi-Auto Washing Machine
 MWM-B1270SA(IM)070915_Layout 1 10/15/15 9:55 AM Page 1 USER MANUAL Market Expansion Services by www.dksh.com.my E-mail: electrical.appliance@dksh.com www.morgan.my facebook.com/morganappliances Semi-Auto
Twin Tub Washing Machine OWNER S MANUAL
 Before using your washing machine, please read this manual carefully and keep it for future reference. Twin Tub Washing Machine OWNER S MANUAL MODEL:WSA Read This Manual Inside you will find many helpful
9.5KG WASHING MACHINE
 G9TLWW17 9.5KG WASHING MACHINE G9TLWW17_IB_Final170920V2.indd 1 G9TLWW17_IB_Final170920V2.indd 2 Contents Guide to the Appliance 2 Caring for the Environment 3 Safety Information and Warnings 4 Items in
Operating & Installation Instructions Fully Automatic Washing Machine (Domestic use)
") Operating & Installation Instructions Fully Automatic Washing Machine (Domestic use) Model No. NA-F00X NA-F90X NA-F85G Contents Safety Precautions Part Names Operation Panel 4 Variety of Programs 5 Detergent
Operating & Installation Instructions Fully Automatic Washing Machine (Domestic use) Model No. NA-F00X NA-F90X NA-F85G Contents Safety Precautions Part Names Operation Panel 4 Variety of Programs 5 Detergent
Operating & Installation Instructions Fully Automatic Washing Machine (Domestic use)
") Operating & Installation Instructions Fully Automatic Washing Machine (Domestic use) Model No. NA-F00A NA-F90A NA-F85A Contents Safety Precautions Part Names 3 Operation Panel 4 Variety of Programs 5 Detergent
Operating & Installation Instructions Fully Automatic Washing Machine (Domestic use) Model No. NA-F00A NA-F90A NA-F85A Contents Safety Precautions Part Names 3 Operation Panel 4 Variety of Programs 5 Detergent
Twin Tub Washing Machine OWNER S MANUAL
 Before using your washing machine, please read this manual carefully and keep it for future reference. Twin Tub Washing Machine OWNER S MANUAL PAL00TT Read This Manual Inside you will find many helpful
WASHING MACHINE. User s Manual. The User s Manual is for common use. Make use of the User s Manual depending upon your washing machine model.
 WASHING MACHINE User s Manual Please read this manual before using and note how to use in the proper manner. Please be careful of keeping the manual. Otherwise, it should be bought separately. FEATURES
WASHING MACHINE. User s Manual SW68ASP / SW57APP
 WASHING MACHINE User s Manual SW68ASP / SW57APP Please read this manual before using and note how to use in the proper manner. Please be careful of keeping the manual. Otherwise, it should be bought separately.
Parts Identification and Accessories Safety Information Installation Control Panel Layout Fully Automatic Washing...
 INDEX Parts Identification and Accessories.................................... 2 Safety Information................................................. 3 Installation.......................................................
SERVICE MANUAL TWIN TUB WASHING MACHINE PWM6010M PWM8010PM PWM1010PM PWM1210PM
 SERVICE MAUAL TWI TUB WASHIG MACHIE PWM6010M PWM8010PM PWM1010PM PWM1210PM + + TABLE OF COTEES 1.SAFET PRECAUTIO 1. Safety precaution 2. Introduction of product 2.1 ame of parts 3.Trouble shooting 3.1
Installation and Operating Instructions Models: HO-4-6S-CER-T HO-4-6NF-CER-T
 Installation and Operating Instructions Models: HO-4-6S-CER-T HO-4-6NF-CER-T For your convenience, we recommend to attach the serial number label HERE. 727626032017 p: 09 573 5678 f: 09 573 5699 e: sales@parmco.co.nz
It is essential to read this manual carefully before it is installed and used for the first time. EFL6KWH
 It is essential to read this manual carefully before it is installed and used for the first time. EFL6KWH This washing machine conforms to current safety requirements. Inappropriate use can, however, lead
Operation Instructions
 Operation Instructions FULLY AUTOMATIC WASHING MACHINE XQB22-(AUS)22G The machine is for cold water connection only CONTENTS PARTS IDENTIFICATION FUNCTIONS OF OPERATING SWITCHES SAFETY PRECAUTIONS INSTALLATION
Installation and Operating Instructions
 Installation and Operating Instructions Models: HO-4-6S-CER-T HO-4-6NF-CER-T For your convenience, we recommend to attach the serial number label HERE. As part of Parmco Appliances commitment to improving
HAIER. Fuzzy Computerized Automatic Washing Machine. Service Manual PART # WD HAIER AMERICA TRADING, LLC
 HAIER Fuzzy Computerized Automatic Washing Machine Service Manual PART # WD-8888-71 HAIER AMERICA TRADING, LLC www.haieramerica.com 1 Table Of Contents Contents 2 Features 3 Specifications 4 Safety Precaution
Installation and Operating Instructions. Models: T4-12LOW-9IS-1
 Installation and Operating Instructions Models: T4-12LOW-9IS-1 727626032017 p: 09 573 5678 f: 09 573 5699 e: sales@parmco.co.nz w: www.parmco.co.nz Parmco Appliances extended 7 year warranty 7 New Zealand
Installation and Operating Instructions
 Installation and Operating Instructions Model: HOB2S-2E-1 For your convenience, we recommend to attach the serial number label HERE. As part of Parmco Appliances commitment to improving and updating product
r n n p t i h m a f f e e
 USER S OPERATION MANUAL X08060287B Before operating this unit, please read this manual thoroughly, and retain for future reference NOTE The manufacturer reserves the right for any modifications on the
CLIM9000CE PORTABLE AIR CONDITIONER USER MANUAL
 CLIM9000CE PORTABLE AIR CONDITIONER USER MANUAL Please read this user manual before using this innovative Air Conditioner and keep it safe for future reference. SAFETY INSTRUCTIONS Important! Carefully
GETTING STARTED? EASY.
 User Manual GETTING STARTED? EASY. ZWF 71440W EN User Manual Washing Machine SAFETY INFORMATION Before the installation and use of the appliance, carefully read the supplied instructions. The manufacturer
Owner s Instruction Manual Model: WM / WM12-700
 WASHING MACHINE Owner s Instruction Manual Model: WM08-700 / WM12-700 Please read this manual carefully before Washing Machine operation. Retain it for future reference. Record model number and serial
ensure Ensure Single inlet Dual inlet - only and cold
 X08060026A NOTE The manufacturer reserves the right for any modifications on the product which might be deemed necessary or useful without informing about it in this IFU. Thank you for choosing a Hisense
Ensure. Single inlet Dual inlet -
 W10677398B NOTE The manufacturer reserves the right for any modifications on the product which might be deemed necessary or useful without informing about it in this IFU. Thank you for choosing a Hisense
BEFORE THE FIRST WASH CYCLE DESCRIPTION OFTHE WASHING MACHINE PREPARATION OFTHEWASHING
 NOTE The manufacturer reserves the right for any modifications on the product which might be deemed necessary or useful without informing about it in this IFU. Thank you for choosing a Hisense washing
Operating & Installation Instructions Fully Automatic Washing Machine (Domestic use)
") Operating & Installation Instructions Fully Automatic Washing Machine (Domestic use) Model No. NA-F80VS8 Contents Safety Precautions Part Names Operation Panel 4 Variety of Programs 5 Detergent 6 Washing
Operating & Installation Instructions Fully Automatic Washing Machine (Domestic use) Model No. NA-F80VS8 Contents Safety Precautions Part Names Operation Panel 4 Variety of Programs 5 Detergent 6 Washing
G6FLWW17 6KG WASHING MACHINE
 G6FLWW17 6KG WASHING MACHINE G6FLWW17_IB_170919_grace.indd 1 Contents Guide to the Appliance 2 Caring for the Environment 3 Safety Information and Warnings 4 Items in the Box 6 Getting Started 7 Basic
5kg Front Load Washing Machine
 5kg Front Load Washing Machine G5FLWW15 Instruction Manual Contents Guide to the Appliance 2 Caring for the Environment 3 Safety Information and Warnings 4 Items in the Box 6 Getting Started 7 Basic Set
Washing Machine. User manual WW9*K5*****/WW8*K5*****/WW7*K5***** Untitled :17:40
 Washing Machine User manual WW9*K5*****/WW8*K5*****/WW7*K5***** Untitled-6 1 2017-12-12 3:17:40 Contents Contents 4 What you need to know about the safety instructions 4 Important safety symbols 4 Important
WASHING MACHINE SERVICE MANUAL CAUTION READ THIS MANUAL CAREFULLY TO DIAGNOSE PROBLEMS CORRECTLY BEFORE SERVICING THE UNIT.
 WASHING MACHINE SERVICE MANUAL CAUTION READ THIS MANUAL CAREFULLY TO DIAGSE PROBLEMS CORRECTLY BEFORE SERVICING THE UNIT. MODEL : WM2240C* Jul. 2010 PRINTED IN KOREA P/No. : MFL30599179 CONTENTS 1.SPECIFICATIONS...
Installation and Operating Instructions
 Installation and Operating Instructions Models: HO-4-77NF-CER-T For your convenience, we recommend to attach the serial number label HERE. As part of Parmco Appliances commitment to improving and updating
GDDEM10 DEHUMIDIFIER
 GDDEM10 DEHUMIDIFIER SOCIABLE REMARK When using this dehumidifier in the European countries, the following information must be followed: DISPOSAL: Do not dispose this product as unsorted municipal waste.
General Care and Safety Guide
 General Care and Safety Guide Thank you for choosing a Celsius Convection Panel Heater. This Celsius appliance has been designed and manufactured to high standards of engineering and with proper use and
Installation and Operating Instructions
 Installation and Operating Instructions TILTA MODELS: T1-6-2 T1-6HT T1-9HT As part of Parmco Appliances Ltd commitment to improving and updating product ranges, we reserve the right to alter, change and
6L PRESSURE COOKER. Instruction Manual. Model: PLA1424
 6L PRESSURE COOKER Instruction Manual Model: PLA1424 Due to ongoing product improvements, specifications and accessories may change without notice. Actual product may differ slightly to that depicted.
INSTRUCTION MANUAL / INSTALLATION MANUAL. 7kg Vented Dryer MODEL: KA7VENTDRYA
 INSTRUCTION MANUAL / INSTALLATION MANUAL 7kg Vented Dryer MODEL: KA7VENTDRYA THIS PAGE IS INTENTIONALLY LEFT BLANK 2 CONTENTS Safety Instructions 4 Your Kogan Vented Dryer 5 Before First Use 5 Accessory
SILENT 12 PORTABLE AIR CONDITIONER USER MANUAL
 SILENT 12 PORTABLE AIR CONDITIONER USER MANUAL Thank you for choosing ElectriQ Please read this user manual before using this innovative Air Conditioner and keep it safe for future reference. Visit our
Installation and Operating Instructions. Models: T4-13DM-SLI-1 T4-14DM-LOW-1 T4-15DM-CUR-1 T4-18GBOX
 Installation and Operating Instructions Models: T4-13DM-SLI-1 T4-14DM-LOW-1 T4-15DM-CUR-1 T4-18GBOX As part of Parmco Appliances commitment to improving and upda ng product ranges, we reserve the right
GETTING STARTED? EASY.
 User Manual GETTING STARTED? EASY. ZWF 81240W ZWF 81440W EN User Manual Washing Machine SAFETY INFORMATION Before the installation and use of the appliance, carefully read the supplied instructions. The
Platinum Series Electronic Panel Heaters
 Operating Instructions Platinum Series Electronic Panel Heaters Models: GPPH500, GPPH510, GPPH520, GPPH530 General Care and Safety Guide Thank you for choosing a Goldair Panel Heater. This Goldair Heater
WASHING MACHINE READ THIS MANUAL CAREFULLY TO DIAGNOSE TROUBLE CORRECTLY BEFORE OFFERING SERVICE.
 website : http://www.lgeservice.com e-mail : http://lgeservice.com/techsup.html WASHING MACHINE SERVICE MANUAL CAUTION READ THIS MANUAL CAREFULLY TO DIAGSE TROUBLE CORRECTLY BEFORE OFFERING SERVICE. MODEL
CONTENTS QUICK REFERENCE GUIDE INSTRUCTIONS FOR USE PROGRAMME CHART BOOKLET
 CONTENTS QUICK REFERENCE GUIDE PROGRAMME CHART PREPARING THE LAUNDRY SELECTING A PROGRAMME AND OPTIONS STARTING AND COMPLETING A PROGRAMME CHANGING A PROGRAMME INTERRUPTING A PROGRAMME DAILY MAINTENANCE
Electronic Ceramic Tower Heater
 Operating Instructions Electronic Ceramic Tower Heater Model: GCT430 General Care and Safety Guide Thank you for choosing a Goldair Ceramic Fan Heater. This Goldair Heater has been designed and manufactured
TUMBLE DRYER MODEL: ED-F7160(WH) Owner s Manual Please read this manual carefully before operating your set. Retain it for future reference.
 Owner s Manual Please read this manual carefully before operating your set. Retain it for future reference.") TUMBLE DRYER MODEL: ED-F7160(WH) Owner s Manual Please read this manual carefully before operating your set. Retain it for future reference. Record model number and serial number of the set. See the label
TUMBLE DRYER MODEL: ED-F7160(WH) Owner s Manual Please read this manual carefully before operating your set. Retain it for future reference. Record model number and serial number of the set. See the label
WASHER EXTRACTOR M XQG60-A508K
 WASHER EXTRACTOR 4160980M XQG60-A508K It is essential to read this manual carefully before it is installed and used for the first time. 9 12 14 15 Correct use Read and understand thoroughly these safety
INSTRUCTIONS FOR USE
 INSTRUCTIONS FOR USE GB IMPORTANT PLEASE READ THESE INSTRUCTIONS THOROUGHLY BEFORE USING THIS APPLIANCE. KEEP THEM IN A SAFE PLACE FOR FUTURE REFERENCE. SECTION 1: BEFORE USE * Safety warnings * User Information
General Care and Safety Guide
 General Care and Safety Guide Thank you for choosing a Celsius Ceramic Tower Heater. This Celsius appliance has been designed and manufactured to high standards of engineering and with proper use and care,
Operating & Installation Instructions Fully Automatic Washing Machine (Household Use)
") Operating & Installation Instructions Fully Automatic Washing Machine (Household Use) Model No. NA-F95A NA-F85A Contents Safety Precautions Part Names Operation Panel 4 Variety of Programs 5 Detergent
Operating & Installation Instructions Fully Automatic Washing Machine (Household Use) Model No. NA-F95A NA-F85A Contents Safety Precautions Part Names Operation Panel 4 Variety of Programs 5 Detergent
AC-12200E Portable Air Conditioner
 AC-12200E Portable Air Conditioner OWNERS MANUAL Read and save these instructions. A Name You Can Trust Trust has to be earned and we will earn yours. Customer happiness is the focus of our business. 2
Contents Contents... 2 Safety Warning... 3 Unpacking... 6 Installation... 7 Installing Your Washing Machine... 7 Moving and Installing...
 Contents Contents...2 Safety Warning...3 Unpacking...6 Installation...7 Installing Your Washing Machine...7 Choosing the Right Location for Your Washing Machine... 7 Moving and Installing...8 Removing
Ceramic Wall Heater With Remote
 Operating Instructions Ceramic Wall Heater With Remote Model: GCH500 General Care and Safety Guide Thank you for choosing a Goldair Ceramic Heater. This Goldair Heater has been designed and manufactured
Black 8KG 1400 Spin Speed Inverter Direct Drive Washing Machine Instruction Manual
 Black 8KG 1400 Spin Speed Inverter Direct Drive Washing Machine Instruction Manual Model number: RHWM81400DIDB Opening times: Monday - Friday 8am 6pm & Saturday 9am 1pm or visit us at Contents Safety Instructions
TK 806 Z. Bedienungs- und Wartungshandbuch. Livret d instructions et d entretien. Manuale uso e manutenzione. User instructions and maintenance
 DE Bedienungs- und Wartungshandbuch FR Livret d instructions et d entretien IT Manuale uso e manutenzione User instructions and maintenance TK 806 Z Dipl.Ing. www..ch Service - Telefon: 0848 559 111 ENGLISH
USER MANUAL. FairWind FWPC6L Pressure Cooker. Contact Us:
 USER MANUAL FairWind FWPC6L Pressure Cooker Contact Us: 1-844-528-2566 Read and Save These Instructions TABLE OF CONTENTS SPECIFICATIONS... 2 Parts List... 3 Important Safety Instructions... 4 Installation
10L Dehumidifier. Model Number: LDH V AC 50/60Hz 290W
 10L Dehumidifier Model Number: LDH1001 220-240V AC 50/60Hz 290W For Customer Services & Spare Parts please call 0345 209 7461 Opening times: Monday - Friday 8am 8pm & Saturday 9am 1pm Or visit us at www.productcare.co.uk
Fully Automatic Washing Machine. Operation Manual MODEL: AW60-806
 Fully Automatic Washing Machine Operation Manual MODEL: AW60-806 FEATURES AND ACCESSORIES FEATURES Transparent window, unique outlook design: Adopting the vogue transparent cover, let`s be clear at a glance
USER MANUAL SILENT16 PORTABLE AIR CONDITIONER
 USER MANUAL SILENT16 PORTABLE AIR CONDITIONER Thank you for choosing electriq Please read this user manual before using this innovative Air Conditioner and keep it safe for future reference. Visit our
PORTABLE AIR CONDITIONER OWNER S MANUAL
 PORTABLE AIR CONDITIONER OWNER S MANUAL ASSEMBLY AND OPERATING INSTRUCTIONS MODELS: JHS-A018-10KR SKU#: 130004 JHS-A018-12KRH SKU#: 130005 WARNING: Read and follow all warnings and instructions in this
12L DEHUMIDIFIER OPERATING INSTRUCTIONS
 12L DEHUMIDIFIER OPERATING INSTRUCTIONS Attention: This Dehumidifier is rated to extract 12L per day in an environment of 80% humidity and temperature of 30 C. This is the world-wide standard for rating
Operating & Installation Instructions Fully Automatic Washing Machine (Household Use)
") Operating & Installation Instructions Fully Automatic Washing Machine (Household Use) Model No. NA-FS95A Contents Safety Precautions Part Names Operation Panel 4 Variety of Programs 5 Detergent 6 Washing
Operating & Installation Instructions Fully Automatic Washing Machine (Household Use) Model No. NA-FS95A Contents Safety Precautions Part Names Operation Panel 4 Variety of Programs 5 Detergent 6 Washing
WCD-200W Water Dispenser
 WCD-200W Water Dispenser OWNERS MANUAL Read and save these instructions. A Name You Can Trust Trust has to be earned and we will earn yours. Customer happiness is the focus of our business. 2 From the
1L Deep Fryer Model FDF100 OPERATING INSTRUCTIONS
 1L Deep Fryer Model FDF100 OPERATING INSTRUCTIONS GENERAL CARE AND SAFETY GUIDE IMPORTANT SAFETY INSTRUCTIONS: Read all instructions before use. Always follow these basic precautions when using an electrical
User manual. Washing Machine ZWP 581 ZWQ 5102 ZWQ 5103 ZWQ 5122
 EN User manual Washing Machine ZWP 58 ZWQ 502 ZWQ 503 ZWQ 522 Contents Safety information 2 Product description _ 3 How to run a wash cycle? 4 Daily use _ 5 Washing programmes 6 Care and cleaning 8 Safety
2400W steam generator with one touch temperature control. Instruction Manual MODEL: SI9020TTN
 2400W steam generator with one touch temperature control Instruction Manual MODEL: SI9020TTN WWW.SWAN-BRAND.CO.UK Contents Important Safeguards 04 UK Wiring Instructions 05 Parts and Features 06 Fabric
User Manual. Washing Machine ZWF 91483WH ZWF 91483WR
 EN User Manual Washing Machine ZWF 91483WH ZWF 91483WR Contents Safety information 2 Safety instructions 3 Product description 4 Control panel 5 Programme Chart 6 Consumption values 7 Options 8 Settings
INSTRUCTIONS FOR USE - TUMBLE DRYER AWG 367
 INSTRUCTIONS FOR USE - TUMBLE DRYER AWG 367 GB IMPORTANT - PLEASE READ THESE INSTRUCTIONS THOROUGHLY BEFORE USING THIS APPLIANCE. KEEP THEM IN A SAFE PLACE FOR FUTURE REFERENCE. INSTALLATION Position
WASHING MACHINE READ THIS MANUAL CAREFULLY TO DIAGNOSE TROUBLE CORRECTLY BEFORE OFFERING SERVICE.
 website : http://www.lgeservice.com e-mail : http://lgeservice.com/techsup.html WASHING MACHINE SERVICE MANUAL CAUTION READ THIS MANUAL CAREFULLY TO DIAGSE TROUBLE CORRECTLY BEFORE OFFERING SERVICE. MODEL
Mobile Air Conditioner Instruction Manual Model TC-N9KM
 Mobile Air Conditioner Instruction Manual Model TC-N9KM Please read and retain these instructions for future reference SPECIFICATION Model no. Cooling capacity Power/Ampere consumption for cooling* Air
Portable Air Conditioner
 AC-12200E AC-12200H Portable Air Conditioner OWNER S MANUAL v1.0 Read and save these instructions. 2 A Name You Can Trust Trust should be earned and we will earn yours. Customer happiness is the focus
Installation and Operating Instructions
 Installation and Operating Instructions Models: RBOX-6S-1000 RBOX-9S-1000 RCAN-6S-1000 RCAN-6S-500 RCAN-6W-1000 RCAN-6W-500 RCAN-9S-1000 RCAN-9S-500 RCAN-9W-1000 RCAN-9W-500 RLCD-9G-1000 RLOW-9S-1000 T4-11GLA
BOILING UNIT REDITAP. Installation and User Guide. IMPORTANT: This booklet should be left with the user after installation and demonstration
 in tap Boiling water to in tap sink Drain Valve (as high as possible) REDITAP CONNECTION SUMMARY Amp mains supply cold mains water into in tap optional filter cold water in hot water BOILING UNIT Installation
WCD-210BK. Water Dispenser OWNERS MANUAL. Read and save these instructions.
 WCD-210BK Water Dispenser OWNERS MANUAL Read and save these instructions. 2 Trust has to be earned and we will earn yours. Customer happiness is the focus of our business. From the factory to the warehouse,
User manual. Washing machine ZWQ 6120 ZWQ 6100
 EN User manual Washing machine ZWQ 6120 ZWQ 6100 Product description 1 1. The control panel 2. Lid handle 3. Adjustable levelling feet 2 3 The control panel 1 2 3 4 5 6 1. Programme selector 2. Pushbuttons
User Manual. Dishwasher ZDM17301SA ZDM17301WA
 EN User Manual Dishwasher ZDM17301SA ZDM17301WA Contents Safety information 2 Safety instructions 3 Product description 4 Control panel 5 Programmes 6 Daily Use 7 Hints and tips 10 Care and cleaning 11
XR510W 5KG 1000RPM WASHING MACHINE XR612W 6KG 1200RPM WASHING MACHINE. Instruction Manual
 XR510W 5KG 1000RPM WASHING MACHINE XR612W 6KG 1200RPM WASHING MACHINE Instruction Manual Serial number: Please read these instructions carefully before use and retain for future reference. Before switching
PORTABLE AIR CONDITIONER OWNER S MANUAL
 PORTABLE AIR CONDITIONER OWNER S MANUAL ASSEMBLY AND OPERATING INSTRUCTIONS MODELS: JHS-A018-10KR SKU#: 130004 JHS-A018-12KRH SKU#: 130005 JHS-A018-14KRH SKU#: 130009 WARNING: Read and follow all warnings
AH-470. Flat Panel Micathermic Space Heater OWNERS MANUAL. Read and save these instructions.
 Flat Panel Micathermic Space Heater AH-470 OWNERS MANUAL Read and save these instructions. A Name You Can Trust Trust has to be earned and we will earn yours. Customer happiness is the focus of our business.
Front Load Washer 5kg USER MANUAL MFWS512
 Front Load Washer 5kg USER MANUAL MFWS512 CONTENTS Safety information... 2-3 Identifying parts of the Washer... 4 Installation... 5-7 Control Features and Functions... 8 Wash Programs... 9 Wash Guide...
Operating Instructions. Oil Column Heater. Models: GOC155, GOC157, GOC1511
 Operating Instructions Oil Column Heater Models: GOC155, GOC157, GOC1511 General Care And Safety Guide Thank you for choosing a Goldair Oil Heater. This Goldair Heater has been designed and manufactured
Autofill wall mounted water. boiler. Getting the best from your water. boiler. Please read and keep these instructions
 Autofill wall mounted water boiler Please read and keep these instructions For Burco wall mounted boilers 76700 (SKU 444448534), 76702 (SKU 444448546), & 76704 (SKU444448548) Getting the best from your
User Manual Washing Machine L FL
 EN User Manual Washing Machine L 62270 FL 2 www.aeg.com CONTENTS 1. SAFETY INFORMATION...3 2. SAFETY INSTRUCTIONS... 4 3. PRODUCT DESCRIPTION... 6 4. CONTROL PANEL...7 5. PROGRAMMES... 8 6. CONSUMPTION
Portable Washing Machine GPW-6
 User Manual [Revision 5.0 April 2017] READ THIS MANUAL CAREFULLY BEFORE USE FAILURE TO DO SO MAY RESULT IN INJURY, PROPERTY DAMAGE AND MAY VOID WARRANTY. KEEP THIS MANUAL FOR FUTURE REFERENCE. Products
SERVICE MANUAL WASHING MACHINE MODEL : WD(M)-1018(0~9)S WD(M)-8018(0~9)N CAUTION
-1018(0~9)S WD(M)-8018(0~9)N CAUTION") website : http://www.lgeservice.com e-mail : http://lgeservice.com/techsup.html WASHING MACHINE SERVICE MANUAL CAUTION READ THIS MANUAL CAREFULLY TO DIAGSE TROUBLE CORRECTLY BEFORE OFFERING SERVICE. MODEL
website : http://www.lgeservice.com e-mail : http://lgeservice.com/techsup.html WASHING MACHINE SERVICE MANUAL CAUTION READ THIS MANUAL CAREFULLY TO DIAGSE TROUBLE CORRECTLY BEFORE OFFERING SERVICE. MODEL
8L DEHUMIDIFIER OPERATING INSTRUCTIONS
 8L DEHUMIDIFIER OPERATING INSTRUCTIONS Attention: This Dehumidifier is rated to extract 8L per day in an environment of 80% humidity and temperature of 30 C. This is the world-wide standard for rating
16 OUTDOOR MISTING FAN
 16 OUTDOOR MISTING FAN Model: SF-1670M READ AND SAVE THESE SAFETY INSTRUCTIONS BEFORE USE IMPORTANT SAFETY INSTRUCTIONS When using electrical appliances, basic precautions should always be followed to
GETTING STARTED? EASY.
 User Manual GETTING STARTED? EASY. ZDF21001WA ZDF21001XA ZDF21001NA EN User Manual Dishwasher SAFETY INFORMATION Before the installation and use of the appliance, carefully read the supplied instructions.
20L Dehumidifier. Model Number: LDH V AC 50/60Hz 440W
 20L Dehumidifier Model Number: LDH2002 220-240V AC 50/60Hz 440W For Customer Services & Spare Parts please call 0345 209 7461 Opening times: Monday - Friday 8am 8pm & Saturday 9am 1pm Or visit us at www.productcare.co.uk
AUTO SPEED BLENDER INSTRUCTION MANUAL MODEL: BLCLMB1
 AUTO SPEED BLENDER INSTRUCTION MANUAL MODEL: BLCLMB1 1 TABLE OF CONTENTS IMPORTANT SAFEGUARDS 3 POLARIZED PLUG 4 PRODUCT DIAGRAM 5 USAGE INSTRUCTIONS PREPARING YOUR AUTO SPEED BLENDER FOR USE 6 HOW TO
User Manual. Tumble Dryer ZDC8202P
 EN User Manual Tumble Dryer ZDC80P Contents Safety information Safety instructions 3 Product Description 4 Control Panel 5 Programme table 5 Options 6 Settings 7 Before First Use 8 Daily Use 8 Hints and