A-dec 300 Support Systems
|
|
|
- Fay Newton
- 5 years ago
- Views:
Transcription


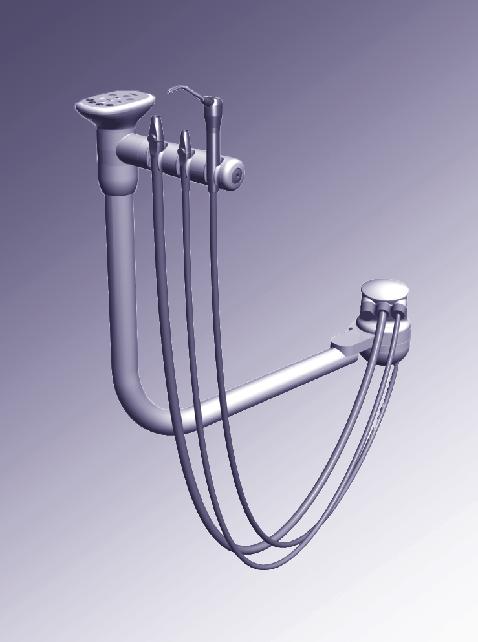
1 Instructions for Use A-dec 300 Support Systems 351, 352, and 353 Assistant s Instrumentation 362 and 363 Support Center and Cuspidor
2 A-dec 300 Support Systems Instructions for Use Copyright 2017 A-dec Inc. All rights reserved. A-dec Inc. makes no warranty of any kind with regard to this material, including, but not limited to, the implied warranties of merchantability and fitness for a particular purpose. A-dec Inc. shall not be held liable for any errors contained herein or any consequential or other damages concerning the furnishing, performance or use of this material. The information in this document is subject to change without notice. If you find any problems in the documentation, please report them to us in writing. A-dec Inc. does not warrant that this document is error-free. No part of this document may be copied, reproduced, altered, or transmitted in any form or by any means, electronic or mechanical, including photocopying, recording, or by any information storage and retrieval system, without prior written permission from A-dec Inc. Trademarks and Additional Intellectual Property Rights A-dec, the A-dec logo, A-dec Inspire, Cascade, Century Plus, Continental, Decade, ICX, ICV, Performer, Preference, Preference Collection, Preference ICC, and Radius are trademarks of A-dec Inc. and are registered in the United States and other countries. A-dec 500, A-dec 400, A-dec 300, A-dec 200, and reliablecreativesolutions are also trademarks of A-dec Inc. None of the trademarks or trade names in this document may be reproduced, copied, or manipulated in any manner without the express, written approval of the trademark owner. Certain touchpad symbols are proprietary to A-dec Inc. Any use of these symbols, in whole or in part, without the express written consent of A-dec Inc., is strictly prohibited. Regulatory Information Regulatory information mandated by agency requirements is provided in the Regulatory Information, Specifications, and Warranty document (p/n ), which is available in the Document Library at Product Service Product service is available through your local authorized A-dec dealer. For service information, or to locate an authorized dealer, contact A-dec at in the USA and Canada or worldwide, or visit Product Models and Versions Covered in This Document Model Version Description 351 A, B Assistant s Instrumentation 352 A Assistant s Instrumentation 353 A Assistant s Instrumentation 362 A Support Center and Cuspidor 363 A Support Center and Cuspidor


3 Content Map Bowl Rinse/Cupfill... 6 Touchpad...2 Water Bottle...9 Syringe...3 Cuspidor Bowl...6 Holder Adjustment...4 Solids Collector HVE/Saliva Ejector...5 Operate / Adjust... 2 Clean / Maintain... 9 Specifications and Warranty Rev E 1


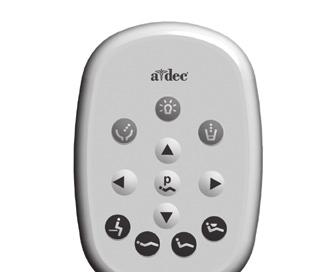
4 A-dec 300 Support Systems Instructions for Use Operate / Adjust Operate / Adjust Power On/Off NOTE A-dec recommends that you perform a shock treatment on the dental unit waterlines before you use the system for the first time. For more information, see Waterline Maintenance on page 9. Baseplate Delivery System Master Toggle (A-dec 332 shown) Chair Power Button Master Toggle Use the master toggle to turn on the power, water, and air. The master toggle is normally located on the delivery system, but may instead be located on the support center or floor box on chairs without a delivery system. If there is no power to the system, verify that the chair power button is pushed in. The chair power must be on in order for the master toggle to control system power. When to Turn Off the Power To save energy, turn off the power at the end of the work day and during longer periods of non-use. Status Light Touchpads and the Status Light The A-dec logo on the touchpad illuminates when the system is on and ready for use. If the status light blinks, it may indicate that a safety feature has interrupted chair motion. See Chair Safety Features on page 3 for more information. For complete details on touchpad functionality, please see your delivery system Instructions For Use. 2


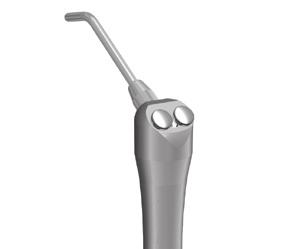
5 Chair Safety Features Chair Stop Plate A-dec dental chairs and systems include several features designed to improve safety. Activated stop switches may halt the chair or prevent it from moving. To help ensure uninterrupted chair motion: remove any potential obstructions under the chair and attached modules avoid pressing the foot control disk or lever keep handpieces properly seated in their holders If the Chair Stops Unexpectedly Check the actions listed above to correct the condition. If the downward movement of the chair stopped because of an obstruction, use the touchpad or footswitch to raise the chair and remove the obstruction. Autoclavable Syringe Water Air 2 Clicks To install the A-dec syringe tip, push the tip in until you feel two clicks. Press both buttons simultaneously for the air/water spray. IMPORTANT For detailed instructions on syringe usage, flow adjustment, and maintenance, see the A-dec Syringes Instructions For Use (p/n ) Rev E 3

 If you have a chair-side vacuum system and auto-electric holders, lift the HVE or saliva")
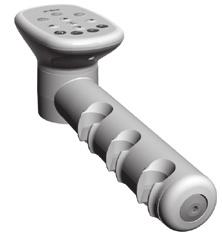
6 A-dec 300 Support Systems Instructions for Use Operate / Adjust Instrument Holders The instrument holders independently rotate for customized positioning of each instrument. To reposition, pull the holder slightly away from the adjacent one, rotate it to the desired position, and release. CAUTION Twisting the holder without pulling it away from the adjacent one will damage the mechanism. 1 Pull Out 2 Rotate Auto-Electric Holders Saliva Ejector High Volume Evacuator (HVE) If you have a chair-side vacuum system and auto-electric holders, lift the HVE or saliva ejector from its holder and open the valve to turn on the vacuum. Return the instrument to its holder to turn off the vacuum. Auto-Electric Holder 4

.")
7 HVE/Saliva Ejector Left/Right Conversion Valve Body To convert the standard HVE and saliva ejector for left-handed operation, push the control valve out of the valve body, rotate the control valve 180, and push it back into place. NOTE Be sure to reinstall the valve on the same side of the valve body. Otherwise, the HVE or saliva ejector will not operate properly. Control Valve CAUTION Do not attempt to remove the HVE valve if you have an Air Vacuum System (AVS). The HVE is permanently attached to the tubing in this configuration and cannot be removed (see below). Air Vacuum System (AVS) HVE (control valve features circular groove) Saliva Ejector The AVS option includes a self-contained air vacuum generator. Also, with this option, the HVE valve body is permanently attached and cannot be removed from the tubing. To activate the saliva ejector vacuum, use the on/off toggle. Saliva Ejector On/Off Toggle Rev E 5


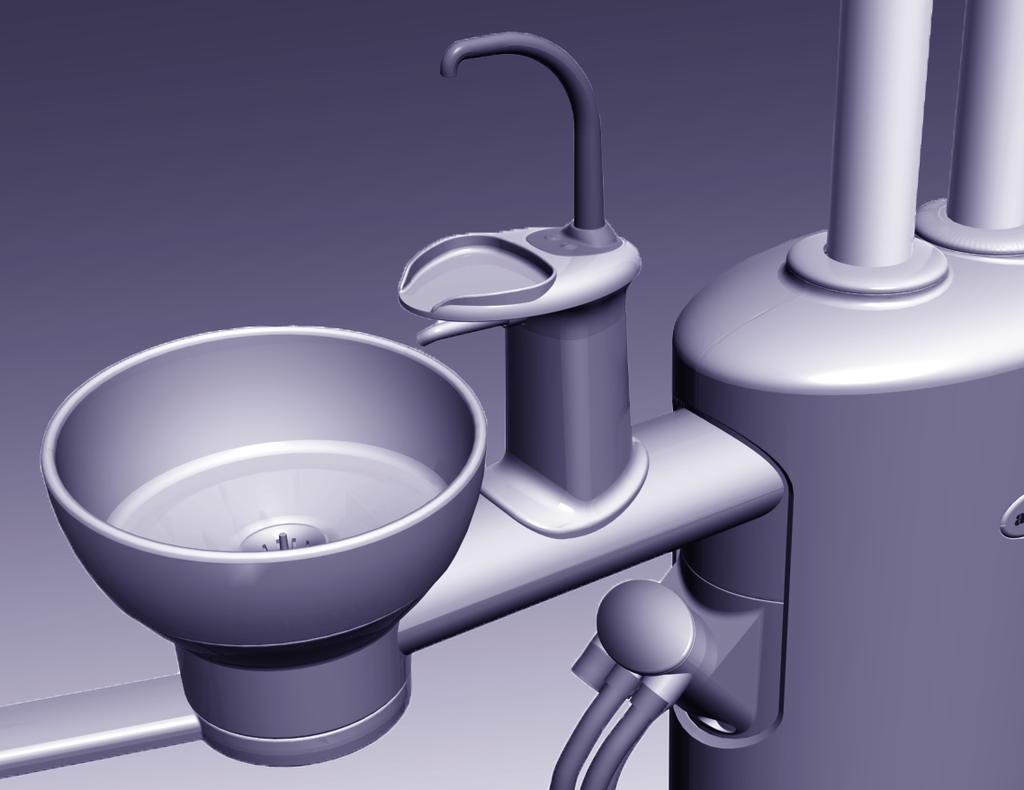
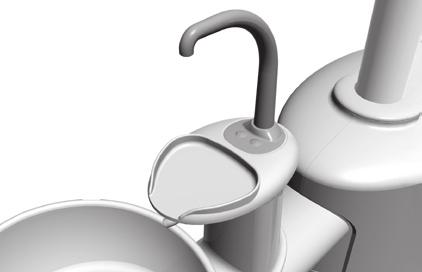
8 A-dec 300 Support Systems Instructions for Use Operate / Adjust Cuspidor Functions Bowl Rinse and Cupfill Cupfill Spout Bowl Rinse Button Cupfill Button Use the buttons under the cupfill spout or on the touchpad to control the bowl rinse and cupfill functions. The buttons support both programmed and manual operation. Button Description and Factory Presets Bowl Rinse Operation: Bowl Rinse Spout Press and release the bowl rinse button for a timed operation. The factory preset is a 30 second rinse. Press and release the bowl rinse button twice in less than two seconds to activate the continuous operation mode. Press and release the button again to end the continuous mode. Bowl Screen Press and hold the bowl rinse button for manual operation. Cupfill Operation: Press and release the cupfill button for a timed operation. The factory preset is a 2.5 second fill. Press and hold the cupfill button for manual operation. Note: Touchpad symbols are proprietary to A-dec Inc. Support Center 6


9 Cuspidor Functions (continued) Bowl Rinse Cupfill Program Button Customize Bowl Rinse or Cupfill Timing To reprogram the timed bowl rinse or cupfill functions: 1. Press on the touchpad, or press and hold the cupfill and bowl rinse buttons under the cupfill spout. Release the button(s) when you hear one beep. 2. Within five seconds, press and hold the cupfill or bowl rinse button for the desired time. 3. Release the button. Three beeps confirm that the program has changed. Support Center Cover Bowl Rinse Spout Bowl Rinse Flow Adjustment The bowl rinse function should provide enough water to completely rinse the cuspidor bowl. If the flow is not sufficient, an adjustment can be made inside the support center: 1. Remove the side cover from the support center by pulling the lower edges of the cover out. 2. With the bowl rinse on, squeeze the pinch valve to reduce the flow. Release the valve to increase the flow. 3. For the best rinsing action, adjust the flow pattern by rotating the bowl rinse spout. Bowl Rinse Flow Pinch Valve Rev E 7

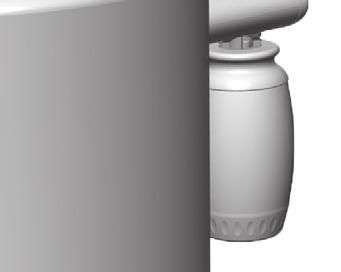
10 A-dec 300 Support Systems Instructions for Use Operate / Adjust Telescoping Arm Adjustment To level the telescoping arm: 1. Extend the arm. 2. Locate the adjustment setscrew underneath the arm. 3. Use a 1/8" hex key and turn the setscrew clockwise to tilt the arm up, counterclockwise to tilt the arm down. 8


11 Clean / Maintain Barrier Protection NOTE For proper use and disposal of barriers, see the instructions provided by the barrier manufacturer. Waterline Maintenance Self-Contained Water Bottle A-dec recommends barrier protection for all applicable touch and transfer surfaces. Touch surfaces are areas that come into contact with hands and become potential cross-contamination points during dental procedures. Transfer surfaces are areas that come into contact with instruments and other inanimate objects. In the USA, barriers must be produced under the Current Good Manufacturing Practice (CGMP) as specified by the U.S. Food and Drug Administration (USFDA). For regions outside the USA, refer to the medical device regulations specific to your location. IMPORTANT For recommendations on cleaning and chemical disinfection of touch and transfer surfaces (where barrier protection is not applicable or when barriers are compromised), please see the A-dec Equipment Asepsis Guide (p/n ). A-dec recommends that you perform a shock treatment on the dental unit waterlines before you use the system for the first time. For on-going waterline maintenance, A-dec recommends a three-part protocol: continuous use of A-dec ICX waterline treatment tablets, regular dental unit water monitoring, and shock treatment. IMPORTANT For complete details on how to maintain good water quality in your system, see the instructions for use provided with ICX and your self-contained water bottle: A-dec ICX... p/n A-dec Self-Contained Water System... p/n Waterline Maintenance Guide... p/n Rev E 9

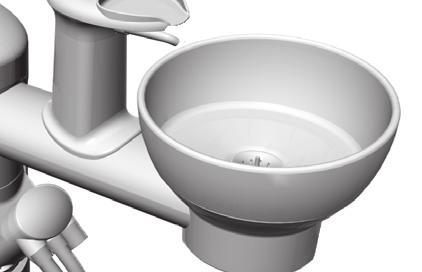
12 A-dec 300 Support Systems Instructions for Use Clean / Maintain Cuspidor and Drain Spouts and Bowl The contoured spouts and smooth bowl of the cuspidor provide for quick and easy cleaning. Remember to empty and clean the bowl screen every time you clean the cuspidor. CAUTION Do not remove the spouts when cleaning the cuspidor. This will help prevent cleaning solutions from damaging the equipment and contaminating the cupfill water. CAUTION Do not empty the solids collector screen or bowl screen into the cuspidor. Doing so could plug the cuspidor drain. Dispose of the contents in an appropriate biohazard container according to the regulations specific to your location. After cleaning, always install the bowl screen in the cuspidor bowl to prevent debris from plugging the drain. Gravity Drain Tubing At the end of each day, flush the cuspidor to remove debris from the flexible drain tubing. If the cuspidor is not flushed regularly, debris may build up and impair draining. To flush the cuspidor, run the bowl rinse for about 60 seconds. Maintenance Parts For replacement cuspidor bowl screens, contact your authorized A-dec dealer and order p/n (package of 5). 10
13 HVE/Saliva Ejector Valve Body Assembly Asepsis NOTE Vacuum lines should be cleaned at the end of each day by evacuating a detergent or water-based detergentdisinfectant through the system. If you use barrier film to protect the main body of the HVE and saliva ejector, replace the barrier film after each patient. Clean and disinfect these instruments at the end of each day or after each patient if the barrier film has been compromised. If you do not use barrier film, or if you perform oral surgery, always clean and disinfect these instruments after each patient. Disinfection To disinfect the HVE and saliva ejector valve body assembly without disconnection from the vacuum system: 1. Remove the vacuum tip from the HVE or saliva ejector. 2. Disinfect the valve body assembly by using an intermediate-level disinfectant according to instructions for the disinfectant; A-dec recommends a phenolic (dual) water-based disinfectant. 3. Follow the manufacturer s instructions for disinfectant contact time. 4. Operate the HVE and the saliva ejector valves several times to verify that they rotate smoothly Rev E 11
14 A-dec 300 Support Systems Instructions for Use Clean / Maintain HVE/Saliva Ejector Valve Body Assembly Asepsis (continued) NOTE A-dec valve body assemblies are heat tolerant for sterilization. Users may sterilize at their discretion. CAUTION Do not attempt to remove the HVE body or valve if you have an Air Vacuum System. The HVE is permanently attached to the tubing in this configuration and cannot be removed for sterilization. Instead, use barrier film produced under FDA good manufacturing practices for protection on the HVE body, making sure to replace the barrier after each use. Routine Maintenance and Sterilization To routinely maintain and sterilize the HVE and saliva ejector when disconnected from the vacuum system (frequency determined by the user): 1. Turn off the vacuum or open the control valve before disconnecting the HVE or saliva ejector. 2. Remove the vacuum tip from the HVE or saliva ejector. Discard disposable vacuum tips. 3. Remove the HVE or saliva ejector valve body assembly from the vacuum line by pulling it away from the tubing at the tailpiece. 4. Disassemble the valve body assembly by pushing the control valve out of the HVE or saliva ejector valve body. 5. Inspect the O-rings. Remove and discard if damaged. 6. Clean undamaged O-rings with a soft brush and a health authority approved detergent. O-rings may be cleaned in place or removed and cleaned at the discretion of the user. 7. Clean all exterior and interior surfaces of the valve body and control valve using a health authority approved detergent and the brushes provided with the product (or equivalent). Lumens or channels of the valve body must be cleaned with a brush of the proper length and diameter. The brush must be long enough to extend through the lumen. 8. Rinse thoroughly with water. 12

15 HVE/Saliva Ejector Valve Body Assembly Asepsis (continued) 9. Process the disassembled valve body assembly components through a washer-disinfector. If a washer-disinfector is unavailable, valve body assembly components must be manually disinfected using a health authority approved disinfectant. 10. Allow the components to dry completely. 11. Sterilize the valve body assembly components at C ( F) for 4 minutes in a pre-vacuum sterilizer or 6 minutes in a gravity displacement sterilizer. 12. Prior to use, replace O-rings as needed, lubricate O-rings with A dec silicone lubricant, and reassemble the valve body assembly. CAUTION Use only silicone lubricant when lubricating instrumentation O-rings. Petroleum-based products will cause permanent damage to the O-rings. 13. Reinstall the valve body assembly on the tubing tailpiece. 14. Operate the HVE and the saliva ejector control valves several times to verify that they rotate smoothly Rev E 13

16 A-dec 300 Support Systems Instructions for Use Clean / Maintain HVE/Saliva Ejector Tip Asepsis NOTE Select tips that are compatible with your HVE and saliva ejector openings. See HVE and Saliva Ejector Openings for Tips on page 17 for specifications. Disposable Tips Replace disposable HVE and saliva ejector tips after each use. CAUTION Disposable HVE and saliva ejector tips are not sterilizable and should not be reused. Sterilizable Tips Heat sterilize stainless steel HVE tips after each use. To clean and sterilize a stainless steel HVE tip: 1. Remove the tip from the HVE. 2. Clean and rinse the tip using a mild detergent and water, then allow the tip to dry completely. 3. Sterilize the tip at C ( F) for 4 minutes in a prevacuum sterilizer or 6 minutes in a gravity displacement sterilizer. 14


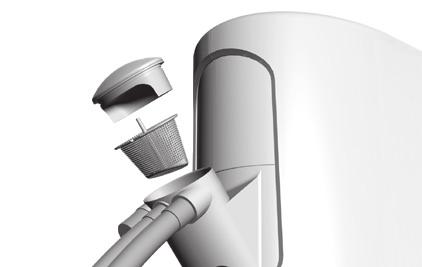
17 Solids Collector Cap Support Center The solids collector aids in preventing solids from entering the central vacuum system. To ensure proper suction from the central vacuum and maintain proper treatment room asepsis, discard and replace the solids collector screen at least twice a week. Screen Arm-Mounted Systems TIP For solids collector replacement screens, contact your local authorized A-dec dealer and reference Pinnacle p/n 5512 or A-dec p/n To replace the solids collector screen: 1. Turn off the vacuum or open the HVE control valve. 2. Remove the solids collector cap and screen. 3. Discard the screen according to your local regulations. DANGER Infectious waste may be present. Follow asepsis protocol to prevent cross contamination. CAUTION Do not empty the screen into your cuspidor. Doing so could plug the drain. 4. Inspect the collector cap O-ring, replace the O-ring as needed, and lubricate with A-dec silicone lubricant as needed. 5. Insert a new screen in the collector and replace the cap Rev E 15

18 A-dec 300 Support Systems Instructions for Use Clean / Maintain Utilities and Shutoff Valves Quad Outlet Box Drain Moisture Separator Vacuum Line The utilities for A-dec chair-mounted systems are located in the contoured floor box under your chair. To access, lift the cover up and off the floor box frame. CAUTION When removing or replacing covers, take care not to damage any wiring or tubing. Verify that the covers are secure after replacing them. Water Manual Shutoff Valve Filter Housing O-Ring Pre-Regulator Assembly Filter Beveled Edge Air Manual Shutoff Valve Manual Shutoff Valve CAUTION To ensure proper operation, install the filter with the beveled edge facing the manifold. The manual shutoff valves control the air and water to the system. Leave these valves completely open (turned counterclockwise) during normal use to prevent leaks. From the valves, air and water pass through separate filters before entering the pre-regulators. Replace these filters when they become clogged and restrict flow. To check for a clogged water filter: 1. Turn on the master toggle. 2. While watching the cuspidor, press the bowl rinse button. If the bowl rinse water flow fades or stops, replace the water filter. To replace the filter: 1. Turn off the master toggle and close the shutoff valve (turn clockwise). 2. Bleed the system of air and water pressure by operating the syringe buttons until air and water no longer flow. 3. Using a standard screwdriver, remove the filter housing from the water pre-regulator assembly and remove the filter. 4. Replace the filter if it is clogged or discolored. Install the filter with the beveled edge facing the manifold. 5. Open the shutoff valves, turn on the master toggle, and operate the bowl rinse to remove air from the waterline. 16
, which is available in the Document Library at www.a-dec.com. Minimum Air, Water, and Vacuum Service Requirements Air: 2.")
19 A-dec 300 Support Systems Instructions for Use Specifications / Warranty Specifications Warranty Warranty information is provided in the Regulatory Information, Specifications, and Warranty document (p/n ), which is available in the Document Library at Minimum Air, Water, and Vacuum Service Requirements Air: 2.5 scfm (71 sl/min) at psi ( kpa) minimum Water: 1.5 gpm (5.7 L/min) at 60±20 psi (410±140 kpa) minimum Vacuum: (wet): 9 scfm (255 sl/min) at 10±2 inches of Hg (34±7 kpa) minimun (dry): 12 scfm (340 sl/min) at 4.5±1 inches of Hg (16±3.5 kpa) minimum HVE and Saliva Ejector Openings for Tips Standard HVE: 11 mm Large Bore HVE: 15 mm Saliva Ejector: 6 mm IMPORTANT For electrical specifications, identification of symbols, and other regulatory requirements, see the Regulatory Information, Specifications, and Warranty document (p/n ), which is available in the Document Library at NOTE Specifications are subject to change without notice. Requirements may vary depending on your location. For more information, contact your authorized A-dec dealer Rev E 17
20 A-dec Headquarters 2601 Crestview Drive Newberg, Oregon United States Tel: within USA/CAN Tel: outside USA/CAN Fax: A-dec Australia Unit Ricketty Street Mascot, NSW 2020 Australia Tel: within AUS Tel: +61.(0) outside AUS A-dec China A-dec (Hangzhou) Dental Equipment Co., Ltd. 528 Shunfeng Road Qianjiang Economic Development Zone Hangzhou , Zheijiang, China Tel: within China Tel: outside China A-dec United Kingdom EU Authorized Representative Austin House, 11 Liberty Way Nuneaton, Warwickshire CV11 6RZ England Tel: 0800.ADEC.UK ( ) within UK Tel: +44.(0) outside UK ÍvÈ.Ç#(È.00SÎ Rev E Copyright 2017 A-dec Inc. All rights reserved. IFUcov4
Instructions for Use. A-dec 461 Cuspidor with Support Center
 Instructions for Use A-dec 461 Cuspidor with Support Center A-dec 461 Cuspidor with Support Center Instructions for Use Copyright 2014 A-dec Inc. All rights reserved. A-dec Inc. makes no warranty of any
InstructIons for use A-dec 561 Cuspidor
 Instructions for Use A-dec 561 Cuspidor Copyright 2014 A-dec Inc. All rights reserved. A-dec Inc. makes no warranty of any kind with regard to this material, including, but not limited to, the implied
Instructions for Use A-dec Self-Contained Water System
 Instructions for Use A-dec Self-Contained Water System The self-contained water system supplies water to handpieces, syringes, and the cuspidor cupfill. The system includes a 2- or 0.7-liter water bottle
Performer Cuspidor. Installation Instructions. (For Performer III Chair & International Performer I Chair) You Will Need. About This Install
 You Will Need. About This Install") Installation Instructions Performer Cuspidor (For Performer III Chair & International Performer I Chair) You Will Need Adjustable wrench or 9/16" open-end wrench Magnetic leveling device 3/16" hex key
Installation Instructions Performer Cuspidor (For Performer III Chair & International Performer I Chair) You Will Need Adjustable wrench or 9/16" open-end wrench Magnetic leveling device 3/16" hex key
Preference ICC. Sterilization Center
 Instructions for Use Preference ICC Sterilization Center Copyright 2018 A-dec Inc. All rights reserved. A-dec Inc. makes no warranty of any kind with regard to this material, including, but not limited
reference ICC A complete system for efficient sterilization
 reference ICC A complete system for efficient sterilization Streamline your sterilization process At A-dec, streamlining processes in the dental practice is always a key design requirement for our equipment
Instructions for Use A-dec Inspire Dental Furniture
 Instructions for Use A-dec Inspire Dental Furniture Models 591, 592, 593, 595 Content Map... 1... 2 Clean / Maintain... 22 Specifications... 27 Copyright 2016 A-dec Inc. All rights reserved. A-dec Inc.
OPERATION and MAINTENANCE INSTRUCTION MANUAL. ADU-20B CompriCart
 OPERATION and MAINTENANCE INSTRUCTION MANUAL ADU-20B CompriCart TABLE OF CONTENTS: Introduction.........................1 Package Contents....................1 Setting Up the Unit...................2 -
Use and Care Guide. Over the Patient Units and Swing Mount Units
 Over the Patient Units and Swing Mount Units Table of Contents Page General Information 2 Operation 3-5 Dental Unit Adjustments 6-10 Cleaning, Disinfecting and Sterilization 11-12 Maintenance 13-15 Page
Procenter Delivery Systems. [Includes: Delivery Units and Assistant s Units (All Styles)] (no serial numbers on Assistant s Units)
![Procenter Delivery Systems. [Includes: Delivery Units and Assistant s Units (All Styles)] (no serial numbers on Assistant s Units)](/thumbs/93/112679558.jpg "Procenter Delivery Systems. [Includes: Delivery Units and Assistant s Units (All Styles)] (no serial numbers on Assistant s Units)") User Guide Procenter Delivery Systems [Includes: Delivery Units and Assistant s Units (All Styles)] Serial Number Locations DA259601i Procenter Delivery Unit Cabinet Mounted Units Assistant s Unit Compact
User Guide Procenter Delivery Systems [Includes: Delivery Units and Assistant s Units (All Styles)] Serial Number Locations DA259601i Procenter Delivery Unit Cabinet Mounted Units Assistant s Unit Compact
OPERATION AND MAINTENANCE MANUAL
 OPERATION AND MAINTENANCE MANUAL ADU-10CF (NSN: 6520-01-456-7170) Part 1 of 2 P.O. Box 1548 Woodinville, WA 98072-1548 1-800-426-5913 * 425-487-3157 * Fax: 425-487-2608 email: info@aseptico.com * Internet:
OPERATION and MAINTENANCE INSTRUCTION MANUAL. ADU-12 Task Force Pneumatic Portable Dental System
 OPERATION and MAINTENANCE INSTRUCTION MANUAL ADU-12 Task Force Pneumatic Portable Dental System TABLE OF CONTENTS: Package Contents....................1 Introduction.........................2 Setting Up
OPERATION and MAINTENANCE INSTRUCTION MANUAL. ADU-10 AseptiMini Pneumatic Portable Dental System
 OPERATION and MAINTENANCE INSTRUCTION MANUAL ADU-10 AseptiMini Pneumatic Portable Dental System TABLE OF CONTENTS: Introduction.........................1 Package Contents....................1 Setting Up
Regulatory Information and Specifications
 Regulatory Information and Specifications Introduction This document contains the required regulatory information and specifications for A-dec products. Products Requiring Agency Information Specific regulatory
PREFERENCE ICC. A Complete System For Efficient Sterilization
 PREFERENCE ICC A Complete System For Efficient Sterilization 2 Streamline your sterilization process 1 RECEIVING AND CLEANING 2 RINSING, PREPAR At A-dec, streamlining processes in the dental practice is
Installation Operation Maintenance Troubleshooting Version Dec/17. Mobile Cabinets
 Installation Operation Maintenance Troubleshooting Version Dec/17 Mobile Cabinets Table of Contents WARRANTY... 3 Important Information... 4 Technical Specifications... 4 Weight & Dimensions... 5 Dimensions...
PORTER INSTRUMENT COMPANY, INC. 245 TOWNSHIP LINE RD. P.O. BOX 907 HATFIELD, PA USA [215] / FAX [215]
![PORTER INSTRUMENT COMPANY, INC. 245 TOWNSHIP LINE RD. P.O. BOX 907 HATFIELD, PA USA [215] / FAX [215]](/thumbs/72/66309935.jpg "PORTER INSTRUMENT COMPANY, INC. 245 TOWNSHIP LINE RD. P.O. BOX 907 HATFIELD, PA USA [215] / FAX [215]") PORTER INSTRUMENT COMPANY, INC. 245 TOWNSHIP LINE RD. P.O. BOX 907 HATFIELD, PA 19440-0907 USA [215] 723-4000 / FAX [215] 723-2199 USER INSTRUCTIONS FOR ASSEMBLY INSTALLATION AND CLEANING PORTER Scavenger
PORTER INSTRUMENT COMPANY, INC. 245 TOWNSHIP LINE RD. P.O. BOX 907 HATFIELD, PA 19440-0907 USA [215] 723-4000 / FAX [215] 723-2199 USER INSTRUCTIONS FOR ASSEMBLY INSTALLATION AND CLEANING PORTER Scavenger
OPERATION and MAINTENANCE INSTRUCTION MANUAL. ADU-17X2 Express Plus II Portable Dental System
 OPERATION and MAINTENANCE INSTRUCTION MANUAL ADU-17X2 Express Plus II Portable Dental System TABLE OF CONTENTS: Introduction.........................1 Package Contents....................1 Safety Precautions...................2
OPERATING INSTRUCTIONS
 DENTAL UNIT AND CHAIR OPERATING INSTRUCTIONS IMPORTANT This manual provides operating instructions for VOYAGER II. The instructions contained in this booklet should be thoroughly read and understood before
X99 Series. Dental Handpiece. Instruction For Use
 X99 Series Dental Handpiece Instruction For Use 0413 Table of Contents Symbols... 2 Introduction... 3-4 Before Use... 5 Product description... 6 Technical Specifications... 7 Operation... 8-11 Hygienic
OPERATION and MAINTENANCE INSTRUCTION MANUAL. ADU-17A Express Air Portable Dental System
 OPERATION and MAINTENANCE INSTRUCTION MANUAL ADU-17A Express Air Portable Dental System TABLE OF CONTENTS: Introduction.........................1 Package Contents....................1 Safety Precautions...................2
OPERATING INSTRUCTIONS
 DENTAL UNIT AND CHAIR OPERATING INSTRUCTIONS IMPORTANT This manual provides operating instructions for VOYAGER-II L. The instructions contained in this booklet should be thoroughly read and understood
Dental Unit User's Guide
 Dental Unit User's Guide MDD 93/42/EEC May 1999 8200590 Quint-7000 User's Guide We reserve the right to make changes. Manufactured by: FINNDENT OY Teollisuustie 5 FIN-07230 MONNINKYLÄ Tel. +358 19 5221500
Operating / User Manual
 UniARM Surgical Support System Operating / User Manual Version 1.1 MITAKA KOHKI Co., Ltd. 1. Introduction Introduction Thank you for purchasing the UniARM for use in surgical procedures. To use the device
Integra Salto Talaris and Integra XT Non-Sterile Device Reprocessing. Instructions for Use. 4. Manual Cleaning Instructions
 Integra Salto Talaris and Integra XT Non-Sterile Device Reprocessing Instructions for Use. Description and Intended Use Integra LifeSciences Corporation reusable surgical device sets consist of various
OPERATING INSTRUCTIONS
 H DENTAL UNIT BOOK NO. 1E03D2C0 (3E) Printed in JAPAN. 2014-07 OPERATING INSTRUCTIONS Thank you for purchasing TAKARA BELMONT product. Please read through this instruction manual carefully before using
Table of Contents. English
 OM-E0799E 000 English Thank you for purchasing VIVA ace Motor Kit. Please read this Operation Manual and the VIVA ace Basic Set Operation Manual carefully before use for operating instructions and care
Operator s Manual. Model G17-EU (International) Disinfection Soak Station for Hysteroscopes, Cystoscopes and ENT scopes
 Disinfection Soak Station for Hysteroscopes, Cystoscopes and ENT scopes") Model G17-EU (International) Disinfection Soak Station for Hysteroscopes, Cystoscopes and ENT scopes Operator s Manual CIVCO Medical Solutions 102 First Street South Kalona, IA 52247 USA Tel: 1-800-445-6741
Model G17-EU (International) Disinfection Soak Station for Hysteroscopes, Cystoscopes and ENT scopes Operator s Manual CIVCO Medical Solutions 102 First Street South Kalona, IA 52247 USA Tel: 1-800-445-6741
SERRES SUCTION BAG SYSTEM MANUAL
 SERRES SUCTION BAG SYSTEM MANUAL INSTRUCTIONS FOR USE Please read this manual carefully before installing or using the Serres Suction Bag System. A B C 1 C6 C4 C5 C2 C1 C3 3.1 3.2 1 2 3 3.3 3.4 2.1 2.2
Operator s Manual. Model G32-S Model G32-E Disinfection Soak Stations
 Model G32-S Model G32-E Disinfection Soak Stations Operator s Manual CIVCO Medical Solutions 102 First Street South Kalona, IA 52247 USA Tel: 1-800-445-6741 Fax: 1-877-329-2482 Website: WWW.CIVCO.COM Copyright
Cleaning & Sterilization
 Handpieces & Attachments Instruments Cleaning & Sterilization System 7 System 6 System 5 CD4 CD3 SABO 2 SABO RemB CORE TPS Processing Instructions User/Patient Safety all contribute to the efficacy of
INSTALLATION INSTRUCTIONS
 INSTALLATION INSTRUCTIONS Siphonic Ultra-High Efficiency Two-Piece Toilets HOptimum Single Flush Models 88AA / 88CA / 88DA HOption Dual Flush Models 886 / 88 / 889 Thank you for selecting American Standard
SAN RAPHAEL PRESSURE LITE VITREOUS CHINA SIPHON JET TOILET
 SAN RAPHAEL PRESSURE LITE VITREOUS CHINA SIPHON JET TOILET BEFORE YOU BEGIN HOW TO USE THESE INSTRUCTIONS Please read these instructions carefully to familiarize yourself with the required tools, materials,
BARRINGTON PRESSURE LITE VITREOUS CHINA SIPHON JET TOILET K-4327
 BARRINGTON PRESSURE LITE VITREOUS CHINA SIPHON JET TOILET K-4327 BEFORE YOU BEGIN INSTALLER HAZARD NOTIFICATION WARNING: Risk of injury or water damage. Contents of vessel under pressure can cause severe
HANDS-ON MODULE 5. CLEANING FLOW-i V3.0
 x HANDS-ON MODULE 5 CLEANING FLOW-i V3.0 Before cleaning BEFORE CLEANING CLEANING PROCEDURES OVERVIEW Cleaning procedure when a bacterial/viral filter IS used Cleaning procedure when NO bacterial/viral
KEEP FOR FUTURE REFERENCE 1 SCFM NOMINAL AIRFLOW SINGLE VACUUM SYSTEM DC-VOLTAGE POWER SYSTEM WITH MANUAL VALVE
 KEEP FOR FUTURE REFERENCE SERVICE MANUAL P.O. Box 368 908 West Main Laurel, MT USA 59044 phone 800-548-7341 phone 406-628-8231 fax 406-628-8354 STOCK NUMBER 36110 1 SCFM NOMINAL AIRFLOW SINGLE VACUUM SYSTEM
Syclone Amalgam Separator Installation and operating guide
 Installation and Operating Guide Syclone Amalgam Separator Installation and operating guide For your safety, please read all instructions prior to installing, operating and servicing the Syclone Amalgam
Instructions for use. 301 plus
 Instructions for use 301 plus Contents W&H symbols... 3 1. Introduction...4 5 2. Unpacking... 6 3. Package contents... 7 4. Safety precautions... 8 5. Description of the front side... 9 6. Description
Artizan Ortho-Pedo Bench Installation / User Manual
 Artizan Ortho-Pedo Bench Installation / User Manual Applies to Models: PB250-L PB250-R Special Tools: Level 3/8 Masonry drill bit 9/32 Wood drill bit Language of origin: English vv If applicable, Midmark
P.N User Manual STAINLESS STEEL ELECTRIC KETTLE 5964/5965 Series MODELS
 User Manual STAINLESS STEEL ELECTRIC KETTLE MODELS 5964/5965 Series www.oster.ca P.N. 166019 IMPORTANT SAFEGUARDS When using electrical appliances, basic safety precautions should always be followed to
Installation, Operation and Maintenance Guide AP3900 Series Thermostatic Mixing Valves
 Note: Please provide valve serial number (stamped on cover of valve) when ordering parts. Hot Water Tempered Water Outlet Cold Water Tempered Water Outlet Redundant Thermostatic Mixing Valve Hot Water
MEGATRON MODEL 2, 3, 4, and 5
 MEGATRON MODEL 2, 3, 4, and 5 BULLETIN M-1020A 2/02 INSTALLATION ADJUSTMENT SERVICE COMPLETE WATER TEMPERATURE CONTROL STATION DOMESTIC OUTLET TEST/SETUP CONNETION RETURN LINE FROM BUILDING RETURN LINE
Hot Chocolate Dispenser
 Hot Chocolate Dispenser Instruction manual Model: CN219-A AU Telephone Helpline: 1300225960 Safety Tips Position on a flat, stable surface. A service agent/qualified technician should carry out installation
Sloan AQUS Installation Instruction, Operation, and Maintenance Guide
 Code No: 0816444 Rev. 3 (09/10) Models HMA-7000 HMA-7000-EU (Euro) Sloan AQUS Installation Instruction, Operation, and Maintenance Guide The Sloan AQUS is designed to reuse sink water as an alternative
OPERATION MANUAL. LED Coupling OM-TR355E. Please read this operation manual carefully and file for future reference.
 OPERATION MANUAL LED Coupling OM-TR355E Please read this operation manual carefully and file for future reference. Caution When operating the product always consider the safety of the patient. The product
P.N ELECTRIC KETTLE User Manual Series MODEL BVSTKT308
 TM User Manual ELECTRIC KETTLE MODEL BVSTKT308 Series www.oster.ca P.N. 162703 IMPORTANT SAFEGUARDS When using electrical appliances, basic safety precautions should always be followed to reduce the risk
Preference Productivity refined
 Preference Productivity refined Preference by A-dec Dental cabinetry should do more than store ancillaries and supplies. It should increase productivity, streamline workflow and save precious time. Designed
Note: Please provide valve serial number (stamped on cover of valve) when ordering parts. Tempered Water Outlet. Hot Water Inlet.
 when ordering parts. Tempered Water Outlet. Hot Water Inlet.") Note: Please provide valve serial number (stamped on cover of valve) when ordering parts. Tempered Water Outlet Angle Checkstop Angle Checkstop Hot Water Inlet G3700LF Cold Water Inlet Installation 1.
Note: Please provide valve serial number (stamped on cover of valve) when ordering parts. Tempered Water Outlet Angle Checkstop Angle Checkstop Hot Water Inlet G3700LF Cold Water Inlet Installation 1.
P.N Rev A ELECTRIC HOT WATER DISPENSER User Manual BVSTWD7915 Series MODEL
 User Manual MODEL ELECTRIC HOT WATER DISPENSER BVSTWD7915 Series www.oster.ca P.N. 166025 Rev A IMPORTANT SAFEGUARDS When using electrical appliances, basic safety precautions should always be followed
INSTALLATION INSTRUCTIONS CARE AND MAINTENANCE
 INSTALLATION INSTRUCTIONS CARE AND MAINTENANCE Heritage VorMax Right Height Elongated 2-piece Toilet Model 205AA104 Thank you for selecting American Standard - the benchmark of fine quality for over 100
OPERATING INSTRUCTIONS AND MAINTENANCE MANUAL
 OPERATING INSTRUCTIONS AND MAINTENANCE MANUAL S-SCORT II Model 15006 SSCOR, INC. 11064 Randall Street Sun Valley, CA 91352 USA Telephone +1-818-504-4054 800-434-5211 Fax +1-818-504-6032 www.sscor.com Email:
ASPIRE Laboratory Aspirator
 ASPIRE Laboratory Aspirator USER MANUAL Rev 2/14/18 Accuris Instruments / Benchmark Scientific Ph: (908) 769-5555 E-mail: info@accuris-usa.com (C) Benchmark Scientific, 2018 THE ACCURIS ASPIRE LABORATORY
POWERGROOM. MultiCyclonic 1654 SERIES
 POWERGROOM MultiCyclonic 1654 SERIES IMPORTANT SAFETY INSTRUCTIONS READ ALL INSTRUCTIONS BEFORE USING YOUR VACUUM. When using an electrical appliance, basic precautions should be observed, including the
AS Medizintechnik GmbH Sattlerstrasse 15, Tuttlingen, Germany Tel 07461/ Fax 07461/
 General Information Use The Air drill System is a pneumatic powered system used for many applications orthopedic and trauma surgery. To ensure proper operation of the air drill, use only original attachment
Instructions for use. BA Optima. Air motors BA602 (BA640081) BA604 (BA640060)
 BA604 (BA640060)") Instructions for use BA Optima Air motors BA602 (BA640081) BA604 (BA640060) Contents 1. Introduction....3 5 2. Safety notes...6 9 3. Product description... 10 11 4. Operation... 12 13 Assembly/Removal,
Instructions for use BA Optima Air motors BA602 (BA640081) BA604 (BA640060) Contents 1. Introduction....3 5 2. Safety notes...6 9 3. Product description... 10 11 4. Operation... 12 13 Assembly/Removal,
OPERATION and MAINTENANCE INSTRUCTION MANUAL. AEU-425 Transport II Portable Dental System
 OPERATION and MAINTENANCE INSTRUCTION MANUAL AEU-425 Transport II Portable Dental System TABLE OF CONTENTS: Introduction.........................1 Package Contents....................1 Specifications.......................2
Note: Please provide valve serial number (stamped on cover of valve) when ordering parts. Thermometer. Hot Water Inlet. Cold Water Inlet G3600LF
 when ordering parts. Thermometer. Hot Water Inlet. Cold Water Inlet G3600LF") Note: Please provide valve serial number (stamped on cover of valve) when ordering parts. Thermometer 1/2" OD Copper Tube Inlets Hot Water Inlet Cold Water Inlet G3600LF Installation 1. Install valve in
Note: Please provide valve serial number (stamped on cover of valve) when ordering parts. Thermometer 1/2" OD Copper Tube Inlets Hot Water Inlet Cold Water Inlet G3600LF Installation 1. Install valve in
A-dec Inspire. Dental Furniture Collection
 A-dec Inspire Dental Furniture Collection 2 a-dec.com/inspire INSPIRE PEAK PERFORMANCE. How can dental furniture inspire peak performance? It must look beautiful, yet be functional. It must have proper
High Output Vacuum/Pressure Pump
 High Output Vacuum/Pressure Pump User Guide Catalogue Numbers: WP62 115 60 (115 V, 60 Hz) WP62 220 50 (230 V, 50 Hz, 1.1 A) WP62 100 60 (100 V, 50/60 Hz) Notice The information in this document is subject
English. Your Model Number is: HD1500 IMPORTANT
 Your Model Number is: HD1500 IMPORTANT Attention Valued Customer: The serial number of your machine and date of purchase is necessary information to facilitate warranty claims and the ordering of replacement
Easy Vac BAGLESS VACUUM
 Easy Vac BAGLESS VACUUM USER S GUIDE 3130 SERIES 3 Safety Instructions 4 Product View 5 Assembly 6-7 Operations 8-12 Maintenance and Care 13 Troubleshooting 14 Consumer Services 15 Replacement Parts 16
MODEL 7000 SUCTION UNIT
 MODEL 7000 SUCTION UNIT OPERATOR S MANUAL Caution Federal law restricts this device to sale by or on order of a physician, or any other practitioner licensed by the law of the State in which he practices
DENTAL UNIT. Rod Type OPERATING INSTRUCTIONS
 DENTAL UNIT Rod Type OPERATING INSTRUCTIONS IMPORTANT This manual provides operating instruction for CLESTA II ROD TYPE. The instructions contained in this booklet should be thoroughly read and understood
Prime chiller. Inline Chiller. Instructions for Models #2645,2646
 Prime chiller Inline Chiller Instructions for Models #2645,2646 Warning and Safety Instructions... Page 2 Chiller Installation... Page 3 Temperature Controller Programming... Page 5 Warranty... Page 7
INSTALLATION. and INSTRUCTION MANUAL. for QUALITY AIR BREATHING SYSTEMS. Model ABM - 700
 INSTALLATION and INSTRUCTION MANUAL for QUALITY AIR BREATHING SYSTEMS Model ABM - 700 M A R T E C H S E R V I C E S C O M P A N Y P.O. Box 7079 OFFICE: 800-831-1525 Mazeppa, MN 55956 Fax : (507)843-4953
INSTALLATION. and INSTRUCTION MANUAL. for QUALITY AIR BREATHING SYSTEMS. Model ABM - 715
 INSTALLATION and INSTRUCTION MANUAL for QUALITY AIR BREATHING SYSTEMS Model ABM - 715 M A R T E C H S E R V I C E S C O M P A N Y P.O. Box 7079 OFFICE: 800-831-1525 Mazeppa, MN 55956 Fax : (507)843-4953
SeedVac TM REF 90091
 WWW..COM SeedVac TM REF 90091 STANDARD IMAGING INC. 7601 Murphy Drive Middleton, WI 53562 Feb / 2005 2005 Standard Imaging Inc. DOC #80191-06 TEL 800.261.4446 TEL 608.831.0025 FAX 608.831.2202 www.standardimaging.com
User Manual ELECTRIC KETTLE Manual del Usuario HERVIDOR ELECTRICO. MODEL/MODELO BVSTKT7098 Series.
 User Manual ELECTRIC KETTLE Manual del Usuario HERVIDOR ELECTRICO MODEL/MODELO BVSTKT7098 Series www.oster.com IMPORTANT SAFEGUARDS When using electrical appliances, basic safety precautions should always
CLASSIC. SIDE CABINET Installation Instructions
 CLASSIC SIDE CABINET Installation Instructions THIS MANUAL IS FOR AUTHORIZED AND QUALIFIED INSTALLATION PERSONAL ONLY! Table of Contents General Information...3 CCS Overview...4 CCS Cabinet Dimensions...5
OPERATION and MAINTENANCE INSTRUCTION MANUAL. AEU-525 Transport III Portable Dental System
 OPERATION and MAINTENANCE INSTRUCTION MANUAL AEU-525 Transport III Portable Dental System TABLE OF CONTENTS: Introduction.........................1 Package Contents....................1 Safety Precautions...................2
Classic Bubbler Premix Cold Beverage Dispensers Operation Manual
 Classic Bubbler Premix Cold Beverage Dispensers Operation Manual D Series E Series Table of Contents Unpacking & Installation Instructions... 3 Assembly... 4 Product Preparation... 5 Disassembly... 6 Routine
VIVA ace Quick Operation Guide
 VIVA ace Quick Operation Guide Contents 1. Installing the Holder Bar and Arm...2 2. Connecting the Motor, the Scaler, and the Syringe...3 3. Installing the Vacuum...4 4. Installing the Water Bottle...5
BRAVO AUTOCLAVES. Installation Notes. BRAVO 1 Quick Start Guide SD-402 Rev. 1.0 Copyright 2012 SciCan Ltd. All rights reserved
 BRAVO AUTOCLAVES Installation Notes BRAVO 1 Quick Start Guide SD-402 Rev. 1.0 Copyright 2012 SciCan Ltd. All rights reserved For questions, technical support, service and inquires, contact: Manufactured
Rocket Quick Guide. Rocket PSU Portable Suction Unit
 Rocket Quick Guide Rocket PSU Portable Suction Unit Contents Changing the PSU and changing the clock time...3 Attaching the suction unit to the chest drain bottle...4-5 Operating instructions...6-8 Changing
 NOTE: If low flow check does not show high enough vacuum flow, repeat Steps 1-4, and adjust vacuum control knob to a higher vacuum flow setting. Effective scavenging is achieved if vacuum flow can be verified
Operating Manual for Profident / Profident PLUS
 Operating Manual for Profident / Profident PLUS Content: 1. Accessories... 1 2. First Steps... 2 2.1 Air Pressure... 2 2.2 Positioning of the Handpieces... 2 2.3 Pressurised Water Bottle... 3 2.3.1 Refill
WL User Manual. Innovative Technology for a Connected World. global solutions: local support TM
 Innovative Technology for a Connected World Coolant inlet and outlet are marked with symbols: Inlet: O; outlet: O CAUTION: READ MANUAL BEFORE OPERATING COOLING UNIT Input power must be rated for 230 VAC
AUTOTROL 363TC AUTOMATIC FILTER VALVE SERVICE MANUAL
 AUTOTROL 363TC AUTOMATIC FILTER VALVE SERVICE MANUAL 2013 Pentair Residential Filtration, LLC www.pentairaqua.com/pro TABLE OF CONTENTS MANUAL OVERVIEW... 2 SAFETY INFORMATION... 2 TYPICAL TOOLS AND FITTINGS
ASG EZ-9000GR Tape Dispenser User Manual ASG #66136
 ASG EZ-9000GR Tape Dispenser ASG #66136 Revision Date: 03/27/18 1 Read Before Use Warnings and Cautions The safety guidelines in this instruction manual must be observed in order to prevent injury to the
Operator s Manual. Model G17 Disinfection Soak Station for Hysteroscopes, Cystoscopes and ENT scopes
 Model G17 Disinfection Soak Station for Hysteroscopes, Cystoscopes and ENT scopes Operator s Manual CIVCO Medical Solutions 102 First Street South Kalona, IA 52247 USA Tel: 1-800-445-6741 Fax: 1-877-329-2482
INSTALLATION INSTRUCTIONS
 INSTALLATION INSTRUCTIONS ARCHIVE 1.6 gpf/6 Lpf One-Piece Toilet Model 97920-60 ARCHIVE 1.28 gpf/4.8 Lpf One-Piece Toilet Model 97920-28 CHAPEAU 1.6 gpf / 6 Lpf One-Piece Toilet Model 97820-60 CHAPEAU
Corn Flame Energy Corn Stove Model 3000
 Corn Flame Energy Corn Stove Model 3000 Installation and Operation Guide Read thoroughly before starting installation Save this manual for future reference SAFETY NOTICE If this stove is not properly installed,
USER'S GUIDE 4757-E SERIES V
 USER'S GUIDE 4757-E SERIES 220-240V 2 Thank You 3 Safety Instructions 4 Product View 5 Assembly 5-6 Operations 6-9 Maintenance and Care 9-10 Troubleshooting 10 Replacement Parts 11 Warranty 12 Consumer
INSTALLATION INSTRUCTIONS CARE AND MAINTENANCE
 INSTALLATION INSTRUCTIONS CARE AND MAINTENANCE Estate VorMax Right Height Elongated 2-piece Toilet Model 207AA104 Thank you for selecting American Standard - the benchmark of fine quality for over 100
5000 Series Bottled Water System by.
 www.xylemflowcontrol.com 2015 Xylem Inc. All rights reserved. Flojet is a trademark of Xylem Inc. or one of its subsidiaries. 81000453 Rev A. 04/2015 5000 Series Bottled Water System by HOW THE SYSTEM
474A+ INSTRUCTION MANUAL DESOLDERING STATION
 1 2 7 474A+ DESOLDERING STATION INSTRUCTION MANUAL Thank you for purchasing 474A+ Desoldering Station. Please read the manual before using the unit. Keep manual in accessible place for future reference.
INSTRUCTIONS FOR OPERATION AND CARE OF
 INSTRUCTIONS FOR OPERATION AND CARE OF LITTLE Splint Compact Splint Pan Model LS-1 Whitehall Manufacturing is a Member of Acorn Engineering s Family of Companies. 6900-191-001 July 2010 Introduction...3
Short instructions for use ESTETICA E30
 Short instructions for use ESTETICA E30 Distributed by: KaVo Dental GmbH Bismarckring 39 D-88400 Biberach Tel. +49 7351 56-0 Fax +49 7351 56-1488 Manufacturer: Kaltenbach & Voigt GmbH Bismarckring 39 D-88400
Important Safeguards. Save these instructions for future reference. (continued on next page)
") User Guide 2. Important Safeguards WARNING To reduce the risk of fire, electric shock or other injury, read and follow the safety precautions and instructions in this User Guide. Save these instructions
User Guide 2. Important Safeguards WARNING To reduce the risk of fire, electric shock or other injury, read and follow the safety precautions and instructions in this User Guide. Save these instructions
Tornado Operations & Maintenance Manual
 TORNADO INDUSTRIES 7401 W. LAWRENCE AVENUE CHICAGO, IL 60706 (708) 867-5100 FAX (708) 867-6968 www.tornadovac.com Tornado Operations & Maintenance Manual MODEL NO. 99690 BD 22/14, 99720 BD 26/14 L9722
Model HD 3501 Part No High Pressure Washer Operator Manual
 0 15 25 40 25 Nozzle Identification SOAP HD3501 Manual 4/22/02 6:57 PM Page 1 Model HD 3501 Part No. 1.810-999.0 High Pressure Washer Operator Manual Overview..................................1 Precautions...............................1-2
EMAX 2 PLUS AND XMAX CLEANING AND STERILIZATION BASKET. Mechanical/Automated Cleaning and Sterilization Guide in a Variety of Applications
 EMAX 2 PLUS AND XMAX CLEANING AND STERILIZATION BASKET Mechanical/Automated Cleaning and Sterilization Guide in a Variety of Applications TABLE OF CONTENTS MANUAL PRE-CLEANING High Speed Handpieces 2
Installation Instructions
 CENTRAL THERMOSTAT TRIM KIT Installation Instructions T000 T000 Thank you for selecting American-Standard...the benchmark of fine quality for over 00 years. To ensure that your installation proceeds smoothly--please
USER MANUAL. Soho All-In-One Chair Rev A 4/23/18. *shown with optional accessories and/or finishes. Earthlite 2018, All Rights Reserved
 USER MANUAL Soho All-In-One Chair *shown with optional accessories and/or finishes 1-400-0038 Rev A 4/23/18 Earthlite 2018, All Rights Reserved Legal Notice The information provided in this document is
PAT LOAD MOMENT INDICATOR DS 150 / 0038
 PAT LOAD MOMENT INDICATOR DS 150 / 0038 INTERACTIVE OPERATOR S HANDBOOK NOTICE The information in this document is subject to change without notice. PAT makes no warranty of any kind with regard to this
DENTAL VACUUM SYSTEM Part Numbers: VS2O, VS40, VS50, VS50H, VS80 and VS80H RECOMMEND DAILY USE OF MONARCH CLEANSTREAM USER S MANUAL
 DENTAL VACUUM SYSTEM Part Numbers: VS2O, VS40, VS50, VS50H, VS80 and VS80H RECOMMEND DAILY USE OF MONARCH CLEANSTREAM USER S MANUAL TABLE OF CONTENTS SECTION PAGE Congratulations.... 3 Purpose of this
EDGEMERE DUAL CONTROL WIDESPREAD LAVATORY FAUCET INSTALLATION INSTRUCTIONS
 EDGEMERE DUAL CONTROL WIDESPREAD LAVATORY FAUCET INSTALLATION INSTRUCTIONS 0.0 Thank you for selecting American Standard... the benchmark of fine quality for over 00 years. To ensure that your installation
Services Unlimited Inc./Parts Guru. Assembly
 PLACE GUIDE PIN BEARING SLEEVE ON PLACE PUMP COVER OVER GUIDE PIN 1 5 Place the pump cover over the guide pin Note flat sides on outside of with the spray tube toward the front. guide pin and on inside
Turbo Cyclonic Pro Bagless Cylinder Vacuum Cleaner
 Turbo Cyclonic Pro Bagless Cylinder Vacuum Cleaner Model Number: RHCV20MR04 220-240V~, 50/60Hz, 900W For Customer Services & Spare Parts please call 0345 209 7461 Opening times: Monday - Friday 8am 8pm
Model K 240 plus Part No
 Model K 240 plus Part No. 1.223 585.0 High Pressure Washer Operator Manual Overview... 2 Precautions... 2-4 Assembly Instructions... 4 Operating Instructions... 5 GFCI Instructions... 6 Using the Accessories...