PRESSURIZED POND FILTER
|
|
|
- Bathsheba Newton
- 5 years ago
- Views:
Transcription
1 PRESSURIZED POND FILTER CARE AND OPERATING INSTRUCTIONS MODELS ITEM # No UV 120V With UV 230V ZG400 revd 1/18
 2 Inlet 3 Waste 4 Outlet 5 Pressure Gauge 6 UV Bulb/Quartz Sleeve (UV MODELS")
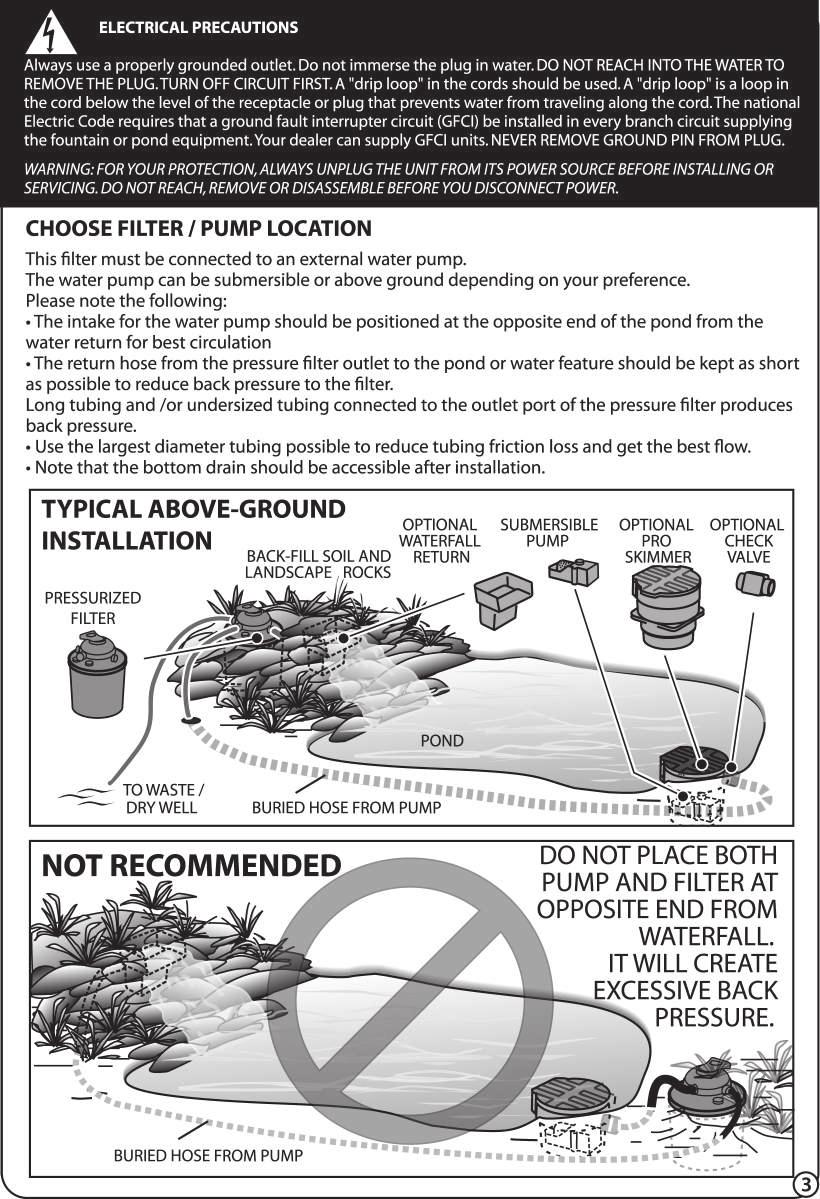
2 WARNING! PONDS ARE DANGEROUS TO SMALL CHILDREN! NEVER LEAVE CHILDREN UNSUPERVISED NEAR A POND Position Valve Selector (Filter, Backwash, Rinse, Winterize, Circulate, Closed, Empty) 2 Inlet 3 Waste 4 Outlet 5 Pressure Gauge 6 UV Bulb/Quartz Sleeve (UV MODELS ONLY) 7 Access Cap 8 UV Bulb/Quartz Sleeve Access Cap 9 Heavy-Duty Lid Clamp with Knob 10 Filter Drum 11 Mechanical Filter Pad 12 BioMatrix TM Biological Media 13 Filter Base Plate (Not shown) 14 Water Chamber Divider 15 Clean Water Chamber 16 Bottom Drain /Access for Backwash Air Kit (Not shown) HOW FILTRATION WORKS Both biological and mechanical filtrations are essential for every pond; without them, your fish would be harmed by ammonia generated by the accumulated fish waste. The beneficial bacteria bed that builds on the filter media nitrifies any ammonia in the pond making it a healthier environment for aquatic life. Mechanical filtration removes debris in suspension in pond water keeping it cleaner and clearer. Biomechanical filtration depends on the establishment of a colony of bacteria on the surface of the media that converts dissolved toxic nitrogenous waste to harmless compounds. When the bacteria are given the proper environment, they grow in a thin biofilm on the surface of each piece of media. The media must first establish itself to handle the load of dissolved ammonia. Depending on the water temperature, it can take 2-4 weeks for the filter to establish itself in the pond environment. The ultraviolet filtration should be left off during initial seeding to allow the bacteria colonies to grow. The time required varies depending on climate, weather conditions, fish load and feed rates. Until the colonies grow large enough, the pond owner must take care to monitor levels of ammonia and nitrates in the water and take appropriate measures to correct any dangerously high levels. CAUTION: Note that smaller filter media cannot be used with this filter. It will pass into valve possibly causing malfunction or it will pass through - back into the pond. The Filter Pad that is included with the pressure filter serves two purposes. First, it can be used to quickly filter water with particulate solids and debris at the start of pond season before the biological filtration has had time to establish. Second, it can be used to polish water anytime pond water has become cloudy. THE FILTER PAD SHOULD BE USED AT START-UP AND AFTERWARD AS REQUIRED; IT MUST BE REMOVED BEFORE DOING A BACKWASH CYCLE. The ultraviolet clarifier included with some models produces a wavelength of light that inhibits algae from reproducing by damaging its DNA. Please note that UV light does not kill string algae that cling to the sides of ponds. NOTE: This filter is intended to pull suspended solids out of the water column. It is NOT designed to remove leaves and large solids from the pond. It should not be used as a pond vacuum. All pumps used with this filter must be used inside a Pump Bag or with a Skimmer or prefilter to prevent large debris from entering the filter chamber and blocking the biological filtration.
3

4 CHOOSE THE CORRECT PUMP Filter Pumps Maximum Your Pressurized Filter System works best within a certain range of flow Model up to: Pressure and pressure. See Table. Exceeding these values will cause leakage or breakage of the filter or its components and void the warranty GPH/11350 LPH 15 PSI/1 BAR/103kPa 6000 GPH/22700 LPH 15 PSI/1 BAR/103kPa GPH/30300 LPH 15 PSI/1 BAR/103kPa If your water feature (for example - waterfall or fountain) requires more water than the recommended flow, a Bypass Loop can be used in-line to divert some of the water flow directly to the water feature. This will avoid overburdening and possibly damaging the pressure filter. See our website for information on Valved Bypass Kit - Item# to set up a Bypass Loop. FILTER SET-UP UNPACK FILTER and remove contents. CLAMP GASKET/ DRUM DIVIDER (LEAVE IN PLACE) FILTRATION CHAMBER OF FILTER DRUM DRAIN PLUG FOR BACKWASH AIR KIT ONLY Figure 1 Figure 2 ADAPTOR GPH/34000 LPH 20 PSI/1.4 BAR/138kPa Open clamp to remove cover and separate parts keeping all O-rings, gaskets and connection surfaces clean of debris. If the model includes an UV clarifier, note that the UV quartz sleeve protrudes from the bottom of the cover. Cautiously place the cover to avoid damaging the quartz sleeve. The UV lamp is packed in the upper protective packaging in a small separate box. Handle it carefully; it will be installed after the cover is reattached. Units with the UV clarifier include a clear extra UV port cap. This must be kept to cover UV port when winterizing. RELOAD FILTER DRUM - Check that the drum divider is properly aligned in the filter drum tracks and is fully seated down to the bottom of the filter drum. Pour Biomatrix Ball Filter media from plastic bag back into filtration chamber of filter drum. Place Foam Filter pad in upper end of filtration chamber. CHECK THAT DRAIN PLUG IS IN PLACE AND TIGHTENED SECURELY. IMPORTANT! CLEAN LUBRICATE ALIGN INSTALL GASKET / Note that an O-Ring or gasket must always be clean, properly seated and lubricated before reattaching the cover. Note that on some models the gasket may have been pre-installed. Models 2700, 5500 & 8000 GASKET seats in track. Use silicone grease (supplied in small packet) to lubricate entire gasket before assembly. GASKET BIOMATRIX MEDIA ADAPTOR WITH PARTS COVER FILTER PAD UV BULB* IN BOX * UV bulb and parts only included with UV Models FILTER DRUM CROSS SECTION VIEW GASKET GASKET SEATED Subscribe to our YouTube Channel and view all of Clearguard videos. INSTALL ADAPTOR* - ONLY if you are planning to use the Pondmaster Backwash Air kit (sold separately). Before using filter, install adaptor into bottom drain opening on pressure filter. Use Teflon tape on threads. See Figures 1 & 2. Follow instructions provided with Backwash Air kit. * NOT INCLUDED (SEE PAGE 9) Model seats on top step of outer flange. First position O-ring onto step as shown then cover all exposed surface of O-ring with silicone grease (supplied in small packet). CROSS SECTION VIEW SEATED TRACK TRACK TOP STEP TOP STEP 4 ONLY LUBRICATE WITH SILICONE GREASE Never use petroleum based lubricants on O-rings or gaskets ALIGN COVER NOTCH Note position of alignment tab on filter drum and matching notch on filter cover. Press cover straight down; Do not twist or shift as it may unseat the gasket / O-ring.
5 SECURE COVER WITH CLAMP Once cover is pressed down evenly, place the clamp around the drum and cover flanges and pull the open end closed. Note that it is best to position the open end of the clamp away from hose connections for easy access to the tightening knob once hoses are attached. Insert hex bolt through opening with hex recess and push through to opening on other end of clamp. Attach the tightening knob to hex nut and turn until clamp closes completely. PRESS COVER COMPLETELY DOWN ATTACH RING CLAMP ULTRAVIOLET CLARIFIER INSTALLATION If your pressure filter was supplied with a UV clarifier, the bulb must be installed. Unscrew the UV cap Lock-Ring and pull straight up. Insert lamp into socket and carefully lower into the quartz sleeve already mounted in the cover. Turn Lock ring clockwise until tight. Be cautious not to cross thread the lock ring before tightening. Check that extra UV port cap is tight before operating filter. DO NOT OPERATE UV CLARIFIERS UNTIL READING ELECTRICAL PRECAUTIONS AND UV CLARIFIER OPERATING INSTRUCTIONS TUBING CONNECTION OPTIONS The adaptors supplied with the pressure or rigid PVC using PVC cement*. MODEL RIGID PVC MUST BE CEMENTED DIRECTLY TO SLIP ADAPTOR* S MUST BE SEATED IN GROOVE ON ALL THREE PORTS INTAK E PORT OUTLET PORT EXTRA UV CAP KEEP IN SAFE PLACE 3 FLEXIBLE TUBING USE BARB FOR 3 FLEXIBLE TUBING. IT MUST BE CEMENTED TO SLIP ADAPTOR.* USE SLIP ADAPTOR ON ALL PORTS WASTE PORT UV LOCK RING QUARTZ SLEEVE Filter US Metric US Model ½ 32mm and 40 mm 1 ½ Model ½ and 2 32mm and 40 mm 1 ½ and 2 Model ½ and 2 32mm and 40 mm 1 ½ and 2 Model MODEL 8000, 5500 & 2700 RIGID PVC MUST BE CEMENTED DIRECTLY TO SLIP ADAPTOR* (US ONLY) SLIP ADAPTOR (US ONLY) INTAKE PORT QUARTZ SLEEVE DETAIL CLEAR NECK NOTE POSITION OF S ONE SEATS IN TRACK AT TOP OF QUARTZ SLEEVE POSITION OTHER OUTSIDE THE TUBE, BELOW THE FLANGE & RIBS QUARTZ SLEEVE DETAIL BLACK NECK NOTE POSITION OF FLAT GASKET AND FLAT GASKET SEATS ON TOP OF QUARTZ SLEEVE FLEXIBLE TUBING POSITION OUTSIDE THE TUBE, BELOW THE FLANGE small sections that restrict UV LOCK RING MOUNTED LAMP USE COLLAR TO SECURE EITHER BARB FITTING OR SLIP ADAPTOR. BARBED FITTING MUST BE PLACED ONTO SLIP ADAPTOR OR BARB FITTING. THREADED INTAKE-PORT ADAPTOR THREADED OUTLET-PORT / WASTE-PORT ADAPTOR QUARTZ SLEEVE IN COVER R WHEN USING RIGID PVC PIPING, 3 UNION CONNECTIONS* MUST BE USED ON ALL 3 LINES FOR ABILITY TO DISCONNECT AND REMOVE LID. OUTLET PORT WASTE PORT (SLIP ADAPTOR - - US ONLY) * 3 Unions & PVC Cement not included. Carefully follow the instructions supplied with PVC cement. 5

6 VALVE POSITIONS The valve has 7 positions. They are numbered for identification. CAUTION: Never lift filter using the valve position handle. CAUTION: Always turn off pump when changing valve positions. Change valve positions by pressing down on handle, rotating until pointer points to desired number and release. (In this illustration the pointer is at position 6.) Check that handle is not in between settings when releasing handle. 1: FILTER: Water passes through media in filter drum and back up through UV/Clean-water chamber to water outlet port 2: RINSE: Water flows through valve and exits from the waste port. This is used to wash away dirt particles in the valve after a backwash cycle. 3: CIRCULATE (BYPASS): This setting passes water through the valve intake and exit through the outlet port directly without entering the filter chamber. It is useful if the pond is being medicated and filtration is undesirable. 4: BACKWASH: Water flow reverses through clean-water chamber then backwards through the filter media and exits through the waste port. 5: CLOSED: This position closes off the intake and stops water from entering the valve. The pump must be off when in this position. Use this setting temporarily when servicing the pump. 6: EMPTY (DRAIN): Water enters the intake and is directed to the waste port without filtration. This is used to empty the pond should the need arise. 7: WINTER: This is a neutral position that equalizes pressure between all three ports. Use this setting -with the pump off-when filter is shut down during winter. Subscribe to our YouTube Channel and view all of Clearguard videos. 6 FILTER OPERATING INSTRUCTIONS 1) Put the valve to position 1 "FILTER''. 2) Turn on pump and check all connections. Check that pressure gauge pointer is in the Green zone. Run filter with Foam Filter pad and Biomatrix Ball media at first. The Biomatrix Ball media works best when the filter's bacteria colonies are established. It takes a few weeks for the bacterial colonies to grow on the media and be effective for filtration. During the waiting period for biological filtration, the filter pad will collect debris and mechanically filter the water without disrupting the growing biological colony. If water flow becomes sluggish, the foam filter pad may have accumulated too much debris and should be removed, rinsed and replaced into filter. It may be necessary to do this several times until the biological filtration is established. After a few weeks the filter pad can be removed, rinsed and set aside for future use. It can be used anytime the pond is stirred up or appears to be cloudy. 3) A backwash schedule should be established to maintain the bacteria colony level on the biomatrix ball media. This should be done every few weeks depending on your pond conditions. Bio load, sunlight, temperature and feeding habits all affect the need for backwash. The best way to tell when to backwash is to monitor water flow rate and the pressure gauge. If water flow rate diminishes or if the gauge indicator has moved to the top or past the green zone it is time to backwash. The backwash alone may not dislodge heavy bacteria colonies; it may be necessary to open the filter and stir up the Biomatrix media before backwashing. Note that for a more substantial power backwash, the Pond master Backwash Air kit can be attached to the drain valve to force air through the media releasing the excess waste. See Accessories section.

7

8 UV CLARIFIER OPERATING INSTRUCTIONS: If your pressure filter was supplied with an UV clarifier or if you are adding a UV Clarifier, note the following: The UV Clarifier will not light up when removed from the pressure filter cover. It incorporates a safety switch to disable power when not assembled. To use the UV feature, unscrew the UV cap/ socket assembly from the cover and push the bulb into the bulb socket. Carefully reinsert the UV bulb straight down into the top opening with the quartz sleeve in place. Rotate the cap clockwise until tight. Plug the power cord into a grounded GFCI protected outlet to check. The top of the UV cap is clear for observation that UV is functioning. Disconnect power until the filter is running. IMPORTANT NOTES: QUARTZ SLEEVE DETAIL BLACK NECK NOTE POSITION OF FLAT GASKET AND FLAT GASKET SEATS ON TOP OF QUARTZ SLEEVE POSITION OUTSIDE THE TUBE BELOW THE FLANGE 1) If installing the UV quartz sleeve into the Filter Cover make certain that 0-Rings and/or flat gasket are properly installed. 2) Completely assemble UV Clarifier into filter with Quartz sleeve installed before supplying power. This will assure that safety switch is engaged and unit will light. The light can be safely checked by viewing through the Clear plastic UV cap on the fixture. 3) Never stare at or expose skin to UV light. It can damage eyesight or burn skin. 4) Do not defeat the safety features by bypassing the built in safety switch. 5) A second port is available to install an additional UV unit. The model uses both ports. See Optional Accessories. Ballast is enclosed in a double insulated case. Never cut power cord. Do not modify the plug provided with the appliance; if it will not fit the outlet, have a proper outlet installed by a qualified electrician. QUARTZ SLEEVE DETAIL CLEAR NECK NOTE POSITION OF S ONE SEATS IN TRACK AT TOP OF t QUARTZ I I,,--1 "-- POSITION SECOND THE TUBE BELOW THE FLANGE QUARTZ SLEEVE WITH /GASKET IN PLACE UV FIXTURE WITH BALLAST GASKET OR UNDER TOP FLANGE (SEE DETAIL) OPEN UV PORT ON FILTER COVER NOTE: YOUR FILTER AND UV ACCESSORIES MAY VARY FROM REFERENCE ILLUSTRATION..A DANGER: ULTRAVIOLET RADIATION. Disconnect Power Before Replacing Lamp. Connect only to a circuit that is protected by a ground-fault circuitinterrupter (GFCI). WARNING: Risk of Electric Shock. Disconnect power before servicing. Do not immerse in water. For household use only. UV MAINTENANCE 1) Effective useful bulb life is one season. The bulb will continue to illuminate long after the UV radiance has diminished. For best results replace bulb annually. 2) Periodically clean the quartz sleeve. Always allow unit to cool before disassembly. Carefully disassemble and clean outside using a solution of 30% white vinegar to water. Allow to soak to soften scale or build-up. Use a bottle brush and mild detergent to clean inside of quartz sleeve. Make certain inside of tube is dry before reassembly. Lubricate 0-Rings with Silicone grease before reassembling. NEVER USE PETROLEUM BASED LUBRICANTS ON S AND GASKET. Note that if Quartz sleeve or UV lamp shows any signs of cracks or fissures it cannot be used and must be replaced. 8 MERCURY WARNING: LAMP CONTAINS MERCURY, MANAGE IN ACCORDANCE WITH DISPOSAL LAWS.


9 WINTERIZATION CAUTION: During harsh winters, water left in the drum may freeze, expand and crack the drum. If necessary, the filter can be drained and winterized at the end of the season. If you live in an area that doesn t experience freezing temperatures, you may never need to do this. To empty the water from the filter drum, it is not necessary to open the filter. 1) Turn off the pump and disconnect the power source to the UV. 2) Turn the Valve to position #7 WINTER. 3) Remove the drain plug at the bottom of the filter to empty the filter from the bottom. Note that the drain plug adaptor has a ½ NPT female thread for attachment to ½ NPT male fittings. If you want to attach a hose to the bottom drain, you can purchase a ½ NPT fitting to connect to the bottom drain adaptor and to a hose. ½ NPT fitting are available at hardware stores or irrigation supply centers 4) If your set-up includes a UV Clarifier, rotate the lock ring counter clockwise to remove it. Pull the socket cap/light unit assembly straight up, being careful not to break the UV lamp. Disconnect lamp from socket by grasping the plastic base of the lamp and carefully pulling it straight apart from the socket cap. Remove the quartz sleeve from the filter cover by pulling straight upwards. Pack the quartz sleeve and UV lamp carefully and store it with the O-ring and socket cap/ ballast for winter. Cover the open UV port with the clear extra UV port cap that was placed in storage. DO NOT ALLOW WATER TO GET INTO UV QUARTZ SLEEVE AND FREEZE. IT WILL CRACK WHEN WATER FREEZES. OPTIONAL ACCESSORIES CLEARGUARD BACKWASH AIR KIT: For more thorough backwashing and agitation in the media filter chamber to break up the stubborn debris. It connects though the drain plug at the bottom of the pressure filter. Pond Filter Maximum water Clearguard Backwash Air Kit Item # Capacity pump size No airpump included Airpump included (120V) 2700 GAL / L 3000 GPH / LPH 5500 GAL / L 6000 GPH / LPH 8000 GAL / L 8000 GPH / LPH GAL / L 9000 GPH / LPH V ONLY UV Clarifier - Upgrade your filter by adding an ultraviolet clarifier to a non UV unit or add a second UV clarifier using the extra port for additional algae control. Filter Item # Watage 9W 18W 18W 18W Voltage 120V V Replacement Filter Pads - Available to replace the filter pads that were supplied with the pressure filters. For 2700, 5000 & 8000 series Pressure filter use ITEM For16000 Pressure filters use ITEM Biomatrix 1 1 /4 (32mm)Ball Media - Increase the biological filtration by adding more media. The Biomatrix Ball media is the only media recommended for use with ClearGuard pressure filters. Available in bags of 300 ITEM # Caution: Do not use undersized media; it will get caught in valve and possibly damage the filter. 9
10 /' TROUBLE SHOOTING ' Subscribe to our YouTube Channel and view all of our Clearguard videos SYMPTOM POSSIBLE CAUSE SOLUTION Filter output is Filter Pad is clogged. Remove rinse and replace filter pad. sluggish. Media needs cleaning. Backwash filter. See BACKWASH CYCLE. Pump intake is clogged, Pump is undersized or requires maintenance. Check pump and clear debris. Use a Pump Bag around pump to prevent future clogging. See pump manual. Water flowing from incorrect port or Difficulty rotating the handle when fully depressed Discharge is clogged. Tubing is too small, too long or kinked. Silicone gasket is damaged or dislodged Remove blockage from discharge Test filter with valve positioned to #3 Circulate (Bypass) position. This tests your hose and pump set-up by passing water directly through valve, not filter. If still slow, make adiustments to set-uo. Replace the diverter assembly. Pressure Gauge pointer does not move Filter has no active bacterial colonies yet. Gauge may not show back pressure if filter is operating normally. Check weekly. Pressure Gauge pointer is in yellow zone. Filter drum is leaking at perimeter. Debris has grown too thick. Pump is oversized. Set-up causes excessive back pressure. Outlet is clogged O-Ring or Gasket is missing, twisted, dirty or was not lubricated. Remove and rinse the filter pad. Backwash. If necessary, stir up Bio-Media manually or with Air turbulence before backwashing. Check weekly. Replace with a recommended pump or split water flow between pump and filter intake usinq a Valved Bypass. Test filter with valve positioned to #3 Circulate position. This tests your hose and pump set-up by passing water directly through valve, not filter. If still slow, make adjustments to set-up. Check for obstructions and clear outlet. Turn off pump. Open filter and remove, clean, re-seat and lubricate O-Ring/ gasket. Attach cover, checking alignment of tab & slot and thoroughly tighten clamp knob. Water pressure is too high. Pump is too large. Install a Valved Bypass to redirect excessive water pressure buildup. Water can be diverted directlv to vour waterfall. Set-up is creating back pressure due to hose configuration. Redo set-up to eliminate back pressure on the outlet oort of the filter. UV does not Power supply problem Check GFCI, Confirm all plugged connections. light. improper msta11at1on sequence. Always nave unit completely installed oetore powering up the UV. It will not light if plugged in first and then assembled. Bulb has dislodged from socket. Turn off pump, open UV and reattach bulb. Reassemble and aooly power. Filter Clogs right away. Pressure filter is clogged with leaves or other large waterborne debris. Never use the filter as a "Vacuum''. For a pond with a lot of debris use or rent a "pond vac" or remove the heavy debris manually. Use a pond skimmer and/or pump bag to prevent large debris from entering pump. 00)
11 PARTS LISTING For reference only, all parts are not available individually Part Illustration # Description 1.5 Outlets Collar 1.5 Slip Connector 1.5 Barb Connector 1.5 Inlet Adaptor 1.5 Outlet Adaptor O-Ring set for 1.5 fittings 2 Outlets Collar 2 Slip Connector 2 Barb Connector 2 Inlet Adaptor 2 Outlet Adaptor O-Ring set for 2 fittings 3 Barb Fitting 3 Slip / Barb adaptor 3 O-Ring set for Adaptor 32/40 mm Outlets Collar 32/40 mm Barb Connector 32/40 mm Outlet Adaptor O-Ring set for 32/40 mm fittings Small Cover w/7 way Valve Large Cover w/7 way Valve Pressure Gauge UV Port Cap w/ Gasket Small Flow Diffuser Large Flow Diffuser (w/o Bolt) Bolt for Large Flow Diffuser 2700 Drum Divider 5500 Drum Divider 8000 Drum Divider Drum Divider Small Filter Pad (15 1 /4 DIA.) Large Filter Pad (20 DIA.) Small Drum Clamp w/knob & Bolt Large Drum Clamp w/knob & Bolt Knob & Bolt (only) for Clamps Gasket for Small Cover Gasket for large Cover 2700 Filter Drum 5500 Filter Drum 8000 Filter Drum Filter Drum Drain Plug & O-Ring Small Bottom Grid Large Bottom Grid 1 1 / 4 BioMatrix Ball Media UV models Only V 9 Watt Fixture/Ballast/Bulb/Sleeve Clear Cap 120V 18 Watt Fixture/Ballast/Lamp/Sleeve Clear Cap 34A 120V 9 Watt Fixture/Ballast/Bulb/Sleeve Black Cap 120V 18 Watt Fixture/Ballast/Lamp/Sleeve Black Cap 230V 9 Watt Fixture /Ballast/Bulb/Sleeve 230V 18 Watt Fixture / Ballast/Lamp/Sleeve 35 9 Watt UV Lamp only (120V or 230V) Watt UV Lamp only (120V or 230V) Watt Quartz Sleeve Clear Neck with o-ring Watt Quartz Sleeve Clear Neck with o-ring 36A 9 Watt Quartz Sleeve Black Neck with gasket Watt Quartz Sleeve Black Neck with gasket Diverter replacement kit - small (preinstalled) Diverter replacement kit - large (preinstalled) Included INCLUDED WITH MODELS - Not Included - - Sub Assembly /2 FITTINGS 2 FITTINGS FITTINGS /40 MM FITTINGS A 19 34A 37 DIVERTER REPLACEMENT KIT (FOR MODEL) Part 37 ITEM# REPLACEMENT GASKET (FOR 2700, 5500, 8000 MODEL) Part 29 ITEM# REPLACEMENT GASKET (FOR MODEL) Part 29 ITEM# /4 BioMatrix Ball Media (300 / bag) Part 33 ITEM# DIVERTER REPLACEMENT KIT (FOR 2700,5500, 8000 MODEL) Part 37 ITEM# REPLACEMENT PRODUCTS 1 1 /2 INLET FITTINGS Includes parts: 1, 2, 3, 4 & O-rings ITEM# /2 WASTE / OUTLET FITTINGS Includes parts: 1, 2, 3, 5 & O-rings ITEM# INLET FITTINGS Includes parts: 7, 8, 9, 10 & O-Rings ITEM# WASTE / OUTLET FITTINGS Includes parts: 7, 8, 9, 11 & O-Rings ITEM# INLET, WASTE / OUTLET FITTINGS Includes parts: 13, 14 & 15 ITEM# /40 MM INLET FITTINGS Includes parts: 16, 17 & O-rings ITEM# /40 MM WASTE/OUTLET FITTINGS Includes parts: 16, 17, 18 & 19 ITEM# SMALL FILTER PAD (FOR 2700, 5500 & 8000 MODELS) Part 26 (15 1 /4 DIA.) ITEM# LARGE FILTER PAD (FOR MODEL), Part 26 (20 DIA.) ITEM# WATT UV CLARIFIER KIT 120V CLEAR NECK Includes parts: 34, 35 & 36 ITEM# WATT UV CLARIFIER KIT 120V BLACK NECK Includes parts: 34A, 35 & 36A ITEM# LAMP ONLY 120V, 9 WATT Part: 35 ITEM# QUARTZ SLEEVE ONLY, 9 WATT CLEAR NECK WITH Part: 36 ITEM# QUARTZ SLEEVE ONLY, 9 WATT BLACK NECK WITH FLAT GASKET Part: 36A ITEM# WATT UV CLARIFIER KIT120V CLEAR NECK Includes parts: 34, 35 & 36 ITEM# WATT UV CLARIFIER KIT120V BLACK NECK Includes parts: 34A, 35 & 36A ITEM# LAMP ONLY 120 V, 18 WATT Part: 35 ITEM# QUARTZ SLEEVE ONLY, 18 WATT CLEAR NECK WITH Part: 36 ITEM# QUARTZ SLEEVE ONLY, 18 WATT BLACK NECK WITH FLAT GASKET Part: 36 A ITEM# WATT UV CLARIFIER KIT 230V Includes parts: 34A, 35 & 36A ITEM# LAMP ONLY 230V, 9 WATT Part: 35 ITEM# WATT UV CLARIFIER KIT230V Includes parts: 34A, 35 & 36A ITEM# LAMP ONLY 230V, 18 WATT Part: 35 ITEM# ZG400 RevD 1/18

12 WARRANTY Pondmaster Filtration systems are warranted against failure due to defects in materials and/or workmanship for one year from date of purchase. This warranty covers defects occurring under normal use and applies to the original purchaser at retail and may not be transferred. The warranty and remedies set forth herein are conditional upon proper installation, use, maintenance, storage, and conformance with the applicable use. It will be based upon Danner Mfg. discretion as to whether the defects are of manufacturing origin. Any damages due to improper installation are not covered by this warranty. This warranty does not apply to appearance or accessory items. This warranty does not include damage due to handling, transportation, unpacking, setup, installation, repair or replacement of parts supplied by any other than Danner Mfg.; improper maintenance, modification or repairs by the purchaser; abuse, misuse, neglect, accident, fire, flood, or other acts of God. Any oral statements about this product made by the seller, the manufacturer, their representatives or any other parties do not constitute warranties and shall not be relied upon by the user and are not part of this contract. Neither the seller nor the manufacturer shall be liable for any injury, loss or damages, direct, incidental, or consequential, including but not limited to incidental or consequential damage for lost profits, lost sales, injury, and inability to use the product and the user agrees that no other remedy is available. Before using, the user shall determine the suitability of the product for their intended use and the user shall assume all risk liability whatsoever in connection therewith. To validate this warranty, keep your proof of purchase (copy of sales receipt from a certified Pondmaster dealer). Warranty covers the repair or prorated replacement of the Danner Mfg. products. Danner Mfg. denies all liability for any other loss including but not limited to loss of equipment, income, livestock, or personal injury. THE FOLLOWING VOIDS WARRANTY: PRODUCT LABELS ARE DEFACED OR REMOVED. PRODUCT IS IMPROPERLY INSTALLED OR MAINTAINED BY USER OR THEIR AGENT. PRODUCT IS ABUSED, MISUSED, OR DAMAGED BY USER OR THEIR AGENT. PRODUCT IS NOT WINTERIZED OR REMOVED FROM SERVICE AND DRIED DURING FREEZING CONDITIONS. PRODUCT DAMAGE IS CAUSED BY OVER-TIGHTENING FITTINGS ON VALVE PORTS. 12 ZG400 RevD 1/18
Pressurized Filter Up to 1250 gallons
 Pressurized Filter Up to 1250 gallons REMINDER CALL 1-888-755-6750 BEFORE RETURNING TO STORE. ITEM #FP1250UV Questions, problems, missing parts? Before returning to your retailer, call our customer service
SimplyClear Pressurized Filter Product Manual
 SimplyClear Pressurized Filter Product Manual For Model: SimplyClear 1250 (Item #130040) Table of Contents: Important Information... 2 Package Contents... 3 Technical Specs... 3 How it Works.................................
EZ CLEAN IMPORTANT SAFETY INSTRUCTIONS READ AND FOLLOW ALL SAFETY INSTRUCTIONS SAVE THESE INSTRUCTIONS. External Aquarium Filter
 EZ CLEAN External Aquarium Filter Model 01105 TM The Supreme EZ CLEAN FILTER is a multifunction aquarium appliance. It provides water filtration with dual cartridges to filter water mechanically removing
Air Pump Up to 800 gallons
 Air Pump Up to 800 gallons REMINDER CALL 1-888-755-6750 BEFORE RETURNING TO STORE. PACKAGE CONTENTS ITEM #PBPAPK40W Questions, problems, missing parts? Before returning to your retailer, call our customer
Industrial Vacuums, Inc
 Instructions/Spare Parts Manual Nilfisk Model GWD255 Drum Top Vacuum CAUTION: This Nilfisk vacuum cleaner is not to be used in explosion-hazardous areas, as serious injury could result. Under no circumstances
Instructions for Emperor Aquatics, Inc. s 16, 25, & 57 Watt Retro-Fit UV Sterilizer (for Savio s Skimmers)
") 02934-INS-SAVIO Rev.A Instructions for Emperor Aquatics, Inc. s 16, 25, & 57 Watt Retro-Fit UV Sterilizer (for Savio s Skimmers) Congratulations! Thank you for purchasing our 16, 25, or 57 Watt Retro-Fit
02934-INS-SAVIO Rev.A Instructions for Emperor Aquatics, Inc. s 16, 25, & 57 Watt Retro-Fit UV Sterilizer (for Savio s Skimmers) Congratulations! Thank you for purchasing our 16, 25, or 57 Watt Retro-Fit
AllClear G2 Series Pressurized Filters Product Manual
 AllClear G2 Series Pressurized Filters Product Manual For Models: AllClear G2 2000 (Item #130050) AllClear G2 3500 (Item #130051) AllClear G2 4500 (Item #130052) AllClear G2 4500 AllClear G2 3500 Table
Aqua Ultraviolet UV Sterilizer Instruction Manual for SL Series Wiper Units
 42371 Avenida Alvarado Temecula, CA 92590 TOLL FREE (800) 454-2725 TEL (951) 296-3480 FAX (951) 296-3490 www.aquauv.com Aqua Ultraviolet UV Sterilizer Instruction Manual for SL Series Wiper Units SEE INSIDE
Prime chiller. Inline Chiller. Instructions for Models #2645,2646
 Prime chiller Inline Chiller Instructions for Models #2645,2646 Warning and Safety Instructions... Page 2 Chiller Installation... Page 3 Temperature Controller Programming... Page 5 Warranty... Page 7
gamma pond Ultraviolet Sterilizers
 gamma pond Ultraviolet Sterilizers Instructions for Models #1410 8w, 1411 15w, 1412 25w, 1403-40w Important Safety Instructions... Page 2 Installation... Page 3 Maintenance & Winterizing... Page 5 Warranty...
SUPER NOVA SERIES UV STERILIZER HIGH INTENSITY ULTRAVIOLET STERILIZATION
 SUPER NOVA SERIES UV STERILIZER HIGH INTENSITY ULTRAVIOLET STERILIZATION Thank you for selecting an Aqua Logic, Inc. Ultraviolet (UV) Sterilizer. Each model has been designed and built to provide years
Nilfisk Model VHS255 Drum Top Vacuum
 Instructions/Spare Parts Manual Nilfisk Model VHS255 Drum Top Vacuum CAUTION: This Nilfisk vacuum cleaner is not to be used in classified (hazardous) environments, as serious injury could result. Under
WARNING: Ensure that the UV is switched off at the mains before you attempt to conduct any type of maintenance on the EazyPod Complete.
 EPC11904121MAN UK English INSTALLATION AND OPERATING MANUAL WARNING: Ensure that the UV is switched off at the mains before you attempt to conduct any type of maintenance on the EazyPod Complete. Evolution
Manual for MC91 SETUP INSTRUCTIONS
 Manual for MC91 SETUP INSTRUCTIONS Evaporative cooling works on the principle of heat absorption by moisture evaporation. Simply put, heat is removed from the air as water evaporates. You feel this principle
Manual for MC37/MFC3600
 Manual for MC37/MFC3600 SETUP INSTRUCTIONS Evaporative cooling works on the principle of heat absorption by moisture evaporation. Simply put, heat is removed from the air as water evaporates. You feel
nova extreme retrofit High Output T5 Lighting Kit
 nova extreme retrofit High Output T5 Lighting Kit Instructions for Model Nova Extreme Retrofit Model#1130-1135 Important Safety Instructions... Page 2 Installation Instructions... Page 4 Warranty... Page
IMPORTANT SAFETY INSTRUCTIONS WARNING: When using electric appliances, basic
 INSTRUCTIONS PERTAINING TO; RISK OF FIRE, ELECTRIC SHOCK OR HARM TO PERSONS IMPORTANT SAFETY INSTRUCTIONS WARNING: When using electric appliances, basic precautions should always be followed, including
HW-17 Record Cleaning Machine Setup and Instruction Manual
 HW-17 Record Cleaning Machine Setup and Instruction Manual VPI Industries, Inc., 77 Cliffwood Ave. #3B, Cliffwood, NJ 07721 Phone: 732-583-6895, Email: Sales@vpiindustries.com http://www.vpiindustries.com
DRY AIR SYSTEMS, INC Metro Boulevard Maryland Heights, Missouri (314) fax (314)
 fax (314)") DRY AIR SYSTEMS, INC. 2655 Metro Boulevard Maryland Heights, Missouri 63043 (314) 344-1114 fax (314) 344-0677 HD SERIES DRIERS TABLE OF CONTENTS WHY AN AIR DRYER 3 WHAT IS A DESICCANT AIR DRYER 3 Desiccant
DRY AIR SYSTEMS, INC. 2655 Metro Boulevard Maryland Heights, Missouri 63043 (314) 344-1114 fax (314) 344-0677 HD SERIES DRIERS TABLE OF CONTENTS WHY AN AIR DRYER 3 WHAT IS A DESICCANT AIR DRYER 3 Desiccant
Prime Chiller 1/10th HP Chiller
 Prime Chiller 1/10th HP Chiller Instructions for Model# 2635 Warning and Safety Instructions... Page 2 Chiller Installation... Page 3 Programming Thermostat... Page 4 Warranty... Page 5 EMAIL:INFO@CURRENT-USA.COM
AUTO SPEED BLENDER INSTRUCTION MANUAL MODEL: BLCLMB1
 AUTO SPEED BLENDER INSTRUCTION MANUAL MODEL: BLCLMB1 1 TABLE OF CONTENTS IMPORTANT SAFEGUARDS 3 POLARIZED PLUG 4 PRODUCT DIAGRAM 5 USAGE INSTRUCTIONS PREPARING YOUR AUTO SPEED BLENDER FOR USE 6 HOW TO
Prime Chiller Mini-Chillers
 Prime Chiller Mini-Chillers Instructions for Model#2680, 2635 Warning and Safety Instructions... Page 2 Chiller Installation... Page 3 Programming Thermostat... Page 4 Warranty... Page 5 EMAIL:INFO@CURRENT-USA.COM
EFX 600. aquamanta. Instruction Manual. 4year guarantee. the experts in aquatic technology. >600 Litres
 EFX 600 aquamanta TM the experts in aquatic technology >600 Litres Coldwater Tropical Marine 4year guarantee Instruction Manual Important Safeguards This appliance is not intended for use by persons (including
Manual update 2016 MC37/MFC3600
 Manual update 2016 MC37/MFC3600 SETUP INSTRUCTIONS Evaporative cooling works on the principle of heat absorption by moisture evaporation. Simply put, heat is removed from the air as water evaporates. You
OZONE SYSTEM FOR IN-GROUND POOLS New and Existing
 INSTALLATION & OPERATIONS MANUAL FOR Z0-910/912 OZONE SYSTEM FOR IN-GROUND POOLS New and Existing MANUFACTURED BY 3428 Bullock Lane San Luis Obispo, CA 93401 800-676-1335 4-0454-041900/03 IMPORTANT SAFETY
Xaact Spot. Xaact Hot Spot
 Xaact Spot & Xaact Hot Spot INFORMATION & OPERATING INSTRUCTIONS READ AND UNDERSTAND THESE INSTRUCTIONS BEFORE OPERATING THE MACHINE 78-00012 Rev. 101211 1 CONTENTS: Machine Specifications............
Ozone + UV Sanitation
 Ozone + UV Sanitation Installation Manual 4-2177-01 Rev.C IMPORTANT SAFETY INSTRUCTIONS When installing and operating the DEL Spa Solar Eclipse, basic precautions should always be followed: READ AND FOLLOW
IMPORTANT SAFETY INSTRUCTIONS EC-AG1-25 EC-AG1, EC-AG2 SAVE THESE INSTRUCTIONS.
 IMPORTANT SAFETY INSTRUCTIONS 2 1. Read and Follow All Instructions 2. Read this manual completely before attempting installation. 3. All permanent electrical connections should be made by a qualified
Prime Tower. Inline Chiller. Instructions for Models #2645,2646
 Prime Tower Inline Chiller Instructions for Models #2645,2646 Warning and Safety Instructions... Page 2 Chiller Installation... Page 3 Temperature Controller Programming... Page 5 Warranty... Page 6 JEE
Thanks for shopping with Improvements! Solar Pool Heater XF Item #
 Thanks for shopping with Improvements! Solar Pool Heater XF Item # 417912 To order, call 1-800-642-2112 West Chester, OH 45069 If you have any questions regarding this product, call 1-800-642-2112 and
ELECTRIC STOVE HEATER Models: FS2213B
 ELECTRIC STOVE HEATER Models: FS2213B OWNER S MANUAL WARNING Read and understand this entire owner s manual, including all safety information, before plugging in or using this product. Failure to do so
MiniSkim. Inspiring Excellence in Fish Keeping! Instruction version: 17/08/2012.
 MiniSkim 80 Inspiring Excellence in Fish Keeping! www.aquaone.com.au Instruction version: 17/08/2012 Important Safeguards To guard against injury, basic safety precautions should be observed, including
SolarPRO CURVE HEATER OWNER S MANUAL
 SolarPRO CURVE HEATER OWNER S MANUAL MODEL 4721 ENGLISH IMPORTANT SAFETY RULES Read all instructions BEFORE assembling and using this product. KEEP THIS MANUAL. IMPORTANT DO NOT RETURN PRODUCT TO STORE
Viper SL Series BLOG Avenida Alvarado, Temecula, CA TOLL FREE (800) TEL (951) FAX (951)
 TEL (951) FAX (951)") Viper SL Series INSTALLATION MANUAL Find us on Facebook www.facebook.com/aquaultraviolet Follow us on Twitter www.twitter.com/aquaultraviolet 42371 Avenida Alvarado, Temecula, CA 92590 TOLL FREE (800)
Viper SL Series INSTALLATION MANUAL Find us on Facebook www.facebook.com/aquaultraviolet Follow us on Twitter www.twitter.com/aquaultraviolet 42371 Avenida Alvarado, Temecula, CA 92590 TOLL FREE (800)
Pro-MAX Ultraviolet Sterilizer
 Pro-MAX Ultraviolet Sterilizer Lifegard Aquatics introduces the Pro-MAX UV Sterilizer, featuring a patent-pending, flow-through design with less restrictive angled inlet and outlet ports requiring less
Fold Here. Stamp. Transworld Aquatic Enterprises, Inc 3730 W. Century Blvd #3 Inglewood, CA Phone: (877) JBJLIGHTING.
 JBJLIGHTING.") Fold Here Stamp Transworld Aquatic Enterprises, Inc 3730 W. Century Blvd #3 Inglewood, CA 90303 Phone: (877) 374-9981 JBJLIGHTING.COM 20 WWW.JBJLAQUARIUM.COM Warranty Registration TABLE OF CONTENTS IMPORTANT
Fold Here Stamp Transworld Aquatic Enterprises, Inc 3730 W. Century Blvd #3 Inglewood, CA 90303 Phone: (877) 374-9981 JBJLIGHTING.COM 20 WWW.JBJLAQUARIUM.COM Warranty Registration TABLE OF CONTENTS IMPORTANT
IAQ Series. Bosch IAQ Photo Catalytic Oxidizer (PCO) Residential Application. Installation Manual and Owner s Guide
 Residential Application. Installation Manual and Owner s Guide") Installation Manual and Owner s Guide IAQ Series Bosch IAQ Photo Catalytic Oxidizer (PCO) Residential Application PCOB-09012-0--A - 9" PCO BULB PCOB-14024-0--A - 14" PCO BULB 67202220344 Revised 07-12
Installation Manual and Owner s Guide IAQ Series Bosch IAQ Photo Catalytic Oxidizer (PCO) Residential Application PCOB-09012-0--A - 9" PCO BULB PCOB-14024-0--A - 14" PCO BULB 67202220344 Revised 07-12
ispring Whole House Water Filter Systems USER S MANUAL
 ispring Whole House Water Filter Systems USER S MANUAL Version 2014-5 Introduction Congratulations on your purchase of the ispring Whole House Water Filter system. Featuring a three-stage filtration process,
Owner s Manual. Filterless UV Air Purifier. This Manual Includes:
 Filterless UV Air Purifier Item No. 203758 Owner s Manual This Manual Includes: Warranty Safety Warnings Operating Instructions Replacement Directions Troubleshooting Tips Cleaning and Maintenance Tips
VMS-3. Part Number: Ultraviolet Systems VMS-3. Installation, Operation & Maintenance
 VMS-3 Part Number: 95-0031 Ultraviolet Systems VMS-3 Installation, Operation & Maintenance The following are the types of flags used in this technical manual. They designate safety related items and important
Camarillo 52 Ceiling Fan
 Owner s Manual Camarillo 52 Ceiling Fan Part # 269263, 269259, 269287 Model # 32091, 32092, 32087 Exclusively Distributed by: HD Supply Facilities Maintenance, Ltd. Atlanta, GA 30339 2017 Made in China
PORTABLE DOG BATH TOOL
 TM PORTABLE DOG BATH TOOL USER GUIDE 1842 SERIES More of a video person? Look for this icon and go online for an instructional how-to video at BISSELL.com/videos IMPORTANT SAFETY INSTRUCTIONS READ ALL
TIDALWAVE I/G POOL PUMP INSTRUCTION MANUAL
 TIDALWAVE I/G POOL PUMP INSTRUCTION MANUAL READ THIS MANUAL CAREFULLY BEFORE USING YOUR PUMP 88 PUMP PARTS BREAKDOWN REF # Order # Mfr # Description 1 NEP4 AC 348 Lid Knobs NEP AC 380 Strainer Lid 3 NEP6
e Bath Fan with Light User s Guide
 e Bath Fan with Light User s Guide abfl50uq, BFL60UQ, BFL70, BFL85 Item Stock Number(s): BFL50UQ, BFL60UQ, BFL70, BFL85 IMPORTANT INSTRUCTIONS - OPERATING MANUAL READ AND SAVE THESE INSTRUCTIONS READ CAREFULLY
ALL-IN-ONE SF PF312 MAR PMAX All-In-One Instructions.indd 1 3/1/2017 9:20 AM
 ALL-IN-ONE SF650 MAR 2017 PMAX All-In-One Instructions.indd 1 888.868.1185 sales@pondmax.com www.pondmax.com 23PF312 3/1/2017 9:20 AM Frequency Cable Length Outlet Ø (Inch) 60 Hz 115 Volt 57 Watts 13 Watt
SSF1610B-CN TRUSTED FOR OVER 100 YEARS. 16 inch (40cm) Oscillating. Stand Fan. Instruction Leaflet PLEASE READ AND SAVE THESE IMPORTANT INSTRUCTIONS
 Oscillating. Stand Fan. Instruction Leaflet PLEASE READ AND SAVE THESE IMPORTANT INSTRUCTIONS") TRUSTED FOR OVER 100 YEARS 16 inch (40cm) Oscillating Stand Fan SSF1610B-CN Instruction Leaflet PLEASE READ AND SAVE THESE IMPORTANT INSTRUCTIONS PLEASE READ AND SAVE THESE IMPORTANT SAFETY INSTRUCTIONS
TRUSTED FOR OVER 100 YEARS 16 inch (40cm) Oscillating Stand Fan SSF1610B-CN Instruction Leaflet PLEASE READ AND SAVE THESE IMPORTANT INSTRUCTIONS PLEASE READ AND SAVE THESE IMPORTANT SAFETY INSTRUCTIONS
ULTRASONIC humidifier
 BU5000_5100_5200-U_07EM2.qxd 7/23/07 13:49 Page 1 ULTRASONIC humidifier BU5000 2007 Sunbeam Products, Inc. doing business as Jarden Consumer Solutions. All Rights Reserved. Printed in China BU5000//07EM2
READ AND UNDERSTAND THESE INSTRUCTIONS BEFORE OPERATING THE MACHINE
 XAACT Xtract 200 INFORMATION & OPERATING INSTRUCTIONS READ AND UNDERSTAND THESE INSTRUCTIONS BEFORE OPERATING THE MACHINE 78-00018 Rev B 032912 1 CONTENTS: Machine Specifications............ 2 Record Important
ALL IN ONE SERIES HOTLINE 1300 AQUATEC INSTRUCTION MANUAL MODEL 03AS310 03AS311. DATE JULY 2017 v2.0. AQP All in One 1000 Instructions.
 INSTRUCTION MANUAL DATE JULY 2017 v2.0 HOTLINE 1300 AQUATEC MODEL 03AS310 03AS311 AQP All in One 1000 Instructions.indd 1 CONGRATULATIONS ON YOUR PURCHASE OF THIS PRODUCT BY AQUAPRO, THE ANSWERS FOR YOUR
K Specifications. Max. Water Volume
 K 2.35 High Pressure Washer Operator Manual Overview... 2 Precautions... 2-4 Assembly Instructions... 4 Operating Instructions... 5 Using the Accessories... 6 Working with Detergents... 7 Shut Down and
US 11/2005. Greens Machine VP-1/VP-3 Salad & Vegetable Dryer VP-1 VP-3. Instruction manual
 US 11/2005 Greens Machine VP-1/VP-3 Salad & Vegetable Dryer VP-1 VP-3 Instruction manual The Greens Machine VP-1 and VP-3 Salad & Vegetable Dryer Item Old # New # Description Req. 1 30011 653628 VP-1
Torrena 42 Ceiling Fan
 Torrena 42 Ceiling Fan Owner s Manual Part # 269268, 269269 Model # 32096, 32097 Exclusively Distributed by: HD Supply Facilities Maintenance, Ltd. Atlanta, GA 30339 2017 Made in China If you are experiencing
C L E A N I N G / M A I N T E N A N C E WA R R A N T Y I N F O R M AT I O N CLEANING/MAINTENANCE FAN STORAGE 3 YEAR LIMITED WARRANTY INSTRUCTIONS
 pure indoor living 16-INCH (41 CM) STAND FAN MODEL: BSF1016RT-CN Instruction Leaflet Read instructions before operating. Retain for future reference. Questions? Comments? Call 1-800-253-2764 in North America.
WHEATGRASS JUICER C O M M E R C I A L. INSTRUCTION MANUAL Model No
 COMMERCIAL PRODUCTS ATTENTION If any components of this unit are broken, do not operate properly, or for product returns, please contact Pragotrade at 1-800-814-4895 Outside the U.S. call 440-638-3131.
π H-2268 SANITAIRE UPRIGHT VACUUM SAFETY uline.com
 π H-2268 SANITAIRE UPRIGHT VACUUM 1-800-295-5510 uline.com SAFETY PAGE 1 OF 7 NOTE: When using an electrical appliance, basic precautions should always be followed, including the following: READ ALL INSTRUCTIONS
ULTRASONIC HUMIDIFIER
 To Buy: Visit www.sylvane.com or call (800) 934-9194 For Product Support: Contact Sunpentown at 1-800-330-0388 ULTRASONIC HUMIDIFIER [ADORABLE MONKEY] To prolong the life of this humidifier, using distilled
Instruction Leaflet. Read instructions before operating. Retain for future reference.
 pure indoor living OUTDOOR STAND FAN WITH MISTING KIT MODEL: BSF1613A/AC Series Instruction Leaflet Read instructions before operating. Retain for future reference. Questions? Comments? Call 1-800-253-2764
Manual for MC21A SETUP INSTRUCTIONS
 Manual for MC21A SETUP INSTRUCTIONS Evaporative cooling works on the principle of heat absorption by moisture evaporation. Simply put, heat is removed from the air as water evaporates. You feel this principle
aquamanta the experts in aquatic technology
 HFX 70/100/150/200 TM aquamanta the experts in aquatic technology Coldwater Tropical Marine 2+1 year guarantee Instruction Manual Instruction version: 05/06/2012 Technical Information MODEL: HFX 70 HFX
100 Series Maxi Internal Filters
 100 Series Maxi Internal Filters Important Safeguards To guard against injury, basic safety precautions should be observed, including the following: 1. Read and follow all safety instructions and important
Natural Mist Humidifier. Vicks. (Model V3500) IMPORTANT! READ AND SAVE THESE INSTRUCTIONS. Use and Care Manual
 IMPORTANT! READ AND SAVE THESE INSTRUCTIONS. Use and Care Manual") IMPORTANT! READ AND SAVE THESE INSTRUCTIONS Vicks Natural Mist Humidifier (Model V3500) Use and Care Manual If you have any questions about the operation of your Vicks Natural Mist Humidifier, call our
IMPORTANT! READ AND SAVE THESE INSTRUCTIONS Vicks Natural Mist Humidifier (Model V3500) Use and Care Manual If you have any questions about the operation of your Vicks Natural Mist Humidifier, call our
Installation Instructions / Warranty
 Installation Instructions / Warranty IP C 04210000 04211000 04212000 IP S 04203000 04204000 04205000 IP E 04199000 04200000 04201000 IP Trim Sets Valve trim only IP C 04212000 IP E 04201000 IP S 04205000
MiniMax Sump #7304. Owner s Manual 1
 v MiniMax Sump #7304 Owner s Manual 1 CONTENTS TABLE OF CONTENTS Important Safety Instructions 3-4 Parts Exploded View & Identification Introduction Getting Started MiniMax Sump 5 MiniMax Sump 6 Adding
Instruction Leaflet. Read instructions before operating. Retain for future reference.
 pure indoor living 2-In-1 Dual Desk/Stand FAN MODEL: BSF1211C-CN Instruction Leaflet Read instructions before operating. Retain for future reference. Questions? Comments? Call 1-800-253-2764 in North America
Ultraviolet Systems UV-C 50 INSTALLATION INSTRUCTIONS & PRODUCT MANUAL
 Ultraviolet Systems Inc. UV-C 50 INSTALLATION INSTRUCTIONS & PRODUCT MANUAL TABLE OF CONTENTS SECTION 1 General Information 1A. Description...1 1B. Specifications...1 SECTION 2 Installation 2A. Pool Preparation...
Patriot. Automatic Pool Vacuum Cleaner. Patent No. 5,794,293. Owner's Guide. Model *Recommended for 3/4 HP and above
 Patriot Model 5-2046-000 Automatic Pool Vacuum Cleaner Patent No. 5,794,293 Owner's Guide *Recommended for 3/4 HP and above 365-1926-1 CAUTIONS 1. Remove the vacuum from the pool prior to super chlorinating
AquaReef Cube. Inspiring Excellence in Fish Keeping!
 AquaReef 275 Cube Inspiring Excellence in Fish Keeping! www.aquaone.com.au Instruction version: 25/03/2011 Important Safeguards To guard against injury, basic safety precautions should be observed, including
POWERCLEAN. Vacuum USER GUIDE 1305, 1306, 1645, 1646, 1647 SERIES. For How-To videos, go to
 POWERCLEAN Vacuum USER GUIDE 1305, 1306, 1645, 1646, 1647 SERIES For How-To videos, go to Sections marked with this video icon have more information online. IMPORTANT SAFETY INSTRUCTIONS READ ALL INSTRUCTIONS
Installation & Service Manual
 Installation & Service Manual Table of Contents Unpacking & Inspection... 2 Basic Guidelines... 2 Specifications... 3 Before Starting Installation Where to install the filter... 4 Tools, pipe, fittings
Instruction Manual - Anti-Siphon Ejector Chlorine & Sulfur Dioxide 500 PPD (10 kg/h) Maximum Capacity
 Maximum Capacity") - Anti-Siphon Ejector Chlorine & Sulfur Dioxide 500 PPD (10 kg/h) Maximum Capacity 100 PPD (2 kg/h) Chlorine or Sulfur Dioxide 250 & 500 PPD (5 & 10 kg/h) Chlorine or Sulfur Dioxide Anti-Siphon Ejector
- Anti-Siphon Ejector Chlorine & Sulfur Dioxide 500 PPD (10 kg/h) Maximum Capacity 100 PPD (2 kg/h) Chlorine or Sulfur Dioxide 250 & 500 PPD (5 & 10 kg/h) Chlorine or Sulfur Dioxide Anti-Siphon Ejector
ULTRASONIC HUMIDIFIER With Night Light and Fragrance Diffuser
 To Buy: Visit sylvane.com or call (800) 934-9194 For Product Support: Contact Sunpentown 1-800-330-0388 ULTRASONIC HUMIDIFIER With Night Light and Fragrance Diffuser SU-2550B (Blue) SU-2550P (Pink) SU-2550V
Fleck 2510 Sediment Filter Installation & Start-Up Guide
 Clean Water Made Easy www.cleanwaterstore.com Fleck 2510 Sediment Filter Installation & Start-Up Guide Thank you for purchasing a Clean Water System! With proper installation and a little routine maintenance
GULPER 16SV 16 GALLON WET/DRY VACUUM WITH FRONT MOUNT SQUEEGEE
 GULPER 16SV 16 GALLON WET/DRY VACUUM WITH FRONT MOUNT SQUEEGEE INTRODUCTION OPERATING & MAINTENANCE INSTRUCTIONS This operator s book has important information for the use and safe operation of this machine.
Mobile Evaporative Cooler. Use & Care Guide MC37 / MC61 INDEX
 INDEX Safety Rules... 1 Quick Start.... 2 Features...3 Maintenance......4 Cooler Parts......5 Warranty......6 Trouble Shooting...7 Mobile Evaporative Cooler Use & Care Guide MC37 / MC61 Safety Safety Rules
MAXUM 5 5 Gallon Box Extractor
 MAXUM 5 5 Gallon Box Extractor INTRODUCTION OPERATING & MAINTENANCE INSTRUCTIONS This operator s book has important information for the use and safe operation of this machine. Read this book carefully
USER MANUAL. PEDESTAL FAN (16 Inch)
") USER MANUAL PEDESTAL FAN (16 Inch) ACFP1016 Hydrofarm.com TABLE OF CONTENTS OVERVIEW 2 PARTS LIST - (WHAT S IN THE BOX) 3 IMPORTANT SAFEGUARDS 4 ASSEMBLY INSTRUCTIONS 4 ASSEMBLY 4 ELECTRIC SCHEMATIC DIAGRAM
USER MANUAL PEDESTAL FAN (16 Inch) ACFP1016 Hydrofarm.com TABLE OF CONTENTS OVERVIEW 2 PARTS LIST - (WHAT S IN THE BOX) 3 IMPORTANT SAFEGUARDS 4 ASSEMBLY INSTRUCTIONS 4 ASSEMBLY 4 ELECTRIC SCHEMATIC DIAGRAM
Because you re not like everyone else. MISTING FAN MF24B OWNER S MANUAL
 Because you re not like everyone else. MISTING FAN MF24B OWNER S MANUAL 2 BECAUSE YOU RE NOT LIKE EVERYONE ELSE. And neither are we. Always at the forefront of our industry, our goal is to offer the best
Ultra Lightweight Household & Commercial Vacuums
 Owner s Manual Ultra Lightweight Household & Commercial Vacuums Save These Instructions Index Important Safety Instructions............................................................. 2 Polarization Instructions................................................................
READ AND UNDERSTAND THESE INSTRUCTIONS BEFORE OPERATING THE MACHINE
 XAACT Xtract 500 INFORMATION & OPERATING INSTRUCTIONS READ AND UNDERSTAND THESE INSTRUCTIONS BEFORE OPERATING THE MACHINE 78-00015 Rev B 032912 1 CONTENTS: Machine Specifications............ 2 Record Important
e Bath Fan with Light User s Guide
 e Bath Fan with Light User s Guide abfl125rok Item Stock Number(s): BFL125ROK IMPORTANT INSTRUCTIONS - OPERATING MANUAL READ AND SAVE THESE INSTRUCTIONS READ CAREFULLY BEFORE ATTEMPTING TO ASSEMBLE, INSTALL,
HOTSPOT. Two Gallon Pump Up Spotter OPERATING & MAINTENANCE
 HOTSPOT Two Gallon Pump Up Spotter INTRODUCTION OPERATING & MAINTENANCE INSTRUCTIONS This operator s book has important information for the use and safe operation of this machine. Read this book carefully
Installation & Operating Instructions
 PREMIUM Installation & Operating Instructions AQP-20SIL Signature Filtered Water Cooler Premium Selection Congratulations on your purchase of a Aquaport Signature Filtered Water Cooler This unit is easy
e Bath Fan with Light User s Guide
 e Bath Fan with Light User s Guide abfl100rnl, BFL125RNL Item Stock Number(s): BFL100RNL, BFL125RNL IMPORTANT INSTRUCTIONS - OPERATING MANUAL READ AND SAVE THESE INSTRUCTIONS READ CAREFULLY BEFORE ATTEMPTING
IMPORTANT SAFETY INSTRUCTIONS SAFETY INSTRUCTIONS. WARNING To guard against injury, basic safety precautions USA
 IMPORTANT SAFETY INSTRUCTIONS USA WARNING To guard against injury, basic safety precautions should be observed, including the following. a) READ AND FOLLOW ALL SAFETY INSTRUCTIONS. b) DANGER To avoid possible
(The chances are you re never going to read me) Owner s Manual HEAVY DUTY SHD-1T.
 Owner s Manual HEAVY DUTY SHD-1T.") (The chances are you re never going to read me) Owner s Manual HEAVY DUTY SHD-1T www.simplicityvac.com Index Important Safety Instructions............................................................ 2
(The chances are you re never going to read me) Owner s Manual HEAVY DUTY SHD-1T www.simplicityvac.com Index Important Safety Instructions............................................................ 2
AquaStream. ½ HP Floating Fountain. Please Keep for Your Records. Model #AS05 6A, 120V/60Hz Owner s Manual UNIT IDENTIFICATION
 TM Included Classic Pattern Dimensions: 6 h x 16 w Included Included Crown & Rocket Pattern Dimensions: Trumpet: 8 h Crown: 4 h x 32 w Geyser Pattern Dimensions: 14 h x 7 w AquaStream ½ HP Floating Fountain
OWNER S MANUAL. Important: Read carefully before assembly and use. PORTABLE CANISTER U #961A00007 ID111867
 OWNER S MANUAL PORTABLE CANISTER Important: Read carefully before assembly and use. U414300 #961A00007 ID111867 THANK YOU for purchasing an Oreck product please register your product: online at oreck.com
ADORABLE Ultrasonic Cool Mist Humidifier
 ADORABLE Ultrasonic Cool Mist Humidifier FOR MODELS: EE-865, EE-3186, EE-3189, EE-3190, EE-3191, EE-4139, EE-4140, EE-5058, EE-6369, EE-7270, EE-8189, EE-8190, EE-8243, EE-8245, EE-8246, EE-8247, EE-8248,
Getz Equipment Innovators 450 lb Dual Portable Dry Chemical Fill System
 Getz Equipment Innovators 450 lb Dual Portable Dry Chemical Fill System 1 Revised 11/18/10 2320 Lakecrest Drive, Pekin IL 61554 PH. (888) 747-4389 Fax (309) 495-0625 Website: www.getzequipment.com LIMITED
REVOLUTION BAGLESS CANISTER VACUUM
 REVOLUTION BAGLESS CANISTER VACUUM 12901 IMPORTANT SAFETY INSTRUCTIONS READ ALL INSTRUCTIONS BEFORE USING YOUR VACUUM. When using an electrical appliance, basic precautions should be observed, including
Minima User Guide and Installation Manual
 Minima User Guide and Installation Manual D r a c o D r u m M i n i m a U s e r G u i d e V e r. 1. 1 Page 1 Table of Contents Introduction... 3 Product Information... 4 Getting to know your DracoDrum
POWERFORCE HELIX. Vacuum USER GUIDE 1700 & 1701 SERIES. (Model 1701 Shown)
") POWERFORCE HELIX Vacuum USER GUIDE 700 & 70 SERIES (Model 70 Shown) IMPORTANT SAFETY INSTRUCTIONS READ ALL INSTRUCTIONS BEFORE USING YOUR UPRIGHT VACUUM. Always connect to a polarized outlet (one slot
POWERFORCE HELIX Vacuum USER GUIDE 700 & 70 SERIES (Model 70 Shown) IMPORTANT SAFETY INSTRUCTIONS READ ALL INSTRUCTIONS BEFORE USING YOUR UPRIGHT VACUUM. Always connect to a polarized outlet (one slot
SR-60 SR-80 SR-120. Owner s Manual 1
 SR-60 SR-80 SR-10 Owner s Manual 1 TABLE OF CONTENTS TABLE OF CONTENTS Important Safety Instructions 3-5 Parts Exploded View & Identification SR-60 6-7 SR-80 8 SR-10 9 Introduction SR-60 10-11 SR-80 1-13
Fleck 5600 Carbon Filter Installation & Start Up Guide
 Clean Water Made Easy www.cleanwaterstore.com Fleck 5600 Carbon Filter Installation & Start Up Guide Thank you for purchasing a Clean Water System! With proper installation and a little routine maintenance
FROZEN CONCOCTION MAKER
 The Navigator Bahamas TM FROZEN CONCOCTION MAKER The Best Margaritas Come From Margaritaville Model DM0500 Series User Manual IMPORTANT SAFEGUARDS WHEN USING ELECTRICAL APPLIANCES, BASIC SAFETY PRECAUTIONS
H-16.5 Record Cleaning Machine Setup and Instruction Manual
 H-16.5 Record Cleaning Machine Setup and Instruction Manual VPI INDUSTRIES, INC., 77 CLIFFWOOD AVE., #3B, CLIFFWOOD, NJ 07721 PHONE: 1-732-583-6895, FAX: 1-732-946-8578 http://www.vpiindustries.com 1 Table
Model CWA200 Owner s Manual
 Model CWA200 Owner s Manual ClearWaveAir Purifier Owner s Manual Model CWA200 Thank you for purchasing the ClearWaveAir air purifier. The ClearWaveAir system will greatly improve the air quality in your
DEL AOP 25 INSTALLATION INSTRUCTIONS & PRODUCT MANUAL
 DEL AOP 25 INSTALLATION INSTRUCTIONS & PRODUCT MANUAL C-M-P.COM 4-2535-01 Rev.B IMPORTANT SAFETY INSTRUCTIONS READ AND FOLLOW ALL INSTRUCTIONS WARNING: Risk of electric shock. Install at least 5 feet from
52 CEILING FAN. Owner s Manual Models #50336, 50337
 52 CEILING FAN Owner s Manual Models #50336, 50337 If a problem cannot be remedied or you are experiencing difficulty in installation, please contact the Service Department: 1-877-706-3267, 9 a.m.- 5 p.m.
POWERFORCE HELIX. Vacuum USER GUIDE 2110 & 2111 SERIES. (Model 2110 Shown)
") POWERFORCE HELIX Vacuum USER GUIDE 0 & SERIES (Model 0 Shown) IMPORTANT SAFETY INSTRUCTIONS READ ALL INSTRUCTIONS BEFORE USING YOUR APPLIANCE. Unplug from outlet when not in use and before conducting maintenance.
POWERFORCE HELIX Vacuum USER GUIDE 0 & SERIES (Model 0 Shown) IMPORTANT SAFETY INSTRUCTIONS READ ALL INSTRUCTIONS BEFORE USING YOUR APPLIANCE. Unplug from outlet when not in use and before conducting maintenance.