RPT Robotic Pool Cleaner
|
|
|
- Garey Underwood
- 5 years ago
- Views:
Transcription


1 RPT Robotic Pool Cleaner Installation and Operating Instructions Product 11701
2 Quick Start Guide 2 1 Chlorine 2-5 ppm ph Temp 13 C-35 C NO SWIM 3.6m 12 cm
3 Float Installation A2 A3 A1 A4 B2 B3 3 B1 B4
4 Contents Quick Start Guide Safety Introduction System Overview How the Robotic Cleaner Cleans Your Pool Operating Conditions Components Cleaner And The Main Parts Power and Control Unit Operation Before First Use Placing Cleaner Unit into the Water Starting the Robotic Cleaner Cleaning Cycle Stopping Robotic Cleaner Operation Pulling Cleaner Unit out of the Water Maintenance Cleaning Filter Storing the Robotic Cleaner Checking Water Outlet Propeller Important Tips Cable Care Troubleshooting Warranty Terms and Conditions Warranty Claims Exclusions and Limitations IMPORTANT SAFETY INSTRUCTIONS READ AND FOLLOW ALL THE INSTRUCTIONS CAUTION: Do not plug the power supply into a grounded outlet or do not switch the pool cleaner ON if it is not fully immersed in water. Operating the cleaner out of water will cause severe damage immediately and will result in loss of warranty. Allow the cleaner to remain in the pool for 15 to 20 minutes following the end of its cleaning cycle. This will allow the motors to cool adequately. Do not leave the cleaner in the pool all the time. Always remember to turn the power supply OFF and unplug it from the power outlet before removing the cleaner from the pool. WARNING: The cleaner must not be used when people are in the water. For use with swimming pool only Safety Note - The unit must be supplied through a residual current device (RCD) having a rated residual operating current not exceeding 30 ma - The connection to the branch circuit should be consistent with the local and national wiring rules (electrical code). - Mishandling of the unit can result in leakage of lubricants. - If the supply cord is damaged, it must be replaced by the manufacturer s service agent or a qualified and trained person in order to avoid hazards. This appliance is not intended for use by persons (including children) with reduced physical, sensory or mental capabilities, or lack of experience and knowledge, unless they have been given supervision or instruction concerning use of the appliance by a person responsible for their safety. Children should be supervised to ensure that they do not play with the appliance. WARNING: A Ground Fault Current Interrupter (GFCI-USA) or a Residual Current Device (RCD-EUROPE) must be installed to protect your electric outlet and prevent any possible electric shock. SAVE THESE INSTRUCTIONS 4
5 Introduction Components System Overview The robotic cleaner sweeps the pool floor and walls to collect dirt and debris into its internal filters. This user manual explains how to operate the robotic cleaner, including cleaning, maintenance and storage procedures Note: This manual reviews several robotic cleaner models. There are some variations in components according to specific model. 4 5 How the Robotic Cleaner Cleans Your Pool After the robotic cleaner is placed in the pool and activated, it operates according to the program set via the power and control unit. The robotic cleaner moves along the floor and walls of the pool, covering the entire area of the pool floor and walls. When the robotic cleaner has finished its program, it remains inactive on the pool floor. Note: Wall climbing is an optional feature. When the wall climbing feature is enabled, the robotic cleaner climbs the wall at intervals according to its internal program. The robotic cleaner ability to climb over stairs in swimming pool is subject to stair geometry and material. Operating Conditions The robotic cleaner is intended for use in swimming pools in the following conditions: - Temperatures ranging from 13 C-35 C, recommended temperature is between 22 C-32 C. - Water ph : Chlorine level: pool is maintained according to the pool manufacturer s instructions. (recommended 2-5 ppm) Note: Failure to maintain the pool according to the recommended operating conditions could prevent the robotic cleaner from functioning properly. Remove the cleaner out of water when performing "Chemical Shock Treatment" to the pool water ) Handle 2) Outlet Top 3) Filter Lock Release 4) Filter Lid 5) Handle Lock Mechanism 6) Drive Track 7) Scrubbing Brush 8) Unit Body 9) Water Inlet 10) Power Supply
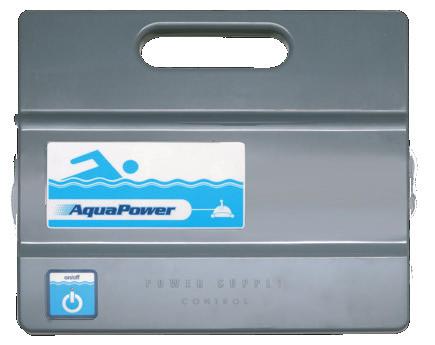
6 Components Operation Power and Control Unit The power and control unit is connected to the robotic cleaner via the floating cable. The unit is powered by AC power (1) and supplies low voltage and commands to the cleaner unit through the outlet socket (2). The unit features a control panel (3) with various controls to operate the robotic cleaner Before First Use Adjusting Suction Height: Positioning the suction inlet (2) close to the pool surface increases the suction power and the cleaning quality. Lowering the suction inlet could result in interference with obstacles on the swimming pool floor or walls. Use a screw driver to adjust the suction inlet position knob (1). - IN pulls the suction inlet away from the pool surface and reduces the suction power. - OUT brings the suction inlet closer to the pool surface and increases the suction power. Contents of Packing Box The robotic cleaner is packed in a box containing: - Robotic cleaner and floating cable - Power and control unit - User manual 2 1 Aquacontrol Power Supply Specifications Dimensions (W * D * H) Weight Electrical Input rating Output rating Storage temperature Operating temperature Ingress protection 273mm * 242mm * 90mm 1.9 Kg V~, 50/60Hz, 210W 29V,6.3A. -10 C - 60 C 0 C - 45 C IP54 Adjusting Floating Handle On wall climbing models, set the floating handle: 1. Press the lock button (1 or 2 according to the model) to release the handle lock. 2. Place the handle (3) diagonally at maximum position. 3. Repeat steps 1 and 2 on the other side of the cleaner unit. 1 Handle lock vertical 2 Handle lock horizontal 3 6
7 Operation Chlorine 2-5 ppm ph Temp 13 C-35 C NO SWIM Removing Brush Covers The robotic cleaner is shipped with a protective cover over the scrubbing brushes. Carefully remove the nylon covers from the scrubbing brushes. CAUTION: Do not use a sharp tool to remove the cover as it could harm the brushes. 3.6m Placing the Power and Control Unit 4. Place the power and control unit at least 3.6 meters from the pool and at least 12 cm inches above the surface. CAUTION: The power and control unit must not be exposed to water or to direct sunlight. 5. Release floating cable plastic ties, which are used to secure the cables during shipping, by pressing plastic snap on the tie. Before placing the cleaner unit in the water 1. Make sure there are no people in the pool. 2. Make sure that the filters are clean. 3. Make sure the pool conditions are met; (see Operating Conditions ). 12 cm Placing Cleaner Unit into the Water 1. Unroll the floating cable. It is recommended to extend a length of cable that is equal to the pool diagonal size plus an additional two meters. 2. Place the cleaner unit in the pool. 3. Let the robotic cleaner sink to the bottom of the pool. Do not start operation before the robotic cleaner is settled on the pool floor. 4. Spread the floating cable across the pool. Make sure that only the required length of cable is spread across the pool. Smooth out coils or twists in the cable. Roll extra cable outside the pool near the power and control unit. 5. Connect the floating cable (A) to the socket (B) located on the power and control unit. CAUTION: Operating the cleaner out of water causes immediate severe damage and results in loss of warranty. Socket (B) Cable plug (A) 7
8 Operation Starting the Robotic Cleaner Connect the power and control unit to the wall socket (1). The Operation LED is lit (4) and the robotic cleaner starts its cleaning program. If the power and control unit is already connected to the AC socket, the Operation LED flashes (5) to indicate that the robotic cleaner is in standby mode. Press the Operation button (6). The Operation LED turns on (6) and the robotic cleaner starts the cleaning program. 1 Cleaning Cycle During the cleaning cycle, the robotic cleaner: - Moves across the pool floor picking up dirt and debris. - Changes direction and rotates automatically. Note: The robotic cleaner might occasionally stop moving for a few seconds. This is part of normal operation, not a malfunction. 2 Stopping Robotic Cleaner Operation The robotic cleaner moves automatically to STANDBY after every cleaning cycle and the operation LED starts flashing (5). To stop the cleaner operation during a cleaning cycle, press the operation button (7) once. The operation LED starts flushing (7) and the cleaner is in standby mode Pulling Cleaner Unit out of the Water 1. Unplug the floating cable from the power and control unit. 2. Pull up on the floating cable to pull the cleaner unit closer until it is possible to take hold of the handle. 3. Using the handle, lift the cleaner unit out of the pool. CAUTION: Do not use the floating cable to lift the cleaner unit out of the water. 8
, (4) 3.")
 is in place and not broken, then close the filter. (6) 5. Insert the filter back into its location until a click is heard to secure the filter in place.")
9 Maintenance 1 2 Cleaning the Filters The two filters must be cleaned after each cleaning cycle. 1. Release the filter and pull it out of the cleaner unit. (1), (2) 2. Pull the filter door against the filter housing to open the filter case. (3), (4) 3. Spray water on the outer sides of the filter and then spray water towards the inner side of the filter to clean all the dirt and debris. (5) 4. Verify that the small plastic shutter (2) is in place and not broken, then close the filter. (6) 5. Insert the filter back into its location until a click is heard to secure the filter in place.(7), (8) 3 5 shutter 4 6 Storing the Robotic Cleaner Follow these instructions to store the robotic cleaner when not in use: 1. Disconnect the power cord from the wall outlet. 2. Disconnect the floating cable from the power and control unit. 3. Spread out the floating cable and release any twists in the cable. 4. Wash the cleaner unit interior space with fresh water and let it dry. 5. Roll the floating cable and place it ON THE CLEANER unit. Caution: DO NOT ROLL the floating cable ON THE HANDLE of the cleaner unit. 6. Store the robotic cleaner components in a dry, closed location. 7. Verify that the power and control unit is not exposed to water. 7 8 CLICK! CLICK! Checking Water Outlet Propeller It is recommended to periodically clean debris and hair from the propeller of the water outlet: 1. Remove the screws (3) that holds water outlet cover(2). 2. Remove the water outlet cover (2). 3. Clean any hairs, dirt, or debris. 4. Verify that the propeller (1) is not broken. 5. Return the cover (2) and fasten it with the screws (3)

10 Maintenance amd adjustment IMPORTANT TIPS: Shut off and unplug the power supply every time you remove the cleaner from the water. Clean the filter bag after every cycle. Periodically straighten out the floating cable. Replace worn brushes to ensure maximum cleaning performance Save your cleaner's packaging for off-season storage or for shipping the unit to your dealer if service is required. Leave your pool cleaner in the water for 15 to 20 minutes after every cleaning cycle. Do not leave your cleaner in direct sunlight when not in use. Never leave the power supply in direct sunlight and avoid leaving it in the rain. Occasionally, you should rinse your cleaner in clean, fresh water. This will lengthen the service life of the drive belts, drive tracks and scrubbing brushes. Clean the propeller once a month CABLE CARE The cable may become twisted after a period of time in use. To correct this condition, simply lock the moveable handle on the top of the cleaner in the opposite diagonal direction. The pool cleaner will now travel in the opposite direction while cleaning your pool and the cable will uncoil. Check the cable periodically for external damage. If the problem persists, use the E-Z Swivel device. Place the robot on the ground and unplug the cable from the transformer. With one hand, holding the E-Z Swivel, walk away from the robot, pulling the cable to its full length. The core will rotate inside the cover and in this way will untangle the cable. CLIMBING UNITS WITH FLOATING HANDLE ONLY If your unit has floating handle, reverse the diagonal position after every cleaning cycle to avoid tangling the cable. Make sure that your pool cleaner positions itself properly on the wall. The machine handle must rest parallel to the water line upon reaching the surface of the water. IMPORTANT: Please be sure to always keep your pool cleaner properly stored anywhere between 10 to 40 degrees Celsius. This will keep the motors, plastics and seals protected. Failure to comply will result in loss of warranty. Robot can be used in water with temperatures ranging from 13 C to 35 C. However, the recommended optimal temperature is between 22 C and 32 C. IMPORTANT: The transformer cord can only be replaced with the aid of special tools, normally available only to authorized dealers, distributors and service centers. 10
11 Troubleshooting 1. CLEANER DOES NOT TURN ON. There is no electricity in the wall socket. a) Disconnect cleaner from the power and control unit. b) Disconnect power supply from the wall socket, wait 30 seconds and reconnect. c) Turn power ON. If not activated, connect the unit to a different wall socket. Floating cable not connected properly to the power and control unit. Reconnect the floating cable to the power and control unit. Obstacle in the drive system of the cleaner unit. a) Turn the cleaner unit carefully to view the underside. b) Rotate the tracks and scrubbing brushes by hand. It should rotate but it should not rotate freely. c) Clean and remove obstacles and debris if necessary. Propeller is seized due to accumulation of hair. Check if the propeller is broken or needs to be cleaned (see Checking Water Outlet Propeller ). 2. CLEANER MOVES BUT DOES NOT PUMP WATER. Filter is dirty. a) Open the bottom-lid, remove the filter-bag, and close the lid without the bag b) Run the robotic cleaner in the pool without the filters. If working properly, clean the filter well or replace the filter. Propeller is broken or seized due to accumulation of hair. Check if the propeller is broken or needs cleaning (see Checking Water Outlet Propeller ). 3. CLEANER PUMPS WATER BUT DOES NOT MOVE. Obstacle in the drive system of the cleaner unit. a) Turn the cleaner unit carefully to view the underside. b) Rotate the tracks and scrubbing brushes by hand. It should rotate but it should not rotate freely. c) Clean and remove obstacles and debris if necessary. 4. CLEANER STARTS AND SHUTS OFF AFTER A SHORT TIME. Filter is dirty. a) Remove the filter. b) Run the robotic cleaner without the filters. If working properly, clean the filters well or replace the filters.. Propeller is broken or seized due to accumulation of hair. a) Remove the top screws on the top outlet. b) Check if the propeller is broken or needs to be cleaned. Obstacle in the drive system of the cleaner unit. a) Turn the cleaner unit carefully to view the underside. b) Rotate the tracks and scrubbing brushes by hand. It should rotate but it should not rotate freely. c) Clean and remove obstacles and debris if necessary. 5. CLEANER DOES NOT PICK UP DIRT. Filter is dirty or has holes. Clean as needed and verify that there no holes in the filter. Propeller is broken or seized due to accumulation of hair. Check if the propeller is broken or needs cleaning (see Checking Water Outlet Propeller ). The suction inlet is not close enough to the pool floor. Move the suction inlet OUT (see Adjusting Suction Height ). 6. DIRT COMES OUT OF THE CLEANER WHEN REMOVING IT FROM POOL. Filter shutter is broken or missing. The filter shutter is located on the bottom lid. Check that both shutters are not broken and function properly. Holes in the filter. Verify that there are no holes in the filter (see Cleaning Filters ) Bottom lid is not properly closed. Make sure that the bottom lid is properly closed. 11
12 Troubleshooting 7. CLEANER UNIT DOES NOT COVER THE ENTIRE POOL. Filter is dirty. Clean the filter. There is not enough length of the floating cable in the water to reach the far end of the pool, or the cable is tangled. a) Verify that there is enough length of the floating cable in the water to reach the far end of the pool. b) Make sure that the floating cable is properly spread out and is not tangled. The angle of the floating handle affects the cleaner movement. Increase diagonal angle of the floating handle (see Adjusting Floating Handle ). Pool ph level is incorrect. Make sure that the ph level is between 7.2 and 7.6. Chlorine level is incorrect. Check water chlorine treatment and correct if required (Remove the cleaner from the pool during the treatment.) Propeller is broken or seized due to accumulation of hair. a) Remove the top screws on the top outlet. b) Check if the propeller is broken or needs cleaning. Obstacle in the drive system of the cleaner unit. a) Turn the cleaner unit carefully to view the underside. b) Rotate the tracks and scrubbing brushes by hand. It should rotate but it should not rotate freely. c) Clean and remove obstacles and debris if necessary. Propeller is broken or seized due to accumulation of hair. Check if the propeller is broken or needs cleaning (see Checking Water Outlet Propeller ). ph level is incorrect. Make sure that ph is between 7.2 and 7.6. Chlorine level is incorrect. Check water chlorine treatment (remove the cleaner from the pool during treatment). Water temperature is not optimal. Recommended temperature is between 22 C 32 C 9.THE CABLE IS TANGLED. Filter is dirty. Clean the filter. Bottom lid is not properly closed. Make sure that the bottom lid is properly closed. Cable is not spread out before putting the cleaner unit into the pool. Make sure that the floating cable is properly spread out and not tangled before operating the robotic cleaner. The length of the cable in the water is too long. Verify that the length of cable in the water equal to the pool diagonal length plus two meters. Propeller is broken or seized due to accumulation of hair. Check if the propeller is broken or needs cleaning (see Checking Water Outlet Propeller ). 8. THE CLEANER DOES NOT CLIMB WALLS. The cleaner is not climbing the pool walls. a) Verify that your robotic cleaner is not a floor-only model. b) Verify that P1, floor cleaning only, is not selected on the power and control unit (see Robotic Cleaner Programming ). Filter is dirty. Clean the filter. 12
13 Warranty Terms and Conditions Astral Pool Australia Pty Ltd (ABN ) ("Astral Pool") provides the following warranty in relation to its Robotic Pool Cleaners. Our goods come with guarantees that cannot be excluded under the Australian Consumer Law. You are entitled to a replacement or refund for a major failure and for compensation for any other reasonably foreseeable loss or damage. You are also entitled to have the goods repaired or replaced if the goods fail to be of acceptable quality and the failure does not amount to a major failure. The benefits of this warranty are in addition to any rights and remedies imposed by Australian state and federal legislation that cannot be excluded. Nothing in this warranty is to be interpreted as excluding, restricting or modifying any state or federal legislation applicable to the supply of goods and services which cannot be excluded, restricted or modified. Your Astralpool Robotic Pool Cleaner is covered by a limited 2 year warranty against defect in material and assembly. Parts Robot Motor, Drives and Electrical System Transformer The rollers, tracks, pulleys, filter cartridge or bag Trolley (if included) Warranty Period 2 Years 2 Years 1 Year 1 Year This warranty is for residential use only.if cleaner is being used in a commercial or communal pool then warranty period is 12 months. 13
14 Warranty Terms and Conditions 1.If a fault covered by warranty occurs, the customer must first contact AstralPool at the contact address listed below, or an Authorised AstralPool Service Agent. 2. Any warranty claim must be accompanied by: (a) proof of purchase; (b) full details of the alleged defect; and (c) appropriate documentation (such as historical and maintenance records). 3. The customer must make the Product available to AstralPool or its Authorised AstralPool Service Agent for inspection and testing. AstralPool or its Authorised AstralPool Service Agent will attend the premises where the Product is installed for inspection and testing. 4. If such inspection and testing finds no defect in the Product, the customer must pay AstralPool's usual costs of service work and testing. If such inspection and testing finds a defect that is not covered by this warranty, the customer must pay AstralPool's usual costs of service work plus any parts and labour required to repair the Product, unless recoverable from AstralPool on the failure of any statutory guarantee under the ACL. 5. If your Robot Cleaner needs to be returned to Astralpool the following is required: (a) Your Robot Cleaner must be packaged carefully including your name, address and contact number. (b) Delivered freight prepaid to your nearest AstralPool Warehouse. (c) You must also include a copy of your invoice showing date of purchase or date of handover of your swimming pool. (d) Description of the fault. 6. For Service please return to your nearest AstralPool Trade Centre which can be found at: 14
15 Exclusions and Limitations EXCLUSIONS The warranty will not apply where: (a) the customer is in breach of the Terms and Conditions of Sale; (b) the Product was used for a purpose other than one it was intended for; (c) the Product was repaired, modified or altered by any person other than AstralPool; (d) the Product has not been installed, maintained and/or operated in complete compliance with the installation and operating instructions and any instructions by AstralPool; (e) the Product has been subject to accident, negligence, alteration, abuse or misuse. The warranty does not extend to: a) normal wear and tear; b) weather and other environmental conditions including but not limited to storm, flood, and/or heat wave damage; or c) service and maintenance items. Examples of exclusions include but are not limited to: Incorrect installation External power spikes / surge Normal wear and tear of consumable parts such as rollers, pulleys, drive belts and filter cartridge/bag LIMITATIONS AstralPool makes no express warranties or representations other than set out in this warranty. The repair or replacement of the Product or part of the Product is the absolute limit of AstralPool's liability under this express warranty. 15
16 Melbourne Cyber Loop Dandenong VIC 3175 Townsville 17 Auscan Crescent Garbutt QLD 4814 Sydney Seven Hills 2/2 Welder Road Seven Hills NSW 2147 Sydney Moorebank 6/30 Heathcote Road Moorebank NSW 2170 Adelaide 20 Marlow Road Keswick SA 5035 Brisbane 12 Breene Place Morningside QLD 4170 Perth 17 Tacoma Circuit Canning Vale WA 6155 Gold Coast 1/28 Export Drive Molendinar QLD
RPT Plus Robotic Pool Cleaner Installation and Operating Instructions. Product 11702
 RPT Plus Robotic Pool Cleaner Installation and Operating Instructions Product 11702 Quick Start Guide 2 1 Chlorine 2-5 ppm ph 7.2-7.6 Temp 13 C-35 C NO SWIM 3.6m 12 cm 3 4 5 6 7 2 Contents Quick Start
RTX Robotic Pool Cleaner
 RTX Robotic Pool Cleaner with Top Access Operating Instructions Product 11711 Product Inst 321 IMPORTANT SAFETY INSTRUCTIONS READ AND FOLLOW ALL THE INSTRUCTIONS CAUTION: Do not plug the power supply into
RBX Robotic Pool Cleaner
 RBX Robotic Pool Cleaner Installation and Operating Instructions Product 11713 Product Inst 322 IMPORTANT SAFETY INSTRUCTIONS READ AND FOLLOW ALL THE INSTRUCTIONS CAUTION: Do not plug the power supply
Pool Cleaning Robot. Model 530 Owner s Manual. global.irobot.com
 Pool Cleaning Robot Model 530 Owner s Manual global.irobot.com IMPORTANT SAFETY INSTRUCTIONS READ AND FOLLOW ALL THE INSTRUCTIONS CAUTION: Do not plug the power supply into a grounded outlet or do not
PoolSweepa FloorCova Pool Cleaner. Operating Instructions
 PoolSweepa FloorCova Pool Cleaner Operating Instructions 8151633 PoolSweepa FloorCova Pool Cleaner Operating Instructions Contents 1. INTRODUCTION...2 2. SPECIFICATIONS...2 3. WARNINGS AND CAUTIONS...2
PoolSweepa FloorCova Pool Cleaner. Operating Instructions
 PoolSweepa FloorCova Pool Cleaner Operating Instructions 8151633 PoolSweepa FloorCova Pool Cleaner Operating Instructions Contents 1. INTRODUCTION...2 2. SPECIFICATIONS...2 3. WARNINGS AND CAUTIONS...2
PoolSweepa Wallclima / Optima Pool Cleaners. Operating Instructions
 PoolSweepa Wallclima / Optima Pool Cleaners Operating Instructions 8151634 PoolSweepa Wallclima / Optima Pool Cleaners Operating Instructions Contents 1. INTRODUCTION... 2 2. SPECIFICATIONS... 2 3. WARNINGS
POWERFORCE HELIX. Vacuum USER GUIDE 2110 & 2111 SERIES. (Model 2110 Shown)
") POWERFORCE HELIX Vacuum USER GUIDE 0 & SERIES (Model 0 Shown) IMPORTANT SAFETY INSTRUCTIONS READ ALL INSTRUCTIONS BEFORE USING YOUR APPLIANCE. Unplug from outlet when not in use and before conducting maintenance.
POWERFORCE HELIX Vacuum USER GUIDE 0 & SERIES (Model 0 Shown) IMPORTANT SAFETY INSTRUCTIONS READ ALL INSTRUCTIONS BEFORE USING YOUR APPLIANCE. Unplug from outlet when not in use and before conducting maintenance.
Model No.: VUM33AS20G
 Model No.: VUM33AS0G USER MANUAL IMPORTANT SAFETY INSTRUCTIONS Before operating the appliance for the first time, read these instructions carefully. Please store this user manual for future reference..
10cm Desk Fan User Manual
 10cm Desk Fan User Manual Model No.: HEG10 230 240Va.c. 50Hz 15W Rev 1 Note: The specifications and/or components of this appliance are subject to change without prior notice. Page 2 of 8 1 Safety Instructions...
FOR YOUR RECORDS, PLEASE KEEP A COPY OF YOUR SERIAL NUMBER AND DATE OF PURCHASE HERE
 QUICK START QUICK START OPERATOR MANUAL FOR THE FOLLOWING CLEANERS Thank You Thank You for entrusting us with keeping your pool clean. We strive to enhance your pool experience by keeping your pool environment
VOLUME UP STRAIGHTENING BRUSH
 VOLUME UP STRAIGHTENING BRUSH Creates voluminous, smooth styles in minutes USE & CARE MANUAL PLEASE READ PRIOR TO USE To register your product go to www.remington-products.com.au www.remington.co.nz 2
User Manual. Deep Cleaning Bagless Vacuum with Powerhead. Deep Clean W3000
 User Manual Deep Cleaning Bagless Vacuum with Powerhead Deep Clean W3000 Features 1 2 3 4 5 6 7 8 9 10 11 On/off button Flexible hose Telescopic wand Wand length adjustment Cord rewind button Combination
2000 WATT CYCLONIC BAGLESS VACUUM CLEANER
 Instruction Manual 2000 WATT CYCLONIC BAGLESS VACUUM CLEANER Model Rated Voltage (V) Rated Frequency (Hz) Rated Power (W) V0409 220-240 V 50 Hz 2000 Watts Model: V0409 Please read this Instruction Manual
SMOOTH FINISH CERAMIC 2 YEAR WARRANTY S3505AU USE & CARE MANUAL. To register your product go to
 SMOOTH FINISH CERAMIC USE & CARE MANUAL PLEASE READ PRIOR TO USE To register your product go to www.remington-products.com.au www.remington.co.nz 2 YEAR WARRANTY S3505AU 1 IMPORTANT SAFEGUARDS Warning:
SILK CERAMIC STRAIGHTENER
 SILK CERAMIC STRAIGHTENER USE & CARE MANUAL PLEASE READ PRIOR TO USE To register your product go to www.remington-products.com.au SILK CERAMIC PLATES 240 C FAST HIGH HEAT 3 YEAR WARRANTY S9600AU 1 IMPORTANT
Sunbeam Tower Fan with Night Mode
 Sunbeam Tower Fan with Night Mode Instruction Booklet FA7250 90cm Remote Controlled Tower Fan Please read these instructions carefully and retain for future reference. SM8650 featured Contents Sunbeam
Parts Identification and Accessories Safety Information Installation Control Panel Layout Fully Automatic Washing...
 INDEX Parts Identification and Accessories.................................... 2 Safety Information................................................. 3 Installation.......................................................
Note: Verify that plastic bags are removed from filters, if equipped or installed, before first use (see page 8) CONTENTS
 CONTENTS") DEAR CUSTOMER Thank you for purchasing the Ionmax Breeze ION420 Air Purifier. The Ionmax Breeze can help to improve the indoor air quality in your home or office. Please read this manual carefully before
DEAR CUSTOMER Thank you for purchasing the Ionmax Breeze ION420 Air Purifier. The Ionmax Breeze can help to improve the indoor air quality in your home or office. Please read this manual carefully before
SALON STYLER - TWIST TO CURL
 SALON STYLER - TWIST TO CURL Intelligent PROheat Sensor Technology provides consistent heat for salon results that last all day* USE & CARE MANUAL PLEASE READ PRIOR TO USE *style shown to last 24hrs in
Robotic Pool Cleaner Classic 4 / Top 4 - UNI
 Robotic Pool Cleaner Classic 4 / Top 4 - UNI EN User Instructions...p. 1-11 Classic 4 - UNI FR Mode d emploi...p. 12-22 IT Istruzioni per l uso...p. 23-33 ES Instrucciones de Uso...p. 34-44 DE Gebrauchsanweisung...s.
Hair dryer INSTURCTION MANUAL. Model No.: RCY-82
 Hair dryer INSTURCTION MANUAL Model No.: RCY-82 Please read this instruction manual before using your beautycare product and keep it in a safe place for future reference. If you pass the appliance on to
Robotic Inground Pool Cleaners. Installation and User's Guide IMPORTANT SAFETY INSTRUCTIONS READ AND FOLLOW ALL INSTRUCTIONS SAVE THESE INSTRUCTIONS
 Prowler 720 and 730 Robotic Inground Pool Cleaners Installation and User's Guide IMPORTANT SAFETY INSTRUCTIONS READ AND FOLLOW ALL INSTRUCTIONS SAVE THESE INSTRUCTIONS Customer Service If you have questions
12L DEHUMIDIFIER OPERATING INSTRUCTIONS
 12L DEHUMIDIFIER OPERATING INSTRUCTIONS Attention: This Dehumidifier is rated to extract 12L per day in an environment of 80% humidity and temperature of 30 C. This is the world-wide standard for rating
QUICK START IMPORTANT: PLEASE READ BEFORE OPERATING CLEANER ENG ESP FRA DEU ITL POR QUICK START OPERATOR MANUAL FOR THE FOLLOWING CLEANERS
 QUICK START ENG ESP FRA DEU ITL POR QUICK START OPERATOR MANUAL FOR THE FOLLOWING CLEANERS Thank You Thank You for entrusting us with keeping your pool clean. We strive to enhance your pool experience
PROLUXE SALON STRAIGHTENING BRUSH
 PROLUXE SALON STRAIGHTENING BRUSH Intelligent PROheat technology provides consistent heat for salon results that last all day* USE & CARE MANUAL PLEASE READ PRIOR TO USE To register your product go to
Hair dryer INSTURCTION MANUAL. Model No.: RCY-170
 Hair dryer INSTURCTION MANUAL Model No.: RCY-170 Please read this instruction manual before using your beautycare product and keep it in a safe place for future reference. If you pass the appliance on
Robotic Pool Cleaner Dolphin X40 PLUS
 Robotic Pool Cleaner Dolphin X40 PLUS 8151662-AU Ver. 01 09/2017 Dolphin X 40 PLUS User Instructions Contents 1. INTRODUCTION... 2 2. SPECIFICATIONS... 2 3. WARNINGS AND CAUTIONS... 2 3.1 Warnings...
SPOTCLEAN. User Guide
 SPOTCLEAN User Guide 3698 Series A B 1. 2 1 3 2. 5 4 6 3. 4. 9 7 10 11 C 1a. 1b. 8 3. 4. 12 13 14 15 D 2e. 2g. 2 Thanks for buying a BISSELL portable spot cleaner We re glad you purchased a BISSELL portable
OSCILLATING FAN HEATER INSTRUCTION MANUAL
 OSCILLATING FAN HEATER INSTRUCTION MANUAL MODEL: FH221B Read the instruction manual carefully before use and retain these instructions for reference GENERAL SAFEGUARDS When using electrical appliances,
RAPIDS 4WD ROBOTIC POOL CLEANER SETTINGS AND TROUBLESHOOTING GUIDE
 820412 BK0015400\REV RAPIDS 4WD ROBOTIC POOL CLEANER SETTINGS AND TROUBLESHOOTING GUIDE PLEASE READ CAREFULLY BEFORE USING YOUR POOL CLEANER Aqua Products, Inc 282 Grove Avenue Cedar Grove, NJ 07009 United
Operating Instructions. Oil Column Heater. Models: GOC155, GOC157, GOC1511
 Operating Instructions Oil Column Heater Models: GOC155, GOC157, GOC1511 General Care And Safety Guide Thank you for choosing a Goldair Oil Heater. This Goldair Heater has been designed and manufactured
INSTALLATION AND OPERATING INSTRUCTIONS
 INSTALLATION AND OPERATING INSTRUCTIONS I INSTALLATION AND OPERATING INSTRUCTIONS LX 300 Pool Bolero ND Pump Cleaner INSTALLATION AND OPERATING INSTRUCTIONS Melbourne: 03 8796 8600 Gold Coast: 07 5552
8L DEHUMIDIFIER OPERATING INSTRUCTIONS
 8L DEHUMIDIFIER OPERATING INSTRUCTIONS Attention: This Dehumidifier is rated to extract 8L per day in an environment of 80% humidity and temperature of 30 C. This is the world-wide standard for rating
Ceramic Wall Heater With Remote
 Operating Instructions Ceramic Wall Heater With Remote Model: GCH500 General Care and Safety Guide Thank you for choosing a Goldair Ceramic Heater. This Goldair Heater has been designed and manufactured
PRO BIG CURLS 2 YEAR WARRANTY CI5338AU USE & CARE MANUAL. PRO CERAmIC TECHNOlOGy 30 PRO HEAT SETTINGS PLEASE READ PRIOR TO USE
 PRO BIG CURLS USE & CARE MANUAL PLEASE READ PRIOR TO USE PRO CERAmIC TECHNOlOGy 30 PRO HEAT SETTINGS 2 YEAR WARRANTY CI5338AU 2 IMPORTANT SAFEGUARDS Warning: Do not use this appliance near bath tubs, showers,
Bagged Vacuum Cleaner with Powerhead. Compact Powerhead for a Powerful Clean Washable HEPA Filtration High Efficiency Soft Start Motor
 Bagged Vacuum Cleaner with Powerhead Compact Powerhead for a Powerful Clean Washable HEPA Filtration High Efficiency Soft Start Motor 3 1 2 5006PH Mode Congratulations on the purchase of your new HOOVER
MANUAL. Aero YEAR WARRANTY D2115AU
 USE & CARE MANUAL PLEASE READ PRIOR TO USE Aero 2000 2 YEAR WARRANTY D2115AU 1 IMPORTANT SAFEGUARDS Warning: Do not use this appliance near bath tubs, showers, basins or other vessels containing water.
User Manual. Compact Bagged Vacuum Cleaner. Dog & Cat W2000
 User Manual Compact Bagged Vacuum Cleaner 3 Features 1 2 On/off button Flexible hose 4 7 3 4 Telescopic wand Wand length adjustment 2 8 5 Cord rewind button 6 7 Variable speed control Combination floor
PERFECT CURLS 2-IN-1
 PERFECT CURLS 2-IN-1 USE & CARE MANUAL PLEASE READ PRIOR TO USE To register your product go to www.remington-products.com.au www.remington.co.nz 2 YEAR WARRANTY CI63E1AU IMPORTANT SAFEGUARDS Warning: When
BRITA. Water Filter & Chiller II. Chilled water filter. Instruction Booklet WF6100
 BRITA Chilled water filter Instruction Booklet WF6100 Water Filter & Chiller II Please read these instructions carefully and retain for future reference. Contents Sunbeam s Safety Precautions 1 Features
ROBOTIC CLEANER. TigerShark / TigerShark QC / TigerShark 2
 ISRC9052E - Rev B ROBOTIC CLEANER OWNER S MANUAL TigerShark / TigerShark QC / TigerShark 2 no installation, no attachments. Just drop it in and turn it on. Filter cleaning is much easier with the optimizes
Robot Pool Cleaner by Maytronics. User Instructions. Guide d utilisation. Istruzioni per l uso. Instrucciones para el Usuario DEU
 1 English Robot Pool Cleaner by Maytronics EN FR IT SP DEU User Instructions Guide d utilisation Istruzioni per l uso Instrucciones para el Usuario Bedienungsanweisungen by MCC8-UNI 8151247, 1/2011 1
Water Kettle. User Manual
 Water Kettle KE01402Q-SA User Manual PLEASE READ AND SAVE THESE INSTRUCTIONS FOR FUTURE REFERENCE 1 IMPORTANT SAFETY INSTRUCTIONS 1. Read all instructions before using the appliance. 2. Before connecting
BLUSH STYLE COLLECTION
 BLUSH STYLE COLLECTION For a fast blow dry that s shiny & smooth USE & CARE MANUAL PLEASE READ PRIOR TO USE To register your product go to www.remington-products.com.au www.remington.co.nz 2 YEAR WARRANTY
USE & CARE MANUAL PRO-TOUCH PLEASE READ PRIOR TO USE SENSOR 2 YEAR WARRANTY D6050AU
 USE & CARE MANUAL PLEASE READ PRIOR TO USE PRO-TOUCH SENSOR 2 YEAR WARRANTY D6050AU 1 IMPORTANT SAFEGUARDS Warning: Do not use this appliance near bath tubs, showers, basins or other vessels containing
FAN HEATER FH118 User Manual
 FAN HEATER FH118 User Manual PLEASE READ AND SAVE THESE INSTRUCTIONS FOR FUTURE REFERENCE IMPORTANT SAFEGUARDS When using electrical appliances, basic safety precautions should always be followed to reduce
COMPACT PRO YEAR WARRANTY D2050AU USE & CARE MANUAL. To register your product go to
 COMPACT PRO 2100 USE & CARE MANUAL PLEASE READ PRIOR TO USE To register your product go to www.remington-products.com.au www.remington.co.nz 2 YEAR WARRANTY D2050AU IMPORTANT SAFEGUARDS Warning: When the
ETLW7. Product: 7kg Top Load Washing Machine. User Manual
 User Model Manual: Code/s: ETLW7 Product: 7kg Top Load Washing Machine Document: 1 User Manual Dear Customer, Congratulations on purchasing your washing machine. The Esatto brand is proudly distributed
PANEL HEATER OPERATING INSTRUCTIONS. For Models: CELEPANEL, CELEPANELT
 PANEL HEATER OPERATING INSTRUCTIONS For Models: CELEPANEL, CELEPANELT WARNINGS AND SAFEGUARDS 1. Use only the voltage specified on the rating label of the appliance. 2. Keep all objects at least 1 metre
ILVAN AUSTRALIA PTY. LTD.
 Instruction Manual MANFC400 REV A 15/12/16 FC400 SILVAN AUSTRALIA PTY. LTD. ABN 48 099 851 144 VICTORIA (HEAD OFFICE) 244-266 Greens Rd Dandenong South 3175 Australia Telephone: +61 (03) 9215 2700 Facsimile:
all-rounder Mini Compact Bagless Vacuum Cleaner Cyclonic Bagless Technology Washable HEPA Filtration Compact, Lightweight & Stylish Design all-rounder
 all-rounder all-rounder Mini Compact Bagless Vacuum Cleaner Cyclonic Bagless Technology Washable HEPA Filtration Compact, Lightweight & Stylish Design 1 3 2 4 5 6 8 9 11 12 10 14 13 7 15 2. 5011 All-Rounder
2.9kW Portable Air Conditioner
 Operating Instructions 2.9kW Portable Air Conditioner Item: GCPAC210 General Care and Safety Guide Thank you for choosing this Goldair product. This Goldair appliance has been designed and manufactured
STEAM MOP S3251NZGN OWNER S GUIDE
 Shark Steam Light STEAM MOP S3251NZGN OWNER S GUIDE IMPORTANT SAFETY INSTRUCTIONS SAVE THESE INSTRUCTIONS For Household Use Only WHEN USING YOUR SHARK STEAM MOP, BASIC SAFETY PRECAUTIONS SHOULD ALWAYS
Contour Gen 3 U4210 Mightymite Gen 3 U4214 Instruction Manual
 Contour Gen 3 U4210 Mightymite Gen 3 U4214 Instruction Manual 35121_U4210-U4214_IFU_V3.indd 1 2/10/08 2:12:58 PM IMPORTANT SAFETY INSTRUCTIONS Thank you for choosing a Volta Vacuum Cleaner from the Electrolux
Instructions for installation and use English
 Instructions for installation and use English H0402400.A - W2503A - 2013/02 Read this manual carefully before installing, maintaining or repairing this device! The symbol indicates important information
Robotic Pool Cleaner Owner's Manual WARNING TYPE EM14-- TYPE EM15--
 TYPE EM14-- TYPE EM15-- Robotic Pool Cleaner Owner's Manual H0574000 RevA WARNING FOR YOUR SAFETY - For anything other than the routine cleaning and maintenance described in this manual, this product must
KERATIN & ARGAN OIL NOURISH
 KERATIN & ARGAN OIL NOURISH ROTATING AIR STYLER USE & CARE MANUAL PLEASE READ PRIOR TO USE To register your product go to www.remington-products.com.au www.remington.co.nz 3 YEAR WARRANTY AS8810AU IMPORTANT
SOHO HAIR DRYER STYLING GIFT PACK 2 YEAR WARRANTY D4512AU USE & CARE MANUAL
 SOHO HAIR DRYER STYLING GIFT PACK USE & CARE MANUAL PLEASE READ PRIOR TO USE To register your product go to www.remington-products.com.au www.remington.co.nz 2 YEAR WARRANTY D4512AU IMPORTANT SAFEGUARDS
INSTRUCTION MANUAL / INSTALLATION MANUAL. 7kg Vented Dryer MODEL: KA7VENTDRYA
 INSTRUCTION MANUAL / INSTALLATION MANUAL 7kg Vented Dryer MODEL: KA7VENTDRYA THIS PAGE IS INTENTIONALLY LEFT BLANK 2 CONTENTS Safety Instructions 4 Your Kogan Vented Dryer 5 Before First Use 5 Accessory
Convection Panel Heater
 Convection Panel Heater 2200 Watt Instruction Booklet HE4200 Please read these instructions carefully and retain for future reference. Contents Sunbeam s Safety Precautions 2 Safety precautions for your
Brita. Water Filter & Chiller. Instruction Booklet WF6000. Please read these instructions carefully and retain for future reference.
 Therapeutics Brita Water Filter & Chiller Instruction Booklet WF6000 Please read these instructions carefully and retain for future reference. Contents Sunbeam s Safety Precautions 2 Features of your
INSTALLATION AND OPERATING INSTRUCTIONS
 INSTALLATION AND OPERATING INSTRUCTIONS I INSTALLATION AND OPERATING INSTRUCTIONS Genus IV Hydronic Central Heating Thermostat Bolero ND Cleaner INSTALLATION AND OPERATING INSTRUCTIONS Melbourne: 03 8796
OWNER S GUIDE NV500NZV2
 OWNER S GUIDE NV500NZV2 Thank you for purchasing the Shark Rotator Upright Vacuum. This Owner s Guide is designed to help you get a complete understanding of your new vacuum cleaner. Please read it carefully
SILK CERAMIC HAIR DRYER 5 YEAR WARRANTY AC9096AU USE & CARE MANUAL 2400 WATTS SILK CERAMIC GRILLE PLEASE READ PRIOR TO USE
 USE & CARE MANUAL PLEASE READ PRIOR TO USE SILK CERAMIC HAIR DRYER 2400 WATTS SILK CERAMIC GRILLE 5 YEAR WARRANTY AC9096AU IMPORTANT SAFEGUARDS Warning: When the hair dryer is used in a bathroom, unplug
BOLT LITHIUM MAX 2-in-1 Cordless Vacuum
 BOLT LITHIUM MAX 2-in-1 Cordless Vacuum USER GUIDE 1971 SERIES IMPORTANT SAFETY INSTRUCTIONS READ ALL INSTRUCTIONS BEFORE USING YOUR VACUUM. When using an electrical appliance, basic precautions should
Sunbeam Remote Controlled Tower Fan
 Sunbeam Remote Controlled Tower Fan Instruction Booklet FA7200 90cm Remote Controlled Tower Fan Please read these instructions carefully and retain for future reference. Contents Sunbeam s Safety Precautions
2.9kW Portable Air Conditioner
 Operating Instructions 2.9kW Portable Air Conditioner Item: GCPAC290 General Care and Safety Guide Thank you for choosing this Goldair product. This Goldair appliance has been designed and manufactured
20L Electronic Dehumidifier
 Operating Instructions 20L Electronic Dehumidifier Attention: This Dehumidifier is rated to extract 20L per day in an environment of 80% humidity and temperature of 30 C. This is the world-wide standard
KERATIN & ARGAN OIL NOURISH HAIR DRYER
 KERATIN & ARGAN OIL NOURISH HAIR DRYER IONIC CONDITIONING TECHNOLOGY USE & CARE MANUAL PLEASE READ PRIOR TO USE To register your product go to www.remington-products.com.au www.remington.co.nz 3 YEAR WARRANTY
SPOTCLEAN PRO 1558 SERIES
 SPOTCLEAN PRO 1558 SERIES 2 IMPORTANT SAFETY INSTRUCTIONS READ ALL INSTRUCTIONS BEFORE USING YOUR CLEANER. When using an electrical appliance, basic precautions should be observed, including the following.
instyle collection 2 YEAR WARRANTY D3016AU
 USE & CARE MANUAL PLEASE READ PRIOR TO USE instyle collection 2 YEAR WARRANTY D3016AU 1 IMPORTANT SAFEGUARDS Warning: Do not use this appliance near bath tubs, showers, basins or other vessels containing
POWERFORCE HELIX TURBO REWIND
 POWERFORCE HELIX TURBO REWIND Vacuum USER GUIDE 2261 SERIES IMPORTANT SAFETY INSTRUCTIONS READ ALL INSTRUCTIONS BEFORE USING YOUR APPLIANCE. Unplug from outlet when not in use and before conducting maintenance.
QUICK GROOM 2 YEAR WARRANTY BHT6450AU USE & CARE MANUAL. To register your product go to remington-products.com.au remington.co.nz
 QUICK GROOM USE & CARE MANUAL PLEASE READ PRIOR TO USE To register your product go to remington-products.com.au remington.co.nz 2 YEAR WARRANTY BHT6450AU IMPORTANT SAFETY INSTRUCTIONS When using electrical
General Care and Safety Guide
 General Care and Safety Guide Thank you for choosing a Celsius Convection Panel Heater. This Celsius appliance has been designed and manufactured to high standards of engineering and with proper use and
USER'S GUIDE 51C1 SERIES V
 USER'S GUIDE 51C1 SERIES 220-240V 2 Thank You 3 Safety Instructions 4 Product View 5 Assembly 6-7 Operations 8-12 Maintenance and Care 13 Troubleshooting 14 Replacement Parts 15 Warranty 16 Consumer Care
CROSSWAVE USER GUIDE 1785, 1713 SERIES
 CROSSWAVE USER GUIDE 1785, 1713 SERIES IMPORTANT SAFETY INSTRUCTIONS READ ALL INSTRUCTIONS BEFORE USING YOUR MULTI-SURFACE CLEANER. When using an electrical appliance, basic precautions should be observed,
Operating Instructions
 Operating Instructions 10L Dehumidifier Attention: This Dehumidifier is rated to extract 10L per day in an environment of 80% humidity and temperature of 30 C. This is the world-wide standard for rating
Piranha Vacuum Cleaner
 Piranha Vacuum Cleaner For Household Use Only Model No.: EV-500-S20 Item No.: 900238 Rev 2 Note: The specifications and/or components of this appliance are subject to change without prior notice. If the
LIFT-OFF FLOORS & MORE 3396 SERIES V
 LIFT-OFF FLOORS & MORE 3396 SERIES 220-240V A B 1. 1 2 C 1. 2. 4. 4 3 5. 6 7 8 5 D1 2. 3. D2 9 10 3. 4. 11 12 D3 D4 2. 3. 2. 3. 3. 2 Thanks for buying a BISSELL steam cleaner We re glad you purchased a
Feel Perfect. Heated Throw. Instruction Booklet. TR6300 Luxe Faux Fur. Please read these instructions carefully and retain for future reference.
 Feel Perfect Heated Throw Instruction Booklet TR6300 Luxe Faux Fur Please read these instructions carefully and retain for future reference. Contents Sunbeam s Safety Precautions 1 Safety Precautions for
VORTEX-PRO Robotic Pool Cleaner Owner's Manual WARNING TYPE EC15--
 TYPE EC15-- VORTEX-PRO Robotic Pool Cleaner Owner's Manual H0516700 Rev C WARNING FOR YOUR SAFETY - For anything other than the routine cleaning and maintenance described in this manual, this product must
IMPORTANT SAFETY INSTRUCTIONS
 POWERFORCE 1292U IMPORTANT SAFETY INSTRUCTIONS READ ALL INSTRUCTIONS BEFORE USING YOUR VACUUM. When using an electrical appliance, basic precautions should be observed, including the following: WARNING
Mega Gen 3 U5010 & Ultima Gen 3 U5011 Instruction Manual ULTIMA & MEGA IFU_V5.indd 1 3/10/08 2:40:58 PM
 Mega Gen 3 U5010 & Ultima Gen 3 U5011 Instruction Manual 35127 ULTIMA & MEGA IFU_V5.indd 1 3/10/08 2:40:58 PM IMPORTANT SAFETY INSTRUCTIONS Thank you for choosing a Volta Vacuum Cleaner from the Electrolux
SHINE REVIVAL 3 YEAR WARRANTY AC4001AU USE & CARE MANUAL 2300 WATTS FOR ULTRA FAST DRYING SALON PROFESSIONAL AC MOTOR TRIPLE INFUSION TECHNOLOGY
 USE & CARE MANUAL PLEASE READ PRIOR TO USE SHINE REVIVAL To register your product go to www.remington-products.com.au 2300 WATTS FOR ULTRA FAST DRYING SALON PROFESSIONAL AC MOTOR TRIPLE INFUSION TECHNOLOGY
6 3. C 1a. 1b. 2e. 2g.
 SPOTCLEAN 3698 A B 1. 3 1 2 2. 5 4 6 3. 9 7 10 C 1a. 1b. 8 3. 11 12 13 4. D 2e. 2g. 2 Thanks for buying a BISSELL portable spot cleaner We re glad you purchased a BISSELL portable spot cleaner. Everything
80cm Tower Fan With Remote Control
 Operating Instructions 80cm Tower Fan With Remote Control Item: GCTF300 General Care and Safety Guide Thank you for choosing this Goldair Venti product. This Goldair Venti appliance has been designed and
PRO-AIR TURBO 2 YEAR WARRANTY D5220AU USE & CARE MANUAL. To register your product go to
 PRO-AIR TURBO USE & CARE MANUAL PLEASE READ PRIOR TO USE To register your product go to www.remington-products.com.au www.remington.co.nz 2 YEAR WARRANTY D5220AU IMPORTANT SAFEGUARDS Warning: When the
PANEL HEATER OPERATING INSTRUCTIONS. For Model: CELEPANELD
 PANEL HEATER OPERATING INSTRUCTIONS For Model: CELEPANELD WARNINGS AND SAFEGUARDS 1. Use only the voltage specified on the rating label of the appliance. 2. Keep all objects at least 1 metre from the front
INSTALLATION AND OPERATING INSTRUCTIONS
 INSTALLATION AND OPERATING INSTRUCTIONS I INSTALLATION AND OPERATING INSTRUCTIONS Astral Heat Pumps Bolero ND Cleaner INSTALLATION AND OPERATING INSTRUCTIONS Melbourne: 03 8796 8600 Gold Coast: 07 5552
Owner s Manual Zodiac Pool Systems, Inc.
 Zodiac Pool Systems, Inc. 2620 Commerce Way Vista, CA 92081 Tel: 800-822-7933 Fax: 877-327-1403 www.baracuda.com 2009 Zodiac Pool Systems, Inc. All rights reserved. TL-3200 W1833A 2/09 Owner s Manual IMPORTANT
Owner s Manual H _REVB
 Owner s Manual H0566000_REVB 1 Important Information Notice for Vinyl Liner Pools: Before installing your pool cleaner, examine the interior of your pool carefully. If the vinyl liner is brittle or has
General Care and Safety Guide
 General Care and Safety Guide Thank you for choosing a Celsius Ceramic Tower Heater. This Celsius appliance has been designed and manufactured to high standards of engineering and with proper use and care,
SALON TURBO 3 YEAR WARRANTY AC2400AU PROFESSIONAL LONG LASTING AC MOTOR TURBO POWER FAN FOR FAST DRYING TOURMALINE CERAMIC TECHNOLOGY
 USE & CARE MANUAL PLEASE READ PRIOR TO USE SALON TURBO To register your product go to www.remington-products.com.au PROFESSIONAL LONG LASTING AC MOTOR TURBO POWER FAN FOR FAST DRYING TOURMALINE CERAMIC
WET & DRY GARAGE VAC 20L CAPACITY WATT 1.5M MOTOR TANK STEEL HOSE KP702 ON BOARD ACCESSORY STORAGE SUCTION STAINLESS
 WET & DRY GARAGE VAC 20L CAPACITY 1.5M SUCTION HOSE STAINLESS STEEL TANK ON BOARD ACCESSORY STORAGE 1250 WATT MOTOR KP702 Table of Contents 20L WET & DRY GARAGE VAC Know Your Product...1 Vacuum Safety
Robotic Pool Cleaner REVOLUTION I. Operating Instructions Robotic Pool Cleaner REVOLUTION I... p. 1-8
 EN Operating Instructions... p. 1-8 8151626 Operating Instructions Contents 1. INTRODUCTION...2 2. SPECIFICATIONS...2 3. WARNINGS AND CAUTIONS...2 3.1. Warnings...2 3.2. Cautions...2 4. POOL CLEANER PARTS...3
ELECTRIC UNDER BLANKET QUEEN FLEECY FITTED MODEL NO: TT-1101XQF INSTRUCTION MANUAL
 ELECTRIC UNDER BLANKET QUEEN FLEECY FITTED MODEL NO: TT-1101XQF INSTRUCTION MANUAL PLEASE READ THESE INSTRUCTIONS CAREFULLY AND RETAIN FOR FUTURE REFERENCE. SAFETY INSTRUCTION Carefully read this manual
STYLE COLLECTION HAIRDRYER
 USE & CARE MANUAL PLEASE READ PRIOR TO USE STYLE COLLECTION HAIRDRYER 2 YEAR WARRANTY D3035AU 1 IMPORTANT SAFEGUARDS Warning: Do Not use this appliance near bath tubs, showers, basins or other vessels
Dolphin Bio Suction. Dolphin Bio Suction. User Manual Instructions.
 Dolphin Bio Suction Dolphin Bio Suction User Manual Instructions by www.maytronics.com by 8151191 Dolphin Bio Suction User Instruction Manual Contents 1. INTRODUCTION... 2 2. SPECIFICATIONS... 2 3. WARNINGS
KREEPY KRAULY PROWLER 910 ROBOTIC ABOVEGROUND POOL CLEANER
 KREEPY KRAULY PROWLER 910 ROBOTIC ABOVEGROUND POOL CLEANER INSTALLATION AND USER S GUIDE IMPORTANT SAFETY INSTRUCTIONS READ AND FOLLOW ALL INSTRUCTIONS SAVE THESE INSTRUCTIONS CUSTOMER SERVICE / TECHNICAL