CFSA Decontamination and Sterilisation Department Standard Operating Procedures
|
|
|
- Cornelia Goodwin
- 5 years ago
- Views:
Transcription
1 Contents SOP No 1. Safety Awareness in Sterile Service Department SOP No 2. Environmental Cleaning and Disinfection in the CSSD SOP No 3. Departmental Dress Code SOP No 4. Collection of Soiled/Contaminated Equipment SOP No 5. Manual Decontamination of Medical Devices SOP No 6. Prepare, Load and Operate Automated Decontamination Equipment SOP No 7. Decontamination and Inspection of Loaner Medical Devices SOP NO 8. Cleaning and Maintenance of Rigid Containers SOP No 9. Missing Instruments SOP No 10. Control of Packing Area SOP No 11. Packing Area Operation SOP No 12 To describe the operation and procedure controls for tracking instruments SOP No 13. Cleaning of Autoclaves SOP No 14. Steam Sterilization Procedure SOP No 15. Ethylene Oxide Sterilisation SOP No 16. Loading and unloading items from the autoclave SOP No 17. Sterile Pack Storage SOP No 18. The Delivery and Distribution of Processed items SOP No 19. Quality Control SOP No 20. Monitoring autoclaves SOP No 21. Recall Procedure SOP No 22. Validation of Equipment SOP No 23. Monitoring ETO Sterilizer SOP No 24. Malfunction of Ethylene Oxide Steriliser SOP No 25. Planned Maintenance Schedule of Equipment SOP No 26. Action for Breakdown of Equipment SOP No 27. Sterile Packaging SOP No 28. Management of Loan sets SOP No 29. Decontamination of Textiles/Linen for sterilization SOP No 30. Inspection, Repair and Replacement of instruments SOP No. 31 Checking and Assembling Instrument Sets SOP No. 32 Prepare, Load and Operate Ultrasonic Cleaner SOP No. 33 Validating an Ultrasonic Cleaner SOP No.34 Low Temperature Sterilization (Hydrogen Peroxide Plasma / Vaporized Hydrogen Peroxide) SOP No. 35 Decontamination and Management of Laryngoscopes SOP No. 36 Daily Heat Sealer Checks SOP No. 37 Decontamination and Disinfection of Babies Bottles SOP No. 38 Decontamination and Sterilisation of reusable LMA s SOP No. 39 Wrapping Medical Devices ready for sterilisation SOP No.40 Decontamination Area SOP No. 41 Management of Chemical spills in a CSSD SOP No. 42 Role of medical representatives in CSSD SOP No. 43 Management of blood spills in the CSSD
2 SOP No. 44 Hand Hygiene SOP No. 45 Marking of Surgical Instruments SOP No. 46 Decontamination of flexible Endoscopes SOP No. 47 Cleaning and Checking of bag valve resuscitators (BVR) SOP No. 48 Layout and flow of CSSD SOP No. 49 Wet Packs SOP No. 50 Handling of potentially infectious instruments and materials SOP No. 51 Receiving and Issuing Packs SOP No 52 Managing surgical instruments contaminated with or potentially contaminated with TSE (Transmissible Spongiform Encephalopathy) from a patient potentially infected with CJD (Creutzfeldt Jacobs Disease) for example.
3 SOP No. 1 Title Safety Awareness in Sterile Service Department Review Date July 2019 Prepared by CSSD Forums of South Africa (CFSA) Area of application Sterile Service Department Staff involved All personnel that are assigned or engaged in Sterile service operation. Objective / Purpose To establish an overview of guidelines and safety awareness procedures in the Sterile service department. Relevant / Related documents Occupational Health and Safety Act and Regulation 85 of 1993 Standard Precaution Guidelines Infection Control Policy Equipment/Supplies PPE Procedure General Guidelines All personnel must follow established work and traffic flow patterns. Material Safety Data Sheets (MSDS) for all chemicals used in the sterile service department must be available in a binder index. Employee must be trained in a safe work procedure and be aware of any relevant procedures, policies. All employees must be trained in appropriate personnel protective equipment designated for each area. Employees must adhere to dress code and policies before entering and when leaving the area. Employees must follow and practice hand washing guidelines (before and after each tasks) in accordance with WHO guidelines. Eating and drinking is prohibited in all workspaces including supply storage, processing and decontamination sections. Work spaces must be free from clutter and have un-obstructed entrances and exits. Visitors are prohibited from entering CPD spaces without permission. If visitors must enter restricted areas, appropriate attire is required and they should be escorted by CSSD staff. Patient Safety Ensure that all items are processed according to established guidelines (manufacturer s instructions). All CSSD personnel should be trained in Decontamination and Sterilization Practices. Safe keeping of all items by ensuring that storage areas are kept clean, storage cupboards are locked, equipment is covered and preventive maintenance is performed on all equipment.
4 Assure there is no contamination of patient care areas during collection and transportation of contaminated items. Employee Safety Prevent burn injuries when loading or unloading steam sterilizers and washer disinfectors by following procedure and wearing appropriate PPE. Employees must use proper body mechanics when carrying or handling heavy items. Use care and caution when handling sharps. Maintain line of light when handling medical devices. In the decontamination area, employees must wear proper personal protective equipment (PPE) to prevent direct exposure from contaminants and injury that could result when handling contaminated and sharp instruments. Appropriate PPE must be worn when handling chemicals used for cleaning and decontamination. When receiving or handling contaminated items, always wear the correct PPE for the task. Note Use of electrical extension cords is prohibited in sterile service areas. All employees must be aware of fire and safety regulations. Refer to MSDS before handling chemicals. If spills occur, refer to policy management of body fluids spillages or consult safety representative. Expected Outcome Reduced medical legal hazards Safe working environment
5 SOP No. 2 Title Environmental Cleaning and Disinfection in the CSSD Review Date July 2019 Prepared by CSSD Forums of South Africa Revised by Karin Swart Area of Application All areas of the facility Staff Involved Only staff trained in decontamination process Objective/Purpose To ensure an acceptable level of hygiene and cleanliness throughout the CSSD area Relevant/Related Documents Procedure Manual Standard Precautions Equipment/Supplies All surfaces and equipment in CSSD All new equipment prior to introduction for use Cleaning materials and equipment Procedure The CSSD will be cleaned in accordance with the cleaning schedule Cleaning will be undertaken between times to be agreed that will enable any aerosol particles to settle prior to commencement of work. Cleaning will take place before work commences or after work is completed, in the case of a 24 hour facility cleaning will be rotated through areas when work is not in progress The cleaning schedule will specify frequency of cleaning Dedicated cleaning equipment and buff machine should be used Designated cleaning equipment will be stored in a designated area for that area s use only Cloths should be single use. Mops or microfiber sleeves will be washed and disinfected after each use. Cleaning work will only be undertaken by Staff trained to work in that area CSSD staff are responsible for making sure that all surfaces are clean All cleaning procedures and cleaning chemicals used in the department will be in line with Departmental recommendations and as approved by Infection prevention and Control The use of brooms is not allowed. Damp cleaning using mops or microfiber sleeves is best practice Use of UV stamps and torches to check on areas cleaned is advised.
6 Process: Damp dust all fixtures and fittings, pipes and ledges daily. Clean and reline all waste bins. Clean and replenish all toilets and showers. Remove filled linen bags and replenish. Damp mop all hard floors to collect dust and debris. Damp mop all hard floors. Buff all hard floors weekly. Change curtains if any at 6 monthly intervals or sooner if soiled. Weekly/ Weekends High dusting to include vents theatre light arms, door frames and arms. Clean CSSD change rooms and shoe storage. Damp dust CSDSD areas entrances. Clean office areas. Clean sterile store. Clean storeroom. Buff main corridor inter- leading to CSSD. Clean cleaning cupboard. Twice weekly Buff main corridor. All high dusting. As required Change curtains if any in the department. Strip and reseal floors. Descale sanitary fixtures. STERILE SERVICES DEPARTMENT CLEANING SCHEDULE List of Inspection Points Area 1. Damp mops floors ( if vacuum is needed it must be fitted with a Hepa-filter) Yes 2. Damp dust all low-level ledges, shelves, and skirting and window ledges. 3. Remove splash stains and finger marks from walls and paintwork using damp cloth. 4. Empty waste bins, replace waste bags, and wash bins if necessary. 5. Clean all internal glass surfaces. 6. Damp dust walls, wall fittings and ceilings. Clean light fittings. 7. No feather dusters allowed- use sheepskin high dusting tool
7 8. Clean all ceiling air vents- no feather dusters allowed- use sheepskin high dusting tool. 9. Check and clean as necessary around sinks, doors, etc. 10. Empty waste bins and wash inside. 11. Clean and polish all frontages of Autoclaves with Stainless Steel cleaner. 12. Cream clean sinks taps and surrounds. Remove debris from waste outlet. 13. Clean inside washer disinfectors according to manufacturers instructions 14. Clean inside washer sterilisers according to manufacturers instructions 15. Damp wipe pipe works, doors, doorframes and door handles. 16. Polish washer s exterior with stainless steel cleaner. 17. Damp wipe all low-level ledges, shelves, and skirting and window ledges. 18. Remove splash stains and finger marks from walls and paintwork using damp cloth. 19. Empty waste bins, replace waste bags, and wash bins if necessary. 20. Clean all internal glass surfaces. 21. Wet wipe walls, wall fittings and ceilings. Clean light fittings. 22. Clean all ceiling air vents. 23. Check and clean as necessary around sinks, doors, etc. 24. Empty waste bins and wash inside. 25. Clean and polish all frontages of Autoclaves with Stainless Steel cleaner. 26. Cream clean sinks taps and surrounds. Remove debris from waste outlet. 27. Clean inside washer disinfectors according to manufacturers instructions 28. Clean inside washer sterilisers according to
8 manufacturers instructions 29. Damp wipe pipe works, doors, doorframes and door handles. 30. Polish washer s exterior with stainless steel cleaner. Method of UV stamping to Check cleaning compliance A UV stamp is placed on common-touch areas in the patent s immediate surroundings. After daily cleaning has taken place, the presence/absence of the stamp is checked with a UV torch. If the stamp is still present, the point is marked as non-compliant. If the stamp has been removed by effective cleaning, the point is marked as compliant. A score is given for contractor cleaning for that shift. Supervisors stamp a selection of these identified points with an invisible ultraviolet (UV) stamp every day before cleaning is commenced in the units. At least 10 common touch points should be stamped a different selection is chosen each week. After daily cleaning is completed, the supervisors check for complete removal of the UV stamp with a UV torch. The cleaners concerned accompany the supervisor on the checking round. Method for reporting: Results are presented to the cleaners in the form of Welsh Safety Crosses per unit (where a day in which 75% or above was achieved is marked as a green day and a score below 75% is a red day and days with no data are coloured yellow) and on run charts per unit (Tool 7) and per supervisor/team. WELSH SAFETY CROSS Month:
9 A departmental cleaning inspection report will be prepared each month (at random times) by the Sterile Services Manager or Senior Staff IPC will do 3 monthly(random) and prn hygiene audits in the department, and cleaning non-conformances should be addressed within 48 hours from report received. Training: IPCCs will be aware of the contents of this policy, and assist with environmental hygiene training in the CSDD department Staff should be made aware of the policy as part of their induction and all training undertaken annually and during macro induction programme for new staff, and micro induction in the department. Housekeeping staff should receive specific competency training for specialized cleaning. No temporary staff should be placed in CSSD in case there is staff shortage or staff not on duty. Expected outcome Quality controlled safe, clean and functional department. SOP No. 3 Title: Departmental Dress Code Review Date: August 2018 Prepared by: CSSD Forums of South Africa (CFSA) Reviewed by: Joyce Selesho Area of Application: All areas of the facility Staff Involved: All personnel Objective / Purpose: To ensure that staff are properly attired, according to the requirements of their work area To protect staff from infection / contamination To protect decontaminated devices from being re-contaminated by staff. Relevant or Related Documents: Procedure manual Standard precautions Occupational Health and Safety Standards Equipments / Supplies PPE
10 PROCEDURE On entering the CSSD, all staff are to change into the departmental uniform in the appropriate changing area Staff moving into the wash area who will be engaged in the handling and processing of incoming equipment, will put on an extra protection including a gown, gloves, and protective goggles (when splashing is anticipated) in addition to the departmental uniform When leaving the wash area, staff will remove and discard the gown and gloves and wash their hands thoroughly Prior to entering the preparation area, all staff and visitors will wash and dry their hands, and put on relevant PPE Staff visiting from other areas will wear the departmental uniform and must comply with the dress code when moving to other areas of the department Expected Outcome: All staff are properly attired at all times, in accordance with the requirements of their work area.
11 SOP 4 Title Collection and Transport of Soiled/Contaminated Equipment Review Date August 2022 Prepared by CSSD forums of South Africa (CFSA) Revised P D van der Walt Area of Application Wards ICU s CSSD Staff Involved Ward staff ICU staff CSSD Assistants CSSD Technicians CSSD Supervisors Objective/Purpose The purpose of this SOP is to provide guidelines for the correct transportation and receiving of used instruments and items from the wards/icu s to CSSD for reprocessing. Relevant and Related Documents Sterilization policy and process Quality Manual Equipment and Supplies PPE Transportation trolleys Plastic bags Procedure Ward and ICU staff checks for the completeness of sets in the department. Used instruments and items are correctly recorder on the dedicated documentation. The instruments and items are placed in a dedicated transportation trolley. If transportation trolleys are not available the instruments and items are placed in a plastic bag and sealed. The used instruments and items are transported in the transportation trolleys or sealed plastic bag to CSSD The CSSD staff receives the used instruments and items in a dedicated area within the decontamination area. The CSSD staff together with the ward/icu staff checks for the completeness of the sets. The CSSD staff sign for received instrument and item on the dedicated documentation. PPE must be worn at all times. The instruments and items must handled further according to standard operating procedure.
12 Expected Outcome The correct transportation and receiving of used instruments and items from the wards/icu s to CSSD.
13 SOP No 5 Title Manual Decontamination of Medical Devices Review Date August 2022 Prepared by CSSD Forums of South Africa (CFSA) Reviewed by Lesley Denish Introduction Manual cleaning of medical devices is not generally recommended unless the device manufacturer s instructions state that the device cannot be safely cleaned in any other way, eg. some power tools. Manual cleaning cannot be validated independently, which makes record-keeping problematic. Manual cleaning efficacy may be affected by: staff competency & training, water quality and temperature range, detergent concentration level, nature of soil to be removed, method of soil removal, and accessibility of solution to item being processed. Manual cleaning must not be used where formal, mechanical methods are available. Purpose To ensure that all soiled equipment returned to the CSSD is cleaned to an acceptable standard. Scope All instruments and equipment returned to CSSD. All new equipment prior to introduction for use. All damaged equipment prior to sending for repair. All parts, used or unused, of loaner sets prior to returning to loaner company Area of Application Cleaning area of theatre/cssd/loaner companies Staff Involved All staff trained in decontamination process. No untrained staff or staff not deemed competent in manual decontamination may be involved. Relevant/Related Documents Procedure Manual Standard Precautions, including hand wash procedure SANS 1541 LOAN SETS: Loan Set Management Principles between Suppliers/Manufacturers, Health care facilities Equipment Personal protective equipment (PPE): o Long-cuff (mid arm to elbow) gloves, o Disposable, long length, high-necked plastic apron, gown or overall o fluid-shield mask, o eye protection, o hair/head protection o non-slip, water repellent footwear Dedicated receptacles (deep double sink or containers) which will hold sufficient volume of water such that the items to be cleaned can be fully immersed for both washing and rinsing, including loaner set containers. Sinks or containers must be graduated, viz. marked to show number of litres of water contained.
14 . Dedicated drying surface next to sinks or containers Hot and cold water Selection of disposable cleaning brushes and pipe-cleaners and non-linting washing cloths.. Dedicated rack with hooks to hang cleaning brushes to drip dry Detergent compatible with medical devices with dispenser or pump top and manufacturer s guidelines on mixing cleaning solutions Clean, non-linting drying cloths. Hot-air drying cabinet or industrial hair dryer.. Alcohol wipes (with no emollient). Eye wash solution and first aid kit with chemical neutralizer in case of splashing with chemicals. Separate handwash basin equipped with elbow-operated taps, liquid soap, paper towel dispenser, waste bin and handwash poster. Procedure There are two principle methods of manual cleaning: - Cleaning by immersion - Non-immersion method for devices which cannot be soaked in aqueous solutions, such as electrical and electronic equipment. For manual washing procedures, the following health and safety measures apply:. Standard Precautions must be applied at all times. Staff manually cleaning medical devices must be trained and competent. Maintain segregation of designated clean and other areas within the department. Identify the correct process for the items to be decontaminated. Staff working in this area will wear personal protective clothing at all times in compliance with the standard precautions dress. PPE is worn in addition to the uniform code for the specific working environment. PPE must be removed and hands thoroughly washed and dried after shifts. Use and store all equipment chemicals and materials in accordance with manufacturer s instructions and organizational policies and procedures. Ensure that stock of chemicals and materials is rotated so that oldest is used first. Keep work areas safe and free from hazards during work activities and report any situations where risks arise that prevent work going ahead or continuing, restricting access to risk area until the area has been assessed as safe by a line manager. Place waste containers in positions that will minimize hazards to staff and visitors and dispose of full waste containers promptly and in accordance with departmental procedures and current legislation. Comply with manufacturers' and organization specifications when using all appliances and processing of medical devices. Handle contaminated devices as little as possible.. Avoid splashing, especially when water is used under pressure. Immersion method Ensure that the receptacles (double sink or containers) are clean and dry before use.. Don PPE.. Fill the receptacle with clean warm water at no more than 35 C. Use compatible enzymatic cleaners / detergents according to manufacturer s instructions. All equipment is transferred from the trolley to the work surface. Each instrument is prepared for decontamination. Remove the protective outer wraps. Discard any disposable materials into the appropriate containers. Clinical healthcare risk waste in red plastic bags, domestic non-risk waste into black bags, sharps into sharps container taking special care to dispose of sharp objects safely. (If needles/blades are found, the instrument set
15 should be set aside and the end-user contacted to remove the sharps- if this is possible. Record as per the hospital Incident Management Procedure).. Sort cannulated from solid devices. Wash baskets, container and instruments separately. When cleaning manually, a pre-rinse, wash, rinse and drying process must be followed. Carefully immerse each item in the solution in order to displace any trapped air in the lumen or cannula of the item; ensure that the solution reaches all surfaces of the device.. Brush, wipe, agitate, irrigate or jet-wash using a spray attachment to dislodge and remove all visible soil. Use pressure sprays/syringes for cannulated instruments according to manufacturer s guidelines.. All devices being manually cleaned must be fully immersed in the solution while being washed to ensure that aerosol contamination of the environment is avoided. Open all instruments fully. Open hinged items. Special attention must be paid to the joints of any jointed instrument and meticulous attention paid to the tips and any crevices. As soon as the water is visibly soiled, it must be replaced. Sinks and accessories must be cleaned at each water change.. Remove the item from the solution and drain over the washing receptacle before transferring to a clean-rinse receptacle (sink or container).. Rinse the item thoroughly with clean water or with a water jet gun, ensuring the item being rinsed is again fully immersed.. If the water, is visibly stained during the rinsing stage, the cleaning stage should be repeated. It is important that all soil and chemical is removed prior to, or during the rinsing stage.. Remove item from rinse water and drain over receptacle.. Carefully hand-dry item with a dry, non-linting cloth. Keep drainage area dry.. Clean items should be stored and transported in such a manner that cross contamination is avoided.. Thoroughly wash and dry used receptacles (sinks or containers) before re-use. Clean water jet spray guns regularly so that they do not become a source of contamination. Non-immersion method. If the item is electrical, ensure it is disconnected from the mains supply before commencing the cleaning procedure.. Wearing PPE, immerse the cleaning cloth in the detergent solution and wring thoroughly.. Commencing with the upper surface of the item, wipe thoroughly, ensuring that detergent solution does not enter electrical components.. Rinse the cloth in clean water every few minutes before re-immersing in detergent solution and wringing before continuing to wipe the item.. Surfaces should be hand-dried using a clean, dry non-linting cloth or by placing in a hot-air drying cabinet, or using an industrial hair dryer.. Using an alcohol wipe after drying will assist with disinfection. Alcohol wipes are flammable when wet. Avoid pooling of alcohol on items and entry of alcohol into ventilation slots/ports.. Safely dispose of cleaning materials and alcohol wipes if used. NOTE: After decontamination, all devices must be visually inspected for soil, damage and functionality. If an instrument is broken, any broken piece is located immediately, or a report made following the procedure for missing instruments. It is vital to identify any missing screws or broken parts as a matter of urgency, as the sooner it is identified the better the chance of locating it.
16 Expected outcome Quality controlled safe, clean and functional medical devices ready for packing.
17 SOP No. 6 Title Prepare, Load and Operate Automated Decontamination Equipment Review Date July 2019 Prepared by CSSD Forums of South Africa (CFSA) Area of application Cleaning Area of Theatre/CSSD/Loaner Companies Staff involved Only staff trained in decontamination process Objective/Purpose To ensure that medical devices/equipment are correctly prepared and loaded for decontamination Relevant/Related Documents ISO 15883:2006 Procedure Manual Standard Precautions Equipment guidelines Manufacturers guidelines Equipment/Supplies Personal Protective Equipment Washer Disinfector Ultrasonic Cleaner Detergent Stain Remover Procedure Maintain segregation of designated clean and other areas within the department Identify the correct process for the items to be decontaminated following manufacturer s instructions Staff working in this area will wear protective clothing at all times in compliance with the standard precautions dress. PPE is additional to the uniform code for your specific working environment and may include: o a) gloves o b) aprons, gowns, overalls (single-use, fluid- repellent, disposable) o c) masks o d) face and eye protection o e) footwear Apply standard precautions for infection control and other relevant health and safety measures Use and store all equipment chemicals and materials in accordance with manufacturer s instructions and organisational policies and procedures. Ensure that stock of chemicals and materials that are rotated so that oldest is used first. Keep work areas safe and free from hazards during work activities and report any situations where risks arise that prevent work going ahead or continuing, restricting access to risk area until the area has been assessed as safe by a line manager.
18 Place waste containers in positions that will minimise hazards to staff and visitors and dispose of full waste containers promptly and in accordance with departmental procedures Comply with manufacturers' and organisation specifications when using all appliances and processing of medical devices. Follow manufacturers instructions Handle contaminated devices as little as possible. Washer disinfectors will be prepared for use as described in the Working Instructions Manual. Follow manufacturers instructions All equipment is transferred from the trolley to the work surface. Identify if the medical devices can be decontaminated in the washer Identify items requiring special attention and handle in accordance with documented manufacturers instructions Each instrument will be prepared for decontamination as follows o o o o o o o o o o o o o o o o o o o Remove the protective outer wraps Wearing gloves and using a Cheatle Forcep discard any disposable materials into the appropriate containers. Clinical waste in red plastic bags, domestic waste into black bags, sharps into sharps container taking special care to dispose of sharp objects safely. Avoid contaminating hands with soilage. Separate baskets, container and instruments. Check degree of soil, sort and discard any disposable material. If needles/blades are found, the instrument set should be set aside and the enduser contacted to come and remove the sharps (if this is possible). Sort Cannulated and solid devices. Open all hinged instruments Flush all Cannulated instruments with the pressure jet gun / syringe before placing in the tray Pressure sprays can be used according to manufacturer s guidelines. Loosen all instrument pins and separate instruments Disassemble all multi part instruments Handle and process all devices in accordance with the manufacturers instructions. If an instrument is broken, any broken piece is located immediately, or a report made following the missing instrument procedure. It is vital to identify any missing screws or broken part as a matter of urgency, as the sooner it is identified the better chance there is of locating it. Set the tray aside until the instrument is replaced or repaired Be aware that small items may become lodged in the drainage system Check instruments off against the checklist returned with the set and take notice of any comments made on the check list by the theatre team/user Keep sets of items being processed together where possible Manually clean items that are too large or unsuitable for mechanical washer/disinfector in accordance with the manual cleaning protocol All handling and processing is to be undertaken in accordance with the manufacturers instructions Note manufacturers instructions if items can be cleaned in washer Standardised washing and disinfecting processes should be used and validated. Choose the relevant washer rack Place instruments into a wash basket and check to ensure all items and parts are present. Load items to be decontaminated in the correct position in baskets so that maximum exposure to the decontamination process is achieved on all surfaces of the instrument Connect all tubes to the appropriate connector on the basket union. And position tray into the chamber. (All staff working in this area must be qualified and have received training from the manufacturers on which tubing to fit to which channel. A certificate of competence will be held on file for each member of staff who is competent Place heavier items at the bottom making sure that all surfaces can be reached by the spray jets
19 Do not pack too densely or over-pack trays, all surfaces must be reached by the spray jets Make sure that instruments do not stick out of baskets as they may affect the washer operation Connect all tubes to the appropriate connector on the basket union if option is available Position tray into the chamber according to manufacturer instructions Use detergents according to washer manufacturers instructions Only prescribed automatic cleaning agents should be used A full-automated process should be used including pre rinsing, washing at 60 C minimum (if recommended by manufacturer), rinsing and drying. Where more than one chemical is used in the automated washer disinfector, the tubing should be marked to indicate which chemical it carries. The containers should not be able to be incorrectly connected The containers must be checked regularly and not allowed to run out All staff working in this area must be qualified and have received training from the manufacturers on how to operate the machinery. A certificate of competence will be held on file for each member of staff who is trained and competent Identify and follow operating instructions for washer disinfectors (W/D s) accurately Check that all daily tests are completed satisfactorily and results recorded in appropriate log books accurately and legibly before using cleaning equipment, reporting any abnormal performance of the cleaning equipment promptly to the appropriate member of staff Chamber self-disinfection should be carried out each week as per manufacturer s recommendations and documented. Maintain records of all items received and prepared for processing Comply with manufacturers and organisation specifications when using all appliances and processing Record data correctly as per departmental procedure using log books Expected outcome Quality controlled safe, clean and functional medical devices ready for packing.
20 SOP No. 7 Title Decontamination and Inspection of Loaner Medical Devices Review Date July 2019 Prepared By CSSD Forums of South Africa Objective/Purpose To ensure that all loaner instrumentation is effectively and safely managed and controlled Relevant/Related Documents SABS 1541:2013 Procedure Manual Standard Precautions Manufacturers Instructions Equipment/Supplies Personal Protective Equipment Automated Machines washing/ultrasonic Double Sinks Brushes Detergent Procedure SABS 1541:2013 provides requirements for loan set management principles between Manufacturers, suppliers and health care facilities, to guide all steps involved in ordering, transporting, receiving, on-site processing, use, and return of these items, clearly identifying individual responsibilities. To ensure accountability, a written agreement between the facility and the lender should also be in place. Staff involved in any aspect of the process must be aware of SABS 1541 requirements, trained and knowledgeable. Loan sets must be ordered timeously in accordance with the loan agreement and delivered to the facility at an agreed time The CSSD must be notified of the date of the booked surgery, doctor, procedure, and the type of loan equipment ordered at least a day prior to delivery quantities, with estimated time of loan set delivery and estimated time of use and return. Loan sets should be delivered to the decontamination area at a very minimum 4hours before use leaving sufficient time for disassembly, cleaning, packaging, and sterilization of the instruments before the scheduled surgery. If a large number of trays need decontaminating the minimum time needed for decontamination must be requested from the CSSD For transportation the loan sets should be packed in secure/ impenetrable, sealed containers to help reduce the possibility of contamination and damage during transport On receipt of the loan set the trays must be checked It is the loan set suppliers responsibility to provide training on disassembly and decontamination of item It is the loan set companies responsibility to provide the following information: o o number of trays details of all prostheses supplied
21 o name of the surgeon o name of patient (if known) o date of use for the instrumentation. o cleaning and sterilising instructions. o specialised equipment required to clean the instrumentation. o tray checklists configured so that the items on each tray can be easily and efficiently verified by staff that are unfamiliar with the contents. o photographs and checklists to identify items and assist with checking o identification numbers on the tray list should correspond with those on the instrumentation. o Decontamination certificate declaring that items are clean and safe to handle, NB this does not verify that instruments have been adequately decontaminated merely that they are safe to handle. The check list should signed by the person who was responsible for packing the instrumentation A tracking and traceability system should be in place. Written instructions on the disassembly, assembly, cleaning and processing of complex instruments and training should be provided on request. Each loan set must pass through a full validated decontamination process before being delivered to the theatre, it is the responsibility of the CSSD to render all items safe for use CSSD Responsibility Pre-Operative Check loaner instruments for accuracy and completeness against the inventory sheet Missing instruments should be reported to the loan company Verify types of instruments and implants Verify quantities of instruments and implants Visually inspect instruments and implants for damage. Manufacturer s written instructions for disassembly, cleaning, packaging, and sterilization of instruments should be available Process according to manufacturers guidelines and hospital policy and procedure for disassembly, cleaning, packaging, and sterilization of the instruments. If written instructions are not available contact the manufacturer Check functionality Damaged instruments should be logged and reported to the loan company Notify theatre immediately of any problems that may delay or compromise the surgical procedure Package and sterilise according to hospital procedure On completion of the process the loan set may be sent to theatre Post Operative After the surgical procedure is completed, return the instrumentation to the decontamination area Verify that all loaner instruments are accounted for Handle contaminated devices as little as possible. Sort and discard any disposable material. Avoid contaminating hands with soilage Disassemble all of the instruments according to training Sort cannulated and solid devices. Cannulated devices can be cleaned in an ultrasonic cleaner or using brushes/high pressure sprays, according to manufacturers guidelines Open hinged medical devices If using an automated process layer heavy items at the bottom. Do not pack too densely Standardised washing and disinfecting processes should be used and validated. Enzymatic cleaners are recommended bearing in mind manufacturers instructions. Containers should be washed with a neutral detergent A full-automated process should be used including pre rinsing, washing at 60C minimum (if recommended by manufacturer), rinsing and drying.
22 If cleaning manually a pre rinse, wash, rinse and drying process should be followed Once decontaminated all devises should be visually inspected for soil, damage and functionality. Check instruments are clean and functioning Clean functioning items should be placed in a tray. The tray should be placed in a metal/plastic transport container. The packer should seal the transport container with a tamper proof seal. Return loaner instruments to the loan company according to contract include the following information o Date o Time o Signature of processing individual Maintain complete records A signed cleaning declaration stating the following should be placed on the outside of the transport container together with the signed Checklist o That the Cleaning SOP was followed o Date and Time o Name of packer that did the inspection o Hospital/Trade Clean items should be stored and transported in such a manner that cross contamination is avoided. For transportation the loan sets should be packed in secure/ impenetrable, sealed containers to help reduce the possibility of contamination and damage during transport Loan sets must be cleaned by the User before transportation it is illegal to transport contaminated items without a special licence Expected outcome Quality controlled safe, clean and functional loan sets ready for transport and reprocessing
23 SOP No. 8 Title Cleaning and maintenance of Rigid Containers Review Date July 2019 Prepared by CSSD Forums of South Africa (CFSA) Area of application Decontamination Area Staff involved Only CSSD and Theatre Staff working in the cleaning area Objective/ Purpose To ensure that all rigid containers are correctly cleaned and maintained Relevant / Related Documents Manufacturer s information Sterilization policy and process Quality Manual Equipment/Supplies Cleaning equipment Rigid Containers Procedure Disassemble container Remove all accessories Remove reusable filters Remove interior basket(s) Remove disposable filters, locks, bands etc. Pay particular attention to the type of detergent recommended for use by the manufacturer A neutral ph detergent should be used for anodized containers Fully submerge the container if cleaning manually Wash in automated washer, Use a good loading techniques to allow for drainage Prior to each use, inspect for: Dents, chips, warping Filter retention mechanism function Fasteners, rivets, and screws Latches Filters single use/ reusable Replace single use filters Track number of filter reuses, see manufacturers guidelines for reusable filters Check reusable filters for cracks and chips Reusable filters must be cleaned every use Very Important to ensure that the lid seals If seal is not airtight sterility will not be maintained Check gasket for fraying, cuts, missing pieces, bubbling, compression Some containers can be stacked, check documentation with the manufacturer
24 Check Health and Safety re weight Expected Outcome Rigid containers are correctly cleaned and maintained
25 SOP No. 9 Title Missing Instruments / Items Review Date July 2019 Prepared by CSSD Forums of South Africa (CFSA) Area of Application Theatre/CSSD Staff Involved Only staff trained in decontamination process Objective/Purpose To locate instruments missing from a set or parts of instruments / scopes. Relevant/Related Documents Procedure Manual Standard Precautions Equipment/supplies N/A. Procedure When wash or preparation room staff identify a missing instrument or part of an instrument the Operator will immediately isolate the tray and contact theatre. The Operator will ensure that: o All wash baskets are checked. o The washer disinfectors are checked o All transport trolleys are checked. o The floor areas are checked o Linen and rubbish sacks are checked If located, the missing item will be returned to circulation. If the item is not located, the set will be held out of circulation until it is found or, authority from senior theatre staff for it to be replaced, if possible, the tray put back into circulation or, quarantined. If the set is required to be put into use without replacing the instrument, a note must be completed and the sister concerned sign as authority to proceed. The incident must be fully recorded Expected Outcome All sets in circulation are complete
26 SOP No. 10 Title Control of Packing Area Review Date July 2019 Prepared by CSSD Forums of South Africa (CFSA) Area of Application Packing Area Staff Involved All Objective/Purpose To ensure everybody entering the preparation area is correctly dressed and conforms to policy Relevant/Related Documents Procedure Manual Standard Precautions Equipment/Supplies Relevant PPE Procedure All staff visitors and other personnel wishing to enter the preparation room will change into the uniform provided. No personal possessions other than locker keys are allowed to be taken into the preparation area. No facial jewellery is allowed, other than stud type earrings, and these must be covered completely by the headwear No food or confectionery of any kind may be taken into any area of the department. Before entry to the preparation room area, all personnel will put on suitable head covering and a clean room gown. The gowns are to be placed in the wash basket at the end of each shift. Personnel will wash and dry their hands before entering area Head covering must be worn at all times and only discarded at the end of the shift Clean Room coat to be placed on packing room exit rack, unless it is the end of a shift, when it is disposed of. All Staff are responsible for keeping the preparation room entry / exit neat and tidy. Expected Outcome Everybody entering the preparation area is correctly dressed and conforms to policy
27 SOP No. 11 Title Packing Area Operation Review Date July 2019 Prepared by CSSD Forums of South Africa (CFSA) Area of application Packing Area Staff involved Only staff trained in CSSD/Theatre Objective/Purpose To describe the operation and procedure controls in the Packing Room Relevant/Related Documents Quality Manual Working Instructions Manual Missing Instrument Form Equipment/Supplies N/A Procedure Senior Staff will ensure the order of production meets immediate customer priority where appropriate. After decontamination, all clean items are received into the packing area Any item that is rejected due to evidence of residual blood, body fluid, stains or water are placed in a plastic bag and identified before being returned for washroom staff to action Any item that is damaged or broken is sent for repair Bio burden tests will be performed on the washer disinfectors regularly, according to policy, ensure that items being processed are safely disinfected. Expected Outcome The Packing Area is operating effectively
28 SOP No. 12 Title Tracking of reusable Surgical Instruments (Manual) Review Date August 2022 Prepared by CSSD Forums of South Africa (CFSA) Reviewed by Xana Jardine Area of application All Areas of the CSSD Staff involved Only staff trained in CSSD/Theatre Objective/Purpose To ensure that surgical instruments can be tracked through decontamination processes in order to ensure that the processes have been carried out effectively. To ensure that a process is in place to track any product suspected of being substandard, contaminated or infected is identified, quarantined, collected, investigated and the findings recorded. Relevant / Related Documents Sterilization policy and process Quality Manual Working Instructions Manual National Core Standards Sterilisation Services Equipment/Supplies Tracking System Manual Label gun Load Control Chemical Indicator Double sided labels Documentation Envelope / Appropriate data storage method Procedure It is good practice that reprocessing facilities implement appropriate systems to allow for the tracking of reusable devices throughout the decontamination process. In CSSD: After cleaning, drying and inspection, surgical instruments are wrapped in appropriate sterilization barrier systems Surgical instruments are loaded onto the autoclave carriage Label gun is adjusted to record the o Date o Autoclave o Pack date (and expiry date) o CSSD Technician o This creates a unique batch code Labels are generated and affixed onto the packaging of surgical instruments An additional label is generated (affixed to/associated with the load control chemical indicator)
29 A Load Control Chemical Indicator is loaded into a process challenge device Items are autoclaved At the end of the cycle confirm if the Load Control Indicator in the process challenge device has passed Affix the Indicator and a batch label to the documentation envelope In Theatre The staff in theatre affix the batch label to the patients peri-operative documentation In the event of sterilization failure, such as positive biological indicators/failed Load Controls, failed in-pack chemical indicators, the items from a particular sterilization batch can be identified and recalled. A written Recall Procedure must be followed in the event of a sterilization failure. Expected Outcome A quality management system is in place enabling any product that is substandard or infected to be tracked back through the process and recalled
30 SOP No. 13 Title Cleaning of Steam Sterilizers (Autoclaves) Review Date July 2019 Prepared by CSSD Forums of South Africa (CFSA) Area of application Autoclaving area Staff involved Personnel involved in sterilization Objective/ Purpose To maintain the steam sterilizer in a good working order and, to prevent the contamination of items due to deposits from walls of the sterilizer, leaking gasket or plugged drain. Relevant/Related documents Procedure Manual Manufacturer s Instructions Equipment / Material Lint free clothes Mild detergent Bucket / basins Dedicated long handle mop Lubrication oil for wheels of trolleys Procedure Follow the manufacture s guidelines for the cleaning of all autoclaves On a daily basis, inspect the door gaskets for cracks and clean with a lint-free cloth, according to manufacturer s recommendations The autoclave must be turned off and allowed to cool Wipe outside stainless steel panelling with lint-free cloth. Daily damp dust loading trolleys carriages, racks, baskets or trays that hold items in the sterilizer. Remove drain plug from bottom of the chamber and remove lint and sediment from strainer. Replace drain plug in bottom of chamber. Thoroughly clean the entire inside surface including the walls, rear panel, floor and inside the door, according to manufacturer s recommendations Use a soft mop or lint free cloth and water to clean Be aware that detergents can stain the walls of the autoclave if not thoroughly rinsed off Expected Outcome Autoclaves maintained in a good condition in accordance with manufacturer s guidelines.
31 SOP No. 14 Title Steam Sterilization Procedure Review Date July 2019 Prepared by CSSD Forums of South Africa (CFSA) Area of application Autoclave area/ specialized area in theatre Staff involved Only trained personnel allocated to area and engineering/maintenance staff Objective/ Purpose To ensure consistent sterilisation of items through quality control checks of the autoclave To ensure that all reprocessed medical devices are sterilized to an acceptable standard and ready for use. Safety Warning Protective Equipment: heat resistant leather gloves and appropriate footwear. Sterilizer is hot, burns may occur! Relevant / Related Documents Manufacturer s Manual Occupational Health and Safety Act, 85 of 1993 Standard Precautions Equipment/Supplies Steam Sterilizer (Autoclave), Loading Trolleys, Log books Testing products: Bowie & Dick test pack, Microbiology test vials Procedure The steam sterilizer must be operated accordance with the manufacturer s instructions. Daily Preparation of the autoclave For an autoclave with a manual recording chart, replace chart identifying autoclave, date and initial in place provided For autoclaves with a computerised recording, check paper Check to ensure printer, recorder is working properly The first cycle will be a warm up cycle. On the second cycle place a Bowie & Dick Test Pack, in the warm empty chamber above the drain, on a pre-vacuum cycle, (first or second of the day depend on whether the sterilizer was shutdown). Run the test according to manufacturers instructions Once the cycle has run record the Bowie & Dick according to procedure If the Bowie Dick result is a fail repeat the test with a new Bowie Dick Test pack. If the Bowie Dick is still a fail shut down the autoclave for repair and recall all sterile packs after the last Positive Bowie Dick Test result Run a daily Biological, according to manufacturers instructions, in the first full load of the day as well as any load containing implants. Record the result according to procedure Complete test and record biological indicator ( BI ) Test according to procedure
32 Operational Guidelines Record contents of load, information must be detailed enough to allow for tracking and recall if necessary. Label Package according to policy Make sure each pack has a tracking label affixed Packaging manufacturers must validate that the product contained can be satisfactorily sterilized within the wrap, pouch, container etc. Ensure that items being loaded are compatible with High Temperatures Process full loads not overloaded- to limit the number of cycles you need to run Load the autoclave according to manufacturers instructions, make sure the door to the chamber is locked, and the appropriate cycle is selected based on the types of devices being processed Load items in a loose fashion to facilitate air removal, and steam penetration of all surfaces do not stack items one on top of the other. Packages must not be in contact with walls or ceiling of chamber, package damage from heat or moisture may occur Load baskets and carts so hands won t touch packs when removing the hot trolley For approved rigid containers, follow manufacturer s validated loading instructions. Close and secure lock the autoclave door. On completion of cycle, cycle complete indicator will appear, visually check the graph / printer to determine that all parameters have been met. Follow manufacturer s directions for door opening and load transfer In the event of a cycle failure / cycle aborted, the entire load will need to go through the full reprocessing cycle The person responsible for checking the load should sign their name on the printout before opening the sterilizer door or scan in their data for tracking Before opening the door, thoroughly wash hands according to Hospital Policy Open the door while standing towards the side to avoid burns. Put on heat resistant gloves and remove carrier from Autoclave. Allow to cool for minutes before storage or dispensing. Do not touch hot packs Inspect packages to ensure integrity and external chemical indicators have changed. Record results in log book and file for each autoclave according to Procedure no: Expected Outcome Consistent sterilisation of items through quality control checks of the autoclave All packs are sterile and safe to use
33 SOP No. 15 Title Ethylene Oxide Sterilisation Review Date July 2019 Prepared by CSSD Forums of South Africa (CFSA) Area of application ETO area Staff involved Only trained personnel allocated to area and engineering staff. Pregnant women should not be allocated to this area Objective/ Purpose To ensure that all ETO sterilisers are functional and operated according to departmental policy. To ensure that all reprocessed medical devices are sterilized to an acceptable standard and ready for use. To ensure that the work environment is safe for employees Safety Warning: ETO is an odourless gas Skin Contact with liquid EO - immediately wash affected area Eye contact with liquid EO - flush eyes with copious amounts of water for at least 15 minutes Ensure staff have been educated regarding safety precautions when working with ETO Relevant / Related Documents Manufacturer s Manual Occupational Health and Safety Act, 85 of 1993 Standard Precautions Sterilization policy and process Environment requirements Safe work practices Emergency procedures Logbooks Equipment/Supplies ETO Sterilizer ETO Cartridges Aeration Cabinet Monitoring equipment Emergency equipment Personal Protective equipment Procedure Daily Preparation of ETO Sterilizer Ensure the work environment is safe for employees Replace Load Control Slips Daily or computer printout paper Identifying sterilizer, date and initial on load control slip Check to ensure printer is working where applicable Complete test and record biological indicator (BI) Test according to manufacturers instructions
34 It is important that all staff members are aware of the policy and procedures that relate to EtO sterilization Operators must know how to operate the ETO sterilizer safely as well as the importance of adequate aeration Operators need to understand the environment requirements and safe work practices Operators must know what the emergency procedures are in case of a leak or accident Operators must understand that regulations have to be followed The ETO sterilizer must be operated accordance with the manufacturer s instructions The ETO sterilizer must be used in a well ventilated controlled room with dedicated exhausts, emission control, enclosed ETO sterilizer/aerator room, ventilation, air exchanges and environmental monitoring provided Single-use cartridge delivers the appropriate volume/concentration of ETO Check with gas manufacturer/supplier for storage recommendations and MSDS sheet. ETO gas must be stored at the prescribed temperature in a well ventilated area in a cupboard marked with Hazardous materials label The cycle must be long enough to allow thorough ETO penetration to kill microorganisms The sterilizer operating temperature is usually preset by the sterilizer manufacturer; there are usually two options: 100F (cold cycle) 130F (warm cycle) The manufacturer of a device is responsible for providing validated information regarding proper sterilization and aeration of their products, usually between 1 to 6 hours, depending on the concentration, humidity, temperature parameters, and the type of sterilizer The ETO cartridge must be discarded in a safe manner according gas manufacturer/supplier and hospital policies Personnel exposure must be measured as a Time Weighted Average based on environmental exposure. Average personnel exposure concentration should be measured over a specific period of time, usually 8 hours Employer must ensure that no employee is exposed to airborne concentrations of ETO in excess of the concentration recommended by suppliers (<1 ppm) ETO won t penetrate soil so proper cleaning and decontamination must be done for the items that will be processed (See Cleaning SOP) Soil and Liquids hinder sterilization efficacy and may result in harmful residuals being formed: Water + EO = Ethylene Glycol (Antifreeze); Saline + EO = Ethylene Chlorohydrins (Possible carcinogen) Material compatibility with EtO must be validated by the device manufacturer Aeration Cabinets are required to remove residual ETO before patient contact with the device If plastic instrument containers/trays are used, make sure they can be sterilized with ETO and aerated It is important that the ETO is aerated from the device within and from the plastic container itself with no cumulative ETO absorption/residual into the plastic that cannot be satisfactorily removed by each aeration cycle Plastic, rubber or silicone mats must have been validated by the manufacturer for suitability in ETO processing Make sure that instrument tip protector manufacturers have validated their recommendations for the application and use of ETO Verify with the manufacturer if colour code tape can be used with ETO Packaging manufacturers must validate that the product contained can be satisfactorily sterilized within the wrap, pouch, container etc. and can release EO upon aeration in a reasonable amount of time; not only from the device but the packaging material too Do not use plastic coated baskets unless designed and validated for ETO sterilization and aeration Label Package according to policy Load items in a loose fashion to facilitate air removal, humidification, ETO circulation and penetration of all surfaces, and ETO removal during aeration Packages must not contact walls or ceiling of chamber, package damage from heat or moisture may occur
35 Process full loads to limit the number of cycles you need to run Load the sterilizer according to manufacturers instructions, make sure the door to the chamber is locked, and the appropriate cycle is selected based on the types of devices being processed Group like products that need same aeration times to avoid exposure when opening the sterilizer/aerator to retrieve items during the aeration process Load baskets and carts so hands won t touch packs if you need to transfer them to an aeration cabinet. For approved rigid containers, follow manufacturer s validated loading instructions. Follow manufacturer s directions for door opening and load transfer When unloading some sterilizer manufacturers recommend immediate removal if transferring items to a freestanding aerator Opening the door 2 inches for 15 minutes is recommended obviously you would not remain in the area Load is transferred to separate aeration unit/area Rolling carts should be PULLED (NOT pushed) to minimize Operator exposure to off-gassing ETO vapors Butyl rubber or Neoprene gloves should be worn if Operator will be in possible contact with ETO residuals, touching wrappers before aeration Aeration in the sterilizer doesn t require transfer Aerate until potentially toxic ETO residues are removed before storage and use of medical devices Length of aeration depends on Composition/materials, thickness, design and weight of the device and it s wrapping, sterilization and aeration system used, temperature, ETO, concentration, duration of gas exposure, rate of air exchange, and air flow pattern Size and arrangement of packages in the sterilizer/aerator or aeration cabinet and the number of ETO absorbent materials being aerated Device manufacturer s recommendations must be VALIDATED aeration parameters (time/temperature) Manufacturer recommended aeration times MUST BE FOLLOWED!!! Preset temperature selections per the aerator manufacturer The aeration time must be uninterrupted 8 hours at 140 F (60 C) 10 hours at 130 F (54 C) 12 hours at 120 F (49 C) 20 hours at 100 F (38 C) DO NOT remove prematurely, with premature removal, personnel and patients may be adversely affected Signing a waiver sheet DOES NOT relieve any liability for anyone Ambient air aeration is not recommended as it greatly increases the risk of worker exposure to EO and is not necessarily a reliable means of removing ETO from the items Expected Outcome ETO sterilizers are operated according to manufacturers instructions. The work environment is safe for employees All equipment is sterilized to an acceptable standard
36 SOP No. 16 Title Loading and unloading items from the autoclave Review Date July 2019 Prepared by CSSD Forums of South Africa (CFSA) Area of application Autoclave area Staff involved Only CSSD and Theatre Staff trained in the task Objective/ Purpose To ensure that items are correctly loaded ad unloaded from autoclaves in order to maintain sterility Relevant / Related Documents Manufacturers Instructions Sterilization policy and process Quality Manual Equipment/Supplies Autoclave Loading/unloading carts PPE Slatted stainless steel airing shelves Procedure Load according to manufacturers instructions Wear relevant protective clothing Load instruments sets flat in single layer Load soft packages on their sides with a hands width between items Load soft packs on top shelf and large instrument trays on lower shelf Load containers according to manufacturers instructions some may be stacked Do not allow packs to touch top, bottom or sides of autoclave Do not compress packs Position peel packs on sides Do not overload On completion of cycle record according to policy Allow autoclave and packs to cool before handling Do not touch packs until completely cooled DO NOT TOUCH HOT RACKS WITHOUT HEAT RESISTANT GLOVES Once cooled check for wet packs, tears, indicator changes etc. Store according to policy Expected Outcome Sterility of packs is not compromised through incorrect loading and unloading
37 SOP No. 17 Title: STERILE PACK STORAGE Review Date July 2022 Prepared by CSSD Forums of South Africa (CFSA) Reviewed by Estelle van der Westhuizen Area of Application: Sterile storage area Staff involved: All staff are involved Objective/Purpose: To ensure the safe storage of all sterile packs up to release to other departments. Relevant and Related Documents: Procedure Manual Standard Precautions Equipment/Supplies: - Stainless steel, slatted shelving SPECIFICATIONS FOR STERILE STORAGE AREA Area must be separated from those used to store clean non-sterile items Only CSSD staff should be allowed access to storage area Control temperature Product should be stored away from direct sunlight and water In draft-free area away from vents and windows Open shelving should be at least 25 cm from the floor, 45 cm below the ceiling and 5 cm from outside wall Each shelf is marked with the name of packs being stored there There should be sufficient space so that packs are not stored too close to each other. Sterile items must not be stored under the following conditions - Near sinks or other areas where they can be exposed to water-
38 - Where the humidity is in excess of 60% - In areas where the temperature exceeds 26 C - Heavy items will not be stacked on top of lighter ones - Do not bend or fold large packs or squeeze packs into tight spaces Personnel entering the sterile storage area must wear the correct theatre attire Closed or covered cabinets are preferred for seldom used-items. Cupboards can be used to store small, delicate or expensive items Cardboard boxes should not be used to as storage containers Shipping cartons should not be brought into the sterile storage area Storage area should be pest free PROCEDURE FOR CLEANING OF STERILE STORAGE AREA Daily cleaning - Inspect the storeroom area daily - Shelves must be damp-dusted with low-level disinfectant daily - Check the labels on the shelves, replace if illegible - Mop floor with a low-level disinfectant - Remove all items that are not supposed to be in storeroom - Where protective clothing when cleaning - Check sterile supplies for expiry dates Weekly cleaning - Walls and windows must be damp-dusted with low-level disinfectant once a week or if they are dirty have them washed with soap and water - Shelves must be unpacked and damp-dusted with low-level disinfectant once a week - Unpack containers that contain single packed instruments - Wipe the containers with low level disinfectant and let it dry PROCEDURE FOR MANAGING STERILE ITEMS AND PACKS IN STERILE STORAGE AREA Handle each pack carefully and individually Pack the packs onto the shelves Peel pouches should be stored on their sides Allow enough space between packs for ventilation
39 Move old stock forward on the shelf Pack the new stock at the back of the shelf, each type of pack according to the names on the shelves Note the shelf life of the packs PROCEDURE FOR ROTATION OF STERILE PACKS Check the integrity of sterile packs and rotate the sterile packs daily Prevent prolonged storage periods by adjusting the number of sterile packs according to needs Regulate a stock supply of day-to-day items to have enough for the busiest day Reprocess and re-sterilise packages that have become contaminated PROCEDURE FOR INSPECTING STERILE PACKS Check the sterile integrity of each pack on receipt on a daily basis for - Date of sterilisation and expiry date - Contents, signature of packer, autoclave number - Required colour change of the chemical indicator and tape - Masking tape must be pasted firmly - Dry whole and clean packaging material - Packs may only be issued to customers provided all the checks have been carried out SHELF LIFE The shelf life of a pack is dependent on its packaging, handling and storage conditions The shelf life of a CSSD processed sterile item is based on events rather than time The date on a sterile package indicates the date the item was sterilized or manufactured. Sterility is maintained as long as the integrity of all barrier properties and seals are maintained Expiration date is a reminder that these items need to be used timeously Use Before and Use First Storage conditions will be such that product integrity is not compromised by moisture or any other means that can breach the wrapping materials Events that can compromise the sterility of a sterile item include: - Holes or torn wrappers - Securing tapes or locks that have been tampered with or removed - Broken or incomplete seals on laminated pouches
40 - Items have been dropped on a dirty surface - Exposure to blood, body fluids or any type of moisture - Cardboard boxed are not to be used except where supplied by the manufacturer for dispensing Do not top up or re-use cardboard dispenser boxes - Items should be decanted from larger outer (shipping) boxes to being brought into the sterile storage area - Elastic band or tapes should not be used to bundle items Expected outcome Sterility of packs is maintained while in the CSSD. NOTA BENE: The expiry date is only a guide. Events related to the storage of products are critical for the ability of materials used to maintain integrity. Any event that could deteriorate the wrapping material must be managed so that wraps are not damaged in any way, and sterility of the contents is not compromised.
41 SOP No. 18 Title The Delivery and Distribution of Processed Items Review Date July 2019 Prepared by CSSD Forums of South Africa (CFSA) Area of application All sterile storage and dispatch areas Staff involved Only staff trained in CSSD/Theatre Objective/Purpose To ensure customers receive sterile items in a safe condition and ready to use Relevant/Related Documents Quality Manual Dispatch Log Equipment/Supplies Clean Trolleys Procedure All items will be checked for sterility before they are released The following should be checked when deciding if the pack is still sterile: - o Holes or tears o Wetness or stains o Broken seals o Dust o Evidence of crushing All damage items are returned to the decontamination area All items issued will be recorded so that a tracking system is effected Various methods can be used in the transport of sterile packaged items to their point of use. This can range from hand carriage (in particular where a decontamination area is located close or adjacent to a point of use), to the use of trolley s and other such transport systems for taking items to a remote location (within a facility or at a different facility). Sterile supplies should be transported in covered or enclosed trolleys with a solid bottom shelf. The solid bottom shelf prevents microorganism on the floor being picked up by the wheels of the trolley and then spun upwards onto the sterile packs. If items are placed inside plastic or paper bags, they should be arranged to prevent them from being crushed or damaged during transport. They all protect medical devices from damage Items must be placed onto a clean trolley that can be covered Trolleys must not be overloaded Soiled items must NOT be loaded onto the same trolley Loaded trolleys must not be left to stand Expected Outcome Customers receive sterile items safe to use
42 SOP No. 19 Title Quality Control Review Date July 2019 Prepared by CSSD Forums of South Africa (CFSA) Area of application Any area where items are reprocessed Staff involved All CSSD, Clinic and Theatre Personnel Objective/ Purpose To ensure that the CSSD provides a quality service Relevant / Related Documents Manufacturer Guidelines Sterilization policy and process Relevant Legislation Equipment/Supplies: Relevant Consumables Equipment
43 Procedure Area Where Test Is To Be Performed Washing Area Packing Area Autoclave Area Sterile Goods Storage Area Details of Test 1. Check that complete sets have been received from user 2. Check spray arms and jets of washers 3. Check Detergent levels on washers 4. Soil Tests according to policy 5. Check tracking system is in place - record 1. All instruments to be visually inspected for cleanliness/functionality deal with rejected items according to policy 2. Check all instrument are present and packed correctly 3. Place a chemical in-pack indicator 4. External chemical indicators-auto - record 5. Check the functioning of heat sealers daily 1. Mechanical monitoring of all sterilisers 2. Perform daily Vacuum Tests on all steam autoclaves (BD) 3. Perform daily Biological Tests on all sterilisers 4. Check that all packs have external chemical indicators before loading into steriliser 5. Check load control test has passed before load is released - ensure a positive colour change - record 6. Check that all parameters have been met on autoclave printout - record 7. Complete any log sheets 8. Check that all items removed from the autoclave are intact, dry and undamaged. 9. All items that have residual moisture, tears or from a failed cycle are to be dealt with in accordance with policy 10. Check tracking system is in place - record 1. Before releasing goods for delivery, check the packaging for damage. 2. Reject any suspect packs and unpack before sending to the wash area for reprocessing 3. Check the external chemical indicator to ensure that the pack has been through a steriliser 4. Check tracking system is in place - record
44 SOP No: 20 Title Monitoring Steam Autoclaves Review Date July 2019 Prepared by CSSD Forums of South Africa (CFSA) Area of application Steriliser Area Staff involved Trained CSSD Staff Objective/ Purpose To monitor that all steam autoclaves are functioning optimally Relevant / Related Documents Manufacturer s information Sterilization policy and process Quality Manual Equipment/Supplies Autoclave Monitoring Supplies Procedure Monitoring includes all sterilizer components that track and record time, temperature and pressure during each cycle, Printouts, gauges, round charts, etc. Documentation of critical cycle parameters permits the earliest detection of equipment malfunctions since they can be evaluated when the cycle is in progress Sterilization failure can be identified at a number of stages: Autoclave parameters are not met Biological Test shows growth Bowie Dick Test Failure Process Challenge Device or Load Control Failure External Process Indicator Failure Internal Chemical Test Failure Wet Packs Chemical Indicators Chemical Indicators are used in combination with physical parameter to monitor the effectiveness of the sterilizer. They monitor conditions in the sterilizer chamber or from within the load as part of a total system of sterilization monitoring. The following main types of chemical indicators are available: Process indicators In-Pack indicators Load controls or Process Challenge Devices The ISO standard classifies indicators according to intended use or performance criteria as follows: Class 1: Process indicators/external indicators
45 Class 2: Indicators for use in specific tests/bowie Dick Class 3: Single parameter indicators/respond to one parameter Class 4: Multi-parameter indicators/respond to 2 or more parameters Class 5: Integrating indicators/react to all parameters/ mirror the performance of Biological indicators Class 6: Emulating indicators/react to all parameters/ verify specific cycle parameters Bowie Dick Test (BD) Bowie-Dick test should be run and documented at least daily before the first process load and after any steam autoclave shut-down. This indicates if air is being removed completely from the autoclave Manufacturer s of the Bowie Dick should provide data on the reliability, safety and performance characteristics of their product, as well as instructions for use storage, handling The Bowie Dick is placed on a rack above the drain of the autoclave in an EMPTY load This test should be done daily in each machine, the machine must be warm There must be a complete, uniform color change which indicates a PASS A PASS indicates that the sterilization process was effective since it indicates no air was present An incomplete or no color change - FAIL A FAIL indicates air was present and sterilization was not achieved Repeat the test If results still show a FAIL do not use the autoclave The Autoclave number and test result must all be recorded in the record book provided. Test cards and results must be recorded and stored according to Hospital policy External Chemical Indicators (CI) A Process indicator is placed on the outside of each individual package to verify that the package has been exposed to a sterilization process. Indicator should be clearly visible on the outside of the sterilized package. This helps differentiate sterilized from unsterilized items. Fix the Process indicator tape or label on the outside of the package or rigid container, once it has been assembled for sterilization. This is not necessary in the case of packaging with pre-printed Process indicators on them. Readily visible and color change provides a quick indication that the load has or has not been exposed to the sterilization process Check that the Process indicator has changed colour according to the manufacturer s instruction after the sterilization cycle has been completed, prior to placing the package in sterile storage. If the process indicators have not changed, the packages should NOT be released. Process indicators provide an indication that the load has been exposed to the conditions necessary to achieve sterilization Helps detect failures in packaging, loading, and sterilizer malfunction. Color change according to the manufacturer s reference Pass - Medical Device can be moved to the Sterile Storage Area for use Color change not according to the manufacturer s reference Fail - Medical Device should be reprocessed Internal Chemical Indicators In-pack chemical indicator can detect sterilizer malfunction or human error in packaging or loading of the sterilizer. Place the CI in an area of the package, instrument tray or rigid container in an area that is determined to be the densest part of each pack Measure if sterilizing parameters have been met inside the pack
46 A member of the surgical team should retrieve the CI at the time of use and interpret its reaction to the sterilization process. This is a patient record and must be kept Color change even and according to the manufacturer s reference Pass - Medical Device can be used Color change uneven and/or not according to the manufacturer s reference FAIL - Medical Device should not be used Send back to Sterilization Department for reprocessing Process Challenge Devices/ Load Controls (PCD) This indicates to CSSD staff that the sterilization parameters have been met in the load and that it can be released Process Challenge Devices/Load controls are devices designed to act as a challenge to the steam penetration capability of a sterilizer and is made up of a barrier system, inside of which a chemical or biological indicator is. The intention of a PCD is to challenge the sterilization process, by either using a Biological or Class 5 integrating indicator, or an enzyme-only indicator. Load Checks are reusable devices; therefore a new indicator has to be loaded into it before use. Follow the manufacturer s instructions in this regard Load the Process Challenge device with an unused chemical indicator, following the manufacturer s instructions. Place it in a peel-open sterilization pouch and seal. Place the PCD, in every full sterilizer load at a point where steam penetration will be most difficult. Process the load as usual. After sterilization, retrieve the PCD and interpret the result of the chemical indicator against its colour standard. The test result PASS/FAIL should be recorded in the sterilizer log book. Complete uniform color change PASS If the PCD shows a PASS it can be assumed that the entire load has met the necessary conditions required for that particular sterilization process Sterilization process was effective and autoclave load can be released Incomplete color change FAIL If the test result is a FAIL, the load should be quarantined and not used until the reason for the fail can be determined and rectified. Sterilization process was ineffective Do not release the load Repackage all sets with new indicators and re-autoclave If results still show a fail, do not use the autoclave Biological Indicators (BI) A biological indicator is a preparation of living spores which provide a defined resistance to a specified sterilization process. A PASS Indicates if sterilizing conditions are adequate to kill micro-organisms Non-pathogenic micro-organisms are used Manufacturer s of the BI should provide data on the reliability, safety and performance characteristics of their product, as well as instructions for storage, handling, use A test must be performed at least daily in each sterilizer. Place the BI in a test pack, into the center of a FULL load. The BI manufacturer must be consulted for recommendations regarding how to use their specific product Process the load as usual. After sterilization, retrieve the BI Test out of the pack. Allow the BI to cool for 10 minutes after sterilization. (Note the BI contains a glass ampoule, which needs to cool prior to crushing and incubating)
47 Check the chemical indicator strip on the BI has changed appropriately according to the manufacturers instructions. Record the sterilizer, load and date on the BI label. Crush the vial inside of the self-contained BI, and start incubation. Follow BI manufacturer s instructions for activation and incubation Now take an unprocessed BI from the same box/batch, and write a 'C' (control) on the side of it. Write the date on the vial. This control vial does not go through the sterilization cycle, and validates that the spores and media solution are viable, the incubator is operating at the correct temperature, and that the BI's have been stored correctly. Incubate the Test BI and the Control BI for 24 to 48 hours according to the manufacturer s instructions Run Control BI every time a BI is incubated If the spores are alive, they give off an acid, which changes the colour of the solution in the vial. Check for any signs of colour change Document the visual result at 24 or 48 hours in the Log Book, dependent on the type of spore being used. Negative '-' means no colour change/no growth Sterilization process was effective since it indicates no growth. Positive '+' means colour change/growth of microorganisms. Indicates microorganism growth and sterilization was not achieved The Test BI (that has been processed) should always remain the same colour before and after incubation, as the sterilization process should have killed the live bacteria. The Control BI (which has not been processed) should always change color after incubation, as the live bacteria would have been cultivated. If there is a BI failure on any load, the whole load must be recalled, repackaged and resterilized. Refer to the individual manufacturers guidelines to activate and incubate the Control. Results must be recorded and stored according to Hospital policy Do not release products until the BI has been read and is positive Maintenance The following information should be recorded in the maintenance logbook for each autoclave: Date of servicing or repair work Description of work performed Name of service engineer Signature of service engineer Expected Outcome The steam autoclave is working effectively and if all re-processing standards have been met, products should be sterile
48 SOP No. 21 Title Recall Process Review Date July 2022 Prepared by CSSD Forum of South Africa (CFSA) Reviewed by Mary Rose Khumalo Area of application CSSD, Wards, Clinics and Theatre Staff involved All CSSD, Ward, Clinics and Theatre Personnel Objective/Purpose To ensure that any product suspected of being substandard is identified, quarantined, collected, investigated and the findings recorded Relevant/Related Documents Sterilization policy and process Quality Manual Working Instructions Manual Daily, Weekly, Quarterly and Annual Test record Equipment/Supplies N/A Procedure In the event of sterilization failure such as positive biological indicators/failure Load Control or sterilizer malfunction, items from that test and previous loads after the last known good test must immediately be recalled. All affected trays must be recalled in the event of failed quality management test i.e. Biological, Load Control. A written recall procedure must be followed in the event of a sterilization failure. The sterilizer must be shut down and all staff must be made aware that it is out of operation. The sterilization record sheet should be checked for a list of "sterilized" items that need to be recalled. The recall procedure should be documented on the sterilization record sheet listing what items have been retrieved and reprocessed and which items had already been used and on whom. Note items that may have already been used on the list. As it becomes apparent that items need to be recalled reprocessing personnel will immediately notify users and retrieve the supplies from storage and from users as soon as possible. A recall is usually authorised by the most senior member on the shift. Other responsible persons i.e. infection Control should be advised of the recall according to hospital policy. Affected departments should be advised verbally as soon as possible, with a follow up written confirmation advisory stipulating which items, trays from a particular batch are suspected and should be returned. Department should be requested to check their stock as well as used stock for the suspected batch. The following details will be given: The name of the sets to be recalled The sterilizing date Details of action to be taken Reason for the recommended action and any likely associated hazards Sterile Service staff will attempt to confirm that the check has been carried out. Any decontamination in the CSSD will be checked by the Sterile Service staff and any identified suspect batch removed. Sterile Service staff will arrange collection of any identified suspect stock on the customer s premises. Recalled items should be labelled 'Under Quarantine' whilst in transit to the cleaning area of reprocessing area where it will be reprocessed or be put into quarantine.
49 All items retrieved from Recall must be completely reprocessed. All items must be disassembled, processed with fresh linen, assembled, rewrapped and sterilized. Once the sterilizer has been repaired all monitoring results must be checked before the sterilizer is used. The cause of the recall should be investigated and a report written. Expected Outcome A quality management system is in place confirming that all products leaving CSSD are sterile and safe to use.
50 SOP No. 22 Title Validation of Equipment Review Date July 2019 Prepared by CSSD Forums of South Africa (CFSA) Area of application All equipment (new or used). Staff involved All CSSD, Clinic, Ward and Theatre Personnel Objective/ Purpose To ensure that all equipment which can influence quality or safety is not used for processing until its performance has been approved. Relevant / Related Documents Manufacturers Instructions Sterilization policy and process Quality Manual Relevant ISO Standards Equipment/Supplies N/A Procedure Ensure all new equipment ordered for CSSD is appropriate and safe to use Copies of any relevant documentation relating to the equipment must be given to the manager Equipment will not be used until it has been validated and an assurance is given that the equipment will give an acceptable quality of product and is safe to operate The installer / manufacturer should verify in writing that all is in order by way of a certificate. This certificate is to be maintained with the log book for the equipment Equipment will only be used after the necessary training is given to the staff No new or replacement equipment will be used without the appropriate approval and training Expected Outcome Quality and safety is maintained
51 SOP No. 23 Title Monitoring ETO Sterilisation Review Date July 2019 Prepared by CSSD Forums of South Africa (CFSA) Area of application ETO area Staff involved All CSSD and Theatre Personnel Objective/ Purpose To ensure that all ETO sterilisers are functioning optimally Relevant / Related Documents Manufacturer s Manual Sterilization policy and process Environment requirements Safe work practices Equipment/Supplies Physical monitors Chemical indicators Biological indicators Environmental monitors Procedure Physical Monitors Measures that ETO machine is functioning effectively Monitoring includes all sterilizer components that track and record time, temperature and pressure during each cycle, Printouts, gauges, round charts, etc. Documentation of critical cycle parameters permits the earliest detection of equipment malfunctions since they can be evaluated when the cycle is in progress Chemical Indicators (CI) Indicator of conditions present: Provide an indication that the load has been exposed to the conditions necessary to achieve sterilization Helps detect failures in packaging, loading, and sterilizer malfunction. External Indicators Placed on the outside of each pack to be sterilized Often included on load record cards Readily visible and color change provides a quick indication that the load has or has not been exposed to the sterilization process If the process indicators have not changed, the packages should NOT be released. Biological Indicators (BI) Indicates if sterilizing conditions are adequate to achieve sterilization
52 Bacillus atrophaeus: Microorganism of choice for monitoring EO sterilization as it offers the best test challenge since it is most resistant to kill Non-pathogenic Manufacturer s of the BI should provide data on the reliability, safety and performance characteristics of their product, as well as instructions for storage, handling, use IMPORTANT to note that equipment sets/trays prepared with surgical towels may absorb so much of the humidification available to the ETO process that the biological indicator may show Positive results because not enough humidity was available to kill the test spore. Limit the use of absorbent surgical towels in these setups BI is placed into the center of a full loadconsider placing the test pack into a small metal basket or instrument tray for easy retrieval if it must be removed before a load is transferred to a separate aerator The BI manufacturer must be consulted for recommendations regarding how to handle their BI If the BI test is removed before aeration, do it in a well ventilated room, protect yourself from EO residue on the package by wearing butyl rubber gloves to disassemble the pack and retrieve the BI for incubation and then aerate the test packaging material before discarding Worker safety must be given primary consideration. Incubation Follow BI manufacturer s instructions for activation and incubation Be careful with dual temperature incubators, be certain you put the ETO BI in the appropriate place For example, ETO (Bacillus atrophaeus) is incubated at 37 C for 48 hours. Steam (Goebacillus stearothermophilus) is incubated at 55 C for 24 hours Bacillus atrophaeus will not grow at higher temperatures Incubate an activated but not sterilized biological to verify that the test microorganisms are alive and ready for use in testing Run Control BI every time a new package of BI's is opened and everyday. If there is a BI failure on any load, the whole load must be recalled, repackaged and resterilized. Refer to the individual manufacturers guidelines to activate and incubate the Control. Test Results Negative Test Sterilization process was effective since it indicates no growth. Positive Test Indicates microorganism growth and sterilization was not achieved Implants that have been EtO sterilized must not be released until the BI results are known Environmental Monitors Area monitoring Required! Personnel monitoring advisable not required These must be monitored according to manufacturer agreement Record-Keeping Load record card (LRC) Packages must be properly identified and recorded on the LRC Expiration date or statement, load contents, sterilization date, load number, sterilizer number and name of the sterilizer operator must be on the card. Examples of the package load stickers should also be affixed to the card. All of this helps with package retrieval in case of a recall The load record card is run with the load The LRC has an ETO chemical indicator Check with state and local agencies for how long sterilization records must be kept which must be in line with Hospital Policy Expected Outcome The ETO machine and loads are validated
53 SOP No. 24 Title Malfunction of Ethylene Oxide Steriliser Review Date July 2019 Prepared by CSSD Forums of South Africa (CFSA) Area of application ETO area Staff involved Trained service personnel needed to identify and correct the cause of the malfunction Objective/ Purpose To ensure that all ETO sterilisers are monitored and operated according to departmental policy, and procedures. To ensure a safe work environment Safety Warning: ETO is an odourless gas Skin Contact with liquid EO - immediately wash affected area Eye contact with liquid EO - flush eyes with copious amounts of water for at least 15 minutes Relevant / Related Documents Manufacturer s Manual Occupational Health and Safety Act, 85 of 1993 Standard Precautions Sterilization policy and process Environment requirements Safe work practices Emergency procedures Equipment/Supplies ETO Sterilizer Aeration Cabinet Monitoring equipment Emergency equipment Personal Protective equipment Procedure Notify department head or designated supervisor Remove sterilizer from service If the malfunction compromised the sterility of the load, the load is aerated adequately and reprocessed If the system has a diagnostic capability, run the system Microprocessor controlled ETO sterilizer are designed to provide indication of error conditions that may lead to malfunction Messages are provided to alert the Operator and are part of the cycle record Do not use until an Engineers has signed that the machine is safe to use Do not use after repair until a ROUTINE biological test is done
54 Expected Outcome The ETO steriliser is monitored and operating according to departmental policy, and procedures. A safe work environment
55 SOP No. 25 Title Planned Maintenance Schedule of Equipment Review Date July 2022 Prepared by CSSD Forums for South Africa (CFSA) Reviewed by R Kloppers Area of application Sterile Service Department Staff involved Senior staff Maintenance Department Objective / Purpose To ensure all plant and equipment is checked and maintained in good working order according to manufacturer s guidelines and departmental schedule. Relevant / Related documents Quality manual Working Instructions Manual Planned Preventative Maintenance Schedules Machine Log Equipment/Supplies All machinery and equipment used in the Decontamination Department Procedure A scheduled planned maintenance of all machinery and equipment used in the Decontamination Department is documented. Shutdown of equipment is planned according to schedule. The work to be carried out at each check is documented. All maintenance carried out is documented. Log books will be examined at least on a monthly basis or as appropriate, and signed by the test person, designated for all equipment, for completion and accuracy. Task sheets for weekly and quarterly Planned Maintenance detail the work to be undertaken and work order dockets are completed by the Maintenance person responsible and a copy issued to the CSSD manager for filling in the appropriate log after the service schedule has been updated. Senior staff will carry out daily checks on equipment in all Areas according to policy and as detailed in die Working Instruction Manual. Testing will be carried out at prescribed frequencies (Daily, Weekly, Quarterly and annually). Results will be recorded on the daily Test/Check Forms in the respective log books. Service Engineers will carry out inspections under the planned preventative maintenance programme according to the agreed schedule. At the end of the visit the Service Engineer will complete a Preventative Maintenance Plan (PMP) form for the equipment checked. The Service Engineer must sign the report. Equipment audits to be done as evaluation system to measure the quality of performance of all medical equipment. By audit committee:
56 Head of maintenance, Administrative representative, representative from Finance department, Hospital store in charge and Nursing superintendent. Training and development of staff: for the safety of the patient and the user. Training may be: In-House or at a recognized institution. A detailed log of preventative and breakdown maintenance needs to be kept. (For when replacement decisions are made). Computerized system wil ensure easy access to maintenance data, and proper control over maintenance schedules, performance levels, maintenance costs and other related data etc. Service certificates to be kept on file at maintenance Engineering office. Expected Outcome All equipment is checked and maintained on a regular planned basis
57 SOP No. 26 Title Action for Breakdown of Equipment Review Date July 2019 Prepared by CSSD Forums of South Africa (CFSA) Area of Application Sterile Service Department Staff Involved Senior Staff Maintenance Department Objective/Purpose To record all breakdowns of machinery To record reasons for breakdowns To record action taken to remedy breakdown. Relevant/Related Documents Quality manual Working Instructions Manual Planned Preventative Maintenance Schedules Machine Log Equipment/Supplies All machinery and equipment used in the Decontamination Department Procedure All equipment breakdowns will be reported to the Supervisor The Supervisor will remove the equipment from further use by switching off (if appropriate), implementing the defect reporting procedure and attaching a clear label showing:- OUT OF ACTION - DO NOT USE The Supervisor will hand over the equipment to the designated engineer. This must be documented in all cases. All breakdowns or repairs will be phoned into the relevant manufacturer if still under guarantee If equipment is still under guarantee NO-ONE must attempt to repair the equipment without the manufacturers permission Equipment on loan or used under service exchange must be returned to the relevant company for repair or replacement All breakdowns are recorded in the relevant logbook and the engineer will enter the job number and repairs completed and signed before the equipment is put back into use. Expected Outcome All breakdowns of machinery are reported and recorded with complete details
58 SOP No. 27 Title Sterile Packaging Review Date July 2019 Prepared by CSSD Forums of South Africa (CFSA) Area of application Packing area Staff involved Only CSSD and Theatre Staff trained in the task Objective/ Purpose To ensure that the correct materials are used and that items are correctly packaged in order to maintain sterility Relevant / Related Documents Manufacturer s information Sterilization policy and process Quality Manual Equipment/Supplies Stainless steel packing tables Packaging materials Packaging Accessories e.g. Tape, sealers Procedure Sterile packaging must provide protection against contamination during handling as well as providing an effective barrier against microbial penetration. Items classified as critical devices should be packaged for sterilization (with the exception of flash sterilization methods) An ideal packaging should have the ability to allow sterilization agents to penetrate and then provide a barrier, which will maintain the sterility of the wrapped devices. Use only medical grade SABS approved packaging The type of packaging and the way you package the devices will determine if aseptic opening is possible in the operating theatre or the ward. The packaging should allow air that is in the pack to be driven out and the sterilizing agent to reach all surfaces of its content. The packaging should protect the contents against damage during handling and transport. The packaging should be able to withstand the conditions during the sterilization process such as pressure changes, high temperature and humidity It is important that the following points are taken into consideration when choosing a tray/set and packaging method: o The type of pack o The size and weight of items to be packed o The number of times the pack will be handled before use o The number and training of personnel who may handle the pack o The distances that packs will be transported o Whether the storage system is open or closed o The condition of the storage area (cleanliness, temperature, humidity)
59 o If secondary packaging (e.g., asepto bags or dust covers) will be used or are necessary o The method of sealing packs The packaging should bear a clearly visible marking indicating whether or not the product has been through a sterilization process. There are many different types of packaging that can be used for different items Packaging material used in steam sterilization must be able to withstand high temperatures, allow for adequate air removal, be flexible considering changes in pressure during the process, permit steam penetration to the pack's contents and allow for adequate drying. Packaging materials used with low temperature sterilization processes (e.g., ethylene oxide and gaseous hydrogen peroxide processes) must have similar properties, particularly being compatible with the sterilization chemicals, moisture, pressure changes and temperature ranges. The packaging system chosen should be appropriate for the items being sterilized and compatible with the specific methods of sterilization being used. Choose packaging to suit the dimensions of the instruments/tray and type of sterilization technique to be used. In addition to containers, individual devices and sets can be packaged with sterilization pouches or wraps The choice of packaging will generally depend on the sterilization method being used. Packaging materials should only be used that have been tested to be compatible and safe for each sterilization purpose. Always follow manufacturer and hospital guidelines Medical Grade single Use Disposable Sterilization Wrap Double wrapping creates a package within a package. Two sheets of wraps are used providing multiple layers of protection of surgical instruments from contamination. Double wrap = wrap and wrap The use of two layers of wraps reinforces the strength of the packaging. Folding the two wraps separately, one after the other makes the pack more secure, as the greater the number of folds the more tortuous the path becomes for micro-organisms to penetrate into the packaging. The double wrap with two sequential folds also affords a two-step unwrapping process which assists in aseptic presentation and creation of a sterile field for users in the operating theatre; the outer wrap is removed before entering the operating room or by an assistant. Do not re-use single use packaging Use a hospital grade masking tape and autoclave tape when using wrap Do not write on packaging Disposable Peel-open Pouches and Reels Paper/Plastic peel-open packaging materials are suitable for steam, steam formaldehyde and low temperature sterilization processes such as ethylene oxide. It is not suitable for use in hydrogen peroxide gas and ozone sterilizers, again due to the paper (cellulose) content. Disposable peel-open pouches and reels are designed to contain lightweight or small items and are available in various sizes, for single use only. Peel-open packaging should not be used for heavy or bulky items because the seals can become stressed and rupture. Pouches are available in many sizes. The open end of the pouch is closed with a sealing device. It is essential that the heat sealer is functioning effectively in order to get an adequate seal. Both ready-made pouches and reels are available flat or with side gussets for packing bulkier objects. The user can cut reels to any size needed, in which case both sides of the pack will need to be sealed by the user. Peel-open packaging is useful when visibility of the contents is important.
60 When packaging items, care must be taken to leave a minimum of 1 inch (2.5cm) of space between the end of the item and the seal of the pouch or reel in order to facilitate aseptic opening. When double pouching, the inner pouch should be at least a size smaller than the outer pouch to prevent folding which may entrap air and inhibit the sterilization process. They must be packaged paper against paper, plastic against plastic in order to enable sterilant penetration. A felt-tip, indelible, non-toxic ink marker can be used on clear plastic side of the pouch to label. Reusable rigid container systems Sterilization containers are a durable sterilization packaging system constructed of a rigid material such as metal, or plastic. A variety of sizes can accommodate a wide range of instrument sets. Containers need to be disassembled and cleaned after each use, following the reprocessing instructions supplied by the container manufacturer. Remember! Containers are classified as devices themselves and as such should be reprocessed after each use, not just wiped down. Containers must be cleaned in the same way as any other reusable device. Following reprocessing they should be checked to include: o o Checks of gaskets for fraying, cuts, missing pieces, bubbling or compression Cleaning reusable filters and inspecting them for cracks or chips. The number of uses also needs to be logged and the manufacturer s recommendations not exceeded. Expected Outcome Pack integrity is maintained through correct use of packaging
61 SOP No. 28 TITLE: Management of Loan Sets. Review date: August 2022 Prepared by: CSSD Forums of South Africa (CFSA) Reviewed by Margareth Clements. Area of application: CSSD and Operating Rooms. Staff involved: All representatives and CSSD staff Objective/ Purpose: To ensure that loansets are ordered and delivered in time to undergo a full decontamination and sterilization process. Relevant and related documents: Quality assurance Various Manufacturers guidelines Health and safety Equipment/supplies: Loan sets Procedure: Loan sets must be ordered and delivered timeously. Individual loan sets must be ordered for each patient for individual procedures. Enough loansets must be ordered for each individual patient, loan sets are not allowed for sharing between patients for infection reasons it is NOT acceptable, used loan sets should be processed before use on another patient. Loan sets should be free from contamination Packaged and transported in a way that prevents damage to the instruments. Meeting the handling Requirements of the Workplace Health and Safety Regulations. Risk Patient safety and the transmission of infection from contamination with foreign material due to Reprocessing instructions not followed. Late delivery of loan sets. Contamination of loan sets due to inadequate disassembly Cancelation, delay or prolonged surgical procedures related to the following : Loan sets not ordered Damaged incorrect or missing instruments on sets / rendering loan sets unusable. Financial Risks. Loan sets ordered and than not used. Damagement of instruments leading to replacement cost.
62 Responsibilities Role of the Facility Loan sets for hire have been evaluated Identifying that key handlers know their roles and responsibilities. Educating surgeonts in the handling, disassembly and management of loansets. CSSD staff should be trained and this is the responsibilities of the operating staff Loan sets are only allowed to be reprocessed in CSSD. When booking a surgical case requiring a loan set, the responsible operating theatre should inform the CSSD on sets that has been ordered. Implement the Loan Set Management Checklist. Responsible Person in operating Room must check with CSSD that they have been trained. NB for all booked cases, report to your unit manager if sets have not arrived before you go home Enter details of loan set in the CSSD control book : Date name of loan set Name of person delivering loan set Person receiving loan set Name of company date and time delivering loan sets Write set on the board Pack and label set correctly - Name of loan set - Company name - Name and surname of surgeon The relevant form, SAN 1541 should contain the following information. Date and time of Procedure. Surgeons name and Assistant name. Gender of patient. Education and Training : All staff involve in the ordering, receipt, checking, reprocessing and use of loanset MUST undergo proper training. There must be a continues training development for new procedures. Before Use : CSSD Responsibilities Loan Sets needs to comply to a checklist ensuring the contents are correct and all documentation are present. Make sure that required sets are delivered to the Operating Rooms with documents provided a tray list, sterilization records included. A loan set should pass through a Validated, decontamination process prior to use. During Use : Operating Rooms : Ensure all instruments are documented in OR count by using the loan set tray list. Handle instruments with care to maintain their integrity. After use CSSD Responsibilities. Package instruments in an orderly manner in original containers for return Notify the company when loan sets are ready for despatch Name of person collecting Name of CSSD personnel handing over the loan set. Date and time Wipe loan set from the board.
63 Items that have not been cleaned should NOT leave facility without a hazardous label. Clean and Contaminated Items should be transported separately to prevent cross contamination taking place. Expected outcome: Loan sets are controlled and managed according to SANS 1541 :2013
64 SOP No 29 Title Decontaminating of linen/textiles for sterilization Review Date July 2022 Prepared by CSSD Forums of South Africa (CFSA) Revised by Elana franks Area of application Laundry, linen, packing area Staff involved Trained CSSD staff Purpose Provide standardized guideline on cleaning, disinfecting of decontamination of textiles. Ensure quality patient care against hospitalized associated infections. Ensure patient safety. Prevent legal medical hazards. Ensure all health care workers are informed about hospital policy. Ensure that all contaminated textiles are cleaned, disinfected and scrutinize to a standard satisfaction. Relevant/related documents Sterilization policy and process quality manual Equipment needed Washing machine Drier Ironing Detergent Stain remover Containers and plastic bags PPE(personal protective equipment) Procedure The laundry process should begin in the operating room with proper collection and sorting of textiles into specially provided containers. Staff working in this area should wear ppe at all times in compliance with the standard precautions dress code Standard precautions for linen and laundry must be adhered to Hand washing facilities, hygienic sink, soap dispensers, and paper towels must be provided in the soiled linen processing facility. Contaminated linen should be handle as little as possible. Soiled linen should be contained when transporting from theatre. Sort and discard any disposable material. Avoid contaminating hands with spoilage. Clinical waste into yellow plastic bags, domestic waste into black bags, sharps into sharps container, in a safe way If any instruments are found tell your supervisor and he/she will contact end user. Soiled linen should be taken to dirty area for pre-wash soring Soiled linen should be sored before being loaded into washing machine. Standardized washing and disinfecting processes should be done.
65 Ironing with a hot iron, hot air drying and drying in the sunlight will reduce the number of bacteria present. Clean and dirty linen should not be place together Linen must be appropriately wrapped before being sent to sterile processing department. Linen should not be place or stored on the floor Linen must be stored in dedicated clean storage area All linen must be thoroughly inspected for holes, stains, before being used in sterile packages Expected outcome Clean undamaged linen when inspected visually.
66 SOP No: 30 Title Inspection, Repair, Replacement and condemning of instruments Review Date July 2019 Prepared by CSSD Forums of South Africa (CFSA) Reviewed by Shane Johnson Area of application Sterile Service Department Staff involved Trained CSSD Staff Objective/ Purpose To ensure that all instruments are inspected and for effective repairs to or the replacement of broken or damaged instruments. Relevant / Related Documents Quality Manual Relevant Repair/Condemning documents Equipment/Supplies Instruments Lubricant Good lighting Magnifying glass preferably lighted Procedure It is advisable to use magnifying lights when inspecting instruments. Theatres when returning any damaged item must ensure that it will be readily identified in the wash reception area. Feedback from theatres re damaged instruments is vital. This information must be marked on the checklist. Broken or damaged instruments will be decontaminated prior to sending for repair and a decontamination certificate sent with the consignment. All instruments should be visually inspected following the cleaning and drying process. All parts of the instrument should be inspected for visible soil : blood, protein and other residue. Pay particular attention to: Cannulas and recessed areas o Hinges, joints, Serrations, shafts. All instruments must be checked for visible damage: Breaks and cracks, Deformed, Signs of wear Discoloration, rust, corrosion. All instruments with lumens must be checked for blockages. All dirty or clogged instruments must be returned to the cleaning area for reprocessing. Functional Checks should be performed on all instruments if possible: Always apply lubricants to the instruments before checking function, repeated opening and closing of the instrument will spread lubricant. o Lubricate joints, threads and gliding surfaces prior to any function tests o Instruments must operate smoothly o Check that points touch, jaw tips must not open or shift laterally when the forceps are closed o Check for bent or broken tips or guide pins or broken springs o Check for bent jaws, ratchets and shanks o Grasping surfaces must be in firm contact with each other. Serrations/grooves slot into each other when the instrument is closed. Operate and lubricate moving parts. Only once instruments have been inspected can they be reassembled. All defective instruments should be reported and sent for repair. Instruments identified as needing repair are placed in a dedicated tray in the preparation room after following the wash/decontamination procedure.
67 The records will be maintained by the technician in the area and any repair received back will be issued to the technician who will complete the documentation. CSSD staff will enter all damaged or broken instruments into the relevant documentation. Maintenance and care should be routinely performed. This includes targeted application of lubricants and stain removers. Note: Tracking of instruments is a main consideration and it is paramount that consideration is given; To processing the set with an instrument missing until the repair has been completed. Whether it is viable to repair or replace and dispose of the item requiring repair. To facilitate full traceability. Advice from the manager must be obtained if temporary replacement is considered. Condemning of Surgical Instruments: Condemning of instruments takes place once a month. Instruments that must be condemning must first go through a decontamination process. Instrument must be inspected to see if it is properly clean. It must also be properly packed and Autoclaved before it is send for condemning. Instruments that must be condemned must be recorded in a condemning book. Instruments that are the same must be placed in a small plastic bag and labeled with its instrument name and quantity. The quantity of condemning instruments for the month must be recorded in a requisition book. Condemning book must be signed by the CSSD manager. On condemning day the condemning instruments with the relevant documentation must be given to Asset management staff assigned on that day. Asset management staff will check all the condemned instruments to see if it corresponds with the condemning documentation. Asset management will receive a copy of the relevant documentation and CSSD will also have their own copy. Instruments that has been condemned can either been replaced by buying a new instrument of the same type or the department can buy another instrument that they have a shortage of. Expected outcome Instruments must be free of visible soil Instruments are suitable for their intended use Instrument trays are complete.
68 SOP No. 31 Title Checking and Assembling Instrument Trays Review Date July 2019 Prepared by CSSD Forums of South Africa (CFSA) Area of application Packing Area Staff involved Personnel involved in packing Objective/ Purpose To ensure that all instrument sets are complete and safely packed before sterilization. Relevant/Related documents Procedure Manual Instrument Checklist Manufacturer s Instructions Equipment / Material All instrument sets for use in theatres and ward procedure packs. Checklist Packing materials In pack indicators Labels/Labeling Gun Procedure Staff working in this area will wear protective clothing at all times in compliance with the standard precautions dress code Make sure that all work surfaces are clean. Clean work surfaces according to department procedure. It is critical that staff understand what the instruments are used for, that they are functioning correctly and that each set is assembled in the proper manner for any given procedure. When choosing trays make allowance for extra length, ungainly, heavy or delicate design, all of which are more susceptible to damage than regular shaped instruments. Trays should be perforated to allow penetration of the sterilizing agent and efficient drying. The person checking should indicate and sign that the quantities are correct and that nothing is missing. Instruments must be laid out according to the order on the check list. Trays are usually packed in the order that instruments are used. The contents of instrument sets are usually decided by the surgical team. Depending on the types of surgery the following are most commonly used first: BP handle and scalpel blade (for cutting), diathermy (bleeding control), scissors (cutting/dissecting), retractor / dilators and forceps The assembly of a tray should be agreed by both the reprocessing area and theatre managers The weight of packs must be taken into consideration when assembling trays. Overloaded and heavy trays/sets may some cases remain wet Instrument trays must be assembled to maximize instrument exposure to the sterilant, as well as, sterilant (e.g., water) removal
69 Choose the relevant tray checklist for the instrument set Place a small strip of autoclave tape in the margin on the front of the tray list, making sure that no information is covered. Place a tray liner (where indicated) on the bottom of the tray. Check that all instruments are present against the checklist, check instruments one by one. Check instruments visually for cleanliness and missing parts (tips, screws, free movement, sharpness and overall condition). Do functionality tests on all instruments to check that they are working effectively. Instruments with ratchets or hinges should be held in an open and unlocked position; sliding/extended/complex multiple-part instruments should be disassembled or sufficiently loosened to permit the sterilizing agent to come into contact with all parts of the instrument. Instrument should be left slightly open to allow for sterilant penetration, rings should be slightly separated. Tips of instruments should all be facing the same direction the use of tip protectors is often advised by the manufacturer. Always make sure that all parts of the instruments are present Items (bowl/basins/receivers) that could hold water during steam sterilization must be placed in a way that allows easy drainage. Examine hollow ware for cleanliness, place open side down; do not nest bowls and receivers (if included in set). Heavy instruments should be placed at the bottom of the tray as the weight of heavy instruments or retractors lying on top or over other instruments can cause the instruments at the bottom to bend and become misaligned. Placing the instruments in a single layer will provide more protection to the instruments. Examine and count linen (if included on set) as per tray list, place on top of tray to prevent them getting soaked during sterilisation. (This not a recommended practice) Place an in-pack chemical indicator into the densest most challenging part of the tray. This indicator will only change colour if the in pack sterilization parameters have been reached, i.e. depending on class of indicator used, steam, time and temperature. NB: These indicators act as a final confirmation to the scrub nurse that the set has been through the sterilization process. Ensure that the tray checklist is dated and signed by the packer and checked. Place the completed checked trays into the packing of choice Expected outcome Sets are correctly assembled ready for packaging and sterilization
70 SOP No. 32 Title Prepare, Load and Operate Ultrasonic Cleaner Review Date July 2019 Prepared by CSSD Forums of South Africa (CFSA) Area of application Cleaning Area of Theatre/CSSD/Loaner Companies Staff involved Only staff trained in the use of the equipment Objective/Purpose To ensure that medical devices/equipment are correctly prepared and loaded for decontamination Relevant/Related Documents Procedure Manual Standard Precautions Equipment guidelines Equipment/Supplies Personal Protective Equipment Ultrasonic Cleaner/Washer Detergent Procedure Maintain segregation of designated clean and other areas within the department Identify the correct process for the items to be decontaminated Staff working in this area will wear protective clothing at all times in compliance with the standard precautions dress. PPE is additional to the uniform code for your specific working environment and may include: gloves aprons, gowns, overalls (single-use, fluid- repellent, disposable) masks face and eye protection footwear Apply standard precautions for infection control and other relevant health and safety measures Use and store all equipment chemicals and materials in accordance with manufacturer s instructions and organisational policies and procedures. Comply with manufacturers' and organisation specifications when using all appliances and processing of medical devices. Handle contaminated devices as little as possible. Equipment will be prepared for use as described in the Manufacturers Guidelines All handling and processing is to be undertaken in accordance with the manufacturers instructions Note item manufacturers instructions if it is safe to process in the ultrasonic cleaner Highly contaminated instruments should always be pre-cleaned in the ultrasonic bath as otherwise they cannot be properly cleaned in the washer-disinfector.
71 It is recommended that sensitive instruments that can only be cleaned manually should first be cleaned in the ultrasonic washer. (First check manufacturer s guidelines). It is also recommended that all trays with instruments should be put through the ultrasonic washer at least once a week in order to give them a microscopic clean. In the case of table top cleaners; Fill the tank with potable water (drinking quality) to the manufacturer s designated level. De-gas the water as recommended by the machine manufacturer. Add detergent, ensuring the manufacturer s recommendations are followed. It is advisable to use a suitable enzymatic detergent that is effective at low temperatures. If the tank has a heater, set the temperature control to be comparable with the detergent manufacturer s recommendations... Sort cannulated and solid devices. Avoid contaminating hands with soilage. Open hinged items Place the basket of instruments into the tank. Never put instruments directly onto the base of an ultrasonic washer. (if instruments are placed directly onto Make sure that instruments do not stick out of baskets as they may affect the washer operation Connect all cannulated instruments to the appropriate connector on the basket union if option is available Position the basket into the chamber according to manufacturer instructions Only prescribed automatic cleaning agents should be used, Enzymatic cleaners are recommended bearing in mind manufacturers instructions Check that connection is made with the machine union before closing the door. Select a program or set the timer control to the time specified by the machine manufacturer. After the cycle has been completed, remove the basket from the tank and rinse the items with clean, potable water unless the machine has an automatic rinse stage, or the load is to be transferred directly into a washer/disinfector for further processing. Drain and dry the items using a non-linting cloth or mechanical drying system. If the ultrasonic cleaner does not automatically drain after use, the ultrasonic washer should be drained, cleaned, dried, covered and left dry and empty until Required for further use, as per the manufacturer s instructions. The frequency of water renewal depends very much on how often the machine is used and on the degree of contamination. Ultrasonic Baths with visible contamination should be renewed frequently, possibly several times each day. Otherwise, daily renewal is recommended. Expected outcome Quality controlled safe, clean and functional medical devices ready for packing
72 SOP No. 33 Title Validating an Ultrasonic Cleaner Review Date July 2019 Prepared by CSSD Forums of South Africa (CFSA) Area of application Areas with Ultrasonic Cleaners Staff involved Only staff trained in the use of the equipment Objective/Purpose To ensure that the ultrasonic cleaner is working efficiently and is able to perform the assigned task. Relevant/Related Documents Procedure Manual Standard Precautions Equipment guidelines Equipment/Supplies Personal Protective Equipment Procedure There are two simple tests for checking the performance of your ultrasonic cleaner: Glass slide test Wet the frosted portion of a glass slide with tap water and draw an "X" with a No. 2 pencil from corner to corner of the frosted area. Making sure that the tank is filled to the fill line; immerse the frosted end of the slide into fresh cleaning solution. Turn the Machine on. The lead "X" will begin to be removed almost immediately, and all lead should be removed within ten seconds. Aluminium foil test Use the prescribed roll of aluminium foil or cut three small pieces of aluminium foil about 10cm x 20cm each. Fold each piece over a rod or length of string which will allow the foil to be suspended in the tank. Making sure that the tank is filled to the fill line; immerse the foil strips into fresh cleaning solution. Suspend the first strip in the centre of the tank and the other two a couple of inches from each end of the tank. Make sure that the tank is filled to the fill line, and turn the machine on. Remove the foil and inspect: All three pieces of aluminium foil should be perforated and wrinkled to about the same degree.
73 Chemical indicators Place the vial with the cavitation indicators i.e. glass beads and a chemical, which initially is green into the basket. The cavitation triggers a chemical reaction in the test fluid, causing a clear colour change. When an effective cavitation is reached, the colour of the fluid in the vial changes from green to yellow. Advantage of this system is that it can be used together with the load to be cleaned. Expected Outcome The ultrasonic cleaner is working efficiently and is able to perform the assigned task.
74 SOP No. 34 Title Low Temperature Sterilization (Hydrogen peroxide Plasma/Vaporized Hydrogen Peroxide) (Formaldehyde) Review Date March 2022 Prepared by Michelle.Mutch Area of application Low temperature sterilizing area Staff Involved Trained CSSD personnel allocated to Low Temperature Sterilizing Objective /Purpose To ensure that Low Temperature Sterilizers are operated according to department policy. To ensure that all reusable soiled, returned equipment is sterilized according to acceptable standards and ready to use To ensure that work environment is safe for all employees. To ensure that safe and standard practises are followed Safety warning Always wear gloves recommended by manufacturer when handling Hydrogen Peroxide cassettes or cartridges, and when removing items from the sterilizer if cycle has been aborted Always wear gloves and mask (N93) and gloves when handling formaldehyde vacoilters Relevant/ Related documents Procedure manual Manufactures instruction ISO25424:2009 Equipment / Material -Sterilizer -Cassettes / Cartridges -Formaldehyde Vacoliter -Tyvek -Wrap recommended by Manufacturer -Cassette collection box -Vacoliter Collection box -Printer paper -Instrument sterilization containers recommended by manufacturer -Record keeping files Procedure Items that cannot be processed in a Hydrogen Peroxide Plasma/Vaporized Hydrogen Peroxide -Any items that is not completely dry -Items or materials that absorb liquids -Items made from materials containing cellulose e.g. cotton, paper, cardboard, linens, gauze or items that contain wood pulp -Formaldehyde has no restrictions on what can be put into machine it can sterilize all material used in CSSD -Always consult manufacturer for a complete list of what can and cannot be processed in sterilizer Inserting and removing cassettes / cartridge or Formaldehyde Vacolitre -Wear appropriator PPE as described by manufacturer -Check cassettes / cartridges and formaldehyde vacoliters for damages -Do not remove cassette from plastic wrapper if indicator strip is red (Sterrad) this indicates that the cassette might have been damaged -Check expiry date -Formaldehyde vacolitre make sure the correct amount of fluid is in the vacoliter and there are not leakages
75 -Hang Formaldehyde vacoliter in correct slot, remove air and connect Biological Monitoring -Use manufacturers approved biological indicators -Daily biological monitoring is recommended (as per hospital policy) -Place biological monitor into a Tyvek pouch -Place biological monitor in a load in the sterilizer -Place the biological monitor in the sterilizer as per manufacturers recommendation (Sterrad back of the chamber on the bottom shelf with the opening toward the back chamber) -Formaldehyde has to have a biological indicator in each and every load and the read out has to read before load is released,the indicator goes into a syringe to make it as difficult as possible for penetration -Process the biological indicator -Incubate Biological indicator at temperature as recommended by manufacturer Preparing items to be loaded -All items must be thoroughly cleaned and dried before packing -Use packaging and containers recommended by the manufacturer -Chemical indicator has to be placed in each and every packed item Loading sterilizer -Arrange items in such a way as to ensure that sterilant will come into contact with all the surfaces -Pack items as per recommended by manufacturer for example do not let items touch the walls or door (Sterrad) -Do not stack containers -Place items packed in Tyvek on sides -Formaldehyde machine load as an autoclave -Place steripeel packs on sides plastic to paper Expected outcome Sterilizer is operated as manufacturer s instruction All equipment is sterilized to a acceptable level All cycles can be verified
76 SOP No. 35 Title Decontamination and Management of Laryngoscopes Review Date July 2019 Prepared CSSD Forums of South Africa (CFSA) Purpose To ensure that all laryngoscopes are decontaminated and fit for purpose. Scope All laryngoscopes returned to CSSD. Area of Application CSSD Wards Theatre Staff Involved Only staff trained in decontamination of laryngoscopes Relevant/Related Documents: Procedure Manual Standard Precautions Equipment PPE Cleaning materials Disinfectant Procedure When washing Instruments manually standard/universal precaution must be applied at all times. Only staff trained in decontamination should manually clean medical devices Identify the correct process for the items to be decontaminated following manufacturers instructions. Check laryngoscope for functionality. Any laryngoscope found to be non-functional should be taken out of service and replaced or repaired as soon as possible. All instruments should be cleaned and sterilised according to department policy. If the blade is disposable, dispose of it according to hospital policy At point of use, immediately after use, the laryngoscope blade should have been rinsed in clean tap water or wiped down to remove any residue. Before cleaning check that the bulb in the laryngoscope is working. Disconnect the blade from the handle. Prior to removal of light carrier, allow the lamp to cool. Prior to cleaning, remove any debris trapped between the carrier and the blade. Reassemble the light carrier and blade. Check that the lamp is sufficiently tightened before submerging in water. NOTE: Submerging in water with lamp removed will result in damage to the electrical circuit. Unscrew bottom cap of handle and remove batteries.
77 NOTE: Batteries will be damaged if submerged in water External surfaces should then be gently scrubbed with a soft brush, to provide a thorough cleaning. (using a medical grade detergent prepared as per the manufacturers instructions) Either clean manually or in an automated cleaner according to manufacturers instructions After cleaning, rinse blades thoroughly, and dry prior to disinfection/sterilization. Inspect physical condition for: Foreign Substances, Damage or cracks, broken, loose or wear WARNING: ultrasonic cleaning is not recommended A minimum of High Level Disinfection is required. If recommended by manufacture blades may be steam autoclaved NOTE: Autoclaving with lamp removed will result in damage to the electrical circuit. Standard battery handles are usually not compatible with steam autoclave sterilization Autoclaveable handles can often be identified by the term AUTOCLAVE written on the handle. If they do not have the marking they ARE NOT autoclavable. NOTE: ALWAYS FOLLOW MANUFACTURERS GUIDELINES Always wrap laryngoscope blades and handles unattached if autoclaving. NOTE: Do not exceed temperature of 134 C Flash and Hot air sterilisation is not recommended If disinfecting refer to solution manufacturer s instructions for recommended exposure times and solution concentrations, NOTE: Disinfecting with lamp removed will result in damage to the electrical circuit. Prior to immersion, ensure that the lamp is secure. Rinse thoroughly in sterile water. Dry with a non linting cloth Test Procedure Once Disinfected/Autoclaved (unwrap pack) replace appropriate size batteries (as per manufacturers instructions) into Laryngoscope handle and replace bottom cap. Stubby handle: insert battery pack with tab side down. Laryngoscope blades and handles should always be tested after cleaning/disinfection/sterilization and prior to use. To check, connect the laryngoscope blade to the handle and pull open to the on position. If the unit fails to light or flickers, check the lamp/ batteries. Be sure adequate supplies of spare lamps, batteries, and replacement parts are readily available. Be sure the lamp s glass envelope is clean and free of any fingerprints after assembly. If necessary, the glass may be cleaned with a soft cloth or cotton ball moistened in alcohol. Wrapping the reassembled laryngoscope should protect it from contamination until the item is to be used the. A re-sealable plastic bag or other impermeable wrap may be used as the covering because the laryngoscope is clean not sterile. Wrapping the blades in sterilization wrap or a sterilization peel pack is not recommended because this may lead the user to think that the blade is sterile. Contamination may result from a clean blade coming into contact with a contaminated laryngoscope handle. The item should be clearly labelled as being high-level disinfected and not sterile. Labelling should also contain some method to indicate the date when the high-level disinfection occurred and the person responsible for completing the process. Expected Outcome Laryngoscope is clean and fit for purpose
78 SOP No. 36 Title Daily Heat Sealer Checks Review Date July 2019 Prepared CSSD Forums of South Africa (CFSA) Purpose To ensure accurate, safe use of heat sealer, and implement quality control Scope All areas with heat sealers Area of Application CSSD Theatre TSSU Staff Involved Only staff trained in use of heat sealers Relevant/Related Documents Procedure Manual Standard Precautions Equipment PPE Heat sealer See through Packaging Scissors Procedure Apply a neat seal to a piece of see through packaging daily and check the following: (Use the maximum width reel in your facility) Check that the heat sealer is set to the manufacturer s specifications i.e. the correct: Temperature Temperature C as per manufacturers recommendations Uniform pressure - The heat sealer must give an adequate consistent pressure. A clean, uniform seal pattern Sealing dwell time as per manufacturers guidelines o Seal Integrity o No gaps in seal o No creasing or scorching o Uniform pattern o Seal strength The pouch should be such that when peeling it open, neither the paper nor the laminate will tear. It should open neatly along the seals. Check if heat sealer s edge is in good condition
79 The edges should be perfectly flush or parallel to the sealing fixture to allow uniform pressure to be exerted. The gasket material should be in good condition. Complete the attached check list. File the check list for quality control purposes. If any problems are found please contact the supplier. Expected Outcome Adequately Sealed packages Date: DAILY HEAT SEALER CHECKLIST Procedure Yes No Temperature uniformity Temperature set between C Is the heat sealer sealing edge perfectly flush or parallel to the sealing fixture Seal Integrity No gaps in seal No creasing or Scorching Pressure Uniformity Is the pattern uniform Strength of Seal Pouch opens without tearing Signature: Sample attached Yes/No:
80 SOP No. 37 Decontamination and Disinfection of Babies Bottles Review Date July 2019 Prepared CSSD Forums of South Africa (CFSA) Purpose To ensure that all soiled/used babies milk bottles returned to the Milk Kitchen are cleaned to an acceptable standard. To minimize pathogenic contamination Scope All bottles returned to the milk kitchen. All new bottles prior to introduction for use. Area of Application Cleaning Area of the Milk Kitchen Staff Involved Only staff trained in decontamination process Relevant/Related Documents Procedure Manual Standard Precautions Equipment Personal Protective Equipment Washer/Disinfector Machine Doubler sink Detergent Procedure When washing bottles standard/universal precaution must be applied at all times Only staff trained in decontamination should clean babies bottles Staff working in this area will wear protective clothing at all times in compliance with the standard precautions dress. PPE is additional to the uniform code for your specific working environment and may include: a) Gloves b) Aprons, gowns, overalls (single-use, fluid- repellent, disposable) Comply with manufacturers' and organisation specifications when using all appliances and processing of medical devices. Transfer all bottles to the work surface. Each bottle will be prepared for decontamination Remove the protective bottle cap Remove the teat from the bottle cap Prepare Sink and add detergent according to manufacturers guidelines Washer disinfectors will be prepared for use according to manufacturers guidelines Standardised washing and disinfecting processes should be used and validated. Choose the relevant washer rack Identify the correct process for the bottles to be decontaminated Place bottle in washer disinfector, Be aware that teats may become lodged in drainage system Pack bottles ensuring that all surfaces can be reached by the spray jets
81 Bottles must be packed upright Place teats and bottle caps in a covered basket Do not pack too densely Do not over-pack trays, note manufacturers maximum prescribed weight Position tray into the chamber according to manufacturer instructions Only prescribed automatic cleaning agents should be used A full-automated process should be used including pre rinsing, washing at 60 C minimum (if recommended by manufacturer), rinsing at 90C if manufacturers instructions allow and drying. Ensure bottle dry in washer Place bottle into holder and wrap in sterile towel till needed Bottle must be used within 24hrs Expected outcome Quality controlled safe, clean bottles ready for use
82 SOP No. 38 Title Decontamination and Sterilization of reusable LMA s Review date July 2014 Prepared by CSSD Forums of South Africa Area of application Sterile Service Department Staff involved All personnel that are assigned or engaged in Sterile service operation. Objective / Purpose To ensure that all soiled LMA s are cleaned to an acceptable standard. To ensure that all LMA s are sterile and ready for use Relevant / Related documents Occupational Health and Safety Act and Regulation 85 of Standard Precaution Guidelines Infection Control Policy. Equipment/Supplies PPE Mild detergent or enzymatic cleaner in accordance with manufacturer s recommendations. Small 12.5mm diameter soft bristle brush. 20ml syringe. Procedure Wipe the LMA cuff and airway tube using a lint free cloth and gloved hands to remove any lubricant and any secretions. Wash the LMA in a prepared detergent and warm water solution (as per manufacturer s instructions). Detergents used must not contain skin or mucous membrane irritants. Do not use the following: disinfectants or chemical agents such as Gluteraldehyde, Ethylene Oxide, Phenol-based cleaners or iodine containing cleaners to clean or sterilise LMA s. These substances may be absorbed by the LMA airway materials, resulting in exposure of the patient to potentially severe tissue burns and possible deterioration of the LMA airway. Always adhere to manufacturers instructions. Do not expose the valve to any cleaning solution. Before cleaning ensure that the balloon valve is closed so that water or cleaning solution does not enter the valve line. Inflate the cuff slightly to act as a seal during cleaning. Flush tube channel with warm water. Manual clean or clean in automated washer disinfector (as per manufacturer s instructions). Using appropriate soft bristle LMA cleaning brush (12.5mm diameter), insert brush between middle aperture bars and proceed to clean the airway channel. Gently clean the side aperture bars with the cleaning brush tip. Be careful not to break or damage the aperture bars. Gently insert the brush through the aperture bars into the airway tube taking care not to damage the bars of the mask.

83 Clean the inside of the airway tube with a soft bristle brush, taking care not to damage the bars at the front of the mask. Rinse the LMA cuff and airway tube under running warm water to remove cleaning residues. Remove excess water from the valve and dry using A Lint free cloth Use an air gun to blow any moisture from channel/s following decontamination, and ensure there is no water in the valve tip. Carefully inspect the LMA to ensure that all visible foreign matter is removed. Ensure LMA is completely cleaned and that all lubricant and secretions are removed Look through the air channel and/or suction channel to ensure no debris are present and that the channel is patent. Flex the tube to no more than 180. If the tube kinks, the LMA is to be discarded. Check to see that there is no damage from inadequate bite block protection following use. Steam autoclaving is the only recommended method of sterilisation for the LMA airway. Deflate the cuff using a syringe (as per manufacturer s instructions) (deflation of the cuff may require a deflation tool since residual air can accumulate in the dorsal cuff) The cuff should be fully deflated and dry before autoclaving Autoclave according to manufacturers guidelines usually at 134 C for 3-4 minutes (prevacuum and wrapped). Note Reusable LMA s have a limited use (e.g. 40 uses or a period of one (1) year, so a record must be kept each time the LMA is used)), Please read the manufacturers instruction manual and guidelines. Expected Outcome Quality controlled safe, clean and functional LMA s ready for use.
84 SOP No. 39 Title Wrapping Medical Devices ready for sterilisation Review Date July 2019 Prepared by CSSD Forums of South Africa (CFSA) Area of application Packing Area Staff involved Personnel involved in packing Objective/ Purpose To ensure that all instrument sets are complete and safely packed before sterilization. Relevant/Related documents Procedure Manual Instrument Checklist Manufacturer s Instructions Equipment / Material All instrument sets for use in theatres and ward procedure packs. Checklist Packing materials In pack indicators Labels/Labelling Gun Tracking devices Procedure Staff working in this area will wear protective clothing at all times in compliance with the standard precautions dress code Make sure that all work surfaces are clean. Clean work surfaces according to department procedure. Trays should be perforated to allow penetration of the sterilizing agent and efficient drying. The person checking should indicate and sign that the quantities are correct and that nothing is missing. Instruments must be laid out according to the order on the check list. The weight of packs must be taken into consideration when assembling trays. Overloaded and heavy trays/sets may some cases remain wet. Preferably place the list on top of the tray folded inner wrap, between the two layers? Close the inner wrap by taking the wrap on the side nearest to you and folding it towards the middle of the pack. Fold the edge back towards you, according to the size of the pack, creating a cuff. Repeat this procedure with the opposite side. Paper must be large enough to ensure that both sides meet and overlap in the centre. Fold both ends of the wrap to produce a V shape. Fold both V s towards the centre. Both V s must meet in the centre and overlap. Repeat the folding with a second piece of wrap.


85 CFSA Decontamination and Sterilisation Department Standard Operating Procedures Seal the pack with 2 pieces of masking tape +- 10cm and a small piece of autoclave tape +5cm. Label the pack either using a labelling gun or a strip of masking tape or whatever tracking system is being used, with the pack details written on it. (according to hospital policy) Do not write directly on the wrapping. If the pack is to be transported to the wards or clinics it should be placed into the appropriate sized aseptor bag to protect it. The aseptor bag must be marked prior to inserting the pack. Do not write directly on the bag; write on a strip of masking tape. Place the completed set on the autoclave trolley ready for autoclaving. Expected outcome Sets are correctly wrapped and ready for sterilization
86 SOP NO. 40 TITLE: Decontamination Area Responsibilities Review date: September 2022 Prepared by: S.E.B. Murray Area of application Decontamination area CSSD Staff involved: Only staff trained in CSSD decontamination, with a working knowledge of equipment and instrumentation. Objective/Purpose: To clean, decontaminate, and prepare for sterilization: all instruments and/ or equipment needed in the hospital, theatres, and wards. To render medical devices: safe, and clean enough, to handle, for inspection, packing and sterilization. Relevant or related documents: Manufacturers guidelines for use: cleaning and handling of instruments, drills and intra-operative surgical equipment. Manufacturer s guidelines for use: including trouble shooting solutions for all equipment used in the Decontamination area. Material Safety Data Sheets pertaining to solutions used in the area. Infection control policies. Standard Precautions (W.H.O.) Occupational Health, and Safety policies. Institutional Policies, S.O.P., and Work orders. Equipment/Supplies: Personnel Protective clothing and equipment as stipulated below Automatic instrument washer disinfector, Automatic endoscopic reprocessor, Ultrasonic washer. Brushes of all sizes needed for the medical devices, Surface cleaning materials and chemicals Detergents and chemicals appropriate for automated machines and manual cleaning, Hand hygiene soaps and sprays, High pressure hose for irrigating lumens, High pressure air for drying medical devices, Drying cabinet for endoscopes. Contained area for testing of drills, saws and other equipment causing aerolysation. PROCEDURE: Staff members will wear full PPE: including scrubs uniform, hair covering including facial hair; dedicated washable, non-slip shoes. A water-proof, disposable, non-shedding gown with long sleeves, close fitting at neck and cuffs; gauntlet gloves; goggles/mask or full face visor, plastic apron. This area is to be cleaned by the Central service technicians at least at the start and end of each shift; after each workload; and more often as deemed necessary by management. The cleaning includes all surfaces, high touch points; areas where water or dust collect. Cleaning needs to be recorded, as proof of work done. Equipment needs daily cleaning both inside and out according to the Manufacturer s information for use. (M.I.F.U.) Cleaning needs to be recorded, as proof of work done. Environment needs to be kept clean, tidy and dry. The floor cleaning needs to be done at least twice a day with a vacuum cleaner and wet mop, due to the high risk area. Only enough supplies to be taken out for the shift, to reduce contamination. Dummy runs as well as function tests need to be performed daily on all equipment and recorded; according to the M.I.F.U. s
87 Reusable brushes need to be cleaned once daily at least at the end of the day and when contaminated, through the instrument washer disinfector. All loads through the instrument washer/disinfector, ultrasonic, automatic endoscopic reprocessor [A.E.R] must be recorded with the names of all items decontaminated. The automatic printouts for all machines are to be filed and kept, as proof of work done, and for traceability. Manual washing must be recorded, date, time, and person. Items coming into decontamination must be in a sealed leak proof container with a tamper-proof lid. All medical devices/sets need to be recorded on entry into decontamination, the point of origin; surgeon, scrub sister, patient surname or hospital number is recorded in order to trace: in cases of lost instruments, or infection risk. [I.e. CJD]. All sets and instruments are checked according to the checklist in decontamination area. Visional inspections for sharps with the aid of chettles or a swab holder are performed. Any items missing are reported immediately to the user department. Incidents in this area are reported to CSSD management and then to the user department manager for rectification and training. Staff trained in removing sharps can do so. Single use items remaining, are discarded at this point. Items brought into the decontamination area must be in the cleaning process within 60 minutes of arrival. Cleaning and disinfectant solutions need to be compatible with both machines and instruments according to the M.I.F.U. s All lumens are soaked (vertically) in water and detergent according to manufacturers recommendations, including the recommended soak-time, temperature and are then manually brushed under water, and rinsed in clear running water; or with a pressured water spray gun; thereafter put through the instrument washer disinfector for processing. All trays of instruments need to go through the ultrasonic washer at least once a week. Manual washing of instruments is strongly discouraged; manual cleaning is only used for manufacturer s recommendations, extremely delicate equipment, and heat sensitive medical devices. Manual cleaning is not an excuse for insufficient instruments. Expected outcome: Timeously decontaminated instruments, inspected, cleaned according to the M.I.F.U, I.P.C, O.H.S., CFSA S.O.P and hospital policy; ready for final inspection, assembly, packing and sterilizing for the next patient s No Risk use.
88 SOP No. 41 Title Management of Chemical spills in a CSSD Review Date May 2020 Prepared by Rochelle Jekels Area of application Sterile Service Department Staff involved All personnel that are assigned or engaged in Sterile service operation. Objective / Purpose To ensure that chemical spills are effectively and safely managed and controlled Relevant / Related documents Regulations for Hazardous Chemical Substances, The Occupational Health and Safety Act Procedure Manual Standard Precautions Manufacturers Instructions Equipment/Supplies Personal Protective Equipment Kit Container Plastic/ metal dust pan Large, sealable plastic bag Waste disposal container with lid Paper towels (one roll) Pillows and brooms Sheets and pads Procedure General Response Guidelines For simple spills, emergency responders do not need to be notified. However, you should contact the environmental health and safety office or other responsible person within your facility. Most importantly, before cleaning up a simple spill, be sure that you can do so safely. You must have the right personal protective equipment, including, at a minimum, appropriate eye protection, protective gloves, and an over coat. Additional protective equipment may be required for spills that present special hazards (such as corrosive or reactive spills or spills that have a splash potential). As a rule of thumb, if you need a respirator, you should request outside assistance because you do not have a simple spill.
89 Steps to be taken during spill clean-up. 1. Prevent the spread of dusts and vapours. If the substance is volatile or can produce airborne dusts, close the decontamination door and increase ventilation (through fume hoods, for example) to prevent the spread of dusts and vapours to other areas. 2. Neutralize acids and bases, if possible. Spills of most liquid acids or bases, once neutralized, can be mopped up and rinsed down the drain (to the sanitary sewer). However, be careful because the neutralization process is often vigorous, causing splashes and yielding large amounts of heat. Neutralize acids with soda ash or sodium bicarbonate. Bases can be neutralized with citric acid or ascorbic acid. Use ph paper to determine when acid or base spills have been neutralized. 3. Control the spread of the liquid. Contain the spill. Make a barrier around the outside edges of the spill. Use absorbent materials such as spill pillows. 4. Absorb the liquid. Add absorbents to the spill, working from the spill's outer edges toward the centre. 5. Collect and contain the clean-up residues. The neutralized spill residue or the absorbent should be scooped, swept, or otherwise placed into a plastic bucket or other container Additional packaging may be required before the wastes can be transported from your area. For spills of powders or solid materials, you may need to add a dust suppressant. Be sure to place descriptive labels on each container. 6. Dispose of the wastes. Keep clean-up materials separate from normal trash. Contact your environmental health and safety officer for guidance in packaging and labelling clean-up residues. Promptly place clean-up wastes in an appropriate hazardous waste receptacle. 7. Decontaminate the area and affected equipment. Ventilating the spill area may be necessary. Open windows or use a fan unless the area is under negative pressure. Make sure all hazardous vapours are gone. For most spills, conventional cleaning products, applied with a mop or sponge, will provide adequate decontamination. 8. Documentation After cleaning up a spill, a simple write-up should be prepared to document what happened, why, what was done, and what precaution can be taken in future to prevent a
90 spill. Such documentation can be used to avoid similar instances in the future. Major incidents are almost always preceded by numerous near misses. Expected Outcome Procedure is in place to manage a chemical spill.
91 SOP No. 42 TITLE: Role of medical representatives in CSSD Review date: August 2022 Prepared by: Liana de Lange Area of application: CSSD Staff involved: All representatives and CSSD staff Objective/ Purpose: To ensure that all representatives know their role and responsibilities in CSSD departments Relevant and related documents: Quality assurance Procedure manuals Standard precautions Health and safety SANS 1541 Equipment/supplies: Loan sets Procedure: All representatives must have a CRICE card to enter the operating theatre and the packing area/sterile store of CSSD entering under supervision with consent Representatives must report to the CSSD supervisor/manager or the shift leader of OT after hours. All loan sets must have an instruction manual and check list No medical representative allowed in the decontamination area. Representatives cannot enter the decontamination area and return to operating theatre for the next case (cross contamination) Representative may not perform any cleaning tasks or use the washer disinfector, they are not trained in the units policies and procedures All sets to be dismantled and cleaned of gross debris in operating theatre before sending it to the decontamination area The medical representative can do a quick check in the packing area, under supervision, wearing the correct PPE and perform hand hygiene before entering The medical representative can collect the sterile loan sets from the sterile store together with the scrub or circulating nurse on preparing for the specific case Medical representatives are not allowed to wrap any sets/trays Medical representatives are not allowed to use the autoclaves or any equipment in CSSD Medical representatives must sign in and out in a register on visits to CSSD. No back packs allowed in CSSD All loan sets should be delivered at the designated receiving area in CSSD where they must be checked by the CSSD staff in the presence of the company representative Expected outcome: Controlled management of medical representatives and loan sets in CSSD
92 SOP No. 43 Title Management of Blood Spills in the CSSD Review Date July 2022 Prepared by Sarah Cronje Area of application Sterile Service Department Staff involved All personnel that are assigned or engaged in Sterile service operation. Objective / Purpose To ensure the safe handling, cleaning and disinfection of bodily fluid spills in a Central Service Facility. Relevant / Related documents Occupational Health and Safety Act no 85 of 1993 Regulations for Hazardous Biological Agents R 1390 Control of Hospital Infection, fifth edition (G.A.J.Ayliffe; A.P. Fraise; C. Bradley, 2009) Chemical disinfection in hospitals (G.A.J. Ayliffe; D Coates;P.N. Hoffman, 1993) Infection Control Policy Standard Precautions Guidelines Equipment/Supplies Blood spill kit Blood spill kit content Check the content of the blood spill kit to ensure it is complete. o 4 paper towels o Plastic apron o Mask with visor o 2 sets of disposable gloves o Red plastic waste bag with a cable tie o 2 sachets of 6g Hypochlorite Procedure to clean blood spillage Place wet flood signs at either side of the spill. Collect spill kit (Remember to replace what has been used) Put on a plastic apron, gloves and face protection. Cover the spill with paper towel to absorb most of the body fluid Wipe up and discard in the red plastic bag Pour on enough disinfectant hypochlorite (1000-ppm available chlorine = 6g sachet) to cover area of spillage. Leave for 10 minutes Wipe disinfectant using the paper towels available and discard together with gloves and apron in red plastic bag cable tie and place in Health care risk waste container. Wash and dry hands according to procedure The cleaner will then follow up with proper cleaning using the disinfectant of your facility.
93 Expected Outcome Quality controlled safe, clean and hazardous free department.
94 Sop No 44 TITLE: Hand Hygiene Review Date August 2022 Prepared by CSSD Forums of South Africa (CFSA) Reviewed by Lesley Denish Introduction Hand hygiene is the single most important measure in the infection prevention and control (IPC) armoury to prevent cross-contamination and healthcare-associated infections (HAIs). Any infectious agent transmitted by the contact or droplet route can potentially be transmitted by touch. Microorganisms are either present on the hands most of the time (resident flora) or acquired during activities such as healthcare (transient flora). Hands can also become contaminated through contact with respiratory secretions when coughing or sneezing. Contaminated hands can lead to cross-transmission of infectious agents in non-outbreak situations (Pratt et al 2001; Boyce & Pittet 2002; Pratt et al 2007, cited in ref 1) and contribute to outbreaks involving organisms such as methicillin-resistant Staphylococcus aureus (MRSA), vancomycin-resistant enterococci (VRE) and multi-resistant Gram-negative (MRGN) microorganisms, such as Acinetobacter spp (Pratt et al 2001, cited in ref 1). Hand hygiene may be accomplished by washing with plain or antiseptic soap and water or by rubbing with alcohol hand rub. Definitions Social handwash: A routine/social hand wash is performed using non-antiseptic liquid soap and is aimed at removing transient microorganisms and rendering the hands socially clean. This level of decontamination is sufficient for general social contact and some clinical care activities, eg. beginning and end of a shift, after removing PPE, visiting the toilet, entering clinical areas such as the CSSD, before eating or using a computer keyboard in a clinical area. Antiseptic handwash: This is done using antiseptic liquid soap to remove or destroy transient microorganisms and to substantially reduce resident microorganisms when procedures are performed such as packing instruments for sterilization or before handling warm sterile trays. Aseptic handwash: This is done before an aseptic procedure. This procedure is done with antiseptic liquid soap containing chlorhexidine gluconate 4% and includes the washing of the forearms up to the elbows. The hands should be kept higher than the elbows during the washing, rinsing and drying procedure. This is done for surgical scrubbing in theatre and is not done in CSSD. Hand rubbing with alcohol handrub: hand hygiene using alcohol-based hand rubs is more effective against the majority of common infectious agents on hands than hand hygiene with plain or antiseptic soap and water. (WHO 2009; Boyce & Pittet 2002; Pratt et al 2007; Canada Standards and Guideline Core Committee 2008;
95 PIDAC 2008) and literature reviews (Pittet & Boyce 2001;Picheansathian 2004; Rotter 2004; Nicolay 2006; Larmer et al 2008; Grayson et al 2009, cited in ref1). Hand rubbing replaces handwashing in CSSD in all circumstances except where hands are visibly soiled or after removing latex gloves. Impediments to effective hand hygiene As intact skin is a natural defence against infection, cuts and abrasions reduce the effectiveness of hand hygiene practices. Breaks or lesions of the skin are possible sources of entry for infectious agents (Larson 1996 cited in ref 1) and may also be a source of them. Similarly, the presence of fingernail disease may reduce the efficacy of hand hygiene and result in the transmission of pathogens (WHO 2009). To reduce the risk of cross-transmission of infectious agents, cuts and abrasions should be covered with waterproof dressings. The type and length of fingernails can have an impact on the effectiveness of hand hygiene (Boyce & Pittet 2002; Lin et al 2003 cited in ref 1). Artificial or false nails have been associated with higher levels of infectious agents, especially Gramnegative bacilli and yeasts, than natural nails (Pottinger et al 1989; Passaro et al 1997; Foca et al 2000; Hedderwick et al 2000; Moolenaar et al 2000; Parry et al 2001; Boyce & Pittet 2002; Gupta et al 2004; Boszczowski et al 2005 cited in ref 1). Fingernails should therefore be kept short (e.g. the length of the finger pad) and clean, and artificial fingernails should not be worn. Studies have also demonstrated that chipped nail polish may support the growth of organisms on the fingernails (Grayson et al 2009 cited in ref 1). It is good practice to not wear any nail polish. Although there is less evidence concerning the impact of jewellery on the effectiveness of hand hygiene, rings can interfere with the technique used to perform hand hygiene resulting in higher total bacterial counts (Boyce & Pittet 2002 cited in ref 1). Hand contamination with infectious agents is increased with ring wearing (Boyce & Pittet 2002; Trick et al 2003 cited in ref 1), although no studies have related this practice to healthcare worker-to-patient transmission. The consensus recommendation is to strongly discourage the wearing of watches, rings or other jewellery during health care; however if jewellery must be worn in clinical areas it should be limited to a plain band (e.g. wedding ring) and this should be moved about on the finger during hand washing or rubbing. Cultural issues and South African Legislation: Individual rights to wear religious or cultural wrist apparel versus patients right to safety: with reference to prayer strings and isiphandla or goatskin armbands: This is sometimes a contentious issue with some staff who feel cultural or religious rights take precedence over the patient s right to safety. This is in fact an incorrect perception. Section 36 of the Bill of Rights in the SA Constitution deals with the Limitation of Rights: - Individual rights are not absolute - Limitations must be applied generally (includes wristwatches, bangles, any wrist device that could be implicated in cross-infection, including goatskin wrist bands and cotton strings)
96 - Must be reasonable & justifiable (infection prevention & patient safety are both) - Less restrictive means must be considered a suggestion is to use a small piece of plastic wrap to contain the goatskin or cotton string completely, and then cover this completely with waterproof elastoplast. Both layers are to be changed daily at the staff member s own cost. - Gauze bandages and paper towel are NOT acceptable alternatives. Handy Hints for Healthy Hands: Before applying antiseptic soap to hands, wet skin well. Do not apply soap to dry skin. After vigorous washing, ensure ALL soap is rinsed off. The water from the mixer tap should not fall directly into the plughole, causing aerosolization of the biofilm in the drain. Offset the mixer faucet slightly in order to avoid re-contamination of hands by splash-back. Dry hands thoroughly with paper towel, (only use a patting motion to dry if skin is sensitive or damaged). Apply emollient hand creams regularly from a pump-top bottle; jars of cream quickly become contaminated. Remember that hands are drier in winter and need extra care at breaks and after working hours. Alcohol-based handrubs are significantly less irritating and damaging than soaps (Pittet & Boyce 2001cited in ref 1) Attend hand hygiene training sessions regularly to refresh knowledge and skills. Procedure Hand washing: Social wash Remove jewellery from hands and forearms (1 plain wedding band may be worn) If long sleeves are worn roll up sleeves above the elbows Wet hands and forearms under running tap water Follow the technique on the step by step illustration on how to wash your hands effectively. Move wedding band to wash skin underneath. Rinse hands thoroughly, holding the fingers upwards. Keep hands above the level of the elbows Turn the water supply off by using your elbows If there are no elbow operated taps, use a paper towel to turn off taps Dry both hands well by using two sheets of paper towel. Dry underneath wedding band. Discard the paper towels in the pedal-operated non-risk waste waste bin.

97 Handwashing: Antiseptic hand wash (see figure above) Remove jewellery from hands and forearms except wedding band. If long sleeves are worn roll up sleeves above the elbows. Wet hands and forearms under running tap water. Apply 3-5 ml of antiseptic hand wash such as aqueous chlorhexidine gluconate 4% to hands. Rub hands together and work up lather. Follow the technique above, but extend the washing from the wrists up the forearms to the elbows, then rinse and repeat washing a second time up the forearms to mid-arm. Rinse hands thoroughly, holding the fingers towards the tap. Keep hands above the level of the elbows. Turn the water supply off by using your elbows if elbow-operated taps are used. If there are no elbow- operated taps, use a paper towel to turn off taps. Dry both hands well by using two sheets of paper towel and discard in non-risk waste bin.

98 Hand rubbing with alcohol handrub Remove jewellery from hands and forearms. If wedding band is worn, move it so that alcohol can reach the skin under the band. If long sleeves are worn roll up sleeves above the elbows Pour 3-5 ml of alcohol hand rub solution into palm of one hand. Dip finger tips of other hand into alcohol. Pour alcohol into other palm and repeat with finger tips of other hand. Apply alcohol evenly to all surfaces of both hands and wrists, following the handwashing steps. Rub hands until they are dry
99 References 1. W. Cape Government Infection Control Assessment Tool for Hand Hygiene 2. NHMRC (2010) Australian Guidelines for the Prevention and Control of Infection in Healthcare. Commonwealth of Australia. 3. WHO Guidelines on Hand Hygiene in Healthcare. World Health Organization The Constitution of the Republic of South Africa, 1996 (Act 108 of 1996) 5. South African National Standards: SANS PART A and SANS 10131
100 SOP No. 45 TITLE: Marking of Surgical Instruments Review date: August 2022 Prepared by: Ina Botha Area of application: CSSD Staff involved: Trained CSSD staff in Assembly and Packing Areas Objective/ Purpose: The primary purpose of instrument marking is to keep all instruments in a set together by using identical tape on each instrument. Relevant and related documents: Quality assurance Procedure manuals Standard precautions Equipment/supplies: Surgical instruments Colour tape 70% isopropyl alcohol. Procedure: Only marking tape designed and tested to withstand multiple cleaning and sterilization cycles should be used for instrument marking It must be able to adhere to the instrument and maintain construction quality during surgical procedures. Items such as magic markers, finger nail polish, and paint should not be used because the marking material can flake off of or leave toxic residues on instrument Marked instruments should be inspected after each use for chipping, peeling and flaking to help prevent tape particles from infecting a surgical wound If the tape is applied incorrectly, it can loosen and provide a hiding place for microorganisms and debris To apply instrument tape: Step 1. Select the area on the instrument for tape application. The selection site should be a flat surface, such as an instrument s shank, rather than the rounded area of an instrument, such as ring handles. Step 2. Wash hands and clean fingers with 70% isopropyl alcohol to remove oils, grease and dirt. Step 3. Wipe the area on the instrument where the tape will be applied with 70% isopropyl alcohol
101 All lubricants, debris and moisture must be removed. Step 4. Cut roll tape to fit the instrument Cut the tape on an angle to allow its edges to lie flat. Pre-cut tape is removed from the sheet. Step 5. Wrap the tape around the instrument one to one-and-a-half times, while applying it with a firm and pulling tension. Be sure to overlap the first tape layer at least once, but not more than twice. Placing too much tape on an instrument can cause a layering problem where the tape can eventually come undone and create a hiding place for debris and micro -organisms. Step 6. After tape application, the instrument should be autoclaved, so the heat can help bond the tape to the instrument Inspection: Routine inspection must be an important aspect of instrument processing activities It is important to ensure the tape lies flat against the instrument s surface each time it is inspected The inspection must confirm the tape is not chipped, cracked flaked, or lifted from the instrument, or becoming unwound If the tape is not intact and or does not completely adhere to the instrument all tape residues must be removed and instrument must be remarked. Expected Outcome: All surgical instruments correctly marked and instruments inspected after decontamination process to ensure that tape is intact.
102 SOP No. 46 Title Decontamination of flexible endoscopes Review Date August 2022 Prepared by Georgia Alevizopoulou Area of application Sterile Service Department and Endoscopy Decontamination Unit (EDU) Staff involved All personnel that are assigned or engaged in Sterile service operation. Objective / Purpose Establish consistent effective reprocessing of flexible endoscopes. Relevant / Related documents Endoscope manufacturer IFUs Equipment manufacturer IFUs Chemistry manufacturer IFUs EDU policy National endoscopy standards Equipment/Supplies PPE Leakage tester Detergent, disinfectant Sponge, brushes, flushing kit, syringe Tap and distilled water Sink, container, (AER if available), cabinet Procedure The endoscope is a delicate instrument that must be treated with care. Always carry flexible endoscopes loosely coiled with the control head and distal tip held securely. All endoscopes and accessories should be reprocessed following manufacturer instructions. Personnel involved in the reprocessing procedure should be protected from direct contact with contaminated endoscopes, accessories and patient fluids. All personnel should be offered appropriate vaccination against infectious agents, i.e. Hepatitis B and wear appropriate PPE. Only properly trained personnel should be involved. Seven steps are involved in handling and reprocessing a flexible endoscope: a. Pre-cleaning at the point of use (bedside) b. Visual inspection and leak test c. Cleaning d. Rinsing e. High Level Disinfection f. Rinsing g. Drying/Storage Pre-cleaning Pre-cleaning begins at the point of patient use, immediately after the end of the procedure:
103 1. Turn off the video system and light source. Still attached to the light source, wipe off gross soil from the scope s body, head and tip with a soft, lint-free cloth dampened in detergent that is prepared at use dilution. A single use sponge is preferred. 2. Place the distal tip in the detergent solution and aspirate the detergent through the suction/biopsy channel system until the expelled solution is visibly clean. Alternate the suctioning of the detergent and air several times. 3. Purge air/water channels: depress and release air/water button several times to flush water channel. 4. Disconnect the water bottle connector from the endoscope taking care not to contaminate its end. 5. Remove all detachable parts, i.e. valves, buttons, and caps. 6. Remove the endoscope from the light source. 7. Confirm that the water-resistant cap is dry and attach. (for videoscopes) Transport the endoscopes and the dedicated accessories to the reprocessing area covered in closed containers or covered trays. Visual Inspection and leak test 1. Operate the control knobs to ensure the angulation properties are in proper order; observe the distal tip moving in all directions. 2. Inspect the insertion tube: look for crimps, bite marks, buckling and kinks of the flexible parts. If any sign of defect, remove the scope for repairs. A leak test is necessary to ensure that the flexible covering is intact and will therefore prevent fluid or moisture entering the internal parts of the scopes. Endoscopes should always be tested for leaks after each and every procedure and prior to immersion of any kind. The leak test procedure involves submerging the endoscope and forcing air through it: 1. Fill in the sink to the marked volume with fresh clean water. 2. Check the leakage tester is purging air and it is dry. 3. Attach the leakage tester to the venting connector of the fiberscope or to the dedicated connector on the water resistant cap for video endoscopes. Pressurize the scope and check for pressure drop on the gauge. 4. Immerse only the distal tip and manipulate the control knobs in all directions: holes can be masked when the tip is straight, but appear when the tip is flexed. If continuous bubbles are observed, remove the distal tip from the water immediately. The control knobs at this point must be out of the water. If no bubbles are noted at the distal tip, immerse the entire scope. Allow sufficient time, ~2min to identify a problem. Every area of the endoscope is checked for the presence of air bubbles. If continuous bubbles are noted at any location along the endoscope, this indicates a leak and must remove the endoscope from water immediately. Do not attempt to clean or use the endoscope. 5. Once successful leak testing is complete, remove the endoscope from the water completely and drain. Release pressure. Make sure you allow sufficient time for all air to escape. 6. Disconnect the leakage tester from the scope. Cleaning Cleaning involves the removal of soil with water and detergent employing proper action. Manual cleaning is mandatory. Mechanical cleaning in an AER (EWD) augments the manual process. 1. Fill in with detergent solution the sink or an appropriate container that can accommodate the entire endoscope. Dilute following the labeled IFUs. 2. The scope is fully disassembled and set in a neutral position. Accessories are cleaned separately. 3. Fully immerse the endoscope and soak for the length of time indicated by the detergent manufacturer. 4. Select appropriate cleaning equipment, such as soft-bristle brushes, lint-free cloths and soft sponges to assist in the cleaning process. Reusable accessories also need to be
104 decontaminated between uses, and replaced as they become worn. If they are labeled for single-use, use only once and discard. 5. First wipe debris from outer surface, including the control handles, around valve seats, the biopsy port and the tip. Only a soft bristle brush should be used to clean the air/water nozzle of the tip. 6. Continue with the brushing of all accessible channels. The brush must be flexible and long enough to extend through the lumen. There are brushes with varying diameters and lengths. Repeat until there is no debris expelled and/or as many times indicated by the scope manufacturer. Be cautious of scopes that have auxiliary water channels or duodenoscopes that have an elevator wire channel and brush following manufacturer s instructions. 7. Attach the flushing adaptors provided by the scope manufacturers to the corresponding channel portals. Use a syringe (or an automated pump if available) to flush solution through. Always follow the manufacturer instructions. 8. Clean all related endoscopic accessories, such as forceps, scissors, buttons, valves, etc. Process either soaking in the same solution with the scope or in an ultrasonic washer. Follow the device manufacturer s instructions. In most cases, suction valves require manual actuation repeatedly to ensure access to all surfaces. 9. At the end, discard the cleaning solution. Fresh solution should be used after each case to avoid cross contamination. Rinsing After cleaning is complete, the endoscope and the related accessories must be thoroughly rinsed to remove any detergent residuals. Fresh water should be used after each case to limit the potential for cross infection. Fresh tap water of drinking quality can be used. One rinsing should be enough. 1. Fill a sink or appropriate size container with fresh clean water and rinse outer surfaces and removable parts of the endoscope with the use of a soft lint free cloth. 2. Flush all channels thoroughly with water with the use of a syringe (or an automated pump if available). 3. Discard the water. Purge the channels with air either using a syringe or compressed air. Follow the manufacturer's instructions for the appropriate air pressures. Use a clean, soft, lint-free cloth to dry the outer surfaces of the scope and the accessories. Drying at this stage prevents dilution of the chemical disinfectant to be used subsequently. High Level Disinfection Routine use of HLD is a common standard of care for flexible endoscopes. When considering HLD over sterilization, the classification of a device as being critical or semicritical is dependant on the use of the endoscope. If an AER (Automated Endoscope Reprocessor) is used, follow manufacturer instructions for proper loading and connecting of the endoscope and operation. Manual HLD involves immersion of the scope in a sink/basin containing the appropriate disinfectant for the time and in temperature recommended by the manufacturer. Procedure of manual HLD: 1. First, check the disinfectant solution is within expiry date and then prepare the use solution following the instructions on the label. 2. Pour the disinfectant solution into an appropriate container. Ensure the container is big enough to accommodate the entire scope. Cover containers when not in use and during soaking time to avoid spillages. Always store any left solution in its original container closed for the time recommended by the manufacturer. 3. Record the date that the solution was poured from the original container, and the date that it can no longer be reused. 4. Verify the minimum recommended concentration (MRC) of the solution is within manufacturer s recommendations. Maintain a log of test results. Never add fresh disinfectant to used disinfectant. Topping off does not extend the reuse life.
105 5. Attach the flushing adaptors provided by the scope manufacturer to the corresponding channel portals and immerse the scope in the disinfectant solution. 6. Use a syringe (or an automated pump if available) to flush disinfectant solution through until no bubbles are seen exiting the channels. Always follow the manufacturer instructions. 7. Place all valves and removable parts in the disinfectant as well. 8. Cover with a lid to minimize exposure to chemical vapors or/and avoid spillage and contamination. Some disinfectants will require specific ventilation requirements. 9. Set a timer and soak only for the time recommended by the disinfectant solution manufacturer. Never leave the scopes in the solution overnight. 10. Remove the scope and accessories and transfer to a separate sink/container, in order to rinse. 11. Discard the HLD solution immediately after the use if it is intended for single use or after the reuse period is over, as indicated by the manufacturer. Flush the drain with large volumes of water. Depending on the product used, neutralizer may or may not be required before flushing down the drain. All disinfectants should be used at the correct temperature, concentration and conditions in accordance with the manufacturers instructions. Rinsing After disinfection, the scope must be thoroughly rinsed to remove all chemical residuals. The number of rinses should be provided by the disinfectant manufacturer. The quality of the water, i.e. "clean" water, tap water, "fresh" water, rinse water labeled as "bacteria-free," etc. used for final rinse of semi-critical devices is still a topic of debate. Agree on a standard policy that will apply in the entire facility. 1. Fill a sink or appropriate size container with water, immerse the scope completely in the water and keep it immersed for at least 1 minute unless longer is specified by the scope or disinfectant manufacturer. Rinse outer surfaces and removable parts of the endoscope with the use of a soft lint free cloth. 2. Flush all channels thoroughly with water, at minimum 100ml, with the use of a syringe (or an automated pump if available). Always follow manufacturer instructions. 3. Remove the scope and repeat rinsing, if indicated by the disinfectant manufacturer; discard rinse water after each use. Drying/Storage Endoscopes are not usually completely dried in between endoscopic procedures. If the scope is not to be used directly and will be stored, the device should be dried prior to storage. A device that is not completely dry provides an ideal situation of rapid colonization of microorganisms. 1. Use a clean, soft, lint-free cloth to dry the outer surfaces of the scope and the accessories. 2. Consult manufacturer s instructions for recommended drying using alcohol and/or medical grade air purge of lumens. Follow the manufacturer's instructions for the appropriate air pressures. Storage is the final step in scope reprocessing. Proper storage requires a controlled environment to prevent damage of the device and extend the use life, and avoid re-contamination. 1. Inspect the storage area for sharp and jagged edges that could damage endoscopes. 2. Storage cabinets should be enclosed, have support structures that permit the full length hanging of endoscopes and be sufficiently spacious so that stored endoscopes are not in contact with each other or the walls of the cabinet. The surfaces must be easily cleaned, nonporous, and not padded with foam rubber or other absorbent material that may retain moisture and allow growth of microorganisms. Specially designed cabinets are commercially available for flexible scopes which may also assist with the drying process by means of special ventilation methods, using filtered air 3. Clean the storing cabinets at least weekly and allow adequate time to dry before storing any endoscopes. 4. Hang endoscopes vertically to facilitate drying. Avoid coiling of any part of the endoscope so as to reduce stasis of any droplets within the channels. The distal tip hangs freely. The scope
106 sheath should not contact cabinet edges. Videoscopes are stored with the water resistant cap off to aerate the scope. Fiberscopes are stored with the ETO/venting cap attached. 5. All valves, soaking caps, and detachable components should have been removed and should not be replaced until the endoscope is next used. 6. All removable parts should be stored separately. They may be name-tagged to match with corresponding endoscope as a set. 7. Valves should be dried with a cotton wool bud and lubricated with silicone oil or water as instructed by the manufacturer. Policies must be in place that will define for how long a reprocessed endoscope can be stored before it needs reprocessing again. If a storage/drying cabinet is used, a risk assessment will determine the period over which a disinfected endoscope can be stored and re-used without further reprocessing. Expected Outcome Flexible endoscopes are properly decontaminated and safe to be used to all patient cases.
107 SOP No.: 47 Title Cleaning and Checking of bag valve resuscitators (BVR) Review Date: September 2022 Prepared By: Esther Mokupi Areas of Application: Decontamination, Arland IAP (Inspection, Assembly and Packing Areas) of CSSD and the wards. Staff Involved: Trained staff in the CSSD and Professional Nurses in the wards. Objective/Purpose: To ensure that the ambubag is cleaned correctly, checked and assembled for use in an emergency. Scope: Application to all CSSD technicians and Nursing Personnel. Relevant and Related Documents: Standard Precautions. Hospital Policies. Procedure Manual. Equiptment/Supplies: PPE (Personal Protective Equipment) Detergent Lint-free cloth Aseptor bag or steri-peel pack. Procedure: In The Ward: After resuscitation the ambubag must be cleaned in the sluice-room. After cleaning the ambubag, it must be taken to CSSD in the steri-peel pack that it was received in In the CSSD: Department Area: Sign for receipt of ambubag in the CSSD record book for handing over and receiving of Ambubag by CSSD. Disassemble the Ambubag. Wash the Ambubag with Endozyme Solution in a deep basin using lint-free cloth. In The IAP (Inspection, Assembly and Packing) Area: Reassemble the Ambubag. The technician who assembles the ambubag must sign and put a date and expiry date of autodaving. Check functionality of ambubag before autodaving. It must resist pressure when it is compressed. Autodave the ambubag. In The Ward: The ambubag must be checked for functionality by a Professional Nurse on the same day it reaches the ward.
108 The Professional Nurse must also sign on the steri-peel pack and emergency tray book to confirm the functionality of ambubag. Expected Outcome: Quality controlled, safe and clean Ambubag, ready for use in an emergency.
109 SOP No 48 Title: Layout and flow of CSSD Review Date: August 2022 Prepared By: Cheryl Bennett Objective/Purpose: To ensure that there is uni-directional flow with no backtracking. Segregation of clean and dirty with hard barriers between and an independent, self contained, controlled department which is dedicated to preventing cross contamination between the various areas. The design of CSSD must ensure the safe return of contaminated items, that have been cleaned and sterilized, to their users. Areas of Application: Central Sterile Service Department. Staff Involved: Cleaning staff, CSSD staff, Delivery staff, Theatre staff, Staff from other departments. Relevant/ Related Documents: HBN 13 Health Building Note AAMI ST 79 Association for advancement of Medical Instrumentation. OHS Occupational Health Organization. Occupational Health and Safety Act 85 of WHO World Health Organization. CDC Centre for Disease Control. South Africa Infrastructure Support System Guidelines(IUSS) Infection Control Policies. Equipment/Supplies: Hard barriers between clean and dirty areas. Automatic/semi automatic doors between areas making it easy to open/close. Adequate lighting in each area. Spacious /comfortable working space to avoid congestion and being cramped so that staff safety is ensured and sterility is not compromised.. Enough stainless steel slatted shelving to allow appropriate equipment/stock to be stored in their designated areas. Air conditioning and extraction fans in each working area including temperature control devices. Hatches must be provided when there are no doors to access from dirty to clean. Procedure It must only be dedicated to decontamination and sterilization of goods. The size of CSSD should be proportionate to the amount of theatres, workload, equipment and number of surgical procedures in the department. The design should encourage limited traffic from theatre staff, other departments and outside delivery staff The design should allow a smooth continuous uni directional flow ( at least two doors required) with no bottle necking It must be strictly controlled regarding air flow, work flow, material flows, staff traffic and other activities e.g deliveries, waste removal etc. There must be segregation with hard barriers between dirty and clean areas with no openings between areas.
110 There must be proper work flow between dirty, clean and sterile in a uni directional flow with no back tracking or bottle necking. Dirty to decontamination area, clean to packing/inspection area, sterile to sterile storeroom area. The flow must be controlled allowing Work and Material from dirty to clean, Staff from clean to dirty never simultaneously, Air from clean to dirty, Pressure from positive to negative. The size of CSSD should be proportionate to the amount of theatres, workload, equipment and number of surgical procedures in the department. The design should encourage limited traffic from theatre staff, other departments and outside delivery staff. The design should allow a smooth continuous uni directional flow (at least two doors required) with no bottle necking. It must be strictly controlled regarding air flow, work flow, material flow, staff traffic and other activities e.g. deliveries, waste removal etc. There must be segregation with hard barriers between dirty and clean areas with no openings between areas. Staff must either work in clean or dirty areas, not both simultaneously, to avoid cross contamination. There must be no back and forth movement of staff between clean and dirty. Decontamination staff should not have easy access to the clean area and vice versa. The highest positive pressure must be in sterile area to Negative pressure in Dirty areas and textile area to avoid contamination. There must be adequate support area ie. Rest area, change rooms, separate office, plant room (separate area which allows workmen to do maintenance of autoclaves). Expected Outcome: The flow of goods, air and staff does not compromise the integrity and sterility of supplies.
111 Sop No. 49 Title: Wet Packs (Any visible moisture in or on chamber, shelf, packs before or after cooling) Review Date: July 2022 Prepared By: Kathleen Marshall for CSSD Forums of South Africa Area of application: CSSD, units, clinics and operating room Maintenance staff Staff Involved: All CSSD, units, clinic and operating room staff Objective/Purpose: To ensure that any sterilised suspected wet pack is identified, collected, investigated, findings recorded and in-vitro Medical devices fully reprocessed. Scope All items sterilised in Vacuum-assisted steam autoclaves Operator behaviour Tray configuration Clinical practice Routine Preventative Autoclave Maintenance Program Water Quality Process of Sterilisation Building Utilities Environment Incident Reporting & Event Investigation Relevant and Related Documents: Manufacturers guidelines for Autoclaves Manufacturers guidelines for packing materials Occupational Health & Safety Act, 85 of 1993 ISO ISO11140:-5 ISO11607:-1 ISO11607:-2 ISO11737:-1 ISO11737:-2 ISO13485:ed-2 ISO17664 AAMI ST79 Annex P AAMI ST ANSI/AAMI ST67:2003, Sterilization of health care products Requirements for products labelled STERILE AORN Journal 88(4): Steam Sterilization Update on The Joint Commission s Position. June 15, The Joint Commission Online.July 20, Sterilisation Policy and procedure of CSSD/SPD Process and monitoring Policy and Procedure of CSSD/SPD
112 Quality Assurance Program records Working Instructions Manual for autoclaves Daily/weekly/monthly track & tracing documents Autoclave Load documents Autoclaves logs Safe work practices Incident reporting and event investigation Load recall procedure Load process challenge device records (with Class 6 load emulator indicators with load number, date and time indicated, always placed under heavy item on the lower shelf above the drain). Equipment/Supplies: Vacuum assisted autoclaves (superheated steam) Loading trolleys with slatted shelves to allow for cooling Scale to check load weights Tray/Sets Matrix and combined weights per load as per IFU s of Autoclave supplier/s Disposables used for packing appropriately stored in area 30-60% humidity Appropriate daily tests done & passed (Bowie & Dick, Biological Indicators, etc.) Clean warm area with sufficient airflow and no direct drafts to allow for correct cooling of packs Correct and sufficient cleaning supplies for autoclaves PROCEDURE General guidelines Steam vapour weight should be 97% (no more than 3% air & equilibrium between condensation and evaporation) Proper disassembly of all devices to allow for contact with steam (sterilant) or moisture can be retained Check the drain screen at the start of each shift if any debris- uses high pressure air to remove it and replace the clean screen before using the autoclaves Appropriate protection must be worn at all times heat resistant leather gloves preferably above elbow length used only for this purpose Steam sterilisers must be regularly cleaned & records kept thereof Incident reporting should be used for recording power failures in particular or any failed loads, or wet trays from theatre The load should be recorded and recalled with load numbers which are pre-recorded on indicator cards and all items fully reprocessed (particularly if any other items of the same load used should be found to be wet in setup before theatre case,) any items that were used before recall must then be recorded on the relevant patient records event investigation records and the surgeon informed Wrapping too fit snugly to eliminate spaces to collect moisture but not tightly to open secured tape during cycle nor must contents form a too dense mass for steam to have easier penetration Soft packs should never exceed 6 kg each and size of 30cmx40cmx25cm Load hollowware angled with openings towards one side of rack Load should never touch chamber walls
113 Trays with a high metal content should spread items evenly throughout to prevent condensates forming on them Only trained staff members to maintain, operate, load and unload sterilisers Loan trays should be sterilised with an accompanying biological Indicator if containing implants that can be read in time before use Particularly Spinal procedure trays are notorious for having multiple levels of screws and rods that are placed in tight multilevel plastic polymeric trays that do not allow for adequate steam removal (take into account the density of the sets and reduce the number of trays sterilised at the same time to compensate.) Rubber finger mats should have sufficient holes to allow for adequate steam penetration Hands must be washed and dry before handling sterile packs or assembling packs All items packed for sterilisation must be non-linting, inspected, clean and dry All items packed for sterilisation must be correctly loaded (configuration e.g. at least 1cm gap between containers) Sufficient space between items to allow for steam penetration & drying If more than one pack is wet after drying cycle or shelf or chamber is wet the entire load will need to go through the full reprocessing cycle linens re washed and dried and all packing materials discarded without exception (Remove/report/reprocess) Wet packs are considered contaminated. More than one item per load or chamber and shelf wet is a :wet load One pack wet after a cycle is a :wet pack Any sterile item in store with external dried watermarks are contaminated reprocess fully No mixed loads (instruments on cycle intended for them, soft packs on linen cycles which is intended for them) Load heavier items on lower shelf Place peel packs loosely on open baskets on their sides (all facing the same direction is best) There should not be visible moisture on packs, shelves or chamber when cycle is complete and items are removed Do not touch packs until they have cooled sufficiently leave them on hot racks/carts (never put a hot tray on any solid cold surface) Do not stack containers or block their vents Do not steam sterilize items that are not suitable for the process (e.g. flammable heat or moisture sensitive items) Do not exceed the maximum weight guideline of the manufacturer of your autoclave per load
114 Allow for cooling hot sterilised items in an area with low traffic & sufficient down draft airflow (at least 4 air exchanges/hour) with no direct cool air drafts and a temperature of at least 24 C humidity between 35-70% Do not store unused packing materials in areas that are moist and/or too hot as this can compromise their function Sterilization failure can be identified at the following stages: Autoclave parameters are not met Biological Indicator shows growth Bowie & Dick failure Process challenge emulator failed Internal chemical indicator test failure Wet packs Wet loads Expected Outcome Patient safety Patient outcomes improved Prevent contamination of apparently sterile items Prevent SSI s Prevent patient morbidity and mortality Prevent wasted time, cancellations & delays Prevent wasted cost
115 SOP No. 50 Title Handling of potentially infectious instruments and materials Review Date August 2022 Prepared by -Warda Hendricks Area of application -Decontamination Area Staff Involved -Trained CSSD personnel Objective/Purpose -To ensure the safe and correct way of handling potentially infectious instruments and materials and to ensure that all appropriate guidelines are followed. Relevant or related documents -Standard precaution guidelines -Infection and prevention control policy -Occupational health and safety act -Quality assurance and monitoring -Track and traceability -Decontamination policy -ISO/SANS standards and hazards chemical substances regulations -Guidelines provided by advisory committee on dangerous pathogens Equipment/ supplies -Protective attire including appropriate clothing,gauntlet gloves, full plastic apron (single use,fluid-repellent, disposable)face mask,eye protection,headcover, safety footwear. -High pressure cleaner -Hand cleaning facilities -Puncture proof and leak-resistant trolleys with removable bins Procedure -Only staff trained to work in decontamination area should be allowed to work in cssd. -All staff in cssd to be vaccinated against hepatitis B. -Treat all blood and body fluids as potentially infectious. -Staff working with infected soiled instruments must wear ppe: -Gauntlet gloves, face masks, aprons (single use)eye protection, safety footwear. -Apply standard precautions for infection control and other health and safety measures. -Use only allocated trolleys. -Follow collection routines and timetables accordance with departmental guidelines. -Linen and waste must be separated from re-usable medical devices at point of use. -Collect used items in puncture-resistant containers. Do not overload containers. -Secure contaminated items and cover them prior to transportation. -Do not leave contaminated goods unattended during transportation. -All containers and trolleys/carts must be clearly identified. -Track and traceability of single used devices or sets of devices/instruments particularly those devices that have been used on patients with concerns associated with Creutzfeldt-Jakob disease or other risk. -Transport of potentially infectious instruments should be sent to designated decontamination area as soon as possible with secure tags.
116 -Potentially infected re-usable devices for example those used on a patient with Creutzfeldt-Jacob disease, vcjd must be quarantined pending on definite diagnosis. -Quarantined insruments must be stored in a secured area or room and should be clearly labelled. The label should contain the following information; -Date of procedure -Clinician responsible for patient care -Patient name, date of birth, identification number -Number of instruments in container -Type of instruments in container -Whether instruments were cleaned prior to quarantine or placed directly into quarantined container. -Indicate whether the instruments are quarantined pending a final diagnosis or have been quarantined following on a known case. -All returned medical devices used on patients with known infections example; hepatitis B and C, MRSA and Hiv will be handled according to the Universal Precaution Policy. -All devices and instruments used on patients with Transmissible Spongiform Encephalopathies [TSE s] eg.cjd and vcjd, it is recommended single use instruments and disposable linen should be used. -Use all equipment, chemicals and detergents, materials in accordance with specific manufactures Instructions and Organisations Policies and Procedures. -Have a safe waste disposal system which place waste containers in position to minimize hazards to staff. - Unload an sort items in receiving area. -All equipment to be transferred from trolley to work surface. -Remove outer wrapping. -Check instruments against checklist. Check any comments made by operating room team or user. -Where possible needles or blades are found on instrument tray it should be set aside and end-user to be contacted to remove the sharps. -All instruments devices must be pre-cleaned an then disinfect. -Open all hinged instruments and disassemble all multi-port instruments. -Instruments missing or broken on the tray must be isolated- incident must be recorded and supervisor informed. -Thermal Washer- Disinfector Machine used. -Standardised washing and disinfecting processes should be used and validated. -Washing baskets must be loaded correctly in washing machine for effective cleaning of instruments and that all surfaces can be reached by spray jets. -All phases of washing machine must be completed to ensure instruments are clean. -Containers and trolleys must be decontaminated aswell. -All handling and processing to be undertaken by manufactures instruction. -Full automated process should be used and identify and accurately follow operating instructions for washer- disinfectors. -All relevant documentation must be recorded and validate. -Remove apron, gloves, eye protection an dispose of it appropriately in correct waste bin. -Wash hands according to handwashing policy before leaving cleaning area. *Expected Outcome -Quality controlled, safe, clean medical devices or instruments. -Safe handling of potentially infectious instruments and materials
117 SOP No. 51 Title: Receiving and issuing packs to Wards from the CSSD Review date: August 2022 Prepared by: Sr. MM. Ndlovu Area of Application: CSSD and Wards Staff involved: All personnel that are assigned or engaged in sterile service operation and ward staff. Objective / Purpose: To ensure that Wards (Patients) receive sterile packs in a safe condition and ready to use. Relevant / Related Documents Quality manuals Control book Equipment / Supplies: Clean trolleys Procedures: - All packs will be checked for sterility before they are released. - The following should be checked before deciding if the pack is still sterile check for the following: Holes or tears Wetness or stains Broken seals Dust Evidence of crushing - All damaged packs are to be returned to the department - All packs issued will be recorded so that the tracking system is effected. - Various methods are to be used in the transportation of sterile packs to the wards. - This can be ranged from hand carriage to the use of trolleys. - Sterile packs should be transported in covered or enclosed trolleys with a solid bottom shelf to prevent micro-organism on the floor being pickedup by the wheels of the trolley and then spin upwards onto the sterile packs - If the packs are placed inside plastic or paper bags, they should be well arranged to prevent them from being crushed or damaged during transportation. - Packs should be placed onto a clean trolley that can be covered. - Trolley must not be overloaded. - Loaded trolleys must not be left to stand. - Contaminated packs must not be loaded onto the same trolley with sterile packs. - N.B: a quality management system must be in place to enable any pack that is of substandard or effected to the tracked back through the recall process. Issuing packs to the Wards:
118 - The sterile packs are issued from the storage room. The storage room is apart and parallel to the reception area. - The wards personnel bring along a control book where the following is be recorded. The date the sterile pack is collected. The time of collection. The name of the pack. The place where the pack is collected from (CSSD) The place where the pack is taken to (Ward) Attachment of the signature of the person collecting the pack Signature must be legible and have designation Attachment of the signature of the person issuing the pack (signature must be legible and have designation) Receiving contaminated packs from the Wards to CSSD: - Contaminated packs are received in the receiving area which is apart and parallel to the issuing area - The same control book that was used for receiving sterile packs from CSSD to the ward is also used for returning contaminated packs from the wards to CSSD, the following is recorded The date the contaminated pack is received in the receiving area The time of the receiving The name of the decontaminated pack is checked, using the checklist for completion and proper functioning If there is any missing or broken instruments, the manager of CSSD is notified, a report is written and missing or broken items replaced The ward where the decontaminated packs was used The place where the decontaminated is being received (CSSD) Attachment of the signature of the person returning the pack Attachment of the signature of the person receiving the decontaminated pack N.B When receiving decontaminated pack, PPE should be worn at all times to protect personnel from micro-organisms Expected outcome: - Wards receive sterile packs that are safe to use
119 SOP No 52 Title Managing surgical instruments contaminated with or potentially contaminated with TSE (Transmissible Spongiform Encephalopathy) from a patient potentially infected with CJD (Creutzfeldt Jacobs Disease) for example. Review date: July 2020 Area of Application: CSSD and Operating Room Staff involved: All staff who are assigned or engaged in sterile service operation. Objective/Purpose: To safely manage surgical instruments potentially exposed or exposed to TSE s. Relevant and related Documents: Prevention of CJD and vcjd by Advisory Committee on Dangerous Pathogens' Transmissible Spongiform Encephalopathy (ACDP TSE) Subgroup. The risk of the surgical instruments infectivity will depend on the type of tissue the instruments are exposed to and the complexity of the design of the surgical instrument. Consult the WHO tissue infectivity matrix. Background: Creutzfeldt-Jakob Disease (CJD) is a transmissible spongiform encephalopathy (TSE), which is a rare and fatal degenerative condition of the Central Nervous System. It is caused by an abnormal diseasespecific isoform of prion protein. Gerstmann-Straussler-Scheinker Syndrome (GSS) is an extremely rare form of TSE. Other rare human TSEs include familial fatal insomnia (FFI) and Kuru. Transmissible encephalopathies have also been described in animals, e.g. Bovine Spongiform Encephalopathy (BSE) in cattle and scrapie in sheep and goats. Sporadic CJD is the commonest human TSE and accounts for 85% of all cases of TSE. The incubation period is unknown, possibly 15 months to over 20 years. CJD is a protracted, progressive illness of the Central Nervous System characterised by progressive dementia or progressive unsteadiness and clumsiness. In most cases death occurs within a year of the onset of symptoms. There are two forms of CJD: Classical, or sporadic CJD. The majority of cases of classical CJD occur in people over 55 years old. This form of CJD is found worldwide with an incidence of 1 per million per year. The incidence may be higher in countries where better surveillance for CJD is conducted. Variant CJD (vcjd). This was identified in 1996 in the UK. Unlike classical CJD, it is rapidly progressive, and affects a wide age range including young people. Studies have suggested that the agent causing vcjd is the same as the BSE agent. The Diagnosis of TSE is made by clinical and neuropathological examination. EEG may give a pattern characteristic of CJD but the diagnosis is usually confirmed at post mortem examination. Sporadic CJD has been transmitted between patients undergoing certain medical treatments: neurosurgical procedures, corneal graft operations and treatment with hormones prepared from human pituitary glands. Patient groups at risk of TSE
120 a) Proven and suspected cases of CJD, vcjd or other TSE. b) Recipients of hormone derived from human pituitary glands c) Recipients of dura mater and corneal grafts. d) Members of families who are recognized as having familial CJD or GSS Equipment/Supplies: Appropriate PPE: fluid repellent gown or a plastic apron under linen gown, gloves, facial protection visor (or mask and goggles). Chemical solutions with known prion efficacy. TSE agents are resistant to conventional methods of disinfection, including heat sterilisation by autoclaving. Procedure: Notify the Infection Prevention & Control Practitioner and the Sterile Services Manager before the procedure takes place. Consult Prevention of CJD and vcjd by Advisory Committee on Dangerous Pathogens' Transmissible Spongiform Encephalopathy for updated information. Where possible (if aware of the diagnosis/ potential diagnosis prior to surgery) use disposable instrumentation. When use of disposables is not possible, use the minimum number of instruments. Some expensive items of equipment, such as drills, may be protected from contamination by using shields, guards or covering, so that the entire item does not need to be destroyed. The drill bit, other parts in contact with high-risk tissue, and the protective coverings should be incinerated. However, in practice, it may be difficult to ensure effective protective covering and advice should be sought from neurosurgical staff and the manufacturer to determine practicality. All endoscopes should have a unique identifier, which should be recorded in the Endoscopy Unit/Theatre at every patient usage. This identification should be logged in the department and the patient s care notes. If an endoscope is identified retrospectively as having been used on a patient with suspected TSE, a member of the Infection Prevention & Control Team ( IPC Team) should be informed immediately. If the endoscope has not been used for any other patient following use on the suspected TSE patient it should be removed from use immediately and quarantined until definitive diagnosis of the patient or destroyed. This will also apply for endoscopes, which have had fewer than 10 decontamination cycles since use on the suspected TSE case. Separate used and unused instruments in the operating room to prevent cross contamination. Process instruments as soon as possible after the procedure (within 15 minutes). Keep instruments moist until they can be cleaned. Avoid contact with fixative agents like alcohol or aldehyde-based products. Transport moist instruments to the CSSD in a suitable closed container. Clean instruments with detergents known to be effective against TSE/prions Air dry then place in an impervious rigid container (e.g. 25 litre Specibin) and seal with heavy duty tape and label, including responsible person s name and list of contents if instruments are to be destroyed, or quarantine high risk instruments for use on SAME patient if further surgery is likely. Process instruments using the below recommended methods: Sodium hypochlorite is considered to be effective at reducing infectivity but only at high concentrations (20,000ppm available chlorine for 1 hour at ambient temperature) that pose certain practical constraints. The following should be taken into account when considering the use of sodium hypochlorite: It must not be used on open surfaces i.e. benches due to the possible release of chlorine gas It corrodes metal and steel It is incompatible with formaldehyde, alcohols and acids It is rapidly inactivated by protein residues Autoclaving
121 Autoclaving remains an important method of reducing infectivity. Different strains of TSE are known to vary in their sensitivity to heat. The following methods will reduce infectivity but cannot be relied upon to completely eliminate infectivity (either porous load or gravity displacement) C for 18 minutes Six successive cycles of 3 minutes Some technologies like Vaporized Hydrogen Peroxide Gas have shown efficiency against TSE Once instruments have been processed they must be quarantined until a definitive diagnosis is made. If the diagnosis is positive, perform a risk assessment based on the infectivity of the tissue, the type of CJD and the complexity of the surgical instruments. If risk is deemed unacceptable, destroy instruments as per local policy (incinerate at 1000 Celcius or have the instruments encased in concrete and buried by a responsible healthcare risk waste contractor) as per waste management companies guidelines. The Waste Treatment facility will need details on the content, composition and disinfection of the items before they will transport the cleaned and disinfected instruments to a treatment or encapsulation site.
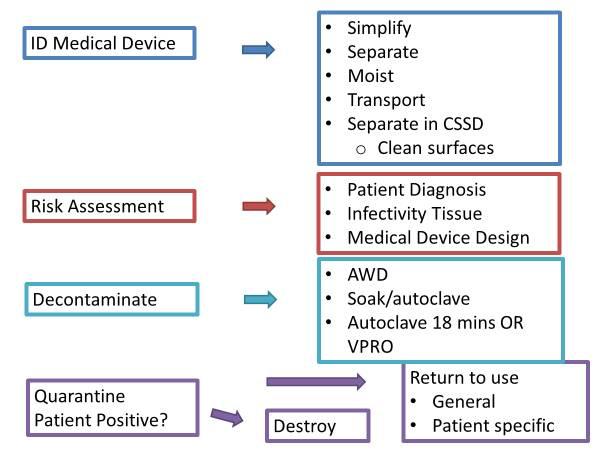
122
Christina Bradley Laboratory Manager Hospital Infection Research Laboratory Queen Elizabeth Hospital Birmingham, UK
 Christina Bradley Laboratory Manager Hospital Infection Research Laboratory Queen Elizabeth Hospital Birmingham, UK Irrespective of where the decontamination is performed or who it is performed by the
Instructions for Use Spinal Punches IFU
 Indications for use Spinal punches are manually operated instruments indicated for cutting or biting bone during surgery involving the skull or spinal column. Contraindiciations Instruments should not
INSTRUCTIONS FOR CLEANING AND STERILIZATION OF ALL B.BRAUN AESCULAP HAND HELD SURGICAL INSTRUMENTS AND POWER PRODUCTS (UNITED KINGDOM REQUIREMENTS)
") INSTRUCTIONS FOR CLEANING AND STERILIZATION OF ALL B.BRAUN AESCULAP HAND HELD SURGICAL INSTRUMENTS AND POWER PRODUCTS (UNITED KINGDOM REQUIREMENTS) 1 INTRODUCTION This paper is intended to give general
INSTRUCTIONS FOR CLEANING AND STERILIZATION OF ALL B.BRAUN AESCULAP HAND HELD SURGICAL INSTRUMENTS AND POWER PRODUCTS (UNITED KINGDOM REQUIREMENTS) 1 INTRODUCTION This paper is intended to give general
Device Reprocessing Checklist Scoring Matrix 1=low 5=high
 Measure Standard Q1 Q2 Q3 Q4 Point of Use Gross Debris Removed during & after procedure (use of water preferred) 5 Delicate instruments on top of heavy or separate 5 Devices contained & identified as biohazard
المملكة العربية السعودية وزارة الصحة اإلدارة العامة لمكافحة عدوى المنشئات الصحية
 1. POLICY STATEMENT: Cleaning, decontamination and sterilization method should be done in CSSD service facility not in the end user department side. 2. PURPOSE: To ensure the proper way of collections,
Corporate. Laundry SOP. Document Control Summary
 Corporate Laundry SOP Document Control Summary Status: Version: Author/Title: Owner/Title: Approved by: Ratified: Related Trust Strategy and/or Strategic Aims Implementation Date: Review Date: Key Words:
Best Practice Guidelines For Cleaning, Disinfection and Sterilization of Critical and Semi-critical Medical Devices
 Best Practice Guidelines For Cleaning, Disinfection and Sterilization of Critical and Semi-critical Medical Devices In BC Health Authorities THIS DOCUMENT IS INTENDED TO DESCRIBE BEST PRACTICES HEALTH
CLEANING INSTRUCTIONS
 Reusable Instrument Care Manual Pagoda Pedicle Screw System Manufacturer Ortho Development Corporation 12187 South Business Park Drive Draper, UT 84020 Phone 801-553-9991 Fax 801-553-9993 www.orthodevelopment.com
Accessories. Maybachstraße. Symmetry Fax: Revised 10/15
 Recommended Care, Cleaning and Sterilization Instructions for Reusable Instruments & Accessories Symmetry Surgical Inc. 3034 Owen Drive, Antioch, TN 37013 USA 1-800-251-3000 Fax: 1-615-964-5566 www.symmetrysurgical.com
MARSHALLTOWN MEDICAL AND SURGICAL CENTER LAUNDRY/LINEN SERVICES. SUBJECT: Infection Control POLICY NO: 106
 MARSHALLTOWN MEDICAL AND SURGICAL CENTER LAUNDRY/LINEN SERVICES SUBJECT: Infection Control POLICY NO: 106 PURPOSE: The activities of collecting, processing and delivering an adequate supply of clean linens
STERITITE INSTRUCTIONS FOR USE
 STERITITE INSTRUCTIONS FOR USE If a rigid container system is used, the manufacturers instructions regarding set preparation and assembly should be followed. -ANSI/AAMI ST79: 2010 & A1:2010 Notes from
MARSHALLTOWN MEDICAL AND SURGICAL CENTER ENVIRONMENTAL SERVICES. SUBJECT: Room Cleaning Occupied Room (All Areas) PROCEDURE NO: 032
 PROCEDURE NO: 032") MARSHALLTOWN MEDICAL AND SURGICAL CENTER ENVIRONMENTAL SERVICES SUBJECT: Room Cleaning Occupied Room (All Areas) PROCEDURE NO: 032 PURPOSE: To provide a systematic approach to remove the accumulation of
MARSHALLTOWN MEDICAL AND SURGICAL CENTER ENVIRONMENTAL SERVICES SUBJECT: Room Cleaning Occupied Room (All Areas) PROCEDURE NO: 032 PURPOSE: To provide a systematic approach to remove the accumulation of
DRAFT. Module 4. Decontamination & Environmental Cleaning
 Module 4. Decontamination & Environmental Cleaning Learning Objectives 1. Define the 3 steps of decontamination 2. List and describe the process for cleaning and disinfecting 3. Discuss safe management
Jennings Street School
 Infection Prevention and Control and Protocols Rationale Following standard infection control precautions can minimise the risk of norovirus outbreaks caused by person-to-person transmission in any institution
Manual Pre-disinfection/Cleaning and Sterilization Instructions for SATELEC Tips and Files
 Manual Pre-disinfection/Cleaning and Sterilization Instructions for SATELEC Tips and Files Cautions Do not use steel wool or abrasive cleaners. Avoid solutions containing iodine or with a high chlorine
Always ensure that surfaces that are being disinfected are compatible with the product being used.
 Cleaning Guidance for Care Environments Introduction Each care facility should have written protocols to guide routine general cleaning together with a written cleaning schedule that ensures all areas
When you sterilize an instrument set, you know what the standards are.
 Sterilization & Infection Control The importance of cleaning in earnest A regular column on sterilization and infection control issues. When you sterilize an instrument set, you know what the standards
INFECTION PREVENTION AND CONTROL ENVIRONMENTAL AUDIT TOOL
 INFECTION PREVENTION AND CONTROL ENVIRONMENTAL AUDIT TOOL HOSPITAL: WARD: DATE: AUDITOR: ACTION PLAN SENT TO : DATE SENT: TOTAL SCORE: / % SCORE: PROGRESS REPORT TO BE RETURNED TO IPCN BY: Date: Page 1
FLASH PAK STERILIZATION CONTAINER SYSTEM
 INSTRUCTIONS FOR USE FLASH PAK STERILIZATION CONTAINER SYSTEM Description The Flash Pak Sterilization Container System consists of a family of rigid reusable containers that provide an effective sterilization
Bridging. the Gap. Health Care Environmental Services. Study Guide. Training Education and Developmental Series. Carts, Closets and Equipment
 Bridging the Gap Health Care Environmental Services Study Guide Carts, Closets and Equipment Training Education and Developmental Series Technology at work for you INTRODUCTION The Environmental Service
2015 Myco Industries, Inc Fax:
 Endoscope Cleaning and Handling It is highly important that you manually clean the endoscope immediately after it is removed from the patient, BEFORE it is automated or manually disinfected. Cleaning your
Housekeeping. Note. Areas that are not covered under contractor services must adhere to the same cleaning standards as specified in this section.
 Housekeeping Although microorganisms are normal contaminants of walls, floors, and other surfaces, these environmental surfaces rarely are associated with transmission of infections to patients or personnel.
Manual Pre-disinfection/Cleaning and Sterilization Instructions for SATELEC Tips and Files
 Manual Pre-disinfection/Cleaning and Sterilization Instructions for SATELEC Tips and Files Cautions Do not use steel wool or abrasive cleaners. Avoid solutions containing iodine or with a high chlorine
Commit 2 Clean TM/MC. Bloodborne Pathogens Awareness Program
 Commit 2 Clean TM/MC Bloodborne Pathogens Awareness Program Commit 2 Clean TM/MC Bloodborne Pathogens Awareness Program Table of Contents Cleaning Minor Spills on Hard Surfaces... 2 Cleaning Major Spills
Fiona Collins Liliana Donatelli Andrew Smith
 Fiona Collins Liliana Donatelli Andrew Smith DISCLOSURE STATEMENT The presenters have no conflict of interest regarding the content of this presentation Develop a database for various countries globally
Cleaning & Sterilization
 Handpieces & Attachments Instruments Cleaning & Sterilization System 7 System 6 System 5 CD4 CD3 SABO 2 SABO RemB CORE TPS Processing Instructions User/Patient Safety all contribute to the efficacy of
A. General Safety LAB/ROOM: INSPECTED BY: DATE:
 A. General Safety Item Subject Yes, No, A1 Exits are not obstructed, fastened or locked with keys A2 EXIT signs, if installed are clear and illuminated A3 A4 A5 A6 Fire extinguishers and fire blankets
Central Sterile Services Department will receive, decontaminate, process, store and/or dispense sterile and non-sterile to departments requesting.
 Title/Description: Central Sterile Services Department: Central Sterile Services Personnel: Central Sterile Services Personnel Effective Date: 1/97 REVISED: 1/97, 11/07, 2/12 I. PURPOSE Central Sterile
Dietary Department, Infection Control
 TITLE/DESCRIPTION: DEPARTMENT: PERSONNEL: Infection Control Dietary Department, Infection Control Dietary Personnel EFFECTIVE DATE: 1/97 REVISED: 5/00, 5/06, 9/11 I. PURPOSE: Maintenance of strict sanitary
I.F.U Re/Processing Reusable Medical Devices
 I.F.U Re/Processing Reusable Medical Devices Distributed by: MANUFACTURER: GA 26-09-001 -EN /20130719 Contents 1 Overview of preparation methods... 3 2 Safety and responsibility... 4 3 Explanation of symbols...
SRSS Cleaning and Sanitisation Procedure
 SRSS Cleaning and Sanitisation Procedure 1. DOCUMENT CONTROL Management SRSS SMS PROCEDURE System Element Title Cleaning and Sanitisation SMS_FS_PR_020_ Version # & V1 10/08/15 Cleaning and Revision date
PROFESSIONAL USER GUIDELINES FOR PRACTICE INFECTION CONTROL AND HYGIENE IN COMPANION ANIMAL VETERINARY CLINICS/HOSPITALS
 GENERAL - BEST PRACTICE CLEANING EQUIPMENT Sweep or rinse away loose debris. On floors, use a dust-attracting mop, not a broom Where possible, make use of vacuum (Clean bag daily) Remove spills (feaces,
Discharge and Transfer Cleaning - Isolation
 Approved by: Corporate Director, Environmental Supports Discharge and Transfer Cleaning - Isolation Environmental Services Operating Standards Manual Number: 3.1.1.11 Date Approved Next Review March 3,
PERFORM Operating Document
 PERFORM Operating Document Use and Maintenance of Tuttnauer Table-Top Autoclave PC-POD-CA-006-v03 Revision History Version Reason for Revision Date 01 New POD 13-Aug-13 02 POD Section 3.1.3 and 3.2 revised
36.0 Sterile Supply Unit (SSU)
") 36.0 Sterile Supply Unit (SSU) 36.1 Introduction 36.1.1 General A Hospital must provide adequate facilities for cleaning, sterilisation and storage of equipment and instruments to ensure the care and safety
36.0 Sterile Supply Unit (SSU) 36.1 Introduction 36.1.1 General A Hospital must provide adequate facilities for cleaning, sterilisation and storage of equipment and instruments to ensure the care and safety
CLEANING AND HANDLING OF WRIGHT INSTRUMENTS
 CLEANING AND HANDLING OF WRIGHT INSTRUMENTS 150824-0 The following languages are included in this packet: English (en) Deutsch (de) Nederlands (nl) Français (fr) Español (es) Italiano (it) Português (pt)
Made in USA. Sunoptic Technologies 6018 Bowdendale Avenue Jacksonville, FL 32216, USA (904)
") Fiber Optic Cables Instructions for Use and Processing Instructions DFU-950-0031-00 Fiber Optic Cables Made in USA Sunoptic Technologies 6018 Bowdendale Avenue Jacksonville, FL 32216, USA (904) 737 7611
Fiber Optic Cables Instructions for Use and Processing Instructions DFU-950-0031-00 Fiber Optic Cables Made in USA Sunoptic Technologies 6018 Bowdendale Avenue Jacksonville, FL 32216, USA (904) 737 7611
LABORATORY CHEMICAL HYGIENE AND SAFETY PLAN
 LABORATORY CHEMICAL HYGIENE AND SAFETY PLAN Laboratory Room Number (s) Building Principle Investigator or Responsible Individual (s) Date Review / Revision Date INTRODUCTION Kent State University has made
HYGIENE, CLEANING AND INFECTION CONTROL POLICY
 HYGIENE, CLEANING AND INFECTION CONTROL POLICY Policy Statement: Cleaning is an important part of infection control in the Centre. Cleaning in itself is a form of disinfecting as it removes all surface
Support for staff involved in the use of steam cleaning machines. C21/HCQAI Criterion 2 Outcome 8 & 10
 Cleaning with Pressurised Steam Standard Operating Procedure Developed in response to: Contributes to CQC Core Standard number: Type: Policy/Procedure Register No: 10047 Status: Public Support for staff
SterilContainer S for use in the Steris V-PRO 60 Low Temperature Sterilization System
 SterilContainer S for use in the Steris V-PRO 60 Low Temperature Sterilization System This document contains Instructions for Use regarding the processing of the SterilContainer S prior to sterilization
PROFESSIONAL USER GUIDELINES FOR PRACTICE INFECTION CONTROL AND HYGIENE IN COMPANION ANIMAL VETERINARY CLINICS/HOSPITALS
 GENERAL - BEST PRACTICE CLEANING EQUIPMENT Sweep or rinse away loose debris. On floors, use a dust-attracting mop, preferably not a broom Where possible, make use of vacuum (Clean bag daily) Remove spills
CONVENTUS CAGE TM PH Procedure Instruments Instrument Tray Cleaning and Sterilization
 CONVENTUS CAGE TM PH Procedure Instruments Instrument Tray Cleaning and Sterilization 1. WARNINGS AND PRECAUTIONS 1.1. Caution should be exercised when handling instruments with sharp points, or cutting/drilling
Discharge and Transfer Cleaning
 Approved by: Corporate Director, Environmental Supports Discharge and Transfer Cleaning Environmental Services Operating Standards Manual Number: 3.1.1.2 Date Approved Next Review March 3, 2018 Purpose
PROFESSIONAL USER GUIDELINES FOR PRACTICE INFECTION CONTROL AND HYGIENE IN VETERINARY EQUINE PRACTICE
 THEATRE AND STERILE PROCEDURES WALLS/TILES - Wash all surfaces from top to bottom using F10CLXD, rinse with - Wash off visible dirt (e.g. blood) using F10CLXD CHAIRS - Trigger spray using F10CL and wipe
Part B - Health Facility Briefing and Planning. PLANNING Operational Models Functional Areas Functional Relationships
 190 CENTRAL SUPPLY UNIT (CSSU) INDEX 190.1.00 Description INTRODUCTION General PLANNING Operational Models Functional Areas Functional Relationships DESIGN General Communications Finishes Building Service
CONVENTUS CAGE TM - DR Procedure Instruments Instrument Tray. Equipment Cleaning and Sterilization
 CONVENTUS CAGE TM - DR Procedure Instruments Instrument Tray Equipment Cleaning and Sterilization Table of Contents 1. WARNINGS AND PRECAUTIONS... 3 2. INSTRUMENT PREPARATION... 3 3. CAVITY PREPARATION
Operating / User Manual
 UniARM Surgical Support System Operating / User Manual Version 1.1 MITAKA KOHKI Co., Ltd. 1. Introduction Introduction Thank you for purchasing the UniARM for use in surgical procedures. To use the device
Manual Pre-disinfection/Cleaning and Sterilization Instructions for SATELEC wrenches
 Caution Manual Pre-disinfection/Cleaning and Sterilization Instructions for SATELEC wrenches Do not use steel wool or abrasive cleaners. Avoid solutions containing iodine or with a high chlorine content.
CONVENTUS CAGE TM PH Procedure Instruments Instrument Tray Cleaning and Sterilization
 CONVENTUS CAGE TM PH Procedure Instruments Instrument Tray Cleaning and Sterilization 1. WARNINGS AND PRECAUTIONS 1.1. Caution should be exercised when handling instruments with sharp points, or cutting/drilling
LABORATORY INSPECTION CHECKLIST
 LABORATORY INSPECTION CHECKLIST Date of Inspection: Conducted by: Department: Building/Room #: Principal Investigator: PI Present? Yes No Type of Inspection: Semi-Annual (scheduled) Complaint Follow Up
Cleaning and Sterilisation for Burs, accessories and filling material
 Cleaning and Sterilisation for Burs, accessories and filling material EN FOR DENTAL USE ONLY CLEANING AND STERILISATION PROCEDURE FOR BURS, ACCESSORIES AND FILLING MATERIAL 1) FOREWORD Devices that are
Special Precautions Isolation Plan Environmental Services
 Special Precautions Isolation Plan Environmental Services When page is received that suspect Ebola patient has arrived in ED: If the patient is not going to be admitted: Once patient is transferred to
Methods & Procedures. Operational Cleaning
 Methods & Procedures Operational Cleaning Prepared for: The Cleaning Site 11 Barber Close Oswestry SY11 2UE Contents Brush Sweep Floor Dust Control Mopping Vacuum Cleaning Damp Mopping Machine Damp Mop
Integra Salto Talaris and Integra XT Non-Sterile Device Reprocessing. Instructions for Use. 4. Manual Cleaning Instructions
 Integra Salto Talaris and Integra XT Non-Sterile Device Reprocessing Instructions for Use. Description and Intended Use Integra LifeSciences Corporation reusable surgical device sets consist of various
AMSCO STERILIZATION CONTAINER SYSTEM User s Guide
 AMSCO STERILIZATION CONTAINER SYSTEM User s Guide . AMSCO STERILIZATION CONTAINER SYSTEM User s Guide TABLE OF CONTENTS 1. Unpacking...2 2. Container transport and handling...2 3. General cleaning, decontamination,
Mini Guide to hygienic laundry practices. based on the RABC system/en 14065
 Mini Guide to hygienic laundry practices based on the RABC system/en 14065 Index electrolux mini guide 3 Hygienic laundry page 4 Storing and sorting dirty laundry page 6 Washing page 8 Transfer from washing
Aesculap Implant Systems
 Aesculap Implant Systems Aesculap Implant Systems Orthopedics USA Instructions for Use/Technical Description Page 1 of 14 Symbols on product packages Caution, general warning symbol Caution, see documentation
LAUNDRY POLICY Page 1 of 6 Reviewed: February 2017
 Page 1 of 6 Policy Applies to: All staff employed by Mercy. Credentialed Specialists, Allied Health Professionals will be supported to meet policy requirements. Related Standards: Australian/New Zealand
Cleaning and Sterilization for Instruments & Posts
 Cleaning and Sterilization for Instruments & Posts EN FOR DENTAL USE ONLY CLEANING AND STERILIZATION PROCEDURE FOR ENDODONTIC FILES, HAND INSTRUMENTS, PINS AND POSTS, STAINLESS STEEL DRILLS, STAINLESS
IMPORTANT INFORMATION ON THE DEPUY SYNTHES
 For the Attention of the Operating Surgeon: IMPORTANT INFORMATION ON THE DEPUY SYNTHES MatrixNEURO RECONSTRUCTION MESH, STERILE MatrixNEURO PREFORMED MESH, STERILE GP2949-B-CAN DESCRIPTION The DePuy Synthes
National Maternity Hospital. Founded in 1894
 National Maternity Hospital. Founded in 1894 Quality Improvement Plan HIQA unannounced on-site assessment October 7 th 2013 On October 7 th 2013, The Health Information & Quality Authority (HIQA) held
RECOMMENDATIONS FOR CLEANING DEVICES
 RECOMMENDATIONS FOR CLEANING D E C O N TA M I N AT I O N A N D S T E R I L I Z AT I O N O F M E D A C T A I N T E R N A T I O N A L O R T H O P E D I C DEVICES 1 This document was prepared to provide cleaning,
CODE OF PRACTICE. No 11 CLEANING OF EQUIPMENT AND PREMISES
 1. MANAGEMENT CODE OF PRACTICE No 11 CLEANING OF EQUIPMENT AND PREMISES 1.1 Everyone in the food chain must be personally committed to ensuring that satisfactory standards are achieved. Requisite standards
University of California, Davis Laboratory Self-Inspection Checklist
 University of California, Davis Laboratory Self-Inspection Checklist Principal Investigator/Laboratory Supervisor: Laboratories Reviewed: Date: Reviewer: Revised 11/2014 I. SAFETY PROGRAM ADMINISTRATON
Peninsula Dental Social Enterprise
 Peninsula Dental Social Enterprise Decontamination and Storage of Dental Instruments Version 3.0 Date approved: October 2016 Approved by: The Board Review due: October 2019 Policy will be updated as required
INSTRUCTIONS FOR CLEANING AND STERILISING HUMECA MEDICAL EQUIPMENT FOR BOTH ELECTRIC AND MANUAL DEVICES
 INSTRUCTIONS FOR CLEANING AND STERILISING HUMECA MEDICAL EQUIPMENT FOR BOTH ELECTRIC AND MANUAL DEVICES Contents: Pagina 1 Introduction...2 2 Treatment instructions...2 3 Cleaning...2 3.1 Place of use...4
PROFESSIONAL USER GUIDELINES FOR PRACTICE INFECTION CONTROL AND HYGIENE IN VETERINARY EQUINE PRACTICE
 THEATRE AND STERILE PROCEDURES WALLS/TILES - Wash all surfaces from top to bottom using F10SCXD, rinse with - Wash off visible dirt (e.g. blood) using F10SCXD CHAIRS - Trigger spray using F10SC and wipe
General Workplace Safety Checklist
 Company or Division Name: Workplace Location: Checklist Prepared by: Date of Preparation: General Safety Is the OSHA Job Safety and Health Protection Poster (if required) displayed in a prominent location
Mechanical Ware Washing
 Mechanical Ware Washing 1 Objectives At the end of the reading, students should be able to: List correctly the ways in which sanitization may be achieved using a ware washing machine Differentiate between
AS Medizintechnik GmbH Sattlerstrasse 15, Tuttlingen, Germany Tel 07461/ Fax 07461/
 General Information Use The Air drill System is a pneumatic powered system used for many applications orthopedic and trauma surgery. To ensure proper operation of the air drill, use only original attachment
SKLAR COATED SURGICAL INSTRUMENTS RECOMMENDED CARE & CLEANING INSTRUCTIONS
 SKLAR COATED SURGICAL INSTRUMENTS RECOMMENDED CARE & CLEANING INSTRUCTIONS CAUTION: The following instructions are for all Sklar Coated stainless steel instruments. Read instructions prior to use. Improper
CLEANING AND SANITATION Policy Owner: Erica Tennessen Policy Originated by (program or department): Program Applicable Programs: All Programs
: Program Applicable Programs: All Programs") CLEANING AND SANITATION Policy Owner: Erica Tennessen Policy Originated by (program or department): Program Applicable Programs: All Programs Statutory or Regulatory Citation: Minn. Stat., Chap. 4626 Minn.
CLEANING AND SANITATION Policy Owner: Erica Tennessen Policy Originated by (program or department): Program Applicable Programs: All Programs Statutory or Regulatory Citation: Minn. Stat., Chap. 4626 Minn.
ENDOSCOPE DECONTAMINATION : Where are we now!
 ENDOSCOPE DECONTAMINATION : Where are we now! Christina Bradley Laboratory Manager Hospital Infection Research Laboratory City Hospital Dudley Road, Birmingham CHOICE OF DECONTAMINATION METHOD Depends
Infection Control Manual Residential Care Part 3 Infection Control Standard IC9: Environmental
 IC9: 0600 LAUNDRY 1.0 STANDARD All staff must follow Routine Practices when handling soiled Off site processing (general linen) Off site processing (general linen) will not require special separation of
THE BASICS OF DECONTAMINATION
 THE BASICS OF DECONTAMINATION Objectives Review the basic factors that impact cleaning and decontamination of surgical devices Present the fundamentals of manual and automatic cleaning Review various cleaning
Recommendations for cleaning, decontamination and sterilisation. devices
 Recommendations for cleaning, decontamination and sterilisation of MEDACTa INTERNATIONAL orthopedic devices 1 This document was prepared to provide cleaning, decontaminating and sterilising instructions
SUGGESTED POLICY FOR THE MONITORING AN ULTRASONIC CLEANER DAILY
 SUGGESTED POLICY FOR THE MONITORING AN ULTRASONIC CLEANER DAILY SUBJECT: ULTRASONIC CLEANER MONITORING DAILY DEPARTMENT: CPD, CSSD, SPA, MDRD, SPD, dental offices, medical offices and department using
HOMES AND SENIORS SERVICES. APPROVAL DATE: April 2004 REVISION DATE: March 2016 REVISION DATE: March 2017 REVIEW DATE: November 2018
 Page 1 of 6 PURPOSE: All equipment used for resident care will be appropriately cleaned, disinfected and/or sterilized to minimize the risk of transmission of infection by reducing micro-organism contamination
Aim. Learning outcomes. 13 May Megan Reilly RN BN Cert IV Assessment & Workplace Training MHlthSc (Inf Control) Immunise Cert MACN CICP 1
 Immunise Cert MACN CICP 1") Aim Apply the principles and practices of reprocessing reusable podiatry instruments and equipment to the officebased practice setting Learning outcomes Describe the chain of infection related to the office-based
Aim Apply the principles and practices of reprocessing reusable podiatry instruments and equipment to the officebased practice setting Learning outcomes Describe the chain of infection related to the office-based
Effective Date: 0 8 / 1 0 / 1 7. Replaces: 08/11/16. Formulated:1997 SPECIAL (MEDICAL) WASTE MANAGEMENT
 WASTE MANAGEMENT") Replaces: 08/11/16 Page 1 of 5 POLICY: Special waste generated on each Texas Department of Criminal Justice (TDCJ) unit will be handled according to the requirements of law and good infection control practices.
Replaces: 08/11/16 Page 1 of 5 POLICY: Special waste generated on each Texas Department of Criminal Justice (TDCJ) unit will be handled according to the requirements of law and good infection control practices.
MARSHALLTOWN MEDICAL AND SURGICAL CENTER ENVIRONMENTAL SERVICES. SUBJECT: Room Cleaning Patient Discharge (All Areas) PROCEDURE NO: 033
 PROCEDURE NO: 033") MARSHALLTOWN MEDICAL AND SURGICAL CENTER ENVIRONMENTAL SERVICES SUBJECT: Room Cleaning Patient Discharge (All Areas) PROCEDURE NO: 033 PURPOSE: To provide a systematic approach to remove the accumulation
MARSHALLTOWN MEDICAL AND SURGICAL CENTER ENVIRONMENTAL SERVICES SUBJECT: Room Cleaning Patient Discharge (All Areas) PROCEDURE NO: 033 PURPOSE: To provide a systematic approach to remove the accumulation
Safety procedures: Wear your PPE. Gloves and goggles when filling the chemical bottle, using the machine, and cleaning the machine.
 iclean Custodian who Learns, Educates, Achieves & Networks Success. Providing Safe, Clean, Efficient & Attractive Schools. KAIVAC TRAINING Recommended PPE: GFCI, goggles, and gloves. Safety procedures:
Setting The Standards For A Safer Future
 Setting The Standards For A Safer Future 2018 / 2019 2018/2019 Excel Healthcare Ltd Catalogue Established in 1983 Excel Healthcare Ltd has grown to become one of the largest suppliers of bench top steam
V. Mueller. V. Mueller Reusable Devices: Cleaning and Sterilization Guide USA. Rx Only
 V. Mueller en V. Mueller Reusable Devices: Cleaning and Sterilization Guide USA Rx Only V. Mueller, CareFusion and the CareFusion logo are trademarks or registered trademarks of CareFusion Corporation
JOB DESCRIPTION. Reports To : Laundry Supervisor, Assistant Director of Housekeeping, Director of Housekeeping
 JOB DESCRIPTION Position : Laundry Attendant Department : Housekeeping Reports To : Laundry Supervisor, Assistant Director of Housekeeping, Director of Housekeeping Position Summary : The Laundry Attendant
EPISD RISK MANAGEMENT. Custodial Safety
 Custodial Safety Custodial Safety The on-going maintenance of school and support facilities require custodians to perform a variety of tasks. These tasks must be performed in a neat, orderly, efficient,
CleaningProtocol. Guidelines for Frontline Staff
 CleaningProtocol Guidelines for Frontline Staff Healthy Measures Ι www.healthymeasuresonline.com Network Services Company Ι 1100 E. Woodfield Road, Suite 200 Ι Schaumburg This document assumes environmental
Common Area Cleaning Guide
 1 P a g e Common Area Cleaning Guide It is the responsibility of every occupant, owner, tenant, contractor, employee & visitor and ALL users of this facility to ensure they take all reasonably practical
Aesculap Implant Systems
 Aesculap Implant Systems Aesculap Implant Systems Orthopedics USA Instructions for Use/Technical Description Page 1 of 16 Symbols on product packages! Caution, general warning symbol Caution, see documentation
Washroom. PURPOSE: To provide clean washrooms for staff, visitors and patients MATERIALS: 19-1
 Washroom 1 High to Low Outside Clean 2 3 to Inside to Dirty Remember the Cleaning Basics PURPOSE: To provide clean washrooms for staff, visitors and patients MATERIALS: Disposable gloves If needed: --Disposable
The Principles, The Process, and The Results:
 The Principles, The Process, and The Results: Presented by: Fred Alston, CSPDT Eastern Region Clinical Sales and Support Manager April 21, 2017 I am an employee of Healthmark Industries Fraser, Michigan
The individual indicated in the responsible person column must decontaminate the item as indicated in the method column.
 A-Z Decontamination of Equipment and Medical Devices (Reviewed June 2017) Staff must follow the Infection Control Decontamination of Equipment and Medical Devices Guidelines as listed in the following
Instructions for care, maintenance, cleaning and sterilization of Smith & Nephew orthopaedic devices
 Instructions for care, maintenance, cleaning and sterilization of Smith & Nephew orthopaedic devices 71381339 REVA CLEANING AND STERILIZATION BRO.indd 1 5/21/12 3:41 PM 71381339 REVA CLEANING AND STERILIZATION
Restrooms. Proper daily cleaning procedures. Custodial Best Practices
 Restrooms Proper daily cleaning procedures Custodial Best Practices Cleaning tools Bowl brush stiff bristle brush used for basic scrubbing and cleaning of toilets and urinals. Bowl swab soft nylon applicator
ON TRACK Reprocessing In-service / Competency for CF/PCF/GIF Endoscopes (EVIS, EXERA, EXERA II)
") THIS CHECKLIST IS DESIGNED FOR USE SOLELY AS A CUSTOMER EDUCATIONAL TOOL, AND IS NOT INTENDED TO REPLACE OR ANY WAY MODIFY THE OLYMPUS INSTRUCTION MANUAL/REPROCESSING MANUAL. BE SURE TO FOLLOW THE DETAILED
THIS CHECKLIST IS DESIGNED FOR USE SOLELY AS A CUSTOMER EDUCATIONAL TOOL, AND IS NOT INTENDED TO REPLACE OR ANY WAY MODIFY THE OLYMPUS INSTRUCTION MANUAL/REPROCESSING MANUAL. BE SURE TO FOLLOW THE DETAILED
Cleaning and Sanitation Procedures Module Cafe/Dining Restroom
 Cafe/Dining Restroom Restrooms Materials Requirement Planning A. Materials requirement planning (MRP) a. Clean rags b. Mop buckets and wringers c. Cotton wet mops and handles d. Dust mop and dustpan e.
AS Medizintechnik GmbH Sattlerstrasse 15, Tuttlingen, Germany Tel 07461/ Fax 07461/
 s 65-201-00-65-202-00 01 Stopcock left 02 Spring Cap 03 Cannula CLEANING / STERILIZATION Immediately after use the instruments have to be soaked in a combined disinfection and cleaning solution in order
Institutions NUMBER: Food Service Safety And Sanitation
 Page 2 of 6 PROCEDURES: I. Safety: General safety guidelines for FSMs include: A. Handling of Supplies: When handling or storing supplies, food service staff and prisoners must: 1. Use proper lifting techniques.
INSTRUCTIONS FOR USE & STERILIZATION FOR INSTRUMENTS
 INSTRUCTIONS FOR USE & STERILIZATION PMS PRECISION MEDICAL SPECIALITIES GMBH Kreuzstrasse 5 DE-78532 Tuttlingen PO Box 4607 DE-78511 Tuttlingen Fon: +49 74 61 13 131 Fax: +49 74 61 76 698 info@pms-tuttlingen.de