Instructions for use and maintenance of gas, gas-electric and electric cookers. Series: 50N
|
|
|
- Merilyn Garrison
- 5 years ago
- Views:
Transcription
1 Instructions for use and maintenance of gas, gas-electric and electric cookers. Series: 50N
2 Index Technical data and specifications Installation Ventilation Positioning Gas connection dapting to different types of gas Replacing the injectors...35 Regulating the air Minimum setting Electrical connection...36 Safety device For the user Ventilation Igniting the burners Igniting the gas oven Igniting the gas grill...37 Safety device Using the gas hob Using the electric hot-plates...37 Using the gas oven...38 Using the gas or electric grill Using the conventional electric oven Using the conventional multifunction electric oven...39 Oven with thermostat...39 Warming compartment...39 dvice and precautions...39 Figures Introduction - Thank you for choosing one of our quality products, capable of giving you the very best service. To make full use of its performance features, read the parts of this manual which refer to your appliance carefully. The Manufacturer declines all responsibility for injury or damage caused by poor installation or improper use of the appliance. - To ensure its appliances are always at the state of the art, and/or to allow constant improvement in quality, the manufacturer reserves the right to make modifications without notice, although without creating difficulties for users. - When ordering spare parts, inform your dealer of the model number and serial number punched on your appliance s nameplate, visible inside the warming compartment or on the back of the cooker. - PPINCE COMPYING WITH THE FOOWING DIRECTIVES: - EEC 90/396 - EEC 73/23 and 93/88 - EEC 89/336 (radio-frequency interference) - EEC 89/109 (contact with foods) FOREWORD - Refer only to the headings and sections covering accessories actually installed on your cooker. 32
3 Usable Oven dimensions Width cm. 39,5 Depth cm. 43,0 Height cm. 32,0 Volume l. 54 Technical data and specifications Nominal external Cookers dimensions 50x50 Height at hob cm 85 Height with lid raised cm 133 Height w. glass lid raised cm 133,3 Depth with door closed cm 50 Depth with door open cm 96 Width cm 50 GS BURNERS (injectors and flow-rates) Gas Burner Injector low nominal flow-rate flow-rate (kw) (kw) G20 auxiliary 70 0,40 0,90 20 semi-rapid 99 0,40 1,85 mbar rapid 126 0,85 3,00 oven 130 1,00* 3,00 grill 110 2,00 G30 auxiliary 48 0,40 0, semi-rapid 68 0,40 1,85 mbar rapid 86 0,85 3,00 G31 oven 86 1,00* 3,00 37 grill 70 2,00 mbar * For thermostat. In case of oven with tap: 1.3 kw EQUIPMENT ll models are equipped with safety device for oven and grill burners. Depending on the models, cooker may also have: - Oven thermostat (or tap) - Electric oven lighting - Grill burner or element - One or more electric hotplates For the YOUT OF HOB BURNERS see the models illustrated in figure 1 at the back of this manual. For the EECTRIC WIRING DIGRM see figure 2 at the back of this manual. The electrical power is stated on the nameplate visible inside the warming compartment (if present) or on the back of the cooker. copy of the nameplate is glued to the cover of this manual (for gas or gas-electric products only). EECTRIC HOTPTES ø 145 1,0 kw - Normal hotplate 1,5 kw - Rapid hotplate ø 180 1,5 kw - Normal hotplate 2,0 kw - Rapid hotplate EECTRIC OVEN POWER Oven: (1,1kW bottom 0,7kW top element) Grill: 2,2 kw 2,0 kw Cat.: see nameplate on cover; Class 1 or 2.1 Type X cookers 33
4 INSTTION The appliance must be installed by qualified staff working in accordance with the regulations in force. Before installing, ensure that the appliance is correctly preset for the local distribution conditions (gas type and pressure). The presettings of this appliance are indicated on the nameplate shown on the cover. This appliance is not connected to a flue gas extractor device. It must be installed and connected in accordance with the regulations in force. This appliance may only be installed and may only operate in rooms permanently ventilated in accordance with national regulations in force. VENTITION The rooms in which gas appliances are installed must be well ventilated in order to allow correct gas combustion and ventilation. The air flow necessary for combustion is at least 2 m 3 /h for each kw of rated power. POSITIONING Remove the packaging accessories, including the films covering the chrome-plated and stainless steel parts, from the cooker. Position the cooker in a dry, convenient and draft-free place. Keep at an appropriate distance from walls which may be damaged by heat (wood, linoleum, paper, etc.). The cooker may be free-standing (class 1) or between two units (in class 2 st 2-1) the sides of which must withstand a temperature of 100 C and which must not be higher than the working table. CONNECTING TO THE GS SUPPY Before connecting the cooker, check that it is preset for the gas to be used. Otherwise, make the conversion as described in the section headed dapting to different gas types. The connection is on the right; if the pipe has to pass behind the cooker, it must be kept low down where the temperature is Installation about 50 C. - Rigid connection (see fig. 3 + B) The connection to the mains gas supply may be made using a rigid metal pipe or with a metal hose. Remove the hose connector (if already fitted) and screw the rigid union onto the threaded connection of the gas train (see fig. 3). The union for rigid connection may already be fitted on the gas train, or may be amongst the cooker accessories. Otherwise, it can be obtained from your dealer. If national regulations permit, a metal hose complying with the national standards can be screwed directly onto the threaded connection of the gas train, fitting a seal (see fig. 3B). However, users are strongly recommended always to fit the rigid union. - Connection using a rubber hose (see fig. 3C). (For butane/propane gas only). Connect a rubber hose carrying the conformity mark currently in force to the hose connector. The hose must be replaced at the date indicated at the latest, and must be secured at both ends using standard hose clamps. It must be absolutely accessible to allow its condition to be checked along its entire length. CUTION: - Use of the hose connector is only permitted for free-standing installation. If the appliance is installed between two class 2 st. 2-1 unions, the rigid union is the only form of connection permitted. IMPORTNT: - fter installation, check that the connections are airtight. - For operation with butane/propane, check that the gas pressure is as indicated on the nameplate. - Use only standard rubber hoses. For PG, use a hose which complies with the national regulations in force. - void sharp bends in the pipe and keep it well way from hot surfaces. References to the regulations covering the gas connection to the appliance: ISO
5 DPTING TO DIFFERENT TYPES OF GS If the cooker is not already preset to operate with the type of gas available, it must be converted. Proceed as follows: - Replace the injectors (see table on page 33); - regulate the primary air flow; - regulate the minimum settings. N.B.: every time you change the type of gas, indicate the new type of gas on the serial number label. REPCING THE HOB BURNER INJEC- TORS (fig. 4) - Remove the lid of the cooker by lifting it off its supports; - remove the grids, burner caps and burners, lifting them off; - unscrew the 2 screws (above) or nuts (below) at the back which secure the work top, and pull it out forward. - remove the mixer pipes and replace the injectors using a 7 mm socket wrench. REPCING THE OVEN BURNER INJEC- TOR (Fig. 5) - oosen the screw which secures the bottom of the oven; - remove the oven bottom (pulling it forward); - remove the oven burner, after taking out the screw which secures it; - replace the injector using a 7 mm socket wrench. REPCING THE GRI BURNER INJEC- TOR (Fig. 6) - Remove the burner after taking out the two screws which secure it; - replace the injector using a 7 mm socket wrench. IMPORTNT: - Never over-tighten the injectors; - after replacing, check that all the injectors are airtight. Installation REGUTING THE BURNER IR Refer to the table below (indicative values) for regulation of the gap H in mm (fig. 4 for the hob, fig. 6 for the grill). Burner G20 20mbar G mbar G31 37mbar uxiliary 3 4 Semi-rapid 3 3 Rapid 4 6 Oven - - Grill 3 8 Check operation of the burner: - Ignite the burner at maximum flame; - the tongue of the flame must be clear and with no yellow tip, and must adhere closely to the burner. If too much air is supplied, the flame detaches from the burner and may be dangerous. If the air supply is insufficient, the flame has a yellow tip and soot may form. SETTING HOB BURNER MINIMUM EV- ES If the cooker is to work on bottled gas (butane/propane), the tap by-pass must be screwed right down. The cooker may be equipped with type taps, with by-pass inside (accessed by inserting a small screwdriver into the rod) or type B taps, with by-pass on the outside on the right (accessed directly). See figure 7. If the cooker is to work on natural gas, proceed as follows for both types of tap: - Ignite the burner at maximum flame; - pull off the knob, without using a lever against the control panel, which might be damaged; - access the by-pass with a small screwdriver and back off by about 3 turns (turning the screwdriver anti-clockwise); - turn the tap rod anti-clockwise again until it stops: the burner will be at maximum flame; - screw the by-pass slowly back in, without pushing the screw-driver, until the flame has apparently shrunk to 1/4 of the maximum size, checking that it is sufficiently stable 35
6 even in quite strong draughts. SETTING OVEN BURNER MINIMUM EV- ES If the cooker is to work on bottled gas (butane/propane), the thermostat by-pass must be screwed right down. If the cooker is to work on natural gas, proceed as follows: - Remove the oven bottom (loosen the screw to remove the bottom); - ignite the oven burner, turning the knob pointer to the maximum setting; - shut the oven door; - access the thermostat or tap by-pass (see fig. 8); - back off the thermostat by-pass by about 3 turns; - after 5 or 6 minutes, turn the knob pointer to the minimum setting; - slowly re-tighten the by-pass, watching the flame decrease in size through the window in the closed oven door until the tongue of the flame is about 4 mm long. Never keep the flame too low. It must be stable even when the oven door is opened or closed quickly; - turn off the burner and replace the oven bottom. CONNECTING TO THE EECTRIC MINS Before making the connection, check that: - the mains voltage is as indicated on the nameplate; - the earth connection is in good working order. If the socket is not easily accessible, the installation engineer must provide a switch with a contact breaking gap of 3 mm or more. If the appliance power lead is not fitted with a plug, use an approved standard type, remembering that: - the green-yellow wire must be used for the earth connection; - the blue wire is the neutral; - the brown wire is live; Installation - the lead must never touch hot surfaces over about 75 degrees C; - replacement leads must be of type H05RR- F or H05V2V2-F of suitable size (see diagrams in fig. 2). - if the appliance is supplied without lead, using type H05RR-F or H05V2V2-F cable of suitable size (see diagrams in fig. 2). IMPORTNT: the manufacturer declines all liability for damage due to failure to comply with the regulations and standards in force. Check that the appliance is correctly connected to the earth (see diagrams in fig. 2 at the back of the manual). THE SFETY DEVICE The correct gap between the end of the thermocouple sensor and the burner is shown in figures 5 and 6. To check that the valve is working properly, proceed as follows: - ignite the burner and leave it to work for about 3 minutes; - turn off the burner by returning the knob to off position ( ); - after 60 seconds for oven and grill burners, turn the knob pointer to the "on" position; - release the knob in this position and move a burning match towards the burner; IT MUST NOT IGNITE. Time needed to excite the magnet during ignition: 10 seconds approx. utomatic tripping time, after flame has been turned off: not more than 60 seconds for oven and grill burners. IMPORTNT - Before doing any work inside the cooker, disconnect the mains plug and shut the gas tap. - Never use matches to check the gas circuit for leaks. If a specific control device is not available, foam or very soapy water can be used. - When re-closing the hob, check that the electrical wires of the spark plugs (if present) are not close to the injectors, so that they cannot run across them. 36
7 HOW TO USE THE COOKER VENTITION ll gas cooking appliances produce heat and moisture in the rooms where they are installed. Take care to ensure that the kitchen is well ventilated; keep the ventilation openings unobstructed or install an extractor hood with fan. In case of intensive or prolonged use, additional ventilation may be required; open a window, or increase the extractor fan power. IGNITING THE HOB BURNERS - Press the knob and turn it anti-clockwise until it reaches the symbol on the control panel (maximum flame position); - at the same time, move a burning match towards the burner head; - to reduce the flame, turn the knob further in the same direction until its pointer is against the symbol (minimum flame position). IGNITING THE OVEN BURNER - Open the oven door; - press the knob and turn it anti-clockwise to the maximum flame position; - move a burning match towards the hole in the centre of the oven bottom and press the knob right down (see fig. 9); - check that the burner has ignited, looking through the hole in the centre of the bottom, keeping the knob pressed all the time; - after about 10 seconds, release the knob and check that the burner remains on. Otherwise, repeat the operation. IGNITING THE GRI BURNER (GS GRIS) - Fit the control knob guard as shown in fig. 12; - press the oven knob and turn it to the right until it reaches the stop; - move a burning match towards the perforated burner pipe and press the knob right down (see fig. 10); 37 For the user - check that the burner has ignited, keeping the knob pressed down; - after about 10 seconds, release the knob and check that the burner remains on. Otherwise, repeat the operation. IMPORTNT - Difficulty in igniting burners is normal if the cooker has been out of use for some time. The air accumulated in the pipes will be expelled in a few seconds; - Never allow too much unburnt gas to flow from the burners. If ignition is not achieved within a relatively short time, repeat the procedure after returning the knob to the off position ( ); - when the oven and grill are lit for the first time, a smell may be noticed and smoke may come out of the oven. This is because of the surface treatment and oily residues on the burners. SFETY DEVICE Burners equipped with this device have the advantage that they are protected if they accidentally go out. If this occurs, the supply of gas to the burner concerned is automatically cut off, preventing the hazards deriving from a leak of unburnt gas. The gas supply must be cut off within no more than 60 seconds for the oven and grill burners. HOW TO USE THE HOB BURNERS Use pans of diameter suitable for the burner type. The flames must not project beyond the base of the pan. Recommended sizes: - for auxiliary burners = pans of at least 8 cm - for semi-rapid burners = pans of at least 14 cm - for rapid burners = pans of at least 22 cm. N.B.: Never keep the knob at settings between the maximum flame symbol and the off position ( ). FOR COOKERS EQUIPPED WITH EEC- TRIC HOTPTES The different heat settings are obtained as follows:
8 - 1 = minimum setting for all hotplates; - 6 = maximum setting for normal and rapid hotplates (with red disc); - 0 = off. Pans must never be smaller in diameter than the hotplates and their bottoms must be as flat as possible (see fig. 11). IMPORTNT: - Never leave hotplates on without pans, except when first used; leave for about 10 minutes to dry oil or moisture residues; - if the hotplate is to be out of use for a long time, apply a little grease to its painted surface; - do not allow spills to burn onto the hotplate, requiring the use of abrasive cleaners. HOW TO USE THE GS OVEN - fter igniting the burner, leave the oven to heat up for about 10 minutes; - place the food for cooking in an ordinary oven dish and place it on the chrome-plated shelf; - place the food in the oven, using the shelf on the third pair of runners whenever possible, and turn the knob pointer to the desired setting; - cooking can be observed through the window in the door with the oven light on. This will avoid opening and closing the door frequently, unless oil or fat has to be added to the dish. IMPORTNT: never place foods directly on the drip tray for cooking; it is there only to collect any drips of fat during grilling. N.B.: For cookers without thermostat: - with the knob on the maximum setting = 270 degrees C - with the knob on the minimum setting = 150 degrees C - ll other temperatures between 150 and 270 degrees C are obtained approximately by positioning the knob between the maximum and minimum settings. Never leave the knob in positions between the maximum symbol and the off setting ( ). For the user - ignite the burner and wait a few minutes to allow it to warm up, or switch on the heating element; - place the foods on the chrome-plated shelf; - insert on the highest runner; - insert the drip tray on the bottom runner; - gently close the oven door, resting it against the knob guard; - after a few minutes, turn the food to expose the other side to the infrared radiation (the cooking time depends on the type of food and personal taste). N.B.: the first time the grill is used smoke will come out of the oven. Before inserting foods for cooking, wait until any oil residues on the burner have completely burnt away. The grill must only be used at its full rated heat. IMPORTNT: accessible parts may be hot when the grill is in use! Keep children well away. The grill element in the top of the oven is switched on by turning the thermostat knob clockwise to the grill symbol on the control panel. The red light will come on to show the element is in operation. The table below will serve as a guide; bearing in mind that cooking times and temperatures may vary depending on the type and amount of foods cooked and personal taste. Food to be Time (minutes) grilled 1st side 2nd side Thin pieces of meat 6 4 Fairly thick pieces of meat 8 5 Thin fish or fish without scale 10 8 Fairly thick fish Sausages Toasted sandwiches 5 2 Small poultry HOW TO USE THE GS OR EECTRIC GRI - fit the knob guard (see fig. 12); 38 CONVENTION EECTRIC OVEN - The oven shelf is designed to take normal oven dishes for cooking sweets or roasts,
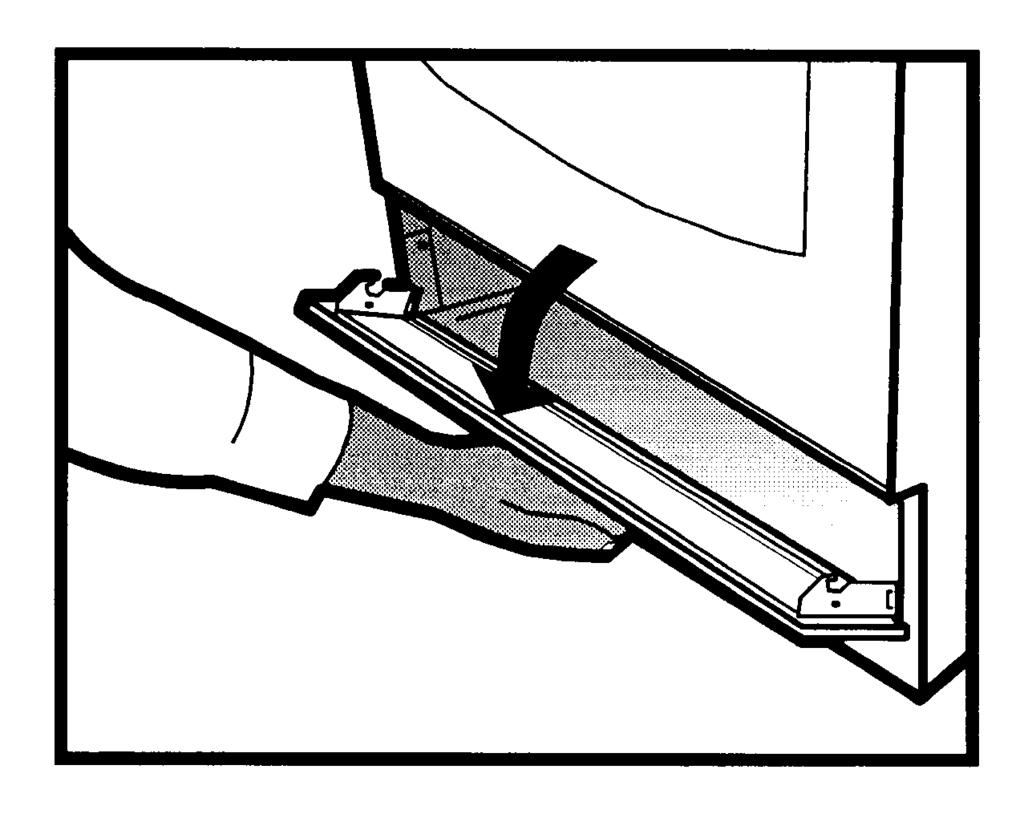
9 or is used without a pan for cooking foods under the grill. - The drip tray is only there to collect any juice from foods and must never be used as a cooking surface. There is a single control knob for the oven or grill. Starting from the 0 (off) position, the knob can be turned clockwise to the following settings: - symbol: oven lamp on (it will remain on even if the knob pointer is turned to the other settings). - Setting from 60 to 250 degrees C: oven heat settings, with thermostat control. - or symbol: grill on (in roof of oven) Turn the knob anti-clockwise to return to the 0 (off) position. N.B. - The yellow light switches on and off as the thermostat is tripped. Before placing food inside, allow the oven to heat up for at least 10 minutes. CONVENTION MUTIFUNCTION EEC- TRIC OVEN Thanks to the various heating elements controlled by a selector knob, this oven offers several cooking modes. Starting from the 0 (off) position and turning the knob clockwise, the settings encountered are: - symbol: conventional static oven cooking at half power (max. temperature 120 C approx.). - symbol: top element on (max. temperature 155 C approx.). - symbol: bottom element on (max. temperature 235 C approx.). - symbol: conventional static oven cooking at full power (max. temperature 295 C approx.). - symbol: grill on. With all settings except zero the red light illuminates to indicate that the oven or grill is on. Before putting food in to be cooked, the oven should be pre-heated for at least 10 minutes. 39 For the user - The oven shelf is designed to take normal oven dishes for cooking sweets or roasts, or is used without a pan for cooking foods under the grill. - The drip tray is only there to collect any juice from foods and must never be used as a cooking surface. OVENS WITH THERMOSTT If cooking temperatures are not as set, call in an engineer to check the thermostat. WRMING COMPRTMENT To open the warming compartment, open the flap door with one hand (see figure 13). To close the warming compartment, simply press the flap door back into place. GENER PRECUTIONS - lways disconnect the power supply before any work inside the oven or where live parts may be accessed. - Never use the warming compartment for storing inflammable liquids or items which do not withstand heat, such as wood, paper, aerosol cans, matches, etc. - Make frequent checks on the rubber connection hose, ensuring that it is well away from hot surfaces, that there are no sharp bends or kinks, and that it is in good condition. The hose must be replaced at the latest at the indicated date and must be secured at both ends using a standard hose clamp. - If taps become stiff to operate over time, contact the fter-sales service. - Wash enamelled or chrome-plated parts with soapy lukewarm water or non-abrasive detergents. metal brush may be used to remove deposits from hob burners and flame caps. Dry thoroughly. - Never use abrasives to clean enamelled or chrome-plated parts. - Do not use too much water when washing the hob. Take care that no water or other substances enter the burner housing holes, as this may be dangerous.
10 - The spark plugs for electric ignition must be kept clean and dry; always check after use, particularly if there have been drips or overflows from pans. - Never close glass lids until the hob burners or hotplates have cooled completely; it might shatter or crack. - Never knock enamelled parts or ignition spark plugs (where present). - The main or wall gas tap should be turned off when the cooker is not in use. - Never lift the cooker by taking hold of the oven door handle. For the user No liability is accepted for injury or damage caused by poor installation or improper use of the cooker. In case of malfunctions, particularly gas leaks or short-circuits, contact your engineer without delay. 40
11 Figuras / Figures / Figuras / Figures SR CUDRO DE CONEXIONES SCHEM DES BRNCHEMENTS ESQUEM DE IGÇÃO CONNECTION DIGRM R 230 V BIFSICO / BIPHSE / BIFÁSICO / TWO-PHSE 400 V MONOFSICO + NEUTRO / MONOPHSE + NEUTRE / MONOFÁSICO + NEUTRO / SINGE-PHSE + NEUTR SR SR N Sección cable Section câble Sec. cabo Wire gauge: 3x6 mm 2 R 230 V TRIFSICO / TRIPHSE / TRIFÁSICO / THREE-PHSE P1 SR Sección cable Section câble Sec. cabo Wire gauge: 4x4 mm 2 R = UXIIR = UXIIIRE = UXIIR = UXIIRY SR = SEMIRRÁPIDO = SEMI-RPIDE = SEMI-RÁPIDO = SEMI-RPID 400 V TRIFSICO + NEUTRO / TRIPHSE + NEUTRE / TRIFÁSICO + NEUTRO / THREE-PHSE + NEUTR N Sección cable Section câble Sec. cabo Wire gauge: 5x2,5 mm 2 R = RÁPIDO = RPIDE = RÁPIDO = RPID P2 = PC Ø 145 = PQUE Ø 145 = DISCO Ø 145 = HOTPTE Ø 145 P1 = PC Ø 180 = PQUE Ø 180 = DISCO Ø 180 = HOTPTE Ø V BIFSICO / BIPHSE / BIFÁSICO / TWO-PHSE 1 2 N Sección cable Section câble Sec. cabo Wire gauge: > 3,5 kw 3x2,5 mm 2 2,2-3,5 kw 3x1,5 mm 2 0-2,2 kw 3x1 mm


12 Figuras / Figures / Figuras / Figures B 1,5 mm 2 mm 4 mm B = TERMOPR / THERMOCOUPE / TERMOPR / THERMOCOUPE B = BUJÍ / BOUGIE D'UMGE / VE DE IGNIÇÃO / SPRK PUG 5 C D H B mm 3 mm 3 3 = TERMOPR / THERMOCOUPE / TERMOPR / THERMOCOUPE B = BUJÍ DE ENCENDIDO / BOUGIE D'UMGE / VE DE IGNIÇÃO / SPRK PUG 6 mm 2-4 mm 3 B 7 H = TERMOPR / THERMOCOUPE / TERMOPR / THERMO-COUPE B = BUJÍ / BOUGIE / VE / SPRK PUG


13 Figuras / Figures / Figuras / Figures
14 ED B1/
Proline GAS HOB Model TCG40IX Instruction Book
 Proline GAS HOB Model TCG40IX Instruction Book GB Operating and Installation Instructions Index Technical data and specifications...... 3 Installation...................... 3-6 Ventilation........................
Installation and Operating Instructions
 Installation and Operating Instructions Models: Verso 4G Hob As part of Parmco Appliances commitment to improving and updating product ranges, we reserve the right to alter, change and update technical
USER MANUAL. 60cm, 3 burners, Hob AKC 630
 USER MANUAL 60cm, 3 burners, Hob AKC 630 For your safety These instructions have been drawn up for your safety and that of others. You are therefore requested to read them carefully before installing
INSTRUCTION MANUAL BUILT-IN HOBS CIR900X
 INSTRUCTION MANUAL BUILT-IN HOBS CIR900X ENGLISH 3-19 Thank you for choosing our product. We advise you to read this manual carefully. It contains all necessary instructions for maintaining unaltered the
USER MANUAL. 80 cm 2 burners, glass hob AKC 820C/BLM
 USER MANUAL 80 cm 2 burners, glass hob AKC 820C/BLM For your safety These instructions have been drawn up for your safety and that of others. You are therefore requested to read them carefully before installing
USER MANUAL AKC cm 4 Burners, Stainless Steel Hob
 USER MANUAL AKC 641 60 cm 4 Burners, Stainless Steel Hob For your safety These instructions have been drawn up for your safety and that of others. You are therefore requested to read them carefully before
GAS COOKER GAS OVEN SERIES. Owner s Manual Please read this manual carefully before operating your set. Retain it for future reference.
 GAS COOKER GAS OVEN SERIES Owner s Manual Please read this manual carefully before operating your set. Retain it for future reference. Record model number and serial number of the set. See the label attached
Contents. 1. Instructions for safety and use 20
 Contents 1. Instructions for safety and use 20 2. Positioning in the counter top 21 2.1 Fixing to the supporting structure 21 2.2 Positioning the adhesive sponge 22 2.3 Positioning the fastening clips
BUILT-IN GLASS HOB MODEL: EGH-G8592G(BK) EGH-G8593G(BK) Owner s Manual Please read this manual carefully before operating your set.
 EGH-G8593G(BK) Owner s Manual Please read this manual carefully before operating your set.") BUILT-IN GLASS HOB MODEL: EGH-G8592G(BK) EGH-G8593G(BK) Owner s Manual Please read this manual carefully before operating your set. Retain it for future reference. Record model number and serial number
BUILT-IN GLASS HOB MODEL: EGH-G8592G(BK) EGH-G8593G(BK) Owner s Manual Please read this manual carefully before operating your set. Retain it for future reference. Record model number and serial number
HG 675 CX 60 HG 675 CN 60 HG 675 CW 60
 HG 675 X 60 HG 675 CX 60 HG 675 CN 60 HG 675 CW 60 1 2 1. : 93/68: 90/396: 2006/95/CE: 2004/108/CE: - 1935/2004:. 2002/95/CE: RoHS 2.,.,,,,...,. (,..)..,,.,. ( ),,, ;,,.,.....,.,,,,,,...,. (..),,.,..,.,,,,
Contents. 1. Instructions for safe and proper use Positioning of hob Attachment to support structure Electrical connection 22
 Contents 1. Instructions for safe and proper use 19 2. Positioning of hob 20 2.1 Attachment to support structure 20 3. Electrical connection 22 4. Gas connection 23 4.1 Connection to LPG 24 4.2 Ventilation
Belling. Gas Hob GHU573 - GHU573T GHU70GE - GHU70TGE - GHU70GC GHU70TGC - GHU60GC INSTALLATION AND USER INSTRUCTIONS
 Belling Gas Hob GHU573 - GHU573T GHU70GE - GHU70TGE - GHU70GC GHU70TGC - GHU60GC INSTALLATION AND USER INSTRUCTIONS Note: This appliance is supplied for use with Natural Gas and can be converted to LPG
INSTRUCTIONS FOR USE ACM 640 IX
 INSTRUCTIONS FOR USE ACM 640 IX INSTALLATION INSTRUCTIONS BEFORE USING THE APPLIANCE PRECAUTIONS AND GENERAL ADVICE ENERGY SAVING TIPS OVEN ACCESSORIES CLEANING AND MAINTENANCE TROUBLESHOOTING GUIDE AFTER-SALES
USER MANUAL ART cm Deluxe Gas Hob
 USER MANUAL ART28916 60cm Deluxe Gas Hob GB IE These instructions have been drawn up for your safety and that of others. You are therefore requested to read them carefully before installing and using the
PROF. RANGE COOKER MODEL: EPRC-A6456GE(SS) Owner s Manual Please read this manual carefully before operating your set. Retain it for future reference.
 Owner s Manual Please read this manual carefully before operating your set. Retain it for future reference.") PROF. RANGE COOKER MODEL: EPRC-A6456GE(SS) Owner s Manual Please read this manual carefully before operating your set. Retain it for future reference. Record model number and serial number of the set.
PROF. RANGE COOKER MODEL: EPRC-A6456GE(SS) Owner s Manual Please read this manual carefully before operating your set. Retain it for future reference. Record model number and serial number of the set.
USER AND INSTALLATION INSTRUCTIONS
 USER AND INSTALLATION INSTRUCTIONS PCC 1274 Issue 3 USER AND INSTALLATION INSTRUCTIONS FOR USE IN :- GB, IE, FR, NL, BE, LU, ES, IT, NO, DE, DK, SE WARNING Read the instructions before use. Only use this
Installation and Operating Instructions
 Installation and Operating Instructions Models: HO-1 HO-2 HO-6 HO-7 As part of Parmco Appliances commitment to improving and updating product ranges, we reserve the right to alter, change and update technical
User Manual. 600mm, 700mm & 900mm Gas Cooktops Model No. CF6GS, CF6GW, CF7GS, CF9GS
 User Manual 600mm, 700mm & 900mm Gas Cooktops Model No. CF6GS, CF6GW, CF7GS, CF9GS For all product enquires, including warranty support, please contact our Customer Care team 1800 444 357 or email customercare@hapl.com.au
BUILD-IN COOKING HOB MODELS H200F, H250F, H400F, 756 & 854F FOR USE WITH LIQUIFIED PETROLEUM GAS
 CO UN T RY L E I S U R E BUILD-IN COOKING HOB MODELS H200F, H250F, H400F, 756 & 854F FOR USE WITH LIQUIFIED PETROLEUM GAS USER AND INSTALLATION INSTRUCTIONS WARNING This appliance must be installed by
HOW TO USE YOUR 2000 RANGE L.P.G. COOKER OR HOB UNIT
 HOW TO USE YOUR 2000 RANGE L.P.G. COOKER OR HOB UNIT CAUTION These instructions must be read and understood before proceeding with the installation and to avoid any possibility of accident it is essential
PROF. RANGE COOKER MODEL: EPRC-9850FE/SS EPRC-9860E/SS. Owner s Manual Please read this manual carefully before operating your set.
 PROF. RANGE COOKER MODEL: EPRC-9850FE/SS EPRC-9860E/SS Owner s Manual Please read this manual carefully before operating your set. Retain it for future reference. Record model number and serial number
Operating Instructions
 Operating Instructions COOKER AND OVEN English, 1 I5ESH/UK I5ESH1/UK Contents WARNING,2 Installation, 3 Positioning and levelling Electrical connection Table of characteristics Description of the appliance,
Contents authorised persons
 Contents 1. INSTRUCTIONS FOR SAFE AND PROPER USE 4 2. POSITIONING OF THE HOB 6 3. GAS CONNECTION 10 4. ELECTRICAL CONNECTION 11 5. ADAPTATION TO DIFFERENT TYPES OF GAS 12 6. FINAL OPERATIONS 14 7. USING
HOOVER HOBS USER INSTRUCTIONS HGH 640 X HGH 640 W HGH 640 B
 HOOVER HOBS USER INSTRUCTIONS HGD 640 SGH HGD 640 GH HGH 640 SX HGH 640 X HGH 640 SW HGH 640 W HGH 640 SB HGH 640 B HGD 750 X HGD 750 SGH HGD 750 GH TECHNICAL CHARACTERISTICS BUILT IN HOBS Burners/hotplates
HVG620 & HVG720 Gas Hob Manual for Installation, Use and Maintenance
 HVG620 & HVG720 Gas Hob Manual for Installation, Use and Maintenance Customer Care Department The Group Ltd. Harby Road Langar Nottinghamshire NG13 9HY T : 01949 862 012 F : 01949 862 003 E : customer
Contents THESE INSTRUCTIONS ARE VALID ONLY FOR THE END USER COUNTRIES WHOSE IDENTIFICATION SYMBOLS APPEAR ON THE COVER OF THIS MANUAL.
 Contents 1. INSTRUCTIONS FOR SAFE AND PROPER USE 4 2. INSTALLATION OF THE APPLIANCE 6 3. ADAPTATION TO DIFFERENT TYPES OF GAS 9 4. FINAL OPERATIONS 12 5. DESCRIPTION OF CONTROLS 14 6. USE OF THE HOB 16
CONTENTS. Welcome to Think Letter page 3. General Information page 4-5. Warning and Safety Instructions page 5-6. Instructions for Use pages 7 10
 Instruction manual GAS COOKTOPS CONTENTS Welcome to Think Letter page 3 General Information page 4-5 Warning and Safety Instructions page 5-6 Instructions for Use pages 7 10 Instructions for Installation
FRANKE DESIGNER GAS COOKTOP 90CM
 page 1 of 7 510 880 45 480 Min 50 860 Min 600 SPECIFICATIONS Recommended use Material Colour availability Weight Dimensions Voltage Domestic Stainless Steel Stainless Steel 18.2kg 880 x 510 x 45mm 220-240V
HOW TO USE YOUR 4500 RANGE L.P.G. COOKER OR HOB UNIT
 HOW TO USE YOUR 4500 RANGE L.P.G. COOKER OR HOB UNIT If the appliance does not operate correctly contact your supplier Or Leisure Products (Bolton) Ltd Holly Street, Bolton, BL1 8QR. England. ~~~~ For
PC 640 GB. Built-in cooking tables 60 Instructions for installation and use
 PC 640 GB Built-in cooking tables 60 Instructions for installation and use Congratualtions on choosing an Ariston appliance, which you will find is dependable and easy to use. We recommend that you read
INSTRUCTION MANUAL GAS COOKTOPS IL**604, IL**775, IL**905 (** = BV, WV and SS models)
") INSTRUCTION MANUAL GAS COOKTOPS IL**604, IL**775, IL**905 (** = BV, WV and SS models) OPEN 24/7 ILVE ACCESSORIES ONLINE SHOP Dear customer, We thank you and congratulate you on your choice. This new carefully
INSTRUCTION MANUAL GAS COOKTOPS IL**604, IL**775, IL**905 (** = BV, WV and SS models) OPEN 24/7 ILVE ACCESSORIES ONLINE SHOP Dear customer, We thank you and congratulate you on your choice. This new carefully
Porter & Charles OPERATION MANUAL. Gas Cooktop CG60S, CG76S, CG90S, CG60W, CG90W
 Porter & Charles OPERATION MANUAL Gas Cooktop CG60S, CG76S, CG90S, CG60W, CG90W Congratulations on the purchase of your Porter & Charles appliance. We are sure it will provide many years of great cooking
3gb53231b.fm5 Page 12 Friday, April 11, :21 PM
 3gb53231b.fm5 Page 12 Friday, April 11, 2003 12:21 PM INSTRUCTIONS FOR USE BEFORE USING THE COOKTOP SUGGESTIONS FOR ENVIRONMENT PROTECTION PRECAUTIONS AND GENERAL ADVICE ENERGY SAVING TIPS CARE AND MAINTENANCE
operating & installation instructions SA20XMFR
 operating & installation instructions SA20XMFR Contents 1. INSTRUCTIONS FOR SAFE AND PROPER USE 26 2. INSTALLATION 28 3. DESCRIPTION OF CONTROLS 30 4. USE OF THE OVEN 35 5. AVAILABLE ACCESSORIES 36 6.
installation and operating instructions omega OF902X upright cooker
 installation and operating instructions omega OF902X upright cooker Contents 1. INSTRUCTIONS FOR PROPER USE... 4 2. DISPOSAL INSTRUCTIONS OUR ENVIRONMENT POLICY... 4 3. SAFETY PRECAUTION... 5 4. INTENDED
INSTRUCTIONS FOR HOBS PISL1CZI PISL20ZI PISL40ZI PISL40Z* PISL4CZI PISL904CZI PISL1004CZI PISL1163CZI PISF4CZI PISF904CZI PISF1004CZI PISF1163CZI
 Select-Abey.rev05 INSTRUCTIONS FOR INSTALLATION AND USE HOBS PISL1CZI PISL20ZI PISL40ZI PISL40Z* PISL4CZI PISL904CZI PISL1004CZI PISL1163CZI PISF4CZI PISF904CZI PISF1004CZI PISF1163CZI CONTROLS ZONE -
MHG201 Gas Hob Manual for Installation, Use and Maintenance
 MHG201 Gas Hob Manual for Installation, Use and Maintenance 1 Customer Care Department The Group Ltd. Harby Road Langar Nottinghamshire NG13 9HY T : 01949 862 012 F : 01949 862 003 E : customer.care@cda.eu
Contents. Downloaded from manuals search engine
 Contents 1. INSTRUCTIONS FOR SAFE AND PROPER USE 6. INSTALLATION 8 3. DESCRIPTION OF CONTROLS 30 4. USE OF THE OVEN 35 5. AVAILABLE ACCESSORIES 36 6. COOKING HINTS 37 7. CLEANING AND MAINTENANCE 43 8.
FR GUIDE D'INSTALLATION ET D UTILISATION EN GUIDE FOR INSTALLATION AND USE TABLE DE CUISSON TABLE DE CUISSON GAZ COOKING GAS HOB
 FR GUIDE D'INSTALLATION ET D UTILISATION EN GUIDE FOR INSTALLATION AND USE TABLE DE CUISSON TABLE DE CUISSON GAZ COOKING GAS HOB 0.1 DPE7610* DPE7610*M 0.1.1 0.1.2 3,5 cm 5 cm 47,5 cm (48 49 cm) 1.1.2
installation and operating instructions OG63XA Cooktop
 installation and operating instructions OG63XA Cooktop Dear customer, We thank you and congratulate you on your choice. This new carefully designed product, manufactured with the highest quality materials,
HOW TO USE YOUR 2500 RANGE L.P.G. COOKER OR HOB UNIT
 HOW TO USE YOUR 2500 RANGE L.P.G. COOKER OR HOB UNIT CAUTION These instructions must be read and understood before proceeding with the installation and to avoid any possibility of accident it is essential
BUILT-IN GAS HOB. Important - Please read these instructions fully before using AG60GNSS AG60GNW
 BUILT-IN GAS HOB Operating & Installation Instructions -Please keep for future reference AG60GNSS AG60GNW Important - Please read these instructions fully before using These instructions contain important
User Instructions FREESTANDING GAS RANGES BERTAZZONI
 User Instructions FREESTANDING GAS RANGES BERTAZZONI DIMENSIONS: 36 (915 mm)(w) x 253/16 (640 mm)(d) x36 (915 mm)(h) Models X365GGVX (X36 5 00 X) [M3W0GTU4X(2 or 5)A] Models X366GGVX (X36 6 00 X) [M3Y0GTU4X(2
SA990XR-8. operating and installation instructions
 SA990XR-8 operating and installation instructions Contents 1 INSTRUCTIONS FOR USE... 3 SAFETY PRECAUTIONS... 34 3 ENVIROMENTAL RESPONSIBILITY... 36 4 INSTALLATION... 37 5 DESCRIPTION OF CONTROLS... 39
Glass Chimney Hood. Installation & User Instructions Please keep for future reference
 Glass Chimney Hood Installation & User Instructions Please keep for future reference 4897549 4897556 Important Please read these instructions fully before installing or using These instructions contain
Instructions Manual SHC520X - SHC700X
 Instructions Manual SHC520X - SHC700X INDEX EN RECOMMENDATIONS AND SUGGESTIONS... 3 CHARACTERISTICS... 4 INSTALLATION... 5 USE... 7 MAINTENANCE... 8 2 RECOMMENDATIONS AND SUGGESTIONS The Instructions for
SAFETY PRECAUTIONS 1 11/09 EOPI 33643
 Use and Care of your new AGA Gas Fired Range Models: GC Open Flue Range (2 Oven) GC Direct Vent Range (2 Oven) GE Open Flue Range (4 Oven) GE Direct Vent Range (4 Oven) For U.S. and Canadian Markets NOTE:
HHG610SS 60cm 4 burner gas hob. HHG710SS 70cm 5 burner gas hob
 User Manual for your HHG610SS 60cm 4 burner gas hob HHG710SS 70cm 5 burner gas hob NOTE: This User Instruction Manual contains important information, including safety & installation points, which will
USHO COOKER INSTALLATION INSTRUCTIONS SAFETY INSTRUCTIONS USER INSTRUCTIONS MODEL: USHO. INSTRUCTION REF: IN152 ISSUE No. 4 DATE
 Page 1 of 11 INSTALLATION INSTRUCTIONS SAFETY INSTRUCTIONS USER INSTRUCTIONS USHO COOKER MODEL: USHO Page 2 of 11 WARNING To avoid scratching the highly polished exterior surface of this equipment whilst
Contents THESE INSTRUCTIONS ARE VALID ONLY FOR END USER COUNTRIES WHOSE IDENTIFICATION SYMBOLS APPEAR ON THE COVER OF THIS MANUAL.
 Contents 1. INSTRUCTIONS FOR SAFE AND PROPER USE 38. INSTALLING THE APPLIANCE 40 3. ADAPTATION TO DIFFERENT TYPES OF GAS 43 4. FINAL OPERATIONS 45 5. DESCRIPTION OF CONTROLS 47 6. USING THE COOKING HOB
BUILT-IN GAS HOB THE BEAUTY OF SIMPLICITY USER MANUAL BATTERY IGNITION. Model:
 BUILT-IN GAS HOB BATTERY IGNITION Model: HB FG 3060 TN VSB [ 141252-11 ] HB FG 3070 TN VSB [ 141253-11 ] HB FG 4060 TN VSB [ 141250-11 ] HB FG 4090 TN VSB [ 141251-11 ] HB FG 5070 TN VSB HB FG 5090 TN
INSTRUCTIONS AND ADVICE FOR THE USE, INSTALLATION AND MAINTENANCE OF BUILT-IN ELECTRIC HOBS
 INSTRUCTIONS AND ADVICE FOR THE USE, INSTALLATION AND MAINTENANCE OF BUILT-IN ELECTRIC HOBS Dear Customer, Thank you for having purchased one of our products. We are certain that this new, modern, functional
Instructions for use
 GB EN Instructions for use These instructions are also available at: docs.kitchenaid.eu Product description and symbols 4 Control symbols 4 Using the burners 4 Practical advice on using the hob 5 Positioning
INSTALLATION and SERVICE INSTRUCTIONS USE and CARE INSTRUCTIONS BUILT-IN GAS HOB. Model: DEGH90WF. distributed by. DèLonghi.
 INSTALLATION and SERVICE INSTRUCTIONS USE and CARE INSTRUCTIONS BUILT-IN GAS HOB Model: DEGH90WF distributed by DèLonghi Pty Ltd Dear Customer, Thank you for having purchased and given your preference
Contents THESE INSTRUCTIONS ARE VALID ONLY FOR END USER COUNTRIES WHOSE IDENTIFICATION SYMBOLS APPEAR ON THE COVER OF THIS MANUAL.
 Contents 1. INSTRUCTIONS FOR SAFE AND PROPER USE 36. INSTALLING THE APPLIANCE 38 3. ADAPTATION TO DIFFERENT TYPES OF GAS 40 4. FINAL OPERATIONS 4 5. DESCRIPTION OF CONTROLS 44 6. USING THE COOKING HOB
Instructions for the use - Installation advices COOKERS % ELBA QUALITY MADE IN ITALY HOME APPLIANCES. Made in Italy
 Instructions for the use - Installation advices COOKERS 100 % ELBA QUALITY MADE IN ITALY HOME APPLIANCES Made in Italy Dear Customer, Thank you for having purchased and given your preference to our product.
Porter & Charles OPERATION MANUAL. Freestanding Gas & Electric Cooker Slide In Freestanding FEG 90
 Porter & Charles OPERATION MANUAL Freestanding Gas & Electric Cooker Slide In Freestanding FEG 90 1. INSTALLATION PAGES 4-6 1.1.Ventilation 1.2.Discharge of fuel gases 1.3.Positioning the cooker 1.4 Dimensions
Instructions for the use - Installation advices COOKERS % ELBA QUALITY MADE IN ITALY HOME APPLIANCES. Made in Italy
 Instructions for the use - Installation advices COOKERS 100 % ELBA QUALITY MADE IN ITALY HOME APPLIANCES Made in Italy Dear Customer, Thank you for having purchased and given your preference to our product.
UBGHFF60W 60cm Gas on Glass Gas Hob
 UBGHFF60W 60cm Gas on Glass Gas Hob GB [02] x 1 [03] x 2 [04] x 1 [01] x 1 [08] x 4 [05] x 2 [09] x 1 [06] x 1 [07] x 4 [10] x 4 [11] x 1 TEMPLATE TEMPLATE UBGHFF60W GB Built-in 60cm Gas on Glass Gas Hob
Contents THESE INSTRUCTIONS ARE VALID ONLY FOR END USER COUNTRIES WHOSE IDENTIFICATION SYMBOLS APPEAR ON THE COVER OF THIS MANUAL.
 Contents 1. INSTRUCTIONS FOR SAFE AND PROPER USE 44. INSTALLING THE APPLIANCE 46 3. ADAPTATION TO DIFFERENT TYPES OF GAS 50 4. FINAL OPERATIONS 5 5. DESCRIPTION OF CONTROLS 54 6. USING THE COOKING HOB
Operating Instructions HOB
 PHN 942 T/IX/A English Operating Instructions HOB Operating Instructions,1 Warnings,2 Assistance,3 Description of the appliance,4 Installation,5 Start-up and use,9 Precautions and tips,9 Maintenance and
BUILT-IN COOKING HOBS P6D. Instructions for the use - Installation advices KEEP IN A SAFE PLACE
 BUILT-IN COOKING HOBS P6D GB Instructions for the use - Installation advices KEEP IN A SAFE PLACE Before operating this hob, please read these instructions carefully 2 Dear Customer, Thank you for having
OVENS AUS. Installation - Use - Maintenance. Oven models: 60cm Built in Ovens
 OVENS Installation - Use - Maintenance AUS Oven models: 60cm Built in Ovens 539.07.031 539.07.041 GENERAL INFORMATION Please read this booklet thoroughly before you use this appliance. It is important
DC740 Built-under & DC940 Built-In
 DC740 Built-under & DC940 Built-In Double Oven Installation, use and maintenance www.cda.eu Contents: 3 Important information 4 Important safety notes 6 Before first use 7 Notes on usage 8 Oven controls
GSI501A. gas cooker. Users Operating Instructions. Before operating this cooker, please read these instructions carefully
 GSI501A gas cooker GB Users Operating Instructions Before operating this cooker, please read these instructions carefully Dear Customer Thank you for choosing one of our appliances which has been carefully
Operating Instructions HOB Contents
 THP 641 W/IX/I English Operating Instructions HOB Contents Operating Instructions,1 Warnings,2 Assistance,2 Description of the appliance,3 Installation,4 Start-up and use,7 Precautions and tips,7 Maintenance
BSF60WH / BSF60SS BUILT IN ELECTRIC FAN OVEN. Instruction Manual. Please read these instructions carefully before use and retain for future reference
 BSF60WH / BSF60SS BUILT IN ELECTRIC FAN OVEN Instruction Manual Please read these instructions carefully before use and retain for future reference SAFETY INSTRUCTIONS Important: This appliance is not
OWNER S MANUAL MOBILE GAS BARBECUE WITH SIDE BURNER
 OWNER S MNUL MOBILE GS BRBECUE WITH SIDE BURNER Picture of ppliance Read this instruction carefully and ensure that your grill is properly installed, assembled, maintained and serviced in accordance to
DOUBLE OVEN. Instructions for use - Installation advice. Before operating this oven, please read these instructions carefully P A U
 P A U TO DOUBLE OVEN model CKB 300 Instructions for use - Installation advice Before operating this oven, please read these instructions carefully 2 CONTENTS Page Number Introduction.....................................
INSTRUCTIONS AND ADVICE FOR THE USE, INSTALLATION AND MAINTENANCE OF BUILT-IN ELECTRIC HOBS
 INSTRUCTIONS AND ADVICE FOR THE USE, INSTALLATION AND MAINTENANCE OF BUILT-IN ELECTRIC HOBS Dear Customer, Thank you for having purchased one of our products. We are certain that this new, modern, functional
User, Installation and Servicing Instructions. Silverlink 600 Gas Griddles GS4 and GS7 IS212 ECN3592
 User, Installation and Servicing Instructions Silverlink 600 Gas Griddles GS4 and GS7 IS212 ECN3592 INSTALLATION AND SERVICING INSTRUCTIONS Please read the following carefully before commencing work on
THE BEAUTY OF SIMPLICITY USER MANUAL
 LICITY BUILT-IN GAS HOB Model: EFH 3650 TN SB EFH 3760 TN VSB EFH 3760 TN VS EFH 3761 TN VSB THE BEAUTY OF SIMPLICITY USER MANUAL Congratulations on choosing appliance, which you will find is dependable
Built-in Hotplate, Ovens, Stoves, Minigrills, Hotplate-Sink Combos for Recreational Vehicles and Marine.
 Built-in Hotplate, Ovens, Stoves, Minigrills, Hotplate-Sink Combos for Recreational Vehicles and Marine. Models: CU311 - CU311M - CU333 - CU333M - CU335 - CU335M - CU401 - CU401PE - CU402 - CU402PE - CU403
Built-in Conventional oven
 Built-in Conventional oven LAM3208 User Manual 2 CONTENTS S afety information 2 S afety instructions 3 Product description 5 B efore first use 6 Daily use 6 Using the accessories 7 Additional functions
Installation, Operating and Servicing Instructions
 Installation, Operating and Servicing Instructions Opus 800 Gas Boiling Tops OG8003, OG8004 & OG8009 Please make a note of your product details for future use: Date Purchased: Model Number: Serial Number:
BUILT-IN OVEN MODEL: EBO-E7081D(SS) Owner s Manual Please read this manual carefully before operating your set. Retain it for future reference.
 Owner s Manual Please read this manual carefully before operating your set. Retain it for future reference.") BUILT-IN OVEN MODEL: EBO-E7081D(SS) Owner s Manual Please read this manual carefully before operating your set. Retain it for future reference. Record model number and serial number of the set. See the
BUILT-IN OVEN MODEL: EBO-E7081D(SS) Owner s Manual Please read this manual carefully before operating your set. Retain it for future reference. Record model number and serial number of the set. See the
4 BURNER GAS HOB INSTRUCTION / INSTALLATION MANUAL CGHOBB12 CGHOBW12
 4 BURNER GAS HOB INSTRUCTION / INSTALLATION MANUAL CGHOBB12 CGHOBW12 Contents Unpacking... 5 Product Overview... 6 The Main Unit...6 Control Panel...6 Before Using Your New Hob... 7 Lighting the Hob...
DOMINO HOBS C621 & C721
 DOMINO HOBS C621 & C721 INSTALLATION AND OPERATING INSTRUCTION BOOKLET IMPORTANT: You must read this instruction Book before installing or using this appliance and retain it for future use. Caple Products
Double Oven / User Manual
 EN Double Oven / User Manual 444410119 BEL FSDF608D Sil Thank you for choosing this product. This User Manual contains important safety information and instructions on the operation and maintenance of
NOTE: THIS APPLIANCE MUST BE INSTALLED SOLELY AND EXCLUSIVELY BY A QUALIFIED TECHNICIAN.
 Table of Contents 1. IMPORTANT SAFETY INSTRUCTIONS... 4 2. DESCRIPTION OF CONTROLS... 6 3. USING THE COOKTOP... 7 3.1 Ignition with safety device... 7 3.2 Practical advices to use the burners... 8 3.3
Contents THESE INSTRUCTIONS ARE VALID ONLY FOR THE DESTINATION COUNTRIES WHOSE IDENTIFYING SYMBOLS ARE INCLUDED ON THE COVER OF THIS MAN- UAL.
 Contents 1. INSTRUCTIONS FOR USE... 4 2. SAFETY PRECAUTIONS... 6 3. ENVIRONMENTAL RESPONSIBILITY... 8 4. USING THE HOB... 9 5. CLEANING AND MAINTENANCE... 12 6. POSITION NEAR THE COUNTER TOP... 15 7. ADAPTATION
Mod. ANBR9..G. CR DOC. NO. GAS-HEATED TILTING BRATT PAN. INSTRUCTIONS FOR INSTALLATION, ADJUSTMENT, USE AND MAINTENANCE...
 -HEATED TILTING BRATT PAN Mod. ANBR9..G. INSTRUCTIONS FOR INSTALLATION, ADJUSTMENT, USE AND MAINTENANCE...page 2-5 APPENDIX....pagina 6-7 Read the manual thoroughly and keep it in a safe place throughout
50cm Single Cavity Gas Cooker CZ55583 INSTALLATION AND OPERATING INSTRUCTIONS
 50cm Single Cavity Gas Cooker CZ55583 INSTALLATION AND OPERATING INSTRUCTIONS The product may differ from the one illustrated but the installation and operation procedure remains the same Contents Introduction
Contents Unpacking... 5 Product Overview... 6
 FREE STANDING GAS COOKER INSTRUCTION / INSTALLATION MANUAL GB CFSG10WH CFSG10SV Contents Unpacking... 5 Product Overview... 6 Front View...6 Top View...6 Control Panel...7 Gas Burners...7 Before Using
Contents THESE INSTRUCTIONS ARE VALID ONLY FOR END USER COUNTRIES WHOSE IDENTIFICATION SYMBOLS APPEAR ON THE COVER OF THIS MANUAL.
 Contents 1. INSTRUCTIONS FOR SAFE AND PROPER USE 36 2. INSTALLATION OF THE APPLIANCE 38 3. ADAPTATION TO DIFFERENT TYPES OF GAS 42 4. FINAL OPERATIONS 44 5. DESCRIPTION OF CONTROLS 45 6. USE OF THE COOKING
RV921 Range Cooker Installation, Use and Maintenance
 RV921 Range Cooker Installation, Use and Maintenance Customer Care Department The Group Ltd. Harby Road Langar Nottinghamshire NG13 9HY T : 01949 862 012 F : 01949 862 003 E : customer.care@cda.eu W :
ASSEMBLY INSTRUCTIONS HOODED GAS GRILL Model: UC-SBP
 ASSEMBLY INSTRUCTIONS HOODED GAS GRILL Model: UC-SBP FOR OUTDOOR USE ONLY PLEASE READ INSTRUCTIONS CAREFULLY BEFORE ASSEMBLY RETAIN THIS MANUAL FOR FUTURE REFERENCE WARNING Hazardous fire or explosion
Instructions for the use - Installation advices GAS COOKERS 100 % ELBA QUALITY MADE IN ITALY HOME APPLIANCES. Made in Italy
 Instructions for the use - Installation advices GAS COOKERS 100 % ELBA QUALITY MADE IN ITALY HOME APPLIANCES Made in Italy Dear Customer, Thank you for having purchased and given your preference to our
INSTRUCTION HANDBOOK
 INSTRUCTION HANDBOOK ENGLISH ENGLAND / IRELAND code 01W484-1 - Fig. 1 Fig. 2 Fig. 3 Fig. 4 Fig. 5 Fig. 6 Fig. 7 Fig. 8 Fig. 9 Fig. 10 Fig. 11-2 - Fig. 12 Fig. 13 Fig. 14 Fig. 15 Fig. 16 Fig. 17 Fig. 18
EGT7828CK EGT7838CK EGT9229CK EGT9239CK EGT9239CKB. User Manual. EN Gas Cooktop. Fj oms113"01u. TH 1cnL.ls:nou01rns. VI Bếp gas âm
 EGT7828CK EGT7838CK EGT9229CK EGT9239CK EGT9239CKB EN Gas Cooktop TH 1cnL.ls:nou01rns VI Bếp gas âm User Manual Fj oms113"01u Hướng dẫn sử dụng Contents 2 Safety instructions... 3 Parts identification...
INSTRUCTION MANUAL GAS HOB. Model:GH600
 INSTRUCTION MANUAL GAS HOB Model:GH600 1 Contents Important Information Description of Hob Operation Maintenance and cleaning Troubleshooting Instruction for installer Technical data Important safety requirements
F900 SERIES GAS CHARGRILL G9440, G9460, G9490, G User, installation and servicing instructions T Read these instructions before use
 F900 SERIES User, installation and servicing instructions GAS CHARGRILL G9440, G9460, G9490, G94120 Read these instructions before use DATE PURCHASED: MODEL NUMBER: SERIAL NUMBER: DEALER: SERVICE PROVIDER:
Operating Instructions HOB Contents
 PAA 642 /I(WH) PAA 642 /I(BK) UK English Operating Instructions HOB Contents Operating Instructions,1 Warnings,2 Assistance,2 Description of the appliance,3 Installation,4 Start-up and use,7 Precautions
Built-in Conventional Oven
 Built-in Conventional Oven LAM3204 User & Installation Guide using this manual Thank you for choosing LAMONA Built - In Oven. This user Manual contains important information on safety and instructions
Instructions. 1 Instructions
 Contents 1 Instructions 22 1.1 General safety instructions 22 1.2 Identification plate 23 1.3 Manufacturer liability 23 1.4 Appliance purpose 23 1.5 Disposal 23 1.6 This user manual 24 1.7 How to read
Built-in Gas Hob CZ55554 CZ55571
 Built-in Gas Hob CZ55554 CZ55571 INSTALLATION AND OPERATING INSTRUCTIONS The product may differ from the one illustrated but the installation and operation procedure remains the same The product may differ
F900 SERIES BOILING PAN G9781. User, installation and servicing instructions. Read these instructions before use T REV.
 F900 SERIES User, installation and servicing instructions BOILING PAN G9781 Read these instructions before use DATE PURCHASED: MODEL NUMBER: SERIAL NUMBER: DEALER: SERVICE PROVIDER: T100915 REV. 1 Dear
OG7302 Salamander Grill
 OG7302 Salamander Grill USER, INSTALLATION, SERVICING AND CONVERSION INSTRUCTIONS For use in GB & IE IS370 ECN3280 1 Dear Customer, Thank you for purchasing this Lincat product. This is just one of over
ELECTRIC COOKER EEP. mod. Fitters and Users Instructions. Before operating this cooker, please read these instructions carefully
 ELECTRIC COOKER mod. 5104.1 EEP Fitters and Users Instructions Before operating this cooker, please read these instructions carefully Introduction Installation CONTENTS Introduction...page 2 Installation...
Double Oven / User Manual
 EN Double Oven / User Manual 444410233 NW G600MD Whi Thank you for choosing this product. This User Manual contains important safety information and instructions on the operation and maintenance of your