MIX Boiler & Font Range Service Manual
|
|
|
- Laurel Summers
- 5 years ago
- Views:
Transcription


1 MIX Boiler & Font Range Service Manual # # # # # Ireland Tel: +353 (1) UK Tel: +44 (0207) Service Manual - Mix Range Dec 2017.docx Page 1 of 67
2 CONTENTS: 1. Introduction 3 2. Safety Instructions Specifications Installation Mix Boiler Installation Mix Font Installation Boiler Setup Overview & Operation PB versions Multi-temp PB versions single-temp Tap versions UC versions Mix Font Menu Navigation User Settings Advanced Settings Engineering Settings Dispense Calibration Routine Maintenance/Internal Access Top Lid Removal Side Panel Removal Draining the Tank PCB Replacement Dispense Solenoid or Pump replacement Dispense Tap removal Tank Lid Sub-Assembly Removal Heater Element Removal Thermistor & Level Probes - Cleaning & replacement Triac Replacement Inlet solenoid Replacement Pump Power Supply (UC versions only) Descaling the Tank Changing the Filter Diagnostics/Trouble Shooting Electrical Schematics Exploded parts drawings and parts list. 43 Service Manual - Mix Range Dec 2017.docx Page 2 of 67
3 1. INTRODUCTION The information provided in this manual is intended to assist in the installation and maintenance of the Marco Mix Boiler range. Please read the instructions carefully to prevent accidents and ensure an efficient installation. This manual is not a substitute for any safety instructions or technical data affixed to the machine or its packaging. All information in this manual is current at the time of publication and is subject to change without notice. Only technicians or service providers authorised by Marco should carry out installation and maintenance of these machines. Marco accepts no responsibility for any damage or injury caused by incorrect or unreasonable installation and operation. 2. SAFETY INSTRUCTIONS When using electrical appliances, basic safety precautions should always be followed to prevent the risk of fire, electric shock, burns, or other injuries or damages. Read all operating and safety instructions carefully. This appliance must be placed/installed on a horizontal flat stable surface. The ambient temperatures this appliance should operate within are 5 C - 35 C. This appliance may be placed in self-service areas if attended to by trained personnel. Risk of flooding, the hose supplied with the boiler is non-toxic food quality tested to 190psi. However, a hose is not a permanent connection. It is, therefore, advisable to switch off boiler and close the stopcock valve when boiler is not in use, e.g. overnight etc. The utmost care has been taken in the manufacture and testing of this machine. Failure to install, maintain and / or operate this machine according to the manufacturer s instructions may result in conditions that can cause injury or damage to property. If in any doubt about the serviceability of the machine always contact the manufacturer or your own supplier for advice. This machine is not intended for use by persons (including children) with reduced physical, sensory, or mental capabilities, or lack of experience and knowledge, unless they have been given supervision or instruction concerning use of the machine by a person responsible for their safety. Children should be supervised to ensure that they do not play with the machine. In the event any wires are damaged, such wires can only be replaced by experts or professional after service staff from the manufacturer after service department or similar function departments. CAUTION - Risk of fire and electric shock. Only to be used with manufacturer s specified power cord set. Marco p/n (USA), (EU), (UK/Ire). This appliance should not be installed in an area where a water jet could be used to clean it. Access to the service area of the appliance is restricted to persons having knowledge and practical experience of the appliance and the relevant safety and hygiene requirements. Service Manual - Mix Range Dec 2017.docx Page 3 of 67
4 3. SPECIFICATIONS BOILERS: MIX PB MIX T MIX PB MIX UC MIX UC Immediate Draw Off (L) 3L 8L 8L 3L 8L Performance Total Hourly output (L/hr) Electrical Plumbing Mains Connection Rating Fittings Required Pressure Earthed Mains Plug to IEC 230vac (UK 3-Pin Plug, BS1363) (EU CEE7 Schuko) (US/Canada - NEMA 2.8kW 12.15A 0.75 BSP (or 3/8 NPT for US versions) food grade inlet hose supplied psi ( kpa) Dimensions Height (mm) Width (mm) Depth (mm) FONTS: MIX Single Button Font MIX Three Button Font Drip Tray Dimensions Height (mm) Width (mm) Depth (mm) Service Manual - Mix Range Dec 2017.docx Page 4 of 67
5 4. INSTALLATION 4.1 Mix Boiler Installation Electrical Installation: Electrical specification: 2.8kW-230VAC-50/60Hz A moulded 13A IEC power cord is provided. This should be plugged into the IEC connection on the rear of the boiler and plugged into a suitable 13A power outlet. When installing the machine, always observe the local regulations and standards. Plumbing Installation: Mains water pressure required (limits): 5-50psi (35-345kPa) bar Fit a stop Valve on a cold water line and attach a 3/4" BSP male fitting, (e.g. 3/4" x 1/2" 311 or washing machine type stop valve). For US versions use 3/8 NPT male fitting. Connect straight tailpiece of the hose to the stop valve fitting. Make sure that the pre-attached sealing washer is fitted. Turn on the water to flush any impurities, dust etc. from the inlet hose and water pipe. Allow several litres through. Connect right-angled tailpiece of the hose to the inlet valve of the boiler (3/4" BSP). Make sure the sealing washer is fitted here also. Turn on water and check for leaks. Service Manual - Mix Range Dec 2017.docx Page 5 of 67
 Service Manual - Mix Range Dec 2017.")
6 4.1 Mix Boiler Installation (cont.) Service Manual - Mix Range Dec 2017.docx Page 6 of 67
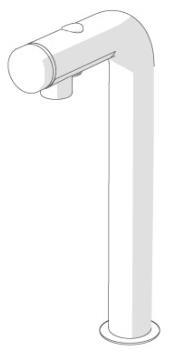
7 4.2 Mix Font Installation Service Manual - Mix Range Dec 2017.docx Page 7 of 67
8 4.2 Mix Font Installation (cont.) Service Manual - Mix Range Dec 2017.docx Page 8 of 67
9 4.2 Mix Font Installation (cont.) Service Manual - Mix Range Dec 2017.docx Page 9 of 67
 Service Manual - Mix Range Dec 2017.")
10 4.2 Mix Font Installation (cont.) Service Manual - Mix Range Dec 2017.docx Page 10 of 67
11 5. BOILER SETUP 5.1 Operating Boiler for the First Time Check that all installation procedures have been carried out. Ensure water valve is on. Plug boiler into suitable socket. Turn on the power switch. The wait progress circle will be visible on the screen and the machine will fill to a safe level, above the elements, before heating. Multi Temp versions Single Temp versions Tap Versions The Ready tick with come up on screen when the machine is full and up to normal operating temperature typically 6 mins for 3L and 16 mins for 8L versions respectively. The boiler is now ready for use the display will show the Water Temperature and the Ready status tick. Multi Temp versions Single Temp versions Tap Versions The Boiler may now be used to dispense hot water to the pre-set factory settings. NOTE: Because the boiler is electronically controlled no priming is necessary. The element cannot switch on until a safe level of water is reached. Service Manual - Mix Range Dec 2017.docx Page 11 of 67

12 6. OVERVIEW & OPERATION 6.1 PB Boiler Multi-temp Operation Service Manual - Mix Range Dec 2017.docx Page 12 of 67
13 6.1 PB Boiler Multi-temp Operation (cont.) Service Manual - Mix Range Dec 2017.docx Page 13 of 67

14 6.2 PB Boiler Single Temp Operation Service Manual - Mix Range Dec 2017.docx Page 14 of 67
15 6.2 PB Boiler Single Temp Operation (cont.) Service Manual - Mix Range Dec 2017.docx Page 15 of 67

16 6.2 Tap Boiler Operation Service Manual - Mix Range Dec 2017.docx Page 16 of 67
17 6.2 Tap Boiler Operation (cont.) Service Manual - Mix Range Dec 2017.docx Page 17 of 67
18 6.3 UC Boiler Operation Service Manual - Mix Range Dec 2017.docx Page 18 of 67
19 6.3 UC Boiler Operation (cont.) Service Manual - Mix Range Dec 2017.docx Page 19 of 67
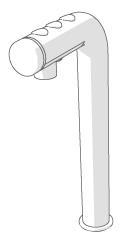
20 6.4 Mix Font Operation Service Manual - Mix Range Dec 2017.docx Page 20 of 67
21 7. MENU NAVIGATION There are 3 menu levels to the Mix Boiler settings. Level 1 User Settings Level 2 Advanced Settings Level 3 Engineering Settings Enter by pressing all 3 buttons simultaneously Enter by pressing all 3 buttons simultaneously for > 3 <6 seconds Enter by pressing all 3 buttons simultaneously for > 6 seconds 7.1 User Settings The screens displayed to the User depend on which machine type the software has been set to. Multi-temp PB and UC versions: The Top row sets the desired dispense temperature of the corresponding button on the Boiler (or the Mix dispense font in the case of a UC version). The second row shows the desired dispense volume a volume of 000 sets the dispense button to Push & Hold mode. Press NEXT to cycle through each value shown on the screen. Press + or to adjust a value. Press SAVE to store values and return to normal operation. Single temp PB and UC versions: (NOTE: in single temp mode ONLY the middle dispense button is enabled the buttons to either side as dis-abled.) Tap versions ONLY: Service Manual - Mix Range Dec 2017.docx Page 21 of 67

22 7.2 Advanced Settings (Hold all 3 buttons simultaneously for >3 <6 seconds) Screen 1 Screen 2 Setting Descale Weeks Filter Litres Set Pin Options OFF, 1-60 weeks When set to a week period, a message will appear on screen to descale after that time period has elapsed. OFF, L When set to a Litre amount, a message will appear on screen to replace the filter after that amount of water has been used. Setting the PIN to any number other than 0000 will restrict access to the Advanced and Engineering Level settings. Blank, any 4-digit combination. Factory Preset Mode (Back door PIN in the event of forgotten PIN is: 1793) Resets a number of Engineering Level settings specific to a machine type. Allows selection of machine type from: TAP PB3 PB8 UC (3 button) UC (1 button) Allows selection of mode types from: Mode Type UC COLD HOT UC HOT COLD UC MIX BOTH UC SINGLE COLD HOT HOT COLD MIX BOTH SINGLE TAP COLD 60S HOT 5S T be used for: UC version connected to 3 button font UC version connected to a single button font PB version in Multi-temp operation PB version in single-temp operation Tap versions for calibration and diagnostic purposes only for calibration and diagnostic purposes only Temp Units o C or o F Service Manual - Mix Range Dec 2017.docx Page 22 of 67
 Service Manual - Mix Range Dec 2017.")
23 7.2 Advanced Settings (cont.) Service Manual - Mix Range Dec 2017.docx Page 23 of 67
24 7.3 Engineering Settings (Hold all 3 buttons simultaneously for >6 seconds) The options available in the Engineering settings are usually only required during factory assembly and are mainly related to the functionality of the multi-temp software control. In the instance where some install locations differ wildly from normal (eg extremely hot or cold incoming mains water), or if a component such as a PCB or inlet solenoid has been changed, this set of options will allow for corrections to be made so that the control software functions properly. Screen 1 Screen 2 Setting Dispense Calibration Cal weight Inlet Flow Tank Factor Cold Temp Cold Flow Option Pressing Go! Initiates the calibration procedure for PB or UC versions. User measured amount of water dispensed during calibration process. Default values (depend on machine type): PB3 = 600 PB8 = 1050 UC (3 button) = 600 UC (1 button) = 600 The software calculated amount of water through the inlet solenoid into the boiler tank during the calibration process. NOTE: should not be edited once calibration process completed. Default value = 1200 Is a constant used in the software calculations related to the size of the tank and whether the water is pumped or fed by gravity default settings are: Default values (depend on machine type): PB3 = 5.0 PB8 = 8.8 UC (3 button) = 1.5 UC (1 button) = 1.5 The temperature of the incoming mains water supply as seen at the boiler. Default Value = 15.0 The measured amount of water dispensed through the inlet solenoid fed to the cold water dispense nozzle in 60 seconds for PB or UC versions. Default value = Service Manual - Mix Range Dec 2017.docx Page 24 of 67


25 7.4 Dispense Calibration Procedure (in Engineering Settings) The Dispense Calibration procedure should only be run if the machine has had major component change, such as PCB or inlet solenoid that requires calibration settings to be re-done. 1. Default settings for a PB3. Press Go! 2. Place bucket. Press Go! 3. Machine will dispense for 15 seconds 4. Weigh output 5. Screen will show the above 6. Enter Weight using +/-. Press Next 7. Machine will refill to the high level 8. Screen will show entered CAL WEIGHT and software Time to refill is displayed on screen. calculated INLET FLOW. Press Next 9. The second Engineering settings screen 10. If the COLD 60S mode test has been performed, will show the above. This value can be entered here in COLD FLOW. Service Manual - Mix Range Dec 2017.docx Page 25 of 67


")
26 8. ROUTINE MAINTAINENCE/INTERNAL ACCESS Maintenance should be carried out by Marco approved technicians only. 8.1 Top Lid Removal: 1. Remove the screw in the top lid with a suitable slotted screwdriver. 2. Rotate lid from the front edge upwards and remove. 8.2 Side Panel Removal: For maintenance requiring deeper internal access, both side panels can be removed by using a suitable cross headed (phillips) screwdriver. Service Manual - Mix Range Dec 2017.docx Page 26 of 67


27 8.3 Draining the tank: 1. Turn off machine and disconnect from mains power. 2. Allow to cool sufficiently to avoid burn risk. 3. Place machine so that the rear of the machine is located next to a sink or a bucket large enough to hold the full contents of the tank. 4. Unclip drain hose plug from rear panel by rotating anti-clockwise 90 o. 5. Gently pull silicone hose from the inside of the machine. 6. Remove drain plug from the end of the silicone hose and empty into sink or bucket. 7. Replace drain plug fully into silicone hose and push silicone hose gently back into the machine. 8. Re-clip the drain plug to the rear plastic enclosure panel by rotating 90 o clockwise. Service Manual - Mix Range Dec 2017.docx Page 27 of 67


28 8.4 PCB replacement: 1. Remove Top Lid & Side panels as per sections 8.1 and Disconnect all wiring connected to the PCB. 3. Remove two cross headed screws with a suitable screwdriver shown in the picture below. 4. Pull Upper front Fascia Panel upwards to remove from the machine. 5. Remove 4 screws to release PCB from Front Fascia panel. Service Manual - Mix Range Dec 2017.docx Page 28 of 67
.")

29 8.5 Dispense Solenoid or Pump replacement: 1. Remove Upper Fascia Panel as per section Undo 4 retaining screws as shown in picture below. 3. Then pull the plastic panel directly outwards from the machine. (For PB versions, push the silicone dispense nozzle through the hole the nozzle will need to be squeezed slightly). To remove the dispense solenoid in a PB version: (CAUTION - make sure tank is drained fully first as per section 8.3!) 1. Disconnect all wires connected to solenoid. 2. Disconnect cold water feed in to the Silicone dispense nozzle by pulling upwards. 2. Pull dispense solenoid out of the silicone mounting grommet. If the grommet is damaged it may need to be replaced. Service Manual - Mix Range Dec 2017.docx Page 29 of 67
 1. Disconnect all wires connected to the pump 2. Pull the silicone hose off the outlet side of the pump.")


30 To disconnect a pump in a UC version: (CAUTION - make sure tank is drained fully first as per section 8.3!) 1. Disconnect all wires connected to the pump 2. Pull the silicone hose off the outlet side of the pump. 3. Pull the pump out of the silicone mounting grommet. 8.6 Dispense Tap removal To remove the dispense tap in any Tap version boiler: (CAUTION - make sure tank is drained fully first as per section 8.3!) 1. Loosen Tap retaining nut by turning clockwise. 2. When tightening the nut, the spigot should be gripped and held in place by a 19mm spanner at the flat sections. Service Manual - Mix Range Dec 2017.docx Page 30 of 67


31 8.7 Tank Lid Sub-Assembly Removal To remove the Tank Lid sub-assembly (with element, thermistor & level probes attached): 1. Disconnect machine from mains power and allow to cool! 2. Remove Outer Lid as per section 8.1 and right hand side panel as per section Disconnect heating element wires as well as disconnecting the level probe connector and thermistor connectors at the PCB. 4. Undo the 3 Tank Lid retention screws located in the picture below. For the screw underneath the collapsible funnel simply push funnel gently out of the way to access the screw. 5. Gently pull the Tank Lid sub-assembly upwards initially ensure wiring does not get caught as sub-assembly is pulled upwards. Service Manual - Mix Range Dec 2017.docx Page 31 of 67


32 6. Once the heater element is just over half way out of the tank, start to angle the sub-assembly towards the rear of the machine, and begin to pull the forward bent section of the heating element out of the tank opening. 7. Finish removal by then sliding the sub-assembly forwards and upwards to disengage from Tank opening. Service Manual - Mix Range Dec 2017.docx Page 32 of 67


33 8.8. Heater Element Removal 1. Remove Tank Lid sub-assembly as per section Undo the two 18mm lock nuts and slide the heater element tabs through the holes in the lid. 8.9 Thermistor & Level Probes - Cleaning & replacement There are 3 probes (low level, high level and descale/overflow) on the Mix Boiler range. Each probe is push-fit mounted into a silicone mounting grommet. The low level and thermistor are paired together in one grommet and the high level and overflow level probes are paired together in the other. The Tank lid sub-assembly does not need to be removed to access the level probes as they can be pulled from the silicone mounting grommet by the metal electrical tab the descale funnel can be pushed gently out of the way to access. The thermistor can be pulled directly from the mounting grommet using a suitable set of pliers. Service Manual - Mix Range Dec 2017.docx Page 33 of 67

34 8.10 Triac Replacement 1. Disconnect the machine from mains power. 2. Remove the left hand side panel as per section Disconnect all wires to the Triac making note of the correct wiring terminal connections 4. Undo two retaining screws as located in the picture below. Correct triac wiring (as per wiring diagrams): Service Manual - Mix Range Dec 2017.docx Page 34 of 67


35 8.11 Inlet solenoid Replacement 1. Disconnect machine from mains power and allow to cool completely. 2. Drain tank fully as per section Remove right hand side panel as per section Disconnect all wires and hoses to the inlet solenoid. 5. Remove two solenoid retaining screws located on the base of the machine. 6. Remove solenoid by pulling upwards (NOTE: if replacing solenoid, observe the orientation of the mounting bracket of the solenoid being removed. If orientation is NOT correct the solenoid will not fit) Service Manual - Mix Range Dec 2017.docx Page 35 of 67


36 8.12 Pump Power Supply (UC versions only) The power supply for the pump is mounted underneath the Tank Support. There are two possible versions of power supply fitted in slightly different locations. Power supply 1 is fitted to UC3 s with serial number <0517xxxxxx. Power supply 2 is fitted to UC3 s with serial number >0517xxxxxx. Power supply 1 has been obsoleted so all spare parts requests will be supplied with the power supply 2. Power supply 1 location: Power supply 2: shown below is mounted with one retaining tab and one M3x6mm screw. If a UC3 unit with a power supply 1 fitted needs replacing, simply remove and refit with power supply 2. The retaining tab is not present on the early model tank supports so the single m3x6 screw should be used to mount the power supply 2 in place. Service Manual - Mix Range Dec 2017.docx Page 36 of 67

37 8.13 De-scaling the tank: Descaling the tank in the Mix range is a little different to other water boilers as the boiler now includes a collapsible funnel for pouring in the pre-mixed descale solution. 1. Disconnect machine from mains power supply and water supply. 2. Allow machine to cool. 3. Remove Top Lid as per section Drain off a sufficient amount water from the boiler that will be replaced by the descale solution, through the drain hose see section Remove the descale funnel bung. 6. Pull funnel into raised position. 7. Pour in descale solution slowly into funnel. 8. Allow descale solution to work for required time to dissolve scale as per descale product instructions. 9. Flush tank thoroughly to flush out limescale and descale solution though the drain hose before re-use at least 4 times. 10. If limescale build up is severe, the Tank Lid Sub-assembly may need to be removed and large deposits of scale removed by hand. Service Manual - Mix Range Dec 2017.docx Page 37 of 67

38 8.14 Changing the Filter: Service Manual - Mix Range Dec 2017.docx Page 38 of 67
39 9. DIAGNOSTICS TROUBLESHOOTING DIAGNOSTIC GUIDE: Reported issue Component Check Not heating Heating element Check resistance of heating element while machine is powered off. PCB Good element will measure 18 to 22 Ohms, If ok, check Triac Check power from board to Triac. 230V supply. If no voltage within range/ replace PCB. If ok next Replace Triac Level probes Error. Level probes Remove earth from Main PCB. If inlet solenoid opens and you hear water entering the tank, Check for limescale. Power down unit and remove the tank lid to check for scale. If scale present, Remove probes and clean with Scotch brite/ descale tank. Not heating/ No water PCB Check incoming water supply. If OK, go to below Inlet solenoid Check voltage from PCB. If 230 v supply, PCB ok, replace solenoid Good solenoid will measure between range 4-5k Ω with no power to unit Not dispensing water Dispense Solenoid PB version Check power supply from PCB/ 230V OK If 230V supply from PCB replace dispense solenoid Not dispensing water Pump UC version Check power from PCB. If 230 v, PCB ok, move to PCB Regulated power supply. Check output to pump. 24v DC. If outside Power supply the 24v, replace Power supply, if ok Replace the pump. Filter error Filter Remove filter and check operation Note, machine will operate without filter If ok/ Replace filter Service Manual - Mix Range Dec 2017.docx Page 39 of 67
40 10. ELECTRICAL SCHEMATICS 10.1 Wiring Diagram - PB Versions Service Manual - Mix Range Dec 2017.docx Page 40 of 67
41 10.2 Wiring Diagram - Tap Versions Service Manual - Mix Range Dec 2017.docx Page 41 of 67
42 10.3 Wiring Diagram - UC Versions Service Manual - Mix Range Dec 2017.docx Page 42 of 67
43 11. PART DIAGRAMS & LISTS 11.1 Mix PB3 parts Service Manual - Mix Range Dec 2017.docx Page 43 of 67
 Service Manual - Mix Range Dec 2017.")
44 11.1 Mix PB3 parts (cont.) Service Manual - Mix Range Dec 2017.docx Page 44 of 67
45 11.1 Mix PB3 parts (cont.) Service Manual - Mix Range Dec 2017.docx Page 45 of 67
46 11.1 Mix PB3 parts (cont.) Service Manual - Mix Range Dec 2017.docx Page 46 of 67
47 11.2 Mix T8 parts Service Manual - Mix Range Dec 2017.docx Page 47 of 67
 Service Manual - Mix Range Dec 2017.")
48 11.2 Mix T8 parts (cont.) Service Manual - Mix Range Dec 2017.docx Page 48 of 67
49 11.2 Mix T8 parts (cont.) Service Manual - Mix Range Dec 2017.docx Page 49 of 67
50 11.2 Mix T8 parts (cont.) Service Manual - Mix Range Dec 2017.docx Page 50 of 67
51 11.3 Mix PB8 parts Service Manual - Mix Range Dec 2017.docx Page 51 of 67
52 11.3 Mix PB8 parts (cont.) Service Manual - Mix Range Dec 2017.docx Page 52 of 67
53 11.3 Mix PB8 parts (cont.) Service Manual - Mix Range Dec 2017.docx Page 53 of 67
 Service Manual - Mix Range Dec 2017.")
54 11.3 Mix PB8 parts (cont.) Service Manual - Mix Range Dec 2017.docx Page 54 of 67
55 11.4 Mix UC3 parts Service Manual - Mix Range Dec 2017.docx Page 55 of 67
 Service Manual - Mix Range Dec 2017.")
56 11.4 Mix UC3 parts (cont.) Service Manual - Mix Range Dec 2017.docx Page 56 of 67
57 11.4 Mix UC3 parts (cont.) Service Manual - Mix Range Dec 2017.docx Page 57 of 67
58 11.4 Mix UC3 parts (cont.) Service Manual - Mix Range Dec 2017.docx Page 58 of 67
59 11.5 Mix UC8 parts (cont.) Service Manual - Mix Range Dec 2017.docx Page 59 of 67
 Service Manual - Mix Range Dec 2017.")
60 11.5 Mix UC8 parts (cont.) Service Manual - Mix Range Dec 2017.docx Page 60 of 67
61 11.5 Mix UC8 parts (cont.) Service Manual - Mix Range Dec 2017.docx Page 61 of 67
 Service Manual - Mix Range Dec 2017.")
62 11.5 Mix UC8 parts (cont.) Service Manual - Mix Range Dec 2017.docx Page 62 of 67
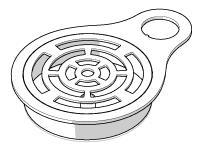
63 11.6 Mix Font 3 Button Service Manual - Mix Range Dec 2017.docx Page 63 of 67
64 11.6 Mix Font 3 Button (cont.) Service Manual - Mix Range Dec 2017.docx Page 64 of 67
65 11.7 Mix Font 1 Button Service Manual - Mix Range Dec 2017.docx Page 65 of 67
66 11.7 Mix Font 1 Button (cont.) Service Manual - Mix Range Dec 2017.docx Page 66 of 67


67 MARCO is an ISO9001:2000 Registered Company. Service Manual - Mix Range Dec 2017.docx Page 67 of 67
Mix Boiler & Font Range ( #, #, #, , )
") Mix Boiler & Font Range (1000870#, 1000871#, 1000880#, 1000878, 1000879) Service Manual Marco Beverage Systems Ltd. 63d Heather Road, Sandyford Industrial Estate, Dublin 18, Republic of Ireland Ireland
Mix Boiler & Font Range (1000870#, 1000871#, 1000880#, 1000878, 1000879) Service Manual Marco Beverage Systems Ltd. 63d Heather Road, Sandyford Industrial Estate, Dublin 18, Republic of Ireland Ireland
SERVICE MANUAL. Ecoboiler Model range: T20 ( ) T30 ( )
 T30 ( )") SERVICE MANUAL Ecoboiler Model range: T20 (1000662) T30 (1000663) Marco Beverage Systems Ltd. 63d Heather Road, Sandyford Industrial Estate, Dublin 18, Republic of Ireland Ireland Tel: (01) 295 2674 Ireland
SERVICE MANUAL Ecoboiler Model range: T20 (1000662) T30 (1000663) Marco Beverage Systems Ltd. 63d Heather Road, Sandyford Industrial Estate, Dublin 18, Republic of Ireland Ireland Tel: (01) 295 2674 Ireland
Instruction Manual Machine P/N: # & #
 Instruction Manual Machine P/N: 1000830# & 1000831# 1 CONTENTS 1. INFORMATION...3 1. Introduction...3 2. Safety...3 3. Warning Notes...3 4. Contact...4 5. Electrical Installation Procedure...4 6. Plumbing
Ecoboiler T20 & T30 SERVICE MANUAL. Marco Beverage Systems Ltd. 63d Heather Road, Sandyford Industrial Estate, Dublin 18, Republic of Ireland
 Ecoboiler T20 & T30 SERVICE MANUAL Marco Beverage Systems Ltd. 63d Heather Road, Sandyford Industrial Estate, Dublin 18, Republic of Ireland Ireland Tel: (01) 295 2674 Ireland Fax: (01) 295 3715 UK Tel:
Marco Beverage Systems Ltd. INSTRUCTIONS FOR MODELS
 Marco Beverage Systems Ltd. INSTRUCTIONS FOR MODELS Ecoboiler UC4L 2.4kW (1000740#) Ecoboiler UC10L 2.8kW (1000741#) Ecoboiler UC10L 5.6kW (1000742#) Ecoboiler UC4L 1.5kW 110V (1000747) Ecosmart UC4L 2.4kW
Marco Beverage Systems Ltd.
 Marco Beverage Systems Ltd. INSTRUCTIONS FOR MODELS ECOSMART PB10, ECOSMART PB10 Hi Deck ECOSMART T10 (P/N: 1000677#, 1000678#, 1000674#) Water pressure : 5-50 psi (min.-max.)35-345 kpa (min.-max.) Marco
AQUARIUS 45 MARINE SERVICE MANUAL
 AQUARIUS 45 MARINE SERVICE MANUAL CONTENTS: PAGE 1. INTRODUCTION 3 2. SAFETY INSTRUCTIONS 4 3. BASIC INSTRUCTIONS 5 3.1. Installation Details 5 3.2. Operating the Boiler for the First Time 6 3.3. Troubleshooting
UNDERCOUNTER SERVICE MANUAL. Ecoboiler UC4L 2.4kW Ecoboiler UC10L 2.8kW Ecoboiler UC10L 5.6kW Ecosmart UC4L 2.
 UNDERCOUNTER SERVICE MANUAL Ecoboiler UC4L 2.4kW 1000740 Ecoboiler UC10L 2.8kW 1000741 Ecoboiler UC10L 5.6kW 1000742 Ecosmart UC4L 2.4kW 1000750 Ecosmart UC10L 2.8kW 1000751 Ecosmart UC10L 5.6kW 1000752
Ecoboiler SERVICE MANUAL. Marco Beverage Systems Ltd. 63d Heather Road, Sandyford Industrial Estate, Dublin 18, Republic of Ireland
 Ecoboiler SERVICE MANUAL Marco Beverage Systems Ltd. 63d Heather Road, Sandyford Industrial Estate, Dublin 18, Republic of Ireland Ireland Tel: (01) 295 2674 Ireland Fax: (01) 295 3715 UK Tel: (0207) 274
T5 ( ) T10 ( ) PB5 ( ) PB10
 T10 ( ) PB5 ( ) PB10") SERVICE MANUAL Ecoboiler Model range: T5 (1000660) T10 (1000661) PB5 (1000665) PB10 (1000666) Marco Beverage Systems Ltd. 63d Heather Road, Sandyford Industrial Estate, Dublin 18, Republic of Ireland Ireland
SERVICE MANUAL Ecoboiler Model range: T5 (1000660) T10 (1000661) PB5 (1000665) PB10 (1000666) Marco Beverage Systems Ltd. 63d Heather Road, Sandyford Industrial Estate, Dublin 18, Republic of Ireland Ireland
EcoSmart boiler SERVICE MANUAL
 EcoSmart boiler SERVICE MANUAL Marco Beverage Systems Ltd. 63d Heather Road, Sandyford Industrial Estate, Dublin 18, Republic of Ireland Ireland Tel: (01) 295 2674 Ireland Fax: (01) 295 3715 UK Tel: (0207)
SERVICE MANUAL. Marco Beverage Systems Ltd. 63d Heather Road, Sandyford Industrial Estate, Dublin 18, Republic of Ireland
 SERVICE MANUAL Under Counter Range, Model UC45 1000743 (2.8kW) 1000744 (5.6kW) 1000744US (5.6kW) 1000745 (8.4kW) 1000753 (2.8kW) 1000754 (5.6kW) 1000755 (8.4kW) 1000743A (2.8kW) 1000744A (5.6kW) 1000745A
Marco Beverage Systems Ltd. INSTRUCTIONS FOR MODEL Revision 9 th Mar Uber Boiler
 Marco Beverage Systems Ltd. INSTRUCTIONS FOR MODEL Revision 9 th Mar 2010 Uber Boiler P/N: 1000680 Uber Boiler 6L 2.8kW P/N: 1000681 Uber Boiler 2L 2.8kW MARCO is an ISO9001:2000 Registered Company. Water
CONTENT PAGE INFORMATION INSTALLATION BREWER SETUP BREWING CLEANING KEY BREWER GRINDER MANUAL MODE DILUTION GRINDER MODE PACKS MODE
 1900097 1JET6 TWIN CONTENT PAGE INFORMATION 3 INSTALLATION 6 BREWER GRINDER 6 7 BREWER SETUP 11 BREWING 12 MANUAL MODE DILUTION GRINDER MODE PACKS MODE 12 14 15 17 CLEANING 19 KEY READ OPERATORS MANUAL
Marco Beverage Systems Ltd. INSTRUCTIONS FOR MODEL. Uber Boiler
 Marco Beverage Systems Ltd. INSTRUCTIONS FOR MODEL Uber Boiler Part/Model Number: 1000680# 1000681 (where # is a suffix of one or more alphanumeric characters) INCORPORATING SOFTWARE 1.10 Water pressure
User and Installation Instructions. Wall Mounted Water Boiler WMB3F/B and WMB3F/W IS435 ECN3461
 User and Installation Instructions Wall Mounted Water Boiler WMB3F/B and WMB3F/W IS435 ECN3461 Dear Customer Thank you for purchasing this Lincat product. With correct use and careful maintenance as described
Installation, Operating and Servicing Instructions
 Installation, Operating and Servicing Instructions Wall Mounted Water Boiler WMB3F/B,WMB3F/W Please make a note of your product details for future use: Date Purchased: Model Number: Serial Number: Dealer:
Jet 6 Twin SERVICE MANUAL
 Jet 6 Twin SERVICE MANUAL Service manual Aug 2017 - Jet 6 Twin Page 1 of 17 Marco Beverage Systems Ltd. 63d Heather Road, Sandyford Industrial Estate, Dublin 18, Republic of Ireland Ireland Tel: (01) 295
The Professional s Choice
 SureFlow compact range: 1000-C & 1000-M Auto-Fill Catering Water Boiler Installation And User Instructions The Professional s Choice CONTENTS CONTENTS & INTRODUCTION 2 SAFETY & ENVIRONMENTAL INFORMATION
User and Installation Instructions. Electric Auto-Fill Water Boilers EB3F, EB4F, EB6F, EB6TF IS339 ECN3539
 User and Installation Instructions Electric Auto-Fill Water Boilers EB3F, EB4F, EB6F, EB6TF IS339 ECN3539 Dear Customer Thank you for purchasing this Lincat product. With correct use and careful maintenance
The Professional s Choice
 CPF Series Models: CPF2100, CPF210, CPF310, CPF4100-3, CPF4100-6 & CPF6100 Auto-Fill Catering Water Boiler With Integrated Multi-Filter Installation And User Instructions The Professional s Choice INSTANTA
Calomax Limited Lupton Avenue, Leeds LS9 7DD Tel Fax
 INSTALLATION, OPERATION AND SERVICING INSTRUCTIONS FOR THE ECLIPSE PUSH BUTTON WATER BOILERS Issue 4 03/01/18 DCR: 986 Please read these instructions carefully before operating your boiler for the first
What to expect from your water softener
 What to expect from your water softener All water softeners work on the same basic principal. Hard water flows through a bed of resin and the calcium and magnesium, the minerals that are responsible for
SERVICE MANUAL UBER FONT
 SERVICE MANUAL UBER FONT Marco Beverage Systems Ltd. 63d Heather Road, Ireland Tel: (01) 295 2674 Ireland Fax: (01) 295 3715 Sandyford Industrial Estate, Dublin 18, Republic of Ireland UK Tel: (0207) 274
BOILING UNIT REDITAP. Installation and User Guide. IMPORTANT: This booklet should be left with the user after installation and demonstration
 in tap Boiling water to in tap sink Drain Valve (as high as possible) REDITAP CONNECTION SUMMARY Amp mains supply cold mains water into in tap optional filter cold water in hot water BOILING UNIT Installation
FLAVIA CREATION C500 User Guide
 FLAVIA CREATION C500 User Guide www.marsdrinks.com CONTENTS Page Safety & Installation Guidelines... 1-2 Brewer Layout... 3 Setting up your Brewer... 4-5 Selecting Cups to Use... 6 The FLAVIA CREATION
Autofill counter top water boiler
 Autofill counter top water boiler Please read and keep these instructions For Burco counter top water boilers 76500 (SKU 444448531) and 76502 (SKU 444448533) Getting the best from your water boiler Remove
4L Instant Water Boiler Instructions for Use
 Power Details: 220-240Va.c. 50Hz-60Hz 2200-2600W Capacity: 4.0L Accessories: 2 Water aid trays Water Filters are not included and can be purchased separately Item Code 10747 IMPORTANT NOTES FOR YOUR INSTANT
Autofill wall mounted water. boiler. Getting the best from your water. boiler. Please read and keep these instructions
 Autofill wall mounted water boiler Please read and keep these instructions For Burco wall mounted boilers 76700 (SKU 444448534), 76702 (SKU 444448546), & 76704 (SKU444448548) Getting the best from your
SERVICE MANUAL # Model: Uber Boiler. Marco Beverage Systems Limited. 63d Heather Road, Sandyford Industrial Estate, Dublin 18.
 SERVICE MANUAL Model: Uber Boiler 1000680 #1000681 Marco Beverage Systems Limited. 63d Heather Road, Sandyford Industrial Estate, Dublin 18. Ireland Tel: +353 (0)1 295 2674 Ireland Fax: +353 (0)1 295 3715
PWC 1800 PureWaterCooler SERVICE MANUAL. for. PureWaterCooler by Vertex Model PWC P/N man Copyright 2011 Vertex Water Products
 SERVICE MANUAL for by Vertex Model PWC-1800 P/N man-7011 Table of Contents 1. Introduction 2. Cooler Set-up 3. Remove Top Cover 4. Remove/Replace Float 5. Remove/Replace Hot Tank 6. Dispensing Solenoid
OPERATING MANUAL/ INSTALLATION
 NHW- 15 HOT WATER MACHINE OPERATING MANUAL/ INSTALLATION 120/240 V 1650/6600 W US 120/240 V 1350/5500 W CAN CONVERTIBLE 2 GA LLON DRIP TRAY INCLUDED ADVANCED TEMPERATURE CONTROL TVT TECHNOLOGY NEWCO ENTEPRISES
Calomax Limited Lupton Avenue, Leeds LS9 7DD Tel Fax
 INSTALLATION, OPERATION AND SERVICING INSTRUCTIONS FOR THE ECLIPSE RANGE OF WATER BOILERS Issue 5 06/11/2015 DCR :939 Please read these instructions carefully before operating your boiler for the first
Coffee Machine Zia series
 Coffee Machine CoEx Brewer - Freshbrew EN Picture: Filename: Zia-6000_9CND_UserManual_5DUCNP20a_EN_v01-02.docx Disclaimer Manufacturer: Although this user manual has been put together with the utmost care,
Coffee Machine Zia series
 Coffee Machine CoEx Brewer - Bean to Cup User Manual User Manual EN Picture: Zia 8.000 Serie Filename: Zia-8000_9CND_UserManual_5DUCNP20b_EN_v01-01.docx Disclaimer Manufacturer: Although this user manual
Installation & Operators Manual. The Classeq Pass Through Range
 Installation & Operators Manual The Classeq Pass Through Range HYDRO 857 HYDRO 957 Service 0844 2245 245 service@classeq.co.uk Part number 902.0005 Revision E Jan 2012 Language English Spares 0844 2245
SCHWAN INSTALLATION GUIDE
 SCHWAN INSTALLATION GUIDE For Schwan Versatap SC52E Instant Hot Cold Filtered Water FOR SERVICE OR ASSISTANCE CALL MERQUIP ON 0800 636 0 636. Schwan recommends that a qualified tradesperson installs your
DOUBLE DISHDRAWER TM DISHWASHER
 DOUBLE DISHDRAWER TM DISHWASHER DD60DA & DD60DC models INSTALLATION GUIDE NZ AU GB IE 591151C 08.17 WARNING! Electrical shock hazard Before installing the dishwasher, remove the house fuse or open the
Zen Boiling Tap Range
 Product Instruction Manual Zen Boiling Tap Range Zen Solo, Zen Spa, Zen Life Tap Range v16.10/3 Version 3.2 Jan 2015 Overview The Zen Boiling Tap Range delivers elegant practical solutions for your domestic
REDRING POWERSTREAM UNVENTED INSTANTANEOUS WATER HEATER. Installation and User Guide
 : GUARANTEE AND CONTACT DETAILS REDRING POWERSTREAM UNVENTED INSTANTANEOUS WATER HEATER Installation and User Guide APPLIED ENERGY PRODUCTS LIMITED MORLEY WAY, PETERBOROUGH PE2 JJ TEL: +44 (0) 844 372
Coffee Machine Siro Touch 600 series
 Coffee Machine Siro Touch 600 series CoEx brewer - Freshbrew Picture: Filename: SiroTouch-600_9CND_UserManual_5DUCNH20b_EN_v01-01.docx Disclaimer Manufacturer: Although this user manual has been put together
HWD-2105 Hot Water Dispenser. NOTICE TO INSTALLER: Please leave this book with the machine.
 User s Guide t f Touch Function Selector Technology HWD-2105 Hot Water Dispenser. NOTICE TO INSTALLER: Please leave this book with the machine. Temperature On Demand US design patent applied for. Other
Autofill Countertop Boilers
 USER INSTRUCTION MANUAL Autofill Countertop Boilers Filtration & Non Filtration Burco Warranty 1 Year Parts 1 Year Labour 083213801 01/04/14 Contents 1.0 About your Product My Product (please complete
Hot Chocolate Dispenser
 Hot Chocolate Dispenser Instruction manual Model: CN219-A AU Telephone Helpline: 1300225960 Safety Tips Position on a flat, stable surface. A service agent/qualified technician should carry out installation
Mira Sport Max with Airboost
 Mira Sport Max with Airboost 9.0 & 10.8 kw These instructions must be left with the user Installation Guide 1 INTRODUCTION our instructions and recommendations. inside the shower. The Mira Sport Max with
IS09 ECN2087. EB3, EB4 & EB6 Automatic Fill Water Boilers INSTALLATION, USER & SERVICING INSTRUCTIONS
 EB3, EB4 & EB6 Automatic Fill Water Boilers INSTALLATION, USER & SERVICING INSTRUCTIONS 1 Contents Introduction 3 Accessories Warnings and Precautions 4 Installation Preparation 5 Work Surfaces and Areas
PWC 7000 PureWaterCooler SERVICE MANUAL. for. PureWaterCooler by Vertex Model Copyright 2012 Vertex Water Products
 SERVICE MANUAL for by Vertex Model 7000 Table of Contents 1. Introduction 2. Cooler Set-up 3. Top Cover Removal 4. Remove/Replace Mechanical Float Valve Assembly 5. Removing/Replacing Control Panel and
ELECTRIC WATER BOILER
 JJ3 ELECTRIC WATER BOILER OWNER S MANUAL Click here for Parts List Manual Part No: 930150-01 Electric Water Boiler - 1 Model No. Product Description Rev. Date Jackson Junior Boiler JJ3 Jackson Junior Boiler
Zip Econoboil. On wall boiling water. Installation instructions & user manual. Model number: ,
 Zip Econoboil On wall boiling water. Model number: 305542, 303542 1 Table of contents Intended Use... 2 Warnings and precautions... 3 Before installation... 5 Technical specification... 6 Installation
Quartz. Digital. Bath with bath waste filler. Quartz Digital Bath with bath waste filler installation instuctions page 1
 Quartz Digital Bath with bath waste filler The Waste Electrical and Electronic Equipment (Producer Responsibility) Regulation 2004 This product is outside the scope of the European Waste Electrical and
Zip Autoboil Installation and Operating Instructions
 Zip Autoboil Installation and Operating Instructions 315052 Zip Autoboil 15 Litre White 313051 Zip Autoboil 15 Litre Stainless Steel 325052 Zip Autoboil 25 Litre White 325051 Zip Autoboil 25 Litre Stainless
OPERATING MANUAL/ INSTALLATION
 NHW- 15 HOT WATER MACHINE OPERATING MANUAL/ INSTALLATION 120/240 V 1650/6600 W US 120/240 V 1350/5500 W CAN CONVERTIBLE 2 GA LLON DRIP TRAY INCLUDED ADVANCED TEMPERATURE CONTROL TVT TECHNOLOGY NEWCO ENTEPRISES
FRANKE MINERVA 3-IN-1 HOT WATER TAP HEATING TANK INSTALLATION GUIDE
 FRANKE MINERVA 3-IN-1 HOT WATER TAP HEATING TANK INSTALLATION GUIDE Introduction Thank you for purchasing this Franke product, which has been designed and manufactured to the highest quality standards.
PWC-500/1000/1010/1500
 SERVICE MANUAL for by Vertex Model PWC-500/1000/1010/1500 P/N man-7008 Table of Contents 1. Introduction 2. Cooler Set-up 3. Remove Top Cover 4. Remove/Replace Float 5. Remove/Replace Hot Tank 6. Faucet
Installation, Operating and Servicing Instructions
 Installation, Operating and Servicing Instructions Opus 700 Electric Pasta Boiler OE7701, OE7702 Please make a note of your product details for future use: Date Purchased: Model Number: Serial Number:
SCHWAN INSTALLATION GUIDE
 1 SCHWAN INSTALLATION GUIDE For Schwan SC60 FOR SERVICE OR ASSISTANCE CALL MERQUIP ON 0800 636 0 636. Schwan recommends that a qualified tradesperson installs your Schwan system. 2 INFORMATION AND SAFETY
SINGLE DISHDRAWER TM DISHWASHER
 SINGLE DISHDRAWER TM DISHWASHER DD4SA & DD4SCT models INSTALLATION GUIDE US CA 595B 08.7 SAFETY AND WARNINGS! WARNING! Electrical Shock Hazard Before installing the dishwasher, remove the house fuse or
The Classeq under counter range
 Installation & Operators Manual The under counter range Part number 902.0011 Revision C Effective date January 2010 Language English Glasswashers Eco 1 Eco 2 Eco 3 Duo 2 Duo 3 Dishwasher Hydro 500 Hydro
Rheem Australia Pty Ltd ABN
 Rheem Australia Pty Ltd ABN 21 098 823 511 SERVICE INSTRUCTIONS Lazer 441, 451, 741, 751, 761, 771, 781 & 791 Series TM001 Revision: AD Issued: Jan 14 Lazer 1 & 2 Silhouette (Designer Series) Classic (Modular
Closomat Lima Vita installation & user guide
 Closomat Lima Vita installation & user guide design manufacture supply install service recycle Technical data The Closomat toilet MUST be installed by a competent or qualified person. Explanation of symbols
Zip Econoboil 1.5 litre White Zip Econoboil 3.0 litre White Zip Econoboil 5.0 litre White Zip Econoboil 7.
 Zip Econoboil Installation and Operating Instructions 301042 Zip Econoboil 1.5 litre White 303042 Zip Econoboil 3.0 litre White 305042 Zip Econoboil 5.0 litre White 307042 Zip Econoboil 7.5 litre White
SERVICE MANUAL DISHWASHERS DIVA ACCESSIBILITY DISHWASHERS
 SERVICE MANUAL DISHWASHERS DIVA ELECTROLUX HOME PRODUCTS S.p.A. Publication no. Spares Operations Italy Corso Lino Zanussi,30 I - 33080 PORCIA /PN (ITALY) 599 38 70-09 Fax +39 0434 394096 EN DISHWASHERS
Induction Fryer. Instruction manual. Model Modèle Modell Modello Modelo Malli: CP793
 Induction Fryer Instruction manual Model Modèle Modell Modello Modelo Malli: CP793 UK Safety Tips Position on a flat, stable surface. A service agent/qualified technician should carry out installation
INSTALLATION MANUAL GUTHD2. Universal Two Way Digital Thermostatic Valve for Shower Systems
 INSTALLATION MANUAL GUTHD2 Universal Two Way Digital Thermostatic Valve for Shower Systems IMPORTANT: To ensure this product is installed properly, you must read and follow these guidelines. The owner/
The Professional s Choice
 DB2000 Push Button Dispense Boiler Installation And User Instructions The Professional s Choice CONTENTS CONTENTS & INTRODUCTION 2 SAFETY INFORMATION 2 ENVIRONMENTAL INFORMATION & DELIVERY CHECKLIST 3
Low Water Cutoff (LWCO) IQ Option Card p/n , for Hot Water Boilers
 IQ Option Card p/n , for Hot Water Boilers") Low Water Cutoff (LWCO) IQ Option Card p/n 102711-01, 102714-01 for Hot Water Boilers Instruction Sheet 102-360 APPLICATION The Low Water Cutoff (LWCO) IQ Option Cards are advanced, microprocessor based
Low Water Cutoff (LWCO) IQ Option Card p/n 102711-01, 102714-01 for Hot Water Boilers Instruction Sheet 102-360 APPLICATION The Low Water Cutoff (LWCO) IQ Option Cards are advanced, microprocessor based
HWD-2110 Hot Water Dispenser
 User s Guide t f Touch Function Selector Technology HWD-2110 Hot Water Dispenser. NOTICE TO INSTALLER: Please leave this book with the machine. Temperature On Demand US design patent applied for. Other
The Classeq pass Through range
 Installation & Operators Manual The Classeq pass Through range Part number 902.0005 Revision D July 2011 English HYDRO 857 HYDRO 957 Service Telephone 0844 2259245 Email : service@classeq.co.uk Spares
DOUBLE DISHDRAWER TM DISHWASHER
 DOUBLE DISHDRAWER TM DISHWASHER DD4DDFT & DD4DVT models INSTALLATION GUIDE US CA 5985 A 08.7 SAFETY AND WARNINGS! WARNING! Electrical Shock Hazard Before installing the dishwasher, remove the house fuse
USER INSTRUCTION MANUAL. Autofill Water Boiler
 USER INSTRUCTION MANUAL Autofill Water Boiler GH187 GC719 (FILTERED PRODUCT) Buffalo Warranty 1 Year Parts 1 Year Labour 083347300-03/06/14 Introduction Thank you for purchasing this Buffalo appliance.
INSTALLATION INSTRUCTIONS
 INSTALLATION INSTRUCTIONS TM DishDrawer dishwasher DD90SDF(H)TX, DD90SDFTM (Designer) & DD90S(H)TI (Integrated) models NZ AU GB IE 5900D 04.3 FOLLOW THE INSTALLATION SEQUENCE RELEVANT TO YOUR MODEL Designer
OWNER S MANUAL. Evaporative Cooler. (English) (EXH, EZH) ILL239-D ILL1140-A FAN SPEED REMOTE CONTROL ECONOMY
 (EXH, EZH) ILL239-D ILL1140-A FAN SPEED REMOTE CONTROL ECONOMY") OWNER S MANUAL Evaporative Cooler REMOTE CONTROL AUTO COOL FAN SPEED PM ECONOMY ILL239-D ILL1140-A (English) (EXH, EZH) Introduction...4 Remote Thermostat Control...5 Wall Mounted Thermostat Control...11
OWNER S MANUAL Evaporative Cooler REMOTE CONTROL AUTO COOL FAN SPEED PM ECONOMY ILL239-D ILL1140-A (English) (EXH, EZH) Introduction...4 Remote Thermostat Control...5 Wall Mounted Thermostat Control...11
Dacor Technical Service
 Attention: This manual is just a section from the complete Wall Oven Service Manual. If you find that you require the complete service manual, which includes exploded views and parts, use and care information
Virtu 60 and 80 series. Coffee machine
 Virtu 60 and 80 series Coffee machine Users manual Model: Virtu 60 and 80 Machine type: 9CND Revision B, English Reference: 5DUCNK20 Your supplier is: The manufacturer of the machine is: De Jong Duke Postbus
Get Cleaning... What s your Vax s model number? User Guide. Carpet Washer Vax Careline: AU: NZ:
 User Guide Vax Careline: AU: 1300 361 505 NZ: 0800 800 900 Carpet Washer Get Cleaning... What s your Vax s model number? W8 W8 W0 W0 W0 W W W W W What s your serial number? (Located on the base of the
Autofill Wall Mount Boilers
 USER INSTRUCTION MANUAL Autofill Wall Mount Boilers HELPLINE 0844 372 7766 Redring Warranty 2 Year Parts 2 Year Labour 083329501-05/12/13 Contents 1.0 About your Product My Product (please complete this
MW402 Integrated Dishwasher
 MW402 Integrated Dishwasher Manual for Installation, Use and Maintenance 1 Customer Care Department The Group Ltd. Harby Road Langar Nottinghamshire NG13 9HY T : 01949 862 012 F : 01949 862 003 E : customer.care@cda.eu
Installation Instructions. Filtered Chilled drinking water for commercial kitchens and tea rooms.
 Installation Instructions Zip HydroTap Filtered Chilled drinking water for commercial kitchens and tea rooms. Affix Model Number Label Here 801525 801525 - Zip HydroTap Installation Instructions - Nov.
Hot Water Dispensers HWD2, HWD3, HWD5. Table of Contents
 Hot Water Dispensers HWD2, HWD3, HWD5 Operator Manual Activate your warranty now at http://gmcw.com/warranty-registration Model HWD2 Safety Information...2 Rough-In Drawing...3 Specifications...4 Installation...4
AUTOMATIC ICE-CUBE MAKER
 AUTOMATIC ICE-CUBE MAKER INSTRUCTIONS AND WARNINGS 24478 ed. 11-2007 It is strictly forbidden to reproduce this instruction manual or any part thereof. Dear Customer, Congratulations on having chosen
CQUBE EVO OPERATION MANUAL EVO_OM_VKI_EN. Part No.: _06
 EVO_OM_VKI_EN Part No.: 1764212_06 CQUBE EVO OPERATION MANUAL CONTENTS GENERAL INFORMATION...3 Introduction... 3 Warnings... 3 Precautions... 4 Intended use... 4 Hazard intensity levels... 4 Facts & weight...
Rise. Digital. Bath with overflow filler. Rise Digital Bath installation instuctions page 1
 Rise Digital Bath with overflow filler The Waste Electrical and Electronic Equipment (Producer Responsibility) Regulation 2004 This product is outside the scope of the European Waste Electrical and Electronic
- website: Vax Ltd., Kingswood Road, Hampton Lovett, Droitwich, Worcestershire WR9 0QH, UK
 V-026PT User Guide.qxd 7/9/06 15:13 Page 12 EEC STATEMENT OF COMPLIANCE Manufacturer/EEC importer: Vax Limited, hereby on our own responsibility, declare that the product V-026PT is manufactured in compliance
Electronically controlled instantaneous water heater. CEX 9-U: C models. Installation instructions
 Electronically controlled instantaneous water heater CEX 9-U: 27910-50 C models Installation instructions For 50 ºC models, the appliance delivers water not exceeding 50 ºC in accordance with AS3498. 1.
MW001 Integrated Dishwasher. Manual for Installation, Use and Maintenance
 MW001 Integrated Dishwasher Manual for Installation, Use and Maintenance Important The CDA Group Ltd cannot be held responsible for injuries or losses caused by incorrect use or installation of this product.
E32 CONVECTION OVEN SERVICE MANUAL
 E32 CONVECTION OVEN SERVICE MANUAL Applies to units from S/N 40256-1- WARNING: ALL INSTALLATION AND SERVICE REPAIR WORK MUST BE CARRIED OUT BY QUALIFIED PERSONS ONLY. -2- CONTENTS This manual is designed
REDRING POWERSTREAM UNVENTED INSTANTANEOUS WATER HEATER. Installation and User Guide
 REDRING POWERSTREAM UNVENTED INSTANTANEOUS WATER HEATER Installation and User Guide IMPORTANT: This booklet should be left with the user after installation and demonstration. It should be kept in a safe
Servicemanual COFFEE QUEEN * en ma
 Servicemanual COFFEE QUEEN *320. 320504 en ma 202 07 Contents. Contents 2 Introduction 3 Functional description 4 Installation and starting 5-6 Programming: Calibration 7 Fault indications 8 Important
WC2 & WC3 Installation & Maintenance Instructions
 WC2 & WC3 Installation & Maintenance Instructions Please leave this instruction booklet with the home owner as it contains important guarantee, maintenance and safety information WC3 shown WC2 WC3 IMPORTANT
TITAN Pro-Max High Efficiency Upflow Water Conditioner Installation and Operation Manual
 TITAN Pro-Max High Efficiency Upflow Water Conditioner Installation and Operation Manual TITAN VI Pro-Max Manufacturer s Warranty Holts Water Conditioning 369 South Mountainway Drive Orem, UT 84058 801-426-9243
DOMESTIC STEAM GENERATOR Installation Instructions
 DOMESTIC STEAM GENERATOR Installation Instructions Please read all of the instructions carefully before commencing installation or using the facility. Contents INTRODUCTION Page 2 TECHNICAL SPECIFICATION
INSTALLATION INSTRUCTIONS UNDERCOUNTER DISHWASHERS
 INSTALLATION INSTRUCTIONS UNDERCOUNTER DISHWASHERS VIKING 111 Front Street Greenwood, Mississippi 38930 USA (662) 455-1200 IMPORTANT - PLEASE READ AND FOLLOW Before beginning - please read these instructions
3. Thermal switch (70 o C thermostat) with a 3 m connection cable
 with a 3 m connection cable") Essence pump Installation and operating manual Contents page page 1. Purpose and operating principle 1 7. Operation 6 2. Safety instructions 2 8. Feed volume setting 7 3. Technical data 3 9. Maintenance
Essence pump Installation and operating manual Contents page page 1. Purpose and operating principle 1 7. Operation 6 2. Safety instructions 2 8. Feed volume setting 7 3. Technical data 3 9. Maintenance
BUNN TECHNICAL TRAINING. Dual SH BrewWISE DBC
 BUNN TECHNICAL TRAINING Dual SH BrewWISE DBC Index Unit 1: Installation Site Requirements...4 Location of the Serial Number...4 Water Supply Install...4 Electrical Install...4 Initial Start-Up...5 Unit
CLIM9000CE PORTABLE AIR CONDITIONER USER MANUAL
 CLIM9000CE PORTABLE AIR CONDITIONER USER MANUAL Please read this user manual before using this innovative Air Conditioner and keep it safe for future reference. SAFETY INSTRUCTIONS Important! Carefully
Technical data. Bathroom/shower room installations. Water services (WRAS approved)
") Technical data The Closomat toilet MUST be installed by a competent or qualified person. Explanation of symbols Safety instructions in this manual are identified by symbols. The safety instructions are
Technical data The Closomat toilet MUST be installed by a competent or qualified person. Explanation of symbols Safety instructions in this manual are identified by symbols. The safety instructions are
INSTALLATION INSTRUCTIONS
 INSTALLATION INSTRUCTIONS TM DishDrawer dishwasher DD36SDFTX (Designer) & DD36STI (Integrated) models US CA 59008D 04.3 a SAFETY AND WARNINGS Electrical hazard WARNING! Before installing the dishwasher,
MW401 Integrated Dishwasher
 MW401 Integrated Dishwasher Manual for Installation, Use and Maintenance Customer Care Department The Group Ltd. Harby Road Langar Nottinghamshire NG13 9HY T : 01949 862 012 F : 01949 862 003 E : service@cda.eu
Virtu 40 series. Coffee machine
 Virtu 40 series Coffee machine Users manual Model: Virtu 40 Machine type: 9FEC Revision B, English Reference: 5DUFEK20 Your supplier is: The manufacturer of the machine is: De Jong Duke Postbus 190 3360
2 Gallon Water Boiler
 USER S GUIDE 2 Gallon Water Boiler READ AND SAVE THESE INSTRUCTIONS NOTICE TO INSTALLER: Please leave this booklet with the machine. CONTENTS CL39...FS39... IS2...II20...II21...CI16............ES83.........