Instructions for Model E782 Betman Cleaning System (Cleaner/Rinser/Rinser/Dryer)
|
|
|
- Patricia Porter
- 5 years ago
- Views:
Transcription
1 1
2 2
 The Model E782 Cleaning")
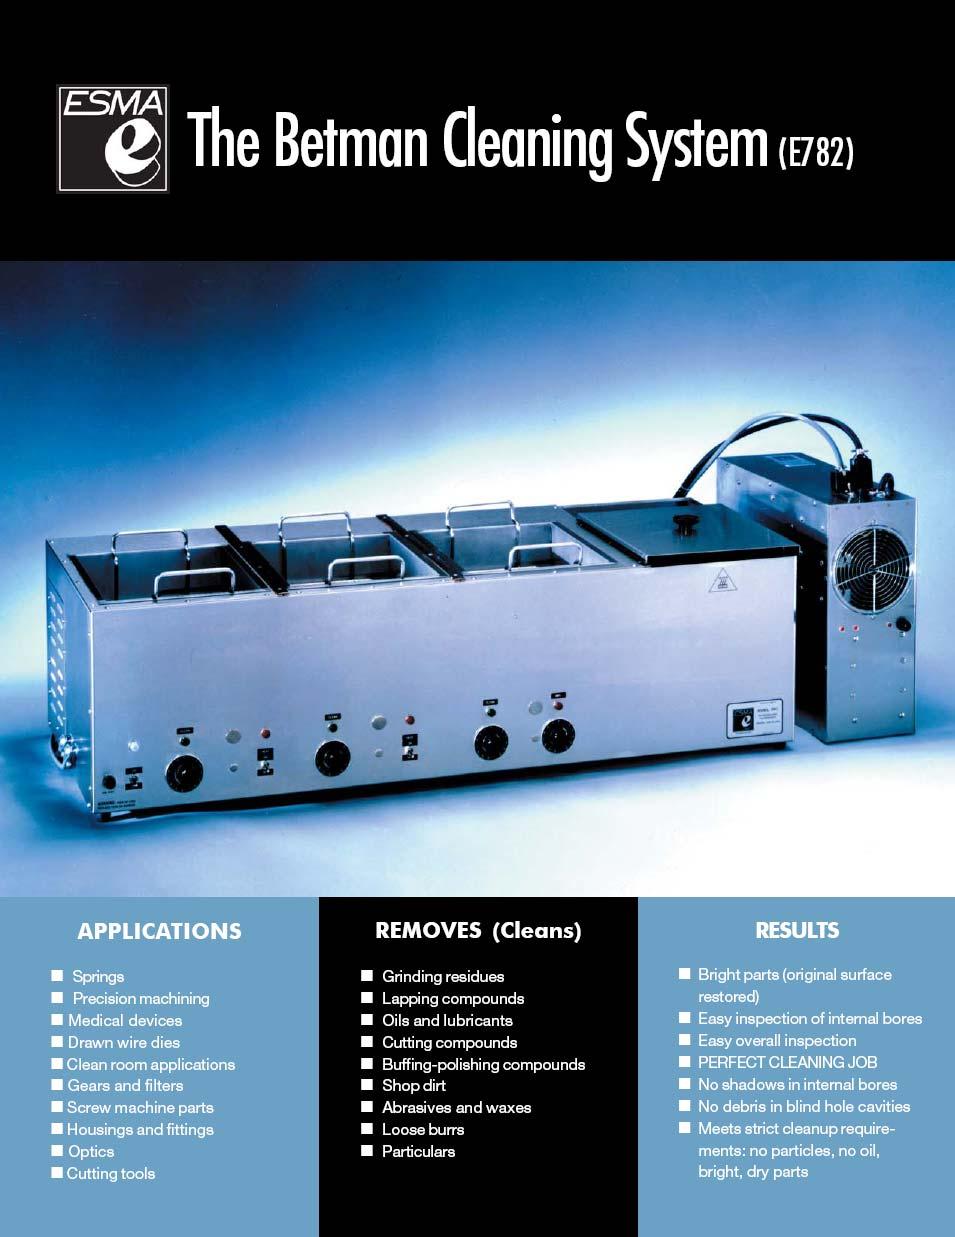
3 Esma Inc. PO Box W. Taft Drive South Holland, IL FAX Introduction Instructions for Model E782 Betman Cleaning System (Cleaner/Rinser/Rinser/Dryer) The Model E782 Cleaning system contains an ultrasonic cleaning tank, two ultrasonic rinse tanks and a hot air drying chamber. Each ultrasonic tank and the drying tank have separate control timers. The ultrasonic tanks are supplied with heaters controlled with internal, adjustable thermostats. The ultrasonic cleaning tank 1 is adapted for a pump filter system. Tanks 2 and 3 are both ultrasonic rinse tanks. Fresh rinse water can be introduced into the system with the excess cascading to drain. The E782 unit consists of two components: the main cleaning unit containing the 316 Stainless Steel tanks housed in a 304 stainless cabinet and a stainless power module cabinet containing the bulk of the electronics. Each tank has 6 potting transducers mounted on the bottom and is equipped with a ball valve for draining. The Power Module contains self-tuning modular circuit boards, high velocity fans to cool the electronics, and an RFI filter to eliminate high frequency noise feedback. PLEASE READ THESE INSTRUCTIONS BEFORE INSTALLATION AND OPERATION. If there are any questions, call (800) INSTALLATION Place unit on a bench close to a sink or drain. The power module can be placed up to 8 feet away from tank, either on a shelf or in a cabinet. The power module should not be positioned where it can be splashed with liquids, where it can attract dirt or abrasives, or where the air 3
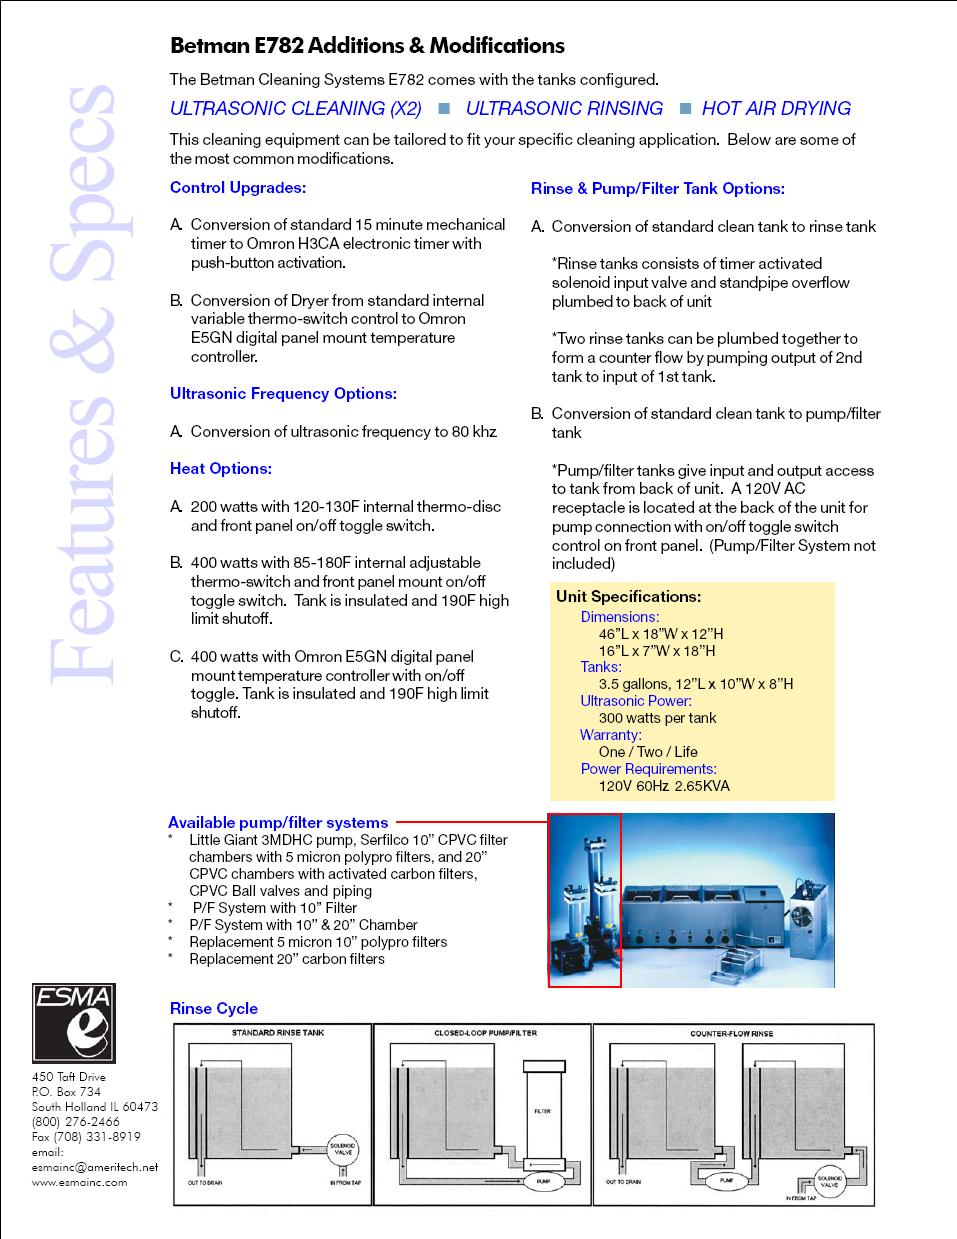
4 cooling by the fan can be restricted because of tight enclosures. Clearance of 1 is necessary both at the air intake and exhaust. PLUMBING A number of valves and connectors have been supplied with unit. With the PVC and plastic fittings and valves, add Teflon tape to the threads and HAND tighten. (DON T OVERTIGHTEN) 1. Three ball valves are supplied. Add Teflon tape and thread a ball valve into the drain port of each tank. A ¼ NPT x ½ hose connector is to be added to the outlet of each ball valve. 2. Tank 1 has input and output for a pump filter system. 3. Connect the water sources to the rinse inlet of tank 2 and 3. A needle valve is supplied to regulate the water flow into the tank. An internal solenoid starts or stops the flow in conjunction with the timer. Connect your water supply to the ¼ compression input of the needle valve. 4. Add ¼ NPT x ½ hose connector to the rinse outlet port of tank 2 and 3 and connect a hose to drain. When operating, turn timer 2 or3 ON and water comes in tank and cascades out to drain. 5. Tanks 2 and 3 have high level sensors. If the water level becomes too high in tank because of a blockage in the drain line, the sensor will shut off this solenoid preventing any water overflow of tank. Before starting, add water manually to tanks 2 and 3 so that the ultrasonics do not run on an empty tank. Pump Filter System The cleaning tank 1 is equipped with electrical and plumbing outlets to hook up the pump filter system. When the pump filter system is turned ON the solution in tank 1 will recycle independent of timer. The standpipe in the tank is the discharge to the pump. The tank level will have to be higher than the standpipe or the standpipe can be removed and the discharge will be at the bottom of the tank. Initial Start Up Of Pump Filter 4
5 1. The initial start up works best if the pump filter system is on the floor or lower than the tank. 2. Add liquid to the tank and allow liquid to flow into filter chamber. Make sure ball valve on the pump filter is open. 3. Open the plug on top of filter chamber to bleed the trapped air in chamber. Close this plug when liquid comes out. 4. If necessary, cycle pump on and off a few times to get trapped air out of lines. 5. When maximum flow is achieved, use the ball valve on the pump filter system to decrease the flow through tank. Excessive flow through tank does decrease the ultrasonic action (Cavitation). When all the air is removed from the system it may be more convenient to place pump filter system on bench next to the cleaning tank. If the top of the filter chamber is higher than the liquid level in tank, a filter cartridge can be easily changed without draining any solution. Electrical The unit has two power cords that are plugged into the 120VAC, 50/60HZ source. The POWER MODULE is rated at 2550 watts, 120vac. Two plug and cord assemblies from tank cabinet are plugged into power module. A fuse, 25amp-125V, is located on the power module cabinet. A separate power cord from tank cabinet is rated at 1550 watts, 120VAC 50/60HZ. The power cord supplies power to the tank heaters. A 15amp- 125V fuse is located on the front of the tank cabinet. Operation The MAIN switch on power module is left ON during daily operation. Parts to be cleaned are placed in rack (basket) and rack is positioned into the tanks. Never place parts directly on bottom tank (tank could eventually be perforated). The basic principle of operation is the enhancement and acceleration of the chemical cleaning by ultrasonic action. 1. Heater The tanks are supplied with 400 watts of heat controlled by an adjustable, internal thermo switch. The thermo switch has 5
6 been adjusted to control the bath temperature at 160degrees F when tank covers are on. If temperature needs to be changed, there is a port at the rear of each tank module where a screwdriver can be used to adjust the control knob of thermostat. The thermostat is the same as used in the drying chamber mentioned below. Use the same procedure for adjusting the temperature but use caution that the bath temperature does not exceed 180 degrees F. CAUTION Before adjusting thermostat turn power OFF. 2. Timer Turn timer knob clockwise to desired time, to start ultrasonic action. When set time expires, the ultrasonic action is terminated. Green indicator light is ON during operation. 3. Drying Chamber The drying chamber uses forced hot air thermostatically controlled at 160 degrees-180 degrees F. (set by the manufacturer) Drying time will vary depending on the number of parts to be dried, if hot or cold water was used to rinse parts before drying and if the cover is on oven. Generally parts should be dry in 10 minutes. CAUTION: Parts after drying will be hot (170 degrees F) and should be cooled before touching. Tmer Turn timer clockwise to desired drying time. The air temperature of the dryer has been set at the factory to reach 170degrees F with cover on the oven. If you want to change the temperature, there is a thermostat mounted above blower in closed chamber behind oven. The temperature can be changed as follows: 1. Disconnect unit from 120V outlet. 2. There is a port at rear of dryer module where a screw driver can be inserted to adjust the temperature. 3. Move control knob of thermostat slightly in clockwise direction to increase temperature and counter-clockwise to decrease temperature. Make only slight changes because a 30 degree angle change corresponds to an approximate 20 degrees F temperature change. Replace top plate on chamber. 6
7 Maintenance Periodically, the liquid in tanks must be changed: - Unplug the unit from 120VAC outlet. - Open ball valve at back of tank chamber to drain. - Flush out tank with clean water and wipe dry. - Close ball valve and add fresh solution. Keep top of unit dry. Unit is manufactured from 304 stainless and can be restored to the original finish with a stainless polish used for kitchen appliances. Modular Circuit Board Unit E782 is equipped with three modular circuit boards that are easily replaced if a problem occurs. Three small indicator lights on the power module indicate that circuit boards are working. If the indicator light goes out, a replacement circuit board can be shipped immediately. This way the need for shipping the unit back for repairs is eliminated and the disruption is minimal. Warranty The unit has a one year warranty, two year warranty on circuit boards and lifetime warranty on tank weld seams and transducer bonds. CALL FOR TECHNICAL SERVICE. 7
Celebrating over 30 years of excellence in manufacturing ultrasonic cleaning equipment, electropolishing equipment and associated chemistries
 Instructions for Model E1002 Ultrasonic Washer Introduction The Model E1002 ultrasonic washer is equipped to run timed cycles of clean, rinse and dry. The unit is housed in a 304 stainless steel cabinet.
1 ESMA, Inc. P. O. BOX 734 * SOUTH HOLLAND, IL * (800) * FAX (708)
 * FAX (708)") 1 2 Instructions for Ultrasonic Washer E789 (U.L. Approved) 1. INTRODUCTION The E789 Automatic Ultrasonic Washer automatically performs a cleaning cycle, the major steps of which are: Ultrasonic cleaning
1 2 Instructions for Ultrasonic Washer E789 (U.L. Approved) 1. INTRODUCTION The E789 Automatic Ultrasonic Washer automatically performs a cleaning cycle, the major steps of which are: Ultrasonic cleaning
Celebrating over 30 years of excellence in manufacturing ultrasonic cleaning equipment, electropolishing equipment and associated chemistries
 Instructions for Ultrasonic Washer E397 & E397RC E498 & E498RC 1. INTRODUCTION The E397 and E498 units automatically perform a cleaning cycle, the major steps of which are: Ultrasonic Cleaning Ultrasonic
PLEASE READ CAREFULLY THE INSTRUCTIONS BEFORE OPERATING
 1 2 ESMA INC PO BOX 734 450 W. Taft Dr. South Holland IL 60473 1-800-276-2466 708-331-1855 INSTRUCTIONS FOR ELECTROPOLISHER E399 Introduction The E399 unit polishes stainless or chrome-cobalt alloys with
BUILT-IN DISHWASHER INSTALLATION INSTRUCTIONS
 BUILT-IN DISHWASHER INSTALLATION INSTRUCTIONS PLEASE READ COMPLETE INSTRUCTIONS BEFORE YOU BEGIN LEAVE INSTALLATION INSTRUCTIONS AND USER'S GUIDE WITH OWNER ALL ELECTRIC WIRING AND PLUMBING MUST BE DONE
Installation Instructions. For the 18 Built-In Dishwasher and Front Color Panels
 Installation Instructions For the 18 Built-In Dishwasher and Front Color Panels Printed in USA 154232102 Before You Begin DO NOT INSTALL DISHWASHER UNTIL YOU HAVE READ ALL INSTRUCTIONS. FOR YOUR SAFETY,
Installation Instructions
 Installation Instructions For the 18" Built-In Dishwasher Sears, Roebuck and Co. Sears Canada, Inc. Hoffman Estates, IL 60179 U.S.A. Toronto, Ontario, Canada M5B 2B8 154435201 Before You Begin DO NOT INSTALL
Flat Wall Mounted / Free stand Electric Fireplace. Model Numbers: S OWNER S MANUAL. Wall Hanging Mode. Freestanding Mode AC 120V / 60HZ 1500W
 Flat Wall Mounted / Free stand Electric Fireplace Model Numbers: 80-421S OWNER S MANUAL Wall Hanging Mode Freestanding Mode AC 120V / 60HZ 1500W WARNING Read and understand this entire owner s manual,
INSTALLATION INSTRUCTIONS UNDERCOUNTER DISHWASHERS
 INSTALLATION INSTRUCTIONS UNDERCOUNTER DISHWASHERS VIKING 111 Front Street Greenwood, Mississippi 38930 USA (662) 455-1200 IMPORTANT - PLEASE READ AND FOLLOW Before beginning - please read these instructions
OWNER S MANUAL ELECTRIC FLAT PANEL FIREPLACE. AC V 60Hz. Model# : /60 - Built-in & Wall Mounted Electric Fireplace WARNING CAUTION
 ELECTRIC FLAT PANEL FIREPLACE Model# :80017 OWNER S MANUAL 50/60 - Built-in & Wall Mounted Electric Fireplace AC 110-120V 60Hz WARNING Read and understand this entire owner s manual, including all safety
ELECTRIC FLAT PANEL FIREPLACE HEATER
 ELECTRIC FLAT PANEL FIREPLACE HEATER Model Numbers: 80-2000A-42 OWNER S MANUAL AC 120V 60Hz 1500W WARNING Read and understand this entire owner s manual, including all safety information, before plugging
SUS-12 Steam Cleaner User Manual
 SUS-12 Steam Cleaner User Manual Steam Cleaner SUS-12 User Manual IMPORTANT SAFETY INSTRUCTIONS Read all instructions before using your Steam Cleaner. When using an electrical appliance, basic precautions
A B A B4
 TM TM SERVICE INSTRUCTIONS Thermo-Aire Heater Kits and Air-Heater Assemblies 383808-A4 383808-B4 383880-A4 383880-B4 DESCRIPTION The Thermo-Aire Heater is used in situations where oils of heavier viscosity
Installing the Turbo Floor Model System
 Installing the Turbo Floor Model System Location 1. Locate as close as possible to water supply source. 2. Locate as close as possible to a three-prong grounding receptacle. 3. Locate the System on a smooth
72 ONYX XL FLAT PANEL ELECTRIC FIREPLACE
 72 ONYX XL FLAT PANEL ELECTRIC FIREPLACE Model Numbers: 80005 OWNER S MANUAL WARNING Read and understand this entire owner s manual, including all safety information, before plugging in or using this product.
DISHWASHER. Models DW2432 and DW2432SS. Installation Manual. Write Serial Number (on inner door of unit) here:
 here:") DISHWASHER Models DW2432 and DW2432SS Installation Manual Write Serial Number (on inner door of unit) here: Felix Storch, Inc. Summit Appliance Division 770 Garrison Avenue Bronx, New York 10474 www.summitappliance.com
DISHWASHER Models DW2432 and DW2432SS Installation Manual Write Serial Number (on inner door of unit) here: Felix Storch, Inc. Summit Appliance Division 770 Garrison Avenue Bronx, New York 10474 www.summitappliance.com
DRAIN WATER TEMPERING INSTALL
 ! WARNING! CAUTION DRAIN WATER TEMPERING KIT - 0601-00-07-86 WARNING! This kit should be installed only by qualified service personnel to reduce the risk of electric shock, serious injury, or fire. A plumbing
WM-450-PT WM-900-PT Commercial Wall Mounted Reverse Osmosis
 WM-450-PT WM-900-PT Commercial Wall Mounted Reverse Osmosis Installation And Service Manual Watts Pure Water 1725 W. Williams Dr. C-20., Phoenix, Arizona 85027 Phone: 888-774-7405 Fax: 602-588-0356 www.wattspurewater.com
Wall Mount Electric Fireplace
 Wall Mount Electric Fireplace User Guide Thank you for purchasing the Ivation Wall Mount Electric Fireplace. This User Guide is intended to provide you with guidelines to ensure that operation of this
INSTALLATION INSTRUCTIONS (CANADA)
") INSTALLATION INSTRUCTIONS (CANADA) MODEL GOS40 (OTHER MODELS ARE SIMILAR) INDEX: UNPACKING INSTRUCTIONS page 2 INSTALLATION INSTRUCTIONS page 3 Regular Installation Design but not limited to page 6 CONNECTIONS
INSTALLATION INSTRUCTIONS (CANADA) MODEL GOS40 (OTHER MODELS ARE SIMILAR) INDEX: UNPACKING INSTRUCTIONS page 2 INSTALLATION INSTRUCTIONS page 3 Regular Installation Design but not limited to page 6 CONNECTIONS
GPC PASTA PRO INSTALLATION & USER OPERATION MANUAL
 GPC-14/18/20 GPC PASTA PRO INSTALLATION & USER OPERATION MANUAL GPC-18 shown with optional rinse station. NOTICE! After installation of your equipment, immediately contact your local gas supplier to obtain
ELECTRIC FLAT PANEL FIREPLACE HEATER. Model# : BG-36B BG-45B BG-50B BG-60B BG-72B BG-100B OWNER S MANUAL
 ELECTRIC FLAT PANEL FIREPLACE HEATER Model# : BG-36B BG-45B BG-50B BG-60B BG-72B BG-100B OWNER S MANUAL 36"/45"/50"/60"/72"/100" LED Wall Mounted Or Built-in Electric Fireplace AC 110-120V 60Hz 1500W WARNING
OPERATING and MAINTENANCE INSTRUCTIONS Models: H137WSUA...D & H138WS18...D Series Humidity Holding Hot Cabinet
 Rev. 5 (/5) Page of ELECTRICAL SPECIFICATIONS: Model No. Volts Watts Amps Hertz Phase NEMA HWSUA2D* HWSUA5D* HWSUAD* HWS5D* HWSD* HWSD* 20 2000. 0 5-20P HWSUA2D20 HWSUA5D20 HWSUAD20 HWS5D20 HWSD20 HWSD20
MAXI PUMP INSTRUCTION MANUAL NE6151B /NE6171B READ THIS MANUAL CAREFULLY BEFORE USING YOUR MAXI PUMP
 MAXI PUMP INSTRUCTION MANUAL NE6151B /NE6171B READ THIS MANUAL CAREFULLY BEFORE USING YOUR MAXI PUMP 8104 MAXI-PUMP PARTS BREAKDOWN Re f # 1 2 3 4 5 6 7a 7b 8 9 10 11 12 13 14 15 16 2 Part # NEP2134 NEP2135
Installation Manual PS-225 & PS-275
 Installation Manual PS-225 & PS-275 Table of Contents Pre-Uncrating Checklist... 1 Verifying System Requirements... 2 Verifying System Direction... 2 Verifying the Electrical Requirements... 2 Removal
PWC 1800 PureWaterCooler SERVICE MANUAL. for. PureWaterCooler by Vertex Model PWC P/N man Copyright 2011 Vertex Water Products
 SERVICE MANUAL for by Vertex Model PWC-1800 P/N man-7011 Table of Contents 1. Introduction 2. Cooler Set-up 3. Remove Top Cover 4. Remove/Replace Float 5. Remove/Replace Hot Tank 6. Dispensing Solenoid
IMPORTANT WARNINGS IMPORTANT SAFETY INSTRUCTIONS
 IMPORTANT WARNINGS IMPORTANT SAFETY INSTRUCTIONS Suncourt recommends professional installation of the Airiva (or by an accomplished DIY person) Please read and save these entire instructions before starting
Ultraviolet Monitoring System. Part Numbers UV/MS-1 V3 UV/MS-2 V3. Installation And Operations Manual
 Ultraviolet Monitoring System Part Numbers UV/MS-1 V3 UV/MS-2 V3 Installation And Operations Manual 2 System Description The Wyckomar UV Monitor measures true UV intensity at 254 nm, which is the effective
INSTALLATION INSTRUCTIONS FOR MULTI-UNIT RESIDENTIAL APPLICATIONS INSTALLATION INSTRUCTIONS ARE PER UNIT MODELS: RS-502C, RS-503C, RS-702C, RS-703C
 ROMA STEAM BATH 16802 BARKER SPRINGS DRIVE HOUSTON, TEXAS 77084 (281) 578-9945 1-800-657-0656 RES-M-RS INSTALLATION INSTRUCTIONS FOR MULTI-UNIT RESIDENTIAL APPLICATIONS INSTALLATION INSTRUCTIONS ARE PER
RESIN FREESTANDING TUB
 RESIN FREESTANDING TUB INSTALLATION INSTRUCTIONS AND CARE GUIDE CONTENTS Tub Installation...2 Rough-In...2 Drain Installation...3 Air Tub Installation...4 Electrical Installation...4 Remote Control Installation...5
SERVICE & OPERATING MANUAL ELECTRONIC LEAK DETECTOR WARNING VDC
 SERVICE & OPERATING MANUAL ELECTRONIC LEAK DETECTOR 032-044-000 032-045-000 } 12-32 VDC SPECIFICATIONS 032-044-000 and 032-045-000 WARNING Hazardous voltage. This Leak Detector is an electrical device.
Model # VWK-2 INSTRUCTION MANUAL
 Model # VWK-2 INSTRUCTION MANUAL Ver. March 2015 ALA Scientific Instruments Inc. 60 Marine Street Farmingdale, NY 11735 Tel. # 631.393.6401 Fax: # 631.393.6407 E-mail: support@alascience.com www.alascience.com
POWER VENTER SYSTEM. Model: PVO-300, PVO-600
 POWER VENTER SYSTEM Model: PVO-300, PVO-600 Included is one ETL and cetl listed Power Venter to be used primarily with a single 120VAC controlled oil fired furnace, boiler, or water heater. The PVO may
MODEL GOS40 COMBI/ROTISSERIE OVEN PROGRAM
 ASSEMBLY INSTRUCTIONS MODEL GOS40 COMBI/ROTISSERIE OVEN PROGRAM INDEX: UNPACKING INSTRUCTIONS INSTALLATION INSTRUCTIONS CONNECTIONS see Goslyn Oil Recovery Program Manual UNPACKING INSTRUCTIONS UNPACKING
2 SPEED PUMP INSTRUCTION MANUAL READ THIS MANUAL CAREFULLY BEFORE USING YOUR 2 SPEED PUMP
 2 SPEED PUMP INSTRUCTION MANUAL READ THIS MANUAL CAREFULLY BEFORE USING YOUR 2 SPEED PUMP 8308 PUMP PARTS BREAKDOWN Ref # Part # Manf. # Descrip on 1 NEP2134 AC 81361 PUMP LID 2 NEP2135 AC 81396 PUMP LID
INSTALLATION, OPERATION and MAINTENANCE MANUAL for Cres Cor AQUATEMP TM HUMIDITY CONVECTION and RETHERM OVENS with MICROPROCESSOR CONTROLS
 9 Heisley Road Mentor, OH 0- Rev. (6/0) Page of INSTALLATION, OPERATION and MAINTENANCE MANUAL for Cres Cor AQUATEMP TM HUMIDITY CONVECTION and RETHERM OVENS with MICROPROCESSOR CONTROLS ROFWB-Q COFWUAB-Q
TIDALWAVE I/G POOL PUMP INSTRUCTION MANUAL
 TIDALWAVE I/G POOL PUMP INSTRUCTION MANUAL READ THIS MANUAL CAREFULLY BEFORE USING YOUR PUMP 88 PUMP PARTS BREAKDOWN REF # Order # Mfr # Description 1 NEP4 AC 348 Lid Knobs NEP AC 380 Strainer Lid 3 NEP6
DRY AIR SYSTEMS, INC Metro Boulevard Maryland Heights, Missouri (314) fax (314)
 fax (314)") DRY AIR SYSTEMS, INC. 2655 Metro Boulevard Maryland Heights, Missouri 63043 (314) 344-1114 fax (314) 344-0677 HD SERIES DRIERS TABLE OF CONTENTS WHY AN AIR DRYER 3 WHAT IS A DESICCANT AIR DRYER 3 Desiccant
DRY AIR SYSTEMS, INC. 2655 Metro Boulevard Maryland Heights, Missouri 63043 (314) 344-1114 fax (314) 344-0677 HD SERIES DRIERS TABLE OF CONTENTS WHY AN AIR DRYER 3 WHAT IS A DESICCANT AIR DRYER 3 Desiccant
ROTA-SPRAY PROCESSOR MODEL 1210 (ROTARY-JET) INSTRUCTIONS MEGA PART NO: &
 INSTRUCTIONS MEGA PART NO: &") ROTA-SPRAY PROCESSOR MODEL 1210 (ROTARY-JET) INSTRUCTIONS MEGA PART NO: 500-702 & 500-713 PLEASE READ IMPORTANT UNPACKING INSTRUCTIONS 1. Carefully consider where the unit will be located. It should be
ROTA-SPRAY PROCESSOR MODEL 1210 (ROTARY-JET) INSTRUCTIONS MEGA PART NO: 500-702 & 500-713 PLEASE READ IMPORTANT UNPACKING INSTRUCTIONS 1. Carefully consider where the unit will be located. It should be
LABORATORY ULTRA ZERO AIR GENERATOR. ZAC-ULT Series USER MANUAL
 LABORATORY ULTRA ZERO AIR GENERATOR ZAC-ULT Series USER MANUAL 166 Keystone Drive Montgomeryville, PA 18936 Telephone: 215-641-2700 Fax: 215-641-2714 Email: mtgmmville@matheson-trigas.com INT-0261-XX rev
Dishwasher. Installation manual DW60M9990AP
 Dishwasher manual DW60M9990AP DW9000M_DD68-00197B-00_EN.indd 1 6/1/2017 4:34:14 PM Contents Contents 3 What s included 3 requirements 7 Dimensions and specifications 9 Step-by-step installation 11 2 English
OPERATING INSTRUCTIONS FUSION MODEL 610 DIGITAL DISPENSING SYSTEM
 OPERATING INSTRUCTIONS FUSION MODEL 610 DIGITAL DISPENSING SYSTEM 1 FUSION, INC. MODEL 610 PRECISION DISPENSER The Model 610 Dispenser consists of: (1) Dispenser Control Box (2) Foot Pedal Switch (3) Power
ROTISSERIE OVEN PROGRAM GUIDE
 ROTISSERIE OVEN PROGRAM GUIDE Goslyn, LP 1904 University Business Dr. #310 McKinney TX 75071 Phone: 888-648- 5040 Fax: 214-618- 3765 WWW.GOSLYN.COM DEC 2013 table of contents general overview 3 Installation
STEAMPRO. Steam Generator Troubleshooting and Service Guide
 STEAMPRO Steam Generator Troubleshooting and Service Guide TABLE OF CONTENTS Page PREFACE... 1 I. STEAMPRO STEAM GENERATOR SYSTEM...2 II. PLUMBING AND ELECTRICAL...3-4 III. SYSTEM OVERVIEW... 5-10 IV.
Installation Manual PS-200 & PS-201
 Installation Manual PS-200 & PS-201 Table of Contents Pre-Uncrating Checklist... 1 Verifying System Requirements... 2 Verifying System Direction... 2 Verifying the Electrical Requirements... 2 Removal
G-7s. Instruction Manual. G-Series Cooler COUNTERTOP COOLER. Part No.11IPA
 G-Series Cooler COUNTERTOP COOLER Part No.11IPA-061000 Instruction Manual FOR YOUR FUTURE REFERENCE This easy-to-use manual will guide you in getting the best use of your cooler. Remember to record the
LITTLE BLASTER LARRY HESS AND ASSOCIATES, INC. BLAST-IT-ALL P.O. BOX 1615 SALISBURY, NC WITH DUST COLLECTOR
 LITTLE BLASTER LARRY HESS AND ASSOCIATES, INC. BLAST-IT-ALL P.O. BOX 1615 SALISBURY, NC 28145 WWW.BLAST-IT-ALL.COM LITTLE BLASTER WITH DUST COLLECTOR MANUAL NUMBER: 561 TABLE OF CONTENTS PAGE FIGURE 1
SMF PUMP OWNER S MANUAL
 SMF PUMP OWNER S MANUAL IMPORTANT SAFETY INSTRUCTIONS READ AND FOLLOW ALL INSTRUCTIONS SAVE THESE INSTRUCTIONS WARNING: Before installing this product, read and follow all warning notices and instructions
Parts & Material Included
 O² Hydro Well System Installation, Use & Care Guide Parts & Material Included 1. Funnel 11. Drain Line 21. Air Head 2. Media Tank Distributer Tube 12. Air Release 22. Drain Fitting 3. Air Tank Distributer
Fountain Classic. Installation and Owner s Manual. Page 16
 Fountain Classic Installation and Owner s Manual Page 16 4120 NW 44th St Lincoln, NE 68524 USA Tel: 402.467.9300 Toll Free in the USA: 800.875.5915 Fax: 402.467.9393 www.purewaterinc.com Page 2 Fountain
1-866-PENNERS
 Cascade Premier and Elite Premier Bathing Systems with Aqua-Aire Installation / Assembly Instructions Premier Elite Premier PENNER PATIENT CARE, INC Box 523 / 102 Grant St. Aurora, NE 68818 360745P Revision
ELECTRIC STOVE HEATER Models: FS2213B
 ELECTRIC STOVE HEATER Models: FS2213B OWNER S MANUAL WARNING Read and understand this entire owner s manual, including all safety information, before plugging in or using this product. Failure to do so
Liberty-Classic. Operator s Manual
 Liberty-Classic Operator s Manual Pure & Secure LLC 4120 NW 44th Lincoln, NE 68524 Phone: 402-467-9300 Fax: 402-467-9393 2006, Pure & Secure LLC. All Right Reserved Table of Contents Important Safety
MIST MAX MODEL MM800. Important: Installation and Operation Manual
 MIST MAX MODEL MM800 Installation and Operation Manual TM Important: This manual contains specific cautionary statements relative to worker safety. Read this manual thoroughly and follow as directed. It
Installation Instructions
 Installation Instructions SELECTRONIC Hard-Wired AC Powered ICU Lavatory Proximity Faucet PRODUCT NUMBER 0. Certified to comply with ASME A..M 0 American Standard M 0. ICU Faucet shown Installed on American
! WARNING. Before using product, read and understand instructions.
 McDonnell & Miller Installation & Maintenance Instructions MM-273A Manual eset Applications: Conductance type control for steam boilers when a manual reset high water alarm or cut-off is required. 5-1/2"
PWC-500/1000/1010/1500
 SERVICE MANUAL for by Vertex Model PWC-500/1000/1010/1500 P/N man-7008 Table of Contents 1. Introduction 2. Cooler Set-up 3. Remove Top Cover 4. Remove/Replace Float 5. Remove/Replace Hot Tank 6. Faucet
Hickory Rotisseries. Machine Type N / 5. 5 E 200ºF - 550ºF. Final Inspection:
 Installation Manual USA Hickory Rotisseries Models: N/5.5 E Machine Type N / 5. 5 E Total Power Rating Elements / Spits Electrical Rating Temperature Range Timer Delivery Date: 6000 or 8400 Watts 4 Elements
OUTDOOR DISHWASHER INSTALLATION INSTRUCTIONS
 OUTDOOR DISHWASHER INSTALLATION INSTRUCTIONS IMPORTANT! Read all of these instructions before installing the dishwasher. AUTOMATIC HIGH LOOP The drain hose is fastened to the back of the machine at the
OWNER S MANUAL. Wall Hanging Mode. Pedestal Mode ELECTRIC FLAT PANEL FIREPLACE HEATER. Model Number: EFW-XB60B WARNING CAUTION
 ELECTRIC FLAT PANEL FIREPLACE HEATER Model Number: EFW-XB60B OWNER S MANUAL Wall Hanging Mode Pedestal Mode WARNING CAUTION Read and understand this entire owner s manual, including all safety information,
INSTRUCTIONS FOR OPERATION AND CARE OF
 INSTRUCTIONS FOR OPERATION AND CARE OF SP-1501 SP-1502 SP-1501 SP-1501B SP-1501-SLD SP-1501B-SLD SP-1502 SP- 1502B P.O. Box 3527 City of Industry, CA, 91744-0527, U.S.A. 800-782-7706 626-968-6681 www.whitehallmfg.com
OptiSoft Softeners Simple Install Steps 1-17
 OptiSoft Softeners Simple Install Steps 1-17 (models OS-10, OS-13, OS-20 & OS-29) Refer to Installation, Operation & Maintenance Manual for More Details v Installation Requirements Installation must conform
AHPO-6/18 GOLD PROOFER OVEN
 AHPO-6/18 GOLD PROOFER OVEN For information or technical assistance, call: TOLL FREE 1(800) 735-DUKE (3853) or 1(314) 231-1130 PN 156081R 1 of 25 TABLE OF CONTENTS MANUFACTURER S INTRODUCTION...3 INSTALLATION...4
Viking Installation Guide
 Viking Installation Guide Viking Range Corporation 111 Front Street Greenwood, Mississippi 38930 USA (662) 455-1200 For product information, call 1-888-VIKING1 (845-4641) or visit the Viking Web site at
Installation Manual UNIVERSAL C-750 PRE-MIX DISPENSER
 IMI CORNELIUS INC One Cornelius Place Anoka, MN 55303-6234 Telephone (800) 238-3600 Facsimile (612) 422-3246 Installation Manual UNIVERSAL C-750 PRE-MIX DISPENSER Part No. 185211000 January 25, 1984 Revised:
Fully Automatic Water Softeners
 OWNERS GUIDE TO INSTALLATION AND OPERATION Fully Automatic Water Softeners SINGLE TANK CABINET MODELS TWO TANK MODELS Read the instructions carefully and learn the specific details regarding installation
CONSTANT SUCTION UNIT
 CONSTANT SUCTION UNIT OPERATOR/MAINTENANCE M A N U A L Squire-Cogswell/Aeros Instruments Inc 1111 Lakeside Drive Gurnee, IL 60031-4099 1-800-662-5822/847-855-0800 Fax: 847-855-6218 www.aerosinstruments.com
INSTALLATION INSTRUCTIONS
 INSTALLATION INSTRUCTIONS INDEX: UNPACKING INSTRUCTIONS page 2 INSTALLATION INSTRUCTIONS page 3 CONNECTIONS page 6 UNPACKING INSTRUCTIONS UNPACKING The model you have purchased can operate from left to
SERVICE/INSTALLATION MANUAL ICE ONLY DISPENSERS MODELS-IOD150, IOD200 AND IOD250
 SERVICE/INSTALLATION MANUAL ICE ONLY DISPENSERS MODELS-IOD150, IOD200 AND IOD250 Ice-O-Matic 11100 East 45th Ave Denver, Colorado 80239 Part Number 9081305-01 Date 10/08 Introduction IOD150,IOD200,IOD250
INSTALLATION INSTRUCTIONS
 INSTALLATION INSTRUCTIONS PROFESSIONAL RANGE MODELS 24 ALL GAS, CONVECTION WITH OPEN BURNERS** 24 NATURAL GAS MODEL *TN480-7BW **THESE MODELS ARE FIELD CONVERITBLE FOR LP/PROPANE GAS.** 24 LP/PROPANE GAS
Installation & Operating Guide
 5-036 HOT WATER TANK Installation & Operating Guide Read all instructions thoroughly. Keep this guide for future reference. Proof of purchase is required for Warranty. Staple receipt or proof of purchase
bc14g combi oven serial numbers with iw/ix/iz/jg/jo
 bcg combi oven REPLACEMENT PARTS LIST serial numbers with iw/ix/iz/jg/jo Effective february 0, 05 Superseding All Previous Parts Lists. The Company reserves the right to make substitution in the event
DISHWASHER INSTALLATION INSTRUCTIONS
 DISHWASHER INSTALLATION INSTRUCTIONS IMPORTANT! Read all of these instructions before installing the dishwasher. AUTOMATIC HIGH LOOP The drain hose is fastened to the back of the machine at the best height.
I N S T R U C T I O N S
 INSTRUCTIONS HIPPO Deluxe Room Steam Vaporiser Congratulations on your purchase of the HIPPO Deluxe Room Steam Vaporiser. Before using this appliance, read the following instructions carefully as they
hinged tops or hinged doors.
 With a Cyber-Jet conveyorized parts washer you get quality, elegance, and flexibility. Three(3) module C-14 system ( wide conveyor belt) Typical of C-24, C-36, and C-48 systems (,, wide conveyor belts)
COPPER FREESTANDING TUB
 COPPER FREESTANDING TUB INSTALLATION INSTRUCTIONS AND CARE GUIDE CONTENTS Tub Installation...2 Rough-In...2 Drain Installation...3 Drain without Overflow...3 Waste and Overflow Drain...3 Trimming Drain
TITAN VI High Efficiency Water Conditioner Installation and Operation Manual
 TITAN VI High Efficiency Water Conditioner Installation and Operation Manual Manufacturer s Warranty Holts Water Conditioning 369 South Mountainway Drive Orem, UT 84058 801-426-9243 To the original purchaser,
Elite Primer Baldor Series External Pond Pump
 Elite Primer Baldor Series External Pond Pump ( 5250PPB21, 6440PPB23, 7550PPB26, 9600PPB28) Installation and User s Guide IMPORTANT SAFETY INSTRUCTIONS, READ AND FOLLOW ALL INSTRUCTIONS. SAVE THESE INSTRUCTIONS
ARIN THERMOSTATIC SHOWER SYSTEM
 ARIN THERMOSTATIC SHOWER SYSTEM INSTALLATION INSTRUCTIONS Before installing, read entire shower system installation instructions. Observe all local building and safety codes. For the following installation
SERVING CANADA INSTALLATION INSTRUCTIONS REVISED: AUGUST 2014
 SERVING CANADA INSTALLATION INSTRUCTIONS REVISED: AUGUST 2014 INDEX: UNPACKING INSTRUCTIONS page 2 INSTALLATION INSTRUCTIONS page 3 CONNECTIONS page 6 Equipment must be installed in compliance with all
MIST MAX MODEL MM2400. Important: Installation and Operation Manual
 MIST MAX MODEL MM2400 Installation and Operation Manual TM Important: This manual contains specific cautionary statements relative to worker safety. Read this manual thoroughly and follow as directed.
Clean Water Made Easy. CWS Time Clock Softener Installation & Start Up Guide. Questions?
 Clean Water Made Easy www.cleanwaterstore.com CWS Time Clock Softener Installation & Start Up Guide Thank you for purchasing a Clean Water System! With proper installation and a little routine maintenance
Installation GUIDE VDWU524SS VDWU524WSSS FDWU524WS FDWU524 VDWU324SS FDWU324
 Installation GUIDE VDWU524SS VDWU524WSSS FDWU524WS FDWU524 VDWU324SS FDWU324 To prevent accidents, which could cause serious injury or death, as well as machine damage read these instructions before installation
OPERATING and MAINTENANCE INSTRUCTIONS Models: H138NPSCLCMCQRL Merchandising Hot Cabinets
 Rev. (/) Page of 0 OPERATING and MAINTENANCE INSTRUCTIONS Models: H8NPSCLCMCQRL Merchandising Hot Cabinets Cabinet model number: Cabinet serial number: Authorized Service Agency: Ph: Fax: Keep this manual
ECS Protector Dry SMART Vent - PSV-D (PSV-DE) Specifications
 Specifications") ECS PROTECTOR ECS Protector - PSV-D (PSV-DE) Specifications Stock Number : Service Pressure: System Connection: Electrical Connection: Temperature Range: Dimensions Vent Assembly: For use under U.S. Patents
ECS PROTECTOR ECS Protector - PSV-D (PSV-DE) Specifications Stock Number : Service Pressure: System Connection: Electrical Connection: Temperature Range: Dimensions Vent Assembly: For use under U.S. Patents
SUKI. Dehumidifier WDH-928DB -20R. User s Manual
 SUKI Dehumidifier WDH-928DB -20R User s Manual Lion Healthcare PO Box 566, Cottesloe, WA, 6911 Phone 1800 011 653 Email sales@salinplus.com www.salinplus.com Contents Structure and principle Features...3
Cascade Premier and Elite Premier Bathing Systems with Aqua-Aire Installation / Assembly Instructions
 Cascade Premier and Elite Premier Bathing Systems with Aqua-Aire Installation / Assembly Instructions Premier Elite Premier PENNER PATIENT CARE, INC Box 523 / 102 Grant St. Aurora, NE 68818 360745P Revision
Issue 4 Oct Panamatic Top loading Maxi & Optima 3 Installation
 Issue 4 Oct 2005 Panamatic Top loading Maxi & Optima 3 Installation Please Do handle the unit with care, to avoid scuffs and scratches during installation. Do not over-tighten plumbing or any other mechanical
Planning and Design Guide 2002 Vrs 2.0
 Planning and Design Guide 2002 Vrs 2.0 DISHWASHERS WASHERS DRYERS ACCESSORIES INSTALLATION S Dimensions & Technical Data D1706...2 D1716...3 D1776...4 D1976...5 Changing Standard Front Panels...6 D1796FI
HydroFlux Welder Torch System T0-102 / T0-103
 HydroFlux Welder Torch System T0-102 / T0-103 Setting Up The HydroFlux 1. Location - The HydroFlux Welder must be placed on a level surface with adequate ventilation. We recommend a minimum of 4 inches
INSTALLATION INSTRUCTIONS
 INSTALLATION INSTRUCTIONS INSTALLATION REQUIREMENTS Tools and Parts Gather required tools and parts before starting installation. Tools needed: Optional tools: Flashlight Options: Bucket Pedestal: You
Electrical cable Water supply tube Fittings for tube Coupler Teflon tape. Hole saw min. 2½" bit
 Installation Parts and Tools Parts not Provided Electrical cable Water supply tube Fittings for tube Coupler Teflon tape Air gap Wire nuts for 6-gauge wiring Hose clamp ⅞" UL approved strain relief Electrical
ECONO FLO 2.7HP VARIABLE SPEED PUMP OWNER S MANUAL
 ECONO FLO 2.7HP VARIABLE SPEED PUMP OWNER S MANUAL IMPORTANT SAFETY INSTRUCTIONS READ AND FOLLOW ALL INSTRUCTIONS SAVE THESE INSTRUCTIONS WARNING: Before installing this product, read and follow all warning
BURWELL BIDET TOILET SEAT INSTALLATION
 BEFORE YOU BEGIN We recommend consulting a professional if you are unfamiliar with installing plumbing fixtures. Signature Hardware accepts no liability for any damage to the product, plumbing, toilet,
TITAN Pro-Max High Efficiency Upflow Water Conditioner Installation and Operation Manual
 TITAN Pro-Max High Efficiency Upflow Water Conditioner Installation and Operation Manual TITAN VI Pro-Max Manufacturer s Warranty Holts Water Conditioning 369 South Mountainway Drive Orem, UT 84058 801-426-9243
INSTALLATION INSTRUCTIONS REVISED: JUNE 2014
 INSTALLATION INSTRUCTIONS REVISED: JUNE 2014 INDEX: UNPACKING INSTRUCTIONS page 2 INSTALLATION INSTRUCTIONS page 3 CONNECTIONS page 6 Equipment must be installed in compliance with all applicable local
Bench Series Ovens Models 21 / 31 / 51 Operating Manual
 Heat cycle HEATER SWITCH RECIRC. FAN Quincy Lab, Inc. Bench Series Ovens Models 21 / 31 / 51 Operating Manual Standard Contents (1) Bench Series Oven (2) Adjustable chrome wire shelf (4) Shelf brackets
Rev B, 9/2/2009. Kodiak Chiller Overview
 930-0001 Rev B, 9/2/2009 Kodiak Chiller Overview Presentation Outline Phone: 781-933-7300 Lytron Technical Support Contact Information 3 Introduction 4 Part I: Unpacking 5 Part II: Installation 7 Part
OPERATING MANUAL MODEL AIR 1500TM AIR DRYER
 OPERATING MANUAL MODEL AIR 500TM AIR DRYER Puregas, LLC 226-A Commerce St. Tel: 800-52-535 Broomfield, Colorado Fax: 303-657-2205 P/N P0255 REV A, 02/9/4 TABLE OF CONTENTS.0 GENERAL... 3 2.0 SPECIFICATIONS...
BC14G SERIES SERIAL NUMBERS WITH IW/IX/IZ/JG/JO REPLACEMENT PARTS LIST. EFFECTIVE March 20, 2006
 BCG SERIES SERIAL NUMBERS WITH IW/IX/IZ/JG/JO REPLACEMENT PARTS LIST EFFECTIVE March 0, 00 BLODGETT OVEN COMPANY, Lakeside Avenue, Burlington, Vermont 050 USA Telephone: (0) 0-700 (00) -5 Fax: (0) 0-7