BeneVision Central Monitoring System. Quick Reference Guide
|
|
|
- Barnard Cooper
- 5 years ago
- Views:
Transcription

1 BeneVision Central Monitoring System Quick Reference Guide
2 NOTE: The Quick Reference Guide is not intended as a replacement to the Operating Instructions. Prior to operating equipment, the user must be familiar with the Operating Instructions Manual contents. This document is a guideline only to be used as an aid to comprehensive Inservice Training. The function with the * symbol indicates configurable settings.
3 Table of Contents Multibed (Main) Screen... 1 Quick Keys...3 Set Password for Remote Control...4 Admit Monitoring Devices...5 Move An Assigned Device from One Patient Tile to Another*...5 Configure Multibed (Main) Screen Layout... 6 Patient Setup... 7 Patient Management Screen...7 Enter Patient Information Using Hospital Database (ADT Query)*...7 Import Discharged Patient Information...8 Assign A Care Group...9 Transfer Patient Data Discharge A Patient* Standby Enter Standby...12 Change Patient Location in Standby...12 Exit Standby...12 Alarms Adjust Alarm Limits...13 Adjust Alarm Responses...14 Adjust Arrhythmia Alarms...16 Reset Alarms*...17 Pause Alarms...18 Acknowledge Latched Alarms...18 Print Real-Time Waveforms NIBP Measurement* Start An NIBP Measurement...20
4 Table of Contents (cont'd) Set An NIBP Measurement Interval...20 Stop An NIBP Measurement...21 Alternate Operating Modes* Night Mode...21 Privacy Mode...22 ViewBed Screen Enter the ViewBed Screen...25 Adjust ViewBed Screen Layout...25 History View and Print Tabular Trends...27 View and Print Graphic Trends...28 View and Print Events...30 View and Print Full Disclosure...34 Caliper Measurement...37 View and Print 12-Lead ECG Analysis Reports...40 View and Print Arrhythmia Statistic Reports...41 Remote CentralStation View* Assign A Remote Patient to A Tile on the CentralStation...42 Clear an Overview Bed...43 Paging*

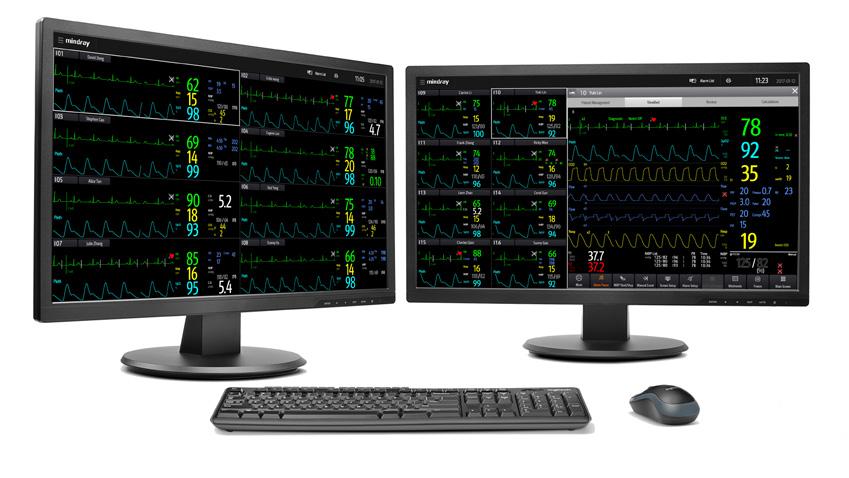
5 The BeneVision Central Monitoring System (hereinafter referred to as the CMS) mainly consists of CentralStation and WorkStation. The CentralStation can admit Mindray physiological monitoring devices via wired or wireless connection. It can display, store, print, and review the patient clinical data from 32 compatible monitoring devices. The WorkStation can display and manage patients with monitoring devices assigned from the designated CentralStation. MULTIBED (MAIN) SCREEN The CentralStation/WorkStation displays the multibed (main) screen where multiple patients are monitored collectively. The multibed (main) screen displays multiple patients across one or more displays on the CentralStation/ WorkStation

6 1. System menu Select to access a drop down menu for advanced operations. 2. Hospital information and system alarm messages Displays the hospital information and system alarm notifications. Select to review a list of all current system alarm messages. 3. Alarm list Select to view of all physiological and technical alarms for all monitoring devices on the CentralStation/WorkStation. 4. Print button Select to access the system wide printing information including Print summary and Print Queue functions. 5. System time and date 6. Patient tile Displays patient information, including patient demographics, patient alarms, real-time parameters and waveforms. Each patient tile displays the information from one monitoring device at a time. 7. Bed number Select (for example) to access more operations for the patient. 8. Patient information Select to enter and modify patient demographics. 9. Multibed (main) screen 10. Extended screen 2
7 Quick Keys Symbol Function Symbol Function Shows more quick Enters the Screen More keys. Screen Setup Setup menu. Enters the Alarm Acknowledges Alarm Setup menu. Alarm Reset ongoing alarms for the duration of the alarm. Pauses the current Return to the Alarm Pause alarms for a preconfigured Main Screen multibed screen. time. Starts or Enters the standby NIBP Start/Stop stops an NIBP measurement. Standby mode. Views all ECG Freezes ECG Full-Screen waveforms. Freeze waveforms. Enters the Load Displays the Load Config Config menu. Minitrends Minitrends screen. Enters the Sends a message Parameters Setup Parameters Setup menu. Send Message to the TM80. Prints a real-time Opens the Print Print report. Print Setup Setup menu. * Enables the * Enables the night Privacy Mode privacy mode. Night Mode mode. 3
8 Set Password for Remote Control The System Setup menu on the multibed (main) screen provides the clinician a permission to control bedside monitors or telemetry devices from the CentralStation/WorkStation. To set remote control on the CentralStation/WorkStation: 1. Select on the multi (main) screen. 2. Select System Setup from the drop down list. 3. Select the Other tab. 4. Select the Remote Control tab. 5. Select Read Only: to only view information from the monitors or telemetry devices. No Password: to control monitors or telemetry devices remotely. No password is required. Local Password: to change the settings of alarms from the monitors or telemetry devices. This includes alarm settings, arrhythmia settings, pausing and resetting alarms. A password is required. User Password: to change the settings of alarms from the monitors or telemetry devices. This includes alarm settings, arrhythmia settings, pausing, and resetting alarms. The user name and password saved in the MLDAP server are required. 4
9 Admit Monitoring Devices To admit monitoring devices on the multibed (main) screen: 1. Select an empty (unoccupied) patient tile with on the multibed (main) screen to access the Device Assignment screen. 2. Select the desired department from the drop down list beside Department. Local: to display monitoring devices on the local CentralStation. Department where a remote CentralStation is located: to display monitoring devices on a remote CentralStation. 3. Select beside the desired monitoring device to admit this device. If more than one device require admission, select the next desired patient tile and repeat the above steps. NOTE: A monitoring device can be admitted to any CentralStation, but only one CentralStation at a time. Move An Assigned Device from One Patient Tile to Another* To move an assigned device from one patient tile to another patient tile on the multibed (main) screen: 1. Select (for example) in the desired patient tile. 2. Select Move Position to.. 3. Select the desired patient tile from the drop down list. NOTE: Moving an assigned device only changes its location, it does not change the patient information, but it preserves all patient data. 5
10 Configure Multibed (Main) Screen Layout The Screen Setup menu on the multibed (main) screen allows the clinician to modify the screen layout, and display layout of parameters or waveforms in the patient tile. To configure the multibed (main) screen layout: 1. Select (for example) in the desired patient tile. 2. Select Screen Setup from the drop down list. 3. Select the Choose Screen tab and select the desired option. Normal Screen: to display real time parameters and waveforms. Big Numerics: to display parameters in big font size. To change the display layout of parameters and waveforms in the patient tile: 1. Select (for example) in the desired patient tile. 2. Select Screen Setup from the drop down list. 3. Select the Tile Layout tab. Select the waveform area and select the desired waveform from the drop down list. Select the parameter tile and select the desired parameter from the drop down list. NOTE: The parameters and waveforms in the Tile Layout tab are a superset and not dependent on a specific monitoring device. If a parameter or waveform is not supported by the monitoring device, it cannot be displayed on the multibed (main) screen. 6
11 PATIENT SETUP Patient Management Screen The Patient Management screen allows the clinician to enter and modify patient demographics. To enter the patient information on the CentralStation/WorkStation: 1. Select the Patient Management tab from the ViewBed screen, the Review screen or the Calculation screen. 1. Select (for example) in the desired patient tile, and select (patient category icon). 2. Enter the patient information using on-screen or external keyboard. 3. Select Save. Enter Patient Information Using Hospital Database (ADT Query)* When connected to a hospital database, patient information can be queried or imported into the CentralStation/WorkStation. To enter patient information using a hospital database: 1. Select the Patient Management tab from the ViewBed screen, the Review screen or the Calculation screen. 1. Select (for example) in the desired patient tile, and select (patient category icon). 2. Select the Find Patient button. 3. Select the ADT tab. 4. Input query criteria. 5. Select. 6. Select beside the desired patient to import patient information to the CentralStation/WorkStation. 7
12 NOTE: The ADT tab is available only when the ADT feature is enabled. Refer to BeneVision Central Monitoring System Operator's Manual for complete details. Import Discharged Patient Information To readmit a previously discharged patient: 1. Select the Patient Management tab from the ViewBed screen, the Review screen or the Calculation screen. 1. Select (for example) in the desired patient tile, and select (patient category icon). 2. Select Find Patient. 3. Select the Discharged Patients tab. 4. Input query criteria. 5. Select. 6. Select beside the desired patient. 7. Select History Data to merge the patient demographic information and history data into current data for this patient. 8. Select OK to confirm. 8
13 Assign A Care Group The care group function allows assigning a patient to a defined care group. Care groups may include departments, care givers, Code Status Identification, or other facility defined groups. To assign a care group: 1. Select the Patient Management tab from the ViewBed screen, the Review screen or the Calculation screen. 1. Select (for example) in the desired patient tile, and select (patient category icon). 2. Select beside Care Group. 3. Scroll and select the desired care group. 4. Select OK to confirm. After assigning a care group to a bed, (for example) in the desired patient tile is filled with the assigned care group's color. NOTE: If the monitoring devices are fixed in the tile, the care group remains assigned upon patient discharge. If the monitoring devices are flexible in the tile, the care group is removed upon discharge. 9
14 TRANSFER PATIENT DATA The Transfer function allows the clinician to move patient information from one monitoring device to another monitoring device. To transfer patient data from one monitoring device to another monitoring device on a same CentralStation/WorkStation: 1. Select the Patient Management tab from the ViewBed screen, the Review screen or the Calculation screen. 1. Select (for example) in the desired patient tile, and select (patient category icon). 2. Select Transfer Patient and select Local from the destination department. 3. Scroll and select the desired bed/room number from the Select the destination bed list. 4. Select OK to confirm. To transfer patient data from one CentralStation/WorkStation to a different CentralStation: 1. Select the Patient Management tab from the ViewBed screen, the Review screen or the Calculation screen. 1. Select (for example) in the desired patient tile, and select (patient category icon). 2. Select Transfer Patient and select Other from the destination department. 3. Scroll and select the desired bed/room number from the Select the destination bed list. 4. Select OK to confirm. 10
15 Data transfer time depends on the amount of data stored on the patient. Once the transfer is completed, the source patient tile is displayed Discharged. The Transferring Data... xx message is displayed in the alarm information area of the destination patient tile, indicating merging patient data from the source to the destination patient tile is in progress. NOTE: To ensure data preservation during transfer, the system date and time at the Central Station/Workstation should be consistent. To ensure patient safety, monitor the patient at the source and destination beds during transfer. DISCHARGE A PATIENT* Discharging a patient clears all patient information, places the patient in the Discharged Patients list, and restores default (preset) settings. Patients can be discharged from the CentralStation/WorkStation, a bedside monitor, or from a TD60/TM80 telemetry monitor. For complete details on discharging a patient from the monitoring bedside devices, refer to the corresponding operator's manual. To discharge a patient from the CentralStation/WorkStation: 1. Select the Patient Management tab from the ViewBed screen, the Review screen or the Calculation screen. 1. Select (for example) in the desired patient tile, and select (patient category icon). 2. Select Discharge Patient. 3. Select Print End Case Report if desired. 4. Enable Standby if desired. 5. Select OK to confirm. 11
16 STANDBY Enter Standby The Standby function allows the clinician to suspend monitoring on a patient. While in standby, the patient is not monitored; however, all data and settings are preserved. To place a patient into Standby at the CentralStation/WorkStation: 1. Select (for example) in the desired patient tile. 2. Select from the drop down list. 3. Select Location to define the patient location while in standby. 4. Select OK to confirm. NOTE: Standby can also be enabled from bedside device. Change Patient Location in Standby To change the patient s location while in standby mode, select the current location from the Standby screen, scroll and select the new location. Exit Standby To resume monitoring and exit standby: 1. Select Resume Monitor in the patient tile. 1. Select (for example) in the desired patient tile. 2. Select from the drop down list. 12
17 ALARMS Adjust Alarm Limits The Alarm menu allows the clinician to configure alarm limits of all parameters and the responses of the CentralStation/WorkStation when an alarm occurs. To adjust an alarm limit through the Alarm menu: 1. Select (for example) in the desired patient tile. 2. Select Alarm Setup from the drop down list. 3. Select the Limits tab. 4. Select the desired parameter. 5. Scroll and select a desired value for the high or low limit. To adjust an alarm limit through a parameter's setup menu: 2. Select a numeric or waveform of the desired parameter. 3. Select the Alarm tab. 4. Scroll and select a desired value for the high or low limit. NOTE: Alarm limits changed on the CentralStation will also be changed on the WorkStation or the bedside monitor. 13
18 Adjust Alarm Responses To adjust the alarm responses through the Alarm menu: 1. Select (for example) in the desired patient tile. 2. Select Alarm Setup from the drop down list. 3. Select the Limits tab. 4. Select the desired parameter. 5. Select Alarm Outputs and select the desired option: Off: to disable the alarm outputs. Paging: to send alarm information to a configured paging device when an alarm is triggered. Print: to send alarm information to a configured printer and print out when an alarm is triggered. All: to send alarm information to configured paging device and print out when an alarm is triggered. 14
19 To adjust the alarm responses through a parameter's setup menu: 2. Select a numeric or waveform of the desired parameter. 3. Select the Alarm tab. 4. Select Alarm Outputs and select the desired option: Off: to disable the alarm outputs. Paging: to send alarm information to a configured paging device when an alarm is triggered. Print: to send alarm information to a configured printer and print out when an alarm is triggered. All: to send alarm information to configured paging device and print out when an alarm is triggered. NOTE: If alarm settings configured are remotely controlled, alarm settings cannot be changed at the CentralStation/WorkStation. is displayed beside a parameter s alarm on/off option for indicating this limitation. 15
20 Adjust Arrhythmia Alarms To adjust a patient's alarm arrhythmia alarm through the Alarm menu: 1. Select (for example) in the desired patient tile. 2. Select Alarm Setup from the drop down list. 3. Select the Arrhythmia tab. 4. Scroll and select individual arrhythmia. 5. Set alarm properties. On/Off: to enable or disable arrhythmia alarm notification Priority: to adjust the level of the alarm. Alarm Outputs: to enable or disable automatic functions when an alarm occurs. For details on each option, refer to Adjust Alarm Responses section for complete details. To adjust a patient's alarm arrhythmia alarm through the ECG menu: 2. Select a numeric or waveform of ECG. 3. Select the Arrhythmia tab. 4. Scroll and select individual arrhythmia. 5. Set alarm properties. On/Off: to enable or disable arrhythmia alarm notification Priority: to adjust the level of the alarm. 16
21 Alarm Outputs: to enable or disable automatic functions when an alarm occurs. For details on each option, refer to Adjust Alarm Responses section for complete details. Reset Alarms* To reset alarms (silence) on a patient: 1. Select (for example) in the desired patient tile. 2. Select from the drop down list. Select in the desired patient tile. Select Alarm Reset (hard key or quick key) on the monitoring device. NOTE: If a new alarm is triggered after an alarm is reset, the visual and audible alarm indications will be activated. 17
22 Pause Alarms To pause all alarms for a pre-configured period: 1. Select (for example) in the desired patient tile. 2. Select from the drop down list. Once the alarm pause time lapses, all alarms are automatically reactivated. Alarms can be reactivated before time lapses by selecting (quick key) a second time. Acknowledge Latched Alarms Lethal alarms can be latched and must be acknowledged even if the alarm condition is resolved. Latched alarms can be acknowledged by selecting (quick key). For details on resetting alarms, refer to Reset Alarms section for complete details. NOTE: A unacknowledged, latched alarm continues to alarm (audio and visual notifications) on the patient even after the alarm condition has been resolved. 18
23 PRINT REAL-TIME WAVEFORMS To print an All Strips Report of current waveform(s) on a patient at the CentralStation/WorkStation: 1. Select (for example) in the desired patient tile. 2. Select Print from the drop down list. To adjust the waveforms printed on the patient at the CentralStation/ WorkStation: 3. Select the Normal Report tab. 4. Select the Realtime Report tab. 5. Select Current Waveforms: to print the displayed waveforms. Selected Waveforms: to print the selected waveforms. NOTE: Waveform print selection on the CentralStation/WorkStation is independent. 19
24 NIBP MEASUREMENT* Start An NIBP Measurement To start an NIBP measurement on a patient: 1. Select (for example) in the desired patient tile. 2. Select NIBP Start/Stop from the drop down list. WARNING: Before starting an NIBP measurement, make sure that the patient category on the monitoring device is correct and the NIBP cuff size is appropriate for this patient. Set An NIBP Measurement Interval In addition to starting and stopping and an NIBP measurement on a monitoring device, automatic NIBP measurements (intervals) can be set. The NIBP measurements will be automatically repeated at a pre-configured interval. To set an NIBP measurement interval on a patient: 2. Select the NIBP numerics. 3. Select the Setup tab. 4. Set Interval to the desired option. 20
25 Stop An NIBP Measurement To stop the proceeding measurement: 1. Select (for example) in the desired patient tile. 2. Select NIBP Start/Stop from the drop down list. ALTERNATE OPERATING MODES* This section only describes how to enable the following operating modes at the CentralStation/WorkStation only. For details on how to set remote control for these modes, refer to BeneVision Central Monitoring System Operator's Manual for complete details. Night Mode To enter night mode: 1. Select (for example) in the desired patient tile. 2. Select Night Mode from the drop down list. 3. Select the current bedside monitor or all the bedside monitors. 4. Select OK to confirm. The symbol is displayed in the desired patient tile in night mode. 21
26 To exit night mode: 1. Select (for example) in the desired patient tile. 2. Select Night Mode from the drop down list. 3. Select the current bedside monitor or all the bedside monitors. 4. Select OK to confirm. NOTE: The night mode can be enabled on the bedside monitor connected to the CentralStation/WorkStation. If the bedside monitor in night mode is disconnected from the CentralStation/WorkStation, night mode will automatically be disabled. Privacy Mode Privacy mode does not display patient information and monitoring data at the bedside monitor. In privacy mode, the bedside monitor continues monitoring the patient, but patient data is only visible at the CentralStation/ WorkStation. To enter privacy mode: 1. Select (for example) in the desired patient tile. 22
27 2. Select Privacy Mode from the drop down list. 3. Select the current bedside monitor or all the bedside monitors. 4. Select OK to confirm. The symbol is displayed in the desired patient tile. WARNING: In privacy mode, all audible alarms are suppressed and the alarm light is deactivated at the bedside monitor. Alarms are presented only at the CentralStation/WorkStation. To exit privacy mode: 1. Select (for example) in the desired patient tile. 2. Select Privacy Mode from the drop down list. 3. Select the current bedside monitor or all the bedside monitors. 4. Select OK to confirm. NOTE: The privacy mode can be enabled on the bedside monitor connected to the CentralStation/WorkStation. If the bedside monitor in privacy mode is disconnected from the CentralStation/WorkStation, privacy mode will automatically be disabled. 23

28 VIEWBED SCREEN The ViewBed screen provides a more detailed view of a single patient s information Patient category symbol 2. Bed list icon Select to view a bed list for all local patients at the CentralStation/ WorkStation or remotely monitored patients. 3. Bed number 4. Technical alarm information area 5. Physiological alarm information area 6. Alarm status symbol 24
29 7. Close button Select to return to the multibed (main) screen. 8. Parameter area Displays parameter values, alarm limits, and alarm status. Selecting a parameter opens the corresponding parameter's menu. 9. Waveform area Displays the parameter's waveforms. Selecting a waveform opens the corresponding parameter's menu. 10. Quick key area Select to access commonly used functions. Enter the ViewBed Screen To enter the ViewBed screen: Select in the desired patient tile from the multibed (main) screen. Select the parameter area or waveform area in the desired patient tile. Adjust ViewBed Screen Layout The Screen Setup menu on the ViewBed screen allows the clinician to modify the screen layout, and display layout of parameters or waveforms on the ViewBed screen. To configure the ViewBed screen layout: 3. Select the ViewBed Screen tab. 4. Select the Choose Screen tab and select the desired option. 25
30 Normal Screen: to display real time parameters and waveforms. Minitrends: to provide a split screen with continuously displayed graphic minitrends on left side beside real time waveforms and numeric parameters on the main display. OxyCRG: to provide a split screen with oxycrg (HR trend, SPO2 trend, and RR trend/rr waveform) on the lower portion of the display with real time waveforms and numeric parameters ECG Full-Screen: to display the ECG leads with numeric parameters on the main display. To adjust patient's displayed parameters or waveforms on the ViewBed screen: 3. Select the ViewBed Screen tab. 4. Select the Tile Layout tab and select the desired option. Select a desired parameter from the drop down list. Select a desired waveform from the drop down list. NOTE: The parameters and waveforms in the Tile Layout tab are a superset and not dependent on a specific monitoring device. If a parameter or waveform is not supported by the monitoring device, it cannot be displayed on the ViewBed screen. Display layout changes made to the multibed (main) screen and the ViewBed screen are independent. Changes to the screen settings are per patient. Once patient is discharged, departmental default (preset) configurations are restored. 26
31 HISTORY Patient historical data stored and able to be reviewed. The review screen provides several tabs to display patient numeric and waveform information. To review a current patient's historical data: 2. Select the Review tab from the ViewBed screen. To review a previously discharged patient's historical data: 1. Select on the multibed (main) screen. 2. Select Discharged Patients from the drop down list. 3. Select Detail for the desired patient. 4. Select the Review tab. View and Print Tabular Trends To view and print tabular trends at the CentralStation/WorkStation: 2. Select the Review tab from the ViewBed screen. 3. Select on the Review screen. 4. Select Tabular Trends from the drop down list. 5. Select. 6. Verify or adjust print setup options. 7. Select Print. 27
32 To adjust the amount and types of trends types displayed on the tabular trends page: 2. Select the Review tab from the ViewBed screen. 3. Select on the Review screen. 4. Select Tabular Trends from the drop down list. 5. Set Trend Group and select the desired option. 6. Set Interval and select the desired option. NOTE: The parameters displayed for Trend Group are dependent on the parameters available on monitoring device. View and Print Graphic Trends To view and print graphic trends at the CentralStation/WorkStation: 2. Select the Review tab from the ViewBed screen. 3. Select on the Review screen. 4. Select Graphic Trends from the drop down list. 5. Select. 6. Verify or adjust print setup options. 7. Select Print. 28
33 To adjust the amount of trends displayed on the graphic trends page: 2. Select the Review tab from the ViewBed screen. 3. Select on the Review screen. 4. Select Graphic Trends from the drop down list. 5. Set Trend Group and select the desired option. 6. Select Zoom and select the desired length of trend data displayed on the current screen. 8 min: displays eight minutes of trend data. Up to one hour of data can be viewed. 30 min, 1 hr, 2 hrs, 4 hrs: displays the selected length of trend data. Up to four hours of data can be viewed. 8 hrs, 12 hrs, 24 hrs, 48 hrs: displays the selected length of trend data. Up to 240 hours of data can be viewed. 7. Select Trends to adjust the number of parameter trended on the screen at a time. NOTE: Trend display selection on the Central Station/WorkStation is independent. 29
34 View and Print Events The event review page stores physiologic and technical events on a patient. To view events at the CentralStation/WorkStation: 2. Select the Review tab from the ViewBed screen. 3. Select on the Review screen. 4. Select Events from the drop down list. To print a list of all events: 2. Select the Review tab from the ViewBed screen. 3. Select on the Review screen. 4. Select Events from the drop down list. 5. Select. 6. Verify or adjust print setup options. 7. Select Print All Event List. 8. Select Print. To print a list of selected events: 2. Select the Review tab from the ViewBed screen. 3. Select on the Review screen. 4. Select Events from the drop down list. 5. Select the desired events. 30
35 6. Select. 7. Verify or adjust print setup options. 8. Select Print List of Selected Events. 9. Select Print. To view and print details of the selected event: 2. Select the Review tab from the ViewBed screen. 3. Select on the Review screen. 4. Select Events from the drop down list. 5. Select the desired events. 6. Select. 7. Verify or adjust print setup options. 8. Select Print Detail of Selected Events. 9. Select Print. To view and print details of the currently displayed event: 2. Select the Review tab from the ViewBed screen. 3. Select on the Review screen. 4. Select Events from the drop down list. 5. Double click a desired event. Select the desired event, and select Detail. 6. Select. 7. Verify or adjust print setup options. 8. Select Print Detail of Selected Events. 31
36 9. Select Print. To access options on a stored event in the events list: 2. Select the Review tab from the ViewBed screen. 3. Select on the Review screen. 4. Select Events from the drop down list. 5. Select the desired event. 6. Select. 7. Select the desired option. Lock: to lock the event manually. locked event cannot be deleted. beside an event indicates a Unlock: to unlock the event. Delete: to delete the event. Select All: to select all events in the events list. Cancel All: to cancel selecting all events in the events list. Rename: to rename an event (if enabled). Note: to allow a note to be saved and printed with the event. 32
37 To access options on a stored event in the detail event window: 2. Select the Review tab from the ViewBed screen. 3. Select on the Review screen. 4. Select Events from the drop down list. 5. Double click a desired event. Select the desired event, and select Detail. 6. Select. 7. Select the desired option. Lock: to lock the currently displayed event manually. event indicates a locked event cannot be deleted. beside an Unlock: to unlock the currently displayed event. Delete: to delete the event. Rename: to rename an event (if enabled). Note: to allow a note to be saved and printed with the event. Export to EMR: exports 20 seconds of waveform data. Refer to BeneVision Central Monitoring System Operator's Manual for complete details. 8. Perform caliper measurement. Refer to Caliper Measurement section for complete details. 33
38 View and Print Full Disclosure The full disclosure review page stores all waveforms and numeric information collected on a patient for a configured period. To view full disclosure data at the CentralStaion/WorkStation: 2. Select the Review tab from the ViewBed screen. 3. Select on the Review screen. 4. Select Full Disclosure from the drop down list. To change the displayed and stored disclosure data: 2. Select the Review tab from the ViewBed screen. 3. Select on the Review screen. 4. Select Full Disclosure from the drop down list. 5. Select Setup. 6. Select the Storage tab. 7. Select the desired waveforms. 8. Select the Display (Maximum: 3) tab. 9. Select the desired waveforms to be displayed. 34
39 To print all compressed waveforms of full disclosure: 2. Select the Review tab from the ViewBed screen. 3. Select on the Review screen. 4. Select Full Disclosure from the drop down list. 5. Select. 6. Verify or adjust print setup options. 7. Select Print Waveform Overview. 8. Select Print. To select the desired compressed waveform segments: 2. Select the Review tab from the ViewBed screen. 3. Select on the Review screen. 4. Select Full Disclosure from the drop down list. 5. Select Select. 6. Click the mouse, hold and drag it to select the desired waveform segment. 6. Touch the waveform and drag finger to select the desired waveform segment. 7. If multiple waveform segments are desired, repeat Step Select adjacent to the selected waveform to cancel the selection if needed. 9. Select Select to exit the selection function. 35
40 To print the selected compressed waveform segments: 2. Select the Review tab from the ViewBed screen. 3. Select on the Review screen. 4. Select Full Disclosure from the drop down list. 5. Select the desired compressed waveform segments. 6. Select. 7. Verify or adjust print setup options. 8. Select Print Overview of Selected Waveforms. 9. Select Print. To view and print details of the selected waveform segments: 2. Select the Review tab from the ViewBed screen. 3. Select on the Review screen. 4. Select Full Disclosure from the drop down list. 5. Select the desired waveform segments. 6. Select. 7. Verify or adjust print setup options. 8. Select Print Detail of Selected Waveforms. 9. Select Print. 36

41 To view and print details of a selected waveform segment: 2. Select the Review tab from the ViewBed screen. 3. Select on the Review screen. 4. Select Full Disclosure from the drop down list. 5. Select the desired waveform segment. 6. Select Detail or double click the desired compressed waveform. 7. Select. 8. Verify or adjust print setup options. 9. Select Print Displayed Waveform Detail. 10. Select Print. Caliper Measurement Caliper allows the ability to electronically measure ECG segment such as PR and QRS intervals. The caliper is available in event detail and full disclosure detail waveform at the CentralStation/WorkStation. PR, QRS, QT and R-R interval Measurement Real-time measurement Caliper arm Close button Caliper arm 37

42 ST Measurement Caliper arm Close button Real-time measurement Caliper arm To measure PR, QRS, QT and R-R interval: 1. Enter the event detail view or the full disclosure detail view. 2. Select Caliper. 3. Click the mouse at a place in the desired waveform area, hold and drag the mouse horizontally to the desired location. 4. Touch at a place in the desired waveform area, and drag the finger horizontally to the desired location. 5. Select PR, QRS, RR or QT from the Caliper menu to obtain the measured values. The QTc value is calculated after RR and QT value have been acquired. 6. Select Save: to save the caliper measurement values as a manual event in the event review page. Enter the name and comments as desired and select OK to confirm. Up to 32 characters can be entered. The measured values are displayed in the first ECG waveform and printed in the detail reports. Reset: to clear the measured values. 7. Select to exit the caliper window. 38
43 To measure ST: 1. Enter the event detail view or the full disclosure detail view. 2. Select Caliper. 3. Select ST. 4. Click the mouse at a place in the desired waveform area, hold and drag the mouse horizontally to the desired location. 5. Touch at a place in the desired waveform area, and drag the finger horizontally to the desired location. 6. Select Save: to save the caliper measurement values as a manual event in the event review page. Enter the name and comments as desired and select OK to confirm. Up to 32 characters can be entered. The measured values are displayed in the first ECG waveform and printed in the detail reports. Reset: to clear the measured values. 7. Select to exit the caliper window. To move the caliper: When displaying the caliper arms, point inside the caliper, select move the entire caliper. to When measuring PR, QRS, QT and R-R interval, select caliper horizontally. to move the When measuring ST, select to move the caliper. To adjust the caliper arms: When displaying a caliper, adjust the caliper arms to change the time difference between two points. When the caliper displays in the shape of, select or to move the caliper arm horizontally. When the caliper displays in the shape of, select or to move the caliper arm vertically. 39
44 View and Print 12-Lead ECG Analysis Reports The 12-lead ECG review page allows the clinician to view and print a 12-lead ECG analysis report. To view a 12-lead ECG analysis report: 2. Select the Review tab from the ViewBed screen. 3. Select on the Review screen. 4. Select 12-Lead ECG from the drop down list. 5. Select Speed to adjust the waveform speed. 6. Select Gain to adjust the waveform size. 7. Select Layout to adjust the waveform layout. 12 1: to display 12-lead ECG waveforms on one page in one column. 6 2: to display 12-lead ECG waveforms on one page in two columns, with 6 lines in each column : to display 12-lead ECG waveforms on one page in two columns, with 6 lines in each column, and one rhythm lead waveform at the bottom : to display 12-lead ECG waveforms on one page in 4 columns, with 3 lines in each column, and one rhythm lead waveform at the bottom : to display 12-lead ECG waveforms on one page in 4 columns, with 3 lines in each column, and three rhythm lead waveforms at the bottom. 40
45 To print a 12-lead ECG analysis report: 2. Select the Review tab from the ViewBed screen. 3. Select on the Review screen. 4. Select 12-Lead ECG from the drop down list. 5. Select. 6. Verify or adjust print setup options. 7. Select Print. View and Print Arrhythmia Statistic Reports The arrhythmia statistics page allows the clinician to view and print the statistics about the HR value and the number of each arrhythmia within a specific time period. To adjust time, view and print an arrhythmia statistic report: 2. Select the Review tab from the ViewBed screen. 3. Select on the Review screen. 4. Select Arrh Statistics from the drop down list. 5. Select Zoom to adjust length of time. 6. Select. 7. Verify or adjust print setup options. 8. Select Print. 41
46 REMOTE CENTRALSTATION VIEW* When there are multiple CentralStations on the network, a clinician can view other patients from a remote CentralStation. NOTE: An overview bed refers to the bed that is currently being monitored at a CentralStation from another CentralStation. Refer to BeneVision Central Monitoring System Operator's Manual for complete details. A clinician can view both real-time and historical patient data for patients monitored by a remote CentralStation in a patient tile or through the Viewbed screen. Assign A Remote Patient to A Tile on the CentralStation Patient tiles that do not currently have a bed or equipment assigned are available for selection. If the patient tile already has an overview bed, it must be cleared before assigning another bed. For details on how to clear an overview bed, refer to Clear an Overview Bed section for complete details. To assign a bed to be remotely viewed: 1. Select an empty (unoccupied) patient tile with on the multibed (main) screen to access the Device Assignment screen. 2. Select. 3. Select the desired department from the drop down list beside Department. 4. Select the desired patient. Once remote monitoring devices are assigned to the CentralStation, is displayed in the patient tile, indicating that these devices are from a remote CentralStation. 42
47 To view a patient from another CentralStation: 2. Select from the ViewBed screen. 3. Select. 4. Select the desired department from the drop down list beside Department. 5. Select the desired patient. Clear an Overview Bed When remote viewing is no longer required, the device can be removed from the multibed (main) screen. To clear an overview bed from the multibed (main) screen: 1. Select (for example) in the desired patient tile. 2. Select Clear Overview Bed. NOTE: Clearing the tile only clears the patient from view. It does not discharge the patient or remove the patient from the assigned CentralStation. 43
48 PAGING* The Paging window allows the configuration of pagers for the CentralStation/WorkStation. To access the Paging window: 1. Select on the multibed (main) screen. 2. Select Paging from the drop-down list. 3. Select OK to confirm. To add a pager: 1. Select the Pager Assignment tab in the Paging window. 2. Select Add a New Pager. 3. Enter the desired number in the Pager Number text box. 4. Enter the name of the person who will be responsible for the pager or some other identifying information In the Pager Assignment text box. 5. Select OK to confirm. NOTE: Pager numbers must be unique. If an existing pager number is entered, the message Pager Number already exists! Please enter a new number. is displayed. To assign an online bed to a pager: 1. Select the Pager Assignment tab in the Paging window. 2. Select beside the desired pager from the Pager List. 3. Select Add Online Bed. 4. Select the desired bed from the bed list. 5. Select OK to confirm. NOTE: An online bed refers to a bed that has been already admitted to the BeneVision CMS. 44
49 To assign a manually input bed to a pager: 1. Select the Pager Assignment tab in the Paging window. 2. Select beside the desired pager from the Pager List. 3. Select the Add Bed Manually button. 4. Enter the desired bed number in the Bed No text box. 5. Select OK to confirm. To remove a bed assignment: 1. Select the Pager Assignment tab in the Paging window. 2. Select a pager from the Pager List. 3. Select the desired bed. 4. Select. To remove a pager: 1. Select the Pager Assignment tab in the Paging window. 2. Select beside the desired pager from the Pager List. 3. Select the Delete button. The Are you sure you want to delete this pager and all its assignments? question dialog box is displayed. 4. Select OK to confirm. To edit a pager: 1. Select the Pager Assignment tab in the Paging window. 2. Select beside the desired pager from the Pager List. 3. Select the Modify button. 4. Edit the pager information. The Pager Number and Pager Assignment are required fields. 5. Select OK to confirm. To resend a page that failed: 1. Select the Failed Pages tab in the Paging window. 2. Select a failed page from the list box. If a clinician want to select all the failed pages, select Select All. 45
50 To print a Paging report: 1. Select the Pager Assignment tab in the Paging window. 2. Select. 46
51 Mindray DS USA, Inc. 800 MacArthur Boulevard, Mahwah, New Jersey USA Tel: , ( 2. 0 )
Passport 12m and Passport 17m BEDSIDE MONITOR GUIDELINE 5.21 Software Version NAME: HOSPITAL: DATE: VALIDATOR: Performed
 Passport 12m and Passport 17m BEDSIDE MONITOR GUIDELINE 5.21 Software Version This document is a guideline only to be used as an aid to comprehensive Inservice training. NAME: HOSPITAL: DATE: VALIDATOR:
T1 BEDSIDE MONITOR GUIDELINE
 APPENDIX A T1 BEDSIDE MONITOR GUIDELINE 5.23 Software Version This document is a guideline only to be used as an aid to comprehensive Inservice training. NAME: HOSPITAL: DATE: VALIDATOR: A. OVERVIEW 1.
BeneVision TM80 Telemetry Monitor
 Telemetry Monitor Note: The TM80 is not intended as a replacement to the Operating Instructions. Prior to operating equipment, the user must be familiar with the Operating Instructions Manual contents.
Clinical Information Center Pro v5 (CIC Pro)
") GE Healthcare Clinical Information Center Pro v5 (CIC Pro) Participant Reference Guide Clinical Systems Clinical and Educational Development Welcome We would like to take a moment to thank you for choosing
GE Healthcare Clinical Information Center Pro v5 (CIC Pro) Participant Reference Guide Clinical Systems Clinical and Educational Development Welcome We would like to take a moment to thank you for choosing
T1 Monitor/Module Default Settings
 Hospital, City, ST Department Clinical/Sales/Service Representatives Date Software Version Signature,Title Maintenance System time Date format: Time format: 12 24 Manage Config Department: General Select
i-vu CCN 4.0 Owner s Guide
 i-vu CCN 4.0 Owner s Guide CARRIER CORPORAION 2007 A member of the United echnologies Corporation family. Stock symbol UX. 11-808-377-01 07/07 able of Contents ACCESSING YOUR SYSEM... 3 YOUR SYSEM DEAILS...
Vital Signs Monitor. Operator s Manual
 Vital Signs Monitor Operator s Manual Copyright 2013-2014 Shenzhen Mindray Bio-Medical Electronics Co., Ltd. All rights reserved. For this Operator s Manual, the issue date is October 2014. Accutorr 7
T1 Patient Monitor. Operator s Manual
 T1 Patient Monitor Operator s Manual Copyright 2014 Shenzhen Mindray Bio-Medical Electronics Co., Ltd. All rights reserved. For this Operator s Manual, the issue date is November 2014. WARNING Federal
General Skills. yes. Device controls, buttons, indicators, and connectors
 HeartStart MRx Skills Checklist This checklist assesses qualified medical personnel s understanding of MRx operation after instructor-based training. Perform a quick skills assessment using the General
80BPM 36.5 C 35/ / 80. Panorama CENTRAL MONITORING SYSTEM. efficient flexible versatile (18) (94) Adult A SMITH, ERICA (92) 5RPM.
 (94) Adult A SMITH, ERICA (92) 5RPM.") Panorama CENTRAL MONITORING SYSTEM 5RPM 78 (92) 80BPM SMITH, ERICA mmhg 35/ 20 (18) 36.5 C mmhg Adult 1427 - A 120/ 80 (94) 1 mmhg efficient flexible versatile Focused on clinical efficiency, the Panorama
Panorama CENTRAL MONITORING SYSTEM 5RPM 78 (92) 80BPM SMITH, ERICA mmhg 35/ 20 (18) 36.5 C mmhg Adult 1427 - A 120/ 80 (94) 1 mmhg efficient flexible versatile Focused on clinical efficiency, the Panorama
Table of Contents. i-vu CCN Standard 4.2
 i-vu CCN Standard 4.2 Owner's Guide CARRIER CORPORATION 2009 A member of the United Technologies Corporation family Stock symbol UTX Catalog No. 11-808-381-01 7/13/2009 Table of Contents Accessing your
Monitoring Operator Guide. Access Control Manager Software Version
 Monitoring Operator Guide Access Control Manager Software Version 5.10.10 2018, Avigilon Corporation. All rights reserved. AVIGILON, the AVIGILON logo, ACCESS CONTROL MANAGER, ACM, ACM VERIFY AND TRUSTED
Nellcor Bedside SpO 2 Patient Monitoring System, PM100N
 Nellcor Bedside SpO 2 Patient Monitoring System, PM100N In-Service Presentation Nellcor Bedside SpO 2 Patient Monitoring System is CE marked and commercially av ailable in European Union countries. Nellcor
Procidia iware AlarmWorX32. AlarmWorX32 Viewer January 2010
 Procidia iware AlarmWorX32 AlarmWorX32 Viewer Siemens Protection AG 2008. notice All / Copyright rights reserved. notice Introduction / Contents Procidia iware is an operator interface software designed
imec8 Vet Portable Multi-Parameter Veterinary Monitor Operator s Manual
 imec8 Vet Portable Multi-Parameter Veterinary Monitor Operator s Manual Copyright 2015 Shenzhen Mindray Bio-Medical Electronics Co., Ltd. All rights reserved. Release date: 2015-08 Revision: 1.0 Intellectual
INSTRUCTIONS FOR USE. IntelliVue Patient Monitor. MP5 Release G.0 with Software Revision G.0x.xx. Patient Monitoring
 INSTRUCTIONS FOR USE IntelliVue Patient Monitor MP5 Release G.0 with Software Revision G.0x.xx Patient Monitoring Part Number M8105-9001C Printed in Germany 09/08 4512 610 29031 *M8105-9001C* M8105-9001C
I/A Series A 2 Software FoxAlert Alarm Manager
 Product Specifications I/A Series A 2 Software FoxAlert Alarm Manager PSS 21S-2B2 B4 Current Alarms Display Most Recent Alarms Display Summary Displays By Status Alarm History Display An Extensive Collection
Alarms Updated 03/26/2018
 Updated 03/26/2018 Table of Contents Alarms Alarms in OneView...1 Types of Alarms...1 Setting up Alarms...2 Alarm Configuration...4 Customize Alarm Parameters...5 List of Configured Alarms...7 Acknowledging
GE Healthcare Healthcare Systems 9900 Innovation Drive Wauwatosa, WI USA
 URGENT Field Safety Notice GE Healthcare Healthcare Systems 9900 Innovation Drive Wauwatosa, WI 53226 USA 22 nd January 2014 GEHC Ref 36092 To: Healthcare Administrator / Risk Manager Chief of Nursing
Accutorr 7. Vital Signs Monitor. Operator s Manual
 Accutorr 7 Vital Signs Monitor Operator s Manual Copyright 2013-2017 Shenzhen Mindray Bio-Medical Electronics Co., Ltd. All rights reserved. Release date: September 2017 Revision: 7.0 Accutorr 7 Operator
Propaq LT Outline Train the Trainer
 Train the Trainer A. Propaq LT and LTR Propaq LT Standalone monitor Propaq LTR Monitor that has the wireless Acuity feature enabled 1. Lightweight (Less than 2 pounds) 2. Uses rechargeable lithium ion
ENSEMBLE Central Nurse Station USER MANUAL
 ENSEMBLE Central Nurse Station USER MANUAL DDM-555-001 Rev C. Nov. 2014 Conformity according to the Council Directive 93/42/EEC concerning Medical Devices Manufacturer s Name : Mennen Medical Ltd. 4 Hayarden
cpm 12/cPM 8 Patient Monitor Operator s Manual
 cpm 12/cPM 8 Patient Monitor Operator s Manual Copyright 2017 Shenzhen Mindray Bio-Medical Electronics Co., Ltd. All rights reserved. Release time: 2017-10 Revision: 1.0 WARNING Federal Law (USA) restricts
PATIENT MONITORING SYSTEMS
 PATIENT MONITORING SYSTEMS PATIENT MONITORING SYSTEMS The benefits of HEYER Scalis to meet the market situation HEYER Scalis function & features make it fit to match the requirement of standard applications
Quick start guide. English
 Quick start guide English Read your entire Astral User Guide or Clinical Guide before use. The Astral device 1. Adapter port Can be fitted with single limb adapter, single limb leak adapter or double limb
Multiparameter. er Monitor DM
 d e n t a l a n d m e d i c a l e q u i p m e n t User manual Multiparameter er Monitor DM ENGLISH Contents 1 Introduction...1 1.1 General Information...1 1.2 Screen Display...2 1.3 Button Functions...5
Avigilon Control Center System Integration Guide
 Avigilon Control Center System Integration Guide with Gallagher Command Centre INT-CARDAX-C-Rev3 Copyright 2013 Avigilon. All rights reserved. No copying, distribution, publication, modification, or incorporation
and Mobile Acuity LT Central Monitoring Systems
 Acuity and Mobile Acuity LT Central Monitoring Systems Directions for use Software version 8.2x ii Welch Allyn Acuity Central Monitoring System 2013 Welch Allyn. All rights are reserved. To support the
Running IGSS as an Operator, Part One
 Running IGSS as an Operator, Part One Contents Duration We want to see how a completed IGSS SCADA system appears to plant operator personnel to get an idea of the various elements in the system and how
Central Monitor. Central Monitoring System. Intuitive, Reliable, Flexible CNS-9601K. Shown with options
 Central Monitor CNS-9601K Intuitive, Reliable, Flexible Central Monitoring System Shown with options Common complaints about typical central monitoring systems Complicated operation Too many false alarms
BeneVision TMS60. Telemetry Monitoring System. Operator s Manual
 BeneVision TMS60 Telemetry Monitoring System Operator s Manual Introduction Copyright 2015 Shenzhen Mindray Bio-Medical Electronics Co., Ltd. All rights reserved. For this Operator s Manual, the issue
Veterinary Portable Multi-parameter Patient Monitor. Operation Manual
 Veterinary Portable Multi-parameter Patient Monitor Operation Manual Content Chapter 1 Introduction... 1-1 1.1 General Information... 1-3 1.2 Screen Display... 1-4 1.3 Button Functions and Basic Operation...
Central Monitor CNS Shown with options
 Central Monitor CNS-6201 Shown with options Superior central information system for your monitoring scene The patient monitor of today collects vital signs and notifies the doctor and nurse with an alarm
Avigilon Control Center System Integration Guide
 Avigilon Control Center System Integration Guide with Gallagher Command Centre INT-CARDAX-C-Rev2 Copyright 2011 Avigilon. All rights reserved. No copying, distribution, publication, modification, or incorporation
Monitor Alarms and Events
 This chapter contains the following topics: What Are Alarms and Events?, page 1 How are Alarms and Events Created and Updated?, page 2 Find and View Alarms, page 3 Set Alarm and Event Management Preferences,
Setting up and Managing Alarms in McAfee ESM 10.x
 McAfee SIEM Alarms Setting up and Managing Alarms in McAfee ESM 10.x Introduction McAfee SIEM provides the ability to send alarms on a multitude of conditions. These alarms allow for users to be notified
INSTRUCTIONS FOR USE. IntelliVue X2. Multi-Measurement Module Release G.0 with Software Revision G.0x.xx. Patient Monitoring
 INSTRUCTIONS FOR USE IntelliVue X2 Multi-Measurement Module Release G.0 with Software Revision G.0x.xx Patient Monitoring Printed in Germany 09/08 *M3002-9001B* Part Number M3002-9001B 4512 610 28261 S
Managing Network Alarms and Events
 10 CHAPTER Prime Performance Manager allows you to view alarms and events that occur in your network. The following topics provide information about displaying network alarms and events: Displaying Active
qube mini Overview
 D a t a S h e e t qube mini Overview The 91389 qube mini is a compact, robust, and light-weight patient monitor with extensive clinical usability. Key features of the qube mini monitor include: Eye-level
User Manual. Dryer Controller M720
 User Manual Dryer Controller M720 Hardware version 1.00 Software version 1.00 Preliminary version Manual M720 Dryer controller Page 1 of 42 Document history Preliminary version: - Created in April, 2009
Alarms and Events. Defining Alarm Conditions. Database-Generated Alarms
 9 Defining Alarm Conditions Database-Generated Alarms The LookoutDirect alarm service keeps track of error messages and any process elements you have defined alarm conditions for. You can define alarm
GE Healthcare. Quick Guide. Dash 2500 Patient Monitor
 GE Healthcare Quick Guide Dash 2500 Patient Monitor Hardkeys Main Menu Hide menu and view entire waveform screen Display the large numeric vital signs Review or change alarm limits for all operating parameters
Fire Operator Workstation (Fire OWS) User s Guide
 User s Guide") Fire Operator Workstation (Fire OWS) User s Guide 1-1 Fire Operator Workstation (Fire OWS) User s Guide Introduction This user s guide details the components, capabilities, and operation procedures of
Fire Operator Workstation (Fire OWS) User s Guide 1-1 Fire Operator Workstation (Fire OWS) User s Guide Introduction This user s guide details the components, capabilities, and operation procedures of
Architectural and Engineering Specification for a Security Management System. StarNet 2
 Architectural and Engineering Specification for a Security Management System StarNet 2 Jan 2, 2018 Page 1 of 12 AE-S2-IN-R1-EN-01/18 This document is intended to provide performance specifications and
Revision History WARNING
 Revision History This manual has a revision number. This revision number changes whenever the manual is updated due to software or technical specification change. Contents of this manual are subject to
ALARM SYSTEM USER S MANUAL Rev
 ALARM SYSTEM USER S MANUAL Rev.06 890-00011 Manufacturer: Viatron Electronics 3514 1st Street, St-Hubert (Quebec) Canada J3Y 8Y5 WARNINGS the warranty can be void if the Agri-Alert 2400 is used in a manner
PAT I E N T M O N I TO R I N G N E T W O R K
 Operating Instructions Datascope Panorama PAT I E N T M O N I TO R I N G N E T W O R K PAT I E N T M O N I TO R I N G N E T W O R K 0070-01-0656-01_revC.indd 1 3/10/10 5:26:09 PM Operating Instructions
ArchestrA Direct Connect
 Table of Contents ArchestrA Direct Connect... 1 Introduction... 1 ArchestrA Direct Connection... 1 ArchestrA Data Source Definition... 2 Data Source Definition... 2 Importing Alarms from ArchestrA... 6
CODE ALERT Enterprise Software User Guide
 CODE ALERT Enterprise Software User Guide 2018 RF Technologies, Inc. All specifications subject to change without notice. All Rights Reserved. No Part of this work may be reproduced or copied in any form
SOFTWARE VERSION 8.5 FAQs
 SOFTWARE VERSION 8.5 FAQs Capnostream 20p Bedside Capnography Monitor 2016 Software Version 8.5 Update Frequently Asked Questions and Answers 1. What items are affected as a part of this software update
Connex Integrated Wall System 2.2 Software Version
 Connex Integrated Wall System 2.2 Software Version Clinical Inservice Presentation MC12931 1 Table of Contents Device Overview & Intended Use Power ON Power OFF Home Screen Navigation Spot Profile Intervals
3D_ISS. Integrated Software System. User Guide Manual
 3D Digital Design & Development LTD 58/60 Edward Road Tribec House New Barnet EN4 8AZ 020 8440 7060 3D_ISS Integrated Software System User Guide Manual Copyright 2014 3D Digital Design and Development
Code Alert Series 30 Software User Guide
 Code Alert Series 30 Software User Guide 2018 RF Technologies, Inc. All specifications subject to change without notice. All Rights Reserved. No Part of this work may be reproduced or copied in any form
DPM 4 Patient Monitor. Operator s Manual
 DPM 4 Patient Monitor Operator s Manual I Intellectual Property Statement Mindray DS USA, Inc. (hereinafter called Mindray DS) owns the intellectual property rights to this product and this manual. This
PowerLogic ION Setup Meter Configuration Software Configuration Guide
 PowerLogic ION Setup Meter Configuration Software Configuration Guide 70002-0293-03 12/2010 Conventions Used in this Manual This section describes the symbols and terminology used in this guide. Symbols
Avigilon Control Center System Integration Guide
 Avigilon Control Center System Integration Guide with Velocity INT-HIRSCH-A-Rev3 Copyright 2013 Avigilon. All rights reserved. No copying, distribution, publication, modification, or incorporation of this
QAM.L L550 series. Patient Monitor Manual QAM.L
 QAM.L550.1112.2 L550 series Patient Monitor Manual QAM.L550.0915.3 Preface This manual has been provided to give detailed descriptions on DARAY s L550 patient monitor, covering the performance, operation
Quick Reference Guide STAN S31 fetal heart monitor. Power ON/OFF. ST Analysis (Fetal ECG analysis)
") Quick Reference Guide STAN S31 fetal heart monitor Important! Read the STAN S31 User Manual. 1. 2. 3. 1 2 3 4 5 6 Transducer connectors 4. Function buttons Power switch 5. Information panel Fetal ECG (FECG)
Quick Reference Guide STAN S31 fetal heart monitor Important! Read the STAN S31 User Manual. 1. 2. 3. 1 2 3 4 5 6 Transducer connectors 4. Function buttons Power switch 5. Information panel Fetal ECG (FECG)
Dryer Controller M720
 User Manual Dryer Controller M720 Hardware version 2.00 Software version 2.00 Manual M720 Dryer controller Page 1 of 60 Document history Preliminary version: - Created in April, 2009 Hardware Version 2.00,
Summit 3208GLD USER MANUAL. Electronics Line
 Summit 3208GLD USER MANUAL Electronics Line Table of Contents 1: Introduction... 2 2: Overview... 3 3: Keypad Functions... 4 3.1: Keypads... 4 3.2: 3108 LCD Keypad Layout... 4 4: Basic System Operation...
Getting Started with Live Exceptions
 Getting Started with Live Exceptions Live Exceptions provides alarm reporting by identifying problems that include delay, errors, failures, security, or configuration changes. The Live Exceptions Browser
Honeywell Total Connect Remote Services
 Honeywell Total Connect Remote Services Basic User Guide With Honeywell Total Connect Remote Services, you can stay connected and in control of your home or business whenever you want, wherever you are.
DPM4 Bedside Monitor Default Settings
 DPM4 Bedside Monitor Default Settings Hospital: Department: Clinical / Sales / Service Representative: (** Patient Size Dependent) Date: Software Version: (* Optional) System Menu System Setup Menu Face
CNAP MONITOR 500 HD QUICK GUIDE. This Quick Guide DOES NOT REPLACE the user manual!
 CNAP MONITOR 500 HD QUICK GUIDE This Quick Guide DOES NOT REPLACE the user manual! Version 07/2016 V1.5.5 EN 2 CONTENT SET UP MEASUREMENT NAVIGATION FAQs FUNCTIONS: FAST ACCESS Hemodynamic Parameters...5
Lesson 10: Configuring Events IGSS. Interactive Graphical SCADA System. Lesson 10: Configuring Events 1
 IGSS Lesson 10: Configuring Events Interactive Graphical SCADA System Lesson 10: Configuring Events 1 Contents of this lesson Topics: What is an event? The Event List Creating events Showing events as
Manage Alarms. Before You Begin. NTP-E57 Document Existing Provisioning CHAPTER
 CHAPTER 9 Manage Alarms This chapter provides procedures required to view and manage Cisco ONS 15600 alarms and conditions. Cisco Transport Controller (CTC) detects and reports SONET alarms generated by
Manage Alarms. Before You Begin CHAPTER
 CHAPTER 9 Manage Alarms This chapter provides procedures required to view and manage Cisco ONS 15600 alarms and conditions. Cisco Transport Controller (CTC) detects and reports SONET alarms generated by
Experion PKS Operator Course EXP01R201 06/2004 Rev 01
 Experion PKS Operator Course EXP01R201 06/2004 Rev 01 COURSE: Experion PKS Operator Course REVISION: 10 June, 2004 Honeywell IAC courseware is subject to change without notice. Honeywell IAC assumes no
Ion Gateway Cellular Gateway and Wireless Sensors
 Page 1 of 9 Account & Network Setup If this is your first time using the Ion Gateway online system site you will need to create a new account. If you have already created an account you can skip to the
Temperature Monitoring, Operation and Maintenance of Research Freezers and Refrigerators SOP-TMOMRFR-01
 Standard Operating Procedure Temperature Monitoring, Operation and Maintenance of Research Freezers and Refrigerators SOP Number: SOP-TMOMRFR-01 Category: Lab Process Supersedes: N/A Effective Date: December
Alarm Manager Plug-in
 Alarm Manager Plug-in User s Guide While every attempt is made to ensure both accuracy and completeness of information included in this document, errors can occur, and updates or improvements may be implemented
HERCULES 6 GRAPHICS SYSTEM
 HERCULES 6 GRAPHICS SYSTEM USER MANUAL Protec Fire Detection PLC, Protec House, Churchill Way, Nelson, Lancashire, BB9 6RT. Telephone: +44 (0) 1282 717171 Fax: +44 (0) 1282 717273 Web: www.protec.co.uk
Contents 1 Set Up 2 Gateway information 3 Operation of the App 4 Troubleshooting Description of sensors. 1 Set Up. 1.1 Connect the Gateway
 Contents 1 Set Up 2 Gateway information 3 Operation of the App 4 Troubleshooting Description of sensors 1 Set Up After downloading the Weatherhub app, follow these steps: 1.1 Connect the Gateway Connect
Operation Manual Fighter ProVision Software. Version: 0.0 Revision: 1
 Operation Manual Fighter ProVision Software Version: 0.0 Revision: 1 TABLE OF CONTENTS 1. Introduction 5 2. Software Installation 5 3. PC Users 6 3.1 Introduction 6 3.2 Default Code 6 3.3 Edit PC User
HeartStart XL+ Configuration Worksheet
 HeartStart XL+ Configuration Worksheet The following pages show the available configuration options for the HeartStart XL+. Please enter your configuration choices and save this worksheet for your records.
Alarm Client. Installation and User Guide. NEC NEC Corporation. May 2009 NDA-30364, Revision 9
 Alarm Client Installation and User Guide NEC NEC Corporation May 2009 NDA-30364, Revision 9 Liability Disclaimer NEC Corporation reserves the right to change the specifications, functions, or features,
Security Escort. Operations Guide. Security Escort
 Security Escort EN Operations Guide Security Escort Security Escort Operations Guide EN 2 Trademarks The Security Escort system software operates in the Microsoft Windows operating system. This manual
Tools Alarms Setting Alarm Calculator Notepad Notepad Functions
 Calendar...- Opening Calendar... - Creating Schedule Events... - Setting Day Off... -4 Viewing/Editing Schedule Events... -4 Calendar Functions... -5 Alarms...-6 Setting Alarm... -6 Calculator...-7 Notepad...-8
Omni (K) PATIENT MONITOR
 PATIENT MONITOR") Omni (K) PATIENT MONITOR Omni (K) Intuitive Designed for a fast paced work environment, the Infinium Omni (K) patient monitor offers an extremely simple and adaptable user interface. Patient information
Omni (K) PATIENT MONITOR Omni (K) Intuitive Designed for a fast paced work environment, the Infinium Omni (K) patient monitor offers an extremely simple and adaptable user interface. Patient information
Monitor Alarms and Events
 What Are Alarms and Events?, page 1 How are Alarms and Events Created and Updated?, page 2 Which Events Are Supported?, page 5 Set Alarm and Event Management Preferences, page 5 Interpret Event and Alarm
Spacelabs Healthcare - Connecting Innovation with Care
 Ultraview SL3800 Spacelabs Healthcare - Connecting Innovation with Care Spacelabs Healthcare is fully committed to making strong connections: between clinicians and their patients; between technological
ViewMatrix. Software for Online Monitoring & Control of Matrix2000 Conventional Fire Alarm Panels. Version: 2.0 Revision: 0.1
 ViewMatrix Software for Online Monitoring & Control of Matrix2000 Conventional Fire Alarm Panels Version: 2.0 Revision: 0.1 CONTENTS 1. Introduction...3 2. Keyboard...5 2.1 POWER indication - Normal Operation...5
Alarm User Guide IGSS Version 9.0
 Alarm User Guide IGSS Version 9.0 Table of Contents Chapter 1: The Alarm List 4 1.1 Introducing the Alarm List 4 Process alarms and 'IGSS Alarm' 4 How is an alarm identified? 4 Alarm characteristics 4
HikCentral Web Client. User Manual
 HikCentral Web Client User Manual Legal Information User Manual 2018 Hangzhou Hikvision Digital Technology Co., Ltd. About this Manual This Manual is subject to domestic and international copyright protection.
Ref. 1067/024 Ref. 1067/032A Ref. 1067/052A
 DS1067-062C Mod. 1067 LBT20063 REMOTE CONTROLLABLE ALARM CONTROL PANELS Ref. 1067/024 Ref. 1067/032A Ref. 1067/052A USER MANUAL TABLE OF CONTENTS INTRODUCTION... 6 1 CONTROL DEVICES... 7 1.1 1067/022 keypad
Laptop / PC Programming Manual
 Laptop / PC Programming Manual Doc. # Fire PC Program rev B 01.07 This Document is property of Evax Systems, Inc. The Evax Fire Solutions Programmer Components 2 1.0 System Setup 4 1.1 Interface Setup
ZP2 Series Operation Manual
 ZP2 Series Operation Manual P/N 501-405203-2-31 REV 03.10 ISS 07NOV13 Copyright Trademarks and patents Manufacturer Version Certification European Union directives Contact information 2013 UTC Fire & Security.
OMNI TOUCH SCREEN PATIENT MONITOR
 OMNI TOUCH SCREEN PATIENT MONITOR OMNI Intuitive Designed for a fast paced work environment, the Infinium Omni patient monitor offers an extremely simple and adaptable user interface. Patient information
Trident User s Manual
 Labkotec Oy Myllyhaantie 6 33960 Pirkkala FINLAND Tel. +358 (0)29 006 260 18.05.2017 Fax +358 (0)29 006 1260 Internet: www.labkotec.fi 34 pages Trident Copyright 2017 Labkotec Oy 1/34 TABLE OF CONTENTS
PM-9000Vet Veterinary Portable Multi-Parameter Patient Monitor. Operator s Manual
 PM-9000Vet Veterinary Portable Multi-Parameter Patient Monitor Operator s Manual CE Marking The product bears CE mark indicating its conformity with the provisions of the Council Directive 84/539/EEC
CRIME. Manufacturing And Minor Inventions CRIME. Control Room Integrated Monitoring Environment
 Control Room Integrated Monitoring Environment INDEX 1. Requirements for software. 2. Installation Instructions. 3. How to Register your Software. 4. Start Using... 5. Operating Instructions. 6. Screen
Transport Pro Patient Monitor Operator s Manual Software Version 2.1
 GE Healthcare Transport Pro Patient Monitor Operator s Manual Software Version 2.1 Transport Pro English 2024598-003 (CD) 2024579-020A (paper) 2007 General Electric Company. All rights reserved. The information
Manage Alarms. Before You Begin CHAPTER
 CHAPTER 9 Manage Alarms This chapter contains the procedures for viewing and managing the alarms and conditions on a Cisco ONS 15454 SDH. Cisco Transport Controller (CTC) detects and reports SDH alarms
1. Functions of GPS locator ETLOC-30S 3
 Contents 1. Functions of GPS locator ETLOC-30S 3 1.1 Direct view of the vehicle position on the map 3 1.2 Vehicle security 3 1.2.1 Vehicle protection 3 1.2.1.1 GPS protection 3 1.2.1.2 GPS higher level
Ovation Alarm Management System
 Ovation Alarm Management System Features Multiple types of fully configurable, easy-tounderstand alarm displays Convenient access to past alarms, returns and state changes Simplified ability to acknowledge,
HEGA Ethernet Gateway Browser Interface Guide
 HEGA Ethernet Gateway Web Interface HEGA Ethernet Gateway Browser Interface Guide Table of Contents Introduction: Browser Interface Guide 3 Common Tasks: 4 Check-in Reports 5 Check-in Administration 5
Alarm Control Panel WIC-16Z4P WIC-5Z2P. User Instructions
 WIC-16Z4P WIC-5Z2P User Instructions Page : 2/14 INDEX # Function Page 1 Add a New User Code 11 2 Arm or Disarm All Areas or Disarm Selected Areas (Partitioned System) 8 3 Arming the System (Away Mode)
Cellular Monitoring System
 Cellular Monitoring System Wireless Temperature Monitoring Installation and Operation User s Manual Temperature Monitoring System used in: Temperature-controlled storage rooms and facilities Medical and
Ultraview SL2400 With Wireless-LAN-Option
 Ultraview SL2400 With Wireless-LAN-Option Spacelabs Healthcare Connecting Innovation with Care Spacelabs Healthcare is fully committed to making strong connections: between clinicians and their patients;
Avigilon Control Center 5 System Integration Guide
 Avigilon Control Center 5 System Integration Guide with Hirsch Velocity INT-HIRSCH-B-Rev1 2012 2014 Avigilon Corporation. All rights reserved. Unless expressly granted in writing, no license is granted