Anco Batch Pasteurizer Collection
|
|
|
- Roland Rogers
- 5 years ago
- Views:
Transcription


1 Anco Batch Pasteurizer Collection Anco Equipment 1070 E. Glenbrook Drive - Pulaski, WI
2 Table of Contents About our Batch Pasteurizer 3 Tank Specifications and Options 4 Batch Pasteurizer Overview 5 Sizing your Boiler 8 Tank and Boiler Install 9 Leak Detection Valve Install, Handling & Maintenance 15 Electric Air Space Heater 18 Anderson Chart Recorder Overview 21 Spray Ball Maintenance and Technical Information 23 Cleaning and Test Run Procedure 25 Pasteurizing Procedure 28 Warranty 34 Conclusion 35 9/25/2018 2
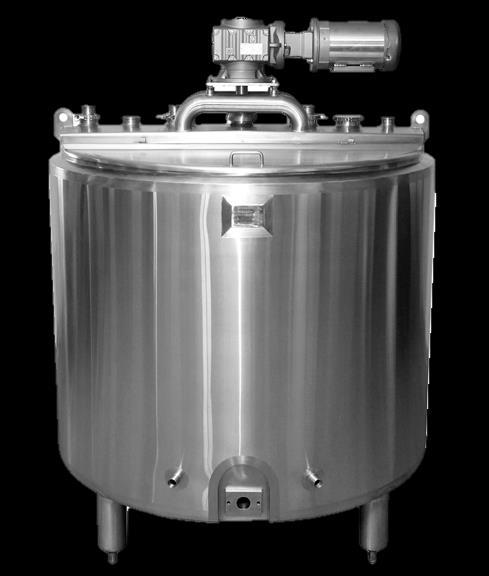
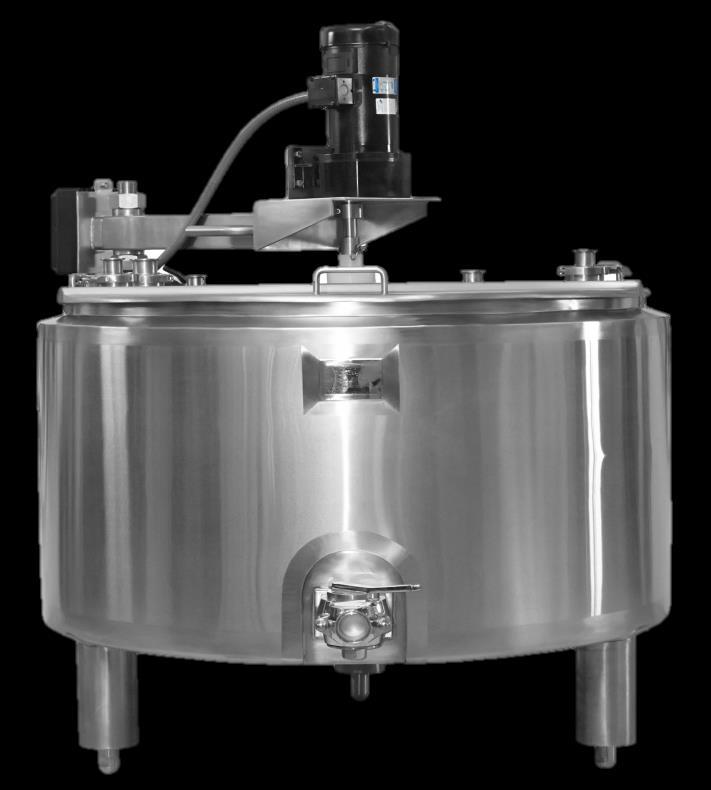
3 About Anco Batch Pasteurizers Vat Batch Pasteurizers are insulated, jacketed, process tanks. When used with a boiler and chilling system tanks can heat and cool almost any food, dairy, beverage or chemical products. The most common use for batch pasteurizers is in the dairy industry for milk pasteurization. The Anco Batch Pasteurizers are available in standard or custom sizes. They typically range from 50 to 2,000+ gallons in size. The Anco Combo Vat is an open-top designed tank for the small cheesemaker; it allows for milk pasteurization and cheesemaking in one vat. 9/25/2018 3
4 Batch Pasteurizer Specifications and Tank Options Capacity Range: 50-2,000 gallon Tank Top: Flat top with removable covers, Wing-Top, Dome Top with Manhole Tank Bottom: Slight slope toward outlet Tank Interior Shell: Cylindrical vertical, 11 gauge type 304 or 316 stainless steel Interior Finish: Jacket: Insulation: Number 4 finish food grade (1-4 ) Zones available, 304 stainless steel full vertical side wall and bottom dimple plate jacket, max. pressure rating of 70 PSI & Max. Flow Rate 50 GPM 2" polyurethane insulation Tank Exterior Shell: Cylindrical vertical, 14 gauge type 304 or 316 stainless steel Exterior Finish: Number 4 finish Outlet: 1.5 or 2 leak detect valve ready Agitation: Bottom Sweep, Full Sweep, Side Scrape, Curd Blade Shaft. Euro-Drive and Motor with or without VSD control. Ports: 2" TC and 1.5 TC and Inlet port (s) available Air Vent: 3 on dome top tanks only Leg: Three or Four stainless steel pipe legs with adjustable ball feet 9/25/2018 4
5 Batch Pasteurizer Overview Tank Inspection To ensure each tank is in good working order, Anco Equipment inspects every aspects of our equipment before we ship our product. We ask all our clients to do the same. Immediately upon arrival of the equipment, confirm the tank has not been scratched, dented, or missing any parts during transit. Call Anco Equipment immediately if you find something wrong with your order. Prepping Instructions Cleaning your vat: after the manufacturing and shipping process, it is important to thoroughly wash and degrease your vat. Please see further in this manual or contact your chemical cleaning supplier for recommendations. Prior to tank use: be sure to clean and sanitize the vat, pump, outlet valve, supply lines and spray balls (if present). If you decide to use a chemical based cleaning process; be sure to follow all manufacturer s instruction. To avoid pitting of your equipment NEVER let highly chlorinated water stand more than ten minutes. Boiler Installation Instructions Please use a licensed boiler technician or licensed Pipe Fitter when installing the tank. The tanks dimple plated jacket is designed to heat and/or cool with Glycol, a hot water boiler or a steam boiler system. The jacket is tested and rate for 70 maximum pounds per square inch (PSI). Low pressure boilers are recommended. If you are using a high pressure boiler confirm with your state rules and regulations that no additional safety valves or documentation are required (example: ASME). A properly sized boiler can have your product at pasteurizing temperature within 25 minutes or less. You will need a licensed plumber or boiler technician to install your boiler system. There should be pressure valves installed to protect the tank jacket from reaching more than the maximum PSI allowed. Please see further in this manual for proper boiler sizing. If you are heating with steam; the steam inlet is the top port of jacket on the side. If the tank has 2 or more zones the bottom zone ports are interchangeable. See diagram further in this manual. If you are heating or cooling with water or Glycol the inlet is the bottom or lowest port of jacket. If the tank has 2 or more zones, the bottom zone ports are interchangeable. See diagram further in this manual. 9/25/2018 5
6 Motor/Gearbox A licensed electrician is needed to hard wire the motor/gear and variable speed drive (if applicable). Agitator must run clockwise. Frequently check the oil level plug and add oil if needed. Food grade oil is recommended. Gaskets Only food grade gaskets can be used on all ports and valves. Gaskets should be inspected regularly for cracks or worn areas. The gaskets must be replaced every 18 months for moderate use or when worn or damaged. Clean In Place-Spray Ball Cleaning Nozzles Unless otherwise noted, your tank is equipped with (2) Food Grade spray ball nozzles. Please see diagram further in this manual for step by step cleaning and maintenance procedure. Leak Detection Valve Instructions and Maintenance Each valve purchase includes a food-grade gasket and a tube of PetroLube. To install; clean the area of the tank where the gasket is place. Apply PetroLube to both sides of the gasket and place on to the tank bolts. Lubricate the inner guts of valve before setting in place. The PetroLube is a food-grade lubricant and is allowed to have product contact. Please see diagram further in this manual. Also find video reference on YouTube under Anco Equipment. Adjustable Ball Feet Any threads showing on the tank s adjustable ball feet must be sealed with a food grade sealant. Exterior Threaded Ports: When connecting any process lines or tubing to the tank s threaded ports; use a Food Grade Anti-Seize & Lubricating Compound on the threaded area. This will help resist acid, chemical corrosion & oxidation. Follow manufactures instructions. Electric Airspace Heater The electric airspace (if needed) will be installed on the lid or roof of tank. Please use a licensed electrician for proper installation. 9/25/2018 6


7 ANCO BATCH PASTEURIZER SEW EURODRIVE MOTOR GEARBOX STAINLESS DUST COVER AIR VENT CIP SPRAYBALL FITTING TC PORT FOR AIR SPACE THERMOMETER CIP SPRAYBALL FITTING LIFTING LUG MANWAY COVER ELECTRIC AIRSPACE FITTING NAME PLATE ANDERSON-NEGELE THERMOWELL FOR PRODUCT THERMOMETER LEAK DETECTION VALVE ADJUSTABLE BALL FEET 9/25/2018 7
8 Sizing your Boiler A properly sized boiler is the key to pasteurizing in a quick timely manner. Since the maximum tank jacket pressure is 70 PSI and the maximum flowrate is 50 GPM, we recommend using a hot water or low-pressure steam boiler. Check the boiler regulations in your state before purchasing a boiler. Note: Figures below are based on a standard tank and may vary if tank dimensions change. Tank Size in Gallons Side Jacket in Gallons Side Jacket in Sq. Ft. Bottom Jacket in Gallons Bottom Jacket in Sq. Ft. BTU's Required , , , , , , , , , ,200,000 1, ,500,000 1, ,800,000 1, ,250,000 2, ,000,000 9/25/2018 8

9 Bottom Inlet & Outlet Ports are Interchangeable Underneath the tank you will find two ports for the bottom zone or jacket. Connect your steam, water, or Glycol lines here. The ports are interchangeable so either port can be the inlet or the outlet.. Bottom Jacket Ports These ports are interchangeable 9/25/2018 9

10 Inlet & Outlet-Single Zone Jacket Install Steam must always enter from the top inlet jacket and exit from the bottom or lower jacket port. Water or Glycol must always enter from the lower inlet port of the jacket and exit from the top or higher jacket port. 9/25/


11 Inlet & Outlet-Two Zone Jacket Install Steam must always enter from the top inlet jacket and exit from the bottom or lower jacket port. Bottom ports are interchangeable. Water or Glycol must always enter from the lower inlet port of the jacket and exit from the top or higher jacket port. Bottom ports are interchangeable. 9/25/

12 Inlet & Outlet-Three Zone Jacket Install Steam must always enter from the top inlet jacket and exit from the bottom or lower jacket port. Water or Glycol must always enter from the lower inlet port of the jacket and exit from the top or higher jacket port. 9/25/
13 Hot Water Boiler Install Diagram Sample Additional components will be required for a complete system. Consult with a qualified professional for design and integration with a specific boiler and plant steam system Water Exits Side Jacket Water Enters Side Jacket 9/25/
14 Steam Boiler Install Diagram Sample This diagram is a graphical representation of a typical steam supply and condensate return system for a jacketed tank. Additional components will be required for a complete system. Consult with a qualified professional for design and integration with a specific boiler and plant steam system. Steam Enters Side Jacket Steam Exits Side Jacket 9/25/
15 Proper Valve Maintenance & Handling DO s DON Ts Handle with Care (see Figure 1) Never throw or drop valve parts into cleaning tank, nicks in the valve will cause leaking. Handle improperly (see Figure 1) Use Petro Gel a food-grade lubricant around the valve gasket, plug, nut, and inside the body to seal. (see Figure 2) Do not block leak detect grooves with lubricant. Keep valve parts away from each other when valve is not in use to reduce nicks from hitting each other Do not let valve come in contact with nonstainless steel parts Nicks inside the valve will cause leaking, use a fine file to remove nicks from plug. Never use steel wool on valve or put it into cleaning tank with iron or steel material Place valve in wash sink carefully and away from other parts to prevent scratching and dents Keep valve parts away from any steel or iron material Do not interchange plug parts. Each valve and plug are mated during the manufacturing process Never open or close a valve without first loosening the bottom nut Inspect valve plug before placing back into valve body for nicks or scratches Never open valve by hammering it as this will decrease its service life If a valve is leaking look for the cause which is usually improper installation. Never tighten the bottom nut too tightly. Excess tightening will not cause a leaking valve to stop leaking. 9/25/


16 Figure 1 Figure 2 9/25/


17 Leak Detection Valve Each Valve Purchase includes a 2 PMO Leak Detect Valve, a Plastic Gasket, and a Tube of Food Grade Petrol Gel. Installing the Valve 1. Apply Petrol Lube to the gasket and stick it to the base of tank. 2. Apply generously to the front of gasket and back of valve. 3. Apply Lube inside the guts of the valve. 4. Test the valve. 5. If there is a leak apply lube to leaking area. 9/25/


18 Anco Electric Air Space Heater The element needs to be wired to single phase 220v. It should be positioned in the tank angled to the center making sure it does not interfere with the agitator shaft or CIP spray balls. The Rheostat control allows you to adjust the amount of electrical current running to the heating element and control the heat of the air space. The Rheostat needs to be installed by a licensed electrician. The Air Space Heater fits into a 3 sanitary ferrule and element is self supporting. The top agitation blade helps move the air in the head space. 18

19 Ground Anco Electric Air Space Heater *To be installed by a licensed electrician 19


20 Anco Airspace Heater Element 20

21 Anderson Chart Recorder and Temperature Probes *Get full Anderson manual on our website under technical information. 9/25/

22 Installation Information A hard copy of the complete installation manual will be included with your Anderson Equipment. 9/25/

23 Spray Ball Installation and Maintenance 9/25/


24 Spray Ball Specification Sheet 9/25/


25 Degreasing your tank after manufacturing is a very simple but important step in preparing your tank. You may consult your chemical supply provider or use these steps below. 1. Fill tank about 10% full with hot water. 2. Add degreaser. 3. Using a circulating pump, rotate the water from the tank outlet to the CIP spray balls. 4. Run the cycle for 15 minutes. 5. Drain soapy water and rinse. Cleaning your Batch Pasteurizer 9/25/
26 GENERAL CLEANING AND SANITIZING OF PASTEURIZING EQUIPMENT Milk-stone is a hard deposit or encrustation that is a combination of milk solids and washing powder that may build on milk equipment. The minerals contained in hard water also contribute to its formation. It is a chemical reaction that is accelerated by heat causing more deposits on heating surfaces than elsewhere. Aside from these contributing factors the primary cause of milk-stone is improper cleaning. Phosphatase Test Is a test used to determine the effectiveness of the pasteurization process. Phosphatase is an enzyme normally present in raw milk that is easily destroyed or inactivated by pasteurization. When milk that is contaminated with raw product or not held at the proper temperature long enough active phosphatase will be present in larger amounts than found in properly pasteurized milk. A positive coliform test is indicative of post-pasteurization contamination. Coliform organisms are easily killed by pasteurization. The following steps can prevent postpasteurization contamination: Clean and sanitized equipment and containers. No hand capping or bottling or other handling of milk equipment. Prevent exposure to potential contaminate such as flies, dust, dirt, drip or splash. Milk spoilage, bacterial breakdown of milk proteins: Sour - milk held at temperature of will allow souring type organisms grow. Bitter - milk that is held at temperatures below 50 would more often become bitter for the same reason. Ropy - thermoduric spore-formers that may survive the heat process, traced to stagnant water on the farm. Sweet curdle - fermentation and coagulation of milk with no acid production by organisms surviving the heat process that may destroy acid producing organisms. Thermoduric -organisms that survive pasteurization temperatures. Thermo-philic-organisms that grow freely in milk at temperatures above 140 F Sanitation - mere cleaning of equipment does not remove or destroy all disease causing organisms that may have been present. Even very small numbers remaining may grow to dangerous proportions since many grow rapidly in milk. All milk equipment must be treated with a sanitizing agent just prior to usage. Cleaning must be thorough before sanitation can be effective since the presence of organic material such as, milk-stone and soil can inactivate the sanitizer. The number and type of bacteria present in raw milk, faulty equipment or soiled, unsanitary contact surfaces of equipment may influence efficiency of pasteurization. 9/25/
27 Cleaning and Sanitization Methods 1. Steam This method can be used successfully only in confined areas. All parts of equipment must be exposed to a temperature of at least 170 F for at least 5 minutes. 2. Hot Water This method is difficult to use on assembled equipment, particularly where hot water flows over a surface cooler. The temperature and exposure time is the same as steam. 3. Chemical An approved chemical sanitizing solution, such as chlorine (not household bleach) or quaternary ammonia is circulated or pumped through assembled equipment. Equipment may also be dipped in a solution to expose all the surfaces to the sanitizer. The strength of a chlorine solution should be 100 parts per million (ppm) for 30 seconds of contact time or 50 ppm for 2 minutes contact time. 9/25/
28 Running your Batch Pasteurizer Once your boiler and electrical components are installed and your tank is degreased; we recommend running a test batch with water prior to running your product. This will also help get a feel for your boiler to maintain a steady temperature. The agitator must be turning clock-wise and should be operating at all times while product is being heated during the pasteurization cycle. Always fill tank from the top of your pasteurizer using the product inlet. The Product and Airspace thermometer along with chart recorder should be on and in place. Hot water or steam should be reduced shortly before reaching pasteurizing temperature or the temperature may overshoot. This will give you the opportunity to make any final adjustments to the pressure valves, pumps, timing, etc. Closely monitor both the product and airspace temperature recordings until full pasteurization of product is reached in 30 min per the PMO guidelines. Please remember if any manholes, wing doors, or ports are opened during the 30 min pasteurization process, you will have to start your 30 min pasteurization over. Turn the air space heater off at the end of pasteurization before starting to cool the vat. Keep covers on until product is withdrawn from the vat unless you will be using the vat for further production. To cool your product following pasteurization it s important to prevent a thermal shocking the dimple jacket or vessel. Thermal shocking is caused when there is a sudden temperature change on the stainless steel causing stress on the jacket material and welds. To prevent this, there should be no more that a 25 F change in cooling media per minute. We recommend using well water or a media 45 F or above after pasteurization of 145 F. This is a great way to gradually bring down the temperature before using your chilling unit. 9/25/
29 Batch Pasteurizing Standards (Rules and procedures may vary from state to state, please check with your local inspector) 1. All components must be added to the batch prior to beginning pasteurization. This includes liquid sugar and sweeteners, water, milk powders and all other flavorings, stabilizers and vitamins. Certain flavoring ingredients may be added after pasteurization. These include ingredients that have a water activity of 0.85 or less, high acid content, dry sugars, fruits and roasted nuts, safe and suitable bacterial culture organisms and flavorings containing a high alcohol content. Fruits and vegetables may be added to cultured products having a ph of 4.7 or less. Such ingredient addition shall be done in a sanitary manner and the ingredients must be of safe and wholesome quality. 2. Pasteurization must be performed in properly designed and operated equipment that ensures that every particle of product will be held continuously for the minimum time and temperature. The product should be heated to pasteurization temperature in as short a time as practicable and in no case should this time exceed 4 hours. Following pasteurization the product must be cooled to 45 F or less as soon as possible. The only exception is for cultured product processing. 3. If, for any reason the lid or any cover is lifted or mechanical failure of any kind occurs after beginning the pasteurization process, the timing process must be restarted and notes to that effect must be made on the recording chart by the operator. 4. The official thermometer is the indicating thermometer and the recording thermometer functions only to provide a record of the pasteurization cycle. The operator must verify the accuracy of the recording thermometer, for each batch, with the indicating thermometer. No batch of milk shall be pasteurized unless the sensors of both thermometers are covered. 5. The air space thermometer reading must also be recorded on the recording chart during pasteurization. To assure the minimum air space temperatures are being maintained, the air space indicating thermometer shall be read at the beginning and at the end of the holding period. The air space temperature must never be less than 5 F above the minimum legal pasteurization temperature required for the product in the vat. 6. Recording charts must be used only for the length of time it has been designed for. Overlapping information on circular charts is never acceptable. Required information on the chart must be legible and meet all the requirements of the PMO. 7. The outlet valve is designed to detect and expel any leakage past the valve seat and is close coupled to prevent cold pockets of product from accumulating in the valve or piping. At no time during the pasteurization cycle or following may the outlet piping be directly attached to any line or vessel containing raw milk or any other contaminating substance. 9/25/
30 Assurance of Holding Periods 1. Vats must be operated so that every particle of milk is held for at least 30 minutes at or above the minimum required temperature for the specific product processed. 2. When the milk product is heated to pasteurization temperature in the vat and is partially cooled in the vat before opening the outlet valve, the recorder chart must show at least 30 minutes at or above the minimum pasteurization temperature. 3. When the milk product is preheated to pasteurization temperature prior to entering the vat, the recorder chart must show a holding time of 30 minutes plus the filling time of the vat from the level of the recorder bulb sensor to the maximum level of normal operation. 4. When cooling is begun after the outlet valve is opened or is done entirely outside the vat, the chart must show a holding time of 30 minutes plus the time necessary to empty the vat to the level of the recording thermometer bulb. 5. The operator must indicate filling and/or emptying times on the chart by inscribing the start and end of the official 30 minute holding time. 6. Vat pasteurization charts must clearly show the four identifying holes (marks) which verify the chart has not been rotated or manually turned to give a false time line accuracy. 9/25/
31 PMO Product and Air Space Guidelines for Dairy Products Product Minimum Product Temperature Minimum Air Space Temperature MILK, SKIM MILK, OR BUTTERMILK 145 F 150 F CREAM, & FLUID DAIRY PRODUCTS WITH >10% MILKFAT 150 F 155 F CONDENSED DAIRY PRODUCTS & HIGH TOTAL SOLIDS PRODUCTS >18% 150 F 155 F CREAM FOR BUTTER 165 F 170 F FROZEN DESSERT MIXES & EGG NOG 155 F 160 F 9/25/

32 INDICATING AND RECORDING THERMOMETERS VAT PASTEURIZER THERMOMETER CRITERIA VAT PASTEURIZATION CRITICAL CONTROL POINTS 1. Time and temperature requirements 2. No temperature abuse 3. Covers in place during operation 4. Vat construction within compliance 5. Agitation during operation 6. No ingredients added after pasteurization 7. Product protected after pasteurization PASTEURIZATION GREATER THAN 160 F 9/25/
33 1.Indicating thermometers shall be mercury actuated, direct reading type, scaled to a minimum of of an inch, with a span of not less than 25 F. The span must include the pasteurization temperature (plus or minus 5 F) and be graduated in 1 F and accurate to within 0.5 F. 2.The sensing bulb of the indicating (official) thermometer must be designed to extend fully into the product during pasteurization. 3.An approved air space must be provided that is graduated in 2-degree maximum increments and accurate to pus or minus 1 F. The bottom of the bulb chamber must not be less than 2 inches or more than 3.5 inches below the underside of the top enclosure or cover. The bottom of the bulb must never be less than 1 inch from the top surface of the product during pasteurization. 4.The vat must be equipped with a recording thermometer graduated in 1 F increments between140 and 155 F. The chart must be graduated in time scale divisions of not more than 10 minutes for a maximum record of twelve hours and designed for the recorder used. 5.On vats used solely for pasteurization at temperatures above 160 F, the recording chart may be graduated in 2 F within a 150 to 170 F range. The chart for this type of vat may be graduated in 15 minutes for a maximum of 24 hours. 6. Review the recording charts for the following information: (PMO, Part II, Section 7, item 16p(E)(1)(b)). 1. Date 2. Chart # if more than one used during a product day 3. Name or number of pasteurization unit 4. Cut-in and cut-out temperature recorded at the beginning of the run, with a reference mark 5. Indicating thermometer temperature at a given time or reference point as indicated on chart 6. Position of FDD (Forward Flow or Diverted Flow) recorded by mechanical "event" pen on the thermal limit controller 7. Amount and identification of each product noted on the chart 8. Record of and reason for each unusual occurrence if any 9. Signature or initials of operator 10. Name of plant 11. Record of Quality Control 9/25/
34 Warranty Equipment & Parts manufactured by ANCO Equipment, LLC: ANCO Equipment, LLC warrants to the first user (the Buyer ) that the equipment manufactured by ANCO will be free from factory defects in materials and workmanship under normal use and proper maintenance for a period of twelve (12) months from the date the equipment is shipped from its facility. Parts, Components & Materials manufactured by others: Parts, components and materials manufactured by others are warranted only to the extent of the warranty given to ANCO by the manufacturer of such parts, components and materials. Said manufacturers sole judgment shall determine the extent of allowance for, or replacement of, any such parts claimed defective. ANCO Equipment, LLC does not warrant the corrosive resistance of stainless steel nor other metal parts for any purpose whatsoever. Company Obligation: ANCO Equipment, LLC s obligation under its warranty is strictly and exclusively limited to the repair or replacement, at the company s location in Pulaski, Wisconsin, of such components of its manufacture as are found by the company to be defective in materials or workmanship on the condition that the buyer gives prompt written notice to the company of any claimed breach of warranty within such twelve (12) month period and delivers to the company the claimed defective component within such time period or a reasonable time thereafter. All costs of packing and shipping claimed defective components and replacement and replacement or repaired components shall be paid by the buyer. The company reserves the right to satisfy its warranty obligation in full by the payment of the full purchase price upon return of the equipment to it at Pulaski, Wisconsin. IN NO EVENT SHALL THE COMPANY BE HELD LIABLE FOR CLAIMS (BASED ON BREACH OF EXPRESS OR IMPLIED WARRANTY, NEGLIGENCE, OR OTHERWISE) FOR ANY OTHER DAMAGES, WHETHER DIRECT, IMMEDIATE, INCIDENTAL, FORESEEABLE, CONSEQQUENTIAL, OR SPECIAL, INCLUDING DAMAGES ARISING OUT OF PERSONAL INJURIES. The Company s warranty stated herein cannot be modified except by a writing signed by an officer of the Company. 9/25/


35 Anco Equipment strives on 100% satisfaction on all their equipment. For any additional questions or concerns please check out our website at or call at (920) /25/
ANCO BATCH PASTEURIZER INSTALLATION MANUAL
 ANCO BATCH PASTEURIZER INSTALLATION MANUAL A N C O E Q U I P M E N T 1 0 7 0 E. G L E N B R O O K D R I V E P U L A S K I, W I 5 4 1 6 2 W W W. A N C O E Q U I P M E N T. C O M Table of Contents About
ANCO BATCH PASTEURIZER COLLECTION
 ANCO BATCH PASTEURIZER COLLECTION ANCO EQUIPMENT 1070 E. GLENBROOK DRIVE PULASKI, W I 54162 W W W.ANCOEQUIPMENT.COM Table of Contents About our Batch Pasteurizer 3 Tank Specifications and Options 4 Batch
Anco Equipment 1070 E. Glenbrook Drive Pulaski, WI Anco Batch Pasteurizer Collection
 Anco Equipment 1070 E. Glenbrook Drive Pulaski, WI 54162 www.ancoequipment.com Anco Batch Pasteurizer Collection 1 2 Table of Contents ABOUT OUR TANKS. 3 CONSTRUCTION..4 3-A BATCH PASTEURIZER...5 DOME
Anco Equipment 1070 E. Glenbrook Drive Pulaski, WI Anco Batch Pasteurizer Collection
 Anco Equipment 1070 E. Glenbrook Drive Pulaski, WI 54162 www.ancoequipment.com Anco Batch Pasteurizer Collection 1 Table of Contents ABOUT OUR TANKS. 3 CONSTRUCTION..4 3-A BATCH PASTEURIZER...5 DOME TOP
Pressurized Filter Up to 1250 gallons
 Pressurized Filter Up to 1250 gallons REMINDER CALL 1-888-755-6750 BEFORE RETURNING TO STORE. ITEM #FP1250UV Questions, problems, missing parts? Before returning to your retailer, call our customer service
Food Jar: Image for reference only: actual product may vary
 C Before first use, and as soon as possible after each use, wash all parts with warm, soapy water. Rinse all parts thoroughly and allow time to dry. Contents should not be left in the container for longer
Installation, Operation and Maintenance Manual for Model 8331 Condensate Accumulator
 Installation, Operation and Maintenance Manual for Model 8331 Condensate Accumulator 2008 Groth Corporation IOM-8331 Ref. ID: 95566 TABLE OF CONTENTS: GENERAL SAFETY INSTRUCTIONS 3 SAFETY WARNINGS 3 INSPECTION
COMPRESSED AIR DRYER. SAFETY... Page 2 MAINTENANCE... Page 5. INSTALLATION... Page 3 PARTS AND KITS... Page 6
 OWNERS MANUAL BOSS COMPRESSED AIR DRYER Distributed by Air & Vacuum Process, Inc. Phone: 281-866-9700 Fax: 281-866-9717 Email: sales@airvacuumprocess.com SAFETY... Page 2 MAINTENANCE... Page 5 INSTALLATION...
Installation and Maintenance "L" and "LS" Series
 Installation and Maintenance "L" and "LS" Series IB-43-E This bulletin should be used by experienced personnel as a guide to the installation and maintenance of "L" and "LS" Series ultra capacity float
Installation of Glass Lined Equipment
 Installation of Glass Lined Equipment Information given herein is for guidance only and may not be complete. It is important that only trained and competent personnel are permitted to handle glass lined
PLEASE READ THIS MANUAL BEFORE USING YOUR APPLIANCE. KEEP THIS MANUAL IN A SAFE PLACE FOR FUTURE REFERENCE.
 File name: ARDI Care & Use Manual.pub Last revised: Oct 10th 2008 PLEASE READ THIS MANUAL BEFORE USING YOUR APPLIANCE. KEEP THIS MANUAL IN A SAFE PLACE FOR FUTURE REFERENCE. ASSEMBLER / INSTALLER Leave
Forteza Series Granite Kitchen Sink
 INSTALLATION MANUAL Forteza Series Granite Kitchen Sink KGD-50 / KGD-52 / KGD-54 / KGU-55 www.kraususa.com I Toll Free: 1.800.775.0703 I 2017 Kraus USA Inc. I REV. November 2, 2017 Thank you for your purchase
SERVICE MANUAL (v1) UL / ULC. WET CHEMICAL HAND PORTABLE RESTAURANT KITCHEN FIRE EXTINGUISHERS Model: SF-6LK / WBDL-6LK
 UL / ULC. WET CHEMICAL HAND PORTABLE RESTAURANT KITCHEN FIRE EXTINGUISHERS Model: SF-6LK / WBDL-6LK") STRIKE FIRST CORPORATION AKC SERVICE MANUAL (v1) UL / ULC WET CHEMICAL HAND PORTABLE RESTAURANT KITCHEN FIRE EXTINGUISHERS Model: SF-6LK / WBDL-6LK All fire extinguishers should be installed, inspected
STRIKE FIRST CORPORATION AKC SERVICE MANUAL (v1) UL / ULC WET CHEMICAL HAND PORTABLE RESTAURANT KITCHEN FIRE EXTINGUISHERS Model: SF-6LK / WBDL-6LK All fire extinguishers should be installed, inspected
Beverage Processing System
 Beverage Processing System The Beverage Processing System provided by Ecomax Industries can be catered to suit client preferences, making them automatic or semi-automatic as required. Ecomax Industries
CARE AND USE GUIDE VACUUM INSULATED HYDRATION BOTTLE
 C CARE AND USE GUIDE VACUUM INSULATED HYDRATION BOTTLE GENERAL CARE Before first use, and as soon as possible after each use, wash all parts with warm, soapy water. Rinse all parts thoroughly and allow
DRY AIR SYSTEMS, INC Metro Boulevard Maryland Heights, Missouri (314) fax (314)
 fax (314)") DRY AIR SYSTEMS, INC. 2655 Metro Boulevard Maryland Heights, Missouri 63043 (314) 344-1114 fax (314) 344-0677 HD SERIES DRIERS TABLE OF CONTENTS WHY AN AIR DRYER 3 WHAT IS A DESICCANT AIR DRYER 3 Desiccant
DRY AIR SYSTEMS, INC. 2655 Metro Boulevard Maryland Heights, Missouri 63043 (314) 344-1114 fax (314) 344-0677 HD SERIES DRIERS TABLE OF CONTENTS WHY AN AIR DRYER 3 WHAT IS A DESICCANT AIR DRYER 3 Desiccant
VP17A BUNN OPERATING & SERVICE MANUAL
 BUNN VP17A OPERATING & SERVICE MANUAL BUNN-O-MATIC CORPORATION POST OFFICE BOX 3227 SPRINGFIELD, ILLINOIS 62708-3227 PHONE: (217) 529-6601 FAX: (217) 529-6644 10860.0001C 9/00 1997 Bunn-O-Matic Corporation
INSTALLATION SETUP AND OPERATING INSTRUCTIONS THERMOSTATIC WATER MIXING VALVE SYSTEM TM-500, TM-550
 C BULLETIN G-6A January 2012 INSTALLATION SETUP AND OPERATING INSTRUCTIONS WATER SYSTEM TM-500, TM-550 IMPORTANT! Provide valve serial number (located on valve body) when ordering parts!! Starting with
AUTO SPEED BLENDER INSTRUCTION MANUAL MODEL: BLCLMB1
 AUTO SPEED BLENDER INSTRUCTION MANUAL MODEL: BLCLMB1 1 TABLE OF CONTENTS IMPORTANT SAFEGUARDS 3 POLARIZED PLUG 4 PRODUCT DIAGRAM 5 USAGE INSTRUCTIONS PREPARING YOUR AUTO SPEED BLENDER FOR USE 6 HOW TO
Chapter 3 Food Safety
 Chapter 3 Food Safety Purchasing and receiving food Food storage Food preparation Cooking and food service Catered food Leftovers Facility maintenance and construction Equipment and utensils Dishwashing
01694-REVC_081315_ENGLISH
 01694-REVC_081315_ENGLISH MODEL: CSP EZ-CREAM TM 3/8 OUNCE, CHICK-FIL-A 120V Series 14I 94152 SAFETY GUIDELINES WHEN USING THIS UNIT: C Warning- E Electrical shock could occur: This unit must be earthed
INSTALLATION, OPERATION AND MAINTENANCE MANUAL FOR COMMERCIAL INDIRECT POWERED WATER HEATER
 INSTALLATION, OPERATION AND MAINTENANCE MANUAL FOR COMMERCIAL INDIRECT POWERED WATER HEATER ELECTRIC HEATER COMPANY BASE MODEL T Edition 0 HUBBELL ELECTRIC HEATER COMPANY P.O. BOX 88 STRATFORD, CT 0665
PLEASE READ THIS MANUAL BEFORE USING YOUR APPLIANCE. KEEP THIS MANUAL IN A SAFE PLACE FOR FUTURE REFERENCE.
 File name: ARFG-42FB Care & Use Manual.pub Last revised: June 3rd 2008 PLEASE READ THIS MANUAL BEFORE USING YOUR APPLIANCE. KEEP THIS MANUAL IN A SAFE PLACE FOR FUTURE REFERENCE. ASSEMBLER / INSTALLER
20 INCH ELECTRIC GRIDDLE
 20 INCH ELECTRIC GRIDDLE USER GUIDE Now that you have purchased a Chefman product you can rest assured in the knowledge that as well as your 3-year parts and labor warranty you have the added peace of
INSTALLATION ADJUSTMENT SERVICE
 Bulletin XL-670 July 201 INSTALLATION ADJUSTMENT SERVICE HIGHLOW THERMOSTATIC WATER MIXING VALVE MODEL XL-670-LF IMPORTANT! Provide valve serial number, (located on valve cover) when ordering parts!! ECO-MIX
INFINITY FLUIDS CORPORATION
 INFINITY FLUIDS CORPORATION INFINITY FLUIDS CORPORATION 344 FRANKLIN STREET WORCESTER, MA 01522 888-565-8137 508-347-3674 CRES PRODUCT: WATER/LIQUID HEATER AIR/GAS HEATER INLINE/INSTANTANEOUS STEAM GENERATORS
Chiller with BP-1 1/2 oz Pump
 Chiller with BP- / oz Pump MODEL: CCP CHILLER WITH BP- / OZ PUMP 800 0V BP- / OZ PUMP ONLY 888 Thank You...for purchasing our Chiller with / oz Pump. This quality, NSF listed pump delivers precise, chilled
TITAN FLOW CONTROL, INC.
 PREFACE: TITAN FLOW This manual contains information concerning the installation, operation, and maintenance of Titan Flow Control (Titan FCI) Suction Diffusers. To ensure efficient and safe operation
Table of Contents Important Safeguards 2 Introduction 3 Installation 4 Operation 5 Cleaning Pattern 5 Automatic Shutoff and Removal 6 Maintenance 6
 Table of Contents Important Safeguards 2 Introduction 3 Installation 4 Operation 5 Cleaning Pattern 5 Automatic Shutoff and Removal 6 Maintenance 6 Warranty 8 WARNING: To reduce the risk of fire, electrical
INSTALLATION AND OPERATION INSTRUCTIONS LC-D SERIES COFFEE CONCENTRATE BREWER WITH DIGITAL ELECTRONIC CONTROL CENTER
 107353 1-00 INSTALLATION AND OPERATION INSTRUCTIONS LC-D SERIES COFFEE CONCENTRATE BREWER WITH DIGITAL ELECTRONIC CONTROL CENTER PLUMBER'S INSTALLATION INSTRUCTIONS CAUTION: Power to brewer must be OFF
Food Waste Disposer Instruction Manual
 Food Waste Disposer Instruction Manual See insert for specific information about your new disposer NOTE: IMPORTANT: CAUTION: This Food Waste Disposer has been designed to operate on 110-120 Volt, 60 Hz
INSTALLATION, OPERATION & MAINTENANCE AVANTCO SERIES 177AG OWNER S MANUAL
 INSTALLATION, OPERATION & MAINTENANCE AVANTCO SERIES 177AG OWNER S MANUAL Manual Griddles: Radiant Charbroilers: Hot Plates: 177AG24MG 177AG36MG 177AG24RC 177AG36RC 177AGR212 All equipment manufactured
OUTLET HOT INLET COLD INLET INSTALLATION
 Bulletin G-29 December 2007 INSTALLATION ADJUSTMENT SERVICE TYPE TM-28 IMPORTANT! Provide valve serial number (stamped on cover of valve) when ordering parts!! Valve manufactured after July 2007 starting
America s Walk-In Tub. Installation & Instructions. Manufactured by. A Division of Spa World Corp NW 35th Avenue ANSI-Z124.1
 America s Walk-In Tub Installation & Operational Instructions REEF SOAKER ASME A112.19.7-2006 ANSI-Z124.1 Manufactured by ACCESS TUBS A Division of Spa World Corp. 5701 NW 35th Avenue Miami, Florida 33142
CARE AND USE GUIDE UNDER ARMOUR HYDRATION BOTTLES
 C CARE AND USE GUIDE UNDER ARMOUR HYDRATION BOTTLES GENERAL CARE Before first use, wash all parts with warm, soapy water. Rinse all parts thoroughly and allow time to dry. Contents should not be left in
Use & Care Guide. Get the most from your new Keurig brewer
 Use & Care Guide Get the most from your new Keurig brewer ADD DESCALE MAX. ADD DESCALE ADD DESCALE ADD DESCALE Before You Brew 1 Plug & Place Rinse & Fill 2 Remove packing tape from brewer and plug into
Phone: x121
 Page of Customer: Tara Backes Address: Keller Graduate School of Management Email: tnbackes@me.com Phone: 503-432-5864 Cell: Fax: Date Sent: 3/8/202 Price Updated: 5/3/20 Quoted By: Rob Sherman Phone:
Gas Connector Installation Instructions
 Gas Connector Installation Instructions 6015 Enterprise Drive Export, PA 15632 USA 1-800-DORMONT (367-6668) (724) 733-4800 Fax (724) 733-4808 www.dormont.com Safety Precautions - Read warnings carefully
USER MANUAL. PEDESTAL FAN (16 Inch)
") USER MANUAL PEDESTAL FAN (16 Inch) ACFP1016 Hydrofarm.com TABLE OF CONTENTS OVERVIEW 2 PARTS LIST - (WHAT S IN THE BOX) 3 IMPORTANT SAFEGUARDS 4 ASSEMBLY INSTRUCTIONS 4 ASSEMBLY 4 ELECTRIC SCHEMATIC DIAGRAM
USER MANUAL PEDESTAL FAN (16 Inch) ACFP1016 Hydrofarm.com TABLE OF CONTENTS OVERVIEW 2 PARTS LIST - (WHAT S IN THE BOX) 3 IMPORTANT SAFEGUARDS 4 ASSEMBLY INSTRUCTIONS 4 ASSEMBLY 4 ELECTRIC SCHEMATIC DIAGRAM
FOOD PREPARATION AND SERVICE - PART 3 SELF INSPECTION CHECKLIST
 OPTIONAL INFORMATION Name of School: Date of Inspection: Vocational Program/Course/Room: Signature of Inspector: FOOD PREPARATION AND SERVICE - PART 3 Guidelines: This checklist covers some of the regulations
Maintenance 5-1. Good maintenance is essential for cleaning results, and long economical life of the washer.
 Maintenance 5-1 5 Maintenance Purpose This chapter discusses the maintenance of your StingRay Parts Washer. In general, the washer is not maintenance-intensive. A few key items, however, need regular,
TABLE OF CONTENTS INSTRUCTIONS FOR USE OF CENTRI-MATIC III 286P-UL IMPORTANT INSTRUCTIONS FOR USE OF CENTRI-MATIC III 286P-UL LIMITED WARRANTY
 F r es hl ys quee z ed, L L C www. dr i nk f r es hl y s quee z ed. c om i nf o@dr i nk f r es hl y s quee z ed. c om - - - TABLE OF CONTENTS PAGE 1 TABLE OF CONTENTS PAGE 2-3 PAGE 4 PAGE 5 INSTRUCTIONS
TQ Series. Electronic Control Pump Instruction Manual. 50Hz. ISO 9001 Certified Walrus Pump Co., Ltd.
 TQ Series Electronic Control Pump Instruction Manual 50Hz ISO 9001 Certified Walrus Pump Co., Ltd. EC Declaration of Conformity Manufacturer: Walrus Pump Co., Ltd. Address: No. 83-14, Dapiantou, Sanjhih
55-Gallon Dispenser Package
 INSTRUCTIONS-PARTS LIST INSTRUCTIONS This manual contains important warnings and information. READ AND KEEP FOR REFERENCE. 308 666 Rev. A Husky 715 55-Gallon Dispenser Package 100 psi (6.9 bar) Maximum
Installation & Operation Manual Ice Cream Freezers
 Installation & Operation Manual Ice Cream Freezers Please read this manual completely before installing or operating this unit! BACF11 BACF15 Blue Air reserves the right to make product modification at
southbend OWNER'S MANUAL INSTALLATION USER'S GUIDE DIRECT STEAM TILTING KETTLE MODELS: KDLT, KDPT
 southbend A MIDDLEBY COMPANY OWNER'S MANUAL INSTALLATION USER'S GUIDE DIRECT STEAM TILTING KETTLE MODELS: KDLT, KDPT These instructions should be read thoroughly before attempting installation. Set up.
INSTALLATION SETUP AND OPERATING INSTRUCTIONS THERMOSTATIC WATER MIXING VALVE SYSTEM * TM-500A, TM-550A
 C ASSE 1017 BULLETIN G-6B March 2009 INSTALLATION SETUP AND OPERATING INSTRUCTIONS WATER SYSTEM * TM-500A, TM-550A IMPORTANT! Provide valve serial number (located on valve body) when ordering parts!! *ASSE
Models: DB-2-HF, DB-3-HF, DB-4-HF, and DB-5-HF. For Service Information, Call
 Service Manual Design Basics Hot Food Tables Models: DB-2-HF, DB-3-HF, DB-4-HF, and DB-5-HF For Service Information, Call 800-544-3057 Please provide the following information: - Model number - Serial
PURPLE K POWDER EXTINGUISHERS INSTALLATION, OPERATION, MAINTENANCE AND RECHARGE MANUAL
 PURPLE K POWDER EXTINGUISHERS INSTALLATION, OPERATION, MAINTENANCE AND RECHARGE MANUAL NO. 05602 FOR AMEREX STORED PRESSURE, HAND PORTABLE DRY CHEMICAL FIRE EXTINGUISHERS. ABC (Ammonium Phosphate Base)
Model A Pipe Line Strainer 3, 4, 6, 8 & 10 Inch (DN80, DN100, DN150, DN200 & DN250) 175 psi (12,1 bar) General Description.
 175 psi (12,1 bar) General Description.") Technical Services: Tel: (00) 31-9312 / Fax: (00) 91-5500 Customer Service/Sales: Tel: (1) 50-5000 / (00) 55-523 Fax: (1) 50-5010 / (00) -1295 Model A Pipe Line Strainer 3,,, & 10 Inch (DN0, DN100,, DN200
Technical Services: Tel: (00) 31-9312 / Fax: (00) 91-5500 Customer Service/Sales: Tel: (1) 50-5000 / (00) 55-523 Fax: (1) 50-5010 / (00) -1295 Model A Pipe Line Strainer 3,,, & 10 Inch (DN0, DN100,, DN200
1500 Watt Iron. OWNER'S MANUAL Model GI465D 120V., 60 Hz., 1500 Watts. 94 Main Mill Street, Door Bois Franc
 OWNER'S MANUAL Model GI465D 120V., 60 Hz., 1500 Watts 1500 Watt Iron U.S.: EURO-PRO Operating LLC Canada: EURO-PRO Operating LLC 94 Main Mill Street, Door 16 4400 Bois Franc Plattsburgh, NY 12901 St. Laurent,
IN EQUIPMENT AND TECHNOLOGY
 LEADERSHIP IN EQUIPMENT AND TECHNOLOGY Walker Engineered Products, the leader in the design, manufacture and service of vessels provides the highest quality solutions in stainless fabrication technology
Natural Mist Humidifier. Vicks. (Model V3500) IMPORTANT! READ AND SAVE THESE INSTRUCTIONS. Use and Care Manual
 IMPORTANT! READ AND SAVE THESE INSTRUCTIONS. Use and Care Manual") IMPORTANT! READ AND SAVE THESE INSTRUCTIONS Vicks Natural Mist Humidifier (Model V3500) Use and Care Manual If you have any questions about the operation of your Vicks Natural Mist Humidifier, call our
IMPORTANT! READ AND SAVE THESE INSTRUCTIONS Vicks Natural Mist Humidifier (Model V3500) Use and Care Manual If you have any questions about the operation of your Vicks Natural Mist Humidifier, call our
ST. KITTS CEILING FAN
 ITEM #0845047 ST. KITTS CEILING FAN MODEL #40829 Questions, problems or missing parts? Before returning this item to your retailer, call our customer service department at 1-800-643-0067, Monday - Thursday,
REFRIGERATED DROP-INS (2-6)FT-DI Installation and Operating Manual
FT-DI Installation and Operating Manual") REFRIGERATED DROP-INS (2-6)FT-DI Installation and Operating Manual For service information call 800-544-3057 Please have the following information available before calling. Information can be found on
REFRIGERATED DROP-INS (2-6)FT-DI Installation and Operating Manual For service information call 800-544-3057 Please have the following information available before calling. Information can be found on
20 High velocity Air
 20 High velocity Air Circulator 66878 Set up and Operating Instructions Distributed exclusively by Harbor Freight Tools. 3491 Mission Oaks Blvd., Camarillo, CA 93011 Visit our website at: http://www.harborfreight.com
ICED CAPPUCCINO MACHINE Taylor MODEL: 390
 4.8.6.3 ICED CAPPUCCINO MACHINE Taylor MODEL: 390 LOCATION: Front of House WHEN CLEANED: Daily, Weekly, Monthly, Seasonal TOOLS/SUPPLIES REQUIRED: Salmon Cloth 2 or 3-Compartment Sink Sink Detergent Sanitizer
Electric Digital Kettle
 Electric Digital Kettle OWNER S MANUAL Model EK119H 120V., 60Hz., 1800 Watts. EURO-PRO Operating LLC Boston, MA, 02465 1 (800) 798-7398 www.euro-pro.com COPYRIGHT 2008 EURO-PRO OPERATING LLC IMPORTANT
Power Washer Maintenance
 Power Washer Maintenance Purpose The maintenance of your MART Power Washer. In general, the washer is not maintenance-intensive. A few key items, however, need regular, scheduled care: Use the information
MODEL HBX-1 P/N 3G59332
 MODEL HBX-1 P/N 3G59332 LIMITED WARRANTY Getz Equipment Innovators warrants its products, and component parts of any product manufactured by Getz Equipment Innovators, to be free from defects in material
INSTRUCTION MANUAL HS-229G
 INSTRUCTION MANUAL HS-229G 510977 STEP 1 - Where to Install the Thermostatic Steam Trap Determine where to install the thermostatic steam trap based on the following information. a. The trap should be
SYSTEMS for CATALYTIC FILTERS
 OP40U5F, OP40B5F, OP80U10F, OP80B10F, OP120U15F & OP120B15F INSTALLATION, OPERATION & SERVICE INSTRUCTIONS Hydrogen Sulfide Removal SYSTEMS for CATALYTIC FILTERS NO DIAPHRAGMS OR AIR CELLS COMPLETELY CORROSION
Eco-Steamer SSC-0312 INSTRUCTION MANUAL CONTENTS
 INSTRUCTION MANUAL Eco-Steamer SSC-0312 CONTENTS Important Safeguards...1 Description of Eco-Steamer...2 Main Features of Eco-Steamer...2 Instructions for Use...3 How to Assemble and Use...3 Accessories...3
AV17 Series Switch-Tek Manual Direct and Remote Drum Mount Float Alarm 17 SEPT 08 Rev A
 AV17 Series Switch-Tek Manual Direct and Remote Drum Mount Float Alarm 17 SEPT 08 Flowline, Inc. 10500 Humbolt Street Los Alamitos, CA 90720 Tel: (562) 598-3015 Fax: (562) 431-8507 www.flowline.com 17
REIMERS ELECTRA STEAM, INC. INSTRUCTION MANUAL JG & JJ MODELS
 REIMERS ELECTRA STEAM, INC. P.O. BOX 37 4407 MARTINSBURG PIKE CLEAR BROOK, VA 22624 PHONE:540-662-3811 FAX:540-665-8101 EMAIL: Sales@reimersinc.com INSTRUCTION MANUAL JG & JJ MODELS READ THIS FIRST CAUTION:
Bob White Systems. the Bucket Milker Manual - Cow
 Bob White Systems the Bucket Milker Manual - Cow Attention: Please read instructions thoroughly before using equipment Upon receiving the unit, please check IMMEDIATELY to see whether there is any visible
Installation Guide. Manufactured for Aero-Spa, LLC Web:
 Installation Guide Manufactured for Aero-Spa, LLC E-Mail: info@aero-spa.net Web: www.aero-spa.net For outdoor use only! WARNING Pool care and sanitizing is the sole responsibility of the owner. In some
Mixing Tank, 500 Gallon with Agitator
 STANDARD OPERATING PROCEDURE Mixing Tank, 500 Gallon with Agitator Model: PCP Manufacturer: Paul Mueller Company Location: Wet Processing Pilot Plant, 1091 Food Sciences Building Publication Date: 04/29/2015
K-SELECT Use & Care Guide. Get the most from your new Keurig brewer
 K-SELECT Use & Care Guide Get the most from your new Keurig brewer Small Cup MAX. Before You Brew 1 2 Plug & Place Rinse & Fill Remove packing tape from brewer and plug into a grounded outlet. Place a
K-COMPACT Use & Care Guide. Get the most from your new Keurig brewer
 K-COMPACT Use & Care Guide Get the most from your new Keurig brewer Before You Brew 1 Plug & Place 2 Rinse & Fill Remove packing tape from brewer and plug into a grounded outlet. Place a large mug (10
ULTRASONIC humidifier
 BU5000_5100_5200-U_07EM2.qxd 7/23/07 13:49 Page 1 ULTRASONIC humidifier BU5000 2007 Sunbeam Products, Inc. doing business as Jarden Consumer Solutions. All Rights Reserved. Printed in China BU5000//07EM2
ROTATING WAFFLE MAKER
 ROTATING WAFFLE MAKER Model Number: 104553 UPC: 681131045537 Customer Assistance 1-855-451-2897 (US) Please consider the option to recycle the packaging material and donate any applianceyou are no longer
568X, 587X, 588X Series
 Please read and save this Repair Parts Manual. Read this manual and the General Operating Instructions carefully before attempting to assemble, install, operate or maintain the product described. Protect
MAYFIELD CEILING FAN LISTED E ITEM # MODEL #BTH44ABZC5C BTH44BNK5C Español p. 20 ATTACH YOUR RECEIPT HERE.
 Harbor Breeze is a registered trademark of LF, LLC. All Rights Reserved. ITEM #0331094 0331096 MAYFIELD CEILING FAN MODEL #BTH44ABZC5C BTH44BNK5C Español p. 20 ATTACH YOUR RECEIPT HERE Serial Number Purchase
48 Vanguard Belt Drive Fans Installation and Operators Instruction Manual
 8 Vanguard Belt Drive Fans Installation and Operators Instruction Manual Thank You The employees of Chore-Time Equipment would like to thank your for your recent Chore-Time purchase. If a problem should
FOOD PREPARATION AND SERVICE - PART 2 SELF INSPECTION CHECKLIST. Food Preparation
 OPTIONAL INFORMATION Name of School: Date of Inspection: Vocational Program/Course/Room: Signature of Inspector: FOOD PREPARATION AND SERVICE - PART 2 Guidelines: This checklist covers some of the regulations
(3 plastic wire connectors,blade balancing kit, 2 extra mounting screws #10-32 for outlet box.)
") Excel Lighting & Manufacturing Ltd. Lifetime Limited Warranty Excel Lighting & Manufacturing Ltd. Warrants the fan motor to be free from defects in workmanship and material present at time of shipment
Excel Lighting & Manufacturing Ltd. Lifetime Limited Warranty Excel Lighting & Manufacturing Ltd. Warrants the fan motor to be free from defects in workmanship and material present at time of shipment
The University of Michigan Small Group Housing Kitchen Guidelines
 The University of Michigan Small Group Housing Kitchen Guidelines Introduction The University of Michigan Department of Environment, Health & Safety (EHS) conduct kitchen inspections in off-campus housing
FFP S700 SERIES. Pull-Out Spray Faucet. Installation guide
 FFP S700 SERIES Pull-Out Spray Faucet Installation guide G 1782 G 1748.XX G 29016 G 1156 G R0239.XX G 13396.XX G R0637 G R1664 G 1636 G 1463 TECHNICAL DATA Minimum working pressure 0,5 bar Maximum working
CELDEK Evaporative Cooler Module Installation, Operation, and Maintenance Manual. CELDEK Evaporative Cooler
 CELDEK Evaporative Cooler Module Installation, Operation, and Maintenance Manual CELDEK Evaporative Cooler RECEIVING AND INSPECTION Upon receiving unit, check for any interior and exterior damage, and
Ultrasonic Humidification System Model 5462 & Model 5472 OPERATING MANUAL
 Ultrasonic Humidification System Model 5462 & Model 5472 OPERATING MANUAL 6/30/06 www.electrotechsystems.com TABLE OF CONTENTS 1.0 General Page 01 2.0 Description 01 3.0 Set-Up 01 4.0 Model 5462 03 4.2
Instruction Manual. Cheese Warmer with Pump
 Instruction Manual Cheese Warmer with Pump 10700 Medallion Drive, Cincinnati, Ohio 45241-4807 USA 2013 Gold Medal Products Co. Part No. 38298 SAFETY PRECAUTIONS Page 2 INSTALLATION INSTRUCTIONS Inspection
High Capacity Instantaneous Steam Fired Water Heater
 MODEL F High Capacity Instantaneous Steam Fired Water Heater Features Compact High Capacity Design Packaged System Water heater is factory assembled on an all welded steel mounting frame to save time and
ELSTON 52 CEILING FAN
 ELSTON 52 CEILING FAN MODEL #10290 Español p. 21 Questions, problems, missing parts? Before returning to your retailer, call our customer service department at 1-877-361-3883, Monday - Thursday, 8 am -
AMERICA AMERICA 52 CEILING FAN INSTALLATION AND OPERATION MANUAL
 AMERICA AMERICA 52 CEILING FAN INSTALLATION AND OPERATION MANUAL Ceiling Fan Weight Including Accessories: 21.00 Lbs. READ AND SAVE THESE INSTRUCTIONS TABLE OF CONTENTS Tools and Materials Required...
Installation Instructions / Warranty
 Installation Instructions / Warranty Massaud 18112001 Massaud 18115001 Axor Massaud 3-Hole Lavatory Mixer Trim with Short Spout 18112001 Axor Massaud 3-Hole Lavatory Mixer Trim with Long Spout 18115001
Instruction Manual - Anti-Siphon Ejector Chlorine & Sulfur Dioxide 500 PPD (10 kg/h) Maximum Capacity
 Maximum Capacity") - Anti-Siphon Ejector Chlorine & Sulfur Dioxide 500 PPD (10 kg/h) Maximum Capacity 100 PPD (2 kg/h) Chlorine or Sulfur Dioxide 250 & 500 PPD (5 & 10 kg/h) Chlorine or Sulfur Dioxide Anti-Siphon Ejector
- Anti-Siphon Ejector Chlorine & Sulfur Dioxide 500 PPD (10 kg/h) Maximum Capacity 100 PPD (2 kg/h) Chlorine or Sulfur Dioxide 250 & 500 PPD (5 & 10 kg/h) Chlorine or Sulfur Dioxide Anti-Siphon Ejector
Ultima Dual Stage Blender
 Ultima Dual Stage Blender BL800 OWNER S GUIDE HELP LINE 1 877 646-5288 IMPORTANT SAFETY INSTRUCTIONS For Household Use Only WHEN USING ELECTRICAL APPLIANCES, BASIC SAFETY PRECAUTIONS SHOULD ALWAYS BE FOLLOWED,
SUTTON 52 CEILING FAN
 SUTTON 52 CEILING FAN MODELS #50188, 50189, 50190 Español p. 19 Questions, problems, missing parts? Before returning to your retailer, call our customer service department at 1-877-361-3883, Monday - Thursday,
FLUSH WATER SAVER DUAL FLUSH KIT
 FLUSH CH ICE Version 12.26.08 FC002 WATER SAVER DUAL FLUSH KIT Dear Consumer; You have purchased a high quality water saver dual flush toilet valve kit. Every care has been taken during manufacturing to
USER S MANUAL BUCKET FAN SERIES BUCKET FAN WHISPER SERIES
 USER S MANUAL BUCKET FAN SERIES BUCKET FAN WHISPER SERIES Bucket Fan 420 Bucket Fan 1055 Bucket Fan 1460 420 1055 1460 2 Bucket Fan CONTENT INTRODUCTION 3 USE 3 WHAT S INCLUDED IN THE BOX 3 DESIGNATION
VENTLESS EXHAUST HOOD OPERATORS MANUAL AND PARTS LIST REV. MAY 2016
 VENTLESS EXHAUST HOOD OPERATORS MANUAL AND PARTS LIST REV. MAY 2016 HOODMART 172 REASER COURT ELYRIA, OH 44035 PHONE: (800)-715-1014 FAX: (800)-716-1214 1 THIS PAGE LEFT BLANK INTERNTIONALLY 2 LIMITED
SEARious Slow Cooker
 SEARious Slow Cooker MC501 MC501C OWNER S GUIDE HELP LINE 1 877 646-5288 IMPORTANT SAFETY INSTRUCTIONS For Household Use Only WHEN USING ELECTRICAL APPLIANCES, BASIC SAFETY PRECAUTIONS SHOULD ALWAYS BE
AeroVent 3X Product Manual
 Product Manual AeroVent 3X TABLE OF CONTENTS Precautionary Warning... Page 1 Assembly... Page 2 Assembly Drawing... Page 3 Parts List... Page 3 Operation... Page 4 Maintenance... Page 5 Cobalt Point Replacement...
3-in-1 Cooking System
 MC750 OWNER S GUIDE 3-in-1 Cooking System www.ninjakitchen.com IMPORTANT SAFETY INSTRUCTIONS For Household Use Only WHEN USING ELECTRICAL APPLIANCES, BASIC SAFETY PRECAUTIONS SHOULD ALWAYS BE FOLLOWED,
01550-RevG IMPORTANT INSTRUCTIONS WEBSITE MANUAL
 01550-RevG-082712 IMPORTANT INSTRUCTIONS WEBSITE MANUAL english model: FSAF Food Server Advantage TM Fudge/Caramel 120V Series 12A 85070 Unit Set-Up Always clean unit thoroughly before first use. See UNIT
Installation Instructions / Warranty
 Installation Instructions / Warranty Metris 31063XX1 Metris 31263XX1 Talis 32310XX1 Focus 31730001 Metris Widespread Lavatory Faucet Metris Widespread Bidet Faucet Talis S Widespread Lavatory Faucet Focus
OSD10, OSD20 & OSD30 DRINK DISPENSER
 INSTRUCTION MANUAL Eat well, drink well and live well with Omega www.omegajuicers.com OSD10, OSD20 & OSD30 DRINK DISPENSER English PLEASE READ THESE INSTRUCTIONS CAREFULLY BEFORE USE OMGMAN 082009 RevA
Installation Instructions / Warranty. PuraVida 15775XX1
 Installation Instructions / Warranty PuraVida 15775XX1 Technical Information Recommended water pressure 15-75 psi Max. water pressure 145 psi Recommended hot water temp. 120-140 F* Max. hot water temp
INSTALLATION and OPERATION MANUAL DIRECT STEAM KETTLES MOUNTED ON ELECTRIC BOILER BASE CABINET MODELS: EMT-6 EMT-10 EMT-12 EMT-6-6 EMT-10-6 EMT-10-10
 INSTALLATION and OPERATION MANUAL DIRECT STEAM KETTLES MOUNTED ON ELECTRIC BOILER BASE CABINET MODELS: EMT-6 EMT-10 EMT-12 EMT-6-6 EMT-10-6 EMT-10-10 CROWN FOOD SERVICE EQUIPMENT LTD. 70 OAKDALE ROAD,