Owner Instructions TTB 4045/100 TTB 4055/100 TTB 4552/100. Original instructions Warning! Read instructions before using the machine TTB 4552/100
|
|
|
- Harvey Whitehead
- 5 years ago
- Views:
Transcription


1 Owner Instructions Original instructions Warning! Read instructions before using the machine TTB 4045/100 TTB 4055/100 TTB 4552/100 TTB 4552/100 TTB 4055/100 TTB 4045/
2 ! Before continuing, please refer to Quick Set Up Guide on Page 8! Index Machine overview Control panel overview Rating label / Personal Protective Equipment / Recycling Safety Precautions Page 2 Page 3 Page 4 Page 5 Page 6 / 7 Quick set-up guide Page 8 Machine set-up Fitting the brushes Tipping the brush deck Fitting and lowering the floor-tool Filling the clean-water tank Control of Substances Hazardous to Health (COSHH) Page 10 Page 10 Page 10 Page 11 Page 11 Machine Operation Pre-cleaning advice Pre-scrub mode Floor-tool in use Break away floor-tool feature Setting the cleaning controls Brush overload (Over Current) Page 11 Page 12 Page 12 Page 12 Page 13 Page 13 Regular Maintenance Cleaning Tanks and Filters Separator removal and cleaning Cleaning the bottom tank and filter Changing the floor-tool blades Page 14 Page 14 Page 14 Page 15 Machine Charging Battery care Hour meter Trouble shooting Specifications Recommended spare parts Schematic diagram Declaration document Warranty Company addresses Page 16 Page 17 Page 18 Page 18 Page 19 Page 20 Page 22 Page 23 Page 24 2


 drainage hose 20 Clean-water filler hose 18 3 21")
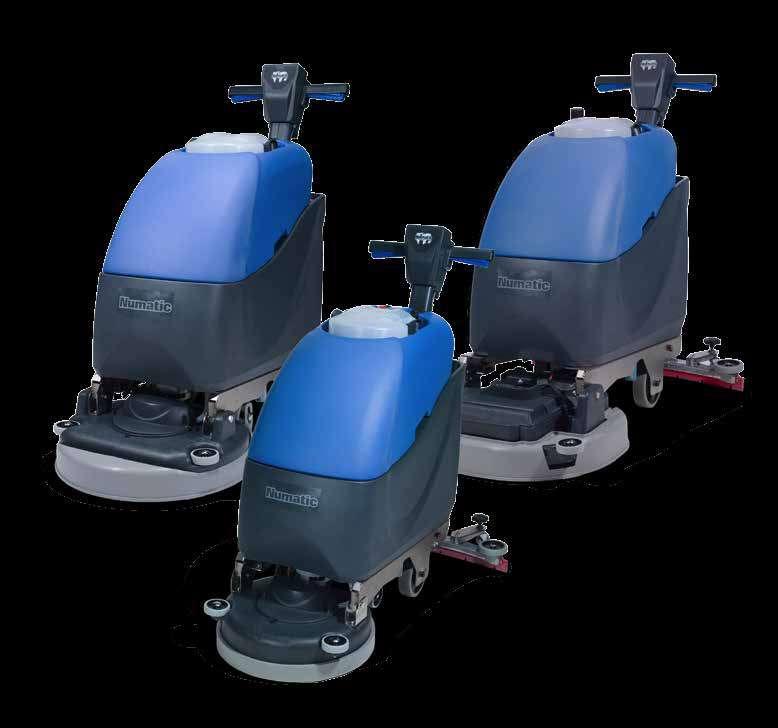
3 Machine Overview Fuse 11 Clean-water filler cap 2 Waste-water tank 12 Floor-tool vacuum hose 3 Clean-water tank 13 Vacuum hose 4 Brush deck 14 Isolator Key 5 Clean Water Filter 15 Floor-tool Lifting Lever 6 Rear wheels 16 Hour Meter - TTB machines only 7 Clean water On / Off tap 17 Floor-tool retaining knobs 8 Separator 18 Squeegee blades 9 Clean-water emptying hose 19 Deck Locking Mechanism 10 Top tank (waste water) drainage hose 20 Clean-water filler hose Operator control panel


4 Control Panel Overview Battery Charge Level Meter 7 Cycle sequence button 2 Hi / Lo Indicator 8 Water Flow On / Off Button 3 Brush Operation / Load Indicator 9 Handle Position Lever 4 Vacuum Indicator 10 On / Off Switch 5 Water Flow Indicator 11 On / Off Triggers 6 Hi / Lo Button 12 Charging Point For full instructions on control panel set up and use, see setting the cleaning controls, page 13. 4


5 About the Machine Rating Label 1 Company Name & Address 2 Machine Description 3 Voltage Frequency 4 Power Rating 5 Max Gradient 6 Weight (ready to use) 7 CE Mark 8 WEEE Logo 9 Ingress Protection Rating 10 Machine year/week Serial number Machine Description Noise Rating Hand Arm Vibration WEEE (Waste, Electrical and Electronic Equipment) Scrubber dryer Accessories and packaging should be sorted for environmentally-friendly recycling. Only for EU countries. Do not dispose of scrubber-dryer into household waste. According to the European Directive 2002/96/EC on waste electrical electronic equipment and its incorporation into national law. Scrubber-dryers that are no longer suitable for use must be separated, collected and sent for recovery in an environmentally-friendly manner. PPE (Personal protective equipment) that may be required for certain operations. Ear Protection Safety Footwear Head Protection Safety Gloves Dust/Allergens Protection Eye Protection Protective Clothing Hi-Vis Jacket Caution Wet Floor Sign Note: A risk assessment should be conducted to determine which PPE should be worn. Safety Critical Component Charging Lead: H05VV-F x 1.0 mm 2 x 3 core Battery Charger: Volt (50/60 Hz) In the event of a breakdown contact your Numatic dealer or the Numatic Technical help line +44 (0)
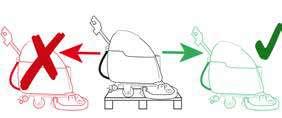
6 ORIGINAL INSTRUCTIONS READ MANUAL BEFORE USE Information for Scrubber Dryer Component Interval Inspect for Charging Lead DAILY Scuffing, cracks, splits, conductors showing Brushes DAILY Bristle damage, wear, drive collar wear Squeegee Blade BEFORE EACH USE Wear, cracks, splits Filters BEFORE EACH USE Clogging and debris retention Tanks AFTER EACH USE Rinse dirty water tank after use WARNING As with all electrical equipment care and attention must be exercised at all times during its use, in addition to ensuring that routine and preventative maintenance is carried out periodically in order to ensure its safe operation. Failure to carry out maintenance as necessary, including the replacement of parts to the correct standard could render this equipment unsafe and the manufacturer can accept no responsibility or liability in this respect. When ordering spare parts always quote the Model Number / Serial Number specified on the Rating Plate. This appliance is not intended for use by persons (including children) with reduced physical, sensory or mental capabilities, or lack of experience and knowledge, unless they have been given supervision or instruction concerning use of the appliance by a person responsible for their safety. Children should be supervised to ensure that they do not play with the appliance. If this product does not have a factory installed Numatic battery charger and batteries then it is the responsibility of the owner and user of the product to ensure that the charging system and battery combination are compatible, fit for purpose and safe to use. CAUTION This machine is not suitable for picking-up hazardous dust. Do not use on surfaces having a gradient exceeding that marked on the appliance. The machine is not to be stored outdoors in wet conditions. This machine is for indoor use only. Read the instruction manual before using the appliance. This product meets the requirements of IEC NOTES This machine is also suitable for commercial use, for example in hotels, schools, hospitals, factories, shops and offices for other than normal housekeeping purposes. Ensure only competent persons unpack/assemble the machine. Keep your machine clean. Keep your brushes in good condition. Replace any worn or damaged parts immediately. DO Regularly examine the power cord for damage, such as cracking or ageing. If damage is found, replace the cord before further use. Only replace the power cord with the correct Numatic approved replacement parts. Ensure that the work area is clear of obstructions and / or people. Ensure that the working area is well illuminated. Pre-sweep the area to be cleaned. Use steam cleaners or pressure washers to clean the machine or use in the rain. Attempt machine maintenance or cleaning unless the power plug has been removed from the supply outlet. Allow any inexperienced repairs. Call the experts. DON T Strain cable or try to unplug by pulling on cable. Leave the brush pad on the machine when not in use. Allow the machine to be used by inexperienced or unauthorised operators or without appropriate training. Use the machine without the solution tanks properly positioned on the machine, as shown in the instructions. Expect the machine to provide trouble-free, reliable operation unless maintained correctly. Lift or pull the machine by any of the operating triggers, use the main handle. Remove the handle from the machine except for service and repair. Use on surfaces having a gradient exceeding that marked on the machine. 6


7 WARNING Only use brushes provided with the appliance or those specified in the instruction manual. The use of other brushes may impair safety. A full range of brushes and accessories are available for this product. Only use brushes or pads which are suitable for the correct operation of the machine for the specific task being performed. It is essential that this equipment is correctly assembled and operated in accordance with current safety regulations. When using the equipment always ensure that all necessary precautions are taken to guarantee the safety of the operator and any other persons who may be affected. Wear nonslip footwear when scrubbing. Use a respiratory mask in dusty environments. The machine, while charging, must be positioned so that the mains plug is easily accessible. When cleaning, servicing or maintaining the machine, replacing parts or converting to another function the power source shall be switched off. Mains operated machines shall be disconnected by removing the power plug, and battery operated machines shall be disconnected by switching off the isolating key. Machines left unattended shall be secured against unintentional movement. When detergents or other liquids are used, read the manufacturer s instructions. Operators shall be adequately instructed as to the correct use of the machine. Precautions when working with batteries 1. Always wear protective clothing e.g. face visor, gloves and overalls when working with batteries. 2. Whenever possible always use a properly designated and well-ventilated area for charging. Do not smoke or bring naked flames into the charging area. 3. Remove any metallic items from hands, wrists and neck i.e. rings, chains etc. before working on a battery. 4. Never rest tools or metallic objects on top of the battery. 5. When charging is complete disconnect from the mains supply. 6. The batteries must be removed from the machine before it is scrapped. 7. The machine must be disconnected from the supply when removing the battery. 8. The batteries are to be disposed of safely and in accordance with the battery directive. 9. Only use genuine Numatic replacement batteries. 10. Do not allow the batteries to become fully discharged; it may not be possible to recharge them. 11. Do not allow one battery to be discharged separately to the other. 12. Do not mix batteries from different machines. 13. The batteries fitted to this product are Valve Regulated Lead Acid (VRLA) gel electrolyte type. The fitting of any other type of battery may cause a safety hazard. Battery care 1. Always recharge the batteries after use. This can be done at any time its not necessary to wait until they are fully discharged; they do not develop a memory. 2. Leaving the charger to operate for a minimum of 4 hours after the green light has come on, at least weekly, will pro-long battery life. 3. Do not store the machine with the batteries discharged. Daily Keep the machine clean Ensure brushes/ pads/ squeegee/ filters are in good condition Check for any worn or damaged parts and replace immediately Drain and rinse dirty water tank after every use Store machine with brush deck secured in tilted position Weekly as daily and Check brush or pad and skirt and rinse Check floor tool blades for wear and wipe clean Clean separator assembly including filter and check condition of seal Flush out system with clean water and clean filters Do not steam clean or pressure wash Batteries Always recharge the batteries after use Charge for a minimum of 4 hours after the green light has come on, this will prolong battery life 7 TwinTec Maintenance


. Fig.1 Fig.")


 and connect the vacuum and floor-tool hose")

 from a tap or")
 or remove the filler cap from the rear left of")


8 Quick Set-Up Guide!! PLEASE READ BEFORE COMMENCING ANY OPERATION. After the removal of all the packaging, carefully open and check the contents. Ensure the Batteries are charged before use. Using the handle position lever (Fig.1), move the handle into the upright position (Fig.2). Fig.1 Fig.2 Place 50 amp fuse (supplied in the accessory kit) into the fuse holder using the Maxi Fuse puller provided (Fig.3). 50Amp (Fig.4) Shows 50 amp fuse. Fig.3 Fig.4 Place the top tank (waste water) onto the machine (Fig.5) and connect the vacuum and floor-tool hose to the separator (Fig.6). Fig.5 Fig.6 Fit the isolator key and switch the machine on (Fig.7). Fig.7 Fill the bottom tank (Clean Water) from a tap or hose pipe using the Flexi-Fill pipe (Fig.8) or remove the filler cap from the rear left of the machine and fill using a bucket (Fig.9). Add non-foaming cleaning fluid as required (See page 11). The TTB 4045 / TTB 4055 / TTB 4552 all have a water capacity of 40 Litres. Fig.8 Note: Great care must be taken to ensure that contaminants (leaves, hair, dirt, etc.) are not allowed to enter the clean-water tank during the filling process. If using a bucket or similar, ensure it is always clean and free from debris. Fig.9 8

 and rotate the")


")


9 Fitting the Brush / Pad. Push in the deck locking pin (Fig.10) and rotate the brush deck into the operating position (Fig.11). Fig.10 Fig.11 Turn on the clean water tap (Fig.12). On Fig.12 Off To start: hold either on / off trigger and press the yellow on / off switch once (Fig.13). Brush, vacuum and water settings can be controlled by the control panel (See Page 13). Fig.13 Fill the clean-water tank to a Max of 40 litres (see page 11) For operation and cleaning controls (see page 13) Off-Aisle Cleaning Kit (Optional Extra Accessory) TTB = 38mm Ø In the event of a breakdown contact your Numatic dealer or the Numatic Technical helpline +44 (0)

.")

 / pad in place (Fig.15).")

 and rotate the brush deck (Fig.17). Fig.")


. Fig.")
10 Fitting the brushes Machine Set-Up ALWAYS ENSURE THAT THE BATTERY IS DISCONNECTED BEFORE MAKING ANY ADJUSTMENTS Featuring the Nulock brush system. The brush is simply pushed and twisted to lock, making fitting and removal a simple process. The Pad is retained using Numatic s own PadLoc system (ask your supplier for details). Only use manufacturer supplied brushes / pads. TTB 4045 requires a 450mm brush or a 400mm pad. TTB 4055 requires a 550mm brush or a 500mm pad. TTB 4552 requires 2 x 280mm brush or 2 x 280mm pad. Fit the brush / pad to the drive chuck, twist to lock the brush (Fig.14) / pad in place (Fig.15). Fig.14 Fig.15 Tipping the Brush Deck Safety gloves are recommended for the changing of used brushes. To tip the deck into the down position (Operating mode) Press in the brush deck locking pin (Fig.16) and rotate the brush deck (Fig.17). Fig.16 To change to brush deck up position, (Transit mode) simply lift the deck and the sprung loaded locking pin will activate to hold the deck up. Fig.17 Fitting and lowering the Floor Tool The floor-tool has been designed for quick fitting, allowing easy squeegee blade replacement and a safety knock-off feature if the floor-tool gets snagged, whilst in transit. Fig.18 Fit the floor-tool and retain using the detent pin (Fig.18). The lifting strap is held by a detent pin (Fig.19). Fig.19 Raise the floor-tool for transit, lower for cleaning operation using the lifting handle fitted to the back of the machine (Fig.20). We are now ready to set the controls to suit the cleaning conditions. Before any settings can be applied, ensure the brush deck is lowered. Fig Note: It is easier to fit the floor-tool if the weight of the machine is resting on the brush. Ensure the brush is fitted first.


 are not allowed to enter the clean-water")

 For best results")


11 Machine Set-Up Filling the clean-water tank The TTB Range are all equipped with a 40 litre clean-water tank allowing large areas to be cleaned in a single fill. To fill the clean-water tank, use the FLEXI - FILL pipe from either a tap or hose pipe (Fig.21). The large cap can also be used for filling from a bucket or suitable container. Fig.21 Fill the clean-water tank to a maximum of 40 litres, including cleaning chemicals if required. Follow chemical manufacturing guide lines. The clear Dump hose at the rear of the machine can be used to see the level of the clean water. MAX Note: Great care must be taken to ensure that contaminants (leaves,hair, dirt, etc) are not allowed to enter the clean-water tank during the filling process. If using a bucket or similar, ensure it is always clean and free from debris. Control of Substances Hazardous to Health (COSHH) For best results use a non-foaming type of chemical, dilute to the manufacturers specification. For further guidance on hazardous substances refer to health and safety instructions online. Visit for UK information.! WHEN HANDLING AND MIXING CHEMICALS. Always ensure that chemical manufacturers safety guidelines are followed.! Only use chemicals recommended for use in auto scrubber-dryers. Pre-cleaning advice Before performing the cleaning operation, place out appropriate warning signs and sweep or dust-mop the floor (Fig.22). Fig Numatic part (629044) Wet Floor sign (available if required)

 to raise and lower the floor-tool.")

. Fig.24 Fig.")


12 Machine Operation Pre-scrub mode The TTB Range has been designed to cope with a variety of floor types and different levels of soiling. On heavily soiled floors use a double scrub technique. First pre-scrub the floor with the floor-tool in the raised position, allow the chemical time to work, then scrub the area a second time with the floor-tool lowered. Refer to (Fig.20) to raise and lower the floor-tool. Floor tool in use The clean-water / chemical mix is dispersed via the THRU-FEED system. The waste water is then retrieved by the floor-tool. Overlap the scrubbing path by 10cm to ensure an even clean (Fig.23). Fig.23 If streaking occurs, wipe the floor-tool blades clean (Fig.24). Fig.24 Fig.25 Breakaway floor-tool The floor-tool design incorporates a safety knock-off feature. Allowing it to safely disengage from its mounting should it become caught on an obstruction, during forward machine movement (See Fig.26). To re-attach the floor-tool blade to its holder. First loosen the retaining knobs on the floor-tool body and slide onto the holding bracket. Fig.26 Tighten retaining knobs to finger tight. Note: Care must be taken to reduce speed when cornering or when manoeuvring around obstacles. Note: The machine will still reverse with the floor-tool in the lowered position, this could possibly damage the blades. Raise the floor-tool before reversing. 12


13 Setting the cleaning controls To activate the machine from SLEEP MODE press either on / off trigger or yellow on / off switch once. The sleep mode will re-activate after 60 seconds if no further controls are used. Stand-by mode will be entered and will illuminate blue display lights. The TTB has been fitted with a Hi - Lo mode, this reduces the noise produced by the vacuum motor. Hi - Lo is only selectable when the machine is in stand-by mode. When the machine is running Hi mode the Hi - Lo indicator will be illuminated blue, this means the Vacuum motor is running at 100% When the machine is in Lo mode and the Hi - Lo indicator is NOT illuminated the Vacuum motor will run at 75% of its capacity. The water and vacuum function can be activated or de-activated when your machine is running i.e. active. Cleaning mode select low and off aisle can only be selected when in Stand-by mode. Fig.27 When the on / off triggers are released the brush motor and the cleaning solution pump will switch off, the vacuum motor will continue for 10 seconds (this is to clear any fluid residue in the hose). The panel if unused will automatically enter SLEEP MODE after 60 seconds. Fig.28 Brush overload The brush motor will cut out and the brush load light will flash if the brush motor has been overloaded (Fig.28). Releasing the handle triggers will allow the machine to stop and reset. If the brush motor keeps overloading consider using a different type of brush. Or move the transit wheels to obtain different brush pressures, Heavy brush load decreases the available battery run time. 13


. Fig.")


 (Fig.33).")

 tank is")


14 Regular Maintenance! ALWAYS ENSURE THAT THE BATTERY IS DISCONNECTED! PRIOR TO ANY MAINTENANCE OPERATION The TTB Range has been designed with ease of use in mind, this included easy stripping-down and cleaning. After use, empty waste-water tank using emptying hose and flush out with clean water (Fig.29). Fig.29 Remove the two hoses to disconnect the separator from the machine (Fig.30). Fig.30 Fig.31 Lift off the separator. The separator has a sealing-rubber which should be examined at every clean-down (Fig.31). Rinse using clean water. Fig.32 Fig.33 Fig.34 Remove the filter fitted into the separator and flush with clean water (Fig.32) (Fig.33). Placed into the top tank is grey filter basket, clean and flush with clean water (Fig.34) (Fig.35). Fig.35 The Bottom (Clean Water) tank is attached to the chassis and should only be removed by a competent service engineer (Fig.36). Clean by flushing with clean water if required. Excess water can be drained using the clear dump hose fitted to the rear of the machine. Fig.36 Located under the left hand side is a clean water filter, ensure the clean water tap is turned off before removing this filter (Fig.37). Clean and flush with clean water if required. Fig.37 Fig.37 14


, turn the floor-tool over and separate the blade")


15 Changing the Floor Tool Blades! ALWAYS ENSURE THAT THE BATTERY IS DISCONNECTED PRIOR TO ANY! MAINTENANCE The floor-tool The TTB range is provided with the aluminium floor-tool shown. Fig.38 To clean the floor-tool, remove securing-pin and disconnect the lifting strap and remove the floor-tool securing pin pull-free the floor-tool from the rear of the machine. Rinse the floor-tool assembly with clean water and refit. Fig.39 Fig.40 Periodically the floor-tool blades should be examined and checked for wear and damage. The blade removal is easy. Simply start by removing the four retaining pins (see Fig.38), turn the floor-tool over and separate the blade carrier from the body (see Fig.39).Peel away the blades from their locating lugs (see Fig.40) and examine or renew as required. Replacement is a reversal of the removal process. Floor-tool overview 1. Floor-tool main body 2. Rear blade 3. Blade carrier 4. Front blade (slotted) 5. Retaining pins x Note: The blades are designed to be reversible, thus extending their useful working life. 15


. Recharge the machine fully after its last use.")
16 Machine Charging To ensure your machine remains at its maximum efficiency and prolong your battery life, please follow the simple steps below: The battery charge level meter displays the charge level of the batteries; when fully charged, all meter lights are illuminated (Fig.41). As the machine is used and the batteries are discharged, the battery charge level meter lights will go out from top to bottom. If the battery-charge level is allowed to discharge to the point that only one red light remains illuminated, the operator should charge the battery. Batteries from new typically retain only 80% of its stated capacity. Batteries will increase to their full capacity after 5-10 charge / discharge cycles. Charge time for a fully discharged basttery, is approximately 8 hours for the TTB 4045/100 / TTB 4055/100 / TTB 4552/100 Range. Spare replacement batteries are available from your supplier. Fig.41 Under normal daily usage: Recharge batteries after each use, regardless of machine operation time. Fig.42 Connect the charger lead supplied, into your machine (Fig.42). Then plug into a suitable power supply (Fig.43). Recharge the machine fully after its last use. Do not leave the machine in a discharged state. Fig.43 Remove the top tank to view the charging light panel located on the front plate. Viewing panel for charging-light sequence (Fig.44). Fig.44 16
 charge completed Charging System Error Unsuitable battery or charging")


. 50 Amp fuse.")
17 Signal (LED) Meaning Red LED on First phase (constant current mode) Yellow LED on Second phase (constant voltage mode) Green LED on Red LED flashing Yellow LED flashing Third phase (constant voltage mode) charge completed Charging System Error Unsuitable battery or charging malfunction safety timer exceeded Internal short circuit, disconnect from power supply, switch power supply, OFF then ON, to restart the charging cycle Battery not connected Under abnormal use: i.e. leaving the machine without charging for a period of time - we advise that you follow these steps: If fuse requires replacing use only Numatic approved part (221107). 50 Amp fuse. If the machine will be standing unused for a period of 30 days or more, then batteries must be fully charged and battery fuse removed using the Maxi fuse-puller provided, prior to this period. Note: Batteries should be recharged every three months. Charge fully the day before you start using the machine again. Hour Meter Fitted to the TTB Range is an hour meter allowing you to monitor the usage of your machine and batteries (Fig.45). Hour meter provides brush run-time only. Fig.45 17
18 Trouble Shooting PROBLEM CAUSE SOLUTION Machine will not operate Missing or blown fuses Battery not connected Low battery charge Fit or replace fuse (page 8) Connect battery (page 8) Charge batteries (page 16) Vacuum will not operate Vacuum not turned on Turn on vacuum (page 13) Poor water pick up Waste-water tank full Clogged / blocked vacuum hose Loose hose connections Debris basket filter clogged / blocked Separator filter clogged / blocked Poor separator seal Damaged separator seal Damaged / split vacuum hose Damaged floor-tool blades Low battery charge Empty waste-water tank (page 14) Remove and clean (page 14) Push tight connections (page 14) Remove and clean (page 14) Remove and clean (page 14) Clean and refit (page 14) Renew (contact service department) Renew (contact service department) Renew (contact service department) Recharge batteries (page 16) No brush / scrub function Little or no water flow Machine just stops while operating No brushes fitted Brush overloaded Clean-water tank empty Clean-water tank filter blocked / clogged Clean water tap not turned on Too much load on the brush system Blown fuse in Battery pack Check and fit (page 10) Reset machine (page 13) Fill clean-water tank (page 11) Remove and clean (page 14) Turn on clean water tap (page 9) Reset the machine and decrease the brush load to best suit the floor type (page 13) Replace 50 Amp fuse (page 8) TTB 4045/100, TTB 4055/100 & TTB4552/100 TTB 4045/100 Capacity Brush Motor Vac Motor Brush Sizes Pad Sizes Weight Protection Class Power 40 L 400W 400W 450mm 400mm 128Kg IPX4 2 x 12V (24V) 100Ah Fluid Flow Speed Run Time Recharge Time Cleaning Speed Hand Arm Vibration Noise Size 0-2L/Min 100 rpm 2.5hrs 8 hrs 0-4kph 0.54m/s 2 70 db(a) Width - 470mm Length mm Height mm TTB 4055/100 Capacity Brush Motor Vac Motor Brush Sizes Pad Sizes Weight Protection Class Power 40 L 400W 400W 550mm 500mm 130Kg IPX4 2 x 12V (24V) 100Ah Fluid Flow Speed Run Time Recharge Time Cleaning Speed Hand Arm Vibration Noise Size 0-2L/Min 100 rpm 2.5hrs 8hrs 0-4kph 0.57 m/s 2 70 db(a) Width - 560mm Length mm Height mm TTB 4552/100 Capacity Brush Motor Vac Motor Brush Sizes Pad Sizes Weight Protection Class Power 40 L 2 x 400W 400W 2 x 280mm 2 x 280mm 134Kg IPX4 2 x 12V (24V) 100Ah Fluid Flow Speed Run Time Recharge Time Cleaning Speed Hand Arm Vibration Noise Size 0-2L/Min 120 rpm 2hrs 8hrs 0-4kph 0.57m/s 2 70 db(a) Width - 565mm Length mm Height mm 18
19 Spare Parts & Accessories Top Tank Blue MM POLYSCRUB BRUSH Separator MM NYLOSCRUB BRUSH SWITCH KEY MM LONGLIFE BRUSH DETENT PIN MM POLYSCRUB BRUSH Vac hose MM NYLOSCRUB BRUSH Floor Tool Hose MM LONGLIFE BRUSH Dump Hose - Top Tank MM POLYSCRUB BRUSH Dump Hose - Bottom Tank MM NYLOSCRUB BRUSH Filler Hose - Bottom Tank MM LONGLIFE BRUSH Dump / Filler Closure - Bottom Tank mm PADLOC DRIVE BOARD Filler Cap Lid mm PADLOC DRIVE BOARD Filler Cap Filter Semi Parabolic Squeegee (4045) Barrel Filter Semi Parabolic Squeegee (4055/4552) Basket Filter Floor Tool Blades - Green PU Clean Water Filter Floor Tool Blades - Red Rubber Clean Water Filter Body Floor Tool Blades - Natural PU Clean Water Filter Clear Bowl Floor Tool Blades - Green PU Clean Water Filter Gasket Floor Tool Blades - Red Rubber Clean Water Filter Mesh Floor Tool Blades - Natural PU AMP MAXI FUSE (BATTERIES) CHARGER CABLE - UK AMP FUSE (CHARGER) 19
20 TTB 4045/100 / TTB 4055/100 TTB 4552/100 Schematic Diagrams Notes 20
21 Notes 21
22 EU Declaration of Conformity 13 EU DECLARATION OF CONFORMITY We hereby declare under our sole responsibility that the following equipment fulfi ls all the relevant provisions of the following EU Directives: Machinery Directive 2006/42/EC EMC Directive 2004/108/EC RoHS Directive 2011/65/EU Machine Description: Type: TTB, ETB series Scrubber Dryer Manufactured by: Numatic International Limited Relevant standards upon which conformity is declared include: IEC :2010 IEC :2002 +A1 EN :2006 EN :1997/A2:2007 IEC 62233:2005 A technical construction fi le for this equipment is retained at the manufacturer s address under the authorisation of the following signatory: Name:Allyn Boyes Position: Technical Manager Signed: Date: 01 /01/2013 Numatic International Limited, Chard, Somerset. TA20 2GB GB 22

23 23 Warranty


24 This machine has been packed with the following: Charging Lead Brush / Pad Floor Tool Fuses Isolator Pin Hose Hook 38mm / 32mm Adaptor Signed Distributed by Numatic International Limited Chard, Somerset TA20 2GB ENGLAND. Telephone Fax: Subject to change without prior notice /14 (A01)
Owner Instructions Original Instructions Warning! Read instructions before using the machine. LoLine NLL 332 NLL 415
 Owner Instructions Original Instructions Warning! Read instructions before using the machine LoLine NLL 332 NLL 415 2 C A B A + B A + B + C Auto - Stop = 30 mins 3 1 2 3! 4 5 6 X 2 7 8 9 X 2 4 10 11 12
Trouble Shooting and Help Guide TT / TTB 1840
 FloorCare Trouble Shooting and Help Guide TT / TTB 1840 Make sure you read and fully understand your 1840 manual before using the machine. The 1840 has been designed to scrub and dry a variety of hard
Owner Instructions Original Instructions Warning! Read instructions before using the machine
 ECO Vac PPR 00- PPR 370- Owner Instructions Original Instructions Warning! Read instructions before using the machine www.numatic.com Kit - AS 607360 60008 60008 6045 6007 6046 6040 604 6089 604 6044 Assembly
CVC 370 WV 370 WVT 370 WV 380 WV 470. Owner Instructions. Original Instructions Warning! Read instructions before using the machine.
 are H Care ecare HomeCare HomeC CVC 370 WV 370 WVT 370 WV 380 WV 470 Owner Instructions Original Instructions Warning! Read instructions before using the machine www.numatic.com Kit A21A / AA12 Kit A21A
JVP Owner Instructions. Original Instructions Warning! Read instructions before using the machine.
 are H Care ecare HomeCare HomeC JVP 80- Owner Instructions Original Instructions Warning! Read instructions before using the machine www.numatic.com Kit AH 6004 604 6040 6044 6004 6045 6005 6046 6089 604
Owner Instructions Original Instructions Warning! Read instructions before using the machine
 ECO Vac Owner Instructions Original Instructions Warning! Read instructions before using the machine HVX 200-2 www.numatic.com HVX 200-2, Kit - XS 607362 60008 60008 60027 6045 604 60240 6042 6046 60323
Owner Instructions Warning! Read instructions before using the machine
 Owner Instructions Warning! Read instructions before using the machine VNP 80 - www.numatic.com Kit AA 607444 6004 6007 6004 6044 6005 6045 6057 604 6046 604 Using the Machine 3 4 5 6 7 8 9 0 3 4 5 6 7
Owner Instructions Original Instructions Warning! Read instructions before using the machine
 Owner Instructions Original Instructions Warning! Read instructions before using the machine RSV 130-11 RSV 200-11 RSV 200MF-11 ECO Vac www.numatic.com 607298 - Kit - AS30 601052 601100 601008 601008 601829
Owner Instructions Warning! Read instructions before using the machine
 Owner Instructions Warning! Read instructions before using the machine HVR 00A HET 00A HHR 00A www.numatic.com HVR 00A, HET 00A Kit - A 607407 60008 60008 600 6059 6045 6007 6044 604 604 6046 HHR 00A,
Owner Instructions HVR HET Warning! Read instructions before using the machine
 HVR 160-11 HET 160-11 Owner Instructions Warning! Read instructions before using the machine www.numatic.com Kit AS-0 Assembly 1 2 3 4 5 6 Using your machine Start Power on light + + + Low Low High 1 2
Owner Instructions. Original Instructions Warning! Read instructions before using the machine.
 Owner Instructions Original Instructions Warning! Read instructions before using the machine www.numatic.com Operating Instructions WV 570 WVD 570 WV 750 WV 750T WVD 750 WVD 750T WV 900 WVD 900 WVD 1800-DH
Owner Instructions Original Instructions Warning! Read instructions before using the machine
 GVE 370 CT 370 CT 380 CT 470 Owner Instructions Original Instructions Warning! Read instructions before using the machine www.numatic.com Kit A26A Kit A40A Kit A43 Wet - Assembling the machine for extraction
Owner Instructions HVR Warning! Read instructions before using the machine
 Owner Instructions Warning! Read instructions before using the machine HVR 240-11 www.numatic.com Kit AS-1 Assembly 1 2 3 4 5 6 Using your machine Start Power on light + + + Low Low High 1 2 Cleaning the
TTB 345 OPERATION - INFORMATION INDEX 1. Part Identification Diagram 2. Basic Operation Instructions 3. Do s and Don ts 4. Fitting The Brush / Drive B
 LAST PAGE RETURN TO MENU TTB-345 OPERATION MANUAL the knowledge is in our hands TTB 345 OPERATION - INFORMATION INDEX 1. Part Identification Diagram 2. Basic Operation Instructions 3. Do s and Don ts 4.
Owner Instructions HVW Warning! Read instructions before using the machine
 Owner Instructions Warning! Read instructions before using the machine HVW 370 www.numatic.co.uk Please refer to information for wet vacuum cleaners BEFORE use at rear of manual. Kit AH-6 1 2 Filling your
Owner Instructions Original Instructions Warning! Read instructions before using the machine
 ECO Vac Owner Instructions Original Instructions Warning! Read instructions before using the machine HVR 200-2 HET 200-2 www.numatic.com HVR 200-2, HET 200-2 Kit - AS 607360 60008 60008 60240 6045 60027
HVR HET HHR UK AO5.indd 1 31/08/ :35:54
 233787 HVR HET HHR UK AO5.indd 1 31/08/2011 12:35:54 Mains lead HO5V2V2 x 10m x 2 x 0.75mm 2 Safety Critical Components Filter Bag Filter NVM-1CH 10m x 2 x 1.00mm 2 >pp< construction 99.6%@0.3µm Tritex
WARNING: Warns of health hazards and identifies possible risks of injury. CAUTION: Indicates possible dangers to the machine or other objects.
 VBT3ASV USER GUIDE SAFETY INFORMATION About this user guide Read this user guide completely before using the machine. Keep this user guide for reference. If you pass your machine on to third parties, it
T1 SCRUBBER DRYER OPERATOR MANUAL
 T1 SCRUBBER DRYER OPERATOR MANUAL Clemas & Co. Unit 5 Ashchurch Business Centre, Alexandra Way, Tewkesbury, Gloucestershire, GL20 8NB. Tel: 01684 850777 Fax: 01684 850707 Email: info@clemas.co.uk Web:
User Manual GV25 GV35 GV702. Company information: Original instructions GV12066 (1)
") User Manual Original instructions GV25 GV35 GV702 Company information: www.vipercleaning.eu info-eu@vipercleaning.com GV12066 (1) 2012-04-10 USER MANUAL ENGLISH TABLE OF CONTENTS Introduction... 4 Manual
User Manual Original instructions GV25 GV35 GV702 Company information: www.vipercleaning.eu info-eu@vipercleaning.com GV12066 (1) 2012-04-10 USER MANUAL ENGLISH TABLE OF CONTENTS Introduction... 4 Manual
COMPACT AND LIGHTWEIGHT FOR OUTDOOR CLEANING
 COMPACT AND LIGHTWEIGHT FOR OUTDOOR CLEANING LET S GET STARTED. VPW1 Let s talk safety PLEASE KEEP THESE ORIGINAL INSTRUCTIONS. Basic safety precautions This pressure washer is intended for household use
CAUTION - READ THESE INSTRUCTIONS BEFORE USING THE MACHINE
 User instructions Model X46 Escalator and Travelator cleaner CAUTION - READ THESE INSTRUCTIONS BEFORE USING THE MACHINE 03-7845-0000 Iss.1 07/04 Fig 1 Fig 2 2 Contents Page 1 Product information... 4 1.1
Tornado Operations & Maintenance Manual
 TORNADO INDUSTRIES, LLC 7401 W. Lawrence Avenue Chicago, IL 60706 Ph (708) 867-5100 Fax (708) 867-6968 www.tornadovac.com Tornado Operations & Maintenance Manual MODEL NO. 99410 BR 13/1MW L9735Rev_C Tornado
MULTIWASH XL OPERATOR S MANUAL & PARTS LIST PFMW18. Save These Instructions
 OPERATOR S MANUAL & PARTS LIST MULTIWASH XL PFMW18 WARNING: OPERATOR MUST READ AND UNDERSTAND THIS MANUAL COMPLETELY BEFORE OPERATING THIS EQUIPMENT. Tacony, Inc., All rights reserved Save These Instructions
Nilfisk Inc Winnetka Avenue North Minneapolis, MN REV.03( ) VF80189
 VF80189") Nilfisk Inc. 9435 Winnetka Avenue North Minneapolis, MN 55445 www.usviper.com REV.03(05-) VF8089 SAFETY PRECAUTIONS This machine is intended for commercial use. It is constructed for use in an indoor
Nilfisk Inc. 9435 Winnetka Avenue North Minneapolis, MN 55445 www.usviper.com REV.03(05-) VF8089 SAFETY PRECAUTIONS This machine is intended for commercial use. It is constructed for use in an indoor
User Manual FANG 18 C. Company information: Original instructions 80188EU (1)
") User Manual Original instructions FANG 18 C Company information: www.vipercleaning.eu info-eu@vipercleaning.com 80188EU (1) 2012-04-10 USER MANUAL ENGLISH TABLE OF CONTENTS Introduction... 4 Manual purpose
User Manual Original instructions FANG 18 C Company information: www.vipercleaning.eu info-eu@vipercleaning.com 80188EU (1) 2012-04-10 USER MANUAL ENGLISH TABLE OF CONTENTS Introduction... 4 Manual purpose
DESIGNED FOR HEAVY DUTY, OUTDOOR CLEANING
 DESIGNED FOR HEAVY DUTY, OUTDOOR CLEANING LET S GET STARTED. VPW2BC Let s talk safety PLEASE KEEP THESE ORIGINAL INSTRUCTIONS. Basic safety precautions This pressure washer is intended for household use
* * English. Operator Manual. Carpet Cleaner Rev. 01 ( ) Model V
 Model V") R3 Carpet Cleaner English Operator Manual Model 9004199-230V R For the latest Parts manuals and other language Operator manuals, visit: www.tennantco.com/manuals 9003707 Rev. 01 (07-2016) *9003707* OPERATION
R3 Carpet Cleaner English Operator Manual Model 9004199-230V R For the latest Parts manuals and other language Operator manuals, visit: www.tennantco.com/manuals 9003707 Rev. 01 (07-2016) *9003707* OPERATION
IMPORTANT SAFETY REMINDERS
 USER MANUAL IMPORTANT SAFETY REMINDERS This appliance should only be used for domestic cleaning, as described in this user guide. Please ensure that this guide is fully understood before operating the
Hard floor cleaner. Vax careline V-120. Vax model number:
 Vax V-120 User Guide.qxd 9/10/07 12:43 Page 1 Vax careline 0870 6061248 Hard floor cleaner Vax model number: V-120 instruction manual Please read carefully before using this cleaner. lways fully extend
Arrow HIGH PERFORMANCE CORDLESS VACUUM LET S GET STARTED. 20V TBTSV1B1
 Arrow 20V HIGH PERFORMANCE CORDLESS VACUUM LET S GET STARTED. TBTSV1B1 Let s talk safety Basic safety precautions This vacuum cleaner is intended for household use only and NOT for commercial or industrial
WARNING: OPERATOR MUST READ AND UNDERSTAND THIS MANUAL COMPLETELY BEFORE OPERATING THIS EQUIPMENT.
 OPERATOR S MANUAL & PARTS LIST Automatic Scrubber PAS14G WARNING: OPERATOR MUST READ AND UNDERSTAND THIS MANUAL COMPLETELY BEFORE OPERATING THIS EQUIPMENT. Tacony Corporation, All rights reserved Save
Bagless upright vacuum
 U89 U90 & U91-P2 Power 2 Series User Guide V2.0:U90-P2 User Guide 13/08/2010 11:44 Page 1 Vax Careline: (UK) 0844 412 8455 (ROI) 1-800 928 308 Bagless upright vacuum Vax model number: U91-P2 Series U90-P2
Tornado Operations & Maintenance Manual
 TORNADO INDUSTRIES 7401 W. LAWRENCE AVENUE CHICAGO, IL 60706 (708) 867-5100 FAX (708) 867-6968 www.tornadovac.com Tornado Operations & Maintenance Manual MODEL NO. 99690 BD 22/14, 99720 BD 26/14 L9722
User Manual. Floor Scrubber Traction Drive
 User Manual Floor Scrubber Traction Drive This manual is furnished with each new Floor Scrubber. This provides the necessary operating and preventive maintenance instructions. Operators must read and understand
Carpet washer. vax.co.uk. W91-RS-B Series W90-RS-B Series. Vax Careline: (UK) (ROI) Vax model number: Version 1.
 (ROI) Vax model number: Version 1.") W91-RS-B Series User Guide v1.3.qxd:user Guide 7/10/10 17:21 Page 1 Vax Careline: (UK) 0844 412 8455 (ROI) 1-800 928 308 Carpet washer Vax model number: W91-RS-B Series W90-RS-B Series instruction manual
W91-RS-B Series User Guide v1.3.qxd:user Guide 7/10/10 17:21 Page 1 Vax Careline: (UK) 0844 412 8455 (ROI) 1-800 928 308 Carpet washer Vax model number: W91-RS-B Series W90-RS-B Series instruction manual
User Guide U88-AM-B / U88-AM-P / U88-AM-R / U88-AM-T / U87-AM-C
 Designed in the UK User Guide U88-AM-B / U88-AM-P / U88-AM-R / U88-AM-T / U87-AM-C Performance is everything. Contents Contents Machine Overview General Safety Information 3 Getting Started 4 How To Use
St eam Cleane r. User Guide. Stick Steam Cleaner. Get Cleaning... vax.co.uk. S87-CX series
 User Guide Stick Steam Cleaner St eam Cleane r Get Cleaning... What s your Vax model number? (Located on the flap of the packaging) e.g. S87-CX What s your serial number? (Located on the base of the machine)
PRESSURE WASHER MODEL NO: JETSTAR 1750 OPERATION & MAINTENANCE INSTRUCTIONS. WARNING Read the instructions before using the machine PART NO:
 WARNING Read the instructions before using the machine PRESSURE WASHER MODEL NO: JETSTAR 1750 PART NO: 7333230 OPERATION & MAINTENANCE INSTRUCTIONS LS0711 INTRODUCTION Thank you for purchasing this CLARKE
SAFETY, OPERATION AND MAINTENANCE MANUAL. MX-1408 SELF-CONTAINED EXTRACTOR This unit is intended for commercial use.
 SAFETY, OPERATION AND MAINTENANCE MANUAL MX-1408 SELF-CONTAINED EXTRACTOR This unit is intended for commercial use. READ & FOLLOW ALL INSTRUCTIONS, WARNINGS & CAUTIONS BEFORE USING THIS EXTRACTOR This
Spiral Dough Mixer. Instruction manual. Model: CP821
 Spiral Dough Mixer Instruction manual Model: CP821 SPARE PARTS LIST OF CP821 NO. Description QTY. NO. Description QTY. 1. Small chain wheel of main shaft 1 29. Chain 06B-1-70L 2 2. Big chain wheel 3 30.
Get Cleaning... What s your Vax s model number? User Guide. Carpet Washer Vax Careline: AU: NZ:
 User Guide Vax Careline: AU: 1300 361 505 NZ: 0800 800 900 Carpet Washer Get Cleaning... What s your Vax s model number? W8 W8 W0 W0 W0 W W W W W What s your serial number? (Located on the base of the
CORDLESS. SlimVac CORDLESS SLIM VAC WITH DETACHABLE HANDHELD LET S GET STARTED. TBTTV1B1 TBTTV1P1 TBTTV1P2 TBTTV1P3 TBTTV1T1 TBTTV1R1 VRS703
 CORDLESS SlimVac CORDLESS SLIM VAC WITH DETACHABLE HANDHELD LET S GET STARTED. TBTTV1B1 TBTTV1P1 TBTTV1P2 TBTTV1P3 TBTTV1T1 TBTTV1R1 VRS703 Let s talk safety Basic safety precautions This vacuum cleaner
User Manual. Floor Scrubber Disc Brush Drive
 User Manual Floor Scrubber Disc Brush Drive This manual is furnished with each new Floor Scrubber. This provides the necessary operating and preventive maintenance instructions. Operators must read and
INSTRUCTION MANUAL Model: SU3022
 INSTRUCTION MANUAL Model: SU3022 GUARANTEE This product is guaranteed for 2 years from the date of original purchase. If any defect arises due to faulty materials or workmanship, the unit will, either
ScrubMaster 26C OPERATING & MAINTENANCE
 ScrubMaster 26C INTRODUCTION OPERATING & MAINTENANCE INSTRUCTIONS READ THIS BOOK This operator s book has important information for the use and safe operation of this machine. Read this book carefully
IMPORTANT SAFETY REMINDERS
 USEr manual IMPORTANT SAFETY REMINDERS This appliance should only be used for domestic cleaning, as described in this user guide. Please ensure that this guide is fully understood before operating the
Floormate Deluxe Let s get started
 Floormate Deluxe Let s get started HF86-FM-D vax.co.uk Let s talk safety Please keep instructions for further use. This Floormate is intended for household use only and NOT for commercial or industrial
OPERATOR'S MANUAL. IMPORTANT: READ OPERATOR'S MANUAL CAREFULLY Please fill out & return your warranty card! DP80405
 CARBON SPOT 30 EXTRACTOR OPERATOR'S MANUAL IMPORTANT: READ OPERATOR'S MANUAL CAREFULLY Please fill out & return your warranty card! DP80405 Diamond Products www.diamondproductsus.com Printed in the U.S.A.
OWNER S MANUAL. IMPORTANT: READ OWNER S MANUAL CAREFULLY Please fill out and return your warranty card MODEL &
 OWNER S MANUAL IMPORTANT: READ OWNER S MANUAL CAREFULLY Please fill out and return your warranty card MODEL 261123 & 261124 032911 TABLE OF CONTENTS CONGRATULATIONS on your purchase of a Global product.
WET/DRY VACUUM. QUEST for Continuous Improvement Windsor s Quality Management System is Certified ISO MODEL: T1. Operating Instructions (ENG)
") WET/DRY VACUUM Operating Instructions (ENG) MODEL: T1 y QUEST for Continuous Improvement Windsor s Quality Management System is Certified ISO 9001. Read these instructions before operating the machine.
WET/DRY VACUUM Operating Instructions (ENG) MODEL: T1 y QUEST for Continuous Improvement Windsor s Quality Management System is Certified ISO 9001. Read these instructions before operating the machine.
Commercial backpack vacuum cleaner
 ORIGINAL INSTRUCTIONS CAUTION READ THESE INSTRUCTIONS BEFORE USING THE MACHINE User instructions Valet BackPack Commercial backpack vacuum cleaner 03-8113-0000 Issue 6 10/10 1 2 Contents 1. General information...
Get Cleaning... What s your Vax s model number? User Guide. Carpet Washer. Vax Careline: AU: NZ: VCWRS700
 Carpet Washer User Guide Vax Careline: AU: 1300 361 505 NZ: 0800 800 900 Get Cleaning... What s your Vax s model number? V C W R S 7 0 0 What s your serial number? (Located on the base of the machine)
Power Wash 2000W Car. User Guide. HPW2C-ZA hoover.za.com. Version 1.0
 Power Wash 2000W Car User Guide HPW2C-ZA hoover.za.com Version 1.0 2 CONTENTS MACHINE OVERVIEW 3 Contents Machine Overview General Safety Information Operation Maintenance FAQs Warranty Other Information
MERCURY HD-22 AUTOSCRUBBER Safe Operations
 Safe Operations PROPER OPERATING PROCEDURES By following proper operating procedures, the Mercury DS- 26 Autoscubber can provide you with productive, easy to operate, safe and clean floors. This machine
Carpet washer. Vax careline V-135B. Vax model number:
 V-135B Infinity User Guide.qxd:V-135B User Guide 6/10/08 16:37 Page 1 A N T I A L L E R G E N A D D I T I V E Vax careline 0870 6061248 Carpet washer Vax model number: V-135B AAA instruction manual Please
Hand Dryer Installation & User Manual
 Hand Dryer Installation & User Manual Please read instructions in conjunction with the illustrations Please save these instructions. Safety & Guidance notes Important:- Read all these instructions before
Bagless upright. vax.co.uk. Vax Careline: (UK) (ROI) Mach 1 series Mach 2 series. Vax model number: Version 1.
 (ROI) Mach 1 series Mach 2 series. Vax model number: Version 1.") U91-M1 & M2 Mach Series User Guide v1.2:user Guide 31/08/2010 19:19 Page 1 Vax Careline: (UK) 0844 412 8455 (ROI) 1-800 928 308 Bagless upright MACH Vax model number: Mach 1 series Mach 2 series WARNING:
U91-M1 & M2 Mach Series User Guide v1.2:user Guide 31/08/2010 19:19 Page 1 Vax Careline: (UK) 0844 412 8455 (ROI) 1-800 928 308 Bagless upright MACH Vax model number: Mach 1 series Mach 2 series WARNING:
VACUUM EXTRACTOR MODEL NO: CWVE1 OPERATING & MAINTENANCE INSTRUCTIONS PART NO: GC0916
 VACUUM EXTRACTOR MODEL NO: CWVE1 PART NO: 6471168 OPERATING & MAINTENANCE INSTRUCTIONS GC0916 INTRODUCTION Thank you for purchasing this CLARKE Workshop Vacuum Extractor. Before attempting to use this
Your Blast Vac Pro. Your Blast Vac Pro
 Your Blast Vac Pro Your Blast Vac Pro Product code: V02364 03/13 JML JML House, Regis Road, London NW5 3EG Tel: 020 7691 3800, Fax: 020 7691 3801 E-mail: info@jmlgroup.co.uk Web: www.jmldirect.com Instructions
Bagless cylinder. Vax careline V-118 V-118CP. Vax model number:
 Vax V-118(CP) User Guide.qxd 30/8/07 09:17 Page 1 Vax careline 0870 6061248 Bagless cylinder Vax model number: V-118 V-118CP instruction manual Please read carefully before using this cleaner. Always fully
SAFETY PRECAUTIONS. 2) Before operating machine: - Make sure all safety devices are in place and operate properly.
 Before operating machine: - Make sure all safety devices are in place and operate properly.") TABLE OF CONTENTS Machine Components Safety Precautions Machine Set Up Machine Operation Machine Maintenance & Storage Troubleshooting Technical Specifications Parts Lists Wiring Diagram 1 2 3 3-4 5 6
TABLE OF CONTENTS Machine Components Safety Precautions Machine Set Up Machine Operation Machine Maintenance & Storage Troubleshooting Technical Specifications Parts Lists Wiring Diagram 1 2 3 3-4 5 6
As part of the V.I.P. family, you are entitled to the best protection by one of the most comprehensive warranties in the industry.
 CONGRATULATIONS on your purchase of a Viper product, and welcome to the V.I.P. family. We appreciate your business and will do everything in our power to keep you happy with your purchase for many years
User Guide. Please read carefully before use. Your Hoover Guarantee. Your Hoover Guarantee. Contents. IMPORTANT Safety Reminders
 Your Hoover Guarantee Contents Your Hoover Guarantee During year 1 HOOVER engineers will replace or repair all defective parts free of charge, except for parts subject to fair wear and tear such as belts,
HOT WASHER MODEL NO: KING150
 WARNING: Do not use the hot washer without reading this manual HOT WASHER MODEL NO: KING150 PART NO: 7320175 OPERATION & MAINTENANCE INSTRUCTIONS LS1215 INTRODUCTION Thank you for purchasing this CLARKE
LiFE2-in-1 CORDLESS 2-IN-1 VACUUM FOR QUICK CLEAN UPS LET S GET STARTED. H85-LF-B14
 LiFE2-in-1 CORDLESS 2-IN-1 VACUUM FOR QUICK CLEAN UPS LET S GET STARTED. H85-LF-B14 Let s talk safety This vacuum cleaner is intended for household use only and NOT for commercial or industrial use. Basic
Fig. 2. Fig. 1. Fig. 3. Fig. 4. Fig. 5. Fig. 7 Fig. 6. Fig. 9. Fig. 8. Fig. 10 MAX H2O
 R 1 2 23 3 5 6 7 10 9 8 4 13 19 23 18 12 17 21 16 11 22 14 15 20 Fig. 1 Fig. 2 2 1 Fig. 3 Fig. 4 MAX H2O 1 Fig. 5 2 Fig. 7 Fig. 6 Fig. 9 Fig. 8 Fig. 10 E N G L I S H KEY 1) Carrying handle 2) Mains ON/OFF
Bagless upright. Vax Careline (UK) (ROI) vax.co.uk VS-19EC. Vax model number:
 (ROI) vax.co.uk VS-19EC. Vax model number:") Vax Careline (UK) 0844 412 8455 Bagless upright Vax model number: VS-19EC instruction manual vax.co.uk Please read carefully before using this cleaner. Always fully extend the mains cable before use. Retain
Vax Careline (UK) 0844 412 8455 Bagless upright Vax model number: VS-19EC instruction manual vax.co.uk Please read carefully before using this cleaner. Always fully extend the mains cable before use. Retain
Upholstery and Drapery Cleaner. Operator and Parts Manual. Model No.: gal Extractor. MNL32506 Rev. 00 (08-98)
") 32506 Upholstery and Drapery Cleaner Model No.: 32506 3 gal Extractor Operator and Parts Manual KLEENRITE 1122 MAPLE STREET MADERA CA 93637 U.S.A. FAX: 1-559-673-5725 CUSTOMER SERVICE: 1-800-241-4865 MNL32506
32506 Upholstery and Drapery Cleaner Model No.: 32506 3 gal Extractor Operator and Parts Manual KLEENRITE 1122 MAPLE STREET MADERA CA 93637 U.S.A. FAX: 1-559-673-5725 CUSTOMER SERVICE: 1-800-241-4865 MNL32506
Tornado Operations & Maintenance Manual
 Tornado Industries, LLC 333 Charles Court West Chicago, IL 60185 www.tornadovac.com Tornado Operations & Maintenance Manual MODEL NO. 99414 Form No. L9740AB Tornado Industries, LLC. All rights reserved
CORDLESS. SlimVac. Fur&Fluff CORDLESS SLIM VAC WITH DETACHABLE HANDHELD LET S GET STARTED. TBTTV1F1
 CORDLESS SlimVac Fur&Fluff CORDLESS SLIM VAC WITH DETACHABLE HANDHELD LET S GET STARTED. TBTTV1F1 Let s talk safety Basic safety precautions This vacuum cleaner is intended for household use only and NOT
Scrubbing machine. Use and Maintenance manual
 Scrubbing machine Use and Maintenance manual ORIGINAL INSTRUCTIONS DOC. 10074280 - Ver. AA - 10-2017 The descriptions contained in this document are not binding. The company therefore reserves the right
Electronic Service Manuals
 Electronic Service Manuals This electronic document is provided as a service to our customers. We do not create the contents of the information contained in this document. Should you have detailed questions
Whole Room Dryer WRD, WRD/110
 Whole Room Dryer WRD, WRD/110 User Instructions Whole Room Dryers CAUTION - READ THESE INSTRUCTIONS BEFORE USING THE MACHINE 03-8117-0000 Iss.1 12/06 Fig 1 Fig 2 Fig 3 Fig 4 CONTENTS Page 1 Product information...................4
KHM800 Professional 800w haze machine
 KHM800 Professional 800w haze machine M A N U A L V E R S I O N 2. 0 0 6-1 1-1 2 Due to continuous product development, please ensure that you have downloaded the latest instruction manual for this product
INDUSTRIAL VACUUM CLEANER WITH AUTO START/STOP
 INSTRUCTIONS FOR INDUSTRIAL VACUUM CLEANER WITH AUTO START/STOP MODEL NO: PC200SDAUTO.V3 Thank you for purchasing a Sealey product. Manufactured to a high standard, this product will, if used according
INSTRUCTION MANUAL 1
 INSTRUCTION MANUAL 1 2 A J B1 I B C K L M D E N F H G 1 2 24 HRS 3 4 12 HRS 2 1 5 6 7 8 HRS HRS 9 10 11 12 13 14 15 INSTRUCTIONS FOR SAFE USE This appliance should only be used for domestic cleaning, as
Hot Chocolate Dispenser
 Hot Chocolate Dispenser Instruction manual Model: CN219-A AU Telephone Helpline: 1300225960 Safety Tips Position on a flat, stable surface. A service agent/qualified technician should carry out installation
AirTM SERIES POWERFUL LIGHTWEIGHT FULL SIZE LET S GET STARTED. CCQSAV1P1 CCQSAV1T1 CCQSAV1C1 CCQSASV1P1 CCQSASV1T1 CCQSASV1C1
 AirTM SERIES POWERFUL LIGHTWEIGHT FULL SIZE LET S GET STARTED. CCQSAV1P1 CCQSAV1T1 CCQSAV1C1 CCQSASV1P1 CCQSASV1T1 CCQSASV1C1 Let s talk safety Basic safety precautions This vacuum cleaner is intended
DUST MANAGER USER INSTRUCTIONS GENERATION FUTURE indd 1 28/11/ :27:15
 GENERATION FUTURE DUST MANAGER USER INSTRUCTIONS 0565-5287.indd 1 28/11/2007 15:27:15 IMPORTANT SAFETY REMINDERS User s manual - This cleaner should only be used for its intended purpose as described in
Scrubber User Manual
 Scrubber User Manual AS430C VIPER NORTH AMERICA [866] 418-4737 [866] 41-VIPER VF90031-US Rev.01 TABLE OF CONTENTS USER MANUAL INTRODUCTION... 2 CONTENTS............................. 2 PURPOSE.............................
IM-H Hand Held Vacuum Cleaner. Instruction Manual Model Ref: H14 / Cat Number: DN909
 IM-H14 19042017 Hand Held Vacuum Cleaner Instruction Manual Model Ref: H14 / Cat Number: DN909 Thank you for choosing the ValetPro Cordless Hand Held Vacuum Cleaner. All products brought to you by JDW
INSTRUCTION MANUAL 1
 INSTRUCTION MANUAL 1 A B R Q P C S N O D M E F I G H L K J 2 1 2 3 4 5 6 3 7 8 9 10 11 4 INSTRUCTIONS FOR SAFE USE This appliance should only be used for domestic cleaning, as described in this user guide.
ORIGINAL INSTRUCTIONS
 WARNING: Read the instructions before using the machine. POWER WASHER MODEL NO: JETSTAR 1950 PART NO: 7336010 OPERATION & MAINTENANCE INSTRUCTIONS ORIGINAL INSTRUCTIONS LS0617 - ISS 3 INTRODUCTION Thank
DUST EXTRACTOR INSTRUCTION MANUAL. 550W (3/4 HP) INDUCTION MOTOR 1850W AUTOMATIC POWER OUTLET 65L COLLECTION BAG ø100mm X 2.
 INDUCTION MOTOR 1850W AUTOMATIC POWER OUTLET 65L COLLECTION BAG ø100mm X 2.") KNOW YOUR PRODUCT DUST EXTRACTOR 550W (3/4 HP) INDUCTION MOTOR 1850W AUTOMATIC POWER OUTLET 65L COLLECTION BAG ø100mm X 2.5M SUCTION HOSE INSTRUCTION MANUAL WARNING: Read all safety warnings and all instructions.
KNOW YOUR PRODUCT DUST EXTRACTOR 550W (3/4 HP) INDUCTION MOTOR 1850W AUTOMATIC POWER OUTLET 65L COLLECTION BAG ø100mm X 2.5M SUCTION HOSE INSTRUCTION MANUAL WARNING: Read all safety warnings and all instructions.
OWNER S MANUAL IMPORTANT: READ OWNER S MANUAL CAREFULLY
 globalindustrial.com Auto Scrubbers OWNER S MANUAL IMPORTANT: READ OWNER S MANUAL CAREFULLY Please fill out and return your warranty card MODEL 261126 032911 TABLE OF CONTENTS CONGRATULATIONS on your purchase
- 1- IMPORTANT SAFETY REMINDERS
 USER MANUAL IMPORTANT SAFETY REMINDERS This appliance should only be used for domestic cleaning, as described in this user guide. Please ensure that this guide is fully understood before operating the
3 in 1 Garden Vacuum 9255 Instructions for Use
 Leaf Blower-Vac/Patio Cleaner Technical Specifications Model GY 8113 Rated voltage 230V Rated frequency 50Hz Rated power consumption 3000W Mains fuse(delayed action) 13A Speed 15000 rpm Max. blower air
17 GALLON PROFESSIONAL RESTROOM CLEANER
 CR2 COMPLETE RESTROOM RESTORATION 17 GALLON PROFESSIONAL RESTROOM CLEANER OWNER S/OPERATOR S MANUAL PROUDLY DESIGNED AND MANUFACTURED BY WWW.EDIC-USA.COM UNPACKING YOUR NEW CR2: When your machine is delivered,
- 2 - IMPORTANT SAFETY REMINDERS
 USER MANUAL IMPORTANT SAFETY REMINDERS This appliance should only be used for domestic cleaning, as described in this user guide. Please ensure that this guide is fully understood before operating the
Tempest TP420/180 Electric Pressure Washer
 Please dispose of packaging for the product in a responsible manner. It is suitable for recycling. Help to protect the environment, take the packaging to the local amenity tip and place into the appropriate
MULTIWASH 14 OPERATOR S MANUAL WARNING: OPERATOR MUST READ AND UNDERSTAND THIS MANUAL COMPLETELY BEFORE OPERATING THIS EQUIPMENT.
 MULTIWASH 4 OPERATOR S MANUAL WARNING: OPERATOR MUST READ AND UNDERSTAND THIS MANUAL COMPLETELY BEFORE OPERATING THIS EQUIPMENT. MW4-MAN 8-08 CONTENTS Page Product information.................................
- 2 - IMPORTANT SAFETY REMINDERS
 USER MANUAL IMPORTANT SAFETY REMINDERS This appliance should only be used for domestic cleaning, as described in this user guide. Please ensure that this guide is fully understood before operating the
INFRARED IP55 HEATER INSTRUCTIONS FOR: MODEL:- QZWP45N 1. SAFETY INSTRUCTIONS
 INSTRUCTIONS FOR: INFRARED IP55 HEATER MODEL:- QZWP45N Thank you for purchasing a Consort Claudgen product. Manufactured to a high standard this product will, if used according to these instructions and
User Guide. 2 in 1 Cordless Stick Vac DSV-SW-SA DSV-SW-HKA. DD16175_DDST12V_UserGuide_Singapore_ indd 1
 User Guide 2 in 1 Cordless Stick Vac DSV-SW-SA DSV-SW-HKA DD16175_DDST12V_UserGuide_Singapore_251115.indd 1 General Safety Information B DD16175_DDST12V_UserGuide_Singapore_251115.indd 2 Machine Overview
High-Pressure Washer BY02-VBP-WTR BY02-VBP-WTH. CAUTION : Do not use this device before reading the instructions.
 High-Pressure Washer BY02-VBP-WTH BY02-VBP-WTR CAUTION : Do not use this device before reading the instructions. 1 1. Safety Instructions The appliance has been designed solely for private use outdoors
C E B D N USER MANUAL H I P J K L /07 PRINTED IN P.R.C.
 C E B D N F USER MANUAL M O G P H I A P J PRINTED IN P.R.C. 1 48005775/07 K L Q 2 3 4 5 14 15 16 17 2 1 6 7 8 9 18 19 20 10 11 12 13 21 INSTRUCTIONS FOR SAFE USE Danger of Scalding. GB This appliance should
186E. MM160 Rev. 12 (12 95)
") 186E MM160 Rev. 12 (12 95) This manual is furnished with each new TENNANT Model 186E. It provides necessary operating and preventive maintenance instructions. Read this manual completely and understand
186E MM160 Rev. 12 (12 95) This manual is furnished with each new TENNANT Model 186E. It provides necessary operating and preventive maintenance instructions. Read this manual completely and understand
DUST MANAGER USER INSTRUCTIONS
 Hoover_Stabiliser_FINAL_Vs2c_01_03_06.qxp 01/03/2006 10:28 Page 1 DUST MANAGER USER INSTRUCTIONS Hoover_Stabiliser_FINAL_Vs2c_01_03_06.qxp 01/03/2006 10:28 Page 2 IMPORTANT SAFETY REMINDERS User s manual-
User instructions. VA20HD, VA55HD, VA55IND and VA75IND. Commercial wet/dry vacuum cleaners CAUTION - READ THESE INSTRUCTIONS BEFORE USING THE MACHINE
 User instructions VA20HD, VA55HD, VA55IND and VA75IND Commercial wet/dry vacuum cleaners CAUTION - READ THESE INSTRUCTIONS BEFORE USING THE MACHINE 03-8112-0000 Iss.3 07/08 http://www.truvox.com/products/vacuums/valet_aqua