Service Manual For Built-in gas hob
|
|
|
- Alaina Smith
- 5 years ago
- Views:
Transcription

1 Service Manual For Built-in gas hob Model list: JZx-Q40xxxx, JZx-Q44xxxx, JZx-Q501Gxx JZx-Q502Sxx 60Gxxxxxxx- xxx 75G50xxxxx- Gxx 90Gxxxxxxx- Gxx JZx-Q41xxxx, JZx-Q45xxxx JZx-Q502Gxx 60Qxxxxxxx 70Gxxxxxxx- xxx 75G50xxxxx- Sxx 90Gxxxxxxx- Sxx Warnings: This service manual is not available to the general users, but only applies to professional technicians with relevant qualifications. Any incorrect maintenance may result in other dangers! The power and gas supply must be cut off before maintenance! A new power cord which meets the relevant technical requirements must be used once possible hidden malfunctions are found with the current power cord (refer to this Manual)! Please read carefully all safety warnings in this Manual before maintenance! The product is prohibited from using until test is conducted as per relevant regulations after maintenance! This service manual applies to many models, so the specific operations please prevail in kind! V3.0 May,
2 Catalogue 1. Precaution Safety Precaution Warning Description of the appliance Features Components and parts Installation Dimension Installation Dimension Electric Diagram Reassembly and Disassembly Safety precautions Tools Disassembly Disassemble the Top Plate Disassemble the Thermocouple Disassemble of the Ignition Pin Disassemble of the Microswitch Harness Disassemble of the Gas Pipe Disassemble of the Bottom Cup Disassemble of the Power Cord Assembly Disassemble of the igniter Disassemble of the Valve & Manifold Pipe Assembly Disasmble of the Gas Connection Disassemble of thebottom plate Reassembly Reassemble of the Ignition Pin Reassemble of the Thermocouple Reassemble of the Gas Pipe Check Point after assemble Troubleshooting Troubleshooting Problems and Corrective Measures Maintenance and test Gas Conversion Replacement of gas-type fitting
3 7.2. Replacement of the injector of the burners Appendix Technical & quality requirements for Built-in gas hob
4 1. Precaution 1.1. Safety Precaution 1. Do not modify this appliance. This appliance should be serviced by an authorized person. 2. All repairs should be done in accordance with the procedures described in this manual. 3. Before you begin, turn off the gas and electricity supply to the appliance. Remove remaining gas in product completely by igniting burner. 4. Be sure that all of built-in protective devices are replaced. Restore any missing protective shields. 5. Do not connect the gas and electricity supply before replacement complete. 6. Use replacement components that have the same ratings. A replacement part that does not have the same safety characteristics as the original might create shock, fire or other hazards 7. You must conduct a gas leakage test after receiving after-sales service in gas pipe and gas connector. Never touch any circuit wiring with your hand nor with uninsulated tool during operation Warning 1. The power cord shall be replaced with the original power cord, specifications for an insulation power line which is no less than AWG8*2 +AWG10*1 and resists temperature of greater than All apparatus within a radius of 50mm from this product must resist temperature of greater than 75 C, otherwise, deformations are easily to be caused during the application process of this product. 3. When the wrapping materials are removed, keep such materials like metal sheet, packing bag, foam and screws out of reach of children s reach to avoid potential dangers. For example, the children may suffocate as a result of swallowing tiny components or playing with packing bag. 4
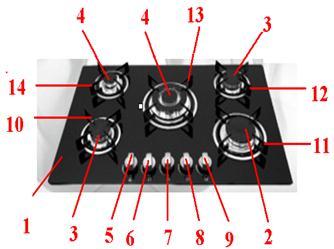
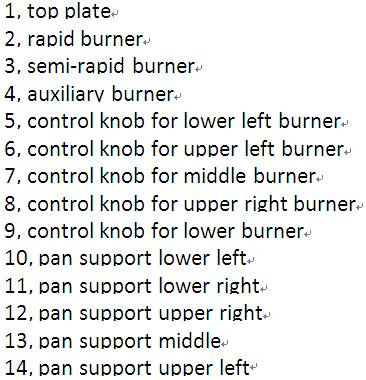

5 2. Description of the appliance 2.1. Features Glass: Q502 GXX Stainless:Q411 SXX 5

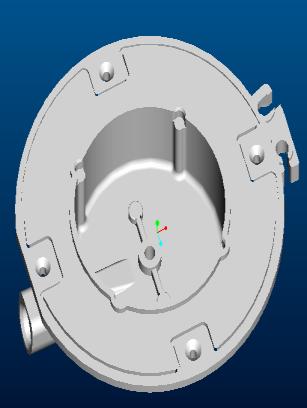

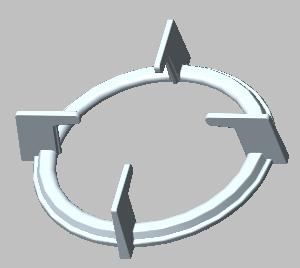

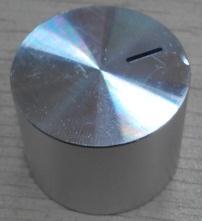

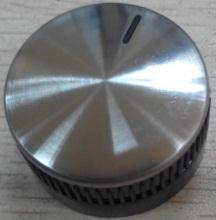


6 2.2. Components and parts (1). Burner (2).Pan support (3). Knob (4).Drip tray 6
7 3. Installation 3.1. Dimension Model W (mm) H (mm) D (mm) Q40xxxx Q41xxxx Q44xxxx Q45xxxx Q501Gxx Q502Gxx Q502Sxx Qxxxxxx Gxxxxxxx- xxx Gxxxxxxx- xxx G50xxxxx- xxx Gxxxxxxx- xxx Note: Dimensions for reference only 7
8 3.2. Installation Dimension Cut out size: Model W(mm) D (mm) T(mm) Q40xxxx (min) Q41xxxx (min) Q44xxxx (min) Q45xxxx (min) Q501Gxx (min) Q502Gxx (min) Q502Sxx (min) 60Qxxxxxxx (min) 60Gxxxx08x- xxx (min) 60Gxxxx4xx- xxx (min) 60Gxxxx006- xxx (min) 60Gxxxxxxx- xxx (min) 70Gxxxxxxx- xxx (min) 75G50xxxxx- xxx (min) 90Gxxxxxxx- xxx (min) Note: Dimensions for reference only 8
9 This appliance is to be built into a kitchen unit or worktop of right size, providing the following minimum distances are allowed; The edge of the appliance must be a minimum distance of 55mm from a rear wall. A minimum distance of 150mm must be left between the side edges of the appliance and any adjacent cabinets or walls. The minimum distance combustible material can be fitted above the appliance in line with the edges of the appliance is 400mm. The minimum distance combustible material can be fitted directly above the appliance is 700mm. This panel (a) must be positioned at a maximum distance of 150mm below the worktop. Gas pipe or connector shouldn't be bent or blocked by any other appliances You must conduct a gas leakage test after installation over gas connection and gas pipe. An oven must have forced ventilation to install a hob above it. Check the dimensions of the oven in the installation manual. The cut out size must obey the indication. 9
10 4. Electric Diagram a. Four burners model b. Five burners model 10
11 5. Reassembly and Disassembly 5.1. Safety precautions WARNING Turn off power for safety and appliance protection. Close middle valve to prevent gas leakage Keep away from inflammable materials around appliance. Before work, put on gloves. CAUTION Cool off the appliance for a while right after using appliance for your safety because you can get burners by high temperature from the appliances Tools Most of the tools that you might need are shown below. Some are optional. 11


 b.")
12 5.3 Disassembly Disassemble the Top Plate Step 1: Remove parts on the Top Plate a. Remove parts on the top plate: Burner lids, Flame spreaders, Control handles b. When disassembling, keep parts safe, do not drop them to the appliance. Step 2: Disassemble of Screws on the Top Plate a. Remove the screws of the burner b. In some versions, remove screws on the side of bottom plate. c. Be careful in order not to damage screw heads when disassembling. d. Be careful not to damage the top plate. Step 3:Detachment of the Top Plate a. Separate the top plate.(in case of stainless steel model, take off the sponge.) b. During assembly, be careful in order not to give physical impact on parts such as ignition devices, flame supervision devises.. 12


13 Disassemble the Thermocouple Step 1: Unscrew the nut out. Step 2: Pull the silver terminal of Thermocouple Step 3: When reassembling, replace parts correctly Disassemble of the Ignition Pin Step 1: Pull the washer and take off ignition pin Step 2: Pull the housing of Ignition pin out of the igniter. Step 3: When reassembling, replace parts correctly Disassemble of the Microswitch Harness Step 1: Before you disassemble the harness, take off the plastic e ring. Step 2: When you take off the micro switch harness, please be careful not to break the hook. Step 3: When you reassemble the harness, replace it correctly. Step 4: Detach the wire from the power cord assembly harness. Step 5: Hold housing of the wire by hand and pull it out of the igniter. 13


14 Disassemble of the Gas Pipe Step 1: Unscrew the nuts out. at both ends of the pipes Step 2: Pull the pipes Disassemble of the Bottom Cup Step 1: Remove all screws on the bottom cup Step 2: Detach the bottom cup from the base box burner Disassemble of the Power Cord Assembly Step 1. Detach the wire from the Microswitch Harness. Step 2. Hold housing of the wire by hand and pull it out of the igniter. Step 3. For power cord grounding, you must use grounding screw attached with washer. Step 4. Remove 2 screws and detach the power cord ass y set 14


15 Disassemble of the igniter Step1. Remove 2 screws Step2. Detach the igniter from the base box burner Disassemble of the Valve & Manifold Pipe Assembly Step 1. Remove 5 screws Step 2. Remove the screw to take off pipe assy. Step 3. Remove 2 screws and detach the valve from the manifold pipe assembly Step 4. You must check the gasket when you disassemble or assemble. Step 5. If you have faulty one, replace it with new one. Step 6. Conduct a leakage test after reassembling. screws 15


16 Disasmble of the Gas Connection Step 1. When you disassemble/assemble gas connection, use 2 spanners. One for fixing gas connection elbow, the other for tightening gas hose. Step 2. Tighten enough to prevent gas leakage. Step 3. Once you re done, conduct leakage test Disassemble of the bottom plate Step 1. Step 2. Separate casing on sink. Detach the appliance as checking the status of the gas connection and the power cord assembly set. 16


17 5.4. Reassembly Reassemble of the Ignition Pin Step 1. Pull the line of the ignition pin in to the hole on bottom cup along the gap on bottom cup Step 2. Push ignition pin to adjust the position Step 3. Klemm ignition pin with snap spring to fox the ignition pin Reassemble of the Thermocouple Step 1. Insert thermocouple into the the relevant hole of the bottom cup from bottom to top. Step 2. Adjust position of the thermocouple in the hole of the bottom cup. Step 3. screw up the nut to fix the thermocouple Reassemble of the Gas Pipe Step 1.Insert the head of the gas pipe into installation parts of the bottom cup or the valve Step 2.Screw up the nut of the joint with spanner Check Point after assembly a. At completion of the appliance repair, assemble after removing tools inside of the appliance. b. You must conduct a leakage test after repairing.(refer to the leakage test on 5.3) c. If ignition does not work, repeat ignition several times so that you can remove remaining air in the gas connection d. Check combustion status by conducting aging 17
18 6. Troubleshooting 6.1. Troubleshooting 18
19 6.2. Problems and Corrective Measures 19
20 Note! 1 Check the ground wire before the fault is detected; 2 Enough attention must be given to high voltage circuit. 20
 Connect product to the air leakage device and set the test pressure at 15kPa; b) The plug valve shall be kept closed and the gas pipelines may be tested its leakage")
21 6.3. Maintenance and test Air leakage test Tool: Air leakage device, soapy water 1. Professional repair procedures a) Connect product to the air leakage device and set the test pressure at 15kPa; b) The plug valve shall be kept closed and the gas pipelines may be tested its leakage through air leakage device; c) All plug valves shall be kept open, block the injectors at the burner, the flame-out protection valve shall be kept open and the gas pipelines may be tested their leakage through air leakage device. The maximum leakage must be controlled below 0.5mL/min as required in the test. 2. Simple procedures: a) Connect the product to the gas source being used; b) Smear soapy water at each joint of the product gas pipelines, the plug valve is kept closed, check visually each joint for air bubbles; c) Smear soapy water at each joint of product gas pipelines, all plug valves shall be kept open, block the injectors at the burner, the flame-out protection device valve shall be kept open and check visually for any air bubbles. No air bubbles shall be detected at each joint as required in the test. Note: Any component of the product gas pipelines shall not be disassembled or replaced only if the air leakage is proved in conformity with relevant requirements. 21
 Disassemble with a wrench the gas-type fittings from main gas tube.")
22 7. Gas Conversion All work must be carried out by a qualified technician, Before you begin, turn off the gas and electricity supply to the appliance Replacement of gas-type fitting Tool: Open-end wrench Steps for operation: a) Disassemble with a wrench the gas-type fittings from main gas tube. b) Lock tightly a replaceable gas-type fitting onto the main gas tube. Gas tube Seal washer Joint 7.2. Replacement of the injector of the burners Tool: 7mm box spanner Steps for operation: Step 1: Remove the pan support,,burner lid and flame spreader. Step 2: Unscrew the injector with a 7 mm box spanner and replace it with the stipulated injector for new gas supply.(see the following table) Step 3: Carefully reassemble all the components. After injectors are replaced,it is advisable to tighten the injector in place. strongly. injector 22


23 Comparison list for injector replacement Nominal heat input and rates see below at 15 at 1013mbar 注 : 23
24 8. Appendix Technical & quality requirements for Built-in gas hob a) Use of natural gas burner when the burner works 10 minutes in rated power,turn it to little fire and keep 60 seconds,reduce the gas pressure to 1400pa,the fire shouldn t extinct. b) Neither flame off nor back burning should appear when the flame is in the fire hole of burner. c) There should be no cracks and graze in the glass components and china components, besides the fringe of them. d) In Rated gas\rated gas pressure,ignite the burner,test the time from ignition to burner working stably,it should not be more than 5 seconds. e) In Rated gas\rated gas pressure,after the burner working for 15 minutes,turn off the plug valve, then test the time during turning off plug valve and flame-out protection device shutting down,it should be less than 90 seconds. f) Every burner should be test ignition,fuse transferring time\ flame stabilization,ignition\ fuse transferring time should be less than 5 seconds. Flame-out will be allowed in 5 seconds after ignition,but flame should be stable in 1 minute. g) If it may cause security problems after corrosion, electric current and other mental parts should be corrosion resistance under the normal conditions of use. Live parts and heat insulator should be prevented to contact with each other unless the heat insulator is corrosion resistance, non-hygroscopic and flame-retardant. h) The shaft of Knob, handle,control stick and other similar parts should be electrically neutral unless the shaft is out of the reach when the other parts are taken down. i) The clamp device of ground terminal should be tight enough to avoid accidental loosening. The wire length from power cord block terminal or cord fixing device to block terminal should be appropriate.if the flexible cord slips off from the cord block terminal, current carrying conductor should tighten firstly compared with earth conductor. j) Phenomenon that may reflect cooking appliance performance should not appear of the pan support in normal use. k) Gas tightness should be accord with standard request after the gas connection was disassembled five times. 24
HG 675 CX 60 HG 675 CN 60 HG 675 CW 60
 HG 675 X 60 HG 675 CX 60 HG 675 CN 60 HG 675 CW 60 1 2 1. : 93/68: 90/396: 2006/95/CE: 2004/108/CE: - 1935/2004:. 2002/95/CE: RoHS 2.,.,,,,...,. (,..)..,,.,. ( ),,, ;,,.,.....,.,,,,,,...,. (..),,.,..,.,,,,
Installation and Operating Instructions
 Installation and Operating Instructions Models: Verso 4G Hob As part of Parmco Appliances commitment to improving and updating product ranges, we reserve the right to alter, change and update technical
Proline GAS HOB Model TCG40IX Instruction Book
 Proline GAS HOB Model TCG40IX Instruction Book GB Operating and Installation Instructions Index Technical data and specifications...... 3 Installation...................... 3-6 Ventilation........................
BUILT-IN GAS HOB. Important - Please read these instructions fully before using AG60GNSS AG60GNW
 BUILT-IN GAS HOB Operating & Installation Instructions -Please keep for future reference AG60GNSS AG60GNW Important - Please read these instructions fully before using These instructions contain important
USER MANUAL. 60cm, 3 burners, Hob AKC 630
 USER MANUAL 60cm, 3 burners, Hob AKC 630 For your safety These instructions have been drawn up for your safety and that of others. You are therefore requested to read them carefully before installing
CLGOGUIT
 CLGOGUIT5 3663602842217 V10617 1 2 IMPORTANT - Please read carefully the separate safety guide before use. x1 [02] x1 [03] x1 [06] x2 [07] x1 [08] x1 [09] x4 [01] x1 [04] x2 [05] x1 [10] x1 [11] x5 (G30
Pizza Oven with Stand
 Pizza Oven with Stand Cooks up to 3 pizzas at a time Use to cook a variety of food Easy clean vitreous enamel interior Model No. P0104 Powerful 22MJ/h stainless steel burner Viewing window and temperature
INSTALLATION GUIDE Dual Fuel Ranges
 INSTALLATION GUIDE Dual Fuel Ranges Contents Wolf Dual Fuel Ranges......................... 3 Safety Instructions............................ 4 Dual Fuel Range Specifications.................. 5 Dual Fuel
USER MANUAL. 80 cm 2 burners, glass hob AKC 820C/BLM
 USER MANUAL 80 cm 2 burners, glass hob AKC 820C/BLM For your safety These instructions have been drawn up for your safety and that of others. You are therefore requested to read them carefully before installing
INSTALLATION and SERVICE INSTRUCTIONS USE and CARE INSTRUCTIONS BUILT-IN GAS HOB. Model: DEGH90WF. distributed by. DèLonghi.
 INSTALLATION and SERVICE INSTRUCTIONS USE and CARE INSTRUCTIONS BUILT-IN GAS HOB Model: DEGH90WF distributed by DèLonghi Pty Ltd Dear Customer, Thank you for having purchased and given your preference
EGG9363NOX EN HOB USER MANUAL
 EGG9363NOX...... EN HOB USER MANUAL 2 www.electrolux.com CONTENTS 1. SAFETY INFORMATION................................................... 3 2. SAFETY INSTRUCTIONS..................................................
INSTALLATION GUIDE NZ AU E
 GAS COOKTOP CG604DX & CG905DX models INSTALLATION GUIDE NZ AU 590447E 08.17 1 SAFETY AND WARNINGS Electrical shock hazard WARNING! Before carrying out any work on the electrical section of the appliance,
FREESTANDING PRODUCTS DOUBLE OVEN. Operating Manual TG50W TG50B TG60W TG60B. Service Helpline:
 EN Operating Manual FREESTANDING PRODUCTS DOUBLE OVEN Operating Manual TG50W TG50B TG60W TG60B Service Helpline: 0333 577 7238 CONTENTS 2 PART-1: SAFETY WARNINGS...4 PART-2: INSTALLATION AND PREPARATIONS
Hot Chocolate Dispenser
 Hot Chocolate Dispenser Instruction manual Model: CN219-A AU Telephone Helpline: 1300225960 Safety Tips Position on a flat, stable surface. A service agent/qualified technician should carry out installation
USER MANUAL AKC cm 4 Burners, Stainless Steel Hob
 USER MANUAL AKC 641 60 cm 4 Burners, Stainless Steel Hob For your safety These instructions have been drawn up for your safety and that of others. You are therefore requested to read them carefully before
Operating Instructions HOB Contents
 THP 641 W/IX/I English Operating Instructions HOB Contents Operating Instructions,1 Warnings,2 Assistance,2 Description of the appliance,3 Installation,4 Start-up and use,7 Precautions and tips,7 Maintenance
Mod. ANBR9..G. CR DOC. NO. GAS-HEATED TILTING BRATT PAN. INSTRUCTIONS FOR INSTALLATION, ADJUSTMENT, USE AND MAINTENANCE...
 -HEATED TILTING BRATT PAN Mod. ANBR9..G. INSTRUCTIONS FOR INSTALLATION, ADJUSTMENT, USE AND MAINTENANCE...page 2-5 APPENDIX....pagina 6-7 Read the manual thoroughly and keep it in a safe place throughout
ENGLISH Please refer to the chapter IKEA GUARANTEE for contact details of the after sales customer service centre.
 AU MATMÄSSIG AU NZ ENGLISH Please refer to the chapter IKEA GUARANTEE for contact details of the after sales customer service centre. AU NZ ENGLISH 4 LANGUAGE COUNTRY ENGLISH 4 Contents Safety information
UBGHFF60W 60cm Gas on Glass Gas Hob
 UBGHFF60W 60cm Gas on Glass Gas Hob GB [02] x 1 [03] x 2 [04] x 1 [01] x 1 [08] x 4 [05] x 2 [09] x 1 [06] x 1 [07] x 4 [10] x 4 [11] x 1 TEMPLATE TEMPLATE UBGHFF60W GB Built-in 60cm Gas on Glass Gas Hob
Belling. Gas Hob GHU573 - GHU573T GHU70GE - GHU70TGE - GHU70GC GHU70TGC - GHU60GC INSTALLATION AND USER INSTRUCTIONS
 Belling Gas Hob GHU573 - GHU573T GHU70GE - GHU70TGE - GHU70GC GHU70TGC - GHU60GC INSTALLATION AND USER INSTRUCTIONS Note: This appliance is supplied for use with Natural Gas and can be converted to LPG
Instructions for use. Gas hobs for installation in worktops GKS GWS GKS GKS
 Instructions for use Gas hobs for installation in worktops GKS 3920.0 GWS 3911.0 GKS 6940.0 GKS 9951.0 For use in: Hong Kong Issue: 2014-01-14 Version: 1.3_EN Identity no.: 073587_HK Welcome 2 Welcome
BUILT-IN / TABLE TOP HOB GAS COOKER USER MANUAL
 GB BUILT-IN / TABLE TOP HOB GAS COOKER USER MANUAL Dear Costumer, It is our ultimate desire that you achieve the best performance from our product, which has been passed through meticulous quality control
PC 640 GB. Built-in cooking tables 60 Instructions for installation and use
 PC 640 GB Built-in cooking tables 60 Instructions for installation and use Congratualtions on choosing an Ariston appliance, which you will find is dependable and easy to use. We recommend that you read
6L PRESSURE COOKER. Instruction Manual. Model: PLA1424
 6L PRESSURE COOKER Instruction Manual Model: PLA1424 Due to ongoing product improvements, specifications and accessories may change without notice. Actual product may differ slightly to that depicted.
Owner s Manual STOVES. MODELS 620 Kitchenaire. 621 Kitchenaire 711S
 Owner s Manual STOVES MODELS 620 Kitchenaire 621 Kitchenaire 711S CONTENTS 2 Introduction 2 Unpacking 2 Installation 2 Electrical Installation 3 Safety Advice 3 Control Panels 4 The Oven 5 Solid Plates
Contents. 1. Instructions for safety and use 20
 Contents 1. Instructions for safety and use 20 2. Positioning in the counter top 21 2.1 Fixing to the supporting structure 21 2.2 Positioning the adhesive sponge 22 2.3 Positioning the fastening clips
User Manual. 600mm, 700mm & 900mm Gas Cooktops Model No. CF6GS, CF6GW, CF7GS, CF9GS
 User Manual 600mm, 700mm & 900mm Gas Cooktops Model No. CF6GS, CF6GW, CF7GS, CF9GS For all product enquires, including warranty support, please contact our Customer Care team 1800 444 357 or email customercare@hapl.com.au
TIDALWAVE I/G POOL PUMP INSTRUCTION MANUAL
 TIDALWAVE I/G POOL PUMP INSTRUCTION MANUAL READ THIS MANUAL CAREFULLY BEFORE USING YOUR PUMP 88 PUMP PARTS BREAKDOWN REF # Order # Mfr # Description 1 NEP4 AC 348 Lid Knobs NEP AC 380 Strainer Lid 3 NEP6
F900 SERIES GAS CHARGRILL G9440, G9460, G9490, G User, installation and servicing instructions T Read these instructions before use
 F900 SERIES User, installation and servicing instructions GAS CHARGRILL G9440, G9460, G9490, G94120 Read these instructions before use DATE PURCHASED: MODEL NUMBER: SERIAL NUMBER: DEALER: SERVICE PROVIDER:
User manual Installation instruction Conversion instruction. BG6xA BG6xB BG6xC BG6xD BG6xE BG6xF
 User manual Installation instruction Conversion instruction BG6xA BG6xB BG6xC BG6xD BG6xE BG6xF Pictograms used: Important information Tip Gas connection Electrical connection Right Wrong Safety regulations
Multi-Function Cooktop
 INSTALLATION GUIDE Multi-Function Cooktop Contents Wolf Multi-Function Cooktop.................... 3 Multi-Function Cooktop Specifications............ 4 Multi-Function Cooktop Installation...............
EGG6343NOR EGG6343NOX EGG6343NOW EGG6343NDX...
 EGG6343NOR EGG6343NOX EGG6343NOW EGG6343NDX...... EN HOB USER MANUAL 2 www.electrolux.com CONTENTS 1. SAFETY INFORMATION................................................... 3 2. SAFETY INSTRUCTIONS..................................................
INSTALLATION MANUAL. Split-type Air Conditioner (Cooling and Heating) Outdoor Unit UQB09JJWC UQB12JJWC. Indoor Unit AQB09JJWC AQB12JJWC
 Outdoor Unit UQB09JJWC UQB12JJWC. Indoor Unit AQB09JJWC AQB12JJWC") AQB09JJ6WC_IM_E_2585 2006.4.17 4:26 PM Page 17 INSTALLATION MANUAL Indoor Unit AQB09JJWC AQB12JJWC Outdoor Unit UQB09JJWC UQB12JJWC ENGLISH FRANÇAIS ESPAÑOL Split-type Air Conditioner (Cooling and Heating)
AQB09JJ6WC_IM_E_2585 2006.4.17 4:26 PM Page 17 INSTALLATION MANUAL Indoor Unit AQB09JJWC AQB12JJWC Outdoor Unit UQB09JJWC UQB12JJWC ENGLISH FRANÇAIS ESPAÑOL Split-type Air Conditioner (Cooling and Heating)
Built in Gas Hob. Model number: RHGH1
 Built in Gas Hob Model number: RHGH1 Before using your appliance, please read this manual carefully and keep it for future reference. Contents Important information 3 Safety Instructions 4-8 Before using
Model No: Little Devil II (inc ss)
") GAS HEATER Model No: Little Devil II (inc ss) PART NO: 6926020, 6926025 (SS) OPERATION & MAINTENANCE INSTRUCTIONS LS1213 INTRODUCTION Thank you for purchasing this CLARKE Gas Heater. Before attempting
GAS HEATER Model No: Little Devil II (inc ss) PART NO: 6926020, 6926025 (SS) OPERATION & MAINTENANCE INSTRUCTIONS LS1213 INTRODUCTION Thank you for purchasing this CLARKE Gas Heater. Before attempting
3gb53231b.fm5 Page 12 Friday, April 11, :21 PM
 3gb53231b.fm5 Page 12 Friday, April 11, 2003 12:21 PM INSTRUCTIONS FOR USE BEFORE USING THE COOKTOP SUGGESTIONS FOR ENVIRONMENT PROTECTION PRECAUTIONS AND GENERAL ADVICE ENERGY SAVING TIPS CARE AND MAINTENANCE
Contents. 1. Instructions for safe and proper use Positioning of hob Attachment to support structure Electrical connection 22
 Contents 1. Instructions for safe and proper use 19 2. Positioning of hob 20 2.1 Attachment to support structure 20 3. Electrical connection 22 4. Gas connection 23 4.1 Connection to LPG 24 4.2 Ventilation
USERS, INSTALLATION AND SERVICING INSTRUCTIONS
 USERS, INSTALLATION AND SERVICING INSTRUCTIONS GAS BRATT PAN G3800 and G3800DX DATE PURCHASED: MODEL NUMBER: SERIAL NUMBER: DEALER: SERVICE PROVIDER: T100753 Rev. 3 Published: 04 /10/2012 Dear Customer,
User Manual. Refrigerator ZRG16605WA
 EN User Manual Refrigerator ZRG16605WA Contents Safety information 2 Safety instructions 3 Operation 4 First use 5 Daily use 5 Hints and tips 5 Care and cleaning 6 Troubleshooting 7 Installation 9 Technical
INSTRUCTION MANUAL GAS HOB. Model:GH600
 INSTRUCTION MANUAL GAS HOB Model:GH600 1 Contents Important Information Description of Hob Operation Maintenance and cleaning Troubleshooting Instruction for installer Technical data Important safety requirements
HG795440NB. EN User manual
 HG795440NB EN User manual 2 www.aeg.com CONTENTS 1. SAFETY INFORMATION...................................................... 3 2. SAFETY INSTRUCTIONS......................................................
GAS COOKER GAS OVEN SERIES. Owner s Manual Please read this manual carefully before operating your set. Retain it for future reference.
 GAS COOKER GAS OVEN SERIES Owner s Manual Please read this manual carefully before operating your set. Retain it for future reference. Record model number and serial number of the set. See the label attached
Service Manual Electric Cooktop
 Service Manual Electric Cooktop 318 202 105 (0311) THIS IS A BLANK PAGE Table of Contents I SAFE SERVICING PRACTICES... 1 PRODUCT FEATURES... 2 WIRING DIAGRAM... 3 SECTION A - INSTALLATION... 4 CUT-OUT
Glass Chimney Hood. Installation & User Instructions Please keep for future reference
 Glass Chimney Hood Installation & User Instructions Please keep for future reference 4897549 4897556 Important Please read these instructions fully before installing or using These instructions contain
Instructions for use
 GB EN Instructions for use These instructions are also available at: docs.kitchenaid.eu Product description and symbols 4 Control symbols 4 Using the burners 4 Practical advice on using the hob 5 Positioning
F900 SERIES BOILING PAN G9781. User, installation and servicing instructions. Read these instructions before use T REV.
 F900 SERIES User, installation and servicing instructions BOILING PAN G9781 Read these instructions before use DATE PURCHASED: MODEL NUMBER: SERIAL NUMBER: DEALER: SERVICE PROVIDER: T100915 REV. 1 Dear
HOW TO USE YOUR 4500 RANGE L.P.G. COOKER OR HOB UNIT
 HOW TO USE YOUR 4500 RANGE L.P.G. COOKER OR HOB UNIT If the appliance does not operate correctly contact your supplier Or Leisure Products (Bolton) Ltd Holly Street, Bolton, BL1 8QR. England. ~~~~ For
INSTALLATION MANUAL. Split-type Air Conditioner (Cooling and Heating) Indoor Unit AQB18J6WC AQB24J2WC. Outdoor Unit UQB18J6WC UQB24J2WC
 Indoor Unit AQB18J6WC AQB24J2WC. Outdoor Unit UQB18J6WC UQB24J2WC") AQB8J6WC_IM_E_25864 2006.4.4 3:29 PM Page 7 INSTALLATION MANUAL Indoor Unit AQB8J6WC AQB24J2WC Outdoor Unit UQB8J6WC UQB24J2WC ENGLISH FRANÇAIS ESPAÑOL Split-type Air Conditioner (Cooling and Heating)
AQB8J6WC_IM_E_25864 2006.4.4 3:29 PM Page 7 INSTALLATION MANUAL Indoor Unit AQB8J6WC AQB24J2WC Outdoor Unit UQB8J6WC UQB24J2WC ENGLISH FRANÇAIS ESPAÑOL Split-type Air Conditioner (Cooling and Heating)
User Manual. Hob ZGX65414BA
 EN User Manual Hob ZGX65414BA GB Contents Safety information 2 Safety Instructions 3 Product description 6 Daily use 6 Hints and tips 7 Care and cleaning 8 Troubleshooting 9 Installation 10 Technical information
User Manual. 3.5L Deep Fryer Stainless Steel Model Number: MDF35S READ AND SAVE THESE INSTRUCTIONS
 User Manual 3.5L Deep Fryer Stainless Steel Model Number: MDF35S READ AND SAVE THESE INSTRUCTIONS IMPORTANT Read and follow the instructions in this user manual even if you feel you are familiar with the
User Manual. Hob PH601SS
 EN User Manual Hob PH601SS Contents Safety information 2 Safety instructions 3 Product description 5 Daily use 5 Hints and tips 6 Care and cleaning 6 Safety information Troubleshooting 6 Installation 7
Table Top Patio Heater
 Table Top Patio Heater INSTRUCTION MANUAL MODEL: HPS-B Certified by international recognized standards. The infra-red with heat wave outdoor heater. Variable control gas valve with electric push igniter.
INSTALLATION AND USER S MANUAL COOKER HOOD RS-600/A-S
 INSTALLATION AND USER S MANUAL COOKER HOOD RS-600/A-S RS-600 (CHS60SS)-GB-05.indd 1 6/8/2010 9:30:59 AM TABLE OF CONTENTS 1. Introduction 2 2. Safety precaution 2 3. Intended use 3 4. Parts supplied 3
Built-in Gas Hob. Important - Please read these instructions fully before using. Operating Instructions -Please keep for future reference
 Built-in Gas Hob Operating Instructions -Please keep for future reference A70GCIS Important - Please read these instructions fully before using These instructions contain important information which will
EN User Manual ZGG67412 GB
 EN User Manual ZGG67412 GB Contents Safety information 2 Safety instructions 3 Product description 5 Daily use 6 Hints and tips 7 Care and cleaning 7 Troubleshooting 8 Installation 9 Technical information
Installation instructions Gas cooktops
 Installation instructions Gas cooktops To prevent the risk of accidents or damage to the appliance, it is essential to read these instructions before it is installed and used for the first time. en-au,
FRANKE DESIGNER GAS COOKTOP 90CM
 page 1 of 7 510 880 45 480 Min 50 860 Min 600 SPECIFICATIONS Recommended use Material Colour availability Weight Dimensions Voltage Domestic Stainless Steel Stainless Steel 18.2kg 880 x 510 x 45mm 220-240V
PROF. RANGE COOKER MODEL: EPRC-9850FE/SS EPRC-9860E/SS. Owner s Manual Please read this manual carefully before operating your set.
 PROF. RANGE COOKER MODEL: EPRC-9850FE/SS EPRC-9860E/SS Owner s Manual Please read this manual carefully before operating your set. Retain it for future reference. Record model number and serial number
Operating Instructions HOB Contents
 PAA 642 /I(WH) PAA 642 /I(BK) UK English Operating Instructions HOB Contents Operating Instructions,1 Warnings,2 Assistance,2 Description of the appliance,3 Installation,4 Start-up and use,7 Precautions
Gas Cooktop Installation, User and Service Instructions GMS 955.1
 Gas Cooktop Installation, User and Service Instructions GMS 955.1 IMPORTANT: SAVE FOR LOCAL ELECTRICAL INSPECTOR S USE. READ AND SAVE THESE INSTRUCTIONS FOR FUTURE REFERENCE. OBSERVE ALL FEDERAL, STATE
HHG610SS 60cm 4 burner gas hob. HHG710SS 70cm 5 burner gas hob
 User Manual for your HHG610SS 60cm 4 burner gas hob HHG710SS 70cm 5 burner gas hob NOTE: This User Instruction Manual contains important information, including safety & installation points, which will
Stoneridge Fire Pit High Dining Table Assembly Instruction
 Stoneridge Fire Pit High Dining Table Assembly Instruction Item# L-DN1773SST-D-T WARNING: For Outdoor Use Only. DANGER If you smell gas: 1. Shut off gas to the appliance. 2. Extinguish any open flame.
IMPORTANT SAFEGUARDS When using this appliance, basic precautions should always be followed, including the following: 1. Read all instructions before
 0 IMPORTANT SAFEGUARDS When using this appliance, basic precautions should always be followed, including the following: 1. Read all instructions before using. 2. Do not operate the appliance with damaged
TECHNICAL INSTRUCTIONS
 TID-0137_0A TECHNICAL INSTRUCTIONS AM Series Boiler Heat Exchanger Maintenance & Replacement For all models of AM Series Boilers, Including: Boilers: AM 399B AM 500B AM 750B AM 1000B Water Heaters: AM
Built-in Gas Hob CZ55554 CZ55571
 Built-in Gas Hob CZ55554 CZ55571 INSTALLATION AND OPERATING INSTRUCTIONS The product may differ from the one illustrated but the installation and operation procedure remains the same The product may differ
Porter & Charles OPERATION MANUAL. Gas Cooktop CG60S, CG76S, CG90S, CG60W, CG90W
 Porter & Charles OPERATION MANUAL Gas Cooktop CG60S, CG76S, CG90S, CG60W, CG90W Congratulations on the purchase of your Porter & Charles appliance. We are sure it will provide many years of great cooking
Operating Instructions HOB
 PHN 942 T/IX/A English Operating Instructions HOB Operating Instructions,1 Warnings,2 Assistance,3 Description of the appliance,4 Installation,5 Start-up and use,9 Precautions and tips,9 Maintenance and
User manual. Gas hob ZGG35214
 EN User manual Gas hob ZGG35214 Contents Safety information 2 Installation _ 4 Product description _ 8 Operation _ 8 Helpful hints and tips _ 9 Safety information Care and cleaning 9 What to do if _ 10
gas Understanding Gas Appliance Conversions READ ALL INSTRUCTIONS
 SUNSTONE DOUBLE SIDE BURNER LIQUID PROPANE TO NATURAL GAS CONVERSION INSTRUCTION PAGE 1 OF 8 Understanding Gas Appliance Conversions Making changes to an appliance so that it can utilize a different fuel
CONTENTS. Welcome to Think Letter page 3. General Information page 4-5. Warning and Safety Instructions page 5-6. Instructions for Use pages 7 10
 Instruction manual GAS COOKTOPS CONTENTS Welcome to Think Letter page 3 General Information page 4-5 Warning and Safety Instructions page 5-6 Instructions for Use pages 7 10 Instructions for Installation
Moisture inside the drum is due to final testing.
 Safety instructions Scope of delivery depending on model Moisture inside the drum is due to final testing. Removing the transport safety devices Water connection depending on model The washing machine
SERVICE MANUAL. Freestanding cooker 500 and 600 / Range Gas- gas Electric CFSGSV14 CFSGWH14 CFSESV14 CFSEWH14
 Freestanding cooker 500 and 600 / Range 2013 Gas- gas Electric CFSGSV14 CFSGWH14 CFSESV14 CFSEWH14 SERVICE MANUAL 2 Door assembly Removing the door assembly 1. Lift the lock of the left and right door
1. Take the hoses and elbow out of the holders, depending on model. max. 100 cm. min. * cm
 Safety instructions The washing machine is heavy - take care when lifting. Caution: frozen hoses may rip/burst. Do not install the washing machine in areas exposed to frost or outdoors. The washing machine
HOW TO USE YOUR 2500 RANGE L.P.G. COOKER OR HOB UNIT
 HOW TO USE YOUR 2500 RANGE L.P.G. COOKER OR HOB UNIT CAUTION These instructions must be read and understood before proceeding with the installation and to avoid any possibility of accident it is essential
User Manual. Hob ZGO75524
 EN User Manual Hob ZGO75524 GB Contents Safety information 2 Safety instructions 3 Product description 6 Daily use 6 Hints and tips 7 Care and cleaning 8 Troubleshooting 9 Installation 10 Technical information
Dashley Outdoor Fire Table
 Dashley Outdoor Fire Table MODEL N0. 085-557-8 L-FT047PST-F ASSEMBLY INSTRUCTIONS Toll-free 888 670-6684 IMPORTANT: Please read this manual carefully before beginning assembly of this product. Keep this
User manual. Hob ZGG66424 IE GB
 EN User manual Hob ZGG66424 IE GB Contents Safety information 2 Installation _ 4 Product description _ 7 Operation 8 Helpful hints and tips 9 Care and cleaning 9 What to do if 10 Technical data _ 11 Environment
user manual VCG64 60cm Gas Cooktop 2 year warranty venini.com.au
 user manual VCG64 60cm Gas Cooktop 2 year warranty venini.com.au This manual explains the proper installation and use of your appliance, please read it carefully before using even if you are familiar with
Gas Range Electric Static/Convection Ovens
 Installation and Operation Manual Gas Range Electric Static/Convection Ovens RN8910GE RN8910GEC RNL8910GE RNL8910GEC Date Purchased Serial Number Dealer Service Provider For use in GB & IE 232781-8 MANUFACTURED
4 BURNER GAS HOB INSTRUCTION / INSTALLATION MANUAL CGHOBB12 CGHOBW12
 4 BURNER GAS HOB INSTRUCTION / INSTALLATION MANUAL CGHOBB12 CGHOBW12 Contents Unpacking... 5 Product Overview... 6 The Main Unit...6 Control Panel...6 Before Using Your New Hob... 7 Lighting the Hob...
Questions? Call 800.GE.CARES ( ) or visit our Web site at: GEAppliances.com In Canada, call or visit
 or visit our Web site at: GEAppliances.com In Canada, call or visit") Installation Instructions Electric Dryer 01 Questions? Call 800.GE.CARES (800.432.2737) or visit our Web site at: GEAppliances.com In Canada, call 1.800.561.3344 or visit www.geappliances.ca BEFORE YOU
Installation Instructions Electric Dryer 01 Questions? Call 800.GE.CARES (800.432.2737) or visit our Web site at: GEAppliances.com In Canada, call 1.800.561.3344 or visit www.geappliances.ca BEFORE YOU
Installation Guide BUILT-IN SXS REFRIGERATOR UPSXB2627**
 Installation Guide BUILT-IN SXS REFRIGERATOR UPSXB2627** www.thesignaturekitchen.com 2 Contents 1. Precaution before installation... 3 2. Product and Cutout dimension... 4 3. Precaution when moving the
TERRACE AND PATIO HEATER HLB-2400/ 2650 SERIES
 TERRACE AND PATIO HEATER HLB-2400/ 2650 SERIES INSTALLATION AND OPERATION GUIDE INDEX General and specifications 1 Security and caution.. 1,2 Tools and accessories required 2 Assembly instructions 3 Verifying
INSTALLATION AND MANINTENANCE INSTRUCTIONS
 INSTALLATION AND MANINTENANCE INSTRUCTIONS Appr. Nr. A 9503 T - 0085 AQ 0765 PEGASUS F2 T HIGH EFFICIENCY GAS-FIRED CAST-IRON BOILERS Models 51-68 - 85-102 2 Contents 1. General technical data 2. Dimensional
OWNERS' GUIDE PRECISION WATER SYSTEMS WATER DISTILLER. Water Systems FOR MODELS: PWS MANUFACTURED BY:
 PREC SION Water Systems OWNERS' GUIDE FOR MODELS: PWS 45-75 MANUFACTURED BY: PRECISION WATER SYSTEMS WATER DISTILLER PRECISION DESIGN & MANUFACTURING INC. 9024 100 STREET WESTLOCK, ALBERTA, CANADA, T7P
HG795440NB EN GAS HOB USER MANUAL IE GB
 HG795440NB EN GAS HOB USER MANUAL IE GB 2 FOR PERFECT RESULTS Thank you for choosing this AEG product. We have created it to give you impeccable performance for many years, with innovative technologies
Synergy Grill User & Engineer Installation & Conversion Guide
 Synergy Grill 1300 User & Engineer Installation & Conversion Guide 1 Index: Description Page Number/Section Important Information 3 Installation 4-6 / Section 1 Commissioning 6 / Section 2 Converting Gas
INSTALLATION INSTRUCTIONS
 INSTALLATION INSTRUCTIONS Gas Cooktop CG905DW models NZ AU www.fisherpaykel.com 590684B 11.14 1 Safety and warnings! WARNING! Electrical Shock Hazard Before carrying out any work on the electrical section
Rambo CAST IRON RING BURNERS OPERATING INSTRUCTIONS. C40LP 3 Ring Burner C50LP 4 Ring Burner
 Rambo CAST IRON RING BURNERS OPERATING INSTRUCTIONS C20LP 1 Ring Burner C30LP 2 Ring Burner C40LP 3 Ring Burner C50LP 4 Ring Burner IMPORTANT: READ THESE INSTRUCTIONS FOR USE CAREFULLY. KEEP THESE INSTRUCTIONS
User Manual. 110 Cup (55 Cup Raw) Gas Rice Cooker. Model: 177GRCLP, 177GRCNAT 12/2018. Please read and keep these instructions. Indoor use only.
 Gas Rice Cooker. Model: 177GRCLP, 177GRCNAT 12/2018. Please read and keep these instructions. Indoor use only.") 110 Cup (55 Cup Raw) Gas Rice Cooker Intertek 5010781 Conforms to ANSI STD Z83.11-2016 Model: 177GRCLP, 177GRCNAT 12/2018 FOR YOUR SAFETY Do not store or use gasoline or other flammable vapors or liquids
110 Cup (55 Cup Raw) Gas Rice Cooker Intertek 5010781 Conforms to ANSI STD Z83.11-2016 Model: 177GRCLP, 177GRCNAT 12/2018 FOR YOUR SAFETY Do not store or use gasoline or other flammable vapors or liquids
QUICK CONNECT INSTALLATION MANUAL DUCTLESS MINI-SPLIT SYSTEM FOR MODELS: 2PAMSHQC12 2PAMSHQC18 2PAMSHQC24 2PAMSHQC36
 QUICK CONNECT DUCTLESS MINI-SPLIT SYSTEM INSTALLATION MANUAL FOR MODELS: 2PAMSHQC12 2PAMSHQC18 2PAMSHQC24 2PAMSHQC36 Before using your air conditioner, please read this manual carefully and keep it for
Hong Kong Town Gas. Gas Hobs. for installation in worktops GD LUX 30 1G GD LUX 30 2G
 Hong Kong Town Gas Gas Hobs for installation in worktops GD LUX 30 1G GD LUX 30 2G Welcome 2 Welcome Dear customer, We thank you for your confidence in our product. We are supplying you with a high-quality
Gas Fire Patio Heater Q9
 Gas Fire Patio Heater Q9 Instruction Manual Please read the manual BEFORE you unpack or install the fire TABLE OF CONTENTS Warning 3 Getting Started 4 What s Included 5 Assembly Procedures 6 Product Drawing
FOOD WASTE DISPOSER Owner s Manual & Installation Instructions
 FOOD WASTE DISPOSER Owner s Manual & Installation Instructions IMPORTANT SAFETY INSTRUCTIONS. READ ALL INSTRUCTIONS BEFORE USING WARNING! When using electrical appliances, basic safety precautions should
INSTALLATION MANUAL COMFORT...BUILT TO LAST. 9,000, 12,000 and 18,000 BTU SINGLE-ZONE DUCTLESS MINI-SPLIT SYSTEM Heat Pump
 COMFORT...BUILT TO LAST 9,000, 12,000 and 18,000 BTU SINGLE-ZONE DUCTLESS MINI-SPLIT SYSTEM Heat Pump INSTALLATION MANUAL INDOOR UNIT: 1PAMSH09-SZW-14.5 1PAMSH09-SZW-15 1PAMSH12-SZW-15 1PAMSH18-SZW-15
INSTALLATION INSTRUCTIONS
 INSTALLATION INSTRUCTIONS Gas-on-glass cooktop CG302D, CG451D, CG603D, CG604D, CG752D, CG903D & CG905D models GB IE IN 590657A 02.14 1 SAFETY AND WARNINGS 3 WARNING! Electrical shock hazard Before carrying
Air Conditioner. user installation & manual manual. imagine the possibilities
 ARFSSSBWK Series ARFSSSCUR AJ JNADCH Series Air Conditioner user installation & manual manual This manual is made with 100% recycled paper. imagine the possibilities Thank you for purchasing this Samsung
REFRIGERAT A OR USE DF1-15 F ridge
 REFRIGERATOR USE DF1-15 Fridge BEFORE USING THE APPLIANCE. Your new appliance is designed exclusively for domestic use. To ensure best use of your appliance, carefully read the operating instructions which
PUREPOWER SERIES CENTRAL VACUUM POWER UNITS PP500, PP600 & PP650
 USER GUIDE PUREPOWER SERIES CENTRAL VACUUM POWER UNITS PP500, PP600 & PP650 AB0039 FOR RESIDENTIAL USE ONLY!! MODELS SFDB-DQ, SFDB-DR AND SFDB-DS 30042509E IMPORTANT SAFETY INSTRUCTIONS SAVE THESE INSTRUCTIONS
Pizza Oven with Light
 Pizza Oven with Light Deluxe outdoor oven for versatile cooking - from cooking pizzas with a delicious wood fired flavour to a beautifully cooked roast dinner Cooks up to 3 pizzas at a time Convenient