Direct Vent. Oil Fired Warm Air Furnaces INSTALLATION, OPERATION & MAINTENANCE MANUAL
|
|
|
- MargaretMargaret Houston
- 5 years ago
- Views:
Transcription
.! WARNING Do not store or use gasoline or other flammable liquids or vapors in the vicinity of this, or any other appliance!")

1 Direct Vent Oil Fired Warm Air Furnaces INSTALLATION, OPERATION & MAINTENANCE MANUAL IMPORTANT INFORMATION CONTAINED IN THIS MANUAL PERTAINS TO OIL FIRED DIRECT VENT FURNACES EQUIPPED WITH A MANUFACTURER INSTALLED BLOCKED VENT SAFETY CONTROL SYSTEM (PRESSURE SWITCH).! WARNING Do not store or use gasoline or other flammable liquids or vapors in the vicinity of this, or any other appliance! WARNING Homeowner Caution: Be sure to keep the area around the vent terminal free of snow, ice, and debris. ALL INSTALLATIONS MUST MEET ALL LOCAL, PROVINCIAL/STATE, AND FEDERAL CODES WHICH MAY DIFFER FROM THIS MANUAL An ISO Certified Company ECR International 2210 Dwyer Avenue, Utica NY Phone: (315) Fax: (866) info@ecrinternational.com web site: P/N# , Rev. C [2/2011]
2 Direct Vent Oil Fired Warm Air Furnace IMPORTANT: This manual must be kept near the furnace for future reference!! ALL INSTALLATIONS MUST MEET ALL LOCAL, PROVINCIAL/STATE, AND FEDERAL CODES WHICH MAY DIFFER FROM THIS MANUAL Read this complete manual before beginning installation. These instructions must be kept with the furnace for future reference. 2
3 Direct Vent Oil Fired Warm Air Furnace 1. DIRECT VENTING OF OLSEN OIL FIRED FURNACES VENT TERMINAL LOCATION VENT TERMINAL INSTALLATION VENT TERMINAL RISER KIT DIRECT VENT INTAKE AIR PIPE INSTALLATION VENTING INSTALLATION - DIRECT VENT BLOCKED VENT SAFETY SWITCH PRESSURE TUBING CONNECTIONS OPERATION OF OIL BURNERS FURNACE SET UP ADJUSTMENTS BLOCKED VENT SAFETY SHUT OFF SYSTEM A. SEQUENCE OF OPERATION BECKETT AFII B. SEQUENCE OF OPERATION RIELLO 40BF FINAL CHECK OUT...11 DIRECT VENTING WIRING DIAGRAMS...12 DIRECT VENTING OF OLSEN OIL FIRED FURNACES - VENTING COMPONENTS...15 VENTING COMPONENTS/MATCHING GUIDE...16 DIRECT VENT - PARTS IDENTIFICATION...17 AFII BURNER WITH BLOCKED VENT SAFETY (BVS) OPERATION...18 DIRECT VENTING OF OLSEN OIL FIRED FURNACES...19 BECKETT AFII BURNER TROUBLESHOOTING...19 BECKETT AFII: SYSTEM AND GENERAL TROUBLESHOOTING...21 RIELLO 40BF BLOCKED VENT SAFETY (BVS) OPERATION...24 RIELLO 40BF BURNER TROUBLESHOOTING...25 RIELLO 40BF BLOCKED VENT SAFETY SYSTEM (BVS) TROUBLESHOOTING...26 HOMEOWNER S REFERENCE TABLE...27 Warnings and Safety Symbols! DANGER Indicates a hazardous situation which, if not avoided, WILL result in death, serious injury.! CAUTION Indicates a hazardous situation which, if not avoided, may result in injury.! WARNING Indicates a hazardous situation which, if not avoided, may result in death, serious injury. NOTICE Indicates information which should be followed to ensure proper installation and operation. 3

4 DIRECT VENTING OF OLSEN OIL FIRED FURNACES 1. DIRECT VENTING OF OLSEN OIL FIRED FURNACES Installation shall be done by a Qualified Installer. Qualified Installer shall mean an individual who has been properly trained or is a licensed installer. The BCL-S, BFL, BML, HML, MPL and WML oil fired furnaces with the suffixes B2U for Beckett s AFII, and RBU for Riello s 40BF series Oil burners, are certified for venting through the wall using ducted outdoor air for combustion. The Direct Vent series is ideal for applications where a conventional chimney is unavailable, nor easily installed; an electrically heated home being retro-fitted for oil forced air heating for example. The term Direct Vent refers to a sealed combustion system. Direct vented appliances require some foresight and planning, since the range of flue lengths is restricted, clearances are critical, and national and local codes are quite strict with respect to safety. Be sure that the furnace can be installed within the physical limitations of the home, and accordance with local codes and regulations. Physical limitations include practical issues such as sufficient clearance to grade. It is advisable to install the vent termination in an area sheltered from winter prevailing winds. Avoid vent termination locations subject to frequent strong wind gusts. Figure 1 - Standard Vent Terminal Assembly Oil Burners: Beckett AFII or Riello Balanced Flue (40BF) The standard Beckett AF or AFG Series is not certified for use, or recommended for direct vent applications. Venting Materials and Fittings: For components available from Olsen, please see Table D3. 2. VENT TERMINAL LOCATION The through the wall termination shall be installed in accordance with the latest editions of CAN/CSA B-139 (Canada), NFPA-31 (United States), and / or any applicable local codes. Please refer to the diagram below. In Canada, the vent terminal shall not terminate: A. Directly above a paved sidewalk or a paved driveway that is located between two buildings, and that serves both of them. B. Less than 7 feet (2.13 m) above any paved sidewalk or a paved driveway. C. Within 6 feet (1.80m) of a window, door, or mechanical air supply inlet to any building, including soffit openings. D. Above a gas / regulator assembly within 3 feet (1 m) horizontally of the center-line of the regulator. E. Within 6 feet (1.80 m) of any gas service regulator vent outlet or within 3 feet (1 m) of any oil tank vent or any oil tank fill inlet. F. Less than 1 foot (0.3 m) above grade level within 6 feet (1.80 m) of any combustion air inlet, unless the appliance is otherwise certified. G. Within 6 feet (1.80 m) of the property line. H. Underneath a verandah, porch, or deck. I. So flue gases are directed at combustible material or at any openings of surrounding buildings that are within 6 feet (1.80 m). J. Less than 3 feet (1 m) from an inside corner of an L-shaped structure. Figure 2 - Vent Terminal Locations 4
5 DIRECT VENTING OF OLSEN OIL FIRED FURNACES K. So that the bottom of the vent termination opening is less than 1 foot (0.3 m) above any surface that may support snow, ice, or debris. L. So that the flue gases are directed towards bricks, siding, or other construction, in such a manner that may cause damage from heat or condensate from the flue gas. M. Within 4 feet (1.2 m) of a power venter. Please refer to the diagram below. In the United States, a vent terminal shall not terminate: Less than 7 feet (2.13 m) above any adjacent public walkway. Less than 4 feet (1.22m) below, 4 feet horizontally, or 1 foot (0.3m) above a door, window, or gravity air inlet of the structure. Less than 1 foot (0.3m) above grade. Less than 1 foot (0.3m) from the soffit of the roof of the structure. Less than 3 feet (0.9m) from the inside corner of an L shaped structure. Less than 5 feet (1.6m) of a gas regulator vent outlet, or oil tank vent outlet. Vent terminal can be installed in any wall having minimum thickness of 5, and maximum thickness of VENT TERMINAL INSTALLATION This applies to the standard Direct Vent Oil Vent Terminal. Select the location of wall penetration that conforms to the code for exterior location, as close to the appliance as possible, maintains clearance to combustibles and where the minimum 1/4-inch per foot slope back to the appliance can be maintained. Cut a 6-1/2 diameter hole through the wall. Remove the Intake Air Sleeve from the Terminal. Insert the Terminal through the wall from outside, secure with 4 screws to the wall, and seal to wall with weatherproof sealant. 1.From inside the building, reattach the Intake Air Sleeve and secure the inner sleeve to the outer sleeve with 2 screws. Use 4 screws to secure Sleeve to the wall. Ensure that the Intake Air Connector is located 4. VENT TERMINAL RISER KIT This Kit has been designed to increase the height of the Vent Terminal by approximately 3 feet, (see diagram below for typical Vent Riser setup). This is ideal where excessive snow build up could occur or where more flexibility is required to maintain minimum clearances to grade. Figure 3 - Vent Terminal Locations 5

6 DIRECT VENTING OF OLSEN OIL FIRED FURNACES Figure 4 - Inside View of Vent Terminal Figure 5 - Intake Pipes 5. DIRECT VENT INTAKE AIR PIPE INSTALLATION! WARNING Flexible duct for combustion air use is not permitted IMPORTANT: OUTDOOR AIR FOR COMBUSTION MUST BE USED. The oil burners approved for use with ducted outdoor air for combustion are the Beckett AFII and the Riello 40BF. All units obtain outdoor air by the following means: Acceptable combustion air intake materials: Beckett AFII Burner inch C Vent (single wall galvanized). 4 inch Rigid Aluminum pipe (0.030 wall thickness). Riello 40BF Burner inch C Vent (single wall galvanized) inch Rigid Aluminum pipe (0.030 wall thickness). 4- inch pipe should be used from the terminal to the appliance where it will be reduced to 3 inch Pipe to attach to the burner inlet collar. IMPORTANT: Intake pipe and fittings should be sealed with foil tape, duct tape, or silicone caulking and attached mechanically with screws. Maximum combustion air intake length is 25 feet using 8 90 elbows. Venting installation dictates that the length from the termination cannot be further than 20 feet; therefore any longer piping for the combustion air intake would be unnecessary. Combustion air intake does not have a minimum length. Condensation may become a problem during some climatic conditions. It may be necessary to wrap a portion, or the entire intake piping (particularly metal intake piping) with a waterproof insulation material VENTING INSTALLATION - DIRECT VENT VENT CLEARANCE TO COMBUSTIBLES: ONE (1) INCH.! WARNING Do not enclose vent. Do not route vent through walls, floors or ceilings. INSTALLATION OF "INSULATED DOUBLE WALL FLEXIBLE VENT. The inner pipe is constructed of 3 or 4 inch 316 stainless steel, with a two-ply aluminum outer pipe. High temperature insulation separates the inner and outer flex pipes. IMPORTANT: The venting and vent terminal are dedicated to the furnace only; do not attempt to vent any other appliance through it. Venting should be installed generally as follows and must comply with CAN/CSA B139 Installation Code for Oil Burning Equipment (Canada) or NFPA 31 Standard for the Installation of Oil Burning Equipment (United States), and / or with local codes and regulations. A. In as short and straight a run as possible without any unnecessary bends. B. There should not be any dips or sags throughout the full length of vent. C. Connector or vent should be sloped upwards from the appliance at least 1/4 per foot. D. Do not bend the connector or vent more than 90 degrees. E. Vent may be cut to minimum of 5 feet in length using fine tooth (24 teeth per inch) hacksaw blade.


 Piecing vent kits together (i.e. using 2 ten foot kits is strictly prohibited). Figure 8 - Pressure Tubing Connection!")

7 DIRECT VENTING OF OLSEN OIL FIRED FURNACES Figure 6 - Pressure Tubing Connections Figure 7 - Combustion Air Intake Connection F. G. H. I. J. K. Male and female ends of appliance adapters and connectors must be cleaned with residue free brake cleaner solvent. Apply minimum 1/4 bead of Si-Ultra Copper Sealant provided, onto outside of male end of vent to appliance connector. Fit connector to vent by threading it counter-clockwise until it stops. Ensure joint is not cross-threaded. Tighten gear clamp on outer sleeve. Apply minimum 1/4 bead of same sealant as mentioned above onto female end inside of connector. Slip connector over end of appliance collar until it stops. Tighten attached gear clamp. Support Vent every 36 to prevent sagging. Attach Terminal Connector as described in two steps listed above. Maximum vent length is 20 feet (using a 20 foot vent kit) Piecing vent kits together (i.e. using 2 ten foot kits is strictly prohibited). Figure 8 - Pressure Tubing Connection! CAUTION Use appropriate safety precautions! All thin metal edges are extremely sharp. This Double Wall Vent is available in kits, from your OLSEN / AIRCO Dealer. See venting components matching guide in this document. High wind conditions can adversely affect combustion process; therefore, avoid locating terminal on walls facing prevailing winds. Figure 9 - Horizontal Right Connection 7. BLOCKED VENT SAFETY SWITCH PRESSURE TUBING CONNECTIONS. Connections should be checked on all furnaces prior to firing the unit. Tubing used to connect burner mounting plate to positive side of pressure switch is high temperature viton tubing, which is black in color. Care must be taken to ensure tubing slopes slightly toward burner mounting plate to ensure if condensation occurs, there is drainage to burner mounting plate. On WML and MPL models tubing will require modification to ensure proper pitch of tubing. See following table for approximate lengths. Furnace Position Down Flow Horizontal Unit on Left Side Horizontal Unit on Right Side Length of Tubing Viton or Black Tubing 5 1/2" - As Built 12" - Included 9" - Cut 12" Tubing used on combustion air intake is clear silicone tubing and should not require any modifications. 7
8 DIRECT VENTING OF OLSEN OIL FIRED FURNACES 8. OPERATION OF OIL BURNERS Once the furnace flue pipe and intake pipe are completely installed, use the following instructions to set the burner: Shut off the electrical power to the furnace. Install an oil pressure gauge to the pressure port on the oil pump. (Refer to the oil pump specification sheet included with the burner instructions & the Furnace Installation Instructions). Restore electrical power to the furnace. Start the furnace and bleed all air from the fuel oil lines. Set burner air settings for initial firing as indicated in the following sections for AFII or 40BF burners. Close the purge valve and fire the unit. Allow the furnace to warm up to normal operating temperatures. During this time, set the pump pressure in accordance with the data provided in Furnace Installation Manual. When the furnace has reached "steady state" (after approximately 10 to 15 minutes), remove the bolt from the center of the Appliance Adapter to the furnace. Set the combustion air damper on the Burner to get a TRACE to ZERO smoke. Figure 10 - BECKETT AFII BURNER When the proper combustion & smoke spot readings are achieved, tighten the locking screw on the dial. Recheck draft, smoke and combustion. RIELLO 40BF BURNER: To adjust the initial air damper setting, remove the burner cover and turn the air damper adjustment screw (2) until the top edge of the air damper (3) is in alignment with the corresponding number from the chart below. Further adjustments must be made with the burner cover in place by unscrewing the plug on the cover. Turn the screw clockwise to increase combustion air or counter clockwise to decrease combustion air. Final position of damper will vary on each installation. Use instruments to establish proper settings for maximum CO2 and smoke spot reading of zero. When adjusted properly, reinsert plastic cap over air adjustment hole. Re-check draft, smoke and combustion. NOTE: Variations in flue gas, smoke, CO2 and temperature readings may be experienced when burner cover is put in place. Therefore, burner cover must be in place when making final adjustments to ensure proper test results. CAUTION! Riello burner pressure gauge threads are British Parallel Thread design. Test gauge with NPT fitting will ruin pump body. Use Riello pressure gauge or adapter. Figure 11 - Pump Body Using chart below, select appropriate air dial setting according to required firing rate. Initial setting should be adequate to start burner. Final adjustments will be required once burner has been started. FINAL ADJUSTMENTS Pull smoke spot reading to make sure it is no more than trace of smoke. Using suitable testing instruments for CO2 (or O2), measure combustion products. CO2 in the stack should be minimum of 12% CO2 (4.6% O2) at trace of smoke. For clean operation of burner, open air control to introduce enough excess air into system to reduce CO2 by 10% of the original trace point. EXAMPLE: 12% CO2 minus 1.2 (which is 10% of 12) equals 10.8% CO2). 8
9 9. FURNACE SET UP ADJUSTMENTS 1. Check system temperature rise. 2. Temperature rise is difference between return air temperature measured at point near return air inlet, and supply air temperature measured near furnace outlet. System temperature rise will typically range between 65 F and 85 F. If temperature rise is too high, airflow must be increased. If temperature rise is too low, airflow must be decreased. 3. Adjust post purge timing between 3 to 5 minutes. Longer post purge times may help to control oil odors. 4. Turn off burner. Observing duct thermometer in supply air stream, note temperature at which blower fan stops. For furnaces equipped with a L6064 combination fan/limit control- The fan adjustments can be made by moving the adjustment levers for "fan on" and "fan off". FOR EXAMPLE: If the "fan off" setting is observed to be 100, and the actual "fan off" temperature as shown by the duct thermometer is 110 F, the "fan off" setting on the fan / limit control could be reset to 90 (one notch to the left), to cause an actual shut down at 100 F. Normally, the 'fan on" setting is set to be approximately 30 higher than the "fan off" setting. To check the operation of the limit switch, shut off power to the furnace. Temporarily remove the neutral wire from the direct drive blower motor. Restore the electrical power to the furnace and set the thermostat above room temperature. After three or four minutes of burner operation, the limit control should turn the burner off. Progress towards a high limit shut down can be monitored by watching the dial on the fan / limit control. When the limit function test is complete, shut off electrical power to the furnace, replace the neutral wire to the blower fan motor, and then restore power. The blower fan will start up immediately. Once the temperature has dropped, the oil burner will resume and continue until the thermostat is satisfied. Restore the thermostat setting to a comfortable temperature. For furnaces equipped with a fan timer board- The Honeywell ST9103 has a fixed fan delay on time of 30 seconds after the burner ignites. The United Technologies has an adjustable fan on time that is set by selecting the dipswitch combination displayed in the installation manual. This fan on delay can be set at 30, 60, 90 or 120 seconds. This provides a delay between the burner ignition and blower start-up to eliminate excessive flow of cold air when the blower comes on. The Honeywell ST9103 has an adjustable fan off time of 60, 90, 120 and 150 seconds that is set by selecting a dipswitch combination on the control board displayed in the installation manual. Similarly the United Technologies have an adjustable fan off time of 2, 3, 4 or 6 minutes displayed in the installation manual. The fan off delay time starts when the burner motor is de-energized at the end of a call for heat. Blower shutdown is delayed to remove any residual heat from the heat exchanger and improve the annual efficiency of the furnace. DIRECT VENTING OF OLSEN OIL FIRED FURNACES 9 Firing Rate Riello 40BF Approximate Air Settings Firing Rate Beckett AFII Approximate Air Settings Air Damper Setting 40BF3 Dial Setting AF II 85 AF II to to to to to BF The electronic fan timer board works in conjunction with snap disc limit controls, which perform a safety function, and breaks power to the oil burner primary control, which shuts off the burner if the furnace over-heats. The limit control is thermally operated and automatically resets. The limit control is factory installed, pre-set and is not adjustable. If a limit control opens, the Honeywell ST9103 will energize the circulating fan. When the limit control closes the burner is re-energized and the heating cycle begins again. If the limit control opens with the United Technologies electronic fan control, the circulating fan will be energized as well. When the limit closes, the control initiates a two-minute delay. When this delay is finished, the fan off timer will begin. At the end of the fan off time cycle the burner will be energized, initiating a normal burner cycle. To check the operation of the limit switch, shut off power to the furnace. Temporarily remove the neutral wire from the furnace and set the thermostat above room temperature. After three or four minutes of burner operation, the limit control should turn the burner off. When the limit function test is complete, shut off electrical power to the furnace, replace the neutral wire to the blower fan motor, and then restore power. The blower fan will start up immediately. Once the temperature has dropped and the limit control has reset, the fan will operate until the fan off time is achieved. The oil burner will then resume operation and continue until the thermostat is satisfied. Restore the thermostat setting to a comfortable temperature.
10 5. Set the heat anticipator adjustment in the thermostat (if so equipped), by removing the "R" or "W" wire to the thermostat, then reading the amperage draw between the two wires. Note: Furnace should be run through at least three full cycles before leaving installation, to ensure all controls are operating properly and as expected. Note: All joints in any positive pressure venting system must be checked for leaks before leaving installation site. 10. BLOCKED VENT SAFETY SHUT OFF SYSTEM Each direct vent furnace is equipped with a Blocked Vent Safety shut off system (BVS). This safety circuit will shut the burner off in the event of a combustion air blockage or venting blockage. The components of this BVS consist of a pressure switch and bypass timer. Beckett AFII - BVS is wired in series with the oil valve. Riello 40BF - BVS is wired in series with L terminal on the 530SE control. 11A. SEQUENCE OF OPERATION BECKETT AFII 1. Room temperature drops, thermostat calls for heat. 2. Pre-purge begins, lasting 5 to 15 seconds. 3. Oil solenoid and BVS are energized 4. Oil Solenoid opens allowing oil to reach the Burner Electrodes. Burner ignition begins. 5. Cad cell detects light from combustion, disconnects the primary control safety circuit, allowing combustion to continue seconds after the bypass timer is energized, the pressure switch is permitted to control the oil solenoid valve. 7. After 15 to 45 seconds (depending on primary control characteristics), the electric spark across the electrode tips stops, combustion continues. 8. L6064 combination fan/limit control- Furnace temperature rises causing fan contacts in the fan / limit switch to close to start the blower fan. Fan timer board- The Honeywell ST9103 has a fixed fan delay on time of 30 seconds after the burner ignites. The United Technologies has an adjustable fan on time that is set by selecting the dipswitch combination displayed in the installation manual. This fan on delay can be set at 30, 60, 90 or 120 seconds. 9. Furnace continues to operate and will eventually reach "steady state", the point at which the system temperature stabilizes. 10. Room temperature rises, thermostat is satisfied, heating contacts open. 11. Oil Solenoid Valve closes, combustion stops, Burner Motor remains on to complete the Post Purge Cycle. Post Purge will continue up to 6 minutes depending on the control switch settings. DIRECT VENTING OF OLSEN OIL FIRED FURNACES 12. L6064 combination fan/limit control- Furnace temperature cools causing fan control contacts to open; blower fan stops. Fan timer board- The Honeywell ST9103 has an adjustable fan off time of 60, 90, 120 and 150 seconds that is set by selecting a dipswitch combination on the control board displayed in the installation manual. Similarly the United Technologies have an adjustable fan off time of 2, 3, 4 or 6 minutes displayed in the installation manual. The fan off delay time starts when the burner motor is deenergized at the end of a call for heat. 13. Furnace remains idle until the next call for heat. 11B. SEQUENCE OF OPERATION RIELLO 40BF 1. Room temperature drops, thermostat calls for heat. 2. Pre-purge begins, lasting 5 to 15 seconds. The BVS is energized simultaneously. 3. Oil Solenoid opens allowing oil to reach the Burner Electrodes. Burner ignition begins. 4. Cad cell detects light from combustion, disconnects the primary control safety circuit, allowing combustion to continue seconds after the bypass timer is energized, the pressure switch is permitted to control the oil solenoid valve. 6. After 15 to 45 seconds (depending on primary control characteristics), the electric spark across the electrode tips stops, combustion continues. 7. L6064 combination fan/limit control- Furnace temperature rises causing fan contacts in the fan / limit switch to close to start the blower fan. Fan timer board- The Honeywell ST9103 has a fixed fan delay on time of 30 seconds after the burner ignites. The United Technologies has an adjustable fan on time that is set by selecting the dipswitch combination displayed in the installation manual. This fan on delay can be set at 30, 60, 90 or 120 seconds. 8. Furnace continues to operate and will eventually reach "steady state", the point at which the system temperature stabilizes. 9. Room temperature rises, thermostat is satisfied, heating contacts open. 10. Oil Solenoid Valve closes, combustion stops, Burner Motor remains on to complete the Post Purge Cycle. Post Purge will continue up to 6 minutes depending on the control switch settings. 11. L6064 combination fan/limit control- Furnace temperature cools causing fan control contacts to open; blower fan stops. Fan timer board- The Honeywell ST9103 has an adjustable fan off time of 60, 90, 120 and 150 seconds that is set by selecting a dipswitch combination on the control board displayed in the installation manual. Similarly the United Technologies have an adjustable fan off time of 2, 3, 4 or 6 minutes displayed in the installation manual. The fan off delay time starts when the burner motor is deenergized at the end of a call for heat. 12. Furnace remains idle until next call for heat. 10
11 12. FINAL CHECK OUT Before the final test cycle, carefully examine complete vent system for leaks. This may be done by spraying soapy solution on all joints and watching for bubbles during prepurge. The hot vent can be checked with lit taper for signs of air movement around joints or seams. Ensure all safety devices and electrical components have been set for normal operation. Ensure all electrical connections are tight and that the wiring is secure. IMPORTANT: Please ensure the homeowner is informed and understands: 1. where circuit breaker or fuse is located in main electrical panel. 2. where furnace switch is located, and switch "on" and "off" positions if not obvious. 3. where oil shut-off valve from oil storage tank is located. 4. to keep area around vent terminal free of snow, ice, and debris. 5. how to operate thermostat, and other related accessories. 6. how to operate manual reset button on primary control, and when not to push reset button. 7. how and where to visually inspect venting system for leaks or other problems. 8. how to inspect, clean and replace air filter, and other homeowner maintenance procedures. 9. who to call for emergency service and routine annual service. 10. terms and conditions of manufacturer's warranty and contractor's warranty. DIRECT VENTING OF OLSEN OIL FIRED FURNACES 11
12 DIRECT VENTING wiring diagram - BCL AND BFL WITH FAN & LIMIT CONTROL DIRECT VENTING wiring diagram - BCL AND BFL WITH FAN & LIMIT CONTROL 12
13 DIRECT VENTING wiring diagram - WML AND MPL WITH FAN TIMER CONTROL DIRECT VENTING wiring diagram - WML AND MPL WITH FAN TIMER CONTROL 13

14 DIRECT VENTING wiring diagram -BML AND HML WITH FAN TIMER CONTROL DIRECT VENTING wiring diagram -BML AND HML WITH FAN TIMER CONTROL 14

15 DIRECT VENTING OF OLSEN OIL FIRED FURNACES - Venting components 15
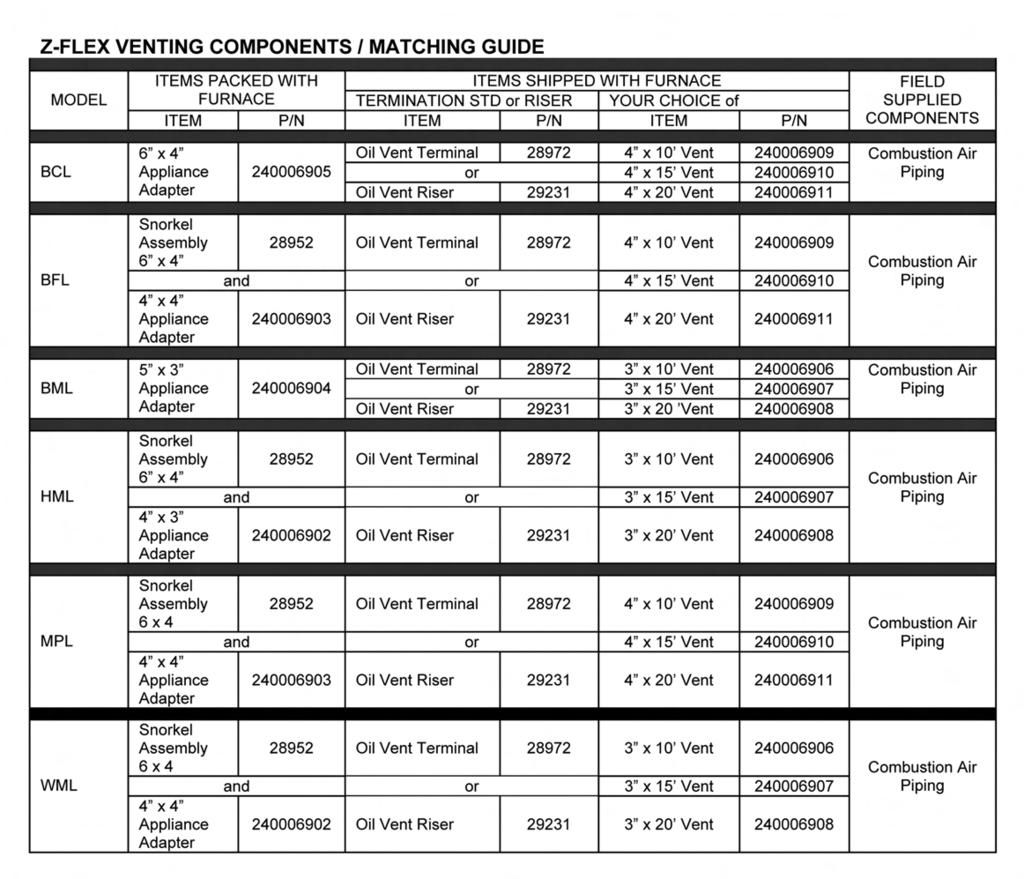
16 Venting Components/Matching Guide 16
17 DIRECT VENT - Parts Identification 17
18 DIRECT VENTING OF OLSEN OIL FIRED FURNACES AFII BURNER WITH BLOCKED VENT SAFETY (BVS) OPERATION EXTERNAL ACTION APPLIANCE RESPONSE Power applied to 7505P control Internal safety check conducted. If no light or flame is detected and all internal conditions are correct, control enters idle mode. 1. Contacts between T and T on 7505P are closed. 2. Primary Control Safety period (4 seconds) internal and external check for flame or light. If flame is detected, control remains in idle mode. 3. When flame is not present, 7505P will apply power to the burner motor and igniter, complete a 15 second valve on delay period and then apply power to the oil valve circuit. 4. When valve is energized, the bypass timer on the BVS is energized. A. Bypass timer contacts close, bypassing the pressure switch for 10 seconds. B. After 10 seconds, the bypass timer contacts open and the pressure switch contacts are in series with the oil solenoid valve. In the event of a vent or combustion intake air blockage the pressure switch, will open and shut the oil solenoid valve off. 5. Enters the trial for ignition period. A. Monitors burner for flame. B. When flame is not detected: i. Enters lockout mode after 15 seconds. ii. Shuts off valve, igniter and burner motor. iii. Flashes indicator light at 1 Hz (½ second on, ½ second off). Thermostat calls for heat. iv. Depress reset button to return to power up sequence. C. When flame is detected, Carry-Over period begins: 6. Enters 10-second Ignition Carry-Over period. A. Turns on indicator light B. If flame is lost and lockout time has not expired, THE PRIMARY CONTROL returns to trial for Ignition period. C. If flame is lost and lockout time has expired, THE PRIMARY CONTROL enters Recycle Mode. 7. Carry-over time expires and igniter turns off. 8. Enters a run mode: A. Flame is monitored until call for heat ends or flame is lost. If flame is lost: i. Control enters Recycle Mode. ii. Recycle time starts (60 seconds). iii. Burner and valve are turned off. iv. Red Light Flash Safety Lockout Red Light Solid Hard Lockout v. Returns to Idle mode at end of Recycle mode. Call for heat is satisfied. Reset button pushed two times without device completing a call for heat. 1. Oil valve circuit is de-energized and valve shuts off. 2. Burner motor runs for selected burner motor-off delay. 3. Burner motor turns off. Returns to Idle mode 1. Enters restricted Hard Lockout. 2. Indicator light on continuously 3. Reset device by pressing and holding reset button for a minimum of 15 seconds. (Yellow Light Turns ON) 18
19 DIRECT VENTING OF OLSEN OIL FIRED FURNACES BECKETT AFII BURNER TROUBLESHOOTING Condition 1: Burner motor does not start when there is a call for heat. Procedure Status Corrective Action 1. Check that limit switches are closed and contacts are clean. 2. Check for line voltage power at the oil primary control. Voltage should be 120 Vac between the black and white lead wires on the oil primary control. 3. Check indicator light with burner off, no call for heat (no flame). 4. Shield cad cell from external light. 5. Verify that the oil valve is closed during the valve on delay period by observing the view port and verifying that no flame is present during the 15-second valve on delay. Indicator light is on. Indicator light is off. Indicator light turns off. Indicator light stays on. Indicator light is on. N/A N/A N/A N/A Cad cell is defective, sees external light, or connections have shorted. Go to step 4. Go to step 5. Eliminate external light source or permanently shield cad cell. Replace cad cell with new cad cell and recheck. If indicator light does not turn off, remove cad cell lead wires from and recheck. If indicator light is still on, replace control. If the indicator light turns off, replace cad cell bracket assembly. If flame is present, replace the oil valve. 6. Jumper thermostat (T -T) terminals on 7505P IMPORTANT First remove one thermostat lead wire. Burner starts. Burner does not start. Trouble is in thermostat circuit. Check thermostat-wiring connections. If connections are clean and tight, check thermostat wires for continuity. Disconnect line voltage power and open line switch. Check all wiring connections. Tighten any loose connections and recheck. If burner still doesn't start, replace 7505P. If burner still doesn't start, check the oil burner motor. It may be seized or burned out. 19
20 BECKETT AFII BURNER TROUBLESHOOTING Condition: Burner starts then locks out on safety with indicator light flashing at 1/2 second on, 1/2 second off. Procedure Status Corrective Action Indicator light Go to Step 2. stops flashing. 1. Reset oil primary control by pushing in and releasing red reset button. Flash - 1 sec. / Solid - 1 sec. 2. Listen for spark after burner turns on (after 2 second delay). 3. Check indicator light after flame is established, but before oil primary control locks out. 4. Check cad cell sighting for view of flame. a. Disconnect line voltage power and open line switch. b. Unplug cad cell and clean cad cell face with soft cloth. Check sighting for clear view of flame. Replace cad cell in socket. c. Reconnect line voltage power and close line switch. d. Start burner. 5. Check cad cell. a. Disconnect line voltage power and open line switch. b. Remove existing cad cell and replace with new cad cell. c. Disconnect all wires from thermostat terminals to ensure that there is no call for heat. d. Reconnect line voltage power and close line switch. e. Expose new cad cell to bright light such as a flashlight. 6. Check cad cell bracket assembly. a. Disconnect line voltage power and open line switch. b. Remove cad cell wires from quick connect connectors on the R7505P and leave control lead wires open. c. Apply power to device. d. Place jumper across cad cell terminals after DIRECT VENTING OF OLSEN OIL FIRED FURNACES Indicator light continues to flash at 1/2 second on, 1/2 second off rate. Verify that the control is not in restricted mode. (See notes at end of this table.). If not in restricted mode, replace 7505P Ignition is off Spark igniter could be defective. Check for line voltage at igniter terminals. If line voltage is present, replace 7505P. Ignition is on. Go to Step 3. Ignition is on but no oil is being sprayed into the combustion chamber. Indicator light is on until the control locks out and starts Replace 7505P flashing during lockout. Indicator light stays off. Go to step 4. Burner locks out Go to step 5. Burner keeps running. Indicator light is on. Indicator light is off. Indicator light is on. Indicator light is off. Wait for Valve ON delay to complete. 1. Check oil supply. 2. Ensure BVS bypass timer contact close and bypass pressure switch for 10-seconds. 3. After 10-seconds, check pressure switch on BVS to ensure closed. a. Pressure switch open. i. Check pressure tubes for proper connection or possible obstructions. ii. Check venting for blockage. iii. Check combustion air intake for blockage. iv. Check pressure switch operation. 4. Check oil line valve. 5. Check for filter blockage or seized oil pump. System is OK. Remount control onto burner housing, go to step 6. System is OK. Replace CAD cell bracket assembly. Replace 7505P NOTE: Hard Lockout : In order to limit the accumulation of unburned oil in the combustion chamber, the control can be reset only 5 times, after which, the control locks out. The reset count returns to zero each time a call for heat is successfully completed. To reset from Hard Lockout: press and hold the reset button for 15 seconds. When the Yellow LED flashes turns on, the device has reset. NOTE: Disable function: Pressing and holding the reset button will disable all functions until the button is released. The burner will restart at the beginning of the normal heat cycle on SAFETY CHECK. 20
21 BECKETT AFII: SYSTEM AND GENERAL TROUBLESHOOTING DIRECT VENTING OF OLSEN OIL FIRED FURNACES Problem Possible Cause Remedy Furnace will not start. Furnace will not start. Furnace will not start without first pushing oil primary control reset button. (Happens on frequent basis) Thermostat not calling for heat No power to furnace. Thermostat faulty. Oil primary control faulty. Photo Cell wiring shorted or room light leaking into photo cell compartment Open safety switch. Photo Cell (Cad Cell) defective No fuel oil Clogged nozzle Clogged oil filter Blocked Vent Safety Circuit opening Check thermostat and adjust. Also, check thermostat for accuracy; if it is a mercury switch type, it might be off level. Check furnace switch, main electrical panel furnace fuse or circuit breaker. Also look for any other hand operated switch, such as an old poorly located furnace switch, which was not removed during furnace replacement. Remove thermostat wires from oil primary control terminals T-T. Place a jumper across T-T. If furnace starts, replace thermostat, thermostat sub-base (if equipped), or both. Check reset button on oil primary control. Remove thermostat wires from oil primary control terminals T1 - T2. Check for 24v across T -T. If no voltage is present, check for 115v to oil primary control. If 115v is present, go to Table C-3. Check photocell (cad cell) wiring for short circuits. Also, check for room light leaking into cad cell compartment. Repair light leak if necessary. See Table C-3. Check for open limit or auxiliary limit. Also, check internal wiring connections; loose connectors, etc. If call cell is dirty, clean it. (Determine why cad cell is getting dirty). If cad cell is poorly aimed, realign it. NOTE: The photocell should have a resistance of 100KΩ in absence of light; a maximum of 1500Ω in the presence of light. Ensure that room light is not leaking into the cad cell compartment. (See diagnostic light section). Check fuel oil supply. Check that all hand operated fuel oil valves are in the open position. Fill oil storage tank if necessary. Replace nozzle with high quality replacement. Use rating plate or Tables in Appendix A as a guide. Replace oil tank filter or in-line filter if used. Ensure BVS bypass timer contact close and bypass pressure switch for 10-seconds. After 10-seconds, check pressure switch on BVS to ensure closed. Pressure switch open: Check pressure tubes for proper connection or possible obstructions. Check venting for blockage. Check combustion air intake for blockage. Check pressure switch operation. Low oil pump pressure Air getting into fuel oil lines, or fuel oil line dirty, clogged, or in some manner defective Defective burner motor Connect pressure gauge to oil pump. Adjust pump pressure, or replace oil pump if necessary. Ensure that erratic pressure readings are not caused by defective fuel oil line. Check fuel oil lines. Replace any compression fittings found with high quality flared fittings. Check for any signs of oil leaks. Any oil leak is a potential source of air or contaminants. Check burner motor. If burner motor is cutting out on over-load, determine why. Replace if necessary. 21
22 DIRECT VENTING OF OLSEN OIL FIRED FURNACES BECKETT AFII: SYSTEM AND GENERAL TROUBLESHOOTING - Continued Problem Possible Cause Remedy No fuel oil. Check fuel oil supply. Check that all hand operated fuel oil valves are in the open position. Fill oil storage tank if necessary. Clogged nozzle. Replace nozzle with high quality replacement. Use rating plate or Tables in Appendix A as a guide. Clogged oil filter. Replace oil tank filter or in-line filter if used. Furnace starts, but cuts out requiring manually resetting the oil protector reset button Oil burner sputtering at nozzle Blocked Vent Safety Circuit opening. Low oil pump pressure. Air getting into fuel oil lines, or fuel oil line dirty, clogged, or in some manner defective. Defective burner motor. Water or contaminants in oil. Electrodes out of adjustment or defective. Poor transformer high voltage connections or defective transformer. Fuel oil filter clogged. Defective oil pump. Fuel oil line partially clogged or contains air. Blocked Vent Safety Circuit opening intermittently. Ensure BVS bypass timer contact close and bypass pressure switch for 10-seconds. After 10-seconds, check pressure switch on BVS to ensure closed. Pressure switch open. Check pressure tubes for proper connection or possible obstructions. Check venting for blockage. Check combustion air intake for blockage. Check pressure switch operation. Connect pressure gauge to oil pump. Adjust pump pressure, or replace oil pump if necessary. Ensure that erratic pressure readings are not caused by defective fuel oil line. Check fuel oil lines. Replace any compression fittings found with high quality flared fittings. Check for any signs of oil leaks. Any oil leak is a potential source of air or contaminants. Check burner motor. If burner motor is cutting out on over-load, determine why. Replace if necessary. Drain fuel oil storage tank, replace fuel oil. (Consult with fuel oil supplier). Check electrode settings. Check electrodes for dirt build-up or cracks in porcelain. Check contacts between the igniter and electrodes. If OK, replace the igniter Replace fuel oil storage tank filter and / or fuel oil in-line filter. Check burner motor / fuel oil pump coupling. Check oil pump pressure. Replace fuel oil pump if necessary. Bleed air from oil line. If problem persists, replace oil line. Ensure BVS bypass timer contact close and bypass pressure switch for 10-seconds. After 10-seconds, check pressure switch on BVS to ensure it remains closed. Pressure switch open. Check pressure tubes for proper connection or possible obstructions. Check venting for blockage. Check combustion air intake for blockage. Check pressure switch operation. Excessive fuel oil consumption. System temperature rise too high. Poor fan off delay timing selection, (fan stops too soon). Fuel oil leak. Stack temperature too high. Thermostat improperly adjusted or in poor location. System temperature rise ideally should not exceed 85 F. Check for clogged air filters. Check blower fan for excess dirt build-up or debris. Speed up blower fan if necessary. Check fan off delay timing setting. Use a duct thermometer in the supply air plenum take-off or first few inches of the supply air trunk duct. Ideally, the fan will shut off at a temperature of F. Manipulate the dip switch settings to come as close as possible to this fan off temperature. Check fuel oil line for leaks. Repair or replace if necessary. Check stack temperature. Stack temperatures will normally range from 350 to 450 F. Check draft regulator. Draft should be set to 0.02 in. w.c. Check thermostat heat anticipator setting against measured amperage draw. Increase heat anticipator setting if necessary. If the thermostat is being influenced by drafts, sunlight, duct work, etc., relocate to more suitable location. 22
23 BECKETT AFII: SYSTEM AND GENERAL TROUBLESHOOTING - Continued Problem Possible Cause Remedy Too much smoke. Soot building up on blast tube (end coning). Furnace will not warm home to desired temperature Home does not heat evenly Supply air temperature too hot. Supply air temperature too cool. Supply air temperature too cool during first moments of furnace cycle. Insufficient combustion air adjustment at oil burner, or improper draft pressure. Heat exchanger partially clogged. Poor alignment between oil burner blast tube and fire pot. Flame impingement caused by Incorrect nozzle angle. Defective fire-pot Airflow blocked or dirty air filter. Thermostat adjustments or location Insufficient airflow. Defective high limit control. Under-sized nozzle. Blower fan motor stopping intermittently on overload. Burner motor stopping intermittently on overload. Improper distribution of heat. Airflow blocked or dirty air filter. Insufficient airflow. Excess airflow. Excessive duct losses. Fan control "fan on" setting too low. Excessive duct losses. DIRECT VENTING OF OLSEN OIL FIRED FURNACES Adjust the oil burner combustion air band and draft regulator to gain the highest practical CO2 or lowest practical O2 content in the flue gases. See Burner Set Up. Check for soot build-up in heat exchanger flue passages, especially in the outer radiator. Check alignment. Blast tube should be centered with fire pot burner opening. Oil burner head should be ¼ inch back from the inside surface of the fire pot. Check nozzle size and angle. (See Appendix A). Check distance from head to inside surface of the fire pot. Check fire-pot. Repair or replace. Clean or replace air filter. Check thermostat heat anticipator setting against measured amperage draw. Increase heat anticipator setting if necessary. If the thermostat is being influenced by drafts, sunlight, duct work, etc., relocate to more suitable location. Check all dampers. Open closed dampers including registers in unused rooms. Check system temperature rise. If temperature rise is too high, speed up blower fan. Test high limit function of all limit switches. Use a duct thermometer to assess accuracy of limit control. Check for obstructions to airflow around limit switch bi-metal elements. Replace control if necessary. Check nozzle. If problem is not caused by air flow problems, use larger nozzle, if permitted by rating plate. Check blower fan motor amperage draw. Check motor ventilation ports, clean if necessary. Replace motor if necessary. Check burner motor. Replace if necessary. This is not likely to be a furnace problem. Balance duct system. Clean or replace air filter. Check all dampers. Open closed dampers including registers in unused rooms. Check system temperature rise. If temperature rise is too high, speed up blower fan. Check system temperature rise. Slow down blower fan if necessary. Check supply air ductwork. Seal leaky joints and seams. Insulate ductwork if necessary. Increase "fan on dipswitch settings on EFT if control has this option.). Register air deflectors may help. Check supply air ductwork. Seal leaky joints and seams. Insulate ductwork if necessary 23
24 RIELLO 40BF BLOCKED VENT SAFETY (BVS) OPERATION EXTERNAL ACTION Thermostat calls for heat. DIRECT VENTING OF OLSEN OIL FIRED FURNACES APPLIANCE RESPONSE 1. Bypass timer is energized, bypass timer holding contacts close, bypassing normally closed pressure switch for 25 seconds. Note: Call for heat must be terminated and initiated again to reset bypass relay. 2. Burner enters pre-purge. 3. After pre-purge, oil valve is energized and burner lights off. 4. Burner operates in run mode. 5. Bypass timer holding contacts open and normally closed pressure switch monitors for vent or combustion air intake blockage. Call for heat is satisfied. Pressure switch contacts open and cause burner to re-cycle 1. Oil valve circuit is de-energized and valve shuts off. 2. Burner motor runs for duration of burner motor-off delay. 3. Burner motor turns off. 1. Bypass timer contacts not closing and bypassing pressure switch/ Shut appliance down and restart. 2. Check for vent blockage. 3. Check for combustion air intake blockage. 4. Ensure pressure tubes are connected properly and clear of obstructions. 5. Check burner set up. 24
25 DIRECT VENTING OF OLSEN OIL FIRED FURNACES RIELLO 40BF BURNER TROUBLESHOOTING Condition: Thermostat is calling for heat. Burner is not running. 1. Reset control box. Problem Possible Cause Remedy 2. Test for 120 Vac supply at sub-base between L (P) & N or terminals #3 and #5. 3. Turn off power supply- Remove control box and jumper terminals #5 and #6. Restore power. 4. Burner Starts Burner starts. Go to step #4. Burner does not start Go to step #2 120 Vac present. Go to step #3 No voltage Motor runs. Motor does not run. Burner stays in Pre-purge. Burner continues to purge and light off with immediate flame dropout. Burner locks out after trial for ignition. Check system fuse, breaker or ensure service switch is ON. Verify all limits are closed. If using switching relay, verify 24 Vac at T-T. Verify BVS pressure switch is closed. Verify reduced voltage (42-52 Vac) between terminals #3 and #7. Ensure good contact between control box spades and sub-base terminals. Defective control box/ Replace. Verify electrical connections. Check for seized pump, motor, or fan against housing. Defective motor capacitor. Thermal overload (Hot motor). Faulty CAD cell or seeing light before trial for ignition. Coil wires on terminals #1 and #2 or #1 and #8 reversed. Open coil circuit; terminals #2 and #8. Open coil circuit; terminal #1 Defective Vac supply, terminals #3 and #7. Defective control box/ Replace Metal yoke for coil missing. Coil wire #2 and #8 reversed. Low resistance of coil holding circuit, terminals #1 and #2, (1350 ohms ± 10%). Verify BVS bypass relay contacts close bypassing the pressure switch for 25 seconds. Verify BVS pressure switch is remaining closed upon light off. Low resistance or no contact on starting circuit of coil, terminals #2 and #8. (1.3-ohm ± %) No oil supply- tank empty, valve closed, dirty filter, damaged supply lines. Defective or dirty oil valve stem, nozzle, or pump strainer. Broken pump drive key, defective pump or no oil pressure. Ignition electrodes shorted, cracked porcelain. Burner motor not up to speed. Excessive draft over fire. Defective control box/ Replace. 25
26 DIRECT VENTING OF OLSEN OIL FIRED FURNACES RIELLO 40BF BLOCKED VENT SAFETY SYSTEM (BVS) TROUBLESHOOTING Condition: Thermostat is calling for heat. Burner is not running.. Problem Possible Cause Remedy 120 Vac present. Go to step #2. No voltage 1. Test for 120 Vac supply at terminal #2 and #3 on bypass timer. 2.Test BVS pressure switch contacts are closed 3. Turn off power supply- Remove control box and jumper terminals #5 and #6. Restore power. Check system fuse, breaker or ensure service switch is ON. Verify all limits are closed. If using switching relay, verify 24 Vac at T-T. Contacts closed. Go to step #3. Verify pressure tubing is connected properly and clear of obstructions. Contacts open Verify vent is not obstructed. Verify combustion air intake is not obstructed. Replace. Verify reduced voltage (42-52 Vac) between terminals #3 and #7. Motor runs. Ensure good contact between control box spades and sub-base terminals. Defective control box/ Replace. Verify electrical connections. Check for seized pump, motor, or fan against Motor does not run. housing. Defective motor capacitor. Thermal overload (Hot motor). 4. Burner Starts Burner stays in Pre-purge. Burner continues to purge and light off with immediate flame dropout. Burner locks out after trial for ignition. Faulty CAD cell or seeing light before trial for ignition. Coil wires on terminals #1 and #2 or #1 and #8 reversed. Open coil circuit; terminals #2 and #8. Open coil circuit; terminal #1 Defective Vac supply, terminals #3 and #7. Defective control box/ Replace Metal yoke for coil missing. Coil wire #2 and #8 reversed. Low resistance of coil holding circuit, terminals #1 and #2, (1350 ohms ± 10%). Verify BVS bypass relay contacts close bypassing the pressure switch for 25 seconds. Verify BVS pressure switch is remaining closed upon light off Low resistance or no contact on starting circuit of coil, terminals #2 and #8. (1.3-ohm ± %) No oil supply- tank empty, valve closed, dirty filter, damaged supply lines. Defective or dirty oil valve stem, nozzle, or pump strainer. Broken pump drive key, defective pump or oil pressure. Ignition electrodes shorted, cracked porcelain. Burner motor not up to speed. Excessive draft over fire. Defective control box/ Replace. 26
Direct Vent. Oil Fired Warm Air Furnaces INSTALLATION, OPERATION & MAINTENANCE MANUAL WARNING NOTICE
 Direct Vent Oil Fired Warm Air Furnaces INSTALLATION, OPERATION & MAINTENANCE MANUAL! WARNING Fire, explosion, asphyxiation and electrical shock hazard. Improper installation could result in death or serious
Direct Vent. Oil Fired Warm Air Furnaces INSTALLATION, OPERATION & MAINTENANCE MANUAL WARNING
 Direct Vent Oil Fired Warm Air Furnaces INSTALLATION, OPERATION & MAINTENANCE MANUAL! WARNING Fire, explosion, asphyxiation and electrical shock hazard. Improper installation could result in death or serious
WARNING. Keep area around vent terminal free of snow, ice, and debris.
 Information contained in this manual pertains to direct vent boilers equipped with manufacturer installed blocked vent safety control system (pressure switch).! WARNING Installations of venting shall be
Direct Vent Supplement
 Direct Vent Supplement UMLA / UMLVA Oil Fired Warm Air Furnaces INSTALLATION, OPERATION & MAINTENANCE MANUAL! WARNING Fire, explosion, asphyxiation and electrical shock hazard. Improper installation could
SUPPLEMENTAL INSTRUCTIONS: DIRECT VENT INSTRUCTIONS FOR HIGH EFFICIENCY OIL-FIRED HOT WATER BOILER
 SUPPLEMENTAL INSTRUCTIONS: DIRECT VENT INSTRUCTIONS FOR HIGH EFFICIENCY OIL-FIRED HOT WATER BOILER Information contained in this manual pertains to direct vent boilers equipped with manufacturer installed
HTL (Up-Flow Model) HTLV
 HTLV") HTL (Up-Flow Model) HTLV (Up-Flow Model with ECM) Series D Oil Fired Warm Air Furnaces INSTALLATION, OPERATION & MAINTENANCE MANUAL An ISO 9001-2008 Certified Company 2210 Dwyer Avenue, Utica NY 13501
HTL (Up-Flow Model) HTLV (Up-Flow Model with ECM) Series D Oil Fired Warm Air Furnaces INSTALLATION, OPERATION & MAINTENANCE MANUAL An ISO 9001-2008 Certified Company 2210 Dwyer Avenue, Utica NY 13501
Installation, Operation and Maintenance Manual Oil Fired Warm Air Furnaces
 Installation, Operation and Maintenance Manual Oil Fired Warm Air Furnaces HTL (Up-Flow Model) ALL INSTALLATIONS MUST MEET ALL LOCAL, PROVINCIAL/STATE, AND FEDERAL CODES WHICH MAY DIFFER FROM THIS MANUAL
BCL-S BFL (Lowboy Model) BCL
 BCL") BCL-S BFL (Lowboy Model) BCL (High Capacity Lowboy Model) Oil Fired Warm Air Furnaces INSTALLATION, OPERATION & MAINTENANCE MANUAL Manufactured by: ECR International Inc. 2201 Dwyer Avenue, Utica, NY 13501
BCL-S BFL (Lowboy Model) BCL (High Capacity Lowboy Model) Oil Fired Warm Air Furnaces INSTALLATION, OPERATION & MAINTENANCE MANUAL Manufactured by: ECR International Inc. 2201 Dwyer Avenue, Utica, NY 13501
OIL FIRED WARM AIR FURNACE. Homeowner Instructions
 OIL FIRED WARM AIR FURNACE Homeowner Instructions Fire, explosion, asphyxiation and electrical shock hazard. Improper installation and operation could result in death or serious injury. Read this manual
WML Series C. WMLV Series C. MPL Series B. Oil Fired Warm Air Furnaces INSTALLATION, OPERATION & MAINTENANCE MANUAL. (Down-Flow/Horizontal Model)
") WML Series C (Down-Flow/Horizontal Model) WMLV Series C (Down-Flow/Horizontal Model with ECM) MPL Series B (Down-Flow/Horizontal Model) Oil Fired Warm Air Furnaces INSTALLATION, OPERATION & MAINTENANCE
WML Series C (Down-Flow/Horizontal Model) WMLV Series C (Down-Flow/Horizontal Model with ECM) MPL Series B (Down-Flow/Horizontal Model) Oil Fired Warm Air Furnaces INSTALLATION, OPERATION & MAINTENANCE
Single stage operation oil burners
 Installation & Operating Manual Single stage operation oil burners WARNING RETROFIT APPLICATIONS ONLY If this burner is being installed in a packaged unit (ie. burner comes with a boiler or furnace), follow
Internet Version for Reference Only INDUCED DRAFT COMMERCIAL WATER HEATERS SUPPLEMENT INSTRUCTIONS TO PART #
 INDUCED DRAFT COMMERCIAL WATER HEATERS SUPPLEMENT INSTRUCTIONS TO PART #238-39387-00 THIS INSTRUCTION SUPPLEMENT IS ONLY INTENDED TO GIVE INSTALLATION INSTRUCTIONS AND INFORMATION RELATED TO THE INDUCED
Installation, Operation and Service Manual
 Installation, Operation and Service Manual Direct Vent CO-AXIAL DIRECT VENT SYSTEM DVS-100 INSTALLATIONS MUST MEET ALL LOCAL AND FEDERAL CODES THAT MAY DIFFER FROM THIS MANUAL Please read the manual in
OPERATING INSTRUCTIONS MANUAL (Please retain for future reference) FVO-200 INDIRECT FIRED SPACE HEATERS
 FVO-200 INDIRECT FIRED SPACE HEATERS") OPERATING INSTRUCTIONS MANUAL (Please retain for future reference) For FVO-200 INDIRECT FIRED SPACE HEATERS CERTIFIED FOR USE IN CANADA AND U.S.A. As per CSA B140.8 Portable Oil Fired Heaters / CSA B140.02003
OPERATING INSTRUCTIONS MANUAL (Please retain for future reference) For FVO-200 INDIRECT FIRED SPACE HEATERS CERTIFIED FOR USE IN CANADA AND U.S.A. As per CSA B140.8 Portable Oil Fired Heaters / CSA B140.02003
OPERATING INSTRUCTIONS MANUAL (Please retain for future reference) FVO-400 INDIRECT FIRED SPACE HEATERS
 FVO-400 INDIRECT FIRED SPACE HEATERS") OPERATING INSTRUCTIONS MANUAL (Please retain for future reference) For FVO-400 INDIRECT FIRED SPACE HEATERS CERTIFIED FOR USE IN CANADA AND U.S.A. As per CSA B140.8 Portable Oil Fired Heaters / CSA B140.02003
OPERATING INSTRUCTIONS MANUAL (Please retain for future reference) For FVO-400 INDIRECT FIRED SPACE HEATERS CERTIFIED FOR USE IN CANADA AND U.S.A. As per CSA B140.8 Portable Oil Fired Heaters / CSA B140.02003
Model Universal Oil Primary Control
 Model 70200 Universal Oil Primary Control Installation and Operating Instructions For Use By Qualified Service Technicians Only Universal Replacement for Carlin, Beckett, Honeywell and ICM Controls On-Board
Single stage operation oil burner
 Installation & Operating Manual Single stage operation oil burner WARNING NON-RETROFIT APPLICATIONS If this burner is being installed in a packaged unit (ie. burner comes with a boiler or furnace), follow
USER S INFORMATION MANUAL (2,4)SG13B
SG13B") USER S INFORMATION MANUAL (2,4)SG13B Series Gas Heating/Electric Cooling Package Unit Congratulations......your outdoor heating/cooling package unit is a valuable piece of equipment, designed and manufactured
USER S INFORMATION MANUAL (2,4)SG13B Series Gas Heating/Electric Cooling Package Unit Congratulations......your outdoor heating/cooling package unit is a valuable piece of equipment, designed and manufactured
OPERATING INSTRUCTIONS MANUAL (Please retain for future reference) FVO-200 INDIRECT FIRED SPACE HEATERS
 FVO-200 INDIRECT FIRED SPACE HEATERS") OPERATING INSTRUCTIONS MANUAL (Please retain for future reference) For FVO-200 INDIRECT FIRED SPACE HEATERS CERTIFIED FOR USE IN CANADA AND U.S.A. As per CSA B140.8 Portable Oil Fired Heaters / CSA B140.02003
OPERATING INSTRUCTIONS MANUAL (Please retain for future reference) For FVO-200 INDIRECT FIRED SPACE HEATERS CERTIFIED FOR USE IN CANADA AND U.S.A. As per CSA B140.8 Portable Oil Fired Heaters / CSA B140.02003
Single stage operation oil burner
 Installation & Operating Manual Single stage operation oil burner WARNING NON-RETROFIT APPLICATIONS If this burner is being installed in a packaged unit (ie. burner comes with a boiler or furnace), follow
SCS SCS
 Models: SCS-5-08-3 SCS-5-20-3 Manufactured by: DNS-0474 Rev A UTC Canada Corporation Division ICP 3400, Industrial Boulevard Sherbrooke, Quebec J1L 1V8 SEALED COMBUSTION SYSTEM OIL FIRED Save these instructions
Installation, Operation and Maintenance Manual
 Installation, Operation and Maintenance Manual O4MD Oil Fired Downflow / Horizontal Warm Air Furnace FOR YOUR SAFETY: Do not store or use gasoline or other flammable liquids or vapors in the vicinity of
OIL FURNACE USER S INFORMATION MANUAL FOR THE OPERATION AND MAINTENANCE OF YOUR NEW OIL-FIRED FURNACE
 58CLA OIL FURNACE USER S INFORMATION MANUAL FOR THE OPERATION AND MAINTENANCE OF YOUR NEW OIL-FIRED FURNACE NOTE TO INSTALLER: THIS MANUAL MUST BE LEFT WITH THE EQUIPMENT USER. WELCOME TO A NEW GENERATION
DOMESTIC WATER HEATER OIL FIRED
 DOMESTIC WATER HEATER OIL FIRED Models : CMO32-II CMO32-II-R CMO50-II CMO32-II & CMO32-II-R INSTALLER / SERVICE TECHNICIAN: USE THE INFORMATION IN THIS MANUAL FOR THE INSTALLATION AND SERVICING OF THE
LRF Lowboy Rear Flue Model LRFV
 LRF Lowboy Rear Flue Model LRFV Lowboy Rear Flue Model with ECM Blower Oil Fired Warm Air Furnaces INSTALLATION, OPERATION & MAINTENANCE MANUAL Manufactured by: ECR International Inc. 2201 Dwyer Avenue,
Fire Bowls and Fire Bowl Inserts (Automated Operation) Operating and Maintenance Instructions
 Operating and Maintenance Instructions") Table of Contents Section 1: Gas and Electric Requirements... 1 Section 2: Installation... 2 Section 3: Burner Setup and Adjustment... 8 Burner Adjustment... 9 Section 4: Maintenance... 10 Section 5: Operation...
Table of Contents Section 1: Gas and Electric Requirements... 1 Section 2: Installation... 2 Section 3: Burner Setup and Adjustment... 8 Burner Adjustment... 9 Section 4: Maintenance... 10 Section 5: Operation...
USER S INFORMATION MANUAL
 USER S INFORMATION MANUAL UPFLOW/HORIZONTAL & DOWNFLOW TWO STAGE INDUCED DRAFT GAS FURNACES Recognize this symbol as an indication of Important Safety Information If the information in this manual is not
OIL-FIRED CENTRAL FURNACE
 OIL-FIRED CENTRAL FURNACE Installation, Operation, and Service Manual With Users Information Section Models: CSHB60-90XE CSHB60-90XP c WARNING: Do NOT store or use gasoline or other flammable vapors and
Interrupted Ignition Series Oil Primary Control
 Interrupted Ignition Series Oil Primary Control Application Guide & Installation Instruction for ICM1511*, ICM1512*, ICM151*, ICM1514* For more information on our complete range of American-made products
OWNER S MANUAL Manufactured Home Downflow Gas Furnace: MGD-B Series
 OWNER S MANUAL Manufactured Home Downflow Gas Furnace: MGD-B Series Heat Controller, Inc. 1900 Wellworth Ave. Jackson, MI 49203 (517)787-2100 www.heatcontroller.com Owner s Manual MGD-B SERIES GAS FURNACE
CMO32 CMO50 DOMESTIC WATER HEATER OIL-FIRED. Models: CMO32 CMO50
 DOMESTIC WATER HEATER OIL-FIRED Models: CMO32 CMO50 DNS-1102 Rev. A DNS-0413 Rev. A CMO32 CMO50 INSTALLER / SERVICE TECHNICIAN: USE THE INFORMATION IN THIS MANUAL FOR THE INSTALLATION AND SERVICING OF
SERVICE AND INSTALLATION MANUAL MODELS HDO(H) OIL FOR YOUR SAFETY
 OIL FOR YOUR SAFETY") Bousquet Technologies Inc. 2121, Nobel, Ste Julie, Quebec, Canada, J3E1Z9 SERVICE AND INSTALLATION MANUAL MODELS HDO(H) OIL Oil-Fired air heater for industrial and commercial use. FOR YOUR SAFETY Do not
Bousquet Technologies Inc. 2121, Nobel, Ste Julie, Quebec, Canada, J3E1Z9 SERVICE AND INSTALLATION MANUAL MODELS HDO(H) OIL Oil-Fired air heater for industrial and commercial use. FOR YOUR SAFETY Do not
INSTALLATION GUIDE Dual Fuel Ranges
 INSTALLATION GUIDE Dual Fuel Ranges Contents Wolf Dual Fuel Ranges......................... 3 Safety Instructions............................ 4 Dual Fuel Range Specifications.................. 5 Dual Fuel
USER S, MAINTENANCE and SERVICE INFORMATION MANUAL
 CONTENTS SAFETY INFORMATION................ 2 FOR YOUR SAFETY....................... 2 SYSTEM OPERATION.................. 2 THERMOSTATS.......................... 2 INTERMITTENT IGNITION DEVICE...........
Installation, Operation and Maintenance Manual. Oil Fired Warm Air Furnace
 Installation, Operation and Maintenance Manual Oil Fired Warm Air Furnace HO-B Series Up-flow or Horizontal Model THE INSTALLATION OF THIS FURNACE SHALL BE IN ACCORDANCE WITH THE REGULATION OF AUTHORITIES
DF400/DF600. Construction Heaters. Installation and Maintenance Manual
 342 N. Co. Rd. 400 East Valparaiso, IN 46383 219-464-8818 Fax 219-462-7985 www.heatwagon.com Installation and Maintenance Manual Please retain this manual for future reference. DF400/DF600 Construction
INTRODUCTION THIS MANUAL INCLUDES IMPORTANT SAFETY INFORMATION
 INSTALLATION AND OPERATING INSTRUCTIONS FOR THE HARDY Fuel Oil Furnace Models D-140 & D-350 HARDY MANUFACTURING COMPANY, INC. 12345 ROAD 505 PHILADELPHIA, MS 39350 PHONE: (601) 656-5866 FAX: (601) 656-4559
INSTALLATION AND OPERATION MANUAL FOR 2 STAGE RIELLO BURNER ADDENDUM TO ( Mo 437 manual )
") INSTALLATION AND OPERATION MANUAL FOR 2 STAGE RIELLO BURNER ADDENDUM TO ( Mo 437 manual ) FOR USE WITH MODEL: OH6FX072DV4 PLEASE READ THESE INSTRUCTIONS PRIOR TO INSTALLATION, INITIAL FIRING, AND BEFORE
INSTALLATION AND OPERATION MANUAL FOR 2 STAGE RIELLO BURNER ADDENDUM TO ( Mo 437 manual ) FOR USE WITH MODEL: OH6FX072DV4 PLEASE READ THESE INSTRUCTIONS PRIOR TO INSTALLATION, INITIAL FIRING, AND BEFORE
OPERATING INSTRUCTIONS MANUAL (Please retain for future reference) FVN/P-400 INDIRECT FIRED SPACE HEATERS
 FVN/P-400 INDIRECT FIRED SPACE HEATERS") OPERATING INSTRUCTIONS MANUAL (Please retain for future reference) For FVN/P-400 INDIRECT FIRED SPACE HEATERS CERTIFIED FOR USE IN CANADA AND U.S.A. As per Standard ANSI Z83.7/CSA 21.4 2000 Gas Fired Construction
OPERATING INSTRUCTIONS MANUAL (Please retain for future reference) For FVN/P-400 INDIRECT FIRED SPACE HEATERS CERTIFIED FOR USE IN CANADA AND U.S.A. As per Standard ANSI Z83.7/CSA 21.4 2000 Gas Fired Construction
Installation Instructions Remote Blowers
 Installation Instructions Remote Blowers Models: REMP3, REMP16 Suitable for use in a household cooking area. Suitable for use with solid state controls. To complete this blower, a Dacor hood assembly or
24 VAC SYSTEM CONTROL KIT
 24 VAC SYSTEM CONTROL KIT Model: CK-91F and CK-91FG Designed for use with the SWG Series Power Venter for controlling Natural Gas or L.P. Gas draft induced appliances with a 24 VAC Gas Valve and a 30-millivolt
Indirect gas-fired air heater
 Indirect gas-fired air heater SERIES HD INSTALLATION AND SERVICE MANUAL MANUFACTURED BY : BROTHERS LIMITED WARNING Improper installation, modification, adjustment or maintenance may cause damage, injury
HOME OWNER S INFORMATION Induced Combustion Gas Furnace
 HOME OWNER S INFORMATION Induced Combustion Gas Furnace NOTE TO INSTALLER: This manual must be left with the equipment user. USER: Please read all instructions in the manual and retain all manuals for
USER S INFORMATION MANUAL
 USER S INFORMATION MANUAL FOR YOUR COMBINATION GAS HEATING/ELECTRIC COOLING AIR CONDITIONING UNIT DO NOT DESTROY. PLEASE READ CAREFULLY AND KEEP IN A SAFE PLACE FOR FUTURE REFERENCE BY A SERVICEMAN OR
USER'S INFORMATION MANUAL
 USER'S INFORMATION MANUAL SERIES ODVB GAS FIRED HOT WATER HEATING BOILER WARNING: If the information in this manual is not followed exactly, a fire or explosion may result causing property damage, personal
Installation, Operation and Service Manual
 Installation, Operation and Service Manual KLF-100 85% + EFFICIENCY OIL FIRED LOWBOY FURNACE INSTALLATIONS MUST MEET ALL LOCAL AND FEDERAL CODES THAT MAY DIFFER FROM THIS MANUAL Please read the manual
EUTECTIC EC-10DV Series
 EUTECTIC EC-10DV Series DIRECT VENT OIL-FIRED WATER BOILER/NO. 2 OIL VENTING INSTALLATION INSTRUCTIONS CONTENTS..........................................PAGE Basic Guidelines..........................................1
NOTE TO INSTALLER: THIS MANUAL MUST BE LEFT WITH THE EQUIPMENT USER.
 c_::_':_-_:_ r'" _" "_1 WARNING: If the information in this manual is not followed exactly, a fire or explosion may Iresult causing property damage, personal injury or [loss of life. m m m Do not store
MAX. Installation, Operation and Maintenance Instructions. Residential Oil-Fired Boiler
 Installation, Operation and Maintenance Instructions Document 1106C Installation, Operation and Maintenance Instructions for MAX Residential Oil-Fired Boiler Models (D) MAX 75 (D) MAX 100 (D) MAX 120 (D)
Bosch 80% AFUE Gas Furnace BGS80 Model
 Bosch 80% AFUE Gas Furnace BGS80 Model 4-Way Multipoise Category I Fan-Assisted Furnace User's Information Manual 3124627 2 Bosch 80% AFUE Gas Furnace User's Information Manual Data subject to change 06.2018
southbend A MIDDLEBY COMPANY INSTALLATION AND OPERATION MANUAL CG214 (E) CG314 (E) CG414 (E) CG220 (E) CG320 (E) CG325 (E) GAS BOILERS MODELS:
 CG314 (E) CG414 (E) CG220 (E) CG320 (E) CG325 (E) GAS BOILERS MODELS:") INSTALLATION AND OPERATION MANUAL GAS BOILERS MODELS: CG214 (E) CG314 (E) CG414 (E) CG220 (E) CG320 (E) CG325 (E) southbend A MIDDLEBY COMPANY 1100 Old Honeycutt Road Fuquay-Varina, NC 27526 (919) 552-9161
INSTALLATION AND OPERATION MANUAL GAS BOILERS MODELS: CG214 (E) CG314 (E) CG414 (E) CG220 (E) CG320 (E) CG325 (E) southbend A MIDDLEBY COMPANY 1100 Old Honeycutt Road Fuquay-Varina, NC 27526 (919) 552-9161
USER S INFORMATION MANUAL
 USER S INFORMATION MANUAL HOT WATER HEATING BOILERS DOMESTIC WATER HEATERS 150,000-300,000 Btu/hr MODELS EB-EWU-02 IMPORTANT INSTALLER - AFFIX INSTALLATION MANUAL ADJACENT TO THE BOILER CONSUMER - RETAIN
Corn Flame Energy Corn Stove Model 3000
 Corn Flame Energy Corn Stove Model 3000 Installation and Operation Guide Read thoroughly before starting installation Save this manual for future reference SAFETY NOTICE If this stove is not properly installed,
V SERIES HDR GAS RANGES
 SERVICE MANUAL ONE POWERFUL PACKAGE V SERIES HDR GAS RANGES TOPS Open Top Hot Top Griddle Top Work Surface BASES Standard Oven Convection Oven Cabinet Base - NOTICE - This manual is prepared for use by
OPERATING INSTRUCTIONS MANUAL (Please retain for future reference) FVN/P-400 INDIRECT FIRED SPACE HEATERS
 FVN/P-400 INDIRECT FIRED SPACE HEATERS") OPERATING INSTRUCTIONS MANUAL (Please retain for future reference) For FVN/P-400 INDIRECT FIRED SPACE HEATERS CERTIFIED FOR USE IN CANADA AND U.S.A. As per Standard ANSI Z83.7/CSA 21.4 2000 Gas Fired Construction
OPERATING INSTRUCTIONS MANUAL (Please retain for future reference) For FVN/P-400 INDIRECT FIRED SPACE HEATERS CERTIFIED FOR USE IN CANADA AND U.S.A. As per Standard ANSI Z83.7/CSA 21.4 2000 Gas Fired Construction
P.O. Box , Dallas, TX USER'S INFORMATION MANUAL Single-Stage Warm Air Gas Furnaces
 P.O. Box 799900, Dallas, TX 75379-9900 USER'S INFORMATION MANUAL Single-Stage Warm Air Gas Furnaces This is a safety alert symbol and should never be ignored. When you see this symbol on labels or in manuals,
ML180UH SERIES GAS FURNACE WARNING WARNING
 2017 Lennox Industries Inc. Dallas, Texas, USA 506525-01 04/2017 Supersedes 10/2015 ML180UH SERIES GAS FURNACE Improper installation, adjustment, alteration, service or maintenance can cause property damage,
USER'S MANUAL PGE Single Package Rooftop
 USER'S MANUAL PGE Single Package Rooftop Gas Heating/Electric Cooling Units Sizes 036-150 3 to 12-1/2 Tons NOTE TO INSTALLER: This manual should be left with the equipment owner. WARNING: If the information
RETROFIT APPLICATIONS ONLY
 Installation & Operating Manual WARNING RETROFIT APPLICATIONS ONLY If this burner is being installed in a packaged unit (ie. burner comes with a boiler or furnace), follow the installation and set-up instructions
EL195UHE SERIES GAS FURNACE WARNING WARNING
 2012 Lennox Industries Inc. Dallas, Texas, USA 506737-01 12/2012 Supersedes 06/2011 EL195UHE SERIES GAS FURNACE Improper installation, adjustment, alteration, service or maintenance can cause property
USER'S INFORMATION MANUAL
 USER'S INFORMATION MANUAL SERIES DV GAS FIRED HOT WATER HEATING BOILER WARNING: If the information in this manual is not followed exactly, a fire or explosion may result causing property damage, personal
breeze easytm model # F100-1W
 DewStop breeze easytm model # F100-1W Installation Guide Read and Save These Instructions LISTED Questions, Problems, Missing Parts? Please Call 1-360-876-2974 or E-Mail info@dewstop.com please retain
Columbia Boiler Company
 EMG Series Boilers Available in Natural Gas & Propane Rev 12012 Columbia Boiler Company PO Box 1070 Pottstown, PA 19464 Tel (610) 473-8457 Fax (610) 367-6800 Website www.columbiaboiler.com Email cbcsales@ptd.net
SIDEWALL VENTER Models :
 SIDEWALL VENTER Models : SMH-1-DE SMH-3-DE SMH-4-DE SMH-5-DE SMH-6-DE SMH-1-BR SMH-4-BR Caution: Do not tamper with the unit or its controls. Call a qualified service technician. Save these instructions
OPERATING INSTRUCTIONS MANUAL (Please retain for future reference) FVN/P-400 INDIRECT FIRED SPACE HEATERS
 FVN/P-400 INDIRECT FIRED SPACE HEATERS") OPERATING INSTRUCTIONS MANUAL (Please retain for future reference) For FVN/P-400 INDIRECT FIRED SPACE HEATERS CERTIFIED FOR USE IN CANADA AND U.S.A. As per Standard ANSI Z83.7/CSA 21.4 2000 Gas Fired Construction
OPERATING INSTRUCTIONS MANUAL (Please retain for future reference) For FVN/P-400 INDIRECT FIRED SPACE HEATERS CERTIFIED FOR USE IN CANADA AND U.S.A. As per Standard ANSI Z83.7/CSA 21.4 2000 Gas Fired Construction
OIL-FIRED CENTRAL FURNACE
 OIL-FIRED CENTRAL FURNACE Installation, Operation, and Service Manual With Users Information Section Models: VHF-ABP VHF-ABT c WARNING: Do NOT store or use gasoline or other flammable vapors and liquids
PrecisionTemp Shower-Mate
 Shower-Mate Instantaneous Gas Water Heater Installation and Operating Instructions The Shower-Mate is a power vented automatic instantaneous water heater designed to be installed in ventilated marine applications.
INSTALLATION INSTRUCTIONS FOR THROUGH-THE-WALL VENTING COMPONENTS
 OIL FIRED WATER HEATER INSTALLATION AND OPERATING INSTRUCTIONS Read these instructions thoroughly before starting INSTALLATION INSTRUCTIONS FOR THROUGH-THE-WALL VENTING COMPONENTS These instructions apply
Electronic Ignition Water Heater
 Electronic Ignition Water Heater TROUBLE SHOOTING GUIDE Effective: 5/26/98 Guides are only intended for use on Atwood products by service technicians who have successfully completed Atwood training. This
National Comfort Products 539 Dunksferry Road Bensalem, PA (215) Fax: (215)
 Fax: (215)") National Comfort Products 539 Dunksferry Road Bensalem, PA 19020 (215) 244-1400 1-800-523-7138 Fax: (215) 639-1674 14299575-10/29/2014 NOTE: These installation and maintenance instructions should be left
National Comfort Products 539 Dunksferry Road Bensalem, PA 19020 (215) 244-1400 1-800-523-7138 Fax: (215) 639-1674 14299575-10/29/2014 NOTE: These installation and maintenance instructions should be left
USER S INFORMATION MANUAL
 USER S INFORMATION MANUAL UPFLOW, DOWNFLOW, UPFLOW/HORIZONTAL & HORIZONTAL ONLY INDUCED DRAFT GAS FURNACES Recognize this symbol as an indication of Important Safety Information If the information in this
B.C.S. Shop Heaters 26, 30 & 36 (36 shown)
") BIOMASS COMBUSTION SYSTEMS, INC. 67 MILLBROOK ST., SUITE 502 WORCESTER, MA 01606 508-798-5970 - FAX 508-798-5971 B.C.S. Shop Heaters 26, 30 & 36 (36 shown) INSTALLATION MANUAL HAND FIRED SYSTEMS 8-09 Biomass
BIOMASS COMBUSTION SYSTEMS, INC. 67 MILLBROOK ST., SUITE 502 WORCESTER, MA 01606 508-798-5970 - FAX 508-798-5971 B.C.S. Shop Heaters 26, 30 & 36 (36 shown) INSTALLATION MANUAL HAND FIRED SYSTEMS 8-09 Biomass
INSTALLATION AND OPERATING INSTRUCTIONS TABLE OF CONTENTS IMPORTANT
 C US This manual must be left with owner and should be hung on or adjacent to the boilerfor reference. COMMON VENTING MODELS CHS-300 through CHS-399 INSTALLATION AND OPERATING INSTRUCTIONS TABLE OF CONTENTS
POWER VENTER. Model: PVE Series
 POWER VENTER Model: PVE Series CONTENTS Typical Venting System Components... System Operation... Power Venter Sizing... Installation Safety Instructions... Installation of Power Venter... Connecting Power
ZG Shown READ ALL INSTRUCTIONS IN THIS MANUAL AND RETAIN FOR FUTURE REFERENCE WARNING
 See unit nameplate for manufacturer and address. 507258-04 7/2018 Supersedes 10/2017 ZG 036, 048, 060, 072, 074 (3, 4, 5 and 6 Tons) ZG 092, 102, 120, 150 (7-1/2, 8-1/2, 10 and 12 Tons) ROOFTOP UNITS ZG
PVE SERIES POWER VENTER SYSTEM MANUAL
 PVE SERIES POWER VENTER SYSTEM MANUAL Contents Page I. Typical Venting System Components 2 II. System Operation 3 III. Power Venter Sizing 3,4 IV. Installation Safety Instructions 5,6 V. Installation of
POWER VENTER SYSTEM. Model: PVO-300, PVO-600
 POWER VENTER SYSTEM Model: PVO-300, PVO-600 Included is one ETL and cetl listed Power Venter to be used primarily with a single 120VAC controlled oil fired furnace, boiler, or water heater. The PVO may
Installation Instructions
 FAVXXR6C2100-A01 Vent Damper and Control Installation Instructions FAMILIARIZE YOURSELF WITH THE INSTALLATION INSTRUCTIONS BEFORE STARTING ATTENTION INSTALLER: This product must be installed by a qualified
OPERATING INSTRUCTIONS MANUAL (Please retain for future reference) FVN/P-400 INDIRECT FIRED SPACE HEATERS
 FVN/P-400 INDIRECT FIRED SPACE HEATERS") OPERATING INSTRUCTIONS MANUAL (Please retain for future reference) For FVN/P-400 INDIRECT FIRED SPACE HEATERS CERTIFIED FOR USE IN CANADA AND U.S.A. As per Standard ANSI Z83.7/CSA 21.4 2000 Gas Fired Construction
OPERATING INSTRUCTIONS MANUAL (Please retain for future reference) For FVN/P-400 INDIRECT FIRED SPACE HEATERS CERTIFIED FOR USE IN CANADA AND U.S.A. As per Standard ANSI Z83.7/CSA 21.4 2000 Gas Fired Construction
USER'S INFORMATION MANUAL
 USER'S INFORMATION MANUAL WARNING: If the information in this manual is not followed exactly, a fire or explosion may result causing property damage, personal injury or loss of life. Do not store or use
Installation, Operation and Maintenance Manual
 Part #461006 Indirect Gas-Fired Furnaces Installation, Operation and Maintenance Manual Please read and save these instructions. Read carefully before attempting to assemble, install, operate or maintain
OPERATING INSTRUCTIONS MANUAL (Please retain for future reference) F-1500T DUAL FUEL CONSTRUCTION HEATER
 F-1500T DUAL FUEL CONSTRUCTION HEATER") OPERATING INSTRUCTIONS MANUAL (Please retain for future reference) For F-1500T DUAL FUEL CONSTRUCTION HEATER CERTIFIED FOR USE IN CANADA AND U.S.A. As per Standard ANSI Z83.7 2000/ CSA 2.14 2000 Gas Fired
OPERATING INSTRUCTIONS MANUAL (Please retain for future reference) For F-1500T DUAL FUEL CONSTRUCTION HEATER CERTIFIED FOR USE IN CANADA AND U.S.A. As per Standard ANSI Z83.7 2000/ CSA 2.14 2000 Gas Fired
INSTALLATION INSTRUCTION
 INSTALLATION INSTRUCTION OIL-FIRED WARM AIR FURNACES Supersedes: 660.08-N1U (399) 660.08-N1U (300) 035-14289-000 Rev. A P-HB (UPFLOW) P-DH (DOWNFLOW HORIZONTAL) P-LB LOWBOY NRTL/C CAUTION THIS PRODUCT
EL296UHV SERIES GAS FURNACE WARNING WARNING
 2011 Lennox Industries Inc. Dallas, Texas, USA 506769 01 08/2012 Supersedes 10/2011 EL296UHV SERIES GAS FURNACE Improper installation, adjustment, alteration, service or maintenance can cause property
Packaged Gas/Electric Units. Owner s Guide to Operating and Maintaining Your Gas/Electric Unit
 Packaged Gas/Electric Units Owner s Guide to Operating and Maintaining Your Gas/Electric Unit ELECTRICAL SHOCK HAZARD. FIRE OR EXPLOSION HAZARD Disconnect power at fuse box or service panel before performing
Do not use this vent pipe or fittings for venting incinerators of any kind.
 ! CAUTION! Do not use this vent pipe or fittings for venting incinerators of any kind. C.S.A. Certified For Natural Gas Or Propane Tested For 100 LBS. ASME Working Pressure For correct installation of
LATTNER BOILER COMPANY 9.5 HP Low-NOx Installation and Start-Up Checklist for Dry Cleaners
 1 1. General Installation Information (to be completed by technician) Date installed: Location (city & state): Cleaner s name: National Board number (boiler): Installed by (company): Installed by (technician):
FLAME115 INFRARED HEATER SERVICE MANUAL INDEX FIRE 115 WARNING
 FLAME115 INFRARED HEATER SERVICE MANUAL INDEX 1. CONTROLS AND COMPONENTS 2. FLAME CONTROL CYCLES 3. MAINTENANCE SCHEDULE 4. TROUBLESHOOTING GUIDE 5. REPAIR PROCEDURES 1. FAN MOTOR ASSEMBLY 2. FUEL FILTER
USER S, MAINTENANCE and SERVICE INFORMATION MANUAL
 CONTENTS SAFETY INFORMATION................ 2 FOR YOUR SAFETY...................... 2 SYSTEM OPERATION.................. 2 THERMOSTATS.......................... 2 INTERMITTENT IGNITION DEVICE..........
READ ALL INSTRUCTIONS IN THIS MANUAL AND RETAIN FOR FUTURE REFERENCE WARNING
 2005 Lennox Industries Inc. Dallas, Texas, USA 505,058M (38152A068) 08/05 Supersedes 06/05 13GCSX Series Units Improper installation, adjustment, alteration, service or maintenance can cause property damage,
CQS POWER VENT. General. Venting Requirements. Venting Instructions PREEVA Indoor, Power-Vented Heater Model PDH
 Applies to: Form I-PDH-V Venting Instructions PREEVA Indoor, Power-Vented Heater Model PDH CUSTOMER AGENCY PROCESS CQS CONVERGENT QUALITY SYSTEM PRODUCT WARRANTY START-UP Power-Vent Indoor Model PDH General
USER'S INFORMATION MANUAL
 USER'S INFORMATION MANUAL WARNING: If the information in this manual is not followed exactly, a fire or explosion may result causing property damage, personal injury or loss of life. Do not store or use
USER S INFORMATION MANUAL
 USER S INFORMATION MANUAL THESE INSTRUCTIONS APPLY TO THE MODEL GTM SERIES GAS- FIRED WARM AIR FURNACE. This symbol indicates important Safety Related Information FIRE OR EXPLOSION HAZARD Failure to follow
USER S INFORMATION MANUAL
 USER S INFORMATION MANUAL UPFLOW & DOWNFLOW/HORIZONTAL CONDENSING GAS FURNACES SAFETY Recognize this symbol as an indication of Important Safety Information If not installed, operated and maintained in
MODEL PVF INDIRECT GAS FIRED FURNACES FOR ENERGY RECOVERY UNITS Installation, Operation, and Maintenance Manual
 RETIN THESE INSTRUCTIONS FOR FUTURE REFERENCE Part # 461006 MODEL PVF INDIRECT GS FIRED FURNCES FOR ENERGY RECOVERY UNITS Installation, Operation, and Maintenance Manual Model PVF, Indirect Gas Furnace,
INDUCED DRAFT HIGHBOY AND COUNTERFLOW/HORIZONTAL GAS FURNACE
 INDUCED DRAFT HIGHBOY AND COUNTERFLOW/HORIZONTAL GAS FURNACE USERS INFORMATION MANUAL MODELS FOR USE WITH NATURAL GAS MHA-50N, MHA-75N, MHA-100N, MHA-125N, MDA-50N, MDA-75N, MDA-100N, MDA-125N FOR USE
THC 85N / 175N INDUSTRIAL / COMMERCIAL SPACE HEATER
 THC 85N / 175N INDUSTRIAL / COMMERCIAL SPACE HEATER Certified to / Certifié à CGA 2.14 M2000 Conforms to / Conforme à ANSI std Z83.7 2000 Suitable for indoor or outdoor installation / Unvented / Unattended
POWER VENT. Standard Power Vent, Fan Type Unit Heaters: Standard Power Vent, Blower Type Unit Heaters: General WARNING WARNING. Model UDAP & Model APD
 General APPLIES TO: Standard Power Vent, Fan Type Unit Heaters: Model UDAP & Model APD Standard Power Vent, Blower Type Unit Heaters: Model UDBP Form I-UD&APD Series-V-PV (05-17) Obsoletes I-UD&APD Series-V-PV
Installation, Operation and Maintenance Manual Oil Fired Warm Air Furnaces
 Installation, Operation and Maintenance Manual Oil Fired Warm Air Furnaces WML-C AND MPL-B (Down-Flow or Horizontal Model) WMLV-C (Down-Flow or Horizontal Model with ECM) ALL INSTALLATIONS MUST MEET ALL