CS S GB D LT LV EST. Instruction for use. Gebrauchsanweisung. Naudojimo instrukcija. Lietošanas instrukcija. Kasutusjuhend
|
|
|
- William Mills
- 5 years ago
- Views:
Transcription

1 CS S GB D LT LV EST Instruction for use Gebrauchsanweisung Naudojimo instrukcija Lietošanas instrukcija Kasutusjuhend
2 WARNING! In order to ensure a normal operation of your refrigerating appliance, which uses a completely environmentally friendly refrigerant the R600a (flammable only under certain conditions) you must observe the following rules: Do not hinder the free circulation of the air around the appliance. Do not use mechanical devices in order to accelerate the defrosting, others than the ones recommended by the manufacturer. Do not destroy the refrigerating circuit. Do not use electric appliances inside the food keeping compartment, other than those that might have been recommended by the manufacturer. WARNUNG! Ihr Gerät verwendet ein umweltverträgliches Kältemittel, R600a (nur unter bestimmten Umständen brennbar). Um einen einwandfreien Betrieb Ihres Gerätes sicherzustellen, beachten Sie bitte folgende Vorschriften: Die Luftzirkulation um das Gerät darf nicht behindert sein. Verwenden Sie außer der vom Hersteller empfohlenen, keine mechanischen Hilfsmittel, um den Abtauprozess zu beschleunigen. Der Kältemittelkreislauf darf nicht beschädigt werden. Verwenden Sie im Lebensmittelaufbewahrungsbereich Ihres Gerätes keine elektrischen Geräte, es sei denn, sie sind vom Hersteller empfohlen. DöMESIO! Nor dami užtikrinti normalų šio šaldymo prietaiso, kuriame naudojama visiškai aplinkai žalos nedaranti šaldymo medžiaga R600a (degi esant tik tam tikroms aplinkos sąlygoms), veikimą, privalote vadovautis šiomis taisykl mis: Nesutrikdysite laisvos oro cirkuliacijos aplink prietaisą. Nor dami pagreitinti atšildymo procesą, nenaudokite kitokių, nei gamintojų rekomenduojamų mechaninių priemonių. Nesugadinkite šaldymo linijos. Buitinio prietaiso maisto saugojimo skyriuose nenaudokite elektrinių prietaisų, nebent juos rekomenduotų gamintojas. UZMANĪBU! Lai garantētu jūsu sasaldēšanas iekārtas (kura izmanto viedei nekaitīgu dzesēšanas vielu R600a uzliesmojošs tikai pie noteiktiem apstākĝiem), ir nepieciešams ievērot sekojošo: Netrauciet gaisa cirkulācijai ap iekārtu. Neizmantojiet nekādas mehāniskās iekārtas atkausēšanas paātrināšanai. Nesabojājiet dzesēšanas ėēdi. Nodalījumā pārtikas produktu glabāšanai neizmantojiet nekādas mehāniskās iekārtas, ja ražotājs to neiesaka. HOIATUS! Et külmutusseade, mis kasutab igati keskkonnasõbralikku külmutusagensit R600a (tuleohtlik ainult teatavatel tingimustel), töötaks normaalselt, peate järgima järgmisi eeskirju: Ärge blokeerige õhu vaba ringlust seadme ümbruses. Ärge püüdke sulamist kiirendada mehaaniliste abivahenditega, mida tootja ei ole soovitanud. Ärge kahjustage külmutusagensikontuuri. Ärge kasutage toiduainete hoiukambrites elektriseadmeid, mida tootja ei ole soovitanud.
3 GB Index Safety first /1 Electrical requirements /2 Transportation instructions /2 Installation instructions /2 Getting to know your appliance /3 Suggested arrangement of food in the appliance /3 Temperature control and adjustment /4 Before operating /4 Storing frozen food /4 Freezing fresh food /4 Making ice cubes /4 Defrosting /5 Replacing the interior light bulb /5 Cleaning and care /5 Repositioning the door /6 Do s and don ts /6 Information about operating noises /7 Trouble shooting /8 Thechnical data /8 D Inhalt Wichtige Hinweise für Ihre Sicherheit /9 Elektrischer Anschluss /10 Transporthinweise /10 Aufstellung des Gerätes /10 Geräteübersicht /11 Allgemeine Einlagerungsempfehlungen /11 Temperaturregelung. Einstellung der Temperatur /12 Bevor der Inbetriebnahme /12 Lagern von tiefgefrorenen Lebensmitteln /12 Einfrieren von frischen Lebensmitteln /12 Abtauen des Gerätes /13 Wechseln des türanschlags /13 Wechsel der Glühlampe /14 Reinigung und Pflege /14 Was Sie tun sollten und was auf keinen fall-einige Hinweise /15 Massnahmen bei Betriebstırunger /16 Technische Daten /16 LV Drošības norādījumi! /25 Elektriskās prasības /26 Transportēšana /26 Uzstādīšana /26 Apraksts /26 Pārtikas produktu izvietošana /27 Temperatūras regulēšana /27 Pirms ekspluatācijas /27 Sasaldētu produktu glabāšana /27 Sasaldēšana /27 Ledus kubiħu gatavošana /27 Iekšējā apgaismojuma spuldzes nomaiħa /27 Tirīšana un apkalpošana /28 Traucējumu meklēšana /28 Tehniskais apraksts /29 EST Register Ohutus ennekõike! /30 Elektriohutus /31 Transpordieeskirjad /31 Paigaldusjuhised /31 Esmane tutvus seadmega /32 Toiduainete soovituslik paigutus seadmes /32 Temperatuuri valik ja reguleerimine /32 Enne seadme kasutamist /33 Külmutatud toiduainete säilitamine /33 Värskete toiduainete külmutamine /33 Jääkuubikute valmistamine /33 Sulatamine /34 Sisevalgusti pirni vahetamine /34 Puhastamine ja hooldus /34 Ukse avanemissuuna muutmine /35 Käsud ja keelud /35 Töömüra andmed /36 Probleemide kõrvaldamine /37 Tehnilised andmed /37 LT Rodykl Svarbiausia - saugumas /17 Elektros reikalavimai /18 Gabenimo nurodymai /18 diegimo instrukcijos /18 Susipažinkite su buitiniu prietaisu /19 Rekomenduojamas maisto produktų išd stymas buitiniame prietaise /19 Temperatūros kontrol ir reguliavimas /20 Prieš pradedant naudoti /20 Šaldytų maisto produktų laikymas /20 Šviežių maisto produktų užšaldymas /20 Ledo gabaliukų gaminimas /20 Atšildymas /21 Vidin s lemput s pakeitimas /21 Valymas ir priežiūra /21 Durelių perstatymas /22 Nurodymai /22 Informacija apie garsus prietaisui veikiant /23 Gedimų šalinimas /24 Techniniai duomenys /24
4 1


5
6 11
7 GB Instruction for use Congratulations on your choice of a Quality Appliance, designed to give you many years of service. Safety first! Do not connect your appliance to the electricity supply until all packing and transit protectors have been removed. Leave to stand for at least 4 hours before switching on, to allow compressor oil to settle, if transported horizontally. If you are discarding an old appliance with a lock or latch fitted to the door, ensure that it is left in a safe condition to prevent the entrapment of children. This appliance must only be used for its intended purpose. Do not dispose of the appliance on a fire. Your appliance contains non CFC substances in the insulation which are flammable. We suggest you contact your local authority for information on disposal and available facilities. We do not recommend use of this appliance in an unheated, cold room. (e.g. garage, conservatory, annex, shed, out-house etc.) To obtain the best possible performance and trouble free operation from your appliance it is very important to read these instructions carefully. Failure to observe these instructions may invalidate your right to free service during the guarantee period. Please keep these instructions in a safe place for easy reference. This appliance is not intended for use by person with reduced physical, sensory or mental capabilities or lack of experience and knowledge unless they have been given supervision or instruction concerning use of the appliance by a person responsible for their safety. Children should be supervised to ensure that they do not play with the appliance. 1
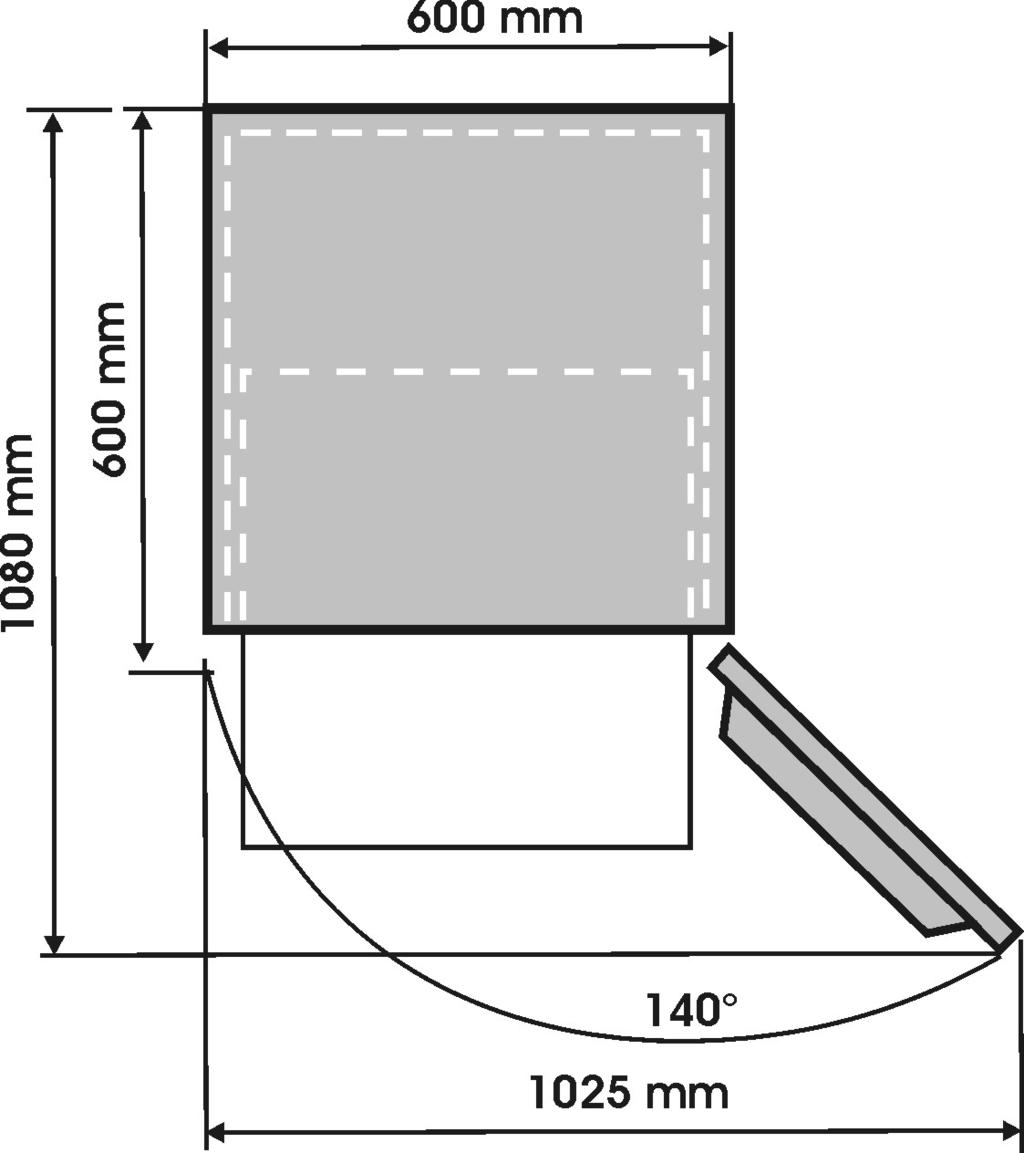
8 GB Electrical requirements Before inserting the plug into the wall socket make sure that the voltage and the frequency shown in the rating plate inside the appliance corresponds to your electricity supply. We recommend that this appliance is connected to the mains supply via a suitably switched and fused socket in a readily accessible position. Warning! This appliance must be earthed. Repairs to electrical equipment should only be performed by a qualified technician. Incorrect repairs carried out by an unqualified person are carry risks that may have critical consequences for the user of the appliance. ATTENTION! This appliance operates with R600a which is an environmental friendly but flammable gas. During the transportation and fixing of the product, care must be taken not to damage the cooling system. If the cooling system is damaged and there is a gas leakage from the system, keep the product away from open flame sources and ventilate the room for a while. WARNING - Do not use mechanical devices or other means to accelerate the defrosting process, others than those recommended by the manufacturer. WARNING - Do not damage the refrigerant circuit. WARNING - Do not use electrical appliances inside the food storage compartments of the appliance, unless they are of the type recommended by the manufacturer. Transportation instructions 1. The appliance should be transported only in an upright position. The packing as supplied must be intact during transportation. 2. If during the transport the appliance, has been positioned horizontally, it must not be operated for at least 4 hours, to allow the system to settle. Instruction for use 3. Failure to comply with the above instructions could result in damage to the appliance, for which the manufacturer will not be held liable. 4. The appliance must be protected against rain, moisture and other atmospheric influences. Important! Care must be taken while cleaning/carrying the appliance not to touch the bottom of the condenser metal wires at the back of the appliance, as this could cause injury to fingers and hands. Do not attempt to sit or stand on top of your appliance as it is not designed for such use. You could injure yourself or damage the appliance. Make sure that the mains cable is not caught under the appliance during and after moving, as this could damage the cable. Do not allow children to play with the appliance or tamper with the controls. Installation instructions 1. Do not keep your appliance in a room where the temperature is likely to fall below 10 degrees C (50 degrees F) at night and/or especially in winter, as it is designed to operate in ambient temperatures between +10 and +38 degrees C (50 and 100 degrees F). At lower temperatures the appliance may not operate, resulting in a reduction in the storage life of the food. 2. Do not place the appliance near cookers or radiators or in direct sunlight, as this will cause extra strain on the appliance's functions. If installed next to a source of heat or freezer, maintain the following minimum side clearances: From Cookers 30 mm From Radiators 300 mm From Freezers 25 mm 3. Make sure that sufficient room is provided around the appliance to ensure free air circulation (Item 2). Put the back airing lid to the back of your refrigerator to set the distance between the refrigerator and the wall (Item 3). 2
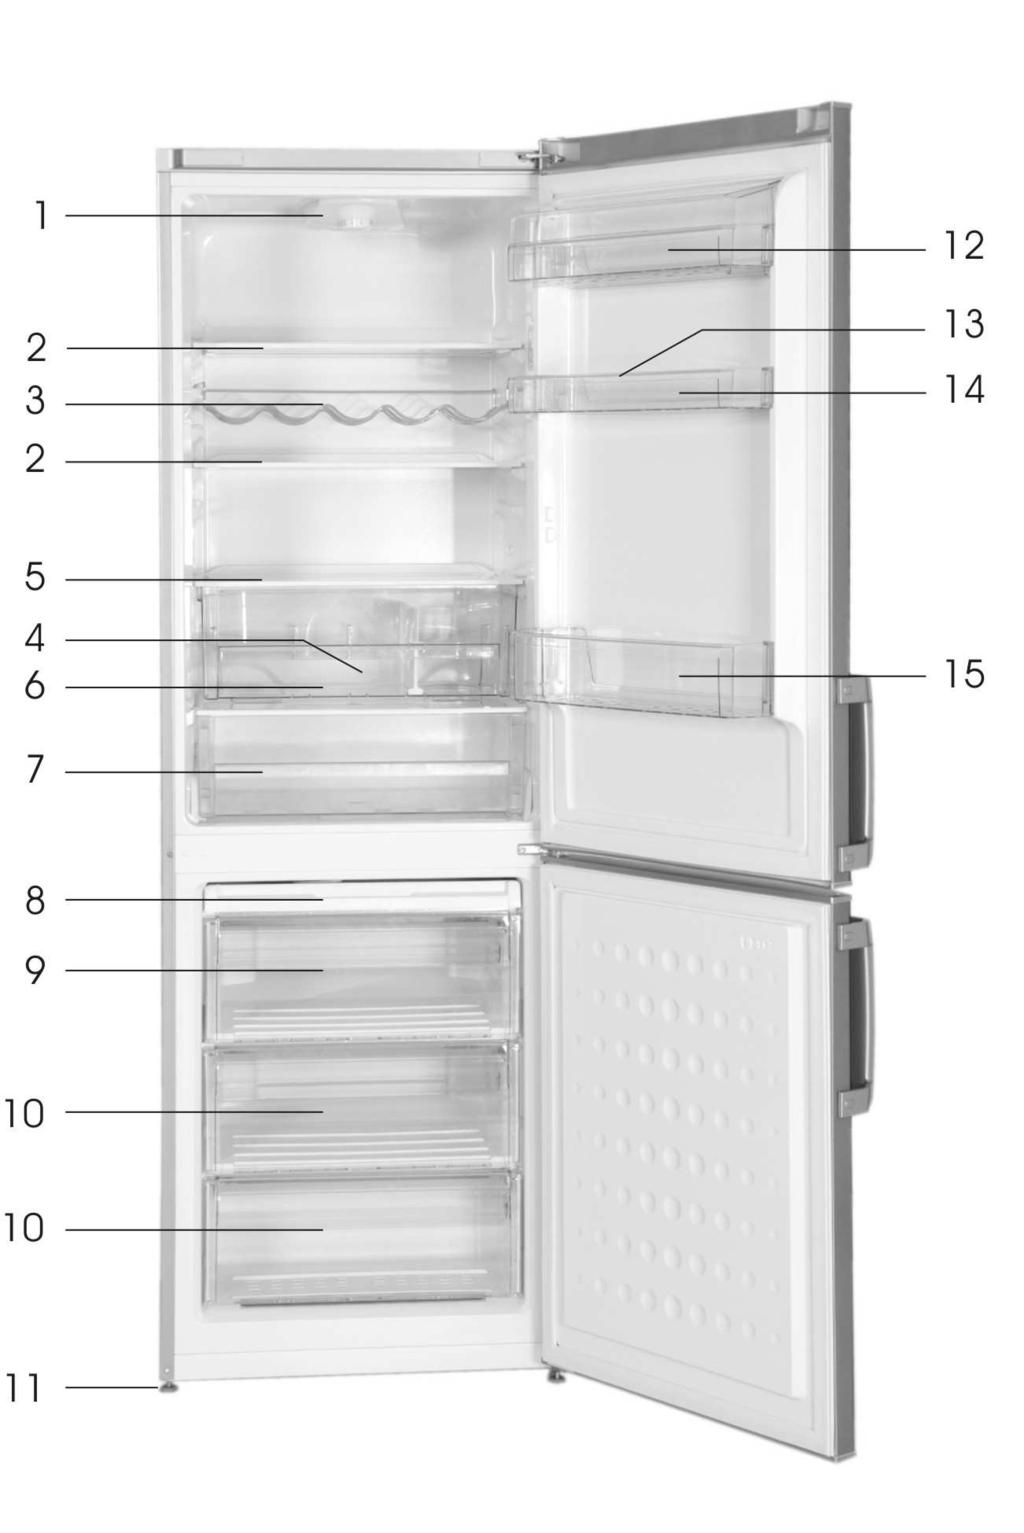
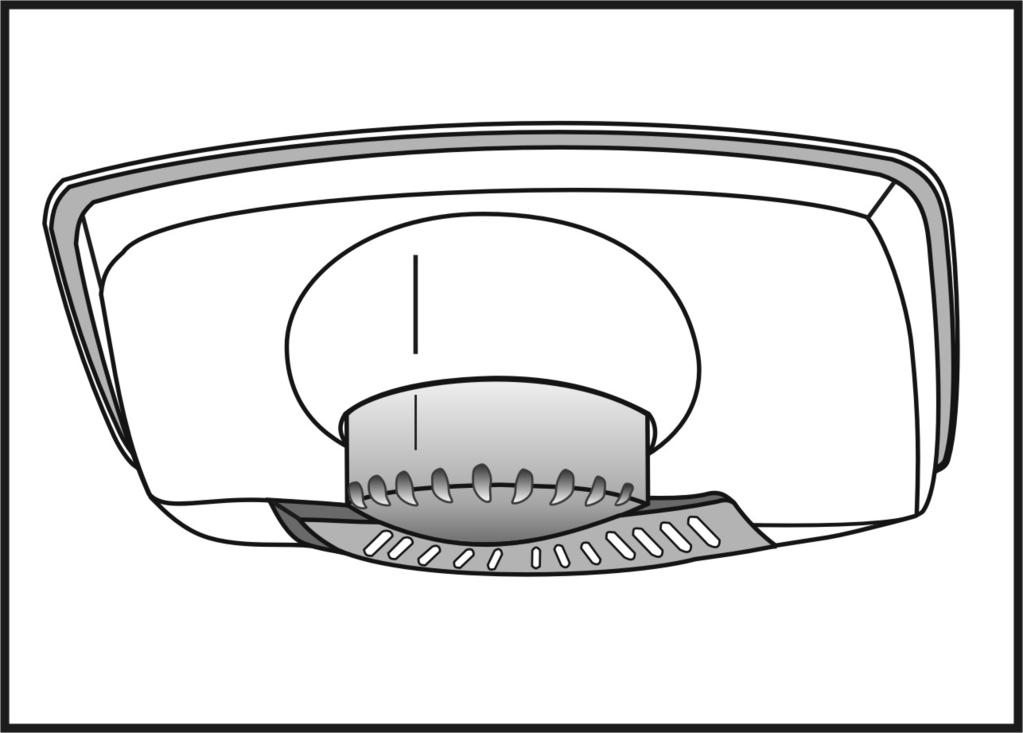
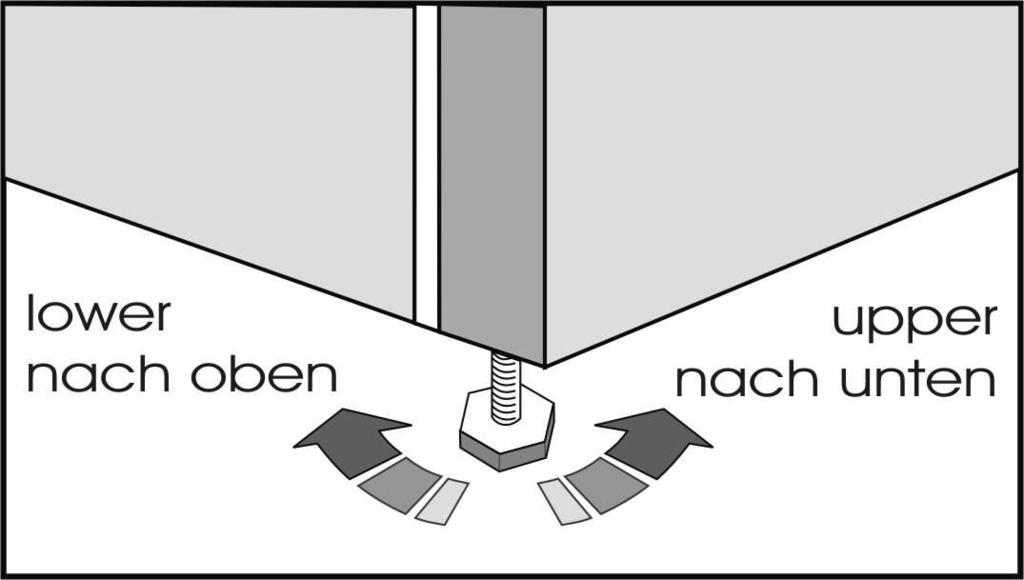
9 GB 4. The appliance should be positioned on a smooth surface. The two front feet can be adjusted as required.to ensure that your appliance is standing upright adjust the two front feet by turning clockwise or anticlockwise, until firm contact is secured with the floor. Correct adjustment of feet prevents excessive vibration and noise (Item 4). 5. Refer to "Cleaning and Care" section to prepare your appliance for use. Getting to know your appliance (Item 1) 1 - Thermostat and lamp housing 2 - Adjustable Cabinet shelves 3 - Wine bottles support 4 - Water collector 5 - Crisper cover 6 - Crispers 7 - Fresh zone compartment 8 - Ice tray support & ice tray 9 - Compartment for quickly freezing 10 - Compartments for frozen froods keeping 11 - Adjustable foot 12 - Dairy Compartment 13 - Shelf for jars 14 - Egg tray 15 - Shelf for bottles Suggested arrangement of food in the appliance Guidelines for obtaining optimum storage and hygiene: 1. The fridge compartment is for the shortterm storage of fresh food and drinks. 2. The freezer compartment is rated and suitable for the freezing and storage of pre-frozen food. The recommendation for storage as stated on the food packaging should be observed at all times. 3. Dairy products should be stored in the special compartment provided in the door liner. Instruction for use 4. Cooked dishes should be stored in airtight containers. 5. Fresh wrapped produce can be kept on the shelf. Fresh fruit and vegetables should be cleaned and stored in the crispers. 6. Bottles can be kept in the door section. 7. To store raw meat, wrap in polythene bags and place on the lowest shelf. Do not allow to come into contact with cooked food, to avoid contamination. For safety, only store raw meat for two to three days. 8. For maximum efficiency, the removable shelves should not be covered with paper or other materials to allow free circulation of cool air. 9. Do not keep vegetable oil on door shelves. Keep the food packed, wrapped or covered. Allow hot food and beverages to cool before refrigerating. Leftover canned food should not be stored in the can. 10. Fizzy drinks should not be frozen and products such as flavoured water ices should not be consumed too cold. 11. Some fruit and vegetables suffer damage if kept at temperatures near 0 C. Therefore wrap pineapples, melons, cucumbers, tomatoes and similar produce in polythene bags. 12. High-proof alcohol must be stored upright in tightly closed containers. Never store products that contain an inflammable propellant gas (e.g. cream dispensers, spray cans, etc.) or explosive substances. These are an explosion hazard. 13. To take out the baskets from the freezer compartment please proceed as in Item 9. 3
10 GB Temperature control and adjustment Operating temperatures are controlled by the thermostat knob (Item 5) and may be set at any position between MIN and MAX (the coldest position). The average temperature inside the fridge should be around +5 C (+41 F). Therefore adjust the thermostat to obtain the desired temperature. Some sections of the fridge may be cooler or warmer (such as salad crisper and top part of the cabinet) which is quite normal. We recommend that you check the temperature periodically with a thermometer to ensure that the cabinet is kept to this temperature. Frequent door openings cause internal temperatures to rise, so it is advisable to close the door as soon as possible after use. Before operating Final Check Before you start using the appliance check that: 1. The feet have been adjusted for perfect levelling. 2. The interior is dry and air can circulate freely at the rear. 3. The interior is clean as recommended under "Cleaning and care. 4. The plug has been inserted into the wall socket and the electricity is switched on. When the door is open the interior light will come on. And note that: 5. You will hear a noise as the compressor starts up. The liquid and gases sealed within the refrigeration system may also make some (noise), whether the compressor is running or not. This is quite normal. 6. Slight undulation of the top of the cabinet is quite normal due to the manufacturing process used; it is not a defect. 7. We recommend setting the thermostat knob midway and monitor the temperature to ensure the appliance maintains desired storage temperatures (See section Temperature Control and Adjustment). Instruction for use 8. Do not load the appliance immediately it is switched on. Wait until the correct storage temperature has been reached. We recommend checking the temperature with an accurate thermometer (see; Temperature Control and Adjustment). Storing frozen food Your freezer is suitable for the long-term storage of commercially frozen foods and also can be used to freeze and store fresh food. If there is a power failure, do not open the door. Frozen food should not be affected if the failure lasts for less than 18 hrs. If the failure is longer, then the food should be checked and either eaten immediately or cooked and then re-frozen. Freezing fresh food Please observe the following instructions to obtain the best results. Do not freeze too large a quantity at any one time. The quality of the food is best preserved when it is frozen right through to the core as quickly as possible. Do not exceed the freezing capacity of your appliance in 24 h. Placing warm food into the freezer compartment causes the refrigeration machine to operate continously until the food is frozen solid. This can temporarily lead to excessive cooling of the refrigeration compartment. When freezing fresh food, keep the thermostat knob at medium position. Small quantities of food up to 1/2 kg. (1 lb) can be frozen without adjusting the temperature control knob. Take special care not to mix already frozen food and fresh food. Making ice cubes Fill the ice - cube tray 3/4 full with water and place it in the freezer. Loosen frozen trays with a spoon handle or a similar implement; never use sharp-edged objects such as knives or forks. 4
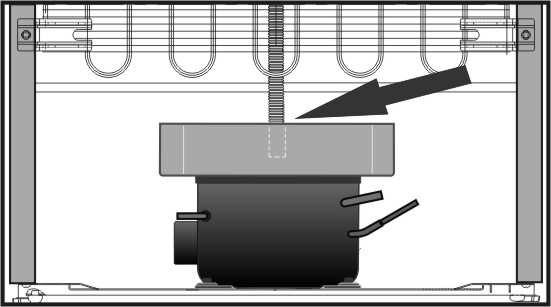
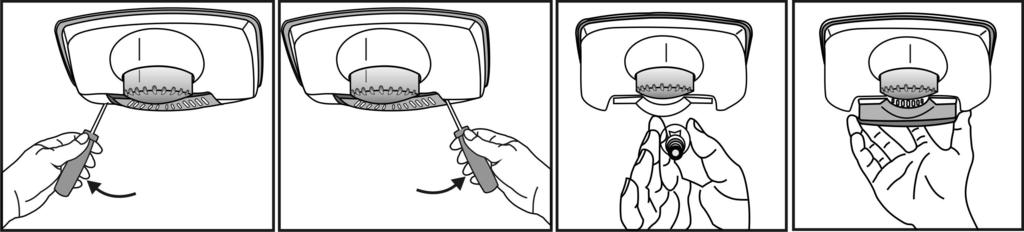
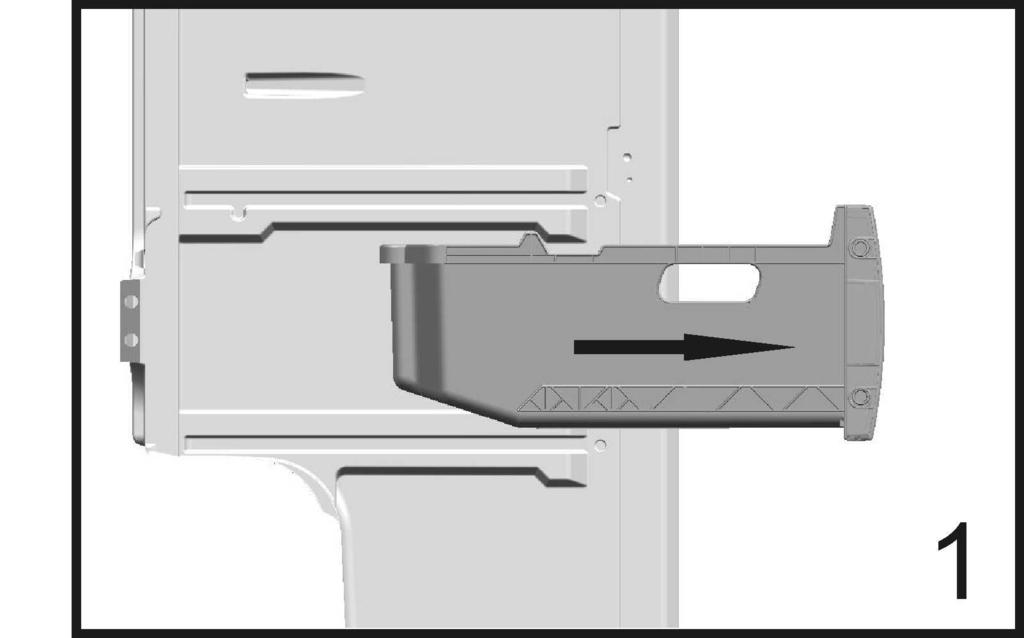
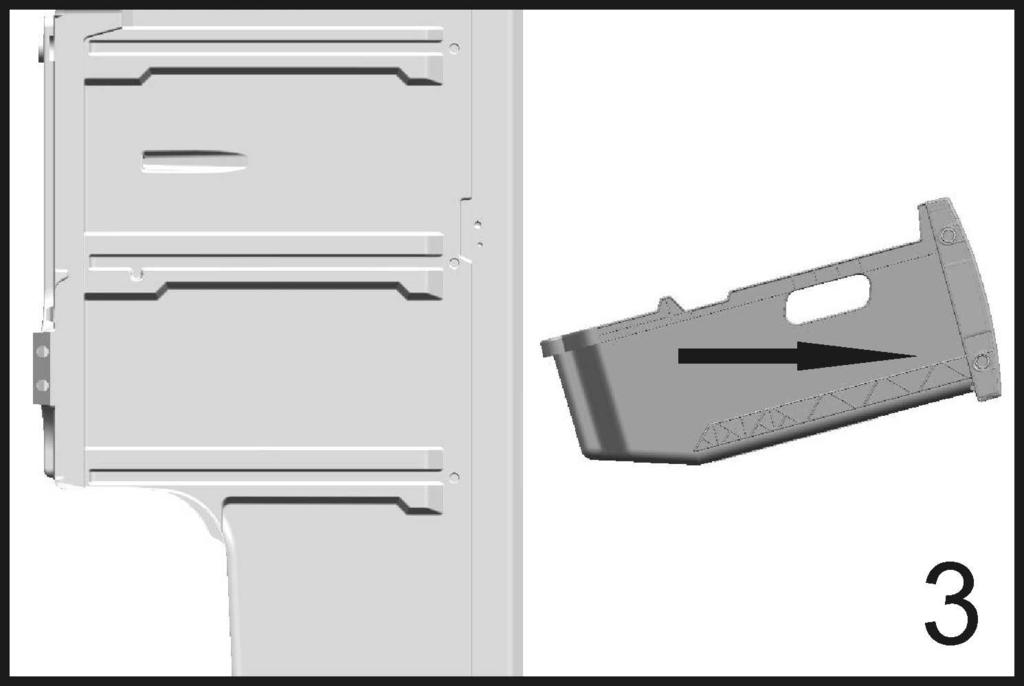
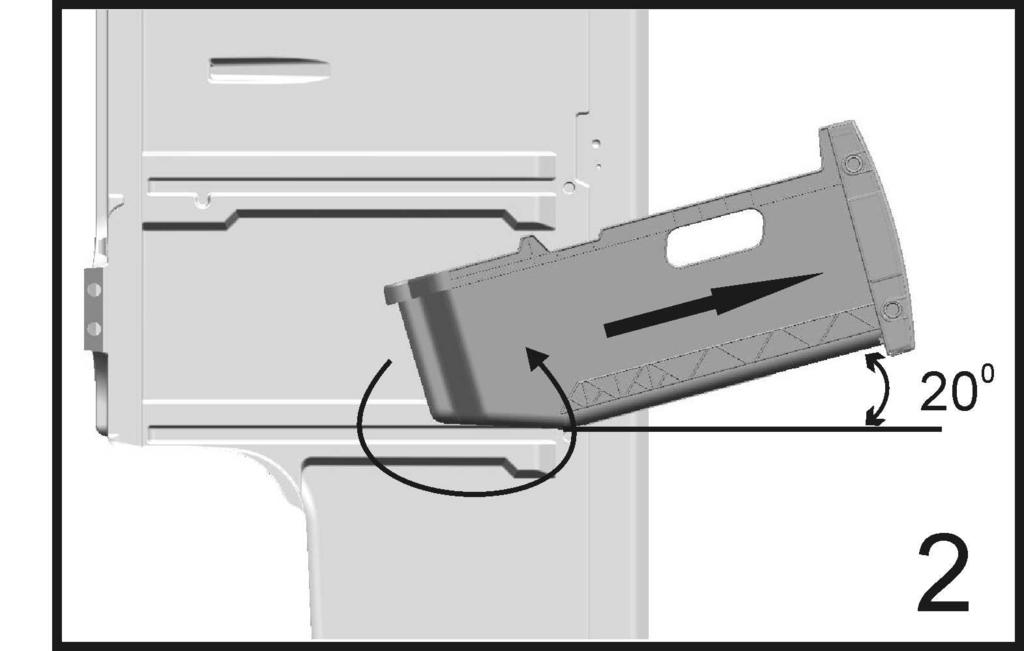
11 GB Defrosting A) Fridge compartment The fridge compartment defrosts automatically. The defrost water runs to the drain tube via a collection container at the back of the appliance (Item 6). During defrosting, water droplets may form at the back of the fridge compartment where a concealed evaporator is located. Some droplets may remain on the liner and refreeze when defrosting is completed. Do not use pointed or sharp-edged objects such as knives or forks to remove the droplets which have refrozen. If, at any time, the defrost water does not drain from the collection channel, check that no food particles have blocked the drain tube. The drain tube can be cleared with a pipecleaner or similar implement. Check that the tube is permanently placed with its end in the collecting tray on the compressor to prevent the water spilling on the electric installation or on the floor (Item 7). B) Freezer compartment Defrosting is very straightforward and without mess, thanks to a special defrost collection basin. Defrost twice a year or when a frost layer of around 7 (1/4") mm has formed. To start the defrosting procedure, switch off the appliance at the socket outlet and pull out the mains plug. All food should be wrapped in several layers of newspaper and stored in a cool place (e.g. fridge or larder). Containers of warm water may be placed carefully in the freezer to speed up the defrosting. Do not use pointed or sharp-edged objects, such as knives or forks to remove the frost. Never use hairdryers, electrical heaters or other such electrical appliances for defrosting. Sponge out the defrost water collected in the bottom of the freezer compartment. After defrosting, dry the interior thoroughly (Item 8). Insert the plug into the wall socket and switch on the electricity supply. 5 Instruction for use Replacing the interior light bulb (Item 10) In case that the light bulb is out of function it is easily to replace. First make sure that the refrigerator / freezer is disconnected from the power supply by removing the plug. Take a flat screwdriver and keep it carefully without force into the left gap between lamp cover and internal cabinet. Then press the handle of the screwdriver carefully to the left side until you notice that the left pin of the cover is disengaged. Repeat this procedure on the right gap, however now press the handle of the screwdriver carefully to the right side. If both sides are loosened the cover can be removed easily. Ensure that bulb is screwed securely in the bulb holder. Plug the appliance into the power supply. If the light still fails, replace E14 screw-cap type 15 Watt (Max) bulb from your local electrical store and then fit it. Carefully dispose of the burnt-out light bulb immediately. If you have changed the light bulb please fix the cover again in it s former position. Take care that the cover snaps-in correctly. Cleaning and care 1. We recommend that you switch off the appliance at the socket outlet and pull out the mains plug before cleaning. 2. Never use any sharp instruments or abrasive substances, soap, household cleaner, detergent or wax polish for cleaning. 3. Use luke warm water to clean the cabinet of the appliance and wipe it dry. 4. Use a damp cloth wrung out in a solution of one teaspoon of bicarbonate of soda to one pint of water to clean the interior and wipe it dry. 5. Make sure that no water enters the temperature control box. 6. If the appliance is not going to be used for a long period of time, switch it off, remove all food, clean it and leave the door ajar. 7. We recommend that you polish the metal parts of the product (i.e. door exterior, cabinet sides) with a silicone wax (car polish) to protect the high quality paint finish.
12 GB 8. Any dust that gathers on the condenser, which is located at the back of the appliance, should be removed once a year with a vacuum cleaner. 9. Check door seals regularly to ensure they areclean and free from food particles. 10. Never: Clean the appliance with unsuitable material; eg petroleum based products. Subject it to high temperatures in any way, Scour, rub etc., with abrasive material. 11. Removal of dairy cover and door tray : To remove the dairy cover, first lift the cover up by about an inch and pull it off from the side where there is an opening on the cover. To remove a door tray, remove all the contents and then simply push the door tray upwards from the base. 12. Make sure that the special plastic container at the back of the appliance which collects defrost water is clean at all times. If you want to remove the tray to clean it, follow the instructions below: Switch off at the socket outlet and pull out the mains plug Gently uncrimp the stud on the compressor, using a pair of pliers, so that the tray can be removed Lift it up. Clean and wipe it dry Reassemble, reversing the sequence and operations 13. To remove a drawer, pull it as far as possible, tilt it upwards and then pull it out completely. Repositioning the door Proceed in numerical order (Item 11). Do s and don ts Instruction for use Do- Clean and defrost your appliance regularly (See "Defrosting") Do- Keep raw meat and poultry below cooked food and dairy products. Do- Take off any unusable leaves on vegetables and wipe off any soil. Do- Leave lettuce, cabbage, parsley and cauliflower on the stem. Do- Wrap cheese firstly in greaseproof paper and then in a polythene bag, excluding as much air as possible. For best results, take out of the fridge compartment an hour before eating. Do- Wrap raw meat and poultry loosely in polythene or aluminium foil. This prevents drying. Do- Wrap fish and offal in polythene bags. Do- Wrap food with a strong odour or which may dry out, in polythene bags, or aluminium foil or place in airtight container. Do- Wrap bread well to keep it fresh. Do- Chill white wines, beer, lager and mineral water before serving. Do- Check contents of the freezer every so often. Do- Keep food for as short a time as possible and adhere to "Best Before" and "Use by" etc. dates. Do- Store commercially frozen food in accordance with the instructions given on the packets. Do- Always choose high quality fresh food and be sure it is thoroughly clean before you freeze it. Do- Prepare fresh food for freezing in small portions to ensure rapid freezing. Do- Wrap all food in aluminium foil or freezer quality polythene bags and make sure any air is excluded. Do- Wrap frozen food immediately after purchasing and put it in to the freezer as soon as possible. Do- Defrost food in the fridge compartment. 6
13 GB Don t- Store bananas in your fridge compartment. Don t- Store melon in your fridge. It can be chilled for short periods as long as it is wrapped to prevent it flavouring other food. Don t- Cover the shelves with any protective materials which may obstruct air circulation. Don t- Store poisonous or any dangerous substances in your appliance. It has been designed for the storage of edible foodstuffs only. Don t- Consume food which has been refrigerated for an excessive length of time. Don t- Store cooked and fresh food together in the same container. They should be packaged and stored separately. Don t- Let defrosting food or food juices drip onto food. Don t- Leave the door open for long periods, as this will make the appliance more costly to run and cause excessive ice formation. Don t- Use sharp edged objects such as knives or forks to remove the ice. Don t- Put hot food into the appliance. Let it cool down first. Don t- Put liquid-filled bottles or sealed cans containing carbonated liquids into the freezer, as they may burst. Don t- Exceed the maximum freezing loads when freezing fresh food. Don t- Give children ice-cream and water ices direct from the freezer. The low temperature may cause 'freezer burns' on lips. Don t- Freeze fizzy drinks. Don t- Try to keep frozen food which has thawed; it should be eaten within 24 hours or cooked and refrozen. Don t- Remove items from the freezer with wet hands. Instruction for use Information about operating noises To keep the selected temperature constant, your appliance occasionally switches ON the compressor. The resulting noises are quite normal. As soon as the appliance has reached the operating temperature, the noises automatically reduce in volume. The humming noise is emitted by the motor (compressor). When the motor switches ON, the noise may briefly increase in volume. The bubbling, gurgling or whirring noise is emitted by the refrigerant as it flows through the pipes. The clicking noise can always be heard when the thermostat switches ON/OFF the motor. A clicking noise may occur when - the automatic defrosting system is active. - the appliance is cooling down or warming up (material expansion). If these noises are excessively loud, the causes are probably not serious and are usually very easy to eliminate. - The appliance is not level - Use the heightadjustable feet or place packing under the feet. - The appliance is not free-standing - Please move the appliance away from kitchen units or other appliances. - Drawers, baskets or shelves are loose or stick - Please check the detachable components and, if required, refit them. - Bottles and/or receptacles are touching each other - Please move bottles and/or receptacles away from each other. 7
14 GB Trouble - shooting If the appliance does not operate when switched on, check; That the plug is inserted properly in the socket and that the power supply is on. (To check the power supply to the socket, plug in another appliance) Whether the fuse has blown/circuit breaker has tripped/main distribution switch has been turned off. Instruction for use That the temperature control has been set correctly. That the new plug is wired correctly, if you have changed the fitted, moulded plug. If the appliance is still not operating at all after above checks, contact the dealer from whom you purchased the unit. Please ensure that above checks have been done, as a charge will be made if no fault is found. Technical data Brand Appliance type REFRIGERATOR-FREEZER type I CS S Total gross volume (l.) 340 Total usable volume (l.) 292 Freezer - usable volume (l.) 95 Refrigerator - useful volume 197 Freezing capacity (kg/24 h) 5 Energy class (1) A++ Power consumption (kwh/year) (2) 229 Autonomy (h) 18 Noise [db(a) re 1 pw] 39 Ecological refrigerating agent R600a (1) Energy class : A... G (A = economical... G = less economical) (2) The real power consumption depends on using conditions and appliance location. The symbol on the product or on packaging indicates that this product may not be treated as household waste. Instead it shall be handed over to the applicable collection point for the recycling of electrical and electronic equipment. By ensuring this product is disposed of correctly, you will help prevent potential negatyve consequences for the environment and humann health, which could otherwise be otherwise be caused by inappropriate waste handling of this product. For more detailed information about recycling of this product, please contact your local city office, you household waste disposal service or the shop where you purchased the product. 8
15 D Gebrauchsanweisung Wir danken Ihnen, dass Sie sich für den Kauf eines BEKO Produkte entschieden haben. Ihr Gerät genügt hohen Ansprüchen und wurde für eine langjährige Benutzung entworfen. Wichtige Hinweise für Ihre Sicherheit! Entfernen Sie das gesamte Verpackungsmaterial, bevor Sie das Gerät einschalten Nachdem Sie das Gerät aufgestellt haben, sollten Sie mit dem Anschliessen und Einschalten mindestens 4 Stunden warten, damit sich das Kältemittel im Kreislauf setzen kann. Schnapp-oder Riegelverschluss vom ausgedienten Gerät entfernen oder unbrauchbar machen, damit sich spielende Kinder nicht selbst im alten Gerät einschliessen können. Das Gerät ist nur für den Gebrauch im Haushalt bestimmt. Werfen Sie das Gerät nicht ins Feuer. Für das in dem Gerät verwendete Kühlmittel und die Gase in der Isolierung sind spezielle Entsorgungsverfahren vorgeschrieben. Befolgen Sie die Müllverordnungen in Ihrer Region, um das Gerät sicher zu entsorgen. Nicht zu empfehlen ist die Verwendung des Gerätes in sehr kalten, unbehitzten Räumen (Garage, Keller, Lagerräume, usw.) Damit Sie den größtmöglichen Nutzen aus Ihrem Gerät ziehen und es optimal und störungsfrei benutzen benutzen können, lesen Sie bitte die Bedienungsanleitung aufmerksam durch. Bewahren Sie sie für den Bedarfsfall sorgfältig auf. Die Nichtachtung dieser Hinweise können zu Sachschäden und zum Verlust der Garantie führen. Dieses Gerät ist nicht dafür bestimmt durch Personen (einschließlich Kinder) mit eingeschränkten physischen, sensorischen oder geistigen Fähigkeiten oder mangels Erfahrung und/oder mangels Wissen benutzt zu werden, es sei denn, sie werden durch eine für ihre Sicherheit zuständige Person beaufsichtigt oder erhielten von ihr Anweisungen, wie das Gerät zu benutzen ist. 9
16 D Elektrischer Anschluss Bevor Sie das Gerät anschliessen, prüfen Sie unbedingt, ob die auf dem Typenschild angegebene Wechselspannung mit der Netzspannung übereinstimmt. Die elektrischen Anschlüsse müssen den gesetzlichen Vorschriften entsprechen. Schließen Sie das Gerät an eine leicht zugängliche Steckdose an. Warnung! Dieses Gerät muss richtig geerdet werden. Reparatur- und Wa rtungsarbeiten sollten nur von Fachkräften durchgeführt werden. Reparaturen, die von nicht qualifizierten Personen ausgeführt werden, sind eine Gefahrenquelle und können gefährliche Konsequenzen für den Benutzer des Gerätes haben. Achtung! Dieses Gerät verwendet das Kühlmittel R600a, ein Gas mit hoher Umweltverträglichkeit, das aber brennbar ist. Achten Sie beim Transportieren und Aufstellen des Geräts darauf, daß keine Teile des Kühlmittelkreislaufs beschädigt werden. Vermeiden Sie bei Beschädigungen offenes Feuer oder Zündquellen, und lüften Sie den Raum, in dem sich das Gerät befindet, mehrere Minuten lang. Warnung! Verwenden Sie zur Beschleunigung des Abtauprozesses keine mechanischen oder anderen Hilfsmittel als die vom Hersteller empfohlenen Mittel. Warnung! Achten Sie darauf, dass der Kühlmittelkreislauf nicht beschädigt wird. Warnung! Keine elektrische Geräte benutzen um den Abtauprozess zu beschleunigen. Verwenden Sie in der Kühl-Gefrier - Kombination keine anderen als die vom Hersteller empfohlenen elektrischen Geräte. Transporthinweise 1. Während des Transports sollte das Gerät stets aufrecht stehend und in Originalverpackung transportiert werden. 10 Gebrauchsanweisung 2. Wurde das Gerät waagerecht transportiert, so muß es zur Beruhigung des Kältekreislaufes wenigstens 4 Stunden ruhig lassen, bevor der Inbetriebnahme. 3. Für Schäden infolge Nichtbeachtung haftet der Hersteller nicht. 4. Das Gerät muss vor Regen, Feuchtigkeit oder anderen Witterungsbedingungen geschützt werden Wichtig! Greifen Sie nicht mit der Hand unter das Gerät während der Reinigung oder des Transportes. Sie könnten sich an scharfen Kanten oder an die Rohre auf der Geräterückseite verletzen. Setzen Sie sich nicht auf das Gerät. Sie könnten sich verletzen oder Beschädigungen am Gerät bewirken. Keine schweren Gegenstände bzw. das Gerät selbst auf das Netzkabel stellen. Das könnte zur Beschädigung des Netzkabels führen. Lassen Sie Kinder nicht mit dem Gerät spielen. Aufstellen 1. Die Umgebungstemperatur hat eine Auswirkung auf den Energieverbrauch und die anwandfreie Funktion des Kühlgerätes. Bei der Standortwahl sollten Sie darauf achten, das Gerät in einem Raum mit einer konstanten Umgebungstemperatur in Betrieb zu setzen die seiner Klimaklasse entspricht, dh C. ( F ). Ein Raum mit schwankenden Temperaturen (insbesonders nachts oder im Winter unter 10 C ) ist zu vermeiden. 2. Bei niedrigen Temperaturen ist es möglich, dass das Gerät nicht funktioniert. Das bewirkt eine Verminderung der Lagerungsdauer von Lebensmitteln, mindert unnötig den Nährwert und im schlechtesten Fall können Lebensmittel frühzeitig verderben Vermeiden Sie direkte Sonneneinstrahlung, und stellen Sie das Gerät nie in der Nähe einer direkten Wärmequelle auf. (Heizkörper, Herd, Ofen ).
17 D Die Mindestabstände zu solchen Geräten betragen : zu Gasherden 300 mm zu Heizkörper 300 mm zu Gefriergeräten 25 mm 3. Halten Sie einen Raum um das Gerät, damit die Luft frei zirkulieren kann. (Abb.2) Lüftungsgitter auf der Gerätrückseite einsetzen (Abb.3) 4. Das Gerät muss auf einem festen, ebenen Untergrund stehen. Bodenunebenheiten durch Ein-oder Herausdrehen der beiden Stellfüßen vorne ausgleichen. Vermeiden Sie starke Geräusche durch richtige Ausrichtung (Abb 4). 5. Lesen Sie Kap. Reinigung und Instandehaltung bevor der Inbetriebnahme. Geräteübersicht ( Abb. 1) 1 - Thermostat und Beleuchtungsarmatur 2 - Höhenverstellbare Ablagen 3 - Weinflaschengestell 4 - Tauwasserablauf 5 - Deckel für Gemüseschubladen 6 - Gemüseschubladen 7 - Frischbereich 8 - Eiswürfelfach 9 - Schnellgefrierabteil 10 - Gefrierschubladen zur Aufbewahrung von tiefgefrorenen Lebensmitteln 11 - Höhenverstellbare Füßen 12 - Fach für Milchprodukte 13 - Gläserfach 14 - Eierbehälter 15 - Flaschenfach Allgemeine Einlagerungsempfehlungen 1. Im Kühlteil werden frische Lebensmittel und Getränke für kurze Zeit aufbewahrt 2. Im Gefrierfach sind im Handel erhältliche tiefgefrorene Produkte für einen langen Zeitraum aufzubewahren, und außerdem besteht die Möglichkeit frische Lebensmittel einzufrieren und zu lagern. Bei abgepackten Waren auf Haltbarkeits- bzw. Gebrauchsanweisung Verbrauchsdatum achten und die angegebenen Lagerbedingungen unbedingt einhalten. 3. Bewahren Sie Milchprodukte im speziellen Türfach auf. 4. Gekochte Speisen in dicht schliessenden Gefäßen aufbewahren. 5. Frische Lebensmittel, gut verpackt, können auf den Ablagengittern aufbewahrt werden.gemüse und Obst werden in den Gemüseschubladen aufbewahrt. 6. Bewahren Sie Flaschen im Türfach auf. 7. Frisches Fleisch, in Polyäthylenbeutel gut verpackt, kann nur für einige Tagen auf die unterste Ablage im Kühlabteil gelagert werden Vermeiden Sie, dass das Fleisch in Berührung mit den gekochten Speisen kommt. 8. Decken Sie die Ablagegitter nicht mit Papier ab, damit die Luft zirkulieren kann. 9. Kein Pflanzöl im Türafch aufbewahren. Vergewissern Sie sich, daß die Lebensmittel gut verpackt bzw. abgedeckt sind, bevor Sie sie einlagern.lassen Sie warme Lebensmittel und Getränke abkühlen, bevor Sie sie im Gerät einlagern. Keine Konserven nach dem Öffnen im Kühlschrank aufbewahren. 10. Glasflaschen mit kohlensäurehaltigen Sodawasser dürfen nicht im Gefrierabteil aufbewahrt werden. 11. Kälteempfindliche Gemüsearten (Paradeiser, Gurken) und Obst (Ananas, Wassermelonen) mit luftdichter Verpackung aufbewahren. 12. Hochprozentiger Alkohol darf nur aufrecht in fest versiegelten Behältern aufbewahrt werden. Lagern Sie im Kühlschrank keine flüchtigen, explosiven oder brennbaren Stoffe. 13. Um die Körbe aus dem Tiefkühlfach zu nehmen, gehen Sie wie in Abschnitt 9 vor. 11
18 D Temperaturregelung. Einstellung der Temperatur Mit den Thermostat kann die die gewünschte Lagertemperatur eingestellt werden (Abb. 5). Wenn das Gerät die eingestellte Temperatur erreicht hat, schaltet sich der Thermostat automatisch aus, steigt die Temperatur wieder, so schaltet es sich wieder ein. Stellung MAX bedeutet die niedrigste Innentemperatur (kälteste Einstellung). Wird der Temperaturregler auf Stufe Mitte zwischen Min.und Max.eingestellt, so wird im Kühlbereich automatisch +5 C (+41 F) erreicht. Im Kühlschrank gibt es kältere und wärmere Zonen (Gemüseschublade, oberes Teil des Kühlschranks). Jedes Lebensmittel sollte den richtigen Platz bekommen, damit es lange frisch bleibt. Wir empfehlen, die Temperatur der Raumtemeperatur, der Häufigkeit mit der der Kühlschrank geöffnet wird, sowie der Menge der eingelagerten Lebensmittel entsprechend einzustellen. Die Temperatur im Kühlschrank regelmäßig an verschiedenen Stellen mit einem Thermometer messen. Vermeiden Sie unnötiges und zu langes Öffnen der Tür. Bevor der Inbetriebnahme Bevor der Innbetriebnahme prüfen Sie ob : 3. Die Stellfüßen vorne ausgeglichen wurden. 4. Der Innenraum gereinigt wurde und die Luft frei zirkulieren kann 5. Der Innenraum sauber ist ( gem. den Empfehlungen im Kap.,,Reinigung ) 6. Der Netzstecker richtig eingesteckt ist. Achtung : 7. Immer wenn das Gerät einschaltet, werden Sie ein Summen hören, das von dem Kompressor des Kühlschranks erzeugt wird Geräusche werden auch vom Kühlmittel der Kühl-Gefrier-Kombination erzeugt. Diese sind normale Betriebsgeräusche. 8. Die leicht gewölbte Form des Kühlschranks, fabrikationsbedingt, ist kein Defekt. Gebrauchsanweisung 1. Um den korrekten Betrieb des Geräts zu erhalten, den Thermostat auf eine mittlere Position einstellen. 2. Sie können Lebensmittel in das Gerät einräumen, wenn eine geeignete Kühltemperatur erreicht ist. Prüfen Sie die Temperatur im Kühlabteil mit einem Thermometer. Lagern von tiefgefrorenen Lebensmitteln Im Gefrierschrank sind im Handel erhältliche tiefgefrorene Produkte für einen langen Zeitraum aufzubewahren. Außerdem besteht die Möglichkeit frische Lebensmittel einzufrieren und zu lagern. Sollte der Strom ausfallen, öffnen Sie die Tür nicht. Falls die Unterbrechung nicht mehr als 18 Stunden dauert, werden die Lebensmittel im Gefrierfach nicht beeinträchtigt. Einmal aufgetaute oder angetaute Produkte sollten sobald wie möglich verzehrt werden und nicht wieder einfrieren, außer sie werden zu einem Fertiggericht weiter verarbeitet. Einfrieren von frischen Lebensmitteln Einige Regeln sollten beachtet werden, um Qualitätsverluste zu vermeiden und die Erhaltung von Konsistenz, Geschmack, Nährwert, Vitamineninhalt und Aussehen der Tiefkühlkost zu garantieren: Frieren Sie nie eine zu große Menge frische Ware auf einmal ein, sonst kann die Ware nicht schnell genug bis zum Kern durchgefroren werden und so können, nach dem Auftauen, Qualität- und Geschmacksverluste auftreten. Das Gefriervermögen des Gerätes nicht zu überschreiten. Möglichst schnell einfrieren! Die einzulegenden Lebensmittel nicht mit den bereits im Fach befindlichen in Berührung zu kommen. Lassen Sie warme Lebensmittel abkühlen, bevor Sie sie im Gerät einlagern. 12
19 D Gebrauchsanweisung Abtauen des Gerätes Kühlabteil Das Abtauen erfolgt vollautomatisch während der Kompressor von dem Thermostat unterbrochen wird. Keine Eingriffe sind erforderlich. Das Abtauwasser läüft durch den Tauwasserablauf in die Auffangschale auf dem Kompressor und verdunstet dort durch die Wärme des Kompressors. (Abb. 6). Das Auftreten von Wassertropfen auf der inneren Rückwand des Kühlraums zeigt die automatische Abtauphase an. Nach dem Abtauen sind Reif- bzw. Eisschichtflecken auf der Rückseite des Kühlschrankes nicht unüblich. Verwenden Sie keine spitzen Gegenstände wie Messer oder Gabeln, um diese zu entfernen. Die Abflußöffnung regelmäßig mit einem Reinigungsstäbchen reinigen, damit das Tauwasser stetig und zügig abfließen kann. Halten Sie die Auffangrinne und die Ablauföffnung sauber. Ist diese verstopft, dann lassen sich die Verschmutzungen mit dem gelieferten Werkstück beseitigen (Abb.7). Gefrierteil Durch den eingebauten Tauwassersammelbehälter gestaltet sich das Abtauen sehr einfach und unkompliziert. Sie sollten etwa zweimal pro Jahr abtauen, bzw. wenn sich eine Eisschicht von etwa 7 mm (1/4 ) Stärke gebildet hat. Schalten Sie zum Abtauen das Gerät ggf. an der Steckdose ab und ziehen Sie den Netzstecker. Wickeln Sie die Lebensmittel in mehrere Lagen Zeitungspapier und verstauen Sie dann alles an einem kühlen Ort (z.b. Kühlschrank oder Speisekammer). Um das Abtauen zu beschleunigen, können Sie vorsichtig Behälter mit warmem Wasser in das Gefrierabteil stellen. Verwenden Sie zum Entfernen des Eises niemals einen spitzen oder scharfen Gegenstand, wie etwa ein Messer oder eine Gabel. Verwenden Sie zum Abtauen niemals einen Haartrockner, ein elektrisches Heizgerät oder ähnliche Elektroapparate. Wischen Sie das Tauwasser auf, das sich am Boden des Gefrierabteils angesammelt hat, und trocknen Sie den Innenraum nach dem Abtauen gründlich ab (Abb. 8). Verbinden Sie den Netzstecker mit der Steckdose und schalten Sie den Strom wieder an. Wechseln des türanschlags Befolgen Sie nacheinander die einzelnen Schritte entsprechend der Numerierung (Abb. 11). Wechsel der Glühlampe (Abb. 10) Falls die Innenbeleuchtung einmal ausfallen sollte, kann das Leuchtmittel leicht ersetzt werden. Trennen Sie das Kühlgerät zunächst von der Stromversorgung, indem Sie den Netzstecker ziehen. Nehmen Sie einen Schlitzschraubendreher zur Hand, setzen Sie die Klinge vorsichtig in den linken Spalt zwischen Lampenabdeckung und Innenwand. Bewegen Sie den Griff des Schraubendrehers vorsichtig nach links, bis sich der linke Stift der Abdeckung löst. Dies wiederholen Sie mit dem rechten Spalt, hier bewegen Sie den Griff des Schraubendrehers entsprechend vorsichtig nach rechts. Wenn beide Seiten gelöst sind, lässt sich die Abdeckung leicht abnehmen. Kontrollieren Sie dann, ob das Leuchtmittel richtig eingeschraubt ist. Verbinden Sie das Gerät mit der Stromversorgung. Sollte das Licht noch immer nicht aufleuchten, erwerben Sie ein neues Leuchtmittel (E14-Gewinde, maximal 15 Watt) im Elektrofachhandel und schrauben dieses ein. Entsorgen Sie das ausgebrannte Leuchtmittel sofort und mit Vorsicht. Nach dem Austausch des Leuchtmittels setzen Sie die Abdeckung wieder wie zuvor auf. Achten Sie darauf, dass die Abdeckung richtig einrastet. 13
20 D Reinigung und Pflege 1. Vor der Reinigung empfiehlt es sich, das Gerät ggf. an der Steckdose abzuschalten und den Netzstecker zu ziehen. 2. Verwenden Sie zum Reinigen weder scharfe Gegenstände noch Scheuermittel, Seife, Haushaltsreiniger, andere Putzmittel oder Wachspolitur. 3. Reinigen Sie den Innenraum des Geräts mit lauwarmem Wasser und reiben Sie ihn dann trocken. 4. Befeuchten Sie zum Reinigen ein Tuch in einer Lösung aus einem Teelöffel Natriumbikarbonat (doppeltkohlensaures Natron) und einem halben Liter Wasser, und wischen Sie den Innenraum damit aus. 5. Achten Sie darauf, daß kein Wasser in die Thermostateinheit gelangt. 6. Wenn das Gerät für eine längere Zeit nicht verwendet werden soll, dann schalten Sie es ab, nehmen Sie sämtliche Lebensmittel heraus, reinigen Sie es, und lassen Sie die Tür leicht geöffnet. 7. Zum Polieren der Metallteile des Geräts (d.h. die Türaußenseite und die seitlichen Außenwände) empfehlen wir die Verwendung eines Wachses auf Silikonbasis (Autopolitur). Auf diese Weise wird die hochwertige Außenlackierung geschützt. 8. Staub, der sich auf dem Kondensator hinter dem Gerät ansammelt, sollte einmal pro Jahr mit einem Staubsauger entfernt werden. 9. Überprüfen Sie die Türdichtung regelmäßig auf Sauberkeit und achten Sie darauf, daß sich keine Reste von Lebensmitteln o.ä. darauf befinden. 10.Vermeiden Sie es in jedem Fall, das Gerät mit ungeeigneten Substanzen zu reinigen, wie etwa mit benzinhaltigen Mitteln, es allzu hohen Temperaturen auszusetzen, es mit scheuernden Substanzen zu putzen, abzureiben o.ä. 11. Ausbau des Deckels des Milchproduktefachs und der Türablage: Zum Ausbau den Deckel zunächst 2-3 cm anheben und dann an der Seite abziehen, an der sich im Deckel eine Öffnung befindet. Gebrauchsanweisung Um eine Türablage zu entfernen, zunächst den gesamten Inhalt der Ablage entfernen und dann einfach vom Boden her nach oben drücken. 12. Achten Sie darauf, daß die Plastikschale an der Rückseite des Geräts, die zum Sammeln von Tauwasser dient, immer sauber bleibt. Wenn Sie die Schale zum Reinigen ausbauen wollen, dann gehen Sie wie folgt vor: Das Gerät ggf. an der Steckdose abschalten und den Netzstecker ziehen. Den Stift am Kompressor vorsichtig mit einer Zange zurückbiegen, so daß die Schale freiliegt. Die Schale abnehmen. Die Schale reinigen und trockenreiben. Zum Wiedereinbauen die gleichen Schritte in umgekehrter Reihenfolge ausführen. 13. Stärkere Eisablagerungen sollten regelmäßig mittels ein Eisschabers aus Plastik entfernt werden. Massive Eisablagerungen vermindern die Kühlleistung Ihres Geräts. 14
21 D Was Sie tun sollten und was auf keinen fall-einige Hinweise Richtig: Das Gerät regelmäßig reinigen und abtauen (siehe Abschnitt Abtauen ). Richtig: Rohes Fleisch und Geflügel tiefer lagern als gekochte Speisen und Molkereiprodukte. Richtig: Bei Gemüse alles unbrauchbare Blattwerk entfernen und etwaigen Schmutz abwischen. Richtig: Blattsalat, Kohl, Petersilie und Blumenkohl am Stiel belassen. Richtig: Käse fest in Butterbrotpapier und dann in einen Beutel aus Polyethylen wickeln, und die Luft soweit als möglich herausdrücken. Käse schmeckt am besten, wenn er eine Stunde vor dem Verzehr aus dem Kühlabteil genommen wird. Richtig: Rohes Fleisch und Geflügel nicht zu fest in Polyethylen- oder Aluminiumfolie einwickeln, um ein Austrocknen zu verhindern. Richtig: Fisch und Innereien in Polyethylenbeutel wickeln. Richtig: Lebensmittel, die einen starken Geruch haben oder nicht austrocknen sollen, in Polyethylenbeutel oder Aluminiumfolie wickeln oder in luftdichten Behältern lagern. Richtig: Brot gut einwickeln, damit es frisch bleibt. Richtig: Weißwein, Bier und Mineralwasser vor dem Servieren gut kühlen. Richtig: Von Zeit zu Zeit den Inhalt des Gefrierabteils überprüfen. Richtig: Lebensmittel so kurz wie möglich aufbewahren und die Angaben Mindestens haltbar bis: bzw. Richtig: Handelsübliche Tiefkühlware entsprechend der Hinweise auf der jeweiligen Verkaufsverpackung lagern. Richtig: Zum Einfrieren nur frische Lebensmittel bester Qualität verwenden und diese vorher gründlich säubern. Richtig: Einzufrierende Lebensmittel vorher in kleine Portionen zerlegen, damit sie rasch durchfrieren. Richtig: Lebensmittel zum Einfrieren in Aluminiumfolie oder Gefrierbeutel aus einwandfreiem Polyethylen packen und darauf achten, daß die Luft vollständig herausgedrückt wurde. Richtig: Tiefkühlware gleich nach dem Einkaufen einwickeln und sobald als möglich in das Gefrierabteil legen. Richtig: Tiefkühlware zum Auftauen ins Kühlabteil legen. 15 Gebrauchsanweisung Falsch: Bananen im Kühlabteil lagern. Falsch: Melonen im Kühlabteil lagern. - Melonen können allerdings für kurze Zeit gekühlt werden, solange sie eingewickelt werden, so daß sich ihr Aroma nicht auf andere Lebensmittel überträgt. Falsch: Die Ablagen mit einem schonenden Material bedecken. - Dies würde die Kaltluftzirkulation behindern. Falsch: Gifte oder Gefahrenstoffe im Gerät lagern. - Das Gerät ist ausschließlich für die Lagerung von Lebensmitteln bestimmt. Falsch: Lebensmittel verzehren, die zu lange im Gerät gelagert wurden. Falsch: Gekochte Speisen und frische Lebensmittel zusammen in einen Behälter tun. - Beides sollte getrennt verpackt und gelagert werden. Falsch: Beim Auftauen Wasser oder Flüssigkeit von Lebensmitteln auf andere Lebensmittel tropfen lassen. Falsch: Die Tür längere Zeit offenstehen lassen. - Hierdurch wird der Betrieb des Geräts teurer, und die Eisbildung verstärkt sich. Falsch: Zum Entfernen des Eises spitze oder scharfe Gegenstände verwenden, wie etwa ein Messer oder eine Gabel. Falsch: Warme Speisen ins Gerät stellen. - Besser zuerst abkühlen lassen. Falsch: Mit Flüssigkeit gefüllte Flaschen oder ungeöffnete Konserven mit kohlensäurehaltigen Getränken in das Gefrierabteil stellen. - Diese können zerplatzen. Falsch: Beim Einfrieren frischer Lebensmittel das maximale Gefriervermögen überschreiten. Falsch: Kindern Speiseeis oder Eissorbetts unmittelbar nach dem Herausnehmen aus dem Gefrierabteil geben. - Die sehr niedrige Temperatur kann zu kalten Verbrennungen an den Lippen führen. Falsch: Kohlensäurehaltige Getränke einfrieren. Falsch: Aufgetaute Tiefkühlware weiter aufbewahren. - Statt dessen innerhalb von 24 Stunden verzehren oder kochen und wiedereinfrieren. Falsch: Mit feuchten Händen etwas aus dem Gefrierabteil herausnehmen.
22 D Massnahmen bei Betriebstırunger Wenn das Gerät nach dem Einschalten nicht funktionieren sollte, dann prüfen Sie, ob der Netzstecker richtig in der Steckdose steckt, und daß der Strom angeschaltet ist (zum Prüfen der Stromversorgung können Sie ein anderes Gerät an die Steckdose anschließen); ob evtl. die Sicherung durchgebrannt ist / der Sicherungsautomat ausgelöst wurde oder der Hauptschalter auf Aus steht; ob der Temperaturwahlschalter richtig eingestellt wurde; Technische Daten Gebrauchsanweisung (falls der angegossene Stecker ersetzt wurde) ob der neu angebrachter Stecker richtig verdrahtet wurde. Sollte das Gerät nach dieser Überprüfung immer noch nicht funktionieren, dann setzen Sie sich bitte mit dem Händler in Verbindung, bei dem Sie das Gerät erworben haben. Denken bitte Sie daran, daß eine Gebühr fällig wird, wenn am Gerät kein Fehler gefunden werden sollte; prüfen Sie das Gerät daher auf jeden Fall wie oben beschrieben. Hersteller Typ (Sterne Kennzeichnung) KÜHL-GEFRIER-Typ I CS S Gesamter Bruttoinhalt (l) 340 Gesamter Nutzinhalt (l) 292 Gefrierteil Nutzinhalt (l) 95 Kühlteil Nutzinhalt (l) 197 Gefriervermögen in kg /24h 5 Energie-Effizienz-Klasse (1) A++ Energieverbrauch KWh/Jahr (2) 229 Lagerzeit bei Störung (h) 18 Geräusch [db(a) re 1 pw] 39 Umweltfreundliches Kühlmittel R600a ( 1 ) Energie-Effizienz-Klassen A... G (die Effizienzklassen für Elektrogeräte reichen von A = niedrigster Verbrauch bis G = hoher Verbrauch ) ( 2 ) Der wirkliche Energieverbrauch hängt von vom Standort der Kühl-Gefrier-Kombination und von den Funktionierungsbedingungen ab. Bedeutung des Symbols Mülltonne Schonen Sie unsere Umwelt, Elektrogeräte gehören nicht in den Hausmüll. Nutzen Sie die für die Entsorgung von Elektrogeräten vorgesehenen Sammelstellen und geben dort Ihre Elektrogeräte ab die Sie nicht mehr benutzen werden. Sie helfen damit die potenziellen Auswirkungen, durch falsche Entsorgung, auf die Umwelt und die menschliche Gesundheit zu vermeiden. Sie leisten damit Ihren Beitrag zur Wiederverwertung, zum Recycling und zu anderen Formen der Verwertung von Elektro- und Elektronik-Altgeräten. Informationen, wo die Geräte zu entsorgen sind, erhalten Sie über Ihre Kommunen oder die Gemeindeverwaltungen. In vielen Ländern der EU ist die Entsorgung von Elektro- und Elektronik-Altgeräten über den Hausund/oder Restmüll ab verboten. In Deutschland ab
23 LT Naudojimo instrukcija Sveikiname pasirinkus kokybišką buitinį prietaisą, sukurtą tarnauti Jums daugelį metų. Pirmiausia- saugumas! Nejunkite savo buitinio prietaiso į elektros tinklą, kol nenu m te visų pakavimo ir pervežimo apsaugų. Jeigu gabenote horizontalioje pad tyje, prieš įjungdami leiskite pastov ti bent 4 valandas, kad kompresoriaus tepalas nusistov tų. Jeigu jūs išardote seną buitinį prietaisą, kurio durel se įtaisytas užraktas arba automatin spynel, įsitikinkite, kad palikote ją saugioje pad tyje, kad jame neužsitrenktų vaikai. Šį buitinį prietaisą naudokite tik pagal numatytą paskirtį. Buitinio prietaiso nedeginkite. Jūsų buitinio prietaiso izoliacijoje yra degių ne chlorofluormetano medžiagų. D l informacijos apie prietaiso išmetimą ir galimas paslaugas kreipkit s į vietinę valdžią. Nerekomenduojame naudoti šio buitinio prietaiso nešildomoje, šaltoje patalpoje, (t.y., garaže, oranžerijoje, priestate, pašiūr je, ne name ir taip toliau). Nor dami, kad buitinis prietaisas veiktų geriausiai ir be gedimų, labai svarbu įd miai perskaityti šias instrukcijas. Nesilaikydami šių nurodymų galite prarasti teisę į nemokamą aptarnavimą garantinio laikotarpio metu. Prašome laikyti šias instrukcijas saugioje vietoje, kad gal tum te bet kada jomis pasinaudoti. Šio buitinio prietaiso nerekomenduojama naudoti asmenims, turintiems fizinių, jutimo ar psichinių negalių arba neturintiems pakankamai patirties ir žinių, kaip naudotis šiuo prietaisu, nebent juos prižiūr tų arba su šio buitinio prietaiso naudojimu supažindintų už jų saugą atsakingas asmuo. Prižiūr kite vaikus, kad jie nežaistų su šiuo buitiniu prietaisu. 17
24 LT Elektros reikalavimai Prieš įkišdami kištuką į sienoje esantį elektros lizdą įsitikinkite, kad buitinio prietaiso viduje esančioje kategorijos plokštel je nurodyta įtampa ir dažnis atitinka jūsų elektros tiekimą. Mes rekomenduojame šį buitinį prietaisą prijungti prie elektros maitinimo per tinkamas įjungtą lizdą su saugikliu, kuris turi būti lengvai prieinamoje vietoje. D mesio! Šį buitinį prietaisą reikia įžeminti. Elektrinio buitinio prietaiso remontą gali atlikti tik kvalifikuotas specialistas. Netinkamai nekvalifikuoto asmens atlikti taisymo darbai gali sukelti pavojų, kurie gali tur ti lemtingų padarinių buitinio prietaiso vartotojui. DöMESIO! Šiame buitiniame prietaise naudojama šaldymo medžiaga R600a, kuri nedaro žalos aplinkai, tačiau tai degios dujos. Gabenimo ir gaminio pastatymo metu privalote pasirūpinti, kad nepažeistum te šaldymo sistemos. Jeigu pažeistum te šaldymo sistemą ir iš jos imtų tek ti dujos, laikykite gaminį atokiai nuo liepsnos šaltinių ir gerai išv dinkite patalpą. DöMESIO - nor dami pagreitinti atšildymo procesą, nenaudokite kitokių, nei gamintojų rekomenduojamų mechaninių arba kitų priemonių. DöMESIO - nepažeiskite aušinimo sistemos. DöMESIO - buitinio prietaiso maisto saugojimo skyriuose nenaudokite elektrinių prietaisų, nebent juos rekomenduotų gamintojas. Gabenimo instrukcijos 1. Prietaisą reikia gabenti tik stačią. Gabenimo metu įpakavimas turi likti nesugadintas. 2. Jeigu buitinį prietaisą gabenote horizontalioje pad tyje, prieš įjungdami leiskite pastov ti bent 4 valandas, kad sistema nusistov tų. Naudojimo instrukcija 3. Nesilaikant anksčiau min tų nurodymų, buitinis prietaisas gali būti sugadintas, ir gamintojas už tai nebus atsakingas. 4. Prietaisą būtina saugoti nuo lietaus, dr gm s ir kitokio atmosferos poveikio. D mesio! Valant/prižiūrint buitinį prietaisą, reikia būti atsargiems, kad nepaliestum te kondensatoriaus metalinių grotelių pagrindo, esančio buitinio prietaiso atbulin je pus je, nes galite susižeisti piršus ir rankas. Nebandykite ant buitinio prietaiso s d ti arba stov ti, nes jis neskirtas tokiam naudojimui. Galite susižeisti arba sugadinti buitinį prietaisą. Patikrinkite, ar slinkdami ir perstatę buitinį prietaisą neprispaud te maitinimo kabelio, nes tai gal tų jį pažeisti. Neleiskite vaikams žaisti su buitiniu prietaisu ar spaudin ti valdymo mygtukų. Instaliavimo instrukcijos 1. Nelaikykite buitinio prietaiso patalpoje, kuriame naktį ir /arba žiemą temperatūra gali nukristi iki minus 10 laipsnių C (50 laipsnių F), nes jis skirtas dirbti ten, kur aplinkos temperatūra yra tarp +10 ir +38 laipsnių C (50 ir 100 laipsnių F). Žemesn je temperatūroje buitinis prietaisas neveiks, tod l maisto saugojimo laikas sutrump s. 2. Žemoje temperatūroje buitinis prietaisas gali neveikti ir gali sumaž ti jo šaldymo efektyvumas, o laikant jį tiesioginiuose saul s spinduliuose ar prie radiatorių, buitinio prietaiso funkcijos gali būti papildomai apkrautos. Statydami šalia šilumos šaltinio arba šaldiklio, išlaikykite šiuos minimalius tarpus iš šonų: Nuo viryklių - 30 mm Nuo radiatorių mm Nuo šaldiklių - 25 mm 3. Įsitikinkite, kad aplink buitinį prietaisą esančios erdv s pakanka laisvai oro cirkuliacijai užtikrinti (2 pav.). Nor dami nustatyti atstumą tarp šaldytuvo ir sienos, pritaisykite galinį v dinimo dangtelį prie šaldytuvo galin s sienos (3 pav.). 18
25 LT 4. Buitinį prietaisą reik tų pastatyti ant lygaus paviršiaus. Prireikus, galima reguliuoti dvi priekines kojeles. Nor dami užtikrinti, kad buitinis prietaisas stov tų tiesiai, reguliuokite dvi priekines kojeles, sukdami jas pagal arba prieš laikrodžio rodyklę, kol prietaisas tvirtai stov s ant grindų. Teisingas kojelių sureguliavimas panaikina pernelyg didelę vibraciją ir triukšmą (4 pav.). 5. Nor dami paruošti buitinį prietaisą naudojimui, vadovaukit s Valymo ir priežiūros skyriaus nurodymais. Susipažinkite su buitiniu prietaisu (1 pav.) 1 - Termostatas ir lemput s korpusas 2 - Pritaikomos šaldytuvo lentynos 3 - Atrama vyno buteliams 4 - Vandens rinktuvas 5 - Uždengiamos d žut s 6 - Uždengiamos d žut s dangtis 7 - Šviežių maisto produktų skyrius 8 - Atrama ledo surinkimo lentynai ir ledo surinkimo lentyna 9 - Greito užšaldymo skyrius 10 - Skyriai užšaldytiems maisto produktams laikyti 11 - Reguliuojamos kojel s 12 - Pieno produktų skyrius 13 - Lentynos stiklainiams 14 - Kiaušinių d klas 15 - Lentynos buteliams Rekomenduojamas maisto produktų išd stymas buitiniame prietaise Nurodymai optimaliems saugojimo ir higienos rezultatams gauti: 1. Šaldytuvo skyrius skirtas trumpam šviežio maisto ir g rimų saugojimui. 2. Šaldiklio kamera yra įvertinta ir tinkama šaldymui ir maisto produktų laikymui prie užšaldymą. Visada reikia prisilaikyti ant maisto produktų įpakavimų nurodytų maisto laikymo rekomendacijų. 3. Pieno produktus reik tų laikyti specialiuose durelių įd klo skyriuose. Naudojimo instrukcija 4. Pagamintus patiekalus reik tų laikyti hermetiškuose induose. 5. Šviežius suvyniotus produktus galima laikyti ant lentynos. Šviežius vaisius ir daržoves reik tų nuvalyti ir laikyti uždengiamose d žut se. 6. Butelius galima laikyti durelių skyriuje. 7. Nor dami laikyti šviežią m są, suvyniokite ją į polietileninį maišelį ir pad kite ant žemiausios lentynos. Neleiskite, kad šviežia m sa liestųsi su pagamintais maisto produktais, kad šie nebūtų užkr sti. Saugumo sumetimais, žalią m są laikykite ne ilgiau nei dvi ar tris dienas. 8. Norint, kad šaldytuvas veiktų veiksmingiausiai, jo ištraukiamų lentynų nereik tų užkloti popieriumi arba kitomis medžiagomis, kurios sutrukdyti laisvą oro cirkuliaciją. 9. Durelių lentynose nelaikykite augalinio aliejaus. Maisto produktus laikykite supakuotus, suvyniotus arba uždengtus. Prieš d dami karštus maisto produktus ir g rimus į šaldytuvą, leiskite jiems atv sti. Skardin se likusio maisto nereik tų laikyti skardin je. 10. Putojančių g rimų nereik tų užšaldyti, o tokius produktus kaip aromatiniai vandens kubeliai, prieš vartojimą reik tų truputį atšildyti. 11. Kai kurie vaisiai ir daržov s, laikomi beveik 0 C temperatūroje, sugenda. Tod l ananasus, melionus, agurkus, pomidorus ir panašius produktus susukite į polietileninius maišelius. 12. Labai stiprūs alkoholiniai g rimai turi būti laikomi stačioje pad tyje stipriai užkimštuose buteliuose. Šaldytuve niekada nelaikykite produktų, kuriuose yra degių sprogstamųjų dujų (pvz., purškiamos grietin l s flakonų, skardinių su purškalais ir t.t.) arba sprogstamųjų medžiagų. Jos gali sukelti sprogimą. 19
26 LT Temperatūros kontrol ir reguliavimas Darbin temperatūra valdoma termostato ranken le (5 pav.), kuri gali nustatyta į bet kurią pad tį nuo MIN iki MAX (pastarojišalčiausia pad tis). Vidutin temperatūra šaldytuvo viduje tur tų būti maždaug +5 C (+41 F). Nustatykite termostatą taip, kad pasiektum te norimą temperatūrą. Kai kurie šaldytuvo skyriai gali būti v sesni arba šiltesni (pvz., lentyna salotoms ir viršutin d žut s dalis), tačiau tai visai normalu. Rekomenduojame periodiškai patikrinti temperatūrą termometru, kad įsitikintum te, jog skyriuje palaikoma ši temperatūra. Nuolat atidarin jant dureles, temperatūra šaldytuvo viršuje pakyla, tod l patartina dureles uždaryti tuoj pat po naudojimo. Prieš pradedant naudoti Galutinis patikrinimas Prieš prad dami naudoti buitinį prietaisą, patikrinkite, ar: 1. Sureguliavote kojeles, kad prietaisas stov tų lygiai. 2. Šaldytuvo vidus yra sausas, o gale oras gali laisvai cirkuliuoti. 3. Vidus yra švarus, pagal Valymo ir priežiūros skyriaus rekomendacijas. 4. Kištukas įkištas į sienoje esantį lizdą, ir elektra įjungta. Atidarius dureles, užsidega vidinis apšvietimas. Ir atkreipkite d mesį, kad: 5. Prad jus veikti kompresoriui, išgirsite nestiprius garsus. Ar kompresorius veikia, ar ne, šaldytuvo sistemoje hermetiškai uždarytas skystis ir dujos taip pat gali kelti silpnus garsus (triukšmą). Tai visiškai normalu. 6. Šaldytuvo skyriaus viršus gali būti trupusį banguotas d l panaudoto gamybos proceso, tačiau tai visiškai normalu ir n ra gedimas. 7. Rekomenduojame nustatyti termostato ranken lę per vidurį ir steb ti temperatūrą, kad įsitinkintum te, jog buitinis prietaisas palaiko norimą temperatūrą (Žr. į skyrių "Temperatūros kontrol ir reguliavimas"). Naudojimo instrukcija 8. Neprikaukite buitinio prietaiso tuoj pat po įjungimo. Palaukite, kol bus pasiekta tinkama temperatūra. Rekomenduojame patikrinti temperatūrą tiksliu termometru (žr.į skyrių Temperatūros kontrol ir reguliavimas ). Šaldytų maisto produktų laikymas Šaldiklis tinkamas ilgam parduotuv se pirktų maisto produktų laikymui; be to, jis gali būti naudojamas šviežiems maisto produktams užšaldyti ir laikyti. Dingus elektrai, neatidarykite durelių. Jeigu gedimas trunka trumpiau nei 18 val., užšaldytiems produktams tai netur tų padaryti jokios žalos. Tačiau jeigu gedimas truktų ilgiau, maisto produktus reik tų patikrinti ir arba nedelsiant suvartoti, arba juos pagaminti, o po to v l užšaldyti. Šviežių maisto produktų užšaldymas Nor dami pasiekti geriausių rezultatų, laikykit s šių instrukcijų. Vienu metu neužšaldykite per didelio maisto kiekio. Maisto kokyb geriausiai išsaugojama tada, kai jis yra visas užšaldomas kaip įmanoma greičiau. Neviršykite buitinio prietaiso galingumo, nustatyto 24 val. Įd jus šiltą maistą į šaldiklio kamerą, šaldytuvo variklis nepertraukiamai veikia tol, kol maistas kietai užšaldomas. Tai gali laikinai padidinti šaldiklio kameros aušinimą. Užšaldant šviežius maisto produktus, termostato ranken l turi būti vidurin je pad tyje. Maži maisto kiekiai iki 1/2 kg (1 lb), gali būti užšaldomi nereguliuojant temperatūros valdymo ranken l s. Ypač svarbu pasirūpinti, kad nesumaišytum te šviežių ir jau užšaldytų maisto produktų. Ledo gabaliukų gaminimas Pripilkite į ledo pad klą ¾ vandens ir įd kite jį į šaldiklį. Išlaisvinkite prišalusius pad klus šaukšto rankena arba panašius įrankiu; niekada nenaudokite daiktų aštriais galais, pvz., peilių arba šakučių. 20
27 LT Atšildymas a) Šaldytuvo skyrius Šaldytuvo skyrius atšyla automatiškai. Atšilęs vanduo per buitinio prietaiso gale esantį surinkimo rezervuarą teka į drenažo vamzdelį (6 pav.). Atšildymo metu ant šaldytuvo skyriaus galin s sienos, už kurios įrengtas pasl ptas garintuvas, gali susidaryti vandens lašelių. Ant tarpiklio gali likti lašelių, kurie atšildymui pasibaigus gali v l užšalti. Užšalusiems lašeliams pašalinti nenaudokite smailių daiktų arba daiktų su aštriais galais, pvz., peilių ar šakučių. Jeigu atšilęs vanduo neišteka iš surinkimo kanalo, patikrinkite, ar drenažo vamzdelio neužkimšo maisto dalel s. Drenažo vamzdelį galima atkimšti prietaisu vamzdžiams atkimšti arba panašiu įrankiu. Patikrinkite, kad šio vamzdelio galas visuomet būtų ant kompresoriaus surinkimo pad klo, kad vanduo neišsilietų ant elektros laidų arba grindų (7 pav.). b) Šaldiklio kamera Atšaldymo procesas yra labai paprastas: naudojant ypatingą atšildyto vandens surinkimo indą, jis vyksta labai tvarkingai. Atšildykite šaldytuvą dukart per metus arba tuomet, kai susidarys maždaug 7 (1/4") mm šerkšno sluoksnis. Nor dami prad ti atšildymo procesą, išjunkite buitinio prietaiso jungiklį ir ištraukite jo kištuką iš elektros lizdo. Visus maisto produktus suvyniokite į keletą laikraščio sluoksnių ir pad kite į v sią vietą (pvz., į šaldytuvą arba sand liuką). Norint pagreitinti atšildymo procesą, šaldiklyje galima atsargiai pastatyti indų su šiltu vandeniu. Užšalusiems lašeliams pašalinti nenaudokite smailių daiktų arba daiktų su aštriais galais, pvz., peilių arba šakučių. Atšildymui niekada nenaudokite plaukų džiovintuvų, elektrinių šildytuvų arba kitokių panašių elektrinių buitinių prietaisų. Šaldiklio skyriaus apačioje susikaupusį atšilusį vandenį sugerkite kempine. Prietaisui atšilus, kruopščiai nusausinkite jo vidų (8 ir 9 pav.). Įkiškite kištuką į sienoje esantį elektros lizdą ir įjunkite buitinio prietaiso jungiklį. 21 Naudojimo instrukcija Vidin s lemput s pakeitimas (10 pav.) Jeigu lemput neveiktų, ją galima lengvai pakeisti nauja. Pirmiausiai būtinai atjukite šaldytuvą / šaldiklį nuo maitinimo tinklo, ištraukdami kištuką iš elektros lizdo. Paimkite atsuktuvą plokščiu galu ir atsargiai, nenaudodami j gos, įstatykite jį į kair je esantį tarpelį tarp lemput s gaubto ir vidin s sienel s. Tuomet atsargiai spauskite atsuktuvo rankeną kair n, kol pasteb site, kad kairysis gaubto kaištis atsikabino. Tuos pačius veiksmus atlikite ir dešiniajam tarpeliui, tik dabar atsuktuvo rankeną atsargiai spauskite dešin n. Atlaisvinus abi puses, gaubtą galima lengvai nuimti. Iki galo įsukite lemputę į lemput s laikiklį. Įkiškite buitinio prietaiso elektros kištuką į maitinimo lizdą. Jeigu apšvietimas vis dar neveikia, vietin je elektros prekių parduotuv je įsigykite E14 tipo 15 W (maks.) lemputę su užsukamu dangteliu ir įsukite ją. Nedelsdami atsargiai išmeskite perdegusią lemputę. Pakeitę lemputę, įtaisykite gaubtą į pradinę jo pad tį. Įsitikinkite, ar gaubtas yra tinkamai užfiksuotas. Valymas ir priežiūra 1. Prieš valymą rekomenduojama ištraukti buitinio prietaiso kištuką iš lizdo ir atjungti maitinimą. 2. Valymui niekada nenaudokite aštrių įrankių arba abrazyvinių medžiagų, muilo, namų ūkyje naudojamo valiklio, skalbimo priemonių ar vaško poliravimui. 3. Buitinio prietaiso skyrių nuvalykite drungnu vandeniu, o po to sausai iššluostykite. 4. Šaldytuvo vidui valyti naudokite dr gną nuspaustą skudur lį, sudr kintą tirpale, pagamintame ištirpinus vieną arbatinį šaukštelį sodos (bikarbonato) vienoje pintoje (0,57 litro) vandens; po to sausai iššluostykite. 5. Pasirūpinkite, kad vanduo nepatektų į temperatūros valdymo d žutę. 6. Jeigu ketinate ilgam nenaudoti buitinio prietaiso, išjunkite jį ir išimkite visą maistą, išvalykite jį ir palikite dureles pravertas. 7. Norint apsaugoti kokybišką dažytą apdailą, metalines gaminio dalis (pvz., išorinę durelių pusę, šaldytuvo šonus) rekomenduojame nublizginti silikono vašku (automobiliniu politūra).
28 LT 8. Kartą per metus bet kokias ant buitinio prietaiso galin s sienos esančio kondensatoriaus susikaupusias dulkes reik tų susiurbti siurbliu. 9. Reguliariai patikrinkite, ar durelių tarpikliai yra švarūs ir ant jų n ra maisto dalelių. 10. Niekada: Nevalykite buitinio prietaiso netinkamomis medžiagomis, pvz., benzino pagrindu pagamintais produktais. Jokiais būdais nenaudokite jo aukštoje temperatūroje. Nešveiskite, netrinkite ir t.t. abrazyvin mis medžiagomis. 11. Pieno produktų skyriaus dangčio ir durelių lentynos iš mimas: Norint nuimti pieno produktų skyriaus dangtį, pirmiausia pakelkite dangtį maždaug vieną colį ir ištraukite jį iš tos pus s, kurioje dangtyje yra plyšys. Nor dami ištraukti durelių lentyną, išimkite iš jos visus daiktus ir po to paprasčiausiai patraukite durelių lentyną į viršų nuo pagrindo. 12. Patikrinkite, ar specialus plastmasinis rezervuaras, esantis buitinio prietaiso gale, kuris surenka atšildytą vandenį, visada švarus. Jeigu norite nuimti lovelį ir išvalyti jį, vadovaukit s toliau nurodytomis instrukcijomis: Ištraukite kištuką iš lizdo ir atjunkite elektros maitinimą. Atsargiai repl mis atsukite kompresoriuje esantį varžtą, kad gal tum te nuimti lovelį. Pakelkite jį. Išvalykite ir sausai iššluostykite. Sumontuokite atgal, naudodami atbulinę veiksmų tvarką. 13. Nor dami išvalyti stalčių, ištraukite jį kaip įmanoma labiau, pakelkite jį viršun ir visiškai ištraukite. Durelių perstatymas Veiksmus atlikite eil s tvarka (11 pav.). 22 Nurodymai Naudojimo instrukcija Reikia- Reguliariai atšildyti ir valyti buitinį prietaisą (žr. į skyrių Atšildymas ). Reikia- Žalią m są ir paukštieną laikyti apačioje, po pagamintais patiekalais ir pieno produktais. Reikia- Nuskinti bereikalingus daržovių lapus ir nuvalyti žemes. Reikia- Salotas, kopūstus, petražol s ir žiedinius kopūstus palikti ant stiebų. Reikia- Sūrį pirmiausia susukti į pergamentinį popierių, o po to įd ti į polietileninį maišelį taip, kad jame liktų kuo mažiau oro. Jis bus skaniausias, jei ištrauksite jį iš šaldytuvo valandą prieš vartojimą. Reikia- Žalią m są ir paukštieną lengvai susukti į polietileną arba aliuminio foliją. Taip neleisite jai apdžiūti. Reikia- Žuvį ir plaučkepenius d ti į polietileninius maišelius. Reikia- Stipraus kvapo maisto produktus arba tuos produktus, kurie gali išdžiūti, d ti į polietileninius maišelius arba susukti į aliuminio foliją arba d ti juos į hermetiškus indus. Reikia- Gerai įvynioti duoną, kad ji liktų šviežia. Reikia- Prieš pateikdami baltą vyną, alų, nestiprų šviesų alų ir mineralinį vandenį, atšaldykite juos. Retkarčiais patikrinti šaldiklio turinį. Reikia- Maisto produktus šaldytuve saugoti kuo trumpiau ir tvirtai laikytis nurodytų Geriausias iki ir Suvartoti iki terminų. Reikia- Gamykliniu būdu užšaldytą maistą laikykite vadovaudamiesi ant pakuočių nurodytomis instrukcijomis. Reikia- Rinktis tik kokybišką šviežią maistą ir, prieš jį užšaldant, įsitikinti, ar jis kruopščiai nuvalytas. Reikia- Užšaldymui skirtą maistą paruošti mažomis porcijomis, kad jis užšaltų greitai. Reikia- Visus maisto produktus įsukti į aliuminio foliją arba kokybiškus šaldymui skirtus polietileninius maišelius ir patikrinti, ar juose neliko oro. Reikia- Nusipirkus šaldytus maisto produktus nedelsiant juos suvynioti ir kuo greičiau d ti juos į šaldiklį. Reikia- Maistą visada atšildyti šaldytuvo skyriuje.
29 LT Negalima- Šaldytuvo skyriuje laikyti bananų. Negalima- Šaldytuvo skyriuje laikyti melionų. Juos galima trumpam atšaldyti, tačiau reikia į ką nors įvynioti, kad nesuteiktų kvapo kitiems maisto produktams. Negalima- Lentynų uždengti jokiomis apsaugin mis medžiagomis, kurios gal tų sutrukdyti oro cirkuliacijai. Negalima- Buitiniame prietaise laikyti nuodingų ar kokių nors pavojingų medžiagų. Jis skirtas tik valgomiesiems maisto produktams laikyti. Negalima- Vartoti maisto, kuris buvo laikomas šaldytuve pernelyg ilgai. Negalima- Laikyti šviežio ir pagaminto maisto tame pačiame inde. Juos reik tų supakuoti ir laikyti atskirai. Negalima- Leisti, kad atšildomas maistas arba jo sultys kristų/laš tų ant kitų maisto produktų. Negalima- Palikti ilgai atidarytų durelių, nes tada buitinis prietaisas sunaudos daugiau energijos ir jame susidarys per daug ledo. Negalima- Ledui pašalinti naudoti aštrių daiktų, pvz., peilių ar šakučių. Negalima- Į šaldytuvą d ti karšto maisto. Pirma leiskite jam atv sti. Negalima- Į šaldiklį kišti butelių su skysčiais arba sandarių skardinių su gazuotais g rimais, nes jie gali sprogti. Negalima- Užšaldant šviežius maisto produktus, viršyti didžiausio leidžiamo užšaldymo svorio. Negalima- Duoti vaikams ledų ir sušaldyto vandens tiesiai iš šaldiklio. Žemos temperatūros gali nušaldyti lūpas. Negalima- Užšaldyti gazuotų g rimų. Negalima- Laikyti šaldyto maisto, kuris atitirpo; jį reik tų suvalgyti per 24 valandas arba pagaminti ir v l užšaldyti. Negalima- Traukti produktų iš šaldiklio šlapiomis rankomis. Naudojimo instrukcija Informacija apie garsus prietaisui veikiant Šiame buitiniame prietaise retkarčiais įjungiamas kompresorius, kuris palaiko vienodą pasirinktą temperatūrą. Tod l girdimi garsai, tačiau tai visiškai normalu. Kai tik buitiniame prietaise pasiekiama darbin temperatūra, garsai savaime prityla. Dūzgimo garsą skleidžia veikiantis variklis (kompresorius). Kai variklis įsijungia, garsam trumpam gali sustipr ti. Burbuliavimo, gargaliavimo arba dūzgimo garsus kelia aušinimo sistemoje cirkuliuojanti aušinimo medžiaga. Termostatui įjungiant arba išjungiant variklį, gali būti girdimas sprags jimo garsas. Sprags jimo garsas gali būti girdimas, kai: - veikia automatin atšildymo sistema. - buitinis prietaisas v sta arba šyla (šaldymo medžiaga plečiasi). Jeigu šie garsai yra pernelyg stiprūs, to priežastys tikriausiai n ra rimtos, ir jas galima lengvai pašalinti. - Buitinis prietaisas gali būti nelygiai pastatytas pareguliuokite reguliuojamas kojeles arba pakiškite po jomis kokį nors tarpiklį. - Buitinis prietaisas į ką nors remiasi atitraukite šį buitinį prietaisą nuo virtuv s baldų arba kitų buitinių prietaisų. - Atsilaisvino stalčiai, krepšeliai arba lentynos - patikrinkite visas ištraukiamas dalis ir, jeigu reikia, v l jas tinkamai įtaisykite. - Buteliai ir (arba) d žut s liečiasi vieni prie kitų atitraukite butelius ir (arba) d žutes vienus nuo kitų. 23
.")
30 LT Gedimų šalinimas Jeigu įjungtas buitinis prietaisas neveikia, patikrinkite: Ar gerai įkišote kištuką į lizdą ir ar įjung te elektros maitinimą. (Nor dami patikrinti elektros tiekimą, įkiškite į lizdą kito buitinio prietaiso kištuką). Ar neperdeg saugiklis/ neįsijung grandin s pertraukiklis/ nebuvo išjungtas pagrindinis maitinimo paskirstymo jungiklis. Naudojimo instrukcija Ar teisingai nustatyta temperatūros valdymo ranken l. Ar pakeitus pritaikytą forminį kištuką nauju, jis buvo prijungtas teisingai. Jeigu atlikus visus viršuje min tus patikrinimus buitinis prietaisas vis tiek neveikia, susisiekite su pardavimo atstovu, pas kurį nusipirkote prietaisą. Įsitikinkite, ar atlikote visus viršuje min tus patikrinimus, nes neradus gedimo, jums teks sumok ti. Techniniai duomenys Rūšis Buitinio prietaiso tipas ŠALDYTUVAS-SALDIKLIS I tipo CS S Bendroji talpa (l) 340 Bendroji naudojama talpa (l) 292 Šaldiklio naudojama talpa (l) 95 Šaldytuvo naudojama talpa (l) 197 Šaldymo paj gumas (kg/24 val.) 5 Energijos efektyvumo klas (1) A++ Energijos sąnaudos (kwh/metus) (2) 229 Savarankiškas šaldymas dingus elektros tiekimui (h) 18 Triukšmo lygis [db(a) / 1 pw] 39 Ekologiška šaldymo medžiaga R600a (1) Energijos efektyvumo klas : A... G (A = ekonomiška... G = mažiau ekonomiška) (2) Realios energijos sąnaudos priklauso nuo naudojimo sąlygų ir vietos, kurioje yra pastatytas buitinis prietaisas. Ant prietaiso arba pakuot s esantis simbolis nurodo, kad su šiuo prietaisu negalima elgtis kaip su buitin mis šiukšl mis. Jį reikia perduoti atitinkam surinkimo punktui, kad elektros ir elektronikos prietaisas būtų perdirbtas. Tinkamai išmesdami šį gaminį, prisid site prie apsaugos nuo galimo neigiamo poveikio aplinkai ir žmonių sveikatai, kuris gali būti padarytas šį gaminį netinkamai išmetant. D l išsamesn s informacijos apie šio gaminio perdirbimą, prašom kreiptis į savo miesto valdžios instituciją, buitinių atliekų išvežimo tarnybą arba parduotuvę, kurioje pirkote šį prietaisą. 24
31 LV Lietošanas instrukcija Apsveicam jūs ar to, ka esat izvēlējis ledusskapi, kas kalpos jums ilgus gadus. Drošības norādījumi! Pirms pieslēgšanas izpakojiet iekārtu un noħemiet visus transportēšanai nepieciešamus materiālus. Atstājiet ledusskapi uz 4 stundām, lai eĝĝā kompresorā notecētu uz leju, ja iekārta bija transportēta horizontālaja stāvoklī. Ja jūs gribat izmest jūsu veco ledusskapi, tad izlauziet durvju slēdzi, lai bērni nevarētu sev aizvērt iekšā. Iekārtu jālieto tikai tam uzdevumam, kuram tā ir paredzēta. Nemetiet ledusskapi ugunī, jo tas var uzsprāgt. Mēs neiesakām izmantot šo iekārtu vēsā, neapkurināmā telpā (piemēram, pagalmā vai garāžā). Lai sasniegtu labākos rezultātus un pareizi izmantotu ledusskapi, ir nepieciešams uzmanīgi izlasīt šo lietošanas instrukciju. Lietošanas instrukcijā izklāstītu prasību un noteikumu neievērošanas dēĝ garantija var būt anulēta. Lūdzu, saglabājiet šo lietošanas instrukciju turpmākām uzziħām. Šī ierīce nav paredzēta, lai to izmantotu persona ar ierobežotām garīgām un fiziskām spējām, bez pieredzes un zināšanām, un arī ja viħš nav apmācīts. Šī ierīce jālieto tikai tā cilvēka klātbūtnē, kurš atbildīgs par personas drošību. Bērni šo ierīci drīkst lietot tikai tā cilvēka klātbūtnē, kurš par tiem ir atbildīgs, lai novērstu nelaimes gadījumus un to, lai bērni ar ierīci nespēlētos. 25
32 LV Elektriskās prasības Pirms pieslēgt iekārtu pie barošanas pārliecinieties, ka elektrtīkla parametri atbilst iekārtas prasībām. Mēs iesakām pieslegt ledusskipi pie rozetes, kura aprīkota ar drošintāju un kura atrodas viegli sasniedzamajā vietā. Uzmanību! Iekārta ir jāiezemē Visus uzstādīšanas un pieslēgšanas darbus uzticiet speciālistam. Nepareizi veikts remonts vai uzstādīšana var novest pie iekrtas bojājumiem, lietotāja traumām un garantijas anulēšanas. Uzmanību! Iekārta izmanto R600a, kura ir videi nekaitīga, bet uzliesmojošā gāze. Transportējot un uzstādot iekārtu, jābūt īpaši uzmanīgam, lai nesabojātu dzesēšanas ėēdi. Ja dzesēšanas ėēda tika sabojāta un ir konstātēta gāzes noplūde, tad turiet iekārtu pēc iespējas tālāk no karstuma avotiem un izvēdiniet telpu. Uzmanību - Neizmantojiet nekāadas mehāniskās iekārtas atkausēšanas paātrināšanai. Uzmanību - Nesabojājiet dzesēšanas ėēdi. Uzmanību - Nodalījuma pārtikas produktu glabāšanai neizmantojiet nekādas mehāniskās iekārtas, ja ražotājs to neiesaka. Transportēšana 1. Iekārtu jatransportē vertikālaja stāvoklī. Transportēšanas materiāliem nedrīkst būt sabojātiem transportēšanas laikā. 2. Ja ledusskapis tika transportēts horizontālajā stāvoklī, tad uztādiet to un atstājiet izslēgtu uz 4 stundām. 3. Ja augstāk minētas prasības netiek ievērotas, garantija tiks anulēta. 4. Iekārtu jāsargā no mitruma un siltuma. 26 Lietošanas instrukcija Svarīgi! Tīrot iekārtu, nepieskarieties metāliskiem kondensatora vadiem. Uz iekārtas nedrīks stāvēt un sēdēt. Uz barošanas vada nedrīkst novietot smagus priekšmetus. NeĜaujiet bērniem spēlēties ar iekārtu. Uzstādīšana Neuzstādiet iekārtu telpās, kur temperatūra var pazemināties līdz 10 grādiem vai zemāk. Neuzstādiet iekārtu telpās, kur temperatūra var pazemināties līdz vairāk nekā 38 gradi. Uzstādiet iekārtu tikai telpā, kuru var izvēdinat. Nenovietojiet saldētavu tuvu karstuma avotiem vai uz tiešajiem saules stariem. Ja šo prasību nav iespējams ievērot, tad atstājiet vismaz sekojošo attālumu: 3,00 cm no elektriskās plīts 3,00 cm no sildītaja 2,50 cm no dzesēšanas iekārtām Nodrošiniet labu gaisa cirkulāciju ap iekārtu. Piestipriniet ierīces aizmugurē speciālās starplikas (3. att.). Iekārta jānovieto uz līdzenas, izturīgas virsmas. Iekārtas izlīdzināšanai izmantojiet divas priekšējās kājinas, kurus var noregulēt pēc augstuma. Apraksts (1. att) 1 - Temperaturas regulatotrs un lampa 2 - Plaukti 3 - Nodalījums pudelēm 4 - Ūdens savācējs 5 - Atvilktnes 6 - AtvikltĦu vāciħi 7 - Šviežių maisto produktų skyrius 8 - Forma ledus kubiniem 9 - Nodalījums ātrai sasaldēšanai 10 - Saldētava 11 - Regulējamas kājiħas 12 - Nodalījums piena produktiem 13 - Olu paplātes 14 - Plaukts krūkām 15 - Plaukts pudelēm
33 LV Pārtikas produktu izvietošana Augšējais nodalījums ir paredzēts svaigu produktu īstermiħa glabāšanai. Apakšējais nodaslījums ir paredzēt svaigu produktu sasaldēšanai un sasaldēto produktu glabāšanai. Piena produktiem arī ir atvēlēts speciāls nodalījums. Temperatūras regulēšana Temperatūru var noregulēt, izmantojot temperatūras regulatoru. Uzstādiet to apmēram vidēja stāvoklī. Pirms ekspluatācijas Pirms sākt iekārtas ekspluatāciju, pārbaudiet sekojošo: Vai iekārta ir labi uzstādīta? Vai ir atstāta vieta gaisa cirkulācijai? Vai iekārta ir tīra? Uzstādiet termostatu pa vidu no 1 un 4. Pieslēdziet iekārtu pie barošanas. Neievietojiet produktus uzreiz. Pagaidiet, kad temperatura sasniegs vajadzigu limeni. Sasaldētu produktu glabāšana Apakšejā nodalījumā var ilgu laiku glabāt sasaldētus pārtikas produktus. Elektrības traucējumu gadījumā neatveriet saldētavas durvis, jo produktus var glabāt līdz 18 stundām bez elektroenerăijas. Sasaldēšana Nodalījums, kas paredzēts produktu sasaldēšanai, ir apzīmēts ar simbolu. Jūs varat izmantot iekārtu produktu sasaldēšanai vai saldētu produktu glabāšanai. Lūdzu, ievērojiet norādijumus uz produktu iepakojuma. Uzmanību Nesasaldējiet limonadi, jo tas var uzsprāgt. Uzmanību Vienmēr glabājiet saldētus produktus atsevišėi no svaigiem. Lietošanas instrukcija Ledus kubiħu gatavošana Uzpildiet formu ledus kubiħu gatavošanai ar ūdens uz 3/4. Tad ielieciet formu saldētavā. Pēc kāda laika ledus kubiħi būs gatavi. Iekārtas atkausēšana Iekārta tiek atkausēta automātiski. Ūdens notek speciālajā paplātē iekārtas aizmugure un iztvaiko. Parliecinieties, ka paplate ir uzstadita virs kompresora. Saldētava ir jāatkausē pašam vismaz divas reizes gadā, vai kad izveidosies 7 mm biezs ledus pārklājums. Lai izħemtu grozus no saldētavas, lūdzu, rīkojieties, kā norādīts 9. punktā. Iekšējā apgaismojuma spuldzes nomaiħa (10. att.) Ja spuldzīte ir izdegusi, tad to var viegli nomainīt. Vispirms pārliecinieties, ka ledusskapis / saldētava ir atvienots no barošanas avota un spraudkontakts ir izrauts no kontaktligzdas. PaĦemiet skrūvgriezi ar plakanu galu un ievietojiet to spraugā, kas atrodas kreisajā pusē starp lampas vāku un iekšējo korpusu. Nepielietojiet spēku. Pēc tam uzmanīgi spiediet skrūvgrieža rokturi uz kreiso pusi, līdz ievērosiet, ka vāka kreisās puses tapa ir iznākusi no savas vietas. Atkārtojiet šo pašu darbību labās puses spraugā, tikai šoreiz uzmanīgi spiediet skrūvgrieža rokturi uz labo pusi. Ja abas puses ir atbrīvotas, tad vāku var viegli noħemt. Pārliecinieties, ka spuldzīte ir cieši ieskrūvēta spuldzītes turētājā. Iespraudiet iekārtas spraudkontaktu barošanas avota kontaktligzdā. Ja spuldzīte vēl arvien nedeg, tad to nomainiet ar E14 tipa ieskrūvējamo 15 vatu (maks.) spuldzīti, ko iespējams iegādāties elektropreču veikalā. Nekavējoties rūpīgi atbrīvojieties no izdegušās spuldzes. Ja esat nomainījis spuldzīti, tad, lūdzu, uzlieciet atkal atpakaĝ vāku tā iepriekšējā stāvoklī. Pārliecinieties, ka vāks pareizi iegūlies savā vietā. 27
34 LV Tirīšana un apkalpošana Iekšejās un ārējās virsmas Uzmanību! Pirms tīrīšanas obligāti atsledziet iekārtu no barošanas. Iztīriet iekārtu ar siltu ūdeni un neitrālu tīrīšanas līdzekli. Nekad neizmantojiet abrazīvos tīrīšanas līdzekĝus vai ėīmiski aktīvas vielas. Noslaukiet iekšējās virsmas ar mīkstu un sausu lupatu. Pārliecinieties, ka elektriskie savienojumi neatrodas kontaktā ar ūdeni. Ja iekārta netiks lietota ilgu laiku, atbrīvojiet to no produktiem un atslēdziet no barošanas. Pēc tam iztīriet iekārtu un atstājiet durvis atvērtas. Vienu reizi gadā tīriet kondensatoru iekārtas aizmugurē, izmantojot putekĝu sūcēju. Atvilktnes Lai nomazgātu atvilktnes izħemiet to no saldētavas. Lietošanas instrukcija Traucējumu meklēšana 1. Iekārta nestrādā, bet tā ir pieslēgta pie barošanas. Pārliecinieties, ka iekārta ir pareizi pieslēgta pie rozetes. Pārliecinieties, ka elektrotīkls nav bojāts. Pārliecinieties, ka ir uzdota vajadzīga temperatūra. 2. Elektrības traucējumi. Turiet iekārtas durvis aizvērtas. Produktu glabāšanas laiks šādos gadījumos ir norādīts iekārtas parametru tabulā. 3. Ja problēmu neizdevās atrisināt Griezieties autorizētajā servisa centrā. Durvju pakāršana uz citu pusi Secīgi izpildiet pēdējā attēla norādījumus. 28
35 LV Lietošanas instrukcija Tehniskais apraksts Marka Modelis Iekārtas tips CS S AUKSTUMA KAMERU UN SALDĒTAVU veids I Kopējais bruto tilpums (I) 340 Kopējais izmantojamais tilpums (I) 292 Saldētavas izmantojamais tilpums (I) 95 Ledusskapja izmantojamais tilpums (I) 197 Sasaldēšanas jauda (kg/24 h) 5 Elektroenerăijas efektivitātes klase (1) A++ Enerăijas patēriħš (KWh/gadā) (2) 229 Autonoma darbība (stundas) 18 TrokšĦi (db(a) uz 1 pw) 39 Ekoloăiska dzesējošā viela R600a (1) Elektroenerăijas klase: A... G (A = ekonomiska... G = vismazāk ekonomiska) (2) Reālais elektroenerăijas patēriħš ir atkarīgs no apstākĝiem un iekārtas atrašanās vietas. Simbols uz produkta vai tā iepakojuma norāda, ka jūs nedrīkstiet no tā atbrīvoties kā no mājsaimniecības atkritumiem. Tā vietā šis produkts jānogādā attiecīgajā savākšanas punktā, kurā tiek pieħemtas elektriskās un elektroniskās iekārtas otrreizējai izejvielu pārstrādei. Pareizi atbrīvojoties no šī produkta, jūs palīdzēsit novērst tā potenciālo negatīvo ietekmi uz vidi un cilvēku veselību, kas var rasties tad, ja neatbrīvosities no šī produkta pareizā veidā. Lai saħemtu sīkāku informāciju par šī produkta otrreizējo pārstrādāšanu, lūdzu, sazinieties ar savu vietējo pilsētas biroju, savu mājsaimniecības atkritumu savākšanas dienestu vai veikalu, kurā jūs šo produktu iegādājāties. 29
36 EST Kasutusjuhend Palju õnne aruka valiku puhul, meie kvaliteetseade teenib teid kindlasti palju aastaid. Ohutus ennekõike! Ärge ühendage seadet elektrivõrku enne, kui pakendi ja transpordikaitsme kõik osad on eemaldatud. Laske seadmel enne sisselülitamist vähemalt 4 tundi seista, et süsteemi tööseisund saaks pärast horisontaalasendis transporti taastuda. Luku või riiviga varustatud seadme kasutuselt kõrvaldamisel jätke lukk/riiv ohutusse asendisse, et lapsed ei saaks seadmesse lõksu jääda. Seadet võib kasutada ainult ettenähtud otstarbeks. Ärge utiliseerige seadet põletamise teel. Seadme isolatsiooni koostisse kuuluvad kloorfluorsüsinikke mittesisaldavad ained, mis on tuleohtlikud. Lisateabe saamiseks utiliseerimismeetodite ja -võimaluste kohta pöörduge kohaliku omavalitsuse poole. Me ei soovita seadet kasutada kütmata külmas ruumis (nt garaaž, kasvuhoone, juurdeehitis, kuur, kõrvalhoone vms). Tutvuge hoolikalt kasutusjuhendiga, et oskaksite seadet optimaalselt ja probleemideta kasutada. Juhiste eiramisel võite jääda ilma tasuta garantiiteeninduse õigusest. Hoidke juhendit kindlas kohas, et see vajadusel kergesti leida. Seade ei ole mõeldud kasutamiseks füüsilise, meele- või vaimupuudega või nappide kogemuste ja teadmistega inimestele, välja arvatud juhul, kui nad kasutavad seda oma ohutuse eest vastutava isiku järelevalve all või on saanud vastavad juhised. Lastel tuleb silma peal hoida, et nad ei saaks seadmega mängida. 30
37 EST Elektriohutus Enne seadme vooluvõrku ühendamist kontrollige, kas seadme sees paiknevale andmesildile märgitud toitepinge ja sagedus vastavad vooluvõrgu näitajatele. Soovitame ühendada seadme vooluvõrku sobivas kohas paikneva kaitsmega varustatud seinakontakti kaudu. Hoiatus! Seade peab olema maandatud. Elektriseadmete remondiga võivad tegelda ainult kvalifitseeritud spetsialistid. Kvalifitseerimata isiku tehtud oskamatu remont võib põhjustada ohte, mis võivad seadme kasutajat tõsiselt kahjustada. TÄHELEPANU! Seadmes on kasutusel külmutusagens R600a, mis on keskkonnasõbralik, kuid tuleohtlik gaas. Toodet tuleb transportida ja paigaldada ettevaatlikult, et mitte kahjustada jahutussüsteemi. Kui jahutussüsteem on viga saanud ja on tekkinud gaasileke, hoidke toodet eemal lahtistest leekidest ja tuulutage veidi aega ruumi. HOIATUS: ärge kasutage sulatusprotsessi kiirendamiseks mehaanilisi vms abivahendeid peale tootja soovitatute. HOIATUS: ärge kahjustage külmutusagensikontuuri. HOIATUS: ärge kasutage toiduainete hoiukambrites elektriseadmeid, välja arvatud tootja soovitatud seadmetüübid. Transpordieeskirjad 1. Seadet võib transportida ainult püstasendis. Tarnepakend peab transpordi käigus terveks jääma. 2. Kui seadet on transporditud horisontaalasendis, ei tohi seda vähemalt 4 tundi kasutada, et süsteem saaks taastuda. Kasutusjuhend 3. Eespool toodud juhiste eiramisel võib seade saada kahjustusi, mille eest tootja ei vastuta. 4. Seade peab olema kaitstud vihma, niiskuse ja muude atmosfäärimõjude eest. NB! Seadme puhastamisel/transportimisel tuleb vältida seadme tagaküljel asuva kondensaatori metalltraatide puudutamist, sest need võivad vigastada sõrmi või käsi. Ärge istuge ega seiske seadme peal, sest see ei ole selleks ette nähtud. Võite end vigastada või seadet kahjustada. Et mitte vigastada toitejuhet, jälgige seadme teisaldamisel, et toitejuhe ei jääks seadme alla. Ärge laske lastel seadme ja selle nuppudega mängida. Paigaldusjuhised 1. Ärge hoidke seadet ruumis, kus temperatuur võib öösiti langeda alla 10 C (50 F), seda eriti talvel, sest seade on mõeldud tööks ümbritseva keskkonna temperatuuril +10 kuni +38 C (50 kuni 100 F). Madala temperatuuri juures ei pruugi seade töötada, mistõttu lüheneb toiduainete säilivusaeg. 2. Ärge asetage seadet pliidi või radiaatori lähedusse ega otsese päikesevalguse kätte, sest see koormab liigselt seadme funktsioone. Seadme paigaldamisel sügavkülmiku või küttekeha lähedusse jätke vajalik vahemaa: pliidist 30 mm radiaatorist 300 mm külmkapist 25 mm 3. Veenduge, et seadme ümber on piisavalt ruumi õhu vaba ringluse jaoks (Joonis 2). Külmkapi ja seina õige vahemaa seadmiseks paigaldage külmkapi taha õhutuskate (Joonis 3). 31
38 EST Kasutusjuhend 4. Seade tuleb paigutada ühetasasele pinnale. Kahte esijalga saab vajadusel reguleerida. Seadme loodimiseks reguleerige kahte esijalga, pöörates neid päri- või vastupäeva, kuni seade seisab põrandal kindlalt ja otse. Jalgade õige reguleerimine aitab vältida liigset vibratsiooni ja müra (Joonis 4). 5. Juhiseid seadme kasutamiseks ettevalmistamiseks leiate lõigust "Puhastamine ja hooldus". Esmane tutvus seadmega (Joonis 1) 1 - Termostaat ja valgusti 2 - Reguleeritavad riiulid 3 - Veinipudelihoidik 4 - Veekogumisanum 5 - Juurviljakastid 6 - Juurviljakasti kate 7 - Värskena hoidmise kamber 8 - Jääalus toetust & jääkarp 9 - Kiirkülmutuskamber 10 - Sügavkülmutatud toiduainete kambrid 11 - Reguleeritav jalg 12 - Piimatoodete kamber 13 - Muna plaadile 14 - Purgiriiul 15 - Pudeliriiul Toiduainete soovituslik paigutus seadmes Juhised optimaalse säilivuse ja hügieeni tagamiseks: 1. Jahutuskamber on ette nähtud värskete toiduainete ja jookide lühiajaliseks hoidmiseks. 2. Külmutuskamber vastab nõuetele ja sobib eelkülmutatud toiduainete külmutamiseks ja säilitamiseks. Alati tuleb järgida toiduainete pakendile märgitud soovitusi säilitustingimuste kohta. 3. Piimatooteid tuleb hoida ukse küljes paiknevas spetsiaalses hoidikus. 4. Valmistoitu tuleb hoida õhukindlalt suletud anumates. 5. Pakendatud töötlemata tooteid võib hoida riiulil. Värsked puu- ja köögiviljad tuleb Pudeleid võib hoida ukseriiulis. 7. Toorest liha hoidke kilekotis kõige alumisel riiulil. Vältige selle kokkupuudet valmistoiduga, et viimane ei saastuks. Ohutuse huvides ärge säilitage toorest liha üle kahe-kolme päeva. 8. Maksimaalse efektiivsuse tagamiseks ei tohi eemaldatavaid riiuleid katta paberi või muu materjaliga, mis takistab õhuringlust. 9. Ärge hoidke taimeõli ukseriiulis. Hoidke toiduaineid pakendis, kilekotis või kaanega suletud nõus. Laske kuumal toidul ja joogil enne külmkappi panekut jahtuda. Avatud plekkpurkide sisu tuleb tõsta ümber teise anumasse. 10. Gaseeritud jooke ei tohi külmutada ja külmutatud tooteid (nt mahlajäätist) ei tohi tarbida liiga külmalt. 11. Mõned puu- ja köögiviljad ei kannata hoidmist temperatuuril 0 C ringis. Seepärast tuleb ananassi, melonit, kurki, tomatit jms hoida kilekotis. 12. Kanget alkoholi tuleb hoida püstiselt tihedalt suletud anumates. Ärge hoidke külmkapis kunagi tooteid, mis sisaldavad kergsüttivaid ohtlikke gaase (nt sifoonpudelid, pulverisaatorid jne) või plahvatusohtlikke aineid. Plahvatusoht. 13. Sahtlite eemaldamisel külmutuskambrist juhinduge joonisest 9. Temperatuuri valik ja reguleerimine Töötemperatuuri seatakse termostaadinupuga (Joonis 5), mille võib seada asendisse 1 5 (kõige külmem). Keskmine temperatuur jahutuskambris peaks olema umbes +5 C (+41 F). Reguleerige termostaati vastavalt soovitud temperatuurile. Jahutuskambri mõned osad võivad olla jahedamad või soojemad (nt salatikamber ja külmiku ülaosa) nii see peabki olema. Soovitame kontrollida temperatuuri regulaarselt termomeetriga ja veenduda, et külmikus on vajalik temperatuur. Ukse sage avamine põhjustab temperatuuri tõusu külmiku sisemuses, seetõttu on soovitatav uks pärast avamist võimalikult ruttu sulgeda.
39 EST Enne seadme kasutamist Viimane kontroll Enne, kui asute seadet kasutama, kontrollige järgmist: 1. Kas seade on jalgade abil korralikult looditud? 2. Kas külmiku sisemus on kuiv ja kas õhk saab selle tagaosas vabalt liikuda? 3. Kas sisemus on puhas (vt lõiku "Puhastamine ja hooldus")? 4. Kas pistik on seinakontakti ühendatud ja elektrivarustus sisse lülitatud? Kas ukse avamisel süttib jahutuskambri tuli? Arvestage järgmist: 5. Kompressori käivitumisega kaasneb müra. Külmutussüsteemis olev vedelik ja gaasid võivad samuti müra tekitada, seda isegi juhul kui kompressor ei tööta. See on täiesti normaalne nähtus. 6. Kapipealse kergelt laineline kuju tuleneb tootmisprotsessist ja ei ole defekt. 7. Soovitame seada termostaadinupp keskmisse asendisse ja kontrollida, et seadmes oleks püsivalt etteantud säilitustemperatuur (vt lõiku "Temperatuuri valik ja reguleerimine"). 8. Ärge asetage toitu külmikusse kohe pärast selle sisselülitamist. Oodake, kuni seade saavutab õige säilitustemperatuuri. Soovitame kontrollida temperatuuri täpse termomeetriga (vt lõiku "Temperatuuri valik ja reguleerimine"). Kasutusjuhend Värskete toiduainete külmutamine Parima tulemuse saavutamiseks järgige alltoodud juhiseid. Ärge külmutage korraga liiga suurt toidukogust. Toidu kvaliteet säilib kõige paremini, kui see võimalikult kiiresti läbi külmub. Ärge ületage seadme külmutusjõudlust 24 tunni jooksul. Sooja toidu asetamisel külmutuskambrisse töötab külmutussüsteem lakkamatult, kuni toit läbi külmub. See võib ajutiselt langetada temperatuuri jahutuskambris. Värskete toiduainete külmutamisel hoidke termostaadinuppu keskmises asendis. Väikese toidukoguse (kuni 1/2 kg) külmutamiseks ei pea temperatuuri reguleerima. Jälgige, et värsked toiduained ei seguneks külmutatud toiduainetega. Jääkuubikute valmistamine Täitke jäänõu kolmveerandini veega ja asetage külmutuskambrisse. Kasutage jäätunud nõude eemaldamiseks lusika käepidet vms, aga mitte mingil juhul teravaservalisi esemeid (nt nuga või kahvlit). Külmutatud toiduainete säilitamine Sügavkülmik sobib kauplusest ostetud külmutatud toidu pikaajaliseks säilitamiseks ning seda võib kasutada ka värske toidu külmutamiseks ja säilitamiseks. Voolukatkestuse ajal ärge avage seadme ust. Kui voolukatkestus kestab vähem kui 18 tundi, ei mõjuta see külmutatud toiduainete säilivust. Kui voolukatkestus kestab kauem, tuleb toiduaineid kontrollida ja kohe ära tarvitada või kuumtöödelda ja seejärel uuesti külmutada. 33
40 EST Sulatamine A) Jahutuskamber Jahutuskambrit sulatatakse automaatselt. Sulamisvesi voolab läbi äravoolutoru kogumisanumasse, mis asub seadme tagaosas (Joonis 6). Jää sulatamise ajal võivad moodustuda veepiisad jahutuskambri tagaküljele, mille taga asub aurusti. Mõned veepiisad võivad pärast sulatamise lõppu külmuda. Ärge kasutage külmunud veepiiskade eemaldamiseks teravaid või terava servaga esemeid nagu noad või kahvlid. Kui sulamisvesi ei voola läbi kogumiskanali ära, tuleb veenduda, et äravoolutoru pole toiduosakeste tõttu ummistunud. Äravoolutoru saab puhastada torupuhasti vms vahendiga. Veenduge, et äravoolutoru ots asetseb kindlalt kogumiskünas kompressori peal, et vesi ei voolaks elektrisüsteemi või põrandale (Joonis 7). B) Külmutuskamber Sulatamine on väga lihtne ja puhas tänu spetsiaalsele sulatusvee kogumise nõule. Sulatage külmikut kaks korda aastas või kui on tekkinud umbes 7 mm jääkiht. Sulatusprotseduuri alustamiseks lülitage seade pistiku juurest välja ning eemaldage juhe seinakontaktist. Kogu toit tuleks pakkida mitmekihiliselt ajalehtedesse ja panna hoiule jahedasse kohta (nt. külmik või sahver). Külmkambrisse võib ettevaatlikult asetada soojaveenõud, et kiirendada sulamist. Ärge kasutage jää eemaldamiseks teravaid või terava servaga riistu nagu noad või kahvlid. Ärge kunagi kasutage sulatamiseks fööni, kuumapuhurit või teisi sarnaseid elektriseadmeid. Eemaldage käsnaga külmutuskambri põhja kogunenud sulatusvesi. Pärast sulatamist kuivatage seadme sisemus korralikult (Joonis 8). Ühendage pistik seinakontakti ja lülitage elektrivarustus sisse. Kasutusjuhend Sisevalgusti pirni vahetamine (Joonis 10) Läbipõlenud pirni on lihtne vahetada. Esmalt ühendage külmik/sügavkülmik vooluvõrgust lahti, eemaldades pistiku seinakontaktist. Võtke lapikkruvikeeraja ja torgake see ettevaatlikult, jõudu rakendamata pilusse lambikatte vasakpoolse serva ja siseseina vahel. Seejärel suruge kruvikeeraja käepidet ettevaatlikult vasakule, kuni märkate, et katte vasakpoolne kinnitus on lahti tulnud. Korrake sama parempoolse piluga, surudes nüüd kruvikeeraja käepidet paremale. Kui mõlemad küljed on lahti tulnud, saab katte hõlpsasti eemaldada. Veenduge, et pirn on korralikult pesasse keeratud. Ühendage seade vooluvõrku. Kui valgust ikkagi ei ole, ostke kohalikust elektritarvete kauplusest E14-keermega 15 W (maksimum) pirn ja paigaldage see. Kõrvaldage läbipõlenud pirn ettevaatlikult. Pärast pirni vahetamist kinnitage kate tagasi endisele kohale. Jälgige, et kate korralikult kohale klõpsataks. Puhastamine ja hooldus 1. Enne puhastamist soovitame lülitada seadme välja ja eemaldada pistiku seinakontaktist. 2. Ärge kasutage puhastamiseks teravaid instrumente, abrasiivseid puhastusvahendeid, seepi, puhastuskemikaali, detergenti või vaha. 3. Puhastage seadme korpust leige veega ning pärast kuivatage see. 4. Puhastage seadme sisemust lapiga, mida on niisutatud söögisooda vesilahuses (teelusikatäis soodat poole liitri vee kohta), seejärel pühkige sisepinnad kuivaks. 5. Vältige vee sattumist temperatuuriregulaatorisse. 6. Kui seadet pikema aja jooksul ei kasutata, lülitage see välja, eemaldage kogu toit, puhastage seade ja jätke uks praokile. 34
41 EST 7. Soovitame toote metallosi (nt ukse välispinda, korpuse külgi) poleerida silikoonvahaga (autopoleerimisvahendiga), mis kaitseb kvaliteetset värvkatet. 8. Puhastage seadme taga asuvat kondensaatorit kord aastas tolmuimejaga. 9. Kontrollige regulaarselt uksetihendeid, veendumaks et need on puhtad ega ole toiduosakestega määrdunud. 10. Mitte kunagi ei tohi: puhastada seadet sobimatu ainega, nt naftapõhiste toodetega; hoida seadet kõrge temperatuuri käes; küürida ja hõõruda abrasiivsete vahenditega; 11. Piimatoodete kambri katte ja ukseriiuli eemaldamine: Piimatoodete kambri katte eemaldamiseks kergitage seda paari sentimeetri võrra ja tõmmake lahti sellest küljest, milles on ava. Ukseriiuli eemaldamiseks tõstke välja selle sisu ja seejärel vabastage ukseriiul kinnitusest, lükates seda üles. 12. Hoolitsege, et seadme taga olev plastist sulaveeküna oleks alati puhas. Kui soovite küna puhastamiseks eemaldada, järgige alltoodud juhiseid: Eemaldage pistik vooluvõrgust. Vabastage küna plõksklamber näpitsate abil ettevaatlikult kompressori küljest, nii et küna saaks eemaldada. Tõstke see üles. Puhastage ja pühkige kuivaks. Paigaldage tagasi vastupidises järjekorras. 13. Sahtli eemaldamiseks tõmmake see välja nii kaugele kui võimalik, kallutage ülespoole ning tõmmake seejärel täiesti välja. Ukse avanemissuuna muutmine Järgige juhiseid numbrite järgi (Joonis 11). Käsud ja keelud Kasutusjuhend Tehke nii: puhastage seadet regulaarselt (vt "Sulatamine"). Tehke nii: hoidke toorest liha valmistoidust ja piimatoodetest allpool. Tehke nii: puhastage köögiviljad mullast ja eemaldage kasutuskõlbmatud pealmised lehed. Tehke nii: ärge eemaldage lehtsalati, kapsa, peterselli ja lillkapsa juurt. Tehke nii: mähkige juust kõigepealt pärgamentpaberisse ja pakkige seejärel võimalikult õhukindlalt kilekotti. Parema tulemuse saamiseks võtke see jahutuskambrist välja tund aega enne tarvitamist. Tehke nii: pakkige toores liha kilekotti või alumiiniumfooliumisse (mitte tihedalt). See kaitseb liha kuivamise eest. Tehke nii: hoidke liha ja rupskeid kilekotis. Tehke nii: hoidke tugeva lõhnaga või kergesti kuivavaid toiduaineid kilekotis, fooliumis või õhukindlas pakendis. Tehke nii: et leib püsiks värske, ärge hoidke seda lahtiselt. Tehke nii: jahutage valget veini, õlu ja mineraalvett enne serveerimist. Tehke nii: kontrollige regulaarselt külmutuskambri sisu. Tehke nii: säilitage toitu võimalikult lühikest aega ja järgige pakendile märgitud säilivusaega. Tehke nii: hoidke kauplusest ostetud külmutatud toiduaineid vastavalt pakendil toodud juhistele. Tehke nii: eelistage alati kvaliteetseid värskeid toiduaineid ja veenduge enne külmutamist, et need on täiesti puhtad. Tehke nii: külmutage värskeid toiduaineid väikeste portsjonitena, et need kiiresti läbi külmuksid. Tehke nii: pakkige kõik toiduained õhukindlalt fooliumisse või sügavkülmutamiseks sobivatesse kilekottidesse. Tehke nii: pakkige külmutatud toiduained kohe pärast poest toomist fooliumisse või kilekotti ja asetage need kohe sügavkülmikusse. Tehke nii: sulatage toitu alati jahutuskambris. 35
42 EST Ei tohi: hoida jahutuskambris banaane. Ei tohi: hoida jahutuskambris meloneid. Neid võib jahutada lühikest aega kilekotti pakituna, et lõhn ei kanduks teistele toiduainetele. Ei tohi: katta riiuleid kaitsematerjalidega, mis võivad takistada õhuringlust. Ei tohi: hoida seadmes mürgiseid või ohtlikke aineid. Seade on mõeldud ainult söödava kraami hoidmiseks. Ei tohi: tarbida toiduaineid, mida on hoitud külmikus liiga kaua. Ei tohi: hoida valmistoitu ja töötlemata toiduaineid ühes anumas. Neid tuleb hoida eraldi pakendis. Ei tohi: lasta toiduainetest nõrguval mahlal või sulamisveel tilkuda teistele toiduainetele. Ei tohi: jätta ust pikemaks ajaks lahti, sest sel juhul suureneb elektrikulu ja seadmes tekib rohkem jääd. Ei tohi: kasutada jää eemaldamiseks terava servaga esemeid (nt nuge-kahvleid). Ei tohi: asetada seadmesse sooja toitu. Laske sellel esmalt maha jahtuda. Ei tohi: asetada sügavkülmikusse vedelikuga täidetud pudeleid või kinniseid plekkpurke gaseeritud jookidega, sest need võivad lõhkeda. Ei tohi: asetada sügavkülmikusse rohkem värskeid toiduaineid kui lubatud. Ei tohi: anda lastele jäätist ja mahlajäätist otse sügavkülmikust. Madal temperatuur võib põhjustada huultel külmaville. Ei tohi: külmutada gaseeritud jooke. Ei tohi: säilitada ülessulanud toiduaineid; need tuleb ära tarvitada 24 tunni jooksul või kuumtöödelda ja seejärel uuesti külmutada. Ei tohi: võtta toitu sügavkülmikust märgade kätega. Kasutusjuhend Seadme töötamisel tekkiv müra ja vibratsioon 1. Kella tiksumisega sarnanev heli - Seda heli tekitab külmiku solenoidklapp. Solenoidklapp on külmutusseadme osa, mis tagab külmutusagensi liikumise ja jaotumise seadme kahes kambris vastavalt reguleeritud temperatuurile. Tegu on normaalse tööheliga, mis ei viita rikkele. 2. Töömüra suureneb, kui külmik töötab. - Et seadmes oleks pidevalt vajalik temperatuur, lülitub aeg-ajalt sisse kompressor. Seda müra tekitab kompressori võimsuse suurenemine käivitumisel. Kompressori seiskumisel on kuulda klõpsatust. - Külmiku jõudlus ja töönäitajad võivad muutuda sõltuvalt ümbritsevast temperatuurist. Tegu on normaalse nähtusega. 3. Vedeliku voolamise või pihustamise heli - See müra on tingitud seadme tööpõhimõttest ja seda tekitab külmutusagensi voolamine seadme külmutusahelas. 4. Tuulemühinale sarnanev heli - Seda tekitab seadme ventilaator (ventilaatorid). Ventilaatorid aitavad tõhustada jahutusfunktsiooni. Tegu on normaalse tööheliga, mis ei viita rikkele. 5. Muu vibratsioon või müra - Müra tugevus ja vibratsioon võib sõltuda ka seadmealuse pinna konarustest ja põrandakatte tüübist. Jälgige, et põrandal ei oleks suuremaid konarusi ja et see taluks seadme raskust (elastsus). - Müra ja vibratsiooni võivad tekitada ka seadme peale asetatud esemed. Need esemed tuleb seadme pealt eemaldada. - Samuti võib põhjuseks olla külmikus asetsevate pudelite puutumine üksteise vastu. Sellisel juhul asetage pudelid ja anumad nii, et nende vahele jääks veidi ruumi. 36
 Kas kaitse on läbi põlenud, kaitselüliti on rakendunud või pealüliti on välja lülitatud?")
43 EST Probleemide kõrvaldamine Kui seade ei tööta, kontrollige järgmist: Kas pistik on korralikult pesas ja kas pistikupesa töötab? (Voolu olemasolu pistikupesas saate kontrollida mõne teise elektriseadmega.) Kas kaitse on läbi põlenud, kaitselüliti on rakendunud või pealüliti on välja lülitatud? Kas temperatuurilüliti on õiges asendis? Kasutusjuhend Kui olete asendanud originaalpistiku pistiku uuega, kas uus pistik on õigesti ühendatud? Kui seade pärast nimetatud punktide kontrollimist ikkagi tööle ei hakka, pöörduge edasimüüja poole, kellelt seadme ostsite. Enne teeninduskeskuse poole pöördumist kontrollige eespool nimetatud punkte, kuna juhul, kui viga ei avastata, peate tasuma põhjuseta väljakutse kulud. Tehnilised andmed Mark Seadme tüüp KÜLMIK-SÜGAVKÜLMIK I tüüpi Mudel CS S Kogumaht (l) 340 Kasulik maht (l) 292 Külmutuskambri kasulik maht (l) 95 Jahutuskambri kasulik maht 197 Külmutusjõudlus (kg/24h) 5 Energiaklass (1) A++ Energiakulu (kwh aastas) (2) 229 Autonoomne töö (h) 18 Müra [db(a), 1 pw] 39 Keskkonnasäästlik külmutusagens R600a (1) Energiaklass: A... G (A = ökonoomne... G = vähem ökonoomne) (2) Tegelik energiakulu sõltub seadme kasutustingimustest ja asukohast. Sümbol tootel või pakendil näitab, et toodet ei või käidelda olmejäätmena. See tuleb toimetada vastavasse kogumispunkti, mis tegeleb elektri- ja elektroonikaseadmete ringlussevõtuga. Tagades toote nõuetekohase kasutuselt kõrvaldamise, aitate ära hoida võimalikke negatiivseid tagajärgi keskkonnale ja inimeste tervisele, mida võib põhjustada kõnealuse toote ebapiisav jäätmekäitlus. Täpsema teabe saamiseks toote ringlussevõtu kohta pöörduge kohaliku omavalitsuse, olmejäätmeid käitleva ettevõtte või toote müünud kaupluse poole. 37

44
UPRIGHT FREEZER FSA14921
 UPRIGHT FREEZER FSA14921 GB Index Safety first /1 Electrical requirements /2 Transportation instructions /2 Installation instructions /2 Temperature control and adjustment /3 Before operating /3 Freezer
REFRIGERATOR-CONGELATOR Tip I REFRIGERATOR-FREEZER Type I DBK386WDR+
 REFRIGERATOR-CONGELATOR Tip I REFRIGERATOR-FREEZER Type I DBK386WDR+ WARNING! In order to ensure a normal operation of your refrigerating appliance, which uses a completely environmentally friendly refrigerant
Refrigerator-Freezer Type I Kühl-Gefrier-Typ I Réfrigérateur-Congélateur Type I Frigo-Congelatore di Tipo I Külmik-Sügavkülmik I Tüüpi CSA21032
 Refrigerator-Freezer Type I Kühl-Gefrier-Typ I Réfrigérateur-Congélateur Type I Frigo-Congelatore di Tipo I Külmik-Sügavkülmik I Tüüpi CSA21032 WARNING! In order to ensure a normal operation of your refrigerating
CS X GB D LT LV. Instruction for use. Gebrauchsanweisung. Naudojimo instrukcija. Lietošanas instrukcija
 CS 232030 X GB D LT LV Instruction for use Gebrauchsanweisung Naudojimo instrukcija Lietošanas instrukcija WARNING! In order to ensure a normal operation of your refrigerating appliance, which uses a completely
Lec TF60183A. User Manual
 Lec TF60183A User Manual LEC Customer Care please keep this handbook in a safe place. Please fill in the model number and serial number in the spaces provided below as they will assist us should you need
BE815 Combi Fridge Freezer
 BE815 Combi Fridge Freezer INSTALLATION AND USER INSTRUCTIONS You must read these instructions prior to using the appliance and retain them for future reference. Contents Introduction & safety warnings...2
FROST FREE FRIDGE FREEZER INSTRUCTION MANUAL. Model No.: PRT260FFSL/ PRT260FFW
 FROST FREE FRIDGE FREEZER INSTRUCTION MANUAL Model No.: PRT260FFSL/ PRT260FFW This booklet contains the information you will require to install and operate your new appliance. It is important and worthwhile
CS GB D IT FR NL LT LV EST. Instruction for use. Gebrauchsanweisung. Istruzioni per l'uso. Notice d utilisation. Gebruiksaanwijzing
 CS 234030 GB D IT FR NL LT LV EST Instruction for use Gebrauchsanweisung Istruzioni per l'uso Notice d utilisation Gebruiksaanwijzing Naudojimo instrukcija Lietošanas instrukcija Kasutusjuhend WARNING!
Built Under Integrated Larder Refrigerator
 Built Under Integrated Larder Refrigerator HJA63 User & Installation Guide Congratulations on your choice of a LAMONA quality Appliance which has been designed to give you service for many years. WARNING!
LEC L6014W/S User Manual
 LEC L6014W/S User Manual Safety Information Important Please read these instructions fully before installation Before use The installation of this appliance is best carried out by 2 people. Dispose of
Frost Free Fridge Freezer USER'S MANUAL
 Frost Free Fridge Freezer USER'S MANUAL PLC185FFSL PLEASE READ THE USER S OPERATION MANUAL CAREFULLY BEFORE USING STRUCTURE ILLUSTRATION The sample cutline is representation of this series of refrigerator,
FRIDGE-FREEZER USER S MANUAL TFP120A
 FRIDGE-FREEZER USER S MANUAL TFP120A PLEASE READ THIS USER S OPERATION MANUAL CAREFULLY BEFORE USING NAMES OF PARTS Freezer compartment Freezer door Thermostat and lamp assembly Door racks Glass shelves
Fully Integrated Larder INSTALLATION AND USER INSTRUCTIONS
 ILF800 Fully Integrated Larder INSTALLATION AND USER INSTRUCTIONS You must read these instructions prior to using the appliance and retain them for future reference. Contents Introduction & safety warnings...2
FLU 150AP. Fully Integrated Larder
 FLU 150AP Fully Integrated Larder Leisure Consumer Products 36-38 Caxton Way Watford Hertfordshire WD18 8UF Tel: 0845 6004916 Fax: 0845 6004925 www.leisurecp.co.uk Printed in Turkey Part no: 57 1556 0000
Fridge - Freezer CCSM1552W
 Fridge - Freezer CCSM1552W Congratulations on your choice of a you service for many years. quality Appliance which has been designed to give WARNING! IMPORTANT! DO NOT connect your appliance to the electricity
to give you service for many years. CHEST FREEZER CFA1300W PERFORMANCE
 Congratulations on your choice of a to give you service for many years. quality Appliance which has been designed WARNING! This appliance is not intended for use by person with reduced physical, sensory
Contents. Please keep this handbook for future reference,or for anyone else whomay use the appliance.
 INSTALLION AND USER INSTRUCTIONS Contents Introduction&safety warning... 3 Electrical requirements...4 Transportation instruction... 6 Installation instruction... 6 Getting to know your combi fridge/freezer...
FRIDGE FREEZER USER MANUAL
 FRIDGE FREEZER USER MANUAL HD-220RWN HD-220RWNS Issue 2-03/05/10 Safety Warning For your own safety, please read all instructions before use and keep for future reference. General safety This manual contains
Tall Larder Fridge TL 6051W SOM 9650
 Tall Larder Fridge Tall Larder Fridge TL 6051W SOM 9650 Please read this manual first! Dear Customer, We hope that your product, which has been produced in modern plants and checked under the most meticulous
4.6 cu.ft. Fully Integrated Larder
 4.6 cu.ft. Fully Integrated Larder BL20 BL21 BEKO plc Beko House 1 Greenhill Crescent Watford Hertfordshire WD18 8QU Tel: 0845 6004911 Fax: 0845 6004922 e-mail: service@beko.co.uk website: www.beko.co.uk
give you service for many years. Frost Free Combi Fridge / Freezer CDA660F
 Congratulations on your choice of a give you service for many years. quality Appliance which has been designed to WARNING! This appliance is not intended for use by person with reduced physical, sensory
48cm UNDER COUNTER LARDER FRIDGE INSTRUCTION MANUAL. MODEL No.: PL120WD
 48cm UNDER COUNTER LARDER FRIDGE INSTRUCTION MANUAL MODEL No.: PL120WD Please read this instruction manual carefully before operation Keep these instructions in a safe place for future reference CONTENTS
70/30 Integrated Fridge-Freezer
 70/30 Integrated Fridge-Freezer User & Installation Guide LAM6800 Please read this manual first! Dear Customer, Congratulations on your choice of a LAMONA quality Appliance which has been designed to give
BEKO plc Beko House Caxton Way Watford Hertfordshire WD18 8UF Tel: Fax: website:
 8.4 cu.ft. Frost Free Combi Fridge / Freezer BC73 F BEKO plc Beko House Caxton Way Watford Hertfordshire WD18 8UF Tel: 0845 6004911 Fax: 0845 6004922 e-mail: service@beko.co.uk website: www.beko.co.uk
48cm UNDER COUNTER FRIDGE INSTRUCTION MANUAL. MODEL No.: PF120WD
 48cm UNDER COUNTER FRIDGE INSTRUCTION MANUAL MODEL No.: PF120WD Please read this instruction manual carefully before operation Keep these instructions in a safe place for future reference CONTENTS Part
CBI 7700 HCA CBI 7701 HCA
 CBI 7700 HCA CBI 7701 HCA Please read this manual first! Dear Customer, We hope that your product, which has been produced in modern plants and checked under the most meticulous quality control procedures,
TLDA cu.ft. Tall Larder Fridge. Operating Instructions
 BEKO plc Beko House Caxton Way Watford Hertfordshire WD8 8UF Tel: 093 660 Fax: 093 8963 e-mail: service@beko.co.uk website: www.beko.co.uk Printed in Turkey Part no: 8 70 00 00 Revision no: 0 R E F R I
BE815. Combi Fridge Freezer INSTALLATION AND USER INSTRUCTIONS
 BE815 Combi Fridge Freezer INSTALLATION AND USER INSTRUCTIONS You must read these instructions prior to using the appliance and retain them for future reference. Cor. er.s Introduction & safety warnings...
Argos Value Tabletop Fridge
 Argos Value Tabletop Fridge Installation & User Instructions Please keep for future reference 481/0423 Important Please read these instructions fully before installing or using These instructions contain
For Models FF2310APS, FF2310APW, FF2310APB 55cm FREESTANDING FRIDGE FREEZER. Instruction Manual
 For Models FF2310APS, FF2310APW, FF2310APB 55cm FREESTANDING FRIDGE FREEZER Instruction Manual Please read these instructions carefully before use and retain for future reference. Before switching on your
Refrigerator Kühlschrank De Koelkast Le Réfrigérateur Saldytuvas - Saldiklis BU 1200 HCA BU 1201
 Refrigerator Kühlschrank De Koelkast Le Réfrigérateur Saldytuvas - Saldiklis BU 1200 HCA BU 1201 Please read this manual first! Dear Customer, We hope that your product, which has been produced in modern
11 cu.ft. Tall Larder Fridge TLDA 567
 cu.ft. Tall Larder Fridge TLDA 567 BEKO plc Beko House Caxton Way Watford Hertfordshire WD8 8UF Tel: 0845 6004 Fax: 0845 6004 e-mail: service@beko.co.uk website: www.beko.co.uk Printed in Turkey Part no:
IFF5050. Integrated Fridge Freezer INSTALLATION AND USER INSTRUCTIONS
 IFF5050 Integrated Fridge Freezer INSTALLATION AND USER INSTRUCTIONS You must read these instructions prior to using the appliance and retain them for future reference. Contents Introduction & safety warnings...2
50/50 Frost Free Integrated Fridge/Freezer
 50/50 Frost Free Integrated Fridge/Freezer User & Installation Guide HJA6856 Congratulations on your choice of a LAMONA quality Appliance which has been designed to give you service for many years. WARNING!
FZU 190AP. Fully Integrated Freezer
 FZU 190AP Fully Integrated Freezer Leisure Consumer Products 36-38 Caxton Way Watford Hertfordshire WD18 8UF Tel: 0845 6004916 Fax: 0845 6004925 www.leisurecp.co.uk Printed in Turkey Part no: 57 1574 0000
KF Fridge / Freezer User Guide
 KF3135-90 Fridge / Freezer User Guide Please read this manual first! Dear Customer, Your product has been produced in modern plants and checked under the most meticulous quality control and we hope that
Frost Free Combi Fridge Freezer. KNM4551i. Operating instructions
 Frost Free Combi Fridge Freezer KNM4551i Operating instructions Please read this manual first! Dear Customer, We hope that your product, which has been produced in a 1st-class manufacturing facility and
Argos Value Fridge Freezer
 Argos Value Fridge Freezer Installation & User Instructions Please keep for future reference 486/9285 486/9405 Important Please read these instructions fully before installing or using These instructions
CDA543F. Printed in Turkey. Part no: Revision no: 0
 CDA543F BEKO plc Beko House Caxton Way Watford Hertfordshire WD18 8UF Tel: 01923 654650 Fax: 01923 819653 e-mail: service@beko.co.uk website: www.beko.co.uk Printed in Turkey Part no: 48 2711 00 00 Revision
Tall Larder Fridge SOM 9650 SOM 9651 P. Operating instructions
 Tall Larder Fridge SOM 9650 SOM 9651 P Operating instructions Please read this manual first! Dear Customer, We hope that your product, which has been produced in a 1st-class manufacturing facility and
User manual. Fridge Freezer ZRT18100WA
 EN User manual Fridge Freezer ZRT18100WA Contents Safety instructions 2 Before first use 4 Daily use _ 4 Hints and tips _ 5 Safety instructions Before the installation and use of the appliance, carefully
TSM 1551 TSM 1551 A+ TSM 1551 A++
 Kühlschrank Refrigerator Réfrigérateur Køleskab TSM 1551 TSM 1551 A+ TSM 1551 A++ Bedienungsanleitung Operating instructions Please read this manual first! Dear Customer, We hope that your product, which
1. SAFETY WARNINGS INSTALLTION Location Reversing the Door Swing Levelling the Unit... 3
 Contents 1. SAFETY WARNINGS... 1 2. INSTALLTION... 2 2.1 Location... 2 2.2 Reversing the Door Swing... 2 2.3 Levelling the Unit... 3 2.4 Cleaning Before Use... 3 2.5 Before Using Your Unit... CE BC108
HOW TO OPERATE THE FREEZER COMPARTMENT PAGE 17 HOW TO DEFROST THE FREEZER COMPARTMENT PAGE 19
 33056-GB.fm5 Page 13 Saturday, January 16, 1999 8:47 AM TABLE OF CONTENTS GB BEFORE USING THE APPLIANCE PAGE 14 SAFEGUARDING THE ENVIRONMENT PAGE 14 PRECAUTIONS AND GENERAL HINTS PAGE 15 HOW TO OPERATE
Refrigerator Kühlschrank Réfrigérateur Koelkast Hladilnik
 Refrigerator Kühlschrank Réfrigérateur Koelkast Hladilnik Instruction of use Gebrauchsanweisung Notice d'utilisation Gebruiksaanwijzing Navodila za uporabo BLSA210M2S EN DE FR NL SL Please read this user
HOW TO OPERATE THE FREEZER COMPARTMENT PAGE 15 HOW TO DEFROST THE FREEZER COMPARTMENT PAGE 17
 GB CONTENTS BEFORE USING THE REFRIGERATOR PAGE 13 SAFEGUARDING THE ENVIRONMENT PAGE 13 PRECAUTIONS AND GENERAL RECOMMENDATIONS PAGE 14 HOW TO OPERATE THE REFRIGERATOR COMPARTMENT PAGE 15 HOW TO OPERATE
USING THE REFRIGERATOR COMPARTMENT
 USING THE REFRIGERATOR COMPARTMENT Switching the appliance on Starting the appliance Insert the plug. The light, located under the control panel or inside the product (depending on model) comes on when
Tall Larder Fridge TL 546 APW TL 546 APS SOM 9650
 Tall Larder Fridge TL 546 APW TL 546 APS SOM 9650 Please read this manual first! Dear Customer, We hope that your product, which has been produced in modern factories and checked under the most meticulous
SAFETY FIRST / ELECTRICAL REQUIREMENTS TRANSPORTATION INSTRUCTIONS INSTALLATION INSTRUCTIONS 4-5 GETTING TO KNOW YOUR BEKO FRIDGE / FREEZER
 11.3 cu.ft. Frost Free Combi Fridge / Freezer CDA 659 F BEKO plc Beko House Caxton Way Watford Hertfordshire WD18 8UF Tel: 01923 654650 Fax: 01923 819653 e-mail: service@beko.co.uk website: www.beko.co.uk
Tall Larder Fridge TLDC 671 W TLDC 671 S
 Tall Larder Fridge TLDC 671 W TLDC 671 S Please read this manual first! Dear Customer, We hope that your product, which has been produced in a 1st-class manufacturing facility and checked under the most
HOW TO USE THE FREEZER COMPARTMENT PAGE 16
 33051-gb.fm5 Page 12 Tuesday, December 22, 1998 3:52 PM GB CONTENTS BEFORE USING THE APPLIANCE PAGE 13 SAFEGUARDING THE ENVIRONMENT PAGE 13 PRECAUTIONS AND GENERAL RECOMMENDATIONS PAGE 14 HOW TO USE THE
Chest Freezer Horizontale Gefrieranlage HSA47530
 Chest Freezer Horizontale Gefrieranlage HSA47530 WARNING! In order to ensure a normal operation of your refrigerating appliance, which uses a completely environmentally friendly refrigerant the R600a
ENGLISH 4 DEUTSCH 28
 GB KÖLDGRADER DE ENGLISH Please refer to the last page of this manual for the full list of IKEA appointed After Sales Service Provider and relative national phone numbers. DEUTSCH Auf der letzten Seite
TZDA cu.ft. Upright Freezer
 7. cu.ft. Upright Freezer TZDA 503 BEKO plc Beko House Caxton Way Watford Hertfordshire WD18 8UF Tel: 085 600911 Fax: 085 600922 e-mail: service@beko.co.uk website: www.beko.co.uk Printed in Turkey Part
Proline. Instructions for use. Model PFZ115WA
 Proline Instructions for use Model PFZ115WA PROline **** Upright Freezer PFZ 115 WA INSTRUCTIONS Thank you for buying this upright freezer. To ensure that you get the best results from your new freezer,
LAGAN GB DE FR IT FCF186/44
 LAGAN GB DE FR IT FCF186/44 ENGLISH 4 DEUTSCH 17 FRANÇAIS 32 ITALIANO 48 ENGLISH 4 Contents Safety information 4 Operation 6 First use 7 Daily use 7 Helpful hints and tips 8 Care and cleaning 9 Subject
NW801LA Integrated Larder Built In
 Installation and User Instructions NW801LA Integrated Larder Built In Retention of the Instruction Book This Instruction Book must be kept handy for reference as it contains important details on the safe
Cooler / Freezer Kühlschrank / Gefrierschrank Congélateur / Réfrigérateur BLSA210M3S
 Cooler / Freezer Kühlschrank / Gefrierschrank Congélateur / Réfrigérateur BLSA210M3S Please read this user manual first! Dear Customer, We hope that your product, which has been produced in modern plants
Contents. For your safety About your product Installing your appliance Using your appliance Care & cleaning...
 USER GUIDE TF5517S Contents For your safety..................................................... 1 About your product.................................................. 3 Installing your appliance...............................................
7.0 cu.ft. Frost Free Tall Freezer TZDA 504 F
 7.0 cu.ft. Frost Free Tall Freezer TZDA 504 F BEKO plc Beko House Caxton Way Watford Hertfordshire WD18 8UF Tel: 0845 6004911 Fax: 0845 6004922 e-mail: service@beko.co.uk website: www.beko.co.uk Printed
RCNA406K30XB. Refrigerator - Freezer Kühlschrank - Gefrierschrank Refrigerador - Congelador Frigorífico - Congelador
 Refrigerator - Freezer Kühlschrank - Gefrierschrank Refrigerador - Congelador Frigorífico - Congelador Instruction of use Gebrauchsanweisung Instrucciones para el uso Instruções de utilização RCNA406K30XB
CHEST FREEZER HS225523
 CHEST FREEZER HS225523 WARNING! In order to ensure a normal operation of your refrigerating appliance, which uses a completely environmentally friendly refrigerant the R600a (flammable only under certain
HR6BMFF320 HR6BMFF320S
 HR6BMFF320 HR6BMFF320S 2 3 5 7 8 10 10 12 14 16 Brief introduction Thank you for your choosing our products. We are sure you will find your new appliance a pleasure to use. Before you use the appliance,
PRODUCT DESCRIPTION CONTROLS
 PRODUCT DESCRIPTION A. Refrigerator Compartment 1. Crisper drawer 2. Shelves / Shelf area 3. Thermostat control knob/light 4. Door trays 5. Bottle rack 6. Removable bottle restraint 7. Rating plate (at
Frost Free Combi Fridge / Freezer CF6914 W
 Frost Free Combi Fridge / Freezer CF6914 W Please read this manual first! Dear Customer, We hope that your product, which has been produced in modern plants and checked under the most meticulous quality
Chest Freezer HSA46330
 Chest Freezer HSA46330 WARNING! In order to ensure a normal operation of your refrigerating appliance, which uses a completely environmentally friendly refrigerant the R600a (flammable only under certain
BEFORE USING THE REFRIGERATOR PAG. 9 PROTECTING THE ENVIRONMENT PAG. 9 PRECAUTIONS AND GENERAL SUGGESTIONS PAG. 9
 GB CONTENTS BEFORE USING THE REFRIGERATOR PAG. 9 PROTECTING THE ENVIRONMENT PAG. 9 PRECAUTIONS AND GENERAL SUGGESTIONS PAG. 9 HOW TO USE THE REFRIGERATOR COMPARTMENT PAG. 10 HOW TO USE THE LOW TEMPERATURE
Please read this user manual first! The user manual will help you use the product in a fast and safe way.
 Hladnjak Please read this user manual first! Dear Customer, We hope that your product, which has been produced in modern plants and checked under the most meticulous quality control procedures, will provide
Buılt Under Integrated Refrigerator BR 11
 Buılt Under Integrated Refrigerator BR 11 Please read this manual first! Dear Customer, We hope that your product, which has been produced in modern plants and checked under the most meticulous quality
Food Protector Technology KGM 9681 KGM 9681 X. Operating instructions
 Food Protector Technology KGM 9681 KGM 9681 X Operating instructions Please read this manual first! Dear Customer, We hope that your product, which has been produced in a 1st-class manufacturing facility
70:30 Integrated Fridge Freezer - Frost Free LAM6350
 70:30 Integrated Fridge Freezer - Frost Free LAM6350 User Instructions www.howdens.com/appliance-registration Register your Lamona appliance purchased from Howdens Joinery to allow us to easily contact
Refrigerator. User manual. Réfrigérateur. Kühlschrank/Gefrierschrank. Chłodziarka EN DE FR PL. Bedienungsanleitung. Manuel d'utilisation
 Refrigerator User manual Kühlschrank/Gefrierschrank Bedienungsanleitung Réfrigérateur Manuel d'utilisation Chłodziarka Instrukcja użytkowania BCN 130000 BCN 130001 EN DE FR PL Please read this user manual
8.5 cu.ft. Frost Free Tall Upright Freezer TZDA 629 F. Printed in Turkey. Part no: Revision no: 1
 8. cu.ft. Frost Free Tall Upright Freezer TZDA 629 F Printed in Turkey Part no: 48 2800 00 01 Revision no: 1 Congratulations on your choice of a service for many years. quality Appliance which has been
Tall Larder Fridge TFFC671 W TFFC671 S SOM 9650
 Tall Larder Fridge TFFC671 W TFFC671 S SOM 9650 Please read this manual first! Dear Customer, We hope that your product, which has been produced in a 1st-class manufacturing facility and checked under
CFP1691W CFP1691B EN www ww.be w k.be o. k c o. om.tr c
 CFP1691W CFP1691B Please read this manual first! Dear Customer, We hope that your product, which has been produced in a 1st-class manufacturing facility and checked under the most meticulous quality control
REFRIGERATOR USER S MANUAL MODEL: HS-306LN
 REFRIGERATOR USER S MANUAL MODEL: HS-306LN Contents 1. SAFETY WARNINGS... 1 2. INSTALLTION... 2 2.1 Location... 2 2.2 Reversing the Door Swing... 2 2.3 Door Space Requirements... 6 2.4 Levelling the Unit...
ST NF60188W ST NF60188STA
 ST NF60188W ST NF60188STA Contents Safety Warnings... 4 Unpacking... 6 Installation... 7 Location... 7 Levelling the Unit... 7 Free Space Requirements... 7 Reversing the Door Swing... 8 Cleaning Before
Bauknecht AG, Industriestrasse 36, 5600 Lenzburg,
 Instructions for use UVI 1340/A Bauknecht AG, Industriestrasse 36, 5600 Lenzburg, www.bauknecht.ch Verkauf Telefon 0848 801 002 Fax 0848 801 017 verkauf@bauknecht.ch Kundendienst Telefon 0848 801 001 Fax
Tall Larder Fridge TFF673APS SOM 9650
 Tall Larder Fridge TFF673APS SOM 9650 Please read this manual first! Dear Customer, We hope that your product, which has been produced in modern plants and checked under the most meticulous quality control
R E F R I G E R A T I O N
 R E F R I G E R A T I O N FCF7030 Frost Free Combi Fridge / Freezer Operating Instructions Contents Introduction & safety warnings...2 Electrical requirements...3 Transportation instructions...4 Installation
Freezer. User manual FFP 1671 B FFP 1671 W EWWERQWEW
 Freezer User manual FFP 1671 B FFP 1671 W EWWERQWEW Please read this manual first! Dear Customer, We hope that your product, which has been produced in a 1st-class manufacturing facility and checked under
CHEST FREEZER USER GUIDE LEC CF61LW
 CHEST FREEZER USER GUIDE LEC CF61LW Thank you for buying this high quality appliance This handbook is designed to help you through each step of owning your new appliance, from installation to use. Please
Frost Free Combi Fridge Freezer CFD 7914
 Frost Free Combi Fridge Freezer CFD 7914 Please read this manual first! Dear Customer, We hope that your product, which has been produced in modern plants and checked under the most meticulous quality
AB910 AS920. Side by Side Frost Free Fridge / Freezer cu.ft cu.ft.
 Side by Side Frost Free Fridge / Freezer AB910 AS920 20.6 cu.ft. 20. cu.ft. BEKO plc Beko House Caxton Way Watford Hertfordshire WD18 8UF Tel: 01923 65650 Fax: 01923 819653 e-mail: service@beko.co.uk website:
HR6BF170R HR6BF170B HR6BF170G
 HR6BF170R HR6BF170B HR6BF170G 9 Hisense Refrigerator Do not place food products directly against the air outlet on the rear wall. Store pre-packed frozen food in accordance with the frozen food manufacture
Contents Safety Warnings... 3 Unpacking... 5 Installation... 6 Product Overview Operation Cleaning Maintenance...
 L5017W/S/B Contents Safety Warnings... 3 Unpacking... 5 Installation... 6 Location...6 Levelling the Unit...6 Free Space Requirements...6 Reversing the Door Swing...7 Cleaning Before Use... 10 Before Using
Tesco Stores Ltd Delamare Road, Cheshunt Herts EN8 9SL Tesco Helpline
 Produced after 13th August 2005 Waste electrical products should not be disposed of with household waste. Please recycle where facilities exist. Check with your Local Authority or retailer for recycling
55CM Wide Freestanding Under Counter Freezer Instruction Manual
 55CM Wide Freestanding Under Counter Freezer Instruction Manual Model Number: RHUCFZ1 Please read these instructions carefully and keep them for future reference For Customer Services, Spare Parts & Manufacturer
Refrigerator TCZF5157W
 Refrigerator TCZF5157W Please read this manual first! Dear Customer, We hope that your product, which has been produced in a 1st-class manufacturing facility and checked under the most meticulous quality
FR-031DDRVBE1 FR-031DDRVWE
 FR-031DDRVBE1 FR-031DDRVWE Contents 1. SAFETY WARNINGS... 1 2. INSTALLTION... 2 2.1 Location... 2 2.2 Reversing the Door Swing... 2 2.3 Door Space Requirements... 3 2.4 Levelling the Unit... 4 2.5 Cleaning
Tall Larder Fridge TFF673APB SOM 9650
 Tall Larder Fridge TFF673APB SOM 9650 Please read this manual first! Dear Customer, We hope that your product, which has been produced in modern plants and checked under the most meticulous quality control
Built-under fridge with ice box instruction manual RBR6. Contact Caple on or for spare parts
 Built-under fridge with ice box instruction manual RBR6 Contact Caple on 0117 938 7420 or for spare parts www.caple.co.uk CONTENTS Warnings 3 Installation warnings 7 Before using your fridge 10 How to
Fridge-freezer KG..N..
 Fridge-freezer KG..N.. en User manual Information concerning disposal Disposal of packaging The packaging protects your appliance from damage during transit. All packaging materials are environmentally
!Please read this manual first Symbols and their descriptions Recycling
 UF483APW !Please read this manual first,dear Customer We hope that your product, which has been produced in modern plants and checked under the most meticulous quality control procedures, will provide
ENGLISH 4 DEUTSCH 29
 GB FROSTKALL DE ENGLISH 4 DEUTSCH 29 ENGLISH 4 Contents Safety information 4 Safety instructions 5 Installation 7 Product description 9 Operation 10 Daily Use 14 Hints and tips 18 Care and cleaning 19
Tall Larder Fridge TF546APW TF546APS SOM 9650
 Tall Larder Fridge TF546APW TF546APS SOM 9650 Please read this manual first! Dear Customer, We hope that your product, which has been produced in a 1st-class manufacturing facility and checked under the
Tall Freezer TFF685APW SOM 9650
 Tall Larder Fridge Tall Freezer TFF685APW SOM 9650 Please read this manual first! Dear Customer, We hope that your product, which has been produced in modern factories and checked under the most meticulous
Full Height Larder Integrated Refrigerator
 Full Height Larder Integrated Refrigerator LAM6700 User & Installation Guide Please read this manual first! Dear Customer, We hope that your product, which has been produced in modern plants and checked
Tall Larder Fridge. Tall Freezer FXF 6118W FXF 6118S SOM 9650
 Tall Larder Fridge Tall Freezer FXF 6118W FXF 6118S SOM 9650 Please read this manual first! Dear Customer, We hope that your product, which has been produced in a 1st-class manufacturing facility and checked
Refrigerator FNT Operating instructions
 Refrigerator FNT 9550 Operating instructions Please read this manual first! Dear Customer, We hope that your product, which has been produced in a 1st-class manufacturing facility and checked under the