Front-Loading Automatic Washer Owner s Guide & Installation Instructions
|
|
|
- Albert Lloyd
- 5 years ago
- Views:
Transcription

1 To prevent accidents and machine damage, read these instructions before installation or use. Use the washer only as instructed in this owner s guide and installation instructions included with your washer. Keep this guide for future reference Front-Loading Automatic Washer Owner s Guide & Installation Instructions As an ENERGY STAR partner, BLOMBERG has determined that this product meets the ENERGY STAR guidelines for energy efficiency. WM72200W
2 Please read this guide first! Dear Customer, We hope that your product which has been manufactured in modern facilities and passed through a strict quality control procedure will give you the best results. Therefore, we advise you to read through this document carefully before using your product and keep it for future reference. This guide will help you use your washer in a fast and safe way. Please read the guide before installing and starting your washer. Particularly follow the instructions related to safety. Keep this guide within easy reach. You may need it in the future. Please read all additional documents supplied with this washer. Please note that this owner s guide & installation instructions may be applicable for several other models. Differences between models will be identified in the guide. 2 / English Front-Loading Automatic Washer
3 Explanation of symbols Throughout this guide the following symbols are used: C CAUTION Important information or useful hints about usage. A WARNING Warning for hazardous situations with regard to life and property. B WARNING Warning for electrical shock If you have questions, call: Call Center (toll free number) (USA) or send to: info@blomberginternational.com For the list of dealers/retailers, distributors and authorized service agents, visit: Please fill in the information below for future reference. Model no.: Serial no.: Purchase date: Owner s Guide & Installation Instructions 3 / English
4 TABLE OF CONTENTS 1 Your Washer 6 Overview...6 Specifications Important Safety Instructions 8 3 Installation Instructions 13 The Right Location of Installation...13 Installation Clearances...14 Allowable Clearances for Undercounter Installation Allowable Clearances for Closet Installation...16 Stacked Installation...16 Removing packaging reinforcement...16 Removing shipping bolts...17 Leveling the washer...18 Electrical Connection...18 Power supply and circuit...20 Water Supply Connection Drainage Installation Checklist...24 Transportation...24 Disposal Information Appliance Disposal Operating Instructions 26 First Use Laundry Tips...27 Preparing the laundry...28 Loading the washer...29 Detergent Use...30 Detergent Quantity...31 Detergent Dispenser (II) Main Wash Detergent Compartment Liquid Fabric Softener Compartment...34 Using liquid detergents...34 (I) Liquid Chlorine Bleach Compartment Water Consumption / English Front-Loading Automatic Washer
5 TABLE OF CONTENTS 5 Selecting a Program and Operating Your Washer 36 Control panel...36 Programs...37 Program selection...40 Program and consumption table Temperature selection...44 Spin speed selection...45 Rinse Hold...45 Auxiliary function selection...46 End Time...48 Changing the selections after program has started...49 Child Lock Preparation 51 Starting the program...51 Door locking system Adding or taking out laundry Cancelling the program...52 Re-spinning the laundry...53 End of program...53 Energy saving mode User maintenance instructions 55 Cleaning detergent dispenser...55 Cleaning the door seal Cleaning the drum...56 Cleaning the outer cabinet and control panel...57 Cleaning the water inlet strainers...57 Cleaning the drain pump filter...58 Descaling the washer Troubleshooting 61 9 WARRANTY STATEMENT FOR THE BLOMBERG CLOTHES WASHERS HOW TO GET SERVICE 75 Owner s Guide & Installation Instructions 5 / English
6 1 Your Washer Overview Power cable 2- Top panel 3- Control panel 4- Drain hose 5- Loading door 6- Filter cap 7- Adjustable feet 8- Detergent drawer 6 / English Front-Loading Automatic Washer
7 Your Washer Specifications Models Front Loading Automatic Washer WM72200W Height (in) / (cm) 33.1 / 84 Width (in) / (cm) 23.6 / 60 Depth (in) / (cm) / 54 Net Weight (lbs) / (kg) / 71 Electricity (V/Hz.) / 60 Total Current (A) 10 Total Power (W) Water pressure (psi) / (bar) (15-145) / (1-10) Drain height (ft.) / (m.) 4.9 / 1.5 Wash capacity (cu. Ft.) 1.95 Dry Load Capacity (lbs)/(kg) / 8 Specifications of this appliance may change without notice to improve the quality of the product. Figures in this guide are schematic and may not match your product exactly. Values stated on the washer labels or in the documentation accompanying it are obtained in laboratory in accordance with the relevant standards. Depending on operational and environmental conditions of the appliance, these values may vary. Owner s Guide & Installation Instructions 7 / English
8 2 Important Safety Instructions B WARNING To reduce the risk of fire, electric shock or injury to persons while using your appliance follow basic safety precautions, including the following: Read all instructions before using the washer. Do not wash articles that have been previously cleaned in, washed in, soaked in, or spotted with gasoline, dry-cleaning solvents, or other flammable or explosive substances (acetone, alcohol, kerosene, some liquid household cleaners, some spot removers, turpentine, waxes and wax removers) as they give off vapors that could ignite or explode. Do not add gasoline, dry-cleaning solvents, or other flammable or explosive substances to the wash water. These substances give off vapors that could ignite or explode. Under certain conditions, hydrogen gas may be produced in a hot-water system that has not been used for 2 weeks or more. HYDROGEN GAS IS EXPLOSIVE. If the hot-water system has not been used for such a period, before using a washing machine, turn on all hot-water faucets and let the water flow from each for several minutes. This will release any accumulated hydrogen gas. As the gas is flammable, do not smoke or use an open flame this time. Do not allow children to play on or in the appliance. Close supervision of children is necessary when the appliance is used near children. Before the appliance is removed from service or discarded, remove the door and the power cord / main plug to prevent accidents. Do not reach into the appliance if the drum is moving. Wait until the drum has completely stopped before opening the door. Do not install or store this appliance where it will be exposed to the weather and direct sunlight. Do not tamper with controls. 8 / English Front-Loading Automatic Washer
9 Important Safety Instructions Do not repair or replace any part of the appliance or attempt any servicing unless specifically recommended in the user-maintenance instructions or in published user-repair instructions that you understand and have the skills to carry out. This appliance must only be used for the purpose of washing, rinsing and spinning machine-washable items using laundry additives that are suitable for use in washers. The appliance manufacturer cannot be held responsible for damage caused by improper or unintended use of the appliance. Only detergents, softeners and additives suitable for use in HE (High-efficiency) washers may be used. Always follow the instructions and information given by the laundry detergent manufacturers when using these products. Always follow the fabric care instructions of garment manufacturers. Do not touch the door glass while washing at high temperatures. Danger of burning! Do not sit on top of the washer. Do not climb onto the washer. Destroy the shipping carton, plastic bag and other packing materials after the washer is unpacked. Keep children away from these packing materials. Danger of suffocation from plastic sheets and cartons! Do not mix chlorine bleach with ammonia or acids such as vinegar and/or rust remover when washing. This mixture can produce hazardous fume which may cause death. Do not operate this appliance if it is damaged, malfunctioning, partially disassembled, or has missing or broken parts, including a damaged cord or plug. Owner s Guide & Installation Instructions 9 / English
10 Important Safety Instructions Store laundry detergents and additives in a cool, dry place out of children s reach due to danger of chemical poisoning and skin irritation. Follow the manufacturers instructions when using laundry products. Do not machine wash fiberglass materials. Small particles can stick to fabrics washed in following cycles and may lead to skin irritation. Do not wash items stained with vegetable oil, cooking oil or petroleum. These items may contain some flammable oils after laundering and the fabric may smoke or catch fire by itself. Be sure to unplug the power cable before attempting maintenance or cleaning of your appliance to minimize the risk of electric shock. Always unplug the cable by grasping the plug, not the cord. Do not use wet hands when plugging/unplugging the power cable. Check the water inlet and drain hose connections regularly for any leakage. Hoses should be replaced every 5 years. Do not leave the washer door open to prevent children hurt themselves by hanging on the door or going inside the drum. Be careful when the appliance is draining hot water. Danger of burning! At the end of a washing day, turn off the water faucets to prevent any leakage that may occur due to a faulty condition of the appliance. Check the appliance and inlet hose connections for water leakage after each use. If there is leakage, turn off the appliance and water faucets and call service. Do not machine wash items having large or heavy metal parts such as buttons or buckles. These items could severely damage the appliance. Always be sure to empty all foreign materials from the pockets of your clothing as small items such as coins, pins etc. could severely damage the appliance. Do not install and operate the appliance in places exposed to temperatures below freezing. Frozen water may cause severe damage by bursting hoses and pump. 10 / English Front-Loading Automatic Washer
11 Important Safety Instructions Make sure that shipping bolts are removed before you operate the washer. If service is required as a result of not removing the bolts, it will not be covered by the warranty. Make sure that the wash drum is empty before you load the washer. Do not store and use any flammable and combustible substances such as lint, paper and chemicals near the appliance. Always follow the manufacturer s instructions when you are using a descaling agent. Be sure that descaling agent contains rustprotective materials and rinse the washer a few times thoroughly after the descaling process (See, Descaling the washer). Install and operate the washer on a solid floor to prevent vibration or movement. It is not recommended to install and operate the washer on wooden floor or on a carpet. The rated voltage of your washer is 208/240V, so it should not be directly connected to the wall power of 110/120V. A special junction box will be provided and used for the wall power connection (See, Installation Instructions for Grounding Instructions and Requirements). If an abnormal sound is heard during the washer operation, refer to the Troubleshooting of this guide. Call service for checking any possible damage or fault if the appliance is dropped or bumped. The end of drain hose should not contact the discharge water in any way as this might cause siphoning of water. Always leave the property after checking that the wash cycle is completed and the washer is turned off. Damaged or worn power cords and plugs must only be replaced by a Blomberg Service technician. Never use an extension cord or adapter to connect the appliance to the electrical power due to the risk of electric shock and/or fire. All broken and faulty components, panels and parts must only be replaced with original Blomberg spare parts by a Blomberg Service technician. Do not force the washer door open when it is locked. The door Owner s Guide & Installation Instructions 11 / English
12 Important Safety Instructions must be closed any time during the program cycle. Do not use fabric softeners or products to reduce static unless recommended by the manufacturers of the fabric softener product. Check the drain pump filter occasionally to remove coins, buttons and such small objects. Always drain off the water completely before cleaning the pump filter, before transporting the washer, when there is a danger of frost and when there is a power failure (For emergency draining, See User maintenance instructions). Always be sure that the washer has been properly installed by licensed personnel, water and electrical connections and grounding conform to all relevant codes and requirements. This manual does not cover every possible condition and situation that may occur. Use common sense and caution when installing, operating, and maintaining any appliance. A WARNING This product may ccontain chemicals known to the state of California to cause cancer or birth defects or other reproductive harm. SAVE THESE INSTRUCTIONS Always follow the instructions on this user guide. If you aren t sure how to perform them, please call Customer Service for assistance and scheduling service. 12 / English Front-Loading Automatic Washer
13 3 Installation Instructions Read this first! This washer can be individually installed in free-standing and built-in installations. You can also install your washer with your dryer as a free-standing or built-in pair. Before you install your appliance, read the following instructions completely and carefully: Save these instructions for future reference. This appliance must be properly installed and grounded by qualified and skilled technicians in accordance with all local codes and ordinances and the latest edition of the National Electrical Code, ANSI/NFPA 70. Proper installation of this appliance is the responsibility of the owner and failure due to improper installation is not covered by the warranty. The Right Location of Installation You can install your washer in a basement, closet or in a laundry room if the location has proper drainage, plumbing and power supply system. Always follow these instructions for installation: Do not install or store this appliance where it will be exposed to the weather, rain, damp places, water and direct sunlight. The ambient temperature must be higher than 60 F (15.6 C) for proper operation. Installation location must have the proper ventilation. Do not store and use any flammable and combustible substances such as lint, paper, curtains, gasoline, coal and liquid or vapor chemicals near the appliance. Install and operate the washer on a strong solid concrete floor to prevent vibration, noise or movement in case of load unbalance. The floor must have sufficient load carrying capacity and the washer must be leveled properly before the operation. It is not recommended to install and operate the washer on a wooden floor or soft floor. If you have to install your washer on a wooden or frame construction floor, the floor must be reinforced properly and the washer must be located in the corner of the room if possible. Owner s Guide & Installation Instructions 13 / English
14 Installation Instructions Never place your washer on a carpet. This prevents air circulation. The electrical components of the machine may overheat and cause damage. Do not stand appliance on the power cable. Do not install and operate your washer in ambient temperatures lower than 32 F (0 C). Controls may stop working properly in such condition. If there is danger of frost, drain all remaining water in pump and hoses since it may freeze and cause damage by bursting them (see Cleaning the drain pump filter ). Installation Clearances C CAUTION The installation location must be large enough for the washer door to be fully opened for loading. The installation location must be large enough for ease of operation, maintenance and service. Ensure there is min 1/2 of clearance on each side of the washer to allow slight sideways movement during washing and spin drying. 14 / English Front-Loading Automatic Washer
15 Installation Instructions Allowable Clearances for Undercounter Installation The dimensions are for the recommended spacing. Counter depth should be (60-62 cm). Custom undercounter installation Washer only Minimum counter width should be 50 (127 cm) for a pair of Blomberg washer & dryer. Custom undercounter installation Washer & Dryer 50Ó (127 cm) Owner s Guide & Installation Instructions 15 / English


 Closet door")

 air opening")
 from the bottom")


 by using a")
.")


 air opening")


 distance from the")


16 Installation Instructions Allowable Clearances for Closet Installation When installed in closet (washer only/washer dryer stacked) : Sides, Rear, Front 1/2 in. (1.27 cm), Top= 1 in. (2.54 cm) Closet door ventilation requirement: A louver having minimum 23 in2 (148 cm2) air opening located at 3 in (7.62 cm) from the bottom of closet door. Stacked Installation You can stack your Blomberg washer and dryer (model no.: DHP W / DHP W) by using a special stacking kit (Part No ). If necessary, consult your dealer or technical service for supplying the stack kit. In stacked closet installation, following configuration is necessary: A louver having minimum 23 in 2 (148 cm 2 ) air opening located at 3 in (7.62 cm) height from the bottom of closet door (for washer) & A louver of minimum 46 in 2 (297 cm 2 ) air opening located at 3 in (7.62 cm) distance from the top of closet door (for dryer). Removing packaging reinforcement Tilt the washer to remove the packaging reinforcement. Remove the packaging reinforcement by pulling the ribbon. 16 / English Front-Loading Automatic Washer


 are fitted into")


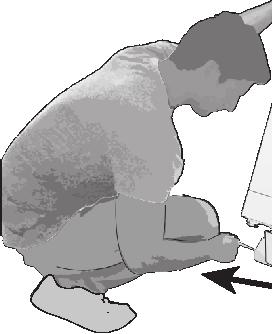
17 Installation Instructions Removing shipping bolts B WARNING Shipping bolts must be removed before operating the washer! Otherwise, the appliance will be damaged seriously! 1.Loosen all the bolts with a spanner wrench until they rotate freely. 2.Remove the shipping bolts by turning them gently. 3.Bolt hole covers (supplied in the bag with the owner s guide) are fitted into the holes on the rear panel with a special lock mechanism. To fit the cover, first insert it into the hole and then rotate it counterclockwise with a screwdriver until it is locked. To unlock, apply the procedure in reverse. C CAUTION Keep the shipping bolts in a safe place to reuse when the clothes washer needs to be moved again in the future. Never move the appliance without shipping bolts properly fixed in place! Owner s Guide & Installation Instructions 17 / English
18 Installation Instructions Leveling the washer B WARNING Do not use any tools to loosen the lock nuts. Otherwise, they can be damaged. 1.Manually (by hand) loosen the lock nuts on the feet. 2.Adjust them until the washer stands level and firmly. 3.Important: Tighten all lock nuts up again. Electrical Connection Grounding Instructions This appliance must be grounded. In the event of malfunction or breakdown, grounding will reduce the risk of electric shock by providing a path of least resistance for electric current. This appliance is equipped with a cord having an equipment-grounding conductor and a grounding plug. The plug must be plugged into an appropriate outlet that is properly installed and grounded in accordance with all local codes and ordinances and the latest edition of the National Electrical Code, ANSI/NFPA 70. B WARNING Improper connection of the equipment-grounding conductor can result in a risk of electric shock. Check with a qualified electrician or serviceman if you are in doubt as to whether the appliance is properly grounded. Do not modify the plug provided with the appliance if it will not fit the outlet, have a proper outlet installed by a qualified electrician. 18 / English Front-Loading Automatic Washer
19 Installation Instructions B WARNING Be sure that the power cord is always accessible by the user after the appliance is installed. Never use an extension cord or adapter to connect the appliance to the electrical power due to the risk of electric shock and/or fire. It is the personal responsibility and obligation of the appliance owner to provide a proper and grounded outlet installed by a qualified electrician. Never use a damaged power cord since there is a risk of electric shock and/or fire. The damaged power cord must be replaced by a qualified electrician as soon as possible. Do not use wet hands when plugging/unplugging the power cable. Electrical supply voltage must conform to the voltage specifications ( V, 60Hz) located on the appliance. For this purpose, a junction box (as seen in picture below) must be obtained. Junction box is supplied with Blomberg Clothes Dryer. Only one appliance must be connected to a properly grounded individual branch circuit outlet. Be sure to unplug the power cable before attempting maintenance or cleaning of your appliance to minimize the risk of electric shock. Always unplug the cable by grasping the plug, not the cord. Do not use wet hands when plugging/unplugging the power cable. Owner s Guide & Installation Instructions 19 / English
20 Installation Instructions Power supply and circuit Connect the clothes washer to the junction box supplied. Junction box must be connected to an earthed outlet protected by a fuse of suitable capacity. Important: Wall power connection should comply with national regulations. The wiring for the electrical outlet circuit must be sufficient to meet the appliance requirements. Use of a Groud Fault Circuit Interrupter (GFCI) is recommended. The voltage and maximum total current are specified in the section Specifications. The appliance must not be directly connected to the wall power in case of absence of junction box. Connection via extension cords or multi-plugs should not be made. B WARNING A damaged power cable must be replaced by a qualified electrician. The appliance must not be operated unless it is repaired! There is the risk of electric shock! 15 Amp. Fuse or circuit breaker, volt, 60 Hz, grounded, alternating current Properly grounded 3-prong receptacle and junction box to be located so the power supply cords are accessible when the washer is in installed position. 20 / English Front-Loading Automatic Washer
21 Installation Instructions Water Supply Connection Your washer comes with both cold and hot water connections. Connect the blue marked cold water supply hose to the cold water inlet valve/faucet and the red marked hot water intake hose to the hot water inlet valve/faucet. Screw the connecting bolts by hand and tighten the connection properly using a plier. Over tightening may cause damage on bolted connection. B WARNING Be sure that the water connection of this washer is handled by a qualified service technician or a plumber. The washer has two bolted ½ water supply hoses and ¾ female hose connections that can be connected to ¾ hot and cold water faucets. B WARNING Be sure that there are rubber seals located on the hose connections. These seals and adjustable bolts ensure a safe connection without leaking. After the water connection is done, turn on both water faucets slowly and completely to check any water leaks. Be sure that water supply hoses are not crushed and they have no kinking, bulges or cuts before the water connection. Owner s Guide & Installation Instructions 21 / English
22 Installation Instructions The water pressure must be between psi (1-10 bar) for the proper operation of this washer. 1 bar corresponds to more than 2.1 gallons (8 liters) per minute flow rate with a fully open faucet. Water inlet hoses and valves should withstand a water pressure of 145 psi (10 bar) at maximum. If the pressure is higher than 145 psi, a pressure-reducing valve must be installed before the water inlet. If the water pressure is lower than 15 psi (1 bar), water fill time may extend or water inlet valve may shut off completely. Hot water supply temperature must not exceed 140 F (60 C). (Ideally 120 F (48 C)) Do not connect the washer to an unpressurized water boiler since water pressure may not be adequate for proper operation. Do not remove the filters located on the water supply hoses (on faucet/hose and hose/inlet valve connections). Always use genuine Blomberg water supply hoses when connecting with this washer. Old or worn-out hoses must not be reused. It is not advised to extend inlet or drain hoses, if necessary consult your dealer or technical service about hose extensions. Hot and cold water faucets must always be easily accessible to the user. At the end of a washing day, turn off water faucets to prevent any leakage or water damage that may occur due to a faulty condition of the appliance. Check the appliance and inlet hose connections for water leakage after each use. If there is leakage, turn off the appliance and water faucets and call service. Check the water inlet and drain hose connections regularly for any leakage. Hoses should be replaced every 5 years. If there is no hot water supply, hot water valve must be connected to a cold water faucet nevertheless. Both water valves should be connected to water supply for proper operation of your washer. 22 / English Front-Loading Automatic Washer
23 Installation Instructions Drainage B WARNING Drain hose should not be bent. Be sure that there are no kinks or cuts on it. Drain hose outlet must not contact the drained water. Drain hose may be connected into a sink, into the drain of a sink, to a standpipe and floor drain. When connecting into a sink, the drain hose should be placed at the edge of the sink and secured with the hose guide supplied by the manufacturer. Additionally, the guided hose may be tied to the water faucet with a strap for extra security. Drain hose may be connected into the drain of a sink. Be sure that the connection is safe and not leaking. An additional clip etc can be used for safe connection. Drain hose may also be connected to a minimum 1.26 in (32 mm) diameter stand pipe. Be sure to secure the drain hose tightly to the pipe (stand pipe, drain pipe/edge of the sink) with a strap etc. The hose should be placed between 16 and 39 in. (40 and 100 cm) from the floor level If you have floor drain system, you can place the drain hose in the hole located on the floor. Owner s Guide & Installation Instructions 23 / English
24 Installation Instructions Installation Checklist Water inlet hoses and accessory bags must be removed from the wash drum. Transportation/shipping bolts must be removed. Washer must be properly leveled by using the adjustable feet. Water inlet hoses are connected to the water faucets, secured and checked for any leaks by turning on both faucets. Drain installation is done properly and drain hose is checked and secured to prevent any flooding. Washer is connected the junction box which is plugged to a properly grounded live wall power outlet. Be sure that power outlet, water faucets and drain outlet must be always accessible to the user. Transportation Before you transport the washer, you should carry out the following: 1.Turn off both water faucets. 2.Before you disconnect the water inlet hoses, decrease the pressure inside hoses by turning on the washer choosing any wash program. As soon as the Start/Pause/Cancel led starts blinking, turn off the appliance. You may securely disconnect inlet hoses without any water gush. 3.Disconnect the drain hose and hang it on the back plate by inserting into the holder plastic brackets. 4.Unplug the power cord and hang it on the back plate by inserting into the holder plastic brackets. 5.Remove bolt hole covers and reinstall shipping bolts to their places. You can apply the procedure in chapter Removing shipping bolts in reverse to accomplish this. 6.Be sure that rubber bushes are properly located in holes and bolts are screwed back tightly for secure transportation of the appliance. 24 / English Front-Loading Automatic Washer
25 Installation Instructions Disposal Information Packing Disposal A WARNING Packing materials of the appliance are potentially dangerous for children. Materials such as plastic bags, films or wrappings must be kept away from children or disposed properly to prevent the danger of suffocation. C CAUTION Packing materials are made of biodegradable and recyclable substances. You should consult your local authority or dealer about the environmental-friendly disposal of the packaging of your appliance. Appliance Disposal A WARNING Be sure to unplug the power cable, cut off the plug and disable the door lock before you dispose your old appliance. Otherwise there is a risk of injury for children and pets. C CAUTION Old appliances contain many recyclable parts. You should consult your local environmental authority about a proper disposal. A proper disposal enables recycling therefore protects the environment. Owner s Guide & Installation Instructions 25 / English
26 4 Operating Instructions First Use A WARNING To reduce the risk of fire, electric shock, or injury to persons, read the IMPORTANT SAFETY INSTRUCTIONS before operating this appliance. Before the first use, Be sure that the washer is installed properly by a qualified installer or service technician in accordance with all national and local codes and requirements. Read all instructions carefully before using the washer. Check that shipping bolts are completely removed. Be sure that the location of installation has proper electrical supply voltage (junction box must be used for connecting the washer to the wall power) and plumbing system needed for the operation of the appliance. Turn on both water faucets and be sure that there are no leaks on hose-faucet connection points or on hoses themselves. Check that the wash drum is empty. Turn on the washer, choose "Tub Sanitize" cycle on the program selector knob and start the washer as empty and without any laundry additives. When the cycle is finished, your washer is ready for subsequent uses. 26 / English Front-Loading Automatic Washer
27 Operating Instructions A WARNING Be sure that siiica gel package, which is located inside the drum, has been removed from the washer before the first use. Granules in this package do not contain poisonous or harmful materials. It is not a detergent and it is not adible. Do not swallow. Do not use for any purpose. Throw into the recycle bin together with this package before the first usage of the washing machine. Laundry Tips Sorting the laundry C CAUTION Always follow the fabric care instructions of garment manufacturers. These instructions would give you proper guidance on suitable wash cycles, wash temperatures and bleach usage. Owner s Guide & Installation Instructions 27 / English
28 Operating Instructions C CAUTION Wash the items which are care labeled as machine-washable. Do not machine wash items that are having symbol on fabric care label. Sort the laundry according to the following fabric types, color groups and wash them separately: White and color fast fabrics Non-fast, colored fabrics Permanent press items(mens shirt, dress pants, poly-cotton blends) Delicate fabrics (silk, rayon etc.) Woolens (only wash woolens that are labeled machine washable or hand washable Hand knits (They should be placed inside out in the washer) C CAUTION Do not wash dark colors with light colors and whites. Color items may bleed and white and light colored items may be discolored. Avoid extended contact of damp clothes before or after washing to prevent dye transfer. Wash heavily and lightly soiled items separately. Lint producers (towels, linen etc) and lint collectors (easy care, permanent press) should be washed separately. Lint producers should be washed inside-out. Preparing the laundry Items of laundry with metal parts (e.g. underwire bras, belt buckles, metal buttons) will damage the washer. Remove metal parts of place the items in a cloth bag, pillow case, or something similar. Remove any non-washable items and accessories from laundry before washing. Empty pockets, remove all foreign objects (e.g. coins, pens, paper clips). If possible: Turn pockets inside out and brush. 28 / English Front-Loading Automatic Washer
29 Operating Instructions Place small items of laundry (e.g. tights) in a cloth bag, pillow case or something similar. This can also help you to avoid searching for lost socks. Handle curtains special care. Remove non-stainless curtain runners and lead tape. Place runners that can t be removed in a cloth bag, pillow case or something similar. Heavy stains should be pretreated with soapy water appropriately before washing (Do not rub or scratch the stained area). If in doubt, check with a pharmacist or dry-cleaner. Use only dyes/discoloring and anti-scaling agents suitable for machine wash. Make sure to follow the instructions on the package. Loading the washer Maximum load capacity depends on the fabric type of laundry, soiling amount of laundry and program cycle you wish to use. C CAUTION Do not exceed the maximum load capacity of the selected program cycle. Washing results are adversely affected by an overloaded drum. Overloading may also cause wrinkling and abrasion on clothes. Make sure power button is off before loading the washer. To load the washer, Pull the door handle. Place laundry items loosely in the drum. Mix small and large items for an even load distribution. Large items should be loaded first. Large items should not be more than half of the total wash load. If you put a wash bag or net which is filled with small items in the drum, put an additional wash bag to prevent load unbalance. Both wash bags should have the same amount of items to provide an even load distribution. Before washing a single or a few items such as a pillow, a teddy bear, a single or a pair of shirts, sweat shirts etc, put some Owner s Guide & Installation Instructions 29 / English
30 Operating Instructions additional items in the drum for better load distribution and spinning. Make sure that there is no clothing obstructing the door or caught between the door and rubber seal. Push the loading door firmly and make sure that the door has been closed properly (especially if you load the washer with full load or big items). In case the door is not locked, door led remains off. In that case, door should be opened and closed again firmly until the door led lights up. If the door is not closed completely, the machine will not start. This is a safety precaution. The front door is locked until end of the washing program and it can not be opened untill the door led on the panel is off following the end of the program. Unload the washed items just after the program cycle has finished. Delay of unloading may cause wrinkling and unwanted odor on laundry. Check to see any small metal items such as pins, coins etc left in rubber seal while unloading the washer. Any residual metal items may cause rusting on the rubber seal. If there is any water left in rubber seal, remove with a soft cloth. Detergent Use About Detergent C CAUTION Your washer is designed to use only HE (high efficiency) detergents. You should always look for the following symbol on the label of detergents: If you use a non-he detergent with this washer, high sudsing will occur. High sudsing will decrease tumble action effectiveness, washing and rinsing performance worsen. Suds may flow out of detergent dispenser giving damage to your washer. 30 / English Front-Loading Automatic Washer
31 Operating Instructions C CAUTION The detergents labeled as HE compatible may also lead to high sudsing and inefficient tumble action. Don t use such detergents. Always follow the instructions and information given by laundry detergent manufacturers when using these products. A WARNING Store laundry detergents and additives in a cool, dry place out of children s reach due to danger of chemical poisoning and skin irritation. Detergent Quantity The amount of washing detergent to use depends on the amount of laundry, the degree of soiling and water hardness. For small amounts of laundry or only slight soiling use accordingly less detergent. Too much detergent causes an excessive amount of foaming, bad washing and rinsing results and a strain on water resources. Too little washing detergent causes laundry to turn grey and calcification of the machine. Recommended amount of powder detergent is max. 1/3 cup (80 ml). Recommended amount of liquid detergent is max. 1/4 cup (60 ml). Owner s Guide & Installation Instructions 31 / English
32 Operating Instructions Light soiling No visible stains or soiling Normal soiling A few visible light stains or soiling Heavy soiling Highly visible stains or soiling Detergent Dispenser Detergent dispenser of your washer has three separate compartments for main wash detergent, fabric softener and liquid bleach. Each of these laundry additives are automatically dispensed at appropriate time during wash program. C CAUTION Do not put laundry additives directly in the wash drum. Always use the detergent dispenser. After adding laundry additives do not close the drawer too quickly. This may cause early dispensing of the additives thus poor wash results and fabric damage. Do not open the drawer during wash program (except for addition of liquid main wash detergent at the beginning of main wash water intake). Dispenser compartments are as follows: -left compartment numbered as II (main wash compartment) -middle compartment marked as (liquid fabric softener compartment) -right compartment numbered as I (liquid chlorine bleach compartment) 32 / English Front-Loading Automatic Washer
33 Operating Instructions (II) Main Wash Detergent Compartment Add HE (High efficiency) powder detergent to this compartment numbered as II before starting the wash program. Use the detergent manufacturer s dosing cup and follow the instructions on the package. If you use a liquid detergent, be sure to use a HE (High efficiency) detergent and add detergent directly to main wash compartment before operating your washer. If you observe liquid detergent stains on washed items, it is recommended for subsequent wash cycles that you should add liquid detergent during first water intake. Color-safe bleach in powder or liquid form may be added into main wash detergent compartment with main wash detergent. Be sure to use main wash detergent and color-safe bleach in same form (either powder or liquid) when adding into main wash compartment. Owner s Guide & Installation Instructions 33 / English

34 Operating Instructions Liquid Fabric Softener Compartment Add the recommended amount of liquid fabric softener to the middle compartment marked as and dilute it with warm water to the maximum fill line. C CAUTION Especially concentrated fabric softeners must be diluted with warm water otherwise siphon may be clogged in time. Do not fill the fabric softener above the maximum fill line as any excess amount will mix into the wash water and you will have to re-fill the compartment. Do not pour the softener directly onto laundry, it may cause stains. Liquid fabric softener is automatically dispensed during the final rinse of wash program. Using liquid detergents If the product contains a liquid detergent cup: Make sure that you have placed the liquid detergent cup in compartment no. 2. If the liquid detergent has lost its fluidity, dilute it with water before putting in the detergent cup. If the product does not contain a liquid detergent cup: Do not use liquid detergent for the prewash in a program with prewash. Liquid detergent stains your clothes when used with Delayed Start function. If you are going to use the Delayed Start function, do not 34 / English Front-Loading Automatic Washer
35 Operating Instructions use liquid detergent. (I) Liquid Chlorine Bleach Compartment Add liquid chlorine bleach to the right compartment numbered as I. Measure 1/3 cup (80 ml) of bleach and pour it into the special container located in the right compartment of the dispenser. This container ensures dispensing and dilution of bleach during the first rinse of wash cycle. There is a maximum fill line on the container. Do not exceed the maximum fill line to prevent early dispensing. Early dispensing may damage your clothes. C CAUTION Be sure that bleach container is present in the right compartment of dispenser before you add liquid bleaching agent. You may remove bleach container if you would not use bleach. However do not put any other laundry additives to the empty compartment. Be sure to choose extra rinse option if you are using bleach in wash program. Bleach must be rinsed from laundry properly otherwise it may cause skin irritation. Bleach is automatically dispensed and diluted during the first rinse of wash program. A WARNING Bleach may only be used in Regular/Cotton and Permanent Press cycles. Don t use bleach with delicates, hand washables or wools, it will lead to clothes damage. The liquid bleach cup insert must be removed if not using liquid bleach to avoid water leaking from the dispenser. Water Consumption Your clothes washer automatically adjusts the water consumption according to load amount. This feature ensures high wash performance results with efficient water and energy consumption. Owner s Guide & Installation Instructions 35 / English
36 5 Selecting a Program and Operating Your Washer Control panel Program selection knob (Uppermost position On / Off) 2 - Duration information display 3 - End Time Setting button 4 - Program Follow-up indicator lights 5 - Start / Pause button 6 - Auxiliary function buttons 7 - Spin speed adjustment button 8 - Temperature adjustment button 36 / English Front-Loading Automatic Washer
37 Selecting a Program and Operating Your Washer Programs Heavy Duty Use to wash your heavily soiled, durable cotton and linen laundry. Heavy Soil option is automatically selected for a perfect cleansing. Heavy Soil option prolongs heating step. Cottons / Normal You can wash your durable white and colorfast items with this cycle. Washes with vigorous tumbling movements. It is recommended for your cotton or linen items (such as bed sheets, pillowcases,jeans,towels, bathrobes,garments, T-shirts,sweat-shirts, etc.). You can select wash temperature according to care label of items. Perm Press You can wash your easy care items on this cycle. Washes with gentler tumbling movements and in shorter washing cycles. It is recommended for your cotton,synthetic or blended items (such as shirts, pants, wrinkle-free items, etc.). You can select wash temperature according to care label of items. Hand Wash / Wool You can wash your machine-washable wool items on this program. It is recommended to use appropriate detergents and laundry additives for wools. The wool wash cycle of this machine has been approved by The Woolmark Company for the washing of machine washable wool products provided that the products are washed according to the instructions on the garment label and those issued by the manufacturer of this washing machine. M1422. In the UK, Ireland, Hong Kong and India, the Woolmark trade mark is a Certification trade mark. Owner s Guide & Installation Instructions 37 / English
38 Selecting a Program and Operating Your Washer Allergen Applying a steam step at the beginning of the programme allows to soften the dirt easily. Use this programme for your laundry (baby clothes, bed sheets, bedlinen, underwear, etc. cotton items) that requires an anti-allergic and hygienic washing at high temperature with intensive and long washing cycle. The high level of hygiene is ensured thanks to the steam application before the programme, long heating duration and additional rinsing step. Spin&Drain This program is used to discharge the water and spin dry the load with selected spin speed. Spin&Drain may be selected as one program in this model. Rinse This cycle is used when you want to rinse separately. Organic Wash You can use organic detergent to wash your durable white and colorfast items with this cycle. Washes with vigorous tumbling movements in a longer washing cycle to give a superior washing performance with organic detergents. Quick Wash Use to wash your lightly soiled and unstained cotton laundry quickly. Delicates & Dark You can wash your delicate easy-care and dark coloured items on this program. It has more sensitive tumbling movements. and does not do intermediate spinning compared to the permanent program. It must be used for cotton, synthetic or blended clothes for which sensitive washing is recommended. Sports Wear You can use this programme to wash sports and outdoors garments that contain cotton/synthetics mix and water repellent covers such as gore-tex etc. It makes sure your garments are washed gently thanks to special rotating movements. 38 / English Front-Loading Automatic Washer
39 Selecting a Program and Operating Your Washer Mixed Fabric Use to wash your cotton and synthetic clothes together without sorting them. Cool Clean Use to wash your moderately soiled and durable cotton/synthetic laundry. An effective and energy efficient washing is provided thanks to the intense washing action. Down Wear Use this programme to wash your coats, vest, jackets etc. containing feathers with a machine-washable label on them. Thanks to special spinning profiles, it is ensured that the water reaches the air gaps amongst the feathers. Tub Sanitize Use regularly (once in every 1-2 months) to clean the drum and provide the required hygiene. Steam is applied before the programme to soften the residues in the drum. Operate the programme while the machine is completely empty. To obtain better results, put powder lime-scale remover for washing machines into the detergent compartment no. 2. When the programme is over, leave the loading door ajar so that the inside of the machine gets dry. C CAUTION This is not a washing programme. It is a maintenance programme. Do not run the programme when there is something in the machine. If you try to do so, the machine detects that there is a load inside and aborts the programme. Owner s Guide & Installation Instructions 39 / English
40 Selecting a Program and Operating Your Washer Program selection 1 Determine the program suitable for the type, quantity and soiling level of the laundry in accordance with the Program and consumption table. C CAUTION Programmes are limited with the highest spin speed appropriate for that particular type of fabric. When selecting a programme, always consider the type of fabric, colour, degree of soiling and permissible water temperature. Always select the relevant lowest required temperature. A higher temperature means higher power consumption. 2 Select the desired program with the Program Selection knob. 40 / English Front-Loading Automatic Washer
41 Program and consumption table Program and consumption table Wash Cycle Heavy Soil Soak Extra Rinse AntiCrease+ Water Intake "Wash Water Temperature F / C" "Max Spin Speed (rpm)" Load Capacity Extra Hot Hot-cold 167/75 Cottons/ Normal Hot Hot-cold 140/60 Warm Hot-cold 110/43 Cold Hot-cold 86/30 Extra High Full Tap Cold Cold 60/15 Organic Wash Hot Hot-cold 153/67 Warm - * - - Hot-cold 111/44 Cold Hot-cold 86/30 Extra High 1/2 Extra Hot Hot-cold 167/75 Allergen Hot Hot-cold 153/ * - Warm Hot-cold 104/40 Extra High Full Cold Hot-cold 86/30 Extra Hot Hot /Cold 167 / 75 Pet Hair Cleansing Hot Hot /Cold 153 / 67 * _ Warm Hot /Cold 104 / 40 Extra High Full Cold Hot /Cold 86 / 30 Hot Hot-cold 140/60 Perm Press Warm Hot-cold 110/43 Cold Hot-cold 86/30 Tap Cold Cold 60/15 Extra High 1/2 : Selectable * : Automatically selected, not cancellable. - : See program description for maximum load. Owner s Guide & Installation Instructions 41 / English
42 Program and consumption table Wash Cycle Heavy Soil Soak Extra Rinse AntiCrease+ Water Intake "Wash Water Temperature F / C" "Max Spin Speed (rpm)" Load Capacity Sports Wear Mixed Fabric Delicates / Dark Hand Wash / Wool Warm Hot-cold 95/35 Cold Hot-cold 86/30 Tap Cold Cold 60/15 Warm Hot-cold 110/43 Cold - Hot-cold 86/30 Tap Cold Cold 60/15 Warm Hot-cold 104/40 Cold Hot-cold 86/30 Tap Cold Cold 60/15 Warm Hot-cold 104/40 Cold Hot-cold 86/30 Tap Cold Cold 60/15 Extra High 1/2 Medium 1/2 Medium 1/2 Extra High 1/4 Hot Hot-cold 140/60 Down Wear Warm Hot-cold 104/ Cold Hot-cold 86/30 Tap Cold Cold 60/15 High 1/4 Tub sanitize Extra Hot Hot-cold 167/75 Low - : Selectable * : Automatically selected, not cancellable. - : See program description for maximum load. 42 / English Front-Loading Automatic Washer
43 Program and consumption table Wash Cycle Heavy Soil Soak Extra Rinse AntiCrease+ Water Intake "Wash Water Temperature F / C" "Max Spin Speed (rpm)" Load Capacity Extra Hot Hot-cold 167/75 Hot Hot-cold 140/60 Quick Wash Warm - - Hot-cold 104/40 Extra High Full Cold Hot-cold 86/30 Tap Cold Cold 60/15 CoolClean Cold Hot-cold 86/ Tap Cold Cold 60/15 Extra High 1/2 : Selectable * : Automatically selected, not cancellable. - : See program description for maximum load. Owner s Guide & Installation Instructions 43 / English
44 Selecting a Program and Operating Your Washer Temperature selection Whenever a new programme is selected, the recommended temperature level for the selected programme appears on the temperature indicator. C CAUTION If the programme has not reached the heating step, you can change the temperature without switching the product to Pause mode. To decrease the temperature, press the Temperature Adjustment button. Temperature will decrease gradually. 44 / English Front-Loading Automatic Washer
45 Selecting a Program and Operating Your Washer Spin speed selection Whenever a new programme is selected, the recommended spin speed level of the selected programme is displayed on the spin speed indicator. C CAUTION If the programme has not reached the spinning step, you can change the spinning speed without switching the product to Pause mode. To decrease the spin speed, press the Spin Speed Adjustment button. Spin speed decreases gradually. Then, depending on the model of the product, Rinse Hold and No Spin options appear on the display. Rinse Hold If you are not going to unload your clothes immediately after the program completes, you can use the rinse hold function to keep your laundry in the final rinsing water in order to prevent them from getting wrinkled when there is no water in the product. Press the Start/ Pause button after this process if you want to drain the water without spinning your laundry. The program will resume and complete after draining the water. If you want to spin the laundry held in water, adjust the Spin Speed and press the Start / Pause button. The program will resume. Water is drained, laundry is spun and the programme is completed. Owner s Guide & Installation Instructions 45 / English
46 Selecting a Program and Operating Your Washer Auxiliary function selection Select the desired auxiliary functions before starting the programme. The chosen auxiliary function indicator will light up. Furthermore, you may also select or cancel auxiliary functions that are suitable to the running programme without pressing the Start / Pause button when the machine is operating. For this, the machine must be in a step before the auxiliary function you are going to select or cancel. If the auxiliary function cannot be selected or canceled, light of the relevant auxiliary function will blink 3 times to warn the user. C CAUTION If a second auxiliary function conflicting with the first one is selected before starting the machine, the function selected first will be canceled and the second auxiliary function selection will remain active. An auxiliary function that is not compatible with the programme cannot be selected. (See, Programme and consumption table ) Auxiliary Function buttons may vary according to the model of the machine. 46 / English Front-Loading Automatic Washer
47 Selecting a Program and Operating Your Washer Auxiliary functions Heavy Soil This function increases washing times for heavily soiled items for better wash results. Extra Rinse When this function is selected, you can increase the number of current rinsing steps. Thus, sensitive skins risk of being affected by the remaining detergent on the clothes will be decreased. Soak This function is used for heavily soiled items when you want to pretreat them before washing. Laundry is soaked in a relatively high amount of warm water. You can use full load and HE High efficiency detergent for soaking. Use 1/3-1/2 of the recommended detergent dosage for the load amount to be soaked. Functions/Programmes Selected by Pressing the Function Buttons for 3 Seconds AntiWrinkle+ This function is selected when the 1rd auxiliary function is pressed and held for 3 seconds and the programme follow-up light for the relevant step turns on. When the function is selected, the drum rotates for up to 8 hours for preventing the laundry from creasing at the end of the programme. You can cancel the programme and take your laundry out at any time during the 8-hour duration. Press the function selection key or the machine on/off key to cancel the function. The programme follow-up light will remain on until the function is canceled or the step is complete. If the function is not cancelled, it will be active in the subsequent washing cycles as well. Owner s Guide & Installation Instructions 47 / English
48 Selecting a Program and Operating Your Washer End Time With the End Time function, the endup of the programme may be delayed up to 19 hours. After pressing the End Time button, the program s estimated ending time is displayed Open the loading door, place the laundry inside and add detergent, etc. 2 Select the washing programme, temperature, spin speed and, if required, the auxiliary functions. 3 Set the end time of your choice by pressing the End Time button. 4 Press Start / Pause button. The delayed start time you have set is displayed. Delayed start countdown starts. _ symbol next to the delayed start time moves up and down on the display. C CAUTION Additional laundry may be loaded during the delayed start period. 5 At the end of the countdown, duration of the selected programme will be displayed. _ will disappear and the selected programme will start. Adjusting the end time If you want to cancel the End Time function, turn the Programme Selection knob to any programme. C CAUTION Additional laundry may be loaded to the product during the End Time countdown period. At the end of the countdown, the washing cycle starts and the time of the selected program appears on the display. 48 / English Front-Loading Automatic Washer
49 Selecting a Program and Operating Your Washer C CAUTION When the End Time selection is completed, the time that appears on the screen is the total of the end time chosen with the duration of the selected program. Do not use liquid detergents when you activate the End Time function! There is a risk of staining the clothes. Changing the selections after program has started After the programme has started you can make the following changes. Switching the product to pause mode Press the Start/Pause button to switch the machine to pause mode while a programme is running. The light of the step which the machine is in and Start/Pause starts flashing in the Program Followup indicator to show that the machine has been switched to the pause mode. Also the ready light blinks until the door is ready to be opened. When the loading door is ready to be opened, the ready light will turn off; the program step light and the Start / Pause light will continue to flash. Changing the auxiliary function, speed and temperature Depending on the step the programme has reached, you can cancel or select the auxiliary functions. See Auxiliary function selection. Also you can change the temperature and make cycle adjustments. See Temperature selection and Spin speed selection. C CAUTION If no change is allowed, the relevant light will flash 3 times. Owner s Guide & Installation Instructions 49 / English
50 Selecting a Program and Operating Your Washer Child Lock Use the Child Lock function to prevent children from tampering with the product. You can also avoid any changes being made in a running program. C CAUTION You can switch the product on and off with the On / Off button when the Child Lock is active. When you switch on the product again, the program will resume from where it has stopped. To activate the Child Lock: Press and hold the 2nd auxiliary function button for 3 seconds. In the program selection display on the panel, the C03-C02-C01 C On light will turn on. When this light is on you can stop pressing on 2nd the Auxiliary Function button. C O To deactivate the child lock: Press and hold the Auxiliary Function button 2 for 3 seconds. In the program selection display on the panel, the C03-C02-C01 C OF light will turn on. C O C OF 50 / English Front-Loading Automatic Washer
51 6 Preparation 1. Turn on both hot and cold water faucets fully. Check and be sure the water connection is tight. 2. Place the laundry in the drum. 3. Add laundry additives (e.g. detergent, fabric softener,bleach). Starting the program 1. Close the door 2. Press the Start / Pause button to start the program. 3. The program follow-up light showing the startup of the program will turn on. 4. The door locks and the door led will light up. 5. The led of the relevant step (prewash, main wash, rinse, softener and spin) that the program has started from will light up. C CAUTION Before pressing the Start / Pause button please ensure that the front door has been closed properly. Otherwise Start / Pause button should be pressed again to start the program If no program is started or no key is pressed within 10 minutes during the program selection process. The display and the program follower indicators will turn off. Door locking system There is a locking system on the loading door of the product that prevents the door from opening in cases when the water level is unsuitable. The ready light in the panel turns on when the loading door is locked. Owner s Guide & Installation Instructions 51 / English
52 Preparation Adding or taking out laundry This is only possible under the following conditions: During time delay, C CAUTION Washer allows adding more laundry during a future step only if the water level is low enough to open the loading door or if the temperature in the washer is low 1. Press the Start / Pause button to switch the product to pause mode. The programme follow-up light of the relevant step during which the machine was switched into the pause mode will flash. 2. Wait until the Loading Door can be opened if the water level is low enough. 3. Open the Loading Door and add or take out the laundry. 4. Close the Loading Door. 5. Make changes in auxiliary functions, temperature and speed settings if necessary. 6. Press the Start / Pause button to then restart the product. Cancelling the program To cancel the programme, turn the Programme Selection knob to select another programme. Previous programme will be cancelled. End / Cancel light will flash continuously to notify that the programme has been canceled. 52 / English Front-Loading Automatic Washer
53 Preparation Your machine will end the programme when you turn the Programme Selection knob; however, it does not drain the water inside. When you select and start a new programme. C CAUTION Depending on the step where the programme was canceled in, you may have to put detergent and softener again for the programme you have selected anew. If you want to open the loading door after you have cancelled the program but it is not possible to open the loading door since the water level in the product is above the loading door opening, turn the Program Selection knob to the Pump+Spin program and discharge the water in the product. Re-spinning the laundry If you want to re-spin the clothes: 1. Rearrange the previously placed clothes in the drum. 2. Select the spin program. 3. Adjust the spin speed. End of program End warning appears on the display when the program is completed. If you do not press any button for 10 minutes, The display and the program follower indicators will turn off. Owner s Guide & Installation Instructions 53 / English
54 Preparation Energy saving mode After you switch on your machine with program selection knob, if no programme is started or no other procedure is performed at the selection step or no action is taken within approx. 10 minutes after the selected programme ends, your machine will switch to energy saving mode automatically and the display and program follower indicators will be completely turned off. If you turn the Programme Selection knob or touch any button, lights and display will switch back to previous condition. The selections which you make when exiting from the energy efficiency may change. Please check the correctness of your selections before starting the programme. If necessary, please make your settings again. This is not an error. C CAUTION This is a feature of this product, and not an error. 54 / English Front-Loading Automatic Washer
55 7 User maintenance instructions A WARNING Be sure to unplug the power cable before attempting maintenance or cleaning of your appliance to minimize the risk of electric shock. Cleaning detergent dispenser Remove any powder/liquid residue buildup in the dispenser drawer. To do this; 1. Press the dotted point on the siphon of the softener compartment and pull towards yourself until the it is removed from the dispenser. C CAUTION If more than a normal amount of water and softener/bleach mixture starts to gather in the dispenser compartments, dispenser must be cleaned. 2. Wash the dispenser drawer, liquid chlorine bleach container and siphon of softener under running warm water in a sink etc. Wear protective gloves or use an appropriate brush or sponge to avoid touching the detergent residues in the drawer when cleaning. 3. Replace the drawer into its housing after cleaning. Check if the siphon and container are in their original locations. Owner s Guide & Installation Instructions 55 / English


56 User maintenance instructions Cleaning the door seal Be sure to check the rubber door seal after unloading your washer. Pull the seal back to search for any foreign objects. Residual metal objects such as pins and coins may form rust stains on rubber seal, and cause the seal to leak. Wipe the stained areas with soapy water using a damp cloth. Then wipe with a dry cloth properly. Do not use an abrasive scrubbing agent when cleaning rubber seal. Cleaning the drum Check the wash drum for any foreign objects after unloading your washer. Residual metal objects such as pins and coins may form rust stains on drum surface and your clothes. Do not use abrasive materials while cleaning the inner surface of the drum. Use soapy water with a damp cloth to wipe the inner surface, then dry it and leave the door open to let inside dry properly. "Tub Sanitize" cycle with extra rinse option should be used for monthly cleaning of drum. To carry out this procedure select "Tub Sanitize" Program. 56 / English Front-Loading Automatic Washer
57 User maintenance instructions Cleaning the outer cabinet and control panel When necessary: Wipe the exterior panels of your washer with soapy water or mild detergent. Dry it with a soft cloth. Use only a soft and damp cloth to clean the control panel. C CAUTION Never use a sponge or scrubbing material. These will damage the painted and plastic parts. Cleaning the water inlet strainers There is a strainer at the end of each water inlet valve at the back side of the washer and also at the end of each water inlet hose where they are connected to the faucets. These strainers prevent the foreign substances and dirt in the water to enter into the washer. Strainers should be cleaned from time to time. Close the water faucets. Remove the nuts of the water inlet hoses to clean the surfaces of the strainers on the water inlet valves with an appropriate brush. If the strainers are very dirty, you can pull them out by means of pliers and clean them. Take out the strainers on the flat ends of the water inlet hoses together with the rubber seals and clean thoroughly under running water. Replace the rubber seals and strainers carefully and tighten the hose nuts by hand. Owner s Guide & Installation Instructions 57 / English

58 User maintenance instructions Cleaning the drain pump filter Filter system in your washer prevents solid items such as buttons, coins and fabric fibers clogging the pump impeller during discharging of the washing water. Thus, a good water discharge is achieved and the pump life is extended. If your washer fails to drain the water, the pump filter may be clogged. You may have to clean it occasionally to prevent any clogging. Water must be drained completely to clean the pump filter. In addition, water may have to be drained off completely in the following cases: before transporting the appliance (e.g. when moving ) when there is a danger of frost In order to clean the dirty filter and discharge the water: 1. Disconnect or unplug the washer from the power supply. A WARNING There may be water at 158F (70 C) in the drum. Therefore, the filter must be cleaned only after the inside water is cooled down to avoid hazard of scalding. 2. Open the filter cover. 58 / English Front-Loading Automatic Washer


59 User maintenance instructions 3. Follow the below procedures in order to drain water. Product has an emergency water draining hose, in order to drain the water: a Pull the emergency draining hose out from its seat b Place a large container at the end of the hose. Drain the water into the container by pulling out the plug at the end of the hose. When the container is full, block the inlet of the hose by replacing the plug. After the container is emptied, repeat the above procedure to drain the water in the product completely. c When draining the water is finished, close the end by the plug again and fix the hose in place. d Turn and remove the pump filter. 4. Clean any residues inside the filter as well as fibers, if any, around the pump impeller region. 5. Replace the filter. 6. If the filter cap is composed of two pieces, close the filter cap by pressing on the tab. If it is one piece, seat the tabs in the lower part into place first, and then press the upper part to close. Owner s Guide & Installation Instructions 59 / English
Front-Loading Automatic Washer Owner s Guide & Installation Instructions
 To prevent accidents and machine damage, read these instructions before installation or use. Use the washer only as instructed in this owner s guide and installation instructions included with your washer.
Front-Loading Automatic Washer-Dryer Owner s Guide & Installation Instructions
 To prevent accidents and machine damage, read these instructions before installation or use. Use the washer-dryer only as instructed in this owner s guide and installation instructions included with your
Front-Loading Automatic Washer Owner s Guide & Installation Instructions
 To prevent accidents and machine damage, read these instructions before installation or use. Use the washer only as instructed in this owner s guide and installation instructions included with your washer.
Front-Loading Automatic Washer
 To prevent accidents and machine damage, read these instructions before installation or use. Use the washer only as instructed in this owner s guide and installation instructions included with your washer.
Front-Loading Automatic Washer
 To prevent accidents and machine damage, read these instructions before installation or use. Use the washer only as instructed in this owner s guide and installation instructions included with your washer.
Dear Customer, We wish that this product, manufactured at modern facilities with total quality notions, will deliver you the best performance.
 Dear Customer, We wish that this product, manufactured at modern facilities with total quality notions, will deliver you the best performance. In order to guarantee this, please read this instruction manual
4 Selecting a Program and Operating Your Machine
 4 Selecting a Program and Operating Your Machine Control panel Figure 1 1 2 3 4 5 6 7 8 1 - Spin Speed Adjustment button 2 - Display 3 - Temperature Adjustment button 4 - Programme Selection knob 5 - On
Washing Machine WF 7141 N
 Washing Machine WF 7141 N 1 Warnings General Safety Never place your machine on a carpet covered floor. Otherwise, lack of airflow from below of your machine may cause electrical parts to overheat. This
Washing Machine PW3608N PW3610N
 Washing Machine PW3608N PW3610N Please read the manual before using the product and please take good care of it. 1Warnings General Safety Never place your machine on a carpet covered floor. Otherwise,
User Manual. Tumble Dryer ZDC8202P
 EN User Manual Tumble Dryer ZDC80P Contents Safety information Safety instructions 3 Product Description 4 Control Panel 5 Programme table 5 Options 6 Settings 7 Before First Use 8 Daily Use 8 Hints and
en-us Use and Care Manual, Installation Instructions Washer WAT28400UC
 en-us Use and Care Manual, Installation Instructions Washer WAT28400UC Under counter (Less Desirable) If front of the appliance is covered ventilation openings must be installed. E & F are minimum area
User manual. Washing Machine ZWP 581 ZWQ 5102 ZWQ 5103 ZWQ 5122
 EN User manual Washing Machine ZWP 58 ZWQ 502 ZWQ 503 ZWQ 522 Contents Safety information 2 Product description _ 3 How to run a wash cycle? 4 Daily use _ 5 Washing programmes 6 Care and cleaning 8 Safety
WASHER EXTRACTOR M XQG60-A508K
 WASHER EXTRACTOR 4160980M XQG60-A508K It is essential to read this manual carefully before it is installed and used for the first time. 9 12 14 15 Correct use Read and understand thoroughly these safety
GETTING STARTED? EASY.
 User Manual GETTING STARTED? EASY. ZDH8333PZ EN User Manual Tumble Dryer SAFETY INFORMATION Before the installation and use of the appliance, carefully read the supplied instructions. The manufacturer
Installation Instructions
 Installation Instructions Full Size Tumble Action Washers Before beginning installation, carefully read these instructions. This will simplify the installation and ensure the washer is installed correctly
Important Safety Information. Operating Instructions The Controls on Your Washer Other Washer Features Preparing to Wash Care of Product
 Model: YIXR1060T Washer Owner s Manual Important Safety Information 2 Operating Instructions The Controls on Your Washer Other Washer Features Preparing to Wash Care of Product Helpful Information Specialized
It is essential to read this manual carefully before it is installed and used for the first time. EFL6KWH
 It is essential to read this manual carefully before it is installed and used for the first time. EFL6KWH This washing machine conforms to current safety requirements. Inappropriate use can, however, lead
GB User manual. Washing machine ZWQ 5130
 GB User manual 2 Washing machine ZWQ 5100 ZWQ 5101 ZWQ 5130 Product description 1 1. The control panel 2. Lid handle 3. Adjustable levelling feet 2 3 The control panel 1 2 3 4 5 6 1. Programme selector
User manual. Washing machine ZWQ 590 SO ZWQ 585 SO ZWQ 580 SO ZWQ 575 SO ZWQ 570 SO
 EN User manual Washing machine ZWQ 590 SO ZWQ 585 SO ZWQ 580 SO ZWQ 575 SO ZWQ 570 SO Product description 1 The control panel 2 Lid handle 3 Filter access cover 4 Adjustable levelling feet Control panel
GETTING STARTED? EASY.
 User Manual GETTING STARTED? EASY. ZWF 71440W EN User Manual Washing Machine SAFETY INFORMATION Before the installation and use of the appliance, carefully read the supplied instructions. The manufacturer
Washing Machine. User manual WW9*K5*****/WW8*K5*****/WW7*K5***** Untitled :17:40
 Washing Machine User manual WW9*K5*****/WW8*K5*****/WW7*K5***** Untitled-6 1 2017-12-12 3:17:40 Contents Contents 4 What you need to know about the safety instructions 4 Important safety symbols 4 Important
Washing. Detergent drawer with compartments I, II, Drum. Control panel. Washing machine door. Service flap for detergent solution pump. Select Start.
 Your washing machine Congratulations You have opted for a modern, high-quality domestic appliance manufactured by Bosch. This washing machine is distinguished by its economical water and energy consumption.
User manual. Washing machine ZWQ 6120 ZWQ 6100
 EN User manual Washing machine ZWQ 6120 ZWQ 6100 Product description 1 1. The control panel 2. Lid handle 3. Adjustable levelling feet 2 3 The control panel 1 2 3 4 5 6 1. Programme selector 2. Pushbuttons
washing machine contents
 washing machine contents WARNINGS SPECIFICATIONS INSTALLATION AND ASSEMBLY USING THE APPLIANCE. PRACTICAL TIPS MAINTENANCE AND CLEANING SAFETY AND TROUBLESHOOTING ENVIRONMENTAL WARNINGS 4 5 6 10 20 22
Removing shipping locks
 y Safety instructions Scope of delivery Moisture in the drum is due to end inspection. Removing shipping locks Water connection l The washing machine is heavy - lift with caution. Frozen hoses can tear/burst.
DAILY REFERENCE GUIDE
 DAILY REFERENCE GUIDE EN THANK YOU FOR BUYING A WHIRLPOOL PRODUCT. In order to receive comprehensive service and support, please register your appliance at www.whirlpool.eu/register Before using the appliance,
Instruction Manual. 6kg Washing Machine L612WM15/L612WMS15. L612WM15/S15_IB.indd 1 10/08/ :00
 Instruction Manual 6kg Washing Machine L612WM15/L612WMS15 L612WM15/S15_IB.indd 1 10/08/2015 13:00 Contents Safety Warnings... 3 Unpacking... 5 Moving and Installing... 6 Removing the Transit Bolts... 6
ensure Ensure Single inlet Dual inlet - only and cold
 X08060026A NOTE The manufacturer reserves the right for any modifications on the product which might be deemed necessary or useful without informing about it in this IFU. Thank you for choosing a Hisense
10kg Washing Machine
 Instruction Manual 10kg Washing Machine L1014WM17 L1014WM17_IB.indd 1 26/07/2017 11:31 L1014WM17_IB.indd 2 26/07/2017 11:31 Contents Safety Warnings... 4 Unpacking... 6 Removing the Transit Bolts... 7
User manual. Washing Machine ZWG K
 EN User manual Washing Machine ZWG 71202 K Contents Safety information 2 Safety instructions 3 Environment concerns 4 Product description _ 5 Control panel _ 6 Washing programmes 7 Consumption values _
5kg Front Load Washing Machine
 5kg Front Load Washing Machine G5FLWW15 Instruction Manual Contents Guide to the Appliance 2 Caring for the Environment 3 Safety Information and Warnings 4 Items in the Box 6 Getting Started 7 Basic Set
XR510W 5KG 1000RPM WASHING MACHINE XR612W 6KG 1200RPM WASHING MACHINE. Instruction Manual
 XR510W 5KG 1000RPM WASHING MACHINE XR612W 6KG 1200RPM WASHING MACHINE Instruction Manual Serial number: Please read these instructions carefully before use and retain for future reference. Before switching
EWF EW EWF EW... EN WASHING MACHINE USER MANUAL
 EWF 31276 EW EWF 31076 EW...... EN WASHING MACHINE USER MANUAL 2 www.electrolux.com CONTENTS 1. SAFETY INFORMATION................................................... 3 2. SAFETY INSTRUCTIONS..................................................
User manual. Washing Machine ZWG 6148K
 EN User manual Washing Machine ZWG 6148K Contents Safety information 2 Safety instructions 3 Environment concerns 4 Product description _ 5 Control panel _ 6 Washing programmes 6 Consumption values _ 7
Washing. Preparation. Contents
 Your washing machine Congratulations you have opted for a modern, high-quality domestic appliance manufactured by Bosch. The washing machine is distinguished by its economical water- and energy consumption.
WASHER USER INSTRUCTIONS
 WASHER USER INSTRUCTIONS Before calling for assistance or service, please check Troubleshooting. It may save you the cost of a service call. If you still need help, contact the dealer from whom you purchased
Washing Machine User Manual WTG841B1W
 Washing Machine User Manual WTG841B1W EN Document Number= 2820525972_EN/ 22-05-17.(11:44) Please read this user manual first! Dear Customer, Thank you for prefering a Beko product. We hope that you get
Unpacking and removing shipping bolts. Connecting the drain line Leveling the washer Connecting to the power supply
 11 INSTALLATION Installation Overview Choosing the proper location Unpacking and removing shipping bolts Connecting the water line Connecting the drain line Leveling the washer Connecting to the power
202 West 2 nd St Whirlpool Laundry Manual WASHER SAFETY. Your safety and the safety of others are very important.
 WASHER SAFETY Your safety and the safety of others are very important. We have provided many important safety messages in this manual and on your appliance. Always read and obey all safety messages. This
Washing. Preparation. Washing. Contents
 Your washing machine Congratulations you have opted for a modern, high-quality domestic appliance manufactured by Bosch. The washing machine is distinguished by its economical water- and energy consumption.
Washing Machine User Manual WTB841R2W
 Washing Machine User Manual WTB841R2W EN Document Number= 2820525983_EN/ 24-07-17.(15:27) Please read this user manual first! Dear Customer, Thank you for prefering a Beko product. We hope that you get
User Manual. Washing Machine ZWF 91483WH ZWF 91483WR
 EN User Manual Washing Machine ZWF 91483WH ZWF 91483WR Contents Safety information 2 Safety instructions 3 Product description 4 Control panel 5 Programme Chart 6 Consumption values 7 Options 8 Settings
GETTING STARTED? EASY.
 User Manual GETTING STARTED? EASY. ZWF 81240W ZWF 81440W EN User Manual Washing Machine SAFETY INFORMATION Before the installation and use of the appliance, carefully read the supplied instructions. The
Switching off Turn the programme selector to Off. Washing
 Your washing machine Congratulations you have opted for a modern, high-quality domestic appliance manufactured by Siemens. This washing machine is distinguished by its economical water and energy consumption.
About the control and indicator settings.
 About the control and indicator settings. WARNING To reduce the risk of fire, electric shock, or injury to persons, read the IMPORTANT SAFETY INSTRUCTIONS before operating this appliance. 11 F 5 4 3 7
User Manual Washing Machine L FL
 EN User Manual Washing Machine L 76475 FL 2 www.aeg.com CONTENTS 1. SAFETY INFORMATION...3 2. SAFETY INSTRUCTIONS... 4 3. PRODUCT DESCRIPTION... 5 4. CONTROL PANEL...6 5. PROGRAMMES... 8 6. CONSUMPTION
User Manual Washing Machine L FL
 EN User Manual Washing Machine L 62270 FL 2 www.aeg.com CONTENTS 1. SAFETY INFORMATION...3 2. SAFETY INSTRUCTIONS... 4 3. PRODUCT DESCRIPTION... 6 4. CONTROL PANEL...7 5. PROGRAMMES... 8 6. CONSUMPTION
Washing. Preparation Correct installation according to the separate Installation instructions.
 Your washing machine Congratulations You have opted for a modern, high-quality domestic appliance manufactured by Siemens. This washing machine is distinguished by its economical water and energy consumption.
Washing. Preparation. Individual settings Spin speed / without final spin. Washing
 Your washing machine Congratulations you have opted for a modern, high-quality domestic appliance manufactured by Bosch. This washing machine is distinguished by its economical water and energy consumption.
Operating and Installation Instructions Washer W en-us. To prevent accidents and
 Operating and Installation Instructions Washer W 3037 To prevent accidents and en-us appliance damage, read these instructions before installation or use. M.-Nr. 09 676 140 Contents IMPORTANT SAFETY INSTRUCTIONS....4
WE 170 P. EN User Manual Washing Machine. CAUTION: Read the instructions before using the appliance. Original Instructions.
 WE 170 P EN User Manual Washing Machine CAUTION: Read the instructions before using the appliance. Original Instructions. 2 www.electrolux.com CONTENTS 1. SAFETY INFORMATION... 2 2. PRODUCT DESCRIPTION...
Front Load Washer 5kg USER MANUAL MFWS512
 Front Load Washer 5kg USER MANUAL MFWS512 CONTENTS Safety information... 2-3 Identifying parts of the Washer... 4 Installation... 5-7 Control Features and Functions... 8 Wash Programs... 9 Wash Guide...
OFF. 20 min. 60 min. 30 min. 60 min OFF. 100 min Start. 200 min 150 min
 Cool Warm HDY-M60 HDY-M60 HDY-M40 20 min 30 min 200 min 150 min 100 min Start Please read this manual carefully before operating your dryer. Retain this for future reference. Record the model and serial
Washing Machine User Manual WTG620M2W
 Washing Machine User Manual WTG620M2W EN Document Number= 2820525985_EN/ 23-05-17.(18:21) Please read this user manual first! Dear Customer, Thank you for prefering a Beko product. We hope that you get
WMA 767 W WMA 767 W WMA 767 S. Automatic washing machine. installation & operating instructions and washing guidance
 WMA 767 W installation & operating instructions and washing guidance Automatic washing machine WMA 767 W WMA 767 S get the best from your new washer Dear Customer, We wish that your product which was manufactured
Instructions for Use. Washing Machine
 Instructions for Use Washing Machine Thank you for your confidence in purchasing our washing machine, and congratulations on the excellent choice. Our appliances are friendly to the environment. Your new
Installation Instructions
 Instructions for Frontload Washers Original Instructions Keep These Instructions for Future Reference. (If this machine changes ownership, this manual must accompany machine.) www.alliancelaundry.com Part
Installation Instructions
 Installation Instructions for Frontload Washers Original Instructions Keep These Instructions for Future Reference. (If this machine changes ownership, this manual must accompany machine.) www.speedqueen.com
Sears, Roebuck and Co., Hoffman Estates, IL U.S.A.
 Pre-lnstallation Requirements... 2 Electrical Requirements... 2 Grounding Requirements... 2 Water Supply Requirements... 2 Drain Requirements... 2 Rough-In Dimensions... 3 Location Of Your Washer... 4
Installation Instructions
 Instructions for Topload Washers Original Instructions Keep These Instructions for Future Reference. CAUTION: Read the instructions before using the machine. (If this machine changes ownership, this manual
Washing Machine LWF27441W. User s Manual. Document Number / (10:04)
") Washing Machine LWF27441W User s Manual Document Number 2820524634/ 04-05-15.(10:04) Please read this user manual first! Dear Customer, Thank you for preferring a Blomberg product. We hope that you get
Washing Machine LWF27441W User s Manual Document Number 2820524634/ 04-05-15.(10:04) Please read this user manual first! Dear Customer, Thank you for preferring a Blomberg product. We hope that you get
G6FLWW17 6KG WASHING MACHINE
 G6FLWW17 6KG WASHING MACHINE G6FLWW17_IB_170919_grace.indd 1 Contents Guide to the Appliance 2 Caring for the Environment 3 Safety Information and Warnings 4 Items in the Box 6 Getting Started 7 Basic
 Your washing machine Congratulations You have opted for a modern, high-quality domestic appliance manufactured by Bosch. The washing machine is distinguished by its economical water- and energy consumption.
Black 8KG 1400 Spin Speed Inverter Direct Drive Washing Machine Instruction Manual
 Black 8KG 1400 Spin Speed Inverter Direct Drive Washing Machine Instruction Manual Model number: RHWM81400DIDB Opening times: Monday - Friday 8am 6pm & Saturday 9am 1pm or visit us at Contents Safety Instructions
Washing Machine PW6708 PW6710
 Washing Machine PW6708 PW6710 Please read the manual before using the product and please take good care of it. 1Warnings General Safety Never place your machine on a carpet covered floor. Otherwise, lack
WASHING MACHINE OWNER S MANUAL
 ENGLISH FRANÇAIS OWNER S MANUAL WASHING MACHINE Read this owner s manual thoroughly before operating the appliance and keep it handy for reference at all times WD100C* WD200C* MFL68267007 www.lg.com Copyright
TUMBLE DRYER MODEL: ED-F7160(WH) Owner s Manual Please read this manual carefully before operating your set. Retain it for future reference.
 Owner s Manual Please read this manual carefully before operating your set. Retain it for future reference.") TUMBLE DRYER MODEL: ED-F7160(WH) Owner s Manual Please read this manual carefully before operating your set. Retain it for future reference. Record model number and serial number of the set. See the label
TUMBLE DRYER MODEL: ED-F7160(WH) Owner s Manual Please read this manual carefully before operating your set. Retain it for future reference. Record model number and serial number of the set. See the label
Installation Instructions
 Installation Instructions for Topload Washers Original Instructions Keep These Instructions for Future Reference. (If this machine changes ownership, this manual must accompany machine.) www.speedqueen.com
Ensure. Single inlet Dual inlet -
 W10677398B NOTE The manufacturer reserves the right for any modifications on the product which might be deemed necessary or useful without informing about it in this IFU. Thank you for choosing a Hisense
Installation Instructions
 Instructions for Topload Washers Original Instructions Keep These Instructions for Future Reference. (If this machine changes ownership, this manual must accompany machine.) www.speedqueen.com Part No.
4KG Tumble Dryer / GVA4KG. Instruction Manual
 4KG Tumble Dryer / GVA4KG Instruction Manual Important Safety Instructions 1 When using electrical appliances, in order to reduce the risk of fire, electric shock, and/or injury to persons, basic safety
Washing Machine User Manual WJ842443W
 Washing Machine User Manual WJ842443W EN Document Number= 2820526964/ 26-07-18.(15:15) Please read these instructions first before using your appliance Dear Customer, Thank you for choosing a Beko appliance.
INSTRUCTION MANUAL 6KG WASHING MACHINE C610WM16. C610WM16_IB.indd 1 29/01/ :27
 INSTRUCTION MANUAL 6KG WASHING MACHINE C610WM16 C610WM16_IB.indd 1 29/01/2016 12:27 Contents Unpacking... 5 Installing Your Washing Machine... 6 Choosing the Right Location for Your Washing Machine...
Operating Instructions Condenser Dryer T 1570 C. To prevent accidents and machine damage read these instructions before installation or use.
 Operating Instructions Condenser Dryer T 1570 C To prevent accidents and machine damage read these instructions before installation or use. U M.-Nr. 03 719 550 Contents IMPORTANT SAFETY INSTRUCTIONS.................................
GETTING STARTED? EASY.
 User Manual GETTING STARTED? EASY. ZWD 71460 W ZWD 71463 W EN User Manual Washer Dryer SAFETY INFORMATION Before the installation and use of the appliance, carefully read the supplied instructions. The
Washing. Detergent drawers with dispensers I, II, Door. Fascia. Door handle. Select Start/Pause. Drainage hose. Detergent-solution pump
 Your washing machine Congratulations You have opted for a modern, high-quality domestic appliance manufactured by Siemens. The washing machine is distinguished by its economical consumption of water and
Contents Contents... 2 Safety Warning... 3 Unpacking... 6 Installation... 7 Installing Your Washing Machine... 7 Moving and Installing...
 Contents Contents...2 Safety Warning...3 Unpacking...6 Installation...7 Installing Your Washing Machine...7 Choosing the Right Location for Your Washing Machine... 7 Moving and Installing...8 Removing
CONTENTS QUICK REFERENCE GUIDE INSTRUCTIONS FOR USE PROGRAMME CHART BOOKLET
 CONTENTS QUICK REFERENCE GUIDE PROGRAMME CHART PREPARING THE LAUNDRY SELECTING A PROGRAMME AND OPTIONS STARTING AND COMPLETING A PROGRAMME CHANGING A PROGRAMME INTERRUPTING A PROGRAMME DAILY MAINTENANCE
INSTALLATION INSTRUCTIONS
 INSTALLATION INSTRUCTIONS INSTALLATION REQUIREMENTS Tools and Parts Gather required tools and parts before starting installation. Tools needed: Optional tools: Flashlight Options: Bucket Pedestal: You
Washing Machine Owner s Instructions
 Washing Machine Owner s Instructions J1043/ J843 Safety Precautions...2 lnstalling the Washing Machine...3 Unpacking the washing machine...3 Overview of the washing machine...3 Selecting a location...3
Washing Machine User Manual WIX765450
 Washing Machine User Manual WIX765450 EN Document Number= 2820526051_EN/ 29-07-17.(10:52) Please read this user manual first! Dear Customer, Thank you for prefering a Beko product. We hope that you get
Washing. Detergent drawer with compartments I, II, Washing machine door. Control panel Washing machine door handle. Select Start.
 . 1 2 3 4 5 6 Your washing machine Congratulations You have opted for a modern, high-quality domestic appliance manufactured by Bosch. This washing machine is distinguished by its economical water and
9.5KG WASHING MACHINE
 G9TLWW17 9.5KG WASHING MACHINE G9TLWW17_IB_Final170920V2.indd 1 G9TLWW17_IB_Final170920V2.indd 2 Contents Guide to the Appliance 2 Caring for the Environment 3 Safety Information and Warnings 4 Items in
Washing. Preparation Correct installation according to the separate Installation instructions.
 Your washing machine Congratulations You have opted for a modern, high-quality domestic appliance manufactured by Bosch. This washing machine is distinguished by its economical water and energy consumption.
Washing Machine User manual
 Washing Machine User manual LWI842 Please read this user manual first! Dear Customer, Thank you for prefering a Blomberg product. We hope that you get the best results from your product which has been
User Manual Washing Machine L FL
 EN User Manual Washing Machine L 76475 FL 2 www.aeg.com CONTENTS 1. SAFETY INFORMATION... 2 2. SAFETY INSTRUCTIONS...4 3. PRODUCT DESCRIPTION...6 4. CONTROL PANEL... 7 5. PROGRAMMES...8 6. CONSUMPTION
r n n p t i h m a f f e e
 USER S OPERATION MANUAL X08060287B Before operating this unit, please read this manual thoroughly, and retain for future reference NOTE The manufacturer reserves the right for any modifications on the
Operating Instructions Condenser Dryer T 1332 C T 1333 C. To prevent accidents and machine damage, read these instructions before Installation or use.
 Operating Instructions Condenser Dryer T 1332 C T 1333 C To prevent accidents and machine damage, read these instructions before Installation or use. UV M.-Nr. 06 610 680 Contents IMPORTANT SAFETY INSTRUCTIONS.................................
EASY-TO-USE AUTOMATIC WASHER Use & Care Guide
 EASY-TO-USE AUTOMATIC WASHER Use & Care Guide Table of Contents... 2 Model 3RLSQ8000 8316482 WASHER SAFETY...2 WASHER DISPOSAL...3 PARTS AND FEATURES...4 WASHER USE...5 Understanding Washer Cycles...5
USER S GUIDE LAW2400. Automatic Washer W-19
 LAW2400 Automatic Washer W-19 USER S GUIDE Congratulations on your purchase of a Maytag Performa clothes washer! Your satisfaction is very important to us. Read this manual for best results. It contains
MACHINE OPERATION. Additional information (including troubleshooting and service) can be found in the individual chapters of the Instructions for use.
 can be found in the individual chapters of the Instructions for use.") MACHINE OPERATION Additional information (including troubleshooting and service) can be found in the individual chapters of the Instructions for use. Sort laundry according to care symbols Do not tumble
MACHINE OPERATION Additional information (including troubleshooting and service) can be found in the individual chapters of the Instructions for use. Sort laundry according to care symbols Do not tumble
Kogan 9kg Front Load Washing Machine KAGFLWASH9A
 Kogan 9kg Front Load Washing Machine KAGFLWASH9A It is essential to read this manual carefully before it is installed and used for the first time. This washing machine conforms to current safety requirements.
Operating and Installation Instructions Washer W en-us. To prevent accidents and
 Operating and Installation Instructions Washer W 4802 To prevent accidents and en-us appliance damage, read these instructions before installation or use. M.-Nr. 07 830 400 Contents IMPORTANT SAFETY INSTRUCTIONS.................................
Washing Machine. User manual WW8*K5***** / WW7*K5*****
 Washing Machine User manual WW8*K5***** / WW7*K5***** Contents Safety information 3 Contents What you need to know about the safety instructions 3 Important safety symbols 3 Important safety precautions
Operator s Manual READY RACK EXTRACTOR. Installation/Operation/Maintenance/Parts DIMENSIONS OF THE WASHER: HEIGHT (AT BACK): 42
: 42") READY RACK EXTRACTOR DIMENSIONS OF THE WASHER: HEIGHT (AT BACK): 42 HEIGHT (W/ LID RAISED): 56 WIDTH: 27 DEPTH: 26 DEPTH (W/ REAR HOSE): 30 WEIGHT: 190 lbs. SHIP WEIGHT: 255 lbs. Operator s Manual Installation/Operation/Maintenance/Parts
READY RACK EXTRACTOR DIMENSIONS OF THE WASHER: HEIGHT (AT BACK): 42 HEIGHT (W/ LID RAISED): 56 WIDTH: 27 DEPTH: 26 DEPTH (W/ REAR HOSE): 30 WEIGHT: 190 lbs. SHIP WEIGHT: 255 lbs. Operator s Manual Installation/Operation/Maintenance/Parts
Washing Machine User's Manual
 WMX 73120 B Washing Machine User's Manual Numéro de document 2820524933/ 28-04-14.(21:00) Please read this user manual first! Dear Customer, Thank you for prefering a Beko product. We hope that you get
Washing. Preparation Correct installation according to the separate Installation instructions.
 Your washing machine Congratulations You have opted for a modern, high-quality domestic appliance manufactured by Bosch. This washing machine is distinguished by its economical water and energy consumption.
Automatic Washer A
 Automatic Washer A Note to You...2 Washer Safety...3 Parts and Features...4 Using Your Washer...5 Starting Your Washer...5 Loading...6 Selecting a Cycle, Time and Temperature...7 Adding Liquid Chlorine
Washing Machine User manual
 Washing Machine User manual LWI28441 Please read this user manual first! Dear Customer, Thank you for preferring a Blomberg product. We hope that you get the best results from your product which has been
Washing Machine User Manual
 Washing Machine User Manual WMB 81243LW EN Document Number= 2820524659/ 30-11-15.(14:26) Please read this user manual first! Dear Customer, Thank you for prefering a Beko product. We hope that you get