TABLE OF CONTENTS DESCRIPTION
|
|
|
- Leo Stevens
- 6 years ago
- Views:
Transcription
1
2 - -
3 TABLE OF CONTENTS PAGE DESCRIPTION 3 Table of Contents, 5 Safety Instructions Very Important Must Read Both Pages 6 Procedures for Loading, Transporting, and Unloading Scrubber 7 Specifications of PowerBuff Automatic Floor Scrubbers 8 Battery Installation and Charging 9 Battery Maintenance 0 Preventative Maintenance Pad Driver and Available Scrubbing Brushes Squeegee Information and Adjustments 3 Brush Operation How to Raise and Lower Brushes Operating Tips and Miscellaneous Information 5 Scrubber View Descriptions for this Manual 6, 7 Operating Procedures pages 8 Main Scrubber Parts 9 Scrubber Controls 0 Rear View of Scrubber Showing Parts Dashboard Layout View and Parts and Rear View Parts Solution Tank and Lid Assembly and Parts 3 Recovery Tank Assembly and Parts, 5 Recovery Lid Assembly and Parts 6 Splash Skirt Assembly and Parts 7 Squeegee Mount Assembly and Parts 8, 9 Squeegee Assembly and Parts 30, 3 Brush Lift, Motor Mount, and Squeegee Lift, and Parts 3, 33 Motor Frame and Motor Mount and Parts 3 Brush Drive Details and Traction Drive Details 35 Drive Hub Assembly and Parts 36 Handle Assembly (for Brush Drive) 37 Handle Assembly (for Traction Drive) 38 Brush Drive Wheel Mounting Assembly and Parts 39 Transaxle Assembly and Parts 0,, Vacuum System and Solution System and Parts 3,, 5 Views of Scrubber with Major Plastic Removed 6 Batteries and Charger Parts 7 Electrical Panel and Parts and Other Electrical Information 8 Electrical Layout for Brush Motors and Vacuum Motor 9 Electrical Layout for Traction Drive Portion of Scrubber 50, 5 Trouble Shooting 5 Warranty - 3 -
4 SAFETY INSTRUCTIONS Hazard Level Explanation or Description of Hazard Level Failure to follow safety instructions labeled could result in severe injury or death to the machine operator or others. Failure to follow safety instructions labeled could result in injury to the machine operator or others. Also, machine or property damage could occur. Failure to follow safety instructions labeled could result in damage to the machine or damage to other property. This manual contains important information about your machine. Read and understand all instructions before operating the machine. Failure to read and follow the instructions could result in injury to the person operating the machine or injury to others. Damage to the machine or other property could occur if instructions are not followed. Do not operate this machine around any solvents, thinners, or other flammable liquids or materials. Electrical sparks can cause a fire or even an explosion. Do not smoke around the machine. Also, keep all sparks and flames away from the batteries. The batteries generate gases that can cause an explosion. Special care needs to be used when working on or near the batteries. Wear eye protection. Do not lay tools on batteries, as they may short out battery terminals. Do not wear metal jewelry, as it may short out battery terminals. Charging batteries can be dangerous. Be aware that the battery charger may have a relatively low voltage output, but the current output is very high and therefore dangerous. Do not operate the charger if any parts of the charger or charger cords are damaged. Do not stand on a wet floor when connecting or disconnecting charger to the power outlet or to the machine. Safety Instructions are continued on the next page - -
5 SAFETY INSTRUCTIONS (continued from previous page) Battery acid is dangerous. Wear eye and face protection, hand protection, and body protection when working on and around batteries. If you get acid on your skin, wash off immediately. If you get acid on your clothing, remove clothing and wash any skin that was in contact with the clothing. Baking soda mixed with water will help to neutralize the acid on your skin. The machine is very heavy, so be very careful when loading, transporting, and unloading the machine. Follow the Procedures for Loading, Transporting, and Unloading Automatic Floor Scrubber (on a separate page). Do not pick up dust; machine is for wet pick-up only. Keep all body parts, clothing, and objects away from moving parts. Operate machine from the rear, not from the side. Disconnect a wire to the batteries before working on the machine. Do not operate machine with charger plugged in. Do not operate machine with any parts damaged or missing. Do not operate close to stairs, loading docks, or other drop-offs. Do not park machine in such a manner that it could roll, forward or backward, off a drop-off. Authorized personnel must perform maintenance and repairs. Do not alter or modify the machine, unless authorized by the manufacturer. Do not expose the electrical components to water or excessive moisture. Always put caution signs around the areas that are being cleaned. Discharge wastewater properly. Improper discharge of wastewater is illegal. Understand and follow all Federal, State, and Local laws regarding disposal of wastewater. Do not use machine as a ladder. Do not use machine as a forklift to push stuff around. Do not ride or let anyone ride on the machine. Your machine warranty may be voided if parts other than PowerBuff parts are used
6 Procedures for Loading, Transporting, and Unloading Automatic Floor Scrubber The machine is very heavy, so be very careful when loading, transporting, and unloading the machine. Use at least two people to load or unload the machine. Loading Procedure Using a Ramp with a Traction Drive Scrubber o Ramp must be long enough so that climb into van, truck, or trailer is no more than 0 degrees. (This would permit a height of for a 7-foot ramp, 8 for an 8-foot ramp, and 3 0 for a 9-foot ramp). o A short pre-ramp may be needed to prevent pad drivers from dragging. o Ramp must be secured to vehicle, and be clean and dry. o Remove squeegee assembly and pad drivers. o Machine must be driven straight up the ramp and never at an angle. Loading Procedure Using a Ramp with a Brush Drive Scrubber o It is not recommended that a brush drive scrubber be loaded using a ramp with an incline of more than 7 degrees. The machine is not self-propelled and therefore it is not able to assist itself up a ramp. It is too heavy to manually push up a steep incline. o If you must load with a ramp, the incline must be no more than 7 degrees. (This would permit a height of no more than one foot for an 8-foot ramp). o Ramp must be secured to vehicle, and be clean and dry. o Remove squeegee assembly and pad drivers. o Machine must be driven straight up the ramp and never at an angle. Loading Procedure Using a Lift Gate o Lift gate must have ample capacity to lift the scrubber o Lift gate must be long enough to accommodate scrubber in the direction that it will be loaded onto the van. Do not load scrubber sideways, because it is dangerous to turn the scrubber while on the lift gate. o Wheels must be firmly chocked to prevent scrubber from rolling off the lift gate. Securing Scrubber o Scrubber must be secured, so that it will not roll or turn over. Use chocks and tie downs to secure scrubber. o Please be aware that a scrubber is very heavy, and that a metal bulkhead in a van may not contain scrubber in the event of an accident. The equipment in a van can be more dangerous than the accident itself. Unloading Procedure Using a Ramp with a Traction Drive Scrubber o Ramp must be long enough so that removal can be controlled. Use same height restrictions as used for loading scrubber. o Ramp must be secured to vehicle, and be clean and dry. o A small pre-ramp may be needed to prevent pad drivers from dragging. o Machine must be driven straight down the ramp and never at an angle. o Use slow forward speed to slow descent as needed. Unloading Procedure Using a Ramp with a Brush Drive Scrubber o Ramp must be long enough so that removal can be controlled. Use same height restrictions as used for loading scrubber. o Ramp must be secured to vehicle, and be clean and dry. o Machine must be driven straight down the ramp and never at an angle. o Do not let machine run over you or anyone else as it comes off ramp
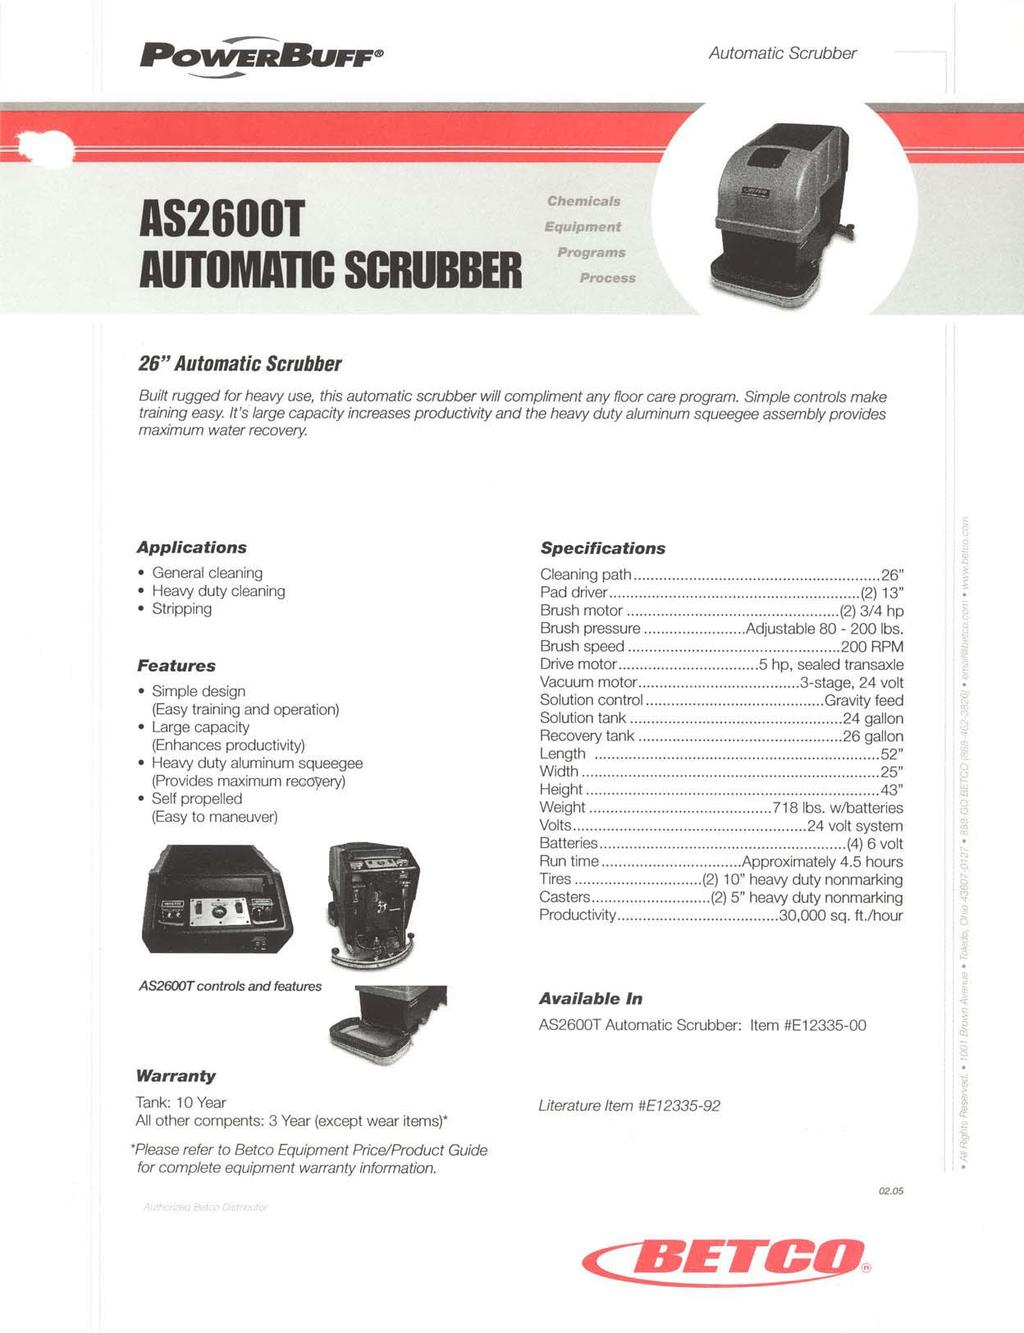
7 AUTOMATIC FLOOR SCRUBBER SPECIFICATIONS Model AS600B AS600T AS300 Scrub Path 6 offset head 6 offset head 3 symmetrical head Coverage 30,000 sq. ft. / hour 30,000 sq. ft. / hour 38,000 sq. ft. / hour Battery Pack volt system volt system 36 volt system Charger volt - 0 amp volt - 0 amp 36 volt - 0 amp Run Time.5 hours hours 5.5 hours Vacuum Motor HP - 3 stage HP - 3 stage HP - 3 stage Brush Motors (Two) 3/ HP - 00 rpm 3/ HP - 00 rpm 3/ HP - 00 rpm Drive System Brush Assisted / hp sealed transaxle / hp sealed transaxle Wheels Front: two 0 solid Rear: two 5 castors Front: two 0 solid Rear: two 5 castors Front: two 0 solid Rear: two 5 castors Tank Construction Rotational molded polyethylene Rotational molded polyethylene Rotational molded polyethylene Solution tank gallon gallon gallon Recovery tank 6 gallon 6 gallon 3 gallon Brushes Two 3 pad holders (Brushes are optional) Two 3 pad holders (Brushes are optional) Two 6 pad holders (Brushes are optional) Forward Speed Walking speed Variable to 90 ft/min (3.3 mph) Reverse Speed Walking speed Variable to 5 ft/min (.6 mph) Variable to 90 ft/min (3.3 mph) Variable to 5 ft/min (.6 mph) Brush Pressure 80 lbs and 00 lbs 80 lbs and 00 lbs 80 lbs and 0 lbs Brush Lifting Mechanical Mechanical Mechanical Squeegee 3 heavy duty curved tracking squeegee 3 heavy duty curved tracking squeegee 0 heavy duty curved tracking squeegee Dimensions (no skirt, no squeegee) 5 long 5 wide 3 tall 5 long 5 wide 3 tall 60 long 5 wide 3 tall Weight with Batteries 685 lbs. 70 lbs. 850 lbs. Warranty 5 years on parts 0 year on tanks 5 years on parts 0 year on tanks 5 years on parts 0 year on tanks - 7 -
8 BATTERY INSTALLATION AND CHARGING BATTERY INSTALLATION Turn off all switches. Drain solution tank and recovery tank. Disconnect recovery dump hose from hooks on rear of machine so that recovery tank can lift. Lift recovery tank lid and tilt up recovery tank. Install batteries as shown on figure. BACK OF MACHINE TOWARD THE OPERATOR BLACK WIRE TO SCRUBBER RED WIRE TO SCRUBBER FRONT OF MACHINE figure BATTERY CHARGING Place the charger on a safe place. Make sure that air can circulate around the charger. Do not get the charger wet. All switches on scrubber must be off. Do not remove battery caps (the caps are vented). Do not charge scrubber in a wet area. Do not stand in a wet area when plugging in charger to the 0 volt receptacle or plugging into the scrubber. Connect the charging plug from the charger to the charging plug on the back of the scrubber (item 6) Plug in the charger to a properly grounded 0 volt receptacle. Indicator needle will rise and then will fall slowly as batteries charge. Charger will shut off automatically when batteries are fully charged

9 BATTERY MAINTENANCE To receive the longest life from the batteries, charge them when they have between 5% and 50% of a full charge. Do not allow batteries to remain in a discharged state for very long, as this shortens the total battery life. Be aware that a discharged battery will freeze easily. Check the electrolyte level weekly. Top off with distilled water as shown in figure. Do not overfill. Make sure that all plugs are tight. Make sure battery connections are tight and free from corrosion. A baking soda and water solution and a wire brush are helpful when cleaning battery connections. Keep caps on when cleaning batteries, so that electrolyte is not contaminated. ELECTRO- LYTE LEVEL IN THIS CELL IS TOO HIGH figure ELECTRO- LYTE LEVEL IN THIS CELL IS TOO LOW ELECTRO- LYTE LEVEL IN THIS CELL IS JUST RIGHT CHECK ELECTROLYTE LEVEL IN ALL CELLS DO NOT OVERFILL. DO NOT FILL ABOVE THE BOTTOM OF THE TUBE THAT EXTENDS INTO BATTERY. KEEP ABOUT /" BELOW BOTTOM OF TUBE. ADD DISTILLED WATER, AS NEEDED, SO THAT ELECTROLYTE LEVEL IS ABOUT 3/" ABOVE PLATES. KEEP ELECTROLYTE LEVEL ABOVE TOP OF PLATES.!!! BATTERIES ARE DANGEROUS!!! READ THE SAFETY INSTRUCTIONS IN THE FRONT OF THIS MANUAL FOR SPECIFIC WARNINGS IF YOU WOULD LIKE TO LEARN MORE ABOUT BATTERIES THERE IS A VERY INFORMATIVE PUBLICATION AVAILABLE. IT COVERS SUBJECTS SUCH AS BATTERY TERMS AND HOW A BATTERY WORKS TO SPECIFIC GRAVITY TESTING WITH A HYDROMETER AND DIAGNOSIS OF BATTERY PROBLEMS. YOU CAN OBTAIN A COPY OF THE BATTERY SERVICE MANUAL FROM BATTERY COUNCIL INTERNATIONAL 0 N. MICHIGAN AVENUE CHICAGO, IL 606 PHONE
10 PREVENTATIVE MAINTENANCE ITEMS Before starting work Inspect pads for wear. Replace if needed. Turn on brush motors and check battery indicator gauge to assure that there is enough charge to scrub floor. After you are finished using scrubber for the day Raise squeegee and leave up. Raise brushes and leave up. Drain and rinse recovery tank, including vacuum shut-off float. Wipe top of tank clean. Clean vacuum intake screen. A small wire brush works well for this. Wipe down recovery tank lid and lid gaskets. Drain and rinse solution tank (especially if using something other than a very mild scrubbing solution). Charge batteries, if needed. Remember batteries have a longer life if allowed to discharge sufficiently. Please read Battery Maintenance page. Weekly maintenance Check electrolyte level in batteries. See Battery Maintenance page for instructions. Clean and lubricate caster wheels and caster swivel. There are grease fittings to use a grease gun. Note: Main 0 wheels do not require lubricating. (They have sealed ball bearings that cannot be lubricated). Wipe surface of machine clean. A silicone product such as Armor All will make the plastic parts look really good. Monthly maintenance Clean battery connections and tops of batteries. See Battery Maintenance page for instructions. Inspect scrub brushes for wear (If you have scrub brushes). General visual inspection for problems. Semi-annual maintenance Inspect carbon brush wear in brush motors. Lubricate all pivot points with a light oil. Porous bushings will absorb some oil to distribute over time. Lubricate brush lift arm sliding surface with a heavy grease. This is located behind the back panel. Bearing grease may be used. As needed items Adjust squeegee tilt. See Squeegee Information page. Turn, flip, or replace squeegee blade for streak free pickup. Replace intake screen and intake screen gasket
11 PAD DRIVER AND AVAILABLE BRUSHES PAD DRIVER NEED PER MACHINE PART NO. DESCRIPTION E756 3" pad driver (must be used with an appropriate pad)* * CONSULT YOUR JANITORIAL SUPPLIER FOR ADVISE ON THE PROPER PAD TO USE FOR YOUR APPLICATION. SCRUB AND STRIP PADS ARE COLOR CODED FROM LEAST AGRESSIVE TO MOST AGRESSIVE AS FOLLOWS: WHITE - RED - BLUE - GREEN - BROWN - BLACK BRUSH NEED PER MACHINE PART NO. DESCRIPTION USES E757 Dynascrub Light to medium scrubbing (replaces red pads) E759 Powerscrub Medium to aggressive scrubbing (replaces blue or green pads) E760 Stratagrit Very aggressive scrubbing or stripping (replaces brown or black pads) A BRUSH WILL OUTLAST A PAD AT LEAST 00 TO - -
12 SQUEEGEE INFORMATION AND ADJUSTMENTS SQUEEGEE MUST BE ATTACHED TO SCRUBBER FOR PROPER ADJUSTMENT OF TILT AND BLADE DEFLECTION (b) USE 9/6" HEX WRENCH OR SOCKET (a) USE /" HEX KEY (c) HOLE IN REINFORCING BLADE IS SHOWN TURNED UPWARD, WHICH IS THE POSITION WHICH ALLOWS FOR THE MOST DEFLECTION OF THE MAIN SQUEEGEE BLADE Problem: Squeegee is leaving streaks at the center or the ends. Cause: Squeegee is not level. If it is not level, it will streak in the center or at the ends. Solution: Make sure that the tips and the center of main squeegee blade are uniformly deflected and not leaving streaks. Adjust squeegee tilt as follows: Step : Loosen (a) and (b) Step : Tilt squeegee in direction needed for squeegee to deflect uniformly along entire length. Step 3: Tighten (a) and (b) enough to hold temporarily. Step : Move scrubber forward to check that deflection is uniform. Step 5: If correct, tighten (a) and (b) as much as you can; or if not correct, start over at step. Problem: Squeegee is leaving streaks not related to squeegee being level. Cause: () Trash under main squeegee blade. () Blade edge is worn or nicked Solution: () Clear trash. () Turn the blade. All four edges can be used. If all edges have been used, then replace the main squeegee blade. Problem: Main squeegee blade is deflecting too much or too little. Cause: Reinforcing blade is turned wrong for the floor conditions. Solution: Holes on the reinforcing blade are offset. Blade can be flipped to put longer or shorter side toward floor. Longer side has a hole (c) at center. Facing the hole down makes the main blade stiffer and allows it to deflect less. Hole turned upward allows blade to deflect more. - -
13 BRUSH OPERATION HOW TO: RAISE BRUSHES, LOWER BRUSHES, ADD HEAVY PRESSURE TO BRUSHES, AND RELEASE PRESSURE FROM BRUSHES FIGURE RAISE BRUSHES IF INSTRUCTIONS IN FIGURE DO NOT WORK, GO TO INSTRUCTIONS IN FIGURE BRUSH HANDLE () PUSH DOWN FOOT PEDAL FOOT PEDAL FIGURE TO RAISE BRUSHES IF INSTRUCTIONS IN FIGURE DO NOT WORK, THERE ARE PROBABLY NO BRUSHES ON SCRUBBER AND THIS SHOULD RAISE BRUSHES. () PUSH IN HANDLE () PUSH DOWN FOOT PEDAL FIGURE 3 3 LOWER BRUSHES ( ) PUSH DOWN FOOT PEDAL () PUSH IN HANDLE (3) RELEASE FOOT PEDAL SLOWLY IF BRUSHES ARE ON SCRUBBER AND WILL NOT RAISE, THEY ARE IN THE HEAVY PRESSURE POSITION, SO PROCEED TO FIGURE 5 TO RELEASE BRUSHES. FIGURE ADD HEAVY BRUSH PRESSURE FIGURE 5 RELEASE HEAVY BRUSH PRESSURE 3 () PULL UP HANDLE () PULL BACK HANDLE, WHILE STILL PULLING UP (3) LOWER HANDLE SLIGHTLY WHILE STILL PULLING BACK () PULL UP HANDLE () PUSH IN HANDLE (3) LOWER HANDLE
14 OPERATING TIPS AND MISCELLANEOUS INFORMATION FLOOR SCRUBBING TIP Double scrubbing can be a very effective way to clean a floor. This especially important before coating with finish, as you do not want to wax in any dirt. To double scrub do the following: Scrub the floor as normal, but leave the squeegee up and the vacuum off. Scrub a few aisles ahead while letting the floor soak. Then go back over what you have wet down, but this time with the squeegee down and the vacuum on. This will get the floor much cleaner than a single pass scrub. Note: Do not double scrub where non-floor cleaning personnel will be walking, since the floor stays wet and is therefore hazardous. SQUEEGEE OPERATING TIPS The curved squeegee picks up solution very well if properly adjusted. The squeegee must be level to work well. If it is not level, it will streak in the center or at the ends. Make sure that the tips and the center are uniformly deflected and not leaving streaks. If squeegee is not level, then loosen the two bolts on squeegee bracket and squeegee will pivot forward and backward. Level squeegee and tighten bolts. If squeegee is properly adjusted and is leaving streaks, then there may be trash caught under the main squeegee blade. A little trick that will clear most trash is to () stop the scrubber, () lift the squeegee, (3) back up a little, () lower the squeegee, and then (5) resume scrubbing as usual. If this does not work, then the trash must be cleared by hand. See Squeegee Information and Adjustments page for more information. IF SCRUBBER IS USED FOR PICKING UP WAX AND STRIPPER The scrubber can be used to vacuum the emulsified wax and stripper from a floor strip. But, be aware that more upkeep will be required on the scrubber than if it were used only for scrubbing, since the wax and dirt will remain after the stripper evaporates. So, after using scrubber on a floor strip do the following. Disconnect vacuum hose from squeegee and vacuum clean water through vacuum hose. Rinse out recovery tank, including letting clean water run out dump hose. Clean squeegee. Clean top of recovery tank. Clean recovery lid and gasket on recovery lid. Drain solution tank and flush lines with clean water. (If you have stripper in the solution tank, you do not want it on the floor if the next job the scrubber is used on is just a scrub). Wipe down anywhere where wax slop has gotten on scrubber. EXPOSING SCRUBBER TO FREEZING TEMPERTURES Do NOT leave scrubber in freezing temperatures If scrubber must be left or transported in freezing temperatures, then precautions must be taken. If an attempt is made to close (or open) the solution valve when it is frozen, the solution cable or solution valve will be damaged. Drain Solution Tank and leave solution valve open. Recovery Tank must also be drained. Then after the scrubber is inside place to be used, do not yet attempt to shut the solution valve. You must first check to make sure that the solution valve is not frozen. Run hot water into solution tank. After water is running out the bottom of the machine (the brush area), then shut off solution valve (do not force the solution valve control handle). You can then fill solution tank and use the scrubber. - -
15 DESCRIPTIONS OF VIEWS SHOWING PARTS ON SCRUBBER TOP VIEW FRONT VIEW RIGHT VIEW TOP-RIGHT-FRONT VIEW IN THIS MANUAL, MANY OF THE PARTS IN THE DRAWINGS ARE SHOWN CORRECTLY ASSEMBLED, OR AT LEAST NEAR THE POSITIONS THEY ARE LOCATED ON THE SCRUBBER. THIS METHOD WILL HELP TRACE A PROBLEM, FIND WHAT IS NEEDED TO CORRECT THE PROBLEM, AND THEN PROPERLY REASSEMBLE THE MACHINE. THE ELECTRICAL LAYOUT HAS ALSO BEEN SIMPLIFIED, SO THAT PROBLEMS CAN BE EASILY TRACED AND REPAIRED
16 Operating Procedures (See page 9 for guide to item numbers) Batteries need to be in the operating range (the green area) of the battery condition meter (item ). Gauge will register battery condition when brush motors (Brush Motor Control Switch, item 6) are turned on. Turn off brush motors after battery condition is determined. Lift solution lid (item A) and add water and liquid cleaner to solution tank (item B). Consult cleaner instructions for proper ratio of cleaner and water (Note: the solution tank holds gallons when full). Take scrubber to area to be cleaned o Traction Scrubber Make sure that squeegee and brushes are off the floor. Turn variable speed control knob (item 8) all the way counterclockwise. Turn on traction switch (item 9). Squeeze forward control lever (item ) if scrubber needs to go forward and reverse control lever if scrubber needs to be moved backward. Gradually increase variable speed control knob (item 8) until scrubber attains the needed speed. Release lever to stop. o Brush Drive Scrubber Lift squeegee and brushes off the floor. Push scrubber to desired location. Lower brushes by depressing brush lift pedal (item 3) and then push in on brush lift and pressure lever (item ), and gradually let brushes drop to contact with floor by slowly lift foot off brush lift pedal (item 3). (Note that the brushes can be lowered using only the brush lift and pressure lever (item )). Lower squeegee using the squeegee lift lever (item 8) and turn on vacuum using the vacuum motor control switch (item 7). Turn on solution by adjusting cleaning solution control lever (item 7) to desired flow rate (the flow rate can be adjusted as the need arises). Turn on brushes using the brush control switch (item 6) and immediately move scrubber forward. o Traction Scrubber adjust speed as needed with the variable speed control knob (item 8). o Brush Drive Scrubber push to desired speed. There is no need to keep the forward control lever depressed. The brush drive scrubber should move easily by pushing alone. Operating procedures are continued on the next page - 6 -
17 Operating Procedures (continued) When you stop scrubbing an area. o Turn off brushes (brushes or pads can wear through the wax if left running in one place) o Turn off solution flow (cleaning solution control lever (item 7)) o Turn off vacuum (vacuum motor control switch (item 7)) o Turn off traction drive on traction drive model (traction on/off switch (item 9)) Before taking scrubber back to storage area o Lift brushes o Lift squeegee To dump dirty water from recovery tank (item C) o Lift recovery dump hose (item ) with plug for recovery dump hose (item 0) from hooks. o Hold end of hose so that the dirty solution will flow into the appropriate place (such as a drain) when plug is removed. o Loosen T-handle on plug for recovery dump hose (item 0) and remove plug from hose. Dirty solution will flow from tank. (Note: do not completely unscrew T-handle from plug). o Replace plug and tighten. Hang hose back on hooks. Machine storage for the day o Brushes in up position o Squeegee in up position o Recovery tank emptied (Note: it is best to occasionally rinse it out with clean water). o Solution tank emptied (especially if machine is to be left for longer than a day). o Turn off all switches. (Note: if traction on/off switch is left on for more than 0 minutes without the machine moving, then the traction control electronics will automatically power down. To reset them, simply turn the traction on/off switch off and then back on)
18 MAIN SCRUBBER PARTS ITEM SKU DESCRIPTION AND NOTES E79 Solution Tank (GRAY) E78 SOLUTION TANK LID (BLACK) 3 E75 RECOVERY TANK (GRANITE) E77 RECOVERY TANK LID (BLACK) 5 E753 SKIRT (BLACK) 6 E76 BASE (BLACK) 7 AS6 Main Frame 8 PE5000 Squeegee assembly - 6" - 8 -
19 SCRUBBER CONTROLS DASHBOARD VIEW ) Forward Control Lever ) Battery Condition Meter 3) Reverse Control Lever ) Circuit Breaker for Vacuum 5) Circuit Breaker for Brush Motors 6) Brush Motor Control Switch 7) Vacuum Motor Control Switch 8) Variable Speed Control Knob (Traction Drive Model) 9) Traction on/off switch (Traction Drive Model) 0) Plug for Recovery Dump Hose ) Brush lift and Pressure Lever ) Recovery Dump Hose 3) Brush Lift Pedal ) Drain Hose for Battery Tray 5) Vacuum Recovery Hose 6) Charging Plug for Volt Charger 7) Cleaning Solution Control Lever 8) Squeegee Lift Lever REAR VIEW - 9 -
20 REAR VIEW OF SCRUBBER T 9 9 B 0 0 6b 6a NOTE: PARTS LIST IS ON NEXT PAGE - 0 -
21 DASHBOARD LAYOUT AND PARTS FOR DASHBOARD AND PARTS FROM REAR VIEW OF SCRUBBER a 8b 9 B 5 T ITEM QTY. AS6/330 PART NO. Right DESCRIPTION Handle AS60 Battery Condition Meter E5 RIGHT HANDLE LEVER 3 AS6/3300 Left Handle E050 VOLT SYSTEM GAUGE AS6/3370 Circuit Breaker - 30 am p 5 3 AS6/337 E50 Circuit LEFT Breaker HANDLE - 70 LEVER am p 6, 7, 9 3 AS6/337 E57 Rocker CIRCUIT Switch BREAKER (9 is for - Traction 30AMP Drive only) 8a 5 AS6/3850 E58 Speed CIRCUIT Control BREAKER Potentiometer - 70 AMP 8b AS6/385 Knob for Speed Control 6, 7, 9 3 E59 ROCKER SWITCH 0 AS6/330 -/" Drain Plug 8a E738 CLAROSTAT ROTARY CONTROL AS6/38 Brush Lift Handle Weldm ent 8b >> see E739 >> for SPEED Recovery CONTROL Drain Hose parts KNOB see the "Vacuum System and Solution System" pages 30 AS6/37 E05 Brush DRAIN Lift PLUG Handle / - Pedal (#5003) >> see E0 >> for BRUSH the Battery LIFT Drain HANDLE Hose parts see the "Vacuum System and Solution System" pages 5 >> see >> >> see for see Vacuum "Vacuum Recovery System Hose and parts Solution see the "Vacuum System" System pages and Solution System" pages 6a 3 AS600 E0 Charging BRUSH Plug LIFT (Anderson HANDLE - plug) PEDAL 6b AS6/30 Bracket for Anderson Plug >> see See "Vacuum System and Solution System" pages 7 AS660 Solution Control Cable (includes knob) 5 >> see See "Vacuum System and Solution System" pages 8 >> see >> for Sqeegee Lift Handle parts see the "Brush Lift, Motor Mount, and Squeegee Lift" pages 96a AS6/375 E0 Lid SB75 Flap Red Electrical Connector 06b AS6/309 E889 Lid BRACKET Flap Retainer FOR ANDERSON PLUG B 7 AS6/350 E77 Forward THROTTLE/SOLUTION Decal (for Brush Drive CONTROL Scrubber) (for AS600) T 8 AS6/353 >> see Speed See "Brush Control Lift, and Motor Forward Mount, Decal and (for Squeegee Traction Lift" Drive pages Scrubber) AS6/3530 Brush Position Decal 9 E55 LID FLAP.06" DIA.SHEET 3 AS6/30 Back Panel 0 AS653 E879 Flow FLAP Label RETAINER 5B AS6/3500 Reverse Forward Decal (for Brush Drive Scrubber) 6T AS6/3390 E637 Dashboard Decal, Speed Control 7 AS6/350 E636 Squeegee BRUSH POSITION Decal DECAL 8 AS6/335 Screw 3 E878 BACK PANEL 9 AS6/396 Nylon Washer 30 7 AS6/3353 AS65 Screw Flow Label 35 7 AS6/335 E63 Flat REVERSE Washer DECAL 6 E63 DASHBOARD 7 E635 Decal, Squeegee 8 E3 0- x 3/ UNC PAN HD PHIL 9 E508 #0 NYLON WASHER 30 7 E833 /-0x3/ PHMS PHILLIPS - BLK 3 7 E83 / FLAT WASHER - BLACK
22 SOLUTION TANK AND SOLUTION TANK LID ASSEMBLY AND PARTS LIST HINGE SEPERATED TO SHOW SCREWS AND WASHERS PART INSIDE TANK 7 PART OUTSIDE TANK ITEM ITEM QTY. QTY. PART NO. PART DESCRIPTION NO. DESCRIPTION AS6/3755 E7900 Solution Tank (granite) Solution Tank (GRAY) AS6/375 E7800 Solution Tank Lid SOLUTION (black) TANK LID (BLACK) 3 3 AS6/3 E000 Hinge - solution lid HINGE - left - SOLUTION LID - LEFT AS6/33 Hinge - solution lid - right E000 HINGE - SOLUTION LID - RIGHT 5 AS6/305 Bolt 5 E80600 Bolt /-0x3/ hex gr 5 6 AS6/38 Hinge - Solution Tank 6 E7300 HINGE - SOLUTION TANK 7 AS6/35 Solution Strainer 7 E000 8 AS6/3060 Hose fitting SOLUTION STRAINER 9 8 AS6/305 AS6/3060 Hose fitting Hose fitting 0 9 AS6/3063 AS6/305 Hose fitting Hose fitting 0 AS6/360 AS6/3063 Rubber Gasket Hose fitting AS6/380 E0700 Restraining cable Gasket, for solution /" BLK tank Neoprene 3 AS6/306 PE50058 Bolt Restraining Cable for Solution Tank 3 AS6/379 E80600 Washer Bolt /-0x3/ hex gr 5 5 AS6/375 E87300 Washer Washer / in flat 6 5 AS6/368 E900 Screw Spacing Washer (# ) AS6/37 E00 Washer /-0 x.5 SS PHMS screw 8 3 AS6/36 Screw 7 0 E87300 Washer / in flat 9 3 AS6/3 Nyloc nut 8 3 E Screw /" - 0 x " 9 3 AS6/3 Nyloc nut - -
23 RECOVERY TANK ASSEMBLY AND PARTS LIST HINGE SEPERATED TO SHOW SCREWS AND WASHERS ITEM SKU Description QTY E75 RECOVERY TANK (GRANITE) ITEM QTY. PART E89 NO. DESCRIPTION Hose Barb / in. 3 AS6753 AS6/3 Recovery Foam Tank Float (Granite) assembly AS6/385 E73 Hose HINGE adapter (this - RECOVERY is a modified AS6/380) TANK 3 AS6/300 Foam Float assembly (float, weights, and cord come assembled) 5 E806 Bolt /-0x3/ hex gr 5 AS6/380 Hinge - Recovery Tank 6 E873 5 AS6/306 Bolt Washer / in flat 6 7 AS6/379 PE5005 Washer Cable for recovery tank ASM 7 8 AS6/3800 E Restraining /-0 cable x.5 SS for recovery PHMS tank screw AS6/368 E873 Screw Washer / in flat AS6/37 Washer - 3 -
24 RECOVERY LID ASSEMBLY TO VACUUM TO SQUEEGEE TO SQUEEGEE TO VACUUM - -
25 RECOVERY LID ASSEMBLY AND PARTS 0 ITEM SKU DESCRIPTION QTY E77 RECOVERY TANK LID (BLACK) E868 VACUUM INTAKE 3 E96 RUBBER VAC. INTAKE FLAP E89 Hose Barb / in. 5 E58 3/3" 50 DURO NEOPRENE 6 E895 RECOVERY LID PLATE 7 E858 Nut, conduit / in. 8 E30 Washer 9 E08 /"BLACK NEOPRENE GASKET 0 E99 Long Recovery Lid Gasket (6") E930 Short Recovery Lid Gasket (0") E83570 Screw /" - 0 x " 3 E399 Vac hose.5" x 5" PE5005 Vac Hose (Squeegee to recovery lid) 5 E56 /"- 3/ CONNECT.HOSE CUFF 6 E9 " Vac Hose (7" Long) 7 E535 HOSE CLAMP " 8 E887.5" WIRE HOSE CLAMP 9 E5 GASKET FOR VAC INTAKE SCREEN 0 E0775 9/6"DIA.STAINLESS STEEL DIS - 5 -
26 SPLASH SKIRT ASSEMBLY AND PARTS LIST ITEM SKU DESCRIPTION QTY E753 SKIRT (BLACK) E0868 RUBBER SPLASH SKIRT - Length 6" ITEM QTY. PART NO. DESCRIPTION AS675 Plastic Skirt AS67 Rubber Splash Skirt 3 AS63 Skirt retainer, for splash skirt AS6/357 Screw 5 AS6/398 Detent Pin (single ball with grip ring) 6 AS6/36 Screw 7 AS6/3 Nyloc nut 8 AS6/337 Lanyard for skirt detent pin 3 E099 SKIRT RETAINER - FULL for 6" E3 #0 x 5/8 PAN HEAD PHILLIPS 5 E077 SINGLE BALL RING (.5) GRIP 6 E8 0-3 x.75 Unslotted Screw 7 E NYLOC NUT 8 E87986 Pin, Detent 5/6" OD x 3/" L, Zinc - 6 -
27 SQUEEGEE MOUNT ASSEMBLY AND PARTS LIST ITEM ITEM SKU QTY. DESCRIPTION PART NO. DESCRIPTION QTY E05 AS6/30 LINKAGE BAR Linkage Bar SQUEEGEE MUNT IS SHOWN UPSIDE DOWN IN BOTH EXPLODED VIEW AND ASSEMBLED VIEW. THE BEST WAY TO WORK ON IT IS TO REMOVE IT FROM THE SCRUBBER AND TURN AS6/333 Squeegee mount housing IT UPSIDE DOWN. E SQUEEGEE MOUNT HOUSING 3 E89 SQUEEGEE MOUNT YOKE E SQUEEGEE MOUNT BRACKET E736 TORSION PIN 6 E73 /-0x" ROUND HD MS 7 E8078 Washer, Lock / in. Split 8 E806 Bolt /-0x3/ hex gr 5 9 E873 Washer / in flat 0 E7 TORSION SPRING E566 SQUEEGEE LIFT HANDLE SPRING E79 Hairpin Cotter, 8 3 E07 / SAE FLAT WASHER GR8 PKG 8 E3 0- x 3/ UNC PAN HD PHIL 5 E508 #0 NYLON WASHER 6 E559.50x.68x.500 LONG BUSHING 8 7 E56.50x.67 BUSHING - 7 -
28 SQUEEGEE ASSEMBLY FOR 6" SCRUBBER x 8 PLACES - 8 -
29 SQUEEGEE ASSEMBLY PARTS LIST FOR 3" WIDE SQUEEGEE ITEM PART # DESCRIPTION QTY. ITEM QTY. E08 PART # DESCRIPTION SQUEEGEE ALUMINUM HOUSING AS635-F E08 Cast LEFT Aluminum ADJUSTMENT Squeegee Channel BRACKET 3 AS6/35 E09 Left RIGHT Adjustment ADJUSTMENT Bracket for Squeegee BRACKET 3 AS6/36 E89 Right YOKE Adjustment BAR FOR Bracket SQUEEGEE for Squeegee AS6/337 Yoke Bar for Squeegee 5 5 AS6/338 E893 Main MAIN squeegee SQUEEGEE mounting PLATE plate 6 6 AS669 E0 Main Main squeegee Squeegee blade Blade 7 7 AS673 E0 Front squeegee Squeegee blade Blade 8 8 AS670 E0 Reinforcement Reinforcement blade Blade 9 AS6/30 Carriage Bolt 0 9 AS6/30 E0 Carriage 5/6-8X.50 Bolt BOLT,CARR SS 0 AS6/303 E03 Carriage 5/6-8X.00 Bolt BOLT,CARR SS AS6/30 E0 Carriage 5/6-8X.50 Bolt BOLT-CARR SS 3 AS6/338 Squeegee Bumper Wheel E05 5/6-8X3.00 BOLT-CARR SS AS6/3330 Bolt 5 3 AS630 E630 Rear HA35SR-3/8 blade retaining WHEEL strap 6 8 AS6/333 E75 Wingnut 3/8-6x.75 BOLT-HH AS6/379 E098 Washer SQUEEGEE REAR BLADE STRAP 8 6 AS6/305 Bolt 6 E77 5/6 WINGNUT 8 9 AS6/3 Shoulder bolt 0 7 AS63 E873 Nylock Washer nut / in flat AS6/387 E806 Washer Bolt /-0x3/ hex gr AS6/33 E000 Wingbolt /X SOC SHOULDER SCREW 3 AS6/377 Washer 0 E6 3/8-6 UNC ELASTIC LOCKNUT AS6/38 Washer 5 AS60 E50 Front Washer, blade retaining 7/6" USS, strap Zinc 6 6 AS680 E08 Entire /-3 Squeegee x.00 Wing Assembly Bolt, Zinc * 3 AS6/35 E3 Clevis / BRASS pin to connect FLAT squeegee WASHER to squeegee mount * AS6/35 Har pin cotter for above clevis pin E36 3/8 SAE FLAT WASHER 5 E09 FRONT BLADE STRAP 6 PE5000 Squeegee assembly - 6" * E8 3/8X.5 CLEVIS PIN * E79 Hairpin Cotter - 9 -
30 BRUSH LIFT, MOTOR MOUNT, AND SQUEEGEE LIFT 3 EXPLODED VIEW PART OF MAINFRAME PART OF MAINFRAME x 3 PART OF MAINFRAME x 6 PARTS PART OF BACK PANEL 3 5 PART OF BACK PANEL
31 PART OF THE FRAME BRUSH LIFT, MOTOR MOUNT, AND SQUEEGEE LIFT ASSEMBLED VIEW AND PARTS LIST ITEM SKU Description QTY ITEM 6 QTY. E080 PART NO. SHOULDER DESCRIPTION SCREW AS6/35 SQUEEGEE Shoulder Bolt LIFT 7 E558 7 AS6/360 CABLE Squeegee Lift Cable 8 8 E36 AS6/38 3/8 Washer SAE FLAT WASHER 9 9 E093 AS65 BRUSH Brush Lift LIFT Arm ARM, - Left LH side PART OF THE FRAME 0 0 E09 AS66 BRUSH Brush Lift LIFT Arm ARM - Right -RH side AS6/365 #N/A Flange Bushing 7 AS6/383 #N/A Washer AS6/339 #N/A Yoke Weldment for Brush Lift AS6/3 E05 3/8-6X.75#5 Bolt BOLT HH ITEM ITEM SKU QTY. PART NO. Description DESCRIPTION QTY 5 5 E75 AS67 PRESSURE Brush Pressure SPRING Spring E05 3/8-6X.50#5 AS6/36 BOLT Bolt HH 6 6 AS6/3 E0 CENTERING Cup washer WASHER AS6 NLA AS6 Motor Frame 7 7 AS6/30 E0 /" Nyloc LOCK Nut NUT 3 E Bolt AS6/30 3/8-6x3/ Bolt 8 8 AS6/37 E0 BRUSH Brush Lift LIFT Handle - PEDAL - Pedal AS6/333 Bolt 9 AS6/30 Linkage Bar E76 3/8-6x.5 BOLT - HH 9 E05 LINKAGE BAR 5 AS6/3333 Hair Pin Cotter 30 AS6/38 Brush Lift Handle - Brace 5 E78 # HAIRPIN COTTER 30 E BRUSH LIFT - BRACE 6 AS6/33 Motor Mount, Left 3 AS6/38 Brush Lift Handle Weldment 6 E06 MOTOR MOUNT, L.H. 3 E0 BRUSH LIFT HANDLE 7 AS6/3 Motor Mount, Right 3 AS6/3 Shoulder Bolt 7 E07 MOTOR MOUNT - R.H. 3 E079 SHOULDER SCREW 8 AS6/33 Clevis pin 33 AS6/3986 Non slip tape 8 E75 5/6x-/8 CLEVIS PIN 33 AS6/3986 #N/A 9 6 AS6/3650 Flange Bushing 3 AS6/399 Rubber Grip for Squeegee Lift 9 E559 LONG BUSHING 6 3 E0778 LEVER HAND GRIP 0 AS6/37 Spring, compression 35 AS6/37 Lift cable bracket 0 E566 LIFT HANDLE SPRING 35 E03 5 AS6365 Sleeve Bushing 36 AS6/335 LIFT Squeegee CABLE Lift BRACKET Handle E560.50x.68 AS6/35 BUSHING Nyloc Nut E89 AS6/383 SQUEEGEE Brush lift yoke LIFT bushing ARM 3 E Nut, AS6/378 5/6" - 8, Nylon Washer Lock 3837 AS6/3 E737 YOKE Shoulder BUSHING Bolt 3 E07 / AS6/38 SAE FLAT WASHER Clevis pin GR8 PKG AS6/3 E000 SHOULDER Nyloc Nut SCREW 5 E79 /X.5 AS6/333 CLEVIS Hair PIN Pin Cotter 039 AS6/35 E6 ELASTIC Shoulder Bolt LOCKNUT 7 5 E79 Hairpin Cotter, 0 E080 SHOULDER SCREW
32 MOTOR FRAME AND MOTOR MOUNT
33 MOTOR FRAME AND MOTOR MOUNT ITEM ITEM QTY. PART PART NO. NO. DESCRIPTION DESCRIPTION QTY. AS6 Motor Frame E097 Motor Frame AS6/33 Motor Mount - left side E06 MOTOR MOUNT, L.H. 3 AS6/3 Motor Mount - right side 3 E07 MOTOR MOUNT - R.H. 8 AS6/383 Washer 5 8 AS6/383 AS6/39 Washer Lock Washer E8066 AS6/3 Washer, Bolt 3/8" Split Lock, Zinc AS6/3 AS6/38 Bolt Washer E35 AS6/3338 3/ key SAE for FLAT brush WASHER motor 9 8 E73 >> see >> /x/x-keystock Drive hub left assembly (see Drive Hub Assembly parts list) 0 9 >> >> see see >> >> (see Drive Drive hub Hub right Assembly assembly parts (see Drive list) Hub Assembly parts list) 0 6 >> AS6/385 see >> (see Washer Drive Hub Assembly parts list) E035 AS6/386 3/8 Washer USS FLAT WASHER 6 3 E500 AS6/3337 7/6-0 Bolt x / UNF Gr5 HHCS Zinc Pkg 5 3 AS6/3337 AS6050 Brush motor - volt Bolt 6 AS605 Cable Mount - right side (brush drive only) 5 E078 Brush motor v 7 AS606 Cable Mount - left side (brush drive only) 6 AS605 Cable Mount - right side (brush drive only) 8 AS600 Actuator Bar (brush drive only) 7 AS606 9 AS683 Cable Swivel Mount Pin (brush - left side drive (brush only) drive only) 0 8 AS600 AS6600 Actuator Cable for Bar motor (brush control drive (brush only) drive only) 9 E79 AS65 Hairpin Nyloc Cotter nut (brush drive only) 0 3 AS6600 AS6/38 Cable Washer for motor control (brush drive only) 3 AS65 AS655 Nyloc Retaining nut (brush ring (brush drive drive only) only) 6 E36 AS6/378 3/8 Washer SAE FLAT WASHER AS655 AS6/3 Retaining Nyloc nut ring (brush drive only) 6 E07 AS69 / Linkage SAE FLAT Arm WASHER (brush drive GR8 only) PKG E6 AS6/333 3/8-6 Hair UNC pin cotter ELASTIC LOCKNUT 9 6 AS69 AS66 Linkage Motor Arm Linkage (brush (Traction drive Drive only) Only) 30 AS6/38 Clevis pin 8 E79 Hairpin Cotter 6 9 E050 MOTOR LINKAGE 30 E79 /X.5 CLEVIS PIN
34 MOTOR FRAME AND MOTOR MOUNT DETAILS FOR BRUSH DRIVE AND TRACTION DRIVE PARTS LISTED ON PREVIOUS PAGE BRUSH DRIVE TRACTION DRIVE TOP-RIGHT-FRONT VIEW TOP-RIGHT-FRONT VIEW BOTTOM-RIGHT-REAR VIEW 5 BOTTOM-RIGHT-REAR VIEW - 3 -
35 DRIVE HUB ASSEMBLY AND PARTS LIST RIGHT HUB ASSEMBLY LEFT HUB ASSEMBLY NOTE THAT THE PARTS ARE THE SAME AS THE RIGHT HUB ASSEMBLY, BUT ARE REVERSED 8 ITEM SKU Description QTY. ITEM QTY. PART NO. DESCRIPTION E556 SCRUBBER PLATE AS6/3500 Drive Hub E588 SCRUBBER PLATE STOP AS6/3 Brush Stop 3 E8 AS6/353 Retaining Pin Special hairpin cotter 3 E70 AS6/ x3/8 SCREW Screw PHMS 3 5 E873 AS6/379 Washer / Washer in flat 6 E0 AS6/380 #0 SAE FLAT Washer WASHER 7 PE5000 AS6/3000 Right drive Right hub assembly Drive Hub assembled (parts through 6) 8 PE5000 AS6/300 Left drive hub Left assembly Drive Hub assembled (parts through 6)
36 HANDLE ASSEMBLY FOR BRUSH DRIVE BOLT HEAD OF 9 ON OTHER SIDE WITH ITEM #0 BUSHING ON TOP AND # 0 BUSHING ON BOTTOM OF HANDLE ITEM QTY. ITEM PART NO. SKU DESCRIPTION DESCRIPTION QTY AS6/3 E00 Handle HANDLE Platform PLATFORM AS6/3300 Left Handle E50 LEFT HANDLE LEVER 3 AS6/330 Right Handle 3 AS6/37 E5 Handle RIGHT Spring HANDLE LEVER 5 AS6/350 E565 Clevis pin HANDLE RETURN SPRING 6 5 AS6/3333 E8 Hair pin 5/6X cotter CLEVIS PIN 7 AS6/36 Shoulder bolt 6 E78 # HAIRPIN COTTER 8 AS6/379 Washer 9 7 AS6/305 E08 Bolt 3/8X.5 socket shoulder bolt 0 8 AS6/3655 E873 Flange bushing Washer / in flat 7 9 AS607 E806 Cable Mount Bolt /-0x3/ (Brush Drive hex Only) gr 5 8 AS6600 Cable Control for Brush Motors (Brush Drive Only) 0 E x.500 BUSHING 9 AS6 Handle Bracket (Brush Drive Only) 0 7 AS6/3656 AS607 Flange Bushing Cable Mount (Brush Drive Only) 8 AS6600 Cable Controls (Brush Drive Only)
37 HANDLE ASSEMBLY FOR TRACTION DRIVE BOLT HEAD OF 9 ON OTHER SIDE WITH ITEM BUSHING #0 5 ON TOP AND BUSHING #0 ON BOTTOM OF HANDLE 3 7 ITEM QTY. PART NO. ITEM SKU DESCRIPTION Description QTY AS6/3 E00 Handle Platform HANDLE PLATFORM AS6/ AS6/330 E50 Left Handle LEFT HANDLE LEVER 3 AS6/37 E5 Right Handle RIGHT HANDLE LEVER 5 AS6/350 E565 Handle Spring HANDLE RETURN SPRING Clevis pin 6 5 AS6/3333 E8 5/6X CLEVIS PIN Hair pin cotter 7 6 AS6/36 E78 # HAIRPIN COTTER Shoulder bolt 8 7 AS6/379 E08 Washer 3/8X.5 socket shoulder bolt 9 AS6/305 8 E873 Bolt Washer / in flat 0 AS6/ E806 Flange bushing Bolt /-0x3/ hex gr 5 AS6/3 Switch Trigger (Traction Drive Only) 0 AS6/35 E x.500 BUSHING Switch Mount (Traction Drive Only) 3 AS6/3375 E5 SWITCH TRIGGER Toggle Switch (Traction Drive Only) AS6/3330 E6 SWITCH MOUNT Grommet (Traction Drive Only) 5 3 AS6/378 E68 TOGGLE SWITCH Washer (Traction Drive Only) 6 NA E5 GROMMET Nuts for toggle switch (Traction Drive Only, comes with toggle switch - Item 3) 0 AS6/ E07 Flange Bushing / SAE FLAT WASHER GR8 PKG 6 NA Washer (Traction Drive Only) 0 AS6/3656 Nuts for toggle switch
38 BRUSH DRIVE WHEEL MOUNTING AND PARTS LIST ITEM SKU DESCRIPTION QTY. E335 0"x /" PERF. RUBBER WHEEL E00 AXLE BRACKET WELDMENT 3 E8067 Washer, 5/6" Lock 8 E8080 Bolt 3/8-6x3/ 8 5 AS6/3 #N/A 6 E35 3/ SAE FLAT WASHER 6 ITEM QTY. PART NO. DESCRIPTION AS638 Wheel 0 inch (bearing in wheel for brush drive) AS60 Axle Bracket Weldment 3 8 AS6/393 Lock washer 8 AS6/30 Bolt 5 AS6/3 Bolt 6 6 AS6/38 Washer
39 TRANSAXLE ASSEMBLY AND PARTS LIST ITEM SKU DESCRIPTION QTY ITEM QTY. PART NO. E0783 DESCRIPTION Transaxle V AS605 E589 Transaxle TRANSAXLE BRACKET 3 AS6/37 E590 Transaxle TRANSAXLE Bracket RETAINER 3 AS6/38 E63 Transaxle 0"x Retainer /" Transaxle Wheel AS6/3383 Wheel 0 inch (keyed for Transaxle) 5 E8067 Washer, 5/6" Lock AS6/393 Lock washer AS6/30 E8080 Bolt Bolt 3/8-6x3/ AS6/3337 AS6/3337 Bolt #N/A AS6/3 E8369 Bolt Screw, 3/8" - 6 x.5 Hex Head 9 9 AS6/39 E8066 Lock washer Washer, 3/8" Split Lock, Zinc 0 AS6/383 Washer 0 AS6/383 #N/A AS6/3336 Key for transaxle E7 8 AS6/39 Lock washer 3/6x3/6x-/" KEYSTOCK 3 AS6/300 E8066 Rubber Washer, mounting 3/8" sleeve Split Lock, Zinc 8 3 E5 Rubber Mounting Sleeve
40 PARTS FOR VACUUM SYSTEM AND SOLUTION SYSTEM (INCLUDING SOLUTION VALVE DETAIL) ITEM SKU Description QTY. ITEM SKU Description QTY. E /8 BARB NYLON 37 E87 Hose Barb NPT NYLON E7 TUBE CLIP ( FOR SOLUTION) 38 E70 0-3x3/8 SCREW PHMS 3 E806 Bolt /-0x3/ hex gr 5 39 E8 0-3 x.75 Unslotted Screw E88 /x3/8x3/8 POLY-E TEE BARB NY 0 E NYLOC NUT 5 AS6/307 /" - 3/8" nylon reduction coupler E05 DRAIN PLUG / (#5003) 6 AS6/3808 /" Vardex tubing 3 E039 HOSE WASHER (#W06) 7 PE5005 Solution Tubing Assy. E98 /-0 THREADED ROD x 7" 3 8 AS6807 Vac hose " 6 E868 VACUUM INTAKE 9 E3 OETIKER CRIMP CLAMP #0 8 7 E96 RUBBER VAC. INTAKE FLAP 0 E CRIMP CLAMP OETIKER E89 Hose Barb / in. E77 SOLUTION CONTROL (for AS600) 9 E58 3/3" 50 DURO NEOPRENE E93 /" Vardex Tubing (8" Long) 50 E895 RECOVERY LID PLATE 3 AS6/306 Tube Pinch Clamp 5 E858 Nut, conduit / in. E55 HOSE CUFF.5" 5 AS6/376 Steel washer 5 E037 Clamp, Tube /" (COV-0909) 53 E08 /" NEOPRENE GASKET 6 E3 #0 x 5/8 PAN HEAD PHILLIPS 5 5 E5 GASKET, INTAKE SCREEN 7 AS6/383 battery drain - 3/8" 55 E0775 STAINLESS STEEL DIS 8 E883 HEX LOCK NUT 56 E56 HOSE CUFF 9 E88 3/8 BARB ELBOW w/lock NUT 57 E9 " Vac Hose (7" Long) 0 E89 Hose Barb / in. 58 E535 HOSE CLAMP " E887.5" WIRE HOSE CLAMP 3 6 E078 Vac motor v E0 #0 SAE FLAT WASHER 6 E56 Gasket for vacuum motor bottom 3 E399 Vac hose.5" x 5" 63 AS6/3003 Vacuum motor cover - bottom PE5005 Recovery Drain Hose Assy. 6 E870 Vacuum motor cover - top 5 PE5005 Vac Hose (Squeegee to recovery lid) 65 AS6/300 Foam gasket 6 E3 VALVE CABLE MOUNT 66 AS6/3 /-0 nyloc nut 3 7 E880 /" SOLUTION VALVE 67 AS6/3003 Spacer for vacuum cover 3 8 PE5005 Solution Tubing 68 E873 Washer / in flat 3 9 E098 VALVE HANDLE ADAPTER 69 E038 ADAPTER 3/ MGHT x / BARB 30 E0009 THREADED CAP FGHT E53 VAC HOSE.5" 3 E65 SOLUTION CABLE CLIP E5 " GREY WIRE SUPPORTED 3 AS6850 Solution Drain Hose Holder E735 " BLK HOSE PROTECTOR 33 PE5005 Solution Drain Hose ASM E0 3/8" NYLOBRAID HOSE 3 E873 / STREET TEE BRASS E /" VARDEX TUBING 35 E830 LOCKNUT FOR /" PIPE AS6/36 acid resistant tubing (by the foot) 36 E87 / BARB x /NPT NYL E87 / x / NPT ADAPTER NYL
41 VACUUM SYSTEM AND SOLUTION SYSTEM 55 7 EXPLODED VIEW SEE SOLUTION TANK PAGE FOR STRAINER AND MOUNTING PRTS 0 DETAIL OF SOLUTION VALVE ON NEXT PAGE
42 VACUUM SYSTEM AND SOLUTION SYSTEM TO SOLUTION TANK SOLUTION DRAIN HOSE OVERVIEW OF VACUUM AND SOLUTION SYSTEMS TOP - RIGHT - FRONT VIEW 3 38 SOLUTION TO FLOOR DETAIL OF SOLUTION VALVE TOP - LEFT - REAR VIEW
43 VIEW OF SCRUBBER PARTS WITH MAJOR PLASTIC PARTS, MAINFRAME, AND VACUUM HOSES REMOVED (VIEWS THAT SHOW LISTED PARTS ARE ON FOLLOWING PAGES) ITEM SKU Description QTY ITEM QTY. PART NO. DESCRIPTION AS680 E756 Pad 3" Holder pad (please driver note that scrub and strip brushes are available) a a AS638 E335 0" 0"x Wheel (for /" Brush PERF. Drive RUBBER only) WHEEL b b AS6/3383 E63 0" 0"x Wheel (for /" Traction Transaxle Drive only) Wheel 3 AS6/3380 5" Swival Caster 3 E69 5"x" PERF. WHEEL w/sealed 8 AS6/30 Bolt 5 8 AS6/39 E8080 Lock Bolt Washer 3/8-6x3/ AS6/39 E8066 Speed Washer, Control 3/8" Mount Split (Traction Lock, Drive Zinc Only) AS6600 Speed Control (Traction Drive Only) AS6/39 Speed Control Mount 8 AS6/350 Speed Control Bracket (Traction Drive Only) 7 9 AS6/308 E397 Electrical -VOLT Panel - AMP SOLO CONTROL 0 58 AS6/36 E0008 Wingnut SPEED CONTROL BRACKET 39 AS6/337 E890 Threaded ELECTRICAL rod PANEL 0 AS6/330 Brass stud E77 / NUT WING 5 3 AS6/3800 Terminal block AS6/33 E8865 Flanged Rod, nut Treaded /-0 x 9-3/ 3 5 AS6/36 AS6/330 Screw Brass stud 3 E730 INSULATOR GLASTIC E085 /-0 FLANGED NUT
44 VIEW OF SCRUBBER PARTS WITH MAJOR PLASTIC PARTS, MAINFRAME, AND VACUUM HOSES REMOVED (PARTS ARE LISTED ONE PAGE BACK) b a PLEASE NOTE THAT SCRUB AND STRIP BRUSHES ARE ALSO AVAILABLE
45 VIEW OF SCRUBBER PARTS WITH MAJOR PLASTIC PARTS, MAINFRAME, AND VACUUM HOSES REMOVED (PARTS ARE LISTED PAGES BACK) 0 THESE PARTS INSIDE FRAME 3 5 THIS PART OUTSIDE FRAME SOLUTION DRAIN (TO DRAIN: REMOVE SPLASH SKIRT, REACH UNDER FRAME TO INSIDE AND PULL OUT SOLUTION DRAIN HOSE)
46 BATTERIES AND CHARGER ITEM SKU Description QTY E88036 Battery Charger - volt ITEM QTY. AS600 PART NO. Battery tray DESCRIPTION - for batteries AS6930 Battery Charger - volt 3 E8677 Battery 6V 35AH Wet AS600 Battery tray - for batteries 3 E837 AS6/370 Cable, 6 AWG, Battery Red, - 6 volt 6.00" 3 5 E6 3 AS6/335 Terminal Battery Wire - connectors Red, 6GA x 8" 6 5 E83 AS6/33 Terminal Battery Wire - to Black, positive 6GA terminal x 8" 6 AS6/333 Battery to negative terminal 7 AS6/309 Bolt AS6/309 Bolt 8 8 E085 8 AS6/33 /-0 FLANGED Nut NUT 8-6 -
47 ELECTRICAL PANEL AND PARTS AND OTHER ELECTRICAL PARTS ITEM SKU Description QTY ITEM QTY. E890 PART NO. ELECTRICAL DESCRIPTION PANEL AS6/308 Electrical Panel E75 SOLENOID (V) AS6700 Solenoid 3 E730 AS6/3800 INSULATOR Terminal Block PLASTIC AS6/330 AS6/330 Brass Brass stud stud E77 AS6/36 / NUT Wingnut WING E89 AS6/358 /-0 Screw x.5 screw E873 AS6/379 Washer Washer / in flat THERE IS A PROGRAMMER AVAILABLE FOR THE SPEED CONTROL. IT ALLOWS THE USER TO ADJUST OPTIONS, SUCH AS: MAXIMUM SPEED IN FORWARD AND REVERSE, ACCELERATION, AND MORE. IT ALSO HAS FAULT FINDING CODES TO HELP TRACE PROBLEMS. IF YOU ARE INTERESTED, PLEASE CALL AND ASK ABOUT THE SPA PROGRAMMER. PROGRAMMER PLUGS IN HERE PART NO. PART E078 NO. E93 AS6050 AS6/385 AS6/386 BRUSH MOTOR PARTS Brush BRUSH motor MOTOR v PARTS Commutator Brush Motor - Bracket volts ASM Commutator Bracket Assembly (includes commutator bracket, (includes commutator bracket, brush brush board board asm, assy, brushes brushes and springs) and springs) Gear Box Box Not Available E0783 PART NO. AS687 AS605 AS6/388 AS687 AS6/388 Transaxle V TRANSAXLE PARTS Not Available Transaxle - volts Not Motor Available for Transaxle - volts Motor coupling for transaxle
48
49
50 Brushes will not lift TROUBLE-SHOOTING PROBLEM CAUSE POSSIBLE SOLUTION Brush lift handle is in the heavy brush pressure position. (a) If brushes are on scrubber; pull up on brush lift handle, then push in and lower. Brush lift pedal should now lift brushes. (b) If there are no brushes on scrubber; push in on brush lift handle and hold in. Brush lift pedal should now lift brushes. Scrubber does not remove any water from the floor. (All water runs out the ends of the squeegee.) (a) Obstruction in the squeegee or in the vac hose from squeegee to recovery tank. (b) Recovery tank is full. (c) Leaking recovery lid gasket. (d) Squeegee hose is disconnected. (e) Vacuum motor not running. (a) Remove obstruction. (b) Empty recovery tank. (c) Repair/replace gasket. (d) Connect hose to squeegee. (e) Replace faulty switch, solenoid, vacuum motor, or wiring connection problem. Scrubber does not remove all water from the floor. ( Some water runs out the ends of the squeegee unless you walk very slowlyf.) Streaks of water are left on the floor. No solution flow Solution flow does not stop (a) Obstruction in the squeegee or in the vac hose from squeegee to recovery tank. (b) Leaking recovery lid gasket. (c) Vacuum intake screen in recovery lid is dirty (d) Squeegee is not properly adjusted. (a) Trash is caught under squeegee blade. (b) Squeegee tilt not properly adjusted. (c) Main squeegee blade worn or damaged. (d) Reinforcing squeegee blade is turned incorrectly for the application. (a) Solution tank is empty. (b) Damaged solution cable or solution valve. (c) Solution hose is obstructed. Damaged solution cable or solution valve. (a) Remove obstruction. (b) Repair or replace gasket. (c) Clean screen or replace. (d) Adjust squeegee per instructions in manual. (a) Remove trash. Sometimes it works to lift squeegee, back up a little, then lower squeegee and resume scrubbing.) (b) Adjust squeegee per instructions in manual. (c) Flip or turn main squeegee blade. Replace if necessary. (d) Flip blade upside down and try it. This changes deflection on the main squeegee blade. (d) Fill solution tank. (e) Repair or replace components as needed. (f) Remove obstruction. Repair or replace components as needed
51 TROUBLE-SHOOTING PROBLEM CAUSE POSSIBLE SOLUTION Cleaning is not even Total runtime is low Scrubber is dead. Nothing will work. The self-propelled traction drive model will not go forward or backward. The self-propelled traction drive model will go forward, but not backward; or otherwise does strange things. Nothing I find here fixes the problem. (a) Pads or scrub brushes are worn. (b) Solution is low. (c) Solution not flowing properly due to crimp in distribution hose. (d) Solution not flowing properly due to obstruction in distribution hose. (e) Brush motor or motors are not running. (a) Battery terminals are dirty. (b) Water level in batteries is low. (c) Batteries are not fully charged. (d) Batteries are bad. (e) Charger is broken. (a) Bad connection involving batteries. (b) Dead batteries. (c) Batteries are bad. (d) Charger is broken. (a) Traction drive switch was left on. Speed control powers down after 0 minutes. (b) Bad toggle switch in handle. (c) Circuit breaker is tripped. (a) Potentiometer is bad. (b) Loose connection. Problem could have several causes. Everything cannot be covered here. (a) Replace as needed. (b) Fill solution tank. (c) Remove crimp from distribution hose. (d) Clear obstruction from hose. (e) Reset breaker. Check connections. (note: if breakers continue to trip, call authorized service personnel.) (a) Clean terminals and connectors. (b) Add distilled water to each battery cell. Do not overfill. (See instructions in manual.) (b) Charge batteries. (c) Replace batteries. (d) Fix or replace charger. (a) Check and clean connections. (b) Try charging batteries. (c) Replace batteries. (d) Fix or replace charger. (a) Turn switch off and back on. (b) Replace toggle switch. (c) Reset circuit breaker. (note: if breakers continue to trip, call authorized service personnel.) (a) Replace if bad. (b) Check connections to switches. Check connections in connector at speed control. Call authorized service personnel. IMPORTANT THE TROUBLE-SHOOTING TIPS ARE NOT INTENDED TO TAKE THE PLACE OF AUTHORIZED SERVICE PERSONNEL. IF YOU ARE UNSURE OF WHAT TO DO THEN DO NOT DO ANYTHING, EXCEPT TO CONTACT AUTHORIZED SERVICE PERSONNEL. BEFORE WORKING ON THIS MACHINE, YOU MUST BE FAMILIAR WITH THE SAFETY INSTRUCTIONS IN THIS MANUAL.

52 AUTOMATIC FLOOR SCRUBBER LIMITED WARRANTY PowerBuff, Inc. warrants new machines to be free from defects in material and workmanship under normal use and service to the original purchaser. This warranty period is subject to the conditions stated below. FIVE YEAR WARRANTY FOR PARTS AND SERVICE LABOR Most parts are covered for five years. Please see other warranties and exclusions below. TEN YEAR WARRANTY ON SOLUTION AND RECOVERY TANKS BATTERY AND BATTERY CHARGER WARRANTIES Battery warranty is for one year on a pro rated basis. Battery warranty is void if batteries are not maintained at the proper fluid level with distilled water. Battery charger is warranted for one year. EXCLUSIONS This warranty does not cover normal wear and maintenance items including, but not limited to: carbon motor brushes, scrub brushes, squeegees, valves, gaskets, wheels, casters, and routine adjustments. This warranty does not cover damage or failure which is the result of misuse, negligent operation, handling or repair, or which is the result of modification or repair by any person other than an authorized PowerBuff, Inc. service representative. LIMITATIONS STATED WARRANTIES ARE IN LIEU OF ALL OTHER WARRANTIES, EXPRESSED OR IMPLIED. PowerBuff s liability under this warranty is limited to repair of the product and/or replacement parts and is given to purchaser in lieu of all other remedies, including incidental and consequential damages. WARRANTY DETAILS AND CLAIM PROCEDURES PowerBuff, Inc. warrants to buyer that for the applicable shipment, such material will be free from defects in material and workmanship or failure to meet specifications (a defect) appears in the material; then seller will, at it s option, either repair or replace the defective goods without charge or credit or refund the purchase price of the defective material, provided that: ) The defect appears within the applicable warranty period. ) Buyer notifies seller in writing of the claimed defect promptly after buyer knows or reasonably should know of the claimed defect. 3) Seller s examination if the material discloses that the claimed defect actually exists. Buyer shall follow seller s instruction regarding return of defective material, and no material will be accepted for repair, replacement, credit, or refund without the written authorization of and in accordance with seller s instructions. In the case of any such return, buyer shall bear the risk if in-transit loss or damage; and shall prepay all transportation charges to seller. Repaired or replacement material will be shipped prepaid by seller, and buyer shall bear the risk of in-transit loss or damage. The replaced material shall become the seller s property. PowerBuff, Inc. Phone Stoneville, NC
OWNER S MANUAL. IMPORTANT: READ OWNER S MANUAL CAREFULLY Please fill out and return your warranty card MODEL &
 OWNER S MANUAL IMPORTANT: READ OWNER S MANUAL CAREFULLY Please fill out and return your warranty card MODEL 261123 & 261124 032911 TABLE OF CONTENTS CONGRATULATIONS on your purchase of a Global product.
OWNER S MANUAL IMPORTANT: READ OWNER S MANUAL CAREFULLY
 globalindustrial.com Auto Scrubbers OWNER S MANUAL IMPORTANT: READ OWNER S MANUAL CAREFULLY Please fill out and return your warranty card MODEL 261126 032911 TABLE OF CONTENTS CONGRATULATIONS on your purchase
User Manual. Floor Scrubber Traction Drive
 User Manual Floor Scrubber Traction Drive This manual is furnished with each new Floor Scrubber. This provides the necessary operating and preventive maintenance instructions. Operators must read and understand
600 Floor Stripper Applicator
 600 Floor Stripper Applicator Operator and Parts Manual Model Part No.: 60763 www.tennantco.com 607624 Rev. 0 (08-2007) *607624* OPERATION This manual is furnished with each new model. It provides necessary
Dirt Dragon. Operator and Parts Manual WOOD FLOOR CLEANING MACHINE
 Dirt Dragon WOOD FLOOR CLEANING MACHINE Operator and Parts Manual 1001 Brown Avenue Toledo, Ohio 43607-0127 Customer Service: 800-441-1934 Fax: 800-942-2007 Technical Service: 877-856-5954 www.basicoatings.com
99105A Series - F Brush Lift Assembly Model :99105A 20" EZ BD Floorkeeper (w/ 2-12 V Batteries) - Series F
 - Series F") 9905A Series - F Brush Lift Assembly Model :9905A 0" EZ BD Floorkeeper (w/ - V Batteries) - Series F Page- 5 7 8 9 5 7 8 0 5 7 8 9 0 5 7 8 9 0 0589 NUT, LOCK W/ LOCTITE 070 RING, RETAINING 0 WASHER, PLAIN
9905A Series - F Brush Lift Assembly Model :9905A 0" EZ BD Floorkeeper (w/ - V Batteries) - Series F Page- 5 7 8 9 5 7 8 0 5 7 8 9 0 5 7 8 9 0 0589 NUT, LOCK W/ LOCTITE 070 RING, RETAINING 0 WASHER, PLAIN
User Manual. Floor Scrubber Disc Brush Drive
 User Manual Floor Scrubber Disc Brush Drive This manual is furnished with each new Floor Scrubber. This provides the necessary operating and preventive maintenance instructions. Operators must read and
Nilfisk Inc Winnetka Avenue North Minneapolis, MN REV.03( ) VF80189
 VF80189") Nilfisk Inc. 9435 Winnetka Avenue North Minneapolis, MN 55445 www.usviper.com REV.03(05-) VF8089 SAFETY PRECAUTIONS This machine is intended for commercial use. It is constructed for use in an indoor
Nilfisk Inc. 9435 Winnetka Avenue North Minneapolis, MN 55445 www.usviper.com REV.03(05-) VF8089 SAFETY PRECAUTIONS This machine is intended for commercial use. It is constructed for use in an indoor
Automatic Scrubber. Model PAS20E WARNING: OPERATOR MUST READ AND UNDERSTAND THIS MANUAL COMPLETELY BEFORE OPERATING THIS EQUIPMENT.
 OPERATOR S MANUAL & PARTS LIST Automatic Scrubber Model PAS20E WARNING: OPERATOR MUST READ AND UNDERSTAND THIS MANUAL COMPLETELY BEFORE OPERATING THIS EQUIPMENT. Tacony, Inc., All rights reserved Save
Electronic Service Manuals
 Electronic Service Manuals This electronic document is provided as a service to our customers. We do not create the contents of the information contained in this document. Should you have detailed questions
Electric Automatic Carpet Extractor. Operator and Parts Manual. Model No.: Rev. 00 (11-99)
") 1520 Electric Automatic Carpet Extractor Model No.: 607649 Operator and Parts Manual TENNANT COMPANY Commercial Products 12875 RANSOM STREET HOLLAND MI 49424 U.S.A. FAX: 1 800 678 4240 CUSTOMER SERVICE:
1520 Electric Automatic Carpet Extractor Model No.: 607649 Operator and Parts Manual TENNANT COMPANY Commercial Products 12875 RANSOM STREET HOLLAND MI 49424 U.S.A. FAX: 1 800 678 4240 CUSTOMER SERVICE:
CREWMAN 20 ORB CREWMAN 28 ORB
 E88066-00 E88068-00 E88070-00 CREWMAN 20 ORB CREWMAN 28 ORB 20, 28 Orbital Strip Machines Operator and Parts Manual 400 Van Camp Road Bowling Green, Ohio 43402 Customer Service: 888-GO-BETCO Fax: 800-445-5056
Operator s Manual. Stripping Solution Applicator
 Operator s Manual Stripping Solution Applicator Record this Important Information Date of Purchase Purchased From Address City State Zip Phone Contact Serial Number Emergency Contacts Medical Emergency
Parts and Service Manual
 Section II Parts and Service Manual (70241A) CLARKE TECHNOLOGY Operator's Manual - MINI MAX Page -29- Frame and Front Cover Assembly Drawing 2/01 Page -30- CLARKE TECHNOLOGY Operator's Manual -MINI MAX
ASD20B STEALTH. 20 Automatic Scrubber with Brush Assist. Operator and Parts Manual E E E
 E87030-00 E88062-00 E29935-00 STEALTH ASD20B 20 Automatic Scrubber with Brush Assist Scan this QR code to view equipment page Operator and Parts Manual 400 Van Camp Road Bowling Green, Ohio 43402 Customer
AS20B CREWMAN. 20 Automatic Scrubber with Brush Assist. Operator Manual E E E
 E83025-00 E29936-00 E29937-00 CREWMAN AS20B 20 Automatic Scrubber with Brush Assist Operator Manual 400 Van Camp Road Bowling Green, Ohio 43402 Customer Service: 888-GO-BETCO Fax: 800-445-5056 Technical
IMAGE V. Parts and Service Manual
 IMAGE 0V Section II Parts and Service Manual (88B) CLARKE TECHNOLOGY Image Operator's Manual Page AUTHORIZED PERSONNEL MAINTENANCE To Access Pump Motor. Remove brush housing from machine. See "Brush Motor
Tornado Operations & Maintenance Manual
 TORNADO INDUSTRIES 7401 W. LAWRENCE AVENUE CHICAGO, IL 60706 (708) 867-5100 FAX (708) 867-6968 www.tornadovac.com Tornado Operations & Maintenance Manual MODEL NO. 99690 BD 22/14, 99720 BD 26/14 L9722
RX-Express III Owner s Manual
 RX-Express III Owner s Manual RX-Express III Table of Contents Page Machine Specifications... 1 Preparation and Precautions... 2 Operation... 4 Cleaning Instructions... 6 Automatic Scrubber Option and
Wet/Dry Vacuums Polyethylene, Polypropylene, & Steel
 Wet/Dry Vacuums Polyethylene, Polypropylene, & Steel Operations and Parts Manual Models: 315P 415P 429P 430P 415S 415ST 415PLT 429ST IMPORTANT SAFETY INSTRUCTIONS When using an electrical appliance, basic
5700XPS. *mm402* Operator Manual. MM402 Rev.15
 5700XPS Operator Manual MM402 Rev.15 *mm402* This manual is furnished with each new TENNANT Model 5700XPS. It provides necessary operating and preventive maintenance instructions. Read this manual completely
Predator Automatic Scrubber 20
 Predator Automatic Scrubber 20 OPERATORS MANUAL AND PARTS LIST Model PAS20 WARNING: OPERATOR MUST READ AND UNDERSTAND THIS MANUAL COMPLETELY BEFORE OPERATING THIS EQUIPMENT. PAS201 TECHNICAL CHARACTERISTICS
Flood Pumper Plus. Water Transfer Machine. Operator and Parts Manual. Model No.: Rev. 00 (11-99)
") Flood Pumper Plus Water Transfer Machine Model No.: 607841 Operator and Parts Manual NOBLES 12875 RANSOM STREET HOLLAND MI 49424 U.S.A. CUSTOMER SERVICE: 1-800-365-6625 FAX: 1 800 678 4240 608468 Rev.
Flood Pumper Plus Water Transfer Machine Model No.: 607841 Operator and Parts Manual NOBLES 12875 RANSOM STREET HOLLAND MI 49424 U.S.A. CUSTOMER SERVICE: 1-800-365-6625 FAX: 1 800 678 4240 608468 Rev.
PACER 30 VACUUM IMPORTANT SAFETY INSTRUCTIONS READ AND UNDERSTAND ALL INSTRUCTIONS BEFORE OPERATING OR SERVICING MACHINE
 DANGER! PACER 30 VACUUM IMPORTANT SAFETY INSTRUCTIONS READ AND UNDERSTAND ALL INSTRUCTIONS BEFORE OPERATING OR SERVICING MACHINE Failure to Observe These Instructions Can Cause Fire, Electrical Burn, Shock
Predator Automatic Scrubber 28
 Predator Automatic Scrubber 28 OPERATORS MANUAL AND PARTS LIST Model PAS28 Contains drawings for all PAS28 models to date WARNING: OPERATOR MUST READ AND UNDERSTAND THIS MANUAL COMPLETELY BEFORE OPERATING
Walk Behind Scrubber. Operating instructions (ENG) MODELS: SCX SCXN BSCSCX
 MODELS: SCX SCXN BSCSCX") Walk Behind Scrubber Operating instructions (ENG) MODELS: SCX326 10052400 SCXN326 10052850 BSCSCX326 10052880 Prior to Serial Number (Ref No. 6*) See Serial number page or call manufacturer. Read these
Walk Behind Scrubber Operating instructions (ENG) MODELS: SCX326 10052400 SCXN326 10052850 BSCSCX326 10052880 Prior to Serial Number (Ref No. 6*) See Serial number page or call manufacturer. Read these
Pump Out Vacuums Polyethylene & Steel
 Pump Out Vacuums Polyethylene & Steel Operations and Parts Manual 110 volt receptacle on single motor only Models: 415P-AD 429P-AD 415DS IMPORTANT SAFETY INSTRUCTIONS When using an electrical appliance,
Predator Automatic Scrubber 28
 Predator Automatic Scrubber 28 OPERATORS MANUAL AND PARTS LIST Model PAS28 Contains drawings for all PAS28 models to date WARNING: OPERATOR MUST READ AND UNDERSTAND THIS MANUAL COMPLETELY BEFORE OPERATING
CAUTION: Read the Operator's Manual before using the appliance.
 Division of Operator's Manual READ THIS BOOK CAUTION: Read the Operator's Manual before using the appliance. This book has important information for the use and safe operation of this machine. Failure
User Manual. E17/E20 Electric Walk-Behind Scrubber Disc Brush Drive
 User Manual E17/E20 Electric Walk-Behind Scrubber Disc Brush Drive This manual is furnished with each new MINUTEMAN E17/E20. This provides the necessary operating and preventive maintenance instructions.
MODELS CMA-180 VL/180 VLTall PARTS MANUAL Rev 2.02A
 MODELS CMA-180 VL/180 VLTall PARTS MANUAL Rev 2.02A C M A D I S H M A C H I N E S 1 2 7 0 0 K N O T T A V E N U E GARDEN GROVE, CALIFORNIA 92841 800-8 5 4-6 4 1 7 FAX 714-895-2141 www.cmadishmachines.com
 Spare Parts List (Kits) Model Ref.:- HM35 SERIES A Spare Parts List (Kits) Issue 8 Dated 10-February-2015 Reference Drawing 09-1108-0000 Issue B Dated 07-January 2014 Drawing Ref. Part Number DESCRIPTION
User Manual. E20 Walk-Behind Scrubber Traction Drive Cylindrical Deck
 User Manual E20 Walk-Behind Scrubber Traction Drive Cylindrical Deck This manual is furnished with each new MINUTEMAN E20. This provides the necessary operating and preventive maintenance instructions.
User Manual. E17/E20 Walk-Behind Scrubber Disc Brush Drive
 User Manual E17/E20 Walk-Behind Scrubber Disc Brush Drive This manual is furnished with each new MINUTEMAN E17/E20. This provides the necessary operating and preventive maintenance instructions. Operators
MODELS CMA-180 VL/180 VLTall PARTS MANUAL Rev 2.02B
 MODELS CMA-180 VL/180 VLTall PARTS MANUAL Rev 2.02B C M A D I S H M A C H I N E S 1 2 7 0 0 K N O T T A V E N U E GARDEN GROVE, CALIFORNIA 92841 800-8 5 4-6 4 1 7 FAX 714-895-2141 www.cmadishmachines.com
Saber Cutter - 36V - Deluxe
 Saber Cutter - 36V - Deluxe Walk Behind Scrubber Operating Instructions (ENG) MODELS: SCENX326 10052340 SCEOX326 10052310 From Serial Number (Ref No1*) *See Serial Number Page in Spare Parts List or call
Power Eagle 716. Self Contained Carpet Extractor. Operator and Parts Manual. Model No.: SI Rev. 01 (01-00)
") Power Eagle 76 Self Contained Carpet Extractor Model No.: 608543 609234 SI Operator and Parts Manual NOBLES 2875 RANSOM STREET HOLLAND MI 49424 U.S.A. CUSTOMER SERVICE: -800-365-6625 FAX: 800 678 4240
Power Eagle 76 Self Contained Carpet Extractor Model No.: 608543 609234 SI Operator and Parts Manual NOBLES 2875 RANSOM STREET HOLLAND MI 49424 U.S.A. CUSTOMER SERVICE: -800-365-6625 FAX: 800 678 4240
User Manual. Phoenix 20 Floor Scrubber Disc Brush Drive
 User Manual Phoenix 20 Floor Scrubber Disc Brush Drive This manual is furnished with each new PowerBoss Phoenix 20. This provides the necessary operating and preventive maintenance instructions. Operators
Page 1 of 18. Part# /5/2013
 Part# 1002655-06 8/5/2013 This manual contains important information concerning the installation and operation of the gun washers listed above. Read manual thoroughly and keep for future reference INSTRUCTIONS
Walk Behind Scrubber. Operating instructions (ENG) MODELS: SC SCC BSCSC
 MODELS: SC SCC BSCSC") Walk Behind Scrubber Operating instructions (ENG) MODELS: SC326 10052220 SCC326 10052260 BSCSC326 10052890 Prior to Serial Number: 10052220000148 10052260000052 10052890000034 Or call Manufacturer. IPX4
Walk Behind Scrubber Operating instructions (ENG) MODELS: SC326 10052220 SCC326 10052260 BSCSC326 10052890 Prior to Serial Number: 10052220000148 10052260000052 10052890000034 Or call Manufacturer. IPX4
User Manual. Phoenix 20 Walk-Behind Scrubber Traction Drive Cylindrical Deck
 User Manual Phoenix 20 Walk-Behind Scrubber Traction Drive Cylindrical Deck This manual is furnished with each new Phoenix 20. This provides the necessary operating and preventive maintenance instructions.
OWNER'S MANUAL IMPORTANT: READ OWNER'S MANUAL CAREFULLY MODEL : CHEETAH DC2000 FOR YOUR CONVENIENCE, RECORD THE FOLLOWING IMPORTANT INFORMATION MODEL:
 OWNER'S MANUAL IMPORTANT: READ OWNER'S MANUAL CAREFULLY MODEL : CHEETAH DC2000 FOR YOUR CONVENIENCE, RECORD THE FOLLOWING IMPORTANT INFORMATION MODEL: SERIAL NUMBER:-------- DATE PURCHASED: PURCHASED FROM:
ScrubMaster 30R OPERATING & MAINTENANCE
 ScrubMaster 30R INTRODUCTION OPERATING & MAINTENANCE INSTRUCTIONS READ THIS BOOK This operator s book has important information for the use and safe operation of this machine. Read this book carefully
Operator and Parts Manual Nu-1600 Burnisher, Belt Drive Nu-2000 Burnisher, Belt Drive
 Operator and Parts Manual Nu-1600 Burnisher, Belt Drive Nu-2000 Burnisher, Belt Drive NuSource Enterprises, LLC; A 4699 61 st St. Suite C; Holland, MI 49423 Length 33.75 in. Width 21 in. Height 50 in.
5100 Automatic Electric Scrubber
 5100 Automatic Electric Scrubber Model No.: 609454 230V 609677 240V EMC Operator and Parts Manual TENNANT COMPANY Commercial Products 12875 RANSOM STREET HOLLAND MI 49424 U.S.A. FAX: 1 800 678 4240 CUSTOMER
FS Automatic Scrubber Fregadora Automática. Model No.: Pac. Operator and Parts Manual Manual de Operación y de Piezas
 FS-2000 Automatic Scrubber Fregadora Automática Model No.: 609541 609542 Pac Operator and Parts Manual Manual de Operación y de Piezas CASTEX 12875 RANSOM STREET HOLLAND MI 49424 U.S.A. FAX: 1 800 678
Saber Cutter - Euro - 24V - Deluxe
 Saber Cutter - Euro - 24V - Deluxe Walk Behind Scrubber Operating Instructions (ENG) MODELS: SCEX264 10052320 SCEOX264 10052290 SCEX324 10052330 SCEOX324 10052300 From Serial Number (Ref No1*) *See Serial
MK-100 JCS Tile Saw TILE SAW OWNER S MANUAL & OPERATING INSTRUCTIONS SERIAL NUMBER:
 MK-00 JCS Tile Saw TILE SAW OWNER S MANUAL & OPERATING INSTRUCTIONS CAUTION: Read all safety and operating instructions before using this equipment Enter the Serial Number of your new saw in the space
User Manual. E17/E20/H20 Walk-Behind Scrubber Disc Brush Drive
 User Manual E17/E20/H20 Walk-Behind Scrubber Disc Brush Drive This manual is furnished with each new MINUTEMAN E17/E20/H20. This provides the necessary operating and preventive maintenance instructions.
WALK BEHIND SCRUBBER. Operating Instructions (ENG) IPX4. Read these instructions before using the machine /20/12 PRV NO.
 IPX4. Read these instructions before using the machine /20/12 PRV NO.") WALK BEHIND SCRUBBER Operating Instructions (ENG) MODELS: SCE36 100580 IPX4 Read these instructions before using the machine AM 86037030 01/0/1 PRV NO. 980065 MACHINE DATA LOG/OVERVIEW OVERVIEW The Saber
WALK BEHIND SCRUBBER Operating Instructions (ENG) MODELS: SCE36 100580 IPX4 Read these instructions before using the machine AM 86037030 01/0/1 PRV NO. 980065 MACHINE DATA LOG/OVERVIEW OVERVIEW The Saber
ASC20BT STEALTH. 20" Cylindrical Scrubber with Traction Drive. Operator and Parts Manual E E E
 E29941-00 E29942-00 E29943-00 STEALTH ASC20BT 20" Cylindrical Scrubber with Traction Drive Operator and Parts Manual 400 Van Camp Bowling Green, Ohio 43402 Customer Service: 888-GO-BETCO Fax: 800-445-5056
ScrubMaster 26C OPERATING & MAINTENANCE
 ScrubMaster 26C INTRODUCTION OPERATING & MAINTENANCE INSTRUCTIONS READ THIS BOOK This operator s book has important information for the use and safe operation of this machine. Read this book carefully
Frontier. Self Contained Carpet Extractor. Operator and Parts Manual. Model No.: Rev. 00 (09-99)
") Frontier Self Contained Carpet Extractor Model No.: 0 0 Operator and Parts Manual NOBLES 7 RANSOM STREET HOLLAND MI U.S.A. CUSTOMER SERVICE: -00-- FAX: 00 7 0 OUTSIDE U.S. : --7-0 00 Rev. 00 (0-) 0 RECOVERY
Frontier Self Contained Carpet Extractor Model No.: 0 0 Operator and Parts Manual NOBLES 7 RANSOM STREET HOLLAND MI U.S.A. CUSTOMER SERVICE: -00-- FAX: 00 7 0 OUTSIDE U.S. : --7-0 00 Rev. 00 (0-) 0 RECOVERY
OPERATOR & Parts Manual. Automatic Scrubber. i20b REV.03( ) INTERNATIONAL CLEANING EQUIPMENT
 INTERNATIONAL CLEANING EQUIPMENT") www.icecompanies.com OPERATOR & Parts Manual Automatic Scrubber i20b 8038002 REV.03(03-2015) INTERNATIONAL CLEANING EQUIPMENT OPERATOR MANUAL READ OPERATOR MANUAL MANUAL CAREFULLY IMPORTANT:To ensure full
www.icecompanies.com OPERATOR & Parts Manual Automatic Scrubber i20b 8038002 REV.03(03-2015) INTERNATIONAL CLEANING EQUIPMENT OPERATOR MANUAL READ OPERATOR MANUAL MANUAL CAREFULLY IMPORTANT:To ensure full
OPERATOR'S MANUAL. IMPORTANT: READ OPERATOR'S MANUAL CAREFULLY Please fill out & return your warranty card! DP80405
 CARBON SPOT 30 EXTRACTOR OPERATOR'S MANUAL IMPORTANT: READ OPERATOR'S MANUAL CAREFULLY Please fill out & return your warranty card! DP80405 Diamond Products www.diamondproductsus.com Printed in the U.S.A.
Operator & Parts Manual Self_Contained Extractor ie U REV.05( ) INTERNATIONAL CLEANING EQUIPMENT
 INTERNATIONAL CLEANING EQUIPMENT") www.icecompanies.com Operator & Parts Manual Self_Contained Extractor ie410 6210149U REV.05(11-2016) INTERNATIONAL CLEANING EQUIPMENT TABLE OF CONTENTS SAFETY PRECAUTION..................... 2 MACHINE
www.icecompanies.com Operator & Parts Manual Self_Contained Extractor ie410 6210149U REV.05(11-2016) INTERNATIONAL CLEANING EQUIPMENT TABLE OF CONTENTS SAFETY PRECAUTION..................... 2 MACHINE
AGITATOR V DO NOT OPERATE THE MACHINE UNTIL YOU HAVE READ ALL SECTIONS OF THESE INSTRUCTIONS IMPROPER USE OF THE MACHINE WILL VOID THE WARRANTY
 AGITATOR 20 120V INFORMATION & OPERATING INSTRUCTIONS DO NOT OPERATE THE MACHINE UNTIL YOU HAVE READ ALL SECTIONS OF THESE INSTRUCTIONS IMPROPER USE OF THE MACHINE WILL VOID THE WARRANTY 1. Always use
Battery Automatic Carpet Extractor. Operator and Parts Manual. Model No.: Pac Rev. 00 (11-99)
") 1500 Battery Automatic Carpet Extractor Model No.: 607647 607653 - Pac Operator and Parts Manual TENNANT COMPANY Commercial Products 12875 RANSOM STREET HOLLAND MI 49424 U.S.A. FAX: 1 800 678 4240 CUSTOMER
1500 Battery Automatic Carpet Extractor Model No.: 607647 607653 - Pac Operator and Parts Manual TENNANT COMPANY Commercial Products 12875 RANSOM STREET HOLLAND MI 49424 U.S.A. FAX: 1 800 678 4240 CUSTOMER
Walk Behind Scrubber. Operating instructions (ENG) MODELS: SC SCC BSCSC SCN
 MODELS: SC SCC BSCSC SCN") Walk Behind Scrubber Operating instructions (ENG) MODELS: SC264 10052210 SCC264 10052250 BSCSC264 10052870 SCN264 10052830 IPX4 Read these instructions before using the machine. 86039070-CC 06/17/15 Machine
Walk Behind Scrubber Operating instructions (ENG) MODELS: SC264 10052210 SCC264 10052250 BSCSC264 10052870 SCN264 10052830 IPX4 Read these instructions before using the machine. 86039070-CC 06/17/15 Machine
SAFETY PRECAUTIONS. 2) Before operating machine: - Make sure all safety devices are in place and operate properly.
 Before operating machine: - Make sure all safety devices are in place and operate properly.") TABLE OF CONTENTS Machine Components Safety Precautions Machine Set Up Machine Operation Machine Maintenance & Storage Troubleshooting Technical Specifications Parts Lists Wiring Diagram 1 2 3 3-4 5 6
TABLE OF CONTENTS Machine Components Safety Precautions Machine Set Up Machine Operation Machine Maintenance & Storage Troubleshooting Technical Specifications Parts Lists Wiring Diagram 1 2 3 3-4 5 6
Model PF 2030 Wide Area Vacuum Cleaner
 Model PF 2030 Wide Area Vacuum Cleaner OPERATING INSTRUCTIONS COMMERCIAL WIDE AREA SWEEPER VACUUM CONGRATULATIONS YOU HAVE JUST ACQUIRED A HIGH QUALITY VACUUM CLEANER. PLEASE READ THIS MANUAL CAREFULLY,
Trooper Portable Carpet Extractor. Operator and Parts Manual. Model No.: Can Rev. 00 (09-99)
") Trooper 1000 Portable Carpet Extractor Model No.: 608811 609229 Can. Operator and Parts Manual NOBLES 12875 RANSOM STREET HOLLAND MI 92 U.S.A. CUSTOMER SERVICE: 1-800-365-6625 FAX: 1 800 678 20 608812
Trooper 1000 Portable Carpet Extractor Model No.: 608811 609229 Can. Operator and Parts Manual NOBLES 12875 RANSOM STREET HOLLAND MI 92 U.S.A. CUSTOMER SERVICE: 1-800-365-6625 FAX: 1 800 678 20 608812
SCRUBBER. Operating Instructions (ENG) MODELS: SG28 SG32 SG36 ENDING WITH SN: IPX4. Read these instructions before using the machine
 MODELS: SG28 SG32 SG36 ENDING WITH SN: IPX4. Read these instructions before using the machine") SCRUBBER Operating Instructions (ENG) MODELS: SG28 SG32 SG36 ENDING WITH SN: 1000136404 IPX4 Read these instructions before using the machine AV 98950 12/11/04 MACHINE DATA LOG/OVERVIEW MODEL DATE OF PURCHASE
SCRUBBER Operating Instructions (ENG) MODELS: SG28 SG32 SG36 ENDING WITH SN: 1000136404 IPX4 Read these instructions before using the machine AV 98950 12/11/04 MACHINE DATA LOG/OVERVIEW MODEL DATE OF PURCHASE
Electronic Service Manuals
 Electronic Service Manuals This electronic document is provided as a service to our customers. We do not create the contents of the information contained in this document. Should you have detailed questions
Scrubber User Manual
 Scrubber User Manual AS430C VIPER NORTH AMERICA [866] 418-4737 [866] 41-VIPER VF90031-US Rev.01 TABLE OF CONTENTS USER MANUAL INTRODUCTION... 2 CONTENTS............................. 2 PURPOSE.............................
Electronic Service Manuals
 Electronic Service Manuals This electronic document is provided as a service to our customers. We do not create the contents of the information contained in this document. Should you have detailed questions
14 Cord Electric All Purpose Automatic Scrubber
 E87977-00 GENIE CE APS 14 Cord Electric All Purpose Automatic Scrubber Operator and Parts Manual 1001 Brown Avenue Toledo, Ohio 43607-0127 Customer Service: 888-GO-BETCO Fax: 800-445-5056 Technical Service:
To Order Parts Call
 GENIE E87977-00 CE APS 14 Cord Electric All Purpose Automatic Scrubber 1001 Brown Avenue Toledo, Ohio 43607-0127 Customer Service: 888-GO-BETCO Fax: 800-445-5056 Technical Service: 877-856-5954 www.betco.com
Power Eagle 1016/1020. Self Contained Carpet Extractor. Operator and Parts Manual
 Power Eagle 0/00 Self Contained Carpet Extractor Model No.: 080 0 09 0 (Can.) 08 00 09 00 (Can.) 0980 00 (0V/0HZ) Operator and Parts Manual NOBLES 8 RANSOM STREET HOLLAND MI 9 U.S.A. CUSTOMER SERVICE:
FLOOD KING 120V. 2. Keep all filters clean. Do not operate the machine if the filters are clogged.
 FLOOD KING 120V INFORMATION & OPERATING INSTRUCTIONS DO NOT OPERATE THE MACHINE UNTIL YOU HAVE READ ALL SECTIONS OF THESE INSTRUCTIONS. IMPROPER USE OF THE MACHINE WILL VOID THE WARRANTY 1. Always be sure
Canister Vacuums S6EVO. Operations and Parts Manual. Models: S6EVO
 Canister Vacuums S6EVO Operations and Parts Manual Models: S6EVO 2 IMPORTANT SAFETY INSTRUCTIONS When using an electrical appliance, basic precaution must always be followed, including the following: READ
WALK BEHIND SCRUBBER SCXN BSCSCX IPX4
 WALK BEHIND SCRUBBER Operating Instructions (ENG) Instrucciones de funcionamiento (SPA) MODELS: SCX326 10052400 SCXN326 10052850 BSCSCX326 10052880 IPX4 Read these instructions before using the machine
Mopit 4 Operator s / Service Manual
 Mopit 4 Operator s / Service Manual FOR PARTS AND SERVICE 1-800-290-2833 To view Mopit 4 instructional videos scan this qr code with your smart phone. You can also find Mopit 4 instructional videos on
MERCURY HD-22 AUTOSCRUBBER Safe Operations
 Safe Operations PROPER OPERATING PROCEDURES By following proper operating procedures, the Mercury DS- 26 Autoscubber can provide you with productive, easy to operate, safe and clean floors. This machine
WALK BEHIND SCRUBBER. Read these instructions before using the machine Lea las instrucciones antes de utilizar la máquina
 WALK BEHIND SCRUBBER Operating Instructions (ENG) Instrucciones de funcionamiento (SPA) MODELS: SC264 IPX4 Read these instructions before using the machine Lea las instrucciones antes de utilizar la máquina
WALK BEHIND SCRUBBER MODELS: SCX264 SCXC Operating Instructions (ENG) Instrucciones de funcionamiento (SPA)
 Instrucciones de funcionamiento (SPA)") WALK BEHIND SCRUBBER Operating Instructions (ENG) Instrucciones de funcionamiento (SPA) MODELS: SCX264 SCXC264 10052380 10052430 SCX324 SCXC324 10052390 10052440 IPX4 Read these instructions before using
WALK BEHIND SCRUBBER Operating Instructions (ENG) Instrucciones de funcionamiento (SPA) MODELS: SCX264 SCXC264 10052380 10052430 SCX324 SCXC324 10052390 10052440 IPX4 Read these instructions before using
As part of the V.I.P. family, you are entitled to the best protection by one of the most comprehensive warranties in the industry.
 CONGRATULATIONS on your purchase of a Viper product, and welcome to the V.I.P. family. We appreciate your business and will do everything in our power to keep you happy with your purchase for many years
An ibuy Stores Company
 REVISED STARTING SERIAL NO. 060604 PARTS MANUAL Model SK-4 4 DOWNCUT CONCRETE/ASPHALT WALK BEHIND SAWS SKU NO. MODEL POWER OPTION 45400D SK4-9H HONDA ENGINE 9 HP GX0 45600D SK4-H HONDA ENGINE HP GX40 4800D
WET/DRY VACUUMS POLYETHYLENE, POLYPROPYLENE & STEEL
 WET/DRY VACUUMS POLYETHYLENE, POLYPROPYLENE & STEEL MODELS: 315P 415P 429P 415S 415ST 415PLT 429ST OPERATIONS AND PARTS MANUAL IMPORTANT READ THIS MANUAL PRIOR TO USE. TABLE OF CONTENTS Page No. Important
Operator & Parts Manual. Rider Auto Scrubber RS26 RS28 RS REV.04 ( ) INTELLIGENT CLEANING EQUIPMENT
 INTELLIGENT CLEANING EQUIPMENT") www.icecompanies.com Operator & Parts Manual Rider Auto Scrubber RS26 RS28 RS32 8300004 REV.04 (03-2017) INTELLIGENT CLEANING EQUIPMENT OPERATOR MANUAL Read operator manual carefully! IMPORTANT: To ensure
www.icecompanies.com Operator & Parts Manual Rider Auto Scrubber RS26 RS28 RS32 8300004 REV.04 (03-2017) INTELLIGENT CLEANING EQUIPMENT OPERATOR MANUAL Read operator manual carefully! IMPORTANT: To ensure
Electronic Service Manuals
 Electronic Service Manuals This electronic document is provided as a service to our customers. We do not create the contents of the information contained in this document. Should you have detailed questions
FS Automatic Scrubber Fregadora Automática. Operator and Parts Manual Manual de Operación y de Piezas. Model No.: Pac
 FS-2000 Automatic Scrubber Fregadora Automática Model No.: 6097 60974 - Pac Operator and Parts Manual Manual de Operación y de Piezas CASTEX 12875 RANSOM STREET HOLLAND MI 49424 U.S.A. CUSTOMER SERVICE:
FS Battery Automatic Scrubber Fregadora Automática Batería. Model No.: Pac
 ENGLISH - ESPAÑOL FS-2000 Battery Automatic Scrubber Fregadora Automática Batería Model No.: 609541 609542 Pac Operator and Parts Manual Manual de Operación y de Piezas CASTEX 12875 RANSOM STREET HOLLAND
690 Power Fishing System
 INSTRUCTION MANUAL 3N51 690 Power Fishing System Read and understand all of the instructions and safety information in this manual before operating or servicing this tool. Register this product at www.greenlee.com
OWNERS MANUAL AUTO SCRUBBERS. IMPORTANT: READ OWNERS MANUAL CAREFULLY Please fill out & return your warranty card! MODEL# SERIAL# FANG 20 & 20T
 R AUTO SCRUBBERS OWNERS MANUAL IMPORTANT: READ OWNERS MANUAL CAREFULLY Please fill out & return your warranty card! MODEL# SERIAL# FANG 20 & 20T VI PER... exceptional value REV.02(06-10) 82089 CONGRATULATIONS
WET/DRY VACUUMS PV-12 PV-18 PV-18S PV-18D. Gulper 12P Gulper 18P Gulper 18PS Gulper 18PD OPERATING & MAINTENANCE
 WET/DRY VACUUMS PV-12 PV-18 PV-18S PV-18D Gulper 12P Gulper 18P Gulper 18PS Gulper 18PD INTRODUCTION OPERATING & MAINTENANCE INSTRUCTIONS This operator s book has important information for the use and
WALK BEHIND SCRUBBER SCC BSCSC IPX4. Operating Instructions (ENG) Instrucciones de funcionamiento (SPA)
 Instrucciones de funcionamiento (SPA)") WALK BEHIND SCRUBBER Operating Instructions (ENG) Instrucciones de funcionamiento (SPA) MODELS: SC264 10052210 SCC264 10052250 BSCSC264 10052870 IPX4 Read these instructions before using the machine Lea
WALK BEHIND SCRUBBER Operating Instructions (ENG) Instrucciones de funcionamiento (SPA) MODELS: SC264 10052210 SCC264 10052250 BSCSC264 10052870 IPX4 Read these instructions before using the machine Lea
*331176* (Electric) North America / International (SN# ) Operator Manual Rev. 02 ( ) Walk-Behind Scrubber
 North America / International (SN# ) Operator Manual Rev. 02 ( ) Walk-Behind Scrubber") 5680 (Electric) (SN# 10000000 - ) Walk-Behind Scrubber Operator Manual The Safe Scrubbing Alternativer North America / International www.tennantco.com 331176 Rev. 02 (09-2008) *331176* This manual is furnished
5680 (Electric) (SN# 10000000 - ) Walk-Behind Scrubber Operator Manual The Safe Scrubbing Alternativer North America / International www.tennantco.com 331176 Rev. 02 (09-2008) *331176* This manual is furnished
MC MC MC MC MC833130
 Pic-A-Vac Model: MC832085 MC833085 MC832105 MC833105 MC832130 MC833130 OPERATION SERVICE PARTS CARE Revised 8/01 FOR COMMERCIAL USE ONLY IMPORTANT SAFETY INSTRUCTIONS When using an electrical appliance,
WIDE AREA VACUUM MODEL PF2030 WARNING: OPERATOR MUST READ AND UNDERSTAND THIS MANUAL COMPLETELY BEFORE OPERATING THIS EQUIPMENT.
 OPERATOR S MANUAL & PARTS LIST WIDE AREA VACUUM MODEL PF2030 WARNING: OPERATOR MUST READ AND UNDERSTAND THIS MANUAL COMPLETELY BEFORE OPERATING THIS EQUIPMENT. Tacony, Inc., All rights reserved Save These
Owner's Manual. (200 Gallon Lawn Service Skid Sprayer) Technical Specifications. Operation. General Information. Warranty/Parts/Service
 Technical Specifications. Operation. General Information. Warranty/Parts/Service") Owner's Manual (00 Gallon Lawn Service Skid Sprayer) Technical Specifications. Horsepower Recoil Start Engine Roller Cast Iron Pump 0 Gallons Per Minute at 0 PSI Pressure Gauge-Adjustable Pressure Range
Owner's Manual (00 Gallon Lawn Service Skid Sprayer) Technical Specifications. Horsepower Recoil Start Engine Roller Cast Iron Pump 0 Gallons Per Minute at 0 PSI Pressure Gauge-Adjustable Pressure Range
Carpet Extractor. Operating instructions (ENG) VOYDU VOYXDUX VOYXDU
 VOYDU VOYXDUX VOYXDU") Carpet Extractor Operating instructions (ENG) MODELS: VOYDU 1.008-613.0 VOYXDU 1.008-615.0 VOYDUX 1.008-617.0 VOYXDUX 1.008-619.0 Read these instructions before using the machine. 86292490-BM 11/29/16
Carpet Extractor Operating instructions (ENG) MODELS: VOYDU 1.008-613.0 VOYXDU 1.008-615.0 VOYDUX 1.008-617.0 VOYXDUX 1.008-619.0 Read these instructions before using the machine. 86292490-BM 11/29/16
20 Automatic Scrubber with Brush Assist
 E87030-00 E88062-00 STEALTH ASD20B 20 Automatic Scrubber with Brush Assist Operator and Parts Manual 1001 Brown Avenue Toledo, Ohio 43607-0127 Customer Service: 888-GO-BETCO Fax: 800-445-5056 Technical
SAFETY OPERATION & MAINTENANCE MANUAL X-405 CARPET EXTRACTOR This unit is intended for commercial use.
 SAFETY OPERATION & MAINTENANCE MANUAL X-405 CARPET EXTRACTOR This unit is intended for commercial use. READ AND FOLLOW ALL INSTRUCTIONS, WARNINGS AND CAUTIONS BEFORE USING THIS EXTRACTOR Address: 777 South
M5 BLUE BOY FIVE GALLON PAINT MIXER Owner s Manual
 M5 BLUE BOY FIVE GALLON PAINT MIXER Owner s Manual Introduction..3 Safety Precautions 4 Installation Instructions 5 Electrical Connections..7 Operating Instructions..8 Maintenance Procedures...8 Parts
Operator & Parts Manual. Rider Auto Scrubber RS26 RS REV.03 ( ) INTERNATIONAL CLEANING EQUIPMENT
 INTERNATIONAL CLEANING EQUIPMENT") www.icecompanies.com Operator & Parts Manual Rider Auto Scrubber RS26 RS32 8300005 REV.03 (03-2015) INTERNATIONAL CLEANING EQUIPMENT OPERATOR MANUAL READ OPERATOR MANUAL CAREFULLY! IMPORTANT: To ensure
www.icecompanies.com Operator & Parts Manual Rider Auto Scrubber RS26 RS32 8300005 REV.03 (03-2015) INTERNATIONAL CLEANING EQUIPMENT OPERATOR MANUAL READ OPERATOR MANUAL CAREFULLY! IMPORTANT: To ensure
EFFECTIVE: MAY, American Dish Service ADS MODEL: ASQ GLASSWASHER PARTS MANUAL. 900 Blake Street Edwardsville, Kansas (913) /08
 /08") EFFECTIVE: MAY, 2014 American Dish Service ADS MODEL: ASQ GLASSWASHER PARTS MANUAL 900 Blake Street Edwardsville, Kansas 66111 (913)422-3700 05/08 The American Dish Service part numbers contained in this
EFFECTIVE: MAY, 2014 American Dish Service ADS MODEL: ASQ GLASSWASHER PARTS MANUAL 900 Blake Street Edwardsville, Kansas 66111 (913)422-3700 05/08 The American Dish Service part numbers contained in this
120V CAUTION: DO NOT OPERATE MACHINE UNTIL YOU HAVE READ ALL SECTIONS OF THIS INSTRUCTION MANUAL IMPROPER USE OF THE MACHINE WILL VOID THE WARRANTY
 KING COBRA 1200 120V INFORMATION & OPERATING INSTRUCTIONS CAUTION: DO NOT OPERATE MACHINE UNTIL YOU HAVE READ ALL SECTIONS OF THIS INSTRUCTION MANUAL IMPROPER USE OF THE MACHINE WILL VOID THE WARRANTY
*MM400* (Electric) ( ) Walk -Behind Scrubber Operator Manual. North America / International. MM400 Rev. 20 ( )
 ( ) Walk -Behind Scrubber Operator Manual. North America / International. MM400 Rev. 20 ( )") 5700 (Electric) (000000-029999) Walk -Behind Scrubber Operator Manual The Safe Scrubbing Alternative R R ES Extended Scrub System North America / International www.tennantco.com MM400 Rev. 20 (09-2006)
5700 (Electric) (000000-029999) Walk -Behind Scrubber Operator Manual The Safe Scrubbing Alternative R R ES Extended Scrub System North America / International www.tennantco.com MM400 Rev. 20 (09-2006)
TABLE OF CONTENTS Contact Information:
 TABLE OF CONTENTS Contact Information: INTRODUCTION BEFORE YOU USE YOUR OWNER S MANUAL, PLEASE READ THIS INTRODUCTION ALL THE WAY THROUGH. WHEN THE MACHINE IS DELIVERED: BEFORE OPERATING THE MACHINE: WARRANTY: