COPPER AND CAST STONE FIRE & WATER BOWLS INSTALLATION, MAINTENANCE, & WARRANTY GUIDELINES
|
|
|
- Dustin Wood
- 6 years ago
- Views:
Transcription

1 COPPER AND CAST STONE FIRE & WATER BOWLS INSTALLATION, MAINTENANCE, & WARRANTY GUIDELINES FOR YOUR SAFETY PLEASE READ BEFORE OPERATING! THIS PRODUCT MUST BE INSTALLED AND SERVICED BY AUTHORIZED PERSONNEL. FAILURE TO FOLLOW THESE INSTRUCTIONS EXACTLY CAN RESULT IN FIRE, EXPLOSION, PERSONAL INJURY, DEATH, DAMAGED EQUIPMENT, AND PROPERTY DAMAGE. WHAT TO DO IF YOU SMELL GAS Do not store or use any gasoline or other flammable vapors and/or liquids in the vicinity of this or any other unit. If you smell gas, shut off gas to the unit. Extinguish any open flame near the unit. Do not attempt to manually light any automated electronic burner assembly. If odor continues, move away from the area and immediately call your gas supplier. This manual should remain with the homeowner or parties responsible for the operation of the unit. FOR USE WITH NATURAL OR LIQUID PROPANE GAS ONLY! DO NOT USE SOLID FUELS. WARNING AND SAFETY INFORMATION CODE REQUIREMENTS: Installation must be in accordance with all local codes and/or the latest edition of the National Fuel Gas Code, ANSI Z223.1 and the latest edition of the National Electrical Code, NFPA 70 (US). Installation in Canada must be in accordance with the latest CAN/CGA-B149.1 or.2 and CSA C22.1 Canadian Electric Code, part 1. Installations must be electrically grounded and bonded in accordance with local codes, or, in the absence of local codes, with the National Electrical Code, ANSI/NFPA 70 (US) or in Canada in accordance with the Canadian Electric Code, part 1 as applicable. 1
2 SAFETY CODE APPROVAL CERTIFICATION LOW VOLTAGE LANDSCAPE AND SWIMMING POOL/SPA AUTOMATIC IGNITION GAS BURNER ASSEMBLY AND TRANSFORMER PANEL. Approved for use near pool edge. The Fireside Expressions fire burner assembly is CSA/AGA approved. It is tested and approved to the nationally recognized specification ANSI Z Gas-Fired Illuminating Appliances in compliance with the 2017 NEC code allowing for approved burner assemblies to be next to the water s edge on swimming pools. 24V AUTOMATIC IGNITION GAS BURNER ASSEMBLY: CSA TRANSFORMER PANEL, Input 120VAC - Output 24VAC: UL LISTED - No. CL Tested to: National Fuel Gas Code ANSI Z223.1, ANSI Z21.97, ANSI Z21.42 OPERATING CONDITIONS The unit should be inspected before use and at least annually by a qualified service person. More frequent cleaning may be required as necessary depending on environmental conditions. It is imperative that the transformer panel, pilot hood, burner assembly and circulating air passageways of the unit be kept clean and free of debris. This system is not designed to operate in wind conditions exceeding 10MPH. DO NOT use this unit if any part of the burner assembly has been under water or is soaked heavily. Immediately call a licensed contractor to inspect the unit and to replace any part of the burner assembly that has been under water. Should overheating occur or the gas supply fail to shut off, turn off the manual gas control valve to the burner assembly. WARNING: HOT! DO NOT TOUCH - FIRE RISK/ BURN RISK. SEVERE BURNS MAY RESULT - CLOTHING IGNITION MAY RESULT! KEEP CHILDREN AWAY! CAREFULLY SUPERVISE CHILDREN! CLOTHING OR OTHER FLAMMABLE MATERIALS SHOULD NOT BE HUNG FROM THE UNIT NOR PLACED ON OR NEAR THE UNIT. 2
3 TABLE OF CONTENTS WARRANTY... 4 SYSTEM REQUIREMENTS... 5 Water Requirements Gas Requirements Electrical Requirements Installation Requirements SYSTEM COMPONENTS Planter Only Bowls... 6 Planter & Water Bowls... 7 Water Only Bowls... 7 Fire Only Bowls... 8 Fire & Water Bowls... 8 INSTALLATION GUIDE Bowl Mounting Plumbing Transformer Panel Wiring Bowl Connections OPERATION & SAFETY Initial Start-Up Procedures Basic System Operation Trouble Shooting GENERAL CARE & MAINTENANCE Planter Bowls Water Bowls Fire Bowls Cleaning and Care for Hammered Copper Bowls Cleaning, Care and Sealing for Cast Stone Bowls Repair for Cast Stone Bowls Cleaning and Care for Polished Copper Finishes Seasonal Care READ THIS INSTRUCTION GUIDE IN ITS ENTIRETY PRIOR TO INSTALLATION. 3
4 WARRANTY FIRE + WATER ELEMENTS FIRE AND WATER BOWLS WARRANTY 1-YEAR LIMITED RESIDENTIAL WARRANTY Fireside Expressions will attempt to repair any unit, when used as intended, which has proven to be defective in workmanship or material, preventing the proper operation of the unit when reported within one year of the date of purchase. This warranty does not cover any costs related to removal or replacement of the unit. For warranty consideration, contact the original dealer and provide proof of purchase, date of purchase, and the date of installation. The dealer will contact Fireside Expressions to obtain instructions regarding the claim. If the unit is deemed defective and cannot be repaired, Fireside Expressions will replace it. This warranty only applies to residential use of the unit. The customer is responsible for shipping costs, which may be reimbursed by Fireside Expressions should the unit be deemed defective. IF NECESSARY, THE UNIT MUST BE REMOVED AND REPLACED ONLY BY A LICENSED PROFESSIONAL IN THE PLUMBING AND/OR ELECTRICAL TRADE. DO NOT ATTEMPT TO REMOVE AND REPLACE THE UNIT YOURSELF. Fireside Expressions will not be responsible for any asserted defect, which has resulted from accidents, over-heating, freeze/thaw, misuse, abuse, repair or alteration. Under no circumstances will Fireside Expressions be liable for incidental or consequential damage resulting from defective units, improper installation, or improper removal. This warranty is your sole warranty and sets forth your exclusive remedy with respect to defective units. All other warranties, expressed or implied, whether of merchantability, fitness for purpose or otherwise, are expressly disclaimed by Fireside Expressions. Fireside Expressions is not responsible for any injury or mishap related to misuse, abuse or lack of judgment in choosing fire display locations. In addition, this warranty does not apply to any damages caused by: (1) any failure resulting from unreasonable use or abuse, (2) unsatisfactory material choices by you or the installer, and (3) accidental damage or element damage such as water or rain. Fireside Expressions is not responsible for the application of local codes and/or if the unit is not approved for installation. Please check with your local building department or governing agencies for prior approval before purchasing. Fireside Expressions is not responsible for the actions and omissions, including negligence, of the installer. Fireside Expressions will not warranty fire bowls and fire pits in which a burner unit purchased from another supplier is used. Contact Us Fireside Expressions a division of CJ s Home Decor & Fireplaces Route 6 Warren, PA Phone: (888) (814) Fax: (814) request@firesidexpressions.com 4
5 SYSTEM REQUIREMENTS WATER REQUIREMENTS: Water flow per bowl: GPM Water supply line should be 3/4 Schedule 40 PVC to each bowl. A larger diameter main supply line may be needed for multiple bowl applications. GAS REQUIREMENTS: The required gas pressure and flow should be measured at each bowl location. Natural Gas: 7 WC (0.25 psi) Propane (LP): 11 WC (0.4 psi) Gas supply line should be 1/2 Schedule 40 black steel gas pipe to each bowl. A larger diameter main supply line may be needed for multiple bowl applications. NOTE: Check with your gas supplier to verify gas flow and pressure available at the location of your installation. In many cases, utility companies will install larger meters at no charge to accommodate larger flows. Gas Flow Requirements Number of Bowls BTU/hour 1 bowl system 60,000 80,000 BTU/hr 2 bowl system 120, ,000 BTU/hr 3 bowl system 180, ,000 BTU/hr 4 bowl system 240, ,000 BTU/hr ELECTRICAL REQUIREMENTS: Transformer panel input voltage: 120VAC / 60Hz Transformer output voltage: 24VAC / 60Hz nominal Automated burner assembly input voltage: 24VAC / 60Hz nominal Use 14 gauge wire to connect transformer panel to bowls System component electrical draws: - 34 VA single fire bowl burner draw (natural gas or propane) - 41 VA single fire pit burner draw (natural gas or propane) - 24 VA single propane adder draw Transformer panel power output capacities: VA transformer panel power output capacity VA transformer panel power output capacity VA transformer panel power output capacity System configurations are limited by the transformer panel power output capacity. 5
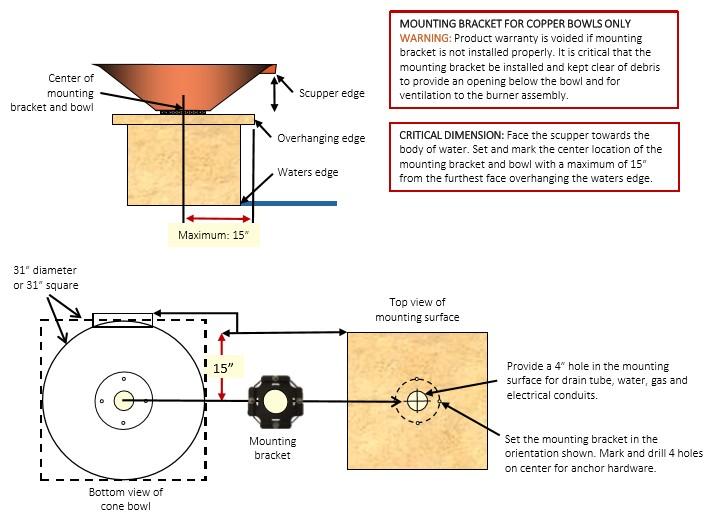
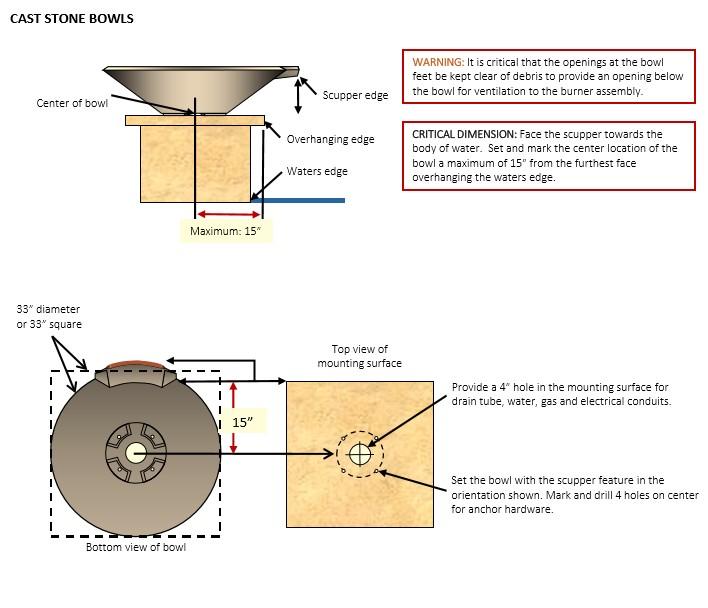
6 INSTALLATION REQUIREMENTS: Installation should be performed by a licensed contractor. All aspects of installation must be in accordance with all local codes and/or the latest edition of the National Fuel Gas Code, ANSI Z223.1 and the latest edition of the National Electrical Code, NFPA 70 (US). Adhere to recommended CSA/AGA clearances: sides 4ft and overhead 6ft. Do not install near any combustibles (side or overhead) such as wood structures, fuels, clothing, fabrics or dry vegetation. Install bowls well out of the way of pedestrian traffic. The water, gas and electrical plumbing shall be installed underground. Install 90 elbow at flexible gas hose gas connection at each bowl for proper installation. When connecting the flexible gas hose to the burner assembly, do not make tight radius bends or kinks in the hose. Warranty is void if not installed properly. Low voltage wiring (14ga 24VAC) should be installed underground between the transformer panel and each bowl. Wire per Fireside Expressions wiring diagram. 120VAC source into transformer panel can come from any 120VAC source, including pool controller or home system. On commercial installations, it is required to install a keyed valve switch and kill switch located in close proximity, in visible sight, of the unit. The keyed valve and kill switches are not supplied by Fireside Expressions. With all gas connections tight, position burner assembly so that it sits level in the bowl. Rotate as required so that the gas hose is not kinked. SYSTEM COMPONENTS Components required for installation. Check to make sure all components are included in the correct quantities. Bowl shape is dependent upon order. This installation guide covers all bowl shapes, all water features, and all automated and manual burner assemblies. PLANTER ONLY BOWLS COMPONENTS INCLUDED WITH PURCHASE Hammered Copper Mounting bracket with required hardware including rubber washers Planter only bowl 4 ABS clean-out cap Cast Stone Planter only bowl 4 ABS clean-out cap COMPONENTS NOT INCLUDED WITH PURCHASE (4) Stainless steel surface anchor hardware including washers Use 1/4 or 5/16 for Hammered Copper bowls Use 5/16 or 1/2 for Cast Stone bowls Fine wire mesh or window screen is recommended to cover drain tube Outdoor silicone sealant PVC cement glue & primer 6
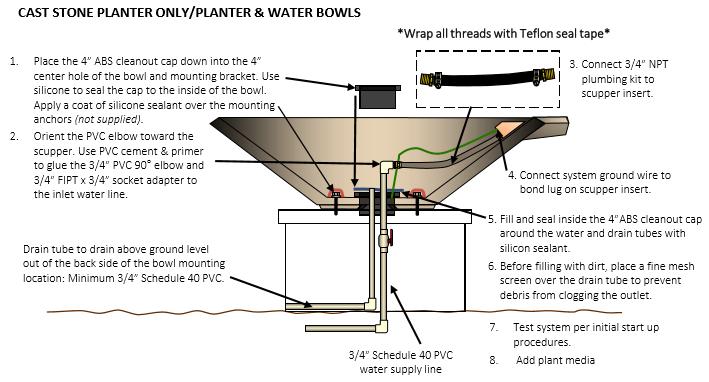
7 PLANTER & WATER BOWLS COMPONENTS INCLUDED WITH PURCHASE Hammered Copper Mounting bracket with required hardware including rubber washers 1/2 NPT plumbing kit Planter & Water bowl 4 ABS clean-out cap Cast Stone 3/4 NPT plumbing kit Planter & Water bowl 4 ABS clean-out cap COMPONENTS NOT INCLUDED WITH PURCHASE (4) Stainless steel surface anchor hardware including washers Use 1/4 or 5/16 for Hammered Copper bowls Use 5/16 or 1/2 for Cast Stone bowls Fine wire mesh or window screen is recommended to cover drain tube PTFE Teflon thread seal tape Outdoor silicone sealant PVC cement glue & primer COPPER BOWL ONLY: Water line connection 1/2 x 3/4 Schedule 40 PVC reducing male adapter MIPT x socket CAST STONE BOWL ONLY: 3/4 PVC 90 elbow Water line connection 3/4 x 3/4 Schedule 40 PVC female adapter FIPT x socket WATER ONLY BOWLS COMPONENTS INCLUDED WITH PURCHASE Hammered Copper Mounting bracket with required hardware including rubber washers Copper water only plumbing parts Water only bowl Cast Stone Cast Stone water only plumbing parts Water only bowl COMPONENTS NOT INCLUDED WITH PURCHASE (4) Stainless steel surface anchor hardware including washers Use 1/4 or 5/16 for Hammered Copper bowls Use 5/16 or 1/2 for Cast Stone bowls PTFE Teflon thread seal tape PVC cement glue & primer COPPER BOWL ONLY: Water line connection 1/2 x 3/4 Schedule 40 PVC reducing male adapter MIPT x socket CAST STONE BOWL ONLY: 3/4 PVC 90 elbow Water line connection 3/4 x 3/4 Schedule 40 PVC female adapter FIPT x socket 7
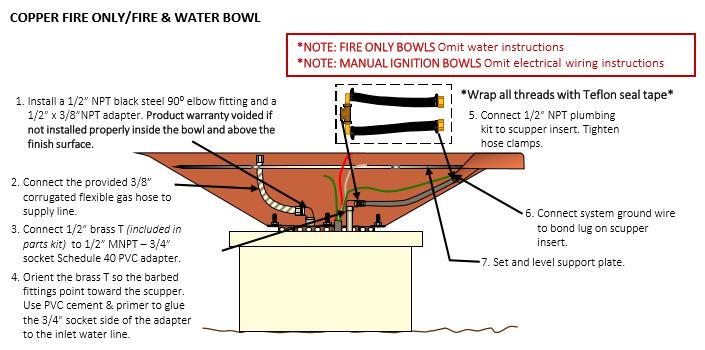
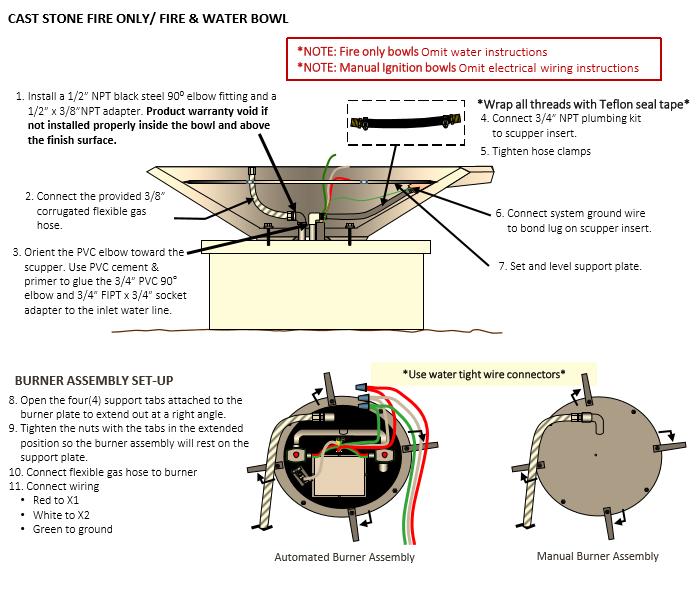
8 FIRE BOWLS ONLY - COMPONENTS INCLUDED WITH PURCHASE Hammered Copper Mounting bracket with required hardware including rubber washers Automated or manual burner assembly Support plate Flexible gas hose Propane adder (propane versions only) 24VAC transformer panel Fire only bowl Cast Stone Automated or manual burner assembly Support plate Flexible gas hose Propane adder (propane versions only) 24VAC transformer panel Fire only bowl COMPONENTS NOT INCLUDED WITH PURCHASE (4) Stainless steel surface anchor hardware including washers Use 1/4 or 5/16 for Hammered Copper bowls Use 5/16 or 1/2 for Cast Stone bowls Gas line connection 1/2 NPT black steel 90 elbow fitting MANUAL ONLY: 1/2 MPT x 3/8 FPT adapter, hex black steel AUTOMATED ONLY: 1/2" MPT x 3/8 MPT adapter, hex black steel Water tight wire connectors PVC cement glue & primer Nipple black steel 3/8 x close Gas key switch (valve) FIRE & WATER BOWLS COMPONENTS INCLUDED WITH PURCHASE Hammered Copper Mounting bracket with required hardware including rubber washers Automated or manual burner assembly Support plate Flexible gas hose Propane adder (propane versions only) 24VAC transformer panel 1/2 NPT plumbing kit Fire & Water bowl Cast Stone Automated or manual burner assembly Support plate Flexible gas hose Propane adder (propane versions only) 24VAC transformer panel 3/4 NPT plumbing kit Fire & Water bowl 8
9 COMPONENTS NOT INCLUDED WITH PURCHASE (4) Stainless steel surface anchor hardware including washers Use 1/4 or 5/16 for Copper Bowls Use 5/16 or 1/2 for Cast Stone Bowls Gas line connection 1/2 black steel 90 elbow fitting Nipple black steel 3/8 x close Gas key switch (valve) COPPER BOWL ONLY: Water line connection 1/2 x 3/4 Schedule 40 PVC reducing male adapter MIPT x socket CAST STONE BOWL ONLY: 3/4 PVC 90 elbow Water line connection 3/4 x 3/4 Schedule 40 PVC female adapter FIPT x socket MANUAL ONLY: 1/2 MPT x 3/8 FPT adaptor, hex black steel AUTOMATED ONLY: 1/2" MPT x 3/8 MPT adaptor, hex black steel Water tight wire connectors PVC cement glue & primer PTFE Teflon thread seal tape 9

10 INSTALLATION GUIDE BOWL MOUNTING 10
11 INSTALLATION GUIDE PLUMBING 11
12 12

13 INSTALLATION GUIDE TRANSFORMER PANEL WIRING 13
14 INSTALLATION GUIDE BOWL CONNECTIONS 14

15 INSTALLATION GUIDE BOWL CONNECTIONS 15

16 INSTALLATION GUIDE BOWL CONNECTIONS 16
17 INSTALLATION GUIDE BOWL CONNECTIONS 17
18 OPERATION & SAFETY INITIAL START UP PROCEDURES PLANTER BOWL Cover the drainage hole with a mesh screen so debris and dirt do not fall into the drainage tube. Fill with dirt and use as any normal planter. ALL WATER BOWLS Open water valve. Turn on water source. Adjust valve to desired flow rate of GPM. Adjust valves per bowl to balance flow on multiple bowl set-ups. Turn off water valve or water source. Check for leaks at base of bowl and all fitting connections. ALL FIRE BOWLS WARNING: Fire bowls are for outdoor use only. Use only fire approved decorative media to cover the support plate and burner assembly. High temperature rated lava, tumbled lava/ceramic stone and fire glass are all accepted media. Fireside Expressions offers lava rock and fire glass that is approved for fire applications. For optimal performance, 2 4 sized lava rock and 1/4 1/2 fire glass is recommended. Use caution when using other suppliers media as pieces may pop or explode when exposed to heat. NOTE: Install decorative media on top of the support plate and burner assembly. Be sure the decorative media is not packed too tightly around the pilot box. For proper ventilation and flame sensing both sides of the pilot box need to be kept clear of decorative media. NOTE: Do not use fire glass with propane systems. For natural gas systems, use of a mesh screen is necessary to maintain fire glass above the support plate. When using lava rock smaller than 1/ 2 use of a mesh screen is necessary. For proper ventilation and flame sensing the top of the pilot box needs to be kept clear of decorative media. NOTE: Do not add decorative media until after all testing and flame height adjustments are complete. FIRE BOWL MANUAL Purge air from gas line at each bowl using the following instructions: Close manual gas valve & disconnect gas hose from burner assembly Open manual gas valve and hold gas hose outside bowl while purging air When you smell gas, close manual gas valve and reconnect gas hose to burner assembly Make certain all gas connections are tight and that there are no leaks Test and balance flame height Open the manual gas valve near the fire bowl to turn on the flow of gas Use stick lighter to ignite gas and light flame Check flame height and make adjustments at the gas valve to achieve a balanced flame across all bowls Do not adjust manual gas valve too low as this can cause the flame to be unstable resulting in possible flame out To ensure a stable flame, maintain the required gas pressure and flow to the burner assembly Add decorative media after all testing and adjustments are complete 18
19 FIRE BOWL AUTOMATED Purge air from gas line at each bowl using the following instructions: Close manual gas valve & disconnect gas hose from burner assembly Disconnect X1 & X2 wires at the transformer panel for each bowl. For propane gas systems, leave propane adder connected Open manual gas valve and hold gas hose outside bowl while purging air When you smell gas, close gas valve and reconnect gas hose to burner assembly Reconnect X1 & X2 wires at the transformer panel for each bowl Make certain all gas connections are tight and that there are no leaks Spark ignition check: Close the manual gas valve Using the control switch, turn on the power to the bowls At each burner assembly, check that the spark electrode is arcing across to the pilot hood. You should be able to hear and see the electrode spark. If there is no spark, make sure that the burner assembly is receiving 24 VAC from the control panel Once a spark has been verified, turn off the power to each bowl using the control switch Test and balance flame height: Open manual gas valve Using the control switch, turn on the power to the bowls Check flame height and make adjustments at the manual gas valve to achieve a balanced flame across all bowls Do not adjust manual gas valve too low as this can cause the flame to be unstable resulting in possible flame out To ensure a stable flame, maintain the required gas pressure and flow to the burner assembly Add decorative media after all testing and adjustments are complete BASIC SYSTEM OPERATION Caution: Before you turn on a fire bowl make sure that the area is clear of people, animals or any objects that are combustible. If you smell gas or there are other indications of a gas leak, immediately turn off the manual gas valve, leave the area and do not operate the fire bowl. Immediately call your utility gas supplier to inspect the fire bowl. FIRE BOWL MANUAL Open the manual gas valve near the bowl to turn on the flow of gas Use a stick lighter to light flame Check flame height and make adjustments at the manual gas valve to achieve a balanced flame across all bowls Do not adjust manual gas valve too low as this can cause the flame to be unstable resulting in possible flame out To ensure a stable flame, maintain the required gas pressure and flow to the burner assembly Do not store or use gasoline or other flammable materials in the vicinity of the bowl Do not leave flame on while unsupervised Do not operate in windy or rainy conditions Bowl should be operated only by a responsible adult Before any inspection of the bowl, always turn off gas and make sure the bowl is cool 19
20 If you experience problems with the bowl, call a licensed contractor To turn off the bowl, close the manual gas valve to the fully closed position FIRE BOWL AUTOMATED To turn on bowl, use the automated control system Check flame height and make adjustments at the manual gas valve to achieve a balanced flame across all bowls Do not adjust manual gas valve too low as this can cause the flame to be unstable resulting in the system cycling on/off because the sensor cannot read the flame properly To ensure a stable flame, maintain the required gas pressure and flow to the burner assembly Do not store or use gasoline or other flammable materials in the vicinity of the bowl Do not leave flame on while unsupervised Do not operate in windy or rainy conditions Bowl should be operated only by a responsible adult Before any inspection of the bowl, always turn off gas and make sure the bowl is cool If you experience problems with the bowl, call a licensed contractor To turn off bowl, use the automated control system TROUBLE SHOOTING Prior to beginning any trouble shooting procedures, ensure all water, gas and electrical components of the system are off. All procedures should be performed by a licensed contractor. While trouble shooting the unit, look for heat or water damage to the burner assembly which may be caused by improper installation or inadequate ventilation and drainage. No spark at the pilot box Remove decorative media from the pilot box area. Look for small pieces obstructing the pilot box. If still no spark, confirm 24VAC output from the transformer panel by measuring the voltage over terminals X1 to X2. At the burner assembly, measure the wire leads at each bowl to verify there is no short in the wire runs. If there is voltage from the transformer panel, but no spark, check for proper wire connection at the pilot assembly. If still no spark, the ignition module or pilot assembly may need to be replaced. If there is no voltage from the transformer panel, check the 15AMP GFI circuit breaker, and replace circuit breaker as needed. Confirm there is 120VAC at the transformer panel over terminals L and N. If 120VAC input to the transformer is confirmed and there is no 24VAC output from the transformer panel, the transformer panel may need to be replaced. Spark but no pilot light Remove decorative media from the pilot box area. Look for small pieces obstructing the pilot box. The pilot valve may not be opening. Turn on burner assembly and listen for the pilot solenoid to energize and open the valve. If not energizing, the pilot solenoid may need to be replaced If the pilot solenoid is energizing, confirm by sound or smell if gas is coming out of the pilot box. If needed, use a lighter to help determine if gas is coming out of the pilot box. If no gas at the pilot box, check that the gas is turned on. 20
21 The pilot orifice may be plugged/blocked. If so, remove debris and verify gas flow. If pilot will still not light, the pilot assembly may need to be replaced. Burner assembly cycles on/off Moisture can be trapped in the decorative media. As a result, steam from the moisture can cause the burner assembly to cycle on and off until all the moisture has dissipated. If the wind is causing an unstable flame or the flame goes out, rotate burner assembly such that the pilot box is blocked from the prevailing wind. If the problem continues, remove decorative media from the pilot box area and burner ring. Retest the flame. If working, reapply the media in a thin layer over burner ring and loosely around the pilot box Check gas pressure. If pressure is too low or high, it can result in an unstable flame, which can cause the burner assembly to cycle on and off. Check with gas supplier that the proper regulator is installed. Check gas flow. If flow is too low or high, it can result in an unstable flame, which can cause the burner assembly to cycle on and off. Regulate gas flow by adjusting the manual gas valve. If problems persist, check with gas supplier that the proper regulator is installed. Burner assembly will not turn on Make sure the pool control system switches are functioning properly (batteries, transmitter signal, etc.) Electrical circuit fault. Check for loss of power. No gas supply. Check that all manual gas valves are in the proper position. If applicable, make sure the propane tank is full and that the propane adder is energized. Unit may overheat due to improper ventilation. Clear ventilation passageways. Check for heat damage, replacement parts may be needed. Failure of solenoid valve(s) may be indicated by a buzzing noise, parts may need to be replaced. Excessive weather conditions such as rain, wind, snow and dust may affect operation. Wait for weather conditions to clear. Clear debris and resolve moisture before attempting to operate the unit again. Pilot light comes on but not the main burner Confirm that all manual gas valves are in the proper position. Check gas pressure. If pressure is too low or high, it can prohibit the main burner from igniting. Check with gas supplier that the proper regulator is installed. Check gas flow. If flow is too low or high, it can prohibit the main burner from igniting. Check with gas supplier that the proper regulator is installed. Failure of solenoid valve(s) may be indicated by a buzzing noise, parts may need to be replaced. Remove decorative media from the pilot box area and burner ring. Retest the flame. Main burner or pilot light does not shut off Make sure the pool control system switches are functioning properly (batteries, transmitter signal, etc.) Remove solenoid coil and clean inside of the solenoid For unresolved issues, call service provider. 21
22 GENERAL CARE & MAINTENANCE PLANTER BOWLS Periodically check that the drainage tube is not clogged and can still drain adequately. WATER BOWLS Periodically clean out debris that collects inside the bowl. Periodically check the bowl for leaks at the base of the bowl. Check that all water connections are tight and sealed. FIRE BOWLS Periodically clean the burner assembly with a wet cloth to remove carbon build-up. Periodically inspect the underside of the burner assembly for any signs of damage from excessive heat; i.e. melted wires, carbon build up, warped parts, etc. Check that all gas connections are tight, clean and sealed. Keep base of bowl and ventilation passageways clear of debris. CLEANING AND CARE FOR OIL-RUBBED HAMMERED COPPER BOWLS Hammered copper bowls exposed to the outdoor environment and pool chemicals can patina over time. To restore the original finish, follow these cleaning instructions. Items needed: Grade #000 steel wool 500 grit black wet sandpaper Dish soap A multi-surface wax Clean soft cloth: use clean microfiber or soft lint free rags Water hose o Bucket for cleaning solution Cleaning instructions: Mix dish soap and water in a bucket. Using the grade #000 steel wool and soapy water, clean the outside of the bowl. Wet the 500 grit sandpaper and lightly sand the bowl. After sanding, rinse the bowl with clean water. Make sure to spray off the decking and other nearby surfaces to prevent any staining. Apply multi-surface wax to the bowl in a circular motion and wipe off with a clean cloth. CLEANING, CARE AND SEALING FOR CAST STONE BOWLS The cast stone bowl comes with a hand applied penetrating sealer. Over time the bowl may become dirty or the sealant may fade due to exposure to the outdoor elements. To clean or restore the finish, follow the instructions outlined below. It is recommended that the bowl be sealed every 1-2 years to protect and maintain the finish. Items needed: 220 grit sandpaper Non-scratch scrubbing pad Clean soft cloth; use clean microfiber or soft lint free rags Mild cleaner, such as dish soap or window cleaner. Avoid abrasive cleaners such as bleach or ammonia-based products Water hose Bucket for cleaning solution and rinse water Rubber/latex gloves for sealer application 22
23 Cleaning instructions: Clean the bowl using a mild cleaner and soft cloth. If there is persistent dirt or a haze on the bowl, a non-scratch scrubbing pad or 220 grit sandpaper can be used to clean the surface. Do a final wipe down with a clean, wet cloth. Sealing instructions: Clean the bowl following the instructions above. Allow enough time for the bowl to fully dry before applying the sealer. Following instructions included with cast stone Sealant Kit. The sealer is a 1-part penetrating sealant. Put on rubber/latex gloves. Apply the sealer in a circular motion with a microfiber cloth, ensure the surface is wiped clean and there are no drips, runs or streaks on the finish. We recommend 2-3 coats, allowing 15 minutes between coats. Allow more time at cooler temperatures. REPAIR FOR CAST STONE BOWLS If the cast stone bowl has been chipped or damaged, the finish can be repaired and restored. Please call Fireside Expressions at to purchase a Cast Stone Repair Kit. Items needed in addition to the Cast Stone Repair Kit: 220 grit sandpaper Scotch-Brite pad Blue painter s tape Putty knife Mixing stick Rubber/latex gloves Repair instructions: Clean the bowl following the cast stone cleaning instructions above. Use blue painter s tape to mask off the area that is to be repaired. Following mixing instructions included with Cast Stone Repair Kit. The paste should have the consistency of toothpaste. Apply the paste with the putty knife or by hand to the damaged areas. Leave the paste high as it will shrink as it dries. NOTE: The paste needs to have a raised profile when dry so it can be sanded smooth and flush with the finish surface. Let dry for at least 1-2 hours. Allow more time at cooler temperatures. Once dry, sand smooth and flush with the 220 grit sandpaper. Clean the bowl following the cast stone cleaning instructions above. Reseal the repaired area of the bowl following the cast stone sealing instructions above. NOTE: We recommend resealing the whole bowl to achieve a more uniform finish. CLEANING AND CARE FOR CAST STONE BOWL POLISHED COPPER SCUPPER INSERTS AND SPILLWAYS Copper features are made with a high quality polished finish. It is the natural process for copper exposed to the elements or pool chemicals to patina due to oxidation. The copper may turn brown, green, blue or even purple. This natural process will continue to change over time. If you desire to keep the original copper appearance, you can do so by following the copper cleaning instructions below. Items needed: Soft bristle brush Scotch-Brite pad Dish soap 23
24 Solution of 8 oz. of white vinegar, 2 tsp of salt, and 1 oz. of lemon juice Buckets for cleaning solutions Water hose A multi-surface wax protectant (spray version) Clean soft cloth; use clean microfiber or soft lint free rags Cleaning instructions: 1. To clean light patina stains mix dish soap cleaning solution with water. Use a rag with solution to wipe away light patina and excess dirt from the polished copper surface. 2. To remove stains and heavier patina, mix a solution of 8 oz. of white vinegar, 2 tsp of salt and 1 oz. of lemon juice in a mixing bucket. Apply the cleaning solution to the surface using a rag. Allow 1-3 minutes to let the solution penetrate the copper. If stains persist, increase concentration of solution by adding more salt and lemon juice. 3. Wipe off the cleaning solution. 4. Use a soft bristled brush or a fine Scotch-Brite pad to clean the patina from the polished copper surface. Start with very light pressure and work in a circular motion. (It is ok for the polishing utensil to be wetted with cleaning solution). 5. Wipe the polished copper surface with a clean dry rag. With a clean wet rag immediately wipe and rinse any remaining cleaning solution from the polished copper surface. Be careful not to allow dirty water to run down the wall, into the pool or on the deck. Take necessary precautions to minimize the amount of run-off water that may stain or damage any nearby materials. 6. Wipe dry and allow the surface to dry. 7. Spray the polished copper surface slightly with the multi-surface wax and wipe off immediately with a cloth. Do not allow the surface wax to dry before wiping. 8. Repeat all steps as needed to maintain the desired look of the polished copper surface. SEASONAL CARE Seasonal shut down of the copper product is recommended if there is a period of the year you do not use your features, or if you live in an area where dust, the wind, snow or freezing conditions occur. In cold climates, you may need to cover the features to prevent damage from ice and snow. Additionally, summer storms can deposit dust and debris on the functional surfaces. Always clean out the features before use to prevent any debris from affecting the functionality of the system. Make sure water valves leading to water features are off or the pump system is disabled. Please contact your pool care professional for assistance if needed. 24
Fire Bowls and Fire Bowl Inserts (Automated Operation) Operating and Maintenance Instructions
 Operating and Maintenance Instructions") Table of Contents Section 1: Gas and Electric Requirements... 1 Section 2: Installation... 2 Section 3: Burner Setup and Adjustment... 8 Burner Adjustment... 9 Section 4: Maintenance... 10 Section 5: Operation...
Table of Contents Section 1: Gas and Electric Requirements... 1 Section 2: Installation... 2 Section 3: Burner Setup and Adjustment... 8 Burner Adjustment... 9 Section 4: Maintenance... 10 Section 5: Operation...
Fire-Water Bowls Model 100
 Fire-Water Bowls Model 100 OWNER S MANUAL / OPERATING AND MAINTENANCE INSTRUCTIONS For your safety: If you smell gas: 1. Shut off gas to the appliance 2. Extinguish any open flame near unit. 3. If odor
GRAND EFFECTS Fire-Water Bowls Model 100
 GRAND EFFECTS Fire-Water Bowls Model 100 OWNER S MANUAL / OPERATING AND MAINTENANCE INSTRUCTIONS For your safety: If you smell gas: 1. Shut off gas to the appliance 2. Extinguish any open flame near unit.
CATALINA FIRE TABLE ASSEMBLY INSTRUCTIONS
 CATALINA FIRE TABLE ASSEMBLY INSTRUCTIONS CSA Model 98300 DRF01000 Installer: Leave these instructions with consumer. Consumer: Keep these instructions for future reference. DANGER If you smell gas: 1.
OVATION SERIES FIRE TABLES ASSEMBLY INSTRUCTIONS
 OVATION SERIES FIRE TABLES ASSEMBLY INSTRUCTIONS CSA Model98900 DRS02403 Installer: Leave these instructions with consumer. Consumer: Keep these instructions for future reference. DANGER If you smell gas:
ASSEMBLY INSTRUCTIONS
 ASSEMBLY INSTRUCTIONS Installer: Leave these instructions with consumer. Consumer: Keep these instructions for future reference. WARNING: If the information in this manual is not followed exactly, a fire
ASSEMBLY INSTRUCTIONS
 ASSEMBLY INSTRUCTIONS CSA Model: 98910L Printed in China Installer: Leave these instructions with consumer. Consumer: Keep these instructions for future reference. WARNING: If the information in this manual
Repeat procedures for other side.
 Repeat procedures for other side. ASSEMBLY INSTRUCTIONS Installer: Leave these instructions with consumer. Consumer: Keep these instructions for future reference. CSA Model 98900 Printed in China DANGER
ASSEMBLY INSTRUCTIONS
 ASSEMBLY INSTRUCTIONS Installer: Leave these instructions with consumer. Consumer: Keep these instructions for future reference. CSA Model99000 BRH01000 DANGER If you smell gas: 1. Shut off gas to the
ASSEMBLY INSTRUCTIONS
 ASSEMBLY INSTRUCTIONS CSA Model 99000 ARL00100 Installer: Leave these instructions with consumer. Consumer: Keep these instructions for future reference. DANGER If you smell gas: 1. Shut off gas to the
Hanover Outdoor Furniture IMPORTANT. If you have any problems with this product (missing or damaged parts, assembly issues, etc.),
,") Hanover Outdoor Furniture IMPORTANT If you have any problems with this product (missing or damaged parts, assembly issues, etc.), PLEASE DO NOT RETURN TO THE RETAILER/STORE from where you purchased the
Hanover Outdoor Furniture IMPORTANT If you have any problems with this product (missing or damaged parts, assembly issues, etc.), PLEASE DO NOT RETURN TO THE RETAILER/STORE from where you purchased the
Stoneridge Fire Pit High Dining Table Assembly Instruction
 Stoneridge Fire Pit High Dining Table Assembly Instruction Item# L-DN1773SST-D-T WARNING: For Outdoor Use Only. DANGER If you smell gas: 1. Shut off gas to the appliance. 2. Extinguish any open flame.
CARBON MONOXIDE HAZARD. This appliance can produce carbon monoxide which has no odor. Using it in an enclosed space can kill you.
 Intrigue EZ User manual for Intrigue EZ decorative gas appliance CAUTION DO NOT DISCARD THIS MANUAL Important operating and maintenance instructions included. Read, understand, and follow these instructions
INSTALLATION, OPERATION & MAINTENANCE AVANTCO SERIES 177AG OWNER S MANUAL
 INSTALLATION, OPERATION & MAINTENANCE AVANTCO SERIES 177AG OWNER S MANUAL Manual Griddles: Radiant Charbroilers: Hot Plates: 177AG24MG 177AG36MG 177AG24RC 177AG36RC 177AGR212 All equipment manufactured
Using it in an enclosed space can kill you.
 38 X 56 GAS FIRE PIT - OWNER S MANUAL Carlisle Chat Fire Table Base Model # 00GBC7 (6877B) Fits 6877A Carlisle Chat Fire Table Top For Propane and *Natural Gas (*See Page 7) Certified to CSA International
Hanover Outdoor Furniture IMPORTANT. If you have any problems with this product (missing or damaged parts, assembly issues, etc.),
,") Hanover Outdoor Furniture IMPORTANT If you have any problems with this product (missing or damaged parts, assembly issues, etc.), PLEASE DO NOT RETURN TO THE RETAILER/STORE from where you purchased the
Hanover Outdoor Furniture IMPORTANT If you have any problems with this product (missing or damaged parts, assembly issues, etc.), PLEASE DO NOT RETURN TO THE RETAILER/STORE from where you purchased the
Electronic Ignition TK Torch
 Hearth Products Controls Co. HPCFIRE.com www.hearthproductscontrols.com Toll Free: (877) 585-9800 Fax: (877) 433-0704 Electronic Ignition TK Torch This TK Torch uses a revolutionary electronic control
TK Torch Match Lit WARNING: FOR OUTDOOR USE ONLY
 TK Torch Match Lit Installation We suggest that our products be installed by professionals that are locally licensed by the authority having jurisdiction in gas piping. Service We suggest that our products
Dashley Outdoor Fire Table
 Dashley Outdoor Fire Table MODEL N0. 085-557-8 L-FT047PST-F ASSEMBLY INSTRUCTIONS Toll-free 888 670-6684 IMPORTANT: Please read this manual carefully before beginning assembly of this product. Keep this
Owner s Manual. FMI BRANDS INC Avenue Surrey, B.C. Canada V3Z 3V7 Toll Free Fax Model number FMPPC2F
 Owner s Manual Model number FMPPC2F Series number 863 2017 FMI Brands Inc. Patent Pending D.863.000.V3 FMI BRANDS INC. 107 19052 26 Avenue Surrey, B.C. Canada V3Z 3V7 Toll Free 1-888-514-1663 Fax 1-888-797-9931
USE AND CARE GUIDE WARNING WARNING WARNING WARNING
 USE AND CARE GUIDE Item No.: HF11501AA USE PROPANE GAS ONLY! -Do not store or use gasoline or other flammable vapors in the vicinity of this or any other appliance. - Service must be performed by a qualified
CYLINDER NOT INCLUDED
 OPERATING INSTRUCTIONS AND OWNER S MANUAL Model # HS125NG / MH125LP / HS125LP READ INSTRUCTIONS CAREFULLY: Read and follow all instructions. Place instructions in a safe place for future reference. Do
Toll Free: (877) Fax: (877)
 Fax: (877)") www.hearthproductscontrols.com Toll Free: (877) 585-9800 Fax: (877) 433-0704 HWI TK (Thermocouple / Hot Wire Ignition System) This TK uses a revolutionary electronic control module (TCI Module) combining
www.hearthproductscontrols.com Toll Free: (877) 585-9800 Fax: (877) 433-0704 HWI TK (Thermocouple / Hot Wire Ignition System) This TK uses a revolutionary electronic control module (TCI Module) combining
Owner s Manual. FMI BRANDS INC th Avenue Surrey, B.C. Canada V3Z 3V7 Toll Free Fax Model number FMPPC2F
 Owner s Manual Model number FMPPC2F Series number 863 D.863.000.V0 FMI BRANDS INC. 309-19133 26th Avenue Surrey, B.C. Canada V3Z 3V7 Toll Free 1-888-514-1663 Fax 1-888-797-9931 Owner & Safety Manual Model
Installation Instructions
 Installation Instructions Gas Cooktop KM 404 KM 406 To prevent accidents and machine damage, read the operating instructions before installation or use. UV M.-Nr. 05 060 881 WARNING: If the information
USE AND CARE GUIDE PEDESTAL FIREBOWL
 DANGER If you smell gas: 1. Shut off gas to the appliance. 2. Extinguish any open flame. 3. If odor continues, keep away from the appliance and immediately call your gas supplier or fire department. WARNING
INSTALLATION AND OPERATIONS GUIDE FOR GRAND CANYON GAS LOG FIRE PIT SERIES ONLY
 INSTALLATION AND OPERATIONS GUIDE FOR GRAND CANYON GAS LOG FIRE PIT SERIES ONLY Installation and service must be provided by a qualified installer, service agency or gas supplier Grand Canyon Gas Logs,
OPERATING INSTRUCTIONS AND OWNER S MANUAL
 OPERATING INSTRUCTIONS AND OWNER S MANUAL MR. HEATER READ INSTRUCTIONS CAREFULLY: Read and follow all instructions. Place instructions in a safe place for future reference. Do not allow anyone who has
Multi-Function Cooktop
 INSTALLATION GUIDE Multi-Function Cooktop Contents Wolf Multi-Function Cooktop.................... 3 Multi-Function Cooktop Specifications............ 4 Multi-Function Cooktop Installation...............
Del Rio Tile Top Fire Pit Table
 Del Rio Tile Top Fire Pit Table Assembly Instruction Item# L-FT097PST-B SKU# 80325096 WARNING: For Outdoor Use Only. DANGER If you smell gas:. Shut off gas to the appliance. 2. Extinguish any open flame.
LUMINOUS A PATIO HEATER LIKE NO OTHER
 LUMINOUS A PATIO HEATER LIKE NO OTHER Manual for Installation, Operation & Maintenance BPL-HAB20 BPL-HAB40 BPL-HAB50 DANGER If you smell gas: 1. Shut off gas to appliance. 2. Extinguish any open flame.
Owner s Manual. FMI BRANDS INC th Avenue Surrey, B.C. Canada V3Z 3V7 Toll Free Fax Model number FMPPC2A
 Owner s Manual Model number FMPPC2A Series number 890 FMI BRANDS INC. 309-19133 26th Avenue Surrey, B.C. Canada V3Z 3V7 Toll Free 1-888-514-1663 Fax 1-888-797-9931 Owner & Safety Manual Model number FMPPC2A,
Outdoor Flame Heater
 Model Outdoor Flame Heater Owner s Manual Read these instructions before lighting this appliance. DANGER If you smell gas: 1. Shut off gas to the appliance. 2. Extinguish any open flame. 3. If odor continues,
CASUAL FIRESIDE TM A HIGHER STANDARD IN QUALITY AND APPEARANCE - SAFE AND BEAUTIFUL OUTDOOR FIRE PIT FOR PROPANE AND *NATURAL GAS
 OWNER'S MANUAL 51-20 Aero CASUAL FIRESIDE TM Report #521-O-02-5 Tested & Certified to ANSI Z21.97-2014/CSA 2.41-2014 CGA 2.17-M91 (R2009) A HIGHER STANDARD IN QUALITY AND APPEARANCE - SAFE AND BEAUTIFUL
SIERRA RADIANT HEAT MAJESTIC OAK VENTED GAS LOG KIT INSTALLATION AND OPERATING INSTRUCTIONS
 SIERRA RADIANT HEAT MAJESTIC OAK VENTED GAS LOG KIT INSTALLATION AND OPERATING INSTRUCTIONS WARNING: If the information in this manual is not followed exactly, a fire or explosion may result causing property
OWNERS MANUAL RON-36, RON-27, RON-24
 OWNERS MANUAL For Outdoor Use Only Installation, Operation, Maintenance Instructions And Parts List Models: RON-36, RON-27, RON-24 Royal Range of California, Inc. 3245 Corridor Drive, Eastvale, CA 91752
SURE HEAT MANUFACTURING
 SURE HEAT MANUFACTURING Installation and Operating Instructions for NATURAL & L.P. GAS A.G.A. SINGLE & DUAL BURNER VENTED UNITS Model: RP (8,24,30)-N GO (8,24,30)-N GLO (8,24,30)-N WO (8,24,30)-N CO (8,24,30)-N
Cleaning Instructions for Burner, Pilot Assembly, and Emitter Screen. Series: LP Gas
 Cleaning Instructions for Burner, Pilot Assembly, and Emitter Screen Series: 220000-450000 LP Gas For assistance call 1.800.762.1142. Bottle brush Brass brush Heavy-duty pipe cleaners Non-abrasive Scouring
Owner s Guide Installation & Operation
 Owner s Guide Installation & Operation Hot Top HHT Series Hestan Commercial Corporation 3375 E. La Palma Ave Anaheim, CA 92806 (888) 905-7463 RETAIN THIS MANUAL FOR FUTURE REFERENCE P/N 002130 REV 1 IMPORTANT
DESIGN CLASS FUNCTION
 PROFESSIONAL QUALITY COOKING EQUIPMENT INSTALLATION MANUAL FOR MEDALLION DUAL FUEL RANGES MODEL NUMBERS: ARR-304DF, ARR-366DF, ARR-364GDDF, ARR-364GRDF, ARR-486GDDF, ARR-486GRDF, ARR-4822GDDF, ARR-484X2GRDF,
Installation/Operating Instructions
 Installation/Operating Instructions Models: 4072-180 24 NG 4072-182 30 NG Outdoor Hearth Kit DO NOT DISCARD INSTALLER: Leave this manual with party responsible for use and operation. OWNER: Retain this
Owner s Manual. FMI BRANDS INC Avenue Surrey, B.C. Canada V3Z 3V7 Toll Free Fax Model number FMPPC2E-1
 Owner s Manual Model number FMPPC2E-1 Series number 401 FMI BRANDS INC. 107 19052 26 Avenue Surrey, B.C. Canada V3Z 3V7 Toll Free 1-888-514-1663 Fax 1-888-797-9931 Owner & Safety Manual Model number FMPPC2E-1,
Gas Cooktop Installation, User and Service Instructions GMS 955.1
 Gas Cooktop Installation, User and Service Instructions GMS 955.1 IMPORTANT: SAVE FOR LOCAL ELECTRICAL INSPECTOR S USE. READ AND SAVE THESE INSTRUCTIONS FOR FUTURE REFERENCE. OBSERVE ALL FEDERAL, STATE
SEISCO SUPERCHARGER EXTENDER/BOOSTER INSTALLATION GUIDE & OWNERS MANUAL
 SEISCO SUPERCHARGER EXTENDER/BOOSTER INSTALLATION GUIDE & OWNERS MANUAL This manual is provided as a guide to installation. All installations must comply with any and all local and national electrical
CINCINNATI, OH USA
 INSTRUCTION MANUAL Part No. 89731 Revised October 1997 CINCINNATI, OH 45241-4807 USA GAS SAFETY PRECAUTIONS Instructions on what to do when a user smells gas can be obtained from the local gas supplier.
Installation / Assembly
 Cabinet Cut-out Dimensions...4 Gas Requirements and Connection...5 Leak Testing Procedure....6 LP Gas...7 Natural Gas...9 Installing Side Burner with a Grill...10 Save these instructions! Copyright 2009-2010
FIRE AND WATER BOWL. Installation Guide & Owners Manual *READ THIS MANUAL BEFORE INSTALLATION OF THE UNIT
 I N N O V A T O R S I N O U T D O O R P R O D U C T S A N D C O M P O N E N T S FIRE AND WATER BOWL Installation Guide & Owners Manual *READ THIS MANUAL BEFORE INSTALLATION OF THE UNIT WARNING: Improper
Installation Instructions
 Installation Instructions Gas Cooktop KM 360 To prevent accidents and machine damage, read these instructions before installation or use. UV M.-Nr. 06 390 460 WARNING: If the information in this manual
For use with models: PGM304-1, versions M-B PGM365-1, versions M-E, M-F & M-G
 PGM-1 Cooktops For use with models: PGM304-1, versions M-B PGM365-1, versions M-E, M-F & M-G Install ation Instructions Part No. 65476 Rev. B Table of Contents Appliance Safety...1 Important Safety Instructions...2
Harmony Outdoor Gas Fire Pit with Porcelain Tiles ITM./ART.#: FIGS545GFPB
 Harmony Outdoor Gas Fire Pit with Porcelain Tiles ITM./ART.#: FIGS545GFPB ANSI Z21.97/CSA 2.41-2014 Outdoor Decorative Gas Appliances Installer: Leave these instructions with consumer. Consumer: Keep these
Gas Connector Installation Instructions
 Gas Connector Installation Instructions 6015 Enterprise Drive Export, PA 15632 USA 1-800-DORMONT (367-6668) (724) 733-4800 Fax (724) 733-4808 www.dormont.com Safety Precautions - Read warnings carefully
INSTALLATION GUIDE Dual Fuel Ranges
 INSTALLATION GUIDE Dual Fuel Ranges Contents Wolf Dual Fuel Ranges......................... 3 Safety Instructions............................ 4 Dual Fuel Range Specifications.................. 5 Dual Fuel
southbend A MIDDLEBY COMPANY INSTALLATION AND OPERATION MANUAL CG214 (E) CG314 (E) CG414 (E) CG220 (E) CG320 (E) CG325 (E) GAS BOILERS MODELS:
 CG314 (E) CG414 (E) CG220 (E) CG320 (E) CG325 (E) GAS BOILERS MODELS:") INSTALLATION AND OPERATION MANUAL GAS BOILERS MODELS: CG214 (E) CG314 (E) CG414 (E) CG220 (E) CG320 (E) CG325 (E) southbend A MIDDLEBY COMPANY 1100 Old Honeycutt Road Fuquay-Varina, NC 27526 (919) 552-9161
INSTALLATION AND OPERATION MANUAL GAS BOILERS MODELS: CG214 (E) CG314 (E) CG414 (E) CG220 (E) CG320 (E) CG325 (E) southbend A MIDDLEBY COMPANY 1100 Old Honeycutt Road Fuquay-Varina, NC 27526 (919) 552-9161
OWNER'S MANUAL WARNING WARNING WARNING WARNING WARNING. Factory No.: HYFP Style No.: WARNING WARNING READ BEFORE USE!
 OWNER'S MANUAL READ BEFORE USE! Factory No.: HYFP30205-19 Style No.: 65209 For Outdoor Use Only! Use Propane Gas Only! - USE PROPANE GAS ONLY! Do not store or use gasoline or other flammable vapors and
Installation Instructions T 9822 Gas Dryer. en - US, CA. To prevent accidents
 Installation Instructions T 9822 Gas Dryer To prevent accidents en - US, CA and appliance damage read these instructions before installation or use. M.-Nr. 07 431 110 2 WARNING For your safety the information
User Manual. 110 Cup (55 Cup Raw) Gas Rice Cooker. Model: 177GRCLP, 177GRCNAT 12/2018. Please read and keep these instructions. Indoor use only.
 Gas Rice Cooker. Model: 177GRCLP, 177GRCNAT 12/2018. Please read and keep these instructions. Indoor use only.") 110 Cup (55 Cup Raw) Gas Rice Cooker Intertek 5010781 Conforms to ANSI STD Z83.11-2016 Model: 177GRCLP, 177GRCNAT 12/2018 FOR YOUR SAFETY Do not store or use gasoline or other flammable vapors or liquids
110 Cup (55 Cup Raw) Gas Rice Cooker Intertek 5010781 Conforms to ANSI STD Z83.11-2016 Model: 177GRCLP, 177GRCNAT 12/2018 FOR YOUR SAFETY Do not store or use gasoline or other flammable vapors or liquids
Installation Instructions Dual Fuel Ranges
 Installation Instructions Dual Fuel Ranges E30DF74EPS E36DF76EPS E48DF76EPS 5995447082 2 Safety IMPORTANT SAFETY INSTRUCTIONS Safety Precautions Do not attempt to install or operate your unit until you
GAS-FIRED INFRARED OUTDOOR PATIO HEATER INSTALLATION, OPERATION MAINTENANCE INSTRUCTIONS
 GAS-FIRED INFRARED OUTDOOR PATIO HEATER INSTALLATION, OPERATION MAINTENANCE INSTRUCTIONS FOR MODEL PTH-03-3G TABLE OF CONTENTS PAGE IMPORTANT TOOLS & PARTS.. 2 PRECAUTIONS.. 3 ASSEMBLY INSTRUCTIONS. 4
Table Top Patio Heater
 Table Top Patio Heater INSTRUCTION MANUAL MODEL: HPS-B Certified by international recognized standards. The infra-red with heat wave outdoor heater. Variable control gas valve with electric push igniter.
GAS-FIRED INFRARED OUTDOOR PATIO HEATER
 GAS-FIRED INFRARED OUTDOOR PATIO HEATER Virco Associates, Inc. INSTALLATION, OPERATION 45, Brea Canyon Road MAINTENANCE INSTRUCTIONS Walnut, CA 9789, U.S.A. FOR MODEL PTH06-SS TABLE OF CONTENTS PAGE IMPORTANT
DESIGN CLASS FUNCTION
 PROFESSIONAL QUALITY COOKING EQUIPMENT INSTALLATION MANUAL FOR PERFORMER SLIDE-IN COOK TOPS MODEL NUMBERS: AROBSCT-424, AROBSCT-242GD, AROBSCT-24X2GR, AROBSCT-430, AROBSCT-636, AROBSCT-436GD, AROBSCT-436GR,
NATURAL GAS MODELS: SGC-36N/SGC-48N/SGC-60N/SGC-72N SGR-24N/SGR-36N BARBECUE - CARE AND USE
 SGC-36N SGC-60N NATURAL GAS MODELS: SGC-36N/SGC-48N/SGC-60N/SGC-72N SGR-24N/SGR-36N BARBECUE - CARE AND USE RETAIN FOR FUTURE REFERENCE FOR YOUR SAFETY If you smell gas: Shut off gas supply to appliance
Riaza Tablemount Fire Bowl. Item# Model# HYUTT DANGER If you smell gas: 1. Shut off gas to the appliance.
 Riaza Tablemount Fire Bowl Item# 50224 Model# HYUTT15001-2 DANGER If you smell gas: 1. Shut off gas to the appliance. 3. If odor continues, keep away from the appliance and immediately call WARNING Do
FIRE AND WATER BOWL. Installation Guide & Owners Manual *READ THIS MANUAL BEFORE INSTALLATION OF THE UNIT
 FIRE AND WATER BOWL Installation Guide & Owners Manual *READ THIS MANUAL BEFORE INSTALLATION OF THE UNIT WARNING: Improper installation, adjustment, alteration, service, or lack of maintenance can cause
OWNER S MANUAL. Smoky Hill 5pc Gas Firepit Chat Set. Product Code: D71 M25973 UPC Code: Date of Purchase: / /
 OWNER S MANUAL Smoky Hill pc Gas Firepit Chat Set Product Code: D7 M97 UPC Code: 790079 Date of Purchase: / / PARTS LIST PART NO. ATTENTION: THIS PRODUCT IS NOT FOR COMMERCIAL USE INTENDED FOR RESIDENTIAL
Hanover Outdoor Furniture IMPORTANT. If you have any problems with this product (missing or damaged parts, assembly issues, etc.),
,") Hanover Outdoor Furniture IMPORTANT If you have any problems with this product (missing or damaged parts, assembly issues, etc.), PLEASE DO NOT RETURN TO THE RETAILER/STORE from where you purchased the
Hanover Outdoor Furniture IMPORTANT If you have any problems with this product (missing or damaged parts, assembly issues, etc.), PLEASE DO NOT RETURN TO THE RETAILER/STORE from where you purchased the
MODENA ZUHNE
 MODENA 28 28in x 18in x 10in 1-855-55-ZUHNE www.zuhne.com info@zuhne.com 16" 18" 10" PRODUCT DESCRIPTION Premium grade handmade sink 16 gauge Stainless Steel T304 10mm/0.4inch radius coved corners Best-in-breed
Owner s Guide Installation & Operation
 Owner s Guide Installation & Operation Char Broiler HCH Series Hestan Commercial Corporation 3375 E. La Palma Ave Anaheim, CA 92806 (888) 905-7463 RETAIN THIS MANUAL FOR FUTURE REFERENCE P/N 002134 REV
GAS COOKTOP MODELS: CTG365D, CTG305D, CTG304D TO REDUCE THE RISK OF FIRE, ELECTRIC SHOCK, OR INJURY TO PERSONS, OBSERVE THE FOLLOWING
 By CNP INDUSTRIES, INC. P.O. Box 18645 Anaheim, Ca 92817 (877) 387-6721 INSTALLATION INSTRUCTIONS GAS COOKTOP MODELS: CTG365D, CTG305D, CTG304D IMPORTANT: Before beginning installation please read these
MODELS LFP4218/LFP6018 TOP VENT GAS FIREPLACE
 MODELS LFP4218/LFP6018 TOP VENT GAS FIREPLACE PFS APPROVED FOR NATURAL GAS OR PROPANE GAS Z21.50-2014 If your plans do not allow for the venting system as outlined previously in the installing chimney/vent
Bullet Burner Matchlit Fire Pit Insert AIR MIXER NOT REQUIRED DUE TO AIR MIX CHAMFERS
 www.theoutdoorplus.com Bullet Burner Matchlit Fire Pit Insert AIR MIXER NOT REQUIRED DUE TO AIR MIX CHAMFERS Bullet Orifice Close-Up Air Mix Chamfer Installation & Operation Instructions Index: 1) General
DAYVA PREMIERE OUTDOOR HEATER Model HS041-2
 INSTRUCTIONS DAYVA PREMIERE OUTDOOR HEATER Model HS041-2 By The Dayva Premier Outdoor heater is another fine product from Dayva International. Dayva is the leader in accessories for the outdoor market.
WALL MOUNTED ELECTRIC FIREPLACE HEATER. Model # : Onyx Ivory Mirror OWNER S MANUAL. AC V 60Hz 1500W
 WALL MOUNTED ELECTRIC FIREPLACE HEATER Model # : 80001 Onyx 80002 Ivory 80008 - Mirror OWNER S MANUAL AC 110-120V 60Hz 1500W WARNING Read and understand this entire owner s manual, including all safety
USE & CARE GUIDE SINGLE SIDE BURNER MODEL BLZ-SB1(NG/LP) DOUBLE SIDE BURNER MODEL BLZ-SB2(NG/LP)
 DOUBLE SIDE BURNER MODEL BLZ-SB2(NG/LP)") USE & CARE GUIDE SINGLE SIDE BURNER MODEL BLZ-SB1(NG/LP) DOUBLE SIDE BURNER MODEL BLZ-SB2(NG/LP) DANGER - IF YOU SMELL GAS: I) Shut off the gas supply to the appliance at its source. 2) Extinguish any
USE & CARE GUIDE SINGLE SIDE BURNER MODEL BLZ-SB1(NG/LP) DOUBLE SIDE BURNER MODEL BLZ-SB2(NG/LP) DANGER - IF YOU SMELL GAS: I) Shut off the gas supply to the appliance at its source. 2) Extinguish any
GAS-FIRED INFRARED OUTDOOR PATIO HEATER
 GAS-FIRED INFRARED OUTDOOR PATIO HEATER Virco Associates, Inc. INSTALLATION, OPERATION 145, Brea Canyon Road MAINTENANCE INSTRUCTIONS Walnut, CA 91789, U.S.A. FOR MODEL PTH101 TABLE OF CONTENTS PAGE IMPORTANCE
TRI-STAR INC SOUTH STANDARD AVENUE, SANTA ANA, CA Ph: Fax: MODEL #. OWNER S MANUAL
 TRI-STAR INC 2205 SOUTH STANDARD AVENUE, SANTA ANA, CA 92707 Ph: 714 424 9380 Fax: 714 424 9385 MODEL #. OWNER S MANUAL INSTALLATION OPERATION MAINTENANCE All equipments manufactured by Tri-star Inc. for
TERRACE AND PATIO HEATER
 TERRACE AND PATIO HEATER USER INSTALLATION AND OPERATION GUIDE INDEX General and specifications.1,2 Security and caution.. 3 Tools and accessories required 5 Assembly instructions 5-7 Operation (Lighting
PLEASE RETAIN THIS MANUAL FOR FUTURE REFERENCES. This equipment is design engineered for commercial use only
 OWNER S MANUAL INSTALLATION OPERATION MAINTENANCE FRYER SRF-40/50 All equipment manufactured by SIERRA CORP. is for use with the type of gas specified on the rating plate and for installation will be in
INSTALLER: THIS MANUAL MUST BE LEFT WITH THE APPLIANCE. CONSUMER: KEEP THIS MANUAL FOR FUTURE REFERENCE. WARNING
 FIRE PIT INSTALLATION AND OPERATING INSTRUCTIONS 401400RD MODELS: 401442FP, 401554FP, 801486FP, 801554FP, 821486FP, 821549FP 401400SQ MODELS: 401443FP, 401467FP, 401558FP 401700RCT MODELS: 401767FP-24,
R-RCM & R-RSB SERIES
 R-RCM & R-RSB SERIES CHEESEMELTER & SALAMANDER BROILERS INSTALLATION - OPERATION - MAINTENANCE CHEESEMELTERS R-RCM-24 R-RCM-36 R-RCM-48 R-RCM-60 SALAMANDERS R-RSB-24 R-RSB-36 R-RSB-48 Telephone: (802)
K Specifications. Max. Water Volume
 K 2.75 High Pressure Washer Operator Manual Overview... 2 Precautions... 2-4 Assembly Instructions... 4 Operating Instructions... 5 Using the Accessories... 6 Working with Detergents... 7 Shut Down and
TERRACE AND PATIO HEATER
 TERRACE AND PATIO HEATER USER INSTALLATION AND OPERATION GUIDE INDEX General and specifications.11 Security and caution.. 12, 13 Tools and accessories required 13 Assembly instructions 14,15 & 16 Verifying
ECCOTEMP. Point of Use Tankless Water Heaters EP-2.4 / EP-7.0. Installation and Operating Instruction Manual. Shop Online.
 ECCOTEMP Point of Use Tankless Water Heaters EP-2.4 / EP-7.0 Installation and Operating Instruction Manual Product Support Eccotemp.com/help-desk Shop Online Eccotemp.com/products Store Locator Eccotemp.com/locator
Intrigue CAUTION. User Manual for: INT-1, INT-20 GAS-FIRED
 Intrigue User Manual for: INT-1, INT-20 CAUTION DO NOT DISCARD THIS MANUAL Important operating and maintenance instructions included. Read, understand, and follow these instructions for safe installation
NO VENTING REQUIRED 120V AC;
 ELECTRIC FIREPLACE Model Number: Alice (EF172B-EF176B) OWNER S MANUAL WARNING Read and understand this entire owner s manual, including all safety information, before plugging in or using this product.
OWNER'S MANUAL WARNING WARNING WARNING WARNING WARNING WARNING. READ BEFORE USE! actory No.: HYTT Style No.:65124
 OWNER'S MANUAL READ BEFORE USE! actory No.: HYTT12208-41 Style No.:65124 USE PROPANE GAS ONLY! -Do not store or use gasoline or other flammable vapors in the vicinity of this or any other appliance. -
SOUTHWEST FIREBIRD MFG SONORAN UNVENTED Model 36/42/48
 SOUTHWEST FIREBIRD MFG SONORAN UNVENTED Model 36/42/48 INSTALLATION INSTRUCTIONS PREFABRICATED MODULAR MASONRY- UNVENTED SONORAN 36/42/48TO BE USED WITH UNVENTED GAS LOGS. SAVE THIS BOOK This book is valuable.
MERIDIAN MODEL# 3793
 MERIDIAN MODEL# 3793 CORTERRA ADA-COMPLIANT WASHFOUNTAIN REQUIRED ITEMS FOR INSTALLATION NOT SUPPLIED 7/16 Hex Wrench Plumbers Putty Teflon Tape Slotted Screwdriver (for Metering Adjustment) Socket and
WARNING: FOR OUTDOOR USE ONLY!
 FOLD 48 FIRE TABLE Match-lit Installation + Owner's Manual Meets the essential requirements as described in the European Directive 2009/142/EC DANGER - IF YOU SMELL GAS 1. Shut off gas to the appliance.
LP GAS PIZZA OVEN USER MANUAL
 LP GAS PIZZA OVEN USER MANUAL To reduce the risk of fire, burn hazard or other injury, read the USER MANUAL carefully and completely before using this appliance FOR OUTDOOR USE ONLY Before Cleaning, make
USE AND CARE GUIDE. Back Painted 32 x32 Fire Pit. 11in. 17in
 11in Please refer to part numbers when reordering For questions or comments about product: Email: sears@sunjoygroup.com or Call toll-free: 1-866-578-6569 Made in / Hecho en CHINA Distributed by Sears,
EcoBurner 2.0 Manual Lit Owner s Manual Installation and Operation Instructions
 EcoBurner 2.0 Manual Lit Owner s Manual Installation and Operation Instructions INSTALLER: Leave this manual with the appliance. CONSUMER: Retain this manual for future reference. Model # s - FD-EB-GEN,
Radiant Patio Heater. Performance that outshines. Manual for Installation, Operation & Maintenance
 Series GA301 Radiant Patio Heater Performance that outshines Manual for Installation, Operation & Maintenance DANGER If you smell gas: 1. Shut off gas to appliance. 2. Extinguish any open flame. 3. If
Professional Warming Drawer and Warming Drawer Cabinet
 Professional Warming Drawer and Warming Drawer Cabinet Care & Use/Installation Instructions Models: (C)VQEWD5300SS (C)VQEWD5420SS IMPORTANT SAFETY INSTRUCTIONS WARNING: Read this manual carefully and completely
Assembly & User Instructions Mirage 38,200Btu Heat Focusing Patio Heater
 Assembly & User Instructions Mirage 38,200Btu Heat Focusing Patio Heater These instructions are for your safety. Please read them thoroughly before use and retain them for future reference. DANGER: If
GAS COOKTOP INSTALLATION INSTRUCTIONS BEFORE YOU BEGIN. IMPORTANT Save these instructions for local electrical inspector s use.
 GAS COOKTOP INSTALLATION INSTRUCTIONS Please read this guide thoroughly before installation. To contact LG Electronics, 24 hours a day, 7 days a week: 1-800-243-0000 (U.S.A.) 1-888-542-2623 (Canada) Or
ASSEMBLY INSTRUCTIONS HOODED GAS GRILL Model: UC-SBP
 ASSEMBLY INSTRUCTIONS HOODED GAS GRILL Model: UC-SBP FOR OUTDOOR USE ONLY PLEASE READ INSTRUCTIONS CAREFULLY BEFORE ASSEMBLY RETAIN THIS MANUAL FOR FUTURE REFERENCE WARNING Hazardous fire or explosion
NorthlineExpress.com Toll-Free
 IMPORTANT INFORMATION WARNI: This appliance assembly contains burner orifices specifically for the input gas and Btu rating. Modifying or failure to use the factory orifice may cause property damage, personal
Gas Fire Patio Heater Q9
 Gas Fire Patio Heater Q9 Instruction Manual Please read the manual BEFORE you unpack or install the fire TABLE OF CONTENTS Warning 3 Getting Started 4 What s Included 5 Assembly Procedures 6 Product Drawing
WARNING: FOR OUTDOOR USE ONLY!
 TULIP FIREBOWL Installation Manual OUTDOOR FIREPIT BURNER MODELS CIR-8 & 8P Burner conforms to: ANSI Z2.97/CSA 2.4 - (202/0/0) Outdoor Decorative Gas Appliances DANGER - IF YOU SMELL GAS. Shut off gas