VACMASTER. User s Guide VP215
|
|
|
- Marybeth Garrett
- 6 years ago
- Views:
Transcription

1 VACMASTER User s Guide VP215
2 Thank you for purchasing the VACMASTER VP215 Vacuum Packaging Machine. You are about to use one of the most powerful vacuum packaging systems available. With the help of the VP215, you will now be able to keep food fresher longer in the refrigerator, freezer or pantry. The VP215 effectively removes air and extends freshness up to five times longer than normal preservation methods. Also, the VP215 can be used to preserve and organize other items, such as keepsakes, small toys and easy-to-lose items. You will soon find your VP215 to be so versatile and convenient, it will never leave the countertop. The VP215 is a chamber vacuum system, which offers two distinct advantages over non-chamber, external suction units. First, a much higher level of vacuum can be achieved, which means a longer shelf life for foods that you package. Second, liquids and liquid-rich foods can be effectively vacuum packaged. Foods like fresh meats, fish, soups, stews, and marinated vegetables are packaged quickly with ease, and no mess. The VP215 Vacuum Packaging Machine uses proven commercial technology. To use, simply place the pouch to be sealed inside the chamber and close the lid. Push start and the sealing process begins. First, the air is removed from the entire chamber and the vacuum pouch. Once the preset vacuum level is achieved, the pouch is sealed. Upon completion of the sealing cycle, air flows back into the chamber. Wait for the lid to release, and the process is complete. To get started, please read and follow all instructions for usage and maintenance carefully before operating the VACMASTER VP215 Vacuum Packaging Machine.
3 Table of Contents Vacuum Packaging Overview...4 VP215 Features...5 VP215 Control Panel...6 Operating Instructions Adding Oil to the VP215 Vacuum Pump...7 Setting up the VP Adjusting/Setting the VP215 Timing Controls...9 Using the VP215 Vacuum Packaging Machine...11 Changing the Oil in the VP VACMASTER Pouches...14 VP215 Uses & Tips...15 Machine Safety & Maintenance...16 Troubleshooting...17 Parts Information...18 Warranty...23
4 Vacuum Packaging Overview If you are part of either the food processing or food service industry, there is a good chance that you already know the advantages of vacuum packaging. It has been used with success for many years as a safe and cost effective method for extending shelf life and maintaining the quality of food products. If vacuum packaging is new to your home or business, you will soon wonder how you lived without it! Whether you are a beginner or expert, there are certain basic guidelines that should always be followed in order to package foods safely for consumption. Neglecting these basic guidelines can result in food spoilage, and in some cases, illness or death. Once you familiarize yourself with the machine procedures, you will feel at ease using the VACMASTER VP215 Vacuum Packaging Machine and enjoy a higher quality of stored foods. Here are a few tips to get you started: Package only fresh foods. Do not package old or rancid foods. An already bad product does not improve with vacuum packaging. Fresh foods (meats, vegetables, cheeses, etc.) should be refrigerated at 34 F or below or frozen after vacuum packaging. Vacuum packaging removes a high percentage of air (which is 21% oxygen). This slows the growth of most living microorganisms, which degrade food, such as aerobic bacteria and molds. However, some forms of bacteria, such as clostridium botulinum (responsible for botulism), are anaerobic and grow in the absence of oxygen. The foods susceptible to botulinum should be refrigerated for the short term and frozen for long-term storage. Consume immediately after heating. Vegetables such as cauliflower, broccoli and cabbage will emit gasses when vacuum sealed. To prepare these foods for vacuum packaging, you must blanch them first and then freeze. All perishable foods must be refrigerated or frozen to prevent spoilage. Vacuum packaging is not a substitute for canning. 4


5 VP215 Features Seal Pad Lid Gasket Vacuum Chamber Filler Plates** Seal Bar Lid Lock* Power Switch Control Panel * Lid Lock: DO NOT USE while the machine is operating. This feature is used to keep the lid closed while the machine is in storage. ** Filler Plates: Filler plates are used to occupy space in the vacuum chamber. The plates allow for a faster vacuum - when more space is occupied, there is less air to be removed from the chamber. 5
6 VP215 Control Panel Vacuum Gauge - Indicates the vacuum level inside the chamber. LED Screen (TIME) - Displays current function or cycle time measured in seconds. VACUUM Function Light - Illuminates to adjust vacuum time. During set up, adjust the vacuum time using the buttons. Also illuminates during the vacuum process. GAS Function Light - This model does not offer the gas flush option. SEALING Function Light - Illuminates to adjust sealing time. During set up, adjust the sealing time using the buttons. Also illuminates during the sealing process. COOLING Function Light - Illuminates to adjust cooling time. During set up, adjust the cooling time using the buttons. Also illuminates during the cooling process. WORKING Indicator Light - Illuminates to indicate the machine is in use. Button - Press to increase the vacuum time, sealing time or cooling time. Button - Press to decrease the vacuum time, sealing time or cooling time. STOP Button - Press to stop the vacuum cycle and immediately seal the pouch. This button will only work while the machine is in the vacuum process. SET Button - Press to select the vacuum time, sealing time or cooling time. Use with the buttons. 6

7 Operating Instructions Please read all instructions before operating the VP215. IMPORTANT: OIL MUST BE ADDED TO MACHINE PRIOR TO USE ADDING OIL TO THE VP215 VACUUM PUMP Note: Make sure the VP215 is turned off and unplugged before adding oil. Required supplies: ½ quart of VACMASTER machine oil Empty oil bottle with spout Phillips head screwdriver Adjustable wrench (not included) Oil Site Glass Oil Fill Bolt Back of Housing Cabinet 1. Prepare the oil The VP215 includes a maintenance kit that contains a ½ quart of oil and an empty oil bottle with spout. Fill the empty oil bottle with oil. 2. Remove the back panel Using the enclosed Phillips head screwdriver, remove the four screws from the back panel and take the panel off of the machine. 3. Remove the oil fill bolt Locate the oil fill bolt on the vacuum pump and remove it using an adjustable wrench or comparable tool. 7

8 Operating Instructions (Continued) 4. Fill the pump with oil Insert the spout into the open hole (oil fill bolt opening) and begin pouring the oil into the pump. Fill the pump until the oil level is at ½ to ¾ in the site glass. This is approximately 3-3½ ounces of oil. 5. Replace the oil fill bolt and back panel Once the pump is filled with oil, screw the oil fill bolt back in place and put the back panel on the machine. The VP215 vacuum pump is now ready for use. SETTING UP THE VP Attach the power cord and plug the machine into a grounded electrical outlet Properly insert the electrical cord into the power outlet on the back of the machine and then plug the cord into the wall outlet. 2. Open the machine lid Release the lid lock, located on the right side of the machine, and allow the lid to lift and remain open. IMPORTANT: DO NOT TURN THE MACHINE ON UNTIL THE LID LOCK HAS BEEN RELEASED. THE LID LOCK FEATURE IS USED ONLY TO KEEP THE LID CLOSED WHILE THE MACHINE IS IN STORAGE. 3. Turn the power switch on Turn the red switch on the left side of the machine toward the front, switching from the 0 to the 1 position. The LED Screen on the control panel will illuminate showing a symbol. 8
9 Operating Instructions (Continued) ADJUSTING/SETTING THE VP215 TIMING CONTROLS Note: All timing adjustments must be made with the lid lock off and the lid open. To adjust/set the timing controls, press the SET button on the control panel until the required label is illuminated Vacuum, Sealing or Cooling. For each selection, the current time setting will show on the LED Screen. Each time setting is displayed in seconds. For initial testing, the time settings should be: Vacuum Time - 40 seconds Sealing Time seconds Cooling Time - 2 seconds To change the settings, please read the following instructions for each control: Vacuum Time: To increase or decrease the vacuum time, press the SET button until VACUUM is illuminated and then use the buttons to adjust the vacuum time accordingly. The time setting will display on the LED Screen on the control panel. Note: Filler plates can be used to reduce the vacuum time required. Place the filler plates inside the chamber as desired. Filler plates occupy space, leaving less air to be removed from the chamber. If you require more space inside the chamber, remove the filler plates to accommodate your product. Sealing Time: To increase or decrease the sealing time, press the SET button until SEALING is illuminated and then use the buttons to adjust the sealing time to accommodate your application. It is recommended that you make adjustments in 0.1 second increments to avoid melting the pouch. Note: For thicker pouches, you should increase the seal time in 0.1 second increments until the pouch seals completely. In addition, for thinner pouches, you should decrease the seal time in 0.1 second increments to avoid over-sealing the pouch. Cooling Time: To increase or decrease the cooling time, press the SET button until COOLING is illuminated and then use the buttons to adjust the cooling time accordingly. Tip: To prolong the life of your seal bar, set the cooling time to twice the sealing time. Note: The VP215 settings will always default to the most recently used settings on the machine. 9

10 Operating Instructions (Continued) USING THE VP215 VACUUM PACKAGING MACHINE Note: After setting the timing controls, press the SET button until all function lights on the control panel are no longer illuminated. The machine will not start until all function lights are off. 1. Select a vacuum chamber pouch Select the proper size of vacuum chamber pouch for the product that you are packaging. Make sure that the mouth of the pouch does not exceed the length of the seal bar and make sure the entire pouch fits inside of the chamber. Allow 1 to 2 of extra headspace at the top of the pouch to ensure a quality, air-tight seal. The VP215 accepts vacuum chamber pouches up to 10 W x 13 L in size. 2. Fill the pouch and place inside the chamber Fill the pouch with the product to be vacuum packaged and place the pouch inside the chamber. Keep pouches that contain liquids or wet product below the height of the seal bar. Lay the pouch flat inside the chamber, with the opening of the pouch across the seal bar. Make sure that the pouch lies flat across the seal bar and is free of wrinkles. Note: The entire pouch, including the opening, must remain inside of the chamber. 3. Close the machine lid to vacuum and seal Close the lid and press down firmly for 2-3 seconds or until the vacuum gauge begins to move. Vacuum Cycle Runs for a set time - counting down to zero Cooling Cycle Runs for a set time - counting down to zero Sealing Cycle Runs for a set time - counting down to zero Lid Release Indicates the end of the process. 10
11 Operating Instructions (Continued) 4. Inspect the pouch When the lid opens, remove the pouch and inspect the vacuum-packaged product. Vacuum confirmation - Check the quality of the vacuum by looking at the tightness of the pouch and the product. Look for air pockets or air leaks. If you notice that the product is not vacuum sealed tightly, then increase the vacuum time by 5 seconds and vacuum and seal again. Seal confirmation Inspect the pouch seal. A positive seal will appear clear upon inspection. If the seal is spotty or incomplete, increase the seal time by 0.1 second. If the seal appears white or milky, decrease the seal time by 0.1 second. Once the settings are determined for your application, vacuum and seal again. If the product is vacuumed and sealed tightly, then the process is complete. CHANGING THE OIL ON THE VP215 Note: Make sure the VP215 is turned off and unplugged before adding oil. Required supplies: ½ quart of VACMASTER machine oil Empty oil bottle with spout Phillips head screwdriver Adjustable wrench (not included) Small oil drain pan or comparable item (not included) See our YouTube video! Maintenance: Change the oil for the first time after 25 hours of use. All subsequent oil changes should occur after every 60 hours of use. Tip: Check the fluid level and color of the oil frequently. The oil level should show ½ to ¾ full in the oil site glass. If the oil becomes discolored (cloudy, dark, milky), an oil change is required. 1. Prepare the new oil The VP215 includes a maintenance kit that contains a ½ quart of oil and an empty oil bottle with spout. Fill the empty oil bottle with oil. 11

12 Operating Instructions (Continued) 2. Warm up the current oil Run the machine for several cycles to warm up the oil. 3. Turn the power off Make sure the VP215 is turned off and unplugged before changing the oil. 4. Remove the back panel Using the enclosed Phillips head screwdriver, remove the four screws from the back panel and take the panel off of the machine. Oil Site Glass Oil Fill Bolt Back of Housing Cabinet Oil Change Bolt 5. Remove the oil drain bolt Locate the oil drain bolt on the underneath side of the vacuum pump. Place an oil drain pan under the oil drain bolt. Remove the bolt using an adjustable wrench or comparable tool. The oil will begin draining immediately, so make sure the oil drain pan is securely in place. 6. Drain the oil Allow all of the oil to drain completely from the pump. Once the oil is removed, screw the oil drain bolt back in place. Do not over tighten the bolt. Note: Dispose of old oil properly and according to your state and local regulations. 12
13 Operating Instructions (Continued) 7. Remove the oil fill bolt Locate the oil fill bolt on the vacuum pump and remove it using an adjustable wrench or comparable tool. 8. Fill the pump with oil Insert the spout into the open hole (oil fill bolt opening) and begin pouring the oil into the pump. Fill the pump until the oil level is at ½ to ¾ in the site glass. This is approximately 3-3½ ounces of oil. 9. Replace the oil fill bolt and back panel Once the pump is filled with oil, screw the oil fill bolt back in place and put the back panel on the machine. The VP215 vacuum pump is now ready for use. 13

14 VACMASTER Pouches For the best results, use our VACMASTER Vacuum Chamber Pouches with your VP215. The VACMASTER Vacuum Chamber Pouches are constructed of a heavy-duty poly/nylon combination. This durable pouch provides increased puncture and abrasion resistance. These pouches are transparent, offering clearly visible product for easy identification. The pouches work well in conjunction with the VP215 Vacuum Packaging Machine, creating a secure vacuum and a tight seal, making it a great asset for Sous Vide cooking. The VACMASTER Vacuum Chamber Pouches are high quality, larger quantity and incredibly affordable! Heavy-duty poly/nylon material Eliminates freezer burn and dehydration Pouches can be frozen, refrigerated, microwaved or boiled Economically priced Offered in a wide range of sizes and thicknesses BPA free VACMASTER Bone Guard If you are vacuum packaging meat, fish or items that may puncture or tear the pouch, you may want to consider using VACMASTER Bone Guard. Bone Guard is a heavy-duty, 6 mil thick material that is clear, for full product visibility, and provides the ultimate in pouch protection. 14
15 VP215 Uses & Tips Vacuum package brown sugar to keep it from getting hard. Make smoothies or juices ahead of time, and portion out for a quick way to get your daily dose of vitamins. Save time on prep and cleanup. Leftover margaritas? Package them for a quick and easy way to enjoy margaritas any time. Make pre-portioned snacks for the family on the go! Package gardening seeds and bulbs to keep fresh until next spring when you can plant them. Making homemade frosting and decorating is such a chore. Put frosting into a chamber pouch and vacuum package it (or just seal). Cut a small corner off and decorate! You won't get your hands or utensils dirty. Keep important documents safe from damage (i.e. passport, birth certificates, marriage license). Keep items safe from wet conditions when outdoors (i.e. first aid kits, cell phones, cameras). For a quick wet washcloth for children while on a road trip or while camping, wet some washcloths and vacuum package them. Use a zipper bag and keep reusing it when needed. Not done with that paint project? Don't wash out your brushes every time - keep them wet and vacuum package them for the following day. Hate it when your toiletries expand and leak when flying or driving to higher altitudes? Vacuum package your items to ensure you won't encounter a mess when you arrive. There are literally hundreds of uses for all your craft projects. Vacuum package your rubber stamps, modeling clay, or playdough to prevent from drying out. Vacuum package your winter wool hats/gloves/scarves for compact summer storage and to keep moths and bugs out of them. Make camping easy - vacuum package meals in advance, keep your toilet paper dry, make a camping kit (matches, dry socks, maps, an extra set of shoes or clothes, etc). Vacuum package tools to keep them from rusting. For a quick ice pack, fill a vacuum bag about half full with water and a few tablespoons of rubbing alcohol. Seal the bag - don't vacuum it - and place in the freezer. The alcohol keeps the water from freezing completely, resulting in a flexible ice pack to wrap around sore joints and minor injuries. 15
16 Machine Safety & Maintenance Read this manual carefully before using your VP215 for the first time. Do not use the VP215 on a wet or hot surface, or near a heat source. Do not immerse machine, or power cord in water, or any other liquid. Use grounded power sources only. Do not use extension cords. Do not operate appliance with a damaged cord. Only use the VP215 for its intended use. Only use VACMASTER vacuum chamber pouches and accessories. Vacuum packaging is not a substitute for canning. Any perishable foods that require refrigeration must still be refrigerated or frozen after packaging. Never vacuum package garlic or fungi, like mushrooms. A dangerous chemical reaction takes place when the air is removed. Unplug machine before cleaning. Regularly clean your VP215 chamber, lid and exterior with a damp cloth and mild soap to remove food particles and debris. Do not use any acetone-based or abrasive cleaner on the lid or other plastic parts. Parts may become discolored or scratched. Wipe the seal bar with a damp cloth only. The seal bar is removable for safe cleaning. 16
17 Troubleshooting VP215 will not turn on - Make sure that the machine is properly plugged into a grounded outlet. Check the power cord for tears and frays. Do not use machine if power cord is damaged. Make sure the power switch is turned on. LED screen will be illuminated when on. If you see F1 displayed on the LED screen and the machine will not function, make sure the lid is open and turn the power off. Turning the machine back on and it should return to working order. VP215 does not pull a complete vacuum with pouch - Vacuum time may not be set high enough. Set vacuum time higher and vacuum again. To vacuum and seal properly, the opening of pouch must be within the vacuum chamber. For detailed instructions, refer to Operating Instructions. VP215 seal bar, lid gasket and vacuum pouch need to be clean, dry and free of debris for the vacuum process to be successful. Wipe surface of seal bar, lid gasket and inside of pouch and try again. Vacuum pouch loses vacuum after being sealed - Sharp items can puncture small holes in pouches. To prevent this, cover sharp edges with paper towel or VACMASTER Bone Guard and vacuum in a new pouch. Some fruits and vegetables can release gases (out-gassing) if not properly blanched or frozen before packaging. Open pouch. If you think food spoilage has begun, discard food. If food spoilage has not yet begun, consume immediately. If in doubt, discard food. VP215 is not sealing pouch properly - Seal time may not be long enough. Increase seal time and try again. For detailed instructions, refer to Operating Instructions. Pouches will not seal if any moisture, food particles or debris are present in the seal area. Wipe the inside of the pouch clean and try again. Pouch must be properly placed along the seal bar. Make sure the entire pouch is over the seal bar and there are no wrinkles in pouch material. If problems persist, contact customer support at for further assistance. Thank you for purchasing the VACMASTER VP


18 Parts Information 18
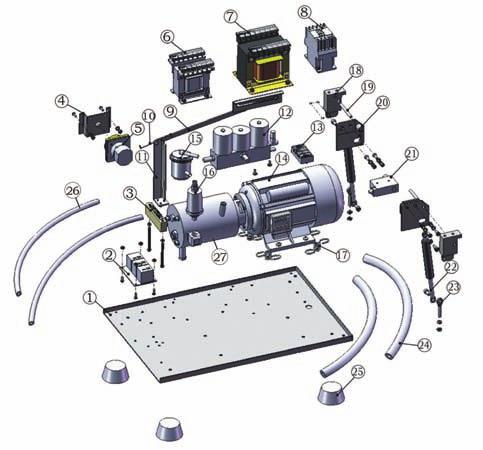


19 Parts Information 19
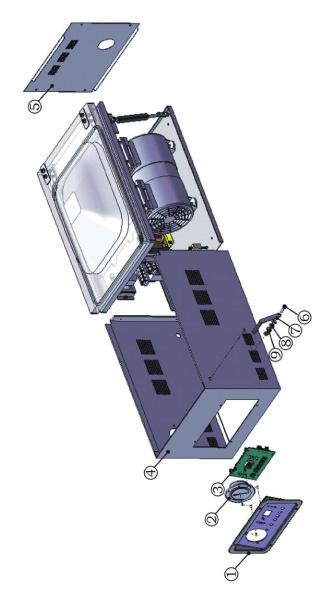


20 Parts Information 20
21 Notes 21
22 Notes 22
23 Limited Warranty ARY, Inc. a distributor and manufacturer of vacuum packaging and other machines (collectively, the Goods ), extends to the purchaser of the Goods a Limited One Year Warranty, from the receipt of the Goods, under terms and conditions set out herein. All Goods sold by ARY, Inc. are warranted to be free from defects in material and workmanship at the time of delivery to purchaser. Defective material may be returned to ARY, Inc. after inspection by an agent of ARY, Inc. and upon receipt from ARY, Inc. of shipping instructions specific to the defective Goods authorized by ARY, Inc. to be returned. ARY, Inc. at its sole option, may either (i) replace or repair any defective materials and workmanship (and return the Goods to purchaser without charge), (ii) refund the purchase price, or (iii) grant a reasonable allowance with the foregoing procedure. This warranty is subject to the following limitations: i. ARY, Inc. s responsibility and the purchaser s exclusive remedy under this warranty is limited to the repair or replacement of defects in material and workmanship, refund of the purchase price, or grant of a reasonable allowance on account of such defects, all as set forth above. ARY, Inc. is not responsible for any consequential damages resulting from the breach of this or any other express or implied warranty with respect to the Goods. ii. This express warranty is the only warranty applicable. It excludes all other express oral or written warranties and all warranties implied by law with respect to the Goods, including any warranties or merchantability or fitness for a particular purpose. iii. Every claim under this warranty shall be deemed waived by purchaser unless made in writing within one (1) year of the receipt of the Goods to which such claim relates. iv. This warranty, as to the Goods, is void (a) to repairs made by anyone other than ARY, Inc. without prior authorization from ARY, Inc., (b) to performance of any system of which ARY, Inc. s Goods are a component part, (c) to deterioration by corrosion or any cause of failure other than defect of material or workmanship, (d) to any components of the Goods, including, without limitation, Teflon tape, lid gaskets and seal wire, or (e) if any of the Good or parts thereof have been tampered with or altered by someone other than ARY, Inc., or subjected to misuse, neglect, abuse, or misuse in application. ARY, Inc. s maximum liability hereunder, arising from any cause whatsoever, whether based in contract, tort (including negligence), strict liability, or any other theory of law, shall not exceed the purchase price. A suit based on any aforementioned cause of action must be commenced within one year from the date said action accrues.
24 ARYInc. A leading supplier of commercial products since ARY, Inc. P.O. Box Kansas City, MO All Rights Reserved. GameMaster, VACMASTER, VacStrip, Total Freshness System and Commercial Culinary Concepts are trademarks or registered trademarks of ARY, Inc. in the United States and other countries. **Vacuum packaging is not a substitute for canning.
VACMASTER. User s Guide VP210
 VACMASTER User s Guide VP210 Thank you for purchasing the VACMASTER VP210 Vacuum Packaging Machine. You are about to use one of the most powerful vacuum packaging systems available. With the help of the
longer than normal preservation methods. Also, the VP120 can be used to preserve and organize
 User s Guide VP120 Thank you for purchasing the VACMASTER VP120 Vacuum Packaging Machine. You are about to revolutionize your home with one of the strongest vacuum packaging systems available. With the
Vacuum Packaging Overview
 User s Guide VP120 Thank you for purchasing the VACMASTER VP120 Vacuum Packaging Machine. You are about to revolutionize your home with one of the strongest vacuum packaging systems available. With the
Operator s Guide. VP330 Chamber Machine Commercial Vacuum Packaging System
 Operator s Guide VP330 Chamber Machine Commercial Vacuum Packaging System Congratulations on your purchase of the VacMaster VP330 Chamber Machine! Thank you for purchasing the VacMaster VP330 Chamber Machine.
Operator s Guide. VP321 Chamber Machine Commercial Vacuum Packaging System
 Operator s Guide VP321 Chamber Machine Commercial Vacuum Packaging System Congratulations on your purchase of the VacMaster VP321 Chamber Machine! Thank you for purchasing the VacMaster VP321 Chamber Machine.
Operator s Guide. VP540 Chamber Machine Commercial Vacuum Packaging System
 Operator s Guide VP540 Chamber Machine Commercial Vacuum Packaging System Congratulations on your purchase of the VacMaster VP540 Chamber Machine! Thank you for purchasing the VacMaster VP540 Chamber Machine.
Operator s Guide. VP215 Chamber Machine Commercial Vacuum Packaging System
 Operator s Guide VP215 Chamber Machine Commercial Vacuum Packaging System Congratulations on your purchase of the VacMaster VP215 Chamber Machine! Thank you for purchasing the VacMaster VP215 Chamber Machine.
Models: VP215 (110V) VP215EU ( V) User s Manual. Register your product and get support at. v
 VP215EU ( V) User s Manual. Register your product and get support at. v") VP215 User s Manual Register your product and get support at www.vacmasterfresh.com Models: VP215 (110V) VP215EU (220-240V) v.2016-12.13 Thank you for purchasing the VacMaster VP215 Chamber Vacuum Sealer.
VP215 User s Manual Register your product and get support at www.vacmasterfresh.com Models: VP215 (110V) VP215EU (220-240V) v.2016-12.13 Thank you for purchasing the VacMaster VP215 Chamber Vacuum Sealer.
To get started, please read and follow all instructions for usage and maintenance carefully before operating the VACMASTER BS116 Impulse Bag Sealer.
 User s Guide BS116 Thank you for purchasing the VACMASTER BS116 Impulse Bag Sealer. You are about to advance your operation with one of the most reliable sealers available. The BS116 is a fully automatic,
Models: VP320 (110V) VP320EU ( V) User s Manual. Register your product and get support at. v
 VP320EU ( V) User s Manual. Register your product and get support at. v") VP320 User s Manual Register your product and get support at www.myvacmaster.com Models: VP320 (110V) VP320EU (220-240V) v.2015-02.02 The VacMaster VP320 Chamber Vacuum Sealer is the most reliable tabletop
VP320 User s Manual Register your product and get support at www.myvacmaster.com Models: VP320 (110V) VP320EU (220-240V) v.2015-02.02 The VacMaster VP320 Chamber Vacuum Sealer is the most reliable tabletop
Operator s Guide. VP545 Chamber Machine Commercial Vacuum Packaging System
 Operator s Guide VP545 Chamber Machine Commercial Vacuum Packaging System Congratulations on your purchase of the VacMaster VP545 Chamber Machine! Thank you for purchasing the VacMaster VP545 Chamber Machine.
Models: DUO550 (110V) DUO550EU ( V) User s Manual. Register your product and get support at. v
 DUO550EU ( V) User s Manual. Register your product and get support at. v") DUO550 User s Manual Register your product and get support at www.vacmasterfresh.com Models: DUO550 (110V) DUO550EU (220-240V) v.2015-04.20 Thank you for purchasing the VacMaster DUO550 Chamber Vacuum
DUO550 User s Manual Register your product and get support at www.vacmasterfresh.com Models: DUO550 (110V) DUO550EU (220-240V) v.2015-04.20 Thank you for purchasing the VacMaster DUO550 Chamber Vacuum
Please read and follow all instructions for usage and maintenance before operating the VACMASTER SV1 Immersion Circulator.
 User s Guide SV1 Thank you for purchasing the VACMASTER SV1 Immersion Circulator. The SV1 is one of the most efficient and reliable instruments for sous vide cooking. This machine, with its space-saving,
PRO350. User s Manual. Register your product and get support at v
 PRO350 User s Manual Register your product and get support at www.vacmasterfresh.com v.2015-04.09 Thank you for purchasing the VacMaster PRO350 Vacuum Sealer. You are about to use one of the most powerful
User s Manual. Model: VP680 (220, 3PH) Register your product and get support at
 Register your product and get support at") VP80 User s Manual Model: VP80 (0, PH) Register your product and get support at www.vacmasterfresh.com Welcome! Table of Contents Thank you for purchasing the VacMaster VP80 Chamber Vacuum Sealer. You
VP80 User s Manual Model: VP80 (0, PH) Register your product and get support at www.vacmasterfresh.com Welcome! Table of Contents Thank you for purchasing the VacMaster VP80 Chamber Vacuum Sealer. You
Operator s Guide. VP325 Chamber Machine Commercial Vacuum Packaging System
 Operator s Guide VP325 Chamber Machine Commercial Vacuum Packaging System Congratulations on your purchase of the VacMaster VP325 Chamber Machine! Thank you for purchasing the VacMaster VP325 Chamber Machine.
PRO380. ARYInc. User s Manual. ARY, Inc. P.O. Box Kansas City, MO
 PRO380 ARYInc. ARY, Inc. P.O. Box 412888 Kansas City, MO 64141 www.myvacmaster.com 800.821.7849 All Rights Reserved. VACMASTER and VacStrip are trademarks or registered trademarks of ARY, Inc. in the United
Models: SV1 (110V) SV1EU ( V) User s Manual. Register your product and get support at. v
 SV1EU ( V) User s Manual. Register your product and get support at. v") User s Manual Register your product and get support at www.vacmasterfresh.com Models: SV1 (110V) SV1EU (220-240V) v.2015-04.09 SAFEGUARDS Important Safeguards For your safety, always follow these basic
User s Manual Register your product and get support at www.vacmasterfresh.com Models: SV1 (110V) SV1EU (220-240V) v.2015-04.09 SAFEGUARDS Important Safeguards For your safety, always follow these basic
Single. 10¼ Seal Bar. Single. 16 Seal Bar. Oil Pump. Dry Pump. Oil Pump. Oil Pump. 186VMC10OP Single 10¼ Seal Bar 186VMC10DPU 186VMC16
 186VMC10OP Single 10¼ Seal Bar 186VMC10DPU Single 10¼ Seal Bar Dry Pump 186VMC16 Single 16 Seal Bar 186VMC32 Double 16 Seal Bars 09/2017 Food Storage and Safety Information...3 Control Panel (VMC10 /DPU
PRO200/260 Quick Start Guide & User Manual
 VACMASTER PRO00/0 Quick Start Guide & User Manual Thank you for purchasing the VACMASTER PRO00/0 Vacuum Packaging Machine. You are about to revolutionize your kitchen with one of the best vacuum packaging
USER MANUAL Vacuum Sealer. Model: PF VS-VMPRO 305
 USER MANUAL Vacuum Sealer Model: PF VS-VMPRO 305 Thank you for purchasing the VacMaster Pro305 Vacuum Packaging Machine. You are about to use one of the most powerful vacuum packaging systems available.
Learn why the Galaxy vacuum sealer can transform any ordinary food into a flavor packed spectacle, and keep Food Fresher, Longer.
 ITEM: 186VME1 User s Guide Learn why the Galaxy vacuum sealer can transform any ordinary food into a flavor packed spectacle, and keep Food Fresher, Longer. Thank for you purchasing the Galaxy VME1 external
EPV15 Professional Vacuum Sealer
 EPV15 Professional Vacuum Sealer www.excaliburdiy.com 062117 Vacuum Packaging and Food Safety...1 Vacuum Sealer Features...2-4 Technical Data...4 Safety, Maintenance & Preparations...5 How To Vacuum &
Attention. Please handle this product with care and inspect it regularly to ensure it is in good working order.
 Attention Please handle this product with care and inspect it regularly to ensure it is in good working order. If the product, power supply cord or plug shows any signs of damage: stop use, unplug and
150 SERIES VACUUM SEALING SYSTEM
 150 SERIES VACUUM SEALING SYSTEM USER S GUIDE 110-877 081913 CONTENTS Important Safeguards... 3 Introduction... 5 Controls & Components... 6 Controller Overview.... 7 Set-Up... 8 Electrical Power....
The most powerful vacuum sealing system on earth.tm
 The most powerful vacuum sealing system on earth.tm NEW! SIDE LOCKS SECURE BAG IN PLACE USER MANUAL SHIELD SEALER TM I SNS 760 PRO-L shieldnseal.com User Manual / Model SNS 760 Pro-L Shield N Seal Vacuum
Packaging System. #1088 Instruction Manual 2 YEAR WARRANTY IMPORTANT WARRANTY INFORMATION PLEASE READ FILL OUT AND RETURN ENCLOSED WARRANTY CARD
 April 2012 Version 1 IMPORTANT WARRANTY INFORMATION PLEASE READ FILL OUT AND RETURN ENCLOSED WARRANTY CARD THIS WARRANTY COVERS THE LEM 1088: MaxVac Packaging System THE WARRANTY IS EXTENDED TO THE ORIGINAL
Questions or Concerns? Please contact us Mon - Fri 9:00 AM - 5:00 PM PST at (888) or by at Model No.
 or by at Model No.") Questions or Concerns? Please contact us Mon - Fri 9:00 AM - 5:00 PM PST at (888) 402-1684 or by email at support@cosori.com Model No.: C361-VS THANK YOU. Thank you for purchasing the C361-VS Slim Vacuum
Questions or Concerns? Please contact us Mon - Fri 9:00 AM - 5:00 PM PST at (888) 402-1684 or by email at support@cosori.com Model No.: C361-VS THANK YOU. Thank you for purchasing the C361-VS Slim Vacuum
Vacuum Sealer USER MANUAL. Model# GVS-455. Pickling. Cancel
 Pickling Cancel Vacuum Sealer Model# GVS-455 USER MANUAL Read this manual thoroughly before using and save it for future reference Model: GVS455 2017 Gourmia www.gourmia.com The Steelstone Group Brooklyn,
CONTENTS & LED
 110-875 032114 CONTENTS Important Safeguards... 4 Introduction... 6 Package Contents... 7 Seal Bar Installation... 7 Components... 8 Control Panel... 9 Digital Display & LED Status... 13 Set-Up... 14 Electrical
PKVS25BK. Automatic Food Vacuum Sealer Electric Air Sealing Preserver System
 PKVS25BK Automatic Food Vacuum Sealer Electric Air Sealing Preserver System In order to make the best use of this appliance and use it safely, please read these introductions carefully before use and keep
vacuum sealer 2YEAR CAUTION
 vacuum sealer USE & MAINTENANCE #1253 ATTENTION: If any components of this unit are broken, or if the unit does not operate properly, please contact LEM Products at 877-536-7763 For more great products
Please consider the option to recycle the packaging material and donate any appliance you are no longer using.
 WAFFLE MAKER Model Number: 103739 UPC: 681131037396 Customer Assistance 1-855-451-2897 (US) Please consider the option to recycle the packaging material and donate any appliance you are no longer using.
Contents ... Important Safeguards. Product Features. How To Vacuum Seal with FoodSaver Fresh Containers. How To Vacuum Seal with FoodSaver Zipper Bags
 User Guide VS1300 Contents Important Safeguards Product Features How To Vacuum Seal with FoodSaver Fresh Containers How To Vacuum Seal with FoodSaver Zipper Bags How To Marinate with your FoodSaver Fresh
VACUUM SEALER INSTRUCTIONS COMPACT. Part #744368
 COMPACT VACUUM SEALER Part #744368 INSTRUCTIONS Thank you for purchasing a Harvest Keeper Vacuum Sealer! To get the most out of your sealer and enjoy safe, reliable operation, please thoroughly read and
USE AND CARE GUIDE FOR MODEL MEK1, MEK15. Express Cordless Kettle
 USE AND CARE GUIDE FOR MODEL MEK1, MEK15 Express Cordless Kettle IMPORTANT SAFEGUARDS When using electrical appliances, basic safety precautions should always be followed, including the following: 1. Read
COVER MODEL# GVS415 VACUUM SEALER FOOD PRESERVER. PHOTO OF PRODUCT
 COVER MODEL# GVS415 VACUUM SEALER FOOD PRESERVER www.gourmia.com PHOTO OF PRODUCT 2016 Gourmia www.gourmia.com The Steelstone Group Brooklyn, NY Welcome to Benefits of Food Storage from Gourmia! All rights
Please consider the option to recycle the packaging material and donate any appliance you are no longer using.
 2 SLICE TOASTER Model Number: 103741 UPC: 681131037419 Customer Assistance 1-855-451-2897 (US) Please consider the option to recycle the packaging material and donate any appliance you are no longer using.
ROTATING WAFFLE MAKER
 ROTATING WAFFLE MAKER Model Number: 104553 UPC: 681131045537 Customer Assistance 1-855-451-2897 (US) Please consider the option to recycle the packaging material and donate any applianceyou are no longer
MODEL# GVS425 VACUUM SEALER FOOD PRESERVER. PHOTO OF PRODUCT
 MODEL# GVS425 VACUUM SEALER FOOD PRESERVER www.gourmia.com PHOTO OF PRODUCT 2016 Gourmia www.gourmia.com The Steelstone Group Brooklyn, NY Welcome to Benefits of Food Storage from Gourmia! All rights reserved.
Ui REFRIGERATOR SPEC SHEET
 Ui REFRIGERATOR SPEC SHEET ISOMETRIC VIEW 19 7/8 20 1/2 32 3/4 FRONT VIEW NOTES: 1. CUTOUT DIMENSIONS: 20 1/2"W X 33"L X 20 3/4"D 2. CUTOUT DIMENSIONS ARE FOR REFRIGERATOR ONLY. REFER TO STAINLESS STEEL
Commercial Grade Vacuum Sealer Instruction Manual
 Commercial Grade Vacuum Sealer Instruction Manual Patent Pending 3067171 WARNING: Read carefully and understand all before operating. Failure to follow the safety rules and other basic safety precautions
Eco-Steamer SSC-0312 INSTRUCTION MANUAL CONTENTS
 INSTRUCTION MANUAL Eco-Steamer SSC-0312 CONTENTS Important Safeguards...1 Description of Eco-Steamer...2 Main Features of Eco-Steamer...2 Instructions for Use...3 How to Assemble and Use...3 Accessories...3
CHEST FREEZER INSTRUCTION MANUAL. Model No.: EWCF5WBX EWCF7WBX
 CHEST FREEZER INSTRUCTION MANUAL Model No.: EWCF5WBX EWCF7WBX To ensure proper use of this appliance and your safety, please read the following instructions completely before operating this appliance.
DXP-PB-2-8 Manual 8 Par-Bake & Form Dough Press
 DXP-PB-2-8 Manual 8 Par-Bake & Form Dough Press OWNER S MANUAL For Customer Service, Call 1-800-835-0606 ext. 205 or Visit www.doughxpress.com CONTENTS Receiving & Setup...2 Operation...3 Pressing Dough...3-4
Instruction Manual. Cheese Warmer with Pump
 Instruction Manual Cheese Warmer with Pump 10700 Medallion Drive, Cincinnati, Ohio 45241-4807 USA 2013 Gold Medal Products Co. Part No. 38298 SAFETY PRECAUTIONS Page 2 INSTALLATION INSTRUCTIONS Inspection
 Changing the Light Bulb The light bulb is located behind the Temperature control. IMPORTANT: Depending on your model, the light bulb in your new refrigerator may use LED technology. If your model uses
Model Instruction Manual. Coleman Limited One-Year Warranty. 26 Quart Power Cooler. For use with 12 VDC only
 Coleman Limited One-Year Warranty The Coleman Company, Inc. ( Coleman ) warrants that for a period of one year from the date of original retail purchase, this product will be free from defects in material
Electric Digital Kettle
 Electric Digital Kettle OWNER S MANUAL Model EK119H 120V., 60Hz., 1800 Watts. EURO-PRO Operating LLC Boston, MA, 02465 1 (800) 798-7398 www.euro-pro.com COPYRIGHT 2008 EURO-PRO OPERATING LLC IMPORTANT
INSTRUCTION MANUAL (UNIT APPEARANCE MAY VARY FROM IMAGE) BEFORE USE, PLEASE READ AND FOLLOW ALL SAFETY RULES AND OPERATING INSTRUCTIONS.
 BEFORE USE, PLEASE READ AND FOLLOW ALL SAFETY RULES AND OPERATING INSTRUCTIONS.") INSTRUCTION MANUAL Model Number: FR551 REFRIGERATOR-FREEZER (UNIT APPEARANCE MAY VARY FROM IMAGE) BEFORE USE, PLEASE READ AND FOLLOW ALL SAFETY RULES AND OPERATING INSTRUCTIONS. Igloo has a policy of continuous
INSTRUCTION MANUAL Model Number: FR551 REFRIGERATOR-FREEZER (UNIT APPEARANCE MAY VARY FROM IMAGE) BEFORE USE, PLEASE READ AND FOLLOW ALL SAFETY RULES AND OPERATING INSTRUCTIONS. Igloo has a policy of continuous
REFRIGERATOR SAFETY. Your safety and the safety of others are very important.
 REFRIGERATOR SAFETY Your safety and the safety of others are very important. We have provided many important safety messages in this manual for your appliance. Always read and obey all safety messages.
Domestic Vacuum Sealer
 Domestic Vacuum Sealer Pour la version française veuillez consulter notre site de web www.andrewjamesworldwide.com Die deutsche Version finden Sie auf unsere Webseite www.andrewjamesworldwide.com Please
Instruction Manual. Double Candy Apple Cooker
 Instruction Manual Double Candy Apple Cooker Model No. 4416 10700 Medallion Drive, Cincinnati, Ohio 45241-4807 USA 2014 Gold Medal Products Co. Part No. 46841 SAFETY PRECAUTIONS DANGER Machine must be
KETTLE. Customer Assistance (US) Model Number: UPC:
 Model Number: UPC:") KETTLE Model Number: 104556 UPC: 681131045568 Customer Assistance 1-855-451-2897 (US) Please consider the option to recycle the packaging material and donate any appliance you are no longer using. Kettle_104556_US_V3_121212.indd
KETTLE Model Number: 104556 UPC: 681131045568 Customer Assistance 1-855-451-2897 (US) Please consider the option to recycle the packaging material and donate any appliance you are no longer using. Kettle_104556_US_V3_121212.indd
Professional. Vacuum Food Sealer INSTRUCTION MANUAL. Model Number VS2650. IM Version No: V3 AFTER SALES SUPPORT
 Professional Vacuum Food Sealer Model Number VS2650 INSTRUCTION MANUAL IM Version No: V3 Welcome Congratulations on choosing to buy a Ambiano Professional product. All products brought to you by Ambiano
Important Safeguards Product Features How To. Care & Cleaning Storage Guide Guidelines. Troubleshooting Warranty
 User Guide VS7850 www.foodsaver.com Important Safeguards Product Features How To Make a FoodSaver Bag Vacuum Seal a FoodSaver Bag Vacuum Seal with FoodSaver Accessories Care & Cleaning Storage Guide Guidelines
USE & CARE INSTRUCTIONS 10- SPEED HAND MIXER FSHM100
 SPECIAL SELECT USE & CARE INSTRUCTIONS 10- SPEED HAND MIXER FSHM100 IMPORTANT SAFEGUARDS When using electrical appliances, basic safety precautions should always be followed, including the following: 1.
COVER MODEL# GVS435 VACUUM SEALER FOOD PRESERVER. PHOTO OF PRODUCT
 COVER MODEL# GVS435 VACUUM SEALER FOOD PRESERVER www.gourmia.com PHOTO OF PRODUCT 2016 Gourmia www.gourmia.com The Steelstone Group Brooklyn, NY Welcome to Benefits of Food Storage from Gourmia! All rights
USING THE REFRIGERATOR COMPARTMENT
 USING THE REFRIGERATOR COMPARTMENT Switching the appliance on Starting the appliance Insert the plug. The light, located under the control panel or inside the product (depending on model) comes on when
User Manual. Commercial Chest Freezer User s Manual 360CF5, 360CF8, 360CF14, 360CF18
 Commercial Chest Freezer User s Manual 360CF5, 360CF8, 360CF14, 360CF18 11/2017 Please read the manual thoroughly prior to equipment set-up, operation and maintenance. - 1 - Installation Important!!! Please
Operator s Manual UNIVERSAL ELECTRIC CHAFER HEATER ENGLISH
 ENGLISH UNIVERSAL ELECTRIC CHAFER HEATER Item Description Voltage Watts Plug 46060 Universal Electric Chafer Heater 120V 160/275 (2.3 Amps) 5-15P 46110 Universal Electric Chafer Heater 230V 120/230 (1.0
Classic & Deluxe Pants Press SPP-0669 SPP-0670
 Classic & Deluxe Pants Press SPP-0669 SPP-0670 INSTRUCTION MANUAL INTRODUCTION Thank you for choosing Sienna for your household pressing needs. Our pants press products are an affordable way to have a
BEFORE USE, PLEASE READ AND FOLLOW ALL SAFETY RULES AND OPERATING INSTRUCTIONS.
 INSTRUCTION MANUAL Model Number: BLZ-SSRF130 BEFORE USE, PLEASE READ AND FOLLOW ALL SAFETY RULES AND OPERATING INSTRUCTIONS. 1 TABLE OF CONTENTS REFRIGERATOR SAFETY 3 IMPORTANT SAFEGUIDES 4 PARTS AND FEATURES
1.5 L Electric Kettle
 USER GUIDE 1.5 L Electric Kettle NS-TK15BK6/NS-TK15BL6/NS-TK15PK6 Before using your new product, please read these instructions to prevent any damage. Contents Introduction.....................................................
Thank you for buying this refrigerator-freezer. To ensure that you get the best
 Dear customer: Thank you for buying this refrigerator-freezer. To ensure that you get the best results from your new refrigerator-freezer, please take time to read through the simple instructions in this
READ AND SAVE THESE INSTRUCTIONS. Vacuum Food Storage System Reference Guide. Space Saving Design.
 Vacuum Food Sealer Space Saving Design Vacuum Food Storage System Reference Guide Preserves the taste and nutritional value of stored foods! www.sealameal.com READ AND SAVE THESE INSTRUCTIONS FSSMSL0160-033
NM A D E in MIC HIG A HL400 & HL800. Owner s Manual
 NM A D E in MIC HIG A HL400 & HL800 Owner s Manual Proud To Be All references to the HL400 also apply to the HL800 Introduction The HL400 is designed to heat your meal using conduction heating. This method
6.5L SLOW COOKER INSTRUCTION MANUAL
 6.5L SLOW COOKER INSTRUCTION MANUAL 220~240V 320W WHSC01SS 320W CONTENTS SAFETY INFORMATION Important Safety Instructions......................... 1-2 Electrical Requirements................................
SAVE THESE INSTRUCTIONS
 2 IMPORTANT SAFEGUARDS When using electrical appliances especially when children are present, basic safety precautions should always be followed to reduce the risk of fire, electric shock, and/or injury
Compact Refrigerator Refrigerador compacto Réfrigérateur compact
 Franklin Chef Compact Refrigerator Refrigerador compacto Réfrigérateur compact Use & Care Guide (pages 1-7) Guía de use y cuidado (páginas 8-13) Guide d emploi et soin (pages 14-17) Models covered/incluye
Earn Reward Points register your new
 Earn Reward Points register your new product today! on back page USER'S GUIDE 60P4 SERIES 2 Thank You 3 Safety Instructions 4 Product View 5 Assembly 6-7 Operations 7-8 Maintenance and Care 9 Troubleshooting
Auto Opening with Pressure Readout 15 x15 & 16 x20 Heat Transfer Machines
 S-450P & S-650P Auto Opening with Pressure Readout 15 x15 & 16 x20 Heat Transfer Machines OWNER S MANUAL S-650P shown For Customer Service, Call 1-800-835-0606 or Visit www.hixcorp.com CONTENTS Receiving
Outdoor Refrigerator USER S MANUAL
 Outdoor Refrigerator USER S MANUAL MODEL Number:BLZ-SSRF-40DH IMPORTANT:READ THIS USER S MANUAL PRIOR TO CONNECTING POWER AND USE Before the refrigerator is used, it must be PROPERLY POSITIONED, LEVELED
AUTO SPEED BLENDER INSTRUCTION MANUAL MODEL: BLCLMB1
 AUTO SPEED BLENDER INSTRUCTION MANUAL MODEL: BLCLMB1 1 TABLE OF CONTENTS IMPORTANT SAFEGUARDS 3 POLARIZED PLUG 4 PRODUCT DIAGRAM 5 USAGE INSTRUCTIONS PREPARING YOUR AUTO SPEED BLENDER FOR USE 6 HOW TO
Horizontal Bottle Cooler Installation and Operation Manual
 Speeds Up the Pace of Innovation Horizontal Bottle Cooler Installation and Operation Manual Please read this manual completely before attempting to install or operate this equipment! TBC-50SD, 50SB/ TBC-95SD,
INSTRUCTION MANUAL. Elite Digital Steam Press SSP-2202
 INSTRUCTION MANUAL Elite Digital Steam Press SSP-2202 CONTENTS Features of the Digital Steam Press...1 Safety Reminders...2 Part Identification...3-4 Steam Press Operation Preparation for use...5 Filling
Ice Cream Maker USER CARE AND INSTRUCTION MANUAL
 Ice Cream Maker USER CARE AND INSTRUCTION MANUAL Thank you for purchasing the RICARDO ice cream maker. Before using this product, please read the user care and instruction manual carefully. INSTRUCTION
2.4 Cu. Ft. Compact Refrigerator
 2.4 Cu. Ft. Compact Refrigerator User s Manual PLEASE READ THIS MANUAL CAREFULLY BEFORE USING YOUR REFRIGERATOR AND KEEP IT FOR FUTURE REFERENCE. Model MCBR240B Product Registration Thank you for purchasing
User Manual. Please read this User Manual and the Safety Information before operating the Soda Maker.
 User Manual Please read this User Manual and the Safety Information before operating the Soda Maker. 2 FOR YOUR SAFETY It is important that you read and understand all use and care instructions and the
PLEASE READ THIS MANUAL BEFORE USING YOUR APPLIANCE. KEEP THIS MANUAL IN A SAFE PLACE FOR FUTURE REFERENCE.
 File name: ARDI Care & Use Manual.pub Last revised: Oct 10th 2008 PLEASE READ THIS MANUAL BEFORE USING YOUR APPLIANCE. KEEP THIS MANUAL IN A SAFE PLACE FOR FUTURE REFERENCE. ASSEMBLER / INSTALLER Leave
mini kettle Model # Operating Instructions Warranty 650 Watts / 120 V / 60 Hz
 mini kettle Model #280.01 Operating Instructions Warranty 650 Watts / 120 V / 60 Hz Read this manual thoroughly before using and save it for future reference IMPORTANT SAFEGUARDS When using electrical
Upright Freezer Congélateur vertical Congelador vertical
 Installation and User Manual Manuel d installation et d utilisation Manual de instalación y del usuario HFU0100ACW Upright Freezer Congélateur vertical Congelador vertical Part # 0570000002 TABLE OF CONTENTS
QA Passed. Inspired living HRF-253 E. OPERATING MANUAL Refrigerator
 Inspired living OPERATING MANUAL Refrigerator QA Passed QA Passed HRF-253 E HNR Company (Pvt) Ltd. Head Office : 63/B, Mega Tower Main Buleward, Gulberg-III, Lahore. UAN: 11 11 HAIER (4243) Tel: 042-3589105
ELECTRICAL DATA: FEATURES: SHIPPING INFORMATION: FOOD WARMING/ MERCHANDISING CABINET. 15 Width 7 Width
 FOOD WARMING/ MERCHANDISING CABINET MODEL 323HH MODEL 323HH-7 15 Width 7 Width With the ability to hold a point-of-purchase advertisement, these sleek, compact warmers are sure to draw eye catching attention.
COMMERCIAL REFRIGERATOR INSTRUCTION MANUAL
 COMMERCIAL REFRIGERATOR INSTRUCTION MANUAL Model No.: TGM-69R FEATURE CHART ADVERTISING PANEL FLOURESCENT SWITCH COOLING FAN FLOURESCENT LAMP EVAPORATOR INNER DRAIN PAN SHELF DOOR HANDLE GLASS DOOR CONDENSER
1.7L KETTLE INSTRUCTION MANUAL 220~240V 2200W
 1.7L KETTLE INSTRUCTION MANUAL 220~240V 2200W WHKE01 2200W CONTENTS SAFETY INFORMATION Important Safety Instructions......................... 1-2 Electrical Requirements................................
USER S GUIDE. Installation, Operation, and Maintenance for your product. OUTDOOR REFRIGERATOR Model AFR151SSOD.
 USER S GUIDE Installation, Operation, and Maintenance for your product. OUTDOOR REFRIGERATOR Model AFR151SSOD www.avallon.com 1 866 471 7427 Important Safety Information Improper handling can cause serious
Gas Connector Installation Instructions
 Gas Connector Installation Instructions 6015 Enterprise Drive Export, PA 15632 USA 1-800-DORMONT (367-6668) (724) 733-4800 Fax (724) 733-4808 www.dormont.com Safety Precautions - Read warnings carefully
Upright Freezer 048-GM-48307
 Upright Freezer 048-GM-48307 IMPORTANT SAFETY INSTRUCTIONS WARNING Read all of the instructions before using this appliance. When using this appliance, always exercise basic safety precautions, including
OWNER S MANUAL ADVENTURER SERIES. Electric Grill A10-603E
 OWNER S MANUAL ADVENTURER SERIES Electric Grill A10-603E For questions regarding performance, assembly, operation, parts, or returns, contact the experts at MAGMA by calling (562) 627-0500 7:00 a.m. -
Vortex Steam Mop SSM-0418
 Vortex Steam Mop SSM-0418 INSTRUCTION MANUAL INTRODUCTION Thank you for choosing Sienna for your household cleaning needs. Our steam mop products use the active power of steam without the use of chemicals;
USER MANUAL. PEDESTAL FAN (16 Inch)
") USER MANUAL PEDESTAL FAN (16 Inch) ACFP1016 Hydrofarm.com TABLE OF CONTENTS OVERVIEW 2 PARTS LIST - (WHAT S IN THE BOX) 3 IMPORTANT SAFEGUARDS 4 ASSEMBLY INSTRUCTIONS 4 ASSEMBLY 4 ELECTRIC SCHEMATIC DIAGRAM
USER MANUAL PEDESTAL FAN (16 Inch) ACFP1016 Hydrofarm.com TABLE OF CONTENTS OVERVIEW 2 PARTS LIST - (WHAT S IN THE BOX) 3 IMPORTANT SAFEGUARDS 4 ASSEMBLY INSTRUCTIONS 4 ASSEMBLY 4 ELECTRIC SCHEMATIC DIAGRAM
Important Safeguards. Save these instructions for future reference. (continued on next page)
") User Guide 2. Important Safeguards WARNING To reduce the risk of fire, electric shock or other injury, read and follow the safety precautions and instructions in this User Guide. Save these instructions
User Guide 2. Important Safeguards WARNING To reduce the risk of fire, electric shock or other injury, read and follow the safety precautions and instructions in this User Guide. Save these instructions
4.5 CU.FT. REFRIGERATOR INSTRUCTION MANUAL
 4.5 CU.FT. REFRIGERATOR INSTRUCTION MANUAL Model No.: MCBR465S To ensure proper use of this appliance and your safety, please read the following instructions completely before operating this appliance.
Because you re not like everyone else. PORTABLE CLEAR ICE MAKER IM200SS OWNER S MANUAL. Manual v1.0
 Because you re not like everyone else. PORTABLE CLEAR ICE MAKER IM200SS OWNER S MANUAL Manual v1.0 2 BECAUSE YOU RE NOT LIKE EVERYONE ELSE And neither are we. Always at the forefront of our industry, our
MODEL (Single Door) MODEL (2 Door pass through)
 MODEL (2 Door pass through)") FOOD WARMING/MERCHANDISING CABINET MODEL 680-1 (Single Door) MODEL 680-2 (2 Door pass through) This warmer provides bottom heat to keep crusts crisp. The illuminated shelves are thermostatically controlled
FOOD WARMING/MERCHANDISING CABINET MODEL 680-1 (Single Door) MODEL 680-2 (2 Door pass through) This warmer provides bottom heat to keep crusts crisp. The illuminated shelves are thermostatically controlled
GCG-10. Instruction Manual. G-Series Cooler. Manual is for the following models: GCG-10-N33EB G-10-N33EB UPRIGHT COOLER
 G-Series Cooler GCG-10 UPRIGHT COOLER Manual is for the following models: GCG-10-N33EB G-10-N33EB Instruction Manual Manual is for the following models: GCG-10-N33EB G-10-N33EB Instruction Manual GCG-10
Turbo Air Speed up the Pace of Innovation TBB-4SB CAUTION! PLEASE KEEP POWER SWITCH ON BEFORE OPERATING THIS EQUIPMENT
 Turbo Air Speed up the Pace of Innovation CAUTION! PLEASE KEEP POWER SWITCH ON BEFORE OPERATING THIS EQUIPMENT Underbar Equipment Back Bars Installation and Operation Manual Please read this manual completely
CONGRATULATIONS! TABLE OF CONTENTS
 CONGRATULATIONS! Thank you for choosing Mytee Products for your supply needs. By doing so, you have joined thousands of your fellow cleaning professionals in choosing quality, service, and value in your
Portable Induction Ranges
 9130, 9130-C 9131-1 9132-1 Portable Induction Ranges INSTALLATION AND OPERATING INSTRUCTIONS IMPORTANT INFORMATION READ BEFORE USE It is recommended that maintenance and repairs be conducted by authorized