ommunication 10/2011 eting-design-c mark Ref. NC JPM & Associés
|
|
|
- Barbra Gaines
- 6 years ago
- Views:
Transcription
1 Ref. NC JPM & Associés marketing-design-communication 10/2011
2 Instructions for Use
3 1a 1b 1c 1d 1e 1f 2a 2b 21 MAX 3a 3b
4 MAX MAX MAX Recipes fig.1 fig.2 fig.3 fig.4 2 MAX MAX fig.5 fig.6 fig.7 fig.8 CLICK MAX fig.9 fig.10 fig.11 fig.12 fig.13 fig.14 fig.15 fig fig.17 fig.18 fig.19 fig.20 fig.21 fig.22
5 IMPORTANT SAFEGUARDS When using electrical appliances, basic safety precautions should always be followed including the following: 1. Read all instructions. 2. Do not touch hot surfaces. Use handles or knobs. 3. To protect against electrical shock do not immerse cord, plugs, or any other parts in water except for the removable insert and accessories. 4. Close supervision is necessary when any appliance is used by or near children. 5. Unplug from outlet when not in use and before cleaning. Allow to cool before putting on or taking off parts. 6. Do not operate any appliance with a damaged cord or plug or after the appliance malfunctions or has been damaged in any manner. Return appliance to the nearest authorized service facility for examination, repair or adjustment. 7. The use of accessory attachments not recommended by the appliance manufacturer may cause injuries. 8. Do not use outdoors. 9. Do not let the cord hang over edge of table or counter, or touch hot surfaces. 10. Do not place on or near a hot gas or electric burner, or in a heated oven. 11. Do not move the product when in use or when the steam pressure valve is closed. 12. Always attach plug to appliance first, then plug cord into the wall outlet. To disconnect, turn any control to "off", then remove plug from wall outlet. 13. Do not use appliance for other than intended use. 14. SAVE THESE INSTRUCTIONS. FOR HOUSEHOLD USE ONLY. 15. To reduce the risk of electric shock, cook only in removable container. CAUTION: DO NOT CARRY THE PRODUCT BY THE LID HANDLES. 5
6 Read and follow the instructions for use. Keep them for future use. SAFETY INSTRUCTIONS 1. This appliance complies with the safety regulations and conditions in effect at the time of manufacture. 2. Check that the power supply voltage corresponds to that shown on the appliance (alternating current) and that there's a grounded plug. 3. Given the diverse standards in effect, if the appliance is used in a country other than that in which it is purchased, have it checked by an approved service center. 4. This appliance is intended for household use only. 5. In case of commercial use, inappropriate use or failure to comply with the instructions, the manufacturer accepts no responsibility and the guarantee does not apply. 6. This appliance is not intended for use by persons (including children) with reduced physical, sensory or mental capabilities, or lack of experience and knowledge, unless they have been given supervision or instruction concerning use of the appliance by a person responsible for their safety. 7. Children should be supervised to ensure that they do not play with the appliance. 8. Replace the sealing gasket every 2 years, or sooner if you see the gasket is worn or in need of replacement. Use only original parts available in authorized repair centers. CONNECTING TO THE POWER SUPPLY 1. Make sure the plug is connected properly to both the appliance and the outlet. 2. Only connect the appliance to grounded electrical outlets which have a minimum load of 15A. If the sockets and plug on the appliance are not compatible, consult a professional qualified technician to replace the outlet with a more suitable one. 3. Do not use the appliance if: - It or its cord is damaged. 6
7 - The appliance has been dropped, shows visible damage, or does not work properly. In these cases, the appliance must be sent to an approved Service Center. Do not take the appliance apart yourself. 4. Do not use an extension cord. If you accept liability for doing so, only use a grounded extension cord which is in good condition and is suited to the wattage of the appliance. 5. If the power cord is damaged, it must be replaced by the manufacturer, an authorized Service Center or a similarly qualified person in order to avoid any danger. 6. Do not leave the cord hanging. 7. Do not unplug the appliance by pulling on the cord. 8. Always unplug the appliance immediately after use; when moving it; prior to any cleaning or maintenance. USE OF THE APPLIANCE 1. Use a flat and stable, heat resistant work surface, away from any water splashes. 2. Always place your Electric Pressure Cooker on a dry surface. 3. Always check the pressure release devices for clogging before use. 4. Make sure that the Electric Pressure Cooker is properly closed before bringing it up to pressure. 5. It is highly recommended not to move the Electric Pressure Cooker when it is under pressure. The pressure limit valve may move: this could cause burns by steam being released. 6. Do not touch the hot surfaces. Be careful, metal parts and especially the lid are very hot. Always wear oven mitts. 7. Do not touch the hot surfaces. Use the carrying handles and not the lid handle. Always wear oven mitts. 8. Never use the insert handle to carry the product, use the carrying handle on the product body. 9. Your Electric Pressure Cooker cooks under pressure. Burns could result from boiling over if not used properly. 10. Do not open the pressure cooker until the unit has cooled and all internal pressure has been released. If the handles are 7
8 difficult to push apart, this indicates that the cooker is still pressurized : do not force it open. Any pressure in the cooker can be hazardous. 11. Do not try to open the lid until the float valve is down. 12. Never use your Electric Pressure Cooker without liquid; when the cooking pot is empty or without the cooking pot: this could cause serious damage. 13. Do not remove the cooking pot while the appliance is working. 14. Do not fill your Electric Pressure Cooker above maximum level. For food that expands considerably during cooking, such as rice, dehydrated vegetables or compotes, do not fill the Electric Pressure Cooker more than half full. Respect the levels indicated in the recipes. 15. After cooking meat which has an outer layer of skin, which could swell due to the effects of pressure, to avoid burns do not pierce the skin after cooking if it appears swollen. Pierce food before cooking to avoid burns. 16. When cooking food with a thick texture (chick peas, rhubarb, compotes, etc.) the Electric Pressure Cooker should be shaken slightly before opening to ensure that the food does not spurt out. 17. Do not use the Electric Pressure Cooker to fry under pressure using oil. 18. The bottom of the removable insert and the heating plate should be in direct contact. Any objects inserted between them or food residue remaining on either surface will affect performance. 19. Wipe clean the bottom of the removable insert and the heating plate after every use. 20. Do not use other cooking pots in the pressure cooker in place of the removable insert. Only replace the removable insert with an original spare part designed to be used with this product. 21. Use the removable insert in the pressure cooker ONLY. Do not use it to cook on stovetops, in the oven etc. 22. During cooking & steam release, the appliance exhausts heat and steam. Keep your face and hands away from the steam flow. Do not touch the lid during cooking. Do not obstruct the steam outlet. 8
9 23. When opening the lid, always hold the lid by its handle. In some cases, boiling water may be trapped between the steam shield and the lid. This can cause severe scalding. 24. Use the product ONLY IF the removable bowl is correctly placed in the unit and the handle is correctly inserted above the carrying handles. 25. If large amounts of steam are released from the rim of the lid, turn power OFF and unplug the power cord at once. Carefully clean the lid, sealing gasket and sealing gasket support cover to ensure that food residue is not interfering with proper operation. If the problem persists after cleaning, consult an authorized Service Center for repair. 26. If pressure is released continuously (during more than 1 minute) while pressure cooking, switch off the appliance and release pressure, and consult an authorized Service Center for repair. 27. Do not immerse the pressure cooker housing in water, or pour water or food directly on to the heating plate without the removable insert in place. If you inadvertently do so, consult an authorized Service Center for repair. 28. Do not touch the float valve and the limit pressure valve except when cleaning and maintaining in accordance with instructions. 29. Do not place foreign objects on top of or blocking the steam valve. Do not replace the valve. 30. Do not use a cloth between the lid and the housing to leave it open. 31. If any part of the appliance is damaged, bring the appliance to service center. 32. Do not substitute other sealing gaskets. 33. Any repairs should be made by an authorized service center using original spare parts. 34. Do not use the appliance if any part is damaged. 35. When using the browning and sauté function, always remove the lid. 9
10 36. Be aware that certain foods, such as applesauce, cranberries, pearl barley, oatmeal or other cereals, split peas, noodles, macaroni, rhubarb, or spaghetti can foam, froth, and sputter, and clog the pressure release device (steam vent). These foods should not be cooked in a pressure cooker. ELECTRICAL REQUIREMENTS This appliance has a grounded plug. Do not attempt to modify the plug in any way. A short power-supply cord has been provided to reduce risk resulting from becoming entangled in or tripping over a longer cord. If an extension cord is used: - The marked electrical rating of the extension cord should be compatible with the electrical rating of the appliance. - The cord must be arranged so that it will not drape over the countertop or tabletop where it can be pulled on by children or tripped over unintentionally. Your appliance contains many materials which can be recycled. Take it to a local civic collection point. 10
11 Cooking is so easy with the Emeril by T-fal Electric Pressure Cooker! To help you get the most out of your Electric Pressure Cooker, please refer to the following chart. Please note that the level of foods and liquids should never exceed the max level marking on the cooking pot. FRESH VEGETABLES COOKING METHOD: STEAMING*/ COOKING IN LIQUID** AMOUNT / PREPARATION (SUGGESTED) AMOUNT / PREPARATION (SUGGESTED) Asparagus Cooking in liquid. 8 stalks / Whole 5 min Eggplant Steamed 2 lbs / Sliced 7 min Artichoke Cooking in liquid 4 pieces / Trimmed 13 min Beets Steamed 1 lb / Diced 16 min Broccoli Steamed 1 lb / Small flowerets 5 min Carrots Steamed 1-2 lbs / Sliced 10 min Carrots Cooking in liquid 4 pieces / Trimmed 7 min Mushrooms Steamed 1 lb / Thin Slices 5 min Mushrooms Cooking in liquid 1 lb / Whole 6 min Green cabbage Steamed 1 lb / Thin slices 10 min Green cabbage Cooking in liquid 1 lb / Leaves 12 min Brussel sprouts Steamed 1 lb / Whole 10 min Cauliflower Cooking in liquid 1 lb / Small flowerets 5 min Cauliflower Steamed 1 lb / Small flowerets 6 min Zucchini Cooking in liquid 2-3 lbs / Sliced 6 min Spinach Steamed 1 lb / Leaves 6 min Spinach Cooking in liquid 1 lb / Leaves 5 min Green beans Steamed 1 lb / Very thin 10 min Turnips Steamed 1 lb / Diced 8 min Turnips Cooking in liquid 1 lb / Diced 6 min Green peas Steamed 1 lb / Whole 4 min Leeks Steamed 1 lb / Thin slices 18 min Squash Steamed 1 lb / Large pieces 9 min Potatoes Steamed 1 lb / Sliced 14 min Potatoes Cooking in liquid 1 lb / Sliced 12 min * Steaming: Pour 3 cups of liquid into the cooking pot - ** Cooking in liquid : Cover the ingredients with liquid. MEATS AMOUNT (SUGGESTED) LIQUID AMOUNTS (SUGGESTED) TIME IN MINUTES LOW PRESSURE (APPROX.) Beef cubes 2 lbs 2-3 cups 30 min Lamb chops 2-3 lbs 1-2 cups 30 min Chicken breast 1-2 lbs 1 cup 15 min Turkey breast 2 lbs 2-3 cups 20 min Fish filets 1 lb 1-2 cups 5 min 11
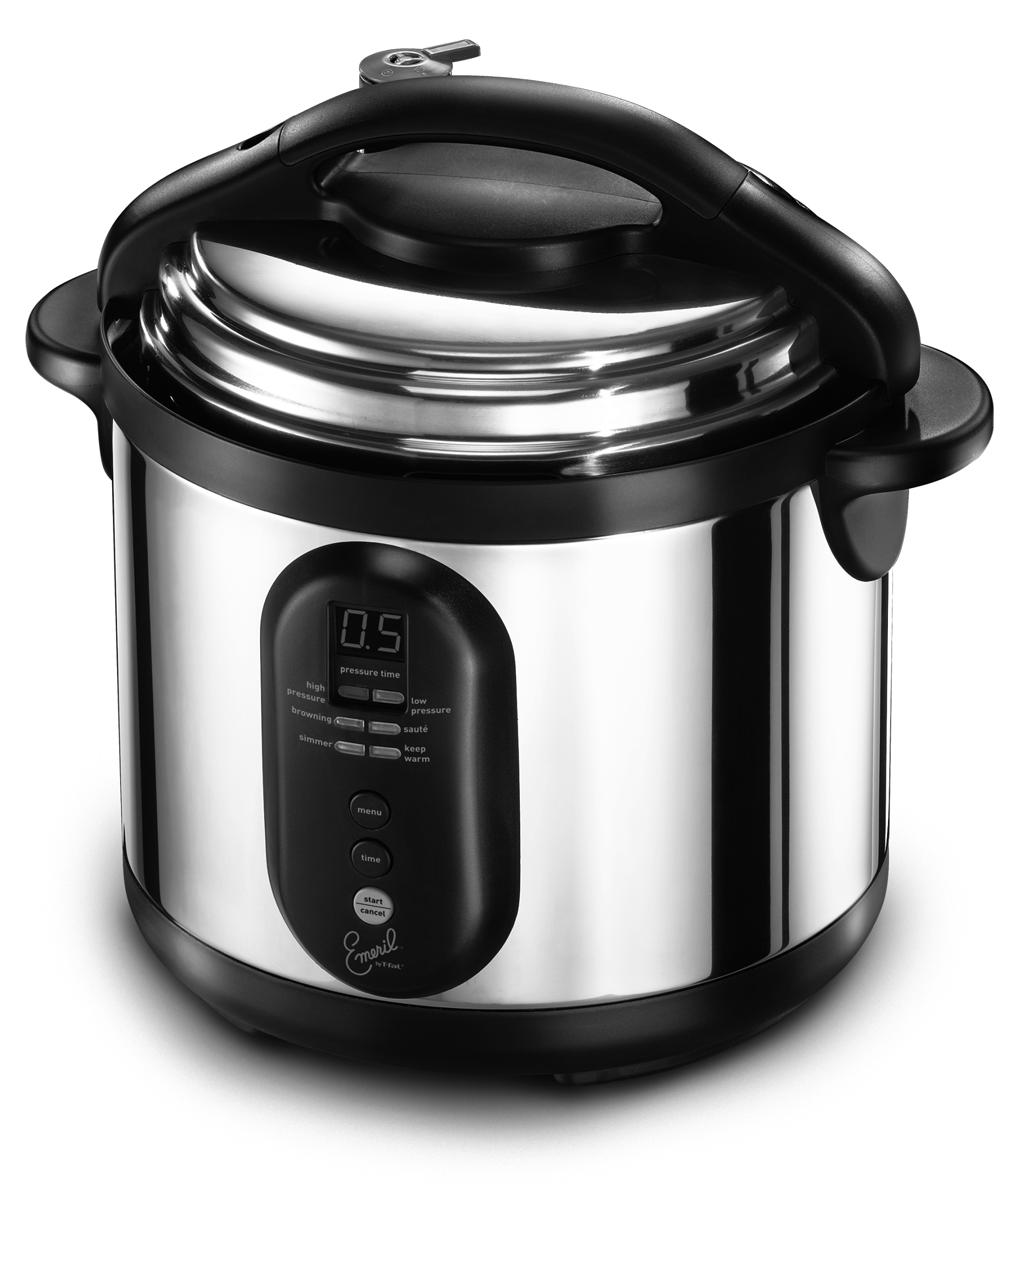
12 12 Description 1a pressure limit valve 1b pressure limit valve chimney 1c float valve 1d push rod (safety opening system) 1e lid handle 1f lid 2a sealing gasket 2b sealing gasket support cover 3a 6 L cooking pot 3b integrated basket supports 4 upper ring 5 carrying handles 6 stainless steel housing 7 heating plate with temperature sensor 8 base 9 removable power cord Control panel 10 digital timer: counts down remaining cooking time 11 high pressure light 12 low pressure light 13 browning light 14 sauté light 15 simmer light 16 keep warm light 17 menu button: press to select a cooking menu 18 timer selection: 1 minute increments up to 40 min 5 minute increments from 40 to 99 min 19 start / cancel Accessories 20 condensation collector 21 steaming basket Before first use Remove packaging Take your appliance out of its packaging, remember to read the operating instructions before using the appliance for the first time - fig. 1. Place your appliance on a flat surface. Remove the lid by grasping the handle, then turn it clockwise and lift the lid off- fig. 2 & 3. Remove all packaging materials from the inside of the appliance: plastic bags, accessories (steaming basket & condensation collector) as well as the plug - fig. 1. Remove the promotional sticker on the product before using your appliance for the first time. Place the pressure limit valve (1a) onto the pressure limit valve chimney (1b). Cleaning Wash the cooking pot, condensation collector and steaming basket in the dishwasher or by hand. The lid, pressure limit valve and sealing gasket support cover can only be washed by hand (and completely submersed in water). The other parts should only be washed by hand and cannot be submersed in water. Unroll the power cord Unroll the power cord; connect it to the appliance, checking it is fully pushed in.
13 Instructions for use Remove the lid To remove lid, grasp the handle, then turn it clockwise and lift the lid off - fig. 2 & 3. Fit the condensation collector into place Fit the condensation collector (20) to the back of the appliance as shown in - fig. 17. Take the cooking pot out and add the ingredients Remove the cooking pot - fig. 6. Add food and liquid to the cooking pot as the recipe directs. For pressure cooking: Please note that the level of foods and liquids should never exceed the max level marking on the cooking pot. Some foods will expand during cooking. For such foods (dried vegetables, grains, rice, etc), please ensure you do not exceed 50% of the capacity of the cooking pot. When pressure cooking, the cooking pot should always be filled to at least 20% of its capacity. For steam cooking: Pour water into the cooking pot to at least 20% of its capacity (approx 40.5 ounces). Less water may be needed depending on recipes and cooking time but always use a minimum of 16.5 ounces water. Place the steaming basket so that it rests on the integrated basket support (3b) or simply place it at the bottom of the cooking pot (3a) - fig. 20. You can cook food in the cooking pot and steam at the same time. When steaming, ensure the food in the steaming basket doesn t touch the lid. Use wooden or plastic utensils to protect the non-stick coating of the cooking pot. Place the cooking pot in the appliance Wipe clean the bottom of the cooking pot and remove any food residue from the heating plate - fig. 7. Then place the cooking pot into the appliance - fig. 8. Do not use your appliance without the cooking pot. Close and lock the lid Check that the sealing gasket is securely placed on the sealing gasket supporting cover. To do this, slightly rotate the sealing gasket in both directions to ensure that it is well positioned. Place the lid on the appliance, in the position shown in - fig. 9 (with the handle positioned at 'ten minutes to 4 o'clock'). Then turn it counter-clockwise until it is fully locked - fig. 10. so that the arrow on the lid is now completely covering the "lock" illustration on the sticker on the top of the upper ring. 13
14 Position the pressure limit valve Position the pressure limit valve to ensure that the dot on the pressure limit valve is aligning to the raised line on the pressure limit valve chimney - fig. 11. Also check that the float valve (1c) is down before you start pressure cooking (this will mean that the lid is properly sealed). If the float valve is not down, gently move the float valve and if necessary, remove any food particles. Plug in the power cord Connect the power cord to the appliance and then to the outlet - fig. 5. The LED display will indicate. Make sure the power cord is connected properly to both the appliance and the outlet. Ensure that the appliance is placed on a flat, stable, dry and heatresistant work surface. Please refer to the table below. Pressure Cooker settings COOKING SETTING FEATURES COMMENTS Low pressure Low pressure setting preserves more vitamins during cooking compared to high pressure setting. Ideal when cooking fish and delicate vegetables in water or in the steam basket. This setting can be used for cooking meat and poultry but the cooking time will be slightly longer. Always cook with the lid closed. High pressure This setting allows faster cooking of meats, poultry or frozen foods. High pressure can also be used for fast cooking of dense vegetables such as potatoes and beets. Always cook with the lid closed. Browning Use this setting to brown foods before cooking or when frying in a small amount of fat. Always cook with the lid open. Brown foods before pressure cooking. The preset temperature for this setting is 356 F. 14
15 COOKING SETTING Sauté FEATURES Use this setting to soften foods before cooking. Suitable with a small amount of fat or liquid. COMMENTS Always cook with the lid open. Soften foods before pressure cooking. The pre-set temperature for this setting is 284 F. Simmer This setting enables you to cook at a low temperature. It is primarily used when adding ingredients at the end of the cooking cycle or to finish off cooking. Always cook with the lid open. The pre-set temperature for this setting is 356 F. Keep Warm Automatically switches on after cooking. Keeps food warm for up to 12 hours. When cooking is finished, you will hear a beeping sound and the Keep Warm indicator light will switch on. It is not recommended to use the Keep Warm setting for more than 1 hour, particularly with fragile food and rice as textures may change. Cooking instructions High or low pressure cooking When the appliance is in stand by, the LED display shows. To pressure cook on high or low, press the button until the desired cooking setting is reached. The cook setting light will illuminate and flash on and off to indicate the selected setting. After adding your ingredients and locking the lid in place, press the button to set the desired cooking time - fig. 13. The timer can only be used with the High & Low Pressure cooking settings. - Time increases in 1 minute increments up to 40 minutes. - Time increases in 5 minute increments from 40 to 99 minutes. Now press the button and the pressure cooker will start the pressure cooking process - fig. 14. When the LED screen stops flashing this indicates the internal temperature has been reached, the appliance is under pressure and the countdown timer starts. If you don't want to indicate any desired cooking time, you can simply press start after choosing your setting mode. The LED display will countdown the remaining time. means that cooking will be finished in 10 minutes. 15
16 16 Once pressure has built up in the appliance, the float valve will rise. The double safety lock in the lid is then activated and the lid will not be able to be opened during cooking. Never attempt to open the lid during pressure cooking. Steam cooking is only possible when using the High and Low Pressure cooking settings. When using the pressure cooker for the first few times, you may notice a slight leaking of steam from the pressure level indicator and the sealing gasket. This is normal and only occurs as pressure builds up. During cooking it is normal for a small amount of steam to escape from the pressure limit valve (1a), as it is a safety valve. Brown, Simmer or Sauté setting Always leave the lid open when using the Browning, Simmer or Sauté settings. When the appliance is in stand by, the LED display shows. To brown, sauté or simmer, press the button until the desired cooking setting is reached. The cook setting light will illuminate and flash on and off to indicate the selected setting. Now press the button and the pressure cooker will start to preheat the cooking pot - fig. 14. The selected cook setting light will also now stop flashing. When the dot in the lower right hand corner of the LED screen stops flashing and becomes fixed, this indicates it has reached temperature and you can now add the ingredients. When using your pressure cooker for the first time, there might be a slight odor. This is normal. Keep Warm Once the cooking cycle is completed, the appliance will automatically switch to Keep Warm. Maximum duration for Keep Warm is 12 hours. In the Keep Warm setting, condensation may build up in the upper ring. This is normal. After 12 hours, the appliance will go into stand by and the LED display will show. To avoid any bacteria from developing, do not use the Keep Warm setting with foods that cannot be stored at an ambient temperature (i.e.) meat, fish, dairy products and eggs Cancel button You can reset the cook setting or cancel the timing at any time during the initial set up or during cooking by pressing the button - fig. 14.
17 Pressure release You can release pressure in two ways. 1. Automatic pressure release: When the appliance is in Keep Warm, pressure will drop slowly. This will take between 12 and 30 minutes. Please bear in mind that during this time, cooking will continue. You can switch to quick pressure release at any time. 2. Quick pressure release: At any time you can immediately release the pressure by using the pressure limit valve. To do so, turn the pressure limit valve so that the steam symbol on the top of the valve is aligned with the raised line on the chimney of the pressure limit valve- fig. 15. Steam will immediately start to be released. Hot steam will be released upwards. When releasing pressure, keep your hands and face away from hot steam ejected from the pressure limit valve. As the pressure limit valve may be hot, we recommend using a kitchen utensil like tongs or a wooden spoon or using gloves for protection to turn the valve. On completion of cooking Unplug the power cord - fig. 16. To remove lid, grasp the handle, turn it clockwise and lift the lid - fig. 2 & 3. Cleaning and maintenance Once your food is cooked, unplug the appliance before cleaning it - fig. 16. It is recommended to clean your appliance after each use. Pay specific attention to the cleaning of the sealing gasket. Clean the housing with a damp cloth. Do not immerse the appliance in water or pour water into the housing. Clean the upper rim of the cooking pot with a damp cloth. Remove the condensation collector and clean it thoroughly with soap and water or in the dishwasher. After drying it, place it back in its original position - fig. 17 & 18. Clean the cooking pot and steaming basket in the dishwasher - fig. 4. Do not use a scourer to clean the pot as this can damage the non stick coating. To clean the sealing gasket and the sealing gasket support cover, remove the gasket support cover from the lid by grasping the knob on the support cover. Seperate the sealing gasket from the cover and wash seperately. These are not dishwasher safe. Once clean, place the sealing gasket and support cover back in their original position - fig. 19 &
18 Handle the non-stick cooking pot with care and do not bang the rim hard with kitchen utensils. When the sealing gasket and support cover are removed, it is easy to wash the following parts with soap and water. These parts are not dishwasher safe, but can be fully submersed in water: - Inside of the lid - Pressure limit valve: Remove it, clean it and place it back in place. The other parts are not dishwasher safe and cannot be fully submersed in water: - Float valve : gently move the float and rinse away any food from the valve. The duct in the pressure limit valve should be checked regularly to prevent blockage. Always use the cooking pot provided. Do not pour water or food directly into the appliance. If you inadvertently immerse your appliance in water or spill water directly on the heating element (when the pot is not in place), take it to your service center for repair. In order to prevent trapped odors, do not store the lid on the unit. Do not carry the appliance by the lid handle. Use the 2 side handles to move the product. Since the sealing gasket is a safety device designed to release the pressure in case of abnormal overload of pressure, you must change it every 2 years. 18 Important Please follow the instructions closely. Do not place the appliance close to an open flame or a flammable object. Always place your appliance on a flat, stable, dry and heat resistant surface. Please ensure you respect the recommendations on the volume of food and water. Do not damage the sealing gasket. Do not use any other type or brand of gasket that has not been made by T-fal for this particular model of appliance. Always ensure the pressure limit valve protective cover; the pressure limit valve and the float valve are clean. Do not open the lid until the float is down. Do not place any foreign objects on the top of the pressure limit valve. Do not replace the valve. Do not use a cloth between the lid and the housing to leave it ajar. Keep the bottom of the cooking pot and the heating plate clean. Do not heat up the cooking pot using any other heat source nor replace it with another pot.
19 Use a wooden or plastic spoon to prevent any damage to the coating of the cooking pot. Never cut food directly in the cooking pot. During cooking & steam release, the appliance emits heat and steam. Keep your face and hands away from the steam flow. Do not touch the lid during cooking - fig. 22. If a great deal of steam is released from the rim of the lid, unplug the power cord at once, and send the appliance to our service center for repair. If the alarm beeping sound is on for more than 1 minute, please do not use the appliance and send the product to a service center. Do not carry the appliance by the lid handle. Use the 2 side handles to transport the product. You must not take the appliance apart or replace any components yourself (except the sealing gasket). This can be done by an authorized service center only. Do not replace the power cord with other cords. Keep out of the reach of children. Do not use the cooking pot on the stove or in any appliances. If pressure is released continuously (for more than 1minute) while pressure cooking, send the appliance to a service center for repair. Do not operate the pressure cooker without the cooking pot. When opening the lid, always hold the lid by its handle. In some cases, boiling water may be trapped between the gasket support cover and the lid. This can cause severe scalding. Troubleshooting TROUBLE POSSIBLE REASONS SOLUTION The appliance beeps and the display shows. The appliance automatically switches to Keep Warm without going through a complete cooking cycle. Lid will not lock. The appliance is unable to build up pressure. When there is not enough water in the cooking pot, the appliance will switch to the Keep Warm setting. The sealing gasket and sealing gasket support cover are not installed properly. The float stays up. Check that the lid is closed properly and that the pressure limit valve is in the correct position - fig. 11. Add more water in the cooking pot and restart the cooking cycle. Properly install the sealing gasket and the sealing gasket support cover. If this occurs just after cooking, remove the valve. Then close the lid and place the valve back into position. If the product has not been used and is cold, push the push rod in directly with your hands. 19
20 TROUBLE POSSIBLE REASONS SOLUTION Cannot open the lid after steam released. The float is still up. In certain rare cases after your appliance has depressurised, the float valve may remain in the high position meaning that the lid cannot be opened. In this case, allow your appliance to cool off completely so as to be sure that there is no more pressure inside it. The amount of time it takes for your appliance to cool off depends on the quantity of food that has been cooking inside it. Only then should you gently turn the float valve using tongs. Make sure you keep your face well away from the handle. Air is escaping from the rim of the lid. No sealing gasket. Food stuck in sealing gasket. Sealing gasket needs to be replaced. Lid not locked properly. Install the sealing gasket. Clean the sealing gasket. Replace the sealing gasket. Lock the lid again. 20 Steam is released from the float valve. The float doesn t rise, meaning the unit will not go under pressure. Food stuck in the sealing gasket of the float valve. The sealing gasket on the float is damaged. The pressure limit valve is not positioned properly. Not enough food and water in the cooking pot. Steam is released from the rim of the lid and the pressure limit valve. Clean the sealing gasket. Replace the sealing gasket. Change the sealing gasket every two years. Check that the sealing gasket is perfectly cleaned. Position the valve to. Put more food and water in the cooking pot. Send the product to our service center for repair. If the pressure cooker still does not work, please call our consumer service center.
21 MANUFACTURER s WARRANTY : With a strong commitment to the environment, most of T-fal products are repairable during and after the warranty period. Before returning any defective products to the point of purchase, please call T-fal consumer service directly at the phone number below for repair options. Your help to sustain the environment is appreciated! The Warranty This product is guaranteed by T-fal for 1 year against any manufacturing defect in materials or workmanship, starting from the initial date of purchase. The manufacturer s warranty by T-fal is an extra benefit which does not affect consumer s Statutory Rights. The T-fal warranty covers all costs related to restoring the proven defective product so that it conforms to its original specifications, through the repair or replacement of any defective part and the necessary labor. At T-fal s choice, a replacement product may be provided instead of repairing a defective product. T-fal s sole obligation and your exclusive resolution under this warranty are limited to such repair or replacement. Conditions & Exclusions The T-fal warranty only applies within USA and is valid only on presentation of a proof of purchase. The product can be taken directly in person to an authorized service center or must be adequately packaged and returned, by recorded delivery (or equivalent method of postage), to a T-fal authorized service center. Full address details for each country s authorized service center are listed on the T-fal website ( or by calling the appropriate telephone number listed below to request the appropriate postal address. T-fal shall not be obligated to repair or replace any product which is not accompanied by a valid proof of purchase. This warranty will not cover any damage which could occur as a result of misuse, negligence, failure to follow T-fal instructions, use on current or voltage other than as stamped on the product, or a modification or unauthorized repair of the product. It also does not cover normal tear and wear, maintenance or replacement of consumable parts, and the following: - using the wrong type of water or consumable; - scaling (any de-scaling must be carried out according to the instructions for use); - ingress of water, dust or insects into the product; 21
22 - mechanical damages, overloading; - damages or bad results due to wrong voltage or frequency; - accidents including fire, flood, lightning, etc; - professional or commercial use; - damage to any glass or porcelain ware in the product. This warranty does not apply to any product that has been tampered with, or to damages incurred through improper use and care, faulty packaging by the owner or mishandling by any carrier. The T-fal manufacturer s warranty applies only for products purchased and used in USA. Where a product purchased in one country and then used in another one: a) The T-fal guarantee duration is the one in the country of usage of the product, even if the product was purchased in another listed country with different guarantee duration. b) The T-fal guarantee does not apply in case of non conformity of the purchased product with the local standards, such as voltage, frequency, power plugs, or other local technical specifications. c) The repair process for products purchased outside the country of use may require a longer time if the product is not locally sold by T-fal. d) In cases where the product is not repairable in the new country, the T-fal guarantee is limited to a replacement by a similar product or an alternative product at similar cost, where possible. Consumer Statutory Rights This T-fal manufacturer s warranty does not affect the statutory rights a consumer may have or those rights that cannot be excluded or limited, nor rights against the retailer from which the consumer purchased the product. This warranty gives a consumer specific legal rights, and the consumer may also have other legal rights which vary from State to State or Country to Country or Province to Province. The consumer may assert any such rights at his sole discretion. Additional information Accessories, Consumables and end-user replaceable parts can be purchased, if locally available, as described in T-fal internet site. U.S.A. GROUPE SEB USA 2121 Eden Road Millville, NJ :
23 23
24 24
TEFAL876-MINUTCOOK-EN-NC _MINUTCOOK 12/10/12 12:59 PageA. Ref. NC
 TEFAL876-MINUTCOOK-EN-NC00113422_MINUTCOOK 12/10/12 12:59 PageA Ref. NC00113422 JPM & Associés marketing-design-communication 10/2012 5085788_MINUT_COOK:MINUTCOOK 15/04/09 9:16 Page B GB MINUT COOK J g
Instructions for Use
 Instructions for Use ENVIRONMENT PROTECTION The packaging of your product is recyclable. Do not dispose of it with the rest of your waste but rather recycle the packaging or bring it to your nearest recycling
E GB
 E GB www.moulinex.com 1a 1b 1d 1e 1c 1f 2a 2b 21 3a 3b 5 4 20 6 11 13 15 10 12 14 16 9 7 8 17 19 18 fig.1 fig.2 fig.3 fig.4 Recetas fig.5 fig.6 fig.7 fig.8 2 1 2 1 fig.9 fig.10 fig.11 fig.12 CLIC fig.13
EN ES. Instructions for use Instrucciones de uso
 POP CORN POPPER ES Instructions for use Instrucciones de uso READ AND SAVE THESE INSTRUCTIONS WARNING: A risk of fire and electrical shock exists in all electrical appliances and may cause personal injury
Important Safeguards. Topic 2 SAVE THESE INSTRUCTIONS - FOR HOUSEHOLD USE ONLY SAVE THESE INSTRUCTIONS - FOR HOUSEHOLD USE ONLY 3
 User s Manual Index Topic Important safeguards 03 Safety features 05 Parts and accessories 05 Before first use 06 Operating instructions 06 Programme settings 08 Care and cleaning 09 Pressure canning guide
INSTRUCTION BOOKLET. Recipe Booklet Reverse Side. Cuisinart Electric Pressure Cooker CPC-600 Series
 INSTRUCTION BOOKLET Recipe Booklet Reverse Side Cuisinart Electric Pressure Cooker CPC-600 Series For your safety and continued enjoyment of this product, always read the instruction book carefully before
5 Litre User s Manual
 5 Litre User s Manual Please visit www.drewandcole.com for video instructions and cooking demonstrations. ALWAYS ensure the INNER POT is in place before cooking. Food with skins (e.g sausages, chicken
GoWISE USA. Instruction Manual. Electric Pressure Cooker GW22606/GW22609/GW GoWISE USA
 GoWISE USA Instruction Manual Electric Pressure Cooker GW22606/GW22609/GW22610 GoWISE USA www.gowiseusa.com sales@gowiseusa.com 1-855-233-9199 Thank you for purchasing this GoWISE USA Electric Pressure
USER MANUAL. FairWind FWPC6L Pressure Cooker. Contact Us:
 USER MANUAL FairWind FWPC6L Pressure Cooker Contact Us: 1-844-528-2566 Read and Save These Instructions TABLE OF CONTENTS SPECIFICATIONS... 2 Parts List... 3 Important Safety Instructions... 4 Installation
EN... P. 1 7 FR... P ES... P SAVOY TOASTER 2 slices / 4 slices KH31. i h. NC
 EN... P. 1 7 FR... P. 8 15 ES... P. 16 23 a SAVOY TOASTER 2 slices / 4 slices KH31 d e i h b g f c NC00133516 www.krups.com fig.1 2 fig.2 fig.3 1 fig.4 fig.5 fig.6 auto fig.7 fig.10 KRUPS INTERNATIONAL
6 Litre User s Manual
 6 Litre User s Manual Please visit www.drewandcole.com for video instructions and cooking demonstrations. Index Topic Important Safety Information 04 Important safeguards 06 Safety features 09 Box contents
6 Litre User s Manual
 6 Litre User s Manual Please visit www.drewandcole.com for video instructions and cooking demonstrations. ALWAYS ensure the INNER POT is in place before cooking. Food with skins (e.g sausages, chicken
3 Litre User s Manual
 3 Litre User s Manual Please visit www.drewandcole.com for video instructions and cooking demonstrations. Index Topic Important Safety Information 04 Important safeguards 06 Safety features 09 Box contents
EN FR ES
 www.krups.com EN FR ES B C H H A B D E F G I C H A D E F G I X2 fig.1 fig.2 fig.4 fig.5 fig.6 fig.7 fig.8 fig.9 fig.11 fig.12 fig.10 4S X4 2S fig.3 4S X4 2S X2 fig.13 fig.14 fig.15 fig.16 fig.17 fig.18
Model: PC600. Batch: PR3496. POWER:1000W AC V, 50/60Hz For your safety, always read the instruction book carefully before using.
 Model: PC600 Batch: PR3496 POWER:1000W AC220-240V, 50/60Hz For your safety, always read the instruction book carefully before using. Introduction-----------------------------------------------------------------------------------------------
DR6000 UK_110 x /12/13 11:40 Page1
 1800129621 DR6000 UK_110 x 154 02/12/13 11:40 Page1 1800129621-48/13 1800129621 DR6000 UK_110 x 154 02/12/13 11:40 Page2 I n s t r u c t i o n f o r u s e EN www.rowenta.com 1800129621 DR6000 UK_110 x
6.3 Qt Electric Pressure Cooker
 HOME APPLIANCES 6.3 Qt Electric Pressure Cooker Use & Care Instructions Read All Instructions Carefully. Save These Instructions. Table of Contents Important Safeguards... 2-3 Specifications... 4 Product
EVEN SEAR MULTI GRILL INSTRUCTION MANUAL MODEL: CKCLIG1
 EVEN SEAR MULTI GRILL INSTRUCTION MANUAL MODEL: CKCLIG1 1 TABLE OF CONTENTS IMPORTANT SAFEGUARDS 3 POLARIZED PLUG 4 PRODUCT DIAGRAM 5 USAGE INSTRUCTIONS PREPARING YOUR EVEN SEAR MULTI GRILL 6 HOW TO USE
User Guide. Provided by E1 E. TF_SORBETIERE_ _EMERIL 30/05/12 11:06 PageC1.
 TF_SORBETIERE_25549-03_EMERIL 30/05/2 :06 PageC A B C D E E User Guide F G Réf. 25549-03 - 5/202 ESPACE GRAPHIQUE www.t-fal.com TF_SORBETIERE_25549-03_EMERIL 30/05/2 :06 PageC4 Fig. Fig. 4 2 Fig. 5 Fig.
Questions or Concerns? Please contact us Mon - Fri 9:00 AM - 5:00 PM PST at (888) or Model No.
 or Model No.") Questions or Concerns? Please contact us Mon - Fri 9:00 AM - 5:00 PM PST at (888) 402-1684 or email support@cosori.com Model No.: C1156-PC THANK YOU. Thank you for purchasing the Electric Pressure Cooker
Questions or Concerns? Please contact us Mon - Fri 9:00 AM - 5:00 PM PST at (888) 402-1684 or email support@cosori.com Model No.: C1156-PC THANK YOU. Thank you for purchasing the Electric Pressure Cooker
6L PRESSURE COOKER. Instruction Manual. Model: PLA1424
 6L PRESSURE COOKER Instruction Manual Model: PLA1424 Due to ongoing product improvements, specifications and accessories may change without notice. Actual product may differ slightly to that depicted.
Rice Cooker & Food Steamer. Instruction Manual. ARC-700 Series
 Rice Cooker & Food Steamer Instruction Manual ARC-700 Series Congratulations on your purchase of the Rice Cooker & Food Steamer. It will surely become one of the most useful and versatile appliances in
instruction manual Pressure Cooker Multicooker Slow Cooker APC-816SB
 instruction manual APC-816SB Pressure Cooker Multicooker Slow Cooker Questions or concerns about your Aroma product? www.aromaco.com/support 1-800-276-6286 DISCOVER more of our products! To Enhance and
Fryer. Instructions for Use
 Fryer Instructions for Use Fryer TABLE OF CONTENTS Important Safeguards................................... 3 Introduction........................................... 4 Descriptive Diagram/Reset Function........................
SEARious Slow Cooker
 SEARious Slow Cooker MC501 MC501C OWNER S GUIDE HELP LINE 1 877 646-5288 IMPORTANT SAFETY INSTRUCTIONS For Household Use Only WHEN USING ELECTRICAL APPLIANCES, BASIC SAFETY PRECAUTIONS SHOULD ALWAYS BE
SUPER WAVE OVEN. ROASTS, BAKES, BROILS, AIR FRIES, GRILLS, BOILS & STEAMS 1300 Watt Power/12.5 Quart
 SUPER WAVE OVEN ROASTS, BAKES, BROILS, AIR FRIES, GRILLS, BOILS & STEAMS 1300 Watt Power/12.5 Quart Customer Service: 1-800-423-4248 Printed in China Super Wave Oven ITEM NO.8217SI. The Sharper Image name
5.5 QUART 6.5 QUART AUTOMATED SMOCOOKER TURBO 1-HOUR SMOKER+ PRESSURE COOKER MODEL#GPS-650
 AUTOMATED 5.5 QUART 6.5 QUART SMOCOOKER TURBO 1-HOUR SMOKER+ PRESSURE COOKER MODEL#GPS-650 6.5 QUART SMOCOOKER TURBO 1-HOUR SMOKER+ PRESSURE COOKER MODEL#GPS-650 Safety Precautions 4 Product Specs 7 Using
PC100 INSTANT COOKER. Series OWNER S GUIDE. ninjakitchen.com
 PC100 Series OWNER S GUIDE INSTANT COOKER ninjakitchen.com THANK YOU for purchasing the Ninja Instant Cooker CONTENTS Important Safeguards....3 Parts.... 6 Getting to Know Your Ninja Instant Cooker...7
Professional Frying System
 Professional Frying System F300 F300C OWNER S GUIDE HELP LINE 1 877 646-5288 F300_15_F300C_15_IB_ENG_121114_3.indd 1 IMPORTANT SAFETY INSTRUCTIONS For Household Use Only WHEN USING ELECTRICAL APPLIANCES,
All-Clad 5-Level AutoSense X-Large Capacity Indoor Grill
 Printed in China All-Clad Grill Griddle Owner s Guide Ref 2100106846 Realisation Espace Graphique All-Clad 5-Level AutoSense X-Large Capacity Indoor Grill Owner s Guide - Model No. PG715850 Read and save
143mm 6.0L LED PRESSURE COOKER EAN:
 143mm 6.0L LED PRESSURE COOKER 210mm MODEL: 7079151(LED-J) EAN:6001001442510 Thank you for purchasing our Platinum Pressure Cooker. Each unit has been manufactured to ensure safety, reliability, and ease
Slow Cooker XJ-13220B User Manual
 Slow Cooker XJ-13220B User Manual PLEASE READ AND SAVE THESE INSTRUCTIONS FOR FUTURE REFERENCE IMPORTANT SAFEGUARDS When using electrical appliances, basic safety precautions should always be followed,
USER MANUAL TRAMONTINA PRESSURE COOKER. MODEL TRAS litres.
 READ BEFORE USING THE PRESSURE COOKER USER MANUAL TRAMONTINA PRESSURE COOKER MODEL TRAS0536-6 litres www.tramontina.com.au TRAMONTINA PRESSURE COOKER USER MANUAL CONTENT IMPORTANT SAFEGUARDS INTRODUCTION
DIGITAL SAUTÉ SLOW COOKER INSTRUCTION MANUAL MODEL: SCCLD1
 DIGITAL SAUTÉ SLOW COOKER INSTRUCTION MANUAL MODEL: SCCLD1 1 TABLE OF CONTENTS IMPORTANT SAFEGUARDS 3 POLARIZED PLUG 4 PRODUCT DIAGRAM 5 USAGE INSTRUCTIONS PREPARING YOUR CALPHALON DIGITAL SAUTÉ SLOW COOKER
Couverture B80 oneway seb.qxd:couverture B80 oneway seb.qxd. USA: CANADA :
 Couverture B80 oneway seb.qxd:couverture B80 oneway seb.qxd 26/06/08 9:23 Page 1 USA: 1-800-395-8325 www.t-falusa.com CANADA : 1-800-418-3325 www.t-fal.ca 0828 074 Couverture B80 oneway seb.qxd:couverture
15 ELECTRIC SKILLET. Instruction Manual. Model: CES-1215R 120V/60Hz / 1400W
 15 ELECTRIC SKILLET Instruction Manual Model: CES-1215R 120V/60Hz / 1400W IMPORTANT SAFEGUARDS PLEASE READ CAREFULLY ALL INSTRUCTIONS BEFORE USING YOUR ELECTRIC SKILLET Do not use this appliance for any
3-in-1 Cooking System
 MC750 OWNER S GUIDE 3-in-1 Cooking System www.ninjakitchen.com IMPORTANT SAFETY INSTRUCTIONS For Household Use Only WHEN USING ELECTRICAL APPLIANCES, BASIC SAFETY PRECAUTIONS SHOULD ALWAYS BE FOLLOWED,
User Manual. 3.5L Deep Fryer Stainless Steel Model Number: MDF35S READ AND SAVE THESE INSTRUCTIONS
 User Manual 3.5L Deep Fryer Stainless Steel Model Number: MDF35S READ AND SAVE THESE INSTRUCTIONS IMPORTANT Read and follow the instructions in this user manual even if you feel you are familiar with the
10,000 prize draw. instructions. EXTRA year guarantee FREE rewards gallery. details. Register online now!
 r instructions 10,000 prize draw EXTRA year guarantee FREE rewards gallery www.russellhobbs.co.uk/productregister/ Register online now! See back for details A 3 h b B 2 C D 1 E F G H K M J L N P R S 2
5 Liter Electronic Deep Fryer
 Model F1066 ONE (1) YEAR LIMITED WARRANTY EURO-PRO CORPORATION warrants this product to be free from defects in material and workmanship for a period of one (1) year from the date of purchase when utilized
MC510 Series OWNER S GUIDE. 2-in-1 Slow Cooker. ninjakitchen.com
 MC510 Series OWNER S GUIDE 2-in-1 Slow Cooker 1-877-646-5288 IMPORTANT SAFEGUARDS For Household Use Only WHEN USING ELECTRICAL APPLIANCES, BASIC SAFETY PRECAUTIONS SHOULD ALWAYS BE FOLLOWED, INCLUDING
Induction Cooker. Instruction Booklet. Model: ID-1081
 Induction Cooker Instruction Booklet Model: ID-1081 IMPORTANT SAFEGUARDS When using electrical appliances, basic safety precautions should always be followed including the following: 1. Read all instructions.
SAVE THESE INSTRUCTIONS
 IMPORTANT SAFEGUARDS When using electrical appliances especially when children are present, basic safety precautions should always be followed to reduce the risk of fire, electric shock, and/or injury
Thanks for shopping with Improvements! Dual Deep Fryer Item #
 Thanks for shopping with Improvements! Dual Deep Fryer Item # 437359 To order, call 1-800-642-2112 West Chester, OH 45069 Made in China 0613 If you have questions regarding this product, call 1-800-642-2112
BL250. Pulse Blender OWNER S GUIDE
 BL250 OWNER S GUIDE Pulse Blender 1-877-646-5288 IMPORTANT SAFETY INSTRUCTIONS For Household Use Only WHEN USING ELECTRICAL APPLIANCES, BASIC SAFETY PRECAUTIONS SHOULD ALWAYS BE FOLLOWED, INCLUDING THE
INTELLICRISP WAFFLE MAKER INSTRUCTION MANUAL MODEL: CKCLWF1. Calphalon_WaffleMaker_IB_SPEC_DarkGrey_CKCLWF1_19EM1.indd 1 1/25/19 09:30
 INTELLICRISP WAFFLE MAKER INSTRUCTION MANUAL MODEL: CKCLWF1 1 Calphalon_WaffleMaker_IB_SPEC_DarkGrey_CKCLWF1_19EM1.indd 1 1/25/19 09:30 TABLE OF CONTENTS IMPORTANT SAFEGUARDS 3 POLARIZED PLUG 4 PRODUCT
L&C Deep Fryer INSTRUCTION MANUAL MODEL:
 L&C Deep Fryer INSTRUCTION MANUAL MODEL: IMPORTANT SAFEGUARDS.... 1 Part Name... 3 To Use... 4 General Frying Advice... 7 Cleaning and Maintenance... 9 The Reset Feature... 10 Troubleshooting... 11 Technical
AIR FRYER USER GUIDE WITH RAPID AIR TECHNOLOGY READ ALL INSTRUCTIONS BEFORE USE
 AIR FRYER WITH RAPID AIR TECHNOLOGY USER GUIDE Now that you have purchased a Chefman product you can rest assured in the knowledge that as well as your 1-year parts and labor warranty you have the added
User Manual. 3.5L Deep Fryer Stainless Steel Model Number: MDF35
 User Manual 3.5L Deep Fryer Stainless Steel Model Number: MDF35 READ AND SAVE THESE INSTRUCTIONS IMPORTANT Read and follow the instructions in this user manual even if you feel you are familiar with the
FOR HOUSEHOLD USE ONLY READ THE MANUAL BEFORE USE AND SAVE FOR FUTURE REFERENCE
 BV3825B05 0.5 L Travel Kettle Customer assistant line: USA 1-855- 664-1252 Features: Small size Easy Grip handle for excellent pour control Brushed Stainless finish 900 W FOR HOUSEHOLD USE ONLY READ THE
SAVE THESE INSTRUCTIONS
 2 IMPORTANT SAFEGUARDS When using electrical appliances especially when children are present, basic safety precautions should always be followed to reduce the risk of fire, electric shock, and/or injury
Steamer Simply Invent GBv6 27/11/06 18:50 Page C1 SIMPLY INVENTS.
 Steamer Simply Invent GBv6 27/11/06 18:50 Page C1 SIMPLY INVENTS www.tefal.com Steamer Simply Invent GBv6 27/11/06 18:50 Page C2 1 2 3 4 5 6 11a 11b 7 8 9 12 10 Steamer Simply Invent GBv6 27/11/06 18:50
Cool-Touch Deep Fryer / Fondue Maker
 Cool-Touch Deep Fryer / Fondue Maker Use and Care Instructions Model EP64 For information or assistance call 514-842-8691 EURO-PRO Corporation In U.S.: 178 West Service Rd., Champlain, NY 12919 In Canada:
USER GUIDE DEEP FRYER WITH OIL FILTRATION SYSTEM
 USER GUIDE DEEP FRYER WITH OIL FILTRATION SYSTEM Emeril is a trademark of Martha Stewart Living Omnimedia, Inc. Copyright 2017, Martha Stewart Living Omnimedia, Inc. All rights reserved. Important Safeguards
PCE_YBD60-100_IB_WM_ENG_V2_ indd 1
 PCE_YBD60-100_IB_WM_ENG_V2_150728.indd 1 PCE_YBD60-100_IB_WM_ENG_V2_150728.indd 2 LIMITED WARRANTY 4 SPECIAL FEATURES 5 BUILT-IN SAFETY FEATURES 6 IMPORTANT SAFEGUARDS 7 PARTS AND ACCESSORIES 8 GENERAL
2 Liter Deep Fryer. OWNER S MANUAL Model F V., 60Hz., 1500 Watts
 OWNER S MANUAL Model F1052 120V., 60Hz., 1500 Watts 2 Liter Deep Fryer EURO-PRO Operating LLC U.S.: 94 Main Mill Street, Door 16 Canada: 4400 Bois-Franc Plattsburgh, NY 12901 St-Laurent, QC H4S 1A7 Tel.:
6.5L SLOW COOKER INSTRUCTION MANUAL
 6.5L SLOW COOKER INSTRUCTION MANUAL 220~240V 320W WHSC01SS 320W CONTENTS SAFETY INFORMATION Important Safety Instructions......................... 1-2 Electrical Requirements................................
EN p Ref. NC /2009 JPM & Associés marketing-design-communication
 EN p. 2-9 Ref. NC00013664 10/2009 JPM & Associés marketing-design-communication EN VITACUISINE COMPACT www.tefal.co.uk / www.tefal.com.au / www.tefal.co.nz Important safeguards Safety instructions Read
Contents. 7 Notices 21 Electromagnetic fields (EMF) 21 Recycling Important 4
 21 Recycling Important 4") HD2178 User manual Contents 1 Important 4 2 Your All-in-One cooker 8 What s in the box 8 Product overview 9 Controls overview 10 3 Getting started 11 Before first use 11 7 Notices 21 Electromagnetic fields
HD2178 User manual Contents 1 Important 4 2 Your All-in-One cooker 8 What s in the box 8 Product overview 9 Controls overview 10 3 Getting started 11 Before first use 11 7 Notices 21 Electromagnetic fields
ROTATING WAFFLE MAKER
 ROTATING WAFFLE MAKER Model Number: 104553 UPC: 681131045537 Customer Assistance 1-855-451-2897 (US) Please consider the option to recycle the packaging material and donate any applianceyou are no longer
User Guide HOLSEM-A2 LED DISPLAY.
 User Guide HOLSEM-A2 LED DISPLAY www.holsem.com Specification & Feature: -----Voltage:120V~ 60Hz -----Wattage: 1500Watts -----Capacity of basket: 3.4 Quart -----Adjustable temperature:170 400 -----Timer
5 Liter Electronic Deep Fryer
 OWNER S MANUAL Liter Electronic Deep Fryer Model F066 20V., 60Hz., 00 Watts EURO-PRO Operating LLC Boston, MA, 026 (00)--3 www.euro-pro.com COPYRIGHT EURO-PRO OPERATING LLC 200 IMPORTANT SAFETY INSTRUCTIONS
unprocess your food TRUGLIDE ELITE RAPID SKILLET Instruction manual & recipe guide MODEL DTGS14
 unprocess your food TRUGLIDE ELITE RAPID SKILLET Instruction manual & recipe guide MODEL DTGS14 2 bydash.com table of contents TABLE OF CONTENTS TRUGLIDE ELITE RAPID SKILLET Important Safeguards... 4-5
Please consider the option to recycle the packaging material and donate any appliance you are no longer using.
 WAFFLE MAKER Model Number: 103739 UPC: 681131037396 Customer Assistance 1-855-451-2897 (US) Please consider the option to recycle the packaging material and donate any appliance you are no longer using.
Indoor Grill With Removable Grids
 READ BEFORE USE Visit www.hamiltonbeach.in for our complete line of products and Use and Care Guides as well as delicious recipes, tips, and other useful information! Indoor Grill With Removable Grids
USER GUIDE 3-IN-1 GRILL AND GRIDDLE
 USER GUIDE 3-IN-1 GRILL AND GRIDDLE Emeril is a trademark of Martha Stewart Living Omnimedia, Inc. Copyright 2015, Martha Stewart Living Omnimedia, Inc. All rights reserved. Imported and Distributed by:
User Guide HOLSEM-A1 KNOB.
 User Guide HOLSEM-A1 KNOB www.holsem.com Specification & Feature: -----Voltage: 120V~60Hz -----Wattage: 1500Watts -----Capacity of basket: 3.4 Quart -----Adjustable temperature: 175 400 -----Timer (0-30
Programmable Cordless Water Kettle with Variable Temperature Control PRO. Operating Instructions Warranty. Model #275 /#276
 HO 2 PRO Programmable Cordless Water Kettle with Variable Temperature Control Model #275 /#276 Operating Instructions Warranty 2. IMPORTANT SAFEGUARDS When using electrical appliances, basic safety precautions
Five Cup Rice Cooker
 READ AND SAVE THESE INSTRUCTIONS WARNING: A risk of fire and electrical shock exists in all electrical appliances and may cause personal injury or death. Please follow all safety instructions. Five Cup
Air Fryer. Model# GAF-535 USER MANUAL
 Air Fryer Model# GAF-535 USER MANUAL Read this manual thoroughly before using and save it for future reference Welcome to the Exciting World of Air Frying from Gourmia Model: GAF-535 2017 Gourmia www.gourmia.com
45 in 1 Multicooker.
 EN 45 in 1 Multicooker www.tefal.com 10 7 8 3 1 9 2 4 5 6 11 Fig.1 Fig.2 Fig.3a Fig.3b 10 cups MAX. Fig.4 Fig.5 Fig.6 Fig.7 10 cups MAX. Fig.8 Fig.9 Fig.10 Fig.11 Fig.12 Fig.13 Fig.14 Fig.15 a b a b Fig.16
Gem Multicooker. User Manual
 Gem Multicooker User Manual Tools for a New Lifestyle Table of Contents Important Safeguards Overview Control and Features Getting Started Advanced Operations Product Specifications Care and Cleaning Troubleshooting
3-Quart Deep Fryer Instruction Manual
 BRAND 3-Quart Deep Fryer Instruction Manual ITEM: 600263 Ginnys.com 1.800.544.1590 Life is happening. We ll help you live it...one moment at a time. IMPORTANT SAFEGUARDS When using electrical appliances,
NO PREHEAT DIGITAL COUNTERTOP OVEN TOD5031SS. use and care manual
 NO PREHEAT DIGITAL COUNTERTOP OVEN use and care manual TOD5031SS TOD5031SS_IB_23433-002.indd 1 CONTENTS Important Safeguards... 3 Getting to Know Your Countertop Oven... 5 How to Use.... 6 Operating Your
User Guide. * Depending on model. EN 1. TE_FRYERS_FILTRA-ONE_UK_NC _Mise en page 1 06/12/13 15:36 PageC1.
 TE_FRYERS_FILTRA-ONE_UK_NC00122287_Mise en page 1 06/12/13 15:36 PageC1 EN 1 2 3 4 5 6 7 8 9 Réf. NC00122287 12/2013 ESPACE GRAPHIQUE User Guide www.tefal.com 12 13 * Depending on model. 10 11 TE_FRYERS_FILTRA-ONE_UK_NC00122287_Mise
mini kettle Model # Operating Instructions Warranty 650 Watts / 120 V / 60 Hz
 mini kettle Model #280.01 Operating Instructions Warranty 650 Watts / 120 V / 60 Hz Read this manual thoroughly before using and save it for future reference IMPORTANT SAFEGUARDS When using electrical
Contents. AFTER SALES SUPPORT CYD-60A-U /
 Contents 03 Introduction 04 General Information and Safety Instructions 06 Assembly and Parts List 07 Getting Started 08 Features 09 Instructions 11 Recipes 14 Helpful Hints 15 Other Useful Information
FOOD STEAMER. HY- 4401DS V~ 50/60Hz 800W HOME ESSENTIALS LIVE COMFORTABLE HOUSEHOLD USE ONLY
 FOOD STEAMER Max PROG O/I HOUSEHOLD USE ONLY Shenzhen Impression E-commerce Co.,Ltd Booth No.3H012, Trading Plaza, No.5, Huanan city, Pinghu Street, Longgang District, Shenzhen, China Facebook Page: https//www.facebook.com/aicoks/
Induction Cooktop with 12 Grill Pan
 SIMPLY MING Induction Cooktop with 12 Grill Pan INSTRUCTION MANUAL IMPORTANT SAFEGUARDS When using this electrical appliance, safety precautions must always be observed, including the following: READ ALL
Dual Tank Deep Fryer. Use and Care Instructions. Double Capacity Twice the Power Easy Cleanup
 Use and Care Instructions Dual Tank Deep Fryer Double Capacity Twice the Power Easy Cleanup 1. Removable 1700Watt X 2 dual elements heat oil faster and recover to cooking temperature sooner 2. Both 3.0
IMPORTANT SAFEGUARDS SAVE THESE INSTRUCTIONS
 IMPORTANT SAFEGUARDS When using electrical appliances especially when children are present, basic safety precautions should always be followed to reduce the risk of fire, electric shock, and/or injury
Stay or Go TM. Slow Cooker
 Stay or Go TM Slow Cooker This product is intended for household use only. This product is only intended for the preparation, cooking, and serving of foods. This product is not intended for use with any
DIGITAL DOUBLE DEEP FRYER
 DIGITAL DOUBLE DEEP FRYER Customer Service: 1-800-423-4248 Printed in China Digital Double Deep Fryer ITEM NO.8387SI. The Sharper Image name and logo are registered trademarks. Manufactured and Marketed
INSTRUCTIONS MANUAL. 1.8L Electric Kettle with Multi-Temp Feature SK-1800R (Red) SK-1800SS (Stainless Steel)
 SK-1800SS (Stainless Steel)") INSTRUCTIONS MANUAL 1.8L Electric Kettle with Multi-Temp Feature SK-1800R (Red) SK-1800SS (Stainless Steel) NAME OF COMPONENTS CONTROL PANEL Temperature selection indicators Display panel Boil button Temperature
INSTRUCTIONS MANUAL 1.8L Electric Kettle with Multi-Temp Feature SK-1800R (Red) SK-1800SS (Stainless Steel) NAME OF COMPONENTS CONTROL PANEL Temperature selection indicators Display panel Boil button Temperature
USER S MANUAL DIGITAL AIR FRYER DAF-530D-2
 USER S MANUAL DIGITAL AIR FRYER DAF-530D-2 Introduction Thank you for purchasing Kitchen Couture Air Fryer. The Kitchen Couture Air Fryer evenly circulates hot air rapidly around food. The Kitchen Couture
PRESSURE COOKER. Model# GPC-655 Model# GPC-855 USER MANUAL
 PRESSURE COOKER Model# GPC-655 Model# GPC-855 USER MANUAL Read this manual thoroughly before using and save it for future reference FOR CUSTOMER SERVICE QUESTIONS OR COMMENTS VISIT US @ GOURMIA.COM INFO@GOURMIA.COM
Professional 8 Liter Deep Fryer
 Professional 8 Liter Deep Fryer OWNER S MANUAL Model F1100H 120V., 60Hz., 1800 Watts EURO-PRO Operating LLC 94 Main Mill Street, Door 16 Plattsburgh, NY 12901 Tel.: 1 (800) 798-7398 IMPORTANT SAFETY INSTRUCTIONS
WEST BEND DEEP FRYER L 5179
 WEST BEND DEEP FRYER L 5179 TO PREVENT PERSONAL INJURY OR PROPERTY DAMAGE, READ AND FOLLOW THE INSTRUCTIONS AND WARNINGS IN THIS CARE AND USE INSTRUCTION MANUAL. Register this and other West Bend products
CLEAr view TOASTER. unprocess your food. Visit us at bydash.com. Instruction manual & recipe IDEAS MODEL DVTS501. page title bydash.
 CLEAr view TOASTER unprocess your food Visit us at bydash.com Instruction manual & recipe IDEAS MODEL DVTS501 page title bydash.com 1 TABLE OF CONTENTS CLEAr view TOASTER Safety Guidelines... 4-5 Parts
AUTO SPEED BLENDER INSTRUCTION MANUAL MODEL: BLCLMB1
 AUTO SPEED BLENDER INSTRUCTION MANUAL MODEL: BLCLMB1 1 TABLE OF CONTENTS IMPORTANT SAFEGUARDS 3 POLARIZED PLUG 4 PRODUCT DIAGRAM 5 USAGE INSTRUCTIONS PREPARING YOUR AUTO SPEED BLENDER FOR USE 6 HOW TO
IMPORTANT SAFEGUARDS SAVE THESE INSTRUCTIONS
 1 2 IMPORTANT SAFEGUARDS When using electrical appliances especially when children are present, basic safety precautions should always be followed to reduce the risk of fire, electric shock, and/or injury
20 INCH ELECTRIC GRIDDLE
 20 INCH ELECTRIC GRIDDLE USER GUIDE Now that you have purchased a Chefman product you can rest assured in the knowledge that as well as your 3-year parts and labor warranty you have the added peace of
RJ11-17-TI CORDLESS GLASS ELECTRIC KETTLE. CUSTOMER SERVICE:
 RJ11-17-TI CORDLESS GLASS ELECTRIC KETTLE CUSTOMER SERVICE: 888.315.6553 customerservice@chefman.com 1 READ ALL INSTRUCTIONS BEFORE USE For your safety and continued enjoyment of this product, always read
WEST BEND DEEP FRYER L 5181
 WEST BEND DEEP FRYER L 5181 TO PREVENT PERSONAL INJURY OR PROPERTY DAMAGE, READ AND FOLLOW THE INSTRUCTIONS AND WARNINGS IN THIS CARE AND USE INSTRUCTION MANUAL. Register this and other West Bend products
GCZNAF Manual Air Fryer. Instruction Manual Model Ref: GCZNAF1501
 GCZNAF1501 22072016 Manual Air Fryer Instruction Manual Model Ref: GCZNAF1501 Introduction Thank you for choosing the Cucina by Giani Manual Air Fryer. All products brought to you by Giani are manufactured
BV382510V 1.0 L gooseneck variable electrical kettle
 BV382510V 1.0 L gooseneck variable electrical kettle Customer assistant line: USA 1-855- 664-1252 Features: Displays Kettle temperature in Fahrenheit or Celsius Displays actual Water Temperature in Kettle
3 Litre Fryer v2.0. Model: SD6040N. Helpline. SD6040N_IM.indd 1 28/10/ :44
 3 Litre Fryer Model: SD6040N Helpline 01733 404703 v2.0 SD6040N_IM.indd 1 28/10/2014 08:44 IMPORTANT INFORMATION - RETAIN FOR FUTURE USE When using any electrical appliance, basic safety precautions should
H I F J J K E A B C D G
 Fry delight XL EN H I F J J K E A B C D G FITTING THE PAN IN THE APPLIANCE 1 2 3 4 5 4 SAFETY INSTRUCTIONS Important recommendations The appliance can be used up to an altitude of 2000 m. This appliance
5L STAINLESS STEEL SLOW COOKER
 5L STAINLESS STEEL SLOW COOKER PL390 Instruction Manual IMPORTANT SAFETY INSTRUCTIONS READ CAREFULLY AND KEEP FOR FUTURE REFERENCE Carefully read this manual before using this appliance. Ensure that you
1.7L KETTLE INSTRUCTION MANUAL 220~240V 2200W
 1.7L KETTLE INSTRUCTION MANUAL 220~240V 2200W WHKE01 2200W CONTENTS SAFETY INFORMATION Important Safety Instructions......................... 1-2 Electrical Requirements................................