FSG 85 B1. Chain Sharpener Translation of original operation manual
|
|
|
- Elmer Phillips
- 6 years ago
- Views:
Transcription

1 FSG 85 B1 Chain Sharpener Translation of original operation manual 6
2 Before reading, unfold the page containing the illustrations and familiarise yourself with all functions of the device. GB / Translation of original operation manual Page 5


3


4 14a 14b a 6b a 18b 3
5 Content Safety Instructions...5 Safety instructions / symbols on the equipment...5 Symbols in the manual...6 General safety instructions...6 Further Safety Instructions...7 General description...8 Summary...8 Function description...9 Intended use...9 Initial operation...9 Scope of delivery...9 Installation...9 Working with the equipment...10 Switching on and off...10 Sharpening the saw chain Maintenance and cleaning...12 Cleaning...12 Changing the grinding disk...12 Storage...13 Waste disposal and environmental protection...13 Guarantee...13 Technical specifications...14 Replacement parts...15 Translation of the original EC declaration of conformity...16 Grizzly Service-Center...16 Exploded Drawing...17 WARNING! When using power tools, observe the following basic safety measures for the prevention of electric shocks and the risk of injury and fire. Read all of these instructions before using this power tool and keep the safety instructions in a safe place. Pass on the instructions to any subsequent user, so that the information is available at all times. Safety Instructions This section concerns the basic safety regulations for working with the electric chain sharpener. Safety instructions / symbols on the equipment Warning! Risk of injury from the rotating tool! Keep hands away. Risk of electric shock! Disconnect from the mains before carrying out maintenance and repair work. Do not expose the unit to rain. Read and observe the operating instructions pertaining to the equipment. Risk of injury! Wear ear, eye and hand protection! Wear breathing protection. Risk of cuts! Wear cut-resistant gloves Safety class II Do not dispose of electrical equipment in household waste. 5
6 Symbols in the manual Warning symbols with information on damage and injury prevention. Instruction symbols (the instruction is explained at the place of the exclamation mark) with information on preventing damage. Help symbols with information on improving tool handling. General safety instructions This equipment is not intended for use by people (including children) with limited physical, sensory or intellectual ability or with a lack of experience and/or knowledge, other than under supervision by a person who is responsible for their safety or having been instructed by the same in how to use the equipment. Children must be supervised in order to ensure that they do not play with the equipment. For reasons of safety, children and young people under the age of 16 and people who are unfamiliar with the operating instructions are not permitted to use the equipment. Safe operation: Keep work area clear. Cluttered areas and benches invite injuries. Consider work area environment. - Do not expose tools to rain. - Do not use tools in damp or wet locations. - Keep work area well lit. - Do not use tools in the presence of flammable liquids or gases. Guard against electric shock. Avoid body contact with earthed or grounded surfaces (e.g. pipes, radiators, ranges, refrigerators). Keep other persons away. Do not let persons, especially children, not involved in the work touch the tool or the extension cord and keep them away from the work area. Store idle tools. When not in use, tools should be stored in a dry locked-up place, out of reach of children. Do not force the tool. It will do the job better and safer at the rate for which it was intended. Use the right tool. - Do not force small tools to do the job of a heavy duty tool. - Do not use tools for purposes not intended; for example do not use circular saws to cut tree limbs or logs. Dress properly. - Do not wear loose clothing or jewellery, they can be caught in moving parts. - Non-skid footwear is recommended when working outdoors. - Wear protective hair covering to contain long hair. Use protective equipment. - Use safety glasses. - Use face or dust mask if working operations create dust. Connect dust extraction equipment. If the tool is provided for the connection of dust extraction and collecting equipment, ensure these are connected and properly used. Do not abuse the cord. Never yank the cord do disconnect it 6
7 from the socket. Keep the cord away from heat, oil and sham edges. Secure work. Where possible use clamps or a vice to hold the work. It is safer than using your hand. Do not overreach. Keep proper footing and balance at all times. Maintain tools with care. - Keep cutting tools sharp and clean for better and safer performance. - Follow instruction for lubricating and changing accessories. - Inspect tool cords periodically and if damaged have them repaired by an authorized service facility. - Inspect extension cords periodically and replace if damaged. - Keep handles dry, clean and free from oil and grease. Disconnect tools. When not in use, before servicing and when changing accessories such as blades, bits and cutters, disconnect tools from the power supply. Remove adjusting keys and wrenches. Form the habit of checking to see that keys and adjusting wrenches are removed from the tool before turning it on. Avoid unintentional starting. Ensure switch is in off position when plugging in. Use outdoor extension leads. When the tool is used outdoors, use only extension cords intended for outdoor use and so marked. Stay alert. Watch what you are doing, use common sense and do not operate the tool when you are tired. Check damaged parts. - Before further use of tool, it should be carefully checked to determine that it will operate properly and perform its intended function. - Check for alignment of moving parts, binding of moving parts, breakage of parts, mounting and any other conditions that may affect its operation. - A guard or other part that is damaged should be properly repaired or replaced by an authorized service centre unless otherwise indicated in this instruction manual. - Have defective switches replaced by an authorized service centre. - Do not use the tool if the switch does not turn it on and off. Warning. The use of any accessory or attachment other than one recommended in this instruction manual may present a risk of personal injury. Have your tool repaired by a qualified person. This electric tool complies with the relevant safety rules. Repairs should only be carried out by qualified persons using original spare parts, otherwise this may result in considerable danger to the user. If the supply cord of this power tool is damaged, it must be replaced by a specially prepared cord available through the service organization. Further Safety Instructions Connect the device only to a power point with a residual current protective device (RCD) with a measured residual current of not more than 30 ma. Keep the mains cable and extension cable away from the grinding disk and 7
8 saw chain. In the event that it is damaged or severed, immediately disconnect the plug from the socket. Do not touch the cable before it has been disconnected from the mains. Before use, carry out a visual inspection of the grinding disk. Do not use grinding disks that are spalled, cracked or otherwise damaged. Replace a worn grinding disk. Never operate the device without the visual protection disk. Do not work with the device if you are tired or after the consumption of alcohol or tablets. Always take a break from the work in good time. Do not use the device in an explosive atmosphere or where sparks could cause fire, explosion etc. Failure to observe this will result in a risk of fire or explosion. Keep your hands away from the grinding disk and chain teeth when the device is in use. Do not move the chain by hand. This will cause a risk of injury. Never place your fingers between the grinding disk and rotary disk or between the grinding disk and protection disk. This will cause a risk of crushing. The chain becomes hot during grinding. Do not touch the machined location, as there is a risk of being burnt. Use only grinding disks recommended by the manufacturer. Do not use saw blades. Switch off the device and disconnect at the plug - to release a jammed insertion tool, - if the connecting cable is damaged or tangled, - in the case of unusual noises. General description Summary The diagrams can be found on the front flap. 1 On / off switch 2 Grinding head 3 Grinding disk cover 4 Handle 5 Fixing screws for grinding disk cover 6 Adjusting screw and adjusting nut for depth stopper 7 Guide rail 8 Grinding plinth 9 Stop notches 10 Locking screw for chain clamping unit 11 Scale for rake angle (+30 to -30 ) 12 Chain clamping unit and rotary disk 13 Chain tensioning and clamping lever 14 Chain feed adjusting screw and adjusting nut 15 Stopper 16 Cable hook (not shown) 17 Mains cable 18 Grinding disk and grinding disk nut (not shown) 19 Fixing screws for the protective screen 20 Protective screen 21 Ventilation openings (not shown) 8
9 Function description Prior to first starting the appliance, firmly mount it on a worktop. It is driven by an electric motor with protection against overheating and restart for added safety. The rake angle is easily adjustable between -30 and +30 using a rotary disk. The chain guide rail has a variably adjustable stopper. To sharpen, swivel the grinding head. The equipment is fitted with a protective screen in order to protect the user. For the function of the operating parts, please refer to the descriptions below. Intended use The chain sharpener is suitable for sharpening the standard saw chain types. The equipment is not designed for any other type of application (e.g. grinding with a coolant liquid, grinding other work pieces or materials such as asbestos, which are hazardous to health). The equipment is intended for use in the field of DIY. It is not designed for commercial use. The equipment is designed for use by adults. Young people under the age of 16 are permitted to use the equipment only under supervision. The manufacturer shall not be liable for damages caused by use other than for the intended purpose or by incorrect operation. Initial operation Scope of delivery Unpack the equipment and check that it is complete: Chain sharpener with grinding disk installed Handle Chain clamping unit and locking screw Adjusting screw and nut Two screws, nuts and washers for mounting on the worktop Dispose of the packaging material correctly. Installation Always use the M10x70 screws from the package to mount the unit. Make sure to leave enough room for working and that nobody else is put at risk. Always use screws of sufficient length and thickness to mount the device on the work surface, in order to prevent loss of control of the device. Installing the appliance: Thickness of the table edge: mm. Drill diameter: 10.5 mm. Size of screw: M10 1. Use the stop notches (9) to correctly place the appliance on the worktop (22). Make sure that the grinding plinth (8) protrudes beyond the edge of the table. 2. Use a pen to mark the drill holes and remove the appliance. 3. Drill two holes into the worktop (22). 4. Use the screws (23) and nuts 9
10 (24) from the package to attach the grinding plinth to the worktop. Assembling the grinder: 5. Screw the handle (4) into the grinding head (2). 6. Remove the locking screw (10) from the chain clamping unit (12). 7. Place the chain clamping unit (12) on the grinding plinth (8) and fix it using the locking screw (10). 8. Snap the mains lead (17) into the cable hook (16). Screwing on the adjusting screw: 9. Press the nut (25) from the package into the recess in the grinding head (2) and screw on the adjusting screw (6) to the grinding head. Working with the equipment Caution! Use only grinding disks and accessories recommended by the manufacturer. The use of other insertion tools and other accessories may cause risk of injury. Never operate the device without the visual protection disk. Do not use saw blades. Check the grinding disk before use: check the distance between the protective screen and the grinding disk. Do not use broken, cracked or otherwise damaged grinding disks. Switch on the equipment only when it is safely installed on the work surface. There is a risk of injury. Risk of injury! Wear ear, eye and hand protection! When working with the saw chain, wear cut resistant gloves and an apron if necessary, to avoid incision injuries. Keep hands away from the grinding disk and chain teeth when the equipment is in use. Do not move the chain by hand. There is a risk of injury. Switching on and off Ensure that the mains voltage matches the specifications on the rating plate. Connect the equipment to the mains. 1. To switch on, press the on/off switch ( I position); the equipment starts up (see 1). 2. To switch off, press the on/off switch ( 0 position); the equipment switches off (see 1). The disk will continue to run after the equipment is switched off. There is a risk of injury. Protection against overheating and restart: The unit will not automatically restart following an automatic cutout due to overload. To restart the grinder, press the On/Off switch ( I position). The unit will start (see 1). 10

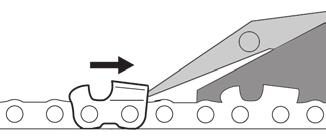
11 Test run: Before starting work and after each change of grinding disk, carry out a test run of at least 30 seconds with no load. Switch off the equipment immediately if the disk runs lumpy, substantial vibrations occur, or abnormal noises are generated. Sharpening the saw chain When working with the saw chain, keep clean the ventilation openings (see Maintenance and cleaning ). An incorrectly sharpened saw chain may damage the chain the increase the risk of the saw jumping back. Ensure that the chain is aligned accurately. Observe the correct rake angle and minimum dimensions of the saw chain. Remove as little material as possible. Do not grind in drive (a) or connecting (b) links, otherwise the saw chain may rupture. In the event of non-observance, there is a risk of accidents when handling the chainsaw. Instructions for sharpening Clean the saw chain before you sharpen it. Use a brush or cloth to remove oily wood chips or residual oil. After sharpening, all cutting links must be of equal length and width. The chain is worn and must be replaced with a new saw chain if only approx. 4 mm of cutting tooth remain. Inserting the saw chain: 1. To open the chain guide, turn the clamping lever (13) anticlockwise. You must first return the clamping lever to its home position several times. The clamping lever unlocks by pulling it outward, returning it to the home position and allowing it to snap back in. 2. Place the saw chain in the chain guide (7). Ensure that the cutting edges face the grinding disk (18). 3. Flap down the chain stop (15) and pull the saw chain back until the cutting tooth (27) to be sharpened contacts the stop (see figure ). Adjusting the sharpening angle: 4. Loosen the locking screw (10) and use the scale (11) on the rotary disk of the chain clamping unit (12) to set the correct sharpening angle α. Tighten the locking screw. Adjusting the stop: 5. Turn off the motor and pull down the grinding head (2) by the handle (4). 6. Turn the chain feed adjusting screw (14a) to move the cutting tooth (27) towards the grinding disk (18) until they make contact (see figure ). Tighten the adjusting nut (14b) to lock the adjusting screw (14a). 7. Turn the clamping lever (13) clockwise to tighten the chain links in the chain guide (7) (see 1.). 8. Turn the adjusting screw (6a) to set the depth stopper such that the grinding disk (18) contacts the tooth root (see figure ). Tighten the adjusting nut (6b) to set the grinding depth. 11
12 Sharpen: 9. Switch on the equipment (see switching on and off ). 10. By putting gentle pressure on the handle (4), move the grinding head (2) upwards and sharpen the cutting tooth. Do not allow the grinding disk (18) to slow down to standstill. This is prevented by reducing the pressing force early enough. 11. Switch off the equipment to move the chain onwards. Loosen the clamping lever (13) and tighten the next chain link to be sharpened in the chain guide (7) using the adjusted chain stop (15) and the clamping lever. Start by sharpening the teeth on one side of the chain. Then adjust the rake angle and sharpen the teeth on the other side. Check the depth limiter distance (see image ): The cutting links, which comprise a cutting tooth (27) and a depth limiter lug (28), are the sawing parts of the chain. The height distance between these two is determined by depth limiter distance A. 1. After every third sharpening process, check depth limiter distance A against the saw chain manufacturer s specifications. 2. Use a flat file to file down the height of the depth limiter lug (28) and, after resetting, round off the depth limiter lug a little. The original shape must remain intact. Maintenance and cleaning Disconnect the plug before adjustment, maintenance or repair. Have any work not described in these instructions carried out by a specialist workshop. Use only original components. Allow the equipment to cool before carrying out any maintenance and cleaning work. There is a risk of burns. Before each use, check the equipment for obvious defects such as loose, worn or damaged components and check that screws or other parts are sitting correctly. In particular, check the grinding disk ( 18). Replace damaged parts. Cleaning Do not use cleaning agents or solvents. Chemical substances may attack plastic parts of the equipment. Never clean the equipment under running water. Clean the equipment thoroughly after each use. Clean the ventilation openings ( 21) and the surface of the equipment with a brush or cloth. Changing the grinding disk Instructions for changing: Never operate the equipment without the protective screen ( 20). Ensure that the rotation speed specified on the grinding disk ( 18) is equal to or greater than the idle-running speed of the equipment. 12
13 Ensure that the disk dimensions fit the equipment. Use only fault-free grinding disks (ring test). If the locator hole in a grinding disk is too small, do not subsequently redrill in order to increase the size. Do not use separated reduction bushes or adapters in order to make a grinding disk fit where the hole is too large. Do not use saw blades. Reassemble the equipment fully after changing the grinding disk. Switch off the equipment and disconnect from the mains. Allow the equipment to cool. 1. Unscrew the grinding disk cover (3). 2. Remove the grinding disk nut (18b) by hand. 3. Take the grinding disk (18a) off the adapter. 4. Place a new grinding disk on the adapter and tighten the grinding disk nut by hand. 5. Put the grinding disk cover (3) back on. Do not tighten the grinding disk nut too much because this may cause the grinding disk and nut to break. 6. Test run: Before starting work and after each change of grinding disk, carry out a test run of at least 30 seconds with no load. Switch off the equipment immediately if the disk runs lumpy, substantial vibrations occur or abnormal noises are generated. Storage Store the appliance in a dry place well out of reach of children. Grinding disks must be stored dry and upright and are not to be stacked. Waste disposal and environmental protection Be environmentally friendly. Return the tool, accessories and packaging to a recycling centre when you have finished with them. Machines are not to be place with domestic waste. Hand over the device at an utilization location. The plastic and metal parts employed can be separated out into pure materials and recycling can be implemented. Ask your Service Center about this. Defective units returned to us will be disposed of for free. Guarantee This appliance has a 36-month guarantee; a shorter 12-month guarantee applies if the appliance is to be used for commercial purposes or for replacement appliances according to statutory regulations. Justified guarantee claims should be reported to our Service Centre (see page 16 for telephone & fax no.s, and address). Our Service Team will tell you more about our complaints handling procedure. Damage due to natural wear and tear, overload or incorrect use is excluded 13
14 from the guarantee. Certain components are subject to normal wear and tear and are excluded from the guarantee. These include in particular: Grinding disks, carbon brushes, stopper, protective screen. Furthermore, the prerequisite for guarantee services is that the references indicated in the operating instructions regarding cleaning and maintenance have been adhered to. Damage, which has been caused from material or manufacturing faults, will be made good free of charge, by replacement delivery or repair. This requires that the appliance is returned to our service center undismantled and with proof of purchase and guarantee. Repairs, which are not covered by the guarantee, can be carried out for charge by our service center. Our service center will be glad to provide you with a cost estimate. We can only process devices which have been packaged sufficiently and which have been dispatched with correct stamping. Note: In case of complaint or service, please deliver your device cleaned, and with an indication of the defect, to our service address. Devices sent in freight collect - by bulk freight, express or with other special freight - are not accepted. If you have a justified guarantee claim, please contact our service centre by telephone, which will then advise you on how the claim will be processed. Defective units returned to us will be disposed of for free. Technical specifications Chain sharpener... FSG 85 B1 Nominal input voltage...230v~, 50 Hz Power consumption...85 W (S2:15 min)** Rated resting period...ca. 5 min Safety class... II Mechanical rating...ip 20 Idle-running speed min -1 Disk speed... max. 50 m/s* Adjustment angle left / right Grinding disk dimensions... Ø 104 mm diameter of bore...22 mm Weight kg Sound pressure level (L pa )...83 db(a); K pa =3 db(a) Sound power level (L wa ) measured...96 db(a); K wa =3 db(a) guaranteed db(a) Vibration (a n ) m/s 2, K=1.5 m/s 2 * The grinding disk must be able to withstand a circulation speed of 50 m/s. ** Short-time duty: Do not run the unit for more than 15 minutes at a time. The stated vibration emission value was measured in accordance with a standard testing procedure and may be used to compare one power tool to another. The stated vibration emission value may also be used for a preliminary exposure assessment. Warning: The vibration emission value may differ during actual use of the power tool from the stated value depending on the manner in which the power tool is used. Safety precautions aimed at protecting the user should be based 14
15 on estimated exposure under actual usage conditions (all parts of the operating cycle are to be considered, including, for example, times during which the power tool is turned off and times when the tool is turned on but is running idle). Technical and optical changes may be undertaken in the course of further development without notice. All dimensions, references and information in this instruction manual are therefore not guaranteed. Legal claims made on the basis of the instruction manual can therefore not be considered as valid. Replacement parts The following replacement parts can be ordered from the Grizzly Service Centre (see address on page 16). When placing an order, please specify the machine type and the number of the replacement part. Grinding disk If other replacement parts are required, please refer to the exploded drawing for the part number. 15
16 Translation of the original EC declaration of conformity We hereby confirm that the FSG 85 B1 series Chain sharpener (serial number ) conforms with the following applicable relevant version of the EU guidelines: 2006/42/EC 2004/108/EC In order to guarantee consistency, the following harmonised standards as well as national standards and stipulations have been applied: EN :2010 EN :2009+A11:2010 EN :2006 EN :1997+A1:2001+A2:2008 EN :2006+A1:2009+A2:2009 EN :2008 Grizzly Gartengeräte GmbH & Co. KG Am Gewerbepark Groß-Umstadt Andreas Gröschl (Technical Manager and Documentation Representative) Grizzly Service-Center DES UK Ltd. Unit B7 Oxford Street Industrial Park Vulcan Road Bilston, West Midlands WV14 7LF Tel: Fax: grizzly@deslimited.com For Irish customers: Tel.: Fax:
17 Exploded Drawing informative rev02-gs 17
18 IAN Grizzly Gartengeräte GmbH & Co. KG Am Gewerbepark 2 D Groß-Umstadt 6 Last Information Update: 03 / 2011 Ident.-No.:
PATIO CLEANER PPC 30 PATIO CLEANER. Translation of original operation manual
 PATIO CLEANER PPC 30 PATIO CLEANER Translation of original operation manual 6 Before reading, unfold the page containing the illustrations and familiarise yourself with all functions of the device. GB
FHA 1100 A1 Domestic Water Pump
 FHA 1100 A1 Domestic Water Pump Translation of original operation manual 6 Before reading, unfold the page containing the illustrations and familiarise yourself with all functions of the device. / Translation
ENGLISH (Original instructions) INSTRUCTION MANUAL. Power Mixer UT2204 DOUBLE INSULATION. IMPORTANT: Read Before Using.
 INSTRUCTION MANUAL. Power Mixer UT2204 DOUBLE INSULATION. IMPORTANT: Read Before Using.") ENGLISH (Original instructions) INSTRUCTION MANUAL Power Mixer UT04 0078 DOUBLE INSULATION IMPORTANT: Read Before Using. ENGLISH (Original instructions) SPECIFICATIONS Model UT04 No load speed (min - )
ENGLISH (Original instructions) INSTRUCTION MANUAL Power Mixer UT04 0078 DOUBLE INSULATION IMPORTANT: Read Before Using. ENGLISH (Original instructions) SPECIFICATIONS Model UT04 No load speed (min - )
Drywall Screwdriver R INSTRUCTION MANUAL
 ENGLISH (Original instructions) INSTRUCTION MANUAL Drywall Screwdriver 6823 6824 6825 6825R 002604 DOUBLE INSULATION WARNING: For your personal safety, READ and UNDERSTAND before using. SAVE THESE INSTRUCTIONS
Blower UB1100 UB1101 INSTRUCTION MANUAL
 ENGLISH (Original instructions) INSTRUCTION MANUAL Blower UB00 UB0 004752 DOUBLE INSULATION WARNING: For your personal safety, READ and UNDERSTAND before using. SAVE THESE INSTRUCTIONS FOR FUTURE REFERENCE.
Safety Warnings. Work area safety. Electrical Safety. Personal Safety
 Table of Contents Safety Warnings...2 Work area safety...2 Electrical Safety...2 Personal Safety...2 Power tool use and care...3 Service...3 Hammer safety warnings...3 Product Layout...4 Product Description...4
ATD /8 Electric Drill
 ATD-10538 3/8 Electric Drill Tool specifications: Rated Voltage: (V) 120 Rated Frequency: (Hz) 60 Rated current: (A) 3.3 No-load Speed: (RPM) 0-2700 Speed Selection: Yes Right/Left Rotation: Yes Chuck
Drywall Screwdriver INSTRUCTION MANUAL
 ENGLISH (Original instructions) INSTRUCTION MANUAL Drywall Screwdriver 68 00603 DOUBLE INSULATION WARNING: For your personal safety, READ and UNDERSTAND before using. SAVE THESE INSTRUCTIONS FOR FUTURE
GENERAL POWER TOOL SAFETY WARNINGS
 GENERAL POWER TOOL SAFETY WARNINGS WARNING! Read all safety warnings and all instructions. Failure to follow the warnings and instructions may result in electric shock, fire and/or serious injury. Save
DUST EXTRACTOR INSTRUCTION MANUAL. 550W (3/4 HP) INDUCTION MOTOR 1850W AUTOMATIC POWER OUTLET 65L COLLECTION BAG ø100mm X 2.
 INDUCTION MOTOR 1850W AUTOMATIC POWER OUTLET 65L COLLECTION BAG ø100mm X 2.") KNOW YOUR PRODUCT DUST EXTRACTOR 550W (3/4 HP) INDUCTION MOTOR 1850W AUTOMATIC POWER OUTLET 65L COLLECTION BAG ø100mm X 2.5M SUCTION HOSE INSTRUCTION MANUAL WARNING: Read all safety warnings and all instructions.
KNOW YOUR PRODUCT DUST EXTRACTOR 550W (3/4 HP) INDUCTION MOTOR 1850W AUTOMATIC POWER OUTLET 65L COLLECTION BAG ø100mm X 2.5M SUCTION HOSE INSTRUCTION MANUAL WARNING: Read all safety warnings and all instructions.
ENGLISH (Original instructions) INSTRUCTION MANUAL. Demolition Hammer HM0810TA DOUBLE INSULATION. IMPORTANT: Read Before Using.
 INSTRUCTION MANUAL. Demolition Hammer HM0810TA DOUBLE INSULATION. IMPORTANT: Read Before Using.") ENGLISH (Original instructions) INSTRUCTION MANUAL Demolition Hammer HM080TA 00079 DOUBLE INSULATION IMPORTANT: Read Before Using. ENGLISH (Original instructions) SPECIFICATIONS Model HM080TA Blows per
ENGLISH (Original instructions) INSTRUCTION MANUAL Demolition Hammer HM080TA 00079 DOUBLE INSULATION IMPORTANT: Read Before Using. ENGLISH (Original instructions) SPECIFICATIONS Model HM080TA Blows per
Instructions for Use. Electric Pole Hedge Trimmer Input Power Tooth gap of cutter blade 16mm
 Voltage/Frequency 230V-240V a.c./ 50Hz Input Power 450W Tooth gap of cutter blade 16mm Strokes 1,600/min Noise emission value LWA 100 db(a) Hand / arm vibration a vhw < 2.5 m /s2 Total Length 1.9m-2.5m
Accessories. Safety Warnings. Table of Contents
 Table of Contents Accessories...1 Safety Warnings...1 Work Area...2 Electrical Safety...2 Personal Safety...2 Power Tool Use and Care...3 Service...3 Hammer Safety Warnings...3 Usage...4 Changing Tools...4
SAFETY AND OPERATING MANUAL
 SAFETY AND OPERATING MANUAL Original instructions GENERAL POWER TOOL SAFETY WARNINGS WARNING: Read all safety warnings and all instructions. Failure to follow the warnings and instructions may result in
SAFETY AND OPERATING MANUAL. 450W/46cm HEDGE TRIMMER JM450PHT
 SAFETY AND OPERATING MANUAL 450W/46cm HEDGE TRIMMER JM450PHT GENERAL POWER TOOL SAFETY WARNINGS WARNING: Read all safety warnings and all instructions. Failure to follow the warnings and instructions may
hp Dust Collector With Vacuum Attachment
 Please dispose of packaging for the product in a responsible manner. It is suitable for recycling. Help to protect the environment, take the packaging to the local amenity tip and place into the appropriate
CYCLONETM ROTARY TUMBLER INSTRUCTION GUIDE
 Lyman CYCLONETM ROTARY TUMBLER INSTRUCTION GUIDE Visit our complete Lyman website at www.lymanproducts.com WARNING: This appliance is not intended for use by persons (including children) with reduced physical,
Qualcast 500W Electric Hedge Trimmer
 Qualcast 500W Electric Hedge Trimmer Assembly Manual GHT500A1 After Sales Support UK/Ireland 0344 801 0979 Web WWW.ARGOS.CO.UK Important- Please read these instructions fully before starting assembly These
CORDLESS HAND VACUUM INSTRUCTION MANUAL
 WHAT S IN THE BOX Cordless Vacuum CORDLESS HAND VACUUM INSTRUCTION MANUAL Brush Tool SPECIFICATIONS Input: Air Flow: Dust Canister Capacity: Weight: ozito.com.au 18V 8 L/sec 540ml 0.85kg Crevice Tool Mounting
SAFETY AND OPERATING MANUAL
 SAFETY AND OPERATING MANUAL Random orbit sander WX655 2 3 1 9 4 5 8 6 7 A1 A2 10B 10A B C1 C2 D 11 E F E F G H1 H2 H3 H4 H4 GENERAL POWER TOOL SAFETY WARNINGS WARNING! Read all safety warnings and all
ELECTRIC AIR PUMP 130W INSTRUCTION MANUAL SPECIFICATIONS. ozito.com.au WHAT S IN THE BOX. Electric Air Pump. 3 x Inflation Adaptors
 WHAT S IN THE BOX ELECTRIC AIR PUMP 130W INSTRUCTION MANUAL SPECIFICATIONS Voltage: 220-240V ~50Hz Power: 130W Max. Current: 0.62A Max. Pressure: 0.6PSI Flow Rate: 440L/Min Inflation Time: Under 2min (double
ENGLISH (Original instructions) INSTRUCTION MANUAL. Belt Sander DOUBLE INSULATION. IMPORTANT: Read Before Using.
 INSTRUCTION MANUAL. Belt Sander DOUBLE INSULATION. IMPORTANT: Read Before Using.") ENGLISH (Original instructions) INSTRUCTION MANUAL Belt Sander 990 99 00336 DOUBLE INSULATION IMPORTANT: Read Before Using. ENGLISH (Original instructions) SPECIFICATIONS Model 990 99 Belt size 76 mm x
ENGLISH (Original instructions) INSTRUCTION MANUAL Belt Sander 990 99 00336 DOUBLE INSULATION IMPORTANT: Read Before Using. ENGLISH (Original instructions) SPECIFICATIONS Model 990 99 Belt size 76 mm x
ORIGINAL INSTRUCTIONS. 18V ONE + Cordless Pole Pruner. RPP1820Li15 OPP1820
 ORIGINAL INSTRUCTIONS 8V ONE + Cordless Pole Pruner RPP80Li5 OPP80 Important! It is essential that you read the instructions in this manual before operating this machine. Subject to technical modifications.
TECMAF HIGH FREQUENCY GRINDERS WARRANTY: 06 (SIX) MONTHS FROM THE DATE OF SHIPMENT
 MONTHS FROM THE DATE OF SHIPMENT") SPECIFIC SAFETY RULES FOR POWER TOOLS Failure to follow all instructions listed below may result in electric shock, fire and/or serious injury. The term power tool in all of the warnings listed below refers
SPECIFIC SAFETY RULES FOR POWER TOOLS Failure to follow all instructions listed below may result in electric shock, fire and/or serious injury. The term power tool in all of the warnings listed below refers
Manual. Belt Sander BSL 115/E. ProxxonTools.com
 ProxxonTools.com Belt Sander BSL 115/E Manual 3080767 Conforms to ANSI/UL 60745-1 ANSI/UL 60745-2-4 Certified to CAN/CSA-C22.2 No. 60745-1-04 CAN/CSA-C22.2 No. 60745-2-4-04 Fig. 1 Fig. 2 Fig. 3 Fig. 4
ELECTRIC CHARCOAL STARTER
 WHAT S IN THE BOX ELECTRIC CHARCOAL STARTER 2000W INSTRUCTION MANUAL SPECIFICATIONS Power: 2000W Input: 230V~50Hz Temperature: 600 C Weight: 0.9kg ozito.com.au Electric Charcoal Starter CFS-2000 WARRANTY
GT110
 2 3 4 1 5 6 7 www.blackanddecker.com.au www.blackanddecker.co.nz GT110 4 8 A C1 2 9 B C2 Intended use Your Black & Decker hedge trimmer has been designed for trimming hedges, shrubs and brambles. This
HEDGE TRIMMER. 550W 450mm WARRANTY INSTRUCTION MANUAL SPECIFICATIONS. ozito.com.au HTE-550 WHAT S IN THE BOX
 WHAT S IN THE BOX HEDGE TRIMMER 550W 450mm INSTRUCTION MANUAL SPECIFICATIONS Input: 230-240V ~ 50Hz Motor: 550W No Load Speed: 1,400/min Blade Length: 450mm Max. Cutting Capacity: 16mm Weight: 2.9kg ozito.com.au
SPECIFICATIONS MODEL NO. OZDE1015WA
 SPECIFICATIONS MODEL NO. OZDE1015WA Motor size: Input: No load speed: Exhaust connection: Hose length: Suction capacity: Dust collection drum: Noise level: Tool Weight: 1100W 230-240V ~ 50Hz 20,000 /min
English BT3600
 www.blackanddecker.com 3 English BT3600 FIG. 1 FIG. 2 150mm BENCH GRINDER BT3600 GENERAL SAFETY RULES WARNING: Read all instructions. Failure to follow all instructions listed below may result in electric
TE 2 TE 2-M TE 2-S English
 TE 2 TE 2-M TE 2-S English 1 Information about the documentation 1.1 About this documentation Read this documentation before initial operation or use. This is a prerequisite for safe, trouble-free handling
CD400A-XE KA196-XE KA273-XE KA196E-XE Australia New Zealand
 www.blackanddecker.com.au CD400A-XE KA196-XE KA273-XE KA196E-XE Australia New Zealand CD400A-XE 1 4 3 1 2 KA196-XE/KA196E-XE 5 1 KA273-XE 4 3 2 A 3 2 4 2 B 3 4 4 3 3 4 C D 4 3 E 2 6 7 8 5 G F 10 11 9 CD400A-XE
3-1/2 Gallon Parts Washer
 3-1/2 Gallon Parts Washer Model 38347 Assembly and Operating Instructions 3491 Mission Oaks Blvd., Camarillo, CA 93011 Copyright 1998 by Harbor Freight Tools. All rights reserved. No portion of this manual
BG8SS. 8 Inch Slow Speed Bench Grinder with LED Lights Assembly & Operating Instructions
 BG8SS 8 Inch Slow Speed Bench Grinder with LED Lights Assembly & Operating Instructions READ ALL INSTRUCTIONS AND WARNINGS BEFORE USING THIS PRODUCT. SAVE THESE INSTRUCTIONS FOR FUTURE REFERENCE. This
HEDGE TRIMMER. 600W 550mm INSTRUCTION MANUAL SPECIFICATIONS. ozito.com.au HTER-600 WHAT S IN THE BOX. Hedge Trimmer. Blade Cover.
 WHAT S IN THE BOX HEDGE TRIMMER 600W 550mm INSTRUCTION MANUAL SPECIFICATIONS Input: 230-240V ~ 50Hz Motor: 600W No Load Speed: 1,400/min Blade Length: 550mm Max. Cutting Capacity: 20mm Weight: 3.15kg ozito.com.au
Electric Lawn Rake GVM-600
 Subject to change Electric Lawn Rake GVM-600 USER S MANUAL www.servotool.nl 0701-09 Art. no. VMM6001 Exploded view 2 1 4 3 4 9 5 7 8 6 Fig.1 Fig.2a 02 Gardenline Gardenline 19 Spare parts list No. Description
Ferm Bench Grinder FSMC-200/150. Art.nr Screwfix Art.nr Ferm BV P.O. Box AC Genemuiden NL
 UK Subject to change USER S MANUAL Document Ref: FSMC-200/150/14544/PMR35/issue 1/May 02 Copyright These instructions are the sole property of Ferm-Omega Tools and may not be reproduced Ferm Bench Grinder
ENGLISH (Original instructions) INSTRUCTION MANUAL. Random Orbit Sander BO5020 BO5021 DOUBLE INSULATION. IMPORTANT: Read Before Using.
 INSTRUCTION MANUAL. Random Orbit Sander BO5020 BO5021 DOUBLE INSULATION. IMPORTANT: Read Before Using.") ENGLISH (Original instructions) INSTRUCTION MANUAL Random Orbit Sander BO500 BO50 00377 DOUBLE INSULATION IMPORTANT: Read Before Using. ENGLISH (Original instructions) SPECIFICATIONS Model BO500 BO50 Pad
ENGLISH (Original instructions) INSTRUCTION MANUAL Random Orbit Sander BO500 BO50 00377 DOUBLE INSULATION IMPORTANT: Read Before Using. ENGLISH (Original instructions) SPECIFICATIONS Model BO500 BO50 Pad
Electric Blower Watt OZBL1800WA. To view the full range visit: Operation Manual 2 Year Replacement Warranty
 Electric Blower 1800 Watt Operation Manual 2 Year Replacement Warranty OZBL1800WA 0212 To view the full range visit: www.ozito.com.au SPECIFICATIONS - MODEL NO. OZBL1800WA Motor: Input: No load speed:
MULTI PURPOSE MIXER 1050W INSTRUCTION MANUAL SPECIFICATIONS. ozito.com.au DMM-080 WHAT S IN THE BOX. Multi-Purpose Mixer. Side Handle.
 WHAT S IN THE BOX MULTI PURPOSE MIXER 1050W INSTRUCTION MANUAL SPECIFICATIONS Motor: 1050W Input: 230-240V ~ 50Hz No Load Speed: 0-550/min Max. Mixing Capacity: 80L Mixing Paddle Length: 600mm Mixing Paddle
2.5MM ELECTRIC NIBBLER
 596701 2.5MM ELECTRIC NIBBLER PLEASE STORE T GENERAL SAFETY RU WARNING! FAILURE TO FOLLOW ELECTRIC SHOCK, FI LISTED HERE REFERS BATTERY-OPERATED TOOLEX INDUSTRIAL 5 1 ) Work area a) Keep work area c b)
EHG2000. ORIGINAL INSTRUCTIONS Heat Gun
 EHG2000 ORIGINAL INSTRUCTIONS Heat Gun Important! It is essential that you read the instructions in this manual before operating this machine. Subject to technical modifications. Safety SAFETY RULES WARNING
INSTRUCTION MANUAL MODEL: 690E
 1 INSTRUCTION MANUAL ALEKO Drywall Sander MODEL: 690E READ THROUGH CAREFULLY AND UNDERSTAND THESE INSTRUCTIONS BEFORE USE Visit our web site for more great products, parts and accessories: 2 3 4 5 6 Caution!
Work-Shed Vac 1100 Watt
 Work-Shed Vac 1100 Watt Operation Manual 3 Year Replacement Warranty WVG-951 To view the full range visit: www.ozito.com.au 0209 SPECIFICATIONS MODEL NO. WVG-951 Motor: Input: Max. vacuum: Hose length:
SAFETY AND OPERATING MANUAL
 SAFETY AND OPERATING MANUAL Original instructions 2 General Safety Warnings WARNING! Read all safety warnings and all instructions. Failure to follow the warnings and instructions may result in electric
Wet & Dry Bench Grinder
 Wet & Dry Bench Grinder 200/150mm Instruction Manual 3 Year Replacement Warranty OZWDBG250WA! warnings and instructions may result in electric shock, fire and/or serious injury. Save all warnings and instructions
SPECIFICATIONS FEATURES
 FEATURES Excellent for collecting the large chips which will drop into the garbage can before reaching the impeller. The filter bag filters out the remaining sawdust down to 5 microns. With the cyclone
ELECTRIC TACKER Original instructions
 ESN114 ESN530 ELECTRIC TACKER ELEKTRISCHER TACKER AGRAFEUSE ÉLECTRIQUE ELEKTRISCHE TACKER FISSATRICE ELETTRICA CLAVADORA ELÉCTRICA AGRAFADOR ELÉCTRICO ELEKTRISK HÄFTPISTOL ELEKTRISK HÆFTEPISTOL ELEKTRISK
Cable Drum Machine. Operation Manual 110ES SERIES. Cleans 1 1/4" to 3" lines up to 25'
 Cable Drum Machine Operation Manual 110ES SERIES Cleans 1 1/4" to 3" lines up to 25' Used For: Sinks, Showers &Tub Drains WARNING - Read All Instructions, When Using Electric Tools, Basic Safety Precautions
Product Code: Cordless Patio Weed Sweeper INSTRUCTION MANUAL. Please retain for reference.
 Product Code: 2036884 Cordless Patio Weed Sweeper INSTRUCTION MANUAL Please retain for reference. 1 Table of Contents: Safety Instructions 2 Product Description 3 Safety Symbols 3 Warnings 4-5 Parts breakdown
CD60RE CD60CRE CD70CRE AST2XC
 1 CD60RE CD60CRE CD70CRE AST2XC English (Original instructions) 4 2 A B C D E 3 Intended use Your Black & Decker inpact drill has been designed for drilling in wood, metal, plastics, and masonry as well
ELECTRIC BODY SAW INSTRUCTIONS. Item #31660
 ELECTRIC BODY SAW INSTRUCTIONS Item #31660 The EASTWOOD ELECTRIC BODY SAW is great for use on virtually all metals including steel, aluminum, brass and more. Cuts wood, fiberglass and other materials with
Sip Vacuum Cleaner 1400/35 Wet & Dry
 Please dispose of packaging for the product in a responsible manner. It is suitable for recycling. Help to protect the environment, take the packaging to the local amenity tip and place into the appropriate
User Manual Drywall Sander Model: BNR7231A
 User Manual Drywall Sander Model: BNR7231A - Page 1- 1. PRODUCT DESCRIPTION The machine is designed for grinding drywalls, ceilings and walls of the inner and outer surfaces, clearing the floor residues,
TE 300-AVR. English Français Español Português
 TE 300-AVR English Français Español Português en fr es pt 1 2 3 4 5 6 7 8 9 TE 300-AVR en Original operating instructions....................................... 1 fr Mode d'emploi original............................................
RSH2455G OPERATOR S MANUAL ELECTRIC QUIET CHIPPER SHREDDER
 RSH2455G ELECTRIC QUIET CHIPPER SHREDDER OPERATOR S MANUAL Important! It is essential that you read the instructions in this manual before mounting and operating this machine. Subject to technical modifications.
DIE GRINDER INSTRUCTIONS IMPORTANT: PLEASE READ THESE INSTRUCTIONS CAREFULLY TO ENSURE THE SAFE AND EFFECTIVE USE OF THIS TOOL.
 DIE GRINDER STOCK No.57842 110V 57843 230V PART No.DG528 INSTRUCTIONS IMPORTANT: PLEASE READ THESE INSTRUCTIONS CAREFULLY TO ENSURE THE SAFE AND EFFECTIVE USE OF THIS TOOL. GENERAL INFORMATION This manual
SAFETY AND OPERATING MANUAL
 SAFETY AND OPERATING MANUAL 2 General Safety Warnings WARNING: Read all safety warnings and all instructions. Failure to follow the warnings and instructions may result in electric shock, fire and/or serious
SAFETY AND OPERATING MANUAL 400W. 125mm RANDOM ORBITAL SANDER JM400ROS
 SAFETY AND OPERATING MANUAL 400W 125mm RANDOM ORBITAL SANDER JM400ROS GENERAL POWER TOOL SAFETY WARNINGS WARNING! Read all safety warnings and all instructions. Failure to follow the warnings and instructions
RCD1802. ORIGINAL INSTRUCTIONS Compact Drill Driver
 RCD1802 ORGNAL NSTRUCTONS Compact Drill Driver mportant! t is essential that you read the instructions in this manual before operating this machine. Subject to technical modifi cations. Safety GENERAL
Cordless Cut-Out Tool
 ENGLISH (Original instructions) INSTRUCTION MANUAL Cordless Cut-Out Tool DCO40 DCO80 04848 IMPORTANT: Read Before Using. ENGLISH (Original instructions) SPECIFICATIONS Model DCO40 DCO80 Collet chuck capacity
ENGLISH (Original instructions) INSTRUCTION MANUAL. Random Orbit Sander BO5040 BO5041 DOUBLE INSULATION. IMPORTANT: Read Before Using.
 INSTRUCTION MANUAL. Random Orbit Sander BO5040 BO5041 DOUBLE INSULATION. IMPORTANT: Read Before Using.") ENGLISH (Original instructions) INSTRUCTION MANUAL Random Orbit Sander BO5040 BO504 0074 DOUBLE INSULATION IMPORTANT: Read Before Using. ENGLISH (Original instructions) SPECIFICATIONS Model BO5040 BO504
ENGLISH (Original instructions) INSTRUCTION MANUAL Random Orbit Sander BO5040 BO504 0074 DOUBLE INSULATION IMPORTANT: Read Before Using. ENGLISH (Original instructions) SPECIFICATIONS Model BO5040 BO504
TE 40 TE 40-AVR English
 TE 40 TE 40-AVR English 1 Information about the documentation 1.1 About this documentation Read this documentation before initial operation or use. This is a prerequisite for safe, trouble-free handling
Leaf Blower Vac 9242 Instructions for Use
 OPERATING CONTROLS 1. Wheel 2. Blower/Suction tube 3. Blower/Vacuum body 4. Auxiliary handle 5. Hole for belt hook 6. Shoulder belt 7. Switch trigger 8. Vacuum/Blower selector lever 9. Collection Bag CONTENTS
Cable Drum Machine Operational Manual CP1020
 TOOLS FOR THE PROFESSIONAL PLUMBER TOOLS FOR THE PROFESSIONAL PLUMBER Cable Drum Machine Operational Manual CP1020 Used For: Sinks, Showers and Tub Drains Cleans 3/4" to 3" lines up to 25' (Not for roots)
ASSEMBLY AND OPERATING INSTRUCTIONS PADDLE MIXER. FOX Model F V / 110V
 ASSEMBLY AND OPERATING INSTRUCTIONS PADDLE MIXER FOX Model F7860 240V / 110V 1 Paddle Mixer FOX MODEL F7860 240V / 110V TABLE OF CONTENTS Safety instructions Page 3 Specifications Page 5 Environmental
ELECTRIC DRILL INSTRUCTIONS. Item #21285
 ELECTRIC DRILL INSTRUCTIONS Item #21285 The EASTWOOD ELECTRIC DRILL is great for use on virtually all metals including steel, aluminum, brass and more. The powerful 6.3 Amp motor and 1/2 capacity chuck
BG6UL. 6 Inch Bench Grinder Assembly & Operating Instructions
 BG6UL 6 Inch Bench Grinder Assembly & Operating Instructions READ ALL INSTRUCTIONS AND WARNINGS BEFORE USING THIS PRODUCT. SAVE THESE INSTRUCTIONS FOR FUTURE REFERENCE. This manual provides important information
150MM ELECTRIC EARTH BORER
 150MM ELECTRIC EARTH BORER MODEL NO: CEA150 PART NO: 3400997 OPERATING & MAINTENANCE INSTRUCTIONS GC0915 INTRODUCTION Thank you for purchasing this CLARKE Electric Earth Borer designed for boring holes
BENCH GRINDER WITH LIGHT AND WHEEL DRESSER MODEL NO: CBG8370L
 BENCH GRINDER WITH LIGHT AND WHEEL DRESSER MODEL NO: CBG8370L PART NO: 6500532 OPERATION & MAINTENANCE INSTRUCTIONS LS0514 INTRODUCTION Thank you for purchasing this CLARKE Bench Grinder with light and
ORIGINAL INSTRUCTIONS Cordless Hedge Trimmer RBC36X26E RHT3626DR RBC36X26E RHT3600R
 ORIGINAL INSTRUCTIONS Cordless Hedge Trimmer RBC36X6E RHT366DR RBC36X6E RHT3600R Important! It is essential that you read the instructions in this manual before assembling, operating, and maintaining the
English... 5 Čeština Slovenčina Magyarul Polski Русский... 85
 FDS 10150-A 2 English... 5 Čeština... 21 Slovenčina... 37 Magyarul... 53 Polski... 69 Русский... 85 1 FDS 10150-A 4 FDS 10150-A Contents 5 EN Screwdriver INSTRUCTION MANUAL Thank you for your purchase
SOVEREIGN W Grass Trimmer (Model: GT2317) Instruction Manual. Important - Please read these instructions fully before starting assembly
 Instruction Manual. Important - Please read these instructions fully before starting assembly") SOVEREIGN 2937573 250W Grass Trimmer (Model: GT2317) Instruction Manual After Sales Support UK/Ireland 0345 640 0800 Web www.argosspares.co.uk Important - Please read these instructions fully before starting
SOVEREIGN 2937573 250W Grass Trimmer (Model: GT2317) Instruction Manual After Sales Support UK/Ireland 0345 640 0800 Web www.argosspares.co.uk Important - Please read these instructions fully before starting
TE 2 TE 2-M TE 2-S. English Français Español Português
 TE 2 TE 2-M TE 2-S English Français Español Português en fr es pt 1 Printed: 15.12.2015 Doc-Nr: PUB / 5261122 / 000 / 00 2 3 4 5 Printed: 15.12.2015 Doc-Nr: PUB / 5261122 / 000 / 00 6 7 8 TE 2 TE 2-M TE
1 supply. Belt Sander INSTRUCTION MANUAL. y::;:,' mm (3") MODEL 9900B. Specifications. DOUBLE INS ULATlO N. Continuous. Belt speed 1.
 MODEL 9900B. Specifications. DOUBLE INS ULATlO N. Continuous. Belt speed 1.") Belt Sander 76 mm (3") MODEL 9900B INSTRUCTION MANUAL DOUBLE INS ULATlO N Specifications Belt size Belt speed rating I Continuous (Input) y::;:,' supply Power cord 76 mm x 533 mm (3") x (2") 360m /min.
Belt Sander 76 mm (3") MODEL 9900B INSTRUCTION MANUAL DOUBLE INS ULATlO N Specifications Belt size Belt speed rating I Continuous (Input) y::;:,' supply Power cord 76 mm x 533 mm (3") x (2") 360m /min.
TE 1000-AVR. English. Printed: Doc-Nr: PUB / / 000 / 04
 TE 1000-AVR English 1 Information about the documentation 1.1 About this documentation Read this documentation before initial operation or use. This is a prerequisite for safe, trouble-free handling and
Easy Rooter. Operating Instructions
 Easy Rooter Operating Instructions For 3" through 10" lines (75mm 250mm) Your Easy Rooter is designed to give you years of trouble-free, profitable service. However, no machine is better than its operator.
POWXG2042 EN 1 APPLICATION DESCRIPTION (FIG. 1 & 2) PACKAGE CONTENT LIST SYMBOLS GENERAL POWER TOOL SAFETY WARNINGS...
 PACKAGE CONTENT LIST SYMBOLS GENERAL POWER TOOL SAFETY WARNINGS...") 1 APPLICATION... 2 2 DESCRIPTION (FIG. 1 & 2)... 2 3 PACKAGE CONTENT LIST... 2 4 SYMBOLS... 3 5 GENERAL POWER TOOL SAFETY WARNINGS... 3 5.1 Work area... 3 5.2 Electrical safety... 3 5.3 Personal safety...
1 APPLICATION... 2 2 DESCRIPTION (FIG. 1 & 2)... 2 3 PACKAGE CONTENT LIST... 2 4 SYMBOLS... 3 5 GENERAL POWER TOOL SAFETY WARNINGS... 3 5.1 Work area... 3 5.2 Electrical safety... 3 5.3 Personal safety...
ASSEMBLY AND OPERATING INSTRUCTIONS 3HP DUST EXTRACTOR. FOX Model F50-843
 ASSEMBLY AND OPERATING INSTRUCTIONS 3HP DUST EXTRACTOR FOX Model F50-843 1 3hp Dust Extractor FOX MODEL F50-843 TABLE OF CONTENTS Safety instructions Page 3 Specific safety instructions for dust collectors.page
PS /2 Inch Angle Grinder Assembly & Operating Instructions READ ALL INSTRUCTIONS AND WARNINGS BEFORE USING THIS PRODUCT.
 PS07214 4 1/2 Inch Angle Grinder Assembly & Operating Instructions READ ALL INSTRUCTIONS AND WARNINGS BEFORE USING THIS PRODUCT. This manual provides important information on proper operation & maintenance.
D O U B L E A U G E R M O R TA R M I X E R OWNER S MANUAL
 D O U B L E A U G E R M O R TA R M I X E R OWNER S MANUAL WARNING: Read carefully and understand all INSTRUCTIONS before operating. Failure to follow the safety rules and other basic safety precautions
WET & DRY VACUUM 1500W 30L WARRANTY INSTRUCTION MANUAL SPECIFICATIONS. ozito.com.au VWD-1530 WHAT S IN THE BOX
 WHAT S IN THE BOX WET & DRY VACUUM 1500W 30L INSTRUCTION MANUAL SPECIFICATIONS Mains Voltage: Input Power: Suction Power Max.: Tank Capacity: IP Rating: Product weight: ozito.com.au 230 240V ~ 50Hz 1500W
BENCH GRINDER WITH LIGHT AND WHEEL DRESSER MODEL NO: CBG6250L
 BENCH GRINDER WITH LIGHT AND WHEEL DRESSER MODEL NO: CBG6250L PART NO: 6500524 OPERATION & MAINTENANCE INSTRUCTIONS LS0514 INTRODUCTION Thank you for purchasing this CLARKE Bench Grinder with light and
PLS 30 SOLDERING GUN WITH HOLDER. Operation and Safety Notes
 SOLDerING GUN WITH HOLDER PLS 30 SOLDERING GUN WITH HOLDER Operation and Safety Notes 6 Before reading, unfold the page containing the illustrations and familiarise yourself with all functions of the device.
Cable Drum Machine. Operation Manual 40 SERIES. Cleans 2" to 4" lines up to 75' N O T F O R R O O T S
 Cable Drum Machine Operation Manual 40 SERIES Cleans 2" to 4" lines up to 75' Used For: Sinks, Showers & Floor Drains N O T F O R R O O T S WARNING - Read All Instructions, When Using Electric Tools, Basic
English (Original instructions) 3
 3") KC9006 AS600 English (Original instructions) 3 A B C D 2 Intended use Your Black & Decker screwdriver has been designed for screwdriving applications. This tool is intended for consumer use only. Safety
KC9006 AS600 English (Original instructions) 3 A B C D 2 Intended use Your Black & Decker screwdriver has been designed for screwdriving applications. This tool is intended for consumer use only. Safety
SOLDERING GUN PLP 100 A1
 SOLDERING GUN PLP 100 A1 SOLDERING GUN Operation and Safety Notes 6 Before reading, unfold the page containing the illustrations and familiarise yourself with all functions of the device. GB / IE Operation
INSTRUCTIONS FOR 2kW Electric Space Heater Stock No Part No.ESH2000C GENERAL INFORMATION
 INSTRUCTIONS FOR 2kW Electric Space Heater Stock No.17775 Part No.ESH2000C IMPORTANT: PLEASE READ THESE INSTRUCTIONS CAREFULLY TO ENSURE THE SAFE AND EFFECTIVE USE OF THIS PRODUCT. GENERAL INFORMATION
Lawn Edger 1400W LWE To view the full range visit: Instruction Manual 2 Year Replacement Warranty
 Lawn Edger 1400W Instruction Manual 2 Year Replacement Warranty LWE-1400 WARNING! Read all safety warnings and all instructions. Failure to follow the warnings and instructions may result in electric shock,
Leaf mulcher Trituradora de hojas Déchiqueteuse à feuilles. Pag 07 Pag 14 Pag 22 WG430. helpline NumBEr worX (9679)
") Trituradora de hojas Déchiqueteuse à feuilles F ES Pag 07 Pag 14 Pag 22 helpline NumBEr 1-866-354-worX (9679) WG430 8 1 2 7 3 4 5 6 6 A B C a E1 E2 b F G H I J K1 K2 L1 L2 L3 L4 M1 f e d c d b M2 N a 6
Trituradora de hojas Déchiqueteuse à feuilles F ES Pag 07 Pag 14 Pag 22 helpline NumBEr 1-866-354-worX (9679) WG430 8 1 2 7 3 4 5 6 6 A B C a E1 E2 b F G H I J K1 K2 L1 L2 L3 L4 M1 f e d c d b M2 N a 6
SPECIFICATIONS - MODEL NO. RSH-100 KNOW YOUR PRODUCT. RSH-100 Manual.qxd 1/11/11 1:01 PM Page 2
 RSH-100 Manual.qxd 1/11/11 1:01 PM Page 2 SPECIFICATIONS - MODEL NO. RSH-100 Motor: Input: No load speed: Max cutting diameter: Noise level: Protection class: Weight: 2400W (S1 2000W / S6 (40%) 2400W)
Mini-Rooter Operating Instructions
 Mini-Rooter Operating Instructions For 1-1/4 through 4 lines (30mm 100mm) Your Mini-Rooter is designed to give you years of trouble-free, profitable service. However, no machine is better than its operator.
ECOMOW ELECTRIC MOWER
 WHAT S IN THE BOX ECOMOW ELECTRIC MOWER 1500W 360mm ORIGINAL INSTRUCTIONS SPECIFICATIONS Motor: No Load Speed: Cutting Width: Cutting Heights: Catcher Capacity: Weight: ozito.com.au 1500W 3,400/min 360mm
ASSEMBLY AND OPERATING INSTRUCTIONS 1HP DUST EXTRACTOR. FOX Model F50-841
 ASSEMBLY AND OPERATING INSTRUCTIONS 1HP DUST EXTRACTOR FOX Model F50-841 1 1hp Dust Extractor FOX MODEL F50-841 TABLE OF CONTENTS Safety instructions Page 3 Specific safety instructions for dust collectors.page
ECOMOW ELECTRIC MOWER
 WHAT S IN THE BOX ECOMOW ELECTRIC MOWER 1000W 305mm ORIGINAL INSTRUCTIONS SPECIFICATIONS Motor: No Load Speed: Cutting Width: Cutting Heights: Catcher Capacity: Weight: ozito.com.au 1000W 3,400/min 305mm
ECOMOW ELECTRIC MOWER
 WHAT S IN THE BOX ECOMOW ELECTRIC MOWER 1800W 420mm INSTRUCTION MANUAL SPECIFICATIONS Power: Input: No Load Speed: Cutting Diameter: Cutting Heights: Catcher Capacity: Weight: 1800W 220-240V~50/60Hz 3,200/min
WET & DRY VACUUM 1250W 12L WARRANTY INSTRUCTION MANUAL SPECIFICATIONS VWD-1212 WHAT S IN THE BOX
 WHAT S IN THE BOX WET & DRY VACUUM 1250W 12L INSTRUCTION MANUAL SPECIFICATIONS Input Power: 1250W Suction Power Max.: 140 mbar Air Flow: 27 l/s Tank Capacity: 12 l Hose Length: 1.5m Hose Diameter: 35mm
Operating Manual RS6 Pro
 Operating Manual RS6 Pro 510 HODGE, ST-LAURENT, QC H4N 2A4 TOLL FREE: 1-877-262-5801 ~ TEL.: 514-382-1140 ~ FAX: 514-382-8249 ~ www.dupliskate.com SET-UP REMOVE THE RS6 FROM THE SHIPPING SKIDS. REMOVE
POWER CUT Hedge Trimmer 46 Model No. 101HT450
 POWER CUT Hedge Trimmer 46 Model No. 101HT450 Operator s Manual To reduce the risk of injury, the user must read and understand the Operator s Manual. Keep these instructions for future reference. Introduction
High-Velocity Floor Fan
 High-Velocity Floor Fan Owner s Manual WARNING: Read carefully and understand all ASSEMBLY AND OPERATION INSTRUCTIONS before operating. Failure to follow the safety rules and other basic safety precautions