GROHE Red Duo. Design + Engineering GROHE Germany /ÄM /04.14
|
|
|
- George Garrett
- 6 years ago
- Views:
Transcription
1 GROHE Red Duo GROHE Red Duo GB D...1 I...5 N...9 GR...13 TR...17 BG...21 RO...25 GB DK NL...6 FIN...10 CZ...14 SK...18 EST...22 CN...26 F...3 S...7 PL...11 H...15 SLO...19 LV...23 RUS...27 E...4 DK...8 UAE...12 P...16 HR...20 LT...24 Design + Engineering GROHE Germany /ÄM /04.14
2 Please pass these instructions on to the end user of the fitting! I


3 max. 45mm A max. 60mm A 13mm 7 8 * Ø8 10mm 3 4 Ø min B 24mm C Ø32 31mm G 1 /2 31mm G 3 /8 24mm B II
4 GB Type approvals The GROHE Red boiling water storage heater with filter system must be installed the safety assembly with expansion vessel provided. The boiling water storage heater with filter system may only be operated together with an original GROHE Red boiling water fitting. Application The GROHE Red boiling water fitting supplies boiling water in addition to hot and cold tap water. Boiling and mixed water flows into the GROHE Red fitting through separate pipes and flows out through two separate areas of the flow straightener. The GROHE boiling water storage heater is designed to heat and store drinking water in pressurised systems. The GROHE boiling water storage heater is suitable for connection to a mains system with a maximum water pressure of 0.8 MPa. It must not be connected to hot water. The filter system measures the flow rate using a sensor and from this calculates the remaining capacity of the filter cartridge as a function of the set litre capacity. If the filter cartridge litre capacity set on the display unit is exceeded, the values are displayed as negative values. The sensor also monitors the maximum service life of the filter cartridge. If the maximum service life of 12 months is exceeded, the remaining capacity of the filter cartridge flashes. The water filtrate is classified as Category 2 according to EN If the boiling water storage heater is to be drained, the safety assembly with expansion vessel of the boiling water storage heater must be removed. Invert the boiling water storage heater and allow the water to run out. However, we strongly advise against draining the boiling water storage heater. There is a significant risk of damaging the boiling water storage heater. Technical data Electrical data boiling water storage heater: Connection: Wall socket with earth wire, protected via a 13 A fuse Voltage supply: 230 V AC / 50 Hz Power consumption: 2100 W Standby power loss (switched on): 15 W Standby power loss (switched off): 1 W Type of protection: IPX4 Filter system: Sensor battery: 3 V lithium battery (type CR 2032) Cable length: 1,500mm Display unit rating (wall installation): IPX4 Sensor rating: IPX8 Sanitary data boiling water storage heater, fitting: Boiling water storage heater capacity: 4 l Flow pressure: min. 0.1 MPa recommended MPa Operating pressure: max MPa Test pressure: 1.6 MPa Flow rate at 0.3 MPa flow pressure - Mixed water: approx. 6.8 l/min - Boiling water: approx. 3.4 l/min Boiling water temperature 99 C The actual temperature may differ slightly due to different ambient pressures Safety notes GROHE Red boiling water storage heater: This device is not intended for use by persons (including children) with physical, sensory or mental impairments or a lack of experience or knowledge in using devices of this type. Heating time from 10 C to 99 C: approx. 15 min Children must be supervised to ensure that they do Available storage heater volume at 99 C: 3 l/min not play with the device. Max. chlorine value: 100 mg/l Risk of electric shock. Avoid damaged power supply Water connection at storage heater: Cold water cable. In case of damage, the boiling water storage Water connection at fitting: Cold water from service valve heater must be replaced by the manufacturer or its Hot water from service valve customer service department or an equally qualified Boiling water from storage heater person. New Water Regulations Caution, risk of scalding! Escaping water is boiling Please ensure installation complies with New Water Regulations. It must also be installed in accordance with local bye-law hot. Never touch the end of the spout in order to swivel the spout as it becomes extremely hot. requirements. The boiling water storage heater must be connected to a permanent power supply with earth wire. Installation is only possible in frost-free rooms. Approval and conformity The boiling water storage heater is only suitable for This product conforms to the requirements of the indoor use. relevant EU guidelines. The boiling water storage heater must be placed in an upright position. The conformity declarations can be obtained from the following The boiling water storage heater and plug must not be address: directly or indirectly sprayed with water when cleaning. The boiling water storage heater must not be opened. GROHE Deutschland Vertriebs GmbH Zur Porta 9 Use only genuine replacement parts and accessories. The use of other parts will result in voiding of the warranty D Porta Westfalica and the CE identification, and could lead to injuries. 1
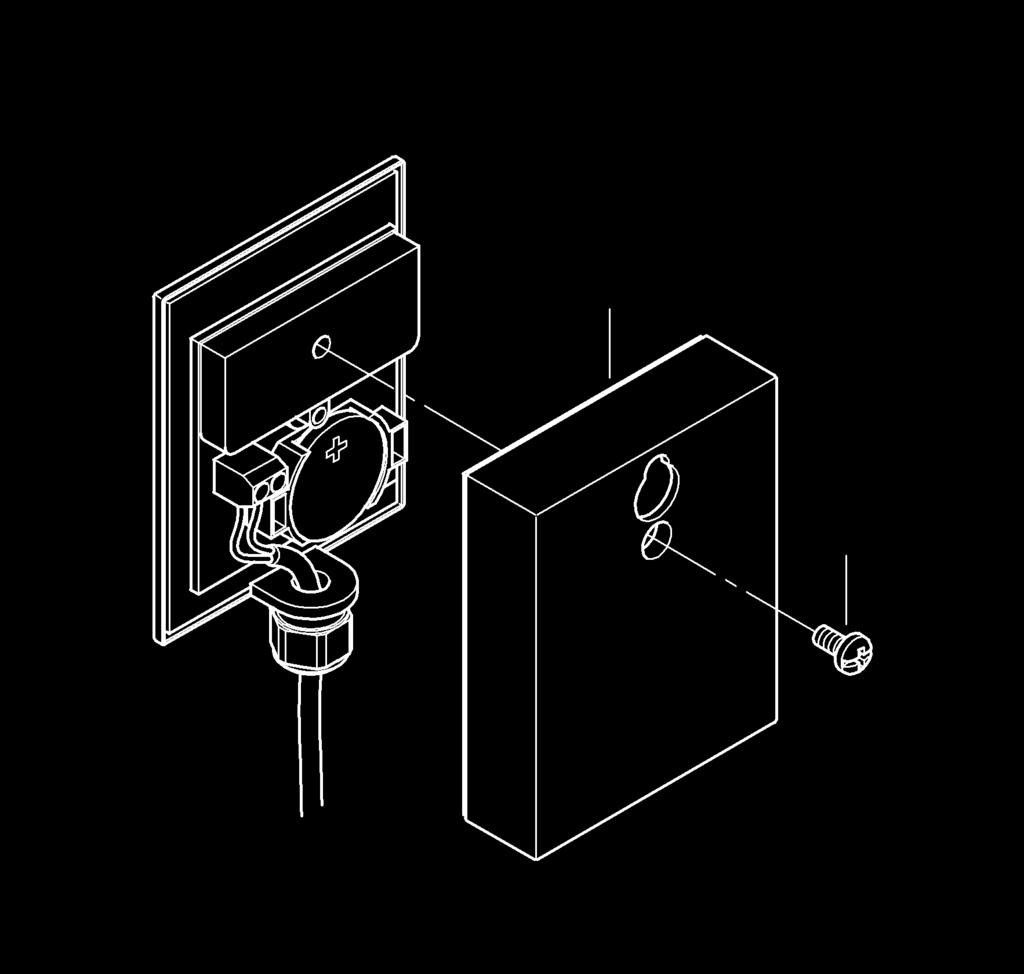
5 Electrical installation Electrical installation work must only be performed by a qualified electrician. This work must be carried out in accordance with the regulations according to IEC (corresponding to VDE 0100 Part 701) as well as all national and local regulations. Extension cables are not permitted between the electrical socket and boiling water storage heater connection. Filling storage heater with water, see Figs. [15] and [16]. 1. Pull button (O1) on handle (O) of fitting outward and turn the handle anti-clockwise, see Fig. [15]. 2. Fill the storage heater until water comes out the spout of the fitting. 3. Connect voltage supply via mains plug (P), see Fig. [16]. 4. Press and hold button (Q) on storage heater for at least 2 seconds to switch on the storage heater. The red indicator lamp (Q1) indicates that the storage heater is switched on. Installation Refer to the dimensional drawing on fold-out page I. Installing fitting, see fold-out page II, Figs. [1] and [2]. Insert fitting in sink hole. This will require leading through the hoses one at a time. Note: If there is no need to fit support plate (A), the clamping length may be increased by 15mm, see Fig. [1]. Mount safety relief valve kit to the waste pipe, see Figs. [3] to [6]. Mount wall holder, see Figs. [7] and [8]. Mount compression couplings (B) and tighten nipple, see Fig. [9]. Fix expansion vessel (C) with safety assembly to the wall holder, see Fig. [10]. Connect filter head and filter, see technical product information for the filter head and the filter cartridge and foldout page III, Fig. [11]. Note direction of flow. 1. Install pressure hose (D) to the inlet of filter head. 2. Install sensor (E) at outlet of filter head. The sensor (E) must be installed horizontally. 3. Install display unit (F). Use suitable screws and wall plugs (not included in the scope of delivery). Connect filter system, see Fig. [12]. 1. Connect adaptor (G) on the cold-water service valve. 2. Screw pressure hose (D) of filter system onto adapter (G). 3. Screw hose (H) onto sensor (E). Connect storage heater, see Figs. [2] and [13]. Install storage heater taking into consideration the available hose lengths. Do not connect voltage supply yet. Flush pipes thoroughly before and after installation (observe EN 806). 1. Connect expansion vessel (C), see Fig. [13]. 2. Screw hose (H) to expansion vessel (C). 3. Screw storage heater pressure hose (I) marked blue to expansion vessel (C) using the seals provided. 4. Connect copper pipe (not in the scope of delivery) to the Ø15mm compression connection (J) of the expansion vessel (C) and tighten. Connecting fitting, see fold-out page III, Fig. [14]. 1. Screw fitting pressure hose (K) marked blue to adapter (G). 2. Screw red marked pressure hose (L) of the fitting onto the hot-water service valve. 3. Connect the fitting pressure hose (M) marked 99 C to connection (N) on the storage heater. Open the service valve and check connections for watertightness. Important! The spout must not be fitted with any downstream resistances in the form of air bubblers (e.g. mousseurs) or components reducing flow (e.g. restrictors) as these will result in damage to the storage heater. Set water hardness at filter head, see fold-out page IV, Fig. [17]. Set water hardness at bypass setting of filter head to local conditions, see table column A on page 4. The relevant water supplier can provide information on the water hardness. The bypass value setted to the filter head must also be set on the display unit (F), see Fig. [18]. Setting the litre specification (factory setting is 600 litre), see Fig. [18]. The value for the litre specification depends on the water hardness as per table column B on page 4: Button Briefly press PROG button (PRG flashes) Briefly press RESET button to access programming for litre specification (00000 flashes) Keep pressing PROG button until required position is reached (00000 digit flashes) Keep pressing RESET button until required digit is reached (00600 digit flashes) Keep pressing PROG button to exit menu (PRG disappears and set value appears) The GROHE Red boiling water system is now fully installed and ready for operation. Display The date of installation must be noted on the maintenance sticker and affixed at a visible location on the storage heater. 2
 to draw water, see fold-out page III, Fig. [15]. Pull button (O1) on handle (O) outward and turn and hold handle (O) anti-clockwise to draw boiling water.")
![Handle (O) closes automatically. Press and hold button (Q) for at least 2 seconds to switch the storage heater on or off, see Fig. [16]. Maintenance Assemble in reverse order.](/docs-images/79/78833717/images/6-1.jpg "In the case of interventions in the mains supply or maintenance work, the GROHE Red boiling system must be bled as steam jets could otherwise occur.")

![Resetting the filter capacity at the display unit (F), see foldout page IV, Fig. [18].](/docs-images/79/78833717/images/6-3.jpg "After a new filter cartridge is inserted, the filter capacity must be reset as follows: Button Display flashing (negative litre specification, e.g. -1 or remaining capacity e.g. 150 flashing) Press RESET button for 3 seconds (reset appears) Display II.")
![Cartridge (S), see fold-out page IV, Fig. [21]. 1. Lever out plug (T) and remove set screw (U). 2. Remove lever (R) and cap (V). 3. Remove screw coupling (W) and take out cartridge (S).](/docs-images/79/78833717/images/6-4.jpg "Assemble in reverse order. When installing the cartridge (S), ensure that the seals are correctly seated. Screw in screw coupling (W) and tighten. III.")

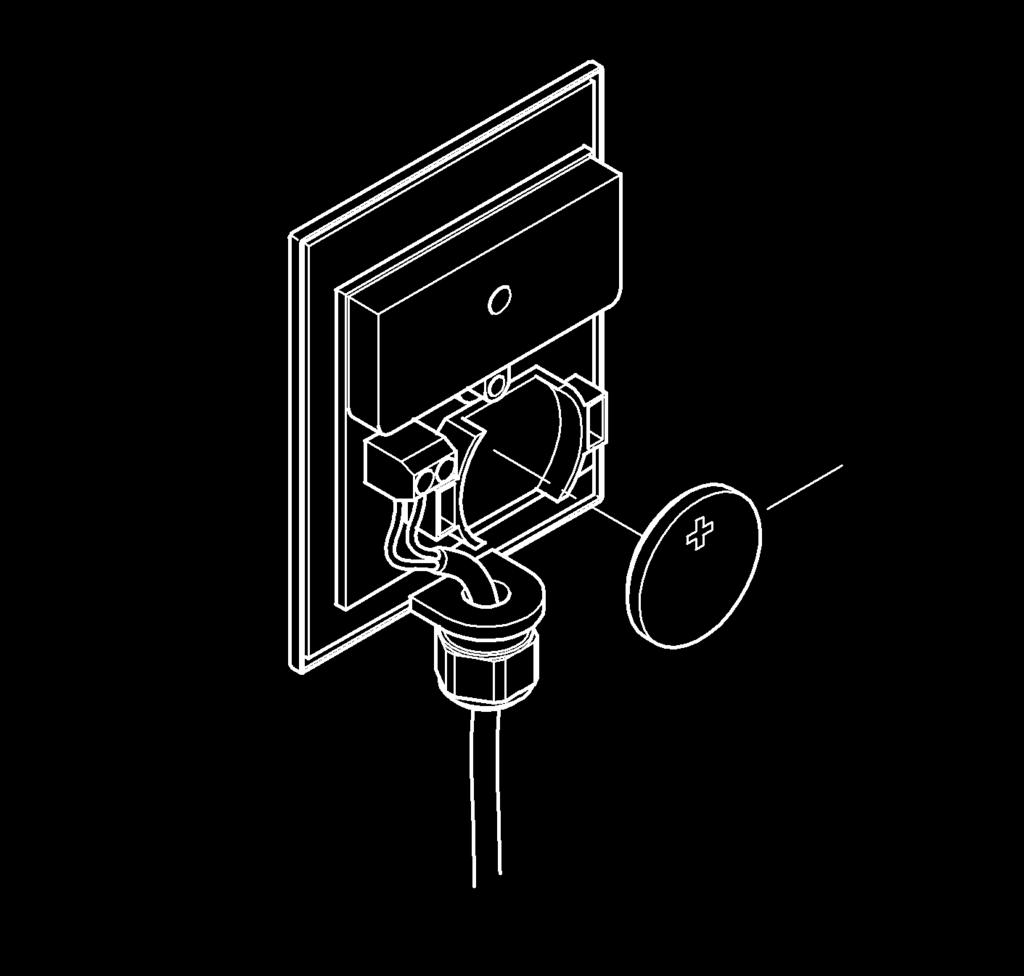
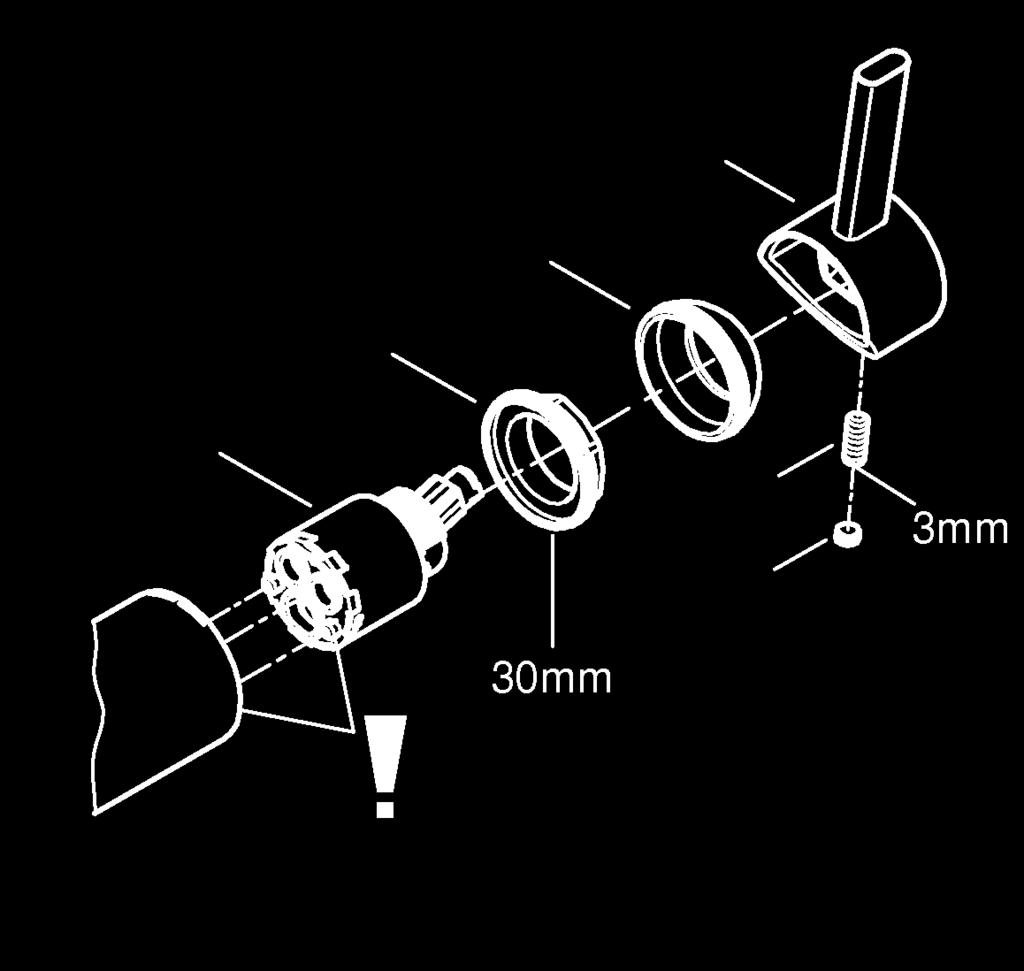
6 Operating the fitting Note: In order to prevent incorrect operation and for protection against injury, we recommend affixing the sticker provided. Open lever (R) to draw water, see fold-out page III, Fig. [15]. Pull button (O1) on handle (O) outward and turn and hold handle (O) anti-clockwise to draw boiling water. Handle (O) closes automatically. Press and hold button (Q) for at least 2 seconds to switch the storage heater on or off, see Fig. [16]. Maintenance Assemble in reverse order. In the case of interventions in the mains supply or maintenance work, the GROHE Red boiling system must be bled as steam jets could otherwise occur. Close the service valve, switch off the storage heater and Service disconnect the mains plug. Wait until the storage heater and fitting have cooled down. Open the lever to depressurise the storage heater. Inspect and clean all parts, replace as necessary and lubricate with special grease. I. Filter See technical product information of filter cartridge for information on replacing the filter cartridge. Resetting the filter capacity at the display unit (F), see foldout page IV, Fig. [18]. After a new filter cartridge is inserted, the filter capacity must be reset as follows: Button Display flashing (negative litre specification, e.g. -1 or remaining capacity e.g. 150 flashing) Press RESET button for 3 seconds (reset appears) Display II. Cartridge (S), see fold-out page IV, Fig. [21]. 1. Lever out plug (T) and remove set screw (U). 2. Remove lever (R) and cap (V). 3. Remove screw coupling (W) and take out cartridge (S). Assemble in reverse order. When installing the cartridge (S), ensure that the seals are correctly seated. Screw in screw coupling (W) and tighten. III. Flow straightener Remove and clean flow straightener (13 263), see fold-out page I. Note the Fault/Cause/Remedy table for information on eliminating problems. If the problem cannot be rectified, disconnect the mains plug to shut off the voltage supply. Note down the serial number of the storage heater on the rear of the device and get in touch with GROHE Customer Service or contact the GROHE Service Hotline under TechnicalSupport-HQ@grohe.com. The GROHE Red boiling water storage heater cannot be repaired. If servicing is required, the complete storage heater must be replaced. In order to ensure correct operation, maintenance must be performed on all hot-water-bearing parts by GROHE Customer Service every five years. Following any service/maintenance work, the boiling water storage heater must be re-filled, see section Installation. The date of maintenance must be noted on the maintenance sticker on the storage heater. The data for time and litre capacity is reset Note: The litre specification programmed for the filter cartridge is retained. Replacement parts See fold-out page I (* = special accessories). Battery (F1), see fold-out page IV, Fig. [19] and [20]. The battery must be replaced 7 years after commissioning the fitting, at the latest. Button Display BATT display flashes (battery is discharged and needs to be replaced) 1. Loosen screw (F2) and remove cover (F3), see Fig. [19]. 2. Remove battery (F1) and replace, see Fig. [20]. Important: Note correct polarity. Note: No settings saved by the user will be lost when changing the batteries or if the battery discharges. Assemble in reverse order. Care For directions on the care of this fitting, please refer to the accompanying Care Instructions. Disposal This category of devices does not belong in the domestic waste, but must be disposed of separately in accordance with the relevant local national regulations. 3
7 Carbonate hardness Bypass Litre capacity A B ( KH) 16 ( fh) 3,38 1, l l l ( KH) ( fh) 3,39-8,75 1,7-4, l l l ( KH) ( fh) 8,76-10,35 4,38-5, l l l 30 ( KH) 53 ( fh) 10,36 5, l 650 l l Fault Cause Remedy Water too cold Flow rate too low Empty storage heater switched on ( On indicator lamp flashes) Heating phase not yet complete Fitting flow straightener dirty or defective Isolating valve not fully open Water supply restricted - Fill the storage heater, see section Installation Reset the storage heater by pressing the reset button (X) located on the rear of the storage heater using a thin object, see fold-out page IV, Fig. [22] - Wait max. 15 minutes - Replace flow straightener, see section Maintenance - Fully open shut-off valves, isolating valves - Check supply lines, open isolating valve Water not boiling Storage heater not hot enough yet - Wait approx. 15 minutes after switching on Storage valve losing water Splashy, irregular spray Fitting running continuously Hose connection or internal tank leaking Fitting flow straightener dirty or defective Handle not closing - Switch off the storage heater, disconnect the mains plug and contact GROHE Customer Service - Replace flow straightener, see section Maintenance - Close the isolating valves, switch off the storage heater, disconnect the mains plug and contact GROHE Customer Service 4
8
9


10 11 F 12 E 14 E H OUT D D IN G 13 C L G N 24mm I J K H Ø15mm M O1 O Q1 2sec P Q R III


11 17 18 F F3 F2 F1 21 S W V 30mm R U T 3mm 22 X IV
12 D & A & info-at@grohe.com AUS Argent Sydney & +(02) Argent Melbourne & +(03) B & info.be@grohe.com BG & grohe-bulgaria@grohe.com CAU & info-az@grohe.com CDN & info@grohe.ca CH & info@grohe.ch CN & CY & info@grome.com CZ & grohe-cz@grohe.com DK & grohe@grohe.dk E & grohe@grohe.es EST & grohe@grohe.ee F & marketing-fr@grohe.com FIN & teknocalor@teknocalor.fi GB & info-uk@grohe.com GR & nsapountzis@ath.forthnet.gr H & info-hu@grohe.com HK & info@grohe.hk I & info-it@grohe.com IND & customercare.in@grohe.com IS & jonst@byko.is J & info@grohe.co.jp KZ & info-cac@grohe.com LT & grohe@grohe.ee LV & grohe@grohe.ee MAL & info-singapore@grohe.com N & grohe@grohe.no NL & vragen-nl@grohe.com NZ & +09/ P & commercial-pt@grohe.com PL & b uro@grohe.com.pl RI & info-singapore@grohe.com RO & info-ro@grohe.com ROK & info-singapore@grohe.com RP & RUS & info@grohe.ru S & grohe@grohe.se SGP & info-singapore@grohe.com SK & grohe-cz@grohe.com T & info-singapore@grohe.com TR & GroheTurkey@grome.com UA & info-ua@grohe.com USA & us-customerservice@grohe.com VN & info-singapore@grohe.com AL BiH HR KS ME MK SLO SRB & adria-hr@grohe.com Eastern Mediterranean, Middle East - Africa Area Sales Office: & info@grome.com IR OM UAE YEM & grohedubai@grome.com Far East Area Sales Office: & info@grohe.com.sg /10/22
GROHE RED MONO Made in Germany
 GROHE RED MONO Made in Germany 99.0830.031/ÄM 239072/06.17 www.grohe.com 30 060 30 329..11..13..22..25..28..31..34..37..40..43..46..49..52..55..58..61..64..67..70..73..76..79..82..85..88..91 1 2 3-7 8
Grohtherm 1000 Cosmopolitan. Grohtherm 1000 Cosmopolitan. Design + Engineering GROHE Germany /ÄM /01.14
 34 449 Grohtherm 1000 Cosmopolitan 34 473 GB D...1 I...5...2 N...9...3 GR...13...5 TR...17...6 BG...21...7 RO...25...9 GB...2...1 NL...6...2 FIN...10...4 CZ...14...5 SK...18...6 EST...22...8 RUS CN...26...9
EUROSMART DESIGN + ENGINEERING GROHE GERMANY /ÄM /
 EUROSMART DESIGN + ENGINEERING GROHE GERMANY 99.0241.031/ÄM 230640/09.14 www.grohe.com 32 467 33 265 D...1 NL...6 PL...11 P...16 BG...21 CN...26 GB...2 S...7 UAE...12 TR...17 EST...22 UA...27 F...3 DK...8
ESSENCE PROFESSIONAL PULL DOWN SINK MIXER MODEL # Product Specifications. Product description
 ESSENCE PROFESSIONAL Product Specifications Product description Essence Professional Pull down Single-lever sink mixer Single hole installation GROHE StarLight chrome finish GROHE SilkMove 28 mm ceramic
GROHTHERM 3000 COSMOPOLITAN DESIGN + ENGINEERING GROHE GERMANY /ÄM / GB
 GROHTHERM 3000 COSMOPOLITAN DESIGN + ENGINEERING GROHE GERMANY 96.514.031/ÄM 235698/02.16 www.grohe.com GB...1...14 Please pass these instructions on to the end user of the fitting. I 1 a b c x 2 7 8 1/2
Eurodisc SE. Eurodisc SE
 36 244 Eurodisc SE 36 245 Eurodisc SE D...1 NL...16 PL...31 P...46 BG...61 CN...26 GB...4 S...19 UAE...34 TR...49 EST...64 UA...27 F...7 DK...22 GR...37 SK...52 LV...67 RUS...28 E...10 N...25 CZ...40 SLO...55
TEMPESTA COSMOPOLITAN 100MM 4 FUNCTION HAND SHOWER MODEL # Product Specifications
 TEMPESTA COSMOPOLITAN 100MM 4 FUNCTION HAND SHOWER Product Specifications Product Description: 4 Function Hand Shower with Wall Bracket and Elbow Standard Specification: New Tempesta Cosmopolitan 100 Hand
Vitalio System. Design + Engineering GROHE Germany /ÄM /04.14
 27 685 27 860 Vitalio System Vitalio System Design + ngineering GROH Germany 99.599.231/Ä 228831/04.14 28 1 127 2 X 3 36-42 150 22mm max. 80 C 4 A 22mm C B 6 30mm *19 377 D 5 D 7 Ø6 F 1 2 3 8 1 F F1 2
RAINSHOWER SYSTEM SMARTCONTROL 360 DUO MODEL # Product Specifications. Product description
 RANSHOWER SYSTEM SMARTCONTROL 360 DUO MODEL #26537000 Product Specifications Product description Rainshower System SmartControl 360 DUO Shower system with thermostat for wall mounting Consisting of: Horizontal
Grohtherm Grohtherm 1000
 34 154 Grohtherm 1000 Grohtherm 1000 GB D...1 I...5 N...9 GR...13 TR...17 BG...21 RO...25 GB...2 NL...6 FIN...10 CZ...14 SK...18 EST...22 CN...26 F...3 S...7 PL...11 H...15 SLO...19 LV...23 RUS...27 E...4
Grohtherm Wireless! Installation Instructions Pumped
 36 022 Pumped Grohtherm Wireless! Grohtherm Wireless! GB D...1...5 I...5 N...9 GR...13 TR...17 BG...21 RO...25 GB...2 NL...6 FIN...10 CZ...14 SK...18 EST...22 RUS CN...26 Installation Instructions F...3
Grohtherm 1000 Cosmopolitan. Grohtherm 1000 Cosmopolitan. Design & Quality Engineering GROHE Germany /ÄM /06.12
 34 448 Grohtherm 1000 Cosmopolitan GB D...1 I...5...2 N...9...3 GR...13...5 TR...17...6 BG...21...7 RO...25...9 GB...2...1 NL...6...2 FIN...10...4 CZ...14...5 SK...18...6 EST...22...8 RUS CN...26...9 F...3...1
Grohtherm Wireless! Installation Instructions Pumped High Pressure
 36 022 Pumped Grohtherm Wireless! 36 023 High Pressure Grohtherm Wireless! GB D...1...5 I...5 N...9 GR...13 TR...17 BG...21 RO...25 GB...2 NL...6 FIN...10 CZ...14 SK...18 EST...22 RUS...26 Installation
Eurosmart FIN EST SLO RUS UAE Eurosmart Design & Quality Engineering GROHE Germany
 25 098 Eurosmart 25 105 D...1 I...5 N...9 GR...13 TR...17 BG...21 RO...25 GB...2 NL...6 FIN...10 CZ...14 SK...18 EST...22 CN...26 F...3 S...7 PL...11 H...15 SLO...19 LV...23 RUS...27 Eurosmart E...4 DK...8
Eurosmart Cosmopolitan. Eurosmart Cosmopolitan. Design & Quality Engineering GROHE Germany /ÄM /10.11
 32 824 Eurosmart Cosmopolitan 32 825 GB D...1 I...5...2 N...9...3 GR...13...5 TR...17...6 BG...21...7 RO...25...9 GB...2...1 NL...6...2 FIN...10...4 CZ...14...5 SK...18...6 EST...22...8 RUS CN...26...9
Linear FIN EST SLO RUS UAE Lineare Design & Quality Engineering GROHE Germany
 25 104 Lineare 25 113 D...1 I...5 N...9 GR...13 TR...17 BG...21 RO...25 GB...2 NL...6 FIN...10 CZ...14 SK...18 EST...22 CN...26 F...3 S...7 PL...11 H...15 SLO...19 LV...23 RUS...27 Lineare E...4 DK...8
Avensys Avensys FIN EST SLO RUS UAE
 34 037 Avensys Avensys GB D...1...5 I...5 N...9 GR...13 TR...17 BG...21 RO...25 GB...2 NL...6 FIN...10 CZ...14 SK...18 EST...22 CN...26 F...3 S...7 PL...11 H...15 SLO...19 LV...23 RUS...27 E...4 DK...8
Avensys Avensys FIN EST SLO RUS UAE
 34 039 Avensys Avensys GB D...1...5 I...5 N...9 GR...13 TR...17 BG...21 RO...25 GB...2 NL...6 FIN...10 CZ...14 SK...18 EST...22 CN...26 F...3 S...7 PL...11 H...15 SLO...19 LV...23 RUS...27 E...4 DK...8
Grohtherm Grohtherm 1000
 34 143 34 256 Grohtherm 1000 34 155 34 156 Grohtherm 1000 D...1 I...5 N...9 GR...13 TR...17 BG...21 RO...25 GB...2 NL...6 FIN...10 CZ...14 SK...18 EST...22 RUS CN...26 F...3 S...7 PL...11 H...15 SLO...19
s y ens Av Avensys FIN EST RUS SLO RUS UAE
 34 224 34 225 Avensys Avensys GB D...1...5 I...5 N...9 GR...13 TR...17 BG...21 RO...25 GB...2 NL...6 FIN...10 CZ...14 SK...18 EST...22 RUS CN...26 F...3 S...7 PL...11 H...15 SLO...19 LV...23 RUS...27 E...4
Installation manual Washer extractor
 Installation manual Washer extractor W555H Type W.55.H Original instructions 438 9054-30/EN 2017.11.06 Contents Contents 1 Safety Precautions...5 1.1 General safety information...6 1.2 Commercial use
Electronically controlled instantaneous water heater. MCX: 27300, and models. Installation instructions
 Electronically controlled instantaneous water heater MCX: 27300, 27400 and 27600 models Installation instructions These appliances deliver water not exceeding 50 ºC in accordance with AS3498. 1. Overview
EXPRESS EASY CONTROL.
 EN EXPRESS EASY CONTROL EL www.tefal.com 1 2 3 4 5 8 9 10 11 12 13 14 6 7 15 18 16 17 a e b c d EN Important recommendations Safety instructions Please read these instructions carefully before first use.
Installation guide COMBI. Before installing read this guide first
 Installation guide COMBI Before installing read this guide first Introduction The operation of the Quooker COMBI The Quooker COMBI supplies boiling water via the Quooker tap and hot water via the existing
Moisture inside the drum is due to final testing.
 Safety instructions Scope of delivery depending on model Moisture inside the drum is due to final testing. Removing the transport braces Water connection depending on model The washing machine is heavy
DELUXE COLLECTION Executive Filtered Water Cooler AQP-WCM-FBOT4
 DELUXE COLLECTION Executive Filtered Water Cooler AQP-WCM-FBOT4 Congratulations on your purchase of an Aquaport Executive Filtered Water Cooler This unit is easy to install and provides great tasting chilled
Installation & Operating Instructions
 PREMIUM Installation & Operating Instructions AQP-20SIL Signature Filtered Water Cooler Premium Selection Congratulations on your purchase of a Aquaport Signature Filtered Water Cooler This unit is easy
4 liter Solo and 8 liter Combi
 4 liter Solo and 8 liter Combi User and installation guide for the water heater 2 ENGLISH The HotSpot boiling water tap With the purchase of the HotSpot boiling water tap you can be sure that you have
MINI ME USER MANUAL.
 MINI ME USER MANUAL www.dolce-gusto.com TABLE OF CONTENTS 1. SAFETY PRECAUTIONS...3 2. MACHINE OVERVIEW...5 3. BEVERAGE EXAMPLES...6 4. RECOMMENDATIONS FOR SAFE USE...7 5. FIRST USE...8 6. PREPARING A
Installation Guide COMBI. Before installing read this guide first
 Installation Guide COMBI Before installing read this guide first Introduction The operation of the Quooker COMBI The Quooker COMBI supplies boiling water via the Quooker tap and warm water via the existing
Installation guide PRO7-VAQ E. Before installing read this guide first
 Installation guide PRO7-VAQ E Before installing read this guide first Introduction The operation of the Quooker PRO7-VAQ E The Quooker system consists of a small tank under the sink which is connected
Installation guide PRO3-VAQ. Before installing read this guide first
 Installation guide PRO3-VAQ Before installing read this guide first Introduction The operation of the Quooker The Quooker system consists of a small tank under the sink which is connected to the boiling-water
Installation and converting instructions to another gas type T4530, T4650
 GB, IE Read the technical installing the appliance. Read the user lighting the appliance. This appliance may only be installed in a room if the room meets the appropriate ventilation requirements specified
1. Take the hoses and elbow out of the holders, depending on model. max. 100 cm. min. * cm
 Safety instructions The washing machine is heavy - take care when lifting. Caution: frozen hoses may rip/burst. Do not install the washing machine in areas exposed to frost or outdoors. The washing machine
HOW TO USE YOUR 4500 RANGE L.P.G. COOKER OR HOB UNIT
 HOW TO USE YOUR 4500 RANGE L.P.G. COOKER OR HOB UNIT If the appliance does not operate correctly contact your supplier Or Leisure Products (Bolton) Ltd Holly Street, Bolton, BL1 8QR. England. ~~~~ For
Moisture inside the drum is due to final testing.
 Safety instructions Scope of delivery depending on model Moisture inside the drum is due to final testing. Removing the transport safety devices Water connection depending on model The washing machine
Illustration shows item no Z Original operating manual. Operating manual. BlueMobil 60. Item no: Z-3285
 Operating manual BlueMobil 60 Item no: Z-3285 Original operating manual Illustration shows item no Z-3285 Important Copyright It is essential that you read this manual thoroughly before the initial operation
User guide Billi Eco Sparkling Tap option XL
 Billi Eco Sparkling Tap option XL Contents Warnings & Important information... 2 General Maintenance... 3 Features and Modes... 4 Tap Options & Operation XL Tap... 5 Dispenser Icon Codes XL Tap... 6 Filtration
Zen Boiling Tap Range
 Product Instruction Manual Zen Boiling Tap Range Zen Solo, Zen Spa, Zen Life Tap Range v16.10/3 Version 3.2 Jan 2015 Overview The Zen Boiling Tap Range delivers elegant practical solutions for your domestic
Electronically controlled instantaneous water heater. MCX: 27300, and models. Instructions for the user
 Electronically controlled instantaneous water heater MCX: 27300, 27400 and 27600 models Instructions for the user These appliances deliver water not exceeding 50 ºC in accordance with AS3498. 1. Overview
Installation Instructions. Filtered Chilled drinking water for commercial kitchens and tea rooms.
 Installation Instructions Zip HydroTap Filtered Chilled drinking water for commercial kitchens and tea rooms. Affix Model Number Label Here 801525 801525 - Zip HydroTap Installation Instructions - Nov.
model DZ9030 PL SLO Downloaded from manuals search engine
 NL G CZ SR HR RO SK TR S DK model DZ9030 PL SLO H www.rowenta.com AR 6* 7 5 4 8 3 3a 3b 3c 3d 9* 0* 2 b* a* c* d* 2 3 4 fig. fig. 2 fig. 3 fig. 4 fig. 5 fig. 6 NO OK fig. 7 fig. 8 fig. 9 NO OK fig. 0 fig.
Installer manual AG-AA10. Air/air heat pump IHB GB AG-AA10-30 AG-AA10-40/50
 -30 Installer manual Air/air heat pump -40/50 IHB GB 1516-1 331554 Table of Contents 1 Important information 2 5 Installation 7 Safety information 2 Model combinations 7 Read before starting the installation
EN PT DK NO SE FI PL HU SK CZ HR RU TR
 EN Installation instructions Page EN PT DK NO SE FI PL HU SK CZ HR RU TR B84-00&BDC 0-009 964.8.00.0 (0) Safety Installation EN Target group and qualification The Geberit product is only allowed to be
Toplock Indoor. Originalbedienungsanleitung
 Toplock Indoor Aquasoft D GB F I ES DK PL HU NL RU Originalbedienungsanleitung Translation of original operating instructions Traduction du mode d emploi d origine Traduzione del manuale di istruzioni
DROP USER MANUAL.
 DROP USER MANUAL www.dolce-gusto.com TABLE OF CONTENTS 1. SAFETY PRECAUTIONS...3 2. OVERVIEW...5 3. BEVERAGE EXAMPLES...6 4. RECOMMENDATIONS FOR SAFE USE...7 5. FIRST USE...8 6. PREPARING A BEVERAGE...9
User and maintenance manual
 GB User and maintenance manual IMPORTANT SAFETY INSTRUCTIONS These instructions shall also be available on website: docs.whirlpool.eu. YOUR SAFETY AND THAT OF OTHERS IS HIGHLY IMPORTANT. This manual and
WXHAP Washington Street Melrose, MA Phone Toll Free Visit us at
 WXHAP 200 99 Washington Street Melrose, MA 02176 Phone 781-665-1400 Toll Free 1-800-517-8431 Visit us at www.testequipmentdepot.com WXHAP 200 Operating Instructions LT LV EE SL SK HU PL CZ TR GR FI DK
Installation guide PRO3. Before installing read this guide first
 Installation guide PRO3 Before installing read this guide first Introduction The operation of the Quooker PRO3 The Quooker system consists of a vacuum-insulated tank, which is connected to the cold water
PREMIUM KITCHEN MIXER TAP. PREMIUM KITCHEN MIXER TAP Assembly, operating and safety instructions IAN
 PREMIUM KITCHEN MIXER TAP PREMIUM KITCHEN MIXER TAP Assembly, operating and safety instructions IAN 282471 GB/IE/NI Assembly, operating and safety instructions Page 5 B 15mm HG00476A HG00476B C 5 4 12
JOVIA USER MANUAL.
 JOVIA USER MANUAL www.dolce-gusto.com TABLE OF CONTENTS SAFETY PRECAUTIONS.... 3-4 OVERVIEW.... 5 PRODUCT RANGE.... 6-7 FIRST USE.... 8 PREPARING A BEVERAGE... 9 RECOMMENDATIONS FOR A SAFE USE / ECONOMY
Operating instructions
 Operating instructions Capriz 2 24c 28c GB, IE Contents Contents 1 Safety... 3 1.1 Action-related warnings... 3 1.2 Intended use... 3 1.3 General safety information... 4 2 Notes on the documentation...
Saturn Booster PLEASE READ THESE INSTRUCTIONS CAREFULLY BEFORE USE AND KEEP THEM FOR FUTURE REFERENCE
 1560 Saturn Booster PLEASE READ THESE INSTRUCTIONS CAREFULLY BEFORE USE AND KEEP THEM FOR FUTURE REFERENCE The Hozelock Cyprio Saturn Booster is an innovative selfcleaning mechanical prefilter. GB Designed
Illustration shows item no Z Original operating manual. Operating manual. BlueMobil eco. Item no: Z-3278
 Illustration shows item no Z-3278 Operating manual BlueMobil eco Item no: Z-3278 Original operating manual Important Copyright It is essential that you read this manual thoroughly before the initial operation
OBLO USER MANUAL.
 OBLO USER MANUAL www.dolce-gusto.com TABLE OF CONTENTS SAFETY PRECAUTIONS....3-4 OVERVIEW....5 PRODUCT RANGE....6-7 FIRST USE....8 PREPARING A BEVERAGE...9 RECOMMENDATIONS FOR SAFE USE / ECONOMY MODE...
Electronic Instantaneous Water Heaters Models: ES3, ES4 & ES6
 Back Cover Front Cover Installation, Maintenance and User Instructions ZIP InLine Electronic Instantaneous Water Heaters Models: ES3, ES4 & ES6 The terms Zip and InLine are registered trademarks Zip Heaters
MW001 Integrated Dishwasher. Manual for Installation, Use and Maintenance
 MW001 Integrated Dishwasher Manual for Installation, Use and Maintenance Important The CDA Group Ltd cannot be held responsible for injuries or losses caused by incorrect use or installation of this product.
Operating instructions
 The energy you need Operating instructions Betacom 3 24c -A (H-GB) 30c -A (H-GB) GB, IE Contents Contents 1 Safety... 3 1.1 Action-related warnings... 3 1.2 Intended use... 3 1.3 General safety information...
EBAC MODEL CD425 ( ) INDUSTRIAL DEHUMIDIFIER OWNER S MANUAL
 INDUSTRIAL DEHUMIDIFIER OWNER S MANUAL") EBAC MODEL CD425 (1018110) INDUSTRIAL DEHUMIDIFIER OWNER S MANUAL Ebac Industrial Products 704 Middle Ground Boulevard Newport News, VA 23606 Tel: 757 873 6800 Fax: 757 873 3632 Website: www.ebacusa.com
EBAC MODEL CD425 (1018110) INDUSTRIAL DEHUMIDIFIER OWNER S MANUAL Ebac Industrial Products 704 Middle Ground Boulevard Newport News, VA 23606 Tel: 757 873 6800 Fax: 757 873 3632 Website: www.ebacusa.com
Autofill wall mounted water. boiler. Getting the best from your water. boiler. Please read and keep these instructions
 Autofill wall mounted water boiler Please read and keep these instructions For Burco wall mounted boilers 76700 (SKU 444448534), 76702 (SKU 444448546), & 76704 (SKU444448548) Getting the best from your
Zip HydroTap MINIBOIL
 89585DE v1.20 06.14 Instant boiling water system Zip HydroTap MINIBOIL Operating and installation instructions Contents 1. Safety Instructions 1. Safety Instructions........................................................................................
Where the tap has a removable aerator on the spout exit it can be removed and cleaned periodically to maintain optimum flow performance.
 TAP6000 3 in Hot Tap Guarantee (UK only): 04-7 Your tap has the benefit of a comprehensive manufacturer s guarantee, details of which are shown on your Proof of Purchase Document. Any claim during the
TH100 Three in One Instant Hot Water Tap
 TH100 Three in One Instant Hot Water Tap Installation, Use and Maintenance Customer Care Department The Group Ltd. Harby Road Langar Nottinghamshire NG13 9HY T : 01949 862 012 F : 01949 862 003 E : customer.care@cda.eu
HOT WASHER MODEL NO: KING150
 WARNING: Do not use the hot washer without reading this manual HOT WASHER MODEL NO: KING150 PART NO: 7320175 OPERATION & MAINTENANCE INSTRUCTIONS LS1215 INTRODUCTION Thank you for purchasing this CLARKE
MINI ME USER MANUAL.
 MINI ME USER MANUAL www.dolce-gusto.com TABLE OF CONTENTS SAFETY PRECAUTIONS.... 3-4 OVERVIEW.... 5 PRODUCT RANGE.... 6-7 FIRST USE.... 8 PREPARING A BEVERAGE.... 9 RECOMMENDATIONS FOR SAFE USE / ECONOMY
User manual. Dishwasher ZDI12001
 EN User manual Dishwasher ZDI12001 Contents Safety information 2 Product description _ 3 Control panel 3 Programmes 4 Before first use _ 4 Daily use 7 Care and cleaning 9 Troubleshooting 9 Technical information
ZIP InLine. Models: ES3, ES4 & ES6. Electronic Instantaneous Water Heaters. ES3, ES4 & ES6 Instructions. V1.09 Page 1 November / 2015
 Installation & User Instructions ZIP InLine Electronic Instantaneous Water Heaters Models: ES3, ES4 & ES6 ES3, ES4 & ES6 Instructions. V1.09 Page 1 November / 2015 Index Contents Description 3 Approvals
RAINSHOWER SMARTCONTROL DESIGN + ENGINEERING GROHE GERMANY
 RANSHOWER SMARTCONTROL DESGN + ENGNEERNG GROHE GERMANY 99.1029.031/ÄM 242625/018 www.grohe.com 26 537 *19 001 *49 059 1 2 90 36mm 37-42 min. 1200 150 5x 5x 3 41mm 4 5 4mm 6 7 Ø10 *48 349-150mm *48 350
DROP USER MANUAL.
 DROP USER MANUAL www.dolce-gusto.com TABLE OF CTENTS. SAFETY PRECAUTIS.... OVERVIEW.... BEVERAGE EXAMPLES.... RECOMMENDATIS FOR SAFE USE...7. FIRST USE.... PREPARING A BEVERAGE...9. E CAPSULE (E.G. LUNGO)...9.
INSTRUCTION MANUAL GAS HOB. Model:GH600
 INSTRUCTION MANUAL GAS HOB Model:GH600 1 Contents Important Information Description of Hob Operation Maintenance and cleaning Troubleshooting Instruction for installer Technical data Important safety requirements
Zenith HydroTap. Filtered Chilled drinking water for residential kitchens and tea rooms. Affix Model Number Label Here NZ
 Installation Instructions Zenith HydroTap G4 Filtered Chilled drinking water for residential kitchens and tea rooms. Affix Model Number Label Here 802261NZ 802261NZ - Residential HydroTap - CO Installation
MOCCA CUBIC AUS/NZ. 08/53066/0 Issue 2
 MOCCA CUBIC AUS/NZ 08/53066/0 Issue 2 The product complies with the European Safety Standards EN60335-2-30 and the European Standard Electromagnetic Compatibility (EMC) EN55014, EN60555-2 and EN60555-3
User manual. Dishwasher ZDT15002
 EN User manual Dishwasher ZDT15002 Contents Safety information 2 Product description _ 3 Control panel 4 Programmes 4 Options _ 5 Before first use _ 5 Daily use 7 Care and cleaning 9 Troubleshooting 10
Francis Pegler Memento Single Sequential Exposed Thermostatic Shower
 e x p e r i e n c e d e s I g n i n n o v a t i o n You re Guide to the Installation, Care and maintenance of Francis Pegler Memento Single Sequential Exposed Thermostatic Shower For further information,
Installation & Operating Instructions
 PREMIUM Installation & Operating Instructions m AQP-3TAP-SS Platinum Water Dispenser Hot/Cold & Room Premium Selection Congratulations on your purchase of an Aquaport Platinum Water Dispenser Thank you
Safety. Operating instructions UV sensor UVS 10 DANGER WARNING. Contents CAUTION Edition Please read and keep in a safe place
 8.. Edition 08.0 D GB F NL I E DK S N P GR TR CZ PL RUS H www.docuthek.com Operating instructions UV sensor UVS 0 Translation from the German 008 009 Elster GmbH Contents UV sensor UVS 0......................
PLEASE LEAVE THIS MANUAL WITH THE OSO UNIT AFTER INSTALLATION INSTALLATION MANUAL
 PLEASE LEAVE THIS MANUAL WITH THE OSO UNIT AFTER INSTALLATION 0 RD 0 RI 0000-06 IM/ IM/a INSTALLATION MANUAL This manual gives detailed advice for installation and should be read carefully prior to fitting
Alpha CombiMax 350 and 600
 Installation and Servicing Instructions Alpha CombiMax 350 and 600 Unvented Hot Water Store for use with the Alpha 240/280 Range of Gas Fired Combination Boilers For Technical help or for Service call...
OBLO USER MANUAL.
 OBLO USER MANUAL www.dolce-gusto.com TABLE OF CONTENTS SAFETY PRECAUTIONS.... 3-4 OVERVIEW.... 5 PRODUCT RANGE.... 6-7 FIRST USE.... 8 PREPARING A BEVERAGE.... 9 RECOMMENDATIONS FOR SAFE USE / ECONOMY
Hot Chocolate Dispenser
 Hot Chocolate Dispenser Instruction manual Model: CN219-A AU Telephone Helpline: 1300225960 Safety Tips Position on a flat, stable surface. A service agent/qualified technician should carry out installation
RESISTENT EXTRA 3592, 3602 RESISTENT EXTRA PLUS 3592P, 3602P
 RESISTENT EXTRA 9, 0 RESISTENT EXTRA PLUS 9P, 0P D A CH Gebrauchsanleitung... GB IRL AUS USA NZ CDN IND Instructions for Use... 1 F CH B NL CDN Mode d'emploi... 18 E MEX Instrucciones de uso... I CH Istruzioni
User guide Billi Sahara & Sahara Plus Tap options XL, XT, XR
 Billi Sahara & Sahara Plus Tap options XL, XT, XR Billi Sahara & Sahara Plus XL, XT, XR. Contents Warnings & Important information... 2 General Maintenance... 3 Features and Modes... 4 Options & Operation
LUCCI NORDIC DC CEILING FAN
 LUCCI NORDIC DC CEILING FAN INSTALLATION OPERATION MAINTENANCE WARRANTY INFORMATION CAUTION READ INSTRUCTIONS CAREFULLY FOR SAFE INSTALLATION AND FAN OPERATION. V 1.0 p u b l i s h e d o n 0 8. 2 0 1 6
User guide Billi Eco Tap options XL, XT, XR
 Billi Eco Tap options XL, XT, XR Billi Eco XL, XT, XR. Contents Warnings & Important information... 2 General Maintenance... 3 Features and Modes... 4 Tap Options & Operation XL Tap... 5 XR & XT Tap...
Operating instructions
 Operating instructions For the operator Operating instructions ecotec plus Gas-fired wall-hung high-efficiency boiler GB, IE Publisher/manufacturer Vaillant GmbH Berghauser Str. 40 D-42859 Remscheid Telefon
CROWN WATER HEATERS CPU10 - CPU15 CPOS10 - CPOS15
 CROWN WATER HEATERS CPU10 - CPU15 CPOS10 - CPOS15 COMPACT PLUS 10 and 15 Litre Unvented Under and Over Sink Water Heater INSTALLATION AND USER GUIDE 1 DIMENSIONS 10L - 250mm 15L - 310mm 100mm 80mm 410mm
Installation guide VAQ E. Before installing read this guide first
 Installation guide VAQ E Before installing read this guide first Introduction The operation of the Quooker VAQ E The Quooker system consists of a small tank under the sink which is connected to the Nordic
LUCCI WHITEHAVEN DC CEILING FAN
 LUCCI WHITEHAVEN DC CEILING FAN INSTALLATION OPERATION MAINTENANCE WARRANTY INFORMATION CAUTION READ INSTRUCTIONS CAREFULLY FOR SAFE INSTALLATION AND FAN OPERATION. V1. 1 - L E D ( 10/ 2 0 1 8 ) CONGRATULATIONS
LD200 / RLD400 LD200-G /RLD400-G
 Dual LCD Line Detector / Dual LCD Rotary Laser Detector LD200 / RLD400 LD200-G /RLD400-G 77-132 / 77-133 FMHT74267 / FMHT74266 Please read these instructions before operating the product GB D F I E PT
MW402 Integrated Dishwasher
 MW402 Integrated Dishwasher Manual for Installation, Use and Maintenance 1 Customer Care Department The Group Ltd. Harby Road Langar Nottinghamshire NG13 9HY T : 01949 862 012 F : 01949 862 003 E : customer.care@cda.eu
SOUND-INSULATED FAN. Iso-K OPERATION MANUAL. Iso-K_v.1(2)-EN.indd :20:59
-EN.indd :20:59") SOUND-INSULATED FAN OPERATION MANUAL _v.1(2)-en.indd 1 10.08.2015 15:20:59 CONTENT Introduction 3 General 3 Safety rules 3 Transport and storage requirements 3 Manufacturer's warranty 3 Fan design 4 Delivery
SOUND-INSULATED FAN OPERATION MANUAL _v.1(2)-en.indd 1 10.08.2015 15:20:59 CONTENT Introduction 3 General 3 Safety rules 3 Transport and storage requirements 3 Manufacturer's warranty 3 Fan design 4 Delivery
GENIO USER MANUAL.
 GENIO USER MANUAL www.dolce-gusto.com TABLE OF CONTENTS SAFETY PRECAUTIONS.... -4 OVERVIEW.... 5 PRODUCT RANGE.... 6-7 FIRST USE.... 8 PREPARING A BEVERAGE.... 9 RECOMMENDATIONS FOR SAFE USE / ECONOMY
Temperature Sensor TRG Original Installation Instructions English
 Temperature Sensor TRG 5-6.. EN English Original Installation Instructions 818597-05 1 Contents Important notes Page Usage for the intended purpose...4 Function...4 Safety note...4 Directives and standards
Autofill counter top water boiler
 Autofill counter top water boiler Please read and keep these instructions For Burco counter top water boilers 76500 (SKU 444448531) and 76502 (SKU 444448533) Getting the best from your water boiler Remove
Built in Electric Ceramic Hob. Instruction Manual
 Built in Electric Ceramic Hob Instruction Manual Model number: RHEH1 Opening times: Monday - Friday 8am 6pm & Saturday 9am 1pm or visit us at Contents Safety Instructions 3-4 Before using the appliance
Operating instructions
 Operating instructions For the operator Operating instructions HOME SYSTEM GB, IE Publisher/manufacturer Vaillant GmbH Berghauser Str. 40 D-42859 Remscheid Tel. +49 21 91 18 0 Fax +49 21 91 18 28 10 info@vaillant.de
Installation Instructions. Filtered Boiling and Boiling Ambient drinking water for commercial kitchens and tea rooms.
 Installation Instructions Zip HydroTap Filtered Boiling and Boiling Ambient drinking water for commercial kitchens and tea rooms. Affix Model Number Label Here 801530 801530 - Zip HydroTap Installation
EDD61 & EDD91 Extractors
 EDD61 & EDD91 Extractors Installation, Use and Maintenance Customer Care Department The Group Ltd. Harby Road Langar Nottinghamshire NG13 9HY T : 01949 862 012 F : 01949 862 003 E : customer.care@cda.eu
Installation guide COMBI E. Before installing read this guide first
 Installation guide COMBI E Before installing read this guide first Introduction The operation of the Quooker COMBI E The Quooker COMBI E supplies boiling water and hot water. The tank is vacuuminsulated
User Manual GV25 GV35 GV702. Company information: Original instructions GV12066 (1)
") User Manual Original instructions GV25 GV35 GV702 Company information: www.vipercleaning.eu info-eu@vipercleaning.com GV12066 (1) 2012-04-10 USER MANUAL ENGLISH TABLE OF CONTENTS Introduction... 4 Manual
User Manual Original instructions GV25 GV35 GV702 Company information: www.vipercleaning.eu info-eu@vipercleaning.com GV12066 (1) 2012-04-10 USER MANUAL ENGLISH TABLE OF CONTENTS Introduction... 4 Manual