Qualification Procedures for making PE 3408 Extra High Molecular Weight Polyethylene Heat Fusion Joints
|
|
|
- Bernice Paul
- 5 years ago
- Views:
Transcription


1 Qualification Procedures for making PE 3408 Extra High Molecular Weight Polyethylene Heat Fusion Joints. BULLETIN NO.106

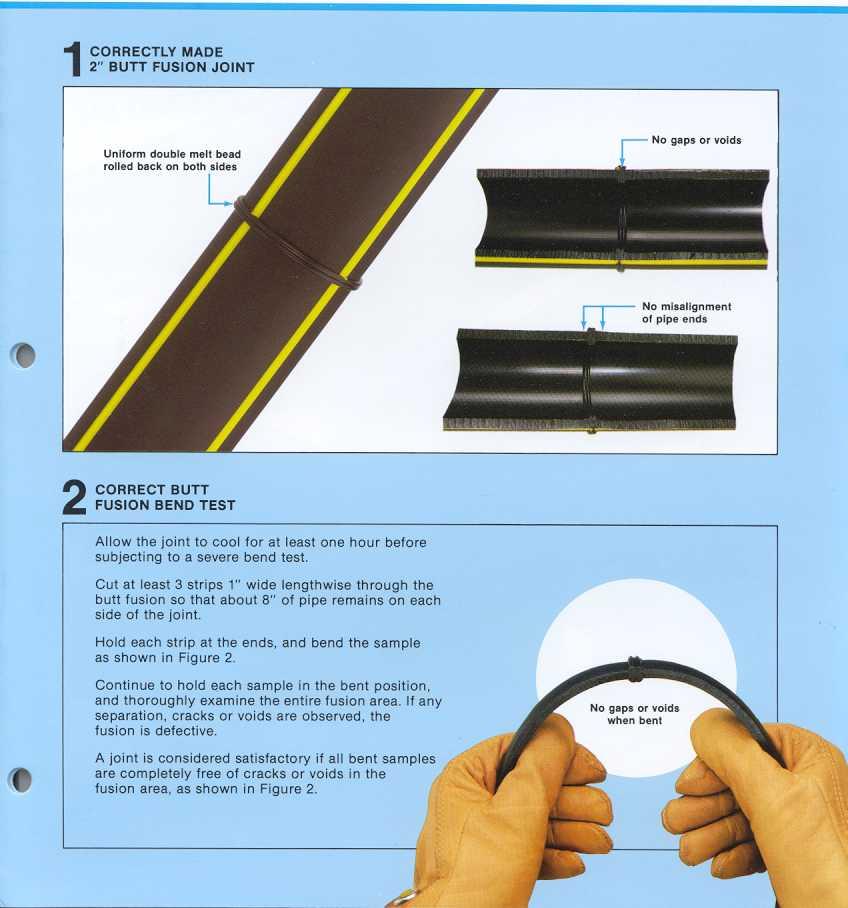
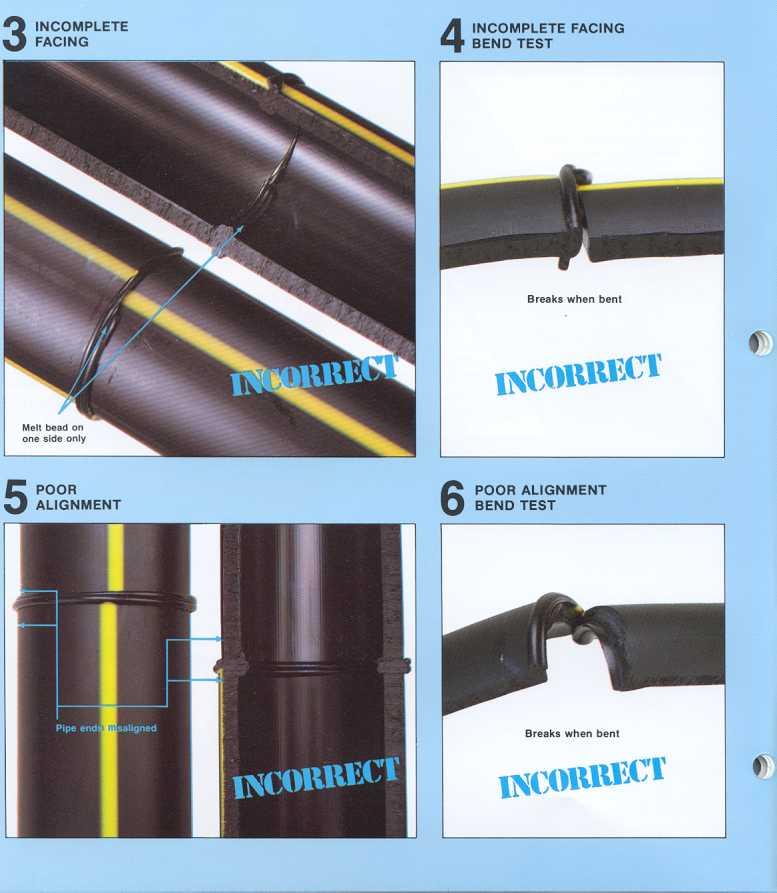
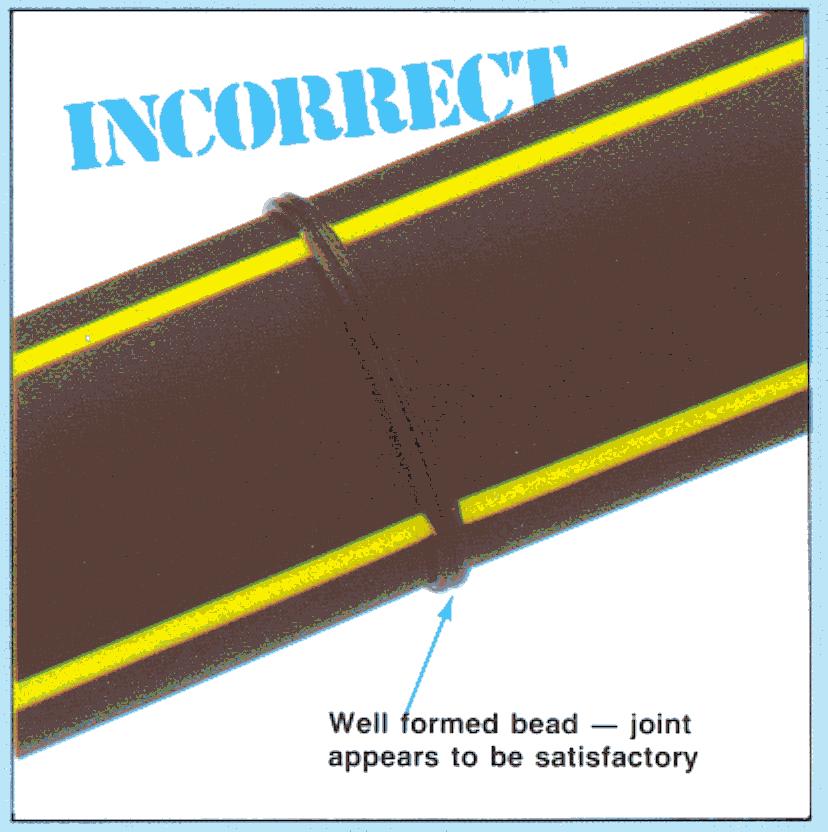
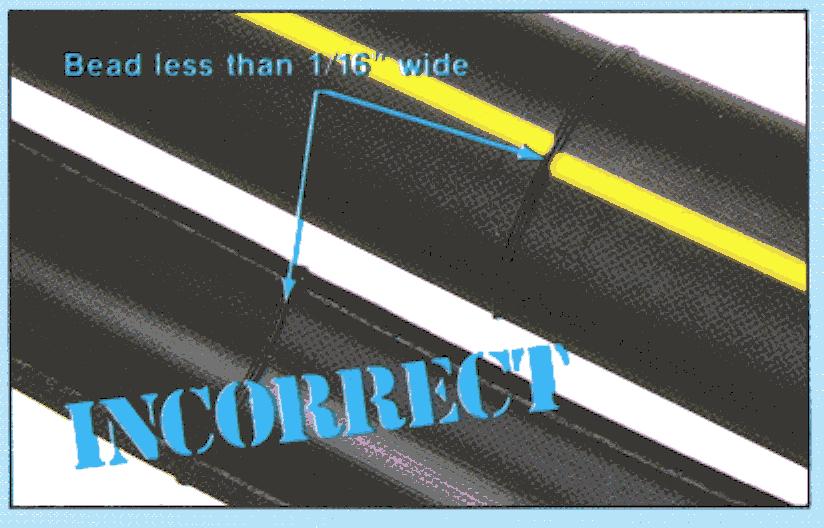
2 . Fusion Butt Photographs Fusion Joints. of Qualification Procedures. Fusion Butt Joints 3 4 Correctly made butt fusion joints... Incorrectly made butt fusion joints.. Saddle Photographs Fusion Joints. Saddle of Fusion Joints..5 6,7..8 Correctly made saddle f-usion joints. Incorrectly made saddle fusion joints SocketFusionJoints Photographs of Socket Fusion Joints 9 10, " Correctly made socket fusion joints. Incorrectly made socket fusion joints ,15


3 @ This bulletin is intended to serve as an aid for the training of personnel as qualified installers of PLEXCO polyethylene pipe in compliance with the regulations of the Department of Transportation, Materials Transportation Bureau, contained in the Code of Federal Regulations Title 49, Part 192. Section of these regulations details the procedure to be used to qualify persons to join plastic pipe. As part of this qualification process, the trainee must make sample fusion joints in accordance with the applicable qualified fusion procedure. The resultant fused joints must have the same visual appearance as correctly made fusion joints described and illustrated in this bulletin. In addition, each joint must be cut into at least 3 longitudinal strips, each of which is visually examined and found not to contain voids or discontinuities on the cut surfaces of the joint area; and deformed by bending, torque, or impact such that if failure occurs it does not occur in the joint area. Refer to Bulletin 101 Fusion Procedures for complete fusion procedures. The pictures in this bulletin are of correctly and incorrectly made butt, saddle and socket fusion joints. They are presented to assist the user in evaluating heat fusion joints. PLEXCO YELLOWSTRIPE@ polyethylene pipe and fittings should be joined only by the heat fusion method. DO NOT attempt to join by threading or with solvent cements. If you use compression fittings, instructions for their use should be obtained from the fittings manufacturer. A fusion joint is made in four simple steps" 1.Be sure that the surfaces of the fusion tools, pipe and fittings are free of contaminants prior to use. Inspect polyethylene pipe for cuts, gouges, and deep scratches, and remove these pipe sections before fusing the pipe. 2. Heat the surfaces to be joined -both the pipe and fittings -simultaneously at a prescribed temperature for a specified time. 3. Remove the heater -bring melted surfaces together. 4. Hold until solidified. Before you begin fusing, here are some points to remember. 1. All heater surfaces have q thin layer of non-stick coating that is easily scratched or scraped off. This coating prevents melted PE from adhering firmly to the heater surfaces but occasionally it, too, must be cleaned. Metal tools should NEVER be used to clean the heater surfaces because they scratch and remove the coating. Wood implements and clean, dry, lint-free rags are recommended for cleaning. All-cotton rags are recommended because rags containing a substantial amount of synthetic fibers may melt and char against the heater surface. If the non-stick coating becomes worn or scratched, the heating unit should be recoated. Melted PE may adhere to the heating iron and is more difficult to remove at places where the coating has been scraped off. In addition, since the coating acts as an insulator, heat transfer in these uncoated areas is greater and local overheating can occur. 2. Just before using, wipe heaters to remove dirt and foreign material. Clean heaters as soon as possible after using with wood implements, and clean rags to remove melted or charred plastic. 3. Check the heater temperature with crayon indicators or surface pyrometer at least once a day to make sure the thermometer or other temperature measuring device is reading accurately. Under heavy use conditions, check temperature twice a day. 4. NEVER lay a heating unit on the soil or grass when the heat cycle is completed. Return it to holder, if possible, or at least lay it on a board. Soil will contaminate the joint and is abrasive to the coating; grass may burn and char the heater surface. Important: All fusion equipment must be in proper working order. Consult the manufacturer's operating manual for maintenance and service procedures. Do not use defective equipment.


4 1. Clean each pipe end with a clean cloth. Place pipe ends into fusion machine. Bring ends together and check alignment. 2. Insert facing unit between pipe ends and lock onto guide rods. Face ends of pipe to the stops. 3. Check alignment of pipe ends. Adjust high-iow if necessary. If adjustment is made, reinsert facing unit and reface to the stops. Always tighten the high side, never loosen the low side. 4. Check heater plate for temperature and wipe surface clean. 5. Insert heater plate between aligned ends and bring ends firmly in contact with plate, but DO NOT APPL y PRESSURE. 6. Heat for times shown below. TABLE 1 -BUTT FUSION TIME CYCLES 7. Remove heater plate after achieving proper melt bead. Quickly observe the parts to be joined to ensure sufficient and uniform melting patterns. Table 2 -Melt Swell Bead Width Guidelines 8. Bring melted ends together quickly. DO NOT SLAM. Apply enough force to roll each bead over to the pipe or fitting surface. Hold this pressure during cooling. 9. Allow the butt fusion to cool, under pressure, for the time shown in Table 1, or about 30 seconds per inch of pipe diameter. 10. DO NOT remove the fused joint from the equipment for an additional three minutes after cooling time. DO NOT test, stress, pull or lay in ground for 10 to 60 minutes after.removal from fusion unit. 11. Clean heater f~ces, being careful not to damage coated surfaces-use wooden implement and clean, dry, lint-free non-synthetic rags. Do not use metal implements to clean heater faces. 12. See Figure 1 for visual parameters of a proper fusion. Guidelines only, exact time depends upon environmental conditions and condition of fusion equipment. Each bead after fusion should have approximately the following diameters: 4


5
6 6


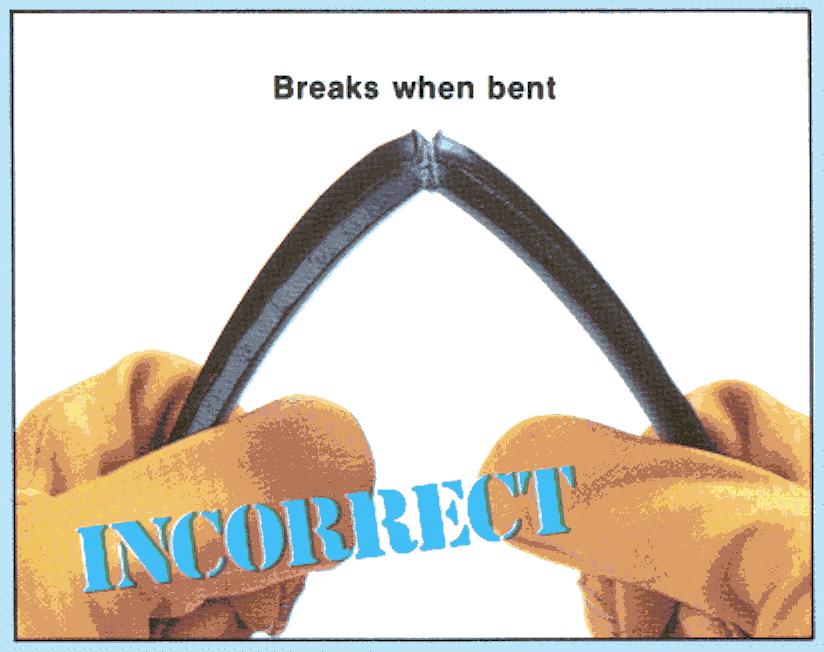
7 @ 7 "COLD JOINT" -EXCESSIVE PRESSURE DURING HEAT CYCLE 8 COLD JOINT BREAKS APART 9 MELT BEAD TOO SMALL 11 MELT BEAD TOO LARGE 1 O SMALL BEAD BEND TEST 7


 and slowly as the melt forms -do not rock excessively as this will enlarge the melt pattern on the pipe. 4.")

 with firm pressure until a melt bead of the following size appears around the")


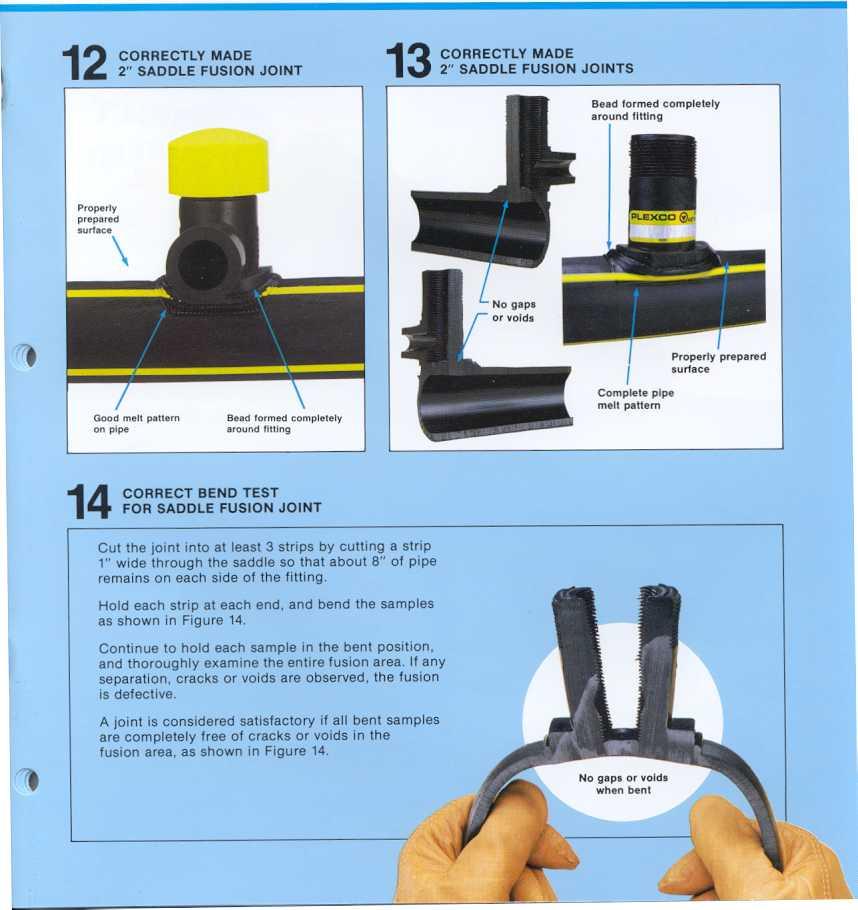
8 It is recommended that an application tool be used when making saddle fusion joints. Variables in the installation procedure are more easily controlled when a tool is used than when the fusion is made manually. When fusing on a pressurized main, the risk of blow-out can be reduced by using equipment that is in proper working order, following the manufacturer's operating instructions, using recommended fusion procedures and by using relieved-center heater faces when fusing High Volume Tapping Tees. 1. Assemble application unit according to manufacturer's instructions and position on pipe. 2. Remove surface skin from the melt areas of the clean, dry pipe and saddle fitting by roughening with utility cloth (50 to 60 grit). Brush away residue with dry rag after roughening. With experience, the iron can be rocked slightly (about 2% ) and slowly as the melt forms -do not rock excessively as this will enlarge the melt pattern on the pipe. 4. After proper melt time, remove fitting from heater and heater from main with a quick snapping action. Check melt pattern on pipe and fitting -heated surfaces on fitting and pipe should be 100% melted with no cold spots. (A mirror may be used to check the melt on the under surface of the saddle base.) FUSION AND COOLING 5. If melt patterns are satisfactory, press the fitting on the pipe very quickly (within 3 seconds after removing heater) with firm pressure until a melt bead of the following size appears around the entire base of the fitting: HEATING 3. With the heating surfaces of the tool at 5000 :t 10 F place the tool in position on pipe. 8 Force Applied Standard Tapping Tee and Service Saddle HVTT and Branch Saddle Place fitting against heater faces and apply pressure. Heat for time shown in Table 2. TABLE 2- STANDARD TAPPING TEE AND SERVICE SADDLE FUSION TIME CYCLES.Guidelines Only, exact time depends upon environmental conditions and condition of fusion equipment These times apply when using smooth heater faces If serrated heater faces are to be used, reduce heating time by approximately five (5) seconds..use During Heating & Fusion: Heating Ibf (All sizes) Ibf (All sizes) Fusion & Cooling Ibf (All sizes) 2" Ibf 3' Ibf 4'& 6' Ibf heat shield on pipe surface for first 15 seconds of this time cycle. Adjust fusion unit to maintain pressure of fitting on pipe. Allow fusion joint to cool for at least the times indicated in Table 2 before releasing pressure. If melt pattern on fitting or pipe is unsatisfactory after heating, apply fitting to pipe and let cool. Remove cutter from tapping tee and cut off fitting top to avoid misuse later. Repeat procedure from Step After letting joint cool 3 minutes beyond that shown in the tables, remove application unit from pipe. Visually check fitting for fusion melt bead around entire fitting base. If fusion joint quality is unacceptable or doubtful, cut off fitting top and apply a new fitting to a new section of pipe. 7. For standard tapping tees and service saddles, let fusion cool an additional 10 minutes prior to pressure testing and tapping the main. Allow an additional 30 minutes before tapping or pressure testing HVTT or branch saddles. 8. Clean heater faces, being careful not to damage coated surfaces -use wooden implement and clean, dry, lint-free non-synthetic rags. Do not use metal implements to clean heater faces. 9. See Figures 12 and 13 for visual parameters of a proper fusion.
9

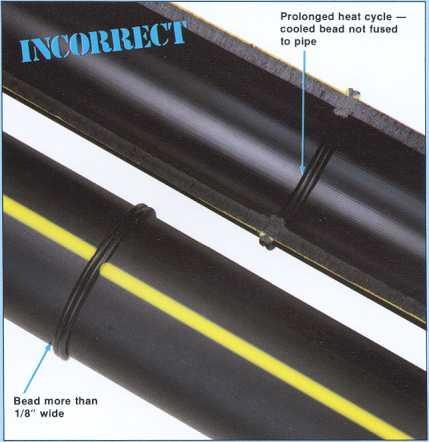
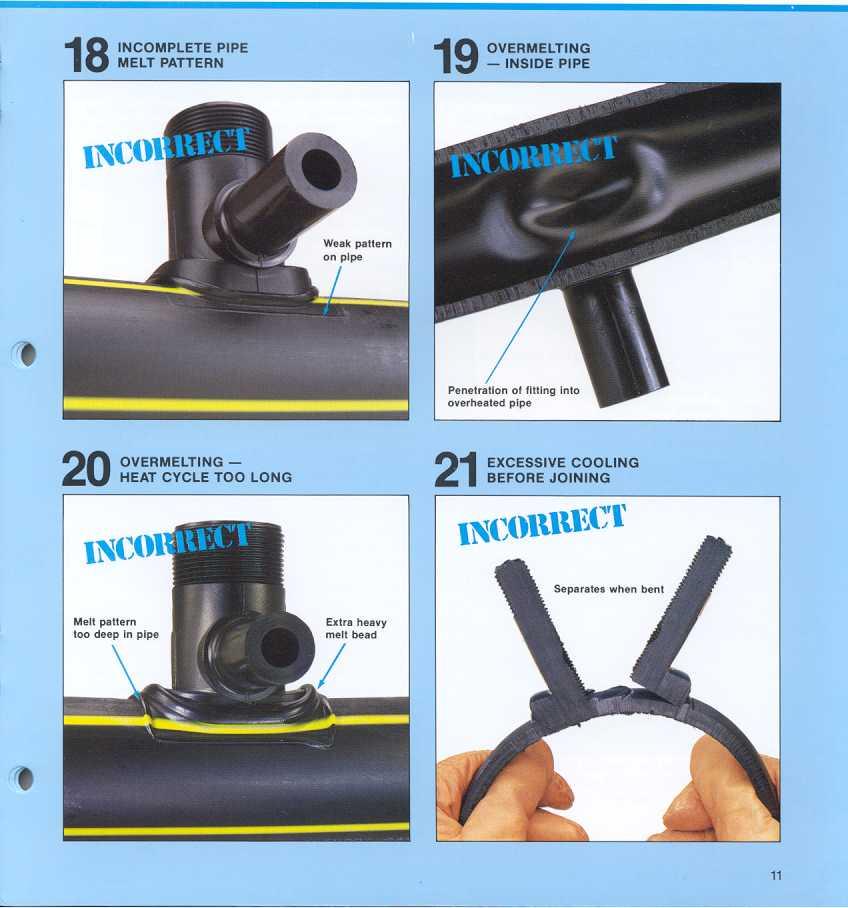
10 Saddle Fusion Joints -Incorrectly made
11


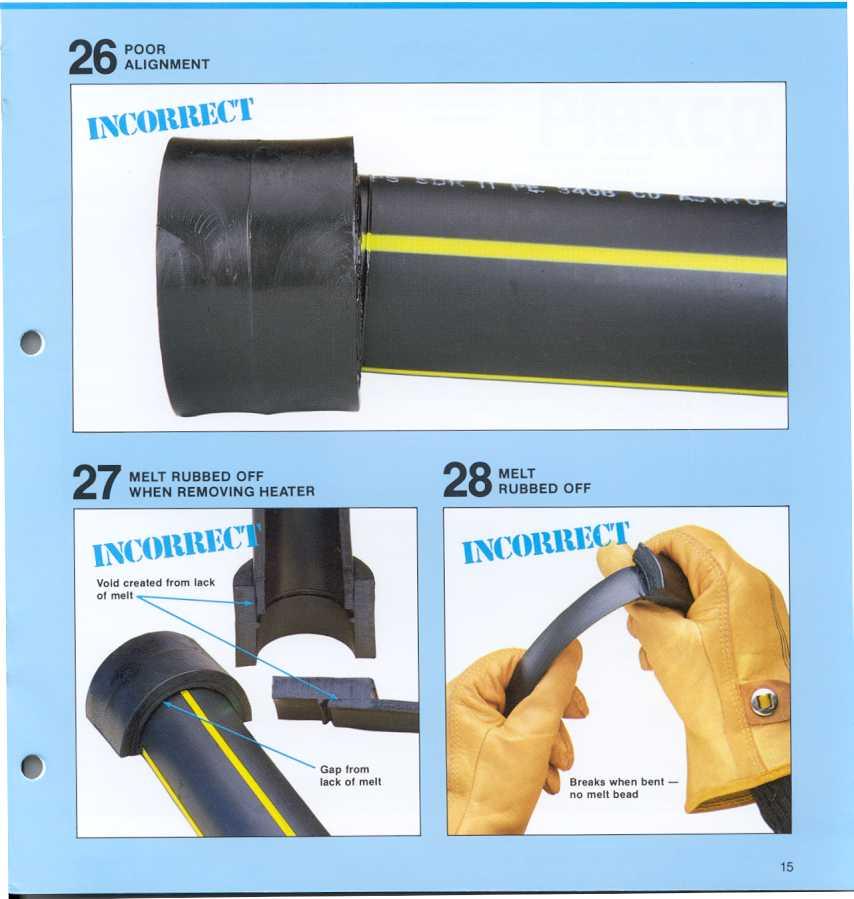
12 1. Using a pipe cutter, cut off damaged or oval ends of pipe squarely. 2. Use chamfering tool to remove the sharp corner at the pipe end on the outside surface of the pipe. Remove burrs and chips inside pipe ends. 3. To prepare pipe for correct penetration into socket, place depth gauge down flush on end of pipe. 4. Place cold ring clamp around pipe, adjacent to depth gauge. After securing cold ring clamp, remove depth gauge. 5. Fitting surfaces should be clean and dry -wipe with cloth -do not touch with hands. HEATING 6. The socket faces of the heating tool should be at 5000 :t 10 F and clean. 7. First, firmly seat the socket fitting on the male face of the heating tool. Then place the female face on the end of the pipe firmly against the cold ring clamp. Heating time starts when the cold ring clamp is bottomed out on the heater surface. Heat for the prescribed period of time, DO NOT TWIST PIPE, FITTING OR HEATING TOOL. T ABLE 3 -SOCKET FUSION TIME CYCLES 8. Snap the heating tool and fitting from the melted pipe by holding upper part of tool handle with one hand and rapping sharply on the handle with the free hand. Immediately remove fitting from heating tool. 9. Inspect the heated parts quickly to make sure all surfaces have been melted. If melt is not complete, cut off melted pipe end, use a new fitting, and repeat fusion steps 1 through 8. FUSION AND COOLING 10. Within 3 seconds after the heating tool has been removed, firmly push the melted fitting squarely onto the pipe end until it makes firm contact with the cold ring clamp. DO NOT TWIST PIPE OR FITTING. Hold the fitting firmly in place for total cooling time shown in Table 3 to insure proper alignment. After waiting 3 additional minutes cooling time, remove the cold ring clamp and inspect the joint. A good joint will have a uniform melt ring that is flat against the socket and perpendicular to the pipe. There should be no gaps or voids between the fitting and the pipe. 11. Wait an additional 10 minutes to complete cooling before the pipe joint is tested or stressed during burial. 12. See Figure 22 for visual parameters of a proper fusion. 13. Clean heater faces, being careful not to damage coated surfaces-use wooden implement and clean, dry, lint-free non-synthetic rags. Do not use metal implements to clean heater faces. *Guidelines only, exact time depends upon environmental conditions and condition of fusion equipment. 12
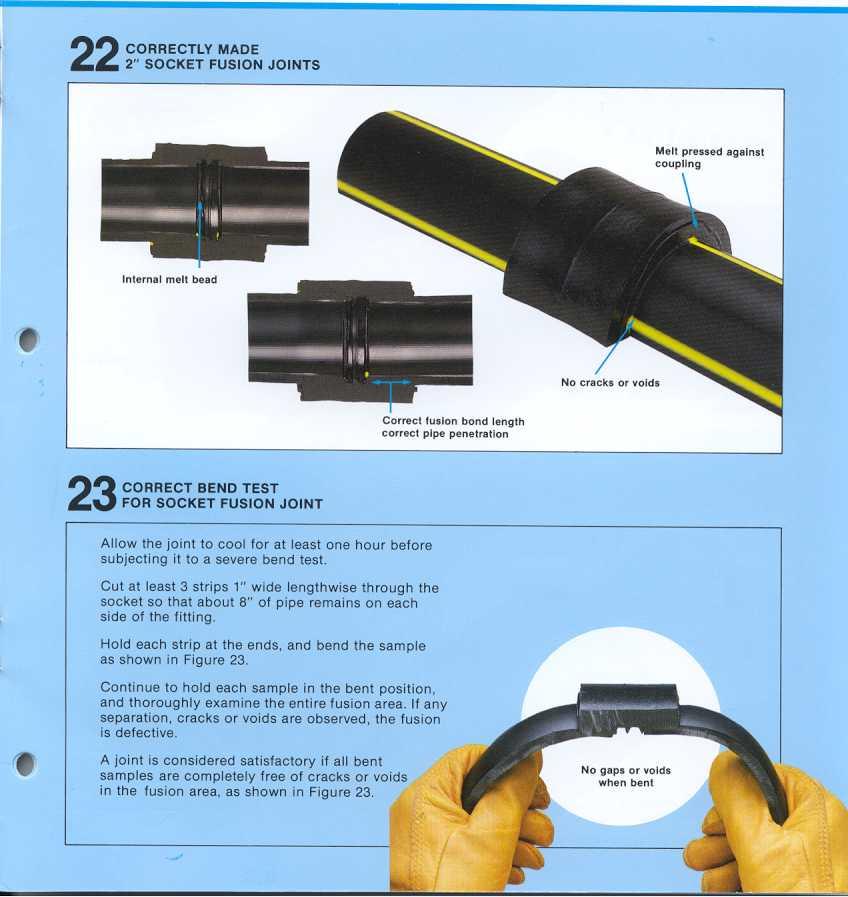
13

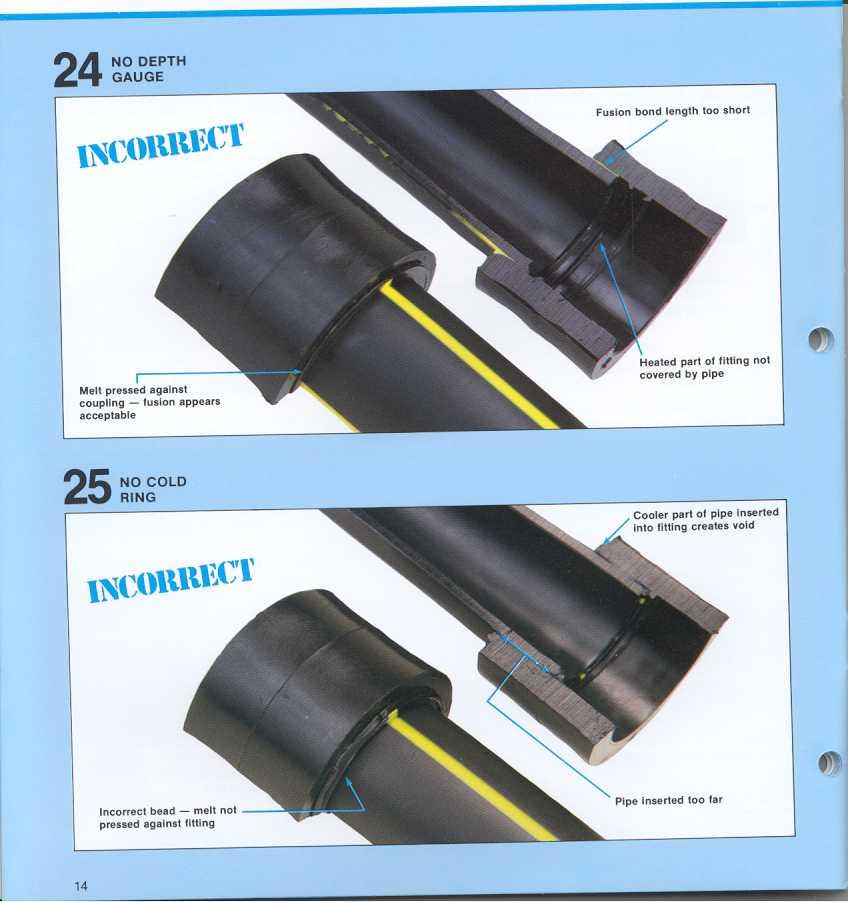
14 ..
15 @
Socket Heat Fusion Techniques. A Guide for Instruction and Training in Vanguard Socket Heat Fusion
 Socket Heat Fusion Techniques A Guide for Instruction and Training in Vanguard Socket Heat Fusion TABLE OF CONTENTS This brochure has been developed to assist those responsible for socket fusion joining
METROPOLITAN Construction Standard No: UTILITIES DISTRICT
 Page: 1 of 8 A. GENERAL * The Plastic Pipe Institute (PPI) developed standardized butt-fusion procedures which are labeled by the industry as Generic Butt-Fusion Procedures. These procedures have been
Table of Contents Topic Page Introduction 1 Gas Distribution Products Overview 2 Federal Regulations for Gas Pipe Joining 2 Precautions
 Table of Contents Topic Page Introduction 1 Gas Distribution Products 1 Overview 2 Federal Regulations for Gas Pipe Joining 2 Precautions 3 Static Electricity 3 Electric Tools 4 Protection Against Shear
Performance Pipe, a Division of Chevron Phillips Chemical Company LP 5085 W. Park Blvd Suite 500 Plano, TX Phone: Fax:
 Manual PP-750 December 2012 December 2012 supersedes all previous editions PERFORMANCE PIPE HEAT FUSION JOINING PROCEDURES INTRODUCTION Performance Pipe, a Division of Chevron Phillips Chemical Company
THE GOOD GUIDE TO BUTT FUSION JOINTING....Connect
 THE GOOD GUIDE TO BUTT FUSION JOINTING...Connect THE GOOD GUIDE TO BUTT FUSION JOINTING This guide will provide basic information to enable the operative to: Equipment required: Understand the equipment
Natural Action Technologies HOUSE UNIT INSTALLATION INSTRUCTIONS for COPPER, PEX, AND CPVC PIPES USING SHARKBITE CONNECTORS
 Natural Action Technologies HOUSE UNIT INSTALLATION INSTRUCTIONS for COPPER, PEX, AND CPVC PIPES USING SHARKBITE CONNECTORS Congratulations! You have just received a Natural Action Technologies Structured
Proweld Equipment Owner & Maintenance Manual Halar Shop 6 W900 (Widos)
") Proweld Equipment Owner & Maintenance Manual Halar Shop 6 W900 (Widos) 35 Green Street, PO Box 653, Malden, MA 02148 Tel: (781) 321-5409 - Fax (781) 321-4421 - Toll Free: (800) 343-3618 www.asahi-america.com
Proweld Equipment Owner & Maintenance Manual Halar Shop 6 W900 (Widos) 35 Green Street, PO Box 653, Malden, MA 02148 Tel: (781) 321-5409 - Fax (781) 321-4421 - Toll Free: (800) 343-3618 www.asahi-america.com
Installation Instructions. For the 18 Built-In Dishwasher and Front Color Panels
 Installation Instructions For the 18 Built-In Dishwasher and Front Color Panels Printed in USA 154232102 Before You Begin DO NOT INSTALL DISHWASHER UNTIL YOU HAVE READ ALL INSTRUCTIONS. FOR YOUR SAFETY,
Patterson/AMT Inline Circulator Pump Refer to pump manual for General Operating and Safety Instructions.
 Please read and save this Repair Parts Manual. Read this manual and the General Operating Instructions carefully before attempting to assemble, install, operate or maintain the product described. Protect
Proweld Equipment Owner & Maintenance Manual Maxiplast (Widos Shop 6)
") Proweld Equipment Owner & Maintenance Manual Maxiplast (Widos Shop 6) Tel: (781) 321-5409 - Fax (781) 321-4421 - Toll Free: (800) 343-3618 www.asahi-america.com - asahi@asahi-america.com Direct Sales:
Proweld Equipment Owner & Maintenance Manual Maxiplast (Widos Shop 6) Tel: (781) 321-5409 - Fax (781) 321-4421 - Toll Free: (800) 343-3618 www.asahi-america.com - asahi@asahi-america.com Direct Sales:
568X, 587X, 588X Series
 Please read and save this Repair Parts Manual. Read this manual and the General Operating Instructions carefully before attempting to assemble, install, operate or maintain the product described. Protect
Owner s Guide and Installation Manual
 For Your Records and Warranty Assistance For reference, also attach your receipt or a copy of your receipt to the manual. Model Name Type 2 Models Owner s Guide and Installation Manual Model No. Date Purchased
OWNERS INSTRUCTION MANUAL
 OWNERS INSTRUCTION MANUAL 132CM/52 Classic INSTALLATION OPERATION MAINTENANCE CAUTION READ INSTRUCTIONS CAREFULLY FOR SAFE INSTALLATION AND FAN OPERATION. IF UNSURE CONSULT A QUALIFIED ELECTRICIAN SUITABLE
569, 570, 571, 572 Series
 Please read and save this Repair Parts Manual. Read this manual and the General Operating Instructions carefully before attempting to assemble, install, operate or maintain the product described. Protect
Heat Exchanger Tube Change Procedure
 Heat Exchanger Tube Change Procedure Application: DATS II, DATS III, CorrDATS, CFM-500 and high temp, 120 or 240 VAC manufactured after 1 May 01 Last Update: 17 Dec 02 The DATS II and III systems use identical
Always check local building codes before doing any construction work.
 How to Install Drop (Suspended) Ceiling Tiles (see page 5 for installing Glue-Up Ceiling Tiles) Ceilume's 0.013" thick ultra-light ceiling tile collection and 0.030" thick regular ceiling tile collection
Application Tooling Specification Sheet
 Modular Crimp Head Order No. 63827-5470 Application Tooling Specification Sheet TYPE 4A Hand Crimp Tool Order No. 63827-5400 FEATURES A full cycle ratcheting hand tool ensures complete crimps Ergonomically
DSSLF2X04H 2 IN 1. Intelligent Lead Free Soldering Station. OPERATION and MAINTENANCE MANUAL
 401H000898 DSSLFX04H Intelligent Lead Free Soldering Station IN 1 OPERATION and MAINTENANCE MANUAL Thank you for purchasing a lead free soldering station. It is designed for lead free soldering. Please
30-YEAR LIMITED WARRANTY
 PROGRESS LIGHTING 30-YEAR LIMITED WARRANTY PROGRESS LIGHTING FAN MOTORS ARE WARRANTED TO THE END USER TO BE FREE OF ELECTRICAL AND/OR MECHANICAL DEFECTS FOR A PERIOD OF 30 (THIRTY) YEARS FROM DATE OF SALE.
INSTALLATION MANUAL SPLIT TYPE ROOM AIR CONDITIONER (PART NO )
") SPLIT TYPE ROOM AIR CONDITIONER INSTALLATION MANUAL (PART NO. 9312791019-01) This air conditioner uses new refrigerant HFC (R410A). The basic installation work procedures are the same as conventional refrigerant
SPLIT TYPE ROOM AIR CONDITIONER INSTALLATION MANUAL (PART NO. 9312791019-01) This air conditioner uses new refrigerant HFC (R410A). The basic installation work procedures are the same as conventional refrigerant
OWNER'S SERVICE MANUAL NO INSPECTION, MAINTENANCE AND RECHARGE
 FOAM FIRE EXTINGUISHERS MODEL 254-6 LITER AFFF FOAM WITH SPRAY NOZZLE Model 250 2 ½ GAL.LON AFFF FOAM WITH ASPIRATED NOZZLE MODEL 252 2 ½ GAL.LON FFFP (ALCOHOL RESISTANT) FOAM WITH ASPIRATED NOZZLE OWNER'S
PURPLE K POWDER EXTINGUISHERS INSTALLATION, OPERATION, MAINTENANCE AND RECHARGE MANUAL
 PURPLE K POWDER EXTINGUISHERS INSTALLATION, OPERATION, MAINTENANCE AND RECHARGE MANUAL NO. 05602 FOR AMEREX STORED PRESSURE, HAND PORTABLE DRY CHEMICAL FIRE EXTINGUISHERS. ABC (Ammonium Phosphate Base)
SERVICING INFORMATION
 SERVICING INFORMATION OPTIKINETICS SOLAR 250 (Early Type) M.Ginda 06/03/08 1 Servicing the Solar 250 effects projector. This is a short guide on how to service the main component parts of the projector.
569, 570, 571, 572 Series
 Please read and save this Repair Parts Manual. Read this manual and the General Operating Instructions carefully before attempting to assemble, install, operate or maintain the product described. Protect
SUBCOURSE EDITION EN US ARMY ENGINEER SCHOOL PLUMBING FIXTURES (PLUMBING IV)
") SUBCOURSE EDITION EN5113 5 US ARMY ENGINEER SCHOOL PLUMBING FIXTURES (PLUMBING IV) US ARMY PLUMBER MOS 51K SKILL LEVELS 1 AND 2 COURSE PLUMBING FIXTURES (PLUMBING IV) SUBCOURSE NO. EN5113 US Army Engineer
SUBCOURSE EDITION EN5113 5 US ARMY ENGINEER SCHOOL PLUMBING FIXTURES (PLUMBING IV) US ARMY PLUMBER MOS 51K SKILL LEVELS 1 AND 2 COURSE PLUMBING FIXTURES (PLUMBING IV) SUBCOURSE NO. EN5113 US Army Engineer
Owner s Guide and Installation Manual
 For Your Records and Warranty Assistance For reference, also attach your receipt or a copy of your receipt to the manual. Model Name Type 2A Models Owner s Guide and Installation Manual Model No. Date
Not Shown Pad Cover, 6" Case, Yellow, 8" Case, Grey, 8" Case, Black, 8" Case, Black, 9" Case, Black, 10"
 S O NSTRUCTONS Model LJ6VH Models N4000 N5000 N6000 Models N4300 N5300 N6300 Models N4950 N5450 N6450 Models N5450CS N5000CS Rev. 6.5 / 02-13 nstruction Sheet 32612AM NA 1. 90510 Handle, Metal 2. 90520AM
Owner s Guide and Installation Manual
 For Your Records and Warranty Assistance For reference, also attach your receipt or a copy of your receipt to the manual. Model Name Type 8 Models Owner s Guide and Installation Manual Model No. Catalog
PVC Ductwork Model. Installation and Maintenance for
 Installation and Maintenance for PVC Ductwork Model WARNING! These installation instructions are for qualified and experienced technicians in the H.V.A.C. and Fire Protection field only. Failure to follow
Cased Aluminum Coils "Dedicated Upflow / Downflow" Convertible to horizontal with separately purchased kit
 18-AD32D1-3 Cased Aluminum Coils "Dedicated Upflow / Downflow" Convertible to horizontal with separately purchased kit Upflow models: 4PXCAU24BS3HAA 4PXCBU24BS3HAA 4PXCBU30BS3HAA 4PXCCU30BS3HAA 4PXCBU36BS3HAA
Please read the following installation instructions first after purchasing this product or transporting it to another location.
 9 Installation Overview Please read the following installation instructions first after purchasing this product or transporting it to another location. 1 Unpacking your refrigerator 2 Choosing the proper
ENRGY CURB APPLICATION GUIDE FOR TPO ROOFING SYSTEMS
 1. Introduction The ENRGY Curb mounting system is a lightweight, nonpenetrating, roof-integrated, photovoltaic (PV) mounting system designed to maintain roof integrity and maximize power density. This
Operator s Manual. Fusion Machine SIDEWINDER. Manual: SW00301 Revision: M 05/17. Patent No. 4,533,424
 Operator s Manual Fusion Machine SIDEWINDER Patent No. 4,533,424 Manual: SW00301 Revision: M 05/17 This product and other products could be protected by patents or have patents pending. All the latest
INSTALLATION GUIDE AND CHECKLIST
 INSTALLATION GUIDE AND CHECKLIST CLOCK SPRING SNAP WRAP November 2017 Copyright Clock Spring Company, L.C. TABLE OF CONTENTS a Snap Wrap Information...i Inspection Checklist...iii Snap Wrap Contents...1
PRODUCT CATALOGUE Avenue Edmonton, AB Canada T6E 5Z7. Toll Free: Phone: (780) Fax: (780)
 Fax: (780)") PRODUCT CATALOGUE 9333 45 Avenue Edmonton, AB Toll Free: 1-800-272-9693 Phone: (780) 436-1930 Fax: (780) 435-4849 info@can-con.com BUTT FUSION EQUIPMENT MicroMax weighs only 3.5 pounds (1.6kg) for ½ CTS
PRODUCT CATALOGUE 9333 45 Avenue Edmonton, AB Toll Free: 1-800-272-9693 Phone: (780) 436-1930 Fax: (780) 435-4849 info@can-con.com BUTT FUSION EQUIPMENT MicroMax weighs only 3.5 pounds (1.6kg) for ½ CTS
TECHNICAL INSTRUCTIONS
 TID-0004_0A TECHNICAL INSTRUCTIONS Hardware Procedure: Coil and Riser Replacement Procedures for All Styles of A, B, C, and D Indirect-Fired Water Heaters Applies to: Indirect-Fire Water Heaters. Description
OWNER S MANUAL CAVN SERIES SELF CONTAINED RETRACTABLE NOZZLE VACUUM SEALER WITH GAS PURGE
 OWNER S MANUAL CAVN SERIES SELF CONTAINED RETRACTABLE NOZZLE VACUUM SEALER WITH GAS PURGE WHAT S IN THE PACKAGE? This Operation Manual. (1) Vacuum Sealer. (1) E-(unit size) Heating Element, inside the
Proweld Equipment Owner & Maintenance Manual
 Proweld Equipment Owner & Maintenance Manual FIELD 12 TRENCH (Widos 4900) Tel: (781) 321-5409 - Fax (781) 321-4421 - Toll Free: (800) 343-3618 www.asahi-america.com - asahi@asahi-america.com Direct Sales:
METIS. Installation instructions. Riser rail kit INSTALLERS PLEASE NOTE THESE INSTRUCTIONS ARE TO BE LEFT WITH THE USER.
 METIS Riser rail kit Installation instructions INSTALLERS PLEASE NOTE THESE INSTRUCTIONS ARE TO BE LEFT WITH THE USER 2180531A September 2006 CONTENTS Page General installation notes 1 Main components
Installation Instructions
 Installation Instructions For the 18" Built-In Dishwasher Sears, Roebuck and Co. Sears Canada, Inc. Hoffman Estates, IL 60179 U.S.A. Toronto, Ontario, Canada M5B 2B8 154435201 Before You Begin DO NOT INSTALL
Male elbow, copper x BSP taper male thread
 Male elbow, copper x BSP taper male thread YP13 Elbow Size Pattern No. Pack 1 Qty Pack 2 Qty Code Barcode Price ( ) ex VAT test 15mm x 1/2" YP13 10 240 08333 5022050083333 16.22 22mm x 3/4" YP13 5 100
Technical Data TYPE T14 & T14D TEMPERATURE PILOT SPENCE ENGINEERING COMPANY, INC. 150 COLDENHAM ROAD, WALDEN, NY SD 4511A T14 PILOT
 Technical Data SD 4511A SPENCE ENGINEERING COMPANY, INC. 150 COLDENHAM ROAD, WALDEN, NY 12586-2035 TYPE T14 & T14D TEMPERATURE PILOT PRINTED IN U.S.A. SD 4511A/9811 5 13 /16 D 4 7 /8 1 13 /16 T14 PILOT
WHEELED STORED PRESSURE
 OWNERS SERVICE MANUAL NO. 19795 INSTALLATION, OPERATING & SERVICING INSTRUCTIONS All fire extinguishers should be installed, inspected and maintained in accordance with the National Fire Protection Association
Hanson LED C e i l i n g F a n
 Hanson LED C e i l i n g F a n model no. 052-8398-2 Toll-free 1-866-827-4985 IMPORTANT: For your safety please read and understand this manual before installing or operating this product. OWNER S MANUAL
Juna Ceiling Fan JU54. Installation Instructions Instrucciones de instalación Instructions d installation
 Juna Ceiling Fan JU54 Installation Instructions Instrucciones de instalación Instructions d installation Read and Save These Safety Precautions. Turn off electricity at main switch before wiring or servicing
AOYG18LFC OUTDOOR UNIT INSTALLATION MANUAL INSTALLATION MANUAL. For authorized service personnel only. PART NO
 AOYG8LFC OUTDOOR UNIT INSTALLATION MANUAL INSTALLATION MANUAL For authorized service personnel only. English PART NO. 93778639 93778639_IM.indb /20/20 6:07:25 PM AIR CONDITIONER OUTDOOR UNIT INSTALLATION
INSTALLATION MANUAL. Split-type Air Conditioner (Cooling and Heating) Outdoor Unit UQB09JJWC UQB12JJWC. Indoor Unit AQB09JJWC AQB12JJWC
 Outdoor Unit UQB09JJWC UQB12JJWC. Indoor Unit AQB09JJWC AQB12JJWC") AQB09JJ6WC_IM_E_2585 2006.4.17 4:26 PM Page 17 INSTALLATION MANUAL Indoor Unit AQB09JJWC AQB12JJWC Outdoor Unit UQB09JJWC UQB12JJWC ENGLISH FRANÇAIS ESPAÑOL Split-type Air Conditioner (Cooling and Heating)
AQB09JJ6WC_IM_E_2585 2006.4.17 4:26 PM Page 17 INSTALLATION MANUAL Indoor Unit AQB09JJWC AQB12JJWC Outdoor Unit UQB09JJWC UQB12JJWC ENGLISH FRANÇAIS ESPAÑOL Split-type Air Conditioner (Cooling and Heating)
MAYFIELD CEILING FAN LISTED E ITEM # MODEL #BTH44ABZC5C BTH44BNK5C Español p. 20 ATTACH YOUR RECEIPT HERE.
 Harbor Breeze is a registered trademark of LF, LLC. All Rights Reserved. ITEM #0331094 0331096 MAYFIELD CEILING FAN MODEL #BTH44ABZC5C BTH44BNK5C Español p. 20 ATTACH YOUR RECEIPT HERE Serial Number Purchase
Gas Connector Installation Instructions
 Gas Connector Installation Instructions 6015 Enterprise Drive Export, PA 15632 USA 1-800-DORMONT (367-6668) (724) 733-4800 Fax (724) 733-4808 www.dormont.com Safety Precautions - Read warnings carefully
52 CEILING FAN READ AND SAVE THESE INSTRUCTIONS FAN RATING AC 120V.
 Irene 52 CEILING FAN READ AND SAVE THESE INSTRUCTIONS FAN RATING AC 120V. 60Hz TABLE OF CONTENTS Tools and Materials Required... 1 Package Contents... 1 Safety Rules... 2 Mounting Options... 3 Hanging
QUICK 3202 OPERATION MANUAL. Lead Free Soldering Station
 QUICK 30 Lead Free Soldering Station OPERATION MANUAL Thank you for purchasing the unit. It is designed for lead free soldering. Please read this manual carefully before use and keep it for future reference.
Application Instructions
 Application Instructions Recommended Materials for LizardSkin Application LizardSkin Sound Control and/or Ceramic Insulation LizardSkin SuperPro Application Kit LizardSkin TopCoat Air compressor capable
H-16.5 Record Cleaning Machine Setup and Instruction Manual
 H-16.5 Record Cleaning Machine Setup and Instruction Manual VPI INDUSTRIES, INC., 77 CLIFFWOOD AVE., #3B, CLIFFWOOD, NJ 07721 PHONE: 1-732-583-6895, FAX: 1-732-946-8578 http://www.vpiindustries.com 1 Table
Catalog Issued GLOBAL APPLICATION TOOLING AND EQUIPMENT
 GLOBAL APPLICATION TOOLING AND EQUIPMENT Table of Contents Introduction........................................................... 1 Area of Application......................................................
CEILING FAN OWNER S MANUAL
 CEILING FAN OWNER S MANUAL VERA CRUZ 5/04 GENERAL INSTALLATION & OPERATION INSTRUCTIONS IMPORTANT SAFEGUARDS: 1. To ensure the success of the installation, be sure to read the instructions and review the
Technical Bulletin TB036 - CHANGES IN THE HEATER REBUILD AND RECOAT SERVICE OFFERINGS
 Technical Bulletin TB036 - CHANGES IN THE HEATER REBUILD AND RECOAT SERVICE OFFERINGS To: All McElroy Manufacturing Fusion Distributors Over the years McElroy Manufacturing, Inc. has supported your recoat
ELECTRIC FLAT PANEL FIREPLACE HEATER
 ELECTRIC FLAT PANEL FIREPLACE HEATER Model Numbers: 80-2000A-42 OWNER S MANUAL AC 120V 60Hz 1500W WARNING Read and understand this entire owner s manual, including all safety information, before plugging
2/4TXCC037BC3HCA 2/4TXCB042BC3HCA 4TXCC044BC3HCA 2/4TXCC043BC3HCA 2/4TXCB048BC3HCA
 18- AH39D1-4 Cased Aluminum "Convertible" Coils 2/4TXCA018BC3HCA 2/4TXCA024BC3HCA 2/4TXCB025BC3HCA 2/4TXCB031BC3HCA 4TXCB032BC3HCA 2/4TXCB036BC3HCA ALL phases of this installation must comply with NATIONAL,
Instruction Manual. Model: LPP4513 (18 ) For safe operation be sure to read through this instruction manual before operating your Laminator.
 For safe operation be sure to read through this instruction manual before operating your Laminator.") Instruction Manual Model: LPP4513 (18 ) For safe operation be sure to read through this instruction manual before operating your Laminator. ID Card System, Laminating Machines & Film FUJIPLA, Inc. TOKYO,
Instruction Manual Model: LPP4513 (18 ) For safe operation be sure to read through this instruction manual before operating your Laminator. ID Card System, Laminating Machines & Film FUJIPLA, Inc. TOKYO,
Union coupling. copper x copper. Cone joint to BS 1010.
 Union coupling. copper x copper. Cone joint to BS 00. YP Size Pattern No. Pack Qty Pack 2 Qty Code Barcode Price ( ) ex VAT 8mm YP 5 00 08250 502205008250 2.78 5mm YP 0 00 0825 502205008250 8.4 22mm YP
Installation and Operation Manual For Hunter Ceiling Fans /16/2004
 Installation and Operation Manual For Hunter Ceiling Fans 1 2 CONGRATULATIONS! Your new Hunter ceiling fan is an addition to your home or office that will provide comfort and performance for many years.
SAN RAPHAEL PRESSURE LITE VITREOUS CHINA SIPHON JET TOILET
 SAN RAPHAEL PRESSURE LITE VITREOUS CHINA SIPHON JET TOILET BEFORE YOU BEGIN HOW TO USE THESE INSTRUCTIONS Please read these instructions carefully to familiarize yourself with the required tools, materials,
Installation Instructions
 Installation Instructions KFN 9855 ide en - CA Installation, repair and maintenance work should be performed by a Miele authorized service technician in accordance with national and local safety regulations
OWNER S MANUAL AVN SERIES RETRACTABLE NOZZLE VACUUM SEALER WITH GAS PURGE
 OWNER S MANUAL AVN SERIES RETRACTABLE NOZZLE VACUUM SEALER WITH GAS PURGE WHAT S IN THE PACKAGE? This Operation Manual. (1) Vacuum Sealer. (1) E-(unit size) Heating Element, inside the manual sheet protector.
OPERATING & SERVICE PARTS MANUAL HDS-215 COMBINATION SHRINK SYSTEM
 OPERATING & SERVICE PARTS MANUAL HDS-215 COMBINATION SHRINK SYSTEM FOR HOT KNIFE AND IMPULSE MACHINES READ ALL INSTRUCTIONS CAREFULLY BEFORE OPERATING EQUIPMENT TABLE OF CONTENTS Electrical Requirements
Non Woven Wallcoverings with or without Crystals Installation and Maintenance Guidelines
 Non Woven Wallcoverings with or without Crystals Installation and Maintenance Guidelines For Vescom Non Wovens: Basic, Patterns, and Swarovski Crystals BEFORE YOU BEGIN Examine the material carefully to
FIREPLACE INSTALLATION
 CHECK GAS TYPE Use proper gas type for the fireplace unit you are installing. If you have conflicting gas types, do not install fireplace. See retailer where you purchased the fireplace for proper fireplace
Qualcast 430W Grass Trimmer (Model: GT2826)
") Qualcast 430W Grass Trimmer (Model: GT2826) Instruction Manual After Sales Support UK/Ireland 0845 077 8888 Republic of Ireland 0124 77708 Web www.homebasespares.co.uk Important - Please read these instructions
Qualcast 430W Grass Trimmer (Model: GT2826) Instruction Manual After Sales Support UK/Ireland 0845 077 8888 Republic of Ireland 0124 77708 Web www.homebasespares.co.uk Important - Please read these instructions
The feedhorn heaters consist of heater wire attached to a strap and covered with heatshrink. They are attached to a rib on the feedhorn.
 Satellite Antenna De-icing Systems Automatic De-icing System for Protection against Snow and Ice Simple to Field Install and Operate Engineered for Customer Specified Voltages Low Energy Costs User selectable
Installation, Operation and Maintenance LOK-FLANGE Multitube Heat Exchangers
 Bulletin 1200/4 (Revised 5/12) Installation, Operation and Maintenance LOK-FLANGE Multitube Heat Exchangers INNOVATORS IN HEAT TRANSFER I. INSTALLATION OF HEAT EXCHANGERS A. HEAT EXCHANGER SETTINGS 1)
Corr/Guard PRESSURE RATED VENTING SYSTEM IMPORTANT: DO NOT INSTALL WITHOUT FIRST READING THESE INSTRUCTIONS VERY CAREFULLY.
 CORR/GUARD INSTALLATION INSTRUCTIONS This symbol on the nameplate means this product is listed by Underwriters Laboratories Inc. Tested to UL1738 / CAN / ULCS636-1995 Listing No. MH26687 Testing No. 11EN
Installation & Service Guide
 Reverse Osmosis Ontario Soft Water.ca Kitchener, Canada 519-579-0500 Installation & Service Guide Pentair 75 gpd Encapsulated Membrane System Standard System 75gpd Membrane Your New Reverse Osmosis System
Please read and digest ALL the instructions before you commence installation.
 Installation Instructions Please read and digest ALL the instructions before you commence installation. If you are still unsure, then please call or contact us through our Support page. We recommend our
SUNSEEKER BY INSTRUCTION MANUAL WARRANTY CERTIFICATE
 SUNSEEKER BY INSTRUCTION MANUAL WARRANTY CERTIFICATE Manual design and all elements of manual design are protected by U.S. Federal and/or State Law, including Patent, Trademark and/or Copyright laws. The
DSSHP06G Intelligent Lead Free Soldering Station INSTRUCTION MANUAL
 DSSHP06G Intelligent Lead Free Soldering Station Sensor in front High frequency heating Digital Calibration Rapid recovery of temperature INSTRUCTION MANUAL Thank you for purchasing this lead free soldering
MULTI HEAT PUMP PANEL CONSOLE TYPE DUCTLESS INVERTER INDOOR UNIT INSTALLATION MANUAL. Models: CH09MCU230VI CH12MCU230VI CH18MCU230VI
 MULTI DUCTLESS INVERTER HEAT PUMP PANEL CONSOLE TYPE INDOOR UNIT INSTALLATION MANUAL Models: CH09MCU230VI CH12MCU230VI CH18MCU230VI Thank you for choosing a C&H Multi Ductless Heat Pump! You can feel confident
FT982. Electric Professional Fogger. CAUTION: Read and follow all instructions
 FT982 Electric Professional Fogger CAUTION: Read and follow all instructions Do Not Return This Fogger To The Store For Help, Information or Parts, Call : 1-800-311-9903 The Fountainhead Group, Inc. 23
Owner s Guide and Installation Manual
 For Your Records and Warranty Assistance For reference, also attach your receipt or a copy of your receipt to the manual. Model Name Type 2A Models Owner s Guide and Installation Manual Model No. Date
C-IV 60 CEILING FAN READ AND SAVE THESE INSTRUCTIONS. FAN RATING AC 120V. 60Hz
 C-IV 60 CEILING FAN READ AND SAVE THESE INSTRUCTIONS FAN RATING AC 120V. 60Hz Please do not use any electric or battery powered tools in the assembly and installation of this or any Matthews Fan Company
Instructions for Coating Fimbel Garage Door Panels
 www.aqua-diy.com Instructions for Coating Fimbel Garage Door Panels Aqua DIY D100 is a high performance heat reflective water-based coating. It has been shipped to you with a thickness suitable for manual
MODEL SK2750. COMPRESSOR SERVICE KIT For use on 2750 Series Compressors
 MODEL SK2750 COMPRESSOR SERVICE KIT For use on 2750 Series Compressors WARNING: Unplug the compressor before beginning disassembly. CAUTION: Improper assembly or use of damaged parts may lead to premature
Heat Exchanger Block Replacement Instructions
 Series 1-4 Gas-fired water boiler Heat Exchanger Block Replacement Instructions Ultra-80 S1-4 Heat Exchanger Block Replacement Kit, Part No. 383-500-773 Ultra-105 S1-4 Heat Exchanger Block Replacement
AquaLiv Water System - Usage & Installation Instructions
 AquaLiv Water System - Usage & Installation Instructions Congratulations on your purchase of an AquaLiv Water System the most complete and comprehensive water purification and enhancement system available
Product instruction manual Easymount Wide Format Laminators
 Product instruction manual Easymount Wide Format Laminators The Easymount has been designed to be user friendly, however we strongly recommend you take a few minutes to read through this manual to ensure
 www.whitakerbrothers.com The Challenge Machinery Company provides owner's manuals on its products solely as a courtesy to its customers. See the information below before using this manual. These manuals
Bliss Box Former Troubleshooting. 6.1 Troubleshooting Chart. Troubleshooting INTRODUCTION SAFETY PROCEDURES
 6.0 Bliss Box Former 1.0 INTRODUCTION Table 6-1 provides a logical sequence of tests that are designed to isolate problems with the Bliss Box Former machines. This table includes a list of probable causes
DUOPEX WATER MANUAL mm
 DUOPEX WATER MANUAL 32-63mm The DUOPEX WATER Pipe and Fitting System is designed for 32mm- 63mm potable hot and cold water applications. This revolutionary alternative for the professional plumber, makes
The feedhorn heaters consist of heater wire attached to a strap and covered with heatshrink. They are attached to a rib on the feedhorn.
 Satellite Antenna De-icing Systems for Dish Antennas Automatic De-icing System for Protection against Snow and Ice Simple to Field Install and Operate Engineered for Customer Specified Voltages Low Energy
Manual Supplement. This supplement contains information necessary to ensure the accuracy of the above manual.
 Manual Supplement Manual Title: 4180, 4181 Technical Guide Supplement Issue: 3 Part Number: Web-Only Issue Date: 4/18 Print Date: March 2013 Page Count: 4 Revision/Date: This supplement contains information
ALUMA INSTRUCTION MANUAL WARRANTY CERTIFICATE
 ALUMA BY INSTRUCTION MANUAL WARRANTY CERTIFICATE Manual design and all elements of manual design are protected by U.S. Federal and/or State Law, including Patent, Trademark and/or Copyright laws. The Minka-Aire
ST. KITTS CEILING FAN
 ITEM #0845047 ST. KITTS CEILING FAN MODEL #40829 Questions, problems or missing parts? Before returning this item to your retailer, call our customer service department at 1-800-643-0067, Monday - Thursday,
INSTALLATION MANUAL. Split-type Air Conditioner (Cooling and Heating) Indoor Unit AQB18J6WC AQB24J2WC. Outdoor Unit UQB18J6WC UQB24J2WC
 Indoor Unit AQB18J6WC AQB24J2WC. Outdoor Unit UQB18J6WC UQB24J2WC") AQB8J6WC_IM_E_25864 2006.4.4 3:29 PM Page 7 INSTALLATION MANUAL Indoor Unit AQB8J6WC AQB24J2WC Outdoor Unit UQB8J6WC UQB24J2WC ENGLISH FRANÇAIS ESPAÑOL Split-type Air Conditioner (Cooling and Heating)
AQB8J6WC_IM_E_25864 2006.4.4 3:29 PM Page 7 INSTALLATION MANUAL Indoor Unit AQB8J6WC AQB24J2WC Outdoor Unit UQB8J6WC UQB24J2WC ENGLISH FRANÇAIS ESPAÑOL Split-type Air Conditioner (Cooling and Heating)
Muskogee Public Schools Custodial Procedures for Floor Care
 FLOOR CARE ENTRANCE MATS PURPOSE OF ENTRANCE MATS A. Exterior Mats a. Remove sand and gravel from shoes prior to entering the building. b. Minimize the amount of abrading material that will scratch and
Guide for Thin Film Evaporation Edited 7/22/13 by Stephen Albright, BJAM & Steven Palefsky
 Guide for Thin Film Evaporation Edited 7/22/13 by Stephen Albright, BJAM & Steven Palefsky N.B. This guide is written largely for use with the Thin-Film Tunneling with Superconductors instructional lab.
Intelligent Lead Free Soldering Station OPERATION and MAINTENANCE MANUAL
 Intelligent Lead Free Soldering Station Sensor in front High frequency heating Digital Calibration Rapid recovery of temperature OPERATION and MAINTENANCE MANUAL Thank you for purchasing a lead free soldering
SPRINGHILL 44 CEILING FAN
 SPRINGHILL 44 CEILING FAN MODELS #50184, 50185 Español p. 20 Questions, problems, missing parts? Before returning to your retailer, call our customer service department at 1-877-361-3883, Monday - Thursday,
Owner s Guide and Installation Manual
 For Your Records and Warranty Assistance For reference, also attach your receipt or a copy of your receipt to the manual. Model Name Type 2 Models Owner s Guide and Installation Manual Model No. Catalog
BUILT-IN DISHWASHER INSTALLATION INSTRUCTIONS
 BUILT-IN DISHWASHER INSTALLATION INSTRUCTIONS PLEASE READ COMPLETE INSTRUCTIONS BEFORE YOU BEGIN LEAVE INSTALLATION INSTRUCTIONS AND USER'S GUIDE WITH OWNER ALL ELECTRIC WIRING AND PLUMBING MUST BE DONE