TABLE OF CONTENTS. Whisper Jet Manual. Purpose, Components 5. Operation 6. Installation Troubleshooting References 14
|
|
|
- Toby Carpenter
- 5 years ago
- Views:
Transcription
1
2 TABLE OF CONTENTS Purpose, Components 5 Operation 6 Installation 6-12 Troubleshooting References 14 Figures & Drawings Page 3
3 Rev Whisper Jet Manual Whisper Jet Manual
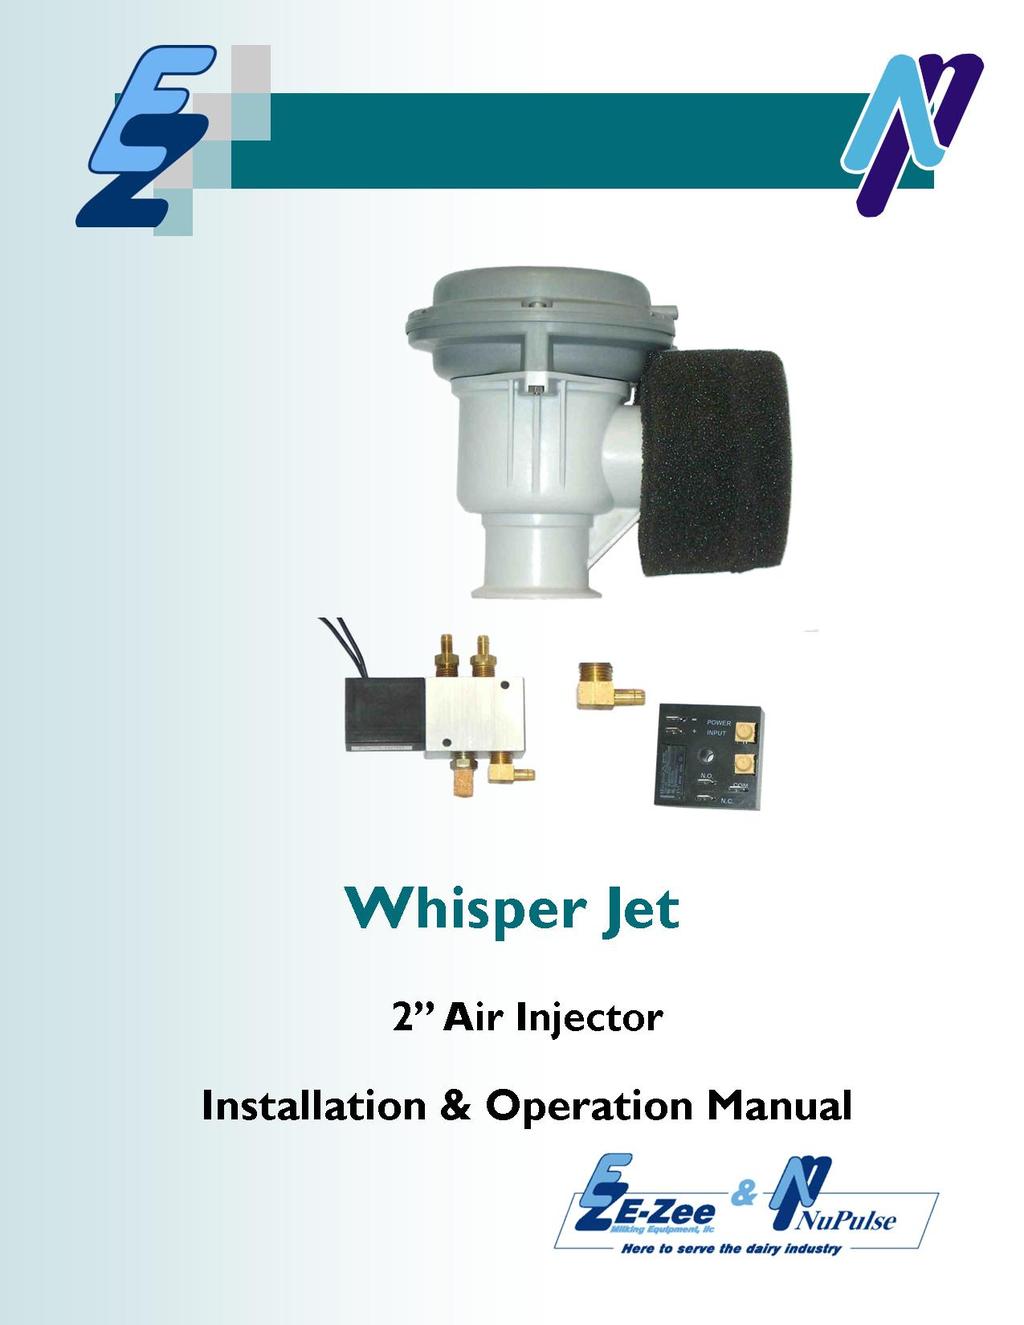
4 PURPOSE An air injector is used in conjunction with an automatic pipeline washer to create a slug of wash solution for the purpose of cleaning all interior surfaces of a pipeline. There are several important factors required for proper cleaning of a pipeline. 1) Wash solutions are at the proper concentrations and temperature. 2) All surfaces are contacted for a sufficient period of time. 3) The slug has enough velocity and density to provide scouring action. The air injector must be adjusted correctly to aid in meeting these requirements. COMPONENTS DESCRIPTION QTY 50 MM Valve assembly 1 2 End Cap, Sani Pro 1 4 way 120VAC Solenoid Valve 1 1/4 ID x 3/8 OD clear PVC tubing 15 ft. Brass 1/4 NPT x 1/4 barb elbow 2 1/4 MNPT brass filter 1 Repeat cycle timer 1 2 Hycar Gasket 2 2 V Insert Clamp 2 Brass 1/4 NPT x 1/4 Barb Straight 2 LOCALLY SOURCED ITEMS - 1/4" ID x 1/2" OD single pulsation hose - 2" x 1-1/2" reducer (if connecting to 1-1/2" pipeline) - Tee or Wye for connecting into "Add water line" - Enclosure to house repeat cycle timer and solenoid valve (if there is not ample room in washer control box) Page 5
5 Whisper Jet Manual SPECIAL TOOLS 1) 1/4" N.P.T. Tap & 27/64 drill bit 2) 3/16", 1/4", 5/16", 3/8", 7/16" & 1/2" drill bits OPERATION The air injector has three possible adjustments: 1) The amount of air admitted into the pipeline: controls velocity of slug. 2) The amount of time air is being admitted referred to as "ON" time. 3) The amount of time between air blasts referred to as "OFF" time. When a system starts washing, vacuum is applied to the pipeline and wash solution is drawn in. The air injector is in the "OFF" time to allow wash solution to accumulate. The length of the "OFF" time is determined by the amount of wash solution flowing into the pipeline and the size of the pipeline to be washed. Enough water should be allowed to enter the pipeline to form a slug length of at least 10 feet. The "ON" time of the air injector needs to be long enough to allow the slug to travel the length of the pipeline and reach the receiver. The amount of air admitted into the pipeline determines the velocity of the slug. The velocity of the slug should be between 20 and 33 feet per second. If an insufficient amount of air is admitted into the pipeline, a slug may not form or the slug will not have enough velocity to make it to the receiver. If too much air is admitted, the air may break up the slug before it reaches the receiver. INSTALLATION 1) Assemble the air injector as shown in Figure 1. 2) It is preferred that the air injector be installed in a clean environment such as the milk room to keep the filter cleaner. The air injector assembly can be mounted in either a horizontal or vertical position. 3) Parlor Installation: The air injector assembly is mounted to a Tee or Wye fitting on the "ADD WATER" pipeline running between the wash vat and the connection into the milk pipeline next to the receiver. A milk/wash valve or plug must be located between the "ADD WATER" line and the receiver to force the slug to travel around the pipeline. It is not recommended that the air injector be installed on the jetter supply line. It should be on a separate "ADD" water line from the wash vat to the pipeline. Refer to Figure 8. Rev. 0908
6 1) Around the barn pipeline: Single loop or double loop with equal length loops. The air injector assembly is mounted to a Tee or Wye fitting on the wash pipeline running between the wash manifolds or wash vat and the connection into the milk pipeline next to the receiver. A milk/wash valve or plug should be located between the wash line and the receiver to force the slug to travel around the pipeline. Refer to Figures 5 and 6. 2) Around the barn pipeline: Unequal length loops. Two separate air injector valves will be needed but controlled from a common timer. The air injector assemblies are mounted to a Tee or Wye fitting on the wash pipeline running between the wash manifolds or wash vat and the connection into the milk pipeline next to the receiver. A milk/wash valve or plug should be located between the wash line and the receiver to force the slug to travel around the pipeline. Refer to Figure 7. 3) The three 1/4" brass fittings and the air filter must be assembled onto the 4 way solenoid, refer to Figure 3 for proper location. Use Teflon tape on all threads. 4) The repeat cycle timer and the solenoid valve must be mounted in an enclosure. Typically there is ample room in the automatic washer control box for these items, however if there is not room, an enclosure will need to be supplied locally. The timer must be provided with 120 V AC power from the washer. If the washer control does not have a location to wire in an air injector, it can be wired to the output that powers the vacuum pump. Use 18 ga wire to make the connection to the timer and solenoid. Refer to Figure 4 for wiring schematic. 5) One 1/2" and one 3/8" hole will need to be drilled in the enclosure for the vacuum supply tubing coming from the vacuum source and going to the 50mm air injector valve. 6) Locate a vacuum line close to the solenoid valve and drill (27/64" bit) and tap a 1/4" NPT hole into the line. It is recommended that the hole be on the side or top of the pipe but not the bottom as moisture may accumulate there which can lead to premature failure of the solenoid valve. Thread the supplied 1/4" brass elbow fitting into this hole using Teflon tape on the threads. 7) Route the dealer supplied 1/4" ID x 1/2" OD vacuum tubing from the vacuum source to the solenoid valve. Route the supplied 1/4" ID x 3/8" OD clear PVC tubing from the solenoid valve to the 50 mm valve. Secure the tubing and be careful not to kink or make sharp bends while routing the tubing which could restrict air flow. Page 7
7 Whisper Jet Manual ADJUSTMENTS Air Admission Rate The air admission rate controls the velocity of the slug and varies depending on the pipeline diameter. Research by the University of Wisconsin has found that the velocity of the slug should be between 20 and 33 feet per second to get the required cleaning action. When slug velocities are too low, it is difficult to maintain a slug. When velocities are too high, excessive air is mixed with the slug causing the slug to break apart or provide inadequate shear action for cleaning. The table below gives the recommended air admission rate range for standard pipeline sizes. The low value reflects a 20 ft/sec. velocity while the high value reflects a 33 ft/sec. velocity. Table #1 - Recommend Air Flow Rates Pipeline Size Air Flow Rate scfm* scfm* scfm* scfm* *scfm standard cubic feet per minute The NuPulse air injector assembly has a plastic end cap that will need a hole drilled in it to admit the proper amount of air. The Table #2 lists the common hole diameters and the approximate air flow the hole will admit. In some cases it may be necessary to drill multiple holes to achieve the desired air admission. Start with a hole size that will admit an air flow rate on the lower end of the recommended range and then test the system to see that the desired slug velocity was achieved. It is better to error on a smaller size hole -they are easy to make larger but difficult to make smaller. Rev. 0908
8 Table #2- Hole Size Admission Rate Hole Size Air Admission Rate ¼ 14 cfm 5/16 21 cfm 3/8 28 cfm 7/16 38 cfm ½ 52 cfm Air Injector timer -"OFF" length While the air injector is off or closed, wash solution is being drawn into the system. It is necessary to provide enough water to develop a minimum 10 foot long slug. Water is drawn into the system through milk units and, in parlor systems, an "add water" line. The table below is the approximate amount of water needed to develop and maintain a slug in a pipeline. The amount of water entering the system can be estimated several different ways. Pipeline Size Wash Solution Volume 2 3 gallons gallons 3 7 gallons 4 13 gallons Page 9
9 Whisper Jet Manual 1. Cylindrical Vertical Wash Vat Measure the wash vat's inside diameter in inches (D) and record. As the wash cycle starts, measure the drop in the wash solution level during each air injector cycle until the milk pump starts. Determine the average in inches (Y) and use the following equation to determine the gallons of wash solution. Gallons of wash solution per cycle = Y*D (Y, D must be in units of inches) 2. Horizontal Wash Vat Measure the inside dimensions for the top of the wash vat in inches (L & W). The assumption is that during the first few cycles, the wash solution level will be in the straight side section of the sink. Measure the wash solution level drop per air injector cycle in inches (H) during several cycles before the milk pump returns wash solution to the sink. Determine the wash solution use per cycle by the following equation: Gallons of wash solution per cycle = (L x W x H) / 231 (L, W & H must be in inches) 3. System with Milk Meters Put milk meters and/or detachers in attach & manual mode and read the amount of solution going through each unit as the wash cycle progresses. This method is also helpful in balancing the wash solution flow through individual milking units. 4. System where Solution is Drawn through Milker Units Only Fill a bucket with a predetermined amount of solution and allow a milking unit to draw the solution out of the pail. Count the number of air injector cycles to empty the pail. The total amount of solution entering the system would then be estimated as the amount of solution drawn through one unit per cycle multiplied by the number of milking units. Adjust the air injector "OFF" time until the desired amount of wash solution is entering the system. The recommended amount of wash solution per cycle should be about one third the capacity of receiver. Greater amounts can cause flooding of the trap. Lesser amounts may not provide adequate coverage to clean the receiver. Rev. 0908
10 Air Injector Timer -"ON" length The air injector needs to be open enough time for the slug to form and travel the total length of the pipeline and empty into the receiver. Measure the length of pipeline in feet (Lp) that the slug must travel. The pipe length will include the length from the air injector to the receiver. Determine the desired slug velocity in feet per second (V). Use the following equation to estimate the "ON" time of the air injector: ON Time = Lp / V If the air admission rate is set in the middle of the suggested range, use a velocity of 26 feet per second. Special System Considerations 1. Around the barn (RTB) pipeline - single loop Refer to Figure 5. This system can be setup and adjusted with no special considerations. 2. Around the barn pipeline - double loops, equal length Refer to Figure 6. This system is typical of barns with the milk house in the middle. This configuration only works if the loops are of equal length. If the sides are different lengths the longer loop will typically experience cleaning problems. The connections to the looped line from the receiver should be done with Y fittings not a "T". The air admission rate and slug volume will need to be doubled because the slug will be split at the first Y and travel in two direction and then recombine at the second Y in route to the receiver. It is recommended that the air admission rate be adjusted for a velocity 40 ft/sec so it will be 20 ft/ sec in each direction. 3. Around the barn pipeline - double loops, unequal length Refer to Figure 7. This pipeline configuration has a Y connection on the return line to the receiver. An air injector is required on each loop controlled by a common timer. The water volume is adjusted per the above recommendation for the pipeline size being used. The air admission rate is adjusted differently for each loop. The slug velocity in the longer loop needs to be higher than the shorter side so the slug from the longer side reaches the Y before the slug from the shorter side enters the receiver. Page 11
11 Whisper Jet Manual 4. Parlor System Parlor systems are cleaned similarly to a single loop RTB pipeline except that a large portion of the wash solution typically enters the system through the milking units and is distributed over the length of the pipeline rather than a single point like the RTB pipeline. An important issue in parlor systems is the even distribution of wash solution through the jetters so the milker units are properly cleaned. One way to control solution distribution is with the use of restrictors in the jetters or their supply hoses. If the parlor has milk meters or other specialized automation, refer to the manufacturers requirements for washing otherwise the wash system should be set up as described in this manual. Refer to Figure 8. Fine Tuning Adjustments Visually observe the following during several wash cycles and make necessary adjustments. 1) The air injector should close just as the slug is entering the receiver. 2) The slug should have enough volume and velocity to coat all surfaces inside the receiver. 3) Ideally the trap should be filled to 1/4 capacity at the end of each wash cycle in order to clean the elbow between the receiver and the sanitary trap. 4) Milk pump capacity should be adequate to keep up with washing. 5) Vacuum level should recover between air injector cycles. It is important to take some vacuum reading at different points on the pipeline to ensure the slug is covering the entire pipeline. Refer to reference 3 for information on using a vacuum meter to take readings. Troubleshooting 1. A slug does not enter the receiver during each air injector cycle. a) "ON" time not long enough -slug does not reach receiver. b) Slug Velocity too high -reduce air admission rate. c) Milk/wash valve leaks too much. d) Not enough wash solution to form a slug - increase "OFF" time or wash solution. Rev. 0908
12 2. Sanitary trap filling up. a) Too much water per cycle -check wash solution draw rate. It may be necessary to install a restrictor between the wash vat/sink and the air injector to reduce wash solution flow rate if the "OFF" time cannot be reduced. b) Milk pump not keeping up - refer to #3 below. 3. Milk Pump not keeping up. a) Check that there are no air leaks between gaskets and check the condition of the milk pump check valve. Reduce vacuum level during washing. Milk pump capacity is affected by the vacuum level. Reducing the vacuum level during washing will increase pump capacity and decrease the flow rate of solution into the system. b) Reduce amount of wash solution per cycle -may require restrictor between wash vat and air injector. c) Increase time for pumping -Increase "OFF" time and decrease wash solution flow rate. If you have a 2 channel vacuum recorder, it can be used to determine slug velocity, slug length and vacuum drop. Refer to Reference #3 and fax U of Wisconsin for a reprint. Maintenance Daily Monthly Check to see that air injector is working properly Wash air filter in mild detergent and replace. If dirty, clean more frequently. Check tubing for leaks and restrictions Yearly Every 2 years Every 3 years Replace all rubber seals in diaphragm valve Replace valve and stem in diaphragm valve Replace foam air filter Replace bearing in diaphragm valve Page 13
13 Whisper Jet Manual References 1) Reinemann, D.J., and A. Grasshoff, Milkline cleaning dynamics: design guidelines and troubleshooting. Proc National Mastitis Council 32nd Annual Meeting, Kansas City, MO. 2) Reinemann, D.J. and J.M. Book, 1994 Airflow requirements, design parameters and troubleshooting for cleaning milking systems. Proc ASAE / National Mastitis Council Dairy Housing Conference, 31 January 4 February, 1994, Orlando, FL USA 3) Reinemann, D.J., June Testing Cleaning Performance of Milking Systems with a Vacuum Recorder. Wisconsin Center for Dairy Research, University of Wisconsin, Madison, WI. For a reprint, send fax to: WITEP, Wisconsin Center for Dairy Research at Include mailing address and number of reprints wanted. Rev. 0908
14 Page 15
15 Whisper Jet Manual Figure 1 Air Injector Assembly For Part Numbers see page 17 Rev. 0908
16 Figure 2 Wash Valve Assembly NO. PART DESCRIPTION 1 D Valve Assembly Clamp Fitting 2 F Hycar Gasket 3 A Sanipro End Cap 4 F V Insert Clamp 5 A Air Filter 6 A Cycle Timer 7 A /4 Brass Filter 8 A /4 Barb Fitting Brass Elbow 9 A VAC Solenoid Valve 10 A /4 Barb Straight Fitting 11 D Valve Spring 12 D Diaphragm 13 D Distributor Seal 14 D Body Seal 15 D Valve Seal Page 17
17 Whisper Jet Manual Figure 3 Connection to Solenoid Valve Figure 4 Wiring Diagram Rev. 0908
18 Figure 5 - Around the Barn Pipeline Single Loop Figure 6 - Around the Barn Pipeline 2 Equal Loops Page 19


19 Whisper Jet Manual Figure 7 - Around the Barn Pipeline 2 Unequal Loops Figure 8 Parlor System Rev. 0908
20 Page 21
21
22
TROUBLESHOOTING HIGH BACTERIA COUNTS IN FARM MILK
 TROUBLESHOOTING HIGH BACTERIA COUNTS IN FARM MILK Douglas J. Reinemann, Graeme A. Mein, David R. Bray, David Reid, and Jenks S. Britt Sources of Bacterial Contamination in Raw Milk The two main sources
MKV MILK METER ICAR approved TECHNICAL MANUAL. Part Number: Waikato Milking Systems NZ Ltd, 2006
 MKV MILK METER ICAR approved Part Number: 39860152 Waikato Milking Systems NZ Ltd, 2006 WAIKATO MILKING SYSTEMS NZ LIMITED 119 Maui St, Pukete Industrial Estate, P O Box 20325 Hamilton, New Zealand Phone:
Guardian II Pipeline Washer B Instruction Supplement
 Guardian II Pipeline Washer B Instruction Supplement P.O. Box 8050 Madison, WI 53708 608-222-3484 Contents Introduction... 2 1. New Features... 2 1.1 Password For Setup... 2 1.2 Delay... 2 1.3 Date & Time
CMA Dishmachines Knott Avenue Garden Grove, CA Undercounter High Temperature Dishwasher. Service Replacement Parts.
 CMA Dishmachines 1700 Knott Avenue Garden Grove, CA 981 Toll Free: 1- (800) 8-617 Fax: 1- (71) 89-11 Service Replacement Parts Undercounter High Temperature Dishwasher Model: UC6e M Machine Serial No.
Owner s Manual. Keep with machine for reference PKC24 INSTALLATION & OPERATION REV Perlick Corporation 8300 W Good Hope Rd Milwaukee, WI 53223
 Owner s Manual Keep with machine for reference PKC24 INSTALLATION & OPERATION REV.11.09 Perlick Corporation 8300 W Good Hope Rd Milwaukee, WI 53223 800-558- 5592 FAX 414-353- 7069 perlick.com TABLE OF
Bob White Systems. the Bucket Milker Manual - Cow
 Bob White Systems the Bucket Milker Manual - Cow Attention: Please read instructions thoroughly before using equipment Upon receiving the unit, please check IMMEDIATELY to see whether there is any visible
Operating Instructions for the BBO-1 and BBO-2 Basket Blasters
 Operating Instructions for the BBO-1 and BBO-2 Basket Blasters 2101 West Cabot Boulevard Langhorne, PA 19047-1893 www.empire-airblast.com Page 2 Model Number: Serial Number: Date of Purchase: Date of Installation:
1 ESMA, Inc. P. O. BOX 734 * SOUTH HOLLAND, IL * (800) * FAX (708)
 * FAX (708)") 1 2 Instructions for Ultrasonic Washer E789 (U.L. Approved) 1. INTRODUCTION The E789 Automatic Ultrasonic Washer automatically performs a cleaning cycle, the major steps of which are: Ultrasonic cleaning
1 2 Instructions for Ultrasonic Washer E789 (U.L. Approved) 1. INTRODUCTION The E789 Automatic Ultrasonic Washer automatically performs a cleaning cycle, the major steps of which are: Ultrasonic cleaning
Instruction Manual for Portable Vacuum System Simple Milking Equipment Zillah, WA
 Instruction Manual for Portable Vacuum System ------------------------------------ Simple Milking Equipment Zillah, WA 98953 801-477-0692 Instructions This vacuum pump system ships via truck freight. Since
CELDEK Evaporative Cooler Module Installation, Operation, and Maintenance Manual. CELDEK Evaporative Cooler
 CELDEK Evaporative Cooler Module Installation, Operation, and Maintenance Manual CELDEK Evaporative Cooler RECEIVING AND INSPECTION Upon receiving unit, check for any interior and exterior damage, and
Standard and CELDEK Evaporative Cooler Modules Installation, Operation, and Maintenance Manual
 Standard and CELDEK Evaporative Cooler Modules Installation, Operation, and Maintenance Manual Standard Evaporative Cooler CELDEK Evaporative Cooler RECEIVING AND INSPECTION Upon receiving unit, check
ALTAIR II CONVECTION STEAM COOKER PARTS AND SERVICE MANUAL
 ALTAIR II CONVECTION STEAM COOKER PARTS AND SERVICE MANUAL EFFECTIVE MAY, 0 Superseding All Previous Parts Lists. The Company reserves the right to make substitution in the event that items specified are
INSTALLATION MANUAL. Manufactured by AQUA-AIR MANUFACTURING. (801) or (800) FAX (801)
 or (800) FAX (801)") INSTALLATION MANUAL Manufactured by AQUA-AIR MANUFACTURING 542 W. 47 Confluence East 800 South, Ave., Salt Ivins, Lake Utah City, 84738 Utah 84123 (801) 265-9699 or (800) 916-5777 FAX (801) 268-3856 (435)
INSTALLATION MANUAL Manufactured by AQUA-AIR MANUFACTURING 542 W. 47 Confluence East 800 South, Ave., Salt Ivins, Lake Utah City, 84738 Utah 84123 (801) 265-9699 or (800) 916-5777 FAX (801) 268-3856 (435)
DEMA 813 PROBELESS DEMAMaster TM INSTALLATION INSTRUCTIONS
 DEMA 813 PROBELESS DEMAMaster TM INSTALLATION INSTRUCTIONS Models: DM-813-PLLL-1T DM-813-PDLL-1T DM-813-PLLL-2T DM-813-PDLL-2T I-729 Pg 1 of 15 System Overview The DEMA DEMAMaster probeless series is designed
FLOOD KING 120V. 2. Keep all filters clean. Do not operate the machine if the filters are clogged.
 FLOOD KING 120V INFORMATION & OPERATING INSTRUCTIONS DO NOT OPERATE THE MACHINE UNTIL YOU HAVE READ ALL SECTIONS OF THESE INSTRUCTIONS. IMPROPER USE OF THE MACHINE WILL VOID THE WARRANTY 1. Always be sure
GLC/GW-100 MANUAL INSTALLATION SERVICE PARTS REV.1.01
 Owner s Manual Keep with machine for reference GLC/GW-100 MANUAL INSTALLATION SERVICE PARTS REV.1.01 CMA DISHMACHINES 12700 KNOTT STREET GARDEN GROVE, CALIFORNIA 92841 800-854- 6417 FAX 714-895- 2141 www.cmadishmachines.com
CAUTION: DO NOT OPERATE MACHINE UNTIL YOU HAVE READ ALL SECTIONS OF THIS INSTRUCTION MANUAL
 KING COBRA 310 120V INFORMATION & OPERATING INSTRUCTIONS U. S. PRODUCTS CAUTION: DO NOT OPERATE MACHINE UNTIL YOU HAVE READ ALL SECTIONS OF THIS INSTRUCTION MANUAL 56041963 IMPROPER USE OF THE MACHINE
READ AND UNDERSTAND THESE INSTRUCTIONS BEFORE OPERATING THE MACHINE
 XAACT Xtract 200 INFORMATION & OPERATING INSTRUCTIONS READ AND UNDERSTAND THESE INSTRUCTIONS BEFORE OPERATING THE MACHINE 78-00018 Rev B 032912 1 CONTENTS: Machine Specifications............ 2 Record Important
Standard and CELDEK Evaporative Cooler Modules Installation, Operation, and Maintenance Manual
 Standard and CELDEK Evaporative Cooler Modules Installation, Operation, and Maintenance Manual Standard Evaporative Cooler CELDEK Evaporative Cooler RECEIVING AND INSPECTION Upon receiving unit, check
Installation, Operation & Maintenance Manual. Wash System
 Installation, Operation & Maintenance Manual Wash System Kleen Flo Wash System Installation, Operation & Maintenance Manual CONTENTS Introduction and Overview... 3 Pipeline Wash System Features... 5 Wash
ADVANTAGE-100H-SC EXTRACTOR
 ADVANTAGE-100H-SC EXTRACTOR 120V INFORMATION & OPERATING INSTRUCTIONS CAUTION: DO NOT OPERATE MACHINE UNTIL YOU HAVE READ ALL SECTIONS OF THIS INSTRUCTION MANUAL IMPROPER USE OF THE MACHINE WILL VOID THE
Nupulse Original Claw Cow Milker
 Instruction Manual for Nupulse Original Claw Cow Milker Copyright 2013 Hamby Dairy Supply You may print manual for own non-commercial use, but not for resale. HAMBY DAIRY SUPPLY 2402 SW Water St. Maysville,
Owner s Manual GLC MANUAL INSTALLATION SERVICE PARTS REV.1.00
 Owner s Manual GLC MANUAL INSTALLATION SERVICE PARTS REV.1.00 C M A D I S H M A C H I N E S 1 2 7 0 0 K N O T T S T R E E T GARDEN GROVE, CALIFORNIA 92841 800-8 5 4-6 4 1 7 F A X 7 1 4-8 9 5-2141 www.cmadishmachines.com
OPERATING MANUAL MANUAL WATER BASE GUN CLEANERS UM120W UNI-RAM CORPORATION ONTARIO CANADA PATENTS
 OPERATING MANUAL MANUAL WATER BASE GUN CLEANERS UM120W PATENTS USA 4,788,836 CANADA USA 5,213,117 ENGLAND EUROPE 0300248 ITALY SWEDEN 0300248 GERMANY FRANCE 8110528.0 JAPAN UNI-RAM CORPORATION ONTARIO
Group 35 Drainage System. This group contains information on the holding tanks. equipment applied to the coach. ...Sink and Shower Strainers
 Group 5 Drainage System GENERAL: This group contains information on the holding tanks and drainage system. It also covers any waste destruction equipment applied to the coach. SPECIFICS: As applicable...drain
Fleck 2510 Sediment Filter Installation & Start-Up Guide
 Clean Water Made Easy www.cleanwaterstore.com Fleck 2510 Sediment Filter Installation & Start-Up Guide Thank you for purchasing a Clean Water System! With proper installation and a little routine maintenance
RX-Express III Owner s Manual
 RX-Express III Owner s Manual RX-Express III Table of Contents Page Machine Specifications... 1 Preparation and Precautions... 2 Operation... 4 Cleaning Instructions... 6 Automatic Scrubber Option and
model NO. LSS GALLON SKID MOUNTED HIGH PRESSURE SPRAYER ASSEMBLY / OPERATION INSTRUCTIONS / PARTS
 000 model NO. LSS- 00 GALLON SKID MOUNTED HIGH PRESSURE SPRAYER ASSEMBLY / OPERATION INSTRUCTIONS / PARTS Part number and descriptions can be obtained from the illustrated parts list section of this manual.
WASHER & DRYER REPAIR
 WASHER & DRYER REPAIR Lasco # Description Lasco # Description Blish Mize SKU UPC Code Picture Blish Mize SKU UPC Code Picture 02-1371 5965355 3/4 Gasket For Hose Thread Connection, Rubber, Inlet Washer,
CATALOG OF REPLACEMENT PARTS
 CATALOG OF REPLACEMENT PARTS LXGe SERIES GLASSWASHERS ML-130255 ML-130256 ML-130257 ML-130258 LXGePR (Cold) LXGeR (Hot) A product of HOBART 701 S. RIDGE AVENUE TROY, OHIO 45374-0001 FORM 43304 Rev. A (May
541D19 SERIES. Technical Manual. A Division of Aquion Partners L.P.
 541D19 SERIES Technical Manual A Division of Aquion Partners L.P. Table of Contents Introduction... Page 1 Technical Specifications... Page 2 Flow Diagrams... Page 3 Injector & Flow Control Selection Injector...
Xaact Spot. Xaact Hot Spot
 Xaact Spot & Xaact Hot Spot INFORMATION & OPERATING INSTRUCTIONS READ AND UNDERSTAND THESE INSTRUCTIONS BEFORE OPERATING THE MACHINE 78-00012 Rev. 101211 1 CONTENTS: Machine Specifications............
TERMINATOR 120V CAUTION: DO NOT OPERATE MACHINE UNTIL YOU HAVE READ ALL SECTIONS OF THIS INSTRUCTION MANUAL
 TERMINATOR 120V INFORMATION & OPERATING INSTRUCTIONS CAUTION: DO NOT OPERATE MACHINE UNTIL YOU HAVE READ ALL SECTIONS OF THIS INSTRUCTION MANUAL 56041962 IMPROPER USE OF THE MACHINE WILL VOID THE WARRANTY
Arch Feeder: Installation Manual
 Arch Feeder: Installation Manual Model #A300N Arch Chemicals, Inc. 1200 Lower River Road, P.O. Box 800 Charleston, TN 37310-0800 Product Stewardship MAKING THE WORLD A BETTER PLACE Arch is committed to
Fleck 5600 Carbon Filter Installation & Start Up Guide
 Clean Water Made Easy www.cleanwaterstore.com Fleck 5600 Carbon Filter Installation & Start Up Guide Thank you for purchasing a Clean Water System! With proper installation and a little routine maintenance
OPERATOR'S MANUAL. IMPORTANT: READ OPERATOR'S MANUAL CAREFULLY Please fill out & return your warranty card! DP80405
 CARBON SPOT 30 EXTRACTOR OPERATOR'S MANUAL IMPORTANT: READ OPERATOR'S MANUAL CAREFULLY Please fill out & return your warranty card! DP80405 Diamond Products www.diamondproductsus.com Printed in the U.S.A.
COBRA -300H EXTRACTOR
 COBRA -300H EXTRACTOR 120V INFORMATION & OPERATING INSTRUCTIONS DO NOT OPERATE MACHINE UNTIL YOU HAVE READ ALL SECTIONS OF THIS INSTRUCTIONS IMPROPER USE OF THE MACHINE WILL VOID THE WARRANTY 1. Always
DEMAMaster Nitro Express Ware Wash Chemical Dispenser
 DEMAMaster Nitro Express Ware Wash Chemical Dispenser Overview The DEMAMaster Nitro Express is an analog ware wash dispenser designed to dispense cleaning chemicals into ware wash and dish machines. The
DEMA SOLID PRODUCT LAUNDRY MASTER TM MODEL: 581L-1W and 581L-2W INSTALLATION INSTRUCTIONS
 Included Parts: A. 581.1 Solid Bowl B. 58.1LA Vacuum Breaker C. 58.6 Stainless Steel Supply Tube D. 58.29 90º Compression Fitting E. 58.24 Straight Compression Fitting F. 58.7 Vinyl Discharge Tube G. 66.123
Owner s Manual GW-100 MANUAL INSTALLATION SERVICE PARTS REV.1.00
 Owner s Manual GW-100 MANUAL INSTALLATION SERVICE PARTS REV.1.00 C M A D I S H M A C H I N E S 1 2 7 0 0 K N O T T S T R E E T GARDEN GROVE, CALIFORNIA 92841 800-8 5 4-6 4 1 7 F A X 7 1 4-8 9 5-2141 www.cmadishmachines.com
INSTALLATION INSTRUCTIONS UNDERCOUNTER DISHWASHERS
 INSTALLATION INSTRUCTIONS UNDERCOUNTER DISHWASHERS VIKING 111 Front Street Greenwood, Mississippi 38930 USA (662) 455-1200 IMPORTANT - PLEASE READ AND FOLLOW Before beginning - please read these instructions
Mobile Milker. Upon receiving the unit check if there is any visible damage to pump, motor etc... If there is any
 1 3 4 Parts Dept 45 Lynwood Dr Trumbull, CT 06611 Tel: (800) 45-8 Fax(03)445-8866 5 6 Mobile Milker Upon receiving the unit check if there is any visible damage to pump, motor etc... If there is any damage
120V CAUTION: DO NOT OPERATE MACHINE UNTIL YOU HAVE READ ALL SECTIONS OF THIS INSTRUCTION MANUAL IMPROPER USE OF THE MACHINE WILL VOID THE WARRANTY
 KING COBRA 1200 120V INFORMATION & OPERATING INSTRUCTIONS CAUTION: DO NOT OPERATE MACHINE UNTIL YOU HAVE READ ALL SECTIONS OF THIS INSTRUCTION MANUAL IMPROPER USE OF THE MACHINE WILL VOID THE WARRANTY
INSTALLATION INSTRUCTIONS
 Web Site: http//www.atomic4.com e-mail: thomas.stevens@cox.net INSTALLATION INSTRUCTIONS INDIGO ELECTRONICS AT-4T THERMOSTAT KIT ATOMIC 4 - MECHANICAL FWC This Indigo Thermostat Kit is designed for use
PIPE DREAMS 96. Aeroponic Garden IMPORTANT:
 1 WARNING: BEFORE PUTTING WATER PUMP INTO OPERATION FILL UP NUTRIENT TANK TO TOP OF PUMP. THE PUMP MUST NEVER RUN DRY OTHERWISE, WARRANTY WILL BE DECLINED. READ FILLING INSTRUCTIONS BEFORE USE. Welcome
ESTEAM CLEANING SYSTEMS OWNER S MANUAL
 ESTEAM CLEANING SYSTEMS OWNER S MANUAL Congratulations on your selection of a new Flood Master, flood extractor built in Canada by Esteam Cleaning Systems. Our goal has been to produce the best high performance
Installation Instructions
 GE Consumer & Industrial Appliances Installation Instructions Junction Box Cover Within this user bag, you will find a junction box cover and a #10 hex head screw used to attach the junction box cover
SAFETY PRECAUTIONS. 2) Before operating machine: - Make sure all safety devices are in place and operate properly.
 Before operating machine: - Make sure all safety devices are in place and operate properly.") TABLE OF CONTENTS Machine Components Safety Precautions Machine Set Up Machine Operation Machine Maintenance & Storage Troubleshooting Technical Specifications Parts Lists Wiring Diagram 1 2 3 3-4 5 6
TABLE OF CONTENTS Machine Components Safety Precautions Machine Set Up Machine Operation Machine Maintenance & Storage Troubleshooting Technical Specifications Parts Lists Wiring Diagram 1 2 3 3-4 5 6
UM120W OPERATING MANUAL MANUAL WATERBORNE GUN CLEANER CAUTION FOR WATERBORNE PAINTS ONLY UNI-RAM CORPORATION ONTARIO CANADA
 OPERATING MANUAL MANUAL WATERBORNE GUN CLEANER UM120W CAUTION FOR WATERBORNE PAINTS ONLY THIS UNIT IS NOT DESIGNED FOR USE WITH SOLVENT BASED PAINT UNI-RAM CORPORATION ONTARIO CANADA Revised 2009-03 CONTENTS
MODEL CMA-130VL PARTS MANUAL Rev 1.00
 MODEL CMA-130VL PARTS MANUAL Rev 1.00 DISTRIBUTED EXCLUSIVELY BY CMA DISHMACHINES 12700 KNOTT AVENUE GARDEN GROVE, CALIFORNIA 92841 800-854-6417 FAX 714-895-2141 www.cmadishmachines.com TABLE OF CONTENTS
DO NOT OPERATE THE MACHINE UNTIL YOU HAVE READ ALL SECTIONS OF THE INSTRUCTIONS IMPROPER USE OF THE MACHINE WILL VOID THE WARRANTY
 KING COBRA 500 120V INFORMATION & OPERATING INSTRUCTIONS DO NOT OPERATE THE MACHINE UNTIL YOU HAVE READ ALL SECTIONS OF THE INSTRUCTIONS IMPROPER USE OF THE MACHINE WILL VOID THE WARRANTY 1. Always use
5700-E Sediment Filter Installation & Start-Up Guide
 Clean Water Made Easy www.cleanwaterstore.com 5700-E Sediment Filter Installation & Start-Up Guide Thank you for purchasing a Clean Water System! With proper installation and a little routine maintenance
TOOLS & MISCELLANEOUS
 TOOLS & MISCELLANEOUS 01-5095 251189 Sillcock Tee Handle, For 16 Broach Splined Stem, Fits Most Outside Hose Valves. 052151010056 01-5223 251199 4 Way Stem Key, Fits Square Stems 1/4, 9/32, 5/16, & 11/32.
BUILT-IN DISHWASHER INSTALLATION INSTRUCTIONS
 BUILT-IN DISHWASHER INSTALLATION INSTRUCTIONS PLEASE READ COMPLETE INSTRUCTIONS BEFORE YOU BEGIN LEAVE INSTALLATION INSTRUCTIONS AND USER'S GUIDE WITH OWNER ALL ELECTRIC WIRING AND PLUMBING MUST BE DONE
HP310-C EXTRACTOR 120V
 HP310-C EXTRACTOR 120V 1 2 3 VAC 1 VAC 2 PUMP INFORMATION & OPERATING INSTRUCTIONS DO NOT OPERATE MACHINE UNTIL YOU HAVE READ ALL SECTIONS OF THIS INSTRUCTIONS IMPROPER USE OF THE MACHINE WILL VOID THE
Installation and Operation Manual. ACF-18 Automatic Chlorinating Feeder
 Installation and Operation Manual ACF-18 Automatic Chlorinating Feeder Operating Specifications Inlet Flow: 1.0-1.5 gpm Outlet Flow: = Inlet Flow Inlet Pressure: 10-45 psi Maximum Output: 26 lbs. of Available
2001 Smith Eastern Corporation
 Automatic Spray Equipment Cleaning System User s Manual UG-45V Smith Eastern Corporation 10630-S Riggs Hill Road Jessup, Maryland 20794-9425 USA 301.497.7600 800.937.HVLP (4857) Fax 301.497.7613 cleaner@airverter.com
USER MANUAL SPRAY GUN CLEANER - WATER BASED PAINTS UA400W CAUTION FOR WATER BORNE PAINTS ONLY
 USER MANUAL SPRAY GUN CLEANER - WATER BASED PAINTS UA400W CAUTION FOR WATER BORNE PAINTS ONLY THIS UNIT IS NOT DESIGNED FOR USE WITH SOLVENT BASED PAINT UNI-RAM CORPORATION ONTARIO CANADA REV 2010-09 CONTENTS
READ AND UNDERSTAND THESE INSTRUCTIONS BEFORE OPERATING THE MACHINE
 XAACT Xtract 500 INFORMATION & OPERATING INSTRUCTIONS READ AND UNDERSTAND THESE INSTRUCTIONS BEFORE OPERATING THE MACHINE 78-00015 Rev B 032912 1 CONTENTS: Machine Specifications............ 2 Record Important
"ER" Series Electric Humidifier
 ER-1 Standard Water "ER" Series Electric Humidifier The Electric Humidifier from PURE Humidifier Co. is loaded with features and options. All you need is tap water, electricity, and a sanitary drain the
As part of the V.I.P. family, you are entitled to the best protection by one of the most comprehensive warranties in the industry.
 CONGRATULATIONS on your purchase of a Viper product, and welcome to the V.I.P. family. We appreciate your business and will do everything in our power to keep you happy with your purchase for many years
8648 Series Air/ Water/ Vacs. Product Information. Important Safety Instructions. Operating Instructions Maintenance & Troubleshooting REV
 Models - 8648 Series Air/ Water/ Vacs Page 2 Page 3 Page 4 Page 5-6 Page 7-10 Page 10-11 Page 12 Page 12-13 Page 14-17 Page 18-19 Product Information Specifications Important Safety Instructions Product
MIRAI EXTRACTOR 100V DO NOT OPERATE MACHINE UNTIL YOU HAVE READ ALL SECTIONS OF THESE INSTRUCTIONS IMPROPER USE OF THE MACHINE WILL VOID THE WARRANTY
 MIRAI EXTRACTOR 100V LOCATOR 1 2 3 4 MODE VAC 1 VAC 2 PUMP BYPASS INFORMATION & OPERATING INSTRUCTIONS DO NOT OPERATE MACHINE UNTIL YOU HAVE READ ALL SECTIONS OF THESE INSTRUCTIONS IMPROPER USE OF THE
Installation and Owners manual
 INSTALLATION AND OWNERS MANUAL WASH DOWN SYSTEMS Installation and Owners manual For the following wash down model number: 700S Series Approximate Installation Time: 2 Hours Tools Required: #2 Phillips
8670 & 8651 series No/Bill Acceptor 8671 & 8652 Series with Bill Acceptors. Product Information. Important Safety Instructions Product Dimensions
 Models - 8670 & 8651 series No/Bill Acceptor 8671 & 8652 Series with Bill Acceptors Page 2 Page 3 Page 4 Page 5 Page 6-11 Page 12 Page 13 Page 13-14 Page 15-20 Page 21 Product Information Specifications
PZ2 Series Manual. PROZONE INTERNATIONAL, Inc. Ozone Water Purification Systems. INSTALLATION GUIDE and OPERATION MANUAL. Prozone PZ2 Series
 PZ2 Series Manual PROZONE INTERNATIONAL, Inc. Ozone Water Purification Systems INSTALLATION GUIDE and OPERATION MANUAL Prozone PZ2 Series Ozone Generator Systems SAFETY READ AND FOLLOW ALL INSTRUCTIONS.
Installation Manual PS-200 & PS-201
 Installation Manual PS-200 & PS-201 Table of Contents Pre-Uncrating Checklist... 1 Verifying System Requirements... 2 Verifying System Direction... 2 Verifying the Electrical Requirements... 2 Removal
Autotrol Performa FA Valve
 Autotrol Performa FA Valve With 400 Series Control Water Conditioning Control System Dealer Installation, Operation, and Maintenance Manual Table of Contents Installation................................
Installation and Owners manual
 INSTALLATION AND OWNERS MANUAL Installation and Owners manual For the following shower model numbers: 100S, 300S, 400S, 600S, 800S and 900S Series Approximate Installation Time: 2-3 Hours Tools Required:
ProPet Washer. I-1020 Page 1 of 6 Rev. D /15/11
 ProPet Washer Overview The ProPet Washer incorporates up to 4 products with a rinse option to safely bathe animals. The different products are easily selected by the turn of a knob. Different dilution
Equipment Alert. P-Trap Must Be Installed to Exhaust or Warranty will be Voided. Refer to this Manual for installation Instructions
 Dry Assembled Elbows MUST Glue when Installed Exhaust Connection P-Trap Must Be Installed to Exhaust or Warranty will be Voided AA2360 Refer to this Manual for installation Instructions 2011 Midmark Corp.
FiberPRO 2.5 H. Heated Spot Extractor. Operator and Parts Manual E
 E29976-00 FiberPRO 2.5 H Heated Spot Extractor Operator and Parts Manual 1001 Brown Avenue Toledo, Ohio 43607-0127 Customer Service: 888-GO-BETCO Fax: 800-445-5056 Technical Service: 877-856-5954 www.betco.com
KEEP FOR FUTURE REFERENCE 1 SCFM NOMINAL AIRFLOW SINGLE VACUUM SYSTEM DC-VOLTAGE POWER SYSTEM WITH MANUAL VALVE
 KEEP FOR FUTURE REFERENCE SERVICE MANUAL P.O. Box 368 908 West Main Laurel, MT USA 59044 phone 800-548-7341 phone 406-628-8231 fax 406-628-8354 STOCK NUMBER 36110 1 SCFM NOMINAL AIRFLOW SINGLE VACUUM SYSTEM
9420* & * Coin Operated Models C* Commercial Models. Product Information. Important Safety Instructions
 Models - 9420* & 9420-1* Coin Operated Models 9420-1C* Commercial Models Page 2 Page 3 Page 4 Page 5-7 Page 8-12 Page 12-13 Page 14 Page 14-15 Page 16-21 Page 22-24 Product Information Specifications Important
DEMAMaster Nitro Express Ware Wash Chemical Dispenser
 DEMAMaster Nitro Express Ware Wash Chemical Dispenser Overview The DEMAMaster Nitro Express is an analog ware wash dispenser designed to dispense cleaning chemicals into ware wash and dish machines. The
Mobile Milker. Filling the oil reservoir to HALF FULL
 1 2 Mobile Milker Upon receiving the unit check if there is any visible damage to pump, motor etc... If there is any damage do not attempt to run the unit! Call 800-245-8222 for assistance. Preparing to
MODEL CMA-180UC PARTS MANUAL Rev 1.16
 MODEL CMA-180UC PARTS MANUAL Rev 1.16 CMA DISHMACHINES 12700 KNOTT STREET GARDEN GROVE, CALIFORNIA 92841 800-854-6417 FAX 714-895-2141 wwwcmadishmachines.com TABLE OF CONTENTS MODEL CMA-180UC 1. PARTS
Easy Dose Chemical Injection and Dispensing System DEMA Engineering Company
 Easy Dose Chemical Injection and Dispensing System DEMA Engineering Company Overview The DEMA Easy Dose is a simple and reliable chemical delivery system. Easy Dose features an electronic control system
Installation Instructions
 Installation Instructions Built-In Dishwasher If you have questions, call 800-GECARES or visit our website at: www.geappliances.com BEFORE YOU BEGIN Read these instructions completely and carefully. IMPORTANT
IMAGE V. Parts and Service Manual
 IMAGE 0V Section II Parts and Service Manual (88B) CLARKE TECHNOLOGY Image Operator's Manual Page AUTHORIZED PERSONNEL MAINTENANCE To Access Pump Motor. Remove brush housing from machine. See "Brush Motor
BOTTLED WATER DISPENSER DISPENSADOR DE AGUA EMBOTELLADA
 BOTTLED WATER DISPENSER DISPENSADOR DE AGUA EMBOTELLADA Line to Refrigerator Ice/Water Dispenser Pump Module Dispenser www.xylemflowcontrol.com Flojet is a trademark of Xylem Inc. or one of its subsidiaries.
Celebrating over 30 years of excellence in manufacturing ultrasonic cleaning equipment, electropolishing equipment and associated chemistries
 Instructions for Ultrasonic Washer E397 & E397RC E498 & E498RC 1. INTRODUCTION The E397 and E498 units automatically perform a cleaning cycle, the major steps of which are: Ultrasonic Cleaning Ultrasonic
PZ1, PZ3 & PZ6 Installation Guide
 PZ1, PZ3 & PZ6 Installation Guide PROZONE INTERNATIONAL, INC. Ozone Water Purification Systems INSTALLATION GUIDE Prozone PZ1, PZ3 and PZ6 Series Ozone Generator Systems SAFETY READ AND FOLLOW ALL INSTRUCTIONS.
4201 Lien Rd Madison, WI Owner s Manual Therma-Stor III Heat Recovery System. Installation, Operation & Service Instructions
 4201 Lien Rd Madison, WI 53704 TS-140F Revised 09-10 Owner s Manual Therma-Stor III Heat Recovery System Installation, Operation & Service Instructions Read and Save These Instructions Table Of Contents
Clean Water Made Easy
 Clean Water Made Easy http://www.cleanwaterstore.com Pro-OX 1650 Iron Filter Installation & Start-Up Guide Thank you for purchasing a Clean Water System! With proper installation and a little routine maintenance
ENCLOSED UNIT TECHNICAL MANUAL Items # &
 R ENCLOSED UNIT TECHNICAL MANUAL Items #91163-00 & 91164-00 The Green Earth II Enclosed Unit is a modular, locking dispensing system that allows the user to dispense chemicals safely. It also has the flexibility
OWNER S MANUAL AVN SERIES RETRACTABLE NOZZLE VACUUM SEALER WITH GAS PURGE
 OWNER S MANUAL AVN SERIES RETRACTABLE NOZZLE VACUUM SEALER WITH GAS PURGE WHAT S IN THE PACKAGE? This Operation Manual. (1) Vacuum Sealer. (1) E-(unit size) Heating Element, inside the manual sheet protector.
AGITATOR V DO NOT OPERATE THE MACHINE UNTIL YOU HAVE READ ALL SECTIONS OF THESE INSTRUCTIONS IMPROPER USE OF THE MACHINE WILL VOID THE WARRANTY
 AGITATOR 20 120V INFORMATION & OPERATING INSTRUCTIONS DO NOT OPERATE THE MACHINE UNTIL YOU HAVE READ ALL SECTIONS OF THESE INSTRUCTIONS IMPROPER USE OF THE MACHINE WILL VOID THE WARRANTY 1. Always use
INFORMATION & OPERATING INSTRUCTIONS
 KING COBRA 310 120V INFORMATION & OPERATING INSTRUCTIONS DO NOT OPERATE MACHINE UNTIL YOU HAVE READ ALL SECTIONS OF THE INSTRUCTIONS IMPROPER USE OF THE MACHINE WILL VOID THE WARRANTY 1. Always use a defoamer
Chilipepper CP8000. Installation Instructions READ BEFORE INSTALLING:
 Chilipepper CP8000 Installation Instructions READ BEFORE INSTALLING: * The Chilipepper is not designed to be connected with rigid piping like copper or galvanized pipes. *Flexible hoses MUST be used. *
 Spare Parts List (Kits) Model Ref.:- HM35 SERIES A Spare Parts List (Kits) Issue 8 Dated 10-February-2015 Reference Drawing 09-1108-0000 Issue B Dated 07-January 2014 Drawing Ref. Part Number DESCRIPTION
ADVANTAGE-400H EXTRACTOR
 ADVANTAGE-400H EXTRACTR 120V INFRMATIN & PERATING INSTRUCTINS CAUTIN: D NT PERATE MACHINE UNTIL YU HAVE READ ALL SECTINS F THIS INSTRUCTIN MANUAL 56041940 IMPRPER USE F THE MACHINE WILL VID THE WARRANTY
Installation Instructions. For the 18 Built-In Dishwasher and Front Color Panels
 Installation Instructions For the 18 Built-In Dishwasher and Front Color Panels Printed in USA 154232102 Before You Begin DO NOT INSTALL DISHWASHER UNTIL YOU HAVE READ ALL INSTRUCTIONS. FOR YOUR SAFETY,
Clean Water Made Easy. CWS Time Clock Softener Installation & Start Up Guide. Questions?
 Clean Water Made Easy www.cleanwaterstore.com CWS Time Clock Softener Installation & Start Up Guide Thank you for purchasing a Clean Water System! With proper installation and a little routine maintenance
System Design and Mechanical Cleaning Processes
 REVIEW OF PRACTICES FOR CLEANING AND SANITATION OF MILKING MACHINES Douglas J. Reinemann, Grea M.V.H. Wolters, Pierre Billon, Ole Lind, and Morten Dam Rasmussen Introduction The fundamental performance
Installation Instructions
 -- _.^-I. - Installation Instructions Undercounter Dishwasher Read and save these instructions. l Installer: Leave Installation Instructions with the Homeowner. l Homeowner: Keep Installation Instructions
Clean Water Made Easy
 Clean Water Made Easy http://www.cleanwaterstore.com Pro-OX 5700-E Iron Filter Installation & Start-Up Guide Thank you for purchasing a Clean Water System! With proper installation and a little routine
Commercial Spotter Model number PS35
 Commercial Spotter Model number PS35 OPERATING INSTRUCTIONS COMMERCIAL AND HOUSEHOLD SPOTTER/EXTRACTOR CONGRATULATIONS YOU HAVE JUST ACQUIRED A HIGH QUALITY COMMERCIAL SPOTTER. PLEASE READ THIS MANUAL
Getz Equipment Innovators 450 lb Dual Portable Dry Chemical Fill System
 Getz Equipment Innovators 450 lb Dual Portable Dry Chemical Fill System 1 Revised 11/18/10 2320 Lakecrest Drive, Pekin IL 61554 PH. (888) 747-4389 Fax (309) 495-0625 Website: www.getzequipment.com LIMITED
Dishwasher Installation Instructions DW 24XT/DW 24XV
 Dishwasher Installation Instructions DW 24XT/DW 24XV Installation Instructions Dishwasher BEFORE YOU BEGIN Read these instructions completely and carefully. IMPORTANT Observe all governing codes and ordinances.