Operating instructions TRUCK BOOSTER
|
|
|
- Linette Cooper
- 5 years ago
- Views:
Transcription

1 Operating instructions TRUCK BOOSTER j
2 English Deutsch Français Nederlands Español Italiano Pyccкий Polski Magyar
3 Index 1 Safety precautions and warnings Description 2.1 Application Operation elements Installation 3.1 Temperature conditions Condition of distance Base / leveling Water connection Mains power connection High-pressure connection Venting Connecting to external fuel supply Operation 4.1 Connections High-pressure hose - directly on the machine High-pressure hose - to outlet point Spray handle - accessories Selection of spray lance Application of detergents (external injector) Application of detergents (internal) Running the TRUCK BOOSTER Starting up Automatic start/stop Running with hot water Double spray lance, pressure regulation Stop Automatic system shut-down Frost protection (internal) Frost protection (external) - not standard Fields of Application 5.1 Fields of application and Working Methods 5.2 Working pressure Temperature Mechanical impact Detergents Working methods Typical cleaning tasks Vehicles Building and equipment Maintenance 6.1 Hour counters Oil Water fi lter Cleaning of high-pressure nozzle Fuel fi lter Disposable waste Trouble Shooting 7.1 General trouble shooting Error messages Technical Data Warranty EC Declaration of Conformity
4 1 Safety Precautions and Warnings Symbols used to mark instructions Before starting up your high-pressure washer for the fi rst time, this instruction manual must be read through carefully. Save the instructions for later use. Safety instructions marked with this symbol must be observed to prevent danger to persons. This symbol is used to mark safety instructions that must be observed to prevent damage to the machine and its performance. This symbol indicates tips and instructions to simplify work and to ensure a safe operation. For your own safety The high-pressure washer may only be used by persons instructed in its use and who have been expressly authorised to do so. Although extremely easy to operate, children should not be allowed to use the washer. Warning Inhalation of aerosols can be hazardous to health. Where applicable use a device in order to avoid or reduce aerosols production, e.g., a shield covering the nozzle. For protection against aerosols use a respiratory mark of class FFP 2 or higher. General When using the high-pressure hot water washer all existing national regulations must be observed. Beyond the instruction manual and the current national legal regulations for prevention of accidents, also the approved rules for safe working must be observed. 4 Any method of use endangering the safety of persons or equipment is forbidden. Before use Before starting up your highpressure hot water washer check that it is in a regular condition. Electric plugs and couplings must be watertight. Check the electric cables at regular intervals for damage and wear. Only use the highpressure hot water washer if the electric cable is all right (damaged electric cables can cause electric shock!) Important instructions Connection to public drinking water supply must be performed in accordance with the applicable regulations in your country. IMPORTANT: Only use water without impurities! Before each use of your highpressure hot water washer check the most important visual parts. High-pressure jets can be dangerous if misused. Never direct the water jet towards people, pets, electric wiring, or the machine itself. Spray handle and lance are affected by a thrust during operation - therefore always hold the spray lance fi rmly with both hands. Never try to clean clothes or footwear on yourself or other persons. Operator and anyone in immediate vicinity of the site of cleaning should take action to protect himself from being struck by debris dislodged during operation. Check that cleaning will not result in dangerous substances (e.g. asbestos, oil) being washed off the object to be cleaned and harming the envi- Nilfisk-ALTO No
5 ronment. Do not clean sensitive surfaces made of rubber, fabrics or the like with the zero nozzle. With the flat jet nozzle keep a distance of at least 15 cm to the surface to be cleaned. Never let children operate the machine. Do not use the machine if the electric cable or the high-pressure hose are damaged. Do not cover the machine during operation or use it in a room without adequate ventilation! If any of the machines overload protection devices trips (machine stops unintended), release the trigger of the spray handle. Lock the spray handle with locking device and turn the start/stop switch to position OFF. Refer to section 7 Trouble Shooting. Never start the cleaner without water supply. Even a short water deficiency can damage the sleeves of the pump. Operation Avoid damage to the electric cables such as squeezing, pulling, knots etc. and keep them away from sharp or hot objects. Avoid damage to the high-pressure hose such as running over by vehicles, squeezing, pulling, knots/kinks etc. and keep it away from oil and sharp or hot objects, as such may cause the hose to burst. The cleaner can be used in zones classifi ed as ZONE 2. Important! Never use the machine in an environment where there could be a danger of explosion (according to EN ). Important! When the system has been in operation and thereafter stopped, there might still be a working pressure in the pipeline and high-pressure hoses. Therefore you should pay special attention to the following: Never dismount the highpressure hose from the machine during operation. Disconnect the machine and relieve the high-pressure hose of pressure prior to dismounting. Never dismount the highpressure hose from the outlet point before it has been securely closed and the high-pressure hose has been relieved of pressure. Prior to any service interference in the machine it should be disconnected and the system relieved of pressure by activating the trigger of the spray handle. Repair and Maintenance Only carry through the maintenance operations described in the operating instructions. Only use original NILFISK-ALTO spare parts. Do NOT make any technical modifications to the high-pressure hot water washer. Warning! High-pressure hoses, nozzles and couplings are important for the safety when operating the machine. Only use the high-pressure hoses, nozzles and couplings prescribed by NILFISK-ALTO! For major repairs, please contact your nearest NILFISK- ALTO service organisation. Mains power connection This product is intended for stationary installation only and is supplied without a power cord! Only let an authorized electrician connect the machine to the mains supply! The following points must be observed: Check that the voltage stated on the data plate corresponds to your mains voltage. Make sure that the power cord contains the right number of wires (including ground wire) and that each wire has the right dimensions to carry the load (amperage) stated on the data plate of the machine. Make sure that the installation (cables, connection points and fuses) is correctly dimensioned for the load of the machine - refer to the data plate of the machine. If not required by local legislation, we strongly recommend you to connect the machine to a power source with a Residual Current Device (RCD) which will dis connect the power supply if the leakage current exceeds 30 ma for 20 milli seconds! See section 3.5 Mains power connection for further instructions. Only let a qualifi ed electrician maintain the electric installation. Safety Devices Safety Valve The pressure side of the highpressure pump is fi tted with a safety valve. This valve leads the water back to the suction side of the pump when the spray handle is closed or if a nozzle is blocked. The safety valve is adjusted and sealed by the producer. THIS ADJUSTMENT MUST NOT BE CHANGED! 5
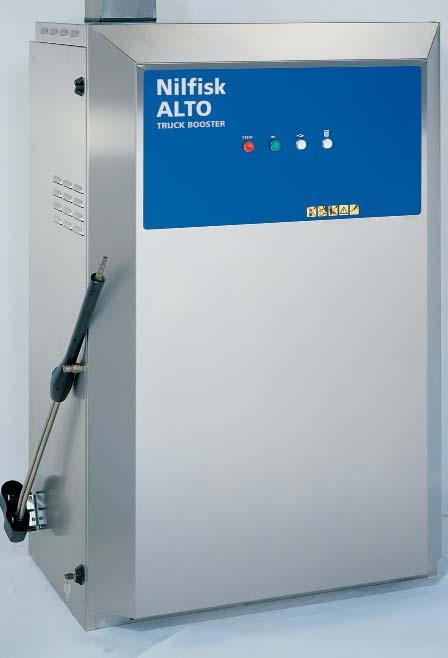
6 Machine protection The machine features an overcurrent protection and built-in thermal protection of the motor. In the event of increased power consumption (maloperation) and in the event of excessive motor temperature (obstructed ventilation etc.), the entire machine will automatically be disconnected from the mains supply. Short circuit protection The machine is equipped with a short-circuit protection. In the event of short-circuits in the machine, the protective device will disconnect the entire machine from the mains supply. 2 Description 2.1 Application This high-pressure hot water washer has been developed for stationary installation and professional use within: - light industry - transport - building and construction - service Section 4 describes how to use the high-pressure hot water washer. Only use the high-pressure hot water washer for purposes described in this manual. The safety precautions must be observed to prevent damage to the machine, the surface to be cleaned or severe personal injuries. 2.2 Operation elements See foldout at the end of these operating instructions. 1 High-pressure outlet (quick coupling, male) 2 Main switch 3 Stop push button (red) 4 Start push button (green) 5 Heating ON/OFF push button 6 Pressure gauge 7 Water inlet 8 Thermostat (temperature adjustment) 9 Button for addition of detergents 10 Inspection window (hour counters, error messages) 11 Holder for spray lance 12 Dosing of detergent 13 Data plate 14 Lifting device 15 Holder for spray lance - frost protection, external (option, not standard) 6
7 3 Installation 3.1 Temperature conditions The machine has been constructed for outdoor placement. The min. ambient temperature for the ma chine is 20 C and the maximum ambient temperature is 40 C. Note: Hose and spray lance are not frost resisting as a standard and must therefore be dismounted at temperatures below 0 C. 3.2 Condition of distance In consideration of the cooling system of the machine and the accessibility of service, there must be free wall space on both sides of the machine. To the right 200 mm at a minimum, to the left 500 mm at a minimum and behind 300 mm. The distance from the chimney outlet to infl ammable material must be 1,000 mm. The chimney (1) can be turned 180 by dismounting 4 pcs. M5 screws (under the top plate), turning the chimney and remounting the screws. 3.3 Foundation / leveling Place the machine on a plane fl oor. Shape of foundation, see foldout at the end of this manual. Bolt the machine to the foundation through the 3 holes (Ø12 mm) in the bottom plate. Before fastening, the machine must be leveled. 7
8 3.4 Water connection The water connection is made with a fl exible hose connected to the water tank (7) of the machine. The water hose can be lead in through: 1. The bottom plate 2. The punch-out pieces in the rear plate (see foldout at the end of this manual). Make sure that the supply hose is suited for the purpose (temperature and fl ow rate). If in doubt, contact your Nilfi sk- ALTO representative. The connection can be made to a public drinking water supply network or a private water supply. Water quality: particle size <50 A shut-off cock should be mounted on the water supply network in the immediate vicinity of the machine. Make sure that the water supply is within the following specifi cations and that the water does not contain particles such as fl oating sand. Min. water inlet pressure: 1 bar (at the required fl ow rate of the machine - see data plate. Max. water pressure: 10 bar Max. water inlet temp.: 30 C. All TRUCK BOOSTER feature a water tank, and no further protection against back-flowing water into the supply network is required. The machine complies with EN If there is a risk of floating sand or other impurities in the inlet water, a sand fi lter (50 micron) should be mounted between the supply outlet and the internal fi lter of the machine. 3.5 Mains power connection CAUTION! An authorized electrician must perform the electrical connection of the machine to the main power supply. Refer to section 1 Safety precautions and warnings. The following precautions must be observed: Make sure that the supply cable is of the correct dimension (see voltage and load on the data plate of the machine) and is suitable for the specifi c environment. 8
9 The electric cable can be lead in through: 1. The bottom plate. 2. The punch-out pieces in the rear plate and through the relief ring into the junction box. (see foldout at the end of this manual). Connect the phase cords of the supply cable to the connection terminals L1, L2 and L3. Connect the zero cord to N. For single phase machines use L1 and N to connect phase and zero cords. Connect protective earth wire to the earthing terminal. Check and measure the protective earth connection according to legislation. Connect the other end of the cable to an approved plugged socket outlet of a correct dimensioned main supply. Make sure that the cable is properly guided and relieved between the fi xed installation and the machine and that the cable is without any damage to the insulation. Also see notes in section 1 Safety precautions and war nings! Note: Beware that the electric cables of the machine are not mixed up. The wires 1, 2, 3, 4 MUST keep the illustrated positions. 3.6 High-pressure connection The outlet of the machine (1) can be connected directly to a standard high-pressure hose (a) or to a pipeline with fixed outlet points (b). IMPORTANT: When connecting to a pipeline always use a fl exible hose connection from the outlet of the machine (pos. 1) - order no Contact your Nilfi sk-alto distributor for further information. b It is recommended to let a service technician authorized by Nilfi sk-alto prepare the pipeline. 9
10 TRUCK BOOSTER 3.7 Venting ON When the TRUCK BOOSTER is properly connected to supply water, electrical installation and a high-pressure hose (or pipeline) the high-pressure pump must be vented before it is operational. c d Turn the main switch, (2) to position ON. 2. Push the START button (3), and the TRUCK BOOSTER will start. 3. Open the outlet point (spray handle on high-pressure hose, (c) or outlet on piping system (d) without having a spray lance connected. 4. Let the water run until all air has escaped from the pump (even water fl ow). 5. In the case of a recently installed piping system, or if the pipeline and the pump have been emptied in any other way, the system should be vented by starting the pump and then letting the water run at each outlet point of the pipeline at turns. It is recommended to begin with the most distant outlet (height and/or length). 6. When connecting the highpressure hose directly to the machine, starting the pump and activating the trigger of the spray handle without having attached the spray lance, should vent the system. 7. Stop the TRUCK BOOSTER by pressing the STOP push button (4). The TRUCK BOOSTER is now vented. 10
11 3.8 Connecting to external fuel supply The TRUCK BOOSTER can be connected to an external fuel supply. As a standard, the machine is supplied with a 40 l container. Heating oil, DIN (without bio diesel) can be used. Diesel according to EN 590 (up to 7% bio diesel) can be used with the following restrictions: Maximum storage time in high pressure cleaner diesel tank: 1 2 month. Diesel stored externally for more than 6 months is not allowed to be fi lled into Nilfi sk- ALTO high pressure cleaners. Diesel EN 590 is not recommended for use in HPW's at an ambient temperature below 0 C. Diesel EN 590 from an open container must not be used. You can choose between one and two -string connection, where one -string only has one supply hose (a) and two -string has an additional return hose (b) - see fi gure. Please observe that in some countries only the one string system is approved. The fuel hose for the external fuel supply can be lead-in: 1. Through the bottom plate to the oil pump. 2. Through the punch-out pieces in the rear plate to the oil pump. See foldout at the end of this manual. Please observe the following restrictions to fuel line. 11
12 4 Operation 4.1 Connections High-pressure hose - directly on the machine The Nilfisk-ALTO high-pressure hose with imprinted max. working pressure and temperature should be attached to the outlet connection of the machine (1) by the quick coupling (a). Max. extension hose: 50 m. Danger of scalding! Never dismount high-pressure hoses at water temperatures above 50 C. IMPORTANT: Prior to dismounting the high-pressure hose, the machine should be stopped. Then activate the trigger of the spray handle to relieve the high-pressure hose of pressure High-pressure hose - to outlet point In the case of a pipeline with fi xed outlet points the high-pressure hose with imprinted working pressure and temperature should be attached to the nipple of the high-pressure cock (1) by the quick coupling (2). Upon attachment turn the handle of the high-pressure cock (3) to open position. Danger of scalding! Never dismount high-pressure hoses at water temperatures above 50 C. IMPORTANT: Prior to dismounting of the high-pressure hose or when changing to another outlet point the highpressure cock should be carefully closed. Then activate the trigger of the spray handle to relieve the high-pressure hose of pressure. 12
13 Pipeline, max. length: Ø12 x 1,5 - max. Ø15 x 1,5 - max. Ø18 x 1,5 - max. 50 m 180 m 500 m When using max. pipe lengths, only use a high-pressure hose of 10 m Spray handle - accessories A 1. Pull the blue quick-release grip (A) of the spray handle backwards. B 2. Insert the nipple of the spray lance (B) into the quickrelease connection and release it. 3. Pull forward the spray lance or any other accessory to ensure correct mounting before starting the machine. NOTE! Clean nipple of any impurities each time the spray lance has been dismounted Selection of spray lance You may use a double spray lance as well as a single spray lance with the machine.the recommended nozzle size of the lance is printed on the data plate of the machine i.e The max. pressure of the machine can be reduced by using nozzles with a wider diameter. Never use lances with smaller nozzles (nominal value / diameter) than stated on the data plate. 13
14 4.1.5 Application of detergents (external) If you want to apply detergents or disinfectants these can be dosed to the water through an external in jector. In conjunction with the injector it may be advantageous to use a wall rack on which spray lances, 2 pcs. of 25 l containers as well as 10 m high-pressure hose can be placed. Refer to your Nilfi sk-alto sales representative for your optimal solution. Below you will find various types of outlet points with injectors. Outlet point with detachable injector To be attached to the quick coupling of the high-pressure cock. To be used for dosing of lowfoaming detergents or disinfectants. Dosage 1-8%. Outlet point with detachable foam injector To be attached to the quick coupling of the high-pressure cock. To be used in conjunction with foam lance for application of high-foaming detergents or disinfectants. Dosage 1-5%. Outlet point with cleaning trolley and foam injector To be attached to the quick coupling of the high-pressure cock. To be used in the same way as Outlet point with detachable foam injector. Makes it possible to place 4 spray lances, 2 pcs. of 25 l containers as well as 20 m highpressure hose. 14
15 TRUCK BOOSTER Application of detergents (internal) A B If you want to apply a detergent, do as follows: + I I I I I I I I I I I I I + I I I I I I I I I I I I I 1. Fill a detergent into a 25 l container. 2. Turn the machine on, push the button for addition of detergents (9) and lay out detergent. The concentration of detergent can be adjusted on the detergent pump. 3. Turn off the addition of detergent by pushing the button (9). NB: The PH value of the detergent should be between %. If you want to apply a detergent with another PH value, an external injector should be used (see section 4.1.5). 4.2 Operation Starting up ON The shut-off cock on the water inlet should be open, and the spray handle on the high-pressure hose should be closed. 1. Turn the main switch (2) to position - ON Push the green START push button (3). 4 3 Check on the pressure gauge (6) that a pressure is being built up in the system and that the motor of the TRUCK BOOSTER stops within c 20 seconds with the green START push button (3) lit. The TRUCK BOOSTER is now in Stand-by mode waiting for the operator to activate the spray handle. If a pressure is not being built up, vent the machine as described in sections Venting. 15
16 ESC + OK TRUCK BOOSTER (A) (B) DCINPUT MITSUBISHI If the motor of the TRUCK BOOSTER does not start or stops unintendedly with the red STOP push button (4) fl ashing, an error is present. Read the error message through the Inspection window and refer to section 7 Troubleshooting Operation - automatic start/stop Always hold the spray lance with both hands! The TRUCK BOOSTER is automatically started when the trigger (1) of the spray handle is activated and will automatically stop and enter standby mode when the trigger is released. 1 When the machine is not in use, the trigger should be locked with locking device Running with hot water The TRUCK BOOSTER is equipped with a diesel unit to heat the water. The diesel unit can be switched on or off at convenience by pushing the white Heating push button (5). Pushing the button once will turn on the light in the button and switch ON the diesel unit. Pushing the button again will turn out the light in the button and switch OFF the diesel unit. The temperature can be adjusted within the limits stated on the Thermostat (8), by turning the button to the desired value. When the diesel unit is ON (push button (5) alight), the control unit of the TRUCK BOOSTER will monitor the water temperature and regulate the diesel unit to provide the preset temperature. If an error occurs to the heating system of the TRUCK BOOST- ER, the machine stops and the red STOP push button (4) will start fl ashing and the diesel unit will be shut off. The TRUCK BOOSTER will continue to be functional with non heated water by pushing the green START push button (3). In this case please refer to section 7 Troubleshooting. 16
17 TRUCK BOOSTER Double spray lance, pressure regulation 1 The spray lance features 2 nozzles, a high-pressure nozzle and a low pressure nozzle. High-pressure mode When the pressure reducing valve (1) is completely closed (turned clockwise - B), only the high-pressure nozzle is used - high-pressure mode. Low pressure mode min. max. When the reducing valve (1) is completely opened (turned counterclockwise - A), both spray lances are used - low pressure mode / possibility of dosing detergents. The pressure can be regulated between these positions Stop Danger of scalding! Never detach high-pressure hoses at a water temperature above 50 C. 4 Never detach the high-pressure hose while the machine is in operation. 1. To stop the machine, push the red STOP button (4). The red light will come on. To disconnect the TRUCK BOOSTER completely from mains, turn the main switch (2) to position - OFF -. OFF 2. Close the shut-off cock of the water inlet and activate the spray lance or open the high-pressure cock to relieve the pipeline / high-pressure hose of pressure. 17
18 4.2.6 Automatic system shut-down Your TRUCK BOOSTER features a function called system shut-down that can be enabled by your Nilfi sk-alto service technician during installation or at a later time. When enabled, system shutdown will automatically switch OFF the TRUCK BOOSTER when it has not been used for a predefi ned time (from 1 sec. up to 9 hours) at your choice. Shut-down is disabled on delivery - please contact your Nilfisk-ALTO service representative if you would like the function(s) to be enabled Frost protection, internal The machine has been constructed for outdoor placement. The machine features a fan heater automatically starting up when the temperature inside the machine gets too low. The adjustment of the thermal sensor is effected in the electric box. On delivery the adjustment has been set at 5 C. This setting must not be lowered. NB: The frost protection does NOT function if the machine has been turned off on the main switch. IMPORTANT: For safety reasons, hoses, spray lances and other accessories should always be thawed prior to use Frost protection, external (Option, not standard) This option ensures that hose, handle and spray lance does not freeze. After use the spray lance must be placed in the spray lance holder (pos. 15). Then turn off the machine on the front panel. If the temperature is below the temperature set on the thermal sensor in the electric box, the frost protection will start. Water will now circulate through hose, handle, spray lance and back to the machine. IMPORTANT: The frost protection is not active, when the machine has been switched on (ready for operation). 18
19 5 Fields of Application and Working Methods 5.1 Fields of application The most important fi elds of application for this product are: Transport Building & Construction Light industry Service Cleaning of trucks, buses, cars etc. Cleaning of vehicles, equipment, buildings etc. Degreasing and cleaning of machines, workpieces, and vehicles. Cleaning of vehicles, public baths, institutions etc. 5.2 Working pressure The high-pressure system may be used with high or low pressure at your own option: Low pressure High-pressure Intermediate pressure Is fi rst and foremost used for the application of detergents and for fl ushing. Is used during the actual cleaning. As an example it may be used for the cleaning of surfaces which cannnot stand a too powerful jet, i.e. soft surfaces. 5.3 Temperature Hot water signifi cantly increases the effi ciency of the cleaning process especially grease, oils and fats can be broken down more easily at higher temperatures. Temperatures up to 60 C should clean off proteins, such as blood substances. Oil and traffi c fi lm should be exposed to app. 70 C, whereas grease and fat is easiest to remove with temperatures of 80 to 85 C. Several detergents become more effi cient when acting with hot water please refer to manufacturers recommendations. 5.4 Mechanical impact In order to break down tough layers of dirt, additional mechanical impact may be required. Special lances with special nozzles (pulsating jet / concentrated 0 jet) are available for such purposes as are rotating brushes plus soft & sand blasting equipment. Please ask your Nilfi sk-alto representative. 19
20 5.5 Detergents As standard the system is delivered without a detergent injector and the optional, factory mounted, internal chemical system. If you want to use detergents or disinfectants these should be dosed through an external injector (see section 4.1.5) or through the pump (see section 4.1.6). The most effi cient cleaning is reached with detergents in conjunction with the high-pressure cleaning. For that purpose NILFISK-ALTO can offer you a series of products specially developed for high-pressure cleaning, among other fi elds within: Cleaning of vehicles, machines, stalls etc. Disinfection Degreasing of workpieces Descaling The products are water-based, without phosphates, and the applied tensides (surface active substances) comply with the present requirements for easy biodegradability. Contact your Nilfi sk-alto distributor for directions as to which product(s) will fulfill your requirements. The method of application and the dosage of the individual products appear from the product labels or the data sheet. Low-foaming detergents are applied through an injector and under low pressure. A change to cleaning under high-pressure is effected by regulating from»low pressure mode«to»highpressure mode«on the double spray lance or by attaching a high-pressure spray lance. For foam cleaning you will have to attach a special foam equipment. Insert the suction hose of the injector into the foam detergent. Attach the foam lance on the spray handle and now you are ready for foam application. Upon the application open the by-pass cock of the foam injector and replace the foam lance by a spray lance, and you are ready for cleaning. General rules for addition of detergents 20 Nilfi sk-alto cleaning equipment can be used for all detergents and disinfectants, which are suitable for high-pressure cleaning according to the prescriptions of the supplier. (If using external injector, section 4.1.5, the ph-value should be between 4 and 14. If using addition of chemicals through the high-pressure pump, section 4.1.6, the ph-value MUST be between 5.5 and 8.5). Acid and lye should not be applied in a concentrated form. Carefully observe the prescriptions and guidelines of the supplier, also the rules concerning safety clothing and drainage facilities. Detergents, which are not exactly prescribed for use in conjunction with high-pressure cleaning, must only be used upon a previous approbation from Nilfi sk-alto and the supplier. The use of Nilfi sk -ALTO detergents ensures that machines, accessories and detergents match, which is the condition of an optimal solution of a cleaning task. Nilfi sk -ALTO can offer you a wide range of effi cient agents for cleaning and disinfection. The products are composed of substances, which combine effi ciency and environmental considerations at one and the same time.
21 5.6 Working methods Your high-pressure hot water washer has been developed for cleaning according to the socalled»2-step method«. However, your high-pressure hot water washer must be equipped with an external detergent injector. STEP 1 Application of detergent - soaking. STEP 2 High-pressure cleaning. In practice the working process is laid down in accordance with the actual job, but as a starting point the following working method can be described for a job: 1. Apply detergent under low pressure. The dosage is chosen according to the job, which is to be carried through, and the adjustment is made on the dosing unit. 2. Await acting time. Let the detergent act on the dirt/surface for a short time prior to pressure cleaning - usually a few minutes. 3. High-pressure cleaning. Clean all surfaces under high-pressure. 4. Rinse afterwards, if necessary. To make sure that residual impurities are removed from the surface. In connection with the working process the optimum cleaning will be reached by following these 3 pieces of advice: Advice no. 1 When using a detergent, usually always apply it on a dry surface. If the surface is rinsed with water at fi rst, it may be diffi cult for it to absorb the detergent, and the result is a reduced effect of the detergent. Advice no. 2 When applying a detergent on large vertical surfaces (i.e. the sides of a truck) work from below and upwards. Thus you will avoid the detergent running off the surface through grooves and dark streaks appearing on the surface whilst cleaning. Advice no. 3 During the high-pressure cleaning you should work so that the high-pressure water does not run over the surface which has not been cleaned yet. This is to ensure that there is sufficient detergent on the surface when the high-pressure water hits the surface. 21
22 5.7 Typical cleaning tasks Vehicle Task Accessories Method Machinery Tractors Ploughs etc. Vehicle bodywork Detergent injection Powerspeed lances Curved lances and underchassis washers Brushes Standard lance Detergent injection Curved lances and underchassis washers Brushes Detergents Active Shampoo Active Foam Sapphire Super Plus Active Wax Allosil RimTop 1. Apply detergent to vehicle or equipment surfaces in order to soften up dirt and grime. Apply from bottom to top. 2. Proceed with cleaning using the high-pressure lance. Clean again from bottom to top. Use accessories to clean in difficult to reach places. 3. Clean fragile areas such as motors, rubber at lower pressure levels to avoid damage. 1. Apply detergent to vehicle or equipment surfaces in order to soften up dirt and grime. Apply from bottom to top. In cases of particularly dirty vehicles, pre-spray with a product such as Allosil in order to remove traces of insects etc, then rinse at low pressure and apply normal car cleaning detergent. Let detergents settle for 5 minutes before cleaning off. Metallic surfaces can be cleaned using RimTop. 2. Proceed with cleaning using the high-pressure lance. Clean again from bottom to top. Use accessories to clean in diffi cult to reach places. Use brushes in order to add a mechanical cleaning effect. Short lances can help for cleaning of motors and wheel arches. Curved lances or under-carriage washers can be valuable for the cleaning of car under-chassis and wheel arches. 3. Clean fragile areas such as motors, rubber at lower pressure levels to avoid damage. 4. Apply a liquid wax using the pressure washer in order to protect the bodywork from pollution. 22
23 5.7.2 Building and equipment General surfaces Metallic equipment Rusted or damaged surfaces prior to treatment Foam injectors Standard lance Curved lances Tank cleaning head Detergents Intensive J25 Multi Combi Active Alkafoam Disinfectant DES 3000 Wet sand blasting equipment 1. Apply thick foam over the surfaces to be cleaned. Apply on dry surfaces. Apply from top to bottom on vertical surfaces. Let the foam act for up to 30 minutes for the optimal effect. 2. Proceed with cleaning using the high-pressure lance. Use applicable accessories. Use highpressure to dislodge large amounts of incrusted dirt or grime. Use lower pressure and high water volume in order to rapidly fl ush away loose dirt and rinse surfaces. 3. Apply DES 3000 disinfectant once the surfaces are perfectly clean. Areas covered by amounts of loose dirt, such as animal remains in slaughterhouses, can be removed by using high water fl ow to fl ush away the dirt to evacuation pits or drains. Tank cleaning heads can be used to clean barrels, vats, mixing tanks etc. Cleaning heads may be hydraulically or electrically powered and give the possibility for automatic cleaning without a constant user. 1. Connect the sand blasting lance to the pressure washer and place the suction tube in the sand. 2. Always wear protective equipment during sand blasting. 3. Spray the surfaces to be treated with the mix of water and sand. Rust, paint etc will be stripped off. These are merely several examples of cleaning tasks that can be solved by a pressure washer in association with accessories and detergents. Each cleaning task is different. Please consult your local dealer or Nilfisk-ALTO representative in order to discuss the best solution for your own cleaning tasks. 6 Maintenance To ensure the most optimal maintenance of your TRUCK BOOSTER, you should consider making a Service Contract with Nilfisk-ALTO. In this way your TRUCK BOOSTER will always be ahead of potential problems. Though paying attention to a few things will ensure a prolonged and reliable operation of your TRUCK BOOSTER. Therefore it will be a good idea to make a habit of the following: Prior to attaching the high-pressure hose, the quick couplings should be cleaned of dust and sand. Flush if necessary. This will prevent a clogging up of the nozzle. Prior to attaching the spray lance or other accessories to the spray handle, the machine should be started and the quick coupling cleaned of dust and sand. 23
24 Maintenance Schedule Weekly 6.2 Checking pump oil level After the first 50 operating hours Every six months or 500 operating hours - Changing pump oil As required 6.3 Cleaning water fi lter 6.5 Fuel fi lter 6.1 Hour counters By depressing the button "Heating ON/OFF" (5) to switch off the heating and then depressing the red STOP button (4) and keeping it depressed, you will be able to see the number of working hours of the high pressure pump, the heating system and the detergent pump through the inspection window (10). Your TRUCK BOOSTER features built-in hour counters that keep track of the number of working hours on your machine. Letting go of the STOP button will switch off the hour counter display again. 6.2 Oil Your TRUCK BOOSTER is equipped with an electronic oil sensor, which monitors the level of lubricant oil in the high-pressure pump. If the oil level (by malfunction or excessive wear) should drop to a low level, your TRUCK BOOSTER will stop. The red light fl ashes. The display shows hour counters. Topping up the oil cup of the pump will be possible, but you should send for a Nilfi sk-alto service technician as soon as possible to disclose the cause of the oil loss. PROTECT THE ENVIRON- MENT Waste oil and oil sludge must be removed as laid down in the instructions. 24
25 6.3 Water filter To avoid debris entering the water tank and the high-pressure pump, a water fi lter is fi tted at the water inlet of the water tank. Dependent on the purity of the water, this fi lter will have to be cleaned at regular intervals. The fi lter can be removed when the union nut (1) has been unscrewed. 6.4 Cleaning of high pressure nozzle A clogging up in the nozzle will cause the pump pressure to increase above normal operating pressure, and cleaning of the nozzle is required immediately. 1. Stop the cleaner and detach the spray lance. 2. Clean the nozzle with the cleaning tool. IMPORTANT: ONLY use the cleaning tool when the spray lance is detached. 3. Flush the spray lance backwards with water. 4. If the pressure is still too high, repeat items Fuel filter Open the door to gain access to the fuel pump. Clean filter: 1. Unscrew fi lter cap (1). 2. Clean/replace fuel fi lter (2). 3. Dispose of cleaning solution/damaged fi lter in accordance with the disposal regulations. 6.6 Disposable waste This high-pressure hot water washer consists of parts, which can affect the environment when thrown away. Parts that can pollute are as follows: Oil, painted/zinc-coated parts, plastics/plastic-coated parts. Therefore, it is important to follow the laws concerning the removal of polluting and dangerous materials when replacing spare parts or disposing of high-pressure hot water washer. It is recommended that you bring the rejected parts to waste disposal areas or recycling plants that are approved for the destruction of these types of materials. 25
26 7 Trouble Shooting You have chosen the best quality and therefore deserve the best service. The TRUCK BOOSTER features an Error detection system that will stop the TRUCK BOOSTER in case of a severe error that needs immediate attention. The red light of the STOP button will fl ash, and the display in the inspection window will indicate the nature of the error. Though the user can correct some of these errors, you should note the error and contact the nearest Nilfisk-ALTO service organization. To avoid unnecessary disappointments, you should check this section before contacting the nearest Nilfisk-ALTO service organization. 7.1 General trouble shooting Symptom Reason Action Machine will not start > A fuse has blown Change the fuse. (NO ERROR indication) > Power disconnected Connect power. Fuses blow > Installation does not Change to an installation. correspond to the ampere corresponding to the ampere consumption of the machine consumption of the machine at a minimum. Change the fuse. Working pressure too low > Nozzle worn Replace the nozzle. > Wrong spray lance Replace the spray lance (see section 4.1.4). > Reduction valve of spray Turn reduction valve comlance not adjusted to max. pletely counter-clockwise pressure. (see section 4.1.4). > Nozzle partly clogged up Clean the nozzle (see section 6.4). Working pressure fluctuating > Insuffi cient water supply Check that the water tank is not drained of water during operation of the machine. If it is, clean the water inlet fi lter of the machine. If that does not solve the problem, the water supply for the machine is insuffi cient. NB! Avoid long, thin hoses (min. 3/4"). > High-pressure hoses too long Dismount high-pressure extension hoses and retry. Extension hose max. 50 m. NB! Avoid long extension hoses with many couplings. > Air in the system Vent the system (see section 3.7). > Detergent container empty Refi ll or close dosing valve. 26
27 Symptom Reason Action > Water inlet fi lter clogged up Clean fi lter (see sect. 6.3). No working pressure > Nozzle clogged up Clean nozzle (see sect. 6.4). > No inlet water Check that the shut off cock of the water inlet is open. Check that the water supply meets the requirements (see section 3.4). > High-pressure cock of outlet Close all high-pressure point open cocks not in use. Machine starts and > Leaky hose/ Repair leak. stops pipeline/spray handle 7.2 Error messages If your TRUCK BOOSTER does not heat the water although the white Heating push button (5) has been activated, the overheat melting fuse has blown. This fuse is located within the machine and MUST ONLY be exchanged by an Nilfi sk-alto service technician. Error Message (red STOP light flashing) Reason Action Illegal sensor comb. > Lack of water Check your water supply open?, suffi cient pressure? Check and clean inlet fi lter, section 6.3. E1 E4 E5 > Declutching of thermal relay Check ventilation. or motor winding protector Check fuses. > Defective or mal-adjusted Call Nilfi sk-alto service. fl ow sensor / pressure switch Flow failure > Defective or mal-adjusted Call Nilfi sk-alto service. fl ow sensor No flame detected > No fl ame is detected when it Check your fuel supply, should be present and refi ll is nescessary. > Fuel fi lter clogged Call Nilfi sk -ALTO service. > Flame sensor soothed or Call Nilfi sk -ALTO service. defective Illegal flame detected E6 > Flame detected when it should Flame sensor not mounted NOT be present in place. Mount sensor. > Flame sensor defective Call Nilfi sk -ALTO service Red STOP light flashing > Shortage of oil in h.p. pump Top up with oil. Display shows hour counters 27
28 8 Technical Data Model TRUCK BOOSTER 7-63 D Pump pressure 1) bar Water volume, min./max. pres. l/min 21/ / /13.3 Water tank, volume liter Water coonnection: Max. pressure, feed water bar Min. pressure, feed water bar 1,0 1,5 Max. temperature, feed water C Spray lance: Nozzle type, h. p./l.p Thrust, max. N/kp 49/4.9 43/4.3 25/2.5 Pipeline, max. length m Ø12 x max. 50 m Ø15 x max. 180 m Ø18 x max. 500 When using max. pipe length, only use a high pressure hose of 10 m. TRUCK BOOSTER 5-49 D TRUCK BOOSTER 5-30 D Sound pressure level L pa measured in accordance with ISO [DISTANCE 1m] [FULL LOAD]: db(a) ) 10 m (3/8") high pressure hose. Data at 12 C hot feed water. We reserve the right to make alterations. 9 Warranty Your Nilfi sk-alto product is guaranteed for 12 months from date of purchase (purchase receipt must be presented) on the following conditions: that defects are attributable to fl aws or defects in materials or workmanship. (Usual wear and tear as well as misuse are not covered by the guarantee). that repairs have not been carried out or attempted by other than Nilfi sk -ALTO-trained service staff. that only original accessories have been applied. that the product has not been exposed to abuse such as knocks, bumps or frost. that the instructions in the manual have been carefully observed. A warranty repair comprises the replacement of defective parts, but it does not cover freight and packaging charges. Besides we refer to national Sale of Goods Act. Any illegitimate guarantee repair will be invoiced. (I.e. malfunctions due to causes mentioned in section 7.0 Trouble shooting of the instruction manual). 28
29 10 EC Declaration of Conformity EC Declaration of Conformity Product: Type: The design of the unit corresponds to the following pertinent regulations: High Pressure Washer TRUCK BOOSTER EC Machine Directive EC Low-voltage Directive EC EMC Directive EC RoHS Direktivet EC PED Direktivet 2006/42/EC 2006/95/EC 2004/108/EC 2011/65/EC 97/23/EC Applied harmonised standards: EN (2006), EN (2006), EN (2001), EN (2006) Applied national standards and technical specifications: Name and address of the person autho rised to compile the technical file: Identity and signature of the person empowered to draw up the declaration on behalf of the manufacturer: DS EN Anton Sørensen General Manager, Technical Operations EAPC Nilfi sk-advance A/S Sognevej 25 DK-2605 Brøndby Anton Sørensen General Manager, Technical Operations EAPC Nilfi sk-advance A/S Sognevej 25 DK-2605 Brøndby Place and date of the declaration Hadsund,
30 (A) (B) ESC + OK DCINPUT MITSUBISHI * 1 11 A B A B
31 HEAD QUARTER DENMARK Nilfi sk-advance A/S Sognevej 25 DK-2605 Brøndby Tel.: (+45) sk-advance.com SALES COMPANIES ARGENTINA Nilfi sk-advance srl. Herrera 1855, 6 fl oor, Of. A-604 ZC 1293 Ciudad Autónoma de Buenos Aires Argentina sk-alto.com AUSTRALIA Nilfi sk-alto Unit 1, 13 Bessemer Street Blacktown NSW 2148 Australia sk-alto.com.au AUSTRIA Nilfi sk-alto Geschäftsbereich der Nilfisk-Advance GmbH Metzgerstraße 68 A-5101 Bergheim/Salzburg sk-alto.at BELGIUM Nilfi sk-advance NV/SA Riverside Business Park Boulevard Internationalelaan 55 Bâtiment C3/C4 Gebouw Bruxelles 1070 Brussel sk.be CHILE Nilfi sk-advance S.A. San Alfonso 1462, Santiago sk.com CHINA Nilfi sk-advance Cleaning Equipment (Shanghai) Co Ltd. No. 4189, Yindu Road Xinzhuang Industrial Park Shanghai sk.cn CZECH REPUBLIC Nilfi sk-advance s.r.o. Do Certous 1 VGP Park Horní Pocernice, Budova H2 CZ Praha 9 sk.cz DENMARK Nilfi sk-alto Danmark Industrivej 1 Hadsund, DK sk-alto.dk FINLAND Nilfi sk-advance OY Ab Koskelontie 23E Espoo, FI sk.fi FRANCE Nilfi sk-advance SAS Division ALTO BP Courtaboeuf Cedex GERMANY Nilfi sk-alto Geschäftsbereich der Nilfisk-Advance AG Guido-Oberdorfer-Straße Bellenberg sk-alto.de GREECE Nilfi sk-advance A.E. 8, Thoukididou Str. Argiroupoli,Athens, GR sk.gr HOLLAND Nilfi sk-advance B.V. Versterkerstraat AN ALMERE HONG KONG Nilfi sk-advance Ltd HK Worsted Mills Ind l Bldg Wo Tong Tsui St. Hong Kong, Kwai Chung, N.T. HUNGARY Nilfi sk-advance Kereskedelmi Kft. H-2310 Szigetszentmiklós-Lakihegy II. Rákóczi Ferenc út INDIA Nilfi sk-advance India Limited Pramukh Plaza, B Wing, 4th fl oor, Unit No. 403 Cardinal Gracious Road, Chakala Andheri (East), Mumbai IRELAND Nilfi sk-advance 1 Stokes Place St. Stephen s Green Dublin 2, Ireland ITALY Nilfi sk-advance S.p.A. Strada Comunale Della Braglia, 18 Guardamiglio, Lombardia, I JAPAN Nilfi sk-advance Inc Kita-Shinyokohama Kouhoku-Ku Yokohama KOREA NIlfi sk-advance Korea 471-4, Kumwon B/D 2F, Gunja-Dong, Gwangjin-Gu, Seoul MALAYSIA Nilfi sk-advance Sdn Bhd SD 33, Jalan KIP 10 Taman Perindustrian KIP Sri Damansara Kuala Lumpur Malaysia MEXICO Nilfi sk Advance de Mexico S. de R.L. de C.V. Agustin M. Chavez 1, PB-004 Col. Centro Ciudad Santa Fe C.P México, D.F. NEW ZEALAND Nilfi sk-advance NZ Ltd Danish House 6 Rockridge Avenue Penrose Auckland NZ NORWAY Nilfi sk-advance AS Bjørnerudvejen 24 Oslo, N POLAND Nilfi sk-advance Sp. z.o.o ul. 3-go Maja 8, Bud. B4 Pruszków, PL PORTUGAL Nilfi sk-advance, Lda. Sintra Business Park Zona Industrial Da Abrunheira Edificio 1, 1o A Sintra, P sk.pt RUSSIA Nilfi sk-advance LLC Vyatskaya str. 27, bld. 7, 1st fl oor Moscow, sk.ru SOUTH AFRICA WAP South Africa (Pty) Ltd 12 Newton Street 1620 Spartan, Kempton Park SINGAPORE Nilfi sk-advance Pte Ltd 22 Tuas Avenue 2 Singapore sk.com SPAIN Nilfi sk-advance, S.A. Torre D Ara Passeig del Rengle, 5 Plta.10ª Mataró, E sk.es SWEDEN Nilfi sk-alto Aminogatan 18 Mölndal, S sk-alto.se SWITZERLAND NA Sondergger AG Nilfi sk-alto Generalvertretung Mühlestrasse 10 CH-9100 Herisau sk-alto.ch TAIWAN Nilfi sk-advance Ltd. Taiwan Branch (H.K.) No. 5, Wan Fang Road, Taipei sk-advance.com.tw THAILAND Nilfi sk-advance Co. Ltd. 89 Soi Chokechai-Ruammitr Viphavadee-Rangsit Road Jomphol, Jatuchak Bangkok sk.com TURKEY Nilfi sk-advance A.S. Serifali Mh. Bayraktar Bulv. Sehit Sk. No:7 Ümraniye, Istanbul sk.com.tr UNITED KINGDOM Nilfi sk-alto Bowerbank Way, Gilwilly Industrial Estate Penrith, Cumbria GB-CA11 9BQ sk-alto.co.uk UNITED ARAB EMIRATES Nilfi sk-advance Middle East Branch SAIF-Zone, P. O. Box Sharjah sk.com USA Nilfi sk-advance st Ave. North Plymouth MN sk-alto.us VIETNAM Nilfi sk-advance Co., Ltd. No.51 Doc Ngu Str. Lieu Giai Ward Ba Dinh Dist. Hanoi sk.com
Operating instructions
 Operating instructions ATTIX 3, ATTIX 5, ATTIX 7 ATTIX 2 GALLON ATTIX 9 GALLON 30200673 C 3 9 auto ATTIX 3 0 3 4 5 8 6 ATTIX 5 7 9 4 auto 8 0 ATTIX 7 2 3 9 auto 4 3 8 5 4 5 6 4 5 Important safety instructions
Operating instructions POSEIDON 2
 Operating instructions POSEIDON 2 128330683 b Instruktionsbog... 3-16 Instruksjonsbok... 17-31 Instruktionsbok... 32-46 Käyttöohje... 47-61 Instruction manual... 62-75 Betriebsanleitung... 76-92 Manuel
Operating instructions POSEIDON PE
 Operating instructions POSEIDON PE 106169306 b EN-DE-FR-NL-ES-DA-NO-SV-FI Copyright 2014 Nilfisk-ALTO User manual... 3-17 Betriebsanleitung... 18-34 Manuel d instructions... 35-51 Gebruikershandleiding...
1 Safety precautions and warnings Description 2.1 Application Operation elements...6
 SOLAR BOOSTER D, EH Instruction manual... 3-30 Betriebsanleitung... 31-59 Manuel d Instructions... 60-87 Gebruikershandleiding... 88-115 Manual de instrucciones... 116-143 Manuale di istruzioni... 144-171
Classic Classic 110.1
 Classic 100.1 Classic 110.1 User Manual Printed in China Copyright 2007 Gerni Index 1 Safety precautions and warnings...3 2 Description...5 3 Before you start using your pressure washer...6 4 Operating
EN NL ES PT PL
 17-03-2005 Nilfisk-ALTO C 100.1 EN NL ES PT PL Instruction manual... 3-12 Gebruikershandleiding... 13-22 Manual de Instrucciones... 23-33 Manual de Instruções... 34-43 Instrukcja obsługi... 44-54 Index
Operating instructions AUTO BOOSTER
 Operating instructions AUTO BOOSTER 107319253 b (03.2014) EN-DE-FR-NL-ES-IT-DA-NO-SVFI-PL-CS-HU Operating Instructions... 3-31 Betriebsanleitung... 32-60 Notice d utilisation... 61-90 Gebruiksaanwijzing...
FORCE. Owner's manual
 FORCE www.alto-online.com Owner's manual 6 6b 7 8 6a 5 9 2 10 1 3 11 4 4a We congratulate you on your new ALTO High Pressure Washer We are confident that the new high pressure washer of ALTO will justify
AERO 21 AERO 21 INOX A
 Operating instructions AERO 21 AERO 21 INOX 107407182 A Operating instructions... 1 Bedienungsanweisungen... 8 Instructions de fonctionnement... 16 Gebruiksaanwijzingen... 24 Istruzioni per l uso... 2
Operating instructions
 Operating instructions TTIX 30 / PC / XC TTIX 40 / PC / XC TTIX 50 / PC / XC TTIX 50-21 PC EC 107400397 E TTIX 30-40-50 TTIX 30 9 8 7 1 2 3 6 5 4 TTIX 50 TTIX 40 TTIX 30-40-50 Contents 1 Important safety
AERO 20 AERO ENGLISH - Operating Instructions
 www.nilfisk-alto.com AERO 20 AERO 25 302002328-2008-05-21 ENGLISH - Operating Instructions Important safety instructions Before using the vacuum cleaner, always read the operating instructions and keep
GM 80P - GM 80P LC Instructions for use
 GM 80P - GM 80P LC Instructions for use 107418517 A (06. 2017) Hose connection Power cord Diffuser 1 2 3 Plastic hose and plastic tube Suction power regulation Rubber or plastic hose with curved steel
Operating instructions RAMIRENT ATTIX 30 / PC / XC ATTIX 40 / PC / XC ATTIX 50 / PC / XC ATTIX PC EC E
 Operating instructions TTIX 30 / PC / XC TTIX 40 / PC / XC TTIX 50 / PC / XC TTIX 50-21 PC EC RMIRENT 107400397 E TTIX 30-40-50 9 8 7 6 5 4 TTIX 40 TTIX 30 1 2 3 TTIX 50 RMIRENT Contents 1 Important safety
C / C / C C X-TRA (C NZ) C / C X-TRA, C / C X-TRA. Instructions for use
 C / C X-TRA, C / C X-TRA. Instructions for use") C 100.7 / C 105.7 / C 110.7 C 110.7 X-TRA (C 110.7 NZ) C 120.7 / C 120.7 X-TRA, C 125.7 / C 125.7 X-TRA Instructions for use EN 02.2018 The instruction consists of 3 parts. Part 1:3 Safety Instructions.
C 100.7 / C 105.7 / C 110.7 C 110.7 X-TRA (C 110.7 NZ) C 120.7 / C 120.7 X-TRA, C 125.7 / C 125.7 X-TRA Instructions for use EN 02.2018 The instruction consists of 3 parts. Part 1:3 Safety Instructions.
GD 1000 Instructions for use
 GD 000 Instructions for use 074836 B (03. 08) . Unpacking. Dust bag replacement 03 3. Filter cleaning 04 4. HEPA - GD 00, GDS 00. Unpacking, Auspacken, Déballage.. Dust bag replacement, Staubbeutel auswechseln,
Super Super Super Works Super Super Works
 Super 130.3 Super 135.3 Super 145.3 Works Super 150.3 Super 160.3 Works User Guide (07.2018) The instruction consists of 4 parts. Part 1:3 Safety Instructions. Part 2:3 User Guide. Part 3:3 Troubleshooting,
POSEIDON 5 POSEIDON 5. Operating guide
 G4 POSEIDON 5 Betjeningsvejledning DK Bruksanvisning N Bruksanvisning S Operating guide UK Betribsanleitung D Mode d emploi F Gebruiksaanwijzingen NL Instrucciones de manejo E Instruções para uso P Käyttöopas
Classic Classic 125.2
 Why compromise Classic 120.2 Classic 125.2 User Guide 128303306 b Classic 120.2 Classic 125.2 Printed in China Copyright 2011 Gerni Index 1 Safety precautions and warnings...3 2 Description...5 3 Before
Nilfisk E 130.2, E 140.2
 Nilfisk E 130.2, E 140.2 User Manual Index 1 Safety precautions and warnings...3 2 Description...4 3 Before you start using your pressure washer...5 4 Operating your pressure washer...6 5 Fields of Application
EN NL ES PT PL
 27-01-2005 Nilfisk-ALTO C 100.2 EN NL ES PT PL Instruction manual... 3-16 Gebruikershandleiding... 17-30 Manual de Instrucciones... 31-44 Manual de Instruções... 45-58 Instrukcja obsługi... 59-72 Index
MC DE, MC PE, MC PE PLUS - Instructions for use
 - Instructions for use 106169306 c (09.2015) EN-DE-FR-NL-ES-DA-NO-SV-FI User manual... 3-17 Betriebsanleitung... 18-33 Manuel d instructions... 34-48 Gebruikershandleiding... 49-64 Manuale di istruzioni...
MH 4M. Operating instructions C ( )
") MH 4M Operating instructions 107140465 C (09.2015) 1 Symbols used to mark instructions WARNING & Safety instructions in these operating instructions which must be observed to prevent risks to persons are
MH 4M Operating instructions 107140465 C (09.2015) 1 Symbols used to mark instructions WARNING & Safety instructions in these operating instructions which must be observed to prevent risks to persons are
Elite - Instructions for use
 Elite - Instructions for use 11.2017 EN Safety Instructions Before first use of the machine, this instruction manual must be read through carefully. Save instructions for later use. WRNING! Do not use
Nilfisk P 130.2/150.2/160.2
 Nilfisk P 130.2/150.2/160.2 User Manual Index 1 Safety precautions and warnings...3 2 Description...5 3 Before you start using your pressure washer...6 4 Operating your pressure washer...7 5 Fields of
VL500 - Instructions for use
 VL500 - Instructions for use 107405529 H (09. 2016) ... 6... 14... 22... 30... 38... 46... 53... 60... 67... 74... 82... 90... 98... 106...113... 120... 128... 135... 143... 151... 159... 167... 175...
Super S Super Super Super Super 145.2
 Why compromise Super 130.2 S Super 130.2 Super 135.2 Super 140.2 Super 145.2 User Guide 128303529 c (11.2013) Super 130.2 S Super 130.2 Super 135.2 Super 140.2 Super 145.2 Printed in China Copyright 2013
Classic Classic S Classic Classic Classic 120.4
 Why compromise Classic 100.3 Classic 100.3 S Classic 110.4 Classic 115.3 Classic 120.4 User Guide 128331922 b (03.2014) Classic 100.3 Classic 100.3 S Classic 110.4 Classic 115.3 Classic 120.4 Printed in
High-Pressure Washer BY02-VBP-WTR BY02-VBP-WTH. CAUTION : Do not use this device before reading the instructions.
 High-Pressure Washer BY02-VBP-WTH BY02-VBP-WTR CAUTION : Do not use this device before reading the instructions. 1 1. Safety Instructions The appliance has been designed solely for private use outdoors
TRITON 800 PE TRITON 1000 PE POSEIDON 1100 PE POSEIDON 1200 PE PLUS
 03-05-2005 TRITON 800 PE TRITON 1000 PE POSEIDON 1100 PE POSEIDON 1200 PE PLUS DA EN FR DE NL Instruktionsbog... 3-24 Instruction Manual... 25-46 Manuel d instructions... 47-68 Betriebsanleitung... 69-90
Tempest TP420/180 Electric Pressure Washer
 Please dispose of packaging for the product in a responsible manner. It is suitable for recycling. Help to protect the environment, take the packaging to the local amenity tip and place into the appropriate
MH 1C - MH 2C - MH 2M - Instructions for use
 1 300 100 0 F C CUT OUT 0 85 30 105 40 175 1% 2% 3% 4% 50120 MH 1C - MH 2C - MH 2M - Instructions for use 60 140 210 90 80 195 70 160 107145403 E (08. 2015) 1 2 3 4 5 6 7 8 9 0 10 F C 85 30 105 40 50120
ATTIX 791-2M/B C
 675 C auto auto 4 5 6 7 6 8 7 9 Contents Important safety instructions Description Before start-up 4 Operation 5 Applications and techniques 6 After finishing work 7 Maintenance 8 Troubleshooting 9 Further
Super S Super Super Super 145.2
 Why compromise Super 130.2 S Super 130.2 Super 140.2 Super 145.2 User Guide 128303529 Super 130.2 S Super 130.2 Super 140.2 Super 145.2 Printed in China Copyright 2010 Gerni Index 1 Safety precautions
MH 7P. Operating instructions B ( ) psi bar
 psi bar") psi bar MH 7P Operating instructions 107140709 B (08.2015) psi bar 1 2 30 3 4 5 6 29 7 28 27 26 25 24 23 22 21 8 9 10 11 12 13 14 20 psi bar 15 16 17 18 19 2 1 Symbols used to mark instructions WARNING
psi bar MH 7P Operating instructions 107140709 B (08.2015) psi bar 1 2 30 3 4 5 6 29 7 28 27 26 25 24 23 22 21 8 9 10 11 12 13 14 20 psi bar 15 16 17 18 19 2 1 Symbols used to mark instructions WARNING
High Pressure Washer - SAFETY INSTRUCTIONS
 High Pressure Washer - SAFETY INSTRUCTIONS Nilfisk DOC0023 REV A 1 Symbols used to mark instructions WARNING & Safety instructions in these operating instructions which must be observed to prevent risks
Nilfisk C Nilfisk C Nilfisk C X-TRA
 Nilfisk C 120.3 Nilfisk C 125.3 Nilfisk C 120.5 X-TRA User Manual 128330335 Index 1 Safety precautions and warnings...3 2 Description...5 3 Before you start using your pressure washer...6 4 Operating your
ORIGINAL INSTRUCTIONS
 WARNING: Read the instructions before using the machine. POWER WASHER MODEL NO: JETSTAR 1950 PART NO: 7336010 OPERATION & MAINTENANCE INSTRUCTIONS ORIGINAL INSTRUCTIONS LS0617 - ISS 3 INTRODUCTION Thank
STT 3000 Series STT250 /150 Surge Protection Device Specifications
 STT 3000 Series STT250 /150 Surge Protection Device Specifications Part Number: 46188660-501 EN2I-6061 June 2011 Introduction This device is designed to give the Smart Temperature Transmitter maximum protection
PRESSURE WASHER MODEL NO: JETSTAR 1750 OPERATION & MAINTENANCE INSTRUCTIONS. WARNING Read the instructions before using the machine PART NO:
 WARNING Read the instructions before using the machine PRESSURE WASHER MODEL NO: JETSTAR 1750 PART NO: 7333230 OPERATION & MAINTENANCE INSTRUCTIONS LS0711 INTRODUCTION Thank you for purchasing this CLARKE
Multi 20 Multi 30. User manual e ( )
") Multi 20 Multi 30 User manual 107402134 e (11.2013) Copyright 2013 Nilfisk-Advance A/S Multi English...6-9 Deutsch...10-13 Français...14-17 Español...18-21 Português...22-25 Italiano...26-29 Nederlands...30-33
Multi 20 Multi 30 User manual 107402134 e (11.2013) Copyright 2013 Nilfisk-Advance A/S Multi English...6-9 Deutsch...10-13 Français...14-17 Español...18-21 Português...22-25 Italiano...26-29 Nederlands...30-33
FF-SR Series. FF-SR25933 Two-hand Safety Control Module FF-SR25933
 Two-hand Safety Control Module FF-SR Series FEATURES Complies with the Machinery Directive 98/37/EC and UL 508 Type III C per EN 574, Category 4 per EN 954-1 Inputs for two dual-contact pushbuttons 0,5
LAVASTOVIGLIE DISHWASHER LAVE-VAISSELLE GESCHIRRSPÜLER VAATWASSER LAVAVAJILLAS MÁQUINA DE LAVAR LOUÇA ΠΛΥΝΤΗΡΙΟ ΠΙΑΤΩΝ BULASIK MAKINASI
 MANUALE D USO INSTRUCTION MANUAL NOTICE D UTILISATION GEBRAUCHSANWEISUNG GEBRUIKSAANWIJZING MANUAL DE USO MANUAL DE INSTRUÇÕES ENTOIXIZOMENO ΠΛYNTHPIO ΠIATΩN KULLANIM KLAVUZU LAVASTOVIGLIE DISHWASHER LAVE-VAISSELLE
HydroDry. Instructions For Use and Parts List. Nilfisk Model /00 revised 10/04 Form No
 HydroDry Instructions For Use and Parts List Nilfisk Model 56259042 8/00 revised 10/04 Form No. 56041506 IMPORTANT SAFETY INSTRUCTIONS This machine is only suitable for commercial use, for example in hotels,
VP600 - Instructions for use
 - Instructions for use 107407797 D (04. 2016) Operating instructions... 6 Bedienungsanweisungen... 12 Instructions de fonctionnement... 18 Gebruiksaanwijzingen... 25 Istruzioni per l uso... 32 Bruksanvisning...
K 5.80 M ( ) Caution! Do not use the unit without first having read the operating instructions.
 Caution! Do not use the unit without first having read the operating instructions.") K 5.80 M 5.960-830 (2004330-04-03) Caution! Do not use the unit without first having read the operating instructions. Contents Short instructions... 2 Assembly... 3 Safety Notes... 4 Before first use...
K 5.80 M 5.960-830 (2004330-04-03) Caution! Do not use the unit without first having read the operating instructions. Contents Short instructions... 2 Assembly... 3 Safety Notes... 4 Before first use...
MC 4M. Operating instructions C ( )
") MC 4M Operating instructions 107145556 C (03.2015) 1 Symbols used to mark instructions WARNING & Safety instructions in these operating instructions which must be observed to prevent risks to persons are
MC 4M Operating instructions 107145556 C (03.2015) 1 Symbols used to mark instructions WARNING & Safety instructions in these operating instructions which must be observed to prevent risks to persons are
K 2 Basic. Operating Instructions. Please read the operating instructions carefully before using the unit (05/17)
") K 2 Basic Operating Instructions Please read the operating instructions carefully before using the unit. 59679030 (05/17) Contents Safety instructions............. 3 Description of the Appliance......
K 2 Basic Operating Instructions Please read the operating instructions carefully before using the unit. 59679030 (05/17) Contents Safety instructions............. 3 Description of the Appliance......
NEPTUNE 5-46 PE NEPTUNE 5-54 PE NEPTUNE 7-61 PE NEPTUNE 5-85 PE
 /DE Operating Instructions...1-19 Betriebsanleitung...20-38 Notice d utilisation...39-57 Gebruiksaanwijzing...58-76 Istruzioni sull uso...77-95 Bruksanvisning... 96-114 Bruksanvisning... 115-133 Brugsvejledning...134-152
GD 5 - GD 10 Instructions for use
 GD 5 - GD 10 Instructions for use 107417937 B (02. 2018) 2 Operating instructions... 8 Bedienungsanweisungen... 13 Instructions de fonctionnement... 18 Gebruiksaanwijzingen... 24 Istruzioni per l uso...
LAVASTOVIGLIE DISHWASHER LAVE-VAISSELLE GESCHIRRSPÜLER VAATWASSER LAVAVAJILLAS MÁQUINA DE LAVAR LOUÇA ΠΛΥΝΤΗΡΙΟ ΠΙΑΤΩΝ BULASIK MAKINASI
 MANUALE D USO INSTRUCTION MANUAL NOTICE D UTILISATION GEBRAUCHSANWEISUNG GEBRUIKSAANWIJZING MANUAL DE USO MANUAL DE INSTRUÇÕES ENTOIXIZOMENO ΠΛYNTHPIO ΠIATΩN KULLANIM KLAVUZU LAVASTOVIGLIE DISHWASHER LAVE-VAISSELLE
RX550i Electric Pressure Washer
 RX550i Electric Pressure Washer READ THIS MANUAL CAREFULLY BEFORE USE FAILURE TO DO SO MAY RESULT IN INJURY, PROPERTY DAMAGE AND MAY VOID WARRANTY. KEEP THIS MANUAL FOR FUTURE REFERENCE. Products covered
High vacuum guide FOR PRE-SEPARATORS AND CYCLONES
 High vacuum guide FOR PRE-SEPARATORS AND CYCLONES High vacum guide for pre-separators and cyclones System description Nederman Pre-separation and Vacuum Transportation Systems pre-separate and discharge
HOT WASHER MODEL NO: KING150
 WARNING: Do not use the hot washer without reading this manual HOT WASHER MODEL NO: KING150 PART NO: 7320175 OPERATION & MAINTENANCE INSTRUCTIONS LS1215 INTRODUCTION Thank you for purchasing this CLARKE
K 2.900M. Operating Instructions. Before first use of the unit read these operating instructions and act in accordance with them
 K 2.900M Operating Instructions Before first use of the unit read these operating instructions and act in accordance with them. 5.961-933.0 01/07 2 Dear Customer, Please read and comply with these instructions
KB Operating Instructions. Before first use of the unit Please read these /07
 KB 6060 Operating Instructions Before first use of the unit Please read these Operating Instructions and act in accordance with them 5.962-095.0 01/07 2 Dear Customer, Please read and comply with these
POWER WASHER MODEL NO: JET 9000 OPERATION & MAINTENANCE INSTRUCTIONS. WARNING: Do not use the machine without reading this manual PART NO:
 WARNING: Do not use the machine without reading this manual POWER WASHER MODEL NO: JET 9000 PART NO: 7333502 OPERATION & MAINTENANCE INSTRUCTIONS GC0913 INTRODUCTION Thank you for purchasing this CLARKE
C.A.V. Operator's Manual. CLARKE-AMERICAN Vacuum 15 Gallon READ THIS BOOK
 Operator's Manual C.A.V.A.V.. 15 CLARKE-AMERICAN Vacuum 15 Gallon READ THIS BOOK This book has important information for the use and safe operation of this machine. Failure to read this book prior to operating
High Pressure Washer 130
 High Pressure Washer 130 7901 WARNING: Do not use the appliance without reading this instruction sheet ORIGINAL INSTRUCTIONS Hozelock Ltd. Midpoint Park Birmingham, B76 1AB. England Tel: +44 (0) 121 313
APW-VAP-150P High Pressure Cleaner Operator Manual
 APW-VAP-150P High Pressure Cleaner Operator Manual BEFORE OPERATING THIS APPLIANCE PLEASE READ THESE INSTRUCTIONS CAREFULLY Item Description OVERVIEW 1. High pressure washer 2. On/off switch 3. Water outlet
PJ130S High Pressure Cleaner
 PJ130S High Pressure Cleaner Operator Manual Original instructions WARNING: Do not use the machine without reading the instruction sheet. Item Description OVERVIEW 1. High pressure washer 2. On/off switch
Operating Instructions
 WD 3 Premium Operating Instructions Before first use of the unit read these operating instructions and act in accordance with them. English 5 59658050 (08/15) 10 11 12 13 14 15 16 2 3 4 Contents General
K Operating Instructions. Before first use of the unit read these operating instructions and act in accordance with them.
 K 1.100 Operating Instructions Before first use of the unit read these operating instructions and act in accordance with them. www.kaercher.com/register-and-win 59651430 (10/13) Contents General information..............
Contents. Safety instructions. Device elements. Colour coding. Hazard levels
 Please read and comply with these original instructions prior to the initial operation of your appliance and store them for later use or subsequent owners. Contents Device elements........... EN 1 Safety
Compact Pressure Washer 100
 Compact Pressure Washer 100 7900 WARNING: Do not use the appliance without reading this instruction sheet ORIGINAL INSTRUCTIONS Hozelock Ltd. Midpoint Park Birmingham, B76 1AB. England Tel: +44 (0) 121
Electronically controlled instantaneous water heater. DEX: C models. Instructions for the user
 Electronically controlled instantaneous water heater DEX: 27930-50 C models Instructions for the user For 50 ºC models, the appliance delivers water not exceeding 50 ºC in accordance with AS3498. MADE
SAFETY AND OPERATING MANUAL
 SAFETY AND OPERATING MANUAL HOT WATER ELECTRIC WATER BLASTERS Read Safety & Operating Instructions Before Commencing Operation THESE INSTRUCTIONS MUST BE READ AND ADHERED TO BEFORE OPERATING THIS MACHINE.
Instruction Manual. Mink. Claw Vacuum Pumps MM 1324 AV, MM 1202 AV, MM 1252 AV, MM 1322 AV US Version
 Instruction Manual Mink Claw Vacuum Pumps MM 1324 AV, MM 1202 AV, MM 1252 AV, MM 1322 AV US Version Busch Manufacturing LLC 516 Viking Drive Virginia Beach, VA 23452 USA 0870207808/-_en / Original instructions
Read this manual through carefully before installing/using the cleaner, paying special attention to the SAFETY INSTRUCTIONS
 PW1370TD 2 EN Read this manual through carefully before installing/using the cleaner, paying special attention to the SAFETY INSTRUCTIONS 3 E3 E1 C3 A1-A2-A3-A4 B4 B1 B5 B2 C1 B3 D 1 4 1 2 3 4 5 6 7 Ø13
2400W Pressure Washer RAC-HP125
 2400W Pressure Washer RAC-HP125 Waste electrical products should not be disposed of with household waste. Please recycle where facilities exist. Check with your local authority or retailer for recycling
Type 2 safety light curtain Type 2 according to the IEC/EN parts 1 and 2 Compact profile: 31 x 32 mm 30 mm resolution for hand detection Wide r
 Type 2 safety light curtain FF-SLD Series FEATURES Active Optoelectronic Protective Device compliant with the requirements of the IEC/EN 61496-parts 1 and 2 European Norms 30 mm resolution for hand detection
Electronic Service Manuals
 Electronic Service Manuals This electronic document is provided as a service to our customers. We do not create the contents of the information contained in this document. Should you have detailed questions
Nilfisk Smart. User Manual c ( ) EN-DA-NO-SV-FI-DE-FR-NL-IT-ES-PT-EL- TR-CS-HU-PL-HR-SL-SK-LV-LT-ET-RU-ZH
 EN-DA-NO-SV-FI-DE-FR-NL-IT-ES-PT-EL- TR-CS-HU-PL-HR-SL-SK-LV-LT-ET-RU-ZH") Nilfisk Smart User Manual 107412814 c (11.2016) EN-DA-NO-SV-FI-DE-FR-NL-IT-ES-PT-EL- TR-CS-HU-PL-HR-SL-SK-LV-LT-ET-RU-ZH EN DA NO SV FI DE FR NL IT ES PT EL TR CS HU PL HR SL SK LV LT ET RU ZH User Manual...
Nilfisk Smart User Manual 107412814 c (11.2016) EN-DA-NO-SV-FI-DE-FR-NL-IT-ES-PT-EL- TR-CS-HU-PL-HR-SL-SK-LV-LT-ET-RU-ZH EN DA NO SV FI DE FR NL IT ES PT EL TR CS HU PL HR SL SK LV LT ET RU ZH User Manual...
PRESSURE WASHER INSTRUCTIONS FOR:
 INSTRUCTIONS FOR: PRESSURE WASHER MODEL: PC2700 Thank you for purchasing a Sealey product. Manufactured to a high standard this product will, if used according to these instructions and properly maintained,
APW PSI PRESSURE WASHER
 APW5001 1300 PSI PRESSURE WASHER 1300 PSI PRESSURE WASHER Please carefully read this manual which has been specifically designed to provide all the necessary information for the correct use of the machine,
HD 645 HD 650/SX HD 658 HD 690/SX A /04
 HD 645 HD 650/SX HD 658 HD 690/SX www.karcher.com 5.960-848 A2008107 03/04 Deutsch English Français Italiano Nederlands Español Português Svenska Suomi ÅëëçíéêÜ Pºcc å¼ Polski 6 17 28 40 52 63 75 87 97
English 6. Copyright DEWALT
 DC500 1 English 6 Copyright DEWALT 2 1 2 3 4 5 11 10 9 8 7 6 A 3 16 15 5 15 11 13 14 12 B C 15 6 16 17 18 8 9 17 4 D E 3 7 2 19 7 4 F G 19 20 21 H 5 ENGLISH VACUUM CLEANER DC500 Congratulations! You have
K M. Operating Instructions. Before first use of the unit read these operating instructions and act in accordance with them
 K 2.900 M Operating Instructions Before first use of the unit read these operating instructions and act in accordance with them. 5.962-499.0 (01/09) Contents General information 2 Safety instructions 3
Instruction Manual. Seco. Dry-running Rotary Vane Vacuum Pumps SV 1003 D, SV 1005 D
 Instruction Manual Seco Dry-running Rotary Vane Vacuum Pumps SV 1003 D, SV 1005 D Busch Vyroba CZ s.r.o. Svárovská 620, CZ 460 01, Liberec 11 Czech Republic 0870140843/A0002_en / Original instructions
IVB 3-M/5-M/7-M. Operating Instructions Betriebsanleitung Notice d utilisation Gebruiksaanwijzing Istruzioni sull uso Driftsinstruks Bruksanvisning
 auto auto auto auto auto IVB -M/-M/7-M Operating Instructions Betriebsanleitung Notice d utilisation Gebruiksaanwijzing Istruzioni sull uso Driftsinstruks Bruksanvisning Driftsvejledning Käyttöohje Navodilo
Heavy Duty Pressure Washer 150
 Heavy Duty Pressure Washer 150 7902 WARNING: Do not use the appliance without reading this instruction sheet Hozelock Ltd. Midpoint Park Birmingham, B76 1AB. England Tel: +44 (0) 121 313 1122 info@hozelock.com
Electronically controlled instantaneous water heater CEX 9. CEX9: C models. Instructions for the user
 Electronically controlled instantaneous water heater CEX 9 CEX9: 27900-50 C models Instructions for the user For 50 ºC models, the appliance delivers water not exceeding 50 ºC in accordance with AS3498.
Power Wash 2000W Car. User Guide. HPW2C-ZA hoover.za.com. Version 1.0
 Power Wash 2000W Car User Guide HPW2C-ZA hoover.za.com Version 1.0 2 CONTENTS MACHINE OVERVIEW 3 Contents Machine Overview General Safety Information Operation Maintenance FAQs Warranty Other Information
User instructions. VA20HD, VA55HD, VA55IND and VA75IND. Commercial wet/dry vacuum cleaners CAUTION - READ THESE INSTRUCTIONS BEFORE USING THE MACHINE
 User instructions VA20HD, VA55HD, VA55IND and VA75IND Commercial wet/dry vacuum cleaners CAUTION - READ THESE INSTRUCTIONS BEFORE USING THE MACHINE 03-8112-0000 Iss.3 07/08 http://www.truvox.com/products/vacuums/valet_aqua
K 2.94 M. Operating Instructions. Before first use of the unit read these operating instructions and act in accordance with them.
 K 2.94 M Operating Instructions Before first use of the unit read these operating instructions and act in accordance with them. 59624720 04/10 Dear Customer, Please read and comply with these original
K 2.50 M. Operating Instructions PRESSURE WASHER /03_
 K 2.50 M 5.960 643 05/03_2004246 Operating Instructions PRESSURE WASHER Before first use of the unit read these operating instructions and act in accordance with them ! Safety Notes! Use of the unit as
CG 435 OPERATING INTRUCTIONS
 CG 435 OPERATING INTRUCTIONS Declaration of conformity The undersigned manufacturer: SAINT-GOBAIN ABRASIVES S.A. 190, Bd J.F. KENNEDY L- 4930 BASCHARAGE Declares that this product: Grinding machine: CG
K M. Operating Instructions. Before first use of the unit read these operating instructions and act in accordance with them
 K 5.140 M Operating Instructions Before first use of the unit read these operating instructions and act in accordance with them. 5.963-147.0 (01/09) Dear Customer, Please read and comply with these original
COMPACT AND LIGHTWEIGHT FOR OUTDOOR CLEANING
 COMPACT AND LIGHTWEIGHT FOR OUTDOOR CLEANING LET S GET STARTED. VPW1 Let s talk safety PLEASE KEEP THESE ORIGINAL INSTRUCTIONS. Basic safety precautions This pressure washer is intended for household use
1800 PSI Electric Pressure Washer
 1800 PSI Electric Pressure Washer 039-8701-4 Use and Care Guide Congratulations on the purchase of your new pressure washer. In order to ensure you have the best possible experience please read through
User Manual GV25 GV35 GV702. Company information: Original instructions GV12066 (1)
") User Manual Original instructions GV25 GV35 GV702 Company information: www.vipercleaning.eu info-eu@vipercleaning.com GV12066 (1) 2012-04-10 USER MANUAL ENGLISH TABLE OF CONTENTS Introduction... 4 Manual
User Manual Original instructions GV25 GV35 GV702 Company information: www.vipercleaning.eu info-eu@vipercleaning.com GV12066 (1) 2012-04-10 USER MANUAL ENGLISH TABLE OF CONTENTS Introduction... 4 Manual
K 2.36 M. Operating Instructions. Before first use of the unit read these operating instructions and act in accordance with them
 K 2.36 M Operating Instructions Before first use of the unit read these operating instructions and act in accordance with them. 5.962-844.0 04/10 Contents General information 2 Description of the Appliance
2000 PSI Electric Pressure Washer
 2000 PSI Electric Pressure Washer 039-8702-2 Use and Care Guide Congratulations on the purchase of your new pressure washer. In order to ensure you have the best possible experience, please read through
OAKHURST, AUBERRY OKT20, AUB20
 OAKHURST, AUBERRY OKT20, AUB20 08/51707/0 Issue 7 The product complies with the European Safety Standards EN60335-2-30 and the European Standard Electromagnetic Compatibility (EMC) EN55014, EN60555-2 and
Glass and Dishwashers. BarAid 500/800. Installation and. Starting from Serial No.:
 Glass and Dishwashers BarAid 500/800 Installation and operation Instructions Starting from Serial No.: 8652 0001 REV. 19.01.2009 1617-A-01-09 Content Page 1 Important Notes... 4 2 Installation... 5 2.1
K Specifications. Max. Water Volume
 K 2.35 High Pressure Washer Operator Manual Overview... 2 Precautions... 2-4 Assembly Instructions... 4 Operating Instructions... 5 Using the Accessories... 6 Working with Detergents... 7 Shut Down and
Glass and Dishwashers 402/452/502. (original instructions) (incl. Australian /502) Starting from Serial No.:
 (incl. Australian /502) Starting from Serial No.:") Glass and Dishwashers ECOMAX 402/452/502 (incl. Australian 452-90/502) INSTALLATION AND OPERATION INSTRUCTIONS (original instructions) Starting from Serial No.: 8663 4000 REV. 05.10.2015 EN IMPORTANT NOTES
Glass and Dishwashers ECOMAX 402/452/502 (incl. Australian 452-90/502) INSTALLATION AND OPERATION INSTRUCTIONS (original instructions) Starting from Serial No.: 8663 4000 REV. 05.10.2015 EN IMPORTANT NOTES
1600 PSI Electric Pressure Washer
 1600 PSI Electric Pressure Washer 039-8050-2 Use and Care Guide Congratulations on the purchase of your new pressure washer. In order to ensure you have the best possible experience please read through
K 3.99 M. Operating Instructions. Before first use of the unit Please read these Operating Instructions and act in accordance with them /08
 K 3.99 M Operating Instructions Before first use of the unit Please read these Operating Instructions and act in accordance with them 59630920 12/08 2 Dear Customer, Please read and comply with these original
Manual de Instrucciones Campanas Extractoras DM-60/ DM-70/ DM-90 Vr. 03. Bedienungsanleitung Dunstabzugshauben DM-60/ DM-70/ DM-90 Vr.
 Manual de Instrucciones Campanas Extractoras DM-60/ DM-70/ DM-90 Vr. 03 Bedienungsanleitung Dunstabzugshauben DM-60/ DM-70/ DM-90 Vr. 03 Instructions Manual Kitchen Hoods DM-60/ DM-70/ DM-90 Vr. 03 Manuel
K 2 Compact. Operating Instructions Before first use of the unit read these operating instructions and act in accordance with them.
 K 2 Compact Operating Instructions Before first use of the unit read these operating instructions and act in accordance with them. 59648880 (11/12) Contents General information................ 3 Safety