HEBT-3V. A.J. Antunes & Co. Scan with mobile device or enter URL for product and service information. TABLE OF CONTENTS
|
|
|
- William Hensley
- 5 years ago
- Views:
Transcription

1 Place this manual in the Toaster section of your Equipment Manual. Manufactured exclusively for McDONALD S BY ANTUNES & CO. 180 KEHOE BLVD. CAROL STREAM, ILLINOIS 60188, U.S.A. PHONE: TOLL FREE: FAX: BUN TOASTER HEBT-3V HEBT-3V BUN TOASTER MFG. NO & A.J. Antunes & Co. HEBT-3V Scan with mobile device or enter URL for product and service information. Owner Information...2 General...2 Service/Technical Assistance...2 Warranty Information...2 Specifications...3 Electrical Specifications & Plug Configuration...3 Dimensions...3 Important Safety Information...4 Installation...5 Unpacking...5 Location...5 Operation...6 Operating Instructions...6 User Mode...6 Manager Mode...6 Safety Features...7 TABLE OF CONTENTS Operation...7 Maintenance...8 Daily Cleaning...8 Quarterly...11 Clean Cooling Fans and Electrical Housings (Annually)...13 Troubleshooting...14 Replacement Parts...17 Wiring Diagram...24 Notes...25 LIMITED WARRANTY A.J. Antunes & Co. provides the following limited warranty to the original purchaser of all Equipment. All components are warranted against defects in the material and workmanship for a period of two (2) years. If any part becomes inoperable during the period of this warranty, A.J. Antunes & Co. will pay labor costs to an Authorized Service Agent to replace the part plus travel expenses. WARRANTY EXCLUSIONS The cost of installation. Equipment that has been damaged due to shipment. Purchaser should make damage claim directly upon carrier. Alteration, misuse, abuse. Improper storage or handling. Improper maintenance. Failure to follow proper installation instructions, including electrical connection. Improper or unauthorized repairs. Scheduled Maintenance procedures as outlined in your MRC Card. Consumables such as Grill Covers (Release Sheets), gaskets, Conveyor Belt Wraps, O-rings, removal of links, and light bulbs. Freight, foreign, excise, municipal, or other sales or use taxes. Consequential damages such as loss of profit, loss of time, the cost of repairing or replacing other property which is damaged, or any other incidental damage of any kind. A.J. Antunes & Co. reserves the right to make changes in design or add improvements on any products. The right is always reserved to modify Equipment because of factors beyond our control and government regulation. Changes to Equipment do not constitute a warranty charge. This warranty is exclusive and is in lieu of all other warranties, expressed or implied, including any implied warranty of merchantability or fitness for a particular purpose, each of which is expressly disclaimed. The remedies described above are exclusive, and in no event shall A.J. Antunes & Co. or any of its Divisions be liable for special consequential or incidental damages for the breach or delay in the performance of this warranty. This manual is for the exclusive use of licensees and employees of Systems, Inc.. Corporation All Rights Reserved 1
2 General This manual provides the safety, installation, and operating procedures for this unit. Please read this manual prior to installing and operating the unit. This unit is manufactured from the finest materials available and assembled to Roundup s strict quality standards. This unit has been tested at the factory to ensure dependable trouble-free operation. OWNER INFORMATION Fill in the information below and have it handy when calling Antunes Technical Service for assistance. The serial number is on the specification plate located on the rear of the unit. Purchased From: Date of Purchase: Model No.: Service/Technical Assistance If you experience any problems with the installation or operation of your unit, contact Antunes Technical Service at (toll free). Warranty Information Please read the full text of the Limited Warranty in this manual. Serial No.: Mfg. No.: Network ID Number: Use only genuine Antunes replacement parts in this unit. Use of replacement parts other than those supplied by the manufacturer will void the warranty. If the unit arrives damaged, contact the carrier immediately and file a damage claim with them. Save all packing materials when filing a claim. Freight damage claims are the responsibility of the purchaser and are not covered under warranty. The warranty does NOT extend to: Damages caused in shipment or damage as result of improper use. Installation of electrical service. Normal maintenance as outlined in this manual. Malfunction resulting from improper maintenance. Damage caused by abuse or careless handling. Damage from moisture into electrical components. Damage from tampering with, removal of, or changing any preset control or safety device. IMPORTANT! Keep these instructions for future reference. If the unit changes ownership, be sure this manual accompanies the equipment. 2
3 SPECIFICATIONS Electrical Specifications & Plug Configuration Model & Mfg. No HEBT-3V (China only) International Volt Watts Hz /60 Plug Description IEC-309 Pin & Sleeve, 16 Amp., 230 Volt Plug Configuration Dimensions 25 1/4 (641 mm) 14 9/16 (370 mm) 24 5/8 (625 mm) CAUTION All electrical connections must be in accordance with local electrical codes and any other applicable codes. 3
4 IMPORTANT SAFETY INFORMATION In addition to the warnings and cautions in this manual, use the following guidelines for safe operation of the unit. Read all instructions before using equipment. For your safety, the equipment is furnished with a properly grounded cord connector. Do NOT attempt to defeat the grounded connector. Install or locate the equipment only for its intended use as described in this manual. Do NOT use corrosive chemicals in and/or on this equipment. Do NOT operate this equipment if it has a damaged cord or plug, if it is not working properly, or if it has been damaged or dropped. This equipment should be serviced by qualified personnel only. Contact the nearest Authorized Service Agency for adjustment or repair. Do NOT block or cover any openings on the unit. Do NOT immerse cord or plug in water. Keep cord away from heated surfaces. Do NOT allow cord to hang over edge of table or counter. Do NOT clean this appliance with a water jet. The following warnings and cautions appear throughout this manual and should be carefully observed. Turn the unit off, wait for the cool-down procedure to complete its cycle, and disconnect the power cord before performing any service or maintenance on the unit. NOTE: Turning off the power switch does NOT turn off all power to the unit. When the unit is plugged in and turned off, an LED light flashes to indicate that the power cord is plugged in. The procedures in this chapter may include the use of chemical products. These chemical products will be highlighted with bold face letters followed by the abbreviated HCS (Hazard Communication Standard). See Hazard Communication Standard manual for the appropriated Material Safety Data Sheets (MSDS). The equipment should be grounded according to local electrical codes to prevent the possibility of electrical shock. It requires a grounded receptacle with separate electrical lines, protected by fuses or circuit breaker of the proper rating. Bread may burn. Therefore toasters must not be used near or below curtains or other combustible walls and materials. Failure to maintain safe operating distances may cause discoloration or combustion. WARNING To avoid possible personal injury and/or damage to the unit, all inspections, tests, and repair of electrical equipment should be performed by QUALIFIED SERVICE PERSONNEL. The unit MUST be completely shut down and unplugged before any internal servicing, except when electrical tests are required. Use extreme care during electrical circuit tests. Live circuits will be exposed. CAUTION All electrical connections must be in accordance with local electrical codes and any other applicable codes. CAUTION Bread may burn. Therefore toasters must not be used near or below curtains or other combustible walls and materials. Failure to maintain safe operating distances may cause discoloration or combustion. CAUTION NEVER unplug the power cord while the unit is running! Use the proper shutdown procedure before unplugging the power cord. WARNING ELECTRICAL SHOCK HAZARD. FAILURE TO FOLLOW THE INSTRUCTIONS IN THIS MANUAL COULD RESULT IN SERIOUS INJURY OR DEATH. Electrical ground is required on this appliance. Do NOT modify the power supply cord plug. If it does not fit the outlet, have a proper outlet installed by a qualified electrician. Do NOT use an extension cord with this appliance. The toaster should be grounded according to local electrical codes to prevent the possibility of electrical shock. It requires a grounded receptacle with separate electrical lines, protected by fuses or circuit breaker of the proper rating. Check with a qualified electrician if you are unsure if the appliance is properly grounded. 4
5 INSTALLATION Unpacking 1. Open the large box. It contains: HEBT-3V toaster Accessories box 2. Remove the accessories box from the large box. 3. With the help of another person, carefully remove the HEBT-3V from the large box. 4. Remove all protective coverings from the unit. 5. Open the Accessories Box. It contains: Owner s Manual Bun Buffer Frame 6. Wipe the entire exterior of the toaster and the accessories mentioned above with a clean towel sprayed with a approved sanitizer. Allow to air dry. NOTE: Handle accessories with care. If an accessory becomes bent or damaged, it may not attach to the unit correctly, which may affect normal operation. NOTE: If any parts are missing or damaged, contact Antunes Customer Service IMMEDIATELY at (toll free). Rear Conveyor Cover Compression Knob Bun Feeder Bun Buffer Frame Front Conveyor Cover and Feeder Assembly Figure 1. HEBT-3V Components Control Panel (Side of unit) Location When placing the toaster into service, pay attention to the following guidelines: Make sure power is off and the toaster is at room temperature. Do NOT block or cover any openings on the unit. Do NOT immerse cord or plug in water. Keep cord away from heated surfaces. Do NOT allow cord to hang over edge of table or counter. 1. Place the toaster in the required position designated by. 2. Attach the Bun Feeder, Bun Buffer Frame, and Crown\Heel Separator accessories (Figure 1.) 3. Plug the power cord into an appropriate power outlet. Refer to the specification plate for the proper voltage. 5
6 Operating Instructions The HEBT-3V toasts Crowns, Heels, Clubs, and other products. Follow these steps to start the HEBT-3V: OPERATION User Mode User Mode allows an operator to view the toaster settings but does not permit any adjustments. 1. Turn on the toaster and wait for warm-up to complete. 2. Set the Compression Knob to 4 (recommended). If further adjustments are required see page 8 under Adjusting Toast Quality. Refer to the figure on page When the unit reaches operating temperature, the control panel displays USE. 4. Insert product into the designated area of the Bun Feeder Assembly with the cut side of the bun facing towards the front. Toasted product drops into the Bun Buffer. 1. Press and hold the PROGRAM button for 5 seconds. After 5 seconds, the display will show the actual temperature of Platen A (front). 2. Press the LIGHTER button to toggle between the setpoint and actual temperature of Platen A (front). 3. Press the PROGRAM button to proceed to the Front Platen Heater menu. The display shows the actual temperature of Platen B (rear). 4. Press the LIGHTER button to toggle between the setpoint and actual temperature of Platen B (rear). 5. Press the PROGRAM button to proceed to the Motor Menu. The display shows the actual speed of the motor. 6. Press the LIGHTER button to toggle between the setpoint and actual speed of the Motor. NOTE: The unit will exit User Mode after 5 seconds of keypad inactivity. Manager Mode Manager Mode allows an operator to view and adjust the following settings: Figure 2. HEBT-3V Control Panel and Display Platen A Temperature Platen B Temperature Motor Speed Temperature Units (Celsius or Fahrenheit) Current Selection: 208 or 240 volts Manager Mode also allows an operator to view (but not adjust) the Ambient Temperature of the Control Compartment as well as the number of days of operation. 1. Turn the unit off. 2. Turn the power on while holding the PROGRAM button. Hold the button for 5 seconds until the display shows EnA. Release the button. 3. To adjust the Platen A (front) Setpoint Temperature, press the LIGHTER or DARKER buttons to reach the desired temperature. NOTE: The recommended temperature setting for Platen A (front) is 271 C (520 F). 6
7 OPERATION 4. Press the PROGRAM button to proceed to the Platen B (rear) Setpoint Temperature. 5. To adjust the Platen B (rear) Setpoint Temperature, press the LIGHTER or DARKER buttons to reach the desired temperature. NOTE: The recommended temperature setting for the front Platen is 271 C (520 F). 6. Press the PROGRAM button to procedure to the Motor Speed Setpoint. 7. Adjust the Motor Speed Setpoint by pressing the LIGHTER or DARKER buttons to reach the desired speed. NOTE: The Motor Speed is adjustable from The recommended setting is 66. Setting 66 = 22 second pass through. Setting 75 = 17 second pass through. 8. Press the PROGRAM button to proceed to the Temperature Units. 9. To change the Temperatures units from Fahrenheit or Celsius, press the LIGHTER or DARKER buttons. 10. Press the PROGRAM button to proceed to the Ambient Temperature of the Control Compartment. NOTE: No changes can be made to the Ambient Temperature of the Control Compartment. Temperatures under 150 F (66 C) are acceptable. Safety Features HI-LIMIT CONTROL A Hi-Limit Control turns off electrical power to the heaters and control circuits if the unit overheats. To reset the control: 1. Allow minutes for the unit to cool. 2. Locate the two Hi-Limit Controls on the rear of the unit. Remove the two black protective caps. 3. Press and release both buttons. Reinstall the protective caps. NOTE: If the Hi-Limit Controls require continuous resetting, contact your Authorized Service Agency. Purging buns from Toaster If buns get stuck in the toaster, press and hold both the UP and DOWN arrow buttons to increase the belt speed until the buns are purged from the toaster. 11. Press and hold the PROGRAM button to save any changes. NOTE: The unit exits Manager Mode after 30 seconds of keypad inactivity. There are variations in bun products Worldwide that are used on the A.J Antunes HEBT toaster such as moisture content, bun formulations, age, tolerances etc. The HEBT was designed to compensate for bun variations by allowing user to adjust the compression, light/dark (speed) & temperatures settings in order to achieve a Gold Standard toasted product. 1. LIGHT DARK ADJUSTMENT: Adjust the light dark setting with the or buttons. The default light/ dark setting on the HEBT from the factory is 0 but can be adjusted from Lighter 0-10 to Darker 0-10 Light 10 is the lightest setting and dark 10 is the darkest. Each increase in lighter value will decrease the pass through time and each increase in darker value with increase the pass through time. 2. TEMPERATURE ADJUSTMENT: Adjust the set point temperature on the platens in the program menu. The default temperature settings on the HEBT are A Platen: 271 C (520 F) and B Platen: 271 C (520 F). The temperatures can be increased to +/- 50 F (10 C) if needed to achieve an acceptable toast quality. 3. COMPRESSION ADJUSTMENT: Adjust the compression knob on the left side of the unit. The default compression setting on the HEBT is 4 but is adjustable from 1-7. It is acceptable to adjust the compression from 1-7 as needed to achieve the desired toast quality and bun compression. 7
8 Daily Cleaning Clean the Toaster and Belt Wraps 1. Turn the toaster s power switch to the off position. The toaster enters a cool-down mode and will automatically shut down when complete. 2. Remove the bun feeder and bun stop with heatresistant gloves. 3. Remove the front and rear conveyor covers with heat resistant gloves. 4. Inspect the front belt for any tears, discoloration, or dam-age to the Belt Wrap snaps. Replace any damaged Belt Wrap as needed. With proper maintenance the Crown and Main Belt Wraps can six months or longer. Refer to PR 68 Q1 and PR 68 Q2 for belt replacement instructions. 5. If the front belt is in good condition, spray a clean, damp towel Sink Detergent solution. Wipe the front belt clean. Rinse the front belt with a separate clean, damp sanitized towel. Allow to air dry. NOTE: The belt rollers will continue turning while in cool-down mode. This allows you to clean the entire belt. Only clean the belt where it is in front of the Backing Plate to avoid causing dam-age to the belt. Repeat this step several times if there is heavy carbon buildup on the conveyor belt. 6. Inspect the rear belts for any tears, discoloration, or damage to the Belt Wrap snaps. Replace any damaged Belt Wrap as needed. With proper maintenance the Crown and Main Belt Wraps can six months or longer. Refer to PR 68 Q1 and PR 68 Q2 for belt replacement instructions. 7. If the rear belt is in good condition, spray a clean, damp sanitized towel with Sink Detergent solution. Wipe the rear belt clean. Rinse the rear belt with a separate clean, damp sanitized towel. Allow to air dry. NOTE: The belt rollers will continue turning while in cool-down mode. This allows you to the entire belt. NOTE: Only clean the belt where it is in front of the Backing Plate to avoid causing damage to the belt. 8. Wash, rinse, and sanitize the bun feeder and bun stop in the three-compartment sink. 9. Wash, rinse, and sanitize the front and rear conveyor covers in the three-compartment sink. Allow to air dry. MAINTENANCE 10. Reinstall the clean front and rear conveyor covers. 11. Reinstall the clean bun feeder and clean bun stop. 12. Clean the outside surfaces of the toaster with clean, damp sanitized towel sprayed with Heavy Duty Degreaser Solution. Rinse with a clean, damp sanitized towel and allow to air dry. 13. Turn the unit on. 14. Place all used towels into the soiled towel bucket. 8
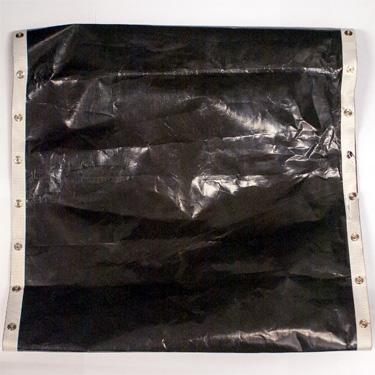

9 MAINTENANCE (continued) HEBT-3V BUN TOASTER Figure 3. Examples of Damaged Belts 9
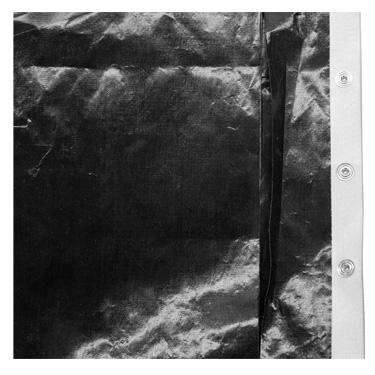
 BELT IS TORN AND FOLDED.")


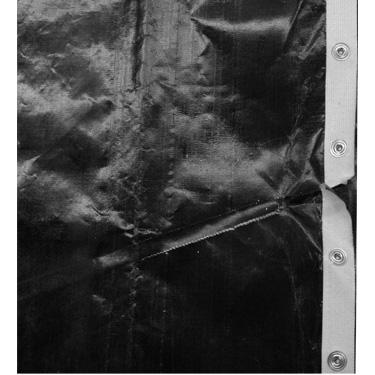
10 HEBT-3V BUN TOASTER MAINTENANCE (continued) BELT IS TORN AND FOLDED. REPLACE BELT. Figure 6. Example of Damaged Belt Figure 4. Example of Damaged Belt BELT IS MISSING SNAPS AND IS DAMAGED. REPLACE BELT. Figure 5. Example of Damaged Belt 10

11 MAINTENANCE (continued) HEBT-3V BUN TOASTER Quarterly Remove Belt Wraps and Clean Rollers 1. Turn the toaster s power switch to the off position. The toaster enters a cool-down mode and will automatically shut down when complete. 2. Unplug the power cord once the cool-down period is complete. NOTE: Wait for the cool-down period to complete before unplugging the power cord. Loose Tense Tense Loose 3. Remove the bun feeder using heat-resistant gloves. 4. Remove the front and rear conveyor covers by lifting up and away from the unit. Set the compression knob to 7. NOTE: Reposition the toaster as needed to perform these steps. 5. Unlock the lock on the left side panel with a flathead screwdriver and open the panel. Set the bun compression knob to Push down on the front and rear belt rollers and move them away from the center of the toaster. Use both hands. This removes tension and locks the rollers in place. 7. Lift the upper belt frame lock. Then rotate down so it rests on the camshaft of the rear be lt roller. 8. Pull down the lower belt frame lock. This provides access to the front and rear belt rollers and belts. 9. Carefully remove both of the belts from the toaster. 10. Wipe all four rollers and backing plates with a clean, damp sanitized towel. Make sure to remove all debris from the rollers and the backing plates so they are as clean as possible. 11. Use a dry cloth towel or nylon-bristled brush to remove all debris from both side compartments, inside of the toaster, and underneath the rollers. Upper Belt Frame Lock Lower Belt Frame Lock Rear Belt Wrap Figure 7. Conveyor Rollers Figure 8. Conveyor Locks Main Belt Wrap Figure 9. Belt Wraps 11

12 MAINTENANCE (continued) Install Belt Wraps 1. If you are installing the existing belt wraps, inspect the belts. Replace belt wraps if worn or damaged. If the belt wraps are in good condition put them back on the toaster. 2. For new or existing belts, wipe both sides of the belts with a clean, damp sanitized towel. Allow to air dry. 3. Slide the belts gently over the appropriate top and bottom roller. Make sure the belt lines up properly on the rollers. The snaps on the belts should face the inside of the roller. 4. Lift up the front and rear belt roller. Use both hands. This will add tension and lock them in place. 5. Lift the lower conveyor lock to lock the rollers into place. NOTE: Lift up on the camshaft of the rear conveyor roller while lifting the conveyor lock. 6. Lift the upper belt frame lock and lock in place on the conveyor assembly. Set the compression knob to Close the side panel and lock the lock using a flathead screwdriver on the side panel. 8. Re-install the front and rear conveyor covers so they lock into place. 9. Re-install the bun feeder and bun stop onto the top of the unit. 10. Plug in the power cord and turn the unit on. Loose Tense Figure 10. Conveyor Rollers Upper Conveyor Lock Lower Conveyor Lock Tense Loose Figure 11. Conveyor Locks 12
13 Clean Cooling Fans and Electrical Housings (Annually) MAINTENANCE (continued) HEBT-3V BUN TOASTER 1. Turn the toaster s power switch to the off position. The toaster enters a cool-down mode and will automatically shut down when complete. Unplug the power cord. 2. Remove the bun feeder and set aside. 3. Remove the top two screws from the control housing cover and slowly lower the cover. 4. Remove any debris or dust from the cooling fan with a small brush. Wipe away any debris with a clean, dry towel Inspect the electrical compartment for crumbs and debris. Clean out all crumbs and debris using a clean, dry towel or nylon bristled brush. Be careful not to disrupt any of the electrical wiring. 5. Slowly close the control housing cover. Reconnect with the screws. 6. Remove the screws from the bottom plate on the rear of the unit and slowly lower the cover. 7. Remove any debris or dust from the cooling fan with a small brush. Wipe away any debris with a clean, dry towel. Inspect the electrical compartment for crumbs and debris. Clean out the crumbs and debris using a clean, dry towel or nylon bristled brush. Be careful not to disrupt any of the electrical wiring. 8. Close the bottom plate and re-install the screws. 9. Reattach the bun feeder. Plug in the power cord, turn the power on, and test the unit before returning it to service. Figure 12. Accessing Top Cooling Fan Figure 13. Accessing Rear Cooling Fan 13
14 TROUBLESHOOTING Problem Possible Cause Corrective Action Control Display flashes Err 5 continuously. Buns not toasting properly. Control Display flashes Err14 continuously. Buns not toasting properly. Control Display flashes Err 9 continuously. Control Display Flashes Err 19 continuously. Buns Burn. Control Display flashes Err 18 continuously. Buns Burn. Control Display flashes Err 13 continuously. Buns not toasting properly. The A Platen temperature has not reached the setpoint temperature within 20 minutes. Failed A Platen Thermocouple. Failed Control Board The B Platen temperature has not reached the setpoint temperature within 20 minutes. Failed Rear Platen Thermocouple. Failed Control Board. Control Compartment ambient temperature is above 150 F (66 C) Failed Cooling Fan. Failed Control Board Failed A Platen Solid State Relay. Failed Control Board. Failed A Platen Thermocouple. Failed B Platen Solid State Relay. Failed Control Board. Failed B Platen Thermocouple. Loose A Platen Thermocouple connection on Control Board or the Front Platen Thermocouple is open. Failed Control Board. Allow the unit to warm up for 30 minutes and then recheck. If the Control Display still flashes Err 5, contact your maintenance person or Authorized Service Agency for service. Contact your maintenance person or Authorized Service Agency for service. Allow the unit to warm up for 30 minutes and then recheck. If the Control Display still reads Err 14, contact your maintenance person or Authorized Service Agency for service. Contact your maintenance person or Authorized Service Agency for service. Verify side vents on toaster are unblocked and not near other heating appliances. If problem persists, contact your maintenance person or Authorized Service Agency for service. Contact your maintenance person or Authorized Service Agency for service. Contact your maintenance person or Authorized Service Agency for service. Re-secure the A Platen Thermocouple to the Control Board. If the Control Display still reads Er 13, check the front Thermocouple for continuity. Contact your maintenance person or Authorized Service Agency for service. Control Display flashes Err 11 continuously. Buns not toasting properly. Control Display flashes Err 12 continuously. Buns not toasting properly. Control Display Flashes Err 10 continuously. Buns not toasting. Loose B Platen Thermocouple connection on Control Board or the Rear Platen thermocouple is open. Failed Control Board. Shorted A Platen Thermocouple to ground. Failed Control Board Shorted B Platen Thermocouple to ground. Failed Control Board. Re-secure the B Platen Thermocouple connection to the Control Board. If the Control Display still reads Er 11, check the Rear Thermocouple for continuity. Contact your maintenance person or Authorized Service Agency for service. Disconnect and re-secure the A Platen Thermocouple connection to the Control Board. If the Control Display still reads Er 12, check the Rear Thermocouple for continuity. Contact your maintenance person or Authorized Service Agency for service. Re-secure the B Platen Thermocouple connection to the Control Board. If the Control Display still reads Er 10, check the Rear Thermocouple for continuity. Contact your maintenance person or Authorized Service Agency for service. 14
15 TROUBLESHOOTING (continued) HEBT-3V BUN TOASTER Problem Possible Cause Corrective Action Control Display flashes Err 20. Control Display flashes Err 8 Crowns and/or Heels must be forced into the toaster. Buns sticking and burning. Buns not toasting adequately or too light/dark. Compression side door will not close. Fan is making an unusual sound. Control Display flashes Err 17 continuously. Buns are not toasting properly. Control Display flashes Err 16 continuously. Buns are not toasting properly. Mechanical bind in one or both conveyors. Worn or damaged Ball Bearings. Drive chain or sprockets damaged. Failed Motor. Failed Control Board. Motor is running when it shouldn t be. PTFE Belts not cleaned properly. PTFE Belts are dirty, worn, or damaged (replace every 3 months). One of the Conveyor top shafts is stuck in the lower lock position. Either both Upper/Lower Conveyor locks are not properly locked in place. To adjust compression, light/ dark setting, and/or temperature, see page 7. Either both Upper/Lower Conveyor Locks are not properly locked in place. The lock on the Compression Side Door is in the locked position when trying to close the door. Failed Cooling Fan. Cooling Fan is dirty and needs to be cleaned. A platen Hi-Limit Control is tripped. B Platen Hi-Limit Control is tripped. Enter user mode to check the motor speed. Check both conveyors for mechanical binds. Test the motor. Replace necessary parts. Contact your maintenance person or Authorized Service Agency for service. Contact your maintenance person or Authorized Service Agency for service. Clean PTFE Belts as described in the Maintenance section of this manual. Clean or replace Silicone Belts as described in the Maintenance section of this manual. Inspect positions of the shafts as described in the Maintenance section of this manual. Inspect the proper position of the locks as described in the Maintenance section of this manual. Inspect the proper position of the locks as described in the Maintenance section of this manual. Turn the lock to the unlocked position before closing the door. Verify vents on toaster are unblocked and not near other heating appliances. Clean fans as described in the Maintenance section of this manual. If problem persists, contact your maintenance person or Authorized Service Agency for service. Allow the unit to cool and reset the A platen Hi-Limit Control. If it trips again, contact your maintenance person or Authorized Service Agency for service. Allow the unit to cool and reset the B platen Hi-Limit Control. If it trips again, contact your maintenance person or Authorized Service Agency for service. 15
16 TROUBLESHOOTING (continued) Problem Possible Cause Corrective Action Control Display is blank. Power Cord is not plugged in. Plug the Power Cord into the appropriate outlet. Turn the toaster on. If the Control Display is still blank, contact your maintenance person or Authorized Service Agency for service. Conveyors not turning. Control Display flashes Err 1, 2, 3, 5, 6, 7, or any number above Err 20. Circuit Breakers turned off or tripped. Damaged electrical outlet, plug, or Power Cord. Power Switch damaged. Faulty Transformer. Motor Drive Chain is detached from sprockets. Reset Circuit Breakers. If they trip again, check the Power Cord, Plug, and outlet for damage. Contact your maintenance person, Authorized Service Agency, and Electrician for service. Replace Transformer. Reinstall the Drive Chain. Drive Chain needs lubrication. Lubricate Drive Chain with Lubit-8 (P/N ). Failed Drive Motor. Internal Control Board fault. Contact your maintenance person or Authorized Service Agency for service. The Control Board needs to be replaced. Contact your maintenance person or Authorized Service Agency for service. 16
17 Sprocket / Tensioner Bracket Assy Sprocket /Bearing Assembly Bracket, Chain Tensioner Loctite # 242 (Blue) Nut, Hex 5/ Shoulder Bolt 3/8 X Lock Washer Sprocket / Retainer Assy Sprocket /Bearing Assembly Retainer Idler Washer, Flat Loctite # 242 (Blue) Nut, Hex 5/ Shoulder Bolt 3/8 X Lock Washer Cam Bracket And Thrust Strip Assembly, Lh Cam Bracket, Lh Thrust Strip, Teflon Housing Assembly Base / Heater Assembly Weldment, End Housing Weldment, End Housing Rod Support Weldment, Inner Base Weldment, Control Housing Base Gasket, Lg Base Gasket, Lg Bushing, Shorty 5/ Push In Grommet For 1-1/8 Dia. Hole Spacer End Covr Bottom Rod, Belt Cover Handle, Pocket Pull, Snap-In Adhesive/ Sealant - Rtv Loctite # 242 (Blue) Screw, #8-32 X 1/4 (#6 Head) Screw, Tap 8-32 X 3/8 Lg Screw, Tap 8-32 X 3/8 W/Int. Tooth Washer Washer, Int. Tooth-Lock,# Screw, Mach. #10-32 X 1/ Scr, #10-32 X 3/8 Lg Socket Hd Cap Fillister Head Phillips Screw # X Electrical Panel Assembly Electrical Panel Wldmnt Fan Cover Label - Warning Label - Shock Hazard Screw, Mach One-Way # Nut, Hex Keps # REPLACEMENT PARTS HEBT-3V BUN TOASTER Item Part No. Description Qty. Item Part No. Description Qty Screw, Phpnhd #10-16 X 3/4 Thrd Form Fan, Axial - 230V, Metal Housing & Imp Adj. Platen Assembly Relay - Sink Bracket Assy Heat Sink, Relay Screw, Tap 8-32 X 3/8 Lg Transformer, 240 Vac/12Vac Relay, Solid State Dual Pole W/Conn-Recept Control Cover Assembly Weldment, Control Housing Cover Label - Warning Label - Shock Hazard Label, Id - A Label, Id - B Wiring Diagram Label Label, Control Label Chinese Translation Handle, Pocket Pull, Snap-In Edge Trim Piece, Nut, Hex Keps # Asy-Pcb, Main Go To Market (Mcd) Motor / Sprocket Assembly Motor Plate Loctite # 242 (Blue) Sprocket, 25B12 3/8 Bore Scr, #10-32 X 3/8 Lg Socket Hd Cap Motor, 230V Cam Brkt & Thrust Strip Assy, Rh End Cover Assembly End Cover Assembly Kit Weldment, End Cover Lock Spacer Spacer,.406 X.172 X Label, Compression Washer, Flat # Nut, Hex Acorn Lock # Bun Feeder Assembly Weldment, Thermocouple Tube Weldment, Idler Roller Front Top Weldment, Drive Roller Front Bottom Weldment, Conveyor Cover - Front Cover Weldment Weldment, Adj. Platen Frame Weldment, Fixed Platen Frame Wment, Bearing Brkt & Spring Guide- Lh Wment, Bearing Brkt & Spring Guide - Rh Platen, Main 230V, 2300W Bushing, Shorty 7/8 1 17
18 Insulation, Main Platen Spacer X X Plate, Tensioner Rh Bracket, Tensioner Bracket, Bearing Spacer,.312 X.187 X Bracket, Tensioner- End Housing, Front Plate, Tensioner - End Housing, Rear Plate, Tensioner - End Housing, Front Bracket, Housing Locking Support Bracket, Rh Support Bracket, Lh Back Conveyor Cover Bracket, Bun Stop Insulation Plate Cover, Duct Fan Bracket, Tensioner- End Housing, Rear Bracket, Tensioner Spring, Compression Setting Spring, Chain Tension Spring, Roller Tension Spring, Cam Adj Wire Set (Club Voltage) Wire Set (Ctrl Board) Wire Set (Fan Xfme) Wire Set (Ssr Hi Volt) Label, Pvc Removal Spacer, 3/8 Cbs Thread Female Handle, Pocket Pull, Snap-In Knob, 1/4 Shaft, Push-On Thrust Strip, Teflon Clip, Steel Cable Spacer, Frame & Platen Lh Spacer,Upper Locking Plate, Front Spacer,Upper Locking Plate, Rear Spacer, 0.69 X X Sleeve Bearing,.50 Od X.75 Lg Sleeve Bearing,.50 Od X.375 Lg Spacer, Adjustable Frame Rh Spacer, Platen Rh Loctite # 242 (Blue) Lubricant, White, Ptfe Sprocket, 25B18, 1/2 Bore 2 REPLACEMENT PARTS (CONTINUED) Item Part No. Description Qty. Item Part No. Description Qty Bearing, Single Groove S/S Chain, Drive Cam, Hbcs Cam Shaft Ring, Retaining, External Nut, Hex Keps # Nut, Hex Keps #6-32 (Small Pattern) Washer, Int. Tooth # Screw, Mach One-Way # Washer, Flat # Nut, Hex Keps # Screw, Tap 8-32 X 3/8 Lg Screw, Mach. #8-32 X Screw, Tap 8-32 X 3/8 W/Int. Tooth Washer Nut, Hex Acorn Lock # Nut, Hex Keps # Screw Set, #10-32 X 3/8 Hex Socket-Cone Point Screw, Phpnhd #10-16 X 3/4 Thrd Form Screw, Hex #10-32 X 1/ Screw, Hexcap 1/4-20 X 1/ Screw, Flange Hex Head Cap Screw, Hex Head, #1/4-20 X 1.375, S.s Screw, Hex Head, #1/4-20 X 2.00, S.s Fan, Axial - 230V, Metal Housing & Imp Cap-Mp, Motor Run Thermostat, Hi-Limit 700 F Contactor, 2 Pole No Thermocouple Type K (Open End) Cable Tie, 1/8W X Ground Lug Plastic Cable Tie Varistor Board Snubber Board Ter Term-Recept 3/16 Faston.135 Max 1 18
19 REPLACEMENT PARTS (CONTINUED) HEBT-3V BUN TOASTER
20 REPLACEMENT PARTS (CONTINUED)
21 REPLACEMENT PARTS (CONTINUED) HEBT-3V BUN TOASTER
22 REPLACEMENT PARTS (CONTINUED)
23 REPLACEMENT PARTS (CONTINUED) HEBT-3V BUN TOASTER
24 WIRING DIAGRAM 24
25 NOTES 25
26 NOTES 26
27 NOTES 27
28 +1 (630) (800) (630)
Gold Standard Toaster Wendy s
 Gold Standard Toaster Wendy s Model GST-H Owner s Manual Manufacturing Number: 90888 www.antunes.com P/N 083 Rev. F 06/8 Table of Contents Warranty Information Service/Technical Assistance Important Safety
MANUFACTURING NUMBERS: CORN CAROUSEL. Model CC-19 Series P/N /99. Owner s Manual
 MANUFACTURING NUMBERS: 9500410 9500412 C US Model CC-19 Series 9500400 P/N 1010730 10/99 Owner s Manual A.J. Antunes & Co. Owner Information...1 General...1 Warranty Information...1 Service/Technical Assistance...2
Owner s Manual WARMER DRAWER. (Without Water Tray) Models WD-20, WD21A, & WD-35A. WD-20 Shown MANUFACTURING NUMBERS: P/N Rev.
 Models WD-20, WD21A, & WD-35A. WD-20 Shown MANUFACTURING NUMBERS: P/N Rev.") MANUFACTURING NUMBERS: 9400130 9400132 9400134 9400136 9400140 9400142 9400144 9400146 9400150 9400152 9400154 9400156 C L I S T E D US SA L NIT A T I S T E ION D CM WARMER DRAWER (Without Water Tray)
MANUFACTURING NUMBERS: 9400130 9400132 9400134 9400136 9400140 9400142 9400144 9400146 9400150 9400152 9400154 9400156 C L I S T E D US SA L NIT A T I S T E ION D CM WARMER DRAWER (Without Water Tray)
Universal toaster. Manufacturing Number &
 Universal toaster Model X-200 Universal Toaster X-200 Manufacturing Number 9210800 & 9210802 Place this manual in the Toaster section of your Equipment Manual. Manufactured exclusively for McDONALD S BY
Hot Dog Hutch. Models HDH-3, HDH-3DR, & HDH-4 owner s manual. Manufacturing Numbers:
 Hot Dog Hutch Models HDH-3,, & HDH-4 owner s manual Manufacturing Numbers: 9300100, 9300101, 9300102, 9300104, 9300106, 9300108, 9300112, 9300116, 9300118, 9300120, 9300124, 9300125, 9300130, 9300132 www.ajantunes.com
Steamer Display Cabinet Model SDC-500 NIT A T D CM I S T E D. P/N Rev. D 03/12. Owner s Manual
 Manufacturing Numbers: 9100532 9100533 9100534 C L I S T E D US P/N 1010968 Rev. D 03/12 SA L NIT A T I S T E ION D CM Steamer Display Cabinet Model SDC-500 Owner s Manual Owner Information...2 General...
MANUAL EGG STATION MODEL MES-1200 WITH TIMER Manufacturing Numbers &
 MANUAL EGG STATION MODEL MES-1200 WITH TIMER Manufacturing Numbers 9300605 & 9300606 Place this manual in the Small Equipment/ Miscellaneous section of your Equipment Manual. Manufactured exclusively for
DCH-320 SQ. Owner s Manual. Display Cabinet Heated. Manufacturing Numbers: P/N Rev. C 01/18 US L I S T C L T NIT A T L E E D
 SA CM DCH-320 SQ Display Cabinet Heated Owner s Manual Manufacturing Numbers: 9500558 NIT A T ION INTERTEK C L I S T E D US L I S T E D C L I S T E D US www.antunes.com TABLE OF CONTENTS Owner Information...2
VT SERIES VERTICAL TOASTER OPERATOR S MANUAL TABLE OF CONTENTS
 VT SERIES VERTICAL TOASTER OPERATOR S MANUAL This equipment chapter is to be inserted in the Equipment Manual MANUFACTURED EXCLUSIVELY FOR McDONALD S BY FRYMASTER, L.L.C. P.O. BOX 51000 SHREVEPORT, LOUISIANA
EGG STATION DUAL ZONE MODEL ESDZ-1200 Mfg. No , &
 MODEL ESDZ-1200 Mfg. No. 9300624, 9300625 & 9300635 Antunes Place this manual in the Small Equipment/ Miscellaneous section of your Equipment Manual. Manufactured exclusively for McDONALD S BY ANTUNES
RAPID TOASTER. Manufacturing Numbers , 607, 608, 611, 613, 615, 616, 624 & 626
 POWER F C RAPID TOASTER MODEL VCT-250 RAPID TOASTER VCT-250 Manufacturing Numbers 9210606, 607, 608, 611, 613, 615, 616, 624 & 626 Place this manual in the Toaster section of your Equipment Manual. Manufactured
EGG STATION DUAL ZONE MODEL ESDZ-1200 Mfg. No &
 MODEL ESDZ-1200 Mfg. No. 9300626 & 9300632 Place this manual in the Small Equipment/ Miscellaneous section of your Equipment Manual. Manufactured exclusively for McDONALD S BY ANTUNES 180 KEHOE BLVD. CAROL
MUFFIN TOASTER MODEL MT-12 Mfg. Numbers , 134, 136, 137, 138, 140, 144, & 150
 MUFFIN TOASTER MODEL MT-2 Mfg. Numbers 92003, 34, 36, 37, 38, 40, 44, & Place this manual in the Toaster section of your Equipment Manual. Manufactured exclusively for McDONALD S BY A.J. ANTUNES & CO.
Variety Steamer Model VS-200A-A1 NIT A T L T D CM I S T E D. P/N Rev. E 03/12. Owner s Manual
 Manufacturing Numbers: 9100200 9100250 C L I S T E D US SA L NIT A T I S T E ION D CM C Variety Steamer Model VS-200A-A1 P/N 1010591 Rev. E 03/12 Owner s Manual Owner Information...2 General...2 Warranty
Manufacturing. Numbers: Little Caesar s I T A T IO. Wing Merchandiser L IS T ED P/N /08. Owner s Manual
 Manufacturing Numbers: 9800103 C L IS T ED US AN I T A T IO L IS Little Caesar s ERTEK INT N S T ED CM C L IS T ED US Wing Merchandiser Implementation Guide Model CTD-24 Owner s Manual Owner Information...2
Product Identification
 Operation Manual Toaster Grills Product Identification The Prince Castle 47-ACC & 48-BCC Toaster Grill Series offers two practical options for quick-and-easy bread product toasting. Both models have pivoting
Product Identification. Display and Touchpad. LEFT and RIGHT Scroll Buttons. Compression Adjustment
 Operation Manual Horizontal Core Bun Toaster Product Identification Heel Section Crown Section Display and Touchpad LCD Display Club Section LEFT and RIGHT Scroll Buttons MENU Button Landing Zone Compression
2004 McDonald s Corporation Printed in the
 SOLID STATE DIGITAL ENERGY SAVING TOASTER PRINCE CASTLE MODEL NO. 411-SDPA This equipment chapter is to be placed in the toasters section of your Equipment Manual. MANUFACTURED FOR MCDONALD S BY PRINCE
Conveyor Toaster Model No. 428-BX. Operation Manual
 Operation Manual Conveyor Toaster LIMITED WARRANTY TABLE OF CONTENTS PAGE This product is warranted to be free from defects in material and/ or workmanship for a period of two (2) years from date of original
RAPID TOASTER. Manufacturing Numbers /502/504/512
 POWER RAPID TOASTER MODEL VCT-200 RAPID TOASTER VCT-200 Manufacturing Numbers 9200500/502/504/512 Place this manual in the Toaster section of your Equipment Manual. Manufactured exclusively for McDONALD
Product Identification. LCD Display. Indicator Light. Adjustment Knobs. LEFT and RIGHT Scroll Buttons. Display PRINCE CASTLE LLC WORLDWIDE
 Original Instructions Operation Manual Vertical Toaster Product Identification BigMac Club Bun In-Feed Heel and Crown Bun In-Feed LCD Display Indicator Light Adjustment Knobs MENU Button LEFT and RIGHT
Operating Instructions
 Operating Instructions Model No. 428 Series Conveyor Toaster TABLE OF CONTENTS Installation.............................. 2 Operation............................... 2 Preventive Maintenance....................
Instruction Manual. Cheddar Easy All-In-One Cheese Corn Shop
 Instruction Manual Cheddar Easy All-In-One Cheese Corn Shop Model No. 2703-00-000 10700 Medallion Drive, Cincinnati, Ohio 45241-4807 USA 2017 Gold Medal Products Co. Part No. 110028 SAFETY PRECAUTIONS
Surface Steamer. Manufacturing Number
 We exist to make our customers successful. Surface Steamer Model SS-400TT Surface Steamer ss-400tt Manufacturing Number 9100906 Place this manual in the Toaster section of your Equipment Manual. Manufactured
Instruction Manual. Nacho Cheese Dispenser and Warmer
 Instruction Manual Nacho Cheese Dispenser and Warmer 10700 Medallion Drive, Cincinnati, Ohio 45241-4807 USA 2013 Gold Medal Products Co. Part No. 36060 SAFETY PRECAUTIONS Page 2 INSTALLATION INSTRUCTIONS
MS-150 miracle steamer
 UP READY DOWN PROGRAM START/STOP POWER MS-150 miracle steamer owner s manual Manufacturing Numbers: 9100421, 9100429 www.ajantunes.com P/N 1010881 Rev. G 03/12 Table of Contents General... 2 Warranty Information...
Product Identification. 247 Series
 Operation Manual Toaster Grills Product Identification The Prince Castle 47 & 48 Toaster Grill Series offers two practical options for quickand-easy bread product toasting. Both models have pivoting sides
User s Manual and Operating Instructions
 User s Manual and Operating Instructions Model Numbers: PT-18W-DDF-A, PT-20F-DDF-A, PT-20S-DDF, PT-24O-DDF, PT-24-DDF, PT-24-DDF-F, PT-30-DDF, PT-30P-DDF-A, PT-30P-DDF-AF READ AND SAVE THESE INSTRUCTIONS
Instruction Manual. Astro Staging Cabinet
 Instruction Manual Astro Staging Cabinet 10700 Medallion Drive, Cincinnati, Ohio 45241-4807 USA 2017 Gold Medal Products Co. Part No. 40269 SAFETY PRECAUTIONS DANGER Machine must be properly grounded to
Part No Revised: June TS1 TOASTER SYSTEM Instruction Manual Models # 5700 AND # 5700SF
 Part No. 44162 Revised: June 2006 TS1 TOASTER SYSTEM Instruction Manual Models # 5700 AND # 5700SF SAFETY PRECAUTIONS 2 TOASTER SYSTEM INSTALLATION CHECKING SHIPMENT Unpack the unit from the shipping container
Henny Penny Island Warmer Model HMI-103 Model HMI-105 TECHNICAL MANUAL
 Henny Penny Island Warmer Model HMI-103 Model HMI-105 TECHNICAL MANUAL THIS PAGE INTENTIONALLY LEFT BLANK. Section TABLE OF CONTENTS Page Section 1. TROUBLESHOOTING... 1-1 1-1. Introduction... 1-1 1-2.
Foodservice Equipment Specialists P.O. Box 880 Saco, ME. / U.S.A * FAX (207)
") Foodservice Equipment Specialists P.O. Box 880 Saco, ME. / U.S.A. 04072 877-854-8006 * FAX (207) 283-8080 OPERATIONS AND MAINTENANCE PROCEDURES FOR SERVICE ASSISTANCE U.S. AND CANADA CALL: 1-877-854-8006
Foodservice Equipment Specialists P.O. Box 880 Saco, ME. / U.S.A. 04072 877-854-8006 * FAX (207) 283-8080 OPERATIONS AND MAINTENANCE PROCEDURES FOR SERVICE ASSISTANCE U.S. AND CANADA CALL: 1-877-854-8006
Hot Dog Roller Grills
 Part No. 87630 Hot Dog Roller Grills Model No. 8022, 8022PE, 8023, 8023SL, 8023PE, 8024, 8024PE, 8024SL, 8025, 8025SL Cincinnati, OH 45241-4807 USA SAFETY PRECAUTIONS DANGER Machine must be properly grounded
Instruction Manual. Cheese Warmer with Pump
 Instruction Manual Cheese Warmer with Pump 10700 Medallion Drive, Cincinnati, Ohio 45241-4807 USA 2013 Gold Medal Products Co. Part No. 38298 SAFETY PRECAUTIONS Page 2 INSTALLATION INSTRUCTIONS Inspection
Instruction Manual. Portion Cup Cheese Warmer
 Instruction Manual Portion Cup Cheese Warmer Model No. 5581-00-100, 5581-01-100, and 5581-00-101 10700 Medallion Drive, Cincinnati, Ohio 45241-4807 USA 2017 Gold Medal Products Co. Part No. 74797 SAFETY
This Manual is for the Exclusive use of Licensees and Employees of McDonald s Systems, Inc. Printed in October 1997
 SOLID STATE DIGITAL TOASTER PRINCE CASTLE MODEL NO. 213-NDB AND 213-NPDB SERIES This equipment chapter is to be placed in the toasters section of your Equipment Manual MANUFACTURED FOR MCDONALD S BY PRINCE
Water filtration system
 Manufacturing Numbers: 9700435 Water filtration system UF-216 Series Owner s Manual UF-216 water Filtration system A.J. Antunes & Co. Table of contents Owner Information...2 General...2 Warranty Information...2
User s Manual and Operating Instructions
 User s Manual and Operating Instructions Model Numbers: CL-30P-DDF, CL-20F-DDF, CL-24O-DDF, CL-30-DDF READ AND SAVE THESE INSTRUCTIONS IMPORTANT: Read and understand all of the directions in this manual
Instruction Manual. Dogeroo, Super Dogeroo, and Mini Dogeroo
 Instruction Manual Dogeroo, Super Dogeroo, and Mini Dogeroo Model No. 8102, 8103, 8108 10700 Medallion Drive, Cincinnati, Ohio 45241-4807 USA Part No. 87793 SAFETY PRECAUTIONS Page 2 INSTALLATION INSTRUCTIONS
Model 2016, 2025, 2025BN, 2025ST Staging Cabinets Instruction Manual
 Model, 2025BN, 2025ST Staging Cabinets Instruction Manual Part No 53021 Cincinnati, OH 45241-4807 USA SAFETY PRECAUTIONS DANGER Machine must be properly grounded to prevent electrical shock to personnel.
Egg Station. Model ES-800 & ES-1200 owner s manual. Manufacturing Numbers: , , , &
 Egg Station Model ES-800 & ES-1200 owner s manual Manufacturing Numbers: 9300592, 9300594, 9300595, & 9300597 www.antunes.com P/N 1011155 Rev. E 05/18 Owner Information...2 General...2 Warranty Information...2
Egg Station. Model ES-600, ES-602, ES-604, ES-800 & ES owner s manual. Manufacturing Numbers:
 Egg Station Model ES-600, ES-602, ES-604, ES-800 & ES-200 owner s manual Manufacturing Numbers: 9300530, 930053, 9300532, 930057, 9300574, 9300575, 9300577, 930058, 930059, 9300593, 9300598, 9300599, 930062,
Product Identification
 Operation Manual Split Lid Contact Grill Product Identification Single Top Split Top LIMITED WARRANTY This product is warranted to be free from defects in material and/or workmanship for a period of 1
Instruction Manual. 36 in. and 42 in. Popcorn Staging Cabinets
 Instruction Manual 36 in. and 42 in. Popcorn Staging Cabinets Model Series 2856 and 2855 42 in. Model 2855-00-000 36 in. Model 2856-00-000 10700 Medallion Drive, Cincinnati, Ohio 45241-4807 USA 2016 Gold
Foodservice Equipment Specialists P.O. Box 880 Saco, ME. / U.S.A * FAX (207)
") Foodservice Equipment Specialists P.O. Box 880 Saco, ME. / U.S.A. 04072 877-854-8006 * FAX (207) 283-8080 OPERATIONS AND MAINTENANCE PROCEDURES FOR SERVICE ASSISTANCE U.S. AND CANADA CALL: 1-877-854-8006
Foodservice Equipment Specialists P.O. Box 880 Saco, ME. / U.S.A. 04072 877-854-8006 * FAX (207) 283-8080 OPERATIONS AND MAINTENANCE PROCEDURES FOR SERVICE ASSISTANCE U.S. AND CANADA CALL: 1-877-854-8006
MODEL # PUMA G, 3-SPEED TRANSPORTABLE AIR MOVER
 OWNER S MANUAL IMPORTANT: READ OWNER S MANUAL CAREFULLY MODEL # PUMA G, 3-SPEED TRANSPORTABLE AIR MOVER FOR YOUR CONVENIENCE, RECORD THE FOLLOWING IMPORTANT INFORMATION MODEL: SERIAL NUMBER: DATE PURCHASED:
MRS-6 Maxi-Guard II. Model: C , 12, 13, 14 OPERATION SERVICE PARTS CARE. Revised 2/02
 MRS-6 Maxi-Guard II Model: C86006-11, 12, 13, 14 OPERATION SERVICE PARTS CARE Revised 2/02 OPERATING INSTRUCTIONS INSPECTION Carefully unpack and inspect your machine for shipping damage. Each unit is
FLCH4R Garage and Utility Electric Heater
 FLCH4R Garage and Utility Electric Heater Installation, Operation & Maintenance Instructions Model No. Volts Amps Watts BTU/HR Phase High Low High Low High Low Min Fuse Size* FLCH4R 208 17.3 8.66 3600
Henny Penny Island Warmer Model HMI-103 Model HMI-105 TECHNICAL MANUAL
 Henny Penny Island Warmer Model HMI-103 Model HMI-105 TECHNICAL MANUAL Section TABLE OF CONTENTS Page Section 1. TROUBLESHOOTING... 1-1 1-1. Introduction... 1-1 1-2. Safety... 1-1 1-3. Troubleshooting...
W Model 1RKU2 w/optional Wall mount. Unit Model Weight (Lbs) Kilowatts Volts- Phase Amps Fan Output Heat Output
 Kilowatts Volts- Phase Amps Fan Output Heat Output") Operating Instructions & Parts Manual 1RKT2, 1RKT3, 1RKT4, 1RKT5, 1RKT9 and 1RKU2 Please read and save these instructions. Read carefully before attempting to assemble, install, operate or maintain the
Operating Instructions & Parts Manual 1RKT2, 1RKT3, 1RKT4, 1RKT5, 1RKT9 and 1RKU2 Please read and save these instructions. Read carefully before attempting to assemble, install, operate or maintain the
CRV Clean Room Vacuum
 CRV Clean Room Vacuum Model: C80704-01, 02 SS (115V) C80704-03, 04 Painted (115V) C80704-07, 12 Painted (240V) C80704-08, 09 SS (240V) OPERATION SERVICE PARTS CARE Revised 7/02 FOR COMMERCIAL USE ONLY
Instruction Manual. Super 88
 Instruction Manual Super 88 10700 Medallion Drive, Cincinnati, Ohio 45241-4807 USA Part No. 49555 SAFETY PRECAUTIONS DANGER Machine must be properly grounded to prevent electrical shock to personnel. Failure
SOLID STATE DIGITAL ENERGY SAVING TOASTER PRINCE CASTLE MODEL NO. 411-D SERIES
 This equipment chapter is to be placed in the toasters section of your Equipment Manual. SOLID STATE DIGITAL ENERGY SAVING TOASTER PRINCE CASTLE MODEL NO. 11-D SERIES MANUFACTURED FOR MCDONALD S BY PRINCE
Instruction Manual. Bucket Oil Pump
 Instruction Manual Bucket Oil Pump 10700 Medallion Drive, Cincinnati, Ohio 45241-4807 USA 2016 Gold Medal Products Co. Part No. 79064E SAFETY PRECAUTIONS DANGER Machine must be properly grounded to prevent
Henny Penny Humidified Counter Warmer Model HCW-2 Model HCW-3 Model HCW-5 Model HCS-5 Model HCW-8 TECHNICAL MANUAL
 Henny Penny Humidified Counter Warmer Model HCW-2 Model HCW-3 Model HCW-5 Model HCS-5 Model HCW-8 TECHNICAL MANUAL Section TABLE OF CONTENTS Section 1. TROUBLESHOOTING... 1-1 1-1. Introduction... 1-1
48 Vanguard Belt Drive Fans Installation and Operators Instruction Manual
 8 Vanguard Belt Drive Fans Installation and Operators Instruction Manual Thank You The employees of Chore-Time Equipment would like to thank your for your recent Chore-Time purchase. If a problem should
UF-216CC water filtration system
 UF-216CC water filtration system owner s manual Manufacturing Numbers: 9700407 www.ajantunes.com P/N 1011135 Rev. C 10/15 TABLE OF CONTENTS Owner Information...2 General...2 Warranty Information...2 Service/Technical
OCH-SS series Direct Wired Units Indoor * and Outdoor Comfort Heaters
 1200 North Main Street Fostoria, OH 44830 Phone: 800-495-4525 Fax: 419-435-0842 A DIVISION OF www.fostoriaindustries.com OCH-SS series Direct Wired Units Indoor * and Outdoor Comfort Heaters *EXCLUDING
FES - Series Portable Electric Heaters. YES - Series Suspended Electric Heaters CONTENTS
 FOSTORIA INDUSTRIES, INC. A DIVISION OF FES - Series Portable Electric Heaters YES - Series Suspended Electric Heaters (FES-1524-3E shown) IMPORTANT SAFETY INFORMATION INSIDE Serious injury or death possible.
ELECTRIC STOVE MODEL CGESS SAFETY INFORMATION AND OPERATION MANUAL
 ELECTRIC STOVE MODEL CGESS SAFETY INFORMATION AND OPERATION MANUAL Read these instructions completely before operating electric stove. Failure to follow them could cause a heater malfunction resulting
48 Vanguard Belt Drive Fans Installation and Operators Instruction Manual
 8 Vanguard Belt Drive Fans Installation and Operators Instruction Manual Thank You The employees of Chore-Time Equipment would like to thank your for your recent Chore-Time purchase. If a problem should
Parts and Instruction Manual ET Extraction Tool
 Parts and Instruction Manual ET Extraction Tool This manual is furnished with each new MINUTEMAN ET Extraction Tool. This provides the necessary operating and preventive maintenance instructions. Operators
Foodservice Equipment Specialists P.O. Box 880 Saco, ME. / U.S.A * FAX (207)
") Foodservice Equipment Specialists P.O. Box 880 Saco, ME. / U.S.A. 04072 877-854-8006 * FAX (207) 283-8080 OPERATIONS AND MAINTENANCE PROCEDURES JT-4, JT4-HC, JT5, JT5HC Belleco Triple Play Toaster FOR
Foodservice Equipment Specialists P.O. Box 880 Saco, ME. / U.S.A. 04072 877-854-8006 * FAX (207) 283-8080 OPERATIONS AND MAINTENANCE PROCEDURES JT-4, JT4-HC, JT5, JT5HC Belleco Triple Play Toaster FOR
Wax Base Heater & Dispenser
 Wax Base Heater & Dispenser Service Manual Models: IDWB2/0900, IDWB2/0775, IDWB3/0900, IDWB3/0775, IDWB4/0900, IDWB4/0775 Introduction............................................................................
OPERATIONS MAINTENANCE MANUAL
 OPERATIONS MAINTENANCE MANUAL COOK & HOLD OVEN SYSTEMS WITTCO MODEL NUMBERS 1300-AD-SS 1300-AD-SS-SPLIT LIMITED WARRANTY Wittco warrants the Products that it manufactures to be free from defects in materials
Disposal Unit (BKSDU) Burger King Shortening. Operation, Service & Parts Manual BURGER KING BKSDU
 Burger King Shortening. Operation, Service & Parts Manual BURGER KING BKSDU") BURGER KING BKSDU Burger King Shortening Disposal Unit (BKSDU) Operation, Service & Parts Manual Frymaster, a member of the Commercial Food Equipment Service Association, recommends using CFESA Certified
BURGER KING BKSDU Burger King Shortening Disposal Unit (BKSDU) Operation, Service & Parts Manual Frymaster, a member of the Commercial Food Equipment Service Association, recommends using CFESA Certified
OPERATING & SERVICE PARTS MANUAL 700ES ENERGY SMART WRAPPER SERIES B
 OPERATING & SERVICE PARTS MANUAL 700ES ENERGY SMART WRAPPER SERIES B READ ALL INSTRUCTIONS CAREFULLY BEFORE OPERATING EQUIPMENT TABLE OF CONTENTS Machine Components & Electrical Requirement... 3 Preliminary
B.I.C.A Built-In Coffee Appliance
 B.I.C.A Built-In Coffee Appliance Automatic Coffee Brewer Parts & Service Models: 1033510, 1033510S & 1033511 3828 S. Main St. Los Angeles, CA 90037-1491 800-421-6860 310-787-5444 Fax 310-787-5412 e-mail:
LOKPRINT. Industrial Apparel Label Station. Operation / Maintenance And Parts List. Users Manual AVERY DENNISON. Manual Edition 5.0.
 Users Manual LOKPRINT Industrial Apparel Label Station Operation / Maintenance And Parts List AVERY DENNISON Manual Edition 5.0 09 June 2010 Manual Part Number 221398 This page intentionally left blank
CUTMASTER Strip Cutting Machine
 EASTMAN THE EASTMAN CUTMASTER Strip Cutting Machine WARNING Safety glasses must be worn at all times when operating or servicing this equipment. Instruction Manual & Illustrated Parts List Please read
DFW-150/250 deluxe food warmer
 UP DOWN PROGRAM START/STOP POWER DFW-150/250 deluxe food warmer owner s manual Manufacturing Numbers: 9100109, 9100120, 9100160, 9100164, 9100190, 9100805 www.ajantunes.com P/N 1010966 Rev. G 08/12 Table
Floss Machines Instruction Manual Models #3017, #3017SS, 3024, and #3077 For Machines Manufactured after July 2007
 Part No. 42131 Floss Machines Instruction Manual For Machines Manufactured after July 2007 Cincinnati, OH 45241-4807 USA Installation Instructions Inspection of Shipment: Unpack all cartons and check
Operating Instructions (ENG) MODEL: AM115V. Read instructions before operating the machine. AM /24/00
 MODEL: AM115V. Read instructions before operating the machine. AM /24/00") Operating Instructions (ENG) MODEL: AM115V Read instructions before operating the machine. A AM 98710 03/24/00 THIS PAGE LEFT BLANK INTENTIONALLY 1 MACHINE DATA LOG/OVERVIEW MODEL DATE OF PURCHASE SERIAL
Operating Instructions (ENG) MODEL: AM115V Read instructions before operating the machine. A AM 98710 03/24/00 THIS PAGE LEFT BLANK INTENTIONALLY 1 MACHINE DATA LOG/OVERVIEW MODEL DATE OF PURCHASE SERIAL
SD2000 FLOOR BURNISHER
 SD2000 FLOOR BURNISHER OPERATION & PARTS MANUAL REV A April 2003 SPECIFICATIONS Length: 33.75 inches Width: 2 inches Height: 50 inches Weight: 69 pounds Pad Speed: 2000 Pad Diameter: 20 inches Drive Motor:.5
CONVEYOR TOASTER MODEL QCS QCS Installation and Operation Instructions 2M-HG0657 Rev. D 6/13/05
 CONVEYOR TOASTER MODEL QCS-2-800 QCS-3-1000 Installation and Operation Instructions 2M-HG0657 Rev. D 6/13/05 SAFETY SYMBOLS These symbols are intended to alert the user to the presence of important operating
DR-180 Through the Wall Exhaust Fan PRODUCT MANUAL & INSTALLATION GUIDE
 DR-180 Through the Exhaust Fan PRODUCT MANUAL & INSTALLATION GUIDE READ AND SAVE THESE INSTRUCTIONS READ CAREFULLY BEFORE ATTEMPTING TO ASSEMBLE, INSTALL, OPERATE OR MAINTAIN THE PRODUCT DESCRIBED. PROTECT
Industrial Vacuums, Inc
 Instructions/Spare Parts Manual Nilfisk Model GWD255 Drum Top Vacuum CAUTION: This Nilfisk vacuum cleaner is not to be used in explosion-hazardous areas, as serious injury could result. Under no circumstances
90 INDUSTRIAL PARK ROAD P.O. BOX 880, SACO, MAINE / (207) FAX (207)
 FAX (207)") COOKING EQUIPMENT 90 INDUSTRIAL PARK ROAD P.O. BOX 880, SACO, MAINE / 04072-0880 (207) 282-1589 800-225-3958 FAX (207) 282-6283 OPERATOR'S MANUAL FOR SERVICE INFORMATION U.S. AND CANADA CALL: 1-800-225-3958
COOKING EQUIPMENT 90 INDUSTRIAL PARK ROAD P.O. BOX 880, SACO, MAINE / 04072-0880 (207) 282-1589 800-225-3958 FAX (207) 282-6283 OPERATOR'S MANUAL FOR SERVICE INFORMATION U.S. AND CANADA CALL: 1-800-225-3958
Operator s Manual. Stripping Solution Applicator
 Operator s Manual Stripping Solution Applicator Record this Important Information Date of Purchase Purchased From Address City State Zip Phone Contact Serial Number Emergency Contacts Medical Emergency
User s Manual and Operating Instructions
 User s Manual and Operating Instructions Model Numbers: MAC-12F, MAC-20F-DDF, MAC-20FO-DDF, MAC-20S-DDF, MAC-24-DDF, MAC-24P, MAC-24POSC, MAC-24W, MAC-24WOSC, MAC-30W, MAC-30WOSC, MAC-30-DDF, MAC-30P-DDF,
Instruction Manual. Spiral Slicer
 Instruction Manual Spiral Slicer Model No. 5280-00-100 10700 Medallion Drive, Cincinnati, Ohio 45241-4807 USA 2017 Gold Medal Products Co. Part No. 82876 Table of Contents... 1 SAFETY PRECAUTIONS... 3
DH07, DH07A /DH08, DH08A CONVECTED AIR DISH HEATERS
 DH07, DH07A /DH08, DH08A CONVECTED AIR DISH HEATERS DH07 shown INSTALLATION, OPERATION & MAINTENANCE MANUAL Manual P/N 92448 Rev. G 04/02/2009 Copyright 1998 Aladdin Temp-Rite Changes may be made to the
Portable Air Conditioner. OWNER S MANUAL Read these instructions before use. Model: MM14CHCS. Voltage rating: 115V~60Hz Power rating : 1400W
 Portable Air Conditioner OWNER S MANUAL Read these instructions before use Model: MM14CHCS Customer Support : 1-800-474-2147 Voltage rating: 115V~60Hz Power rating : 1400W For product inquiries or support
52 CEILING FAN. Owner s Manual Models #50336, 50337
 52 CEILING FAN Owner s Manual Models #50336, 50337 If a problem cannot be remedied or you are experiencing difficulty in installation, please contact the Service Department: 1-877-706-3267, 9 a.m.- 5 p.m.
R Series B & T2 Model
 FRONT R Series B & T2 Model Fan Forced Wall Heaters 4-1/4 (108mm) NOTE: Knockouts in top same dimensions 3-1/4 3-1/4 (108mm) (108mm) as bottom 16-7/8 (429mm) 13-7/8 (352mm) BOTTOM 13-7/8 (352mm) 7-3/4
MC MC MC MC MC833130
 Pic-A-Vac Model: MC832085 MC833085 MC832105 MC833105 MC832130 MC833130 OPERATION SERVICE PARTS CARE Revised 8/01 FOR COMMERCIAL USE ONLY IMPORTANT SAFETY INSTRUCTIONS When using an electrical appliance,
OPERATING & SERVICE PARTS MANUAL 700ES ENERGY SMART WRAPPER SERIES C
 OPERATING & SERVICE PARTS MANUAL 700ES ENERGY SMART WRAPPER SERIES C READ ALL INSTRUCTIONS CAREFULLY BEFORE OPERATING EQUIPMENT TABLE OF CONTENTS Machine Components & Electrical Requirement... Preliminary
Floss Machine Instruction Manual Model #3017, #3017SS AND #3077
 Part No. 42131 Revised: May 2004 Floss Machine Instruction Manual Model #3017, #3017SS AND #3077 Econo-Floss Floss-Maxx Cincinnati, OH 45241-4807 USA INTRODUCTION Your Floss Machine warranty is described
CREWMAN 20 ORB CREWMAN 28 ORB
 E88066-00 E88068-00 E88070-00 CREWMAN 20 ORB CREWMAN 28 ORB 20, 28 Orbital Strip Machines Operator and Parts Manual 400 Van Camp Road Bowling Green, Ohio 43402 Customer Service: 888-GO-BETCO Fax: 800-445-5056
52 SAN LUCAS CEILING FAN
 52 SAN LUCAS CEILING FAN Owner s Manual Models #20551 If a problem cannot be remedied or you are experiencing difficulty in installation, please contact the Service Department: 1-877-459-3267, 9 a.m.-
Instruction Manual. Popcorn Topping Dispenser
 Instruction Manual Popcorn Topping Dispenser Model Series 2396-00-100 (101, 110, 111, and 140) Pedestal Assembly for Models without Remote. Rack Assembly shown for Single Pedestal Models. 10700 Medallion
OmniDry 2.9 Amp Centrifugal Air Mover
 Owner s Manual OmniDry 2.9 Amp Centrifugal Air Mover Please Read And Save These Instructions ETL Listed - Tested for product safety standards. Innovating since 1974 www.hydroforce.com 800-637-3789 Copyright
Professional Warming Drawer and Warming Drawer Cabinet
 Professional Warming Drawer and Warming Drawer Cabinet Care & Use/Installation Instructions Models: (C)VQEWD5300SS (C)VQEWD5420SS IMPORTANT SAFETY INSTRUCTIONS WARNING: Read this manual carefully and completely
INSTALLATION and OPERATION BALL WASHER MODEL NO: BW-022
 Easy Picker Golf Products, Inc. 415 Leonard Blvd. N., Lehigh Acres, FL 33971 PH: 239-368-6600 FAX: 239-369-1579 Service: 800-982-4653 SALES: 800-641-4653 www.easypicker.com salesdept@easypicker.com INSTALLATION
Nilfisk Model VHS255 Drum Top Vacuum
 Instructions/Spare Parts Manual Nilfisk Model VHS255 Drum Top Vacuum CAUTION: This Nilfisk vacuum cleaner is not to be used in classified (hazardous) environments, as serious injury could result. Under
14 Upright Vacuum with HEPA Filter & Dual Power
 E29990-00 14 Upright Vacuum with HEPA Filter & Dual Power Operator and Parts Manual 1001 Brown Avenue Toledo, Ohio 43607-0127 Customer Service: 888-GO-BETCO Fax: 800-445-5056 Technical Service: 877-856-5954
READY. Miracle Steamer. Model MS-250/255 owner s manual. Manufacturing Numbers:
 Miracle Steamer Model MS-250/255 owner s manual Manufacturing Numbers: 9100430, 9100435, 9100436, 9100437, 9100438, 9100440, 9100460, 9100462, 9100466, 9100468, & 9100933 Original Instructions www.antunes.com
ELECTRIC STOVE HEATER Models: FS2213B
 ELECTRIC STOVE HEATER Models: FS2213B OWNER S MANUAL WARNING Read and understand this entire owner s manual, including all safety information, before plugging in or using this product. Failure to do so
TOUCHDOWN 48 CEILING FAN
 TOUCHDOWN 48 CEILING FAN MODEL #50205 Español p. 20 Questions, problems, missing parts? Before returning to your retailer, call our customer service department at 1-877-361-3883, Monday - Thursday, 8 am
User Manual. Conveyor Toaster. Models: T140 06/2017. Please read and keep these instructions. Indoor use only.
 Conveyor Toaster Models: T140 06/2017 Please read and keep these instructions. Indoor use only. www.avantcoequipment.com 1 Installation, Operation and Care Unpacking Great care has been taken during the