INSTALLATION & USER MANUAL for Undercounter WOW RO Systems
|
|
|
- Shana Craig
- 5 years ago
- Views:
Transcription


1 INSTALLATION & USER MANUAL for Undercounter WOW RO Systems Place Data Label Here Scan with QR Reader App Visit our website: Powered by Madison Street, Torrance, CA (310) V
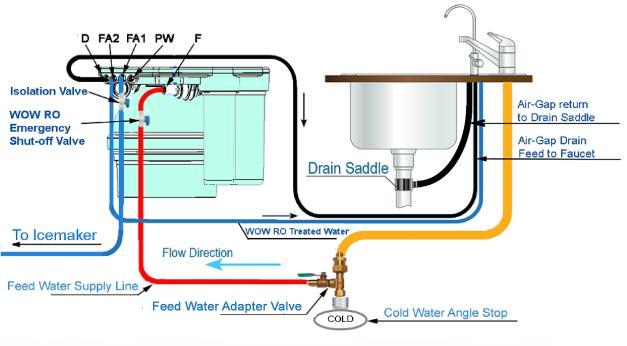
2 Introduction to The WOW RO System The WOW RO System operates by removing contaminants from water at the molecular level. By using your household water pressure to squeeze your water against a special membrane, water molecules are separated from impurities. Rejected dissolved solids are automatically rinsed down the drain leaving only high-quality, delicious water for you to use. General Information 1. The WOW RO System will replenish approximately 1.5 gallons (5.7 L) in minutes, depending on your incoming water pressure, quality and temperature. This appliance is designed with a self-regulating flush feature that limits the reject water to approximately 2 gallons (7.6 L) for every gallon (liter) of treated water. Your appliance will perform better and last longer with heavy use. We encourage you to water house plants, provide water for pets, cook, mix drinks, fill batteries, etc., with treated water. Caution: The working capacity of this appliance depends on the pressure and temperature of the water supply. This appliance is not guaranteed to work properly with water pressure less than 20 psi (1.4 bar) and water temperature less than 40 F (4 C). Figure 1: Installation Diagram 2. The storage tank will store 1.5 gallons (5.7 L) of water. 3. The WOW RO System can be connected to a variety of appliances, including your automatic ice maker, cold water dispenser in the refrigerator door, coffee maker, water cooler and other commercial applications. 4. The WOW RO System is designed to be connected to cold water only. Caution: Never run hot water through your appliance. 5. The flow of water through your treated water faucet will not be as strong as your sink faucet. 6. The WOW RO System is made of safe, non-toxic, health and environment-friendly materials. BPA Free. Warning: Do not allow your appliance to freeze. 2
3 Contents Introduction to The WOW RO System... 2 General Information... 2 Section 1-Installation & Start-up Procedures... 5 Avoid Common Mistakes... 6 Pre-installation Checklist... 7 Installation Tool List... 7 Installation Kit Contents... 8,9 Part Inspection Proper Placement of Filters Installing Filter Cartridges Connecting the System Start-up Procedure Section 2-Connecting Additional Appliances to WOW RO System Connecting to Multiple Appliances Refrigerator/Ice-maker/Coffee-maker/Cooler setup Section 3 When More Water is Needed Adding Extra Storage Tanks Modular Expandability Section 4-Plumbing the Sink Install Drain Saddle Assembly Prepare Sink for RO Faucet Installation Install Incoming Water Supply Valve Section 5-Maintenance Changing Filters Recommended Filter Replacement WOW RO System Appliance Sanitizing Water-on-Water Notes Section 6-Troubleshooting Troubleshooting Tables... 36,37 Owner Information Year Limited Warranty
4 Figure 1: Installation Diagram 4
5 Section 1 Installation & Start-up Procedures 5
6 Installation Steps and Start-Up Procedures AVOID COMMON MISTAKES! Review the most common missed steps made BEFORE starting. This will ensure an easy and successful installation. 1. Prepare and install all service components such as RO faucet, drain, and valve before installing WOW RO System (Pages 26-28). 2. Fully pre-fill filter cartridges according to Step 3 (Page 11) to remove all air before attaching to system. 3. When installing pre-filled filters to system, you MUST make sure they are properly attached and engaged to the stop tabs per Step 3 (Figure 3, Page 11) instructions. Filters are labeled PRE, POST and RO. Ensure each filter matches position on RO unit manifold. 4. If replacing an existing RO unit under the sink, you MUST ensure an independent isolation valve is used between the WOW RO System and any added outlets. Without an isolation valve, the WOW RO System will not start. Refer to Section 2 for connecting additional appliances. 5. Before beginning Start-up Procedures (Step 5, Page 13) make sure all tube connections match the Figure 1 diagram on Page Make sure unit is ONLY connected to a cold water supply (Page 7). 7. If your connections to and from WOW RO System have a leak (even one drop), the system will not work. Repair leak (see Troubleshooting if necessary) and repeat Start-up Procedures (Step 5, Page 13). 8. To avoid air-gap overflowing onto counter, air-gap return line must never have loops or sags in tubing. 9. If you are not using WOW s RO installation kit, it is critical that installers use correct color coded tubing (See installation kit contents, Page 8) to ensure easy trouble shooting or add-on appliance follow-up If replacing an existing RO unit, make sure you replace all old tubing with new color coded tubing. 6
7 Installation Steps and Start-Up Procedures Warning: Installation of this appliance must conform with state and local plumbing codes, laws, regulations, and the instructions provided with this appliance. Failure to install as instructed will void the product warranty. Step 1 Pre-Installation Checklist Look under sink to identify where the unit will rest. To identify hot from cold, turn on hot water at the sink until hot water is flowing. Touch pipes below and mark cold from hot. Identify desired location for new faucet and mark sink for drilled hole, unless hole is preexisting. Review tool kit supplies needed (Table 1). Open box and confirm 3 filter cartridges (PRE, POST & RO), 1 RO unit (tank & manifold) and installation kit (if purchased *). * If installation kit is not purchased, you will need: 3 4 x 1/4 tubing 1 3/8 drain saddle (sized for air-gap or non air-gap) 1 3/8 tubing if air-gap is desired 1 Feed water adapter 1 1/4 WOW RO emergency shut-off valve 1 Faucet with appropriate connector to 1/4 tubing Recommended Tool List Relton drill 1-1/4 assembly (HST-20) (porcelain sinks) Greenlee 1/2 to 1-1/4 punch (stainless steel sinks) Professional Installers Must Have Tool List 2 pressure gauges adapted to 1/4 tube Conductivity or TDS meter 1 to 1-1/4 Carbide drill bit or hole saw Tubing cutter or sharp knife 7/16 open-end wrench 1/2 open-end wrench 9/16 open-end wrench 5/8 open-end wrench Medium-sized (#2) Phillips screwdriver Table 1: Recommended Tool List 7

8 Installation Kit Contents A B I C D G E F G H 8
9 Installation Kit Legend A. Non air-gap faucet B. Air-gap faucet C. Non air-gap faucet hardware D. Air-gap faucet hardware E. Drain saddle (1/4 ) F. Drain saddle (3/8 ) G. 1/4 WOW RO emergency shut-off valve H. Feed water adapter I. Tubing for install connections: Black 3/8 - Air-gap return line to 3/8 drain saddle Black 1/4 - Air-gap drain feed to faucet/d port to non air-gap drain saddle Red 1/4 Blue 1/4 9
10 Installation Steps and Start-Up Procedures Step 2 Inspect Unit Parts from Box Cartridge Inspection: Remove red cap on pre-filter and post-filter. Confirm that external large O-Ring is in place. Confirm that 2 smaller O-Rings are in place (located in center). Remove red cap on RO-membrane. Confirm that large external O-Ring is in place. Confirm that medium O-Ring is in place. Confirm that 2 small O-Rings are in place (located in center). If any O-Rings are missing, please call our service center: (866) ext: 4 Proper Placement of Filters Caution: Cartridges must line up with tank cutouts when present Newer systems may not have cutouts Figure 2: 10


11 Installation Steps and Start-Up Procedures Step 3 Install Filtration & RO Membrane Cartridges 1. Remove red cap from top of filter & RO membrane cartridges. 2. With a black permanent marker, write the date on each filter to track replacement time. Filters last up to a year. 3. Pre-fill all the cartridges with bottled water or tap water until they overflow from the top. Wait 3 minutes and top off as cartridges soak up water. Repeat until cartridges are completely saturated and no air is present at the top. Figure 3a: 4. Attach post-filter in the labeled POST position, RO membrane in the labeled RO position and the pre-filter in the labeled PRE position, with a twisting counter clockwise upward motion until you feel and hear stop tabs touch and colored dots are aligned (see Figure 3),. Figure 3b: POST RO PRE POST RO PRE Figure 3c: Warning: Check to see if the cartridges are fully engaged. Visually confirm colored dots are lined up and white cartridge stop tabs are flush with black manifold stop tabs prior and after pressurization of system. 11
 D: Drain (¼ black) FA1: Faucet/Accessory 1 (⅜ blue) FA2: Faucet/Accessory 2 (¼ blue) PW: Used for testing or additional storage. SQ: Used for testing or additional storage.")
12 Installation Steps and Start-Up Procedures Step 4 Connect the System WOW RO System port identification markings molded into top of manifold: (See Figure 4). F: Feed (¼ red) D: Drain (¼ black) FA1: Faucet/Accessory 1 (⅜ blue) FA2: Faucet/Accessory 2 (¼ blue) PW: Used for testing or additional storage. SQ: Used for testing or additional storage. RF: Do not touch (pre-connected). NOTE: Ports that are not used require the appropriate sized plug. (Included). A. With the WOW RO System in place, remove any port plugs as necessary (push in white collet to release) and make the following connections: B. Feed F connection: Take the 1/4 red tubing and snip off a 6 length. Take long end of remaining tubing and attach to feed water adapter (cold water supply). Attach other end to WOW RO System emergency shut-off valve (in installation kit). With 6 tubing, attach one end to WOW RO System emergency shut-off valve and the other end to gray F port (See Figure 1, Page 4: Installation Diagram). C. Drain D connection: i. Air-Gap Faucet Route the free end of the 1/4 black tubing attached to the RO faucet air-gap to the connection marked D. ii. Non Air-Gap Faucet * Route drain line connection (saddle clamp or other) to the connection marked D, using the 1/4 black tubing. * Check local plumbing codes for compliance when using non air-gap faucets. D. RO Faucet connection: FA1 (3/8 ) or FA2 (1/4 ) If there are no additional appliances (i.e. icemaker, coffee maker, cooler, etc.) to hook up then you have the choice of using either port for the RO faucet. i. If the RO faucet is more than ten feet in distance from the WOW RO System, then the 3/8 FA1 port is preferred. ii. Use the 1/4 FA2 port for the RO faucet and the 3/8 FA1 port for the added appliances. Note: If your installation needs to connect to multiple appliances, such as an icemaker or coffee maker, go to Section 2, Pages Figure 4: System Connections
13 Installation Steps and Start-Up Procedures Step 5 Start-up Procedure Before the WOW RO System is operational, it must be properly primed by removing all air from the unit. Purging the system: A. Make sure the RO faucet and all other outlets using an isolation valve are CLOSED. B. Turn feed water adapter Valve and emergency shut-off valve on. Notice the sound of water filling the system. C. Within 3-4 minutes, the waste line from the system will open with a noticeable exhaust of air and water. D. After waiting another minute, open RO faucet. Notice air/water exhausting from faucet port. Wait for a steady stream of water and then CLOSE the faucet. E. Within 2 minutes, the waste port will open again with a shot of air/water exhausting. At this point, let the tank fill for approximately 45 minutes. F. After system shuts down (indicated by no audible or visible drain flow), open RO faucet and empty system to a trickle. At this point, the system should have generated a full gallon and a half of water. If not, see Note 1 below or refer to Troubleshooting Guide (Page 35). G. Turn off RO faucet and let water make-up process refill tank (approximately 45 minutes). H. The unit is operational, but it is required to repeat this process (Steps F & G) five times to completely prep and flush filter cartridges and ensure TDS levels are at their minimums. This will guarantee the best tasting water immediately. I. System is now fully operational! If system does not work, refer to Troubleshooting Guide. Note 1: If your connections along any FA lines have a leak (even one drop), the system will not work. Repair leak and repeat Start-up Procedure. Note 2: See Pages if adding any appliances. Note 3: Unlike traditional captive air RO systems, the WOW RO System will always have water in the tank. This fact does not change the need to follow Steps A-F for start-up. 13
14 Section 2 Connecting Additional Appliances to WOW RO System There are many reasons why additional storage is required. If the unit is installed in houses with larger families, cooking needs alone may warrant more storage. If family fills water bottles exceeding 1½ gallons at same time, additional storage will be required. In addition, devices with larger storage capacities like coolers will require greater draw down needs. Draw down refers to amount of water that is released when opening up faucet and emptying tank from start to finish (single pull). A standard WOW RO System holds 1½ gallons. The WOW RO System has been designed in a modular format to add additional storage tanks as needed. 14
, under-thecounter hot & cold vented systems, commercial steamers (restaurants), commercial coffee makers and other appliances that benefit from RO water.")
15 Connecting to Multiple Appliances The WOW RO System is uniquely designed to connect to one or more appliances (Figure 5), including refrigerator icemakers/door dispensers, coolers (both gravity fed and pressurized), under-thecounter hot & cold vented systems, commercial steamers (restaurants), commercial coffee makers and other appliances that benefit from RO water. This section addresses Do s and Don ts of connecting to one or more appliances. It also addresses how to determine storage and expansion needs depending on how many appliances are hooked up. General MUST Do s for connecting ANY additional appliances: A. It s a must that the filter and water lines to any and all added outlets be clear of air. Note: System will not work with air in the lines. B. Close isolation lines to all additional outlets. C. Charge system to its full status (refer to Start-up, Page 13). D. Follow the instructions provided from Pages Determining Your Expansion and Storage Needs: A standard WOW RO System holds 1½ gallons. The WOW RO System has been designed in a modular format to add additional storage tanks as needed. Review chart below for each device connected. Add all additional tanks needed from right hand column to determine complete storage needs. Device Average Reservoir in Gallons * Estimated Additional Tanks Needed Refrigerator / Icemaker 0 gallons None Commercial Coffee Maker 1 gallon 0-1 Depending on draw down needs at peak periods (See Page 14 for draw down definition). Count glass/cups per hour to determine if greater than 1 gallon. Gravity Cooler Up to 3 gallons 1 Pressurized Cooler Up to 3 gallons 1 Vented Hot Box 2/3 of a gallon or 84 oz. 0 * Check device manual for actual reservoir capacity. 15
16 Adding a Refrigerator/Icemaker Refrigerator Hook-ups: (Figure 7, Page 17) Adding a line from the WOW RO System to your refrigerator will provide you with clean tasting water and clearer, harder ice cubes. Adding a refrigerator hook-up from a new WOW (dry) installation: a. Remove the 3/8 plug from the FA1 port by pushing on the white collet, releasing the plug. b. Connect the 3/8 plastic tubing to the FA1 port that goes to the icemaker. c. Make sure that a 3/8 isolation/shut-off valve is installed at the system in the icemaker line and easily accessible under the sink cabinet (Figure 6). d. Close isolation valve. e. Go to Start-up Procedures (Page 13) and proceed until fully operational. f. After start-up, open isolation valve and bleed line to icemaker as described below (Bleeding Lines). Adding a refrigerator hook-up from a pre-installed WOW (wet) installation: a. Close feed water valve. b. Open faucet to relieve pressure on the FA ports. c. Remove the 3/8 plug from the FA1 port by pushing on the white collet, releasing the plug. d. Connect the 3/8 plastic tubing to the FA1 port that goes to the icemaker. e. Make sure that a 3/8 isolation/shut-off valve is installed at the system in the icemaker line and easily accessible under the sink cabinet (Figure 6). f. Close isolation valve. g. Turn on feed water. h. Open isolation valve. i. Bleed line to icemaker as described below (Bleeding Lines). Bleeding Lines: Refrigerator with no door dispenser: Open up freezer and clear ice cube tray. Push lever down to engage ice-making. This will begin clearing air out of line. Refrigerator with door dispenser: Use glass to engage water dispensing and wait for a solid stream of water. Isolation (shut-off) Valve Figure 6 16

17 Figure 7 Refrigerator Icemaker 17
 Valve Adding a coffee maker hook-up from a new WOW (dry) installation: a.")
18 Adding a Coffee Maker Commercial Coffee Maker Hook-ups: (Figure 8A, Page 21) Adding a line from the WOW RO System to a commercial coffee maker will ensure RO water is always being used to create great tasting coffee and reducing or eliminating scaling. Isolation (shut-off) Valve Adding a coffee maker hook-up from a new WOW (dry) installation: a. Remove the 3/8 plug from the FA1 port by pushing on the white collet, releasing the plug. b. Connect the 3/8 plastic tubing to the FA1 port that goes to the coffee maker. c. Make sure that a 3/8 isolation/shut-off valve is installed at the system in the coffee maker line and easily accessible under the sink cabinet (Figure 6). d. Close isolation valve. e. Go to Start-up Procedures (Page 13) and proceed until fully operational. f. After start-up, open isolation valve and bleed line to coffee maker as described below (Bleeding Lines). Adding a coffee maker hook-up from a pre-installed WOW (wet) installation: a. Close feed water valve. b. Open faucet to relieve pressure on the FA ports. c. Remove the 3/8 plug from the FA1 port by pushing on the white collet, releasing the plug. d. Connect the 3/8 plastic tubing to the FA1 port that goes to the coffee. e. Make sure that a 3/8 isolation/shut-off valve is installed at the system in the coffee maker line and easily accessible under the sink cabinet (Figure 6). f. Close isolation valve. g. Turn on feed water. h. Open isolation valve. i. Bleed line to coffee maker as described below (Bleeding Lines). Figure 6 Bleeding Lines: Brew a pot of coffee. 18

.")
19 Adding a Cooler Water Cooler Hook-ups: (Figure 8A, Page 21) Adding a line from the WOW RO System to a cooler will ensure RO water is always being used to create great tasting water. When adding devices with larger storage capacities, like coolers, you must first determine draw down needs. Refer to Section 2, Page 14-15, Determining your Expansion Needs. Isolation (shut-off) Valve Adding a cooler hook-up from a new WOW (dry) installation: a. Remove the 3/8 plug from the FA1 port by pushing on the white collet, releasing the plug. b. Connect the 3/8 plastic tubing to the FA1 port that goes to the cooler. c. Make sure that a 3/8 isolation/shut-off valve is installed at the system in the cooler line and easily accessible under the sink cabinet (Figure 6). d. Close isolation valve. e. Go to Start-up Procedures (Page 13) and proceed until fully operational. f. After start-up, open isolation valve and bleed line to cooler as described below (Bleeding Lines). Adding a cooler hook-up from a pre-installed WOW (wet) installation: a. Close feed water valve. b. Open faucet to relieve pressure on the FA ports. c. Remove the 3/8 plug from the FA1 port by pushing on the white collet, releasing the plug. d. Connect the 3/8 plastic tubing to the FA1 port that goes to the cooler. e. Make sure that a 3/8 isolation/shut-off valve is installed at the system in the cooler line and easily accessible under the sink cabinet (Figure 6). f. Close isolation valve. g. Turn on feed water. h. Open isolation valve. i. Bleed line to cooler as described below (Bleeding Lines). Bleeding Lines: Open spigot to dispense water and wait for a solid stream of water. Figure 6 Pressurized Cooler Gravity Cooler 19

. d. Close isolation valve. e. Go to Start-up Procedures (Page 13) and proceed until fully operational.")
20 Adding a Hot Tank w/ Vented Faucet Hot Tank Hook-ups: (Figure 8-B) Adding a line from the WOW RO System to a hot tank will ensure RO water is always being used to create great tasting hot water. When adding devices with larger storage capacities, like hot tanks, you must first determine draw down needs. Refer to Section 2, Page 14-15, Determining your Expansion Needs. Adding a hot tank hook-up from a new WOW (dry) installation: a. Remove the 3/8 plug from the FA1 port by pushing on the white collet, releasing the plug. b. Connect the 3/8 plastic tubing to the FA1 port that goes to the hot tank. c. Make sure that a 3/8 isolation/shut-off valve is installed at the system in the hot tank line and easily accessible under the sink cabinet (Figure 6). d. Close isolation valve. e. Go to Start-up Procedures (Page 13) and proceed until fully operational. f. After start-up, open isolation valve and bleed line to hot tank as described below (Bleeding Lines). Adding a hot tank hook-up from a pre-installed WOW (wet) installation: a. Close feed water valve. b. Open faucet to relieve pressure on the FA ports. c. Remove the 3/8 plug from the FA1 port by pushing on the white collet, releasing the plug. d. Connect the 3/8 plastic tubing to the FA1 port that goes to the hot tank. e. Make sure that a 3/8 isolation/shut-off valve is installed at the system in the hot tank line and easily accessible under the sink cabinet (Figure 6). f. Close isolation valve. g. Turn on feed water. h. Open isolation valve. i. Bleed line to hot tank as described below (Bleeding Lines). Bleeding Lines: Open RO faucet to dispense water and wait for a solid stream of water. See Hot Tank Manual for any additional requirements. Isolation (shut-off) Valve Figure 6 20


21 Figure 8-A Ice-maker, Coffee-maker, Water Cooler Isolation Valve To Faucet To Coffee Maker To Water Cooler To Icemaker Figure 8-B Hot Tank, Vented Faucet Installation 21
22 Section 3 When More Water is Needed There are many reasons why additional storage is required. If the unit is installed in houses with larger families, cooking needs alone may warrant more storage. If family fills water bottles exceeding 1½ gallons at same time, additional storage will be required. In addition, devices with larger storage capacities like coolers will require greater draw down needs. Draw down refers to amount of water that is released when opening up faucet and emptying tank from start to finish (single pull). A standard WOW RO System holds 1½ gallons. The WOW RO System has been designed in a modular format to add additional storage tanks as needed. Review chart below for each device connected. Add all additional tanks needed from right hand column to determine complete storage needs. Device Average Reservoir in Gallons * Estimated Additional Tanks Needed Refrigerator / Icemaker 0 gallons None Commercial Coffee Maker 1 gallon 0-1 Depending on draw down needs at peak periods (See Section 3, Page 22 for draw down definition). Count glass/ cups per hour to determine if greater than 1 gallon. Gravity Cooler Up to 3 gallons 1 Pressurized Cooler Up to 3 gallons 1 Vented Hot Box 2/3 of a gallon or 84 oz. 0 * Check device manual for actual reservoir capacity. 22


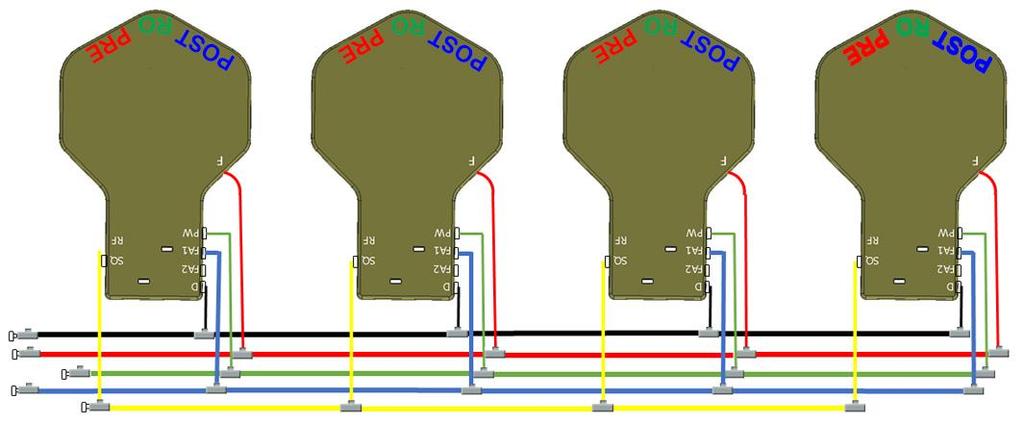
23 When More Water is Needed / Desired Steps to determine storage needs: See Section 2, Page 15 Adding extra storage tanks: a. Open RO faucet and drain off at least a couple cups of water to release pressure on the internal bladder. b. Wait until you hear the pressure release from the drain line. c. Turn the feed valve off. d. Remove the ¼ plugs from the SQ (Squeeze) and PW (Tank, Product Water) ports by pushing in white collet to release. e. Connect ¼ yellow tubing between the matching SQ ports on the WOW RO System manifold and the spare tank adapter connected to the spare tank (See Figure 9 below for one or multiple tank set-ups). f. Connect ¼ green tubing between the matching PW ports on the manifold and the adapter (See Figure 9 below for one or multiple tank set-ups). g. After connections are completed, slowly turn on feed water and open faucet. You will hear a combination of air and water eliminated from system. Leave open until a solid stream of water dispenses. h. Close the faucet. i. In less than a minute, control module will activate and system will resume making water with a noticeable exhaust of air and water down the drain. j. To expel all air from the newly added tank, it may be necessary to drain water from faucet several times. MANIFOLD MANIFOLD Figure 9: Multiple Tanks SPARE TANK SPARE TANKS 23
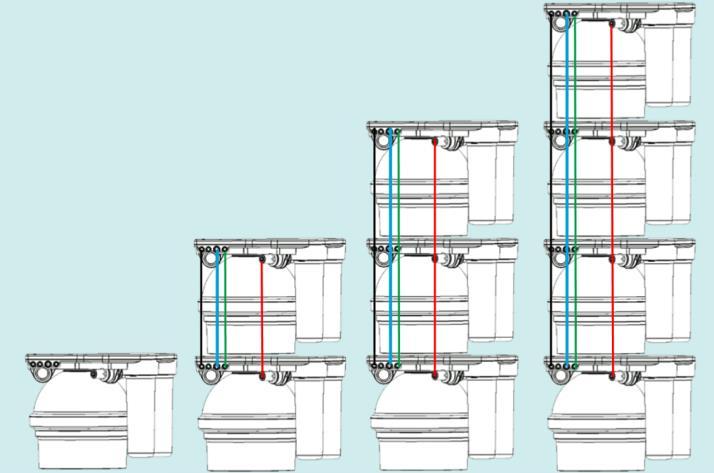
24 Modular Expandability Parallel Processing: 24
25 Section 4 Plumbing the Sink 25

26 Install the Drain Saddle Assembly The drain saddle assembly should be installed above the P-trap on the vertical or horizontal tailpiece (See Figure 10 below). Use the black 1/4 saddle for the non air-gap RO faucet, or the white 3/8 saddle for the air-gap RO faucet. A. Position the drain saddle in the desired location, mark the spot to be drilled, and remove the saddle. (See Figure 10). B. Drill a 7/16 hole through one side of the drain pipe only. RO FAUCET NEVER MOUNT HERE MOUNT DRAIN SADDLE HERE Figure 10: Drain Saddle Assembly Mounting Locations C. Peel off the paper backing from the drain gasket and apply the gasket to the port connection of the drain saddle (See Figure 11). D. Make sure to align the drain saddle to the drilled hole (use small screwdriver to check alignment). E. Attach the drain saddle to the drain pipe and tighten the two screws evenly. F. Cut the 1/4 tube or 3/8 tube to the desired length and connect to the drain saddle with the provided locking clip. Note: State and local plumbing codes may prohibit the use of saddle valve connections. Reminder: Must not have loop or sag in the drain saddle line as this will cause an overflow through the air-gap. Figure 11: Drain Saddle Assembly 26
27 Prepare the RO Faucet for Installation The most convenient installation will allow the use of an existing spray attachment or soap dispenser hole. If either hole is not available, then follow the basic procedures outlined below. Drilling a stainless steel sink: A. Mark the sink location for the center of the spigot. B. Impact punch the sink top to provide a starting point for the drill bit. C. Drill a 1/4 pilot hole in the sink using a high-speed drill bit. D. Drill a 1/2 diameter hole to accept the bolt of a 1 Greenlee Chassis Punch. E. Set the punch and turn the nut with a wrench to cut the hole. Follow Greenlee instructions. Drilling a porcelain clad steel or cast-iron sink: Caution: Be careful when the drill is about to penetrate the base metal of the sink. Reduce the speed and support the drill so the drill chuck does not impact the porcelain or enamel. A. Position the faucet for customer convenience and then secure the faucet on the sink. B. Assemble the faucet with all of the components (See Figure 12, for typical air-gap and non airgap faucet) pre-assembling both drain lines to air-gap faucet. C. Feed the assembled faucet and tubing through the hole in the sink and fasten from under the sink. D. Air-Gap return to drain; a 3/8 line must be installed with no loops or sags. It must be a direct shot to the drain. Figure 12: Air Gap and Non-Air Gap Faucets 27

28 Install the Incoming Water Supply Valve For installation with standard angle stop incoming water supply valve (See Figure 14). A. Shut off the water at the angle stop valve. B. Use a wrench to loosen the compression nut on the angle stop riser tube/flex line to upper faucet. C. Install the incoming water supply valve onto the angle stop. Use the wrench to tighten the compression nut on the incoming water supply valve. Do not over - tighten. D. Reconnect the riser tube to the other end of the incoming water supply valve. Do not overtighten. Caution: A longer riser tube assembly will be required if a gentle loop cannot be made. (See Figure 13). E. Fully insert the 1/4 tube into the speedfit/john Guest style connection. The new incoming water valve can be swiveled to position the tubing out of the way. F. Make sure the incoming water supply valve is off before turning the angle stop valve on. Check for leaks. Incorrect Figure 13: Correct Flexible Hose Positions Figure 14: Installation with Flexible Hoses 28
29 Section 5 Maintenance 29

30 Changing Filters Changing the Filter & RO Membrane Cartridges (PRE, RO, POST) (Refer to Installation) Removal 1. Open RO faucet for a glass of water and close. 2. Turn system feed off and wait for 20 seconds. 3. The system has now been depressurized for a safe removal of the cartridges. 4. Towels should be placed under the system first. 5. Remove cartridges with a clockwise upward twist. Replacement 1. Remove red cap from top of filter cartridges. 2. With a black permanent marker, write the date on each filter to track replacement time. Filters last up to a year in most cases. 3. Pre-fill all cartridges with bottled water or tap water. 4. Attach post-filter in the labeled POST position, RO membrane in the labeled RO position and the pre-filter in the labeled PRE position, with a twisting counter clockwise upward motion until you feel and hear stop tabs touch (see Figure 15). Note: Make sure your cartridges are inserted completely! Figure 15: Changing Filter & RO Membrane Cartridges POST RO PRE POST RO PRE POST RO PRE Stop Tabs 30
31 Recommended Filter Replacement The frequency in which the membrane and filters should be replaced depends upon the quality of the water that enters the appliance. Contact your WOW Water specialist or visit for replacement filters and parts. Note: The installation of the WOW RO System appliance on a pre-treated water supply will greatly increase the life of its filters. Note: Any filter that demonstrates reduced water production or a slower rate of flow is overdue for a change. Warning: Shut off water to the appliance before beginning any maintenance. Filter Recommended Replacement (Months) Replacement Sediment/Carbon Pre-filter (RED) Part# Replacement Reverse Osmosis Membrane (GREEN) Part# Replacement Carbon Post-filter (BLUE) Part#
 - The Sediment/Carbon pre-filter (PRE) performs important")
 - The Reverse Osmosis membrane (RO) is the workhorse of")


32 WOW RO System Appliance Figure 16: WOW RO System Appliance 1. Replacement Sediment/Carbon Pre-Filter (RED) - The Sediment/Carbon pre-filter (PRE) performs important function of protecting the RO membrane from particulate matter and chlorine in the water supply. 2. Replacement Reverse Osmosis Membrane (GREEN) - The Reverse Osmosis membrane (RO) is the workhorse of the WOW RO system. This low energy technology significantly reduces nearly every category of undesirable water contaminants as small as 1/100,000,000 (one hundred-millionth) of an inch. This includes inorganic mineral salts, heavy metals, toxic organic chemicals and undesirable microbes. 3. Replacement Carbon Post-Filter (BLUE) - The activated carbon post-filter (POST) removes the smallest organic chemical molecules. WOW RO System Filter Labels 32
33 Sanitize Water on Water This can be performed at the time of the filter replacement. Place a towel down under the system for spills. Also have a small bucket available. 1. With feed supply on, drain down about 20 seconds of water through the faucet, then close the faucet. 2. Giving it 10 seconds, the system should be de-pressurized by this time. The PW/SQ port will not have any pressure. 3. Turn off supply to the F port. 4. Remove the PW and the SQ pins. 5. Install the sanitizer cannister (available online at to the PW port, using a ¼ tube, making sure the cannister has the sanitizing solution (3% Hydrogen Peroxide) inside. (This is important). 6. Place ¼ tubing in the SQ port and direct SQ exit into a bucket or pot. 7. Using the supply line to pressurize the sanitizer is best, so detach from the F port. Place into the sani-cup and turn on supply for 10 seconds. 8. You are now ready to turn on the feed valve to the sanitizer. Water will immediately emanate from the SQ port into the bucket. Leave on for about a liter/quart of water. You have now introduced a sanitizer to the product water bladder. 9. Next, remove sanitizer tube from PW port. Disengage feed line from sanitizer unit and place back into F port. Plug the PW port. Remove SQ exhaust line and place plug back in SQ port. 10. Leave sanitizing solution in the system for about 2 hours, then open faucet and drain system until empty. Then let system fill on its own. 33
 bookstore.")
34 Notes For comprehensive and detailed information on all aspects of installing POU RO systems we recommend purchasing Reverse Osmosis "A Practical Application Manual for Residential Point-of-Use Systems" by Robert Slovak, one of the members of the TOPPER development team. This publication can be purchased directly from TOPPER or from the Water Quality Assn. ( bookstore. Refer to Installation Instruction Video for tips. 34
35 Section 6 Troubleshooting 35
36 Troubleshooting PROBLEM REASON SOLUTION System will not make water. Not enough feed water pressure. Feed valves are closed. Tubing may be connected to wrong port. House regulator may need to be increased or add a pump. Feed water adapter, Emergency shut-off valve, Angle stops. See Page 12 connection. System has a trickle of water from faucet and has never initiated to a high flow volume. Leak down line of FA Ports. System has added outlets with no isolation valves, causing trapped air. Locate leaks and repair. Isolation valve needs to be added as described in Section 2, Pages 15-21, and follow procedure. Exceeding storage capacity. Current storage insufficient. Revisit When more water is needed, Section 3, Page 22 Water dispensing does not meet average flows. Not enough water pressure. Pre-filter is plugged. House regulator may need to be increased or add a pump. Change filter. See Page 30 Failure to dispense water from a remote location such as a spare RO faucet, refrigerator water dispenser or cooler. If RO water is dispensing from the primary faucet, then either the isolation valve to the remote location is closed or there is some tubing obstruction. A combination of long distance from the WOW RO system and inadequate tubing size may prevent the control module from activating. Limit ¼ tubing to runs of 15 and use ⅜ tubing up to 50. For even longer runs consider ½ tubing. System making noise. Trapped air. Close isolation valves and wait until system is full and shut down. Purge lines until steady stream and close valve at the end. See Step 5, Page
37 Troubleshooting PROBLEM REASON SOLUTION System starts knocking after turning faucet off. Air or water leak. Pre & Post filters are in wrong locations. Bad Internal check valve in post-filter. Check for leaks on all FA lines. Close all isolation valves. If problem persists, you have a leak down the FA line. Repair any leaks you may find. (SYSTEM WILL NOT FUNCTION WITH ANY LEAKS IN THE FA LINES). If that does not correct the problem, then turn off the feed water valve and open the RO faucet. Remove the postfilter cartridge, and inspect and relubricate the O-Rings or change post-filter. Match filter with proper position on RO unit. Change post-filter Water leaking from Air-Gap installation. Air-gap installation incorrect. Clogged drain. Remove loops or sags from Air-Gap to drain. Unclog drain. Small leaks at plugs. Small leaks from tube connections. Internal O-ring is off-set. Old tubing or tubing cut at an angle. Rotate plugs a few times. Check for leaks after a few minutes. Cut 1 off end of tubing. Leak at pre/post filter. (Filter fell off) Filter cartridge was not inserted correctly. Insert and rotate to the stop tabs. See Page 11. High TDS levels. WOW RO System not properly flushed prior to use. Filters needs replacing. TDS creep. Follow guidelines in Start-up Procedure, Section 1, Step 5. See Page 30 Empty and refill tank once a week. 37
38 Owner Information Safety Instructions Warning: This appliance must be applied to potable water only. It is recommended that a water treatment specialist install and maintain this appliance. Note: The manufacturer reserves the right to make specification and product changes without prior notice. When installing the appliance into a local water supply, it is recommended to conduct a water analysis. If the water analysis does not correspond with the requirements, the lifetime of the filtration cartridges and membrane unit may be significantly reduced. In this case, it is recommended to use auxiliary water treatment systems (e.g. mechanical filter, de-ionizing filter, and/or water softener). It is recommended to use only microbiological safe water with your WOW RO System appliance. Caution: Do not use water that is microbiologically unsafe or of unknown quality without adequate disinfection before or after the appliance. We recommend that you have your local treatment specialist service this appliance. Ensure that all items are checked when servicing the appliance. For Online instructions, go to OWNERS REGISTRATION CARD PLEASE fill out this form when installation has been completed and return to WOW Water System at the address below. Topper Manufacturing Corp, Madison St. Torrance CA (310) Name: Street Address: City: State: Zip: Name of Water Service Company: Purchased From: Date of Purchase: Serial Number: Date of Installation: Model Number: Installation Company: Technician: Telephone: 38

: This warranty is void should any part of the Reverse Osmosis system be damaged due to misapplication, neglect, accident, alteration, or installation and operation")

39 2 Year Limited Warranty TWO YEAR LIMITED WARRANTY WOW Water Reverse Osmosis System For a period of 2 (two) years from date of original installation, we will repair or replace any part of this Reverse Osmosis unit that we find to be defective in operation because of faulty material or workmanship. You pay only freight to and from our factory and local labor charges. Warranty does not include filter cartridges and RO membrane. Available for replacement at General Provisions (or Conditions): This warranty is void should any part of the Reverse Osmosis system be damaged due to misapplication, neglect, accident, alteration, or installation and operation contrary to our printed instructions. Damage caused by freezing, flood, fire, or Acts of God are not covered by this warranty. We assume no warranty liability in connection with this Reverse Osmosis System other than as specified herein. This warranty is in lieu of all other warranties, expressed or implied including warranties of fitness for a particular purpose. We do not authorize any person or representative to assume for us any other obligations on the use of the Reverse Osmosis unit. For this warranty to be valid, the following conditions must be met: 1. Microbiologically-safe water supplies. 2. ph cannot be lower than 3 or higher than Water temperature must be between 40 F and 100 F. 4. Total dissolved solids cannot exceed 1500 ppm. 5. Supply line pressure min. 20 psi; max. 125 psi. 6. ALL UNITS MUST BE ON COLD WATER LINES ONLY. Any and all warranties will be immediately void if label or any part of label is removed or if original WOW RO replacement filters are not used Madison Street, Torrance, CA
INSTALLATION & USER MANUAL for Undercounter WOW RO Systems
 INSTALLATION & USER MANUAL for Undercounter WOW RO Systems Place Data Label Here Scan with QR Reader App Visit our website: www.wowwater.com Powered by 23880 Madison Street, Torrance, CA 90505 - (310)
Installation & Service Guide
 Reverse Osmosis Ontario Soft Water.ca Kitchener, Canada 519-579-0500 Installation & Service Guide Pentair 75 gpd Encapsulated Membrane System Standard System 75gpd Membrane Your New Reverse Osmosis System
475 PRO SERIES Reverse Osmosis System Installation & Operation Manual
 PLEASE READ ALL INSTRUCTIONS BEFORE INSTALLING AND USING THIS SYSTEM 475 PRO SERIES Reverse Osmosis System Installation & Operation Manual Model STAGE 1 STAGE 2 STAGE 3 STAGE 4 OUTPUT 475 SEDIMENT CARBON
MKTF CRO-Series 5-Stage Reverse Osmosis System Installation and Maintenance Manual
 MKTF - 215 CRO-Series 5-Stage Reverse Osmosis System Installation and Maintenance Manual Please fill out the following information at the time of installation. Save for future reference. Model: Date Code:
WATER FILTRATION SYSTEM (USF3) OWNER S MANUAL
 OWNER S MANUAL") WATER FILTRATION SYSTEM (USF3) OWNER S MANUAL 1 INTRODUCTION Congratulations on choosing Permatech to improve the quality of your water. You will immediately begin to notice the numerous benefits of having
WATER FILTRATION SYSTEM (USF3) OWNER S MANUAL 1 INTRODUCTION Congratulations on choosing Permatech to improve the quality of your water. You will immediately begin to notice the numerous benefits of having
ULTIMATE REVERSE OSMOSIS SYSTEM
 ULTIMATE REVERSE OSMOSIS SYSTEM INSTALLATION INSTRUCTION & OWNER S MANUAL Ver 3.1 All Rights Reserved APEC Water Systems Please keep this Owner s Manual for future reference. It contains useful information
IMPORTANT! ank You! Model: Twist-In 100 GPD, 3-Stage RO Unit. Installation, Operation & Maintenance Guide
 Twist-In 00 GPD, 3-Stage RO Unit WARNING: Please read carefully before proceeding with installation. Your failure to follow any attached instructions and operating parameters may lead to the product s
Alkaline RO System INSTALLATION MANUAL
 Alkaline RO System INSTALLATION MANUAL 1-800-992-8876 Customer Support Disclaimer All rights reserved. All material published on this site by Express Water Inc., including all portions of the website,
APEX Water Filters MODEL RO 5. Treat your body to pure goodness with Apex filtered water INSTRUCTION MANUAL. pure water in every drop
 APEX Water Filters pure water in every drop MODEL RO 5 INSTRUCTION MANUAL Treat your body to pure goodness with Apex filtered water A Water supply adapter valve B Cold water shut-off valve C Hot water
2-Stage Under Counter Filtration System Model: WP-2 LCV
 INSTALLATION, OPERATION AND MAINTENANCE MANUAL Save manual for future reference 2-Stage Under Counter Filtration System Model: WP-2 LCV IMPORTANT If you are unsure about installing your WATTS water filter,
GROWMAX WATER Perfect Water for Plants and Gardens
 GROWMAX WATER Perfect Water for Plants and Gardens WATER SYSTEMS FOR HYDROPONICS AND GARDENING GROWMAX 3000 Ultra-Pure Reverse Osmosis Water System Up to 3000 L/D of Pure Water Don't forget to register
Installation and Operation Manual
 How To Install, Operate and Maintain Your Reverse Osmosis System FILTER CARTRIDGE CONFIGURATION MAY BE SUBJECT TO CHANGE. 475 PRO SERIES 475BP PRO SERIES INSTALLERS: PLEASE READ ALL INSTRUCTIONS BEFORE
PRF-RO Pentair Reverse Osmosis System Installation and Maintenance Manual SAFETY GUIDES THE BASIC REVERSE OSMOSIS SYSTEM. Tools and Materials Required
 PRF-RO Pentair Reverse Osmosis System Installation and Maintenance Manual SAFETY GUIDES Read and follow all steps and guides carefully before installing and using your reverse osmosis system. Do not use
Reverse Osmosis System OWNERS MANUAL
 APS Water Services Corporation Quick Change, Twist & Loc Reverse Osmosis System OWNERS MANUAL Installation, Operation & Maintenance Sold By : APS Water Services Corp 818-786-0600 NOTE: Please read through
1 P a g e. G4 Counter Top OPERATION MANUAL
 1 P a g e G4 Counter Top OPERATION MANUAL Table of Contents Introduction. 3 Receiving....4 Description Model G3 & G4...5/6 Water Production Flow Chart...7 Positioning the Cooler...8 Water Cooler Connections..9
REVERSE OSMOSIS DRINKING WATER SYSTEM
 REVERSE OSMOSIS DRINKING WATER SYSTEM 10/10 1 2 Introduction To The Sierra Congratulations on your purchase of the Nimbus Sierra reverse osmosis system. When properly maintained, this system will provide
Table of Contents. List of Figures
 1 P a g e Table of Contents Introduction. 3 Receiving....4 Description Model G3 & G4...5/6 Water Production Flow Chart...7 Positioning the Cooler...8 Water Cooler Connections..9 Feed Water Connection....10
5000 Series Bottled Water System by.
 www.xylemflowcontrol.com 2015 Xylem Inc. All rights reserved. Flojet is a trademark of Xylem Inc. or one of its subsidiaries. 81000453 Rev A. 04/2015 5000 Series Bottled Water System by HOW THE SYSTEM
WATERSHIELIJrM REVERSE OSMOSIS INSTALLA TION MANUAL ~ ~ ~ ~ ~ l ~ TO INSURE THIS PRODUCT AND THE INSTALLATION THEREOF. ~ ~ ~ ~ ~
 WATERSHIELIJrM REVERSE OSMOSIS SYSTEM INSTALLA TION MANUAL p 1 ~ -~ I IMPORTANT I ITHIS REVERSE OSMOSIS SYSTEM WAS SOLD IN KIT FORM. IT HAS ~ INOT BEEN PRESSURE TESTED IN ANY WAY. UPON INSTALLATION IT
US Water American Revolution 5-Stage RO System The ONLY RO system on the market that is totally American made!
 US Water American Revolution 5-Stage RO System The ONLY RO system on the market that is totally American made! MEMBRANE POST CARBON PRE SEDIMENT TUBING FAUCET AND MOUNTING KIT FILTER WRENCH DRAIN SADDLE
BOTTLED WATER DISPENSER DISPENSADOR DE AGUA EMBOTELLADA
 BOTTLED WATER DISPENSER DISPENSADOR DE AGUA EMBOTELLADA Line to Refrigerator Ice/Water Dispenser Pump Module Dispenser www.xylemflowcontrol.com Flojet is a trademark of Xylem Inc. or one of its subsidiaries.
INSTALLATION & SERVICE MANUAL
 INSTALLATION & SERVICE MANUAL Countertop Reverse Osmosis Systems Series CT System Tested and Certified by WQA against NSF/ANSI Standard 58 for the reduction of Arsenic, Barium, Cadmium, Copper, Cyst, Hexavalent
IMPORTANT! ank You! Model: Twist-In 100 GPD 4-Stage RO/DI Unit. Installation, Operation & Maintenance Guide
 Model: 54037 Twist-In 00 GPD 4-Stage RO/DI Unit WARNING: Please read carefully before proceeding with installation. Your failure to follow any attached instructions and operating parameters may lead to
REVERSE OSMOSIS DRINKING WATER SYSTEM
 REVERSE OSMOSIS DRINKING WATER SYSTEM 12/12 1 Please fill out the following information at the time of installation. Save for future reference. Model: Sierra NS-1N30-00 Date Code: Install Date: Sold by:
Owner s Manual AQ-RO-BASE. Aquasana OptimH2O Drinking Water System Reverse Osmosis Filtration Technology
 Owner s Manual AQ-RO-BASE Aquasana Drinking Water System Reverse Osmosis Filtration Technology Welcome to the Aquasana experience. You are about to enjoy clean, clear water and the peace of mind that comes
REVERSE OSMOSIS WATER FILTRATION SYSTEM MODEL PB-TLRO4H50T INSTRUCTION MANUAL
 REVERSE OSMOSIS WATER FILTRATION SYSTEM MODEL PB-TLRO4H50T INSTRUCTION MANUAL Pure Blue H20, LLC 13813 Monroes Business Park Tampa, FL 33635 USA www.pureblueh2o.com (844) 787-3148 (844) PURE-1-4-U 2015.02.25
Installation and Operation Manual
 How To Install, Operate and Maintain Your Reverse Osmosis System INSTALLERS: PLEASE READ ALL INSTRUCTIONS BEFORE IN- STALLING AND USING THIS SYSTEM. IT IS RECOMMENDED TO WAIT UNTIL THE ENTIRE SYSTEM IS
TANKLESS REVERSE OSMOSIS SYSTEMS USER S MANUAL
 Water Systems, LLC www.123filter.com Email: sales@123filter.com TANKLESS REVERSE OSMOSIS SYSTEMS USER S MANUAL Model #RCB4T ABOUT THE SYSTEM Reverse Osmosis process is a separation process. Tap water enters
Model #: PT3000T36-GOLD
 Good Water Warehouse Inc. 1700 E Walnut Ave Fullerton CA 92831 (714) 441-2893 (714) 441-0525 FAX Reverse Osmosis System Installation & Service Guide Model #: PT3000T36-GOLD Do not use with water that is
INSTALLATION AND OPERATIONS MANUAL
 MODEL 6001 REVERSE OSMOSIS High Purity Water Production System THREE STAGE Filtration for the reduction of: Organic Matter Total Dissolved Solids (TDS) Suspended Solids Chemical Contaminants Bad Taste
R.O. DRINKING WATER SYSTEM
 R.O. DRINKING WATER SYSTEM INSTALLATION, OPERATION & SERVICE MANUAL IMPORTANT NOTICES: This reverse osmosis system contains replaceable treatment components critical for effective performance. It is the
25 Year Limited Warranty
 REVERSE OSMOSIS APPLIANCE OWNER S MANUAL AND INSTALLATION GUIDE MODELS H2000, H2500, H3000, H3500, LC50P, AND LC100P VERSION 4.4 25 Year Limited Warranty To place the equipment under warranty, the warranty
WATER FILTRATION SYSTEM (RO5) OWNER S MANUAL
 OWNER S MANUAL") WATER FILTRATION SYSTEM (RO5) OWNER S MANUAL 1 INTRODUCTION Congratulations on choosing Permatech to improve the quality of your water. You will immediately notice the numerous benefits of having quality
WATER FILTRATION SYSTEM (RO5) OWNER S MANUAL 1 INTRODUCTION Congratulations on choosing Permatech to improve the quality of your water. You will immediately notice the numerous benefits of having quality
Parasitic Cysts - Cryptosporidium and Giardia, Chemicals, Heavy Metals, Dissolved Salts, Offensive Tastes and Odours, Sediment, Dirt,
 Aqua-Pure is a market leader in water filtration. In addition to our comprehensive range of Domestic Water Purifiers, we design and manufacture an extensive commercial and industrial range of purification
PRO-RO 6-Stage Reverse Osmosis System
 PRO-RO 6-Stage Reverse Osmosis System Rev: 1016 Introduction to the PRO-RO Congratulations on your purchase of the PRO-RO six stage reverse osmosis system. The PRO-RO features a four-stage prefilter,
MODEL FW-2000 OPERATION MANUAL
 MODEL FW-2000 OPERATION MANUAL 1 P a g e Table of Contents Introduction...pg.3 Receiving..pg.4 Description Model H2O- 2000....pg.5 Operation. pg.6,7 Drain Container Operation. p.g.8 Cup Dispenser Operation.p.g.9
5-Stage Reverse Osmosis System
 5-Stage Reverse Osmosis System 41840 McAlby Court, Suite A Murrieta, CA 92562 800-451-9343, FAX 951-894-2801 www.nimbuswater.com 02/09 1 Introduction to the WaterMaker Five Congratulations on your purchase
by Water Purification Supplies
 REVERSE OSMOSIS PURIFIER With Booster Pump by Water Purification Supplies Member, Water Quality Association Read these instructions carefully before using the purifier. Retain these instructions in safe
INSTALLATION MANUAL CRS-3
 INSTALLATION MANUAL CRS-3 12630 US 33 N. Churubusco, IN 46723 Ph. (260)693-1972 Fax (260)693-0602 www.sterlingwatertreatment.com 1 TABLE OF CONTENTS: SECTION I. SECTION II. INTRODUCTION...3 SPECIFICATIONS...3
The High Efficiency Reverse Osmosis Drinking Water System Installation, Operation And Service Manual. + -DLX
 The High Efficiency Reverse Osmosis Drinking Water System Installation, Operation And Service Manual. + -DLX TABLE OF CONTENTS Section I. Section II. Section III. Section IV. Section V. Section VI. Section
WHOLE HOUSE FILTER &
 INSTALLATION, OPERATION AND MAINTENANCE MANUAL Warning Please read carefully before proceeding with installation. Your failure to follow any attached instructions or operating parameters may lead to the
INSTALLATION & SERVICE MANUAL
 INSTALLATION & SERVICE MANUAL Countertop Reverse Osmosis Systems Series CT CT-315 CT-315TFC CT-445 CT-445P CT-D425 CT-D425P CT-550UP 3 STAGE CTA RO SYSTEM 3 STAGE TFC RO SYSTEM 4 STAGE TFC RO SYSTEM 4
TABLE OF CONTENT WARNING: READ ENTIRE MANUAL. FAILURE TO FOLLOW ALL GUIDES AND RULES COULD CAUSE PERSONAL INJURY OR PROPERTY DAMAGE.
 TABLE OF CONTENT I. COMPONENTS AND TOOLS IDENTIFICATION... 3 II. PRE-INSTALLATION... 3 System Location... 4 Site Preparation... 4 Unit Preparation... 4 III. INSTALLATION INSTRUCTIONS... 4 Faucet Installation...
INSTALLATION MANUAL ARS-1
 INSTALLATION MANUAL ARS-1 First Sales, LLC 12630 US 33 N. Churubusco, IN 46723 Ph. (260) 693-1972 Fax (260) 693-0602 1 ARS-1 Manual 141021 TABLE OF CONTENTS: SECTION I. SECTION II. INTRODUCTION AND LIABILITY...3
WATER FILTRATION SYSTEM (RO6) OWNER S MANUAL
 OWNER S MANUAL") WATER FILTRATION SYSTEM (RO6) OWNER S MANUAL 1 INTRODUCTION Congratulations on choosing Permatech to improve the quality of your water. You will immediately notice the numerous benefits of having quality
WATER FILTRATION SYSTEM (RO6) OWNER S MANUAL 1 INTRODUCTION Congratulations on choosing Permatech to improve the quality of your water. You will immediately notice the numerous benefits of having quality
Aquaversa. Installation Guide
 Aquaversa Installation Guide About the Aquaversa Drinking Water System The Multipure Aquaversa Drinking Water System (MP750) is designed for use on the countertop next to the sink, below the sink, or inline
Owner s Manual AQ-RO-3. Aquasana OptimH2O Drinking Water System. Reverse Osmosis plus Claryum Filtration Technology
 Owner s Manual AQ-RO-3 Aquasana OptimHO Drinking Water System Reverse Osmosis plus Claryum Filtration Technology Welcome to the Aquasana experience. You are about to enjoy clean, clear water and the peace
25 Year Limited Warranty
 REVERSE OSMOSIS APPLIANCE OWNER S MANUAL AND INSTALLATION GUIDE MODELS H2000, H2500, H3000, H3500, LC30, LC50, LC100, LC50P, LC100P VERSION 4.1 25 Year Limited Warranty To place the equipment under warranty,
ERO-175. Undersink REVERSE OSMOSIS DRINKING WATER SYSTEM. u Safety Guides u Installation u Operation u Maintenance u Repair Parts
 Undersink REVERSE OSMOSIS DRINKING WATER SYSTEM ERO-175 u Safety Guides u Installation u Operation u Maintenance u Repair Parts EcoWater Systems LLC P.O. Box 64420 St. Paul, MN 55164 TEL (651) 739-5330
Installation and Operation Manual
 Model EP-RO25 How to install, operate and maintain your Reverse Osmosis Drinking Water System Do not return unit to store If you have any questions or concerns when installing, operating or maintaining
INSTALLATION, OPERATION AND SERVICE MANUAL GUARDIAN R.O. DRINKING WATER SYSTEM WITH WATER QUALITY MONITOR MODEL LRO-35
 INSTALLATION, OPERATION AND SERVICE MANUAL GUARDIAN R.O. DRINKING WATER SYSTEM WITH WATER QUALITY MONITOR MODEL LRO-35 Tested and Certified by NSF International against NSF/ANSI Standard 58 for the reduction
Owners Manual FOR REVERSE OSMOSIS SYSTEMS MODEL ET6500 (P/N )
") Owners Manual FOR REVERSE OSMOSIS SYSTEMS MODEL ET6500 (P/N 10-02-1330) Includes: Installation and Service Procedures, Specifications and Operation Guidelines 07\15 RO Manual A TABLE OF CONTENTS Introduction
Owners Manual FOR REVERSE OSMOSIS SYSTEMS MODEL ET6500 (P/N 10-02-1330) Includes: Installation and Service Procedures, Specifications and Operation Guidelines 07\15 RO Manual A TABLE OF CONTENTS Introduction
Owners Manual. Economy RO. Installation, Operation & Service Instructions with Parts List Economy Reverse Osmosis Drinking Water System
 Owners Manual Economy RO Installation, Operation & Service Instructions with Parts List Economy Reverse Osmosis Drinking Water System Models: RO75, RO75BP Canada West 855 Park St., Unit 1 Regina, SK S4N
Installation and Operation Manual
 Installation and Operation Manual Canature North America Inc. How To Install, Operate and Maintain Your Reverse Osmosis System FILTER CARTRIDGE CONFIGURATION MAY BE SUBJECT TO CHANGE. 475 PRO SERIES 475BP
The Coffee Professor Reverse Osmosis System Model Genesis Cafe
 The Coffee Professor Reverse Osmosis System Model Genesis Cafe Congratulations on your purchase of the most advanced water purifier system available! Installation and Service Guide PLEASE READ THIS MANUAL
WM-450-PT WM-900-PT Commercial Wall Mounted Reverse Osmosis
 WM-450-PT WM-900-PT Commercial Wall Mounted Reverse Osmosis Installation And Service Manual Watts Pure Water 1725 W. Williams Dr. C-20., Phoenix, Arizona 85027 Phone: 888-774-7405 Fax: 602-588-0356 www.wattspurewater.com
INSTALLATION INSTRUCTIONS
 Please read carefully and retain for future reference. CONTENTS 1. Important Information 2. Included Parts 3. Filter Head Assembly Instructions 4. Installation Instructions 4.1. Auxiliary Tap Connection
OWNER S MANUAL AND INSTALLATION GUIDE PLEASE READ THIS MANUAL CAREFULLY BEFORE ATTEMPTING INSTALLATION
 ClearChoice Economy Under Sink Drinking Water System OWNER S MANUAL AND INSTALLATION GUIDE PLEASE READ THIS MANUAL CAREFULLY BEFORE ATTEMPTING INSTALLATION Congratulations on the purchase of your ClearChoice
Model MRO-35 INSTALLATION, OPERATION & SERVICE MANUAL
 Millennium Reverse Osmosis Drinking Water System Model MRO-35 INSTALLATION, OPERATION & SERVICE MANUAL Tested and Certified by NSF International against NSF/ANSI Standard 58 for the reduction of the claims
Installation, Operation & Service Instructions with Part List. Quick Change Reverse Osmosis Drinking Water System
 Installation, Operation & Service Instructions with Part List Quick Change Reverse Osmosis Drinking Water System Model No. QCRO4V-50 www.pura.com This system certified by WQA according to NSF/ANSI 58 for
REVERSE OSMOSIS DRINKING WATER SYSTEM
 REVERSE OSMOSIS DRINKING WATER SYSTEM INSTALLATION, OPERATION & SERVICE MANUAL Drink With Confidence! TABLE OF CONTENTS SECTION I. Page INTRODUCTION...3 SECTION II. SPECIFICATIONS...4 SECTION III. SECTION
Tap Master Artesian Hydro Gardener Series Installation & Service Manual
 Perfect Water Technologies 7 Tips for an Easy and Successful Installation 1. Keep it simple - there are 3 connections to make, and the tubing is color coded. 2. Have plenty of time, light, space, and towels
1 P a g e MODEL G5CT COUNTER TOP OPERATION MANUAL
 1 P a g e MODEL G5CT COUNTER TOP OPERATION MANUAL Table of Contents Introduction...pg.3 Receiving..pg.4 Description Model G5CT Counter Top.......pg.5 Operation. pg.6,7 Positioning the Cooler....pg.8 Water
REMOTE FAUCET PUMP SYSTEM
 REMOTE FAUCET PUMP SYSTEM Use & Care Guide See Important Safeguards on Page 2 An exclamation point within an equilateral triangle is intended to alert user to the presence of important operating and maintenance
HIGH EFFICIENCY RO. attached instructions or operating parameters may lead to the product s failure. Keep this Manual for future reference.
 Owners Manual HIGH EFFICIENCY RO Installation, Operation & Service Instructions with Parts List H.E.R.O. Drinking Water System Models: H.E.R.O. s Please read carefully before proceeding with installation.
Installation & Service Manual
 Installation & Service Manual Table of Contents Unpacking & Inspection... 2 Basic Guidelines... 2 Specifications... 3 Before Starting Installation Where to install the filter... 4 Tools, pipe, fittings
AQUA ONE. Reverse Osmosis System Model ARO5000. Installation and Service Guide PLEASE READ THIS MANUAL CAREFULLY BEFORE ATTEMPTING INSTALLATION
 AQUA ONE Reverse Osmosis System Model ARO5000 Congratulations on your purchase of the most sophisticated water purifier system available! Installation and Service Guide PLEASE READ THIS MANUAL CAREFULLY
Installation Instructions Residential Reverse Osmosis Drinking Water System
 Your Reverse Osmosis System has been tested to ensure it will operate correctly. The following periodic maintenance is recommended so your system will provide years of trouble-free service: Replacement
PRO 48 INSTALLATION INSTRUCTIONS
 PRO 48 INSTALLATION INSTRUCTIONS CONTENTS PRO 48 Installation Recommendations 3 PRO 48 Overall Dimensions 4 PRO 48 Installation Specifications 5 PRO 48 Installation Instructions 6 PRO 48 Installation Checklist
ispring Whole House Water Filter Systems USER S MANUAL
 ispring Whole House Water Filter Systems USER S MANUAL Version 2014-5 Introduction Congratulations on your purchase of the ispring Whole House Water Filter system. Featuring a three-stage filtration process,
Green Water Systems OWNERS MANUAL. Includes: Installation Procedures, Warranties, Service & Operation Guidelines.
 Green Water Systems OWNERS MANUAL Includes: Installation Procedures, Warranties, Service & Operation Guidelines. GS Elite GS PRO GS1 1 Cu. Ft. S. C. S. GS1.5 1 Cu. Ft. S. C. S. GS2 2 Cu. Ft. S. C. S. 7000
One Less Thing to Forget...
 Installation Guide One Less Thing to Forget... Sign up now for cartridge auto-renew and save 10%! Stop stressing about when to purchase your next nuvoh2o replacement cartridge. Sign up for our auto-renew
DWSB-TFC-50 DWSB-50-PUMP
 INSTALLATION MANUAL DWSB-TFC-50 DWSB-50-PUMP 12630 US 33 N. Churubusco, IN 46723 Ph. (260)693-1972 Fax (260)693-0602 www.sterlingwatertreatment.com 1 TABLE OF CONTENTS: SECTION I. SECTION II. INTRODUCTION...3
Whole House Filter Model: WH-LD
 INSTALLATION, OPERATION AND MAINTENANCE MANUAL Save manual for future reference Whole House Filter Model: WH-LD! WARNING Please read carefully before proceeding with installation. Your failure to follow
Owners Manual. For Reverse Osmosis Systems MODEL ET4000 ET5000 P/N
 Owners Manual For Reverse Osmosis Systems MODEL ET4000 ET5000 P/N -30-0 -320-0 Includes: Installation and Service Procedures, Specifications and Operation Guidelines A TAE OF CONTENTS Introduction... 2
Installation Guide Europa
 Installation Guide Europa One Less Thing to Forget... Sign up now for cartridge auto-renew and save 10%! Stop stressing about when to purchase your next nuvoh2o replacement cartridge. Sign up for our auto-renew
INSTALLATION INSTRUCTION Ver
 ispring Reverse Osmosis Water Filter Systems INSTALLATION INSTRUCTION Ver 2005-6 Copyright 2005-2015 ISPRING WATER SYSTEMS, LLC. All rights reserved. Please keep this owner s manual for future reference.
3-STAGE WATER FILTRATION SYSTEM INSTALLATION INSTRUCTION & OWNER S MANUAL
 3-STAGE WATER FILTRATION SYSTEM INSTALLATION INSTRUCTION & OWNER S MANUAL Ver 1.2 All Rights Reserved APEC Water Systems Please keep this Owner s Manual for future reference. It contains useful information
3-STAGE WATER FILTRATION SYSTEM. INSTALLATION INSTRUCTION & OWNER S MANUAL Ver 1.5
 3-STAGE WATER FILTRATION SYSTEM INSTALLATION INSTRUCTION & OWNER S MANUAL Ver 1.5 www.freedrinkingwater.com All Rights Reserved APEC Water Systems Please keep this Owner s Manual for future reference.
L24TWS. Beverage Tower Kit Components. L24TWD Lynx Beverage Kits Model L24TWS Single Tower and L24TWD Double Tower
 Installation, Care and Use of Your Lynx Beverage Tower Kits MOM FRIENDLY. DAD READY. L24TWS Beverage Tower Kit Components L24TWD Lynx Beverage Kits Model L24TWS Single Tower and L24TWD Double Tower Introduction:
DELUXE COLLECTION Executive Filtered Water Cooler AQP-WCM-FBOT4
 DELUXE COLLECTION Executive Filtered Water Cooler AQP-WCM-FBOT4 Congratulations on your purchase of an Aquaport Executive Filtered Water Cooler This unit is easy to install and provides great tasting chilled
Advanced Two-Stage Drinking Water Filter
 OWNER'S MANUAL E L I T E Advanced Two-Stage Drinking Water Filter MODEL NO. 625.385010 Caution: Read and follow all safety rules and operating instructions before first use of this product. Questions?
USER S MANUAL. For use with the following systems: Flow Diagram for 5, 6 or 7-Stage Reverse Osmosis Water Systems (no pump)
") USER S MANUAL Version 2013-1 For use with the following systems: Residential Units (no pump) Residential Units with Booster Pump Commercial Units (with Booster Pump) RCC7, RCC7D, RCC7U, RCC7AK, RCC7AKUV
USER S MANUAL Version 2013-1 For use with the following systems: Residential Units (no pump) Residential Units with Booster Pump Commercial Units (with Booster Pump) RCC7, RCC7D, RCC7U, RCC7AK, RCC7AKUV
CELDEK Evaporative Cooler Module Installation, Operation, and Maintenance Manual. CELDEK Evaporative Cooler
 CELDEK Evaporative Cooler Module Installation, Operation, and Maintenance Manual CELDEK Evaporative Cooler RECEIVING AND INSPECTION Upon receiving unit, check for any interior and exterior damage, and
RO.. DRINKING WATER SYSTEM
 MICROLINE RO.. DRINKING WATER SYSTEM MODEL C. T. A. - 3 INSTALLATION, OPERATION & SERVICE MANUAL IMPORTANT NOTICES: This reverse osmosis system contains replaceable treatment components critical for effective
NSRO42C4. How to Install, operate and maintain your Reverse Osmosis Drinking Water System
 NSRO42C4 How to Install, operate and maintain your Reverse Osmosis Drinking Water System If you have any questions or concerns when installing, operating or maintaining your Reverse Osmosis System call
Please read the following installation instructions first after purchasing this product or transporting it to another location.
 9 Installation Overview Please read the following installation instructions first after purchasing this product or transporting it to another location. 1 Unpacking your refrigerator 2 Choosing the proper
PWC-500/1000/1010/1500
 SERVICE MANUAL for by Vertex Model PWC-500/1000/1010/1500 P/N man-7008 Table of Contents 1. Introduction 2. Cooler Set-up 3. Remove Top Cover 4. Remove/Replace Float 5. Remove/Replace Hot Tank 6. Faucet
Owner's Manual & Installation Guide
 NS-1N30 REVERSE OSMOSIS DRINKING WATER SYSTEM Owner's Manual & Installation Guide 288 Distribution Street San Marcos, CA. 92078-4538 800-824.4915 Email: sierra@nimbuswater.com 1 A OWNER'S MANUAL About
R.O. Drinking Water System Model No. UltroWater INSTALLATION, OPERATION & SERVICE MANUAL
 R.O. Drinking Water System Model No. UltroWater INSTALLATION, OPERATION & SERVICE MANUAL Tested and Certified by NSF International against NSF/ANSI Standard 58 for the reduction of the claims specified
Installation & Operating Guide
 HOT WATER DISPENSER Installation & Operating Guide Read all instructions thoroughly. Keep this guide for future reference. Proof of purchase is required for Warranty. Staple receipt or proof of purchase
PWC 7000 PureWaterCooler SERVICE MANUAL. for. PureWaterCooler by Vertex Model Copyright 2012 Vertex Water Products
 SERVICE MANUAL for by Vertex Model 7000 Table of Contents 1. Introduction 2. Cooler Set-up 3. Top Cover Removal 4. Remove/Replace Mechanical Float Valve Assembly 5. Removing/Replacing Control Panel and
INSTANT HOT WATER DISPENSER
 INSTANT HOT WATER DISPENSER Tank Installation Materials required (not provided) 2 mounting bracket screws (and 2 plastic anchors if attaching to drywall) Shut-Off valve and T fitting Components When you
R.O. DRINKING WATER SYSTEM MODEL T.F.C
 M I C R O L I N E R.O. DRINKING WATER SYSTEM MODEL T.F.C. - 335 INSTALLATION, OPERATION & SERVICE MANUAL Tested and Certified by NSF International against NSF/ANSI Standard 58 for the reduction of the
CP-JR STILL WATER CHILLER SYSTEM DESCRIPTION
 CP-JR STILL WATER CHILLER SYSTEM DESCRIPTION Congratulations on the purchase of your Crysalli system. The Crysalli CP-JR-SW Still Water chiller, with CR-12FC Water Filter System are a configuration designed
Water Softener Installation / Operation Manual
 Water Softener Installation / Operation Manual BrassMaster and BrassMaster Plus Technical Video Library: http://watercontrolinc.com/residential-technical-support/residential-technical-videos BrassMaster
WL380 QUICK START GUIDE
 WL380 QUICK START GUIDE WARNING! Only trained and qualified technicians should attempt to install, maintain, or service Waterlogic equipment. Failure to follow all instructions in this manual could result
Reverse Osmosis Install Guide
 Reverse Osmosis Install Guide Written by 602abcWATER Start Here Step 1 Con irm All Product Components Open your packages and con irm that you have received all the correct components. If you are missing
Installation, Operation and Maintenance Manual AQPC-35. TFC Reverse Osmosis Drinking Water System
 Installation, Operation and Maintenance Manual AQPC-35 TFC Reverse Osmosis Drinking Water System Tested and Certified by NSF International against NSF/ANSI Standard 58 for the reduction of the claims specified
Owner's Manual. Whole House Water Softener with Triton Electronic Control Valve. or call
 Owner's Manual SoftMAX Whole House Water Softener with Triton Electronic Control Valve ACTIVATE YOUR WARRANTY BY REGISITERING YOUR PRODUCT AT WWW.WATERTECH.COM or call 888-254-8412 Dealer Contact and Product