PROGRAMMABLE THERMOSTAT
|
|
|
- Irene Robinson
- 5 years ago
- Views:
Transcription
1 RAMMABLE THERMOSTAT
2 ! PLEASE TAKE A TIIME TO READ THE INSTRUCTII IONS FIRST.. This thermostat has been designed to provide you with years of trouble free service. Proper understanding of any product is the key to successfully using it. By spending only a few moments reading through this manual, you will become acquainted with the many features built into this thermostat. Following the procedures listed within this manual will minimise the chance of damaging the thermostat or any of the equipment it controls. Take special notice of all! NOTES as these contain import information and safety tips. 3
3 CONTENTS Technical Information 4-5 Technical Specifications 4 Application Chart 5 Tools Required 5 Installation 6-11 Jumper & Switch Settings 6 Installing Batteries 6 Setting Day & Time 7 Locating Thermostat 8 Pre Wires & Wall Mount 10 Mount new Thermostat Base 11 Wiring Diagrams Heating Only 12 Cooling Only 13 Heat & Cool 4 or 5 Wire 14 New or Unreferenced 16,17 Programming Program Operation 18 Program Periods Chart 19 Reviewing Programs 20 Changing Programs 21 Features Set Temperature Swing 22,23 Energy Usage Monitor 24,25 Manual mode / Hold 26 Temporary Override 27 Comfort Override 1-9 hours 28 Fitter Change Reminder 29 Low Battery Indicator 30 Troubleshooting 31, Back Resetting & Assistance 31 4
4 PHYSICAL DIMENSIONS 89MM X 143MM X 36MM ELECTRICAL LOAD LIMIT 1.0 amps at 24 Vac COMPRESSOR PROTECTION DELAY 4 Minutes TEMPERATURE DISPLAY Celsius TIME DISPLAY 12 Hour TEMPERATURE DIFFERENTIAL CELSIUS Preset =1.5º: 1º above, 0.5º below setpoint Selectable 0.5º to 9º: +0º to 4.5º, -0º to 4.5º TEMPERATURE ADJUSTMENT 1º Steps DISPLAY RANGE 0º to 37ºC ±1ºC CONTROL RANGE 7º to 35ºC SYSTEM SWITCH 3 Position (COOL OFF HEAT) SAMPLING RESOLUTION 1 Minute Interval RAMMING RESOLUTION 10 Minutes Steps (factory option 5 min) RAMMING PERIODS (Comfort Presets) Monday Friday: 4 Periods per Day Saturday: 4 Periods per Day Sunday: 4 Periods per Day OPTIONAL RAMMING PERIODS (Govt. Presets) Monday Friday: 6 Periods per Day Saturday: 6 Periods per Day Sunday: 4 Periods per Day 5
 Bit (if using anchors) Wire Strippers or Knife Masking Tape & Pen (for")
5 TOOLS REQUIRED: #1 Phillips Screwdriver (small) Drill with 3/16 (4.8mm) Bit (if using anchors) Wire Strippers or Knife Masking Tape & Pen (for labelling wires) 6

6 You will need to remove the Base Plate to gain access to the Battery Compartment and Jumper Section. While holding the thermostat face in the palm of your hand, press in on release button with your thumb. Hold on to the base plate firmly with your other hand by placing your fingers in the holes on the back of the thermostat. Keeping release button pressed in, swing thermostat away from base. When remounting the thermostat face to the base plate, hook the top of the face onto the top of the base plate. Swing the face down until the face snaps into the base. Press in on the face, firmly, in the middle, to seat the terminal pins. This is necessary to secure face! 7
7 You have two choices. You may wish to go ahead and install the batteries and explore the many feature and functions of you new thermostat. If so, the Base Plate must be replaced before you open the front door of the thermostat Face. The Base acts as the hinging mechanism for the door. Skip the installation section for now and get acquainted with your new thermostat. - OR - You may be ready to mount the Base Plate on the wall. Just set the thermostat face aside in a safe location to protect the electronics. Do not open the front door with the Base Plate removed, as it acts as the hinge. For mow, skip the Setting Clock section and proceed with Install. You ll need to come back to this section once you ve installed the batteries and hung the thermostat on the wall. 1 DAY & TIME To begin setting the clock press the button (it may require a second press If you just installed the batteries). The day of the week will start flashing. Use the and buttons to choose the current day. Press DAY & TIME to set the hour; the display will flash the hours digits. 2 Use press the flashing. the and buttons to select the current hour. To continue, DAY & TIME button to set the minutes. The minutes in the display will start 8
8 3 DAY & TIME Use the and button to select the current minute. Will continue cycling through the options. To return to normal operation press the.the display will stop flashing. DAY & TIME 9
9 ! THERMOSTAT LOCATION Proper location of the thermostat is very important to insure a comfortable temperature. Observe the following general rules for best results. 1. The thermostat should be on the inside wall of a room that is open used, approx. 5-ft. (1.5m) above the floor. 2. Avoid areas that exhibit unusual heating or cooling conditions such as in direct sunlight, near a fireplace, stove, register, door, window, or stairwell. 3. Be aware of furnishings which may block airflow or alter temperature such as: sofa, chairs, bookcases, track lighting, lamps, stereo components, television sets. 4. Hot water pipes in the wall, a stove, refrigerator, or fireplace on the other side of a prospective wall may affect the accuracy of your thermostat. 5. Location any control in a damp area will cause corrosion, and shorten the life of the control. 6. Do not install where air circulation is poor (ie, in a corner, or an alcove, or behind an open door). 7. All construction work and painting should be complete before installing unit. 8. This thermostat does not require levelling. 10
10 ! To avoid electrical shock and to prevent damage to the Furnace, air conditioner, and thermostat, disconnect the power supply before beginning work. This can be done at the fuse box, at the circuit breaker, or at the appliance. 1 Labelling each wire with its terminal designation. Make sure the wires do not fall back inside the wall. 2 Strip the insulation approx. 3/8-in. (9.5mm) from the ends of the wires. Inspect wire ends and clean off any corrosion that may be present. 3 Fill wall opening with non-combustible insulation. This will prevent drafts from affecting the thermostat. This will also help hold the wires in place. 4 While holding the thermostat face in the palm of your hand, press in on release button with your thumb. Hold the base plate firmly with your other hand by placing your fingers in the holes on the back of the thermostat. Keeping release button pressed in, swing thermostat away from base. 11
11 .! BE CAREFUL NOT TO DROP THE BODY OR TO DISTURB ELECTRONIC PARTS. LEAVE THE COVER CLOSED OR REMOVED WHILE THE BODY IS REMOVED FROM THE BASE. 5 When mounting the thermostat to a soft material, like plasterboard, where the screws will not make new mounting holes. Using the thermostat base as a guide, mark the screw locations on the wall. 6 Drill a 3/16-inch hole at each of the screw locations, and insert a plastic anchor into each. 7 Hold thermostat base against the wall, with the wires coming through wherever is convenient for wiring. Route the wires above the terminal strip. Position the base for best appearance (hiding any marks from the old thermostat). Attach the base to the wall with the two provided screws. 12
12 8 Attach wires to terminal screws using the appropriate wiring diagram from the following pages. If you are unsure as to which diagram to use, please contact a local qualified heat & air contractor for assistance. HEATING SYSTEMS Heating Element or Burner Relay Heating System 13
13 COOLING SYSTEMS * If both Y and C wires are present, tape of C wire. Cooling System Transformer Fan Relay Cooling Compressor Relay 14

14 HEAT & COOL SYSTEMS HEAT & COOL SYSTEMS Heating Element or Burner Relay Heating System Transformer Cooling System Transformer Fan Relay Cooling Compressor Relay The thermostat you have purchased is a programmable type, which simply means that it has a built in clock and can change temperature settings automatically throughout the day. This may be confusing at a glance, but there are some very good reasons why this may be desirable. For example, let s say you live in a area where it is cold outside, and you have your heating system running to heat up the inside temperature to 70 o F. This a comfortable temperature in the house when you re sitting around with your family. But it uses a lot of electricity or gas to maintain that temperature all day, when you are at work a good part of that day. 15
15 With a programmable thermostat you can set the temperature back, perhaps to 60 o, while you are away at work, and to 65 o at night you are sleeping and still have it set to a comfortable level during the times that you are relaxing at home. This example could obviously be reversed for conditions where it is hot outside and you are having to cool indoors, by setting temperatures up to higher levels during periods of absence or sleep. An efficient heat and air system should kick on, or cycle, four to six times an hour while maintaining one set of temperature. However, if the temperature has been set back to a lower level or set up to a higher level, the unit will have to run much longer to recover to the comfort level. The big question here is, how many degrees can you set the temperature back to keep the heat from cycling on when you don t need it, and still be able to bring the temperature back up to your comfort level without the heating unit having to run excessively? Many factors will effect this balance; How big is the difference between outside and inside temperature? How efficient is your heating or cooling unit? How big is your house? How well insulated is your house? How many and what hours are you away from home? How many and what hours do you sleep? The pre-programmable set of times and temperatures within your new thermostat can be altered to better match your needs if you so desire. Be sure to also read the section on the Usage Monitor for more information on determining the best settings for your situation. 16
16 Pre- Programmed Times and Temperatures Program System Switch on Heat System Switch on Cool Period 12 Hours o C 12 Hours o C Weekday am 20 o C 5.00 am 24 o C Program am 14 o C 7.00 am 29 o C pm 20 o C 3.00 pm 24 o C 5 Day pm 14 o C pm 29 o C Saturday am 20 o C 7.00 am 24 o C Program am 20 o C 7.15 am 24 o C pm 20 o C 6.00 pm 24 o C 1 Day pm 14 o C pm 29 o C Sunday am 21 o C 7.00 am 24 o C Program am 21 o C 7.15 am 24 o C pm 21 o C 6.00 pm 24 o C 1 Day pm 14 o C pm 29 o C B 17
17 By following these simple steps you will be able to customise your new thermostat to better meet your needs. THE DATE & TIME MUST HAVE BEEN SET AS DESCRIBED IN THE EARLIER SECTION Within this thermostat are two separate sets of memories; one for heating control, and one for cooling control. This switch must be set to heat to access the heating memory or to cool to access the cooling memory. The system switch must be set prior to reviewing or changing programs. To review and NOT CHANGE a program memory, just press the W-DAY SAT specific program you wish to enter or or. SAT The display should change to the 1 st period (P1) and show the Start Time and the Temp Set for P1. Each subsequent press of the program button steps the display to the next period (P1, P2, P3 ) Each period contains a time and a temperature. The thermostat will change to that temperature at this time. However, it may take some time to achieve the set temperature (see Theory of Operation). When you have finished reviewing the program(s), press to return the display to normal.. If no key is pressed for 30 secs, the display will return to normal automatically. 18
18 READ ENTIRE STEP S DIRECTIONS BEFORE BEGINNING STEP SET & RETURN SET & RETURN To CHANGE a program memory, press and hold, then press the specific program you wish to enter or or. W-DAY SAT The display should change to the 1 st Period (P1) with the Start Time flashing. You may release the button now. SUN Use the button to set the time forward. Use the button to set the time back. When you have the new Start Time correct, or if the Start Time did not require changing, press the same program button or or again to move to the Set Temperature. W-DAY SAT SAT or Use the and buttons to adjust the temperature. When you have the new Set Temperature correct, or if the Set Temperature did not require changing, press the same program button or again to move to the Start Time for the 2 nd W-DAY SAT Period (P2). SUN Use the and buttons to make adjustments where necessary. Continue cycling through each period s Start Time, and then Set Temperature by pressing the same program button or or W-DAY SAT SUN When you have finished making adjustments to this program, press the button to return to normal operation. SET & RETURN Temperature Swing is the term given to the amount the thermostat will allow the temperature to vary from the Set Temperature. This feature allows you to decide how closely the thermostat will control the temperature in the room. The less time the unit (heating or cooling) runs, the less money you spend on utilities! 19
19 Your new thermostat comes to you preset to allow the room temperature to climb 2 o F above the Set Temperature, and then will let it fall 1 o F below the Set Temp. This has been found to be a balance between energy savings and comfort for most average people. For example, it s winter, the Heating unit is running and has just brought the room temperature up to 70 o F. You have your new thermostat set to 70 o F, and have not altered the preset Temp Swing. The heating unit will continue running until the room temperature reaches 72 o F before shutting off. The temperature will then begin to fall, and will continue falling until the heating unit kicks back on when the room temperature falls to 69 o F. In this example you have a total Temp Swing of 3 o F, 2 o F on the Hi side and 1 o F on the Lo side of the Set Temp. Your new thermostat gives you a very high level of control over Temp Swing by having separate Hi side and Lo side settings. This allows you to control not only the size of the Temp Swing, but also it s placement in relation to the Set Temperature. Let s say, you set your thermostat at 70 o F. You set the Temp Swing Hi setting to +3 o F and a Lo setting to -1 o F. Your room s temperature would be allowed to vary from 69 o F to 73 o F. Temp Swing is adjustable from 0 o F to 9 o F on both Hi and Lo side, giving you a total swing of from 1 o F to 18 o F (both Hi & Lo may not be set to 0 o F). Which settings will work best in your home, controlling your heating and cooling units, can best be determined by simple experimentation. Also, see the section Usage Monitor later in this manual. To review and NOT CHANGE the temp. Swing Just Press the TEMP TEMP SWING. The display should change to show the Hi setting. SET & Press the SWING again to view the Lo setting. Press RETURN to return to normal operation ( the unit automatically returns if no key is pressed for 30 secs). 20
20 To CHANGE the Temp Swing, press and hold, SET & RETURN then should press TEMP SWING.The display should change and have the current Hi setting flashing. You may release the now. SET & RETURN button Use the Use the Temp When you have set the Hi side, press button to increase the number of degree above Set Temp. button to decrease the number of degrees above Set TEMP SWING to move on to Lo side setting. Use the Use the button to increase the number of degrees below Set Temp. button to decrease the number of degrees above Set Temp. When you are satisfied with your settings press normal operation (automatic if no key is pressed for 30 seconds). SET & RETURN to return to After adjusting the Temperature Swing and/or Program Times & Temps. You must have a way to determine if indeed these new settings are lowering your energy usage. This is where the Usage Monitor comes in. The Usage monitor feature has been provided to better equip you to fine tune the efficiency of your heating and cooling systems. Displaying the total number of hours and minutes the heating and cooling systems were during a period of time can act as a guide or measuring stick by which you can judge the efficiency of your current settings. You can check the usage for each five different periods (each period of time is measured from midnight). The first two periods (today and yesterday) are provided just to give you a quick check of your settings. If after making changes early this morning, your unit was on for a significant amount more times today than yesterday, and weather conditions were similar, then your changes would have lessened your efficiency. 21
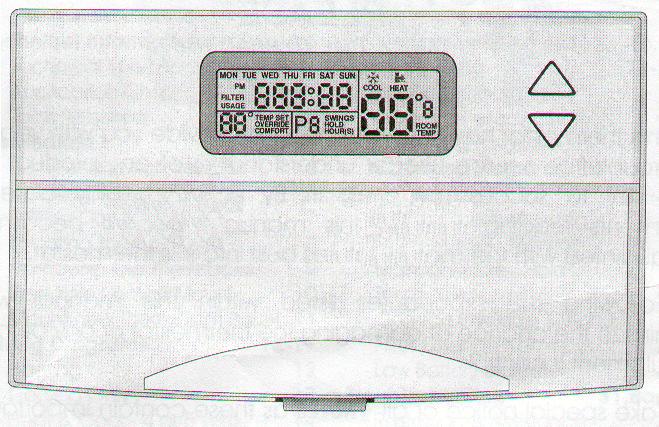
21 A more accurate approach will use the third and fourth period (this week and last week) readings. The week begins with Sunday. So you have made your changes to the settings late Saturday night. The next week the thermostat operates using the new settings. Late Saturday night you check the usage for this week and last week. You can see which settings were better by which week shows less time. For this next method you must know when your utility meter is read and keep track of your usage until the utility company again reads your meter. Since your usage monitor s longest period in the past two weeks (which starts wit Sunday) you would have to record the usage each day in a log and total it when the meter was again read. You would then contact the utility company and ask how many Degree Days (days adjusted for weather conditions) there were in this reading period. By dividing the number of Degree-days into the Total Usage Hours you will get a number. The smaller the number the better! The Usage Monitor began counting the number of hours in an on condition as soon as the batteries were installed. To reset the Usage counter to zero, press and hold press SET & RETURN USAGE for three seconds. To return to normal operation, or wait for 30 secs for automatic return. Each press of the UASGE button cycles the display to show one of the five available periods. Watch the days of the week at the top of the display to see which period is being displayed. The display will light each day that is included in this recording period. The fifth period however, is for the past two weeks and only displays the current day of the week. To return press To the right we have included a sample display for each period. SET & RETURN 22

22 SET & RETURN HOLD By simply pressing the button you can place your new thermostat into Manual Operation Mode, where you set the desired temperature and it is maintained. The Hold indicator will light on the display conforming that you have entered Hold mode. The and buttons are used to adjust the temperature. At anytime you can return to the Program controlled mode by pressing. 23
23 This Manual Mode is more desirable in some cases. You may feel more comfortable with a conventional thermostat. Or, you may have experimented with different programmed times and temperatures, and discovered that you are not achieving the level of savings or comfort that you had hoped for. This may be due to the amount of insulation in your home, or a heating or cooling system that may have too slow of a recovery rate to allow for setting the temperature back or forward. Your lifestyle or job may have your home occupied so much of the time that it is simply impractical to have the temperature vary at times. It may also be that you find that you are not maintaining the level of comfort you are used to from a constant temperature. Regardless of the reasons, your new thermostat can still provide you with years of service, while providing you with many features not available in conventional thermostats. A Temporary Override has been provided to allow you to change the temporarily change the temperature without altering the thermostat s program. The thermostat will use the new temperature setting during the duration of this program period. At the start of the next program Period, the override will be cancelled and the thermostat will return to the temperatures stored within the program. To activate the Override all you need to do is adjust the temperature using the and buttons. The override indicator will light up just beside the set temperature (Temp Set). In approx. 18 seconds the display will begin to alternate between the current time and the number of hours and the minutes until the start of the next program period. This is the amount of time your override will be in effect. 24
24 If the time remaining until the next program period is not practical for your needs, such as, you have friends over and the house is getting too warm, so you override the temperatures to lower it. The display shows the override will last for an hour and two minutes. Your company may be staying little longer than an hour or two. You would be better off using Comfort Override (see the next section). As always, you may return to the Program mode at the time by pressing SET & RETURN Comfort Override allows you to change the temperature for a specific number of hours (from one to nine) without altering the thermostat s program. The thermostat will use the new temperature setting for the specified amount of time, then the thermostat will return to the temperature stored within the program. To activate Comfort Override you begin the same as for Temporary Override. Simply adjust the set temperature (Temp Set) using the and buttons. The Override indicator will light up just as it does with Temporary override. You now have approx. 18 seconds to enter the desired length of time by pressing the button once for DAY & each hour the new Temp Set TIME should be in effect. The display indicator will now change to Comfort and the Hours will flash. After about 18 seconds the display will begin to alternate between the current time and the number of hours and minutes your override will be in effect. As always, you may return to the Program mode at any time by pressing SET & RETURN 25
25 Probably the most important maintenance you will need to perform on your heating and cooling system is changing the air intake filter(s). This can affect your system efficiency greatly! For this reason your new thermostat comes with a built in timer to assist you in keeping up with the number of hours your unit has been running since your last filter change. Upon receipt of the thermostat, the Filter indicator is lit to remind you to check your filter(s). The Filter indicator is present to light after 250 hours of use. Your needs may vary from this number. If your filter(s) seem excessively dirty when you change them, you should lower the reminder time. Remember, clean filters are important. You can check the Filter timer at any time just by pressing the FILTER button. The display will change to show the total hours and minutes of use since the last filter timer reset. Remember to always reset your filter reminder when you change filter(s)! To reset the Filter counter to zero, press and hold FILTER for three seconds. To return to normal operation press SET & RETURN, or wait for 30 secs for automatic return. To change the number of hours before the Filter reminder lights, press SET & RETURN and hold the button, and then press The display will begin to flash. FILTER, 26

26 Press and hold the button to increase the time. Press and hold the button to decrease the time. Press to save the settings and return to normal operation. As the batteries within your thermostat begin to weaken, you will notice the LCD display begin to dim. The thermostat will continue to function properly, however the display will become increasingly harder to see. The time, programs, and all modifications you have made to temperature swings, filter timing, etc. are saved by the batteries. When the batteries become too low, the thermostat will replace the room temperature in the display with the word Lo. When this appears you will need to replace the batteries as soon as possible. From the time you remove the batteries from the thermostat, you will have approx. 45 seconds to install fresh ones. You will need to remove the face from the wall mount to gain access to the Battery Compartment. Push up on release button with your thumb. Keeping release button pressed in swing thermostat in swing thermostat out and away from the base. 27
27 When remounting the thermostat face to the base plate, hook the top of the face onto the top of the base plate. Swing the face down until the face snaps into the base. Press in on the face, firmly, in the middle, to seat the terminal pins. This is necessary to secure face! In the event that the thermostat begins to perform erratically or unexpectedly, use a small blunt object to press the button. This will return the thermostat to Α all preset programs and RESET options. You will need to reprogram any customised options. If you should encounter any difficulties in the use of this thermostat, whether they be in operation or understanding, please contact the company who selected this quality thermostat for you. This would most likely be the contractor who installed your heating and cooling systems. If you purchased this thermostat yourself and need assistance, or if you are unsure of who installed it, you may be able to get help from any local heating and cooling contractor. They can best assist you as they have the equipment and can investigate your problem first hand! For any further information please contact
FOR BOTH CONVENTIONAL AND HEAT PUMP SYSTEMS INSTALLATION AND OPERATING INSTRUCTIONS IMPORTANT!
 PSP721U SMART TEMP UNIVERSAL PROGRAMMABLE THERMOSTAT FOR BOTH CONVENTIONAL AND HEAT PUMP SYSTEMS INSTALLATION AND OPERATING INSTRUCTIONS 52033 IMPORTANT! Please read all instructions carefully before beginning
Smart Temp. Model
 Smart Temp Model 42-160 SINGLE STAGE PROGRAMMABLE THERMOSTAT 1 Heat / 1 Cool Single Stage Thermostat. 5+2 Programmable, Compatible with Gas Heat & Heat Pump System Installation and Operation Manual SPECIFICATIONS:--------------------------------------------------------------------------------
OWNERS MANUAL YEAR LIMITED WARRANTY READ ALL INSTRUCTIONS BEFORE PROCEEDING. Store this booklet for future reference
 5100 Premier Series 7-Day Programmable 2-Heat / 2-Cool Heat /Cool Digital Thermostat OWNERS MANUAL Compatible with low voltage multi-stage heat / cool systems with up to two stages of heating and two stages
USER MANUAL MODEL READ ALL INSTRUCTIONS BEFORE PROCEEDING. 5-2 Day Programmable Multi-Stage 2 Heat/1 Cool Heat Pump Digital Thermostat
 WARNING! Important Safety Information Builder MODEL 2200 Series 5-2 Day Programmable Multi-Stage 2 Heat/1 Cool Heat Pump Digital Thermostat USER MANUAL Compatible with low voltage multi stage heat/cool
Programmable Thermostat
 Set & $ave Programmable Thermostat Installation and Operation Manual English Model 44360 Form# 42710-01 20091204 2009 Hunter Fan Co. 2 Table of Contents Important Information... 5 Tools... 6 Uninstalling
OWNERS MANUAL YEAR LIMITED WARRANTY READ ALL INSTRUCTIONS BEFORE PROCEEDING. Store this booklet for future reference
 3100 Premier Series Non-Programmable 2 Heat / 2Cool & Heat / Cool Digital Thermostat OWNERS MANUAL Compatible with low voltage multi-stage heat / cool systems with up to two stages of heating and two stages
Microelectronic Programmable Thermostat Owner s Manual. 1 J.H Form Number
 Microelectronic Programmable Thermostat Owner s Manual 1 J.H. 5-94 Form Number 69-0819 Table of Contents Programmed Recovery... 3 Programming Your Thermostat... 6 Programming... 6 Program Schedule... 7
WARNING Important Safety Information
 1 Specifications 1 2 3 4 5 Builder Series Programmable Thermostats 2000 2000NC 2200 2200NC Single Stage Heat / Cool Conventional and Heat Pump Multi-Stage 2 Heat / 1 Cool Conventional and Heat Pump Before
User s Manual
 997-060180-4e User s Manual 8403-060 Menu Driven Display 1120-445 I. CONTROLLER OPERATION ADJUSTING TEMPERATURE (Temporary Override when in Programmable mode) 1. Before you can adjust the temperature,
USER MANUAL 2000NC MODEL READ ALL INSTRUCTIONS BEFORE PROCEEDING. Builder Series 5-2 Day Programmable Single Stage Heat/Cool Digital Thermostat
 MODEL 2000NC USER MANUAL Builder Series 5-2 Day Programmable Single Stage /Cool Digital Thermostat Compatible with low voltage single stage gas, oil or electric heating or cooling systems, including single
MagicStat CT3300 Programmable Thermostat
 MagicStat CT3300 Programmable Thermostat Installation and Programming Instructions Weekday/Weekend (5-day/2-day) Programmable Heat and/or Cool Low Voltage (20 to 30 Vac) Thermostat and Mounting Plate Model
USER MANUAL WARNING! CONTENTS MODEL 1 SPECIFICATIONS READ ALL INSTRUCTIONS BEFORE PROCEEDING 2 INSTALLATION
 MODEL 5100 USER MANUAL Compatible with low voltage multi-stage heat/cool systems with up to two stages of heating and two stages of cooling. READ ALL INSTRUCTIONS BEFORE PROCEEDING 1 2 3 4 5 6 7 CONTENTS
USER MANUAL WARNING! CONTENTS MODEL 1 SPECIFICATIONS READ ALL INSTRUCTIONS BEFORE PROCEEDING 2 INSTALLATION. Premier Series
 Premier Series MODEL 5000 USER MANUAL 5-2 Day Programmable Single Stage Heat/Cool Digital Thermostat Compatible with low voltage single stage gas, oil or electric heating or cooling systems, including
OWNER'S MANUAL. How to operate your new Programmable Thermostat
 OWNER'S MANUAL How to operate your new Programmable Thermostat Congratulations! You made a smart choice when you purchased your new programmable thermostat. It s the smart thermostat that: Keeps you comfortable
Programmable Load Management Thermostat
 Programmable Load Management Thermostat Weekday/Weekend (5-day/ Saturday/Sunday) Programmable T7512A,B USER S GUIDE 69-1575 1 69-1575 Welcome to the world of comfort and energy savings with your new Honeywell
Install Guide Customer Support: or Visit our website
 Install Guide 8095 ustomer Support: 888-515-2585 or Visit our website www.ritetemp.biz Install Guide 8095 aution Tools 1 Location To avoid electrical shock and to prevent damage to the furnace, air conditioner,
Parts Diagram. Up button. Down button. Right (fan) button. Left (system) button. RC/RH Jumper. Field programming pins
 button. Left (system) button. RC/RH Jumper. Field programming pins") Table of Contents Parts Diagram........................................................... 1 Icon Descriptions......................................................... 2 Specifications...........................................................
Table of Contents Parts Diagram........................................................... 1 Icon Descriptions......................................................... 2 Specifications...........................................................
WARNING Important Safety Information
 Premier Series Programmable Thermostats MODEL 5000 1 2 3 Specifications Installation Testing Your New Thermostat Programming User Settings WARNING Important Safety Information Additional Operation Features
Programmable Load Controller USER S GUIDE
 Programmable Load Controller USER S GUIDE Weekday/Weekend (5-day/Saturday/ Sunday) Programmable Heat and/or Cool Conventional and Heat Pump T7512A,B,C TM Scientific Atlanta Honeywell 1 69-0989 1 69-0989-1
Set & $ave. Model Programmable Thermostat. installation and operation manual
 Set & $ave Programmable Thermostat installation and operation manual Model 44110 42707-01 8-21-06 2 Table of Contents Important Information... 5 Tools... 6 Uninstalling the Existing Unit... 7 Installing
Elegance. SMT-700 User manual. Ver
 Elegance SMT-700 User manual Ver 3.0. 0807 Congratulations on the purchase of your new Thermostat! Your new air conditioning system thermostat has been built using the best components and design philosophy
CT2800 Programmable Thermostat
 CT2800 Programmable Thermostat INSTALLATION AND PROGRAMMING INSTRUCTIONS Welcome to the world of comfort and energy savings with your new Honeywell Programmable Thermostat. Your new thermostat will automatically
Install Guide 3M-10 ENGLISH
 Install uide 3M-10 ENLISH Install uide 3M-10 aution Tools Location To avoid electrical shock and to prevent damage to the furnace, air conditioner, and thermostat, disconnect the power supply before beginning
P200 Programmable Thermostat Installation Instructions & User Guide. For Installation Help. White-Rodgers.com
 P200 Programmable Thermostat Installation Instructions & User Guide For Installation Help 1-877-654-9394 White-Rodgers.com 2011 Printed in China White-Rodgers 8100 West Florissant Avenue St. Louis, MO
Owner s Manual MODEL 8555
 110-793B 7/11/01 3:29 PM Page 1 ELECTRONIC THERMOSTAT Owner s Manual MODEL 8555 7 Day Programmable Thermostat 110-793B 7/11/01 3:29 PM Page 2 OWNER S MANUAL TABLE OF CONTENTS ENERGY STAR Program Information............................................................
INSTALLATION MANUAL. Need Help? This manual covers the following models: T755. Power Type. Thermostat Applications Guide. Page.
 INSTALLATION MANUAL This manual covers the following models: T755 Thermostat Applications Guide Description Gas or Oil Heat Electric Furnace Heat Pump (No Aux. or Emergency Heat) Heat Pump (with Aux. or
HEAT PUMP PROGRAMMABLE THERMOSTAT
 HEAT PUMP PROGRAMMABLE THERMOSTAT SA PM 3 COOL TEMP Form 44014-01 r010408 Model 43168 Owners Manual 1 Congratulations! Heat Pump Programmable Thermostat Model 43168 THERMOSTAT CONTROLS Switches & Buttons...15
DP711. PurePro DP711 INSTALLATION AND OPERATING INSTRUCTIONS
 DP711 PurePro DP711 INSTALLATION AND OPERATING INSTRUCTIONS 52178 1 COMPATIBILITY........................................ 2 2 FEATURES.............................................. 2 3 ELECTRICAL RATINGS.................................
1F60-22 INSTALLATION & OPERATING MANUAL SETBACK THERMOSTAT. Homeowner: Save this booklet for future use!
 INSTALLATION & OPERATING MANUAL SETBACK THERMOSTAT 1F60-22 PHOTO --POSITION ONLY! (For use on 24 Volt AC Heat/Cool and Heat-Only Systems) Homeowner: Save this booklet for future use! Congratulations! You
Comfort System T-21-P Touchscreen Thermostat Installation Manual
 Comfort System T-21-P Touchscreen Thermostat Installation Manual Version 1.40 INTRODUCTION The Comfort System T-21-P is a feature-rich touchscreen thermostat that can be battery powered or hardwired to
Smart Temp. ApolloP/n Installation Manual. Version 1.0
 Smart Temp ApolloP/n 44-800 Installation Manual Version 1.0 TABLE OF CONTENTS Introduction...6 Getting started...7 Installing the thermostat...8 Disassembly...8 Thermostat location...8 Mounting the subbase...8,
T-32-TS Touchscreen Thermostat. Installation Manual
 T-32-TS Touchscreen Thermostat Installation Manual TABLE OF CONTENTS Introduction...4 Getting Started...5 Installing the Thermostat...6, 8 Disassembly...6 Thermostat Location...6 Mounting the Subbase...6,
Operating your heating system with the Prefect PRE5701 Programable Thermostat
 Operating your heating system with the Prefect PRE5701 Programable Thermostat 1 Your central heating system has been designed to provide a comfortable and flexible living environment, enabling you to have
Install Guide CT100. Caution. Caution
 PG 1 Install Guide CT100 Caution topcover Turn off electricity to the HVAC system before installing or servicing thermostat or any part of the system. Do not turn electricity back on until work is completed.
RTH8500 Series. Quick Installation Guide. Included in your box. Programmable Thermostat. Quick Install Guide Screws and anchors. RTH8500 Thermostat
 RTH8500 Series Programmable Thermostat Quick Installation Guide Included in your box Quick Install Guide Screws and anchors UWP Mounting System (UWP) RTH8500 Thermostat Tools you will need Tools you may
Digital Programmable
 www.geappliances.com Digital Programmable Thermostats Operating Instructions Auto Changeover..........10 Day/Time Setting Mode.....6 Default Mode...............4 Fan Control...............10 Hold and Temporary
PSPA711/PSPA _PSPA711_722_MAN_ENG5.qxd 2/8/05 9:45 AM Page 2 1 COMPATIBILITY 3 ELECTRICAL RATINGS 2 FEATURES
 14165_PSPA711_722_MAN_ENG5.qxd 2/8/05 9:45 AM Page 2 PSPA711/PSPA722 2 UP DOWN 1 COMPATIBILITY Temperature Offset (User Calibration) Your PSPA711 or PSPA722 is compatible with most 24 System or Battery
2 THERMOSTAT DETAILS 3 REMOVING OLD THERMOSTAT
 CONTENTS Installation Instructions for Heating & Air Conditioning 1F72 5/2 Day Programmable Heat Pump Thermostat Preparations... 1 Thermostat Details... 1 Removing Old Thermostat... 1-2 Mounting and Wiring...
Cat No. 099A. Digital Programmable Thermostat for Weekday/Weekend Setting. User Maunal
 Cat No. 099A Digital Programmable Thermostat for Weekday/Weekend Setting User Maunal TABLE OF CONTENT 1 INTRODUCTION. 2 2 INSTALLATION. 4 3 SETTING CLOCK. 11 4 SETTING PROGRAM...12 5 SLEEP OPERATION MODE
6 Setting Your Program Schedule 7 Operating Your Thermostat 8 Additional Operation Features 9 Thermostat Maintenance
 Programmable Thermostats Detailed User Guide 2020NC 2220NC Single Stage Heat / Cool Conventional and Heat Pump Up to 2 Heat / 2 Cool Conventional Up to 2 Heat / 1 Cool Heat Pump Model number is located
INSTALLATION MANUAL. * If using remote sensors the thermostat must be hardwired. Need Help?
 INSTALLATION MANUAL This manual covers the following models: T955W Master Thermostat Base Module Thermostat Applications Guide Description Gas or Oil Heat Electric Furnace Heat Pump (No Aux. or Emergency
7-DAY or 5/2-DAY PROGRAMMABLE, OR NON-PROGRAMMABLE THERMOSTAT INSTALLATION AND OPERATING INSTRUCTIONS
 TX100E 7-DAY or 5/2-DAY PROGRAMMABLE, OR NON-PROGRAMMABLE THERMOSTAT INSTALLATION AND OPERATING INSTRUCTIONS 52203 IMPORTANT! Please read all of these instructions carefully before beginning installation.
SC Installation, Operation & Application Guide
 SC 5211 2-Stage Heat Pump Auto Changeover Hardwire Programmable Electronic Thermostat 7-Day, 5-2-Day or 5-1-1-Day Programmable Configurable 2-Stage Heat Pump Systems Large Display With Backlight Selectable
ELECTRONIC THERMOSTAT
 110-792B 7/12/01 8:28 AM Page 1 ELECTRONIC THERMOSTAT Owner s Manual MODEL 8554 5-2 Day Programmable Thermostat 110-792B 7/12/01 8:28 AM Page 2 OWNER S MANUAL TABLE OF CONTENTS ENERGY STAR Program Information............................................................
WARNING Important Safety Information
 Builder Series Non-Programmable Thermostats MODEL 1000 MODEL 0 1 2 3 4 Single Stage Heat / Cool Conventional and Heat Pump Multi-Stage 2 Heat / 1 Cool Conventional and Heat Pump Before Installing, Programming
INSTALLATION MANUAL. Need Help? This manual covers the following models: T915. Power Type. Thermostat Applications Guide. Page.
 INSTALLATION MANUAL This manual covers the following models: T915 Thermostat Applications Guide Des cription Gas or Oil Heat Electric Furnace Heat Pump (No Aux. or Emergency Heat) Heat Pump (with Aux.
SAS6000UTK-7 UNIVERSAL THERMOSTAT
 SAS6000UTK-7 UNIVERSAL THERMOSTAT Used with Single Stage, Multi-Stage, Heat pump Installation and operation instructions SPECIFICATION: Power Supply Dual Power 24VAC (18-30VAC,50/60Hz) or Battery Powered
INSTALLATION MANUAL. This manual covers TopTech models: TT-S-755H. Need Help? Thermostat Applications Guide. Power Type. Table of Contents.
 INSTALLATION MANUAL This manual covers TopTech models: TT-S-755H Thermostat Applications Guide Description Gas or Oil Heat Electric Furnace Heat Pump (No Aux. or Emergency Heat) Heat Pump (with Aux. or
Safety & Installation Instructions
 Model 8800 Universal Communicating Thermostat Safety & Installation Instructions READ AND SAVE THESE INSTRUCTIONS Table of contents Installation Installation location recommendations... 2 Thermostat mounting...
Operator: Save these instructions for future use!
 WHITE-RODGERS 1F82-51 Programmable Electronic Digital Heat Pump Thermostat INSTALLATION AND OPERATION INSTRUCTIONS Operator: Save these instructions for future use! FAILURE TO READ AND FOLLOW ALL INSTRUCTIONS
1F Non-programmable Electronic Digital Heat Pump Thermostat INSTALLATION AND OPERATION INSTRUCTIONS
 FAILURE TO READ AND FOLLOW ALL INSTRUCTIONS CAREFULLY BEFORE INSTALLING OR OPERATING THIS CONTROL COULD CAUSE PERSONAL INJURY AND/OR PROPERTY DAMAGE. DESCRIPTION Your new White-Rodgers Digital Thermostat
6 Setting Your Program Schedule 7 Operating Your Thermostat 8 Additional Operation Features 9 Thermostat Maintenance
 Programmable Thermostats Detailed User Guide 2020NC 2220NC Single Stage Heat / Cool Conventional and Heat Pump Up to 2 Heat / 1 Cool Conventional and Heat Pump Model number is located on back of thermostat
For Quick Set-Up go to Page 14
 Talking Thermostat Model VT3000 Guide SmartWay Solutions, Inc. US Patent 6,608,560 & 7,62,253 For Quick Set-Up go to Page 4 Model VT3000, a universal thermostat for use on most Gas or Electric, Conventional
SMART TEMP UNIVERSAL 7-DAY PROGRAMMABLE THERMOSTAT (FOR BOTH CONVENTIONAL AND HEAT PUMP SYSTEMS) INSTALLATION AND OPERATING INSTRUCTIONS
 INSTALLATION AND OPERATING INSTRUCTIONS") TX9100Uc SMART TEMP UNIVERSAL 7-DAY PROGRAMMABLE THERMOSTAT (FOR BOTH CONVENTIONAL AND HEAT PUMP SYSTEMS) INSTALLATION AND OPERATING INSTRUCTIONS 52174 IMPORTANT! Please read all of these instructions
TX9100Uc SMART TEMP UNIVERSAL 7-DAY PROGRAMMABLE THERMOSTAT (FOR BOTH CONVENTIONAL AND HEAT PUMP SYSTEMS) INSTALLATION AND OPERATING INSTRUCTIONS 52174 IMPORTANT! Please read all of these instructions
DAY/TIME Button: Selects hour, minute and day setting.
 CONTENTS MODEL 5400 USER MANUAL READ ALL INSTRUCTIONS BEFORE PROCEEDING For more information on energy savings, go to www.energystar.gov Premier Series Universal Auto Changeover Thermostat Up to 3 Heat
IF79 CAUTION CONTENTS YOUR THERMOSTAT REPLACES 1 PREPARATIONS. Installation Instructions for. Heating & Air Conditioning
 CONTENTS Installation Instructions for Heating & Air Conditioning IF79 n- Programmable Heat Pump Thermostat Preparations... 1 Thermostat Details... 1 Removing Old Thermostat... 1-2 Mounting and Wiring...
Installation, Start-Up, and Operating Instructions
 Installation, Start-Up, and Operating Instructions CONTENTS Page SAFETY CONSIDERATIONS...1 GENERAL...1 INSTALLATION...1-5 Install Batteries...1 Select Transmitter Location (Optional)...1 Mount Transmitter
1F97-51 OPERATION GUIDE WHITE-RODGERS. Operator: Save this booklet for future use! 7-Day Programmable Electronic Digital Thermostat
 OPERATION GUIDE 1F97-51 7-Day Programmable Electronic Digital Thermostat WHITE-RODGERS Operator: Save this booklet for future use! About Your New Thermostat... Your new White-Rodgers Digital Thermostat
INSTALLATION MANUAL. Need Help? This manual covers the following models: T725. Power Type. Thermostat Applications Guide. Page.
 INSTALLATION MANUAL This manual covers the following models: T725 Thermostat Applications Guide Des cription Gas or Oil Heat Electric Furnace Heat Pump ( Aux. or Emergency Heat) Heat Pump (with Aux. or
OWNERS MANUAL YEAR LIMITED WARRANTY READ ALL INSTRUCTIONS BEFORE PROCEEDING. Store this booklet for future reference
 3000 Premier Series Non-Programmable Single Stage /Cool Digital Thermostat OWNERS MANUAL Compatible with low voltage single stage gas, oil or electric heating or cooling systems, including single stage
MS7 Single Zone Mini Split System Air Conditioners and Heat Pumps
 2011 Lennox Industries Inc. Dallas, Texas, USA 506789 01 08/2011 MS7 Single Zone Mini Split System Air Conditioners and Heat Pumps This manual is the property of the homeowner and must be left with the
WARNING Important Safety Information
 1 Specifications Premier Series Non-Programmable Thermostats MODEL 3000 MODEL 3200 1 2 3 4 5 Specifications Installation Testing Your New Thermostat Programming User Settings Temperature Adjustment WARNING
Install Guide Customer Support: or Visit our website
 Install Guide 8045 Customer Support: 888-515-2585 or Visit our website www.ritetemp-thermostats.com 312-014 Install Guide 8045 Caution To avoid electrical shock and to prevent damage heating system, and
DAY/TIME Button: Selects hour, minute and day setting.
 MODEL 5300 USER MANUAL READ ALL INSTRUCTIONS BEFORE PROCEEDING For more information on energy savings, go to www.energystar.gov Premier Series Universal Auto Changeover Thermostat Up to 2 Heat / 2 Cool
INSTALLER S & OWNER S MANUAL
 INSTALLER S & OWNER S MANUAL HVAC INSTALLER: PLEASE LEAVE MANUAL FOR HOMEOWNER DEH 3000R Part No. 4028407 Dehumidifier & Ventilation System Controller 4201 Lien Road, Madison, WI 53704 TOLL-FREE (800)-533-7533
2 THERMOSTAT DETAILS 3 REMOVING OLD THERMOSTAT
 CONTENTS Installation Instructions for Heating & Air Conditioning 1F79 n-programmable Heat Pump Thermostat Preparations... 1 Thermostat Details... 1 Removing Old Thermostat... 1-2 Mounting and Wiring...
Model: Touch-RF. 1 Wireless Series
 Model: Touch-RF Model: Touch-RF 1 Wireless Series Table Of Contents Product Image 1 Locking the Keypad 18 Table of Contents 2 Temperature Control 19 What is a Programmable Room Thermostat? 3-4 Hot Water
1F Non-Programmable Electronic Digital Multi-Stage Thermostat INSTALLATION AND OPERATION INSTRUCTIONS
 1F83-261 Non-Programmable Electronic Digital Multi-Stage Thermostat INSTALLATION AND OPERATION INSTRUCTIONS Operator: Save these instructions for future use! FAILURE TO READ AND FOLLOW ALL INSTRUCTIONS
Programmable Heat-Pump Thermostat TAYSTAT 540
 Programmable Heat-Pump Thermostat TAYSTAT 540 OWNER S GUIDE FEATURES The Trane Co. sells comfort systems. Comfort is achieved through matching the correct equipment and controls. This thermostat is designed
Honeywell CT3550 PROGRAMMABLE THERMOSTAT. Table of Contents OWNER S GUIDE
 Weekday, Saturday and Sunday Programmable Heat and/or Cool Low Voltage (20 to 30 Vac) Thermostat and Wallplate Model CT3550 Honeywell CT3550 PROGRAMMABLE THERMOSTAT OWNER S GUIDE Para pedir estas instrucciones
Operator: Save these instructions for future use!
 WHITE-RODGERS 1F81-51 Programmable Electronic Digital Multi-stage Thermostat INSTALLATION AND OPERATION INSTRUCTIONS Operator: Save these instructions for future use! FAILURE TO READ AND FOLLOW ALL INSTRUCTIONS
INTRODUCTION Thank you for purchasing your new Comfort-Set 90 Series thermostat. Your new White-Rodgers Thermostat uses solid state microcomputer
 INTRODUCTI Thank you for purchasing your new Comfort-Set 90 Series thermostat. Your new White-Rodgers Thermostat uses solid state microcomputer technology to provide precise time/temperature control. This
OWNER S MANUAL Venstar Inc. 08/07
 Digital Thermostat commercial SCHOOL THERMOSTAT T2900SCH MABLE up to 3-heat & 2-cool HEAT COOL HEAT PUMP Energy Saving Operation Morning Warm-up Period Programmable Override Unoccupied until button press
Energy Plannersm Programmable Thermostat Customer Guide. Take control of your comfort and energy savings
 Energy Plannersm Programmable Thermostat Customer Guide Take control of your comfort and energy savings BLANK PLACEHOLDER FOR INSIDE FRONT COVER DO NOT PRINT Contents Introduction About this Guide... 1
WARNING Important Safety Information
 1 Specifications Premier Series Non-Programmable Thermostats MODEL 3000 MODEL 3200 1 2 3 4 Specifications Installation Testing Your New Thermostat Programming User Settings WARNING Important Safety Information
INSTALLER S & OWNER S MANUAL
 INSTALLER S & OWNER S MANUAL HVAC INSTALLER: PLEASE LEAVE MANUAL FOR HOMEOWNER Part No. 4028539 Dehumidifier & Ventilation System Controller 4201 Lien Rd Madison, WI 53704 TOLL-FREE 1-800-533-7533 www.thermastor.com
Installer Guide. WARNING Important Safety Information. 1 Specifications
 1 Specifications cont. Premier Series Universal Auto Changeover Up to 3 Heat / 2 Cool Heat Pump or 2 Heat / 2 Cool Conventional Thermostat Installer Guide Before Installing, Programming or Operating, PLEASE
Instruction Guide: Thermostat Operation
 Instruction Guide: Elite Communicating Thermostats TPCM32U03*/TPCM32U04* (*GSR, GSM, TRN, AST) INSTRUCTION GUIDE: ELITE COMMUNICATING THERMOSTAT Thermostat Operation NOTE: These communicating thermostats
Small Digital Thermostat Controller Temperature Control
 www.klimaireintl.com Small Digital Thermostat Controller Temperature Control Small-Fiac IOM Manual KLIMAIRE International +1.647. 477. 3333 +1.646. 808. 0240 klimaireintl@klimaireintl.com Digital Thermostat
EUROSTER 2510 USER MANUAL 1 EUROSTER 2510
 EUROSTER 2510 USER MANUAL 1 EUROSTER 2510 Introduction Congratulations on the purchase of your new Digital Thermostat. Thanks to the latest microprocessor technology, the thermostat offers many convenient
Safety & Installation Instructions
 Model 8476 Thermostat with Event-Based Air Cleaning Safety & Installation Instructions READ AND SAVE THESE INSTRUCTIONS Table of contents Installation Installation location recommendations... 3 Outdoor
Honeywell CT3611 PROGRAMMABLE THERMOSTAT. Table of Contents OWNER S GUIDE
 Honeywell CT3611 PROGRAMMABLE THERMOSTAT Seven Day Programmable Heat Pump Low Voltage (20 to 30 Vac) Thermostat and Wallplate Model CT3611 OWNER S GUIDE Para pedir estas instrucciones en español, llame
Installer Guide. WARNING Important Safety Information. 1 Specifications
 1 Specifications cont. Premier Series Universal Auto Changeover Up to 3 Heat / 2 Cool Conventional and Heat Pump Thermostat Installer Guide Before Installing, Programming or Operating, PLEASE READ ALL
Safety & Installation Instructions
 8400 Series Thermostats Safety & Installation Instructions READ AND SAVE THESE INSTRUCTIONS 61000652A 8400 Tstat Install.indd 1 7/23/09 2:20:45 PM Table of contents Installation Installation location recommendations...
ATP21W02 CONTENTS YOUR THERMOSTAT REPLACES 1 PREPARATIONS REMOVING OLD THERMOSTAT 2 THERMOSTAT DETAILS
 CONTENTS Installation Instructions for 97B0082N07 Heating & Air Conditioning 5/2 Day Programmable Heat Pump Thermostat Preparations...1 Thermostat Details...1 Removing Old Thermostat... 1-2 Mounting and
Install Guide 8046 ENGLISH. Customer Support: or: visit our website Printed in China ON.
 . ON Install Guide 8046. ON ENGLISH Customer Support: 888-515-2585 or: visit our website www.ritetemp-thermostats.com Printed in China 1-405-049 Install Guide 8046 Caution To avoid electrical shock and
Customer Information Visually Impaired Programmable Talking Thermostat VIP 1007 Single Stage VIP Stage & Heat Pump VIP Stage Heat /Cool
 VIP Customer Information Visually Impaired Programmable Talking Thermostat VIP 1007 Single Stage VIP 2007 2 Stage & Heat Pump VIP 2207 2 Stage Heat /Cool C ongratulations on acquiring the VIP Talking Thermostat
Eswa DC-1. Thermostat for Floor Heating
 Eswa DC-1 Thermostat for Floor Heating The Eswa DC-1 is a thermostat which can be used for 7-day programming of floor heating systems or for limiting floor temperatures. This thermostat conforms to the
IT801 Thermostat. User s Manual. The complete guide to the set up and operation of your new smart Wi-Fi thermostat.
 IT801 Thermostat User s Manual The complete guide to the set up and operation of your new smart Wi-Fi thermostat. The smart Wi-Fi thermostat system learns your comfort preferences, then finds opportunities
WARNING Important Safety Information
 Builder Series Non-Programmable Thermostat MODEL 00NC Heat Only or Cool Only Thermostat Before Installing, Programming or Operating, PLEASE READ ALL INSTRUCTIONS Specifications Temperature Adjustment WARNING
Honeywell/36. Programmable Thermostat OWNER S GUIDE
 Honeywell/36 Programmable Thermostat OWNER S GUIDE Seven Day Programmable Heat and/or Cool Low Voltage (20 to 30 Vac) Thermostat and Wallplate Model CT3600 Para pedir estas instrucciones en español, llame
SC Installation, Operation & Application Guide
 SC 5811 2 Heat/2 Cool Auto Changeover Hardwire Programmable Electronic Thermostat 7-Day, 5-2-Day or 5-1-1-Day Programmable Configurable 2-Stage Heat/2-Stage Cool Systems 2-Stage Heat Pump Systems Large
Safety & Installation Instructions
 8400 Series Thermostats Safety & Installation Instructions READ AND SAVE THESE INSTRUCTIONS 61000652C 8400 Tstat Install.indd 1 10/13/09 11:08:56 AM Table of contents Installation Installation location
ETN-24-HC21-PROG Econo-Vent
 ETN-24-HC21-PROG Econo-Vent Owner's Manual - Installation and Operating Instructions Cat. G030121 Rev. 3.1 02.06 Meitav-tec Ltd (Contel group) Tel: 972-3-9626462 ax: 972-3-9626620 www.meitavtec.com - support@meitavtec.com
CM707. Programmable Room Thermostat with Optimum Start, Optimum Stop and Delayed Start. User Guide
 CM707 Programmable Room Thermostat with Optimum Start, Optimum Stop and Delayed Start User Guide WHAT IS A PROGRAMMABLE ROOM THERMOSTAT? An explanation for householders... A programmable room thermostat
Model: Slimline-B. Battery Series
 Model: Slimline-B Model: Slimline-B 2 Battery Series Table of Contents Product Image 1 Holiday Programming 20 Table of Contents 2 Frost Protection 21 What is a Programmable Room Thermostat? Installation
REMOVING OLD THERMOSTAT DETAILS. Model No CONTENTS YOUR THERMOSTAT REPLACES 0 PREPARATIONS. 5/2 Day Programmable Thermostat
 CONTENTS Installation Instructions for Heating & Air Conditioning Model. 47445 5/2 Day Programmable Thermostat Preparations...... 1 Thermostat Details... 1 Removing Old Thermostat... ~. 1 Mounting and
Emerson Inspire 1HDEZ Installation Instructions. Thermostat/Interface Equipment Control TROUBLESHOOTING
 Emerson Inspire 1HDEZ-1521 Installation Instructions Thermostat/Interface Equipment Control TROUBLESHOOTING FAILURE TO READ AND FOLLOW ALL INSTRUCTIONS CAREFULLY BEFORE INSTALLING OR OPERATING THIS CONTROL
Underfloor Heating Programmable Thermostat
 Underfloor Heating Programmable Thermostat t: 093 4906 m: 0794 69635 w: www.gs-ufh.co.uk e: gs@warmfloors.co.uk POWER CLOCK H A DOWN UP TO CHANGE THE TIMINGS AT ANY STAGE DURING THE PROCESS YOU CAN PRESS
1F91W-71 OPERATION GUIDE WHITE-RODGERS. Operator: Save this booklet for future use! Multi-stage Electronic Digital Thermostat
 OPERATION GUIDE 1F91W-71 Multi-stage Electronic Digital Thermostat WHITE-RODGERS Operator: Save this booklet for future use! About Your New Thermostat... Your new Digital COMFORT SET II Multi-stage Thermostat