Manufacturing and technical service location:
|
|
|
- Josephine Dennis
- 5 years ago
- Views:
Transcription


1
2 Manufacturer: SEFAM 144 AV CHARLES DE GAULLE NEUILLY SUR SEINE FRANCE Manufacturing and technical service location: SEFAM 10 ALLEE PELLETIER DOISY VILLERS-LES-NANCY FRANCE TEL: +33 (0) Technical assistance: TEL.: +33 (0) E:mail: technicalservice@sefam-medical.com 2 Before you start SEFAM S.Box
3 CONTENTS Before you start... 4 Safety guidelines... 4 Recommended use... 4 Contra-indications... 5 Essential performance of the device... 5 List of authorized accessories... 6 Features of the device... 7 Heated humidification... 7 Intelligent Start... 7 Mask Fit & Go... 7 Mask unplugged... 7 Comfort Control Plus... 7 Ramp function... 8 Information and settings... 9 Definitions... 9 Settings ranges User interface description How to set the device Using the SD card Cleaning and maintenance Daily Weekly Monthly Disinfecting the materials Disinfecting the surface of the device Disinfecting the humidifier chamber (if humidifier is installed) Things never to use Troubleshooting tips Device Messages Error Messages Technical characteristics Performance of the device Humidifier performance Conditions of use Transport and storing conditions Electrical characteristics Physical characteristics Definition of symbols CE marking Regulatory Requirements End of life disposal of the device Electromagnetic Compatibility Special characteristics according to the standard NF EN ISO : Functional diagram of the internal pneumatic circuit SEFAM S.Box Contents 3
4 Before you start This user guide is intended for Physicians & Home Care Providers. Under no condition should it be given to patients. Safety guidelines WARNING: It means that there is a possibility of danger risk of injuries or accident to patient. Please take note of the safety measures indicated in the SEFAM S.Box Patient Manual. See Patient Manual for instructions on how to install, maintain and store the device. It is imperative that each patient is provided with the Patient Manual as well as the accessory use instructions. Use this device only with the authorized accessories listed in this manual. To ensure proper maintenance, and to avoid all possible damages, only qualified and trained personnel is authorized to perform maintenance work or authorized modifications on the device. The User takes full responsibilities for any dysfunction of the device caused by any maintenance done by any unauthorized person. Do not begin treatment if you detect an anomaly with the device. Never use the device before making sure that the Air inlet filter is installed. WARNING: It is advisable not to use portable RF communicating devices (including peripherals, such as antenna cables as well as external antennas) closer than 30 cm (12 inches) from all parts of the SEFAM S.Box device. This also includes the specified cables by the manufacturer. Should the opposite happen, the performance of these devices could be altered. In case the device is equipped with a heated humidifier: The side cover must be removed and replaced by the humidifier that includes the heater plate and humidifier chamber. Precaution must be taken by the patient while using the humidifier chamber in order to prevent any risk of water entering the machine, which can cause irreversible damage. For this purpose, the device must be placed on a horizontal and stable surface, and not in a tilted position. The humidifier chamber should always be emptied before moving it with the device or transporting it. CAUTION: It means that there is a possibility of material damage to the device or others. As this device is an electrical medical device, during its installation, please follow and respect all instructions concerning the electromagnetic compatibility, as indicated in this manual. Like all electrical medical devices, the device could experience interferences and disturbances from mobile or wireless radiofrequency communication equipment (Wi-Fi, cell phones or mobile phones ). Recommended use The SEFAM S.Box is designed for the treatment of Obstructive Sleep Apnea Hypopnoea Syndrome (OSAHS) in patients over 30 kg, breathing spontaneously. This device is not intended to provide assistance to vital functions. It can be used at home or in healthcare centers (hospital or clinics). It is also designed for hassle free travelling and can be used on airplanes. 4 Before you start SEFAM S.Box
5 The S.Box heated humidifier is an accessory designed to warm and add moisture to the air flow delivered to the patient by the SEFAM S.Box device, for the treatment of Obstructive Sleep Apnea Hypopnoea Syndrome (OSAHS). It is intended for use by adult patients in either the homecare or the hospital environment. NOTE: The EMISSION characteristics of this device allows the machine to be used in industrial zones and in healthcare centres (class A defined in the CISPR 11). When it is used in a residential area (class B defined in the CISPR 11 is normally required), this device may not provide enough protection for communication services with radio frequencies. Users may have to take certain measures, such as the repositioning or the reorientation of the device in order to correct for this. Contra-indications Studies have shown that using positive pressure can be contraindicated in certain patients with one of these pre-existing medical conditions: Severe bullous emphysema Pneumothorax Pneumocephalus, trauma or recent surgery with sequela of cranio-nasopharyngeal fistula. Decompensated cardiac insufficiency or hypotension, particularly in case of decreased blood volume or cardiac arrhythmia Dehydratation Tracheotomy. Furthermore, due to the fact that positive pressure affects the cardiac output in certain heart failure patients, it is recommended that patient blood pressure and heart rate are carefully monitored when starting treatment at an effective pressure. The risks and benefits of treatment by Continuous Positive Airway Pressure must be individually evaluated in such subjects. This evaluation must take into account the fact that the device can be adjusted to deliver pressures up to 20 cm H 2 O, and under certain defect conditions, static pressures up to 40 cm H 2 O are possible. The device must not be used then, if such pressure level presents a risk to the patient. Essential performance of the device The essential performance of the SEFAM S.Box is to deliver a pressure equivalent to that of the adjusted pressure ± 0.5 cm H 2 O. The device was designed to maintain basic safety and essential performance without maintenance regarding electromagnetic disturbance during the lifetime of the machine. However, in case of failure the device has to be repaired by authorized persons who will use original parts only. SEFAM S.Box Before you start 5
6 List of authorized accessories The SEFAM S.Box product can be used with the following optional accessories: Description Reference SEFAM S.Box M S.Box heated humidifier M S.Box humidifier chamber M Oximeter Connectivity: S.Box modem M S.Box WIFI module M Tubings: S.Box heated tube M S.Box Ø 15 mm standard tube M S.Box Ø 22 mm standard tube M Travel accessories: S.Box carrying bag M SEFAM S.Box by Starck carrying case M S.Box cigarette cable (24 VDC-5 m) M Machine data analysis: SEFAM Analyze Software M S.Box SD card M S.Box USB cable M Divers: Inlet air filters (50 pcs) M S.Box Power supply M WARNINGS: Use only the authorized accessories given in the list above or compliant with the standard EN ISO :2007. Only connect the USB authorized cable to the USB connector. The SEFAM S.Box should not be used if connected via USB to an unauthorized device. Use only those accessories which can guarantee the patient s treatment pressure and reduce the rebreathing of CO 2. When a full face mask is necessary, always use a mask which is equipped with an antiasphyxia valve to maintain spontaneous breathing. WARNING: Use of this equipment adjacent to or stacked with other equipment should be avoided because it could result in improper operation. If such use is necessary, this equipment and the other equipment should be observed to verify that they are operating normally. WARNING: Use of accessories, transducers and cables other than those specified or provided by the manufacturer of this equipment could result in increased electromagnetic emissions or decreased electromagnetic immunity of this equipment and result in improper operation. 6 Before you start SEFAM S.Box
7 Features of the device The SEFAM S.Box can operate either in constant mode (CPAP), it then delivers a constant pressure level, or automatic mode (Auto-CPAP) where the pressure changes between a minimum pressure and a maximum pressure depending on the detected respiratory events. When selected, the AUTO- CPAP mode will be activated 5 minutes after starting treatment. Heated humidification This function allows to control the power supplied to the heater plate depending on the air flow, and to regulate the heating power to maintain the difference in temperature between the water and the air constant. The device is delivered with an installed side cover and depending on the selected configuration, it may be delivered with a heated humidifier which needs installing. In this case, the side cover must be removed from the device and replaced by the humidifier including the heater plate and the humidifier chamber (refer to the patient manual for the setup). The presence of the humidification system is automatically detected by the machine and the heated humidification function starts and stops simultaneously with the device. Intelligent Start This feature permits the patient to start the treatment automatically at the first breathings in the mask, without using the start / standby button. It can be activated or deactivated by following the instructions of paragraph 1. Setting menu page 19. Mask Fit & Go Before starting the treatment and when the device is in standby mode, the patient can check the air tightness of his/her mask by using the touch button. The level of unintentional leak is displayed and in case of undesired leak, the patient can adjust his/her mask. Mask unplugged When the patient removes his mask, the device automatically switches to low power. The machine will restore normal power when the mask is reconnected (pressure delivered above 3 cm H 2 O) or if the start / standby button or the ramp button is pressed. If the mask is unplugged for more than 5 minutes, the compliance session is stopped and recorded, and the device will automatically turn off after 30 minutes. Note: If the patient uses a resistive interface (nasal pillows mask), a specific calibration of the pneumatic configuration may be performed so that the device can detect that the mask is unplugged (Ciruit Select function). Comfort Control Plus The Comfort Control Plus CC+ is intended to increase the treatment pressure while inhaling and to decrease it while exhaling to make the patient's breathing more comfortable during the treatment. It can be activated during the ramp or the treatment. In both cases, three levels are available in order to get an optimal comfort. SEFAM S.Box Features of the device 7
8 Ramp function The ramp function makes it possible to gradually increase the pressure to help the patient fall asleep. If it is activated, it starts automatically when the device is switched on (if the ramp time is different than zero). Pressing the ramp button this function. There are two types of ramp: T RAMP Time ramp: you can determine the ramp time deactivates (and by pressing again reactivates) I RAMP Intelligent ramp: the ramp time is automatically determined by the device. Time ramp In CPAP mode, the treatment begins at a reduced pressure called Ramp pressure (ramp start pressure), and then the pressure rises up to the prescribed pressure (during the ramp time). If the T Ramp function is deactivated, the pressure increases immediately to the prescribed pressure. In AUTO-CPAP mode, this function is used to delay the activation of automatic operation (during the latency or ramp time). In the case where the Ramp pressure (ramp start pressure) is less than the minimum pressure, a progressive increase in pressure will be done from the Ramp pressure to the minimum pressure. If the function is deactivated, the pressure remains at the Ramp pressure within the first 5 minutes of treatment and then switches to automatic operation. T Ramp function in CPAP mode T Ramp function in Auto-CPAP mode The symbol is displayed in the status bar and you can adjust the Ramp pressure, the ramp time or latency time and the maximum ramp time (if the Ramp pressure is below the prescribed pressure). Intelligent ramp The I Ramp function permits the beginning of the treatment at an adjustable Ramp pressure (ramp start pressure), then a faster increase pressure in the CPAP mode or the activation of the automatic operation in the Auto-CPAP mode as soon as the device starts to detect respiratory events indicating that the patient has fallen asleep. The symbol is displayed in the status bar. The I Ramp stops automatically when the maximum ramp time bas been reached (45 minutes). 8 Features of the device SEFAM S.Box
9 Information and settings The adjustment of the therapeutic pressure must be determined by the prescribing physician for each patient individually, with the configuration of the equipment to be used, including the accessories. The correct installation and positioning of the patient interface are critical to the proper operation of the device. WARNING: Before setting the device, confirm that the product delivers an air flow when it is in operation mode. Otherwise, stop the machine immediately and contact the technical support. Settings are accessible directly on the interface of the device, via a Bluetooth connection (tablets/cell phones apps), via a configured SD card or remotely through S.Box Wi-Fi module or S.Box modem. You can also adjust the device with the SEFAM Analyze software, by connecting the machine to a computer with a USB cable or a wireless connection. CAUTION: The USB connection inhibits automatically any Bluetooth communication. The most recent compliance data are recorded by sessions in the device memory and on the SD card up to one year for 8 hours of operation per day. They can also be retrieved by wired or wireless connection with the PC software, on the SD card or by modem. Using SEFAM Analyze, you can analyze the compliance data, the use of the device by the patient and the treatment efficiency. Definitions Bluetooth, BLE (Bluetooth Low Energy): Device hour counter: Usage hour counter: Ramp pressure (ramp start pressure): Maximum pressure: Minimum pressure: Prescribed pressure: Humidifier chamber: Session: Heating time: Ramp time: low-power, short-range wireless communications technology for connecting devices. device operating time. total time during which the patient has effectively breathed in the mask (treatment time minus the time when the mask was removed and the time with no respiration). level of pressure produced by the device at the beginning of the ramp function to help the patient fall asleep comfortably. In Auto-CPAP mode, the pressure is reset to the Ramp pressure or the minimum pressure (if the Ramp pressure is lower than the minimum pressure) when no breathing cycle is detected for more than 2 minutes. maximum pressure that the device can deliver in Auto-CPAP mode. minimum pressure that the device can deliver in Auto-CPAP mode. level of pressure prescribed for the patient. chamber containing the water necessary for humidification. period during which data is recorded to memory between the time the device starts operation and the time the device goes into standby. time needed for the device to reach the operating level required by the heated humidification feature. time taken by the device to reach the prescribed pressure from the Ramp pressure in CPAP mode or to activate the Auto-CPAP feature when the time ramp is enabled. SEFAM S.Box Information and settings 9
10 Maximum ramp time: parameter accessible only by the home care provider which restricts the maximum value of the ramp time adjustable by the patient when the ramp is activated. 3G: wireless mobile telecommunication technology for connecting electronic devices. Wi-Fi: Settings ranges high-speed wireless transmission technology for connecting electronic devices to one another. The following tables indicate the operating mode of the device, the default value, the minimum and maximum values that can be set for each parameter, and the available functions. Operating mode: Parameter Display By default Operating mode CPAP APAP (Auto-CPAP) APAP (Auto-CPAP) Adjustable parameters: Parameter Humidification level (if the humidifier is installed) Heating power of the heated tube (if installed) Mask select: theoretical leak in the mask at 12.0 cm H 2 O Ramp time (if T Ramp is selected) Maximum ramp time (if T Ramp is selected) Minimum value Maximum value Value by default Increment OFF OFF l/min (Type:A) OFF 60 l/min Maximum ramp time AUTO (with humid.) 01 (without humid.) 30 l/min (Type:B) 01 2 l/min 15 min 5 min OFF 45 min 45 min 5 min Brightness of the display In CPAP mode: Set pressure 4 cm H 2 O 20 cm H 2 O 8 cm H 2 O 0.5 cm H 2 O Ramp pressure (ramp start pressure) 4 cm H 2 O Prescribed pressure 4 cm H 2 O 0.5 cm H 2 O In Auto-CPAP mode: Ramp pressure (ramp start pressure) Maximum pressure Minimum pressure 4 cm H 2 O 4 cm H 2 O or minimum pressure 4 cm H 2 O Maximum set pressure 4 cm H 2 O 0.5 cm H 2 O 20 cm H 2 O 20 cm H 2 O 0.5 cm H 2 O 20 cm H 2 O or maximum pressure 4 cm H 2 O 0.5 cm H 2 O 10 Information and settings SEFAM S.Box
11 The device is switched on by holding down the start / standby button. If the heated humidifier is installed, it switches on automatically if the humidification level is set between 01 to 10. Note: With a humidification level set to 10, the maximum filled humidifier chamber allows at least 8 hours of use. The rate of water evaporation depends on several factors such as environment, leak rate, patient's breathing pattern, etc. Available features: Feature Activated feature Deactivated feature By default Bluetooth BT: ON BT: OFF BT: ON Comfort Control Plus CC+ CC+: R.1, R.2 or R.3 (during the ramp) CC+: 1, 2 or 3 (during the treatment) CC+: OFF CC+: OFF Modem connection 3G: ON 3G: OFF 3G: ON PolyLink connection BLE: ON BLE: OFF BLE: ON Wi-Fi connection WIFI: ON WIFI: OFF WIFI: ON Intelligent Start IS: ON IS: OFF IS: ON Ramp Locking access to a group of three settings by the patient (Ramp pressure, CC +, Intelligent Start) T RAMP (Time ramp) I RAMP (Intelligent ramp) LOCK (locked access) OFF UNLOCK (unlocked access) I RAMP UNLOCK (unlocked access) Note: The connection to the PolyLink system, the S.Box modem or the Wi-Fi module will operate only when the corresponding accessory is installed in the device. Circuit Select (pneumatic calibration): Used patient circuit Length: 1,80 m Diameter: 15 mm (Heated tube included) Length: 1,80 m Diameter: 22 mm Other By default Display CS 15 Note: As the device is equipped with a differential pressure sensor, the pressure level is automatically compensated for altitude. SEFAM S.Box Information and settings 11

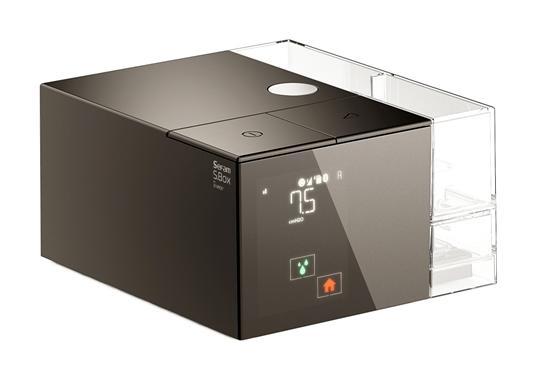
12 User interface description The two mechanical buttons on the top of the device are used to manage its operation: Start / standby button : to switch the device on or off. Ramp button : to disable or enable the ramp feature when the device is in use. If it is pressed simultaneously with the touch key menu., it also allows you to access your specific settings The touch screen areas located on the front side permit to access the information and the settings menus of the device, and eventually, change the value of certain parameters. The parameters are accessible by various touch keys: the settings concerning the treatment of the patient, the recorded compliance data, the general settings of the device like the brightness and the time. The display can also notify possible problems concerning the device or its accessories. General organization of display From top to bottom, the display is structured in three zones: a status bar a settings zone an area with 8 touch keys and the S symbol displayed when the device is switched on. Notes: The backlight of the display is activated when you approach your hand (Wave & Go function) or by tapping a touch key or one of the two operating buttons located at the top of the device. The displays used in this manual are given as examples. 12 Information and settings SEFAM S.Box
13 Description of symbols Symbol Meaning Symbol Meaning Status bar GSM mobile phone network status. Flashes quickly during the transmission. Airplane mode Wi-Fi Communication activated. Flashes quickly during the transmission. Oximeter connected Comfort Control Plus C.C.+ function activated SD card inserted Flashes slowly when data storing is in progress. Flashes slowly when settings update is in progress. USB connection activated Time ramp T RAMP activated Intelligent ramp I RAMP activated Bluetooth connection activated Bluetooth transmission in progress Operation mode C: CPAP A: APAP (Auto-CPAP) Settings: values, units and symbols displayed Numbers or letters Pressure unit: hecto Pascal or cm H 2 O Flow unit: liter per minute Time unit: hour and minute Caution: the device detected an error or an incident Machine hour counter Bluetooth Setting of the brightness of the display Setting of the ramp time Usage hour counter Mask adjustment Diameter of tube Touch keys Scrolling-down touch key, allows to decrease the value of the displayed parameter Touch key to adjust the S.Box heated tube with ATC setting Touch key to access the settings Multifunctional touch key Scrolling-up touch key, allows to increase the value of the displayed parameter Touch key to adjust the heated humidifier setting Touch key to access information Home touch key SEFAM S.Box Information and settings 13
14 How to set the device 1. Setting menu The adjustment of the treatment parameters is accessible by the touch keys displayed on the screen. The access to some of them is restricted to the medical professional (in standby mode only). In this case, press and maintain the ramp button, then tap the touch key for two seconds when it is shown on the display. In the settings sequence: tapping the touch key or permits to decrease or increase the value of the parameter, make changes, deactivate or activate the displayed function, tapping the touch key permits to access the next display, maintain the ramp button pressed, then tapping the touch key permits to return to the previous display, The standby screen is restored by tapping or after two minutes without tapping a key. ❶ Press and hold the ramp button then tap the touch key Views of the display: Mode of operation You can change the displayed mode by tapping the key or. Possible settings: CPAP or APAP (Auto- CPAP). for two seconds in standby mode. ❷ Maximum pressure if the APAP (Auto- CPAP) mode was selected. You can decrease or increase the displayed value by tapping repeatedly the key or. Possible settings: from the minimum pressure to 20 cm H 2 O. Minimum pressure if the APAP (Auto- CPAP) mode was selected. You can decrease or increase the displayed value by tapping repeatedly the key or. Possible settings: from 4 cm H 2 O to the maximum Pressure. 14 Information and settings SEFAM S.Box
15 or ❷ Views of the display: Pressure level if the CPAP mode was selected. You can decrease or increase the displayed value by tapping repeatedly the key or. Possible settings: from 4 cm H 2 O to 20 cm H 2 O. ❸ Ramp selection You can change or deactivate the selected ramp by tapping the key or. Possible settings: I RAMP, T RAMP and OFF. or If you selected T RAMP Time ramp the displayed value on the right corresponds to the maximum ramp time. You can decrease or increase the displayed value by tapping repeatedly the key or. Possible settings: from 5 to 45 minutes. ❹ Ramp pressure (ramp start pressure) In CPAP mode, this setting is displayed only if the ramp was selected (ramp OFF). You can decrease or increase the displayed value by tapping repeatedly the key or. Possible settings: from 4 cm H 2 O to the maximum pressure adjusted in APAP mode (Auto- CPAP). from 4 cm H 2 O to the prescribed pressure in CPAP mode. SEFAM S.Box Information and settings 15
16 ❺ Views of the display: CC+ (Comfort Control Plus) You can change or deactivate the selected function by tapping the key or as many times as necessary. Possible settings: during the ramp (R.1, R.2, R.3) during the entire treatment (1, 2, 3) deactivating: OFF. ❻ IS (Intelligent Start) You can activate (ON) or deactivate (OFF) this function by tapping the key or. Possible settings: ON and OFF. ❼ Circuit Select (pneumatic calibration) Tapping repeatedly the touch key or or, you can choose the pneumatic calibration adapted to the pneumatic circuit (tube and mask) of the patient. Possible settings: 15 (tube 15 mm in diameter) 22 (tube 22 mm in diameter) CS (Circuit Select). If you select Circuit Select CS, the touch key is displayed on the screen. Tap it to run the specific calibration. 16 Information and settings SEFAM S.Box
17 Views of the display: A progress bar indicates the status of the calibration until the specific calibration is effective and confirmed on the display. Refer to paragraph "5. Circuit Select: specific calibration of the pneumatic configuration" page 22. ❽ Mask select: theoretical leak in the mask You can enter the value of the theoretical leak in the mask at 12 cm H 2 O (given in the corresponding instructions for use of the mask) by tapping the touch key or as many times as necessary. Possible settings: from 20 to 60 lpm by steps of 2 lpm. Three possible types of masks: A, B and C (refer to the corresponding list). ❾ Locking access to the group of three following settings by the patient: Ramp pressure CC + Comfort Control Plus IS Intelligent Start. You can lock (or unlock) access by patient to these three settings in selecting LOCK (or UNLOCK) by tapping the touch key or. Possible settings: LOCK and UNLOCK. ❿ Choosing the format of time display The time display is set to 24 hours by default. You can select another format by tapping the key or. Possible Settings: 24H and 12H. SEFAM S.Box Information and settings 17
18 ⓫ Views of the display: Clock The hour blinks on the display. You can set it by tapping the touch key or as many times as necessary. Tap. The minutes blink. Adjust the minutes the same way as the hour. ⓬ Pressure unit You can change the unit of the displayed pressure by tapping the touch key or. Possible settings: cm H 2 O and hpa. ⓭ Offset of the pressure and flow sensor The touch key visible on the screen permits to run an automatic calculation of the offsets of the sensors. It is also possible to read the offset values of the pressure and flow sensor. The offset value of the pressure sensor is displayed approximately two seconds later. Unchangeable value: from 1500 to 2500 (default value 2000). If a offset problem occurs on the pressure sensor, the value is no longer displayed : 18 Information and settings SEFAM S.Box

19 Views of the display: The offset of the flow sensor comes after. Unchangeable value: from 1450 to 5450 (default value 3450). If a offset problem occurs on the flow sensor, the value is no longer displayed : ⓮ Delete of data The touch key visible on the screen permits, if you wish, to restore the FACTORY configuration of the device. CAUTION: Restoring the FACTORY configuration erases all of the data recorded in the device and on the SD card, as well as the pairing with the installed communicating accessory. Tapping the touch screen or, you can choose: YES to go back to the factory configuration NO if you wish to keep all data and the pairing of accessories. ⓯ Total machine hour counter This counter calculates the operating time of the device. SEFAM S.Box Information and settings 19
20 ⓰ Views of the displays: Total usage hour counter This counter calculates the time during which the patient has breathed into the mask. ⓱ Software version This is the version of the embedded software of the device. It can be read but not written. Tap to exit the menu. 2. Settings accessible to the patient The patient can access a settings menu of the device in standby mode (see patient manual). He/she can also make the following adjustments using the touch keys displayed: Tap Displayed parameter: Adjusted by Available displays: in standby or operating mode Heating power of the heated tube (when S.Box heated tube with ATC installed) or OFF, 01 to 05 and AUTO (if humidifier installed) in standby or operating mode Humidification level (when humidifier installed) or OFF, 01 to 10 in standby mode Mask Fit & Go: controls air tightness of the mask Readjustment of the mask LK: OK, LK: NOK in operating mode Display of the clock during the treatment Return to the delivered pressure Tap to exit the display. 20 Information and settings SEFAM S.Box
21 3. Information menu The touch key gives access to the compliance information recorded in the device during the last 24-hour periods stored (within the limit of 30 days), then to the technical information about the device (see patient manual). Tap Information displayed successively: in standby mode Accessing a period of use Selecting one of the last memorized periods of use Accessing the compliance information report for the period of use Average level of unintentional leakage in the mask each time you go to the next display Usage hour counter Average pressure delivered Index of obstructive Apneas and Hypopnoeas Index of central Apneas Number of the last days of use for which the compliance has been higher than 4 hours per day (when the number of the last days of use is more than 1 and within the limit of 30 days) Accessing technical information concerning the device Identification number specific to the patient each time you go to the next display Software version Total usage hour counter Total machine hour counter Tap or to exit the menu. 4. Pairing a Bluetooth device When you are using Sefam ACCESS Pro application or SEFAM Analyze software on a Bluetooth enabled device (such as a Smartphone or a tablet) and you connect it to the SEFAM S.Box in standby mode via Bluetooth wireless communication, a message appears on the display of the machine at the first pairing: View of the display: The display disappears after 30 seconds. or Enable pairing Refuse to pair SEFAM S.Box Information and settings 21
22 5. Circuit Select: specific calibration of the pneumatic configuration The specific calibration function of the pneumatic circuit permits to adjust the pressure delivered to the mask with a high level of accuracy by compensating for all the pneumatic resistances in the patient circuit. It makes it possible to adapt any type of pneumatic resistance generated by a breathing tube, a mask or any accessory that can be connected in between the patient and the device. CAUTION: Since the pressure performance is depending on the selected pneumatic configuration, it is important to select the proper configuration. In the case of a specific configuration, this operation must be performed by qualified personnel only. To optimize the performance of the device, it is advisable to carry out a specific calibration depending on the pneumatic configuration. 1. Make sure the unit is in standby mode. If it is in operation, stop it by pressing down the start / standby button for a few seconds. 2. Install the desired pneumatic configuration (breathing tube, filter, etc ) with the patient interface (e.g. mask). Make sure to keep the respiratory circuit straight and outlet free. 3. Refer to paragraph "1. Setting menu" page 14 to access the successive displays, until the pneumatic calibration appears. Select Circuit Select Tap the touch key A calibration progress bar appears Circuit Select confirmed. to start the specific calibration. until the specific calibration is effective. Do not touch the pneumatic circuit while the device is performing the calibration. The message "CS: OK" informs that the calibration was done properly. Tap to exit the settings menu. 22 Information and settings SEFAM S.Box
23 Using the SD card The SD card permits to store the most recent compliance data or to update the device settings. Saving data Each time the treatment is stopped, the most recent compliance data memorized by the device are automatically saved on the SD card. The memory card can also store the signals acquired in real time for about 3 months. For this purpose, a memory card has to be inserted in the device while using it. Once the data is saved, the patient can send the memory card to you and you will retrieve the compliance data and analyze it using the SEFAM Analyze software. Then, insert the SD card in the memory card reader of your computer. To retrieve the compliance data, refer to the user manual of the SEFAM Analyze software. CAUTION: Use only authorized SD cards. Settings update You can adjust the settings of a device by following the instructions given by the SEFAM Analyze software, and save them on the SD card. An update of the device settings starts automatically when the patient inserts the card for the first time. Service card A SD card can be configured as a "service card" using the SEFAM Analyze software, in order to set up a collection of devices with the same default parameters. This allows adjusting only the parameters specific to the patient. To configure a service card, refer to the user manual of the SEFAM Analyze software. To use the service card with the device, hold down the button while inserting the card. SEFAM S.Box Information and settings 23
24 Cleaning and maintenance Make sure that the patient follows carefully the instructions given in this chapter. The patient should refer to the user guide for instructions on maintenance for the mask, the breathing tube, the S.Box heated tube with ATC and the communicating accessory. WARNING: Unplug the device from the power supply. Always remove the breathing tube and the humidifier chamber from the device before cleaning. CAUTION: For cleaning, only use materials suited for this purpose. Do not use aggressive detergent, scouring sponge or hard bristle brush. Daily Humidifier chamber (if humidifier is installed): Remove the humidifier chamber: o To remove the humidifier chamber from the device, press the button to unlock the humidifier chamber and at the same time, pull the humidifier chamber using the integrated handle. o Put the humidifier chamber away from the device and pull the opening clip upwards to release the upper part of the chamber. Empty the water if any. Rinse with clean water. Allow to dry by draining, away from the sun. Re-install the humidifier chamber, once it is dry. o Fill the bottom part of the humidifier chamber, then press down on the upper part to close the chamber and lock it. o Place the humidifier chamber back on the heater plate, hinge side towards the inside of the machine, and push it against the device until you hear a "click". Weekly Humidifier chamber (if humidifier is installed): Remove the humidifier chamber: o To remove the humidifier chamber from the device, press the button to unlock the humidifier chamber and at the same time, pull the humidifier chamber using the integrated handle. o Put the humidifier chamber away from the device and pull the opening clip upwards to release the upper part of the chamber. Empty the water if any. Clean the different parts of the chamber with warm water and a mild detergent (e.g. using 3 drops of dishwashing liquid diluted in water). Rinse thoroughly with water to remove any trace of detergent. Allow to dry by draining, away from the sun. Re-install the humidifier chamber, once it is dry. o Fill the bottom part of the humidifier chamber, then press down on the upper part to close the chamber and lock it. o Place the humidifier chamber back on the heater plate, hinge side towards the inside of the machine, and push it against the device until you hear a "click". 24 Cleaning and maintenance SEFAM S.Box
25 Notes: The different parts of the humidifier chamber can also be cleaned in a dishwasher (maximum 70 C). Do not leave stagnant water in the chamber in order to prevent the development of micro-organisms. Washable filter: Remove the air intake grid. Pull the filter towards you to remove it. Wash the filter with lukewarm water and a mild detergent (e.g. using a drop of dishwashing liquid diluted in water). Rinse thoroughly to remove any trace of detergent. Drying the filter: press the filter in a clean absorbent cloth, then, let it dry totally away from the sun. Once dried, place the filter at the back of the device and put back the air intake grid. Do not use a partially dry filter. Monthly Device: Clean the outside of the device with a damp cloth (rag, paper towel) sprinkled with a little water and a drop of mild detergent. Remove traces of detergent by repeating this procedure with a new cloth, (rag, paper towel) slightly moistened with only water. Wipe the device completely dry with a dry cloth (rag, paper towel). Air inlet filters: The optional fine filter cannot be washed. It must be changed once a month or more, if it is visibly dirty. Change filters as soon as they are torn or stained. It is recommended to change the washable filter every 6 months. Humidifier (if installed): Once the humidifier chamber has been cleaned, the patient can let it soak for 15 minutes in a solution of 9 volumes of water and one volume of white vinegar. Rinse thoroughly with water to remove any trace of vinegar. Allow to dry by draining, away from the sun. When the humidifier chamber has been removed and emptied, the heated plate can be cleaned by following same cleaning procedure as the device. Reinstall it once it is dry. Put the humidifier chamber back in place. o Fill the humidifier chamber, then press down on the upper part to close the chamber and lock it. o Place the humidifier chamber back on the heater plate, hinge side towards the inside of the machine, and push it against the device until you hear a "click". WARNINGS: Check if the heater plate is properly dried before plugging the device. Never use the device without making sure that the air inlet filter is present. Do not use spray detergent. Harmful residues could enter and remain in the air outlet, the air inlet filter or inside of the device, which could cause air way irritation. Never use concentrated bleach higher than 0.1%. For example: pour 200 ml of bleach to 2.6% in 5 liters of cold water. SEFAM S.Box Cleaning and maintenance 25
26 Disinfecting the materials Please refer to the instructions for use of the chemicals you use in order to comply with dilution and quantity of products, contact time and wearing of personal protective equipment. Disinfecting the surface of the device Disinfecting the outside of the device is done with disinfectant detergents. If using a spray or foam disinfectant detergent: o Spray the product on a non-woven disposable cloth or tissue o Wipe the outside of the device with this cloth or tissue and let it dry. If using disinfectant detergent wipes: o Wipe the outside of the device and let it dry. Disinfecting the humidifier chamber (if humidifier is installed) The humidifier chamber is prescribed to be used by one patient only at home or several times in a Medical Care Center. Remove the humidifier chamber from the device and disassemble it completely. Pre-disinfection: o Submerge the parts of the humidifier chamber completely in the pre-disinfectant solution diluted according to the instructions recommended by the manufacturer of the pre-disinfectant. o Likewise, respect the recommended soaking time and, if necessary, brush with a soft brush. o Rinse carefully and thoroughly all parts of the chamber with running water. Cleaning: o Prepare a soaking container with water and mild detergent (e.g. using 5 to 10 ml of dishwashing liquid diluted in 5 liters of water). o Clean the parts of the humidifier chamber in the detergent solution and, if necessary, brush with a soft brush. o Rinse carefully and thoroughly the different parts of the humidifier chamber under running water. o Remove the excess water by slightly shaking it. Disinfection: o Prepare a new soaking container with water and disinfectant. o Follow the same steps as for pre-disinfection. Drying: o Let it drain out away from the sun. Storage: o Reassemble the humidifier chamber. o Keep the disinfected and dried humidifier chamber in a clean, single-use, hermetically sealed bag until its next use. Note: Dispose of the humidifier chamber when it is damaged and replace it with a new one. 26 Disinfecting the materials SEFAM S.Box
27 Things never to use Never use abrasive or strong alkaline cleaners, acetone, benzene, leaded gasoline to clean the device. Do not use a type of sponge with a scraper or a hard bristle brush. Never use any pre-disinfectant or disinfectant products containing Aldehydes and/or its derivatives: Formaldehyde, Glutaraldehyde, etc. Do not use pre-disinfectant or non-active disinfectant on Mycobacterium tuberculosis (B.K). Never disinfect the internal circuit of the air flow with disinfectant or with an Airway Surface Disinfection System (ASDS). SEFAM S.Box Disinfecting the materials 27
28 Troubleshooting tips Device Messages Message on the display This symbol flashes on screen. This symbol flashes on screen. The symbol flashes quickly on the status bar display. Possible cause The mask is disconnected. The device detected an operating error in the heated humidifier. The device has detected a malfunction of the S.Box heated tube with ATC. The SD card is either not inserted or not properly inserted in the device. The SD card is locked. The SD card is 90% full, or more. SD card error. The unit detected an operating error. Proposed solution Check the connection between the mask, the breathing tube and the device. This message disappears once you breathe into your properly reconnected mask or press the button. The device is operating without the heated humidification function. The corresponding error code is registered in the memory of the machine and is accessible by using the SEFAM Analyze software. Refer to the section "Error messages". The device is operating without using the function of the heated tube. Check the tube connections to the device. Unplug the device from all power sources. Plug it in again and turn it on. If the problem persists, contact Technical Support Service. Insert the SD card properly into the SD card slot. Unlock the SD card and reinsert it into the SD card slot. Delete files on the SD card and give it back to the patient. Give a new SD card to the patient. Refer to the section "Error Messages". or The error code flashes. (XX = 2 figures). 28 Troubleshooting tips SEFAM S.Box
29 Error Messages Code Description Corrective action ER01 ER02 Problem with patient settings. High temperature in the motor Reset the default settings by pressing the ramp button 2 seconds, then the scroll up using touch key. The message will blink. Tap scroll up touch key to confirm. The device is now set at default values. You can begin to make the settings you wish to. If the error persists, return the device to Technical Support service. Unplug the device from all power supply. Allow it to cool down and plug it in again following carefully the instructions from the patient manual. If the error persists, return the device to Technical Support service. ER03 Memory battery full. Unplug the device from all power supply. Plug it in again. If the error persists, return the device to Technical Support service. ER04 High pressure Unplug the device from all power supply. Plug it in again If the error persists, return the device to Technical Support service. ER06 CheckSum code error. Unplug the device from all power supply. Plug it in again. If the error persists, return the device to Technical Support service. ER07 Turbine problem. Unplug the device from all power supply. Verify that there is no object in the air outlet. Plug the machine in again. If the error persists, return the device to Technical Support service. ER08 ER10 ER11 ER12 ER13 Voltage level problem Device set-up problem High motor current consumption Device memory is empty. Communication error on the I²C bus. Unplug the device from all power supply. Plug it in again. If the error persists, return the device to Technical Support service. Unplug the device from all power supply. Plug it in again. If the error persists, return the device to Technical Support service. Unplug the device from all power supply. Plug it in again If the error persists, return the device to Technical Support service. Unplug the device from all power supply. Plug it in again If the error persists, return the device to Technical Support service. Unplug the device from all power supply. Plug it in again If the error persists, return the device to Technical Support service. for Notes: When an error is detected, the device goes in standby mode (except for special cases) making access to different menus impossible. Error codes can be processed using the SEFAM Analyze software or the tablets/smartphones apps. SEFAM S.Box Troubleshooting tips 29
30 Technical characteristics Performance of the device Pressure range: Maximum pressure at the patient-side connection port in the first default condition: Maximum adjustable pressure: Duration of ramp: Sound pressure level measured according to standard NF EN ISO : 2009: Patient-side connection port: Battery life in electronic board: Air inlet filters: 4 cm H 2 O to 20 cm H 2 O Adjustable by steps of 0.5 cm H 2 O 40 cm H 2 O 20 cm H 2 O 0 to 45 minutes 1 minute Adjustable in 5 minute steps 27.5 dba with side cover 28.5 dba with humidifier conical connector 22 mm in diameter 5 years Optional high-efficiency filter, disposable fabric. HEPA filter, which is 90% effective for particles > 3 microns. Values determined under ATPD (Ambient Temperature and Pressure, Hygrometry) conditions. Time required for the device to warm from the minimum storage temperature between uses until it is ready for its intended use when the ambient temperature is 20 C: Time required for the device to cool from the maximum storage temperature between uses until it is ready for its intended use when the ambient temperature is 20 C: Humidifier performance At least one hour At least one hour Humidification rate: > 12mgH 2 O/l at the maximum setting for a leakage rate < 60 l/min. Heating time: 45 minutes Pressure drop depending on flow: 1.3 cm H 2 O at 1 l/sec Humidifier chamber compliance: 11 ml / kpa (humidifier chamber empty) 8 ml / kpa (humidifier chamber full) Maximum operating pressure: 20 cm H 2 O Maximum gas temperature coming from the respiratory circuit: 43 C Values determined under ATPD (Ambient Temperature and Pressure, Hygrometry) conditions. Conditions of use Pressure range: Temperature: Relative humidity: Altitude range: 700 hpa to 1060 hpa +5 C to +40 C with side cover +5 C to +35 C with humidifier Between 15 % and 90 % without condensation Approximately m 30 Technical characteristics SEFAM S.Box
31 Transport and storing conditions Pressure range: Temperature: Relative humidity: Electrical characteristics Device 700 hpa to 1060 hpa -25 C to +70 C Up to 90 % without condensation Input voltage: 24.0 V 20 % Maximum power consumption: 75 W during a mask disconnection Current consumption at 20 cm H 2 O with 0.42 A (minimum configuration: SEFAM S.Box only) a 4-mm leak: 1.99 A (maximum configuration: SEFAM S.Box with humidifier set to 10 and heated tube set to 05) RF emission type (SEFAM S.Box ): Frequency band: Maximum power: Bluetooth version 2.1+ EDR 2400 to MHz (ISM band) 4 dbm RF emission type (PolyLink): Bluetooth Smart (BLE 4.1) Frequency band: 2402 to 2480 MHz (ISM band) Maximum power: 5.3 dbm RF emission type (optional S.Box Modem): Frequency band: Maximum power: RF emission type (optional S.Box Module Wi-Fi): Frequency band: Maximum power: Power supply HSDPA, WCDMA, EDGE, UMTS 850MHz, 1900 MHz (for US version) 900MHz, 2100MHz (for European version) 800MHz, 850MHz, 2100MHz (for Japanese version) +33 dbm Wi-Fi b/g/n 2412 to 2484 MHz (ISM band) +18 dbm Power supply class II: Input voltage: Power supply provided: Input current: Output voltage: WARNING: VAC, Hz MDS-090BAS24 A (outlet depending on the country) 2-1 A 24 V Use only the plug-in power supply provided with the device The power supply is not intended to be repaired. In case of a breakdown, please contact your home care provider for a replacement. The 24 V DC input is protected against voltage reversals. SEFAM S.Box Technical characteristics 31
32 Physical characteristics Dimensions (L x W x H): 245 x 140 x 110 mm with side cover 245 x 185 x 110 mm with humidifier Carrying bag dimensions (L x W x H): 305 x 245 x 180 mm Carrying case dimensions (L x W x H): 350 x 310 x 190 mm Weight (without power supply): 1.4 kg with side cover 1.7 kg with humidifier Power supply weight: 0.5 kg Operational volume (minimum volume 730 ml of gas in the humidifier chamber): Usable volume of water in chamber 350 ml Maximum liquid level: Indicated by on humidifier chamber Definition of symbols Symbol Description Symbol Description Start / standby button. Device is in accordance with the requirements of the European directive 93/42 /EC on medical devices. Class II device. 24 V Direct Current power supply Manufacturer. Danger: hot surface. On the humidifier chamber, this symbol indicates that it is necessary to open the chamber and remove its cover before pouring water in from a recipient. On the heater element, this symbol indicates in which direction to push the latch to lock or unlock the heater plate. On the packaging, this symbol means "Atmospheric pressure limit". On the packaging: this symbol means "Fragile" because the package must be handled with care. On the packaging, this symbol means "Temperature limit". Ramp button. Device can no longer be used, dispose separately from household garbage. See "End of life disposal of the device" page 33. Type BF device. Device composes an RF transmitter, non - ionizing radiation. Manufacturing date. On the humidifier chamber, this symbol indicates the maximum water level which should not be exceeded in the chamber. Do not pour water directly into the openings of the humidifier chamber. Device protected against solid objects of more than 12 mm and against drops of water falling vertically. On the packaging, this symbol means "Relative humidity limit". On the packaging: this symbol means "Keep dry" because the package must be protected against moisture and water. Refer to the user manual. 32 Technical characteristics SEFAM S.Box
33 CE marking Date of CE marking of SEFAM S.Box : 2017 Regulatory Requirements Risks concerning this medical device are evaluated according to the ISO standard, specifically with regard to global residual risk. The SEFAM S.Box complies with the following Directives and standards: Directive 93/42/CEE of the European Parliament and of the Council concerning medical devices, modified by the European Directive 2007/47/CE Directive 2014/53/EU of the European Parliament and of the Council on the harmonization of the laws of the Member States relating to the making available on the market of radio equipment Directive 2011/65/EU of the European Parliament and of the Council on the restriction of the use of certain hazardous substances in electrical and electronic equipment (RoHS) Directive 2012/19/EU of the European Parliament and of the Council on waste electrical and electronic equipment (WEEE) Federal Aviation Administration RTCA/DO-160G section 21 category M IEC : AC1: AC2: Amd1:2012: Medical electrical equipment. Part 1: General requirements for basic safety and essential performance IEC :2014: Medical electrical equipment Part 1-2: General requirements for basic safety and essential performance Collateral Standard: Electromagnetic disturbances Requirements and tests IEC :2015: Medical electrical equipment Part 1-2: General requirements for basic safety and essential performance Collateral Standard: Electromagnetic disturbances Requirements and tests ISO :2015: Medical electrical equipment -- Part 2-70: Particular requirements for basic safety and essential performance of sleep apnea breathing therapy equipment EN ISO 8185:2009: Respiratory tract humidifiers for medical use -- Particular requirements for respiratory humidification systems End of life disposal of the device In European Union this device has to be considered as an electrical and electronic piece of equipment as defined in Directive 2012/19/EU, and must be collected and processed separately from household waste for disposal as indicated by the symbol of the crossed out garbage bin (see "Definition of symbols"). In other countries, this device must be processed following local regulation. Unsuitable disposal of the device at the end of its life could harm the environment. SEFAM S.Box Technical characteristics 33
34 Electromagnetic Compatibility Electromagnetic emissions Conformity Electromagnetic environment guidance RF emissions CISPR 11 Harmonic emissions IEC Voltage fluctuations/flicker emissions IEC Group 1 Class B Class A Complies The device uses RF energy only for its internal function. Therefore, its RF emissions are very low and are not likely to cause any interference in nearby electronic equipment. Electromagnetic Immunity Test level Compliance level Electromagnetic environment guidance Electro-static discharge (ESD) IEC Electrical fast transient/burst IEC Surge IEC Voltage dips, short interruptions and voltage variations on power supply input lines IEC Magnetic fields in the Power Supply Frequencies (50/60 Hz) IEC Conducted RF IEC ± 6 kv contact ± 8 kv air ± 2 kv for power supply lines ± 1 kv for input / output lines ± 1 kv lines/lines ± 2 kv lines/earth < 5% UT (>95% dip in UT) for 0.5 cycles 40% UT (60% dip in UT) for 5 cycles 70% UT (30% dip in UT) for 25 cycles < 5% UT (>95% dip in UT) for 5 s ± 6 kv contact ± 8 kv air ± 2 kv for power supply lines ± 1 kv for input / output lines ± 1 kv lines/lines ± 2 kv lines/earth < 5% UT (>95% dip in UT) for 0.5 cycles 40% UT (60% dip in UT) for 5 cycles 70% UT (30% dip in UT) for 25 cycles < 5% UT (>95% dip in UT) for 5 s Floors should be wood, concrete or ceramic tile. If floors are covered with synthetic material, the relative humidity should be at least 30 %. Mains power quality should be that of a typical commercial or hospital environment. Mains power quality should be that of a typical commercial or hospital environment. Mains power quality should be that of a typical commercial or hospital environment. If the user of the device requires continued operation during power mains interruptions, it is recommended that the device be powered from an uninterruptible power supply or a battery. 3A/m 3A/m Power frequency magnetic fields should be at levels characteristic of a typical location in a typical commercial or hospital environment. 3Vrms From 150 khz to 80 MHz 3Vrms From 150 khz to 80 MHz Portable and mobile RF communications equipment should be used no closer to any part of the [ME EQUIPMENT or ME SYSTEM], including cables, than the recommended separation distance calculated from the equation applicable to the frequency of the transmitter. Recommended separation distance : Radiated RF IEC Note: 10 V/m from 80 MHz to 6 GHz 10 V/m from 80 MHz to 6 GHz U T is the AC mains voltage prior to application of the test level. Recommended separation distance : from 80 MHz to 800 MHz from 800 MHz to 2,5 GHz 34 Technical characteristics SEFAM S.Box
35 Special characteristics according to the standard NF EN ISO :2009 Sound pressure level measured in compliance with NF EN ISO :2009 WITHOUT HUMIDIFIER WITH HUMIDIFIER 27.5 dba 28.5 dba Sound power level measured in compliance with NF EN ISO :2009 WITHOUT HUMIDIFIER WITH HUMIDIFIER 35.5 dba 36.5 dba Static pressure stability at 10 cm H 2 O (Long-term accuracy according to ISO :2009, annex BB.1 and ISO : ) WITHOUT HUMIDIFIER WITH HUMIDIFIER Pressure accuracy: +/- 0.5 cm H 2 O +/- 0.5 cm H 2 O Dynamic pressure stability (Short-term accuracy according to ISO :2009, annex BB.2 and ISO : ) WITHOUT HUMIDIFIER 22 mm diameter tube Most positive pressure difference (cm H 2 O) Most negative pressure difference (cm H 2 O) Difference in dynamic pressures (cm H 2 O) 15 mm diameter tube Most positive pressure difference (cm H 2 O) Most negative pressure difference (cm H 2 O) Difference in dynamic pressures (cm H 2 O) Test pressure (cm H 2 O) Respiratory freq. Respiratory freq. Respiratory freq. Respiratory freq. Respiratory freq. breaths/min breaths/min breaths/min breaths/min breaths/min SEFAM S.Box Technical characteristics 35
36 WITH HUMIDIFIER 22 mm diameter tube Most positive pressure difference (cm H 2 O) Most negative pressure difference (cm H 2 O) Difference in dynamic pressures (cm H 2 O) 15 mm diameter tube Most positive pressure difference (cm H 2 O) Most negative pressure difference (cm H 2 O) Difference in dynamic pressures (cm H 2 O) 15 mm diameter tube and fine filter Most positive pressure difference (cm H 2 O) Most negative pressure difference (cm H 2 O) Difference in dynamic pressures (cm H 2 O) Test Pressure (cm H 2 O) Respiratory freq. Respiratory freq. Respiratory freq. Respiratory freq. Respiratory freq. breaths/min breaths/min breaths/min breaths/min breaths/min Maximum flow and pressure (In accordance with ISO :2009, annex CC.1 and ISO : ) WITHOUT HUMIDIFIER Test pressure (cm H 2 O) Maximum flow (lpm) causing a pressure drop of 1 cm H 2 O at the patient port 22 mm diameter tube >124 > mm diameter tube >120 > WITH HUMIDIFIER Maximum flow (lpm) causing a pressure drop of 1 cm H 2 O at the patient port 22 mm diameter tube >126 > mm diameter tube >125 > mm diameter tube and fine filter >120 > Technical characteristics SEFAM S.Box
37 Test pressure (cm H 2 O) WITHOUT HUMIDIFIER Pressure measure (cm H 2 O) at 40 l/min at the patient interface 22 mm diameter tube mm diameter tube WITH HUMIDIFIER Pressure measure (cm H 2 O) at 40 l/min at the patient interface 22 mm diameter tube mm diameter tube mm diameter tube and fine filter Functional diagram of the internal pneumatic circuit Device with side cover Device with humidifier SEFAM S.Box Technical characteristics 37
38 38 Technical characteristics SEFAM S.Box
39

40 Manufacturer: SEFAM 144 AV CHARLES DE GAULLE NEUILLY SUR SEINE FRANCE Manufacturing plant: SEFAM 10 ALLÉE PELLETIER DOISY VILLERS-LES-NANCY FRANCE : M-164DFU00-30-Version
Download the FREE application. on your Smartphone or on your tablet. and
 Download the FREE application on your Smartphone or on your tablet and With SEFAM ACCESS, you can: Easily adjust your S.Box, Easily monitor the evolution of the effectiveness of your treatment and other
Patient Manual EcoStar
 EcoStar Patient Manual Table of Contents Before starting... 3 Safety instructions... 3 Intended use... 4 Adverse effects... 4 Contraindications... 4 Checking the components... 4 Description of the device...
GoodKnight H 2 O. User's Manual. Heated Humidifier. Ref. : M-146DFU00-20 Revision D
 GoodKnight H 2 O Heated Humidifier User's Manual Ref. : M-146DFU00-20 Revision D Revision D User's Manual Revisions: GoodKnight H 2 O Heated Humidifier The pages below are included in the American version
GoodKnight 425. Patient Manual. Ref. : M-145DFU00-40 Revision A
 GoodKnight 425 Patient Manual Ref. : M-145DFU00-40 Revision A List of Patient Manual Revisions GoodKnight 425 The pages below are included in the American version of the patient manual Ref. M-145DFU00-40,
System Contents Your REMstar Pro C-Flex+ system includes the following items: Reusable gray foam filter Disposable ultra-fine filter (optional)
") System Contents Your REMstar Pro C-Flex+ system includes the following items: Device Reusable gray foam filter User manual Disposable ultra-fine filter (optional) Carrying case Side cover panel Power cord
System Contents Your REMstar Pro C-Flex+ system includes the following items: Device Reusable gray foam filter User manual Disposable ultra-fine filter (optional) Carrying case Side cover panel Power cord
VPAP COPD. H5i. Welcome Guide. Making quality of care easy. Respiratory Care Solutions. English NONINVASIVE VENTILATOR HEATED HUMIDIFIER
 VPAP COPD NONINVASIVE VENTILATOR H5i HEATED HUMIDIFIER Welcome Guide English Respiratory Care Solutions Making quality of care easy Respiratory Care Solutions Making quality of care easy Welcome Thank
RESmart CPAP System. User Manual
 RESmart CPAP System User Manual 0123 Table of Contents Symbols... 1 Intended Use... 2 Specifications... 3 Warning & Cautions... 4 Unpacking the System... 5 System Features... 6 First Time Setup... 7 Installing
VPAP Auto VPAP ST VPAP S. H5i. Welcome Guide. English POSITIVE AIRWAY PRESSURE DEVICE HEATED HUMIDIFIER
 VPAP Auto VPAP ST VPAP S POSITIVE AIRWAY PRESSURE DEVICE H5i HEATED HUMIDIFIER Welcome Guide English Welcome Thank you for choosing the S9 VPAP Series or H5i. Before operating these devices, please read
System One Heated Humidifier USER MANUAL
 System One Heated Humidifier USER MANUAL 2016 Koninklijke Philips N.V. All rights reserved. Table of Contents Intended Use... 2 Warnings... 2 Cautions... 2 Contraindications... 3 Symbol Key... 3 System
DreamStation Go. Heated Humidifier. User manual. Instructions for use
 DreamStation Go Heated Humidifier User manual Instructions for use Table of contents 1. Safety information... 1 2. System overview...3 3. Connecting and setting up the humidifier...5 Humidifier pop-up
VPAP Adapt. H5i. Welcome Guide. English. adaptive servo-ventilator
 VPAP Adapt adaptive servo-ventilator H5i HEATED HUMIDIFIER Welcome Guide English Welcome Thank you for choosing the VPAP Adapt or H5i. Before operating the device, please read the entire Welcome and Information
REMstar SE USER MANUAL
 REMstar SE USER MANUAL 2012 Koninklijke Philips Electronics N.V. All rights reserved. Table of Contents Intended Use... 2 Important... 2 Warnings... 2 Cautions... 3 Contraindications... 3 Symbol Key...
OWNER S MANUAL DLFCAB / DLFCHB / DLFDAB / DLFDHB High Wall Ductless System Sizes 09 36
 OWNER S MANUAL DLFCAB / DLFCHB / DLFDAB / DLFDHB High Wall Ductless System Sizes 09 36 TABLE OF CONTENTS PAGE SAFETY PRECAUTIONS... 2 GENERAL... 2 INDOOR UNIT PART NAMES... 3 REMOTE CONTROL PART NAMES...
User manual. DreamStation Heated Humidifier
 ! User manual DreamStation Heated Humidifier! Table of Contents Intended Use... 1 Warnings... 1 Cautions... 1 Contraindications... 2 Symbol Key... 2 System Overview... 2 System Features and Contents...
USER Manual JR 10/02/06
 USER Manual 1038585 JR 10/02/06 Important! Fill in the information below when you receive the BiPAP Auto M Series system. Serial No.: (located on the bottom of the device) System Prescribed for: Date of
A U T O S E R I E S Operating Manual
 A U T O S E R I E S Operating Manual English The SleepStyle 200 Auto Series is designed for use in the home or sleep laboratory, for the treatment of Obstructive Sleep Apnea. For further assistance, please
DreamStation Service & Technical Reference Manual
 DreamStation Service & Technical Reference Manual CHAPTER 1: INTRODUCTION 1.0 CPAP/BIPAP SYSTEM OVERVIEW... 1-2 1.1 HUMIDIFIER SYSTEM OVERVIEW... 1-4 1.2 SERVICE NOTICE... 1-5 1.3 SERVICE TRAINING... 1-5
OWNER S MANUAL. R 410A Ductless Split System Air Conditioner and Heat Pump
 R 410A Ductless Split System Air Conditioner and Heat Pump Models DLC4(A/H) Outdoor Unit, DLF4(A/H) Indoor Unit Sizes 9K, 12K, 18K, 24K, 30K and 36K Please read the operating instructions and safety precautions
Table of Contents. isleep 20 users manual
 Table of Contents 1 Intended Use of the isleep 20... 3 1.1 What is the isleep 20?... 3 1.2 Indications for Use... 4 1.3 Contraindications... 4 1.4 About this Manual... 5 2 Safety Information... 7 2.1 General
AutoSet AutoSet for Her Elite Escape Auto Escape. H5i H5i for Her. Welcome Guide. English. POSITIVE AIRWAY PRESSURE DEVICEs HEATED HUMIDIFIER
 AutoSet AutoSet for Her Elite Escape Auto Escape POSITIVE AIRWAY PRESSURE DEVICEs H5i H5i for Her HEATED HUMIDIFIER Welcome Guide English Welcome Thank you for choosing the S9 Series or H5i. Before operating
Operating Manual. Model HC254
 A U T O S E R I E S Operating Manual Model HC254 English The SleepStyle 200 Auto Series is designed for use in the home or sleep laboratory, for the treatment of Obstructive Sleep Apnea. For further assistance,
SleepEasy. User Manual
 SleepEasy Would you like a free travel bag for your SleepEasy? If so, go to http://sleepeasy.respironics.com/register to register your product and receive your SleepEasy travel bag. A nominal charge for
REMstar Auto A-Flex USER MANUAL
 REMstar Auto A-Flex USER MANUAL 2012 Koninklijke Philips Electronics N.V. All rights reserved. Table of Contents Intended Use... 2 Important... 2 Warnings... 2 Cautions... 3 Contraindications... 3 Symbol
LINE. Patient compass. Welcome Guide English. Your guide to the therapy device
 LINE Welcome Guide English Patient compass Your guide to the therapy device 2 Touchscreen Filter compartment Handle Unlocking button Voltage input Name of device On/off button SD card slot 3 Welcome to
Transcend Heated Humidifier User Manual
 Transcend Heated Humidifier User Manual Page 1 Transcend Heated Humidifier TM User Manual Notices Revised Notice Trademark Transcend Heated Humidifier User Manual 103404 Rev H Published February 2016
PR-L2466W- PA. Operating Instructions. High Performance Refrigerator PR-L2466W-PA
 Operating Instructions High Performance Refrigerator PR-L2466W- PA PR-L2466W-PA Please read these instructions carefully before using this product, and save this manual for future use. See page 11 for
PAP Disinfecting Device User Guide. For all PAP Devices (Positive Airway Pressure) CPAP, APAP, Bi-PAP
 CPAP, APAP, Bi-PAP") PAP Disinfecting Device User Guide For all PAP Devices (Positive Airway Pressure) CPAP, APAP, Bi-PAP Thank You! Thank you for your purchase of the SoClean 2 PAP disinfecting system. Please familiarize
PAP Disinfecting Device User Guide For all PAP Devices (Positive Airway Pressure) CPAP, APAP, Bi-PAP Thank You! Thank you for your purchase of the SoClean 2 PAP disinfecting system. Please familiarize
1 Intended Use of the Breas HA 01 Humidifier
 User Manual for Breas HA 01 Humidifier 1 Intended Use of the Breas HA 01 Humidifier Read this manual thoroughly so that you completely understand how the humidifier is operated and maintained before taking
Instructions For Use. Hybernite ROC 2300 Rainout Control System
 Instructions For Use Hybernite ROC 2300 Rainout Control System The Hybernite Rainout Control System helps to prevent moisture condensation in the breathing tube of adult patients requiring continuous positive
Quick start guide. CPAP Pro. Auto CPAP. Navigating in the menu. Caring for my. Setting up my therapy. DreamStation. Additional help and tips
 DreamStation CPAP Pro Auto CPAP Quick start guide Please refer to the device, humidifier and mask user manuals for full cleaning and user instructions. 2015 Koninklijke Philips N.V. All rights reserved.
One-Touch Dispense. Multi-temp selections. 208 F For tea, coffee, instant noodle. 194 F Keep warm around 194 F. 176 F Keep warm around 176 F.
 Instruction Manual Automatic Dispensing Hot Water Pot with Multi-temperature Function Automatic Dispensing One-Touch Dispense FEATURES Reboil Function 5 Temperature Settings Image Of SP-5016 208 F For
VPAP Adapt. H5i. Welcome Guide. English POSITIVE AIRWAY PRESSURE DEVICE HEATED HUMIDIFIER
 VPAP Adapt POSITIVE AIRWAY PRESSURE DEVICE H5i HEATED HUMIDIFIER Welcome Guide English Welcome Thank you for choosing the VPAP Adapt or H5i. Before operating this device, please read the entire Welcome
REMstar Auto A-Flex USER MANUAL
 REMstar Auto A-Flex USER MANUAL 2010 Koninklijke Philips Electronics N.V. All rights reserved. Table of Contents Intended Use... 2 Important... 2 Warnings... 2 Cautions... 3 Contraindications... 3 Symbol
Transcend Sleep Apnea Therapy Starter System User Manual
 Transcend Sleep Apnea Therapy Starter System User Manual Page ii Notices Revised Notice Trademark Copyright 103084 Rev T Published May 2018 and supersedes all previous versions. The information contained
MODEL 7000 SUCTION UNIT
 MODEL 7000 SUCTION UNIT OPERATOR S MANUAL Caution Federal law restricts this device to sale by or on order of a physician, or any other practitioner licensed by the law of the State in which he practices
For Android devices MYQ-G0301 MYQ-G0301C MYQ-G0301D MYQ-G0301LA
 Smart Smart Garage Garage Hub Hub Manual Manual For Android devices MYQ-G0301 MYQ-G0301C MYQ-G0301D MYQ-G0301LA by Before You Start To reduce the risk of SEVERE INJURY to persons: DO NOT enable the MyQ
Owner's Manual TABLE OF CONTENTS
 40MAQ High Wall Ductless System Sizes 09 to 36 Owner's Manual TABLE OF CONTENTS PAGE A NOTE ABOUT SAFETY... 2 GENERAL... 2 PART NAMES... 3 FUNCTION BUTTONS... 4 DISPLAY PANELS... 5 REMOTE CONTROL... 6
DreamStation. BiPAP Pro. Auto BiPAP. User manual
 DreamStation BiPAP Pro Auto BiPAP User manual Table of Contents Intended Use... 1 Important... 1 Warnings... 1 Cautions... 2 Contraindications... 2 Symbols Glossary... 3 System Contents... 4 How to Contact
Portable Air Conditioner User Manual
 Portable Air Conditioner User Manual Email: usinfo@jmatek.com Web: www.jmatek.com Model / Modèle / Modelo: MN09 Series / Série / Serie: MN09CES, MN09CESBB, MN09CESWW, MN09CHES, MN09CHESBB, MN09CHESWW MN10
User Manual. Non-contact Infrared Thermometer.
 User Manual Non-contact Infrared Thermometer www.paryvara.com info@paryvara.com Introduction Thank you for purchasing this Non-contact Infrared Thermometer. Please read the User Manual carefully to ensure
ASPIRE Laboratory Aspirator
 ASPIRE Laboratory Aspirator USER MANUAL Rev 2/14/18 Accuris Instruments / Benchmark Scientific Ph: (908) 769-5555 E-mail: info@accuris-usa.com (C) Benchmark Scientific, 2018 THE ACCURIS ASPIRE LABORATORY
VPAP ST with ivaps. Welcome Guide. Making quality of care easy. English. Respiratory Care Solutions NONINVASIVE VENTILATOR
 VPAP ST with ivaps NONINVASIVE VENTILATOR Welcome Guide English Respiratory Care Solutions Making quality of care easy Respiratory Care Solutions Making quality of care easy Welcome Thank you for choosing
APC BC300 Series 40kW 208/450/480V User Guide
 APC BC300 Series 40kW 208/450/480V User Guide Copyright 2002 APC Denmark ApS This manual is subject to change without notice and does not represent a commitment on the part of the vendor Thank You Thank
CLEAN MIST SMART HUMIDIFIER Instruction Manual and Warranty Information IM0031B READ AND SAVE THESE INSTRUCTIONS
 CLEAN MIST SMART HUMIDIFIER Instruction Manual and Warranty Information IM0031B READ AND SAVE THESE INSTRUCTIONS Contents Safety Instructions... 1 Unpacking / Specifications... 2 Parts & Contents... 3
Bipap A30/40 ventilator and System One humidifier
 The Lane Fox Respiratory Unit Bipap A30/40 ventilator and System One humidifier Patient start-up user guide Contents p.2 Contents p.3 What is bi-level ventilation? p.3 What s included in your bag? p.3
JA-63 Profi User manual
 JA-63 Profi User manual Contents: 1 Limited warranty... 2 2 Indicators... 3 3 Controlling the system... 4 3.1 Arming... 5 3.2 Disarming... 6 3.3 Panic Alarm... 6 3.4 To stop ALARM... 6 3.5 Home arming...
SOMNObalance (e) SOMNOsoft 2 (e) autocpap device with exhalation relief. CPAP device with exhalation relief. Instructions for use
 SOMNOsoft 2 (e) autocpap device with exhalation relief. CPAP device with exhalation relief. Instructions for use") SOMNObalance (e) autocpap device with exhalation relief SOMNOsoft 2 (e) CPAP device with exhalation relief Instructions for use Contents Contents 1 Introduction 4 1.1 Intended use... 4 1.2 Description
SOMNObalance (e) autocpap device with exhalation relief SOMNOsoft 2 (e) CPAP device with exhalation relief Instructions for use Contents Contents 1 Introduction 4 1.1 Intended use... 4 1.2 Description
INSTRUCTIONS OPERATING BLUETOOTH CAPACITIVE TOUCH THERMOSTAT MODEL COOL/FURNACE COOL/FURNACE/HEAT PUMP
 BLUETOOTH CAPACITIVE TOUCH THERMOSTAT OPERATING INSTRUCTIONS 3316420.XXX MODEL COOL/FURNACE COOL/FURNACE/HEAT STRIP COOL/FURNACE/HEAT PUMP Read these instructions carefully. These instructions MUST stay
AutoSet CS POSITIVE AIRWAY PRESSURE DEVICE. Welcome Guide. English
 AutoSet CS POSITIVE AIRWAY PRESSURE DEVICE Welcome Guide English Welcome Thank you for choosing the AutoSet CS. Before operating this device, please read the entire Welcome and Information Guides. Module/Adapter
SimplyGo Mini. User Manual REF R05 JH 08/01/2016 EN-INTL
 SimplyGo Mini REF 1121830 1121829 R05 JH 08/01/2016 EN-INTL User Manual Table of Contents Introduction...1 Intended Use...1 Contraindications...1 Device and Accessories Description...1 SimplyGo Mini System...2
Components of the device. Appearance of the device. ihealth thermometer User s manual LED screen. Manufacturer info. LED screen.
 Components of the device The external body of the thermometer is made of plastic. The device is equipped with an infrared temperature sensor, MCU, electro-acoustic components, batteries, LED-screen, battery
S9 Series AutoSet & Elite
 S9 Series AutoSet & Elite POSITIVE AIRWAY PRESSURE DEVICEs User Guide A 3 2 5 4 1 S9 AutoSet indications for use The S9 AutoSet self-adjusting system is indicated for the treatment of obstructive sleep
Kinsa Smart Ear ThermometerTM Instructions For Use
 ENGLISH Kinsa Smart Ear ThermometerTM Instructions For Use Thank you for purchasing the Kinsa Smart Ear Thermometer, a professionally accurate instrument for fast and easy temperature taking in the ear.
Contraindications Positive airway pressure therapy may be contraindicated in some patients with the following preexisting
 S9 Escape Auto POSITIVE AIRWAY PRESSURE DEVICE Information Guide English English S9 Escape Auto indications for use The S9 Escape Auto self-adjusting system is indicated for the treatment of obstructive
micomme, Sepray,, are registered trademarks of Micomme Medical Technology Development Co., Ltd. All rights reserved. Modes: Sepray CPAP 25,Sepray CPAP
 Sepray CPAP 25/CPAP A25 User Manual MICOMME MEDICAL 0123 micomme, Sepray,, are registered trademarks of Micomme Medical Technology Development Co., Ltd. All rights reserved. Modes: Sepray CPAP 25,Sepray
Failure to comply with the following instructions may result in death or serious injury to
 1. Safety Precautions [Warning] Failure to comply with the following instructions may result in death or serious injury to the user or failure of the product. - Do not disassemble, repair, or modify the
ULTRASONIC HUMIDIFIER
 To Buy: Visit www.sylvane.com or call (800) 934-9194 For Product Support: Contact Sunpentown at 1-800-330-0388 ULTRASONIC HUMIDIFIER [ADORABLE MONKEY] To prolong the life of this humidifier, using distilled
Sleep Apnea Therapy System User Manual
 Sleep Apnea Therapy System User Manual Page ii Notices Revised Notice Trademark Copyright Transcend Sleep Apnea Therapy System User Manual 103084 Rev M Published December 4, 2013 and supersedes all previous
BiPAP Pro Bi-Flex USER MANUAL
 BiPAP Pro Bi-Flex USER MANUAL 2010 Koninklijke Philips Electronics N.V. All rights reserved. Table of Contents Intended Use... 2 Important... 2 Warnings... 2 Cautions... 3 Contraindications... 3 Symbol
DreamStation. BiPAP autosv REF R04 HM 01/30/2017 EN-DOM. User manual
 DreamStation BiPAP autosv REF 1128707 1128707 R04 HM 01/30/2017 EN-DOM User manual 2017 Koninklijke Philips N.V. All rights reserved. Provider guide DreamStation BiPAP autosv Warning! Remove this guide
instructions for use Air Purifier with ionizer _00/
 Instructions for use Air Purifier with Ionizer 5713710041_00/07.12 H T S R Q L P N O M I H A B C D E U F G Fig. 2 Fig. 3 Fig. 4 2 introduction Thank you for choosing a De Longhi product. Please take a
Schuco byallied MEDICAL ASPIRATOR. USER'S MANUAL A Caution
 S168-544-OO1E REV.A Schuco byallied MEDICAL ASPIRATOR MnrInI -33OA USER'S MANUAL A Caution Federal law restricts this device to sale by or on order of a physician, or any other practitioner licensed by
User manual. DreamStation CPAP DreamStation CPAP Pro DreamStation Auto CPAP DRAFT
 User manual DreamStation CPAP DreamStation CPAP Pro DreamStation Auto CPAP Table of Contents Intended Use... 1 Important... 1 Warnings... 1 Cautions... 2 Contraindications... 2 Symbol Key... 3 System Contents...
USER MANUAL. Safety Precautions. Unit Specifications and Features. Operating Instructions. Installation Instructions.
 Safety Precautions Unit Specifications and Features Operating Instructions Installation Instructions Care and Cleaning Troubleshooting Tips USER MANUAL Dehumidifier TDDP7011ES2 Warning notices: Before
S9 Escape. Welcome Guide. English POSITIVE AIRWAY PRESSURE DEVICE
 S9 Escape POSITIVE AIRWAY PRESSURE DEVICE Welcome Guide English Welcome Thank you for choosing the S9 Escape. Before operating this device, please read the entire Welcome and Information Guides. DC power
EVAPORATIVE AIR COOLER
 EVAPORATIVE AIR COOLER EN OPERATING INSTRUCTIONS Read the instructions carefully before operating the appliance or carrying out maintenance operations. Observe all the safety instructions; failure to observe
Iconic. aroma diffuser. user manual. Iconic-Aroma-Diffuser Handleiding.indd :11
 Iconic aroma diffuser user manual 1 Iconic-Aroma-Diffuser Handleiding.indd 1 12-01-17 15:11 Thank you for choosing Duux. We re so glad you decided to read the instructions to your new Duux air purifier!
EW 40 Wireless Fan Control
 Installation & Operating Manual EW 40 Wireless Fan Control USA CAN Product Information... Chapters 1 + 2 Mechanical Installation... Chapter 3 Electrical Installation... Chapter 4 Start Up and Configuration...
For ios devices MYQ-G0301 MYQ-G0301C MYQ-G0301-D MYQ-G0301LA
 Smart Smart Garage Garage Hub Hub Manual Manual For ios devices MYQ-G0301 MYQ-G0301C MYQ-G0301-D MYQ-G0301LA by Before You Start To reduce the risk of SEVERE INJURY to persons: DO NOT enable the MyQ Smart
CLEAN MIST SMART HUMIDIFIER Instruction Manual and Warranty Information IM0002E READ AND SAVE THESE INSTRUCTIONS
 CLEAN MIST SMART HUMIDIFIER Instruction Manual and Warranty Information IM0002E READ AND SAVE THESE INSTRUCTIONS Contents Safety Instructions... 1 Unpacking / Specifications... 2 Parts & Contents... 3
DAILY REFERENCE GUIDE
 DAILY REFERENCE GUIDE EN THANK YOU FOR BUYING A WHIRLPOOL PRODUCT. In order to receive a more complete assistance, please register your appliance on http://www.whirlpool.eu/register Before using the appliance,
Owner s Manual TABLE OF CONTENTS
 40GVC / 38GVC 40GVQ / 38GVQ High---Wall Ductless plit ystem izes 009 --- 024 Owner s Manual TABLE OF CONTENT PAGE AFETY PRECAUTION... 2 GENERAL... 2 INDOOR UNIT PART NAME... 3 REMOTE CONTROL PART NAME...
USERS MANUAL FOR GAS BOILERS
 USERS MANUAL FOR GAS BOILERS PLEASE READ THE MANUAL CAREFULLY: IT CONTAINS IMPORTANT INFORMATION REGARDING SAFETY, INSTALLATION, USE AND MAINTENANCE OF THE APPLIANCE MODELS: NOVADENS 24 NOVADENS 24C NOVADENS
Thank you for purchasing the Ionmax Serene ION138 Ultrasonic Aroma Diffuser. The Ionmax Serene reintroduces moisture into the air to help you
 DEAR CUSTOMER Thank you for purchasing the Ionmax Serene ION138 Ultrasonic Aroma Diffuser. The Ionmax Serene reintroduces moisture into the air to help you maintain a comfortable humidity level in your
Mobile Air Conditioner Use and Care Manual. Part Number: 048-GM-48265
 Mobile Air Conditioner Use and Care Manual Part Number: 048-GM-48265 Thank you very much for selecting this new model of Portable Air Conditioner, please read this Use and Care Manual carefully before
OPERATING MANUAL. AIR CONDITIONER Duct Type. Indoor Unit ARTG36LH ARTG45LH ARTG54LH ARTG60LH PART NO KEEP THIS MANUAL FOR FUTURE REFERENCE
 OPERATING MANUAL AIR CONDITIONER Duct Type Indoor Unit ARTG36LH ARTG45LH ARTG54LH ARTG60LH KEEP THIS MANUAL FOR FUTURE REFERENCE PART NO. 9374379583 CONTENTS SAFETY PRECAUTIONS... 2 FEATURES AND FUNCTIONS...
Transcend EZEX TM User Manual
 Transcend EZEX TM User Manual Page ii Notices Revised Notice Trademark Copyright 103435 Rev G Published August 26, 2014 and supersedes all previous versions. The information contained in this document
OXYGEN CONCENTRATORS Information For Our Customers
 811 Bevins St. Lakeport, CA 95453 Phone 707-263-9888 OXYGEN CONCENTRATORS Information For Our Customers An oxygen concentrator is a machine that separates the oxygen from the nitrogen in the air, concentrates
Enhance DX. Mattress Replacement System. User Manual
 Enhance DX Mattress Replacement System User Manual Prius Healthcare USA 580 Corporate Center 4025 Tampa Road, #1117 Oldsmar, FL 34677, USA TEL: (813)854-5464 FAX: (813)854-5442 1111 Content 1. THE PURPOSE
5580 S. Nogales Highway Tucson, AZ Phone: (800) Fax: (520) ANAPOD Instructions For Use
 Fax: (520) ANAPOD Instructions For Use") 5580 S. Nogales Highway Tucson, AZ 85706 Phone: (800) 975-7987 Fax: (520) 294-6061 www.westmedinc.com TM ANAPOD Instructions For Use PN 75054, Rev 02 ii TABLE OF CONTENTS Servicing: Beyond the replacement
5580 S. Nogales Highway Tucson, AZ 85706 Phone: (800) 975-7987 Fax: (520) 294-6061 www.westmedinc.com TM ANAPOD Instructions For Use PN 75054, Rev 02 ii TABLE OF CONTENTS Servicing: Beyond the replacement
CPAPSolutions. Product Profile. Overview: The Family of SleepStyle TM CPAP Solutions
 CPAPSolutions Product Profile Overview: The Family of SleepStyle TM CPAP Solutions 02 Fisher & Paykel Healthcare Contents 03 Sleep Performance for an Energized Lifestyle 04 Fisher & Paykel Healthcare -
PROGRAMMABLE 7-DAY RF THERMOSTAT
 PROGRAMMABLE 7-DAY RF THERMOSTAT Installation and user instruction This instructions to be retained by the user 1 Thank you for choosing Beretta s radio frequency (RF) Radiostat. This central heating control
Non-invasive/invasive ventilators. User Guide. English
 Non-invasive/invasive ventilators User Guide English Contents Introduction................................................ 1 Indications for use 1 Contraindications 1 Adverse effects 1 Stellar at a glance...........................................
User guide User guide English
 User guide English ENGLISH Welcome HumidAir is a humidifier that provides heated humidification and is designed for use with your AirSense 10 or AirCurve 10 device. Read this guide together with your AirSense
Operating Instructions READ AND SAVE THESE INSTRUCTIONS
 Operating Instructions READ AND SAVE THESE INSTRUCTIONS Aprilaire Communicating Thermostat Model 8870 CAUTION: Do not set to OFF mode during periods when freezing temperatures could occur. Thank you for
DLFEHA. OWNER S MANUAL High Wall Ductless System Sizes 09 to 24 TABLE OF CONTENTS
 DLFEHA OWNER S MANUAL High Wall Ductless System Sizes 09 to 24 TABLE OF CONTENTS PAGE A NOTE ABOUT SAFETY... 2 GENERAL... 2 PART NAMES... 3 INDOOR UNIT DISPLAY INDICATOR... 3 REMOTE CONTROLLER... 3 FUNCTION
Quality makes the Difference. AquaTREND uni. User s Manual Humidifi er for Therapeutic Air Flow
 Quality makes the Difference AquaTREND uni User s Manual Humidifi er for Therapeutic Air Flow SERIAL NUMBER HOFFRICHTER GmbH delivers all its systems with a serial number in order to ensure traceability.
INSTRUCTION MANUAL 4-WAY BALL VALVE Digital Manifold
 LOW VAC INSTRUCTION MANUAL 4-WAY BALL VALVE Digital Manifold REF HIGH SPECIAL FEATURES Low battery indicator Displays 63 refrigerants Displays corresponding saturation, dew or bubble point temperature
CLEAN MIST DUAL TANK SMART HUMIDIFIER. Instruction Manual and Warranty Information TABLETOP & FLOOR STANDING WITH REMOTE CONTROL
 CLEAN MIST DUAL TANK SMART HUMIDIFIER TABLETOP & FLOOR STANDING WITH REMOTE CONTROL Instruction Manual and Warranty Information IM0036B READ AND SAVE THESE INSTRUCTIONS Contents Safety Instructions...
PORTABLE AIR CONDITIONER (LOCAL)
") EN PORTABLE AIR CONDITIONER (LOCAL) OPERATING INSTRUCTIONS Read the instructions carefully before operating the appliance or carrying out maintenance work. Observe all the safety instructions; failure
EN PORTABLE AIR CONDITIONER (LOCAL) OPERATING INSTRUCTIONS Read the instructions carefully before operating the appliance or carrying out maintenance work. Observe all the safety instructions; failure
Important! Fill in the information below when you receive the REMstar M Series system.
 1016452 AM 2/09/06 Important! Fill in the information below when you receive the REMstar M Series system. Serial No.: (located on the bottom of the device) System Prescribed for: Date of Purchase or Rental:
JS. Bosch Remote Control
 6720606990-00.1JS Bosch Remote Control For: GWH 635 ES/635 ESO/250SX/250SXO/2400E /2400EO/2400ES/2700ES/715ES/C800ES/C920ES /C920ESC/EVOLUTION 500/INTEGRA 500/C1210ES /C1210ESC/C1050ES/C950ES/940ES/940ESO/830ES
Lyric T6 & T6R Smart Thermostat
 Lyric T6 & T6R Smart Thermostat EN User Guide Lyric T6 Programmable Thermostat Lyric T6R Wireless Programmable Thermostat Lyric T6 & T6R Smart Thermostat Features Connects to the Internet so you can control
TYBOX PAC. * _rev1* User guide. Programmable thermostat for heat pumps
 User guide TYBOX PAC Programmable thermostat for heat pumps TYBOX DELTA DORE - Bonnemain 35270 COMBOURG - FRANCE E-mail : deltadore@deltadore.com Device compliant with the requirements of directives: 2004/108/CE
User guide User guide English
 User guide English ENGLISH Welcome The AirSense 10 AutoSet and AirSense 10 AutoSet for Her are ResMed's premium auto-adjusting pressure devices. The AirSense 10 Elite and AirSense 10 CPAP are ResMed's
Model: T83653v2 Instruction manual DC: WIRELESS COLOR FORECAST STATION Mold Risk for Forecast Station & Indoor Remote Sensor Location
 Model: T83653v2 Instruction manual DC: 012916 WIRELESS COLOR FORECAST STATION Mold Risk for Forecast Station & Indoor Remote Sensor Location FRONT VIEW Time, Alarm + Calendar Indoor Humidity & Temperature
DESCRIPTION OF THE APPLIANCE SAFETEY OPERATION CAUTION MAJOR COMPONENTS. Features
 048-GM-486 SAFETEY OPERATION DESCRIPTION OF THE APPLIANCE Please exercise caution when using this air purifier or any other electrical device! This manual describes the safety precautions which should
OWNER'S MANUAL R-410A Duct Free Split System Air Conditioner and Heat Pump
 R-10A Duct Free Split System Air Conditioner and Heat Pump Product Family: DFF(A/H)H, DFC(A/H) Please read the operating instructions and safety precautions carefully and thoroughly before installing and
DIGITAL ULTRASONIC HUMIDIFIER WITH HUMIDISTAT
 DIGITAL ULTRASONIC HUMIDIFIER WITH HUMIDISTAT To prolong the life of this humidifier, using distilled water is highly recommended. NEVER add fragrance or oil in the water, it will cause the machine to
OWNER'S MANUAL. 101-Pint Commercial Indoor Portable Evaporative Cooler. Model: SF-48LB. Read and save these instructions before use
 101-Pint Commercial Indoor Portable Evaporative Cooler Model: SF-48LB OWNER'S MANUAL Read and save these instructions before use Ideal for Indoor cooling 6. Check the household voltage to ensure it matches