FACSCalibur Startup Procedures
|
|
|
- Timothy Jeffrey Richard
- 5 years ago
- Views:
Transcription

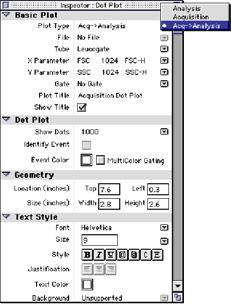
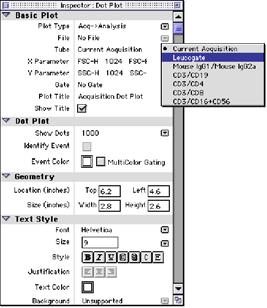
1 FACSCalibur Startup Procedures Always turn on the FACSCalibur before turning on the computer when acquiring data. This enables the computer to recognize that the cytometer is connected. When analyzing data, it is not necessary to turn on the cytometer. 1. Turn on the FACSCalibur. The power switch is located in the lower right corner of the instrument. The LO fluid control button lights green and the STANDBY button lights orange. 2. Turn on the FACStation. 3. Slide the fluidics drawer out. Flip the vent valve toggle switch in the direction of the arrow. The switch, located between the sheath and waste reservoirs, relieves the sheath reservoir of air pressure. 4. Slide the metal sheath bracket away from you, and lift up to remove it. 5. Remove the sheath reservoir, remove the fluid detection probe, and fill the reservoir to 3/4 its capacity with the recommended sheath fluid. CAUTION: Avoid filling the sheath reservoir to its maximum capacity. When a full reservoir is pressurized, fluid may be forced into the air supply tubing, preventing proper pressurization. 6. Replace the sheath reservoir. 7. Replace the sheath bracket by sliding the metal bracket toward you. Make sure that the square lip on the tight side of the bracket is covering the ball plunger.
2 8. Connect the sheath fluid detection probe connector and snap the fluid and air supply tubing into place by pushing firmly until you hear a dick (make sure to position the tubing so there are no kinks). 9. Flip the vent valve toggle switch to pressurize the reservoir. Check the sheath reservoir to make sure it is properly pressurized. A properly pressurized sheath reservoir will not be able to move around under the bracket. 10. Disconnect the waste tubing (orange) and the air tubing (white) from the FACSCalibur instrument squeezing the metal clip on the quick disconnect and pulling. CAUTION: It is good practice to empty the waste reservoir when you fill the sheath reservoir. This prevents the waste reservoir from overflowing. Follow good laboratory practice: wear appropriate safety attire and gloves when handling waste materials. 11. Disconnect the fluid detection probe connector by squeezing the sides and pulling. 12. Remove the waste reservoir, remove the fluid detection probe, and empty the reservoir according to local, state and federal hazardous waste handling regulations. 13. Fill the waste container with 400 ml of undiluted household bleach. This will make a 10% solution of bleach in the waste container once it is full. 14. Replace the waste reservoir. 15. Connect the fluid detection probe connector and snap the waste and air vent tubing into place by pushing firmly until you hear a click (make sure to position the tubing so there are no kinks). 16. Check the sheath filter to be sure that no air bubbles are trapped inside. If bubbles are visible, gently tap the filter body to dislodge them and force them to the top. Push the roller in the pinchcock forward to allow the pressurized sheath fluid to force the air bubbles into the waste reservoir. Return the pinchcock to dosed position. Repeat steps if necessary. NOTE: To remove stubborn bubbles, squeeze the metal dip and pull the sheath filter from the lower quick-disconnect port. Lift the filter up and firmly tap the filter body to dislodge the bubbles. Reconnect the filter to its lower quick-disconnect port. Push the roller in the pinchcock forward to allow the pressurized sheath filter to force air bubbles into the waste reservoir. Return the pinchcock the dosed position. NOTE: Allow the laser to warm up for 5 minutes after turning on the instrument, before running samples.
3 FACSCalibur Shutdown Procedure Always clean the FACSCalibur instrument before you power it off at the end of the day. Proper cleaning will ensure that your instrument will function consistently. To prevent the sample tube from becoming dogged and to remove adhesive dyes that could remain in the tubing causing carryover, run BD FACS Clean through the SIP at the end of each day followed by a distilled water rinse. Follow this procedure immediately after running viscous samples or dyes such as propidium iodide (PI), acridine orange (AO), or thiazole orange (TO). Bleaching the Droplet Containment Tube and the Sample Injection Tube 1. Set the fluid control to RUN, install a tube containing 3 ml of 10% bleach on the SIP with the support arm to the side (vacuum is on), and let it run for 1 minute. 2. Move the support arm under the tube (vacuum is off). Allow the 10% bleach to run for 4 minutes on HI. Don t allow the tube to go dry Rinsing the Droplet Containment Tube and the Sample Injection Tube 1. Install a tube containing 3 ml of distilled water on the SIP with the support arm to the side (vacuum is on). Let it run for 1 minute. 2. Move the support arm under the tube (vacuum is off). Allow the water to run for 4 minutes on HI. Don t allow the tube to go dry 3. Set the fluid control to STANDBY. 4. Place a tube containing no more than 1 ml of distilled water on the SIP. CAUTION: Sheath fluid will back flush into the tube and may cause the tube to overfill if more than 1 ml of distilled water is in the sample tube. This could short out the regulator board. 5. If you are finished running samples, choose Shut Down from the Special menu to turn off the computer, and then shut off the power to the FACSCalibur. Otherwise simply log off using the FileGuard shield at the top right corner of the page. 6. The tube of distilled water should remain on the SIP to prevent salt deposits from forming in the injection tube. 7. Depressurize the machine. Remove the waste container and bring it to the sink near the door. Empty the waste into the sink while running water. Add approximately 300 ml of Clorox to the waste container and place it back in the fluidics drawer. 8. Remove the sheath container from the fluidics drawer and fill it to top of the notch located on the side of the sheath container. Finally, replace the container in the fluidics drawer.
4 Troubleshooting This troubleshooting guide has also been placed on the desktop of all the FACS Facility computers. In the event of a problem with the machine, please seek Don Foster at TAC S617 or S631 for help. If he is not available please report your problem to him later via the form provided on top of the cytometers. You may also call Becton Dickinson for help. Their BD phone number is located on the side of FACS Calibur S along with the serial numbers of all the machines in the facility. They can walk you through most any problem. NOTE: The CellQuest Status window from Cytometer menu can be used to help diagnose STATUS problems. System Stays In NOT READY Check the following: Sheath reservoir empty Waste reservoir full Initial 5-minute warm up is not complete Electrical connector on sheath probe is loose or disconnected System Stays In STANDBY (System Not Pressurized) When the system is not pressurized, installation of a sample tube with the fluidics control button set to RUN will not change the status to READY it will remain in STANDBY. Pressure may be leaking from the reservoir caps or the vent valve, or the sample tube has not been pressurized properly. The sample either does not flow to the flow cell or flows poorly, and the FACSCalibur produces poor data. Check the following: Air escaping from the sheath reservoir (tighten cap) Vent valve in clown position Cracked sample tube Bal seal worn out Blue connector for sheath reservoir not correctly seated Bubbles are registered as events, producing spurious data. Bubbles can also cause alteration in the sample flow path, resulting in less than optimal data. The fluidic system should be re-primed. If the sheath
5 reservoir was run dry, refill sheath and RUN system for 5 to 10 minutes with a test tube of distilled water before using for sample acquisition. This will remove bubbles and air from the sheath lines. No Events on the Computer Screen Check the following: If the system remains in STANDBY, check items under System Stays in STANDBY above. If the STATUS window displays READY, make sure sample concentration is adequate and properly mixed. Ensure instrument settings are correct for applications being run. Ensure threshold is not eliminating the populations by being set too high. Check the CellQuest Status window from Cytometer menu to see if readings are being updated. If the readings are not being updated, communication between the instrument and the computer is not present. Turn off the computer and the FACSCalibur, turn them back on, and resume where you left off. Prime the fluidics to remove air bubbles that may be trapped in the flow cell. These trapped air bubbles can deflect the sample stream away from the laser beam, causing no events to be detected. Sheath Fluid Dripping from the Sample Injection Tube Check the following: Ensure that the droplet containment tube is seated as far up into the flow cell assembly as possible. Loosen the droplet containment tube retainer, push the tube up, and re-tighten the retainer. Replace the 0-ring inside droplet containment tube retainer. Listen to hear if droplet containment system pump is rotating. If you cannot hear the pump with the tube support arm to the side, the pump may have stalled. Turn off the FACSCalibur and turn it on. If the motor is still not rotating, call BDIS Customer Support.
6

7
8
9


10

11
12

13

14

15
16
17
ACME DIAGNOSTICS STANDARD OPERATING PROCEDURE
 ACME DIAGNOSTICS STANDARD OPERATING PROCEDURE Procedure Number: II.01.200a Effective Date: 09/14/99 Review and Update: 09/2003 TITLE: ADVIA 120 ROUTINE MAINTENANCE PURPOSE AND PRINCIPLE: The ADVIA 120
SC300 BEFORE USE PLEASE READ THE MANUAL AND SAFETY INSTRUCTIONS.
 TM Model SC300 BEFORE USE PLEASE READ THE MANUAL AND SAFETY INSTRUCTIONS. Please retain for future reference. Thank you for purchasing your Earlex SteamStation SC300, we hope you enjoy using it. Please
Sanitise Syrup Lines & Valves. Taylor PH61 Cleaning every 14 days
 Taylor PH61 Cleaning every 14 days Drain the Syrup Lines Remove each syrup feed tube from syrup bottle and let excess syrup drain from the feed tube back into the syrup bottle. When flow of syrup from
MINIMED 670G SYSTEM CHANGING THE MINIMED SILHOUETTE INFUSION SET QUICK REFERENCE GUIDE
 START HERE Wash your hands. Select Reservoir & Tubing. Press. Select Options. Select New Reservoir. Remove the infusion set you have been using by loosening the adhesive and pulling away from body. 5 Remove
SCIF SOP for BSL 2 samples on Aria3
 Date Last Modified: July 2, 2015 Author: David Gravano SCIF SOP for BSL 2 samples on Aria3 Overview of BSL-2+ Sorting Area and Procedures: This document aims to provide a description of the facility, instrumentation,
JOHN DEERE GATOR HPX/XUV 2 PASSENGER HEATER INSTALLATION INSTRUCTIONS (p/n: 9PH20S30)
") P. 1 of 12 JOHN DEERE GATOR HPX/XUV 2 PASSENGER HEATER INSTALLATION INSTRUCTIONS (p/n: 9PH20S30) Item: Qty: Description: 1 2 1 x 1 x 5/8 Tee Fitting 2 2 Plastic Snap-in Hose Grommet 3 4 1-1/2" Hose Clamps
P. 1 of 12 JOHN DEERE GATOR HPX/XUV 2 PASSENGER HEATER INSTALLATION INSTRUCTIONS (p/n: 9PH20S30) Item: Qty: Description: 1 2 1 x 1 x 5/8 Tee Fitting 2 2 Plastic Snap-in Hose Grommet 3 4 1-1/2" Hose Clamps
STANDARDD OPERATING PROCEDURE FOR THE LUMINEX
 The Flow Cytometry Facility STANDARDD OPERATING PROCEDURE FOR THE LUMINEX All users must follow the SOP & fill in the logbook. If you are unsure about anything please do not hesitate to ask for help. Before
Operator s Manual. The FREEDOM ROCKER. Contents. Congratulations!
 Operator s Manual The FREEDOM ROCKER Congratulations! Congratulations on your purchase of a Next Advance Freedom Rocker! We re sure that once you use it you won t want to return to manual processing. Please
MULTIWASH III MICROPLATE WASHER OPERATION AND MAINTENANCE MANUAL E
 MULTIWASH III MICROPLATE WASHER OPERATION AND MAINTENANCE MANUAL 8618-01 E DECLARATION OF CONFORMITY We, TriContinent Scientific, Inc. declare under our sole responsibility that the following products:
MINIMED 670G SYSTEM CHANGING THE MINIMED MIO INFUSION SET QUICK REFERENCE GUIDE
 START HERE Wash your hands. Select Reservoir & Tubing. Press. Select Options. Select New Reservoir. Remove the infusion set you have been using by loosening the adhesive and pulling away from body. Remove
FC 5 FC 5 Premium. OPERATOR MANUAL Floor Cleaner...2 MANUAL DE USUARIO Limpiador de piso...22 MANUEL D UTILISATION Nettoyant pour sols...
 FC 5 FC 5 Premium OPERATOR MANUAL Floor Cleaner.................2 MANUAL DE USUARIO Limpiador de piso............22 MANUEL D UTILISATION Nettoyant pour sols...........44 59682960 2018.03 FLOOR CLEANER
PORTABLE DOG BATH TOOL
 TM PORTABLE DOG BATH TOOL USER GUIDE 1842 SERIES More of a video person? Look for this icon and go online for an instructional how-to video at BISSELL.com/videos IMPORTANT SAFETY INSTRUCTIONS READ ALL
How to Fix a Leaky Toilet:
 How to Fix a Leaky Toilet: First, determine the type of toilet you have. Pressurized Toilet: Inside this toilet is a sealed tank. When water is fed from the water line, the air inside the tank is compressed.
Administration of AMBISOME Using the GemStar Pump
 1 1-800-862-2731 Administration of AMBISOME Using the GemStar Pump Drug Name: Volume and Rate: Schedule: FLUSHING: Dextrose Ambisome Dextrose Heparin KEY POINTS: 1. Always wash your hands with an antibacterial
ICED CAPPUCCINO MACHINE Taylor MODEL: 390
 4.8.6.3 ICED CAPPUCCINO MACHINE Taylor MODEL: 390 LOCATION: Front of House WHEN CLEANED: Daily, Weekly, Monthly, Seasonal TOOLS/SUPPLIES REQUIRED: Salmon Cloth 2 or 3-Compartment Sink Sink Detergent Sanitizer
DANGER Any appliance is electrically. WARNING To reduce the risk of IMPORTANT SAFETY INSTRUCTIONS
 IMPORTANT SAFETY INSTRUCTIONS When using electrical appliances, especially when children are present, basic safety precautions should always be taken, including the following: READ ALL INSTRUCTIONS BEFORE
MINIMED 670G SYSTEM CHANGING THE QUICK-SET INFUSION SET QUICK REFERENCE GUIDE
 START HERE Wash your hands. Press. Select Options. Select Reservoir & Tubing. Select New Reservoir. Remove the infusion set you have been using by loosening the adhesive and pulling away from body. 6 Remove
Water Distiller Service Manual
 Water Distiller Service Manual Water Distiller Service Manual L70478WT 2008 Regal Ware, Inc. Table of Contents RECOMMENDED TOOLS... 2 GENERAL INSPECTION...3 BOILING CHAMBER TROUBLESHOOTING & REPAIRS Description...
Pet. Easy Guide. VAX Ltd., Kingswood Road, Hampton Lovett, Droitwich, Worcestershire, WR9 OQH, UK - website:
 V-027P Rapide Pet User Guide 10/7/07 10:05 Page 14 EEC STATEMENT OF COMPLIANCE Manufacturer/EEC importer: VAX Limited, hereby on our own responsibility declare that the products V-027/V-027PT/V-027P/CCW-701
Wagner Product Training
 Wagner Product Training Safety Considerations and Recommendations As with any power tool, you need to exercise a level of care to ensure user safety. Wagner products used correctly are very safe, and meet
PrimePour TM Operation Manual
 COT2000 SERIES PrimePour TM Operation Manual READ BEFORE USE. 840247001 7/14 For more Good Thinking visit www.commercial.hamiltonbeach.com 840247001_v18.indd 1 IMPORTANT SAFETY INSTRUCTIONS WARNING When
Cool Flow & CoolOR PERSONAL COOLING SYSTEMS POLAR PRODUCTS polarproducts.com
 I N S T R U C T I O N S Cool Flow & CoolOR PERSONAL COOLING SYSTEMS POLAR PRODUCTS 800-763-8423 polarproducts.com Cool Flow & CoolOR PERSONAL COOLING SYSTEMS Instructions for Patients and Medical Professionals
Bravo. Troubleshooting Guide
 Bravo Troubleshooting Guide Table of Contents Table of Contents 2 Bravo Alarm Code by Alarm Code Indication 3 Alarm Codes A022, A023, A024, E020 & E021 Door Locking Problems 4-9 Alarm Code E010 10 Alarm
- website: Vax Ltd., Kingswood Road, Hampton Lovett, Droitwich, Worcestershire WR9 0QH, UK
 V-026PT User Guide.qxd 7/9/06 15:13 Page 12 EEC STATEMENT OF COMPLIANCE Manufacturer/EEC importer: Vax Limited, hereby on our own responsibility, declare that the product V-026PT is manufactured in compliance
CEM MARS5 Microwave Updated November 13, 2017
 CEM MARS5 Microwave Updated November 13, 2017 Instrument instructions can be found at: http://academic.bowdoin.edu/chemistry/resources/instructions.shtml If you have any problems with the instrument or
Product waste disposal - Protection of the environment:
 Product waste disposal - Protection of the environment: In accordance with the provisions of the Waste Electrical and Electronic Equipment (WEEE - 2002/ 96/ EC) Directive, used electric and electronic
ENGLISH. Attaching the handle (Fig. A) Attaching the steam head (Fig. B) Attaching the hand held steam cleaner (Fig. C) (Original instructions)
 Attaching the steam head (Fig. B) Attaching the hand held steam cleaner (Fig. C) (Original instructions)") FSMH1621D A B C D E 2 F G H I J 3 K L M N 4 (Original instructions) ENGLISH Intended use Your Black & Decker steam mop has been designed for sanitising and cleaning sealed hardwood, sealed laminate, linoleum,
FSMH1621D A B C D E 2 F G H I J 3 K L M N 4 (Original instructions) ENGLISH Intended use Your Black & Decker steam mop has been designed for sanitising and cleaning sealed hardwood, sealed laminate, linoleum,
Care and Use Instructions
 EB0029 0114.qxp_Layout 1 16/01/2014 14:07 Page 1 Model SC1000 Care and Use Instructions For service and further information, please contact: Ewbank LLC, 8261 Highway 73, Suite F, Stanley, NC 28164, USA
When using electrical appliances, especially when children are present, basic safety precautions should always be taken, including the following:
 IMPORTANT SAFETY INSTRUCTIONS When using electrical appliances, especially when children are present, basic safety precautions should always be taken, including the following: READ ALL INSTRUCTIONS BEFORE
INSTALLATION INSTRUCTIONS GEO PRIME TANK. (Patent Pending) GPC
 GPC") INSTALLATION INSTRUCTIONS GEO PRIME TANK (Patent Pending) GPC Table of Contents General Description 2 Installation 3 Flushing and Purging 5 Initial Start up 7 Adding or Checking Fluid 8 Replacing a Pump
INSTALLATION INSTRUCTIONS GEO PRIME TANK (Patent Pending) GPC Table of Contents General Description 2 Installation 3 Flushing and Purging 5 Initial Start up 7 Adding or Checking Fluid 8 Replacing a Pump
Microwave Digestion. Microwave Digestion
 Microwave Digestion To perform an atomic absorption or atomic emission measurement the sample must be dissolved prior to analysis. It is often the case that the sample is not easily dissolved. In such
STEAM MOP INSTRUCTION MANUAL CATALOG NUMBER BDH1765SM PLEASE READ BEFORE RETURNING THIS PRODUCT FOR ANY REASON. SAVE THIS MANUAL FOR FUTURE REFERENCE.
 STEAM MOP INSTRUCTION MANUAL CATALOG NUMBER BDH1765SM Thank you for choosing BLACK+DECKER! PLEASE READ BEFORE RETURNING THIS PRODUCT FOR ANY REASON. SAVE THIS MANUAL FOR FUTURE REFERENCE. SAFETY GUIDELINES
Page 1 of 18. Part# /5/2013
 Part# 1002655-06 8/5/2013 This manual contains important information concerning the installation and operation of the gun washers listed above. Read manual thoroughly and keep for future reference INSTRUCTIONS
INSTANT HOT WATER DISPENSER
 INSTANT HOT WATER DISPENSER Tank Installation Materials required (not provided) 2 mounting bracket screws (and 2 plastic anchors if attaching to drywall) Shut-Off valve and T fitting Components When you
ULTRASONIC HUMIDIFIER
 To Buy: Visit www.sylvane.com or call (800) 934-9194 For Product Support: Contact Sunpentown at 1-800-330-0388 ULTRASONIC HUMIDIFIER [ADORABLE MONKEY] To prolong the life of this humidifier, using distilled
BMW E36 Thermostat Removal And Coolant Flush
 BMW E36 Thermostat Removal And Coolant Flush Disclaimer: The cooling system is critical to the proper operation of your car. Failure to properly install all of the components of the cooling system could
Operation and Maintenance Manual BLIZZARD50 CS6-50-VD 120V/60HZ
 Operation and Maintenance Manual BLIZZARD50 CS6-50-VD 120V/60HZ CS6-50-VD Operation & Maintenance Manual Table of Contents: 1.0 Introduction 1 2.0 Unpacking your COOL- SPACE 1 3.0 Set-up of COOL-SPACE
6. Cooling System XCITING 400i. This chapter covers the location and servicing of the cooling system components for the KYMCO XCITING 400i.
 6. Cooling System XCITING 400i Cooling System This chapter covers the location and servicing of the cooling system components for the KYMCO XCITING 400i. Coolant... 6-3~6-11 Radiator... 6-12~6-23 Thermostat...
Series 1140 and 1141 Temperature Regulators
 Hoffman Specialty Installation & Maintenance Instructions HS-504(E) Series 1140 and 1141 Temperature Regulators! CAUTION FOLLOW ALL INSTALLATION AND OPERATING INSTRUCTIONS. TURN OFF WATER OR STEAM BEFORE
Mitocell: Instructions for Use
 Mitocell: Instructions for Use 1 Introduction The Mitocell (MT200) is designed for the measurement of the respiration rate of either 50 or 100µl sample volumes of mitochondria and cell suspensions. The
Freestyle 2000 Cleaning
 CCFS 2000 Cleaning Process Rev 1-2-0-7-20160520 COCA-COLA FREESTYLE Freestyle 2000 Cleaning Copyright 2015, The Coca-Cola Company Classified - No Category CCFS 2000 Cleaning Process Rev 1-2-0-7-20160520
Professional SLIM STEAM POCKET MOP S3455UKJR OWNER S GUIDE
 Professional SLIM STEAM POCKET MOP S3455UKJR OWNER S GUIDE IMPORTANT SAFETY INSTRUCTIONS For Household Use Only WHEN USING YOUR SHARK STEAM MOP, BASIC SAFETY PRECAUTIONS SHOULD ALWAYS BE FOLLOWED, INCLUDING
SuperKlean Washdown Products
 DURAREEL DR8 & DR8S INSTALLATION AND MAINTENANCE INSTRUCTIONS **DO NOT THROW AWAY AFTER INSTALLATION** **SAVE AND DISPLAY PROMINENTLY WHERE THIS EQUIPMENT IS USED** GENERAL WARNINGS High pressure and hot
Bob-White Systems: AUTOMATED BOTTLE FILLER
 Bob-White Systems: AUTOMATED BOTTLE FILLER PRODUCT CAPPER MANUAL General Safety Rules WARNING: READ ALL INSTRUCTIONS. Failure to follow the safety rules listed below and other basic safety precautions
STEAM MOP INSTRUCTION MANUAL CATALOG NUMBER BDH1725SM PLEASE READ BEFORE RETURNING THIS PRODUCT FOR ANY REASON. SAVE THIS MANUAL FOR FUTURE REFERENCE.
 STEAM MOP INSTRUCTION MANUAL CATALOG NUMBER BDH1725SM Thank you for choosing BLACK+DECKER! PLEASE READ BEFORE RETURNING THIS PRODUCT FOR ANY REASON. SAVE THIS MANUAL FOR FUTURE REFERENCE. SAFETY GUIDELINES
OPERATION and MAINTENANCE MANUAL
 MULTIWASH III MICROPLATE WASHER OPERATION and MAINTENANCE MANUAL P/N 8618-01 B DECLARATION OF CONFORMITY We, TriContinent Scientific, Inc. declare under our sole responsibility that the following products:
Eco Pump. Thank You MODEL: BP
 Eco Pump MODEL: BP-1 88717 Thank You...for purchasing our Eco Pump. This quality, NSF listed pump delivers precise portions and is a reliable alternative to the constant expense of disposable pumps. CONSISTENT
Eco Pump. Thank You MODELS: BP-1/4 BP-1/2
 Eco Pump MODELS: BP-1/4 BP-1/2 Thank You...for purchasing our Eco Pump. This quality, NSF listed pump delivers precise portions and is a reliable alternative to the constant expense of disposable pumps.
Installation Instructions EFS Hand Washing Station
 Installation Instructions EFS Hand Washing Station Both water and soap are sequenced and dispensed from outlet. Override button allows for non potable, water-only dispensing. Lighted icons indicate the
Clean Water Made Easy. CWS Time Clock Softener Installation & Start Up Guide. Questions?
 Clean Water Made Easy www.cleanwaterstore.com CWS Time Clock Softener Installation & Start Up Guide Thank you for purchasing a Clean Water System! With proper installation and a little routine maintenance
OPERATION MANUAL VCX-4 Vacuum Coolant Exchanger
 OPERATI MANUAL VCX-4 Vacuum Coolant Exchanger MAHLE Aftermarket Inc., Service Solutions 0 Innovation Drive York, PA 740 800-468- www.servicesolutions.mahle.com Manual P/N 05-8446-00 (REV B) TABLE OF CTENTS
Multi-Mode Electrode pro
 Multi-Mode Electrode pro Manual 8.110.8018EN / 2015-06-30 Metrohm AG CH-9100 Herisau Switzerland Phone +41 71 353 85 85 Fax +41 71 353 89 01 info@metrohm.com www.metrohm.com Multi-Mode Electrode pro 6.1246.120
HERSHEY S Classic Syrup Dispenser
 HERSHEY S Classic Syrup Dispenser COMPLETE UNIT 87952 MODEL: SPPH PUMP ONLY 88548 MODEL: BP-1 Used with Hershey s 64 oz pouches with 16mm fitments. Thank You...for purchasing this dispenser. The reliable,
BEFORE OPERATING THE MACHINE: WARNING
 BEFORE OPERATING THE MACHINE: Read the manual carefully and completely before attempting to operate the unit. This manual has important information for the use and safe operation of the machine. Keep this
Bottle Pump. Thank You MODEL: BP-1
 Bottle Pump MODEL: BP-1 Your lid may vary depending on specific model number. Thank You...for purchasing our Stainless Steel Hybrid Pump. This quality, NSF listed pump delivers precise portions and is
P.O.D. Pressure On Demand
 P.O.D. Pressure On Demand OWNERS MANUAL & INSTRUCTIONS Please! Read all these instruction carefully before use and save these instructions for future reference. SAFETY INSTRUCTIONS NEVER open the Pressure
CLEAN MIST ULTRASONIC HUMIDIFIER. Instruction Manual and Warranty Information READ AND SAVE THESE INSTRUCTIONS IM0036A
 CLEAN MIST ULTRASONIC HUMIDIFIER Instruction Manual and Warranty Information IM0036A READ AND SAVE THESE INSTRUCTIONS Contents Safety Instructions... 1 Unpacking / Specifications... 2 Parts & Contents...
Installing the 30-cm Column Heater/Cooler
 715001558, REV. C 1 OF 10 This procedure describes how to install the ACQUITY UltraPerformance LC System 30-cm Column Heater/Cooler (Figure 1) on an ACQUITY UPLC System. NOTE: To be certain you have the
EXTREME HP-1 Reverse Osmosis System
 EXTREME HP-1 Reverse Osmosis System Leader Evaporator Co., Inc. 49 Jonergin Drive Swanton, VT 05488 Tel: 802-868-5444 www.leaderevaporator.com TABLE OF CONTENTS INTRODUCTION... 4 THEORY OF OPERATION...
CONTENTS. III. OPERATING INSTRUCTIONS... pg 7 LOADING DISPOSABLE SET (Figure 4)... pg 9. IV. INDICATORS AND ALARMS... pg 10
... pg 9. IV. INDICATORS AND ALARMS... pg 10") OPERATOR S MANUAL CONTENTS I. INTRODUCTION... pg 2 FRONT HOUSING PARTS LOCATION (Figure 1)... pg 4 REAR HOUSING PARTS LOCATION (Figure 2)... pg 5 II. CONTROL PANEL... pg 6 KEYPAD (Figure 3)... pg 6 III.
OPERATOR S MANUAL CONTENTS I. INTRODUCTION... pg 2 FRONT HOUSING PARTS LOCATION (Figure 1)... pg 4 REAR HOUSING PARTS LOCATION (Figure 2)... pg 5 II. CONTROL PANEL... pg 6 KEYPAD (Figure 3)... pg 6 III.
User guide User guide English
 User guide English ENGLISH Welcome HumidAir is a humidifier that provides heated humidification and is designed for use with your AirSense 10 or AirCurve 10 device. Read this guide together with your AirSense
Syringe Pump. User Manual
 Syringe Pump User Manual Specifications Length Height Width Weight Waterproof Rating Battery 30 cm 13 cm 12.5 cm 1.8 kg IPX3 Rechargeable Li Polymer 7.4 V 1900 mah 6 Hour Battery Life Running 3 Hours When
Technical data. Bathroom/shower room installations. Water services (WRAS approved)
") Technical data The Closomat toilet MUST be installed by a competent or qualified person. Explanation of symbols Safety instructions in this manual are identified by symbols. The safety instructions are
Technical data The Closomat toilet MUST be installed by a competent or qualified person. Explanation of symbols Safety instructions in this manual are identified by symbols. The safety instructions are
Get Cleaning... What s your Vax s model number? User Guide. Carpet Washer Vax Careline: AU: NZ:
 User Guide Vax Careline: AU: 1300 361 505 NZ: 0800 800 900 Carpet Washer Get Cleaning... What s your Vax s model number? W8 W8 W0 W0 W0 W W W W W What s your serial number? (Located on the base of the
FIREPLACE INSTALLATION
 CHECK GAS TYPE Use proper gas type for the fireplace unit you are installing. If you have conflicting gas types, do not install fireplace. See retailer where you purchased the fireplace for proper fireplace
Falex Thermal Fowling Tester (FT2)
") 450 Falex Thermal Fowling Tester (FT2) * SAE Unit * OPERATION & MAINTENANCE MANUAL Version 1.1 Falex Corporation 1020 Airpark Drive Sugar Grove, IL 60554 www.falex.com Phone: (630) 556-3669 FT2 (F450)
450 Falex Thermal Fowling Tester (FT2) * SAE Unit * OPERATION & MAINTENANCE MANUAL Version 1.1 Falex Corporation 1020 Airpark Drive Sugar Grove, IL 60554 www.falex.com Phone: (630) 556-3669 FT2 (F450)
Installation & Operating Guide
 5-036 HOT WATER TANK Installation & Operating Guide Read all instructions thoroughly. Keep this guide for future reference. Proof of purchase is required for Warranty. Staple receipt or proof of purchase
POWER WASHER MODEL NO: JET 9000 OPERATION & MAINTENANCE INSTRUCTIONS. WARNING: Do not use the machine without reading this manual PART NO:
 WARNING: Do not use the machine without reading this manual POWER WASHER MODEL NO: JET 9000 PART NO: 7333502 OPERATION & MAINTENANCE INSTRUCTIONS GC0913 INTRODUCTION Thank you for purchasing this CLARKE
u Wait until the steam mop cools down. (approximately five minutes) u Lift the steam mop up off the cleaning pad. u Remove the water tank (3).
 u Lift the steam mop up off the cleaning pad. u Remove the water tank (3).") FSM1630S A B C D E 2 F G H I J K 3 ENGLISH (Original instructions) Intended use Your Black & Decker steam mop has been designed for sanitising and cleaning sealed hardwood, sealed laminate, linoleum, vinyl,
FSM1630S A B C D E 2 F G H I J K 3 ENGLISH (Original instructions) Intended use Your Black & Decker steam mop has been designed for sanitising and cleaning sealed hardwood, sealed laminate, linoleum, vinyl,
Safety. Rinse Kit for Multi-Pro 1200 and 1250 Turf Sprayers Model No Safety and Instructional Decals. Installation Instructions
 Rinse Kit for Multi-Pro 1200 and 1250 Turf Sprayers Model No. 106-4842 Form No. 3353-529 Rev B Installation Instructions Note: Determine the left and right sides of the machine from the normal operating
GREASE INTERCEPTORS. Z1192 GREASE RECOVERY APPLIANCE (GRA) INSTALLATION and OPERATION INSTRUCTIONS
 INSTALLATION and OPERATION INSTRUCTIONS") Z1192 GREASE RECOVERY APPLIANCE (GRA) INSTALLATION and OPERATION INSTRUCTIONS Note: Zurn Grease Interceptors with grease recognizing sensors are efficient appliances designed to separate grease from water.
Z1192 GREASE RECOVERY APPLIANCE (GRA) INSTALLATION and OPERATION INSTRUCTIONS Note: Zurn Grease Interceptors with grease recognizing sensors are efficient appliances designed to separate grease from water.
SuperKlean Washdown Products
 February 2012 DURAMIX 8000 INSTALLATION AND MAINTENANCE INSTRUCTIONS **DO NOT THROW AWAY AFTER INSTALLATION** **SAVE AND DISPLAY PROMINENTLY WHERE THIS EQUIPMENT IS USED** WARNING HIGH PRESSURE AND HOT
ENGLISH. Attaching the handle (Fig. A) Attaching the steam head (Fig. B) (Original instructions)
 Attaching the steam head (Fig. B) (Original instructions)") FSMH1621 A B C D E 2 F G H I J 3 K L M 4 (Original instructions) ENGLISH Intended use Your Black & Decker steam mop has been designed for sanitising and cleaning sealed hardwood, sealed laminate, linoleum,
FSMH1621 A B C D E 2 F G H I J 3 K L M 4 (Original instructions) ENGLISH Intended use Your Black & Decker steam mop has been designed for sanitising and cleaning sealed hardwood, sealed laminate, linoleum,
Installation. Leveling
 Your refrigerator was packed carefully for shipment. Remove and discard shelf packaging and tape. Do not remove the serial plate. Location Do not install refrigerator near oven, radiator or other heat
PREASSEMBLED SURGICAL WASH SET FOR DIDECO COMPACT ADVANCED Instructions for Use Product Designations: WS-55C, WS-125C, WS-175C, WS-225C DESCRIPTION:
 PREASSEMBLED SURGICAL WASH SET FOR DIDECO COMPACT ADVANCED Instructions for Use Product Designations: WS-55C, WS-125C, WS-175C, WS-225C DESCRIPTION: The Preassembled Surgical Wash Set is a device for the
Table of Contents What to Expect with. Mounting Options. Tools Needed. Downrod. Blades
 Table of Contents Congratulations on purchasing your new Hunter ceiling fan! It will provide comfort and performance in your home or office for many years. This installation and operation manual contains
THE HYBRID SERVICE GUIDE
 THE HYBRID SERVICE GUIDE Watch the video online: www.waterlogicfirewall.com/ products-hybrid-water-purifier/ F-FWEG1-M-A-NT-**-*** Warning: Boil the water should the purification unit fail 1. PURE KIT
Table of Contents What to Expect with Your Installation. Tools Needed. Wall Control
 Table of Contents Congratulations on purchasing your new Casablanca ceiling fan! It will provide comfort and performance in your home or office for many years. This installation and operation manual contains
rev3 INSTALLATION & OPERATION MANUAL OIL CIRCULATING HEATING SYSTEM MODEL OSM
 216279-000 rev3 INSTALLATION & OPERATION MANUAL OIL CIRCULATING HEATING SYSTEM MODEL OSM IDENTIFYING YOUR SYSTEM IOM216279-000 The HOTSTART heating system is designed to heat fluids for use in marine
3 C D E 1 I A B F G H J K M L
 GC4800 series 2 3 C D E 1 I A B F G H J K M L 4 English 6 Français 23 54 67 GC4800 series 6 English Introduction Congratulations on your purchase and welcome to Philips! To fully benefit from the support
Ultrasonic Humidifier
 USE & CARE INSTRUCTIONS Guardian Technologies LLC 26251 Bluestone Blvd. Euclid, Ohio 44132 1.866.603.5900 www.guardiantechnologies.com 20015 Guardian Technologies LLC Refurbished Ultrasonic Humidifier
Cleaning the internal optics surfaces
 Cleaning the internal optics surfaces The face of the fiber-optic assembly and the lens are directly exposed to sample fluids inside the analyzer s flow cell. Automatic rinse cycles use high-pressure rinse
TECHNICAL INFORMATION Touchtronic Clothes Dryers
 TECHNICAL INFORMATION Touchtronic Clothes Dryers Includes: T1302, T1303, T1322, T1329ci T1403 & T1405 2004 Miele This page intentionally left blank. Table of Contents GENERAL INFORMATION A. Warning and
Models Series Series
 Models 31800-Series 31801-Series INDUSTRIAL DIAPHRAGM PUMPS 4 GPM/15 LPM FEATURES Self-Priming Easy Installation Can run dry without damage Low Amp Draw Flow to 4 GPM/15 LPM Compact Size Thermal Overload
OPERATING AND MAINTENANCE MANUAL FOR PLATE HEAT EXCHANGER INDIRECT FIRED WATER HEATER. Electric Heater Company Base Model "BWXP"
 OPERATING AND MAINTENANCE MANUAL FOR PLATE HEAT EXCHANGER INDIRECT FIRED WATER HEATER Electric Heater Company Base Model "BWXP" HUBBELL ELECTRIC HEATER COMPANY P.O. BOX 288 STRATFORD, CT 06615 PHONE: (203)
Electronic Service Manuals
 Electronic Service Manuals This electronic document is provided as a service to our customers. We do not create the contents of the information contained in this document. Should you have detailed questions
NXT Hg5 Amalgam Separator Installation and Operations Manual
 NXT Hg5 Amalgam Separator Installation and Operations Manual Thoroughly read and understand instructions prior to installing, operating and servicing the NXT Hg5 Amalgam Separator. These instructions are
Models Series Series
 Models 3180-Series 3181-Series INDUSTRIAL DIAPHRAGM PUMPS Commercial Duty, 3 GPM/1 LPM FEATURES Sealless Easy Installation Run Dry Ability Flow to 3 GPM/1 LPM Self-Priming Low Amp Draw Thermal Overload
MONSTER FLOOR (SC1Z1) INSTRUCTION MANUAL. CUSTOMER SERVICE: (AUS) (NZ) Model #: SC1Z1 AUS, NZ
 INSTRUCTION MANUAL. CUSTOMER SERVICE: (AUS) (NZ) Model #: SC1Z1 AUS, NZ") Steam Booster MONSTER FLOOR (SC1Z1) INSTRUCTION MANUAL CUSTOMER SERVICE: 1800 663 866 (AUS) 0800 666 783 (NZ) Model #: SC1Z1 AUS, NZ IMPORTANT SAFE T SAVE THESE INSTRUCTIONS When using an electrical appliance,
Steam Booster MONSTER FLOOR (SC1Z1) INSTRUCTION MANUAL CUSTOMER SERVICE: 1800 663 866 (AUS) 0800 666 783 (NZ) Model #: SC1Z1 AUS, NZ IMPORTANT SAFE T SAVE THESE INSTRUCTIONS When using an electrical appliance,
Water Distillation System Instruction Manual Nutriteam TC-501
 Water Distillation System Instruction Manual Nutriteam TC-501 Thank you for purchasing the Nutriteam TC-501 Water Distillation System. It will provide your household with freshly made, ultra clean, great
ADD FLUID 300 NDNL 300 CT 300 OC 700 NDNL 725 NDNL 950 NDNL
 SERVICE MANUAL ADD FLUID ADD FLUID MODELS 200 NDNL 200 CT 250 PNDT 300 NDNL 300 CT 300 OC 700 NDNL 725 NDNL 950 NDNL 957 NDNL 1600 NDNL BW3S NDNL For additional information on Thermodyne Foodservice Products,
Carpet washer. Vax careline V-135B. Vax model number:
 V-135B Infinity User Guide.qxd:V-135B User Guide 6/10/08 16:37 Page 1 A N T I A L L E R G E N A D D I T I V E Vax careline 0870 6061248 Carpet washer Vax model number: V-135B AAA instruction manual Please
professional FABRIC STEAMER
 ONE YEAR LIMITED WARRANTY Conair will repair or replace (at our option) your unit free of charge for 12 months from the date of purchase if the appliance is defective in workmanship or materials. To obtain
BRAVO AUTOCLAVES. Installation Notes. BRAVO 1 Quick Start Guide SD-402 Rev. 1.0 Copyright 2012 SciCan Ltd. All rights reserved
 BRAVO AUTOCLAVES Installation Notes BRAVO 1 Quick Start Guide SD-402 Rev. 1.0 Copyright 2012 SciCan Ltd. All rights reserved For questions, technical support, service and inquires, contact: Manufactured
NXT Hg5 mini Amalgam Separator Installation and Operations Manual
 NXT Hg5 mini Amalgam Separator Installation and Operations Manual Thoroughly read and understand instructions prior to installing, operating and servicing the NXT Hg5 mini Amalgam Separator. These instructions
Operation and Maintenance Manual 120V/60HZ
 Operation and Maintenance Manual 120V/60HZ GLACIER CS5-16-VD CS5-16-VD-TB CS5-18-VD CS5-18-VD-TB AVALANCHE CS6-36-1D CS6-36-VD BLIZZARD CS6-50-VD Operation & Maintenance Manual 60HZ Models Table of Contents:
Air Conditioner. Instruction Manual. For Models WA-1010E, WA-1010H, WA-1010M WA-1230E, WA-1230H P O R T A B L E
 R Instruction Manual For Models WA-1010E, WA-1010H, WA-1010M WA-1230E, WA-1230H P O R T A B L E Air Conditioner It is important that you read these instructions before using your new purchase and we strongly
Standard Downrod for ceilings 8-10 feet high. Longer Downrod for ceilings 10 feet or higher
 Table of Contents www.casablancafanco.com To register your fan, please visit: www.casablancafanco.com/register What to Expect with Your Installation Save your receipt for proof of purchase. Ceiling Bracket??
HFG 12 and 24 Hydrogen Generators Installation Instructions
 HFG 12 and 24 Hydrogen Generators Installation Instructions Model 12 Model 24 PLEASE READ THESE INSTRUCTIONS FROM BEGINNING TO END BEFORE STARTING YOUR INSTALLATION. If you are still having problems after
ULTRASONIC HUMIDIFIER WITH ANTIBACTERIAL TANK & BASE Instruction Manual and Warranty Information IM0012A READ AND SAVE THESE INSTRUCTIONS
 ULTRASONIC HUMIDIFIER WITH ANTIBACTERIAL TANK & BASE Instruction Manual and Warranty Information IM0012A READ AND SAVE THESE INSTRUCTIONS Contents Safety Instructions... 1 Specifications / Parts & Contents...