Safety Quik (formerly Cimfast) Name: CF Model Numbers: CF 50, CF 75, CF100
|
|
|
- Curtis Caldwell
- 5 years ago
- Views:
Transcription
1


2 Combine the Dormont braided hose and exclusive safety fittings Safety Quik, SwivelMAX and coiled restrainer to build the Dormont Safety System Plus. It s a complete system of products engineered to make safe and proper gas equipment installations. What is t he Dorm ont Safet y Syst em? It s when you combine Dormont s braided hose, 2 SwivelMax, 1 Safety Quik and 1 coiled restrainer making for one of the safest gas installations available. Pictured: complete hose assembly with 2 SwivelMax, 1 Safety Quik, 1 coiled restrainer and close up of braiding on hose. Upgrading to Dormont s braided hose increases reliability with every installation. Braided hoses resist the wear & tear that can stretch other hoses and cause the hose to deteriorate over time. Use braided hoses to create the Dormont Safety System & enjoy a lifetime warranty* on the hose for the life of the original appliance to which it is connected. *Braided hoses are guaranteed for the life of the original appliance to which they are connected. For more details on conditions of warranty, contact Mechline. Safety Quik (formerly Cimfast) Name: CF Model Numbers: CF 50, CF 75, CF100 OFF ON With Safety Quik, the hose can only be disconnected when the valve is turned to the OFF position. Still providing simple, one-handed disconnect functionality, be confident that the gas hose cannot be disconnected until the gas flow is shut off. Likewise, the valve cannot be opened until the gas hose is correctly re-attached. Can be used with unbraided or braided hoses. SwivelMax (formerly Super Swivel) Name: S Model Numbers: S50, S75, S100, S125 SwivelMAX provides unique multi-plane rotational movement to increase aisle space in the kitchen; decrease stress on the hose and thereby increase the service life of the hose. Maximise performance, mobility, space and safety. Coiled Restrainer Name: RC Model Numbers: RC36, RC48, RC60 Add the Coiled Restrainer to maximise space and safety so equipment can move closer to the wall without impeding foot traffic or equipment s mobility.
3 Recommended Operating Instructions: Cleaning Behind Equipment I. Disconnecting the gas hose: 1. Turn the control knobs of the appliance to the off position. 2. Carefully pull the appliance away from the wall, stopping when the restraining device cable is taut. 3. Turn off the gas supply at the local gas isolation valve. Turn off the electrical supply, and unplug any electrical leads. 4. Pull back the sleeve on the female half of the quick-disconnect coupling, and withdraw the nipple which is connected to the gas hose. Do not allow the gas hose to drop onto the floor, which may damage the hose. Protect both halves of the quick-disconnect coupling. 5. Unclip the restraining device at one end. 6. Carefully move the appliance away from the wall. 7. Carry out the cleaning process, making sure no cleaning solution or foreign substance comes into contact with either half of the quick-disconnect coupling or the gas hose. Dormont Flexible Gas Hose Installation and Operating Instructions To be left with the operator after installation II. Reconnecting the gas hose: 1. Ensure that the appliance control knobs and the local gas isolation valve are turned off. 2. Reconnect the two halves of the quick-disconnect coupling by pushing the nipple into the female half. 3. Reattach the restraining device. 4. Reconnect any electrical supply cables. 5. Turn the local gas isolation valve to the on position. 6. Carefully push the appliance back into position, ensuring that the gas hose is not twisted or kinked. 7. Make sure that the gas hose does not fall under the appliance casters. Dormont Engineering Support The Dormont technical department is available to advise on all aspects of gas hose sizing, installation, and Standards. Call Enterprise Drive Export, PA USA (724) FAX (724) DORMONT ( ) Developments Ltd. Unit 18 Potters Lane Kiln Farm, Milton Keynes MK11 3HF Tel: Fax: DM441A, Rev. 6, 05/04 KM39643
4 Dormont Flexible Gas Hose Installation and Operating Instructions WARNING Please read the following instruction booklet carefully. Failure to fully comply with the enclosed instructions could result in severe injury or death. WARNING 1. The installation MUST BE in compliance with BS 6173-Installation of gas-fired catering appliances for use in all types of catering establishments (1st, 2nd and 3rd family gases). 2. Installation and testing MUST BE carried out by a CORGI approved installation engineer. 3. Cleaning solutions and chemicals must not come into contact with any part of the gas hose. This includes acids, solvents, fluxes, chlorinated chemicals etc. In the event of contact with the gas hose, rinse immediately with clean water and dry thoroughly. 4. Contact with sharp objects, wiring etc. and surfaces at temperatures in excess of 105 degrees celsius shall be avoided. 5. Bending and flexing of hoses should be limited to movement required to carefully push and pull appliance into and out of position for cleaning and maintenance. 6. Gas hoses are for use with 1st, 2nd, and 3rd family gas operating at a pressure not in excess of 50mbar. 7. End fittings are bonded into the ends of the gas hose, and no attempt should be made to remove them. 8. Once fitted, gas hoses must not be reused on another appliance or at another location. 9. WARNING: THE HOSE ASSEMBLY MUST BE FITTED SO THAT GAS ENTERS THE FEMALE HALF OF THE QUICK-DISCONNECT COUPLING AND EXITS THE MALE (NIPPLE) HALF. DIRECTION ARROWS ARE PERMANENTLY MARKED ON THE QUICK-DISCONNECT COUPLING. 10. Never insert screwdrivers, probes etc. into the quick-disconnect coupling. This will damage the valve assembly. 11. Never allow the gas hose to be kinked, twisted, torqued or pinched when installed. 12. Ensure that only the restraining device supplied with the Dormont hose is fitted. The restraining device must be fitted at all times when the appliance is in use, and should be inspected as part of the regular maintenance and safety procedures. 13. Use only one gas hose per appliance. 14. For installations where greater mobility is required, Dormont SwivelMAX TM gas hose assemblies are recommended. 15. Quick-disconnect coupling must be disconnected prior to maximum movement of appliance to avoid over extending the gas hose. Whenever the appliance is moved for cleaning or maintenance, the instructions contained within this booklet must be followed. 2 C UK USA US ANSI Z21.24 ANSI Z21.69 ANSI Z223.1 ANSI Z21.15 ANSI Z21-75 ANSI Z21.90 ANSI Z21.41 Canadian Standards Association City of New York Design Certifications Connectors For Gas Appliances CORGI Technical Bulletin 54 Connectors For Moveable Gas Appliances. National Fuel Gas Code Fire Prevention Association N.F.P.A. #54 Manually Operated Gas Valve For Appliances, Appliance Connector Valves And Hose End Valves. Connectors For Outdoor Gas Appliances and Manufactured Homes. Gas Convenience Outlets and Optional Enclosures. Quick Disconnect Devices For Use With Gas Fuel. Design certified to ANSI/U.L. 567, Pipe Connectors For Flammable And Combustible Liquids And LP-Gas. For Use With Natural Gas And Propane. National Sanitation Foundation Criteria C-2. MEA # M and M. Approved by the Commonwealth of Massachusetts Board of State Examiners of Plumbers and Gas Fitters. CANADA Canadian Standards Association C.G.A Connectors For Gas Appliances. CSA Connector For Moveable Gas Appliances. CAN/C.G.A Quick-Disconnect Devices For Use With Gas Fuel. CAN/C.G.A. B149.1 Natural Gas and Propane Installation Code. BELGIUM AUSTRALIA Certified to BS 669-2:1997 Kitemark License # KM39643 C US Association Royale Des Gaziers Belges Societe Technique De L Industrie Du Gaz En Belgique A.S.B.L. Test Reports LDG/95/ December 1995 AS Hose and hose assemblies for liquefied petroleum gases (LPG), natural gas and town gas. Type 2 AS1869/B-WP7kPa mm mm mm mm KM
5 Installation Correct/Incorrect Examples Restraining Device Installation Instructions INCORRECT CORRECT The restraining device must always be connected when the appliance is in service. Installation of the restraining device must be in accordance with BS Q.D. AT APPLIANCE END INCORRECT INCORRECT Q.D. AT SUPPLY END CORRECT AVOID SHARP BENDS THE CORRECT WAY TO INSTALL METAL HOSE FOR VERTICAL TRAVERSE IS WITH A SINGLE NATURAL LOOP. AVOID SHARP BENDS THAT STRAIN AND TWIST THE METAL HOSE CORRECT Refer to figure The restraining device must be installed parallel, and in line with the gas hose. 2. Attach the staple bracket (A) securely to the wall using the plastic wall plugs (B), and screws (C) supplied, or an appropriate alternative. 3. Locate a sufficiently strong part of the rear appliance frame. Carefully drill a 5mm diameter hole taking care not to damage internal appliance components. 4. Thread hex nut (D) and washer (E) onto the eye bolt (F). Slide the eye bolt through the 5mm drilled hole and place other washer (E) and nylon lock nut (G) onto the eye bolt on the inside of the appliance panel frame. Tighten securely. 5. Attach one of the restraining device snap hooks (H) to the staple bracket (A) on the wall, and the other to the eye bolt (F). Note: The restraining devices are designed to be shorter than the length of the gas hose, and can withstand a minimum tensile load of 500kg. The restraining device must be fitted to prevent damage to gas hose assembly, and must not be attached to gas supply pipes, to the gas hose assembly, or to any point which is insufficiently anchored. A-Staple Bracket D-Hex Nut G-Nylon Lock Nut B-Plastic Wall Plugs Figure 3 E-Washers (2) C-#12 1'' Screws F-Eye-Bolt H-Restraining Device with 2 snap hooks INCORRECT AVOID TWISTING THE HOSE CORRECT BTU Capacities Flow rating 0.55 sp. gr. natural gas, 0.58 mbar pressure drop, MJ/m3 Length (mm) 1000 mm 1250 mm 1500 mm DO NOT ALLOW THE HOSE TO DRAG ON THE FLOOR DURING USE INCORRECT CORRECT Hose I.D. inches 1/2'' 66,000 59,000 56,000 3/4'' 152, , ,000 1'' 246, , , /4'' 490, , ,000 AVOID FATIGUE, MAINTAIN A CONSTANT LOOP/DIAMETER The BTU capacities given here were determined under the test conditions specified in BS669 part The BTU capacities given here are for braided and unbraided gas hoses fitted with standard quick-disconnect fittings or Safety Quik TM. For sizes/lengths other than those given, or for hoses fitted with SwivelMAX TM fittings, or without quickdisconnect couplings, contact Mechline for advice. 4 5
6 Design-certified for use with Dormont gas hoses only, the SwivelMAX is supplied fitted as part of the Dormont gas hose assembly when ordered with an S suffix. 2 S suffix denotes double swivel assembly. Installation of SwivelMAX Dormont gas hose assemblies should be carried out in the same method as detailed in this booklet. Single SwivelMAX (1S) Installation Quick-Disconnect Protection Valve The Safety Quik is designed as a combined quick-disconnect coupling/shut off valve, and can be used in place of the female half of the standard quick-disconnect coupling. Installation should be carried out in the same method as detailed in this booklet. How to use: To disconnect 1. Turn the blue isolation handle to the off position - horizontal to the gas hose. 2. Push the outer safety sleeve up toward the blue handle. This will cause the nipple/gas hose assembly to disconnect. Note: The nipple/gas hose cannot be disconnected until the valve is in the off position. To reconnect: 1. Firmly push the quick-disconnect nipple/gas hose assembly into the Safety Quik body. This will allow the outer safety sleeve to return to the original position. 2. Turn the blue isolation handle to the on position - in line with gas hose. Note: The valve cannot be turned to the on position until the nipple/gas hose is fully attached. 6 Other Gas Hose Installation Products Available From Dormont Maximum Movement Swivel Double SwivelMAX (2S) Installation Note: SwivelMAX does not currently fall within the scope of the Kitemark license. Gas Flow Wall Fixture Shut-Off Valve Safety Sleeve Nipple Off position Safety Quik Iron Elbow SwivelMAX Hose Coiled Restrainer Flow Equipment Fixing Coupling On position Item of Equipment Installation Instructions (refer to figure 1. below) 1. Before commencing with the installation, carefully read all sections of this instruction booklet, including the WARNING section and the installation correct/incorrect section. Installation work should only be carried out in accordance with BS 6173 by a CORGI registered engineer. 2. The accessible manually operated shut-off valve shall be installed in accordance with BS 6173: This gas isolation valve (A) must be in the off position. If there is no local gas isolation valve fitted, the main gas isolation valve must be turned off. Do not commence with installation unless the gas supply is fully isolated. 3. Remove the Dormont gas hose and fittings from the bag/box. 4. The location of the gas connection point on site in relation to the gas connection point on the appliance can vary greatly. It is not possible to illustrate every possible installation combination, and these instructions illustrate a few examples. The installation engineer must take great care to ensure that the gas hose is not kinked, twisted or taut when installed, and that the end fittings of the gas hose are not subjected to sharp bends. The installation shall be such as to avoid excessive flexing, bending or vibration in service. Please refer to section of this manual for correct and incorrect installations. For installation situations where sharp bends are a possibility, or are unavoidable, Dormont SwivelMAX fittings are recommended. 5. It is recommended that the connection point for the hose at the installation end is fixed at 600mm 770mm AFFL and is facing downward. This is dependent upon the length of hose to be used and the gas connection position on the appliance. The gas outlet, to which the hose is to be connected, shall be located in the same room as the appliance. The gas hose assembly must not be concealed within, or run through any wall, floor, or partition. The gas hose must not come into contact with the floor during use. C A B D G E F Figure 1 Side View Gas Flow Direction 6. To facilitate moving of the appliance as close to the wall as possible, the two ends of the gas hose should be offset from each other (refer to figure 2). 7. Warning: The quick-disconnect coupling must be fitted so that the gas enters the female half (valved) of the coupling and exits the male (nipple) half. Follow the gas flow direction arrows permanently marked Wall on the coupling. A. Local gas isolation valve B. Female half of quick-disconnect coupling C. Male (nipple) half of quick-disconnect coupling D. Dormont gas hose E. Connection point into appliance F. Appliance G. Restraining device Figure 2 Appliance APPLIANCE SIDE: 8. In order to achieve correct curvature of gas hose, it may be necessary to fit View from above a 90 degree elbow to the appliance connection point (E) fig.1. Apply appropriate thread jointing compound and tighten into position required. 9. End fittings are supplied bonded into the ends of the Dormont gas hose. Apply appropriate thread jointing compound to the end fitting threads, and wind the end fitting/gas hose (D) assembly into the appliance connection point.(e.) 10. Ensure that the gas supply and all the appliance control knobs are turned off before connecting to the gas supply. GAS SUPPLY (INSTALLATION) SIDE: 11. Separate the female half of the quick-disconnect coupling (B) from the male (nipple) half (C) that is bonded into the end of the gas hose. 12. Apply appropriate thread jointing compound, and thread the female half of the quick-disconnect coupling onto the supply pipe from the gas isolation valve (A.) Tighten into position. 13. Connect the quick-disconnect nipple (C) into the quick-disconnect female (B.) 14. On completion, the final assembly shall be tested for leaks at all joints. Leak test in accordance with accepted procedures. Leak test solutions can cause corrosion, so thoroughly rinsing with water is required. Caution: A naked flame shall not be used for this purpose. 15.When installation of the gas hose is complete, carefully push the appliance back into the required operating position. Check that the hose is not kinked, over bent, caught under the appliance casters, or touching the floor. Ensure that the appliance controls are in the off position before turning on the gas supply. 3 Offset
7
8
9
10
11
Gas Connector Installation Instructions
 Gas Connector Installation Instructions 6015 Enterprise Drive Export, PA 15632 USA 1-800-DORMONT (367-6668) (724) 733-4800 Fax (724) 733-4808 www.dormont.com Safety Precautions - Read warnings carefully
HD Sheldon & Company, Inc.
 FOODSERVICE PRODUCTS FROM DORMONT MFG. HD Sheldon & Company, Inc. Dormont Gas Connectors, Accessories, and Foodservice Products HD Sheldon & Company 143 West 29th Street, New York, NY 10001 USA Email:
GAS COOKTOP INSTALLATION INSTRUCTIONS BEFORE YOU BEGIN. IMPORTANT Save these instructions for local electrical inspector s use.
 GAS COOKTOP INSTALLATION INSTRUCTIONS Please read this guide thoroughly before installation. To contact LG Electronics, 24 hours a day, 7 days a week: 1-800-243-0000 (U.S.A.) 1-888-542-2623 (Canada) Or
Owner s Guide Installation & Operation
 Owner s Guide Installation & Operation Fryer HFR Series Hestan Commercial Corporation 3375 E. La Palma Ave Anaheim, CA 92806 (888) 905-7463 RETAIN THIS MANUAL FOR FUTURE REFERENCE P/N 002137 REV 1 IMPORTANT
INSTALLATION OF DURAVENT POLYPRO SINGLE WALL POLYPROPYLENE VENTING SYSTEMS
 SUPPLEMENT VENTING INSTRUCTIONS FOR INSTALLATION AND OPERATION INSTRUCTION MANUALS FOR THE FOLLOWING PRODUCT TYPES: HIGH EFFICIENCY CONDENSING COMMERCIAL, COMMERCIAL POWER DIRECT VENT, LIGHT DUTY COMMERCIAL
Gas and Electric Dryer user manual
 DV48H7400E(G)* DV45H7400E(G)* DV45H7200E(G)* DV45H7000E(G)* Gas and Electric Dryer user manual This manual is made with 100% recycled paper. imagine the possibilities Thank you for purchasing this Samsung
Installation Instructions T 9822 Gas Dryer. en - US, CA. To prevent accidents
 Installation Instructions T 9822 Gas Dryer To prevent accidents en - US, CA and appliance damage read these instructions before installation or use. M.-Nr. 07 431 110 2 WARNING For your safety the information
NOTICE: This guide and the contents within were created by AllPoints
 GAS CONNECTOR NOTICE: This guide and the contents within were created by AllPoints Foodservice Parts and Supplies, Inc. utilizing products currently offered by the company. Excluding product specs, the
Installation Instructions
 Installation Instructions Gas Cooktop KM 360 To prevent accidents and machine damage, read these instructions before installation or use. UV M.-Nr. 06 390 460 WARNING: If the information in this manual
Installation Instructions
 Installation Instructions Gas Cooktop KM 404 KM 406 To prevent accidents and machine damage, read the operating instructions before installation or use. UV M.-Nr. 05 060 881 WARNING: If the information
INSTALLATION INSTRUCTIONS FOR FREESTANDING DUAL FUEL
 INSTALLATION AND SERVICE MUST BE PERFORMED BY A QUALIFIED INSTALLER. IMPORTANT: SAVE FOR LOCAL ELECTRICAL INSPECTOR'S USE. READ AND SAVE THESE INSTRUCTIONS FOR FUTURE REFERENCE. If the information in this
INSTALLATION AND OPERATION MANUAL GAS SKILLETS MODELS: GTS-30 GTS-40
 INSTALLATION AND OPERATION MANUAL GAS SKILLETS MODELS: GTS-30 GTS-40 CROWN FOOD SERVICE EQUIPMENT LTD. 70 OAKDALE ROAD, DOWNSVIEW, (TORONTO), ONTARIO, CANADA, M3N 1V9 TELEPHONE: (416) 746-2358, FAX: (416)
AUTOMATIC DRYER INSTALLATION INSTRUCTIONS MISE EN SERVICE SÉCHEUSE AUTOMATIQUE INSTRUCCIONES DE INSTALACIÓN DE LA SECADORA AUTOMÁTICA
 AUTOMATIC DRYER INSTALLATION INSTRUCTIONS MISE EN SERVICE SÉCHEUSE AUTOMATIQUE INSTRUCCIONES DE INSTALACIÓN DE LA SECADORA AUTOMÁTICA The installation, including a proper exhaust system, is the responsibility
OPERATING INSTRUCTIONS MANUAL (Please retain for future reference)
") OPERATING INSTRUCTIONS MANUAL (Please retain for future reference) For FRHR-100N/P RADIANT CONSTRUCTION HEATERS CERTIFIED FOR USE IN CANADA AND U.S.A. As per Standard ANSI Z83.7 2000/ CSA 2.14 2000 Gas
OPERATING INSTRUCTIONS MANUAL (Please retain for future reference) For FRHR-100N/P RADIANT CONSTRUCTION HEATERS CERTIFIED FOR USE IN CANADA AND U.S.A. As per Standard ANSI Z83.7 2000/ CSA 2.14 2000 Gas
INSTALLATION OF VENTING SYSTEM COMPONENTS WARNING
 INSTALLATION OF VENTING SYSTEM COMPONENTS WARNING When installing the EVERHOT IGI model series direct vent water heaters, use only EVERHOT vent/air intake system kits and components. Installation and service
Installation Manual PS-225 & PS-275
 Installation Manual PS-225 & PS-275 Table of Contents Pre-Uncrating Checklist... 1 Verifying System Requirements... 2 Verifying System Direction... 2 Verifying the Electrical Requirements... 2 Removal
GPC PASTA PRO INSTALLATION & USER OPERATION MANUAL
 GPC-14/18/20 GPC PASTA PRO INSTALLATION & USER OPERATION MANUAL GPC-18 shown with optional rinse station. NOTICE! After installation of your equipment, immediately contact your local gas supplier to obtain
GAS COOKTOP INSTALLATION INSTRUCTIONS
 INSTALLATION AND SERVICE MUST BE PERFORMED BY A QUALIFIED INSTALLER. IMPORTANT: SAVE FOR LOCAL ELECTRICAL INSPECTOR'S USE. READ AND SAVE THESE INSTRUCTIONS FOR FUTURE REFERENCE. WARNING If the information
The Dormont Blue Hose
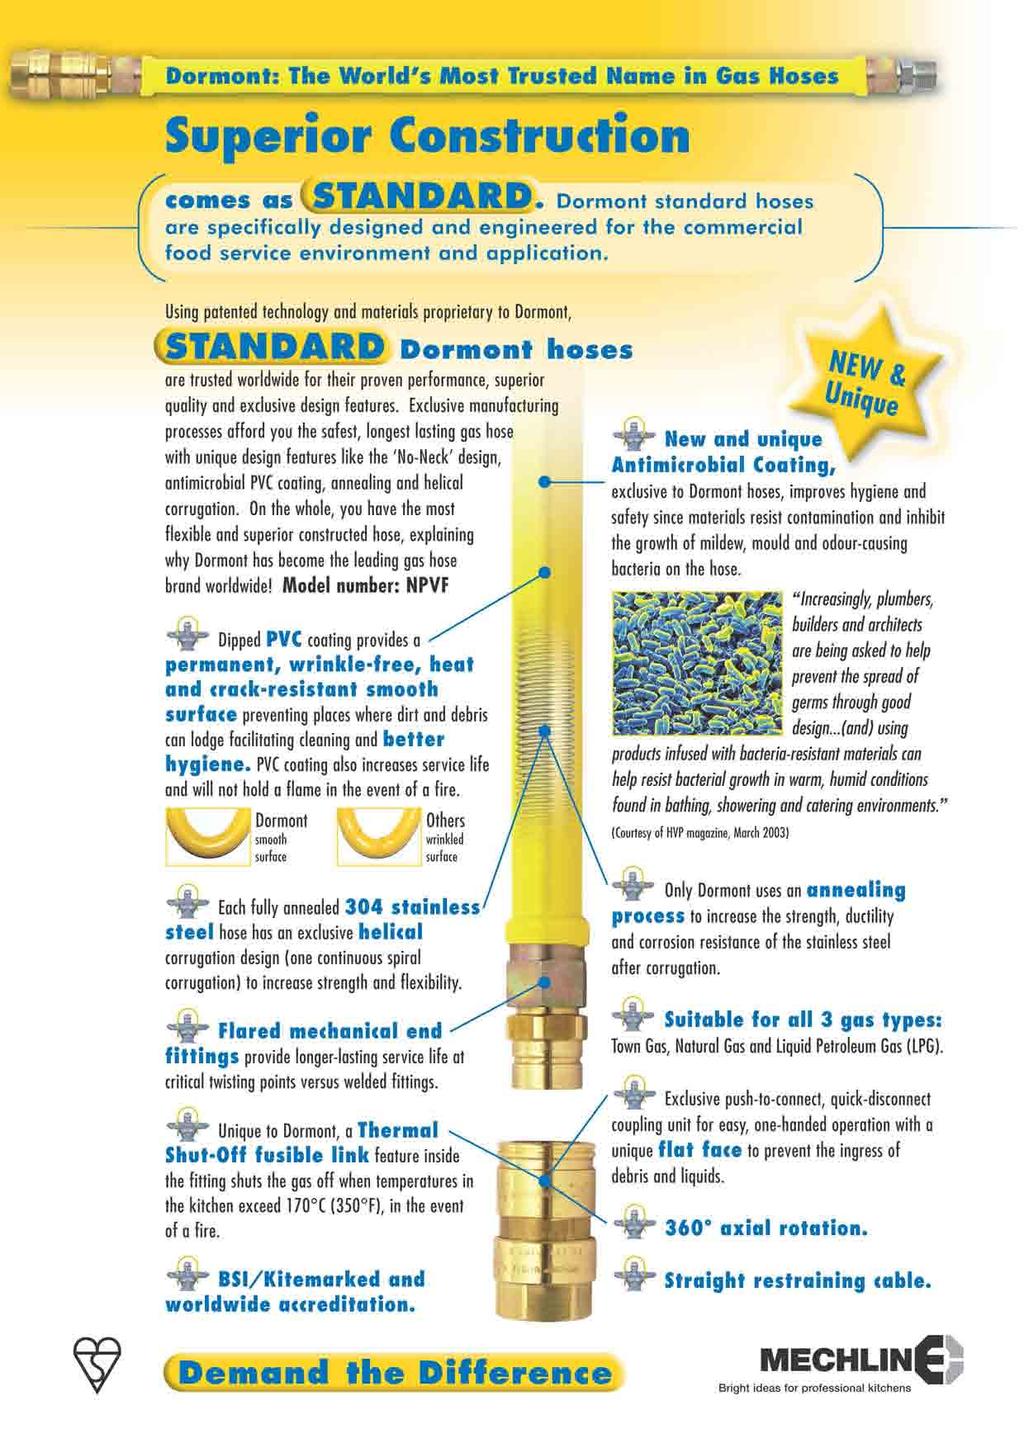
 Product Showcase EXCLUSIVE! Rotation technology (patent pending) reduces stress at both hose ends The Dormont Blue Hose For Caster-mounted Commercial Gas Equipment EXCLUSIVE! Inhibits growth of bacteria,
EUTECTIC EC-10DV Series
 EUTECTIC EC-10DV Series DIRECT VENT OIL-FIRED WATER BOILER/NO. 2 OIL VENTING INSTALLATION INSTRUCTIONS CONTENTS..........................................PAGE Basic Guidelines..........................................1
Installation Manual PS-200 & PS-201
 Installation Manual PS-200 & PS-201 Table of Contents Pre-Uncrating Checklist... 1 Verifying System Requirements... 2 Verifying System Direction... 2 Verifying the Electrical Requirements... 2 Removal
BUILT-IN DISHWASHER INSTALLATION INSTRUCTIONS
 BUILT-IN DISHWASHER INSTALLATION INSTRUCTIONS PLEASE READ COMPLETE INSTRUCTIONS BEFORE YOU BEGIN LEAVE INSTALLATION INSTRUCTIONS AND USER'S GUIDE WITH OWNER ALL ELECTRIC WIRING AND PLUMBING MUST BE DONE
Rambo CAST IRON RING BURNERS OPERATING INSTRUCTIONS. C40LP 3 Ring Burner C50LP 4 Ring Burner
 Rambo CAST IRON RING BURNERS OPERATING INSTRUCTIONS C20LP 1 Ring Burner C30LP 2 Ring Burner C40LP 3 Ring Burner C50LP 4 Ring Burner IMPORTANT: READ THESE INSTRUCTIONS FOR USE CAREFULLY. KEEP THESE INSTRUCTIONS
Multi-Function Cooktop
 INSTALLATION GUIDE Multi-Function Cooktop Contents Wolf Multi-Function Cooktop.................... 3 Multi-Function Cooktop Specifications............ 4 Multi-Function Cooktop Installation...............
INSTALLATION OF CENTROTHERM INNOFLUE SINGLE WALL POLYPROPYLENE VENTING SYSTEMS
 SUPPLEMENT VENTING INSTRUCTIONS FOR INSTALLATION AND OPERATING INSTRUCTION MANUALS 238 48384 00, 238 44727 00, 238 44445 00, 238 48144 00, 238 47936 00, 238 45917 00, 238 45637 00, 238 47448 00, 238 48071
Questions? Call 800.GE.CARES ( ) or visit our Web site at: GEAppliances.com
 or visit our Web site at: GEAppliances.com") Installation Gas Dryers Instructions 02 DESIGN CERTIFIED Questions? Call 800.GE.CARES (800.432.2737) or visit our Web site at: GEAppliances.com This is the safety alert symbol. This symbol alerts you to
Installation Gas Dryers Instructions 02 DESIGN CERTIFIED Questions? Call 800.GE.CARES (800.432.2737) or visit our Web site at: GEAppliances.com This is the safety alert symbol. This symbol alerts you to
INSTALLATION AND OPERATION INSTRUCTIONS
 Printed in U.S.A. INSTALLATION AND OPERATION INSTRUCTIONS RFPA21A CONSTRUCTION HEATER FLOOR MODEL SAVE FOR FUTURE REFERENCE Space-Ray Division, Gas Fired Products, Inc. P.O. Box 36485, Charlotte, NC 28236
Installation instructions for the T 9820 Gas Dryer
 Installation instructions for the T 9820 Gas Dryer The T 9820 gas dryer is only approved for use in the USA and Canada. It is not approved for use in Mexico. To prevent accidents en - US, CA and machine
en-us Use and Care Manual, Installation Instructions Washer WAT28400UC
 en-us Use and Care Manual, Installation Instructions Washer WAT28400UC Under counter (Less Desirable) If front of the appliance is covered ventilation openings must be installed. E & F are minimum area
Instantaneous Oil-Fired Water Heater. Installation Manual OM-148. (Type B)
") Instantaneous Oil-Fired Water Heater Installation Manual MODEL OM-148 (Type B) IMPORTANT THIS APPLIANCE SHOULD BE INSTALLED BY A LICENSED, AUTHORIZED PERSON(S) DUE TO THE NECESSITY OF MAKING ELECTRICAL,
Instantaneous Oil-Fired Water Heater Installation Manual MODEL OM-148 (Type B) IMPORTANT THIS APPLIANCE SHOULD BE INSTALLED BY A LICENSED, AUTHORIZED PERSON(S) DUE TO THE NECESSITY OF MAKING ELECTRICAL,
OG7302 Salamander Grill
 OG7302 Salamander Grill USER, INSTALLATION, SERVICING AND CONVERSION INSTRUCTIONS For use in GB & IE IS370 ECN3280 1 Dear Customer, Thank you for purchasing this Lincat product. This is just one of over
S150 S300 CONSTRUCTION HEATERS. Rev: August 15, 2008 SERVICE AND MAINTENANCE MANUAL No PLEASE RETAIN FOR FUTURE REFERENCE PRODUCTS
 S150 & S300 CONSTRUCTION HEATERS Rev: 2.7.2 August 15, 2008 SERVICE AND MAINTENANCE MANUAL No. 934-6637 PLEASE RETAIN FOR FUTURE REFERENCE PRODUCTS A DIVISION OF HAUL-ALL EQUIPMENT LTD. 4115-18 Avenue
100% Safety Shutoff Control 40,000 BTUH Input Rating Constant Pilot Propane Gas
 glor sun The Original Outdoor Patio Heater Manufactured by INFRARED DYNAMICS, INC. Yorba Linda, CA 92886 U.S.A. Tel: (714) 572-4050 Fax: (714) 572-6093 Toll-Free: (888) 317-5255 www.infradyne.com SPECIFICATIONS:
FLAME GRILL GAS-FIRED (NAT & LPG) The Clay Oven Company Ltd. Leading manufacturers of clay ovens since 1974
 The Clay Oven Company Ltd. Leading manufacturers of clay ovens since 1974") FLAME GRILL GAS-FIRED (NAT & LPG) The Clay Oven Company Ltd. Leading manufacturers of clay ovens since 1974 163 Dukes Road London UK W3 0SL www.clayovens.com Tel: +44 208 896 2696 Fax: +44 208 8962686
FLAME GRILL GAS-FIRED (NAT & LPG) The Clay Oven Company Ltd. Leading manufacturers of clay ovens since 1974 163 Dukes Road London UK W3 0SL www.clayovens.com Tel: +44 208 896 2696 Fax: +44 208 8962686
Table Top Patio Heater
 Table Top Patio Heater INSTRUCTION MANUAL MODEL: HPS-B Certified by international recognized standards. The infra-red with heat wave outdoor heater. Variable control gas valve with electric push igniter.
DISHWASHER. Models DW2432 and DW2432SS. Installation Manual. Write Serial Number (on inner door of unit) here:
 here:") DISHWASHER Models DW2432 and DW2432SS Installation Manual Write Serial Number (on inner door of unit) here: Felix Storch, Inc. Summit Appliance Division 770 Garrison Avenue Bronx, New York 10474 www.summitappliance.com
DISHWASHER Models DW2432 and DW2432SS Installation Manual Write Serial Number (on inner door of unit) here: Felix Storch, Inc. Summit Appliance Division 770 Garrison Avenue Bronx, New York 10474 www.summitappliance.com
CYLINDER NOT INCLUDED
 OPERATING INSTRUCTIONS AND OWNER S MANUAL Model # HS125NG / MH125LP / HS125LP READ INSTRUCTIONS CAREFULLY: Read and follow all instructions. Place instructions in a safe place for future reference. Do
JADE TACO RANGES MODEL: JTR and JTRB Series JADE STOCK POT RANGES MODEL: JSP Series
 Jade Range LLC, A Middleby Company 2650 Orbiter Ave. Brea, CA 92821 Telephone (714) 961-2400 FAX (714) 961-2550 JADE TACO RANGES MODEL: JTR and JTRB Series JADE STOCK POT RANGES MODEL: JSP Series INSTALLATION,
DANGER Indicates a hazardous situation which, if not avoided, will result in death or serious injury.
 Installation Gas Dryers Instructions 02 DESIGN CERTIFIED Questions? Call 800.561.3344 or visit our Web site at: GEAppliances.ca This is the safety alert symbol. This symbol alerts you to potential hazards
MODELS: JGM, JGGM, JGT, JGTS, JGTSD, JGTSDS, JGGT, JGGTS, JTYG GRIDDLES AND JHP, JHPE HOT PLATES
 Jade Range LLC, A Middleby Company 2650 Orbiter Ave. Brea, CA 92821 Telephone (714) 961-2400 FAX (714) 961-2550 MODELS: JGM, JGGM, JGT, JGTS, JGTSD, JGTSDS, JGGT, JGGTS, JTYG GRIDDLES AND JHP, JHPE HOT
INTRODUCTION. NOTE: Read the entire instruction manual before starting the installation. FIRE, EXPLOSION, ELECTRICAL SHOCK HAZARD
 Installation Instructions NOTE: Read the entire instruction manual before starting the installation. SAFETY CONSIDERATIONS Improper installation, adjustment, alteration, service, maintenance, or use can
Owner s Manual. FMI BRANDS INC th Avenue Surrey, B.C. Canada V3Z 3V7 Toll Free Fax Model number FMPPC2A
 Owner s Manual Model number FMPPC2A Series number 890 FMI BRANDS INC. 309-19133 26th Avenue Surrey, B.C. Canada V3Z 3V7 Toll Free 1-888-514-1663 Fax 1-888-797-9931 Owner & Safety Manual Model number FMPPC2A,
Installation and maintenance instructions
 6304 4995 0/004 GB For installer Installation and maintenance instructions Flue gas heat exchanger WT50/60 Please read thoroughly prior to installation and maintenance. Summary About this manual This equipment
User, Installation and Servicing Instructions. Silverlink 600 Gas Griddles GS4 and GS7 IS212 ECN3592
 User, Installation and Servicing Instructions Silverlink 600 Gas Griddles GS4 and GS7 IS212 ECN3592 INSTALLATION AND SERVICING INSTRUCTIONS Please read the following carefully before commencing work on
55-Gallon Dispenser Package
 INSTRUCTIONS-PARTS LIST INSTRUCTIONS This manual contains important warnings and information. READ AND KEEP FOR REFERENCE. 308 666 Rev. A Husky 715 55-Gallon Dispenser Package 100 psi (6.9 bar) Maximum
X62 Tap Range. Please keep these instructions for future reference
 X62 Tap Range This instruction booklet covers: X625205CP, X625215CP, X625255CP, X625265CP, X625122CP, X625126CP, X625135CP Please keep these instructions for future reference 02 For latest prices and delivery
AVANI Grinding Booth
 AVANI Grinding Booth GB-6066-DD Customer: Kelly Walsh Customer PO#: 11305 AVANI SO#: Serial #: 153920-153921 Ship Date / Install Date: Tested By: Please read and save these instructions. Read carefully
Dryer. User manual DV22K6800** DV22K A-00_EN (US)_ indd :15:41
_ indd :15:41") Dryer User manual DV22K6800** DV22K6800-03650A-00_EN (US)_151211.indd 1 2015-12-11 7:15:41 Before installation Read through the following instructions before installing the dryer, and keep this manual
Dryer User manual DV22K6800** DV22K6800-03650A-00_EN (US)_151211.indd 1 2015-12-11 7:15:41 Before installation Read through the following instructions before installing the dryer, and keep this manual
ASSEMBLY INSTRUCTIONS
 ASSEMBLY INSTRUCTIONS Installer: Leave these instructions with consumer. Consumer: Keep these instructions for future reference. WARNING: If the information in this manual is not followed exactly, a fire
INSTALLATION GUIDE Dual Fuel Ranges
 INSTALLATION GUIDE Dual Fuel Ranges Contents Wolf Dual Fuel Ranges......................... 3 Safety Instructions............................ 4 Dual Fuel Range Specifications.................. 5 Dual Fuel
V SERIES HDR GAS RANGES
 SERVICE MANUAL ONE POWERFUL PACKAGE V SERIES HDR GAS RANGES TOPS Open Top Hot Top Griddle Top Work Surface BASES Standard Oven Convection Oven Cabinet Base - NOTICE - This manual is prepared for use by
AUTOMATIC FOODSERVICE EQUIPMENT. Automatic Cheese Melter Model 820 & 1020 GAS OWNER S MANUAL. Sandwiches Soups Salads
 AUTOMATIC FOODSERVICE EQUIPMENT Automatic Cheese Melter Model 820 & 1020 GAS OWNER S MANUAL Sandwiches Soups Salads IMPORTANT: RETAIN THIS MANUAL IN A SAFE PLACE FOR FUTURE REFERENCE. Broiler area must
Installation Instructions. For the 18 Built-In Dishwasher and Front Color Panels
 Installation Instructions For the 18 Built-In Dishwasher and Front Color Panels Printed in USA 154232102 Before You Begin DO NOT INSTALL DISHWASHER UNTIL YOU HAVE READ ALL INSTRUCTIONS. FOR YOUR SAFETY,
Using it in an enclosed space can kill you.
 38 X 56 GAS FIRE PIT - OWNER S MANUAL Carlisle Chat Fire Table Base Model # 00GBC7 (6877B) Fits 6877A Carlisle Chat Fire Table Top For Propane and *Natural Gas (*See Page 7) Certified to CSA International
SURE HEAT MANUFACTURING
 SURE HEAT MANUFACTURING Installation and Operating Instructions for NATURAL & L.P. GAS A.G.A. SINGLE & DUAL BURNER VENTED UNITS Model: RP (8,24,30)-N GO (8,24,30)-N GLO (8,24,30)-N WO (8,24,30)-N CO (8,24,30)-N
ASSEMBLY INSTRUCTIONS
 ASSEMBLY INSTRUCTIONS CSA Model: 98910L Printed in China Installer: Leave these instructions with consumer. Consumer: Keep these instructions for future reference. WARNING: If the information in this manual
GAS HEATERS MODEL NOS: DEVIL 700, 900/910SS,1600/ 1610SS & 2100 PART NOS: , , , , , &
 GAS HEATERS MODEL NOS: DEVIL 700, 900/910SS,1600/ 1610SS & 2100 PART NOS: 6920182, 6920186, 6920188, 6920190, 6920192, &6920194 USER INSTRUCTIONS ORIGINAL INSTRUCTIONS GC0318 iss2 INTRODUCTION Thank you
Models: GW/R-T GW/R-2-T GW/R-3-T
 Part# GW/R-T-OM 1/12/04 TN Models: GW/R-T GW/R-2-T GW/R-3-T This manual contains important information concerning the installation and operation of the gun washers listed above. Read manual thoroughly
Owner s Guide Installation & Operation
 Owner s Guide Installation & Operation Hot Top HHT Series Hestan Commercial Corporation 3375 E. La Palma Ave Anaheim, CA 92806 (888) 905-7463 RETAIN THIS MANUAL FOR FUTURE REFERENCE P/N 002130 REV 1 IMPORTANT
SuperKlean Washdown Products
 DURAREEL DR8 & DR8S INSTALLATION AND MAINTENANCE INSTRUCTIONS **DO NOT THROW AWAY AFTER INSTALLATION** **SAVE AND DISPLAY PROMINENTLY WHERE THIS EQUIPMENT IS USED** GENERAL WARNINGS High pressure and hot
Owner s Manual. FMI BRANDS INC th Avenue Surrey, B.C. Canada V3Z 3V7 Toll Free Fax Model number FMPPC2F
 Owner s Manual Model number FMPPC2F Series number 863 D.863.000.V0 FMI BRANDS INC. 309-19133 26th Avenue Surrey, B.C. Canada V3Z 3V7 Toll Free 1-888-514-1663 Fax 1-888-797-9931 Owner & Safety Manual Model
THC 85 / 175 INDUSTRIAL / COMMERCIAL SPACE HEATER
 THC 85 / 175 INDUSTRIAL / COMMERCIAL SPACE HEATER Certified to / Certifié à CGA 2.14 M2000 Conforms to / Conforme à ANSI std Z83.7 2000 Suitable for indoor or outdoor installation / Unvented / Unattended
UPPER & LOWER SIDE VENT INSTALLATION
 UPPER & LOWER SIDE VENT INSTALLATION FOR NORCOLD MODELS 900/9100/N600/N800 Read these important instructions carefully. Become thoroughly acquainted with the content before installing vents and refrigerator.
Gas Cooktop Installation, User and Service Instructions GMS 955.1
 Gas Cooktop Installation, User and Service Instructions GMS 955.1 IMPORTANT: SAVE FOR LOCAL ELECTRICAL INSPECTOR S USE. READ AND SAVE THESE INSTRUCTIONS FOR FUTURE REFERENCE. OBSERVE ALL FEDERAL, STATE
Instantaneous Oil-Fired Water Heater. Installation Manual OM-148. (Type D)
") Instantaneous Oil-Fired Water Heater Installation Manual MODEL OM-148 (Type D) IMPORTANT THIS APPLIANCE SHOULD BE INSTALLED BY A LICENSED, AUTHORIZED PERSON(S) DUE TO THE NECESSITY OF MAKING ELECTRICAL,
Instantaneous Oil-Fired Water Heater Installation Manual MODEL OM-148 (Type D) IMPORTANT THIS APPLIANCE SHOULD BE INSTALLED BY A LICENSED, AUTHORIZED PERSON(S) DUE TO THE NECESSITY OF MAKING ELECTRICAL,
INSTALLATION INSTRUCTIONS
 INSTALLATION INSTRUCTIONS Gas Cooktop CG905DW models NZ AU www.fisherpaykel.com 590684B 11.14 1 Safety and warnings! WARNING! Electrical Shock Hazard Before carrying out any work on the electrical section
OPERATING INSTRUCTIONS MANUAL (Please retain for future reference) FVN/P-400 INDIRECT FIRED SPACE HEATERS
 FVN/P-400 INDIRECT FIRED SPACE HEATERS") OPERATING INSTRUCTIONS MANUAL (Please retain for future reference) For FVN/P-400 INDIRECT FIRED SPACE HEATERS CERTIFIED FOR USE IN CANADA AND U.S.A. As per Standard ANSI Z83.7/CSA 21.4 2000 Gas Fired Construction
OPERATING INSTRUCTIONS MANUAL (Please retain for future reference) For FVN/P-400 INDIRECT FIRED SPACE HEATERS CERTIFIED FOR USE IN CANADA AND U.S.A. As per Standard ANSI Z83.7/CSA 21.4 2000 Gas Fired Construction
Installation Instructions
 Installation Instructions For the 18" Built-In Dishwasher Sears, Roebuck and Co. Sears Canada, Inc. Hoffman Estates, IL 60179 U.S.A. Toronto, Ontario, Canada M5B 2B8 154435201 Before You Begin DO NOT INSTALL
DESIGN CLASS FUNCTION
 PROFESSIONAL QUALITY COOKING EQUIPMENT INSTALLATION MANUAL FOR PERFORMER SLIDE-IN COOK TOPS MODEL NUMBERS: AROBSCT-424, AROBSCT-242GD, AROBSCT-24X2GR, AROBSCT-430, AROBSCT-636, AROBSCT-436GD, AROBSCT-436GR,
Handshower, Hose & Handshower Accessories
 P24443, P24445, P24446, P24452, P24453, P24456 1 of 6 INSTALLATION INSTRUCTIONS Thank You For Choosing KALLISTA We appreciate your commitment to KALLISTA quality products. Please take a moment to review
WARNING FOR YOUR SAFETY FOR YOUR SAFETY. Outback Patio Heaters. Patio Heaters
 Patio Heaters Outback Patio Heaters A regulator of an approved type is required to operate this unit. A regulator of 28-30mbar must be used for butane and 37mbar for propane. For more details on compatible
OPERATING INSTRUCTIONS MANUAL (Please retain for future reference) F-1500T DUAL FUEL CONSTRUCTION HEATER
 F-1500T DUAL FUEL CONSTRUCTION HEATER") OPERATING INSTRUCTIONS MANUAL (Please retain for future reference) For F-1500T DUAL FUEL CONSTRUCTION HEATER CERTIFIED FOR USE IN CANADA AND U.S.A. As per Standard ANSI Z83.7 2000/ CSA 2.14 2000 Gas Fired
OPERATING INSTRUCTIONS MANUAL (Please retain for future reference) For F-1500T DUAL FUEL CONSTRUCTION HEATER CERTIFIED FOR USE IN CANADA AND U.S.A. As per Standard ANSI Z83.7 2000/ CSA 2.14 2000 Gas Fired
OVATION SERIES FIRE TABLES ASSEMBLY INSTRUCTIONS
 OVATION SERIES FIRE TABLES ASSEMBLY INSTRUCTIONS CSA Model98900 DRS02403 Installer: Leave these instructions with consumer. Consumer: Keep these instructions for future reference. DANGER If you smell gas:
Owner s Manual. FMI BRANDS INC Avenue Surrey, B.C. Canada V3Z 3V7 Toll Free Fax Model number FMPPC2F
 Owner s Manual Model number FMPPC2F Series number 863 2017 FMI Brands Inc. Patent Pending D.863.000.V3 FMI BRANDS INC. 107 19052 26 Avenue Surrey, B.C. Canada V3Z 3V7 Toll Free 1-888-514-1663 Fax 1-888-797-9931
User, Installation, Servicing and Conversion Instructions. Opus 700 Gas Oven Ranges OG7001 & OG7002 IS431 ECN3592
 User, Installation, Servicing and Conversion Instructions Opus 700 Gas Oven Ranges OG7001 & OG7002 IS431 ECN3592 Dear Customer, Thank you for purchasing this Lincat product. This is just one of over 450
GAS COOKTOP INSTALLATION INSTRUCTIONS
 INSTALLATION AND SERVICE MUST BE PERFORMED BY A QUALIFIED INSTALLER. IMPORTANT: SAVE FOR LOCAL ELECTRICAL INSPECTOR'S USE. READ AND SAVE THESE INSTRUCTIONS FOR FUTURE REFERENCE. WARNING If the information
I-VICFLEX.AB4. Victaulic VicFlex Style AB4 Sprinkler Fitting for Hat Furring Channel Ceiling Systems WARNING INSTALLATION INSTRUCTIONS
 INSTALLATION INSTRUCTIONS I-VICFLEX.AB Victaulic VicFlex Style AB Sprinkler Fitting for Hat Furring Channel Ceiling Systems Read and understand all instructions before attempting to install any Victaulic
OWNERS MANUAL INSTALLATION, OPERATION, & MAINTENANCE INSTRUCTIONS
 OWNERS MANUAL INSTALLATION, OPERATION, & MAINTENANCE INSTRUCTIONS 1128 Sherborn Street Corona, CA 92879-2089 (951) 281-1830 (951) 281-1879 IPC SERIES PASTA COOKER All Imperial Mfg. Co. equipment is manufactured
Please read the following installation instructions first after purchasing this product or transporting it to another location.
 0 INSTALLATION INSTALLATION Installation Overview Please read the following installation instructions first after purchasing this product or transporting it to another location. Check and choose the proper
QUICK CONNECT INSTALLATION MANUAL DUCTLESS MINI-SPLIT SYSTEM FOR MODELS: 2PAMSHQC12 2PAMSHQC18 2PAMSHQC24 2PAMSHQC36
 QUICK CONNECT DUCTLESS MINI-SPLIT SYSTEM INSTALLATION MANUAL FOR MODELS: 2PAMSHQC12 2PAMSHQC18 2PAMSHQC24 2PAMSHQC36 Before using your air conditioner, please read this manual carefully and keep it for
Owner s Manual. FMI BRANDS INC Avenue Surrey, B.C. Canada V3Z 3V7 Toll Free Fax Model number FMPPC2E-1
 Owner s Manual Model number FMPPC2E-1 Series number 401 FMI BRANDS INC. 107 19052 26 Avenue Surrey, B.C. Canada V3Z 3V7 Toll Free 1-888-514-1663 Fax 1-888-797-9931 Owner & Safety Manual Model number FMPPC2E-1,
5700-E Sediment Filter Installation & Start-Up Guide
 Clean Water Made Easy www.cleanwaterstore.com 5700-E Sediment Filter Installation & Start-Up Guide Thank you for purchasing a Clean Water System! With proper installation and a little routine maintenance
Assembly & User Instructions Mirage 38,200Btu Heat Focusing Patio Heater
 Assembly & User Instructions Mirage 38,200Btu Heat Focusing Patio Heater These instructions are for your safety. Please read them thoroughly before use and retain them for future reference. DANGER: If
GAS-ON-GLASS COOKTOP
 GAS-ON-GLASS COOKTOP CG301D, CG302D, CG451D, CG603D, CG604D, CG752D, CG903D & CG905D models INSTALLATION GUIDE GB IE IN PH 590657D 08.17 1 SAFETY AND WARNINGS! WARNING! Electrical shock hazard Disconnect
INSTALLATION GUIDE GB IE B / ß1
 FREESTANDING COOKER OR90 Dual Fuel models INSTALLATION GUIDE GB IE 591554B / 1105508-ß1 11.18 1 SAFETY AND WARNINGS! WARNING! Electrical Shock Hazard Before carrying out any work on the electrical section
Installation Instructions
 Installation Instructions SELECTRONIC Hard-Wired AC Powered ICU Lavatory Proximity Faucet PRODUCT NUMBER 0. Certified to comply with ASME A..M 0 American Standard M 0. ICU Faucet shown Installed on American
Page 1 of 18. Part# /5/2013
 Part# 1002655-06 8/5/2013 This manual contains important information concerning the installation and operation of the gun washers listed above. Read manual thoroughly and keep for future reference INSTRUCTIONS
SUBCOURSE EDITION EN US ARMY ENGINEER SCHOOL PLUMBING FIXTURES (PLUMBING IV)
") SUBCOURSE EDITION EN5113 5 US ARMY ENGINEER SCHOOL PLUMBING FIXTURES (PLUMBING IV) US ARMY PLUMBER MOS 51K SKILL LEVELS 1 AND 2 COURSE PLUMBING FIXTURES (PLUMBING IV) SUBCOURSE NO. EN5113 US Army Engineer
SUBCOURSE EDITION EN5113 5 US ARMY ENGINEER SCHOOL PLUMBING FIXTURES (PLUMBING IV) US ARMY PLUMBER MOS 51K SKILL LEVELS 1 AND 2 COURSE PLUMBING FIXTURES (PLUMBING IV) SUBCOURSE NO. EN5113 US Army Engineer
Wok Cookers Instruction Manual
 Wok Cookers Instruction Manual Part No. DC100-09 Single Burner Wok Cooker Part No. DC200-09 Double Burner Wok Cooker IMPORTANT It is IMPORTANT that you read these instructions carefully and understand
OWNER'S, SERVICE & INSTRUCTION
 OWNER'S, SERVICE & INSTRUCTION M A N U A L GAS DECK OVENS MODELS 209, 209SS X 309, 309SS 212, 212SS X 312, 312SS 215, 215SS X 315, 315SS IMPORTANT INSTRUCTIONS FOR OVEN INSTALLATION, OPERATION AND MAINTENANCE
TRI-STAR INC SOUTH STANDARD AVENUE, SANTA ANA, CA Ph: Fax: MODEL #. OWNER S MANUAL
 TRI-STAR INC 2205 SOUTH STANDARD AVENUE, SANTA ANA, CA 92707 Ph: 714 424 9380 Fax: 714 424 9385 MODEL #. OWNER S MANUAL INSTALLATION OPERATION MAINTENANCE All equipments manufactured by Tri-star Inc. for
NATURAL GAS CONVERSION KIT
 NATURAL GAS CONVERSION KIT Model # 498425 For use with Char-Broil RED Series Grills Only. FOR OUTDOOR USE ONLY This Natural Gas Conversion Kit can be used ONLY with Dual Fuel grills. WARNING CALIFORNIA
These instructions are for your safety. Please read them thoroughly before use and retain them for future reference
 Assembly & User Instructions Mirage 38,200Btu Heat Focusing Patio Heater These instructions are for your safety. Please read them thoroughly before use and retain them for future reference DANGER: If you
Questions? Call 800.GE.CARES ( ) or visit our Web site at: GEAppliances.ca
 or visit our Web site at: GEAppliances.ca") Installation Instructions Dryers Questions? Call 800.GE.CARES (800.432.2737) or visit our Web site at: GEAppliances.ca This is the safety alert symbol. This symbol alerts you to potential hazards that
Installation Instructions Dryers Questions? Call 800.GE.CARES (800.432.2737) or visit our Web site at: GEAppliances.ca This is the safety alert symbol. This symbol alerts you to potential hazards that
Marathoner Gold & SilverStar GAS CONVECTION OVENS
 IMPORTANT FOR FUTURE REFERENCE Please complete this information and retain this manual for the life of the equipment: Model #: Serial #: Date Purchased: OPERATOR S MANUAL Marathoner Gold & SilverStar GAS
INSTALLER: THIS MANUAL MUST BE LEFT WITH THE APPLIANCE. CONSUMER: KEEP THIS MANUAL FOR FUTURE REFERENCE. WARNING
 FIRE PIT INSTALLATION AND OPERATING INSTRUCTIONS 401400RD MODELS: 401442FP, 401554FP, 801486FP, 801554FP, 821486FP, 821549FP 401400SQ MODELS: 401443FP, 401467FP, 401558FP 401700RCT MODELS: 401767FP-24,
Series SFN Unbraided Flexible Hose Assemblies Series SFB Braided Flexible Hose Assemblies
 Series SFN Unbraided Flexible Hose Assemblies Series SFB Braided Flexible Hose Assemblies SprinkFLEX Stainless Steel Sprinkler Fittings connect the branch line to the sprinkler using a flexible stainless
Installation, Operation and Maintenance LOK-FLANGE Multitube Heat Exchangers
 Bulletin 1200/4 (Revised 5/12) Installation, Operation and Maintenance LOK-FLANGE Multitube Heat Exchangers INNOVATORS IN HEAT TRANSFER I. INSTALLATION OF HEAT EXCHANGERS A. HEAT EXCHANGER SETTINGS 1)
Model vkfd28b braided flexible sprinkler drops (lpcb approved)
") Page 1 of 6 1. DESCRIPTION Viking Flexible Sprinkler Drops are a complete assembly intended for installation into commercial suspended ceilings with medium to heavy support tee bars as described in ASTM
Page 1 of 6 1. DESCRIPTION Viking Flexible Sprinkler Drops are a complete assembly intended for installation into commercial suspended ceilings with medium to heavy support tee bars as described in ASTM
INSTALLATION GUIDE NZ AU D
 GAS COOKTOP CG905DW models INSTALLATION GUIDE NZ AU 590684D 08.17 1 SAFETY AND WARNINGS! WARNING! Electrical Shock Hazard Before carrying out any work on the electrical section of the appliance, it must