User Manual WASHING MACHINE. Model No: LSA1100
|
|
|
- Alisha Avice Edwards
- 5 years ago
- Views:
Transcription


1 User Manual WASHING MACHINE Model No: LSA1100
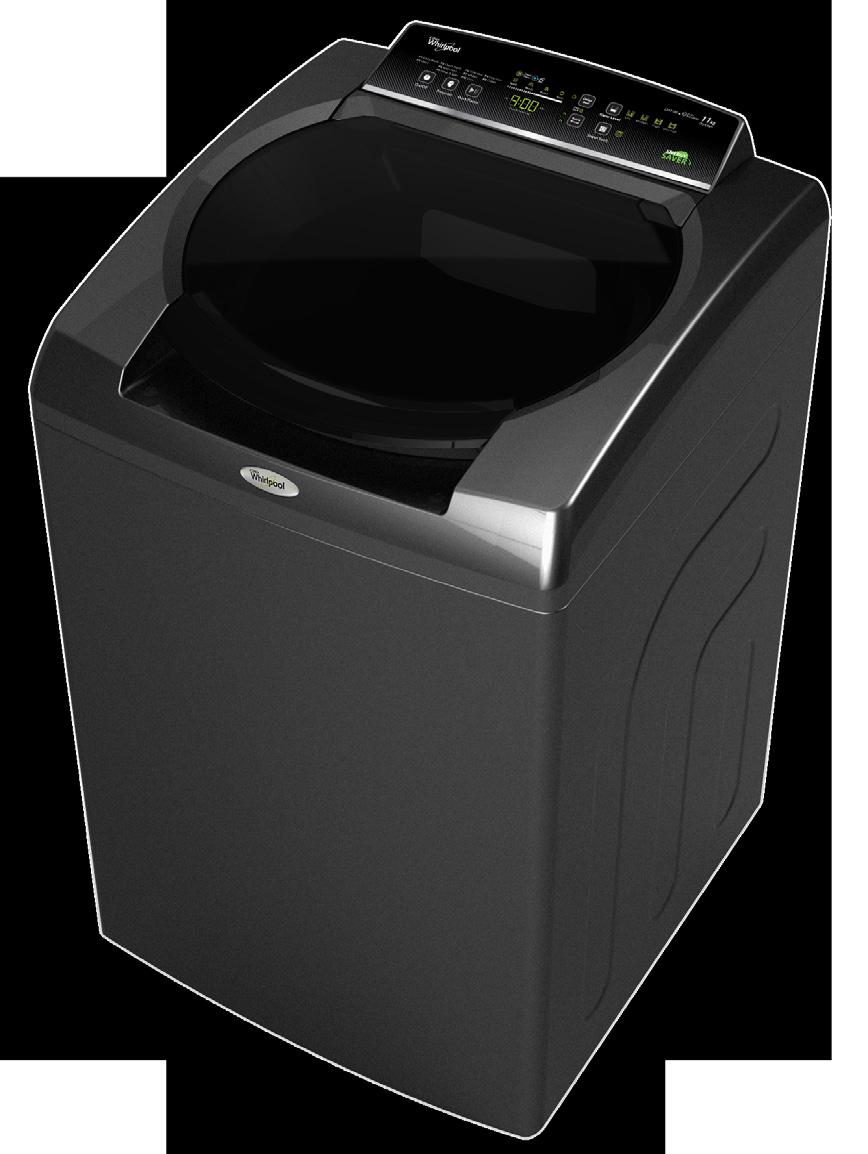
2 Key Features of your New Washer 6 th sense # Automatic Precision Water Level Selection 6 th Sense automatically selects optimum water level based on the load to ensure that no water is wasted and you get an enhanced wash performance compared to other washers. Flexi Loading/ Add a Garment The machine allows you to add clothes in between a cycle, saving your precious time, water and energy, thereby avoiding repetition of a cycle for clothes that were left out. AUTO TUB CLEAN All the programs are configured in such a way that after every wash / rinse process the tub will be automatically cleaned with out taking extra water; so that your washer is kept clean as well as the precious water is saved. AIR SUSPENSION SYSTEM The new suspension system which acts as an air cushion below the tub coupled with a unique cabinet pattern reduces noise levels and machine walk, thus suppressing vibration. # Available only on selected programs. For details refer the program guide Thank you for purchasing this Whirlpool product. Please read this manual carefully before operating your washing machine and retain it for future reference. 2 Model No: LSA1100
3 Contents Installation control panel and features using your washer SIMPLE TIPS FOR TROUBLE FREE PERFORMANCE PROGRAM GUIDE preparation BEFORE WASH CLEANING AND MAINTENANCE SPECIFICATIONS 20 EASY TROUBLE SHOOTING THAT KEEPS YOU IN CONTROL WASHER SAFETY 17 SAFETY PRECAUTION

4 Know Your Machine Control Panel Top Detergent Softener Detergent / Softener Tray Toughened Glass Balance Ring Assembly Lid Assembly Basket Agitator Cabinet Foot Balancing ring Basket Agitator cap Agitator 4
5 Installation PARTS REQUIRED (Supplied with product) Water inlet hose Drain hose Drain hose clamp User Manual Rat Mesh & Screws TOOLS/ PARTS REQUIRED (Not supplied with product) Bucket Spirit level Phillips screw driver Installation REQUIRements Location Requirement Select a proper location for your washer to improve performance and minimize noise / possible washer walk. Install your washer in a basement, laundry room, closet, or recessed area mm (Incl. Feet) 665 mm IMPORTANT: Do not install, store, or operate washer where it will be exposed to weather or in temperatures below 0 0 C. Water remaining in the washer after use may cause damage at low temperatures. See Cleaning and Maintenance section in your User manual for winterizing information. Proper installation is your responsibility. Recessed area or closet installation Dimensions show the minimum recommended spacing to be allowed, except for closet door ventilation openings which are minimum required. Consider allowing more space for ease of installation and servicing, and spacing for companion appliances and clearances for walls, doors and floor mouldings. Add minimum spacing of 100 mm on all sides of the washer to reduce noise transfer. If a closet door or louvered door is installed, top and bottom air openings in the door are required. ELECTRICAL REQUIREMENTS A 220 Volt, 60 Hz, AC only, 10 A rated, fused electrical supply is required. A time-delay fuse or circuit breaker is recommended. It is recommended that a separate circuit breaker serving only this appliance be provided. This washer is equipped with a power supply cord and an external earth wire. The plug should be accessible for disconnection from the supply. To minimize possible shock hazard, the cord must be plugged into a mating outlet. If a mating outlet is not available, it is the personal responsibility and obligation of the customer to have the properly earthed outlet installed by a qualified electrician. Earthing should be done in accordance with local codes and ordinances. It is recommended that a qualified electrician determine that the earth path is adequate. Do not earth to a gas pipe. Do not have a fuse in the neutral or earth circuit. 5
6 When in the installed position the mains plug must be accessible for disconnection. Do not use manual stabilizer Electric Shock Hazard Electrically earth this appliance. Do not use an extension cord or a portable electrical outlet device. Failure to follow these instructions can result in death, fire or electric shock. Earthing Instructions This washer must be earthed. In the event of a malfunction or breakdown, earthing will reduce the risk of electric shock by providing a path of least resistance for electric current. This washer is equipped with a separate earth wire. The earth wire must be connected into an appropriate outlet that is properly installed and earthed in accordance with all local codes and ordinances. IMPORTANT : Improper connection of the equipment-earthing conductor can result in a risk of electric shock. Whirlpool Corporation declines any responsibility for damage caused by failure to observe this rule. Check with a qualified electrician or serviceman if you are in doubt as to whether the appliance is properly earthed. Do not modify the plug provided with the appliance if it does not fit the outlet, have a proper outlet installed by a qualified electrician. Water Supply Requirements Cold water tap with 3/4 BSP threads not more than 1 m from the rear side of the Washer and at a height of at least 1.3 m from the foot level. If connected to hot water supply, ensure that the temperature does not exceed 70 o C. It may cause a fault or damage to the machine. The water storage tank should correspond to a level of 2 to 80 m above the level of tap and water pressure from 0.2 to 8 kgf/cm 2 In case of inadequate water pressure, customer has to correct the water supply to improve flow rate or pour water manually. Suggestion to improve water flow Rate: Tank height from water inlet tap should be greater than 10 ft (Refer Picture) Ensure that there is no blockage in water line. Floor Requirements Installing on a carpet is not recommended. Floor must support the washer s total weight (with water and cloth load) of 143 kg. The floor should have a floor drain or a hole (according to plumbing laws), where the washer is installed. This will ensure draining away any water which may overflow from the washer due to malfunction or hose leak. Do not place the machine on a slanting, uneven or unstable surface. Place the machine on a solid leveled surface to avoid excessive vibration and noise during operation. Installation Procedure Before you start: Parts removed during installation like screws, inlet valve plug, etc. must be disposed properly. It is necessary to remove all shipping materials for proper operation and to avoid excessive noise from the washer. 6
7 Whirlpool User Manual Excessive Weight Hazard Use two or more people to move and install washer. Failure to do so can result in back or other injury. 1. Move machine to the final location Remove the shipping bracket from bottom, by removing two screws using a Phillips (star) screw driver. IMPORTANT Failing to remove the shipping bracket can result in excessive noise during spin/rinse operation. Fix the rat mesh provided along with the product to the bottom of the machine with screws. Assemble the foots (4nos) to the corresponding provisions at the bottom of the machine. 4. Set the machine upright 9 ) 1.5 m (5 Move washer to within 1.5 m of its final location; it must be in a fully upright position. Note: To avoid floor damage, set the washer onto a cushion before moving it and make sure lid is taped shut. 2. tilt the machine Set the machine upright and remove all packing supports from inside of the basket. 5. Attach drain hose to drain port 1 Tilt/ tip the machine sideways. Ensure that place the machine is placed over a carton/ foam support on the floor to prevent the damage to the floor or to the product. It is recommended to use the inner foam cushion for support before tilting the machine. 2 The drain hose connection will be demonstrated by the service engineer when he comes to install your washing machine. However, the steps for the connections are give below for your reference. Steps to follow 3. Remove the shipping bracket Screw Insert the drain hose to the drain outlet area of the machine. A) Press the hose clamp. B) While Pressing, push the clamp and the hose simultaneously towards the body. C) Release the hose clamp after insertion. Shipping bracket 7

8 do s Always ensure that the end of the drain hose is below the outlet port of the washer so that water is drained completely. 6. Connect the INLET HOSE TO TAP Height of the doorsill or any bump should be less than 5 cm, if there is any. less than 5 cm Total length of the drain hose should be less than 3 m when an extention hose is used. less than 3 m Attach the straight end (tap side) of the hose to the water tap. Screw on coupling by hand until it is seated on washer. Run water for a few seconds through hose into a laundry tub or bucket to prevent clogs. Water should run until clear. IMPORTANT: Do not over tighten or use tape or sealants on the thread when attaching to tap or washer. This can result in damage. 7. Connect the inlet hose to machine dont s Avoid submerging the end of the hose. Valve Make sure that the hose is not kinked or crushed between wall and the washer Remove the inlet valve cap. Connect elbow end of the water supply hose to the machine valve. Check for water leaks on both tap and washer sides of the inlet hose. 8. Level the Washer Ensure that hose is not blocked with any foreign object. Also ensure that the hose is not crushed Spirit Level Adjustable Foot 8

9 Whirlpool User Manual Move the washer to the final installing location. Keep the Spirit Level vertical on the side panel as well as rear flat portion and adjust the levelness of the machine by adjusting the threaded type adjustable foot at the bottom. Recheck the level of washer and repeat as needed. IMPORTANT: It is important to level the machine for proper functioning. HELPFUL TIP: You may want to prop up the front of the washer with a wood block or similar object that will support the weight of washer. 9. Plug into an outlet Note: Parts removed during installation like screws, inlet valve cap etc. must be properly disposed to avoid choke hazard. Choke Hazard Small parts Not for children under 3 years Failure to follow may result in death. Inlet Valve Cap If the power cord is damaged, it must be replaced by an authorized service person in order to avoid hazard. Installation Checklist Check electrical requirements. Be sure that you have the correct electrical supply and recommended earthing method. Check that you have all of your tools. Plug in the power cord to a mating outlet and connect the external earth wire as instructed. Check that all parts are now installed. If there is an extra part, go back through the installation steps to see what was skipped. Check that all shipping materials were completely removed from washer. 10. Remove the Protective Film over the control panel Protective film Control Panel Check that water tap is on. Check for leaks around tap and inlet hose. Remove the protective film from control panel. Check that the washer is connected into an earthed outlet. Check that the rat mesh is fixed to the bottom of the machine at right position. Dispose off/recycle all packaging materials. Read Using your Washer section in this User manual. It is recommended to remove the thin protective film layer over the control panel. This film is provided to protect the control panel from scratches during transportation. To test and clean your washer, measure 1/2 of normal recommended amount of powdered or liquid detergent and pour it into the washer basket. Close the lid. Select any cycle. Start washer and allow to complete full cycle. NOTE : Images used in this section are for illustration purpose only 9
10 Control Panel and Features For Model: LSA1100 ON/OFF Program Start/Pause CHECK WATER Press the On/Off button to turn the Washer On or to manually turn Off the washer. The Machine switches Off automatically at the end of wash process. Select the appropriate program depending on the type of fabric to be washed and how dirty they are. Press the program button repeatedly to arrive at the desired program (P1 to P10). Press Start button to begin the wash process. Pressing this button again will cause the machine to PAUSE. You can add clothes/ change the selected program/options if required. It indicates no water supply to the Washer. 6 th Sense key Lock Water Level SUPER SOAK th It indicates the 6 sense (Automatic Precision Water Selection) phase during wash process of machine. Press Delay End & Extra Rinse button together until key Lock LED glows. To unlock press both buttons again until the Key lock LED goes Off. During Key lock mode, no button can be operated. Key Lock option can be activated only when machine is in operation. NOTE: In case of any urgency during key lock mode, switch off the main power. th 6 Sense automatically selects the optimum water level for the wash load to ensure best wash performance. If required, you can manually select the water level by pressing this button; ensure that the clothes are submerged in water. Water filling starts after pre-set time allowing customer to add the detergent on the dispenser tray. Select Super Soak option for heavily soiled clothes. CYCLE STATUS extra rinse DELAY END Digital Display Select Extra Rinse for additional rinse of 2x (2 times rinse ) or 3x (3 times rinse)as per requirement. Select Delay End to set a delay in end time for the selected wash program. Delay hours will be indicated in the digital display. The digital display will be indicating the program number, time left for completing the wash cycle, error signals and delay in hours (while using delay end feature). This bar will indicate the status of the wash process. Machine will give out a chime once the wash process is completed. Note: Sometimes the water level goes to High even for a low load of clothes. This is a safety measure to prevent cloth damage in case of low voltage. If there is water already in the wash tub, the machine will automatically set the water level as Very High. In addition, if wet clothes are put into the washer, higher water level will be chosen. To ensure best wash performance short soak is inbuilt in every wash process. In case of wool cycle the machine automatically fills the tub up to the Very High water level. This ensures that your precious woolen fabrics are always washed gently. Use dissolved detergent with warm water to prevent the detergent clumping 10 #Images used in this page are for illustration purpose only
11 Using your Washer STEP: 1 POWER ON the machine STEP: 2 load your machine Separate whites from colored clothes. Towels (Lint generators) should be washed separately. Do not stuff the clothes; drop them loosely and evenly for best results. Ensure that the clothes are loaded well below the balance ring. Ensure that small clothes are loaded in the middle of the basket for best wash performance. STEP: 3 STEP: 4 Press the On/Off button to turn the washer On or to manually turn it Off. select the program Select the appropriate program depending on the type of cloth to be washed and how dirty they are. Press the program button repeatedly to arrive at the desired program. Do check the Using your Washer section in this user manual for special features. adding detergent and softener Adding detergent Pull out the detergent/softener tray gently till it stops. Add the measured and correct amount of the detergent based on the detergent manufacturer s recommendations (depending on load size and soil level) in to the detergent compartment. In case of using tap cold water wash, mix the measured amount of detergent with warm water (1 litre at approximately 40 o C) and add this mixed detergent solution to the wash load. In case of low water inlet pressure, scatter the detergent evenly on the basket for proper dispensing. IMPORTANT: Using very little detergent will result in a poor wash quality. Using too much detergent will produce excessive suds and may cause the washer to slow/ stop. Excessive suds can result in poor rinsing and detergent residue on clothes. Check for the instructions on the Detergent pack. HELPFUL TIPS Less detergent can be visualized through the transparent lid with the absence of foam. Too much detergent can be visualized through transparent lid with the presence of excessive foam; excessive foam is not an indication of good cleaning. Using tap cold water for wash may cause detergent clogging and clumping to clothes Adding Softener Pour a measured amount of liquid fabric softener into the softener compartment below the max level indicator. Always follow softener manufacturer s directions for correct amount of fabric softener. Close dispenser tray. IMPORTANT: Fabric Softener will be automatically dispensed by the machine during operation. Do not overfill or dilute. Overfilling dispenser will cause fabric softener to immediately dispense into washer. If Extra Rinse option is selected, fabric softener will be dispensed during the last rinse. It is normal for a small amount of water to remain in the dispenser at the end of a cycle. HELPFUL TIPS: See Washer Maintenance for information on recommended method of cleaning detergent/ softener dispenser tray. 11
12 Using your Washer STEP: 5 start/pause wash process water level Very High Press the START/PAUSE button to start the wash process or pause during operation to add fabric (one or two light clothes/modify the program). CYCLE STATUS Your Washer can automatically select the appropriate water level based on Fabric Size & type (6 th sense). If you want a higher water level, you can manually select the water level by pressing the button. Always ensure that the clothes are fully submerged in Water. For Advancing, Press START/PAUSE, Change the Water level and then select START/PAUSE. This will indicate the status of the wash process. Machine will give out a chime once the wash process is completed. special features (Select at the time of program selection) SUPER SOAK We understand that just selecting a fabric type eg. Delicate, Normal, heavy is not enough and you want that extra bit of scrubbing for the heavily soiled clothes. To activate this feature, press SUPER SOAK button followed by program selection. EXTRA RINSE Select Extra Rinse option for an additional rinse if required. 2x LED will glow for 2 times rinse and 3x LED for 3 times rinse. If extra rinse selected, during final rinse phase optional cannot be deselected. DIGITAL DISPLAY The display shows the selected program, detergent dosage, error signals, remaining cycle time required to complete the wash cycle and the delay end hours during setting of Delay End feature. delay end This features help you to set a delayed finished to your wash process. A delay can be set between 3-24 hrs in steps of one hour. Repeatedly press this button to reach the desired delay time (displayed in the Digital Display ) in term of hours. For example, to set a delay of 4 hours, press the button till the display shows ( ) and continue. Fill and drain time is not considered for set time. HELPFUL TIPS You can modify the delay end hours even during wash process by pressing the START/ PAUSE key, then modify delay time and again press START/PAUSE key to continue. key LOCK Key lock option can be activated only after pressing the START/ PAUSE button. Press Delay End and Extra Rinse buttons together until the LED glows. To unlock press both buttons again until the LED goes off. During key lock mode, other keys cannot be operated. 12


 and right voltage availability for the machine to deliver proper function.")
 are separated from Lint-Receivers (e.g. Synthetic fibres, black color garments).")
13 Simple Tips for Trouble Free Performance Foreign object entrapment Please ensure that you empty all pockets of objects such as coins, pens, toothpicks, match sticks etc. These can get stuck inside the machine and could cause damage to your clothes and/or Washing machine. Metallic buckles/zippers All metallic buckles / zippers must be closed before putting clothes into the washing machine. Open buckles / zippers could damage / scratch inner plastic parts and may even damage clothes. Best Performance Good wash performance depends on the right quality and quantity of the detergent used (i.e. minimum 1g/ltr of water and in case of more hardness, use 1.5g/ltr of water concentration) and right voltage availability for the machine to deliver proper function. Similarly the water extraction also depends on right voltage level and type of clothes used (i.e. Cotton Vs Delicate). Lint Separate Whites from colored clothes before washing. Always ensure that Lint-generating clothes (e.g. towels) are separated from Lint-Receivers (e.g. Synthetic fibres, black color garments). Make sure that you add the recommended amount of detergent for each wash load. Tangling Do not stuff clothes or wrap them around the Agitator. Drop them loosely around the Agitator. A mixture of large / small clothes will wash the best. Electrical Always ensure that the household electrical wiring and earthing is proper, and plug points must be intact. Rodents Protect your machine from Rodents / Vermin; as they can damage the wiring, which may leads to short circuits or general nonfuctioning of the machine. Separate light-colored clothes from dark ones This will avoid discoloration of whites/light colored clothes 13
14 14 Whirlpool User Manual Program Guide - Model LSA1100 For best fabric care, choose the program that best fits the load being washed. Items to wash: Daily use, cotton, mixed cottons and colorfast items Program: P1 - Daily Wash Mixed cottons, P2 - Small loads, Quick Wash cottons, polyesters Machine-wash silks, hand-wash fabrics, Lingerie, Trimmed and Embroidered items, polyesters, Synthetics No-iron fabrics, cottons, perm press, linens, synthetics Woollen Fabric P3 - Delicate P4 - Easy Iron P5 - Wool Large items such P6 - as sheets, Bed Linen sleeping bags, small comforters, jackets, small rugs, Bed spreads, Curtains, sturdy fabrics, colorfast items, towels, jeans White cottons Coloured or dark fabrics Fabrics requiring rinsing without detergent Hand-washed items or dripping wet items P7 - Whites P8 - Colors P9 - Rinse & Spin P10 - Spin Available options: Extra rinse (2x or 3x) Super Soak Delay End Water Level- Low / Medium/High/Very High Delay End Water Level-Low/ Medium/High /Very High Extra rinse (2x or 3x) Super Soak Delay End Water Level-Medium/ High /Very High Extra rinse (2x or 3x) Super Soak Delay End Water Level Medium/ High /Very High Extra rinse (2x) Delay End Water Level- Very High Extra rinse (3x) Super Soak Delay End Water Level-Low/ Medium/High /Very High Delay End Extra rinse (2x or 3x) Super Soak Delay End Water Level- Medium/High /Very High Extra rinse (2x or 3x) Delay End Water Level-Low/ Medium/High /Very High Delay End Estimated duration** 63 min 16 min 47 min 54 min 42 min 70 min 83 min 49 min 30 min 6 min Program details: In case of Maximum load this cycle will use a higher water level than other cycles and thus takes more fill time. 6 th sense is available in this program. Use this cycle to wash small, lightly soiled loads of 2 3 items that are needed in a hurry. Maximum recommended wash load is 2kg. Place small items in mesh garment bags before washing. Maximum recommended wash load is 3kg. Use this program for Light soiled fabrics to minimize creasing. Use this program for Woollen Fabric only. Maximum recommended wash load is 2kg. Water-level sensing process may take longer for some items than for others because they will absorb more water than other fabric types. 6 th sense is available in this program. Extra rinse (2x) is deafult in this program. Use this program to wash normally soiled cotton load. Maximum recommended wash load is 2kg. Only low water level can be selected in this program. Use this program for washing coloured or dark clothes. Soak, Wash, Rinse & Spin cycle is default. This program uses a higher, preset water level & the process starts with Spin. One can use this program to drain washer even after cancelling a program as well. **The actual running time can deviate from the values in the table, because it takes into account the operating conditions and options applicable at that time. Fill and drain time is not a part of estimated duration. 6th sense automatically calculates timing based on the wash load. Based on the voltage and water level of each program, cycle time may vary and will not match with the display time. Due to continuous R&D, specifications may change without prior notice.
15 Preparation Before Washing Fabric Care Labels Always read and follow fabric care labels & instructions to avoid damage to your garments. The label will show the type of fabric and how it should be washed. Sorting Sort items according to the type of the fabric, and wash separately for best results. Separate heavily soiled items from lightly soiled ones. Separate delicate items from sturdy fabrics. Separate lint-takers from lint-givers. Synthetics, knits, and corduroy fabrics will pick up lint from towels, rugs, and chenille fabrics. Separate colored items from whites. Check before Loading Empty pockets. Loose coins, button, or any small object can pass under the Agitator and become trapped, causing unexpected sounds. Close zippers, fasten hooks, tie strings and sashes, and remove non-washable trim and ornaments. Mend rips and tears to avoid further damage to items during washing. Use mesh garment bags to help avoid tangling when washing delicate or small items. We recommend not to wash water proof or water resistant items. Whirlpool User Manual Pre treatment on stains or heavily soiled clothes Ensure collars, cuffs, dress hem and pockets are pre-treated by brushing them with pre-wash product. IMPORTANT Read and follow the recommendation of the Pre-treating agent carefully. It is recommended to use the pre treating agents well away from washer, since these may cause damage to the plastic parts of the washer. Helpful Tips Treat stains as soon as possible for best results. Loading Load garments in loose heaps evenly around the basket wall. Do not wrap large items such as sheets around the Agitator. Load them in loose piles around the sides of the basket.try mixing different size items to reduce tangling. IMPORTANT Washer must not be over loaded. Clothes must be able to move freely during the wash process for best cleaning and to reduce wrinkling and tangling. Fire Hazard Never place items in the washer that are dampened with gasoline or other flammable fluids. No washer can completely remove oil. Do not dry anything that has ever had any type of oil on it (including cooking oils). Doing so can results in death, explosion or fire. 15
16 Cleaning and Maintenance Cleaning Your Washer Keep your washer as clean and fresh as your clothes. After each wash, wipe the body of the washer with a soft cloth. Helpful Tips Always leave the washer lid open between uses to help dry out the washer and prevent the build up of odor-causing residue. Water Inlet Hoses Replace inlet hoses after 5 years of use to reduce the risk of hose failure. Periodically inspect and replace inlet hoses if bulges, kinks, cuts, wear, or leaks are found. Cleaning Inlet Valve Filter Close the tap and turn on the washer. Press START/PAUSE Key to start the wash. (this is to remove all water pressure form the water supply hose). Turn off the washer after a minute. Pull out power cord. Unscrew the water supply hose from machine. Gently pull the filter out from the valve of the machine. Lint Filter Remove the Agitator cap by pulling it up. Pull out the lint filter assembly from the agitator as shown by the arrow mark direction in the figure. Clean it by passing forced tap water or by hand. Then fix back to the original position Fix back the Agitator cap Cleaning Your Dispenser Tray You may find laundry product residue leftover in your dispenser trays. To remove residue, follow this recommended cleaning procedure: Pull out the detergent/softener tray gently till it stops. Lift up slightly, and then continue pulling out. Wash in warm, soapy water, using a mild detergent. Rinse with warm water. Air dry, or dry with a towel, then place back into slot. Clean filter and wash directly under tap. Fit back filter and water supply hose. Detergent Softener Helpful Tips It is advisable to clean the filter hose frequently for trouble free operation. Small parts Choke Hazard Not for children under 3 years Do not forget to re-fix the filter after cleaning. Failure to do so will result in death. IMPORTANT: Dispenser trays are not dishwasher safe. Non-Use And Vacation Care Operate your washer only when you are at home. If moving, or not using your washer for a long period of time, follow these steps: Unplug or disconnect power to washer. Turn off the water supply to washer, to avoid flooding due to water pressure surge. 16
17 Cleaning and Maintenance Winter Storage Care IMPORTANT: To avoid damage, install and store washer where it will not freeze. Because some water may stay in hoses, freezing can damage washer. If storing or moving during freezing weather, winterize your washer. To winterize washer: Shut off both water taps, disconnect and drain water inlet hoses. Put 1 qt. (1 L) of R.V.-type antifreeze in basket and run washer on RINSE & SPIN cycle for about 30 seconds to mix antifreeze and remaining water. Unplug washer or disconnect power. Transporting Your Washer Shut off water tap. Disconnect and drain the water inlet hose. If washer will be moved during freezing weather, follow Winter Storage Care directions before moving. Disconnect drain hose from back of washer. Unplug power cord. Place inlet hose and drain hose inside washer basket. Drape power cord over edge and route/tape it on to the rear side of the washer. Place packing tray from original shipping materials back inside washer. If you do not have packing tray, place heavy blankets or towels into the basket opening. Close lid and place tape over lid and the front of washer. Keep lid taped until washer is placed in the location. Electric shock Hazard Electrically earth this appliance. Do not use an extension cord or an electrical portable outlet device. Failure to follow these instructions can result in death, fire or electric shock. Reinstalling / Using Washer Again To reinstall washer after non-use, vacation, winter storage or moving: Refer the Installation Instructions to locate, level, and connect washer. Before using it again, run the washer through the following recommended procedure: Flush and reconnect water inlet hose and drain hose. Turn on the water tap. Plug in washer or reconnect power. Run washer through Bed Linen cycle to clean washer and remove antifreeze, if used. Use half the manufacturer s recommended amount of detergent for a medium-size load. Care for the Environment Washer Disposal By ensuring this product is disposed off correctly, you will help avoid potential negative consequences for the environment and human health, which could otherwise be caused by inappropriate waste handling of this product. The symbol on the product, or on the documents accompanying the product, indicates that this appliance may not be treated as household waste. Instead it should be handed over to the applicable collection point for recycling of electrical and electronic equipment. Disposal must be carried out in accordance with local environmental regulations for waste disposal. For more detailed information about treatment, recovery and recycling of this product, please contact your local city office, your household waste disposal service or the shop where you purchased the product. Hazardous Substances Components used in the manufacturing of this washing machine contains traces of Lead and Hexavalent Chromium. Contact with the washing machine during the life of the product does not endanger health or safety to humans or any living creature. Specifications SPECIFICATION LSA 1100 Power Supply Capacity Type of wash system Spin speed Net Weight (kg) 42 Input power Dimensions (WxDxH) Water Pressure 220V AC, 60 Hz 11Kg Dry Linen Agitator rpm Machine Class class W at 220V 620 x 665 x 1035 in mm 20kpa(3psi) - 686kpa(100psi) NOTE: Due to continuous R&D, specifications may change without prior notice. 17
18 Easy Trouble Shooting that Keeps you in Control Problem Checklists Machine not working at all Ensure that there is no power cut-off and the electric fuse or circuit breaker is not blown. The power cord should be correctly connected to an electrical outlet. Make sure that the lid is closed properly. Drain error Ensure that the drain hose s free end is not hooked up in the machine. If so, put it down on the floor. Make sure that there is no blockage in the drain hose and it should be put flat on the floor. Drain hose should not be kinked. Check if any part of the drain hose is higher than 20cms from the floor or the extention drain hose is longer than 3m. Abnormal Noise during washing Ensure that the cloth mover is not touching any foreign object. Make sure that there are no foreign objects in the wash tub. Adjust the machine if it is on an uneven floor. Detergent not being consumed Ensure that the inlet water pressure is not too low. Make sure to use high compact detergent. Lid Open error Ensure that the lid is firmly closed. Fill error Beep sound with Check water LED flashing This error will pop up approximately after 10 min, if there is No or Very low water supply. Check if the water tap is closed or if water inlet pipe filter or inlet valve filter is blocked with foreign objects. If yes, open the tap / clean the filter (refer page 16) and then press START / PAUSE button again. Always ensure that there is adequate supply of water to the machine (refer page 6 for required water pressure) Power error The supply voltage may be too low or too high. The machine will resume automatically when the normal voltage comes back. Power failure error PF error indicates any power failure while Delay End feature is functioning. This is just for the information to the customer and will not impact the wash process. Speed sensor error Too much suds may cause motor temperature overload. Wait for short time to recover. If error / problem persists, call your nearest authorized Service Centre. Note: During machine operation or during water filling, if the customer opens the lid, then the display will show lid open error and no water will enter into the basket/machine. 18
19 Trouble Shooting First try the solutions suggested here for assistance and to possibly avoid a service call. If you experience Possible Causes Solution Vibration or Off-Balance Check the following for proper installation or see Using Your Washer section. Noises Click or metallic noises Water Leaks Check the following for proper installation Feet may not be in contact with the floor Washer may not be level Load could be unbalanced Objects caught in washer drain system or within basket Water inlet hose not attached tightly Water inlet hose washers are loose Front and rear feet must be in firm contact with floor, and washer must be level to operate properly. See Level the Washer in Installation Instructions. Load dry items in loose heaps evenly around basket wall. Adding wet items to the washer or adding more water to the basket could unbalance washer. Redistribute the load more evenly without covering the Agitator. See Program Guide and Using Your Washer in this manual. Empty pockets before washing. Loose items such as coins could fall between basket & tub. It may be necessary to call for service to remove items. It is normal to hear metal items on clothing such as metal snaps, buckles, or zippers touch against the stainless steel basket. Tighten water inlet-hose / drain hose connection. Drain hose connection should be proper. Make sure all water inlet hose flat washers are properly seated. Washer not level Water may splash off basket if washer is not level. Household plumbing leaks Washer not loaded properly Check all household plumbing for leaks (drain pipe, water pipes and taps.) Unbalanced loading can cause basket to be out of alignment and cause water to splash off tub. See Preparation Before Washing for loading instructions. Washer not performing as expected Load is tangling Not cleaning or removing stains Washer not loaded as recommended Washer not loaded properly See simple tips for Trouble Free Performance section. Load garments in loose heaps evenly around the basket wall. Reduce tangling by mixing types of load items. Use the recommended cycle for the type of garments being washed. Washer is less efficient at cleaning when load is tightly packed. Load garments in loose heaps evenly around the basket wall. Load with dry items only. Add only 1 or 2 garments after washer has started. Voltage can be checked. 19
20 Trouble Shooting Electric shock Hazard Electrically earth this appliance. Do not use an extension cord or an electrical portable outlet device. Failure to follow these instructions can result in death, fire or electric shock. If you experience Possible Causes Solution Washer won t run or fill, washer stops working Washer not draining/ spinning, loads are still wet Dry spots on load after cycle Check for proper water supply Check for proper electrical supply Normal washer operation Washer not loaded properly Small items may have been caught in drain system or in between basket and tub, which can slow down draining Using a program with a low spin speed Washer not loaded properly or load could be unbalanced Wrong or too much detergent causing suds to slow or stop draining and spinning High-speed spins extract more moisture Water inlet hose must be attached to tap and have water flowing to inlet valve. Water tap must be turned on. Check that inlet valve filter has not become clogged. Check for any kinks in inlet hose, which can restrict water flow. Do not use an extension cord. Ensure that there is power to outlet. Reset a tripped circuit breaker. Replace any blown fuses. NOTE: If problems continues, contact an electrician. Lid must be closed for washer to run. Washer will pause during certain phases of cycle. Do not interrupt the program cycle. Washer spins the load before filling to determine load size. Remove several items, rearrange load evenly in basket. Close the lid and press Start/Pause button. Empty pockets and use garment bags for small items. Programs with lower spin speeds remove less water than cycles with high spin speeds. Use the recommended cycle for your garment. To remove extra water in the load, Select Spin and dry it. Load may need to be rearranged to allow even distribution of the load in the basket. Reduce load size to improve water removal. A tightly packed load may not allow the washer from spinning correctly, leaving the load wetter than normal. Use only High Compact detergent. To remove extra suds, select Rinse & Spin. Do not add detergent. The high spin speeds combined with air flow during the final spin can cause items near the top of the load to develop dry spots during the final spin. This is normal. 20
21 If you experience Possible Causes Solution Load not rinsed Check for proper water supply Water inlet hose must be attached and have water flowing to the inlet valve. Water tap must be turned ON. Check that water inlet valve filters are not clogged. Remove any kinks in the inlet hose. Fabric damage Washer not loaded as recommended Washing at cold temperature Heavy sand, pet hair, lint, and detergent or bleach residues may require additional rinsing Sharp items could have been there in pockets during wash cycle Strings and straps could have tangled Items may have been damaged before washing Fabric damage can occur in a tightly packed load. Garment care instructions may not have been followed The washer is less efficient at rinsing when the load is tightly packed. Load garments in loose heaps evenly around the basket wall, without covering the Agitator. Load with dry items only. Use cycle designed for the fabrics being washed. Add only 1 or 2 garments after washer has started. Dissolve detergent in warm water before adding it to the detergent dispenser. This will improve the rinse performance. Add an Extra Rinse to the selected cycle (feature available only for specific program). Empty pockets, zip zippers, and snap or hook fasteners before washing to avoid snags and tears. Mend rips and broken threads in seams before washing. Load garments in loose heaps evenly around the basket wall.load with dry items only. Load garments in loose heaps evenly around the basket wall.load with dry items only. Use cycle designed for the fabrics being washed. Add only 1 or 2 garments after washer is started. Always read and follow garment manufacturer s care label instructions. Use appropriate programs based on fabric type and load size. Odours Washer maintenance not done Estimated Time Remaining is not correct Using wrong or too much detergent Fill and Drain time is not included in the Time remaining See Cleaning Your Washer in Washer Maintenance section of this user manual. Use only High Compact detergent. Be sure to measure correctly. Always follow the manufacturer s directions. See Cleaning your Washer section. This is normal to avoid the errors due to field variations like low water pressure, minor variation in drain height etc. 21
22 Washer Safety Your safety and the safety of others is very important We have provided many important safety messages in this manual and on your appliance. Always read and obey all safety messages. This is the safety alert symbol. This symbol alerts you to potential hazards that can kill or hurt you and others. All safety messages will follow the safety alert symbol and either the word Danger or Warning. These words mean: You can be killed or seriously injured if you don t immediately follow instructions. You can be killed or seriously injured if you don t follow instructions. All safety messages will tell you what the potential hazard is, how to reduce the chance of injury, and what can happen if the instructions are not followed. 22 IMPORTANT SAFETY INSTRUCTIONS WARNING: To reduce the risk of fire, electric shock, or injury to persons when using the washer, follow basic precautions, including the following: Read all instructions before using the washer Do not wash articles that have been previously cleaned in, washed in, soaked in, or spotted with petrol, dry cleaning solvents, or other flammable or explosive substances which give off vapors that could ignite or explode. Do not add petrol, dry-cleaning solvents, or other flammable or explosive substances to the wash water. These substances give off vapors that could ignite or explode. Under certain conditions, hydrogen gas may be produced in a hot water system that has not been used for 2 weeks or more. HYDROGEN GAS IS EXPLOSIVE. If the hot water system has not been used for such period, before using the washing machine, turn on all hot water taps and let the water flow for several minutes. This will release any accumulated hydrogen gas. As the gas is flammable, do not smoke or use an open flame near it. Do not allow children to play on or in the washer. Close supervision of children is necessary when the washer is being used near children. SAVE THESE INSTRUCTIONS This appliance is not intended for use by persons (including children) with reduced physical, sensory or mental capabilities, or lack of experience and knowledge, unless they have been given supervision or instructions concerning use of the appliance by persons responsible for their safety. Before the washer is removed from service or discarded, remove the door or lid. Do not reach into the washer if the drum, tub or Agitator is moving. Do not install or store the washer where it will be exposed to the weather. Do not tamper with controls. Do not repair or replace any part of the washer or attempt any servicing unless specifically recommended in this Use and Care Guide. See Installation Instructions for earthing requirements. If the supply cord is damaged, it must be replaced by the manufacturer or its service agent or a similarly qualified person in order to avoid hazard.
23 Safety Precaution Electrical Do not pull the cord to disconnect the plug. Hold the plug itself. Do not use an adaptor or extension cord to plug in your washing machine. Important: Switch Off The Main Supply When Machine is Not In Operation. Machine Placement Do not drag the washing machine to its position. Always lift and move the machine. Do not move the washing machine if it contains the wash load or water or when in operation. Do not attempt to dismantle the washing machine. Do not expose the machine to direct sunlight or rain*. Do not install the machine in a damp area such as restroom, with exposure to direct shower, as there is a danger of electric shock, fire, machine trouble, corrosion and rusting. Do not spill water over the machine*. In case of spillage, wipe & dry. Avoid the machine coming in contact with floor cleaning chemicals*. Personal Safety Do not wash or spray water over the switch or control panel. To prevent deformation of plastic parts, do not use water with a temperature greater than 70 O C. Do not allow children, person with reduced physical, sensory or mental capabilities to play with machine. Do not wash shoes or utensils in the machine. Do not put your hands in the rotating spin-basket till it stops completely. Do not place heavy objects on the power cord. Do not use caustic soda or bleach to clean the washing machine. Make sure the lid is closed while washing or spinning. Environment Keep the machine away from fire or heat. Electric shock Hazard Do not remove ground point. Do not use an adapter. Do not use an extension cord. Failure to follow these instructions can result in death, fire or electrical shock. Manufacturer will not be responsible if the user uses accessories not manufactured or recommended by the manufacturer * Exposure can lead to rusting/corrosion. 23

24 W
WASHER USER INSTRUCTIONS
 WASHER USER INSTRUCTIONS Before calling for assistance or service, please check Troubleshooting. It may save you the cost of a service call. If you still need help, contact the dealer from whom you purchased
TOP-LOADING HIGH EFFICIENCY LOW-WATER WASHER USE AND CARE GUIDE
 TOP-LOADING HIGH EFFICIENCY LOW-WATER WASHER USE AND CARE GUIDE Table of Contents WASHER SAFETY... 2 WASHER DISPOSAL... 3 WHAT S NEW UNDER THE LID?... 4 CONTROL PANEL AND FEATURES... 5 CYCLE GUIDE... 6
B L O O M W A S H W
 W11028051 B L O O M W A S H Specifications Contents B L O O M W A S H SPECIFICATION Power Supply Capacity (Dry Linen) Type of Wash System Wash Speed Spin Speed Machine Weight Input Power ( Motor Rating
EASY-TO-USE AUTOMATIC WASHER Use & Care Guide
 EASY-TO-USE AUTOMATIC WASHER Use & Care Guide Table of Contents... 2 Model 3RLSQ8000 8316482 WASHER SAFETY...2 WASHER DISPOSAL...3 PARTS AND FEATURES...4 WASHER USE...5 Understanding Washer Cycles...5
Important Safety Information. Operating Instructions The Controls on Your Washer Other Washer Features Preparing to Wash Care of Product
 Model: YIXR1060T Washer Owner s Manual Important Safety Information 2 Operating Instructions The Controls on Your Washer Other Washer Features Preparing to Wash Care of Product Helpful Information Specialized
Automatic Washer A
 Automatic Washer A Note to You...2 Washer Safety...3 Parts and Features...4 Using Your Washer...5 Starting Your Washer...5 Loading...6 Selecting a Cycle, Time and Temperature...7 Adding Liquid Chlorine
TWO SPEED AUTOMATIC WASHERS Use & Care Guide
 TWO SPEED AUTOMATIC WASHERS Use & Care Guide Table of Contents... 2 W10096744 WASHER SAFETY...3 PARTS AND FEATURES...4 WASHER USE...5 Understanding Washer Cycles...5 Loading...5 Normal Sounds...5 Starting
WASHER USER INSTRUCTIONS
 If you need assistance or service, first see the Troubleshooting section. Additional help is available by calling our Customer experience Center at 1-800-253-1301 from anywhere in the U.S.A., or write:
WASHER USER INSTRUCTIONS
 WASHER USER INSTRUCTIONS Table of Contents ASSISTANCE OR SERVICE... 1 WASHER SAFETY... 2 WASHER USE... 3 WASHER CARE... 5 TROUBLESHOOTING... 6 WARRANTY... 8 If you need assistance or service, first see
WASHER USER INSTRUCTIONS
 If you need assistance or service, first see the Troubleshooting section. Additional help is available by calling our Customer Interaction Center at 1-800-253-1301 from anywhere in the U.S.A., or write:
WASHER USER INSTRUCTIONS WASHER SAFETY
 WASHER USER INSTRUCTIONS If you need assistance or service, first see the Troubleshooting section. Additional help is available by calling our Costco Support Line for KIRKLAND SIGNATURE appliances by Whirlpool
About the control and indicator settings.
 About the control and indicator settings. WARNING To reduce the risk of fire, electric shock, or injury to persons, read the IMPORTANT SAFETY INSTRUCTIONS before operating this appliance. 11 F 5 4 3 7
WASHER USER INSTRUCTIONS
 WASHER USER INSTRUCTIONS If you need assistance or service, first see the Troubleshooting section. Additional help is available by calling: Whirlpool Customer Interaction Centre 1-300-363-344 (Australia)
Black 8KG 1400 Spin Speed Inverter Direct Drive Washing Machine Instruction Manual
 Black 8KG 1400 Spin Speed Inverter Direct Drive Washing Machine Instruction Manual Model number: RHWM81400DIDB Opening times: Monday - Friday 8am 6pm & Saturday 9am 1pm or visit us at Contents Safety Instructions
202 West 2 nd St Whirlpool Laundry Manual WASHER SAFETY. Your safety and the safety of others are very important.
 WASHER SAFETY Your safety and the safety of others are very important. We have provided many important safety messages in this manual and on your appliance. Always read and obey all safety messages. This
Compact Two Speed Automatic Washers
 Compact Two Speed Automatic Washers A Note to You...2 Washer Safety...3 Parts and Features...4 Washer Installation...5 Using Your Washer...7 Starting your washer...7 Loading...8 Selecting a cycle and time...9
WASHER USER INSTRUCTIONS
 If you need assistance or service, first see the Troubleshooting section. Additional help is available by calling our National Call Center at 0800-128-940, or at: Johannesburg: Tel: (011) 621-0500 Fax:
Operating & Installation Instructions Fully Automatic Washing Machine (Domestic use)
") Operating & Installation Instructions Fully Automatic Washing Machine (Domestic use) Model No. NA-F00A NA-F90A NA-F85A Contents Safety Precautions Part Names 3 Operation Panel 4 Variety of Programs 5 Detergent
Operating & Installation Instructions Fully Automatic Washing Machine (Domestic use) Model No. NA-F00A NA-F90A NA-F85A Contents Safety Precautions Part Names 3 Operation Panel 4 Variety of Programs 5 Detergent
washing machine contents
 washing machine contents WARNINGS SPECIFICATIONS INSTALLATION AND ASSEMBLY USING THE APPLIANCE. PRACTICAL TIPS MAINTENANCE AND CLEANING SAFETY AND TROUBLESHOOTING ENVIRONMENTAL WARNINGS 4 5 6 10 20 22
B. Table of Contents (New Zealand)
") SUDS-MISER AUTOMATIC WASHER Use & Care Guide For questions about features, operation/performance, parts, accessories or service, call: 1-300-363-344 (Australia) 0-800-442-584 (New Zealand) Table of Contents...
SUDS-MISER AUTOMATIC WASHER Use & Care Guide For questions about features, operation/performance, parts, accessories or service, call: 1-300-363-344 (Australia) 0-800-442-584 (New Zealand) Table of Contents...
User manual. Washing Machine ZWP 581 ZWQ 5102 ZWQ 5103 ZWQ 5122
 EN User manual Washing Machine ZWP 58 ZWQ 502 ZWQ 503 ZWQ 522 Contents Safety information 2 Product description _ 3 How to run a wash cycle? 4 Daily use _ 5 Washing programmes 6 Care and cleaning 8 Safety
TWO SPEED AUTOMATIC WASHERS Use & Care Guide
 TWO SPEED AUTOMATIC WASHERS Use & Care Guide Table of Contents...2 3950327 www.whirlpool.com TABLE OF CONTENTS WASHER SAFETY... 3 PARTS AND FEATURES... 4 USING YOUR WASHER... 5 Understanding Washer Cycles...
XR510W 5KG 1000RPM WASHING MACHINE XR612W 6KG 1200RPM WASHING MACHINE. Instruction Manual
 XR510W 5KG 1000RPM WASHING MACHINE XR612W 6KG 1200RPM WASHING MACHINE Instruction Manual Serial number: Please read these instructions carefully before use and retain for future reference. Before switching
TWO SPEED AUTOMATIC WASHERS
 TWO SPEED AUTOMATIC WASHERS Use & Care Guide For questions about features, operation/performance, parts, accessories or service call: 1-800-253-1301 or visit our website at www.whirlpool.com Table of Contents...2
GB User manual. Washing machine ZWQ 5130
 GB User manual 2 Washing machine ZWQ 5100 ZWQ 5101 ZWQ 5130 Product description 1 1. The control panel 2. Lid handle 3. Adjustable levelling feet 2 3 The control panel 1 2 3 4 5 6 1. Programme selector
Washer Troubleshooting Guide
 Washer Troubleshooting Guide NORMAL SOUNDS YOU MAY HEAR The following sounds may be heard while your washer is operating. They are normal. Upper part of agitator clicking during wash: Gears engaging after
Semi-Auto Washing Machine
 MWM-B1270SA(IM)070915_Layout 1 10/15/15 9:55 AM Page 1 USER MANUAL Market Expansion Services by www.dksh.com.my E-mail: electrical.appliance@dksh.com www.morgan.my facebook.com/morganappliances Semi-Auto
Easy-To-Use Automatic Washers
 Easy-To-Use Automatic Washers A Note to You... 2 Washer Safety... 3 Parts and Features... 4 Operating Your Washer... 5 Caring for Your Washer... 11 Troubleshooting... 12 Requesting Assistance or Service...
Washing. Detergent drawer with compartments I, II, Drum. Control panel. Washing machine door. Service flap for detergent solution pump. Select Start.
 Your washing machine Congratulations You have opted for a modern, high-quality domestic appliance manufactured by Bosch. This washing machine is distinguished by its economical water and energy consumption.
9.5KG WASHING MACHINE
 G9TLWW17 9.5KG WASHING MACHINE G9TLWW17_IB_Final170920V2.indd 1 G9TLWW17_IB_Final170920V2.indd 2 Contents Guide to the Appliance 2 Caring for the Environment 3 Safety Information and Warnings 4 Items in
SKY Stainless Steel Compact Dishwasher. Instructions
 SKY4313 - Stainless Steel Compact Dishwasher Instructions Please retain these instructions for future reference. Notice: Do not allow children to operate this appliance. Keep appliance out of reach of
User manual. Washing machine ZWQ 590 SO ZWQ 585 SO ZWQ 580 SO ZWQ 575 SO ZWQ 570 SO
 EN User manual Washing machine ZWQ 590 SO ZWQ 585 SO ZWQ 580 SO ZWQ 575 SO ZWQ 570 SO Product description 1 The control panel 2 Lid handle 3 Filter access cover 4 Adjustable levelling feet Control panel
Washing Machine. User manual WW9*K5*****/WW8*K5*****/WW7*K5***** Untitled :17:40
 Washing Machine User manual WW9*K5*****/WW8*K5*****/WW7*K5***** Untitled-6 1 2017-12-12 3:17:40 Contents Contents 4 What you need to know about the safety instructions 4 Important safety symbols 4 Important
Contents Contents... 2 Safety Warning... 3 Unpacking... 6 Installation... 7 Installing Your Washing Machine... 7 Moving and Installing...
 Contents Contents...2 Safety Warning...3 Unpacking...6 Installation...7 Installing Your Washing Machine...7 Choosing the Right Location for Your Washing Machine... 7 Moving and Installing...8 Removing
DRYERUSERINSTRUCTIONS. TableofContents ASSISTANCE OR SERVICE... 1 DRYER SAFETY... 1 DRYER USE... 3 DRYER CARE... 5 TROUBLESHOOTING... 5 WARRANTY...
 by Whirlpool Corporation DRYERUSERINSTRUCTIONS If you need assistance or service, first see the "Troubleshooting" section. Additional help is available by calling our Customer Interaction Center at 1-800-253-1301
Washing. Preparation. Contents
 Your washing machine Congratulations you have opted for a modern, high-quality domestic appliance manufactured by Bosch. The washing machine is distinguished by its economical water- and energy consumption.
WASHER EXTRACTOR M XQG60-A508K
 WASHER EXTRACTOR 4160980M XQG60-A508K It is essential to read this manual carefully before it is installed and used for the first time. 9 12 14 15 Correct use Read and understand thoroughly these safety
It is essential to read this manual carefully before it is installed and used for the first time. EFL6KWH
 It is essential to read this manual carefully before it is installed and used for the first time. EFL6KWH This washing machine conforms to current safety requirements. Inappropriate use can, however, lead
Operating & Installation Instructions Fully Automatic Washing Machine (Domestic use)
") Operating & Installation Instructions Fully Automatic Washing Machine (Domestic use) Model No. NA-F00X NA-F90X NA-F85G Contents Safety Precautions Part Names Operation Panel 4 Variety of Programs 5 Detergent
Operating & Installation Instructions Fully Automatic Washing Machine (Domestic use) Model No. NA-F00X NA-F90X NA-F85G Contents Safety Precautions Part Names Operation Panel 4 Variety of Programs 5 Detergent
User manual. Washing machine ZWQ 6120 ZWQ 6100
 EN User manual Washing machine ZWQ 6120 ZWQ 6100 Product description 1 1. The control panel 2. Lid handle 3. Adjustable levelling feet 2 3 The control panel 1 2 3 4 5 6 1. Programme selector 2. Pushbuttons
Welcome to the Whirlpool family
 Welcome to the Whirlpool family Welcome To Whirlpool Family Know your Fully Automatic 2 Installing your Fully Automatic Washing Machine 3 Washing Process 5 Understanding the control panel 6 Simple tips
WASHING MACHINE. User s Manual SW68ASP / SW57APP
 WASHING MACHINE User s Manual SW68ASP / SW57APP Please read this manual before using and note how to use in the proper manner. Please be careful of keeping the manual. Otherwise, it should be bought separately.
GETTING STARTED? EASY.
 User Manual GETTING STARTED? EASY. ZWF 71440W EN User Manual Washing Machine SAFETY INFORMATION Before the installation and use of the appliance, carefully read the supplied instructions. The manufacturer
4 Selecting a Program and Operating Your Machine
 4 Selecting a Program and Operating Your Machine Control panel Figure 1 1 2 3 4 5 6 7 8 1 - Spin Speed Adjustment button 2 - Display 3 - Temperature Adjustment button 4 - Programme Selection knob 5 - On
READ CAREFULLY AND KEEP FOR FUTURE REFERENCE
 product safety READ CAREFULLY AND KEEP FOR FUTURE REFERENCE This product can be used by children aged 8 years and above, and persons who require supervision, provided: they are familiar with the hazards
Full-Auto Electric Washing Machine
 Full-Auto Electric Washing Machine INSTRUCTION MANUAL Model: TK15's Applying the Nano Silver Technology... go beyond washing, sterilize your clothes and deodorize a bad smell (OPTION). Applying One-Touch
User Manual. Washing Machine ZWF 91483WH ZWF 91483WR
 EN User Manual Washing Machine ZWF 91483WH ZWF 91483WR Contents Safety information 2 Safety instructions 3 Product description 4 Control panel 5 Programme Chart 6 Consumption values 7 Options 8 Settings
DRYER USER INSTRUCTIONS
 If you need assistance or service, first see the Troubleshooting section. Additional help is available by calling our Customer experience Center at 1-800-253-1301 from anywhere in the U.S.A., or write:
CONTENTS QUICK REFERENCE GUIDE INSTRUCTIONS FOR USE PROGRAMME CHART BOOKLET
 CONTENTS QUICK REFERENCE GUIDE PROGRAMME CHART PREPARING THE LAUNDRY SELECTING A PROGRAMME AND OPTIONS STARTING AND COMPLETING A PROGRAMME CHANGING A PROGRAMME INTERRUPTING A PROGRAMME DAILY MAINTENANCE
User's Manual. Exhaust Type Tumble Dryer HLP140E. Please read this manual carefully before using. Retain it for future reference.
 Exhaust Type Tumble Dryer User's Manual HLP140E Please read this manual carefully before using. Retain it for future reference. Names Of The Parts Transparent Windows Door Drum Exhaust Shroud Air Intake
Washing Machine Instruction Manual
 Washing Machine Instruction Manual DWD-FU107's/FU127's INSTRUCTION MANUAL Economic wash system Using artificial intelligence, the washer uses minimum energy and water by selecting optimal water level and
G6FLWW17 6KG WASHING MACHINE
 G6FLWW17 6KG WASHING MACHINE G6FLWW17_IB_170919_grace.indd 1 Contents Guide to the Appliance 2 Caring for the Environment 3 Safety Information and Warnings 4 Items in the Box 6 Getting Started 7 Basic
BULL INSTRUCTION MANUAL. Model Number: BC-130 REFRIGERATOR BEFORE USE, PLEASE READ AND FOLLOW ALL SAFETY RULES AND OPERATING INSTRUCTIONS.
 BULL INSTRUCTION MANUAL Model Number: BC-130 REFRIGERATOR BEFORE USE, PLEASE READ AND FOLLOW ALL SAFETY RULES AND OPERATING INSTRUCTIONS. 1 REFRIGERATOR SAFETY Your safety and the safety of others are
Instructions for Use. Washing Machine
 Instructions for Use Washing Machine Thank you for your confidence in purchasing our washing machine, and congratulations on the excellent choice. Our appliances are friendly to the environment. Your new
User Manual Washing Machine L FL
 EN User Manual Washing Machine L 62270 FL 2 www.aeg.com CONTENTS 1. SAFETY INFORMATION...3 2. SAFETY INSTRUCTIONS... 4 3. PRODUCT DESCRIPTION... 6 4. CONTROL PANEL...7 5. PROGRAMMES... 8 6. CONSUMPTION
5kg Front Load Washing Machine
 5kg Front Load Washing Machine G5FLWW15 Instruction Manual Contents Guide to the Appliance 2 Caring for the Environment 3 Safety Information and Warnings 4 Items in the Box 6 Getting Started 7 Basic Set
Washing. Preparation Correct installation according to the separate Installation instructions.
 Your washing machine Congratulations You have opted for a modern, high-quality domestic appliance manufactured by Siemens. This washing machine is distinguished by its economical water and energy consumption.
THE READY RACK 2 GEAR PPE DRYING CABINET. Operator s Manual & Installation Guide. Installation/Operation/Maintenance/Part Number I
 THE READY RACK 2 GEAR PPE DRYING CABINET Operator s Manual & Installation Guide Installation/Operation/Maintenance/Part Number 820220I Copy right 2016 Forward We are pleased that you have selected a Ready
Front Load Washer 5kg USER MANUAL MFWS512
 Front Load Washer 5kg USER MANUAL MFWS512 CONTENTS Safety information... 2-3 Identifying parts of the Washer... 4 Installation... 5-7 Control Features and Functions... 8 Wash Programs... 9 Wash Guide...
WASHER/DRYER USE AND CARE GUIDE
 WASHER/DRYER USE AND CARE GUIDE Table of Contents WASHER/DRYER SAFETY2 ACCESSORIES4 USING LESS WATER AND ENERGY4 CHECK YOUR VENT SYSTEM FOR GOOD AIRFLOW 5 CONTROL PANEL AND FEATURES6 WASHER CYCLE GUIDE7
HEAVY DUTY HAND WASH ALLERGY EASY IRON
 EXCELLENCE model REGULAR HEAVY DUTY HAND WASH ALLERGY EASY IRON Wash time 12 min 15 min 6 min 12 min 9 min Wash action REGULAR HEAVY DUTY HAND WASH REGULAR REGULAR Wash temp WARM-COLD WARM WARM-COLD HOT
WASHING DRYER COMBO MODEL: EWDC-F0806IN(WH) Owner s Manual Please read this manual carefully before operating your set.
 Owner s Manual Please read this manual carefully before operating your set.") WASHING DRYER COMBO MODEL: EWDC-F0806IN(WH) Owner s Manual Please read this manual carefully before operating your set. Retain it for future reference. Record model number and serial number of the set.
WASHING DRYER COMBO MODEL: EWDC-F0806IN(WH) Owner s Manual Please read this manual carefully before operating your set. Retain it for future reference. Record model number and serial number of the set.
DRYER USER INSTRUCTIONS DRYER SAFETY
 If you need service, first see the Troubleshooting section. Additional help is available by calling our Customer Interaction Center at 1-800-253-1301 from anywhere in the U.S.A., or write: Estate Brand
CDC266 Reverse Action
 40000194.qxd 11/3/04 5:30 pm Page 1 GB User Instructions CDC266 Reverse Action 40000194.qxd 11/3/04 5:30 pm Page 2 WARNING Check that the product has no visible signs of damage before use. If damaged do
Washers CK8518. Owner s Manual & Installation Instructions
 Washers Safety Instructions.............. 2, 3 Operating Instructions Control Panels..................... 4-9 Features.......................... 10,11 Loading and Using the Washer....12, 13 Cleaning the
User Manual. Tumble Dryer ZDC8202P
 EN User Manual Tumble Dryer ZDC80P Contents Safety information Safety instructions 3 Product Description 4 Control Panel 5 Programme table 5 Options 6 Settings 7 Before First Use 8 Daily Use 8 Hints and
TUMBLE DRYER MODEL: ED-F7160(WH) Owner s Manual Please read this manual carefully before operating your set. Retain it for future reference.
 Owner s Manual Please read this manual carefully before operating your set. Retain it for future reference.") TUMBLE DRYER MODEL: ED-F7160(WH) Owner s Manual Please read this manual carefully before operating your set. Retain it for future reference. Record model number and serial number of the set. See the label
TUMBLE DRYER MODEL: ED-F7160(WH) Owner s Manual Please read this manual carefully before operating your set. Retain it for future reference. Record model number and serial number of the set. See the label
User manual. Washing Machine ZWG 6148K
 EN User manual Washing Machine ZWG 6148K Contents Safety information 2 Safety instructions 3 Environment concerns 4 Product description _ 5 Control panel _ 6 Washing programmes 6 Consumption values _ 7
Washing Machine. User manual WW8*K5***** / WW7*K5*****
 Washing Machine User manual WW8*K5***** / WW7*K5***** Contents Safety information 3 Contents What you need to know about the safety instructions 3 Important safety symbols 3 Important safety precautions
INSTRUCTION MANUAL (UNIT APPEARANCE MAY VARY FROM IMAGE) BEFORE USE, PLEASE READ AND FOLLOW ALL SAFETY RULES AND OPERATING INSTRUCTIONS.
 BEFORE USE, PLEASE READ AND FOLLOW ALL SAFETY RULES AND OPERATING INSTRUCTIONS.") INSTRUCTION MANUAL Model Number: FR551 REFRIGERATOR-FREEZER (UNIT APPEARANCE MAY VARY FROM IMAGE) BEFORE USE, PLEASE READ AND FOLLOW ALL SAFETY RULES AND OPERATING INSTRUCTIONS. Igloo has a policy of continuous
INSTRUCTION MANUAL Model Number: FR551 REFRIGERATOR-FREEZER (UNIT APPEARANCE MAY VARY FROM IMAGE) BEFORE USE, PLEASE READ AND FOLLOW ALL SAFETY RULES AND OPERATING INSTRUCTIONS. Igloo has a policy of continuous
DAILY REFERENCE GUIDE
 DAILY REFERENCE GUIDE EN THANK YOU FOR BUYING A WHIRLPOOL PRODUCT. In order to receive comprehensive service and support, please register your appliance at www.whirlpool.eu/register Before using the appliance,
EWF EW EWF EW... EN WASHING MACHINE USER MANUAL
 EWF 31276 EW EWF 31076 EW...... EN WASHING MACHINE USER MANUAL 2 www.electrolux.com CONTENTS 1. SAFETY INFORMATION................................................... 3 2. SAFETY INSTRUCTIONS..................................................
OWNER S MANUAL WASHING MACHINE
 ENGLISH ESPAÑOL OWNER S MANUAL WASHING MACHINE Before beginning installation, read these instructions carefully. This will simplify installation and ensure that the washer is installed correctly and safely.
Washing. Preparation. Washing. Contents
 Your washing machine Congratulations you have opted for a modern, high-quality domestic appliance manufactured by Bosch. The washing machine is distinguished by its economical water- and energy consumption.
Washing. Preparation Correct installation according to the separate Installation instructions.
 Your washing machine Congratulations You have opted for a modern, high-quality domestic appliance manufactured by Bosch. This washing machine is distinguished by its economical water and energy consumption.
Washing Machine Model: WWT6041
 Washing Machine Model: WWT6041 Conditions of use Parts of the washing machine Saving water and energy The difference between the Deep Rinse and Eco Rinse options Control panel About your washing machine
GETTING STARTED? EASY.
 User Manual GETTING STARTED? EASY. ZWF 81240W ZWF 81440W EN User Manual Washing Machine SAFETY INFORMATION Before the installation and use of the appliance, carefully read the supplied instructions. The
Introductión. Table of contents. Safety measures
 Introductión Read this manual carefully as it offers practical advice to help you get the most from your washing machine. This «Instruction and Installation Manual» contains everything you need to know
CONTROL PANEL. 3.1 Control Panel Description. Spin Touchpad ( ) Program Touchpads ( ) Temperature Touchpad ( ) Option Touchpad ( ) 1 On/Off Button ( )
 Program Touchpads ( ) Temperature Touchpad ( ) Option Touchpad ( ) 1 On/Off Button ( )") CONTROL PANEL 3.1 Control Panel Description ENGLISH NOTE: For model this option replaced by Easy Iron program. 1 2 3 9 4 10 5 7 6 8 * Picture of control panel model: EWF12843 1 On/Off Button ( ) 2 On/Off
CONTROL PANEL 3.1 Control Panel Description ENGLISH NOTE: For model this option replaced by Easy Iron program. 1 2 3 9 4 10 5 7 6 8 * Picture of control panel model: EWF12843 1 On/Off Button ( ) 2 On/Off
Front-Loading Washer
 Front-Loading Washer PRODUCT MODEL NUMBERS WFW75HEF, WFW90HEF, WFW92HEF PRODUCT MODEL NUMBERS WFW7590F, WFW9290F Washer Dimensions: Washer Dimensions: 52 3 /4" (1353 53¼" (1340 mm) mm) 33 5 /16" (846 mm)
IMPORTANT Read this manual thoroughly before using the appliance. This will ensure optimum results and maximum safety.
 GB IMPORTANT Read this manual thoroughly before using the appliance. This will ensure optimum results and maximum safety. Save these instructions for future reference. IMPORTANT SAFEGUARDS Read the following
Installation Instructions
 Installation Instructions IMPORTANT: Read and save these instructions. IMPORTANT: Installer: Leave Installation Instructions with the homeowner. Homeowner: Keep Installation Instructions for future reference.
4KG Tumble Dryer / GVA4KG. Instruction Manual
 4KG Tumble Dryer / GVA4KG Instruction Manual Important Safety Instructions 1 When using electrical appliances, in order to reduce the risk of fire, electric shock, and/or injury to persons, basic safety
User manual. Washing Machine ZWG K
 EN User manual Washing Machine ZWG 71202 K Contents Safety information 2 Safety instructions 3 Environment concerns 4 Product description _ 5 Control panel _ 6 Washing programmes 7 Consumption values _
GE Appliances. Washers. Owner s Manual WBSR1060 WBXR1060 WBXR2060 WCSR2070 WCXR1070 WJSR2080 WMSR2100 WNSR2100 WNXR2100 WSSR2070
 GE Appliances Washers Owner s Manual WBSR1060 WBXR1060 WBXR2060 WCSR2070 WCXR1070 WJSR2080 WMSR2100 WNSR2100 WNXR2100 WSSR2070 GE Answer Center 800.626.2000 Part No. 175D1807P252 Pub. No. 49-9981 6 98
REFRIGERATOR SAFETY. Your safety and the safety of others are very important.
 REFRIGERATOR SAFETY Your safety and the safety of others are very important. We have provided many important safety messages in this manual for your appliance. Always read and obey all safety messages.
WASHER/DRYERUSERINSTRUCTIONS
 WASHER/DRYERUSERINSTRUCTIONS Tableof Contents If you need assistance or service, first see the "Troubleshooting" section. Additional help is available by calling our Customer Interaction Center at 1-800-253-1301
Ensure. Single inlet Dual inlet -
 W10677398B NOTE The manufacturer reserves the right for any modifications on the product which might be deemed necessary or useful without informing about it in this IFU. Thank you for choosing a Hisense
Dryer Troubleshooting Guide
 Dryer Troubleshooting Guide NORMAL SOUNDS YOU MAY HEAR The following sounds may be heard while your dryer is operating. They are normal. Humming: It is normal for the dryer to hum due to the high velocity
Switching off Turn the programme selector to Off. Washing
 Your washing machine Congratulations you have opted for a modern, high-quality domestic appliance manufactured by Siemens. This washing machine is distinguished by its economical water and energy consumption.
Automatic Washers. In the U.S.A. for assistance or service, call the Consumer Assistance Center:
 Automatic Washers A Note to You...2 Washer Safety...3 Parts and Features...4 Using Your Washer...5 Starting your washer...5 Loading...7 Selecting a cycle and time...8 Using the liquid chlorine bleach dispenser...12
DEHUMIDIFIER OWNER S MANUAL. Read this manual carefully before operating the appliance and retain it for future reference.
 OWNER S MANUAL DEHUMIDIFIER ESPAÑOL FRANÇAIS Read this manual carefully before operating the appliance and retain it for future reference. Model : UD701KOG1 P/NO : MFL68026017 www.lg.com TABLE OF CONTENTS
Para una version en espanol, visite
 BRAVOS XL TOP-LOADING HIGH EFFICIENCY LOW-WATER WASHER USE AND CARE GUIDE LAVEUSE HAUTE EFFICACITÉ BRAVOS XL À FAIBLE CONSOMMATION D EAU AVEC CHARGEMENT PAR LE DESSUS GUIDE D UTILISATION ET D ENTRETIEN
Steam Station IRSG Portable DVD Player
 Steam Station IRSG2416 7 Portable DVD Player To reduce the risk of fire, injury or electrical shock: Read all the instructions before operating the pump station and keep them for future reference. If you
ELECTRIC AND GAS DRYERS Use & Care Guide
 ELECTRIC AND GAS DRYERS Use & Care Guide Table of Contents... 2 W10112128 TABLE OF CONTENTS DRYER SAFETY...3 PARTS AND FEATURES...5 CHECKING YOUR VENT...6 DRYER USE...6 Starting Your Dryer...6 Stopping
WE 170 P. EN User Manual Washing Machine. CAUTION: Read the instructions before using the appliance. Original Instructions.
 WE 170 P EN User Manual Washing Machine CAUTION: Read the instructions before using the appliance. Original Instructions. 2 www.electrolux.com CONTENTS 1. SAFETY INFORMATION... 2 2. PRODUCT DESCRIPTION...
LARGE CAPACITY AUTOMATIC COMBO WASHER / DRYER Use & Care Guide
 LARGE CAPACITY AUTOMATIC COMBO WASHER / DRYER Use & Care Guide For questions about features, operation/performance, parts, accessories or service call: 1-800-253-1301 or visit our website at www.crosley.com
WASHING MACHINE OWNER S MANUAL
 ENGLISH FRANÇAIS OWNER S MANUAL WASHING MACHINE Read this owner s manual thoroughly before operating the appliance and keep it handy for reference at all times WD100C* WD200C* MFL68267007 www.lg.com Copyright
INSTRUCTION MANUAL 6KG WASHING MACHINE C610WM16. C610WM16_IB.indd 1 29/01/ :27
 INSTRUCTION MANUAL 6KG WASHING MACHINE C610WM16 C610WM16_IB.indd 1 29/01/2016 12:27 Contents Unpacking... 5 Installing Your Washing Machine... 6 Choosing the Right Location for Your Washing Machine...
DAILY REFERENCE GUIDE
 DAILY REFERENCE GUIDE AWG 812 / PRO ORIGINAL INSTRUCTIONS FOR USE EN THANK YOU FOR BUYING A WHIRLPOOL PRODUCT. In order to receive a more complete assistance, please register your appliance on www.whirlpool.eu/register